VacuFlush 5006 - Toilets DOMETIC - Free user manual and instructions
Find the device manual for free VacuFlush 5006 DOMETIC in PDF.

| Product Type | Marine Vacuum Toilet |
| Model | VacuFlush 5006 |
| Brand | Dometic |
| Height | 18.6 in (472 mm) |
| Width | 15.5 in (394 mm) |
| Depth | 19.4 in (493 mm) |
| Weight | 24 lb (10.9 kg) |
| Power Supply | 12V DC, max 40 A |
| Flush Method | Vacuum flush |
| Bowl Material | Vitreous china |
| Seat Type | Standard elongated seat with lid |
| Operation | Electric push-button flush |
| Water Consumption | Approx. 0.5 L per flush |
| Noise Level | Low - vacuum pump runs briefly |
| Maintenance | Clean bowl with mild detergent; inspect seals annually |
| Safety Features | Do not flush non-biodegradable items; keep pump area dry |
| Spare Parts | Seal kit, vacuum pump rebuild kit, flush valve |
| Repairability | User-serviceable seals and pump; consumables available |
| Intended Use | Marine/RV toilet for 12V systems |
Frequently Asked Questions - VacuFlush 5006 DOMETIC
User questions about VacuFlush 5006 DOMETIC
0 question about this device. Answer the ones you know or ask your own.
Ask a new question about this device
Download the instructions for your Toilets in PDF format for free! Find your manual VacuFlush 5006 - DOMETIC and take your electronic device back in hand. On this page are published all the documents necessary for the use of your device. VacuFlush 5006 by DOMETIC.
USER MANUAL VacuFlush 5006 DOMETIC
Vacuum pedal-flush toilet
operation manual
natural_image
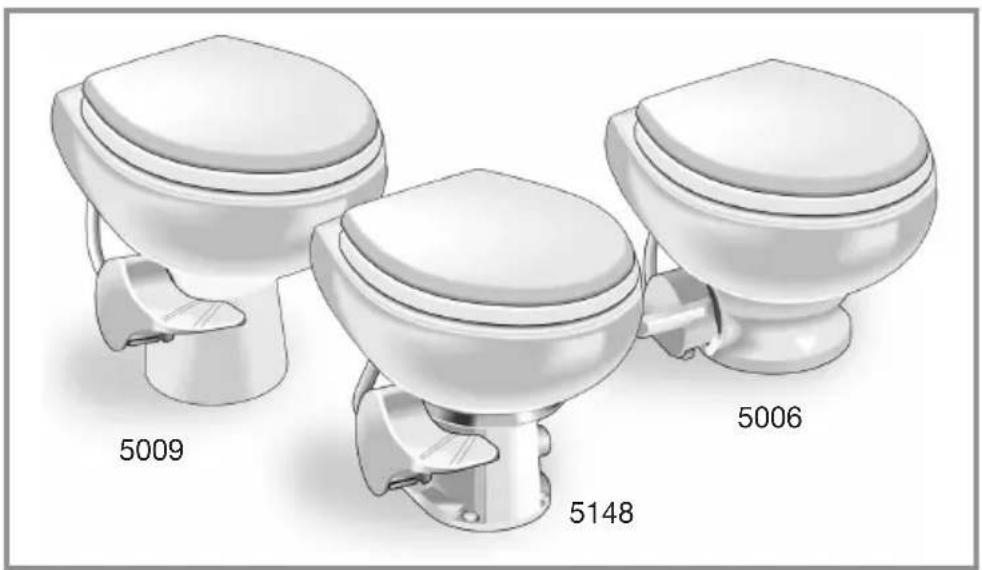
Illustration of three white toilet fixtures labeled 5009, 5006, and 5148 (no additional text or symbols)5000 Series VacuFlush® Toilets
For VacuFlush toilet models
5006, 5009, 5047, 5048, 5049,
5146, 5147, 5148, 5149
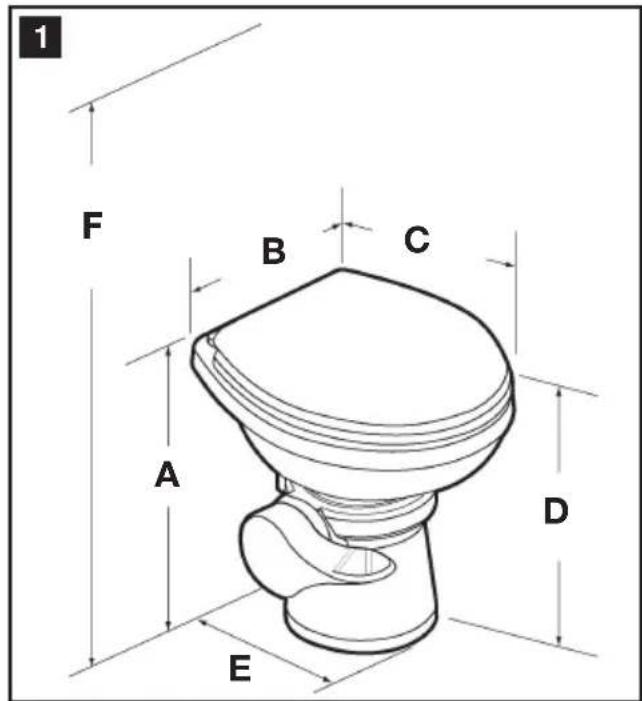
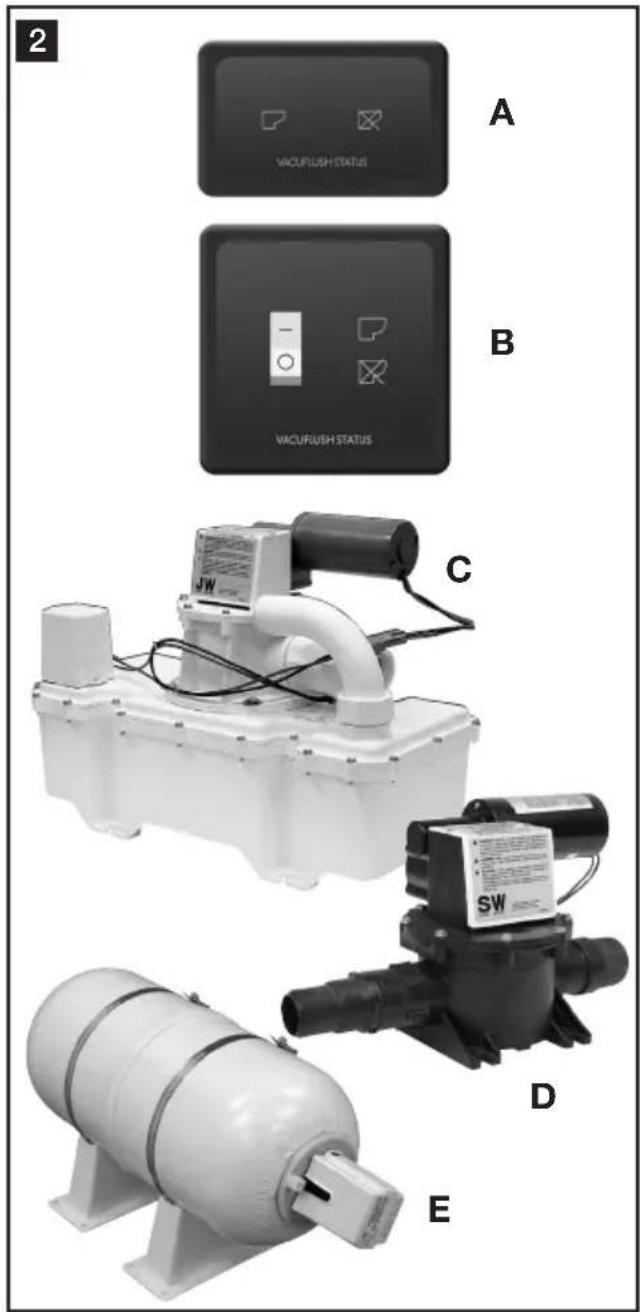
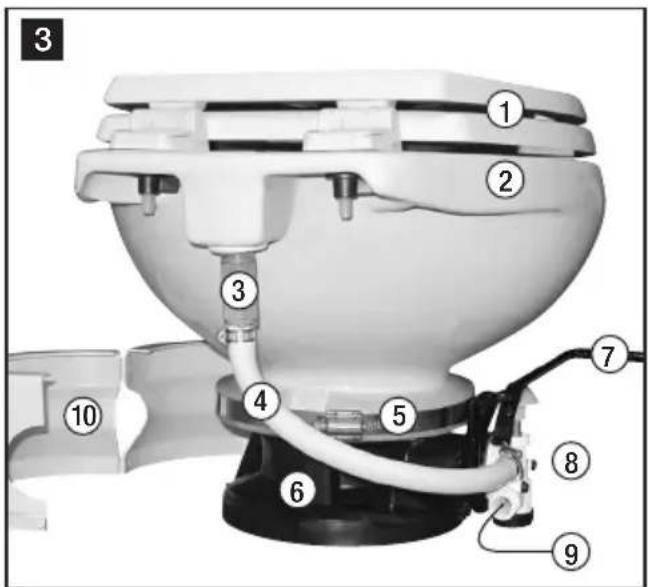
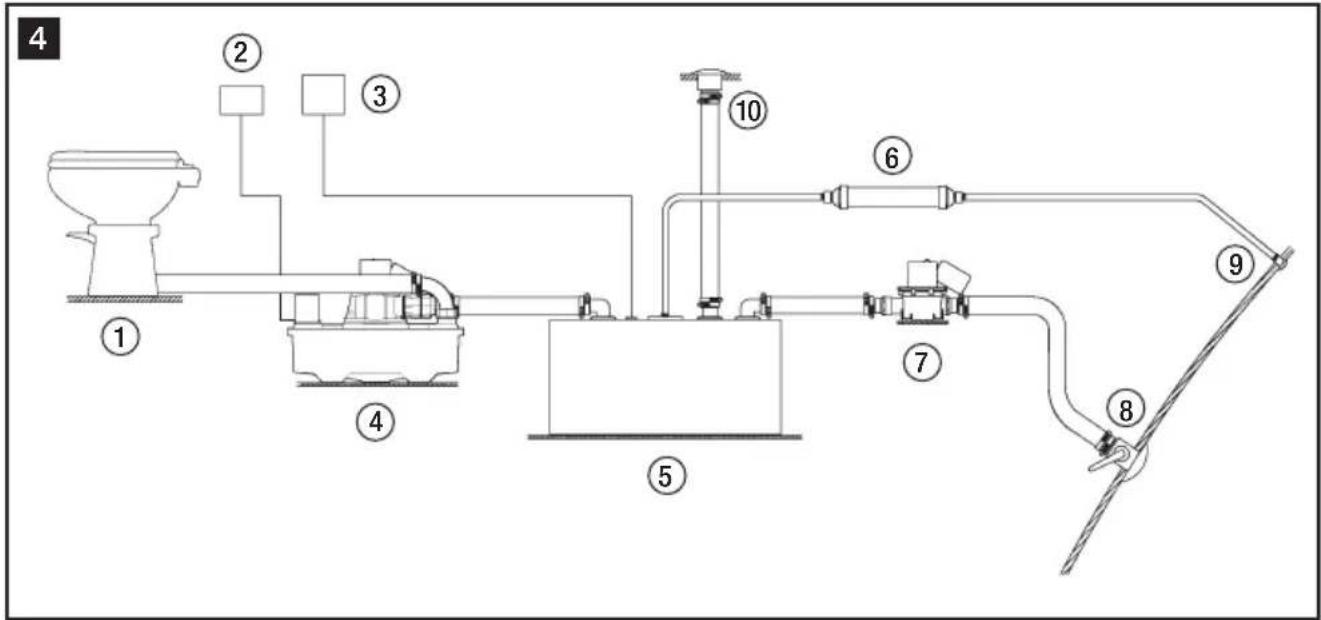
Table of contents
EN
1 Notes on using the manual .... 3
2 General safety instructions 3 - 4
3 Intended use 4
4 Components 5
5 Specifications 5 - 6
6 Operation....7 - 8
7 Maintenance/winterizing/service....8 - 13
8 Warranty 14 - 15
9 Customer service....15
1 Notes on using the manual

Caution!
Safety Instruction: Failure to observe this instruction can cause material damage and impair the function of the device.

Note
Supplementary information for operating the device.
fig. 1 A, page 2: This refers to an element in an illustration. In this example, item A in figure 1 on page 2.
2 General safety instructions
The manufacturer will not be held liable for claims for damage resulting from the following:
- Faulty installation or connection
- Damage to the unit from mechanical influences, misuse or abuse
• Alterations to the unit without express written permission from the manufacturer - Use for purposes other than those described in this manual
2.1 Warnings – marine applications
The following statements must be read and understood before installing, servicing and/or operating this product on a boat. Modification of this product may result in property damage.
Dometic recommends that a qualified technician or electrician install or service this product. Equipment damage, injury to personnel or death could result from improper installation. DOMETIC ACCEPTS NO RESPONSIBILITY OR LIABILITY FOR DAMAGE TO EQUIPMENT, OR INJURY OR DEATH TO PERSONNEL THAT MAY RESULT FROM IMPROPER INSTALLATION, SERVICE OR OPERATION OF THIS PRODUCT.

Caution! Hazard of Flooding
If toilet is connected to ANY through-the-hull fittings, ALWAYS close seacocks when toilet is not in use (even if boat is unattended for a brief period). All passengers must be instructed on how to close valves when the toilet is not in use. Failure to do so can result in flooding which can cause loss of property and life.

Caution! Hazard of Flooding
If the toilet uses fresh water for flushing and is connected directly or indirectly to a shore-side municipal water system at ANY time, shoreside water connections MUST be disconnected if the boat is unattended (even if boat is unattended for a brief period). Failure to do so can result in flooding which can cause loss of property and life.


Caution! Hazard of Flooding
Before beginning any work on this product, be sure that all electrical power to the toilet system has been turned off and that seacocks are in the CLOSED or OFF position. Failure to do so can result in flooding which can cause loss of property and life.

Caution!
Overfilling the holding tank can create serious damage to the sanitation system, such as rupturing the holding tank and releasing tank contents into the bilge. To prevent this possibility, Dometic recommends using the “full” tank shut-down relay in the toilet’s electronic control module. The “full” signal from the holding tank can be generated by an optional Dometic DTM01C tank monitor or DTM04 four-level tank monitor system.
3 Intended use
The Dometic VacuFlush toilet vacuums waste from the bowl and pumps it to a holding tank or other effluent storage/disposal system. Operated by a foot pedal, the toilet allows the user to add water to the bowl (before using or flushing) by slightly raising the pedal, and to flush the toilet by pressing the pedal down. An optional status panel activates lights to indicate when the toilet is activated, when the toilet is ready to flush, and when the toilet is not ready to flush due to recharging vacuum.
3.1 Benefits
Convenient pedal-operated flush. Add water or flush with the foot pedal.
Home-like comfort in small space. Toilets feature a full-size wood seat with large opening and deep bowl for premium comfort.
Water conservation. Water consumption per flush is determined by how long the pedal is pushed. VacuFlush pedal-flush toilets typically use about 1 pint (0.5 l) per flush when the pedal is pressed for 3 seconds.
Integrated check valve. VacuFlush 5000 series toilets use an in-line check valve to prevent back-flow in event of negative pressure in the water supply line.
"OK to Flush" and "Do Not Flush" indicator lights (option). When equipped with an optional VacuFlush status panel, a green light indicates when proper vacuum is achieved and toilet is ready to flush. Red light indicates when vacuum level is too low for a flush to occur. Vacuum recharges in about one minute after flushing.
Automatic “full tank” shut-down (option). When connected to an optional holding tank level indication system and the holding tank reaches full level, the VacuFlush toilet’s vacuum generator will shut its electrical power off. This safety feature prevents overfilling the holding tank, which may cause damage to the boat.
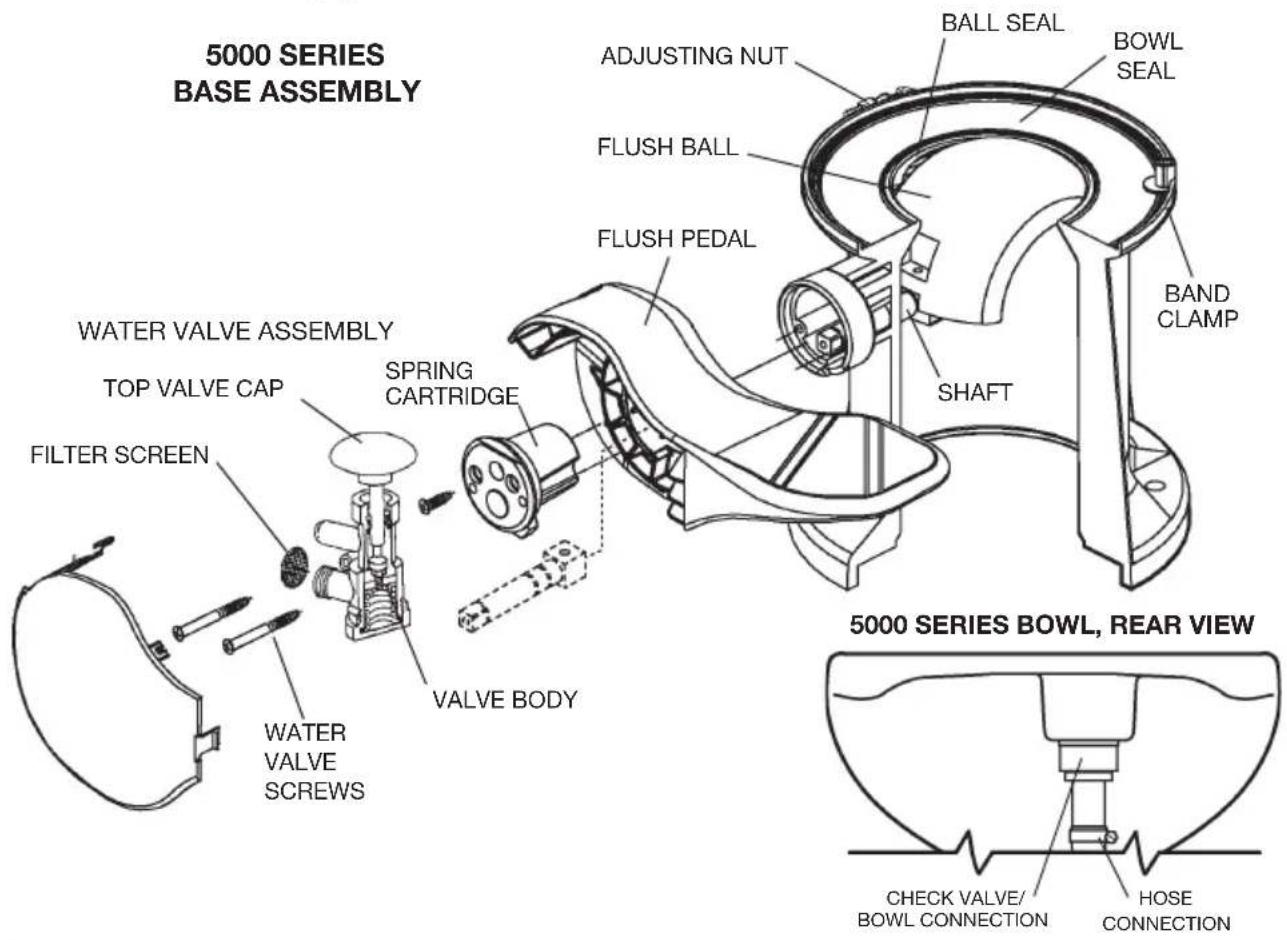
4 Components
(fig. 3, page 2) (fig.
Ref. Description
1 Seat and lid assembly
2 Ceramic bowl
3 Water supply check valve
4 Water supply hose
5 Half clamp kit
6 Pedestal base
7 Flush pedal lever (cover not shown)
8 Water valve
9 Inlet screen
10 Pedestal cover
Refer to complete parts list (packed separately) for additional information.
2, page 2)
Ref. Description
A Vacuum status panel (DVS01 - option)
B VacuFlush status panel and power switch (DVS02 - option)
C J series vacuum generator *
D S series vacuum pump *
E Vacuum tank *
* VacuFlush pedal-operated toilets use either a vacuum generator or vacuum pump/vacuum tank combination. Refer to vehicle manufacturer for your specific system components.
4.1 Typical VacuFlush toilet system (marine)
(fig. 4, page 2)
Ref. Description
1 VacuFlush toilet
2 VacuFlush status panel
3 Holding tank status panel
4 Vacuum generator
5 Holding tank (waste)
Ref. Description
6 Vent filter
7 Discharge pump
8 Overboard discharge fitting
9 Air vent fitting
10 Dockside discharge fitting
Some VacuFlush toilet systems combine the vacuum generator (4) and holding tank (5) into one unit (VacuFlush holding tank system). Contact boat or vehicle manufacturer for complete information on your toilet system.
5 Specifications
5.1 Materials
Toilet bowl: vitreous ceramic
Toilet seat: enameled wood
Pedestal base: polypropylene
5.2 Toilet installation specifications
| Electrical | Vacuum pump* draw 6 | amps at 12 V DC; 3 amps at 24 V DC |
| Circuit breaker/fuse 10 | amps at 12 V DC; 5 amps at 24 V DC | |
| Water Supply | Fitting 0.5 in. NPT | |
| Flow rate 2.0 gpm/7.6 lpm minimum required at toilet | ||
| Discharge | Size 1.5 in./38 mm ID PVC pipe or sanitation hose | |
| Horizontal run** 50 ft./15 m maximum to vacuum source | ||
| Vertical run** 6 ft./1.8 m maximum to vacuum source | ||
| Required component | Vacuum source † | VacuFlush vacuum generator, vacuum holding tank, or holding tank system (purchased separately) |
* Required for J and S series VacuFlush vacuum generators.
** Based on J and S series VacuFlush vacuum generator specifications.
Where applicable, see VHT series vacuum holding tank manual for other installation specifications.
† Purchased separately.
Specifications subject to change without notice.
5.3 Dimensions (fig. 1, page 2)
Models 5009, 5047, 5048, 5049
Ref. Dimension
A 17.375 in. / 441 mm
B 14.875 in. / 378 mm
C 18.375 in. / 467 mm
D 16.5 in. / 419 mm - seat height
E 13.25 in. / 337 mm
F 32 in. / 813 mm - seat lid up
Model 5006 \* overall width includes flush pedal
Ref. Dimension
A 13.25 in. / 337 mm
B 17.25 in. / 438 mm *
C 18.375 in. / 467 mm
D 12.375 in. / 314 mm - seat height
E 13.375 in. / 340 mm
F 27.75 in. / 705 mm - seat lid up
Models 5146, 5147, 5148, 5149
Ref. Dimension
A 15.75 in. / 400 mm
B 14.875 in. / 378 mm
C 18.375 in. / 467 mm
D 15 in. / 381 mm - seat height
E 12.75 in. / 324 mm
F 29.875 in. / 759 mm - seat lid up
All dimensions may vary +/- 0.375 in. (10 mm)
6 Operation
6.1 Toilet system start-up
- Fill freshwater tank.
- Turn on electrical power and water supply to VacuFlush toilet system.
- Flush water through entire toilet system by pressing flush pedal for about 15 seconds.
Release pedal, allowing pedal to snap back into original position. Vacuum pump will operate for about one minute, then shut off.
6.2 Normal toilet operation
ADD WATER TO TOILET BOWL
Lift flush pedal until desired water level is achieved. More water is usually added only when flushing solids. (If pedal is raised too long, toilet bowl can overflow.)
FLUSH TOILET
Press flush pedal down for about 3 seconds, then release it. Allow pedal to snap back into original position to assure vacuum seal. It takes about one minute for vacuum to recharge for the next flush. A small amount of water remains in bowl after every flush.
If flush pedal is accidentally released before effluent leaves bowl, do not flush again until vacuum pump stops running.
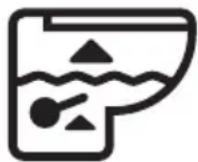
DO NOT FLUSH FOREIGN OBJECTS

natural_image
Crossed safety symbol with broken paper airplane, paper airplane, and pencil (no text or symbols)CAUTION! Flush only water, bodily wastes and rapid-dissolving tissue paper. Do not flush wet wipes, sanitary napkins, condoms, diapers, razor blades, paper cups, cotton swabs, food, hair or liquids such as oils or solvents. Clogging or damage to the toilet system may occur.

Note
Make sure all guests understand toilet operation before use.
6.3 Indicator lights (requires optional VacuFlush status panel)
"OK TO FLUSH" INDICATOR
On a VacuFlush status panel, a steady green “OK to Flush” light indicates when the toilet is ready to flush.
"DO NOT FLUSH" INDICATOR
VacuFlush status panels include a red "Do Not Flush" light to indicate two toilet system conditions:
- vacuum level in toilet system is not sufficient for complete flush.
- holding tank is full and should be pumped out (only when connected to an optional holding tank level indication system). When the red light is on, electrical power to the toilet automatically shuts off to prevent possible overfilling of the holding tank.
(continued on next page)
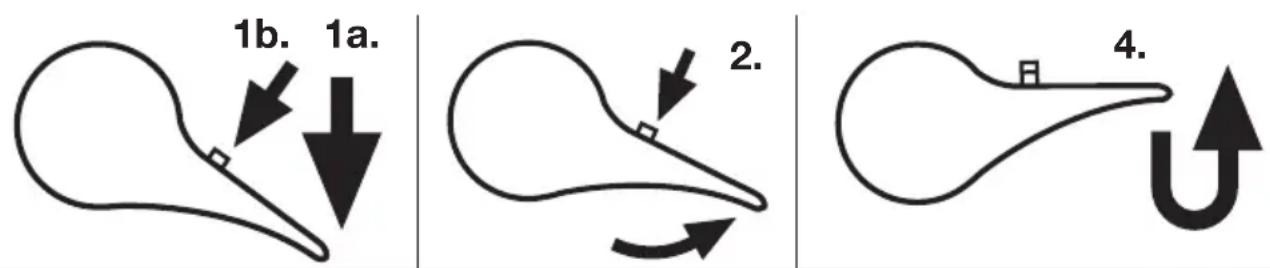
6.4 Locking foot-pedal open for pump-out (models 5146, 5147, 5149, 5149)
VacuFlush ^® 5140 series vacuum toilets include a hold-open pedal lock. When installed in a toilet system with a VHT12/24, VHT4500 or VHT5200 vacuum holding tank, the pedal lock holds the flush ball open to allow positive air pressure into the vacuum holding tank during pump-out. This helps assure thorough discharge of the vacuum holding tank.

Note
Before pumping out holding tank, turn off water supply to toilet and electrical power to vacuum pump. Follow steps below to assure thorough tank discharge.
- a. Press down fully on Pedal, then b. press Lock.
- Slowly bring Pedal up while holding Lock down against Pedal until Pedal stops. The Lock prevents the flush ball inside the toilet bowl from closing completely.
- Pump out holding tank.
- After pump-out is complete, press down on Pedal fully, then release to close flush ball.
7 Maintenance / Winterizing / Service
7.1 Cleaning the toilet
To maintain the toilet's original, lustrous appearance, use Dometic® Toilet Bowl Cleaner or other non-abrasive bathroom and toilet bowl cleaners. Please follow label directions.

Caution
To avoid damaging the toilet system's seals and valves, do not clean toilet with abrasive cleaners, caustic chemicals, or lubricants and cleaners that contain alcohols or petroleum distillates.
7.2 VacuFlush system maintenance
Maintenance procedures vary widely and depend on factors such as frequency of use, quality of flushing water, etc. The following chart provides a general guideline for keeping your toilet system ready for use at any time.
| Maintenance procedure Service interval Notes | ||
| ROUTINE | ||
| Check all clamped hose joints below water line for leaks. | Monthly — | |
| Check filter screen in water valve. After first year of service, then as needed if water flow is noticeably slower. | Screen is located inside water valve inlet. | |
| Replace vent filter (if installed in holding tank vent line). | Annually — | |
| MAJOR SYSTEM MAINTENANCE | ||
| Replace duckbill valves in vacuum generator or vacuum pump. | Every three years See vacuum generator or vacuum pump parts list for replacement kit part number. | |
| Replace flush ball seal and flush ball (if required). | Every three years See toilet parts list for replacement kit part number. | |
7.3 Recommended spare parts
When operating boat or other vehicle in remote areas, keep the following spare parts on hand to assure continuous toilet system operation.
| Description Where used | |
| Flush ball seal VacuFlush toilet. See parts list. | |
| Flush ball VacuFlush toilet. See parts list. | |
| Water valve (in foot pedal) VacuFlush toilet. See parts list. | |
| Vacuum switch kit Vacuum tank or vacuum generator. See parts list. | |
| Duckbill valves Vacuum tank or vacuum generator. See parts list. | |
To order spare parts, refer to Customer Service section.
7.4 During extended periods of non-use
Sanitation hoses should be cleared if toilet will not be needed for an extended period of time (more than two weeks).
- Fill toilet bowl with water and add 4 oz. (120 ml) of liquid biodegradable laundry detergent (should NOT contain bleach).
- Flush toilet, holding pedal down for about two minutes. Close flush ball.
- Turn off water supply to toilet.
- Flush the toilet without water, allowing the vacuum pump to shut off after the flush. Repeat three times. (This procedure will minimize any remaining water in the sanitation hoses.)
- Turn off power to the vacuum pump.
- Completely pump out holding tank.
If system will be subjected to freezing temperatures, please follow above procedure, then winterize system as described in this manual.
TURN OFF ELECTRICITY AND WATER TO TOILET SYSTEM IF IDLE FOR LONG TIME
If people will not be using the boat for a long time (vacation, maintenance, off-season, etc.), or in the event of a long electrical power interruption, electrical power and water supply to the toilet system should be shut off.
7.5 Clearing blockage in toilet base
- Turn off water to the toilet.
- Open the flush ball.
- Pull the foreign material from the 1-inch diameter orifice at the bottom of the base or, using a small diameter blunt rod, attempt to push the blockage through the orifice.
7.6 Winterizing
At the end of each season, the VacuFlush toilet system should be winterized for storage. The following procedure should be used:
- Pump out holding tank.
- Thoroughly flush system with fresh water.
- Drain freshwater tank.
-
Add freshwater antifreeze to freshwater tank.
-
Flush freshwater water antifreeze and water mixture through toilet and into the waste holding tank. Each installation is different, so amounts may vary. User discretion is required to assure adequate protection.
-
Empty holding tank.

Note
Use nontoxic antifreeze designated for potable water systems. (See boat or vehicle owner's manual.)

Caution
Never use automotive-type antifreeze in freshwater systems.
7.7 Troubleshooting guide
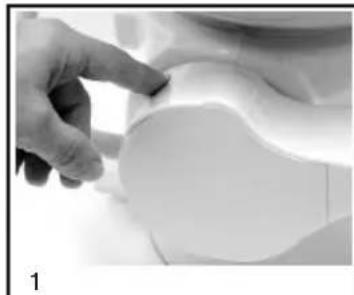
REMOVING PEDAL COVER
- To gain access to water valve, press tab on back of pedal to release pedal cover.
- Pull cover away from pedal. Cover snaps back into place.
For short-base model 5006, remove two screws holding pedal cover in place (not shown).
REMOVING PEDESTAL COVER
- For tall models, remove screw located under flush pedal.
- Unsnap bottom and pull cover away from pedestal. Model and serial number label is located on base.
natural_image
Close-up of a hand pointing at a white object on a surface, possibly part of a device or tool (no visible text or symbols)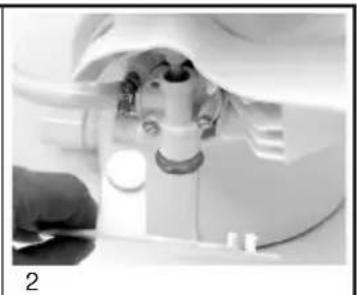
natural_image
Close-up of a medical procedure in progress, showing a patient inside a scanner (no visible text or symbols)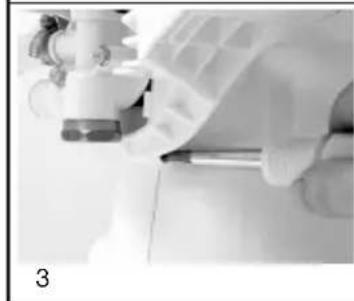
natural_image
Close-up of a robotic arm gripping a tool, no visible text or symbols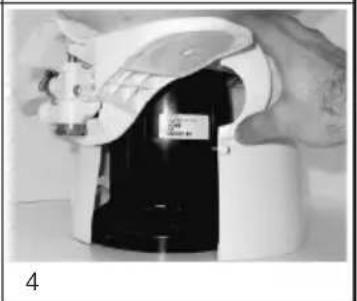
natural_image
Close-up of a hand opening a white electronic device with a black body (no visible text or symbols)Problem Possible Cause Service Instruction
| 1. Water will not stay in bowl. a. Loose clamp ring.b. Improper seal around flush ball due to dirt or debris on flush ball or under flush ball seal.c. Worn or damaged seal.d. Worn or damaged flush ball. | a. Tighten clamp ring adjusting nut.b. Inspect flush ball for foreign debris. Clean flush ball and underside of seal if needed.c. Replace seal.d. Replace flush ball. |
| 2. Plastic flush ball will not close completely. | a. Too much friction between flush ball and ball seal.b. Water valve screws are too tight.c. Defective spring cartridge. |
| 3. Flush ball will not open. a. Broken shaft.b. Shaft not fully engaged in the spring cartridge. | a. Replace shaft.b. Put pressure on shaft from under the flush ball (pushing into spring cartridge) until it engages. You may have to rotate flush ball until shaft lines up with square in spring cartridge. |
| 4. Water does not shut off in toilet (toilet overflows). | a. Not enough clearance between pedal and top of water valve cap.b. Dirt lodged in water valve seal. |
| 5. Water does not enter toilet bowl properly. | a. Insufficient water flow rate at toilet.b. Water valve clogged.c. Plugged rim wash holes in toilet. |
Problem Possible Cause Service Instruction
| 6. Lifting foot pedal does not add water to the bowl. | a. Too much clearance between pedal and top of water valve cap. | a. Replace foot pedal (most models) or adjust cam strap so clearance is .06 in. (1.5 mm) max (model 5006 only). |
| 7. Water leaking from water valve. | a. Water valve body cracked due to freeze damage.b. Water line connection is loose or not seated properly.c. Defective water valve.d. Stripped threads. | a. Replace water valve.b. Insure that threads are not cross-threaded and tighten.c. Replace water valve.d. Replace water valve. |
| 8. Water leaking from rear of toilet bowl. | a. Loose check valve or hose clamps.b. Cracked or defective toilet bowl. | a. Secure check valve connections.b. Replace toilet bowl. |
| 9. Water is leaking from the base/ toilet connection. | a. Clamp ring may be loose.b. Ball seals may be worn or defective. | a. Remove pedestal cover (on applicable models) and tighten the clamp ring.b. Replace ball seals. |
| 10. Vacuum pump running too often between flushes. | a. Water leaks out of bowl between flush ball and ball seal.b. Vacuum line leak. | a. Leave small amount of water in bowl. If water is sucked from bowl, see problems 1 and 2.b. Tighten all connections at toilet, vacuum generator or vacuum holding tank (including hose clamps and threaded spin nuts).If leak persists, contact Customer Service. |
11. Vacuum pump will not shut off.PUMP SERVICE WARNINGS WARNING - ELECTRICAL SYSTEMTurn off power before servicing when power isn't required for test. WARNING - ELECTRICAL SYSTEMTurn off power before servicing when power isn't required for test. WARNING - MOTOR STARTS AUTOMATICALLYTurn off power before servicing. WARNING - MOTOR STARTS AUTOMATICALLYTurn off power before servicing. | a. A vacuum leak exists.b. Insufficient vacuum (pump creates less than 10 inches Hg).c. Faulty vacuum switch (pump creates more than 10 in. Hg)d. Improper vacuum generator wiring.e. Bellows not pumping. | a. See problem 9b.b. Isolate pump and use vacuum gauge to check vacuum levels. Could be a plugged discharge line or worn duckbill valves.c. Replace vacuum switch.d. Refer to wiring diagram to check for proper wiring.e. Tighten set screw in eccentric to motor shaft if needed. Check for damage to bellows and motor shaft. Replace if necessary. |
12. Vacuum pump will not run. a. No electrical power.  | b. Loose or broken electrical wiring.c. Improper electrical connections.d. Faulty vacuum switch.e. Faulty motor.f. Shut-down relay prevents pumping. | a. Check input power, circuit breaker and fuse.b. Tighten or reconnect wires at vacuum pump and tank, vacuum generator, or vacuum holding tank.c. Make certain wires at vacuum switch are connected to the “B” terminals.d. To check vacuum switch, short across “B” terminals with jumper wire.e. Replace motor.f. Empty the holding tank. |
Problem Possible Cause Service Instruction
| 13. Vacuum pump is running too slow, overheating, blowing fuses or circuit breaker. | a. Gear motor is worn, defective.b. Plugged vent line or vent filter.c. Blockage in discharge line. | a. Check motor; replace if needed.b. Disassemble and clean out vent line. Replace vent filter if necessary.c. Disassemble and clean discharge line. Be certain that in-line valves (duckbill valves) and seacock are in proper position.d. Wire size too small. Check electrical diagram for proper wire size for voltage of pump.e. Check input power for low voltage.f. Remove and clean bellows assembly. (When flushing toilet, using more water may alleviate this problem.) |
 | d. Improper wire size. | |
 | e. Improper voltage.f. Vacuum pump bellows clogged with tissue. | |
| 14. Toilet will not flush.(No vacuum.)See problem 15if necessary. | a. Blockage exists in system. | a. Open flush ball, check 1-inch(25 mm) orifice at bottom of base for blockage and dislodge it. If blockage is not in base, it may be found in:• outlet of vacuum tank• inlet of vacuum generator• diptube of vacuum generator• inlet of vacuum pump |
 | b. Pump will not run.c. Duckbill valves in vacuum pump are inverted due to blocked discharge line or an attempt to pump out against closed seacock. | b. See problem 12.c. Replace duckbill valves, making sure they point in the correct direction. |
| 15. Blockage between toilet and vacuum generator. | a. Collapsed vacuum line.b. Sharp bends or kinks in vacuum hose.c. Improper operation of toilet.d. Foreign objects were flushed down toilet. | a. Inspect vacuum line for collapsed condition. Replace if needed.b. Inspect vacuum hose for kinks or bends. If less than 8.5 inches (216 mm) radius on any bend, reposition hose to achieve minimum 8.5-inch bend radius.c. Make sure each person using toilet knows correct procedure.d. DO NOT flush non-dissolving items (i.e. sanitary napkins, facial tissue, wet strength tissue, paper towels, etc.) or excessive toilet tissue down toilet. Dometic brand toilet tissue is best. |
| 16. Pump emits odor. a. Loose or defective hose connection on pump. | b. Loose intake or discharge fittings on pump.c. Worn, torn or punctured pump bellows (vacuum generator) or diaphragm (vacuum holding tank). | a. Tighten connections or replace hose and make new connections.b. Tighten intake or discharge fittings on pump. Replace nipples or adapters if necessary.c. Replace pump bellows or diaphragm. |
8 Warranty and product liability
North America and Rest of the World:
Manufacturer's One-Year Limited Warranty
Dometic Corporation, Sanitation Division warrants to the original purchaser only that this product, if used for personal, family or household purposes, is free from defects in material and workmanship for a period of one year from the date of purchase.
If this Dometic product is placed in commercial or business use, it will be warranted to the original purchaser only to be free of defects in material and workmanship for a period of ninety (90) days from the date of purchase.
Dometic reserves the right to replace or repair any part of this product that proves, upon inspection by Dometic, to be defective in material or workmanship. All labor and transportation costs or charges incidental to warranty service are to be borne by the purchaser-user.
EXCLUSIONS
IN NO EVENT SHALL DOMETIC BE LIABLE FOR INCIDENTAL OR CONSEQUENTIAL DAMAGES, FOR DAMAGES RESULTING FROM IMPROPER INSTALLATION, OR FOR DAMAGES CAUSED BY NEGLECT, ABUSE, ALTERATION OR USE OF UNAUTHORIZED COMPONENTS. ALL IMPLIED WARRANTIES, INCLUDING ANY IMPLIED WARRANTY OF MERCHANTABILITY OR FITNESS FOR ANY PARTICULAR PURPOSE, ARE LIMITED TO A PERIOD OF ONE YEAR FROM DATE OF PURCHASE.
IMPLIED WARRANTIES
No person is authorized to change, add to, or create any warranty or obligation other than that set forth herein. Implied warranties, including those of merchantability and fitness for a particular purpose, are limited to one (1) year from the date of purchase for products used for personal, family or household purposes, and ninety (90) days from the date of purchase for products placed in commercial or business use.
OTHER RIGHTS
Some states do not allow limitations on the duration of an implied warranty and some states do not allow exclusions or limitations regarding incidental or consequential damages; so, the above limitations may not apply to you. This warranty gives you specific legal rights, and you may have other rights which vary from state to state.
To obtain warranty service, first contact your local dealer from whom you purchased this product or go to http://www.dometic.com for a dealer near you.
Europe:
Warranty and Customer Service
Warranty arrangements are in accordance with EC Directive 44/1999/CE and the normal conditions applicable for the country concerned. For warranty or other service, please contact our Dometic Customer Service department. Any damage due to improper use is not covered by the warranty.
The warranty does not cover any modifications to the product or the use of non-original Dometic parts; the warranty does not apply if the installation and operating instructions are not adhered to and no liability shall be entertained.
Product Liability
Product liability of Dometic Group and its subsidiary companies does not include damages which may arise from: faulty operation; improper alterations or intervention in the equipment; adverse effects from the environment which may impact the equipment itself or the direct vicinity of the equipment or persons in the area.
To obtain warranty service, first contact your local dealer from whom you purchased this product or go to http://www.dometic.com for a dealer near you.
9 Customer service
There is a strong, worldwide network to assist in servicing and maintaining your toilet system. For the Authorized Service Center near you, please call from 8:00 a.m. to 5:00 p.m. (ET) Monday through Friday.
You may also contact or have your local dealer contact the Parts Distributor nearest you for quick response to your replacement parts needs. They carry a complete inventory for the Dometic product line.
Telephone: 1 800-321-9886 U.S.A. and Canada
330-439-5550
International
Fax: 330-496-3097 U.S.A. and Canada
330-439-5567
International
Web sites: http://www.Dometic.com
http://www.DometicSanitation.com
Toilet model identification
The toilet model identification label is located on the toilet base and will show the model number and serial number. For models 5006, 5009, 5047, 5048 and 5049, remove pedestal cover to locate identification label (see page 11).