
WallScreen Deluxe - Projection screen Stewart - Free user manual and instructions
Find the device manual for free WallScreen Deluxe Stewart in PDF.


| Product Type | Projection Screen |
| Brand | Stewart |
| Model | WallScreen Deluxe |
| Screen Material | Matte white, non-glare with 1.1 gain |
| Aspect Ratio | 16:9 |
| Diagonal Size | 100 inches |
| Viewing Area | 87 x 49 inches |
| Frame | Aluminum with matte black finish |
| Motorization | Electric motor with remote control |
| Power Supply | 110-240V AC, 50/60Hz |
| Power Consumption | 100W |
| Weight | 50 lbs (22.7 kg) |
| Installation | Wall-mount brackets included |
| Viewing Angle | 160 degrees |
| Warranty | 2 years |
| Features | Quiet motor, multi-stop positioning, IR and RF remote |
| Cleaning | Use soft dry cloth, avoid chemicals |
| Safety | Auto-stop when fully extended, child safety |
Frequently Asked Questions - WallScreen Deluxe Stewart
User questions about WallScreen Deluxe Stewart
0 question about this device. Answer the ones you know or ask your own.
Ask a new question about this device
Download the instructions for your Projection screen in PDF format for free! Find your manual WallScreen Deluxe - Stewart and take your electronic device back in hand. On this page are published all the documents necessary for the use of your device. WallScreen Deluxe by Stewart.
USER MANUAL WallScreen Deluxe Stewart
Fixed Frame, Snap Screens with Various Framing Options

natural_image
Blank gray image with a black border and 'Stewart' watermark in the corner (no other text or symbols)Stewart
F I L M S C R E E N
The Reference for Stunning™
WallScreen Deluxe
OWNER'S MANUAL
Contents
To the Owner 4
About WallScreen Deluxe 5
Preparing the Installation 6
Frame Assembly Instructions 8
EZ Mount Bracket System 9
Wall Board Mount 12
Eye Bolt Mount (Hanging) 14
T-Stand (Self-Supporting) 15
Pocket Mount 16
Aperture Mount 17
Attaching the Screen to the Frame 18
Caring for and Cleaning the Screen 20
One (1) Year Limited Warranty 21
Congratulations on purchasing one of the finest optical viewing screens in the world.
Your handcrafted, WallScreen Deluxe projection screen has been carefully inspected to ensure you will have an optimal viewing experience that will last many years. Please take a moment to review this manual. It will guide you through the installation and the operation of your screen and will also provide you with detailed instructions on how to care for your screen's viewing surface.
From all of us at Stewart Filmscreen, we would like to thank you for choosing WallScreen Deluxe. Should you have any questions, please don't hesitate to contact our customer service department at 1 (310) 784-5300, or toll free at 1 (800) 762-4999. We're here to help.
natural_image
Abstract line drawing with intersecting curves and a triangular shape (no text or symbols)Mary Stewart CEO and Owner

Frank Gomez Fixed Frame Masking Specialist
PREPARING THE INSTALLATION (CONTINUED)
Note: Bolts and other fasteners for the screen are standard gauge and standard sizes used in the U.S., regardless of the installation country. For this reason, sizes are in inches rather than metric measurements.
UNPACKING
Be sure to unpack carefully in a clean area. Use special care when handling the screen so that it does not become soiled or damaged. If you plan to repack your screen and hardware for transportation to another location, you may wish to photograph or make a note of how it was packed. Retain the packing material for future use, if desired.
CAUTION
Do not stand on the screen tube or store it on its end. This will cause screen damage. If you are not planning to install the screen immediately, make sure it remains horizontal during storage.
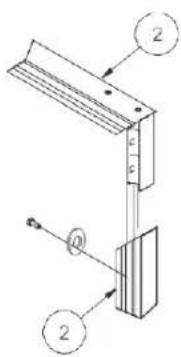
- Connect the frame members by matching the numbered dots on the ends of the members.
- Secure the frame members with the supplied 5/16-18 x 1/2" hex bolt and 5/16-18 washer (see Figure 1).


DETAIL A AUD. LEFT BOTTOM CORNER
DETAIL B AUD. LEFT TOP CORNER

DETAIL C AUD. RIGHT TOP CORNER

DETAIL D AUD. RIGHT BOTTOM CORNER
EZ MOUNT BRACKET SYSTEM
NOTE: Professional mounting techniques should be used. Stewart Filmscreen cannot be liable for substandard or faulty installations. Failure to comply with the instructions and guidance contained in this manual may result in voiding your warranty.

CAUTION
- Be careful not to touch or scratch the viewing surface.
To accurately position the frame, mount the EZ Mount hanging bar and temporarily hang the frame before attaching the screen material. On the bottom of the frame, there are magnets you can slide to line up the steel pucks to align with wall studs. If the wall is not perfectly flat, the force of the magnet may cause the frame to bend. For this reason, shims can be used to place between the wall and the steel pucks so that the frame remains straight. The screen should not be attached to the frame at this point (see Figures 3-5).
- Identify the location of wall studs where you can securely mount the EZ Mount hanging bar.
- Use a level to accurately position the EZ Mount hanging bar on the wall (see Figure 2).
- Drill holes through the bar into the studs.
- Use the provided 2" screws or other appropriate fasteners to secure the EZ Mount hanging bar to the wall studs.
Note: A minimum of three (3) screws are recommended to safely secure the frame.

natural_image
Simple line drawing of three vertical bars with a horizontal line across them (no text or symbols)Figure 2: EZ Mount is Level and on Wall Studs
EZ MOUNT BRACKET SYSTEM (CONTINUED)
- Reposition the frame and the slide, and then secure the magnets so they align with the steel pucks mounted on the wall.
- Remove the frame. Follow the steps for attaching the screen to the frame (pages 18-19).
- Your WallScreen is now ready to hang in its final position (see Figures 3-5).

Figure 3: WallScreen with Fitted EZ Mount Hanging Bar - Rear View

Figure 4: Wall Mounting - Side/Top View

Figure 5: Wall Mounting - Side/Bottom View
NOTE: Professional mounting techniques should be used. Stewart Filmscreen cannot be liable for substandard or faulty installations. Failure to comply with the instructions and guidance contained in this manual may result in voiding your warranty.
- Lay assembled frame face down on a clean surface.
- Fit wall boards to the outside of the brackets already attached to the frame.
- Bolt wall boards to brackets using the supplied 3/4" hex head bolts (see Figure 6).
Note: Depending on the size of the screen, the number of wall boards may vary. Temporary attachment of the wall boards to the frame for the purpose of positioning the frame and brackets on the wall.
- Without the screen material attached, position the frame and boards on the wall (see Figure 7).
- Make sure the unit is level and plumb. You may need to use shims between the boards and the wall to achieve vertical plumb.
- Align the board holes with wall studs, mark and drill holes in the wall that align with the board holes.

natural_image
3D diagram of a rectangular frame with labeled corner points A and B, no text or symbols presentFigure 6: Temporarily Attaching Wall boards to the Frame

natural_image
Pure structural diagram of a two-panel frame with vertical and horizontal beams (no text or symbols)Figure 7: Positioning the Frame and Wall Boards to the Wall

EYE BOLT MOUNT (HANGING)
NOTE: Professional mounting techniques should be used. Stewart Filmscreen cannot be liable for substandard or faulty installations. Failure to comply with the instructions and guidance contained in this manual may result in voiding your warranty.
- Attach the screen to the frame (see pages 18-19).
- Use the Eye Bolt Mount to suspend the screen. Eye bolts are already secured to the frame making your WallScreen ready for installation to an appropriate surface (see Figure 10).

T-STAND (SELF-SUPPORTING)
NOTE: Professional mounting techniques should be used. Stewart Filmscreen cannot be liable for substandard or faulty installations. Failure to comply with the instructions and guidance contained in this manual may result in voiding your warranty.
- Attach the screen to the frame (see pages 18-19).
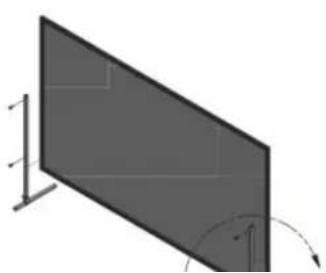
- Use the T-Stand knobs provided to first attach the vertical members to each base, then to attach the finished screen (frame/screen assembly) to the T-Stands. The through-holes on each vertical member should run parallel to the base (see Figure 11).
- Hand-tighten the knobs.
Note: On some custom sized frames the use of additional "back support braces" is required and will be included, if necessary. These vertical support braces assure parallel top and bottom frame member alignment once the screen has been attached to the frame. Do not install the screen/frame without required back braces.
natural_image
Pure geometric diagram of a tilted rectangular panel with angular arrows, no text or symbols present
natural_image
Abstract geometric shape with a vertical line and triangular base, no text or symbols presentPOCKET MOUNT
NOTE: Professional mounting techniques should be used. Stewart Filmscreen cannot be liable for substandard or faulty installations. Failure to comply with the instructions and guidance contained in this manual may result in voiding your warranty.
- Attach the screen to the frame (see pages 18-19).
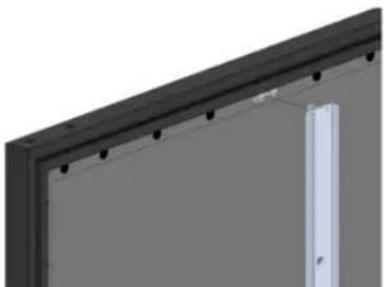
- Align the first pocket mount to a wall stud on your wall and fasten the pocket mount at three points (see Figure 12).
- Make sure to measure the distance you will need between each pocket mount, from the frame to ensure everything is aligned.
- Fasten the rest of the pocket mounts to the wall.
- Raise your assembled frame and simply click onto the pocket mounts (see Figure 13).
natural_image
Exterior view of a wall-mounted frame with mounting holes and a vertical door (no text or symbols visible)
natural_image
Simple 3D diagram of two vertical lines inside a rectangular frame (no text or symbols)Figure 12: Pocket Mounts on Wall
APERTURE MOUNT
NOTE: Professional mounting techniques should be used. Stewart Filmscreen cannot be liable for substandard or faulty installations. Failure to comply with the instructions and guidance contained in this manual may result in voiding your warranty.
The aperture mount allows you to install the screen into an opening in a wall or wall unit. Access to the back of the screen is required to install the attachment hardware.
- Prepare the aperture.
- Attach the screen to the frame (see pages 18-19).
- Carefully insert the frame (with the screen already attached) into the aperture. Take care so that you do not damage the screen.
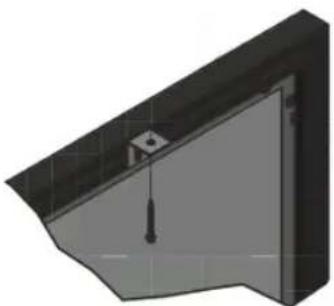
- Install the frame/screen assembly into the aperture using the attached mounting brackets and appropriate fasteners (see Figure 14).
natural_image
3D rendering of a mechanical component with a central mounting bracket and a vertical screw (no text or symbols visible)Figure 14: Installing Frame/Screen Assembly – Rear View, Close-up

CAUTION
Be careful not to touch or scratch the viewing surface.
ATTACHING THE SCREEN TO THE FRAME
DO NOT perform this step UNTIL instructed to do so in the mounting section.

CAUTION
- Be careful not to touch or scratch the viewing surface.
- Do not use any tools to fasten the screen to the frame.
- Do not fold or crease the screen.
UNPACKING AND UNROLLING THE SCREEN
The viewing side of the projection screen is rolled to the inside to protect optical quality. The screen is rolled lengthwise.
- Remove the screen from the cardboard shipping tube.
- On a clean surface, unroll the screen viewing side up (see Figure 15).
- Remove the protective packing material from the screen material.

natural_image
Abstract geometric shapes with diagonal lines and a shaded base (no text or symbols)ATTACHING THE SCREEN TO THE FRAME (CONTINUED)
-
Place the frame over the screen, snap side down (see Figure 15).
-
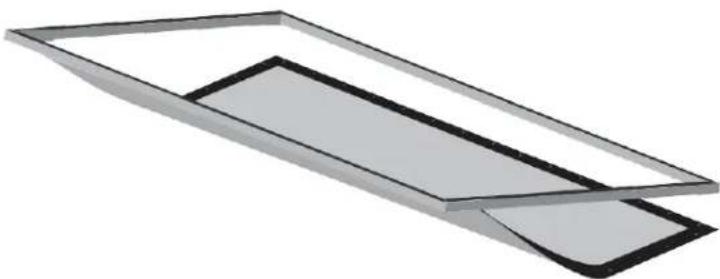
Starting with the snaps on the top corners and then horizontally along the top while lifting the frame with one hand, snap the screen into the frame. Gently allow the screen to stretch onto the snaps. Do not jerk, wrinkle, or crease the screen material, as it can be damaged (see Figure 16).
-
Lift the frame to a vertical position to finish attaching the sides and bottom row of the snaps (see Figure 17).
Note: If there are any wrinkles or puckers on the screen, the snaps on the frame can be adjusted side to side. Lay the frame viewing side down on a clean surface. A movement of 1/16" to 1/8" (1.6mm to 3.2mm) is usually sufficient to eliminate puckers.

natural_image
Abstract geometric diagram with overlapping planes and a shaded region (no text or symbols)Figure 16: Attaching Top Corner Snaps
natural_image
3D rendering of a rectangular metal tray or shelf with a shaded interior (no text or symbols)Figure 17: Attaching Remaining Snaps
CARING FOR AND CLEANING THE SCREEN
GENERAL MAINTENANCE
With reasonable care, you may expect many years of dependable use of your Stewart projection screen.
FOR VINYL SCREEN MATERIALS ONLY
The surface of your screen is delicate, so we encourage you to keep your screen clean. Special attention to these instructions should be followed when cleaning.
- Avoid getting any foreign objects on the screen, as cleaning may prove very difficult. It may not be possible to remove scratches, paint, ink, etc.
- A draftsman-style brush may be used to lightly whisk away any loose dirt or dust particles. (This type of brush is usually available at office supply stores.)
- For tougher spots, you can make a cleaning solution using a water-based detergent and warm water. To make the solution, mix one-part Simple Green, 409, or another water-based industrial cleaner with three parts warm water. Moisten a clean cotton cloth, or cotton swab with this solution, moisten the stained area, and gently lift off the stain. Never use an aggressive scrubbing action as you could damage the screen surface by removing the optical coating. Re-moisten the area with clean water and dab dry with a clean sponge or cotton cloth. Any residual watermarks will evaporate on their own in a few minutes; do not attempt to manually dry the screen.
- Contact tech support at Stewart Filmscreen if you have questions about removing difficult spots.
VELUX™ COVERING
CAUTION
- Do not use any other cleaning materials on the screen.
- Deoxy-alkylate salts are alcohol based classes to clear the season. The only
STEWART FILMSCREEN CORPORATION (Stewart) warrants all products to the original purchaser only. Stewart products are guaranteed to be free from defects in materials and workmanship for a period of one (1) year from the date of purchase by the original purchaser or eighteen (18) months from date of manufacture, as defined in the serial number. Additionally, all products must be properly operated and maintained according to Stewart instructions and cannot be damaged due to improper handling or treatment after shipment from the factory. This warranty does not apply to equipment showing evidence of misuse, abuse, or accidental damage, including neglect caused by improper installation (i.e. proximity to hot lights, exposure to extreme heat or cold, exposure to excessive humidity, etc.).
Stewart on-site warranty repair services are not available for this product. Stewart's sole obligation under this warranty shall be to repair or to replace (at Stewart's sole discretion) the defective part of the merchandise. This warranty expressly does not cover any costs of removal, installation, framing, or other costs incidental to replacing the screen or returning it to Stewart. Returns for service should be made to your Stewart dealer. If it is necessary for the dealer to return the screen or part to Stewart, transportation (freight) expenses to and from Stewart are payable by the purchaser. Stewart is not responsible for damage in shipment. To protect against damage or loss in transit, insure the product and prepay all transportation expenses.
This warranty is in lieu of all other warranties, expressed or implied, including warranties as to fitness for use or merchantability. Any implied warranties of fitness for use, or merchantability, that may be mandated by statute or rule of law are limited to the one (1) year warranty period. This warranty gives you specific legal rights, and you may also have other rights which vary from state to state. In no event will Stewart be liable for sums in excess of the purchase price of the product. No liability is assumed by Stewart for expenses or damages resulting from interruption in operation of equipment, or for incidental, direct, or consequential damages of any nature. In the event that there is a defect in materials or workmanship of a Stewart Filmscreen product, you may contact our Customer Service Department at 1161 W Sepulveda Blvd, Torrance, CA 90502-2797, or call us at 1 (310) 784-5300, or toll free at 1 (800) 762-4999.
IMPORTANT: This warranty shall not be valid and Stewart shall not be bound by this warranty if the product is not operated and maintained in accordance with Stewart's written instructions. Stewart Filmscreen Corporation shall not be liable for any and all consequential damage(s) occasioned by the breach of any written or implied warranty pertaining to the sale of a Stewart Filmscreen product in excess of the purchase price of the product sold.
Stewart
F I L M S C R E E N
The Reference for Stunning™
www.StewartFilmscreen.com
1161 W. Sepulveda Blvd., Torrance CA 90502 USA | 1 (800) 762-4999 | Tel: 1 (310) 784-5300 | Fax: 1 (310) 326-6870
Email: TechSupport@StewartFilmscreen.com
©2021 Stewart Filmscreen. Specifications are subject to change without notice.


- WallScreen Deluxe
- OWNER'S MANUAL
- Contents
- PREPARING THE INSTALLATION (CONTINUED)
- UNPACKING
- CAUTION
- EZ MOUNT BRACKET SYSTEM
- EZ MOUNT BRACKET SYSTEM (CONTINUED)
- EYE BOLT MOUNT (HANGING)
- T-STAND (SELF-SUPPORTING)
- POCKET MOUNT
- APERTURE MOUNT
- ATTACHING THE SCREEN TO THE FRAME
- UNPACKING AND UNROLLING THE SCREEN
- ATTACHING THE SCREEN TO THE FRAME (CONTINUED)
- CARING FOR AND CLEANING THE SCREEN
- GENERAL MAINTENANCE
- FOR VINYL SCREEN MATERIALS ONLY
- VELUX™ COVERING
- Stewart
- F I L M S C R E E N
Brand : Stewart
Model : WallScreen Deluxe
Category : Projection screen