
KW-NX7000BT - Car stereo JVC - Free user manual and instructions
Find the device manual for free KW-NX7000BT JVC in PDF.
Download the instructions for your Car stereo in PDF format for free! Find your manual KW-NX7000BT - JVC and take your electronic device back in hand. On this page are published all the documents necessary for the use of your device. KW-NX7000BT by JVC.
USER MANUAL KW-NX7000BT JVC
For customer Use: Enter below the Model No. and Serial No. which are located on the top or bottom of the cabinet. Retain this information for future reference. Model No. Serial No.
LVT1837-001A
[J] KW-NX7000[J].indb 2
08.6.12 0:14:33 AM
ENGLISH Thank you for purchasing a JVC product. Please read all instructions carefully before operation, to ensure your complete understanding and to obtain the best possible performance from the unit.
IMPORTANT FOR LASER PRODUCTS
1. CLASS 1 LASER PRODUCT
2. CAUTION: Do not open the top cover. There are no user serviceable parts inside the unit; leave all servicing to
qualified service personnel.
3. CAUTION: (For U.S.A.) Visible and/or invisible class II laser radiation when open. Do not stare into beam.
(For Canada) Visible and/or invisible class 1M laser radiation when open. Do not view directly with optical instruments.
4. REPRODUCTION OF LABEL: CAUTION LABEL, PLACED OUTSIDE THE UNIT.
CAUTION INFORMATION (For U.S.A.) This equipment has been tested and found to comply with the limits for a Class B digital device, pursuant to Part 15 of the FCC Rules. These limits are designed to provide reasonable protection against harmful interference in a residential installation. This equipment generates, uses, and can radiate radio frequency energy and, if not installed and used in accordance with the instructions, may cause harmful interference to radio communications. However, there is no guarantee that interference will not occur in a particular installation. If this equipment does cause harmful interference to radio or television reception, which can be determined by turning the equipment off and on, the user is encouraged to try to correct the interference by one or more of the following measures: – Reorient or relocate the receiving antenna. – Increase the separation between the equipment and receiver. – Connect the equipment into an outlet on a circuit different from that to which the receiver is connected. – Consult the dealer or an experienced radio/TV technician for help. This product has a fluorescent lamp that contains mercury. Disposal of these materials may be regulated in your community due to environmental considerations. For disposal or recycling information, please contact your local authorities or for USA, the Electronic Industries Alliance: http://www.eiae.org. Cautions on the monitor:
- The monitor built in this unit has been produced with high precision, but it may have some ineffective dots. This is inevitable and is not malfunction.
- Do not expose the monitor to direct sunlight.
- Do not operate the touch panel using a ball-point pen or similar tool with the sharp tip. Touch the buttons on the touch panel with your finger directly (if you are wearing a glove, take it off).
- When the temperature is very cold or very hot... – Chemical changes occur inside, causing malfunction. – Pictures may not appear clearly or may move slowly. Pictures may not be synchronized with the sound or picture quality may decline in such environments. Caution Changes or modifications not approved by JVC could void the user’s authority to operate the equipment.
08.6.12 0:11:56 AM
- DO NOT install any unit or wire any cable in a location where; – it may obstruct the steering wheel and gearshift lever operations. – it may obstruct the operation of safety devices such as air bags. – it may obstruct visibility.
- DO NOT operate the unit while driving. If you need to operate the unit while driving, be sure to look around carefully.
- The driver must not watch the monitor while driving.
- If the parking brake is not engaged, “Parking Brake” flashes on the monitor, and no playback picture will be shown. – This warning appears only when the parking brake wire is connected to the parking brake system built in the car (refer to the Installation/Connection Manual). Temperature inside the car... If you have parked the car for a long time in hot or cold weather, wait until the temperature in the car becomes normal before operating the unit. ENGLISH For safety...
- Do not raise the volume level too much, as this will block outside sounds, making driving dangerous.
- Stop the car before performing any complicated operations. WARNINGS: To prevent accidents and damage Every time you turn on the unit or attach the monitor panel with the ignition switch turned on, the screen below appears. Pay sufficient attention when operating the unit and make sure of safe driving. How to reset your unit [European Union only]
- Your preset adjustments will also be erased. Notes on the SD slot for System updating: How to forcibly eject a disc The SD slot marked below is for System updating. To update the System, ☞ page 18.
- Do not remove the cover in any case other than updating the System. SD slot for system updating Press and hold OPEN/TILT while holding [Hold] /ATT. [Hold]
- If this does not work, reset the unit.
- KW-NX7000[J].indb 3 Contents INTRODUCTION Before operations Initial settings Basic operations — Monitor panel/ touch panel Basic operations — Remote controller (RM-RK250) Menu operations
- AV OPERATIONS Common operations on AV screens p. 58
- Listening to the radio p. 60
- Disc operations p. 63
- SD operations p. 78
- USB operations p. 80
- Bluetooth® operations — Cellular phone/audio player p. 82
- Listening to the CD changer p. 89
- Listening to the satellite radio p. 91
- Listening to the HD Radio™ broadcast p. 94
- Listening to the iPod p. 96
- Using other external components p. 100
- Sound equalization p. 102
- Assigning titles to the sources p. 103
- AV menu items p. 104
- Additional information p. 112
- NAVIGATION SYSTEM Safety instructions for the Navigation System p. 18
- Basic operations p. 19
- Registering your home/favorite points Starting guidance p. 25
- Searching for a place p. 28
- How you are guided p. 39
- Arranging your route p. 43
- Traffic information on the map p. 45
- Navigation menu items p. 48
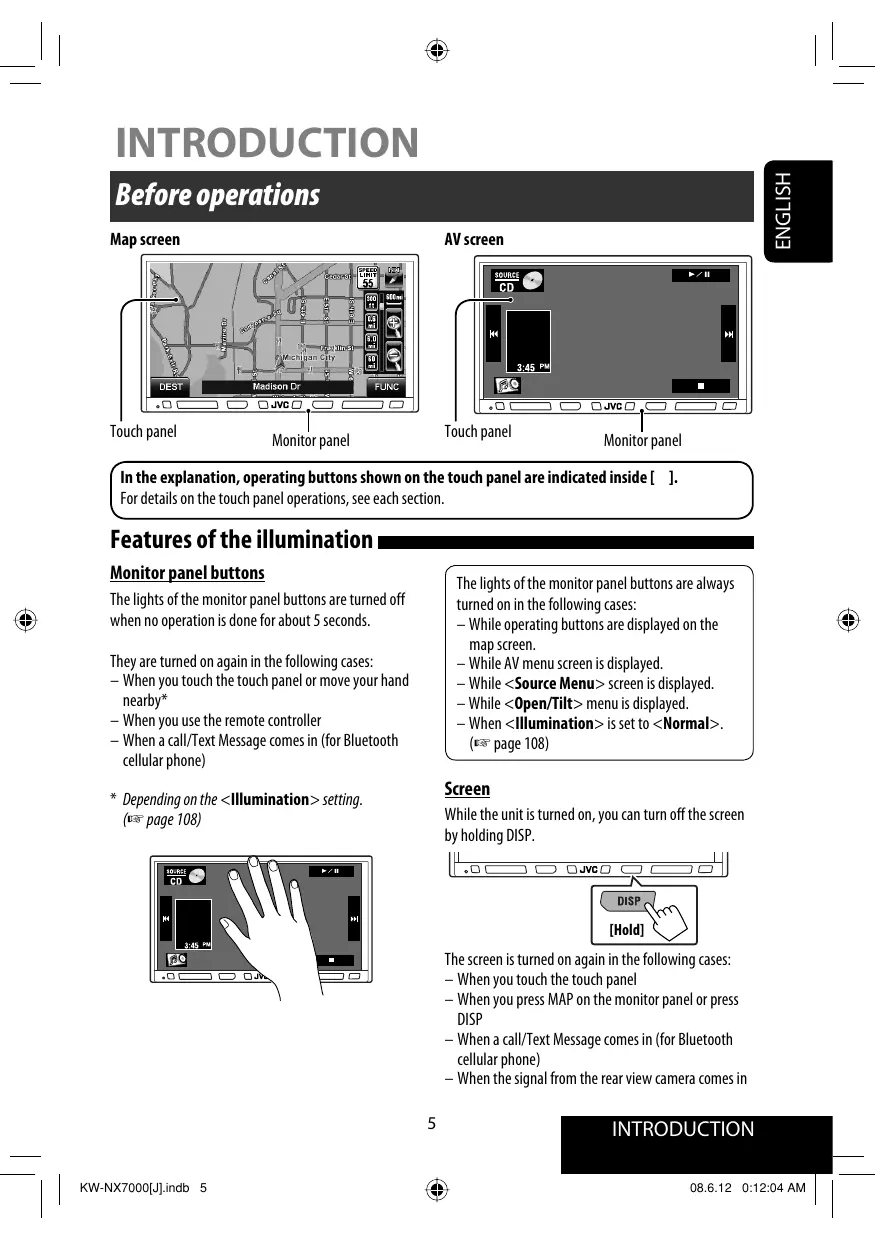
- Additional information INTRODUCTION Before operations Map screen Touch panel AV screen Touch panel Monitor panel Monitor panel In the explanation, operating buttons shown on the touch panel are indicated inside [ ]. For details on the touch panel operations, see each section. Features of the illumination Monitor panel buttons The lights of the monitor panel buttons are always turned on in the following cases: – While operating buttons are displayed on the map screen. – While AV menu screen is displayed. – While <Source Menu> screen is displayed. – While <Open/Tilt> menu is displayed. – When <Illumination> is set to <Normal>. (☞ page 108) The lights of the monitor panel buttons are turned off when no operation is done for about 5 seconds. They are turned on again in the following cases: – When you touch the touch panel or move your hand nearby* – When you use the remote controller – When a call/Text Message comes in (for Bluetooth cellular phone) Screen p. 53
- Depending on the <Illumination> setting. (☞ page 108) While the unit is turned on, you can turn off the screen by holding DISP. [Hold] The screen is turned on again in the following cases: – When you touch the touch panel – When you press MAP on the monitor panel or press DISP – When a call/Text Message comes in (for Bluetooth cellular phone) – When the signal from the rear view camera comes in
KW-NX7000[J].indb 5 Detaching/attaching the monitor panel Detaching
While the unit is turned on: The monitor panel is released. Open/Tilt Open Tilt + Eject Tilt – Close Yes Detach Exit Detach?
Attaching plate The monitor panel opens by about 50°.
- It closes automatically when no operation is done for about a minute.
- The attaching plate closes automatically about 10 seconds after the monitor panel is released. Remove the monitor panel before this happens.
Soft case (supplied) Attaching Caution:
- Hold the monitor panel securely so as not to drop it accidentally.
- Fit the monitor panel onto the attaching plate until it is firmly locked.
08.6.12 0:12:05 AM
ENGLISH Initial settings Installation settings
When you turn on the unit for the first time, the initial setup screen appears. Follow the procedure below and make the necessary settings. Indication language: In this manual, English indications are used for the purpose of explanation. You can select the indication language.
Normally select [Start Installation Settings].
- If you select [Skip Installation Settings (for store display)], the System starts in the navigation demonstration mode for stores (☞ page 53). You need to make the settings you turn on the power next time. Turn on the power. Select the language you want for the display and the voice guidance. The power is turned off then turned on automatically so that your setting takes effect. Continued on the next page
KW-NX7000[J].indb 7 Adjust the settings. Finish the procedure. ENGLISH
State/ Province* Time Zone Select the State or Province where you are living. Select your residential area for clock adjustment.
- This unit automatically sets the time by GPS signal. Daylight Select <Auto> if your Saving Time residential area is subject to Daylight Saving Time. Reverse Select the reverse signal polarity Signal (<Battery> or <GND>) Polarity according to the connection of your car. You can also change these settings through the menu screens as follows:
- Language: (Function Menu)> (Map Settings)> <System> - <Language> (☞ page 51)
- Time Zone: <AV Menu> - <Setup> - < (Clock)> -<Time Zone> (☞ page 105)
- Daylight Saving Time: <AV Menu> - <Setup> - < (Clock)> -<DST> (☞ page 105)
- Reverse Signal Polarity: <AV Menu> - <Setup> < (Others)> - <Reverse Signal> (☞ page 108)
- You can also change the State or Province when searching for a destination.
08.6.12 0:12:06 AM
Canceling demonstration
Turn on the power. Cancel the demonstration. Select <Off>. ENGLISH
You can cancel the demonstration on the screen. Setup Demonstration Wall Paper Color Scroll Dimmer Dimmer Time Set If the map is displayed, switch the screen to the AV screen by pressing DISP.
Exit Finish the procedure. Setup Demonstration Wall Paper Color Scroll Dimmer
Basic operations — Monitor panel/touch panel Adjusts the volume.*1 Remote sensor
- Changes the display information.*2
- Turns off the screen. [Hold]
- Switches to the map screen.
- Changes the map view.
- Turns off the power. [Hold]
- Attenuates the sound (if the power is on).
- Operates the current source on the map screen.
- Searches for radio stations or channels.
- Selects tracks/chapters. Resets the unit. ☞ page 3
- Use only when the internal system malfunctions. *1 Also adjustable on the touch panel (on the AV screen only): Move your finger on the touch panel as illustrated. VOL Tilt + Eject Tilt –
- Shaded items cannot be used. *2 Each time you press DISP, the display changes to show the various information. AV screen 1 Open The number and contents of AV screens vary depending on the source. Opens the monitor panel. Ejects the disc. Closes the monitor panel. Tilts the monitor panel. To detach the monitor panel. Erases this screen. AV screen 2 Map screen
KW-NX7000[J].indb 10
08.6.12 0:12:09 AM
To turn off the AV function
- If the map is displayed, switch the screen to the AV screen by pressing DISP. ENGLISH
- To activate the AV function: ABC Radio For the operations on the AV screen ☞ page 58 Source Off Exit Basic operations — Remote controller (RM-RK250) Before using the remote controller:
- Aim the remote controller directly at the remote sensor on the unit.
- DO NOT expose the remote sensor to bright light (direct sunlight or artificial lighting). Installing the battery
R03/LR03/AAA
The unit is equipped with the steering wheel remote control function.
- See the Installation/Connection Manual (separate volume) for connection. Insert the batteries into the remote controller by matching the polarity (+ and –) correctly. Caution: Battery shall not be exposed to excessive heat such as sunshine, fire or the like.
- If the range or effectiveness of the remote controller decreases, replace both batteries.
KW-NX7000[J].indb 11 Main elements and features For navigation system operations and AV operations On the map screen 1 AV/OFF 2 MAP/POS 3 MENU 4 TRAFFIC 5 ENT 6 6 5/∞
On the AV screens On menu screens
- In navigation menus: Switches to the AV screen. Switches to the AV screen. Selects the source.
- In <AV Menu> screen: Selects the source. Turns off the AV function if pressed and held, and turns on the AV function again if pressed briefly. Displays your current Switches to the map screen. Displays your current position. position.
- In <Destination Menu> Switches <Destination screen: Displays the map. Menu>, <Function Displays <AV Menu> screen.
- In <AV Menu>screen: Menu>, and the map (☞ page 16) Displays the top screen of screen. (☞ page 15) <AV Menu> or switches to the AV screen. Displays <Traffic List> (Not used) screen. (☞ page 45)
- “DISC/SD/USB/USB iPod”: Plays/pauses.
- “Bluetooth PHONE”: Answers incoming (Not used) Confirms the selection. calls.
- “Bluetooth AUDIO”: Starts playback.
- Disc: Selects the title/group/program/ playlist.
- File: Selects the folders.
- FM/AM: Selects preset stations.
- HD Radio: Selects a multicast channel.
- Satellite tuner: Selects categories.
- “USB iPod”: Selects previous/next item. In navigation menus: Selects Scrolls the map (in eight
- “iPod”: Enters the main menu (5), and an item. directions). pauses/resumes playback (∞).
- FM/AM and HD Radio: Searches for stations.
- Satellite tuner: Searches for channels.
- “DISC/SD/USB/USB iPod/iPod/ Bluetooth AUDIO”: Selects tracks/ chapters/items.
KW-NX7000[J].indb 12
08.6.12 0:12:10 AM
BACK/BAND Repeats the last voice guidance during guidance.
- “TUNER/HD Radio/SAT”: Selects the bands.
- “DISC/SD/USB“: Stops playback.
- “USB iPod“: Enters <Search Mode> menu.
- “Bluetooth PHONE”: Ends the call.
- “Bluetooth AUDIO”: Pauses.
- In navigation menus: Displays the map screen or the top screen of current menu (<Destination Menu> or <Function Menu>).
- In <AV Menu> screen: Switches to the AV screen. Adjust the volume. Scales the map. (Not used) Starts guidance to the home. (Not used) (☞ page 24) Attenuates/restores the sound.
- Changes the display information. (☞ page 10)
- Turns off the screen if pressed and held, and turns on the screen again if pressed briefly. (☞ page 5)
- Enters numbers. In navigation menus: Enters (Not used)
- “TUNER/HD Radio/SAT”: Selects the a phone number or house preset station directly. number.
- Displays <Dial Menu> screen. (☞ page 85)
- Displays <Redial> list if pressed and held. (☞ page 86)
- Answers incoming calls. ENGLISH On the map screen PHONE These buttons do not function at this position. Continued on the next page
KW-NX7000[J].indb 13 For AV operations only On the AV screens y TOP M u DVD MENU
- DVD/DivX 6: Shows the disc menu. (☞ pages 71 and 73)
- VCD: Resumes PBC playback. (☞ page 75)
- DVD-VR: Shows the Original Program screen. (☞ page 72)
- DVD/DivX 6: Shows the disc menu. (☞ pages 71 and 73)
- VCD: Resumes PBC playback. (☞ page 75)
- DVD-VR: Shows the Playlist screen. (☞ page 72)
- Makes selection/settings.
- @ / #: Skips back or forward by 5 minutes for DivX/MPEG1/MPEG2. (☞ page 73)
- DISC +/– buttons: Changes discs for “CD-CH.” Shows the on-screen bar. (☞ page 76) VCD: Returns to the PBC menu. (☞ page 75)
- “DISC/SD/USB“: Switches the number entry mode. (☞ pages 71 to 75)
- Erases the misentry after entering a wrong number. Changes the aspect ratio of the playback picture. “DISC/SD/USB/USB iPod”: Reverse search/forward search. Disc: Selects the audio language/audio stream/audio channel. Disc: Selects the subtitles. Disc: Selects the view angle.
These buttons do not function at this position.
KW-NX7000[J].indb 14
08.6.12 0:12:13 AM
ENGLISH Menu operations To display a menu Navigation menus Map screen
- If the operating buttons are not displayed, touch the screen. To return to the map, press [Exit] on the touch panel or MAP/POS on the remote controller. Map Settings (☞ page 50) On the remote: Returns to <Function Menu> screen To return to the map, press [Exit] on the touch panel or MAP/POS on the remote controller. Continued on the next page
KW-NX7000[J].indb 15 Basic menu operations ENGLISH AV screen Navigation menu Ex.: <Sound> in <Map Settings> screen Returns to the previous screen On the remote: Moves to the preceding menu page Moves to the succeeding menu page Current page/total menu pages Exits from the menu screen Demonstration Wall Paper Color Scroll Dimmer Demonstration Wall Paper Color Scroll Dimmer Back Indicates the remaining time before the current screen is erased automatically Auto
Returns to the previous screen Exit Exits from the menu screen
- Non-available items will be shaded on the menu screen. To return to the AV screen, press [Exit] on the touch panel or DISP on the remote controller.
KW-NX7000[J].indb 16
08.6.12 0:12:14 AM
Setup Demonstration Wall Paper Color Scroll Dimmer Dimmer Time Set The following steps are one of the fundamental procedures. Some of the settings do not open the sub-setting window, but just selecting an option will change the setting.
- The display indications may change according to change of the specifications. Exit
- You can also use MENU on the remote controller. Exit Setup Off iPod (Off) Audio&Video Audio Back Exit Exit
- When operating on <AV Menu>, press [Back] to close the selection list or to change other settings.
Setup NAVIGATION SYSTEM Safety instructions for the Navigation System SAFETY INSTRUCTIONS Terms of licence Use of the Navigation System is only permitted if the traffic conditions are suitable and you are absolutely sure that no risk, obstruction or inconvenience will be incurred to you, your passengers or other road users. The requirements of the Road Traffic Regulations must always be followed. The destination must not be entered while driving the car. The Navigation System serves solely as an aid to navigation. It never releases the drivers from their duties to drive carefully and to make own judgement in road traffic. Inaccurate or incorrect instructions may happen to be given due to changing traffic conditions. The actual road signs and traffic regulations must therefore always be observed. In particular, the Navigation System cannot be used as an aid to orientation when visibility is poor. This Navigation System must only be used for its intended purpose. The volume of the car radio/ Navigation System must be adjusted so that external noise is still audible. You are granted a non-exclusive licence to use the database for your personal purposes. The present licence does not authorise the granting of sublicenses. Use of the data is only permitted in this specific JVC system. It is forbidden to extract or make further use of significant parts of the database content, or to duplicate, modify, adapt, translate, analyse, decompile or reverse-engineer any part thereof.
WARNING:
Road traffic regulations always take priority when a vehicle is being driven in traffic. Navigation System is only an aid. Errors may occur in individual data items/ entries. At all times, the driver must decide whether or not to heed the information provided. JVC does not accept liability for erroneous data provided by the Navigation System. © 2008 NAVTEQ All rights reserved. When replacing/rotating the tires: Navigation guidance is performed, based on the database, therefore, it may not be applicable to the current situation because of changes in traffic conditions (e.g. changes in tollroads, principal roads, one-way traffic, or other traffic regulations). In this case, observe the current traffic signs or regulations.
- Traffic signs should be observed carefully while driving using the Navigation System. Navigation System is only an aid. Driver must always decide whether or not to heed the information provided. JVC does not accept liability for erroneous data provided by the Navigation System.
- Traffic guidance is restricted to passenger vehicles only. Special driving recommendations and regulations for other vehicles (e.g. commercial vehicles) are not included.
- Do not operate the unit while driving. It is required to clear all the accumulated calibration data which is important for accurate navigation. To clear the data, perform <Reset Calibration Data>. (☞ page 52) On map updating If “Your map data is more than one year old, and the update may be available. For more information, please visit www.jvc-exad.com” appears on the monitor, visit <http://www.jvc-exad.com>. For details about updating your unit, visit <http:// www.jvc-exad.com> (English website only).
KW-NX7000[J].indb 18
08.6.12 0:12:16 AM
The map scrolls automatically so that your position is always at the center of the map. Your position Speed limit on the current street ENGLISH Basic operations Direction Scale Current time Current street Icons on the map
- Home and Favorite points icons are displayed when registering home/favorite points or searching for a destination.
- POI icons are displayed on the map when a group is selected in the <POI Icon> setting (☞ page 51) and the map scale is between 80 ft (25 m) and
0.3 mi (400 m). (The travel icons and leisure icons
are displayed when the map scale is between 80 ft (25 m) and 0.6 mi (1 km).)
- Traffic icons are displayed on the map when the <Traffic Icon> setting is activated (☞ page 51) and the map scale is between 80 ft (25 m) and 1.5 mi (2.5 km). Home (☞ pages 22 to 24) Favorite points (☞ pages 22 to 24, 36) POI (Point Of Interest) (☞ pages 30, 32 and 56) Traffic (☞ pages 45 and 57)
KW-NX7000[J].indb 19 To change the map scale
Touch the screen to display the operating buttons. The position you touched is centered on the map.
- You can also display the buttons by moving your hand close to the screen.
- The buttons disappear if no operation is done for about 5 seconds.
Zoom in The map scrolls to the direction you are touching and holding.
- Touch and hold the map to keep scrolling the map.
- The scrolling speed varies depending on the position you are touching and holding: – Inner area: slow – Outer area: fast
- You can also select a scale directly by pressing one of the scale buttons. Direction and distance from your current position Displays current position To display your current position
KW-NX7000[J].indb 20
08.6.12 0:12:19 AM
2D Heading Up (2D H.Up) The map rotates so that you are always displayed heading “upwards.” Shows the direction of north Direction of the car ENGLISH To change the map view The map view changes as follows: 2D Heading Up = 3D Map = 2D North Up
- You can also change the map view through (Function Menu)> - < (Map Settings)> - <Display> - <View Mode>. (☞ page 51) 3D Map (3D H.Up) The three dimensional map is displayed in “heading up.” Shows the direction of north Direction of the car 2D North Up (2D N.Up) The map view is oriented with north “upwards,” as in usual paper maps. Direction of the car
KW-NX7000[J].indb 21 Registering your home/favorite points Registering your home/favorite points
You can register one point as your home and 100 favorite points.
- For guidance to your home, ☞ page 24.
- For guidance to a favorite point, ☞ page 36.
Place the cursor on the position where you want to register. (☞ page 20) The selected position is saved as a favorite point icon on and the favorite point is marked with the map. (You cannot save the selected position if 100 favorite points are already registered.)
- You can display the map of selected area on whole screen by touching the map part once. (If you press more than once, the map scrolls.) To display above screen again, press [Select].
- If there are several POIs on the selected position, select one from the list. – The list appears only when <POI Icon> is set to <On>. (☞ page 51) To register the selected position as your home: Information on the cursor-pointed position POIs The home is marked with icon on the map.
- When the home is already registered, you are asked if you want to replace the old home. Press [Yes] to replace, or press [No] to cancel.
- To return to the map, press [Exit].
KW-NX7000[J].indb 22
08.6.12 0:12:22 AM
Editing information Select a registered point you want to edit. To select your home ENGLISH
- You can use up to 32 characters. Deletes the entry
- Press briefly: last character
- Press and hold: all characters To select a favorite point Displays other keyboards*
- For available characters, ☞ page 55. B To edit the phone number Deletes the entry
- Press briefly: last number
- Press and hold: all numbers Moves to the next/previous list To delete the registration Press [Delete] in step 3.
Edit the information. A Displays the name editing screen A confirmation message appears. Press [Yes] to confirm the operation. Press [No] to cancel.
- To return to the map, press [Exit]. B Displays the phone number editing screen Changes the registration of the favorite point to home Continued on the next page
KW-NX7000[J].indb 23 To delete all registered items To go home
When you have registered your home, you can easily get guided to home. While not guided... On the unit:
Your home [Home]: Deletes your home [Favorite]: Deletes all favorite points On the remote: On the map screen only A confirmation message appears. Press [Yes] to confirm the operation. Press [No] to cancel.
- To return to the map, press [Exit].
- To cancel guidance, ☞ page 26.
KW-NX7000[J].indb 24
08.6.12 0:12:25 AM
ENGLISH Starting guidance Setting a destination on the map
Touch the position where you want to select as a destination. (☞ page 20) Distance and direction from your position Information on the cursor-pointed position
- You can display the map of selected area on whole screen by touching the map part once. (If you press more than once, the map scrolls.) To display above screen again, press [Select]. The System starts calculating the route to the selected destination, and guidance starts.
- If there are several POIs on the selected position, select one from the list. – The list appears only when <POI Icon> is set to <On>. (☞ page 51) Cancels the calculation After pressing [Select] on the map screen, you can do various operations by pressing one of the buttons on the next screen. Available buttons vary according to the type of the selected position and the navigation status. [Go]: Starts guidance to a position. (☞ above) [Replace]: Changes the destination to the selected position. [Save]: Saves a position as a favorite point. (☞ page 22) [Edit]: Edits the information of a position. (☞ page 23) [Add]: Adds a position to via points. (☞ page 43) [Options]: Modifies the route options. (☞ page 27)
KW-NX7000[J].indb 25 To cancel guidance
A confirmation message appears. Press [Yes] to confirm the operation. Press [No] to cancel. Setting a destination using the Destination Menu Home (☞ page 24) Previous (☞ page 35) Favorites (☞ page 36) Address (☞ page 28) Vicinity (☞ page 30) POI Name (☞ page 32) Goes to your home.
- Not selectable if no home is registered. Searches from the history of previous destinations and via points (latest 50 points).
- Not selectable if there is no history. Searches from your favorite points (maximum 100 points).
- Not selectable if no favorite point is registered. Searches by an address. Searches for POIs (Point Of Interest) around the following places: your current position, the position selected on the map, the destination, or the route you are taking. Searches from the database of POI. Phone (☞ page 31) Searches by a telephone number. Searches by a zip code. Searches for POIs of a registered category.
KW-NX7000[J].indb 26
08.6.12 0:12:28 AM
Changing route options
Finish the settings. ENGLISH
You can modify your route options each time before you start guidance. Place the cursor on your destination.
- You can also change these settings through (Function Menu)> - < (Map Settings)> - <Route> (☞ page 50). Set options. Priority Select the priority for route calculation (fastest route or shortest route). (☞ page 50) Freeway Toll Road Ferry Bypass Traffic Select whether to use or avoid these types of roads to go to the destination. (☞ page 50) Select how to reflect traffic information to route calculation. (☞ pages 45 and 46)
- This setting takes effect when the traffic service is activated. (☞ page 47)
KW-NX7000[J].indb 27 To enter names, addresses, or numbers
Ex. Input screen for a street name Displays other keyboards*1 Exits the input screen and returns to the map Deletes the entry
- Press briefly: last character
- Press and hold: all characters List of matches
Enter the city name, then select from the list. A Changes State or Province Enters a space Number of Moves to the next/ matches*2 previous list Returns to the previous input Displays the number and symbol keys*1 screen B Specifies the street before specifying the city
- Buttons vary depending on the input item.
- Non-available items will be shaded on the menu screen.
- For some input screens, available characters are automatically narrowed down as the System searches its database for matches.
- Lower cases are not available. Moves to the next/previous list *1 For available characters, ☞ page 55. *2 When there are more than 100 matches, “100+” is displayed and only first 100 matches are displayed. A search result is always displayed with the 2D North Up (2D N.Up) map view, regardless the <View Mode> setting. (☞ page 51)
KW-NX7000[J].indb 28
08.6.12 0:12:30 AM
Enter the house number, then select from the list. ENGLISH A To change State or Province Moves to the next/previous list
- You can also select the center of the street or an intersection on the street by pressing [Middle of the Road] or [Intersection]. – When selecting intersection on the street, specify the crossing street after pressing [Intersection].
- If no data of house number for the selected street is available in the database, this step is skipped. B To enter the street name before specifying the city Go to step 3 before specifying the city (☞ page 28), then go to step 4.
Enter the street name, then select from the list.
- You can also select the center of the city by pressing [Center Of City]. When selecting center of the city, go to step 5. Moves to the next/previous list
- You can display the map of selected area on whole screen by touching the map part once. (If you press more than once, the map scrolls.) To display above screen again, press [Select]. Moves to the next/previous list
KW-NX7000[J].indb 29 POI near a place/route <Vicinity>
The System has a huge database of POIs (Point Of Interest), such as restaurants, gas stations, hospitals, etc. You can search for a POI around the place where you are now. While guided, you can also search for a POI near the destination or along the route. Select a category, then a sub-category for the POI. Searches from all sub-categories
Sub-categories Moves to the next/previous list of categories Moves to the next/previous list of sub-categories
Select the area to search. Local Within 12.5 mi (20 km) of your current position or the position selected on the map. If no POI is found in this area, the System expands the area to search. Destination Within 12.5 mi (20 km) of the destination. If no POI is found in this area, the System expands the area to search. On Route
12.5 mi (20 km) along the route
Cancels Select a POI from the list. Moves to the next/previous list [A to Z]: Alphabetical order [Distance]: From the nearest
- You can display the map of selected area on whole screen by touching the map part once. (If you press more than once, the map scrolls.) To display above screen again, press [Select].
KW-NX7000[J].indb 30
08.6.12 0:12:33 AM
By telephone number <Phone>
Enter the telephone number, then select from the list. ENGLISH A To change State or Province Moves to the next/previous list A Changes State or Province
- You can display the map of selected area on whole screen by touching the map part once. (If you press more than once, the map scrolls.) To display above screen again, press [Select].
- The System searches the whole country where the selected State/Province belongs to.
- The hyphens are automatically inserted between the 3rd and 4th digit, and 6th and 7th digit.
KW-NX7000[J].indb 31 From the list of POI <POI Name>
A To change State or Province Enter the POI name, then start searching. Moves to the next/previous list A Changes State or Province (☞ right) B Specifies the category and sub-category (☞ page 33) Cancels
KW-NX7000[J].indb 32
08.6.12 0:12:35 AM
Select a POI from the list. ENGLISH Moves to the next/previous list [A to Z]: Alphabetical order [Distance]: From the nearest Sub-categories Moves to the next/previous list of categories Moves to the next/previous list of sub-categories
- Press [Cancel] to cancel the selected category. (Previous screen is displayed.)
- You can start searching POIs only with specifying a category/sub-category by pressing [Search].
- You can display the map of selected area on whole screen by touching the map part once. (If you press more than once, the map scrolls.) To display above screen again, press [Select].
KW-NX7000[J].indb 33 Enter the street name, then select from the list. Enter the zip code, then select from the list. A Changes State or Province
- You can also select the center of the city by pressing [Center Of City]. When selecting center of the city, go to step 5. (☞ page 35) Moves to the next/previous list
- The System searches the whole country where the selected State/Province belongs to. A To change State or Province Moves to the next/previous list
KW-NX7000[J].indb 34
08.6.12 0:12:37 AM
From previous destinations <Previous> Enter the house number, then select from the list. You can select a place from the last 50 destinations and via points.
- You can also select the center of the street or an intersection on the street by pressing [Middle of the Road] or [Intersection]. – When selecting intersection on the street, specify the crossing street after pressing [Intersection].
- If no data of house number for the selected street is available in the database, this step is skipped.
Select a place from the list of the previous destinations/via points. Moves to the next/previous list
Moves to the next/previous list
- You can display the map of selected area on whole screen by touching the map part once. (If you press more than once, the map scrolls.) To display above screen again, press [Select].
- You can display the map of selected area on whole screen by touching the map part once. (If you press more than once, the map scrolls.) To display above screen again, press [Select]. Continued on the next page
KW-NX7000[J].indb 35 To delete all the places in the list of previous destinations/via points From your favorites <Favorites>
- For registering your favorite points, ☞ page 22.
Select a favorite point from the list. Moves to the next/previous list
- You can display the map of selected area on whole screen by touching the map part once. (If you press more than once, the map scrolls.) To display above screen again, press [Select]. A confirmation message appears. Press [Yes] to confirm the operation. Press [No] to cancel.
- To return to the map, press [Exit].
KW-NX7000[J].indb 36
08.6.12 0:12:39 AM
You have three [Quick Search] buttons in <Destination Menu>. You can assign a POI category to each button. When you press one of the buttons, the System searches for a POI of the registered category within about 12.5 mi (20 km) around your current position. Registered category ENGLISH Quick Search To register a category to the buttons
Select one of the [Quick Search] buttons to register the category.
Select a category, then a sub-category of the POI. To change a category assigned to the Quick Search button Searches from all sub-categories
Moves to the next/previous list of categories Repeat steps 1 to 3 until three categories are registered. The selected category (or sub-category) name is assigned to the button. Select one of the [Quick Search] buttons whose category you want to change. Sub-categories Moves to the next/previous list of sub-categories The search for the current category starts, then the results are listed. The search for the selected category starts to register it to the [Quick Search] button. Cancels Cancels Continued on the next page
KW-NX7000[J].indb 37 Press one of the [Quick Search] buttons to start searching.
Select a POI from the list. Select a category, then a sub-category of the POI. Searches from all sub-categories Moves to the next/previous list of categories Sub-categories Moves to the next/previous list of sub-categories Cancels The search for the selected category starts to register it to the [Quick Search] button. The category assignment is changed and the button name is replaced. Moves to the next/previous list
- You can display the map of selected area on whole screen by touching the map part once. (If you press more than once, the map scrolls.) To display above screen again, press [Select]. How you are guided Screen while guided Name of the next street Speed limit on the current street Lanes to take
- Yellow: Recommended lane
- White: The lane leading to the destination
- Gray: Not the lane for the destination Current street Route to take (green) Distance to the next turn.
- Press to listen to the last voice guidance again. On the remote: Next turn to make. The second turn to make (if any). Direction of the destination or a via point. Distance to the destination ( ) or a via point ( ).
- Press to change the information of distance and time to that of the next via point. : Estimated time of arrival (ETA). : Remaining time to the selected destination or a via point.
- Press to switch the information between estimated time of arrival (ETA) and remaining time.
- To cancel guidance, ☞ page 26.
- For settings of guidance and map display, ☞ pages 50 to 52.
KW-NX7000[J].indb 39 Guidance at turns When you approach a turn, the System guides you with voice guidance and indications on the screen.
- Guidance voice comes out only through the front speakers (and the front line out on the rear). The voice guides you several times as you approach the turn. At the place close to the next turn When you do not have to make a turn, the System gives no guidance. Magnified map of the turn* At the place closer to the next turn Indicates the distance to the next turn At the turn “Turn right now.” What if I miss a turn? Don’t worry. The System calculates a new route quickly and guides you to the destination.
- You can select whether or not to display the magnified map through < (Function Menu)> - < (Map Settings)> - <Display> - <Magnified View>. (☞ page 51)
- You can remove the magnified map by touching the map part on the right side of the screen.
KW-NX7000[J].indb 40
08.6.12 0:12:44 AM
To check the entire route/information on the destination and via points To confirm the information on your route You can check the information on your route such as ways you will use, destinations, and via points.
ENGLISH Getting information on your route and places
Moves to the next/previous list [Overview]: Displays entire route [Dest.]: Displays information of the destination and via points
- To return to the map, press [Exit].
- When pressing [Dest.], select a desired point to check its detailed information.
KW-NX7000[J].indb 41 To confirm how your trip will go Customizing how you are guided
To adjust the volume of the voice guidance Adjust the volume level on <Guidance Volume>. (☞ page 50) To customize how the map is displayed at turns
Select whether or not to display the magnified map at turns on <Magnified View>. (☞ page 51) To customize the voice guidance on an AV screen Select desired style of guidance on <Guidance in AV mode>. (☞ page 51) Drive simulation starts. To customize the mixing of audio sound and voice guidance Select the volume of the AV source sound while the voice guidance is produced on <Music Mix>. (☞ page 50) Shows the simulation just before the next turn Changes the speed of the drive simulation (normal/faster) When switching to an AV screen during guidance To cancel the simulation and resume guidance Perform menu operation (< (Destination Menu)> or < (Function Menu)>). The guidance continues even when you switch the display to an AV screen.
- The system guides you when you approach a turn by voice guidance or switching to map screen.
KW-NX7000[J].indb 42
08.6.12 0:12:45 AM
Adding places to stop by To change the sequence of via points After selecting your destination, you can select up to four places (“via points”) to stop by. ENGLISH Arranging your route
To add via points After guidance has started...
Select a place you want to stop by.
- To search for a via point, ☞ page 28.
- To find a via point by scrolling the map, ☞ page 20.
The System starts calculating the new route, and guidance starts. Continued on the next page
KW-NX7000[J].indb 43 Avoiding a congestion ahead Change the sequence of via points. To optimize the sequence If you realize a congestion exists ahead... ENGLISH
While being guided...
To rearrange the sequence manually
[Move Up]: Moves up the order of selected point [Move Down]: Moves down the order of selected point
- Repeat 1 and 2 to move other via points before pressing [Recalculate]. The System starts calculating the new route, and guidance starts.
Select the distance to avoid, then start recalculating the route. To delete a via point Press [Delete] after selecting the item you want to delete, then press [Recalculate] in step 4. A detour is calculated, and guidance starts.
KW-NX7000[J].indb 44
08.6.12 0:12:48 AM
What is TMC? As the traffic information is transmitted by FM radio stations, JVC cannot assume responsibility for the completeness or accuracy of the information. Traffic Message Channel (TMC) is a technology for delivering real-time traffic information to drivers. The traffic information sent by an FM radio station are received and analyzed by the System. The System can inform you of where congestion exists, and how you can detour it.
- You do not have to tune in to a special radio station to receive the traffic information.
- When you subscribe to the traffic service or giving it a tryout, the antenna of your car automatically extends when you turn on the ignition switch. ENGLISH Traffic information on the map Checking the traffic information
How to get traffic information Traffic information is supplied from NAVTEQ Traffic RDS. This unit automatically starts the 90 days free trial of the traffic service when using the GPS antenna and receiving your position for the first time. From 30 days before the expiration date of your traffic subscription or free trial, a notice (☞ page 55) appears on the display when turning on the unit. If you want to use the service after expiration, subscribe to it. (☞ page 47)
Select a list, then a traffic alert. Moves to the next/previous list The icons of traffic alert which are not on your route are shown in gray when all the information is displayed. Traffic information on the map [All]: Lists all the information [On Route]: Lists the information on your route Details of the selected alert are displayed. Congestion Traffic icon
- For the meanings of traffic icons, ☞ page 57.
- Traffic icons and congested lines are displayed on the map when <Traffic Icon> setting is activated. (☞ page 51)
- Traffic icons and congested lines are displayed on the map when its scale is between 80 ft (25 m) and
1.5 mi (2.5 km).
Moves to the next/previous information
- To return to the map, press [Exit].
- You can also use TRAFFIC on the remote controller to display <Traffic List> screen.
KW-NX7000[J].indb 45 How traffic information is reflected in navigation If <Bypass Traffic> is set to <Manual> (☞ page 50), [Reroute] appears on the screen when the traffic service informs the System of traffic accidents or congestion ahead on your route. Recalculates the route To confirm detailed information of a traffic icon on a map
Place the cursor on the traffic icon. Ignores the traffic alert
Shows the detail of the alert Appears when you approach a traffic event on your route.
- The rerouting may be canceled while you are checking due to a change of traffic conditions. The rerouting is also canceled if you do not confirm the rerouting in one minute.
- If there are several POIs on the selected position, select one from the list. – The list appears only when <POI Icon> is set to <On>. (☞ page 51) If <Bypass Traffic> is set to <Auto>, the System automatically calculates a new route when the traffic service informs the System of an obstacle on your route. Information on the cursor-pointed position If <Bypass Traffic> is set to <Off>, the System does not take traffic information into account when calculating a route. POIs Subscribing to traffic service ENGLISH
To subscribe to the service
Write down the ID number of your unit.
Activate your subscription. Access <http://www.jvc-exad.com> on the Internet and get your PIN code.
- The ID number of your unit written down in step 6 is required to get the PIN code.
- Keep your PIN code for future reference. PIN code:
Enter the PIN code, then start subscription.
- If you enter a wrong PIN code, “Activation failed. Please try again.” appears. Check your PIN code and enter correct one.
Selectable settings, [reference page] Home* Start guidance to the home. ☞ [24] Previous*1 Favorites*1 Address Vicinity POI Name Phone ZIP Code Quick Search Search for a place using the database in the System. ☞ [28 – 38]
*1 Selectable only when at least one place is registered.
KW-NX7000[J].indb 48
08.6.12 0:12:53 AM
Function Menu ENGLISH The procedure for setting an item is shown on page 16. Traffic List Vehicle Info You can check the traffic information. ☞ [45] You can confirm the information on your route such as ways you will use, destinations, and via points. ☞ [41] Selectable settings, [reference page] You can check your drive information: current direction, current velocity, maximum speed, average speed, trip meter, current town and street name, longitude and latitude, altitude. ☞ [54] You can check your unit status: unit properties and connections. ☞ [54] You can confirm the entire route. ☞ [41] Dest. You can confirm the list of via points and the destination. ☞ [41] Edit You can rearrange the order of via points. ☞ [43] Detour You can avoid a congestion ahead. ☞ [44] Simulation* Once the route is determined, you can simulate it on the map. ☞ [42] Cancel*2 Cancels the guidance. ☞ [26] Settings ☞ [50 – 52]
- Selectable only while guided.
KW-NX7000[J].indb 49 Function Menu—Map Settings Initial: Underlined Route Freeway Toll Road Ferry Bypass Traffic Attention Tone*1 Guidance Volume*1 Adaptive Volume Sound Output Music Mix Speed Alert POI Alert Selectable settings, [reference page] Fastest: The System calculates the shortest journey time. Shortest: The System calculates the shortest route to the destination.
- This setting is effective next time the System calculates a route. Select whether to use or avoid these types of roads to go to the destination. Use, Avoid
- These settings are effective next time the System calculates a route. Auto, Manual, Off ☞ [46] Select the type of attention tone, which comes out before voice guidance. A.I., Prompt, Normal, Off Adjust the volume of the voice guidance. 00 to 10 (5) When this function is activated, the System automatically increases the guidance volume level as the car speeds up. Max, Mid, Min, Off Select the guidance output channel. L ch., L+R ch., R ch. You can turn down the volume of the AV source while voice guidance is produced. Mute: The AV source sound does not come out. Att.: The AV source sound is lowered. Normal: The AV source sound is not affected. The System sounds an alarm when you surpass the speed limit of the current road by the set value. 20 mph, 15 mph, 10 mph, 6 mph, 3 mph, Off Alert sounds when you approach a POI of the selected category.
- To select categories for POI alert, press [Edit], then select categories and sub-categories (the selected items are marked with “√”). To activate POI alert for selected categories, press [On]. To deactivate it, press [Off]. – You can select up to 3 categories. *1 When adjusting these items, test tone is produced.
KW-NX7000[J].indb 50
08.6.12 0:12:55 AM
Speed Limit Sign Vehicle Icon Current Street Name Display One Way View Mode Magnified View Night Mode Guidance in AV mode Traffic Icon System Language Scale Unit*2 Selectable settings, [reference page] Select the categories of POI which you want to be displayed on the map.
- To select categories of POI, press [Edit], then select categories and subcategories (the selected items are marked with “√”). To display the icon of selected categories on the map, press [On]. To hide it, press [Off]. Select whether to show or hide the speed limit icon on the map. Show, Hide ☞ [39] Select the icon for your current position.
Select whether to show or hide the current street name on the map. Show, Hide ☞ [39] Select whether to show or hide the information of one way road on the map. Show, Hide ENGLISH The procedure for setting an item is shown on page 16. 3D H.Up, 2D H.Up, 2D N.Up ☞ [21] Select the display at turns. On: The display is split into two, and a magnified map of the next turn is displayed in the left pane. Off: No magnified map is displayed. Select the condition to switch the display to the night screen. Auto: Switches to the night screen when you turn on the headlights. On: Activates night screen. Off: Deactivates night screen. Select the style of guidance while an AV screen is displayed. Map: The screen automatically switches to the navigation mode when you approach a turn. Voice: Only voice guidances sound. Select whether to show or hide the traffic icon on the map. Show, Hide ☞ [45] Select the language used for on-screen information and voice guidance. Dansk, Deutsch, English US, Español, Français, Italiano, Nederlands, Português, Svenska, Руccĸий
- After you change the indication language setting, the power is turned off then turned on automatically. Select the measuring units for distance. km, mile *2 The unit setting you find at your first access to the menu varies depending on the selection of State/Province in the initial settings (☞page 7); when a State in United States is selected, <mile> was set; when others, <km>. Continued on the next page
KW-NX7000[J].indb 51 Function Menu—Map Settings (continued) ENGLISH The procedure for setting an item is shown on page 16. Initial: Underlined Selectable settings, [reference page] If you find your current position displayed on a wrong place on the map, use this setting to correct your position.
- To change your position, move the cursor to the position where you want to set as current position and press [OK], then adjust the direction by pressing [ ]/[ ] and press [OK]. Shutdown Message*2 Favorite*1: Initializes the list of your favorite points. ☞ [24] Previous*1: Initializes the list of previous destinations and via points. ☞ [36] Home*1: Initializes the registration of your home. ☞ [24] Initializes all your settings.
- When you press [Restore], a confirmation message appears. Press [Yes] to confirm the operation. Press [No] to cancel. The Navigation System is gradually optimized by automatic calibration. Reset the calibration data in the following cases:
- When you reinstall the unit in another car.
- When you replace or rotate the tires. Once this is carried out, the calibration data is cleared.
- When you press [Reset], a confirmation message appears. Press [Yes] to confirm the operation. Press [No] to cancel. Select this to update your map database using an SD card.
- When you press [Open the Front Panel], the front panel opens. Press [Cancel] to cancel the operation.
- For details about updating your unit, visit <http://www.jvc-exad.com> (English website only). Edit the voice message at startup/shutdown of the System.
- To edit the message, press [Edit], enter the message, then press [OK]. You can listen to the edited message by pressing [Test].*3 Traffic Service Subscribe to traffic services. ☞ [47] Clear User Memory Reset Calibration Data Access Navi SD Startup Message*2
- Selectable only when at least one place is registered. *2 You cannot use Cyrillic characters for the message. *3 For entering the characters, ☞ page 28.
KW-NX7000[J].indb 52
08.6.12 0:12:58 AM
Initial settings How you are guided
- If you skip the installation settings, the System starts up in demonstration mode for stores, and the initial setup screen appears every time you turn on the unit after turning off and on the ignition switch. Finish the installation settings to obtain the full performance from the unit.
- If GPS signal reception is poor, navigation guidance may not be correct.
- The System may not receive GPS signals in the following places... – in a tunnel or parking lot in a building – under an overhead road – in a place surrounded by high buildings or by closely standing trees
- The position of your car may not be detected correctly in the following cases... – when driving on a road close to the other one (e.g. a highway and ordinary road running in parallel) – when turning at an almost straight fork in the road – when driving on a gridiron road – after taking a ferry, etc. – when driving on a steep mountain road – when driving on a spiral road – when turning left or right after running on a long straight road – when driving in a zigzag line on a broad road – when starting your car shortly after starting the engine – when driving for the first time after installing the unit – when changing tires or attaching chains on the tires – when tire slip occurs continuously and frequently – after driving on areas other than a road (e.g. private lands or parking lots) – after driving in underground or tower type parking lots – after rotating your car on a turntable – after frequent stops and starts in a congestion – when the accuracy of GPS is deteriorated intentionally – when driving on a road constructed recently Searching for a place
- When there are more than a certain number of matches, all matches are not displayed on the list of the search result. – When searching by phone number, POI name, and vicinity, only the first 50 matches are displayed. – When searching by the other methods, only first 100 matches are displayed.
- While driving at a speed greater than 6 mi/h (10 km/ h), the following operations are prohibited: – entering a destination. – inputting a PIN code in <Traffic Service>.
- The specified destination is displayed in 2D North Up view regardless of your map view setting. POI search
- If no POI data exists for the selected area, “Specified destination is not found.” appears on the display. Press [Back] and search again with different conditions (such as different category or place).
- POI search in <On Route> is canceled if the guidance finishes or if rerouting starts before the search is completed. Quick Search
- The selected category is registered to [Quick Search] button even if you cancel the searching before the search is completed. Basic navigation procedure
- When you reach the area approximately within 120 ft (40 m) around the destination/via point, the Navigation System considers you to have reached your destination/via point. Continued on the next page
KW-NX7000[J].indb 53 ENGLISH Additional information
- The route calculated by the System is one of the possible routes to your destination. The route is not always the most appropriate one.
- If no-exit roads (only entering the rotary from the roads is allowed) exist on the rotary, the no-exit roads can neither be shown in the route guidance on the display nor counted in the route guidance voice message.
- The following phenomena may occur even if the System is working correctly... – It may guide to a closed road or to a route requiring U-turn. – It may not guide to your destination if there is only a narrow road or no road to your destination. – It may not avoid a congestion even if <Bypass Traffic> is set to <Auto>. – It may show a different road name. – It may not ask you to turn at a junction even if you need to. – It may give guidance different from the actual road conditions. – It may give incorrect distance information.
- Press [Reset] to clear the record.
- The following items are displayed in < (Function Menu)> - <Vehicle Info> <System>. (☞ page 49)
Name of the unit Version of the software Version of the map database Version of the voice guidance database Connection status of the ILLUMINATION CONTROL lead <On>: The illumination signal is detected. y Connection status of the PARKING BRAKE lead <On>: The parking brake is engaged. u Connection status of the REVERSE GEAR SIGNAL lead <On>: Reverse gear signal is detected. i Number of the GPS satellites being utilized/ Number of all the available GPS satellites Vehicle information
- The following items are displayed in < (Function Menu)> - <Vehicle Info> - <Drive>. (☞ page 49)
Direction of the car Current speed Maximum speed* Average speed* Distance you have traveled* The street you are now on The city you are now in Latitude and longitude of your current position Altitude of your current position Date/Local time
- The data shown on the screen are approximate values for reference.
KW-NX7000[J].indb 54
08.6.12 0:13:01 AM
Arranging your route Characters you can use ENGLISH
- Highways are always used to calculate the route if distance to a destination exceeds a certain distance.
- If the destination cannot be reached without using highways, ferries, or toll roads, they are used to calculate the route without respect to the <Route> settings.
- A detour may not be calculated with <Detour> depending on the route. Traffic information on map
- JVC provides no warranty for the purchase of a TMC license.
- The traffic information service is only available in the 48 contiguous United States.
- From 30 days before the expiration date of your traffic subscription or free trial, “TMC service will be expired on 20xx-x-x. To extend the service, please visit www.jvc-exad.com” appears on the display when turning on the unit.
- For 30 days after your traffic subscription or free trial has expired, “TMC Service has been expired. To activate the service, Please visit www.jvc-exad.com” appears on the display when turning on the unit. Messages shown on the navigation screen Messages Route calculation failed. Remedies/Causes The destination/via point is too far from any road. Select another destination/ via point where is close to a road. Route calculation is aborted The destination/via point is too far from the current position. Select another because destination is too far. destination/via point where is nearer to the current position. Specified destination is not found. Valid information is not found in the database. Search for another place by changing conditions. No more items can be selected. More than 3 categories are selected for <POI Alert> setting. (☞ page 50) Please deselect any items. Cancel extra selections. Activation failed. Please try again. PIN code entered is incorrect. Check your PIN code and input correct one. There is no available traffic No valid traffic information is available now. Try one of the followings: information now.
- Activate traffic service. (☞ page 47)
- Move to the place where you can receive traffic service.
- No traffic information on your route. Display the list of all traffic information. (☞ page 45)
KW-NX7000[J].indb 55 List of POI icons Leisure Gas Station Amusement Park Parking Park & Ride Bowling Center Parking Garage Camping Ground Hotel Golf Course Restaurant Recreation Facility Restaurant Chain Ski Resort Shopping Tourist Attraction Travel Agency Book Store Zoo Fashion Entertainment Flower & Jewelry Furniture Art Galleries Hair & Beauty Casino Home Improvement Museum Music & Video Nightlife Office Supply Theater Travel Sporting Goods Airline Access Toys & Gift Airport Chain Store Ferry terminal Rest Area Train Station Car Rental Car Dealer & Service
KW-NX7000[J].indb 56
08.6.12 0:13:04 AM
List of traffic icons Automotive Motorcycle Dealer ENGLISH Traffic jam Road works Road is blocked or closed Bank No entry for vehicles Medical Road narrows (right side) Dentist Emergency Road narrows (both sides) Hospital/Polyclinic No overtaking Medical Service Condition Pharmacy Falling or fallen rocks Community Strong winds City Hall Snow Court House Pedestrian on the road Government Office Library Wild animals Place of Worship No cycling Police & Fire Other Caution Event Post Office School Service University & College
KW-NX7000[J].indb 57 AV OPERATIONS Common operations on AV screens Displays <Source Menu> screen ☞ below Displays and erases Short Cut icons ☞ page 59 When you slide your finger on the touch panel, it functions in the same way as you touch [5 / ∞ / 4 / ¢] repeatedly. Current Track Title Artist Name Album Title Selecting the playback source
- Available sources depend on the external components you have connected, media you have attached, and the < (Input)> settings you have made (☞ pages 107 and 108). On the remote: “TUNER” or “HD Radio“ = “SAT” = “DISC”(DVD/ VCD/CD) = “SD“ = “USB“ or “USB iPod“ = ”CD-CH”, “iPod”, or “EXT-IN” = “Bluetooth PHONE” = “Bluetooth AUDIO” = “AV-IN” = (back to the beginning) On the unit: ABC Radio
- You cannot select these sources if they are not ready. Source Off Current source Exit Exit
KW-NX7000[J].indb 58
08.6.12 0:13:07 AM
You can easily access some frequently used functions by using Short Cut icons.
Short Cut icons: Available icons vary among the sources. ABC Radio Using Short Cut Icons Changes the sound mode. ☞ page 102
Short Cut window appears.
- To erase the window, press the button again. Turns on or off Track/Chapter Repeat. ☞ pages 69, 79, 81, 90, and 98 Press a Short Cut icon. Setup Beep Telephone Muting Illumination Motion Sensitiv. Reverse Signal Initialize Normal Proximity/Motion Touch Panel Back Exit The corresponding screen is displayed.
KW-NX7000[J].indb 59 Listening to the radio Preset no. Assigned station name (☞ page 103). If no name is assigned, “No Name” appears. Press [SOURCE], then press [TUNER]. (☞ page 58)
- You can also use AV/OFF on the remote controller. Press it repeatedly. Press [BAND]. Press [ ] or [ ] to search for a station—Auto Search.
- Manual Search: Hold either [ ]or [ ] until “Manual Search” appears on the screen, then press it repeatedly.
- The ST indicator lights up when receiving an FM stereo broadcast with sufficient signal strength.
KW-NX7000[J].indb 60
08.6.12 0:13:09 AM
FM station automatic presetting —SSM (Strong-station Sequential Memory)
This function works only for FM bands. You can preset six stations for each band. ENGLISH When an FM stereo broadcast is hard to receive
Mode Mono SSM Title Entry Exit
Start Enter Back Mode Mono SSM Title Entry Start Enter Exit [Hold] Back Reception improves, but stereo effect will be lost.
- The MONO indicator lights up. Exit Local FM stations with the strongest signals are searched and stored automatically in the FM band. To restore stereo effect, select <Off>.
KW-NX7000[J].indb 61 Selecting a preset station Ex.: Storing FM station of 92.5 MHz into preset number 4 of the FM1 band. On the remote:
Tune in to a station you want to preset.
92.5 MHz
- To select directly on the touch panel
- You can also display the Preset List by pressing
Display the Preset List.
- To select from the Preset List
Select a preset number. Exit
[Hold] Back The station selected in step 1 is now stored in preset number 4. Back You can also display the Preset List by pressing [ 1 ] or holding [5 / ∞].
KW-NX7000[J].indb 62
08.6.12 0:13:10 AM
The disc type is automatically detected, then playback starts (for some discs, the top menu of the disc appears). If a disc does not have any disc menu, all tracks on it will be played repeatedly until you change the source or eject the disc. ENGLISH Disc operations If “ ” appears on the screen, the unit cannot accept the operation you have tried to do.
- In some cases, without showing “ ,” operations will not be accepted.
Open the monitor panel. Insert a disc. Label side <Open/Tilt> menu is displayed.
- By pressing and holding the button, you can open the monitor panel and eject the disc. Monitor panel closes automatically. If not, press [Close].
Caution: Do not place your finger behind the monitor panel. Caution on volume setting: Discs produce very little noise compared with other sources. Lower the volume before playing a disc to avoid damaging the speakers by the sudden increase of the output level. When playing back a multi-channel encoded disc, the multi-channel signals are downmixed.
- You can fully enjoy multi-channel sound by connecting an amplifier or a decoder compatible with these multichannel sources. (☞ also page 117)
KW-NX7000[J].indb 63 Playable disc types Disc type Recording format, file type, etc. DVD DVD Video (Region Code: 1)*1 Playable DVD Audio DVD-ROM DVD Recordable/Rewritable DVD Video (DVD-R/-RW*2, +R/+RW*3) DVD-VR
- DVD Video: UDF bridge DivX/MPEG1/MPEG2
- DivX/MPEG1/MPEG2/JPEG/MP3/ JPEG WMA/WAV/AAC: ISO 9660 level MP3/WMA/WAV/AAC*4 1, level 2, Romeo, Joliet MPEG4 DVD+VR DVD-RAM Dual Disc DVD side Non-DVD side CD/VCD Audio CD/CD Text (CD-DA) VCD (Video CD) DTS-CD*5 SVCD (Super Video CD) CD-ROM CD-I (CD-I Ready) CD Recordable/Rewritable CD-DA (CD-R/-RW)
MP3/WMA/WAV/AAC*4
- ISO 9660 level 1, level 2, Romeo, JPEG Joliet DivX/MPEG1/MPEG2 MPEG4 *1 If you insert a DVD Video disc of an incorrect Region Code, “Region code error” appears on the screen. *2 DVD-R recorded in multi-border format is also playable (except for dual layer discs). DVD-RW dual layer discs are not playable. *3 It is possible to play back finalized +R/+RW (Video format only) discs. +RW double layer discs are not playable. *4 This unit can play back AAC files encoded using iTunes. *5 To reproduce DTS sound, use the digital connection. (☞ Installation/Connection Manual) Caution for DualDisc playback The Non-DVD side of a “DualDisc” does not comply with the “Compact Disc Digital Audio” standard. Therefore, the use of Non-DVD side of a DualDisc on this product may not be recommended.
KW-NX7000[J].indb 64
08.6.12 0:13:12 AM
DVD Video: Title no./Chapter no./Playing time DVD-VR: Program no. (or Playlist no.)/Chapter no./Playing time While playing the following discs, press DISP.
- Each time you press the button, the display changes to show the different information. (☞ page 10)
Sampling frequency/Bit rate/Recorded signal channel no. [3 / 8] Starts playback/pauses [ 7] Stops playback [4 ¢] Press: Selects chapter Hold: Reverse/forward search*3 [5 ∞] Selects title/program/playlist *1 DVD-VR also indicates either VR-PRG (program) or VR-PLAY (playlist) playback. *2 Indicates the button pressed. *3 Search speed: x2 ] x10 : Buttons on the touch panel. In the explanation, they are indicated inside [ ]. These buttons also work when they are not shown on the touch panel (while watching the playback pictures on the screen).
KW-NX7000[J].indb 65 While playing the following discs, press DISP.
- Each time you press the button, the display changes to show the different information (☞ page 10). For DivX/MPEG1/MPEG2: Folder no./Track no./Playing time For JPEG: Folder no./Track no. Starts playback/pauses [3 / 8] [7] Stops playback [4 ¢] Press: Selects track Hold: Reverse/forward search for DivX/ MPEG1/MPEG2 *1 [5 ∞]
The PBC indicator lights when PBC is in use.
Press: Selects folder Hold: Displays Folder/Track Lists 01 ]: Displays Folder/Track Lists Track no./Playing time PBC [3 / 8] Starts playback/pauses [7] Stops playback [4 ¢] Press: Selects track Hold: Reverse/forward search*3 Track no./Playing time
Only for CD Text *5*6 Current Track Title Artist Name Album Title [3 / 8] Starts playback/pauses [7] Stops playback [4 ¢] Press: Selects track Hold: Reverse/forward search*7 Folder no./Track no./Playing time Audio format (MP3/WMA/WAV/AAC) Sound mode (☞ page 102)
Current Folder Name Current File Name.mp3 Current Track Title Artist Name Album Title [3 / 8] Starts playback/pauses [7] Stops playback [4 ¢] Press: Selects track Hold: Reverse/forward search*7
Tag data appears only when it is recorded.*5*6 Press: Selects folder Hold: Displays Folder/Track Lists 01 ]: Displays Folder/Track Lists Indicates the button pressed. “No Name” appears for conventional CDs or if not recorded. Touching an information bar scrolls the text if all the text is not shown. Search speed: x2 ] x10
KW-NX7000[J].indb 67 Operation buttons on the screen You can display the following operation buttons while watching the playback pictures on the screen.
- If no operation is done for about 5 seconds, the operation buttons disappear (except when a disc menu is displayed). ☞ pages 71 to 75 on how the operation buttons particularly work for a variety of the discs Displays <Source Menu> screen Selects folders Starts playback/pause Press: Selects tracks Hold: Reverse/forward search [ ] (*2) Displays Short Cut icons.
Displays <AV Menu> screen [7] Stops playback
- The above buttons also work when they are not shown on the screen (while watching the playback picture). *1 While a disc menu is played back for DVD, [KEY] is automatically displayed. On the disc menu, you can select a menu item directly by touching it on the screen. Touch the screen (center portion).
For DVD/VCD/DivX menu operation playback [5 ∞ 2 3] Selects the menu items [ENTER] Confirms the selection [TOP MENU] Displays the disc menu [MENU] Displays the disc menu [RETURN] Returns to the previous menu or displays the menu (only for VCD with PBC) Touch [KEY].
For entering the numbers [0]–[9]=[ENTER] Enters numbers [Direct/CLR] • Switches between chapter/track entry and title/folder entry
- Erases the last entry when you enter a wrong number Ex.: To enter “105,” press [1], [0], [5], then [ENTER] Touch [KEY]. To erase the operation buttons, touch the screen again.
KW-NX7000[J].indb 68
08.6.12 0:13:16 AM
Selecting playback modes
ENGLISH You can use the following playback modes—Repeat or Random. Ex.: To select Track Repeat
When one of the playback modes is selected, the corresponding indicator lights up on the source information screen. Exit To cancel, select <Off>. Disc type Repeat Random Chapter: Repeats current chapter* Title: Repeats current title Chapter: Repeats current chapter* Program: Repeats current program (not available for Playlist playback) Track: Repeats current track* Folder: Repeats all tracks of the current folder
Folder: Randomly plays all tracks of current folder, then tracks of next folders Disc (All): Randomly plays all tracks Folder: Repeats all tracks of the current folder Track: Repeats current track* (PBC not in use) Disc (All): Randomly plays all tracks (PBC not in use) Track: Repeats current track* Disc (All): Randomly plays all tracks Track: Repeats current track* Folder: Repeats all tracks of the current folder
- By pressing Folder: Randomly plays all tracks of current folder, then tracks of next folders Disc (All): Randomly plays all tracks Short Cut icon, you can also turn on or off Track/Chapter Repeat.
KW-NX7000[J].indb 69
Selecting tracks on the list You can browse Folder/Track Lists by using the bar as illustrated. – Press : Skips the List up or down. – Drag : Scrolls the List up or down. If a disc includes folders, you can display the Folder/ Track (File) Lists, then start playback.
List 0005/0035 Folder 01 Folder 02 Folder 03 Folder 04 Folder 05 Folder 06
0003/0099 Track061.mp3 Track062.mp3 Track063.mp3 Track064.mp3 Track065.mp3 Track066.mp3 Back Exit Browses Folder List. Browses Track List. Exit
Select a folder (1), then a track (2).
List Folder 01 Folder 02 Folder 03 Folder 04 Folder 05 Folder 06
0005/0035 You can also display the Folder/Track Lists by pressing [ 01 / 01 ] or holding [5 / ∞]. 0003/0099 Track001.mp3 Track002.mp3 Track003.mp3 Track004.mp3 Track005.mp3 Track006.mp3 Back
Prohibiting disc ejection Exit You can lock a disc in the loading slot.
Selected track starts playing. 1 Current folder number/total folder number 2 Current track number/total track number of the current folder *1 Press to move to the previous/next pages of the lists *2 See the following. /ATT. Press and hold OPEN/TILT while holding [Hold] [Hold] To cancel the prohibition, repeat the same procedure to select <EJECT OK?>.
KW-NX7000[J].indb 70
08.6.12 0:13:19 AM
ENGLISH Operations using the remote controller—RM-RK250 Stop playback. Start playback/pause (if pressed during playback). Reverse/forward search.*1 (No sound can be heard.) Slow motion during pause.*2 (No sound can be heard.) Press: Select chapter (during playback or pause). Hold: Reverse/forward search.*3 (No sound can be heard.) Select title (during playback or pause). Select chapter. Select title (when not playing). (twice)
Select title (during playback or pause). Select aspect ratio. Select audio language. Select subtitle language. Select view angle. Also functions as CLEAR: Erases a misentry of the number. Using menu driven features 2 Select an item you want to start playback.
Search speed: x2 ] x5 ] x10 ] x20 ] x60 Slow motion speed: 1/32 ] 1/16 ] 1/8 ] 1/4 ] 1/2 Search speed: x2 ] x10 To confirm the number entry, close the cover of remote controller, then press ENT within 5 seconds after entering numbers. Within 5 seconds
KW-NX7000[J].indb 71 Stop playback. Start playback/pause (if pressed during playback). Reverse/forward search.*1 (No sound can be heard.) Forward slow motion during pause.*2 (No sound can be heard.)
- Reverse slow motion does not work Press: Select chapter (during playback or pause). Hold: Reverse/forward search.*3 Select program. Select playlist (during playback or pause). Select chapter. Select program (when not playing). (twice) Select program/playlist (during playback or pause). Select aspect ratio. Select audio channel (ST: stereo, L: left, R: right). Turn on/off subtitle. Using Original Program/Playlist screens ( ☞ page 76) Also functions as CLEAR: Erases a misentry of the number.
For Original Program For Playlist 2 Select an item you want to start playback.
To erase the screen. Search speed: x2 ] x5 ] x10 ] x20 ] x60 Slow motion speed: 1/32 ] 1/16 ] 1/8 ] 1/4 ] 1/2 Search speed: x2 ] x10 To confirm the number entry, close the cover of remote controller, then press ENT within 5 seconds after entering numbers. Within 5 seconds
KW-NX7000[J].indb 72
08.6.12 0:13:21 AM
ENGLISH Stop playback. Start playback/pause (if pressed during playback). Reverse/forward search.*5 (No sound can be heard.) Press: Select track. Hold: Reverse/forward search.*6 (No sound can be heard.) Select folder.
Select track (within the same folder). *4 Select folder. (twice) Select aspect ratio. Select audio language. (DivX only) Select subtitle language. (DivX only) While playing... Reverse/advance the scenes by 5 minutes. Current playback position 2nd press 1st press 1st press 2nd press 3rd press Stop playback. Start playback. (Slide show: each file is shown for a few seconds.) Shows the current file until you change it if pressed during Slide show. Select file. Select folder. Select aspect ratio. Select file (within the same folder). (twice) Select folder. Stop playback. Start playback/pause (if pressed during playback). Reverse/forward search.*2 Press: Select track. Hold: Reverse/forward search.*3 Also functions as CLEAR: Erases a misentry of the number. Select folder. Select track (within the same folder). (twice) Select folder. *1 To confirm the number entry, close the cover of remote controller, then press ENT within 5 seconds after entering numbers. Within 5 seconds *2 Search speed: x2 ] x5 ] x10 ] x20 ] x60 *3 Search speed: x2 ] x10
KW-NX7000[J].indb 74
08.6.12 0:13:23 AM
ENGLISH Stop playback. Start playback/pause (if pressed during playback). Reverse/forward search.*4 Press: Select track. Hold: Reverse/forward search.*5 *1 Select track. *4 Search speed: x2 ] x5 ] x10 ] x20 ] x60 *5 Search speed: x2 ] x10 Stop playback. During PBC playback... Start playback/pause (if pressed during playback). Reverse/forward search.*6 (No sound can be heard.) Forward slow motion during pause.*7 (No sound can be heard.)
- Reverse slow motion does not work. Press: Select track. Hold: Reverse/forward search.*8 (No sound can be heard.) To cancel PBC playback 2 Select the desired track.
Select track. Select aspect ratio. Select audio channel (ST: stereo, L: left, R: right). *6 Search speed: x2 ] x5 ] x10 ] x20 ] x60 *7 Slow motion speed: 1/32 ] 1/16 ] 1/8 ] 1/4 ] 1/2 *8 Search speed: x2 ] x10
KW-NX7000[J].indb 75 Using the list screens Operations using the on-screen bar You can use Original Program or Playlist screen anytime while playing DVD-VR with its data recorded.
These operations are possible on the screen using the remote controller, while playing the following discs—DVD/VCD/DivX/MPEG1/MPEG2/JPEG. Display the Original Program/Playlist screen.
Display the on-screen bar. (☞page 77) Select an item you want. To erase the screen 1 Original Program/Playlist number 2 Recording date 3 Recording source (TV station, the input terminal of the recording equipment, etc.) 4 Start time of recording 5 Title of the program/playlist* 6 Highlight bar (current selection) 7 Creating date of playlist 8 Total number of chapters included in the playlist 9 Playback time
Make a selection. If a pop-up menu appears...
- For entering time/numbers... : Move the entry position : Select a number
- The title of the original program or playlist may not be displayed depending on the recording equipment. To remove the on-screen bar
KW-NX7000[J].indb 76
08.6.12 0:13:25 AM
ENGLISH On-screen bar Information Operation Above example is of DVD Video. Items shown on the bar vary due to the disc type. 1 Disc type 2 • DVD: Audio signal format
- VCD: PBC 3 Playback mode *1 DVD Video: C. RPT: Chapter repeat T. RPT: Title repeat DVD-VR: C. RPT: Chapter repeat PG. RPT: Program repeat DivX/MPEG1/MPEG2: T. RPT: Track repeat F. RPT: Folder repeat F. RND: Folder random A. RND: All (Disc) random JPEG: F. RPT: Folder repeat VCD: T. RPT: Track repeat A. RND: All (Disc) random 4 Playback information Current title/chapter 5 Time indication Elapsed playing time of the disc Remaining title time (for DVD) Remaining disc time (for others) Elapsed playing time of the current chapter/track *2 Remaining time of the current chapter/track *2 6 Playback status Play Reverse/forward search Reverse/forward slow-motion Pause Stop 7 Operation icons Change time indication (see 5) Time Search (Specify a certain scene by entering time.) Title Search (by its number) Chapter Search (by its number) Track Search (by its number) Repeat play *1 Random play *1 Change the audio language, audio stream, or audio channel Change or erase the subtitle language Change the view angle Current program/chapter Current Playlist/chapter Current track Current folder/track Current folder/file *1 ☞ page 69 *2 Not applicable for DVD-VR
KW-NX7000[J].indb 77 SD operations
This unit can play the JPEG/MP3/WMA/WAV/AAC* files stored in SD card.
- You can operate the SD card in the same way you operate the files on discs. (☞ pages 66 to 70, 73 and 74)
- All tracks in the SD card will be played repeatedly until you change the source.
- Make sure all important data has been backed up.
Insert an SD card. Open the monitor panel. Push in the SD card until you hear a clicking sound. The source changes to “SD” and playback starts. <Open/Tilt> menu is displayed.
Close the monitor panel.
- If <Open/Tilt> menu is still displayed: You can also press [Close] on <Open/Tilt> menu.
- If <Open/Tilt> menu is not displayed: [Twice]
- This unit can play back AAC files encoded using iTunes. This unit cannot play back FairPlay-encrypted files. Caution: Do not place your finger behind the monitor panel. Caution: To eject the SD card
- Do not release your finger quickly; otherwise, the SD card may pop up out from the loading slot. Push in the SD card lightly.
- You can also eject the SD card by holding OPEN (when the monitor panel is closed).
KW-NX7000[J].indb 78
08.6.12 0:13:28 AM
Selecting playback modes ENGLISH
You can use the following playback modes—Repeat or Random. Ex.: To select Track Repeat
When one of the playback modes is selected, the corresponding indicator lights up on the source information screen.
To cancel, select <Off>. Exit File type Repeat Random Track: Repeats current track * Folder: Randomly plays all tracks of current Folder: Repeats all tracks of the current folder, then tracks of next folders folder SD (All): Randomly plays all tracks Folder: Repeats all files of the current folder
- By pressing Short Cut icon, you can also turn on or off Track Repeat.
KW-NX7000[J].indb 79 USB operations You can connect a USB mass storage class device such as a USB memory, Digital Audio Player, portable HDD, etc. to the unit.
- You can also connect the iPod to the USB terminal of the unit. For details of the operations, ☞ pages 96 to 98.
Connect a USB device. USB cable from the rear of the unit
- You cannot connect a computer to the USB ( terminal of the unit.
The source changes to “USB” and playback starts. This unit can play JPEG/MPEG1/MPEG2*1/MP3/WMA/ WAV/AAC*2 files stored in USB mass storage class device.
- You can operate the USB device in the same way you operate the files on discs. (☞ pages 66 to 70, 73 and 74)
- All tracks in the USB device will be played repeatedly until you change the source.
- Make sure all important data has been backed up. Caution:
- Avoid using the USB device if it might hinder your safety driving.
- Do not pull out and attach the USB device repeatedly while “Now Reading...” is flashing on the monitor screen.
- Do not start the car engine if a USB device is connected.
- Stop playback before disconnecting a USB device.
- Do not leave a USB device in the car, expose to direct sunlight, or high temperature to avoid deformation or cause damages to the device.
- For more details about USB operations, ☞ page 114. *1 Except for MPEG2 files recorded by JVC Everio camcorder (extension code <.mod>). *2 This unit can play back AAC files encoded using iTunes. This unit cannot play back FairPlay-encrypted files.
KW-NX7000[J].indb 80
08.6.12 0:13:30 AM
Selecting playback modes ENGLISH
You can use the following playback modes—Repeat or Random. Ex.: To select Track Repeat
When one of the playback modes is selected, the corresponding indicator lights up on the source information screen. To cancel, select <Off>. Exit File type Repeat Track: Repeats current track * Folder: Repeats all tracks of the current folder Track: Repeats current track * Folder: Repeats all tracks of the current folder Folder: Repeats all files of the current folder
Short Cut icon, you can also turn on or off Track Repeat.
KW-NX7000[J].indb 81 Random Folder: Randomly plays all tracks of current folder, then tracks of next folders USB (All): Randomly plays all tracks Folder: Randomly plays all tracks of current folder, then tracks of next folders USB (All): Randomly plays all tracks Bluetooth® operations — Cellular phone/audio player For Bluetooth operations, it is required to connect the Bluetooth Adapter (KS-BTA200) to the CD changer jack on the rear.
- Refer also to the instructions supplied with the Bluetooth Adapter and the Bluetooth device.
- Refer to the list (included in the box) to see the countries where you may use the Bluetooth® function. To register using <Open> Preparation:
- Operate the Bluetooth device to turn on its Bluetooth function.
- Make sure “NEW DEVICE” is selected. If not, press [5] or [∞] to select it.
To use a Bluetooth device through the unit (“Bluetooth PHONE” and “Bluetooth AUDIO”) for the first time, you need to establish Bluetooth wireless connection between the unit and the device.
- Once the connection is established, it is registered in the unit even if you reset your unit. Up to five devices can be registered in total.
- Only one device can be connected at a time for each source (“Bluetooth PHONE” and “Bluetooth AUDIO”).
Connecting a new Bluetooth device Device Name Registration (Pairing) methods Use either of the following items in <Bluetooth> menu to register and establish the connection with a device.
- Select “Bluetooth PHONE” or “Bluetooth AUDIO” as the source to operate <Bluetooth> menu. Open Make the unit ready to establish a new Bluetooth connection. The connection is established by operating the Bluetooth device. Search Make the unit ready to establish a new Bluetooth connection. The connection is established by operating this unit. Back Exit Go to other menu items
Enter a PIN (Personal Identification Number)* code to the unit.
- You can enter any number you like (1-digit to 16-digit number).
- Some devices have their own PIN code. Enter the specified PIN code to the unit.
KW-NX7000[J].indb 82
08.6.12 0:13:32 AM
You can enter [0] – [9] only.
- [BS]: Erases the character before the cursor.
- [Del]: Erases the character on the cursor.
- [Enter]: Confirms the entry. Operate the Bluetooth device to connect while “Open...” is displayed on the screen. Enter the same PIN code (as entered in the above step) on the device to be connected. Now connection is established and you can use the device through the unit. To register using <Search>
- Make sure “NEW DEVICE” is selected. If not, press [5] or [∞] to select it. Press [
Select a device you want to connect.
Select a device you want to connect.
Press [Bluetooth]. Press [Special Device]. The unit displays the list of the preset devices. Use <Open> (or <Search>) to connect. To connect/disconnect a registered device The device remains registered even after you disconnect the device. Use <Connect> (or activate <Auto Connect>) to connect the same device from next time (☞ page 111).
To connect a special device <Special Device>
Select “Bluetooth PHONE” or “Bluetooth AUDIO,” then select a registered device you want to connect/disconnect.
Press [ Press [Bluetooth]. Press [Search]. The unit searches for available devices and displays the list of them. (If no available device is detected, “Device Unfound” appears.)
Press [Bluetooth]. Press [Connect] or [Disconnect].
- Select <Connect> to connect the selected device.
- Select <Disconnect> to disconnect the selected device. To delete a registered device Enter the specific PIN code of the device to the unit.
- Refer to the instructions supplied with the device to check the PIN code. Operate the Bluetooth device to connect while “Connecting...” is displayed on the screen.
Select “Bluetooth PHONE” or “Bluetooth AUDIO,” then select a registered device you want to delete.
Press [Bluetooth]. Press [Delete Pairing]. Confirmation screen appears. Press [Yes]. Now connection is established and you can use the device through the unit.
KW-NX7000[J].indb 83 Using the Bluetooth cellular phone ENGLISH ☞ page 86 Connected Device Name
Status of the device Signal strength/Battery remainder (only when the information comes from the device) Bluetooth icon lights up when the adapter is connected.
Adjusts the volume of the incoming calls.*3 [5 ∞]
Selects the registered device (“NEW DEVICE” appears when a new device can be registered.) Hold: Activates <Voice Dialing> function Displays <Dial Menu> screen. *1 When a cellular phone with audio function is connected, appears. *2 This button appears when the Bluetooth Adapter is connected. *3 This adjustment does not affect the volume level of the other sources.
Press [SOURCE], then press [BLUETOOTH PHONE]. (☞ page 58)
- You can also use AV/OFF on the remote controller. Press it repeatedly. Press [
Press [Bluetooth]. Establish the connection with a device, then make a call (or settings using <Bluetooth> menu). (☞ pages 110 and 111) When a call comes in... The source is changed to “Bluetooth PHONE” automatically. When <Auto Answer> is deactivated... To answer the incoming call
- Press the message displayed on the touch panel.
- Press any button on the monitor panel (except /ATT or VOL +/–). Name and phone number (if acquired) To end the call
- Hold the message displayed on the touch panel.
- Hold any button on the monitor panel (except /ATT or VOL +/–). When <Auto Answer> is activated... The unit answers the incoming call automatically. (☞ page 111)
- You can adjust the microphone volume. (☞ page 111)
KW-NX7000[J].indb 84
08.6.12 0:13:35 AM
When a Text Message comes in... Device Name ENGLISH If the cellular phone is compatible with Text Message, you can read the messages on the screen.
- You cannot edit or send a message through the unit. When <Message Info> is set to <Auto>... The unit rings and the following screen is displayed to inform you of a message arrival. (☞ page 111) Back
Exit Select a calling method, then call. Device Name Receiving Message Jack Read ? Yes
Back Exit Back Exit To read the message, press [Yes]. The source is changed to “Bluetooth PHONE.” To read the message later, press [No].
- The message is stored into <Message> = <Unread>. (☞ page 110) When <Message Info> is set to <Manual>... Access the message list to read messages. (☞ page 111) Cancels. Redial Shows the list of the phone numbers you have dialed. Received Calls Shows the list of the received calls. Phonebook Shows the phone book of the connected cellular phone. Missed Calls Shows the list of the missed calls. Phone Shows the phone number Number entry screen = “Entering a phone number” (☞ page 86). Voice Dialing (Only when the connected cellular phone has the voice recognition system): = Speak the name you want to call. To make a call
Exit Continued on the next page
KW-NX7000[J].indb 85
- You can make a call from the navigation screen. When displaying the information of the destination where you want to call to, press [
To redial previously dialed numbers To stop ringing (canceling the outgoing call)
Hold any button on the monitor panel (except or VOL +/–).
/ATT Entering a phone number
- You cannot use the remote controller to enter phone numbers.
Back You can enter [0] – [9], [*], [#] (up to 32 numbers)
- [BS]: Erases the character before the cursor.
- [Del]: Erases the character on the cursor.
- [Preset]: Goes to Preset List. You can preset the entered number by selecting a preset number. (☞ page 87)
- [Dial]: Calls the entered number. Exit When using the remote controller, you can display <Redial> menu anytime . [Hold]
- By pressing Short Cut icon, you can easily activate <Voice Dialing> function.
- You can also activate it by holding [
KW-NX7000[J].indb 86
08.6.12 0:13:38 AM
You can preset up to six phone numbers.
Select the phone number you want to preset from <Phonebook>, <Redial>, <Received Calls>, or <Missed Calls>. 1 Press [ 2 Press [Bluetooth]. 3 Press [Dial Menu], then... ENGLISH Presetting the phone numbers
List Ex.: Selecting <Received Calls>
Select a telephone number to store. Back
[Hold] You can use the following buttons on the remote controller for the Bluetooth phone operations. Back Select a preset number.
- Displays <Dial Menu> screen/Answers the incoming call.
- Displays the <Redial> list if pressed and held (regardless of the current source). Ends the call. Now “Tom” is stored into preset no. 1. Adjusts the volume of the incoming calls. Makes a call to the preset numbers.
KW-NX7000[J].indb 87 Using the Bluetooth audio player
Connected Device Name Status of the device Signal strength/Battery remainder (only when the information comes from the device) Bluetooth icon lights up when the adapter is connected.
[3 / 8] [7] Starts playback/pauses [4 ¢] Reverse/forward search [5 ∞] Selects the registered device (“NEW DEVICE” appears when a new device can be registered.*3)
Displays <Dial Menu> screen. *1 Indicates the button pressed. It may be different from the operation status. *2 This button appears when the Bluetooth Adapter is connected. *3 You cannot select “NEW DEVICE” when a Bluetooth audio player is connected.
You can use the following buttons on the remote controller for the Bluetooth audio operations. Press [SOURCE], then press [BLUETOOTH AUDIO]. (☞ page 58)
- You can also use AV/OFF on the remote controller. Press it repeatedly.
Starts playback/pauses. Reverse/forward skip Start playback. Adjusts the volume.
- See page 82 for connecting a new device.
- See page 83 for connecting/disconnecting a registered device.
- See page 83 for deleting a registered device. Bluetooth Information: If you wish to receive more information about Bluetooth, visit the following JVC web site: <http://www.jvc. co.jp/english/car/> (English website only)
KW-NX7000[J].indb 88
08.6.12 0:13:40 AM
ENGLISH Listening to the CD changer It is recommended to use a JVC MP3-compatible CD changer with your unit.
- You can play only CDs (CD-DA) and MP3 discs. Ex.: while playing an MP3 disc Folder no./Track no./Playing time DISC 1 MP3 indicator Sound mode (☞ page 102) Current Folder Name Current File Name.mp3 Current Track Title Artist Name Album Title [4 ¢] Press: Selects track Hold: Reverse/forward search [5 ∞] Press: Selects folder (only for MP3) Hold: Displays Disc List You can also display the Disc List by holding [5 / ∞]. Preparation: Make sure <Changer> is selected for <External Input>. (☞ page 108)
- If you select an MP3 disc, the Track list of the current folder appears. You can select a track and start playing. Press [SOURCE], then press [CD-CH]. (☞ List page 58) Folder 05 Folder 06 Folder 07 Folder 08 Folder 09 Folder 10
- You can also use AV/OFF on the remote controller. Press it repeatedly.
Select a disc to start playing. Tag data appears only when it is recorded.
Back Track001.mp3 Track002.mp3 Track003.mp3 Track004.mp3 Track005.mp3 Track006.mp3 Exit
- If you select a folder on the list, you can start playing the first track of the folder. *1 Press to move to the previous/next pages of the lists. *2 You can also select folders/tracks by using the bar (☞ page 70). Disc List DISC 01 DISC 04 DISC 02 MP3 DISC DISC 03 DISC 06 Back Exit To go to the other list
KW-NX7000[J].indb 89 Selecting playback modes
You can use following playback modes—Repeat or Random. Ex.: To select Track Repeat for an MP3 disc (for CDs, ☞ page 69)
Exit When one of the playback modes is selected, the corresponding indicator lights up on the source information screen. To cancel, select <Off>. Disc type Repeat Random Track: Repeats current track * Disc: Disc: Repeats all tracks of the current disc All: Randomly plays all tracks of the current disc Randomly plays all tracks of all loaded discs Track: Repeats current track * Folder: Randomly plays all tracks of current Folder: Repeats all tracks of the current folder, then tracks of next folders folder Disc: Randomly plays all tracks of the Disc: Repeats all tracks of the current disc current disc All: Randomly plays all tracks of all loaded discs
- By pressing Short Cut icon, you can also turn on or off Track Repeat. You can use the following buttons on the remote controller to operate the CD changer. Selects disc. Selects folder (MP3 only).
- Press: Selects track.
- Hold: Reverse/forward search
KW-NX7000[J].indb 90
08.6.12 0:13:42 AM
Before operating, connect either one of the following (separately purchased) to the CD changer jack on the rear of this unit.
- JVC SIRIUS Satellite radio interface, KS-SRA100, for listening to SIRIUS Satellite radio.
- JVC Smart Digital Adapter, XMDJVC100, for listening to XM Satellite radio. Activate your subscription after connection: Activate your subscription after connection:
- Only Channel 0, 1, and 247 are available before activation. on the monitor panel:
Turn on the power. on the monitor panel: Select “SAT” for the source. on the remote controller:
ENGLISH Listening to the satellite radio
Select “SAT” for the source.
- ☞ also page 58 on the remote controller: The SIRIUS Satellite radio starts updating all the SIRIUS channels. (☞ “GCI update” column below.)
- Once completed, SIRIUS Satellite radio tunes in to the preset channel, CH184.
- ☞ also page 58 Contact SIRIUS on the internet at <http://activate.siriusradio.com/> to activate your subscription, or you can call SIRIUS toll-free at 1-888-539SIRIUS (7474).
“Subscription Updated Press Any Key to Continue” appears on the monitor once subscription has been completed. The XMDirectTM Universal Tuner Box starts updating all the XM channels. “Channel 1” is tuned in automatically. (☞ “GCI update” column below.) Check your XM Satellite radio ID labelled on the casing of the XMDirectTM Universal Tuner Box, or tune in to “Channel 0.” (☞ page 92) Contact XM Satellite radio on the internet at <http://xmradio.com/activation/> to activate your subscription, or you can call 1-800-XM-RADIO (1-800-967-2346). Once completed, the unit tunes in to one of the available channels (Channel 4 or higher). GCI (Global Control Information) update:
- If channels are updated after subscription, updating starts automatically, and no sound can be heard. For SIRIUS : “Channel is Updating XX% completed” appears. For XM : “UPDATING” appears.
- Updating takes a few minutes to complete.
- Do not press any buttons or perform any operations until updating is completed.
KW-NX7000[J].indb 91 Tuning in to a channel you want Preset no. Channel no. Band CATEGORY SAT SR1 Signal Reception indicator 3:45
Category Name Channel Name Song Title Artist Name Composer Name Press [SOURCE], then press [SAT]. (☞ page 58)
Press [SOURCE], then press [SAT]. (☞ page 58)
- You can also use AV/OFF on the remote controller. Press it repeatedly. Press [BAND]. Press [BAND].
BAND Press [5 CATEGORY] or [CATEGORY ∞] to select a category.
- To select a channel from all categories, select <All>. Press [ ] or [ ] to make a channel to listen to.
- Holding either button changes the channel rapidly.
- While searching, invalid and unsubscribed channels are skipped.
Press [5 CATEGORY] or [CATEGORY ∞] to select a category.
- To select a channel from all categories (including non-categorized channels), skip this step.
- If you do not select a channel within 15 seconds, the category selected is canceled. You can select a channel from all categories now. Press [ ] or [ ] to select a channel to listen to.
- Holding either button changes the channel rapidly.
- While searching, invalid and unsubscribed channels are skipped.
KW-NX7000[J].indb 92
08.6.12 0:13:45 AM
Selecting preset channels You can preset six channels for each band. Ex.: Storing a channel into preset number 4 On the remote:
ENGLISH Storing channels in memory
Tune in to a station you want to preset. CATEGORY SAT SR1
Music Club Channel Name Song Title Artist Name Composer Name
- You can also select preset channels on the unit in the same way as selecting FM/AM preset stations (☞ page 62). Display the Preset List. Selecting on the lists CATEGORY BAND You can select a channel using the lists—Category List/Channel List.
Press [ Press [List]. SR1 SR2 SR3 Category Exit
Back Category Name 1 Category Name 2 Category Name 3 Category Name 4 Category Name 5 Category Name 6 Select a category (1), then a channel (2) from the selected category.
The station selected in step 1 is now stored in preset number 4.
Pop Rock Country Hip-Hop R&B/Urban Dance/Electronic *1 Press to move to the previous/next pages of the list. *2 You can also select categories/channels by using the bar (☞ page 70). You can also display the Preset List by pressing [ 1 ] or holding [5 / ∞].
KW-NX7000[J].indb 93 Category Name 1 Category Name 2 Category Name 3 Category Name 4 Category Name 5 Category Name 6 Back Select a preset number. SR1 SR2 SR3 Category
Listening to the HD Radio™ broadcast Before operating, connect HD Radio tuner box, KT-HD300 (separately purchased) to the CD changer jack on the rear of the unit.
- The radio antenna connection by using antenna splitter KS-U21 (separately purchased) is also required. See the Installation/Connection Manual (separate volume) for connection. What is HD Radio Technology? HD Radio Technology can deliver high-quality digital sound—AM digital will have FM-like quality (in stereo) and FM digital will have CD-like quality—with static-free and clear reception. Furthermore, stations can offer text and data, such as artist names and song titles.
- When the HD Radio tuner box is connected, it can also receive conventional analog broadcasts.
- Many HD Radio stations also offer more than one channel of programming. This service is called multicasting.
- To find HD Radio stations in your area, visit www.hdradio.com <http://www.hdradio.com/>. ☞ below Flashes first then lights up when a digital audio broadcast is tuned in. Band Preset no. CHANNEL HDRADIO ☞ page 95 Signal strength HD SEARCH FM1
87. 5 MHz
Station Call Sign and channel number HD Radio reception mode Refer to page 60 for basic radio operations. When receiving HD Radio Multicast channels...
Press [5 CHANNEL] or [CHANNEL ∞] to select a desired channel.
- “LINKING” appears while linking to a multicast channel. Searching for HD Radio stations only
- The HD SEARCH indicator appears. Press [ ] or [ ] to search for a station—Auto Search.
KW-NX7000[J].indb 94
08.6.12 0:13:47 AM
Tuning in to stations with sufficient signal strength While receiving an HD Radio broadcast, the unit tunes to digital or analog audio automatically due to the receiving condition. This function works only for FM bands. Once you have activated this function (selected <Local>), it always works when searching for FM stations.
CHANNEL ENGLISH Changing HD Radio reception mode CHANNEL
Mode Mono Local / DX SSM Blend Hold Back Mode Mono Local / DX SSM Blend Hold
Start Digital Analog Exit Back Switch between digital and analog audio automatically Tuning to digital audio only Tuning to analog audio only Local Auto
Start Digital Analog Exit Only stations with sufficient signal strength will be detected.
- The DX indicator goes off, then the LO indicator lights up.
- If no sound can be heard from the selected setting, change the setting to <Analog> or <Digital>.
- The setting automatically changes to <Auto> if you tuned in to or change to another station, or if you turned off the power.
- This setting cannot take effect for the conventional FM/AM stations.
- If the radio station forces the reception mode to digital, the DIGITAL indicator flashes.
KW-NX7000[J].indb 95 Listening to the iPod You can connect the iPod using the following cable or adapter: To listen to the music To watch the video Cable/adapter To operate USB 2.0 cable (supplied for the iPod) ☞ “When connected with the USB cable” below. Interface Adapter for iPod—KS-PD100 (not supplied) ☞ “When connected with the interface adapter” on page 99. USB Audio and Video cable for iPod—KS-U20K (not supplied) ☞ “When connected with the USB cable” below.
- Make sure <iPod (Off)> is selected for <AV Input>. (☞ page 107) When connected with the USB cable Track no./Playing time Current Track Title Artist Name Album Title [5 / ∞] Press: Moves to the previous/next item of a category (ex.: another album, artist, playlist, etc.)*1 Hold: Enters <Search Mode> menu [4 / ¢] Press: Selects a track/video Hold: Reverse/forward search [3 / 8] Starts playback/pause *1 [5 / ∞] may not function depending on how you select the current track/video.
Press [SOURCE], then press [USB iPod]. (☞ page 58) Playback starts automatically.
- When you connect the iPod to the USB terminal, “USB iPod” is selected as the source and playback starts automatically.
Press [4] or [¢] to select a track/video.*2 *2 You cannot resume playback for video sources.
KW-NX7000[J].indb 96
08.6.12 0:13:50 AM
Search modes: – For <Music>: Playlists, Artists, Albums, Songs, Podcasts, Genres, Composers, Audiobooks – For <Videos>: Video Playlists, Movies, Music Videos, TV shows, Video Podcasts
- Available search modes depend on the type of your iPod. Exit
ENGLISH *1 Press to move to the previous/next pages of the list *2 You can also select Search Mode and tracks/ videos by using the bar. (☞page 70) Selecting a track/video from <Search Mode> Select <Music> or <Videos>. You can also display Search Mode and track/video Lists by holding [5 / ∞]. Playlists Artists Albums Songs Podcasts Genres Back Exit
- Selecting <Shuffle Songs> starts playback.
Select a search mode (1), then desired item (2). 0003/0099 Playlists Artists Albums Songs Podcasts Genres Back Track 01 Track 02 Track 03 Track 04 Track 05 Track 06 Exit
- Repeat step 2 until a desired track/video starts playing. 1 Current track (video) number/total track (video) number
KW-NX7000[J].indb 97 Selecting playback modes Changing the play speed of the audio books
You can select the playback speed of the “Audiobook” sound file in your iPod.
Exit Audiobooks Normal Faster Slower
Audiobooks Repeat One: All: Random Normal Faster Slower Functions the same as “Repeat One.” *1 Functions the same as “Repeat All.” Song: Functions the same as “Shuffle Songs.” *2 Album: Functions the same as “Shuffle Albums.” Normal Plays at normal speed. Faster Plays faster. Slower Plays slower.
- When the playback modes are selected, the corresponding indicators light up alternately on the screen. You can display iPod Artwork on the screen. (☞ pages 106 and 116) *1 By pressing Short Cut icon, you can also turn on or off Track Repeat. *2 You can also activate <Shuffle Songs> in <Search Mode> menu (☞ page 97). To cancel, select <Off>.
KW-NX7000[J].indb 98
08.6.12 0:13:52 AM
When connected with the interface adapter ENGLISH Track no./Playing time [4 ¢] Press: Selects tracks Hold: Reverse/forward search [SEARCH] Enters player’s menu [ 3 / 8] Starts playback/pauses Preparation: Make sure <iPod> is selected for <External Input>. (☞ page 108)
Press [SOURCE], then press [iPod]. (☞ page 58) Playback starts automatically.
- You can also use AV/OFF on the remote controller. Press it repeatedly.
Press [4] or [¢] to select a track.
Selecting a track from the player’s menu
Press [SEARCH] to enter the player’s menu. “SEARCH” flashes on the screen during menu operations.
- This mode will be canceled if no operations are done for about 5 seconds.
Press [4] or [¢] to select the desired item. Press: Selects an item. Hold: Skips 10 items at a time if there are more than ten items. Press [3 / 8] to confirm the selection. Repeat steps 2 and 3 to select a track.
- When a track is selected finally, playback starts.
- To return to the previous menu, press [SEARCH]. Selecting playback modes Operations are exactly the same as explained on page 98 for “USB iPod.”
- <Audiobooks> is not displayed in step 3. Playlists Ô Artists Ô Albums Ô Songs Ô Genres Ô Composers Ô (back to the beginning)
KW-NX7000[J].indb 99 Using other external components AV-INPUT You can connect an external component to the LINE IN/VIDEO IN jacks. Sound mode (☞ page 102) Assigned title (☞ page 103)
Press [SOURCE], then press [AV-IN]. (☞ page 58)
- You can also use AV/OFF on the remote controller. Press it repeatedly. Turn on the connected component and start playing the source. To display the operation buttons (☞ page 68) while watching the playback picture Touch the screen (center portion). Touch the screen (center portion).
- If no operations are done for about 5 seconds, the operation buttons disappear.
KW-NX7000[J].indb 100
08.6.12 0:13:54 AM
You can connect an external component to the CD changer jack on the rear using the Line Input Adapter—KS-U57 (not supplied) or AUX Input Adapter—KS-U58 (not supplied). ENGLISH EXT-INPUT Assigned title (☞ page 103) Preparation: Make sure <External> is selected for <External Input>. (☞ page 108)
Press [SOURCE], then press [EXT-IN]. (☞ page 58)
- You can also use AV/OFF on the remote controller. Press it repeatedly.
Turn on the connected component and start playing the source.
KW-NX7000[J].indb 101 Sound equalization Short Cut icon, you By pressing can easily change the sound mode. Storing your own adjustments You can store your adjustments into <User1>, <User2>, and <User3>.
Repeat steps ~ and Ÿ, then in step !...
Adjust (1), then store (2).
Select a sound mode.
Ex.: When storing into <User2>. Move to other six sound modes
- You can also make adjustments by moving each bar directly.
KW-NX7000[J].indb 102
08.6.12 0:13:55 AM
ENGLISH Assigning titles to the sources
You can assign titles as follows. FM/AM stations* Up to 16 characters—up to 30 stations. AV-IN EXT-IN Up to 16 characters
- You cannot assign titles to the HD Radio stations.
Select the source. (☞ page 58)
- For FM/AM stations: Select the band, then tune into a station. You can enter up to 16 characters (for available characters, ☞ page 119). Display <Title Entry> screen.
- [Store]: Confirm the entry.
- [2/3]: Move the cursor.
- [BS]: Erase the character before the cursor.
- [Del]: Erase the character on the cursor.
- [Cap]: Change the letter case (upper/ lower).
- [A 0 Ä]: Change the character set.
- [Space]: Enter a space. Exit
Finish the procedure. Setup Title Entry Enter
KW-NX7000[J].indb 103 AV menu items Initial: Underlined Wall Paper Color Scroll Display Dimmer Dimmer Time Set Dimmer Level Bright Picture Adjust *2 Selectable settings, [reference page] Off: Cancels. On: Activates the demonstration on the screen. To stop it temporarily, touch the screen. You can select the background picture of the screen. Metal, Sky, Bright, Plain You can select the color of the background picture. Blue, Light-Blue, Red, Orange, Yellow, Green, Purple, DarkBlue, Dark-Green, Brown, Light-Brown, Black Off: Cancels. Once: Scrolls the disc information once. Auto: Repeats scrolling (5-second intervals).
- Touching an information bar scrolls the text regardless of this setting. ☞ [67] Off: Cancels. On: Activates dimmer. Auto: Dims the monitor when you turn on the headlights.*1 Dimmer Time Set : Activates the Dimmer Time setting below. Sets the Dimmer On/Off times. You can select the brightness for dimmer. 01 (bright), 02 (middle), 03 (dark) You can adjust brightness of the screen. –5 (darkest) to +5 (brightest); Initial 00 You can adjust the following to make the screen clear and legible for watching the playback picture. The setting will be stored—one for “DISC/SD/USB” (common) and the other for “AV-IN.” –15 to +15; Initial 00 Bright: Adjust if the picture is too bright or too dark. Contrast: Adjust the contrast. Color: Adjust the color of the picture—lighter or darker. Tint: Adjust the tint if the human skin color is unnatural.
- Press [5] or [∞] to adjust. *1 The ILLUMINATION CONTROL lead connection is required. (☞ Installation/Connection Manual) *2 Adjustable only when the source is “DISC/SD/USB” (the media must contain pictures or movies) or “AV-IN.”
KW-NX7000[J].indb 104
08.6.12 0:13:57 AM
Display DST (Daylight Saving Time) Time Format OSD Clock Selectable settings, [reference page] You can change the aspect ratio of the picture. Aspect ratio of incoming signal 4:3 16:9 Regular: For 4:3 original pictures Full: For 16:9 original pictures Panorama: For viewing 4:3 pictures naturally on the wide screen Auto:
- For “DISC”: Aspect ratio is automatically selected to match to the incoming signals.
- For the other video sources: Aspect ratio is fixed to <Regular>. Select the indication language shown on the AV screen. English, Español, Français, Deutsch, Italiano, Nederlands, Svenska, Dansk, Руccĸий, Português
- After you change the indication language setting, the power is turned off then turned on automatically. Select your residential area from one of the following time zones for clock adjustment. Hawaii, Alaska, Pacific, Mountain, Central, Eastern, Atlantic, Newfoundland Activates this if your residential area is subject to DST. Off : Cancels. Auto : Activates daylight saving time. Select either 12-hour system or 24-hour system. 12 Hours, 24 Hours When <On> is selected, the clock time is displayed on the playback picture. Off, On ENGLISH The procedure for setting an item is shown on page 16. *3 Not adjustable when no picture is shown.
KW-NX7000[J].indb 105 OSD Position *1 Position 1 Position 2 Disc File Type *1 DivX Regist. (Registration) *1 iPod Artwork *1 D. Audio Output *1 Selectable settings, [reference page] Select the initial disc menu language; Initial English (☞ also page 118). Select the initial audio language; Initial English (☞ also page 118). Select the initial subtitle language or erase the subtitle (Off); Initial Off (☞ also page 118). Select the monitor type to watch a wide screen picture on the external monitor. 16:9 : Select when the aspect ratio of the external monitor is 16:9. 4:3LB (Letterbox)/4:3PS (Pan Scan): Select when the aspect ratio of the external monitor is 4:3.
- Refer to the illustrations on the left to see how the pictures are shown on the screen. Select the position of the on-screen bar. ☞ [76] 1: Higher position 2: Lower position Select playback file type when a disc/SD/USB contains different types of files. You can store this setting separately for each source —“DISC/SD/USB.” Audio: Plays back audio files. Still Picture: Plays back JPEG files. Video: Plays back DivX/MPEG1/MPEG2 files. (Not applicable to “SD”) Audio&Video: Plays back audio files and DivX/MPEG1/MPEG2 files. (Not applicable to “SD”) This unit has its own Registration Code. Once you have played back a file with which the Registration Code recorded, this unit’s Registration Code is overwritten for copyright protection. Off: Cancels. On: Activates artwork display. To display artwork, press DISP repeatedly. ☞ [10]
- Refer also to page 116. Select the signal format emitted through the DIGITAL OUT (optical) terminal. (☞ also page 117) PCM : Select this when connecting an amplifier or a decoder incompatible with Dolby Digital, DTS, or MPEG Audio, or when connecting to a recording device. Dolby D : Select this when connecting an amplifier or a decoder compatible with Dolby Digital. Stream : Select this when connecting an amplifier or a decoder compatible with Dolby Digital, DTS, or MPEG Audio. *1 Selectable only for “DISC”, “SD“, and “USB.“ (Playback stops when you change the setting.)
KW-NX7000[J].indb 106
08.6.12 0:14:00 AM
Disc D. (Dynamic) Range Compres. (Compression) *2 Tuner Selectable settings, [reference page] When playing back a multi-channel disc, this setting affects the signals reproduced through the LINE OUT terminals. Dolby Surr. : Select this to enjoy multi-channel surround audio by connecting an amplifier compatible with Dolby Surround. Stereo : Normally select this. You can enjoy a powerful sound at a low volume level while playing Dolby Digital software. Auto: Select to apply the effect to multi-channel encoded software. On: Select to always use this function. Auto: Increases the tuner selectivity to reduce interference noises between adjacent stations. (Stereo effect may be lost.) Wide: Subject to the interference from adjacent stations, but sound quality will not be degraded and the stereo effect will remain. US : When using in North/Central/South America. FM/AM intervals are set to 200 kHz/10 kHz. Europe : When using in any other areas. FM/AM intervals are set to 50 kHz (100 kHz during auto search)/9 kHz. SA : When using in South American countries where FM interval is 100 kHz. AM interval is set to 10 kHz. Your SIRIUS identification number appears on the monitor. You can determine the use of LINE IN and VIDEO IN terminals. ☞ [100] Off: Select when no component is connected (“AV-IN” is skipped while selecting the source). iPod (Off): Select when connecting the iPod using the USB Audio and Video cable for iPod. ☞ [96] Audio&Video: Select when connecting an AV component such as a VCR. Audio: Select when connecting an audio component such as a portable audio player. ENGLISH The procedure for setting an item is shown on page 16. Selectable only for “DISC”, “SD“, and “USB.“ (Playback stops when you change the setting.) Appears only when an HD Radio tuner box is connected. Appears only when a SIRIUS Satellite Radio is connected. Not selectable when “AV-IN” is selected as the source.
KW-NX7000[J].indb 107 Beep Telephone Muting *4 Others Illumination Selectable settings, [reference page] Off: Select when no rear view camera is connected to the CAMERA IN plug. On: Select when connecting the rear view camera to the CAMERA IN plug. The picture from the camera is displayed as it is taken.
- While the pictures through the camera are shown on the monitor, no message will be displayed. For connecting an external component to the CD changer jack on the rear. Changer/iPod *3: CD changer or iPod. ☞ [89, 99] External: Any other than the above. ☞ [101]
- For connecting the Bluetooth adapter, Satellite radio interface, and Smart Digital Adapter, this setting is not required. They are automatically detected. Off: Cancels. On: Activates the key-touch tone. Off: Cancels. Muting1, Muting2: Select either one which mutes the sounds while using the cellular phone. You can turn off the lights of the monitor panel buttons while turning on the unit. ☞ [5] Normal: Always lights. Proximity/Motion: Lights up when your finger moves closer to the touch panel. Touch Panel: Lights up when your finger touches the touch panel. Change the sensitivity of the sensor for Illumination Off mode. Low, Mid, High Select the reverse signal polarity according to the connection of your car. GND, Battery Initialize all settings you have made in <AV Menu>. Press and hold [Enter] to initialize the settings, then reset the unit. ☞ [3] *1 The REVERSE GEAR SIGNAL lead connection is required. See Installation/Connection Manual. The rear view through the camera appears on the screen in <Full> aspect ratio (regardless of the aspect ratio setting) when you shift the gear to the reverse (R) position. When you press DISP, or when you shift the gear to another position other than the reverse (R) position, the rear view screen is cleared. *2 Not selectable when the component connected to the CD changer jack is selected as the source. *3 The name of the component detected through the CD changer jack is shown. *4 The TEL MUTING lead connection is required. See Installation/Connection Manual.
KW-NX7000[J].indb 108
08.6.12 0:14:03 AM
The procedure for setting an item is shown on page 16. Equalizer ENGLISH Flat/Hard Rock/R&B/Pop/Jazz/Dance/Country/Reggae/Classic/User1/User2/User3 ☞ [102] Volume Adjust *5 Subwoofer Level High Pass Filter Crossover Amplifier Gain Exit Selectable settings, [reference page] Adjust fader—speaker output balance between the front and rear speakers.
- Upmost—front only (F6)
- Downmost—rear only (R6) When using a two-speaker system, set the fader to the center (0). Adjust balance—speaker output balance between the left and right speakers.
- Leftmost—left only (L6)
- Rightmost—right only (R6) Initial 0 Adjust and store auto-adjustment volume level for each source, comparing to the FM volume level. The volume level will automatically increase or decrease when you change the source.
- Not adjustable when FM is selected as the source. (“Fix” appears on the display.) –12 to +12; Initial 00 Adjust the subwoofer output level. Level: –06 to +08; Initial 00 Through: Select when the subwoofer is not connected. On: Select when the subwoofer is connected. Adjust the crossover frequency between the front/rear speakers and the subwoofer. 80Hz, 120Hz, 150Hz You can change the maximum volume level of this unit. Off: Deactivates the built-in amplifier. Low: VOL 00 to 30 (Select this if the peak power of the speakers is less than 50 W.) High: VOL 00 to 50 *5 For digital sources: you can make the adjustments separately depending on the audio format—Dolby Digital/DTS and the others.
KW-NX7000[J].indb 109 Mode *1 Menu items Mono Local / DX SSM *2 Title Entry *3 Blend Hold *4 Repeat Random Audiobooks
Selectable settings, [reference page] Only for FM. (Off, On) ☞ [61] Only for FM of HD Radio. (Local, DX) ☞ [95] Only for FM. Press and hold to start SSM. ☞ [61] Only for FM/AM stations, “AV-IN,” and “EXT-IN.” ☞ [103] Only for HD Radio broadcast. ☞ [95] ☞ [69, 79, 81, 90, 98] ☞ [69, 79, 81, 90, 98] Only for “USB iPod.” ☞ [98] Normal, Faster, Slower Items listed under <Mode> vary among the playback sources. Also available for AM when an HD Radio tuner box is connected. Unavailable for AM/FM stations when an HD Radio tuner box is connected. Appears only when an HD Radio tuner box is connected. List For “DISC”: Folder List and Track List (☞ page 70) For “CD-CH”: Disc List, Folder List, and Track List (☞ page 89) Selectable settings, [reference page] Select the method to make a call. ☞ [85] You can read a message from the following message histories. Unread: Messages you have not read. Read: Messages you have read. Unsent: Messages you have not sent. Sent: Messages you have sent.
- The number of messages in each history is also shown. *5 Selectable only for “Bluetooth PHONE” or “Bluetooth AUDIO.” Select a device (or “NEW DEVICE”) before operating the menu. *6 Only for the device connected for “Bluetooth PHONE.” *7 Selectable only when the source is “Bluetooth PHONE” and the connected cellular phone is compatible with Text Massage.
KW-NX7000[J].indb 110
08.6.12 0:14:06 AM
Disconnect Delete Pairing Auto Connect *8 Settings Auto Answer *9 Message Info *9 MIC Setting *9 Version *10 Selectable settings, [reference page] ☞ [82] ☞ [83] Only for “NEW DEVICE.” Shows the list of Bluetooth devices which require some special procedure to establish Bluetooth connection. Select a device you want to connect.
- After selecting the device, use <Open> or <Search> (☞ page 82 or 83) for connection.
- Once the connection is established, it is registered in the unit. You can connect the unit and the device by using <Connect> (☞ below) from the next time. Only for the registered devices. After selecting a device from among the registered devices (☞ pages 82 and 83), establish the connection with it. Only for the device being connected. Disconnect the current device before connecting another device. Only for the registered devices. Delete the registered devices. When the unit is turned on, the connection is established automatically with... Off: No Bluetooth device. Last: The last connected Bluetooth device. Order: The available registered Bluetooth device found first. Off: The unit does not answer the calls automatically. Answer the calls manually. On: The unit answers the incoming calls automatically. Reject: The unit rejects all incoming calls. Auto: The unit informs you of the arrival of a message by ringing and displaying “Receiving Message.” To read the message, ☞ page 85. Manual: The unit does not inform you of the arrival of a message. Adjust microphone volume connected to the Bluetooth adapter. 01/02/03 The Bluetooth software and hardware versions are shown. ENGLISH The procedure for setting an item is shown on page 16. *8 Selectable only for “Bluetooth PHONE.” *9 Only for the cellular phone connected for “Bluetooth PHONE.” Not selectable when “NEW DEVICE” is selected. *10 If you wish to receive more information about Bluetooth, visit the following JVC web site: <http://www.jvc.co.jp/ english/car/> (English website only) When operating the Bluetooth device, refer also to the instructions supplied with the device.
KW-NX7000[J].indb 111 Additional information General Turning on the power
- By pressing MAP on the monitor panel, you can also turn on the power. If the source is ready, playback starts. Tuner (FM only) Storing stations in memory
- When SSM is over, received stations are preset in no. 1 (lowest frequency) to no. 6 (highest frequency). Disc General
- In this manual, words “track” and “file” are interchangeably used.
- This unit can only play back audio CD (CD-DA) files if different type of audio files (MP3/WMA/WAV/AAC) are recorded on the same disc.
- This unit can display only one-byte characters. No other characters can be correctly displayed. Ejecting a disc
- If “No Disc“ appears after removing a disc, insert a disc or select another playback source.
- If the ejected disc is not removed within 15 seconds, the disc is automatically inserted again into the loading slot to protect it from dust. Playing Recordable/Rewritable discs
- This unit can recognize a total of 5 000 files and 250 folders (a maximum of 999 files per folder).
- Use only “finalized” discs.
- This unit can play back multi-session discs; however, unclosed sessions will be skipped while playing.
- This unit can recognize a total of 25 characters for file/folder names.
- Some discs or files may not be played back due to their characteristics or recording conditions. Playing DVD-VR
- For details about DVD-VR format and Playlist, refer to the instructions supplied with the recording equipment. Inserting a disc
- When a disc is inserted upside down or has no playable files, “Cannot play this disc Check the disc” appears on the screen. Eject the disc.
KW-NX7000[J].indb 112
08.6.12 0:14:09 AM
- This unit can play back DivX files with the extension code <.divx>, <.div>, or <.avi> (regardless of the letter case—upper/lower).
- Audio stream should conform to MP3 or Dolby Digital.
- The file encoded in the interlaced scanning mode may not be played back correctly.
- The maximum bit rate for video signals (average) is 4 Mbps. Playing MPEG1/MPEG2 files
- This unit can play back MPEG1/MPEG2 files with the extension code <.mpg>, <.mpeg>, or <.mod>*.
- <.mod> is an extension code used for the MPEG2 files recorded by JVC Everio camcorders. The MPEG2 files with the <.mod> extension code cannot be played back when stored on a USB mass storage class device.
- The stream format should conform to MPEG system/ program stream. The file format should be MP@ML (Main Profile at Main Level)/SP@ML (Simple Profile at Main Level)/ MP@LL (Main Profile at Low Level).
- Audio streams should conform to MPEG1 Audio Layer-2 or Dolby Digital.
- The maximum bit rate for video signals (average) is 4 Mbps. Playing JPEG files
- This unit can play back JPEG files with the extension code <.jpg>, or <.jpeg>.
- It is recommended that you record a file at 640 x 480 resolution.
- This unit can play back baseline JPEG files. Progressive JPEG files or lossless JPEG files cannot be played.
- This unit can play back files with the extension code <.mp3>, <.wma>, <.wav>, or <.m4a> (regardless of the letter case—upper/lower).
- This unit can play back the files meeting the conditions below: – Bit rate: MP3/WMA: 32 kbps — 320 kbps AAC: 16 kbps — 320 kbps – Sampling frequency: 48 kHz, 44.1 kHz, 32 kHz (for MPEG1) 24 kHz, 22.05 kHz, 16 kHz (for MPEG2) 48 kHz, 44.1 kHz, 32 kHz, 22.05 kHz (for WMA)
44.1 kHz (for WAV)
48 kHz, 44.1 kHz (for AAC)
- This unit can show ID3 Tag Version 1.0/1.1/2.2/2.3/2.4 (for MP3).
- This unit can also show WAV/WMA Tag.
- This unit can play back files recorded in VBR (variable bit rate).
- Files recorded in VBR have a discrepancy in elapsed time indication.
- This unit cannot play back the following files: – MP3 files encoded with MP3i and MP3 PRO format. – MP3 files encoded with Layer 1/2. – WMA files encoded with lossless, professional, and voice format. – WMA files which are not based upon Windows Media® Audio. – WMA/AAC files copy-protected with DRM. – AAC files encoded by using any other application than iTunes. – AAC files copy-protected with FairPlay (except those stored on an iPod). – Files which have the data such as AIFF, ATRAC3, etc.
KW-NX7000[J].indb 113 ENGLISH Playing MP3/WMA/WAV/AAC files File playback
- If “No SD Card“ appears after removing an SD card, reattach an SD card or select another playback source.
- When the SD card has no playable files, or has not been formatted correctly, “Cannot play this SD card Check the SD card” appears on the monitor. Replace the SD card. Do not pull out or attach the SD card while “Now Reading...” is shown on the screen.
- This unit can recognize a total of 5 000 files and 250 folders (a maximum of 999 files per folder).
- This unit can recognize a total of 25 characters for file/folder names. USB
- If “No USB Device“ appears after removing a device, reattach a device or select another playback source.
- When the USB device has no playable files, or has not been formatted correctly, “Cannot play this device Check the device” appears on the screen.
- This unit cannot recognize a USB device whose rating is other than 5 V and exceeds 500 mA.
- While playing from a USB device, the playback order may differ from other players.
- This unit may be unable to play back some USB devices or some files due to their characteristics or recording conditions.
- USB devices equipped with special functions such as data security functions cannot be used with the unit.
- Do not use a USB device with 2 or more partitions.
- Depending on the shape of the USB devices and connection ports, some USB devices may not be attached properly or the connection might be loose.
- When connecting a USB device, refer also to its instructions.
- Connect only one USB device to the unit at a time. Do not use a USB hub.
- This unit may not recognize a USB device connected through a USB card reader.
- When connecting with a USB cable, use the USB 2.0 cable.
- This unit may not play back files in a USB device properly when using a USB extension cord.
- This unit cannot assure proper functions or supply power to all types of the devices.
- This unit can recognize a total of 5 000 files and 250 folders (a maximum of 999 files per folder).
- This unit can recognize a total of 25 characters for file/folder names.
- For MPEG1/2 files: The maximum bit rate for video signals (average) is 2 Mbps. Disc/file information shown on the external monitor The following screens appear only on the external monitor.
- CD T. RPT Track Information Album Four seasons Artist Robert M. Smith Title Rain TIME 00:14 Track : 6 / 14 Cloudy Fair Fog Hail Indian summer Rain Shower Snow Thunder Typhoon Wind Winter sky
Selected playback mode Elapsed playing time of the current track Operation status Current track number/total number of tracks on the disc 5 Track information 6 Track list 7 Current track (highlighted bar)
KW-NX7000[J].indb 114
08.6.12 0:14:11 AM
Current folder (highlighted bar) Current folder number/total folder number Folder list Selected playback mode Elapsed playing time of the current track (not displayed for JPEG) Operation status Current track number/total number of tracks in the current folder (total number of tracks on the disc) Track information (only for MP3/WMA/WAV/ AAC) Track list Current track (highlighted) Warning messages for Bluetooth operations
- Connection Error: The device is registered but the connection has failed. Use <Connect> to connect the device again. (☞ page 83)
- Error: Try the operation again. If “Error” appears again, check if the device supports the function you have tried.
- Device Unfound: No available Bluetooth device is detected by <Search>.
- Loading: The unit is updating the phone book and/ or Text Message.
- Please Wait...: The unit is preparing to use the Bluetooth function. If the message does not disappear, turn off and turn on the unit, then connect the device again (or reset the unit).
- Reset08: Check the connection between the adapter and this unit. ENGLISH Icons for phone types
- These icons indicate the phone type set on the device.
- If tag data includes “Jacket Picture” (baseline
Other than above JPEG), it will be displayed. CD changer Bluetooth operations General
- While driving, do not perform complicated operation such as dialing the numbers, using phone book, etc. When you perform these operations, stop your car in a safe place.
- Some Bluetooth devices may not be connected to this unit depending on the Bluetooth version of the device.
- This unit may not work for some Bluetooth devices.
- Connecting condition may vary depending on circumstances around you.
- When the unit is turned off, the device is disconnected.
- If you select a folder, which does not include any music files, on the list (☞ page 89), you will hear a beep. Select another folder including music files.
KW-NX7000[J].indb 115 Satellite radio operations
- You can also connect the JVC SIRIUS radio PnP (Plug and Play), using the JVC SIRIUS radio adapter, KSU100K (not supplied) to the CD changer jack on the rear. (Select “EXT-IN” as the source.) By turning on/off the power of the unit, you can turn on/off the JVC PnP. However, you cannot control it from this unit.
- To know more about SIRIUS Satellite radio or to sign up, visit <http://www.sirius.com>.
- For the latest channel listings and programming information, or to sign up for XM Satellite radio, visit <http://www.xmradio.com>.
- When you turn on this unit, the iPod is charged through the unit.
- While the iPod is connected, all operations from the iPod are disable. Perform all operations from this unit.
- The text information may not be displayed correctly.
- The text information scrolls on the monitor. This unit can display up to 40 characters when using the interface adapter and up to 128 characters when using the USB 2.0 cable or USB Audio and Video cable. Notice: When operating an iPod, some operations may not be performed correctly or as intended. In this case, visit the following JVC web site: <http://www.jvc. co.jp/english/car/> (English website only) HD Radio reception
- During SSM search, All stations including conventional FM/AM stations are searched and stored for the selected band. For the USB connection: When <iPod Artwork> is set to <On>: Do not press any keys during the first 30 seconds or more of playing back any track containing artwork*. It takes 30 seconds or more to display artwork and no operations are available while loading it.
- The picture displayed on the iPod’s screen while playing back a track. iPod operations
- You can control the following types of iPods: – Through the USB 2.0 cable:
- iPod video (5th Generation)*
- iPod nano (2nd Generation) – Through the interface adapter:
- iPod with dock connector (3rd Generation)
- iPod with Click Wheel (4th Generation)
- iPod video (5th Generation)
- To watch the video with its audio, connect the iPod using USB Audio and Video cable (not supplied).
- If the iPod does not play correctly, update your iPod software to the latest version. For details about updating your iPod, visit <http://www.apple.com>. Menu settings
- If you change the <Amplifier Gain> setting from <High> to <Low> while the volume level is set higher than “30,” the unit automatically changes the volume level to “VOL 30.”
- After you change any of <Menu Language/Audio Language/Subtitle> settings, turn off then on the power, and re-insert the disc (or insert another disc) so that your setting takes effect.
- When you select <16:9> for a picture whose aspect ratio is 4:3, the picture slightly changes due to the process for converting the picture width.
- Even if <4:3PS> is selected, the screen size may become <4:3LB> for some discs.
KW-NX7000[J].indb 116
08.6.12 0:14:15 AM
2-channel signal is emitted. When playing multi-channel encoded disc, multi-channel signals are downmixed.
- DTS sound cannot be reproduced. Through the DIGITAL OUT terminal ENGLISH Sound signals emitted through the rear terminals Through the analog terminals (Speaker out/LINE OUT) Digital signals (Linear PCM, Dolby Digital, DTS, MPEG Audio) are emitted.
- To reproduce the multi-channel sounds such as Dolby Digital, DTS, and MPEG Audio, connect an amplifier or a decoder compatible with these multi-channel sources to this terminal, and set <D. Audio Output> correctly. (☞ page 106) Output signals 48 kHz, 16/20/24 bits Linear PCM 48 kHz, 16 bits stereo Linear PCM* 96 kHz, Linear PCM 48 kHz, 16 bits stereo Linear PCM with Dolby Digital with DTS with MPEG Audio 48 kHz, 16 bits stereo Linear PCM 48 kHz, 16 bits stereo Linear PCM
44.1 kHz, 16 bits stereo Linear PCM /
48 kHz, 16 bits stereo Linear PCM Audio CD with DTS DTS bitstream DivX/ with Dolby Digital MPEG with MPEG Audio 48 kHz, 16 bits stereo Linear PCM 32/44.1/48 kHz, 16 bits Linear PCM MP3/WMA 32/44.1/48 kHz, 16 bits Linear PCM WAV
44.1 kHz, 16 bits Linear PCM
44.1 / 48 kHz, 16 bits Linear PCM
- Digital signals may be emitted at 20 or 24 bits (at their original bit rate) through the DIGITAL OUT terminal if the discs are not copy-protected.
KW-NX7000[J].indb 117 Language codes (for DVD/DivX language selection) Code Language Code Language Code Language Code Language Code Language
Afar Abkhazian Afrikaans Ameharic Arabic Assamese Aymara Azerbaijani Bashkir Byelorussian Bulgarian Bihari Bislama Bengali, Bangla Tibetan Breton Catalan Corsican Czech Welsh Bhutani Greek Esperanto Estonian Basque Persian Finnish Fiji Faroese Frisian Irish Scots Gaelic Galician Guarani Gujarati Hausa Hindi Croatian Hungarian Armenian Interlingua Interlingue Inupiak Indonesian Icelandic Hebrew Japanese Yiddish Javanese Georgian Kazakh Greenlandic Cambodian Kannada Korean (KOR) Kashmiri Kurdish Kirghiz Latin Lingala Laothian Lithuanian Latvian, Lettish Malagasy Maori Macedonian Malayalam Mongolian Moldavian Marathi Malay (MAY) Maltese Burmese Nauru Nepali Norwegian Occitan (Afan) Oromo Oriya Panjabi Polish Pashto, Pushto Quechua Rhaeto-Romance Kirundi Rumanian Kinyarwanda Sanskrit Sindhi Sangho Serbo-Croatian Singhalese Slovak Slovenian Samoan Shona Somali Albanian Serbian Siswati Sesotho Sundanese Swahili Tamil Telugu Tajik Thai Tigrinya Turkmen Tagalog Setswana Tonga Turkish Tsonga Tatar Twi Ukrainian Urdu Uzbek Vietnamese Volapuk Wolof Xhosa Yoruba Zulu
KW-NX7000[J].indb 118
08.6.12 0:14:17 AM
- When any language other than <Руccĸий> is selected for <Language>. (☞ page 105)
KW-NX7000[J].indb 119 ENGLISH Characters you can use
- When <Руccĸий> is selected for <Language>. (☞ page 105) REFERENCES Maintenance Caution on cleaning the unit To keep discs clean Do not use any solvent (for example, thinner, benzine, etc.), detergent, or insecticide. This may damage the monitor or the unit. A dirty disc may not play correctly. If a disc does become dirty, wipe it with a soft cloth in a straight line from center to edge.
- Do not use any solvent (for example, conventional record cleaner, spray, thinner, benzine, etc.) to clean discs. How to clean the connector Frequent detachment will deteriorate the connectors. To minimize this possibility, periodically wipe the connectors with a cotton swab or cloth moistened with alcohol, being careful not to damage the connectors. To play new discs New discs may have some rough spots around the inner and outer edges. If such a disc is used, this unit may reject the disc. To remove these rough spots, rub the edges with a pencil or ball-point pen, etc. Connectors Do not use the following discs: Moisture condensation Moisture may condense on the lens inside the unit in the following cases:
- After starting the heater in the car.
- If it becomes very humid inside the car. Should this occur, the unit may malfunction. In this case, eject the disc and leave the unit turned on for a few hours until the moisture evaporates. Sticker and sticker residue Stick-on label Unusual shape How to handle discs When removing a disc from its case, press down the center holder of the case and lift the disc out, holding it by the edges. Center holder
- Always hold the disc by the edges. Do not touch its recording surface. When storing a disc into its case, gently insert the disc around the center holder (with the printed surface facing up).
- Make sure to store discs into the cases after use. Transparent or semi-transparent on its recording area
KW-NX7000[J].indb 120
08.6.12 0:14:20 AM
What appears to be trouble is not always serious. Check the following points before calling a service center.
- For operations with the external components, refer also to the instructions supplied with the adapters used for the connections (as well as the instructions supplied with the external components). Symptoms
- No sound comes out of the speakers.
- The screen is not clear and legible.
- “Position Error Push Open Key” appears on the screen. General
- “Mecha Error Push Reset” appears on the screen, and the panel does not move.
- “SD Loading Error” appears on the monitor.
- “No Signal” appears.
- The buttons on the monitor panel do not work.
- The unit does not work at all.
- The touch panel does not respond properly.
- <Illumination> function does not work properly. Remedies/Causes
- Adjust the volume to the optimum level.
- Check the cords and connections.
- DTS sound cannot be reproduced through the analog terminals (Speaker out/LINE OUT). Sunshine from the windshield may cause this symptom. Adjust <Bright>. (☞ page 104) The monitor panel angle has been forcibly adjusted, or its adjustment has been interrupted while opening or closing. Press OPEN/TILT. Reset the unit. (☞ page 3) SD is not inserted fully. Fully insert it into the slot to close the monitor panel.
- Start the playback on the external component connected to VIDEO IN plug.
- Check the cords and connections.
- Signal input is too weak. When the monitor panel is open, only VOL +/– and OPEN/ TILT work. The other buttons do not function. Reset the unit. (☞ page 3)
- Keep your hands and the touch panel clean and dry.
- Eliminate static electricity and do not place magnetic items near the unit.
- Leave the unit until the temperature becomes stable in the car.
- A rubber mat on the floor may cause this symptom. In this case, do not use the rubber mat.
KW-NX7000[J].indb 121 ENGLISH Troubleshooting Symptoms
- Guidance does not start.
- You cannot operate some functions of an AV source on the map screen.
- You cannot operate AV sources with the remote controller on the map screen.
- Route calculation seems to have stopped. Navigation
- Navigation voice cannot be heard from the speakers.
- The voice guidance does not come out from the speaker on the driver’s side.
- Navigation guidance is sometimes incorrect.
- Navigation guidance is hard to listen to.
- “Route calculation failed.” appears on the monitor.
- “Specified destination is not found.” appears on the monitor.
- A POI found using <POI Name> in the <Destination Menu> is not within the selected city/state.
- “There is no available traffic information now.” appears on the monitor.
- “Activation failed. Please try again.” appears when trying to subscribe to traffic service.
- The current position displayed on the map remains wrong for more than 30 minutes. Remedies/Causes The System proceeds calibration. Wait until calibration is completed. When calibration is completed, the guidance starts. On the map screen, you can operate some limited functions of the current source only. Press AV/OFF on the remote controller or DISP and operate the source on the AV screen. On the map screen, 4¢5∞ keys of the remote controller always works for scrolling the map. Route calculation may take long depending on the route. Wait for a while. <Guidance Volume> level is set to the minimum level. Adjust it to the optimum level. (☞ page 50) Change the <Output> setting. (☞ page 50) Reversing signal/speed signal lead are not connected. Connect them correctly (☞ Installation/Connection Manual—separate volume). Surround noise interferes. Increase the <Adaptive Volume> level. (☞ page 50) Failed to calculate the route. Select another destination/ via point. Valid information is not available in the database. Search for another place. This is not a malfunction. The system may also search areas around the selected city/state. No valid traffic information is available now. Check your PIN code and input correct one. Check the connection information of the leads below through <System> in <Vehicle Info>. (☞ pages 49, 54) – GPS antenna – Reverse gear signal lead If any disconnection is found, connect the lead again.
- If no problems are found with connections, reset the calibration data by selecting <Reset Calibration Data>. (☞ page 52)
KW-NX7000[J].indb 122
08.6.12 0:14:23 AM
Remedies/Causes Store stations manually. (☞ page 62)
- Static noise while listening to the radio. Connect the antenna firmly.
- Disc can be neither recognized nor played back.
- Disc cannot be ejected.
- Recordable/Rewritable discs cannot be played back.
- Tracks on the Recordable/Rewritable discs cannot be skipped.
- Playback does not start. Eject the disc forcibly. (☞ page 3)
FM/AM Disc in general Symptoms
- SSM automatic presetting does not work. Unlock the disc. (☞ page 70)
- Insert a finalized disc.
- Finalize the discs with the component which you used for recording.
- Insert the disc correctly again.
- The format of files is not supported by the unit. The playback picture is not clear and legible. Adjust items in <Picture Adjust> menu. (☞ page 104) Sound and pictures are sometimes
- Stop playback while driving on rough roads. interrupted or distorted.
- Change the disc. No playback picture is shown and “Parking Parking brake lead is not connected properly. Brake” appears on the screen, even when the (☞ Installation/Connection Manual) parking brake is engaged. No picture appears on the external monitor. • Connect the video cord correctly.
- Select the correct input on the external monitor. “Eject Error” or “Loading Error” appears on Change the source by pressing AV. the screen. “Region code error” appears on the screen Region code is not correct. (☞ page 64) when you insert a DVD Video. Disc cannot be played back.
- Record the tracks using a compliant application on the appropriate discs. (☞ page 64)
- Add appropriate extension codes to the file names. Noise is generated. The track played back is not a playable file format. Skip to another file.
- Tracks are not played back as you have intended them to play. Playback order may differ from the one played back using other players.
- Elapsed playing time is not correct. This sometimes occurs during playback. This is caused by how the tracks are recorded.
- “Not Support” appears on the screen and track skips. The track is unplayable.
KW-NX7000[J].indb 123 Symptoms
- Noise is generated. SD/USB
Remedies/Causes The track played back is not a playable file format. Skip to another file. Tracks cannot play back as you have intended Playback order may differ from the one played back using them to play. other players. “Now Reading...” keeps flashing on the
- Readout time varies depending on the SD card/USB screen. device.
- Do not use too many hierarchy and folders.
- Turn off the power then on again. Correct characters are not displayed (e.g. For available characters. (☞ page 119) album name). While playing a track, sound is sometimes The tracks are not properly copied into the SD card/USB interrupted. device. Copy tracks again, and try again. Bluetooth device does not detect the unit. This unit can be connected with one Bluetooth cellular phone and one Bluetooth audio player at a time. While connected to a device, this unit cannot be detected from another device. Disconnect currently connected device and search again. The unit does not detect the Bluetooth
- Check the Bluetooth setting of the device. device.
- Search from the Bluetooth device. The unit does not make pairing with the
- Enter the same PIN code for both the unit and target Bluetooth device. device. If the PIN code of the device is not indicated on its instructions, try “0000” or “1234.”
- Select the device name from <Special Device>, then try to connect again. (☞ pages 83, 111) Echo or noise occurs. Adjust the microphone unit position. Phone sound quality is poor.
- Reduce the distance between the unit and the Bluetooth cellular phone.
- Move the car to place where you can get a better signal reception. The sound is interrupted or skipped while
- Reduce the distance between the unit and the Bluetooth using a Bluetooth audio player. audio player.
- Disconnect the device connected for “Bluetooth PHONE.”
- Turn off, then turn on the unit.
- (When the sound is not yet restored,) connect the player again. “NEW DEVICE” cannot be selected for Bluetooth audio player is already connected. To select “Bluetooth AUDIO.” “NEW DEVICE,” disconnect it. (☞ page 83) The connected audio player cannot be Check whether the connected audio player supports AVRCP controlled. (Audio Video Remote Control Profile). “Reset08” appears on the screen. Check the connection between the adapter and this unit.
KW-NX7000[J].indb 124
08.6.12 0:14:25 AM
Remedies/Causes Insert a disc into the magazine. Insert the magazine. Current disc does not include playable files. Replace the disc with one including playable files. Connect this unit and the CD changer correctly and press the reset button of the CD changer. “Reset01” – “Reset07” appears on the screen. Press the reset button of the CD changer. The CD changer does not work at all. Reset the unit. (☞ page 3)
“CALL 1-888-539-SIRIUS TO SUBSCRIBE”
Start subscribing to SIRIUS Satellite radio. (☞ page 91) appears on the screen. “No Signal” or “NO SIGNAL” appears on the Move to an area with stronger signals. screen. “No Antenna” or “ANTENNA” appears on the Connect the antenna firmly. screen. “No CH” appears on the screen for about 5 No broadcast on the selected channel. seconds, then returns to the previous display Select another channel or continue listening to the previous when listening to the SIRIUS Satellite radio. channel. “CH–––” appears on the screen for about Selected channel is no longer available or is unauthorized. 2 seconds, then returns to the previous Select another channel or continue listening to the previous channel while listening to the XM Satellite channel. radio. “NO NAME” appears on the screen. No text information for the selected channel. “UPDATING” appears on the screen and no The unit is updating the channel information and it takes a sound can be heard. few minutes to complete. “OFF AIR” appears on the screen while Selected channel is not broadcasting at this time. Select listening to the XM Satellite radio. another channel or continue listening to the previous channel. “LOADING” appears on the screen while The unit is loading the channel information and audio. Text listening to the XM Satellite radio. information is temporarily unavailable. “Reset08” appears on the screen. Reconnect this unit and the Satellite radio correctly and reset the unit. Satellite radio does not work at all. Reconnect the Satellite radio after a few seconds.
KW-NX7000[J].indb 125 ENGLISH CD changer Symptoms
- “No Disc” appears on the screen.
- “No Magazine” appears on the screen.
- “Cannot play this disc Check the disc” appears on the screen.
- “Reset08” appears on the screen. HD Radio reception ENGLISH Symptoms
- Sound quality changes when receiving HD Radio stations.
- No sound can be heard.
- “Reset08” appears on the screen.
- The iPod does not turn on or does not work. AV-IN iPod
- “Disconnect” appears on the screen.
- “No Files” appears on the screen.
- “Reset01” – “Reset07” appears on the screen.
- “Reset08” appears on the screen.
- The iPod’s controls do not work after disconnecting from this unit.
- “Restricted Device” appears on the screen.
- No operations are available when playing back a track containing artwork.
- No picture appears on the screen.
- Playback picture is not clear and legible. Remedies/Causes Fix the reception mode either to <Digital> or <Analog>. (☞ page 95)
- <Analog> is selected when receiving all digital broadcast of HD Radio station. Select <Digital> or <Auto>. (☞ page 95)
- <Digital> is selected when receiving weak digital signals or receiving conventional radio broadcast. Select <Analog> or <Auto>. (☞ page 95) Reconnect this unit and the HD Radio tuner box correctly, then reset the unit.
- Check the connection.
- Charge the battery. Deactivate the equalizer either on this unit or the iPod. Check the connection. The headphones are disconnected during playback. Restart playback. No tracks are stored. Import tracks to the iPod. Disconnect the adapter from both this unit and iPod. Then, connect them again. Check the connection between the adapter and this unit. Reset the iPod. Check whether the connected iPod is compatible with this unit. (☞ page 116) Operate the unit after the artwork is loaded. (☞ page 116)
- Turn on the video component if it is not on.
- Connect the video component correctly. Adjust items in <Picture Adjust> menu. (☞ page 104)
KW-NX7000[J].indb 126
08.6.12 0:14:27 AM
Design and specifications are subject to change without notice. NAVIGATION SYSTEM System & Service Signal-to-Noise Ratio: L1, C/A code Global Positioning System Standard Positioning Service 12-channel multi-channel reception system 1 575.42 MHz –130 dBm 1/second, continuous Polarization Right Handed Circular Polarization Dimensions (approx.) (W × H × D)
30.4 mm × 11.7 mm × 35.5 mm
(1-1/4 inches × 1/2 inch × 17/16 inches) Cable (approx.)
5.0 m (16.4 feet)
Attachment mat size (approx.) 70 mm × 70 mm (2-13/16 inches × 2-13/16 inches) 20 W RMS × 4 Channels at 4 Ω and ≤ 1% THD+N 80 dBA (reference: 1 W into 4 Ω) Load Impedance: Equalizer Control Range: Frequencies: Reception System Reception Frequency Sensitivity Update Rate GPS Antenna AMPLIFIER Power Output: Level: Audio Output Level Line-Out Level/Impedance: LINE OUT (FRONT/REAR), Output Impedance: SUBWOOFER: Color System: Video Output (composite): Other Terminals: Input: Output: Others: ENGLISH Specifications 4 Ω (4 Ω to 8 Ω allowance) 60 Hz, 150 Hz, 400 Hz, 1 kHz, 2.5 kHz,
6.3 kHz, 15 kHz
±10 dB 5 V/20 kΩ load (full scale) 1 kΩ NTSC 1 Vp-p/75 Ω LINE IN, VIDEO IN, CAMERA IN, USB input, Antenna input VIDEO OUT CD changer, OE REMOTE, DIGITAL OUT (optical) Continued on the next page
KW-NX7000[J].indb 127 FM (with channel interval set to
87.5 MHz to 107.9 MHz
100 kHz or 200 kHz): FM (with channel interval set to
87.5 MHz to 108.0 MHz
50 kHz): AM (with channel interval set to 530 kHz to 1 710 kHz 10 kHz): AM (with channel interval set to 9 kHz): 531 kHz to 1 602 kHz FM Tuner Usable Sensitivity:
11.3 dBf (1.0 μV/75 Ω)
50 dB Quieting Sensitivity:
16.3 dBf (1.8 μV/75 Ω)
Alternate Channel Selectivity (400 kHz): 65 dB Frequency Response: 40 Hz to 15 000 Hz Stereo Separation: 35 dB AM Tuner Sensitivity/Selectivity: 20 μV/35 dB Signal Detection System: Non-contact optical pickup (semiconductor laser) Frequency Response: DVD, fs=48 kHz/96 kHz: 16 Hz to 22 000 Hz VCD/CD: 16 Hz to 20 000 Hz Dynamic Range: 93 dB Signal-to-Noise Ratio: 95 dB Wow and Flutter: Less than measurable limit 8 Mbytes to 2 Gbytes Data Transfer Rate: Maximum 10 Mbps USB Standards: Data Transfer Rate Full Speed: Maximum 12 Mbytes Low Speed: Maximum 1.5 Mbytes Mass storage class Less than 500 mA/5V Screen Size: 7 inch wide liquid crystal display Number of Pixel: TFT (Thin Film Transistor) active matrix format Color System: NTSC/PAL Aspect Ratio: 16:9 (wide)
KW-NX7000[J].indb 128
08.6.12 0:14:30 AM
DC 14.4 V (11 V to 16 V allowance) Negative ground –10°C to +60°C (14°F to 140°F) 0°C to +40°C (32°F to 104°F) 182 mm × 111 mm × 160 mm (7-3/16” × 4-3/8” × 6-5/16”) 188 mm × 117 mm × 10 mm (7-7/16” × 4-5/8” × 7/16”)
3.5 kg (7.8 lbs) (including trims and sleeve)
- Manufactured under license from Dolby Laboratories. Dolby and the double-D symbol are trademarks of Dolby Laboratories.
- “DTS” and “DTS Digital Out” are registered trademarks of DTS, Inc.
- “DVD Logo” is a trademark of DVD Format/Logo Licensing Corporation registered in the US, Japan and other countries.
- DivX, DivX Ultra Certified, and associated logos are trademarks of DivX, Inc. and are used under license.
- Official DivX® Ultra Certified product
- Plays all versions of DivX® video (including DivX® 6) with enhanced playback of DivX® media files and the DivX® Media Format
- Microsoft and Windows Media are either registered trademarks or trademarks of Microsoft Corporation in the United States and/or other countries.
- HD Radio™ and the HD Radio Ready logo are proprietary trademarks of iBiquity Digital Corp.
- “SIRIUS” and the SIRIUS dog logo are registered trademarks of SIRIUS Satellite Radio Inc. ENGLISH GENERAL Power Requirement: Operating Voltage: Grounding System: Allowable Storage Temperature: Allowable Operating Temperature: Dimensions (W × H × D): Installation Size (approx.):
- With trim plate and sleeve attached Panel Size (approx.):
- XM and its corresponding logos are registered trademarks of XM Satellite Radio Inc.
- “SAT Radio,” the SAT Radio logo and all related marks are trademarks of SIRIUS Satellite Radio Inc., and XM Satellite Radio, Inc.
- The Bluetooth word mark and logos are owned by the Bluetooth SIG, Inc. and any use of such marks by Victor Company of Japan, Limited (JVC) is under license. Other trademarks and trade names are those of their respective owners.
- iPod and iTunes are trademarks of Apple Inc., registered in the U.S. and other countries.
- This product incorporates copyright protection technology that is protected by U.S. patents and other intellectual property rights. Use of this copyright protection technology must be authorized by Macrovision, and is intended for home and other limited viewing uses only unless otherwise authorized by Macrovision. Reverse engineering or disassembly is prohibited. Required space for installation and the monitor ejection 20 (13/16) 100 (3-15/16) 4 (3/16) Dashboard CAUTION: When ejecting the monitor, leave an open space for the monitor to come out. If you do not, the monitor may obstruct the steering wheel and gearshift lever operations, and this may result in a traffic accident. Unit: mm (inch) 160 (6-5/16)
91.3 (3-5/8)
If a kit is necessary for your car, consult your telephone directory for the nearest car audio speciality shop.
KW-NX7000[J].indb 129 Panel del monitor Panel del monitor State/ Province* Time Zone Demonstration Wall Paper Color Scroll Dimmer Dimmer Time Set Demonstration Wall Paper Color Scroll Dimmer
Demonstration Wall Paper Color Scroll Dimmer Demonstration Wall Paper Color Scroll Dimmer Dimmer Time Set Demonstration Wall Paper Color Scroll Dimmer Dimmer Time Set Off iPod (Off) Audio&Video Audio Back Exit Exit Freeway Toll Road Ferry Bypass Traffic Current Track Title Artist Name Album Title En el control remoto: “TUNER” o “HD Radio” = “SAT” = “DISC”(DVD/ VCD/CD) = “SD” = “USB” o “USB iPod” = ”CD-CH”, “iPod” o “EXT-IN” = “Bluetooth PHONE” = “Bluetooth AUDIO” = “AV-IN” = (vuelta al principio) En la unidad: ABC Radio Setup Beep Telephone Muting Illumination Motion Sensitiv. Reverse Signal Initialize Normal Proximity/Motion Touch Panel Back Exit
Mode Mono SSM Title Entry Exit Start Enter
Back Exit Mode Mono SSM Title Entry Start Enter [Sostener] Current Track Title Artist Name Album Title [3 / 8] [7] [4 ¢] ESPAÑOL
Current Folder Name Current File Name.mp3 Current Track Title Artist Name Album Title [5 ∞] Folder 01 Folder 02 Folder 03 Folder 04 Folder 05 Folder 06
Back 0003/0099 Track061.mp3 Track062.mp3 Track063.mp3 Track064.mp3 Track065.mp3 Track066.mp3 Exit Folder 01 Folder 02 Folder 03 Folder 04 Folder 05 Folder 06
0003/0099 Track001.mp3 Track002.mp3 Track003.mp3 Track004.mp3 Track005.mp3 Track006.mp3
- Para reanudar PBC, pulse Connected Device Name
Device Name Receiving Message Jack Read ? Yes
Back Exit Back Exit Ej.: Seleccionando <Received Calls>
Connected Device Name Current Folder Name Current File Name.mp3 Current Track Title Artist Name Album Title Pulse [SOURCE], luego pulse [CD-CH]. List (☞ página 58) Folder 05 Folder 06 Folder 07 Folder 08 Folder 09 Folder 10 Track001.mp3 Track002.mp3 Track003.mp3 Track004.mp3 Track005.mp3 Track006.mp3 Exit Category Name Channel Name Song Title Artist Name Composer Name Music Club Channel Name Song Title Artist Name Composer Name
BAND SR1 SR2 SR3 Category Exit Category Name 1 Category Name 2 Category Name 3 Category Name 4 Category Name 5 Category Name 6 Back
Category Name 1 Category Name 2 Category Name 3 Category Name 4 Category Name 5 Category Name 6
Pop Rock Country Hip-Hop R&B/Urban Dance/Electronic
Mode Mono Local / DX SSM Blend Hold Local Auto Back Mode Mono Local / DX SSM Blend Hold
Start Digital Analog Exit Back
Start Digital Analog Exit Current Track Title Artist Name Album Title [5 /∞] Modos de búsqueda: – Para <Music>: Playlists, Artists, Albums, Songs, Podcasts, Genres, Composers, Audiobooks – Para <Videos>: Video Playlists, Movies, Music Videos, TV shows, Video Podcasts
Playlists Artists Albums Songs Podcasts Genres Back Exit Track 01 Track 02 Track 03 Track 04 Track 05 Track 06 Back Exit DivX Regist. (Registration) (Cod. Reg. DivX) *1 iPod Artwork (Illustrazione)*1 D. (Dynamic) Range Compres. (Compression) (Compres. D.Range)*2 Sintonizador IF Band Width (Ancho Banda IF)*3 Flat/Hard Rock/R&B/Pop/Jazz/Dance/Country/Reggae/Classic/User1/User2/User3 ☞ [102] Disconnect (Desconectar) Delete Pair (Borrar Vínculo) Settings (Configuración) Auto Answer (Auto Responder)*9 48 kHz, 16/20/24 bit PCM Lineal 96 kHz, PCM Lineal 32/44,1/48 kHz, 16 bit PCM Lineal MP3/WMA 32/44,1/48 kHz, 16 bit PCM Lineal WAV 44,1 kHz, 16 bit PCM Lineal AAC 44,1/48 kHz, 16 bit PCM Lineal
IMPORTANT POUR PRODUITS LASER
Étui souple (fourni) State/ Province* Time zone Demonstration Wall Paper Color Scroll Dimmer Demonstration Wall Paper Color Scroll Dimmer
w HOME e ATT Map Settings (☞ page 50) FRANÇAIS Demonstration Wall Paper Color Scroll Dimmer Demonstration Wall Paper Color Scroll Dimmer Dimmer Time Set Back Demonstration Wall Paper Color Scroll Dimmer Dimmer Time Set Off iPod (Off) Audio&Video Audio Back Exit Exit Previous (☞ page 35) Favorites (☞ page 36) Address (☞ page 28) Vicinity (☞ page 30) POI Name (☞ page 32) Phone (☞ page 31) Autoroute Toll Road Ferry Bypass Traffic All (Tous) On Route (Itinéraire)*2 Directions (Directions)*2 Route (Itinéraire)*2 Traffic List (Liste Trafic) Route (Itinéraire) Sound (Son) FRANÇAIS Station Sports d’hiver Shopping Attraction Touristique Librairie Fleurs & Bijoux Spectacles Mobilier Galeries d’art Centre auto Concession moto Travaux routiers Véhicules d’occasion Services socio-culturels FRANÇAIS Police & Pompiers Autres avertissements Current Track Title Artist Name Album Title Sur la télécommande: “TUNER” ou “HD Radio” = “SAT” = “DISC”(DVD/ VCD/CD) = “SD” = “USB” ou “USB iPod” = “CD-CH”, “iPod”, ou “EXT-IN” = “Bluetooth PHONE” = “Bluetooth AUDIO” = “AV-IN” = (retour au début) Sur l’appareil: ABC Radio Normal Proximity/Motion Touch Panel Back Exit
Mode Mono SSM Title Entry Start Enter Exit Back
Exit Mode Mono SSM Title Entry Current Track Title Artist Name Album Title
Current Folder Name Current File Name.mp3 Current Track Title Artist Name Album Title [5 ∞] List Folder 01 Folder 02 Folder 03 Folder 04 Folder 05 Folder 06 FRANÇAIS
Back Folder 01 Folder 02 Folder 03 Folder 04 Folder 05 Folder 06
0003/0099 Track001.mp3 Track002.mp3 Track003.mp3 Track004.mp3 Track005.mp3 Track006.mp3 Back
Exit 0003/0099 Track061.mp3 Track062.mp3 Track063.mp3 Track064.mp3 Track065.mp3 Track066.mp3 Connected Device Name Device Name Receiving Message Jack Read ? Yes
Back Exit Back Exit FRANÇAIS Ex.: Sélection de <Received Calls>
Connected Device Name Current Folder Name Current File Name.mp3 Current Track Title Artist Name Album Title List Folder 05 Folder 06 Folder 07 Folder 08 Folder 09 Folder 10 Track001.mp3 Track002.mp3 Track003.mp3 Track004.mp3 Track005.mp3 Track006.mp3 Exit Category Name Channel Name Song Title Artist Name Composer Name
Music Club Channel Name Song Title Artist Name Composer Name CATEGORY
SR1 SR2 SR3 Category Exit Category Name 1 Category Name 2 Category Name 3 Category Name 4 Category Name 5 Category Name 6 Back
Category Name 1 Category Name 2 Category Name 3 Category Name 4 Category Name 5 [Maintenez Category Name 6
Pop Rock Country Hip-Hop R&B/Urban Dance/Electronic Mode Mono Local / DX SSM Blend Hold Local Auto Back Auto Digital Analog Exit
Start Digital Analog Exit Mode Mono Local / DX SSM Blend Hold Back
Start Digital Analog Exit Current Track Title Artist Name Album Title [5 / ∞] Modes de recherche: – Pour <Music>: Playlists, Artists, Albums, Songs, Podcasts, Genres, Composers, Audiobooks – Pour <Videos>: Video Playlists, Movies, Music Videos, TV shows, Video Podcasts
Playlists Artists Albums Songs Podcasts Genres Back FRANÇAIS Track 01 Track 02 Track 03 Track 04 Track 05 Track 06 Exit FR_09Other_NX7000[J].indd 102 6/11/08 2:21:46 PM FR_09Other_NX7000[J].indd 103 FR_09Other_NX7000[J].indd 104 6/11/08 2:21:50 PM Affichage OSD Position (Position OSD) *1 Position 1 Position 2 FR_09Other_NX7000[J].indd 106 6/11/08 2:21:50 PM Entrée Tuner
Beep (Bips) Telephone Muting (Sourd. Téléphon.) *4 Autres Illumination (Illuminations) Flat/Hard Rock/R&B/Pop/Jazz/Dance/Country/Reggae/Classic/User1/User2/User3 ☞ [102] Fader/Balance Mode (Mode) *1 Articles du menu Mono (Mono) Local / DX (Local/DX) SSM (SSM) *2 FRANÇAIS Delete Pairing (Supprimer Liais.) Auto Connect (Connection Auto) *8 Auto Answer (Reponse Auto) *9 Tuner (FM uniquement) Track Information Album Four seasons Artist Robert M. Smith Title Rain TIME 00:14 Track : 6 / 14 Cloudy Fair Fog Hail Indian summer Rain Shower Snow Thunder Typhoon Wind Winter sky
48 kHz, 16/20/24 bits Linear PCM 96 kHz, Linear PCM 48 kHz, 16 bits stéréo Linear PCM 48 kHz, 16 bits stéréo Linear PCM 48 kHz, 16 bits stéréo Linear PCM 48 kHz, 16 bits stéréo Linear PCM 32/44,1/48 kHz, 16 bits Linear PCM MP3/WMA 32/44,1/48 kHz, 16 bits Linear PCM WAV 44,1 kHz, 16 bits Linear PCM AAC 44,1/48 kHz, 16 bits Linear PCM
Having TROUBLE with operation? Please reset your unit Refer to page of How to reset your unit Still having trouble?? USA ONLY Call 1-800-252-5722 http://www.jvc.com We can help you! EN, SP, FR © 2008 Victor Company of Japan, Limited KW-NX7000[J].indb 2 0608NSMMDWJEIN