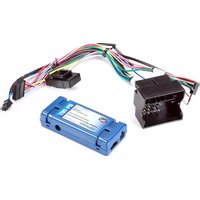
RP4-VW11 - Car audio interface PAC - Free user manual and instructions
Find the device manual for free RP4-VW11 PAC in PDF.


| Product Type | Radio Replacement Interface |
| Brand | PAC |
| Model | RP4-VW11 |
| Compatible Vehicles | Select Volkswagen models (2005-2015) |
| Dimensions (L x W x H) | 3.5 x 2.5 x 1.2 inches |
| Weight | 0.25 lbs |
| Power Supply | 12V DC (vehicle battery) |
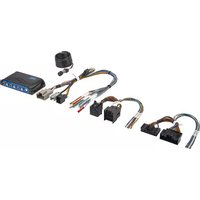
| Main Functions | Retains steering wheel controls, provides accessory power, integrates with aftermarket radios |
| Installation Type | Plug-and-play with included harnesses |
| Cable Length | 12 inches (main harness) |
| Operating Temperature | -4°F to 158°F (-20°C to 70°C) |
| Maintenance & Cleaning | Wipe with a dry cloth; avoid liquids |
| Safety | Fuse protected; follow vehicle electrical guidelines |
| Spare Parts & Repairability | Non-repairable; replace unit if faulty |
| Warranty | 1 year limited |
| Certifications | CE, FCC |
Frequently Asked Questions - RP4-VW11 PAC
User questions about RP4-VW11 PAC
0 question about this device. Answer the ones you know or ask your own.
Ask a new question about this device
Download the instructions for your Car audio interface in PDF format for free! Find your manual RP4-VW11 - PAC and take your electronic device back in hand. On this page are published all the documents necessary for the use of your device. RP4-VW11 by PAC.
USER MANUAL RP4-VW11 PAC
Introduction & Features
The RP4-VW11 interface allows the replacement of a factory radio in select Volkswagen vehicles with LSFT-CAN databus radios. Using this interface will retain factory features such as steering wheel controls (SWC) and the factory Volkswagen amplifier whenever the original radio is removed. The RP4-VW11 also provides data bus driven outputs such as retained accessory power (RAP), vehicle speed sensor (VSS), illumination, reverse trigger and parking brake.
Important Notes
- The radio select rotary switch on the side of the interface must be adjusted to the proper radio setting before plugging the interface into the vehicle (see next page for setting chart).
- The interface comes pre-programmed for all of the vehicles factory SWC functions and does not require programming unless you wish to re-assign the SWC functions to different buttons or assign buttons that are not pre-programmed. The SWC can always be restored to default settings by pressing and releasing the program button on the side of the interface once and waiting 7 seconds for the LED to flash 4 times.
- The LED will flash whenever a user programmable SWC button is pressed.
- The SWC will not function when car is in Accessory mode.
- When used in any of the following vehicles equipped with a Multi Function Display (MFD): The audio screen will display the SWC functions as they are pressed on the steering wheel. It will also display "Programming Mode" whenever the programming button on the side of the interface is pressed. The Blue/White remote input wire must be hooked up and the MFD must be in audio mode for these features to be displayed.
2009+ CC,
2010+ Eos, Golf, GTI, Jetta, Passat, Rabbit
2011+ Tiguan - When used in any of the following vehicles equipped with a MFD: The up & down arrows on the SWC that also control the MFD come programmed with functions but the SWC will control both the radio and the MFD. These buttons can be removed by reprogramming the interface and not programming these buttons.
2006-2009 Golf, GTI, Jetta, Passat
2007-2009 Eos, Rabbit - In vehicles equipped with factory Bluetooth, the telematics module must be disconnected in order to use the Phone & Voice buttons. Not disconnecting the telematics module will result in the MFD switching to phone mode every time the Phone or Voice buttons are pressed. The telematics module can usually be found under the passenger seat.
- The RAP feature is not available in 2010+ vehicles equipped with a premium amplified system
Wiring Connection Chart
Interface Connector
| Red / White P.B. Output (-) |
| Purple / White VSS Output |
| Blue/White Radio On Input |
| Red Acc. Output (1 amp) |
| Orange / White I lum. Output (+) |
| Green Reverse Output (+) |
Vehicle Connector
| Yellow Battery +12v | |
| Black Ground | |
| Blue/White Amp Turn On Input | |
| White Front L + input | |
| White / Black Front L - input | |
| Grey Front R + input | |
| Grey / Black Front R - input | |
| Green Rear L + input | |
| Green / Black | Rear L - input |
| Purple | Rear R + input |
| Purple / Black | Rear R - input |
SWC Connector
| Blu/Yel Kenwwod, NewerJVC, OEM or Blaupunkt | |
| 3.5mm Jack | Alpine, JVC, Clarion, Pioneer, Sony, Valor, Boyo, Dual, Visteon or Advent |
Illustration / Schematic
Wiring

SWC Connection
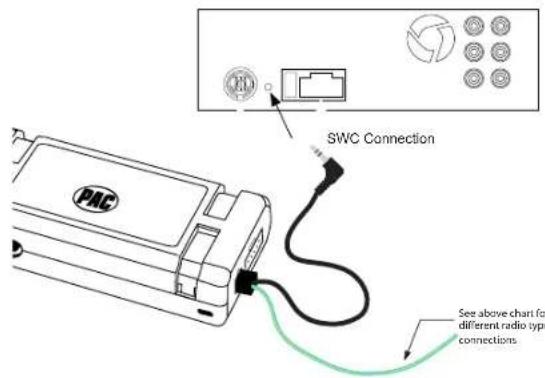
Installation Steps
SET RADIO SELECT SWITCH
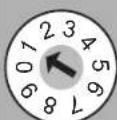
| Alpine | Advent, BOYO, Dual, Visteon, Sony | Blaupunkt | Clarion JVC | Kenwood OEM | Pioneer Valor | ||
| 1 7 8 4 | 2 3 6 7 5 |
-
The radio select rotary switch on the side of the interface must be adjusted to the proper radio setting before plugging the interface into the vehicle.
-
Make all connections as described in the connection chart on page one. Vehicles with a premium factory amplifier: The factory amplifier only accepts two channels of audio input (left and right). Fading is not supported in this application. The factory amplifier's fading is controlled by data communication from the factory radio. Neither the aftermarket radio or the RP interface have the ability to control the amplifier's fader.
- Connect the SWC wire according to the chart on page 1 (aftermarket radio MUST support a wired remote input)
- If you wish to reassign functions to the SWC follow the programming instructions in the next section.
Optional Steering Wheel Control Programming
IMPORTANT! The interface comes pre-programmed for all of the vehicles factory SWC functions and does not require programming unless you wish to re-assign the SWC functions to different buttons. The SWC can always be restored to default settings by pressing the program button on the side of the interface once and waiting 7 seconds for the LED to flash 4 times.
In the following vehicles equipped with a MFD the screen must be set to audio mode for all buttons to program correctly.
2009+ CC,
2010+ Eos, Golf, GTI, Jetta, Passat, Rabbit
2011+ Tiguan
The OK & Back buttons can be programmed but they will also control the MFD at the same time.
2004-2010 Touareg can only program Volume Up & Down
Optional Steering Wheel Control Programming (cont.)
Default SWC Button Assignments
| Alpine | JVC | Kenwood | Clarion | Valor | OEM | Sony/Pioneer | Blaupunkt | |
| Volume + | Volume + | Volume + | Volume + | Volume + | Volume + | Volume + | Volume + | Volume + |
| Volume - | Volume - | Volume - | Volume - | Volume - | Volume - | Volume - | Volume - | Volume - |
| Phone | Receive | Receive | Answer | Send/End | Source | Answer | Answer | Source |
| Track + | Track + | Track + | Track + | Search + | Track + | Next | Track + | Track + |
| Track - | Track - | Track - | Track - | Search - | Track - | Previous | Track - | Track - |
| Voice/Star | Mute | Mute | Mute | Mute | Mute | Mute | Mute | Mute |
| Preset Up | Preset + | Band | Disc + | N/P | Cursor Up | Cursor Up | Preset + | Disc + |
| Preset Down | Preset - | Preset + | Disc - | N/P | Cursor Down | Cursor Do | Preset - Disc - | |
| OK | N/P | N/P | N/P | N/P | N/P | N/P | N/P | N/P |
| Back | N/P | N/P | N/P | N/P | N/P | N/P | N/P | N/P |
*N/P = Not programmed by default. Can be re-programmed to perform any function the user would like.
If you wish to re-assign the SWC functions, the interface must be programmed in the specific order shown in the chart on the next page. If you come across a function in the chart that your steering wheel does not have, or you do not want to program, press and release the program button on the side of the interface to skip that function. The LED will flash off and on confirming that you have successfully skipped that function and are ready to proceed to the next one.
SET RADIO SELECT SWITCH
| Alpine | Advent, BOYO, Dual, Visteon, Sony | Blaupunkt | Clarion | JVC | Kenwood | OEM | Pioneer | Valor |
| 1 | 7 | 8 | 4 | 2 | 3 | 6 | 7 | 5 |
Optional Programming Order
| Alpine JVC | Kenwood Clarion Valor OEM | Advent, Boyo, Dual, Visteon, Sony | Pioneer Blaupunkt | ||||||
| 1 Volume - | Volume + Volume | Volume + Volume + | Volume + Volume | Volume + Volume | Volume + Volume | + Volume + | |||
| 2 | Volume - | Volume - | Volume - | Volume - | Volume - | Volume - | Volume - | Volume - | Volume - |
| 3 | Mute | Mute | Mute | Mute | Mute | Mute | Mute | Mute | Mute |
| 4 | Preset + | Source | Source | Source | Source | Source | Preset + | Preset + | Source |
| 5 | Preset - | Track + | Play | Search + | Track + | Next | Preset - | Preset - | Track + |
| 6 | Source | Track - | Track + | Search - | Track - | Previous | Source | Source | Track - |
| 7 | Track + | Band/Disc + | Track - | Band | Up Cursor | Play/Ok | Track + | Track + | Disc + |
| 8 | Track - | Preset/Disc - | Disc/FM + | Send/End | Down Cursor | Band | Track - | Track - | Disc - |
| 9 | Power | Select | Disc/AM - | Send | Ok | Up Cursor | Band | Band | Ok |
| 10 | Enter/Play | Attenuation | Answer | End | Down Cursor | Phone Menu | |||
| 11 | Band/Program | Phone Receive | BT Answer | Answer Call | |||||
| 12 | Receive | Phone Reject | BT Hangup | End Call | |||||
| 13 | End | Voice Dial | Voice Activation | ||||||
| 14 | Power | ||||||||
Optional Steering Wheel Control Programming (cont.)
Step A.
Turn the vehicle ignition to the ON position.

Step B.
Press and hold the programming button.


LED will turn off.
Step C.
Release the programming button. The LED will turn back on.

Step D.
Within 7 seconds, press and release the button that is to be learned on the steering wheel.


Step E.
Release the button.
![graph TD A["△"] --> B["VOL"] C["▽"] --> B["VOL"]](/content/2026/05/829724/images/d851d34931dedf022bb56cfce0491d401367a90c770ec0b4ea5e5d8b767ce377.jpg)

The LED will turn on back on.
Step F.
If you need to program more buttons, repeat steps D & E for each additional audio function on the steering wheel.
Program remaining buttons
The LED will turn off during this process.
Step G.
After all buttons are programmed


Once programming is completed, wait 7 seconds.
The LED will flash four times indicating the end of programming.
Testing & Verification
- Turn the ignition on. The LED on the interface will turn on & the +12v accessory wire will turn on.
- Turn on the radio & check balance & fade. Note: Premium Factory amplified Systems will not fade as neither the aftermarket radio or the RP interface have the ability to control the amplifier's fader.
- Verify that all SWC are functioning properly.
- Turn off vehicle & remove key. Radio will turn off as soon as the key is removed from the ignition
Product Updates (Firmware)
The RP4-VW11 can be updated with new firmware as it becomes available using the PAC-UP interface updater (sold seperatly). Please visit www.pac-audio.com/firmware for available updates.


- INTRODUCTION & FEATURES
- IMPORTANT NOTES
- WIRING CONNECTION CHART
- ILLUSTRATION / SCHEMATIC
- INSTALLATION STEPS
- OPTIONAL STEERING WHEEL CONTROL PROGRAMMING
- OPTIONAL STEERING WHEEL CONTROL PROGRAMMING (CONT.)
- STEP A
- STEP B
- STEP C
- STEP D
- STEP E
- STEP F
- STEP G
- TESTING & VERIFICATION
- PRODUCT UPDATES (FIRMWARE)
Brand : PAC
Model : RP4-VW11
Category : Car audio interface