
CW1542 - Juicer Coline - Free user manual and instructions
Find the device manual for free CW1542 Coline in PDF.


| Product Type | Slow Juicer (masticating) |
| Brand | Coline |
| Model | CW1542 (also JE5621G-GS) |
| Power Consumption | 150 W |
| Voltage / Frequency | 220–240 V, 50/60 Hz |
| Juice Container Capacity | Approx. 600 ml |
| Continuous Running Time | 15 minutes maximum |
| Rest Time Between Cycles | At least 30 minutes |
| Reversing Function | Yes (R position on switch) |
| Reset Switch | Yes (overload protection) |
| Safety Interlock | Prevents operation if hopper or bowl not locked |
| Food Pusher Included | Yes |
| Pulp Spout Sluice Flap | Removable for cleaning |
| Dishwasher Safe Parts | All detachable parts except motor unit |
| Motor Unit Cleaning | Soft damp cloth only; never immerse |
| Included Accessories | Food pusher, hopper, squeezing screw, strainer, spinning brush, juice bowl, juice container, pulp container, small cleaning brush |
| Recommended Food Preparation | Cut into pieces 3–5 cm length, 1.5–2 cm width; remove tough peel and seeds |
| Not Suitable For | Frozen food, ice, sugar cane, coconut, cereals (unless softened) |
Frequently Asked Questions - CW1542 Coline
User questions about CW1542 Coline
0 question about this device. Answer the ones you know or ask your own.
Ask a new question about this device
Download the instructions for your Juicer in PDF format for free! Find your manual CW1542 - Coline and take your electronic device back in hand. On this page are published all the documents necessary for the use of your device. CW1542 by Coline.
USER MANUAL CW1542 Coline
natural_image
Close-up of a black and white kitchen grater with a mesh grille and handle (no visible text or symbols)Slow Juicer
Art.no 18-4655 Model JE5621G-GS
44-1542
JE5621G-GS
Please read the entire instruction manual before using the product and then save it for future reference. We reserve the right for any errors in text or images and any necessary changes made to technical data. In the event of technical problems or other queries, please contact our Customer Services (see address details on the back).
Safety
- Never use the product for longer than 15 minutes at a time. Switch the product off and let the motor cool down for at least 30 minutes before using it again.
- Incorrect handling of this product could result in personal injury.
- The product should always be disconnected from the mains when it is not in use, when it is to be assembled/disassembled and when it is to be cleaned.
- Switch the product off and disconnect it from the mains before changing any accessories or handling any of the moving parts.
- This appliance may not be used by children.
- Keep the appliance and its mains lead out of children’s reach.
- The product may be used by persons with reduced physical, sensory or mental capability, lack of experience or knowledge which could jeopardise their safety, provided they have been given supervision or instruction concerning the safe use of the product and understand the hazards involved.
- Never let children play with the product.
- Ensure that the product is used with the correct voltage. Refer to the rating plate on the product.
- To prevent electric shocks, the product and its mains lead should be kept dry.
- Never lay the mains lead over hot surfaces, sharp edges or corners.
- Always disconnect the product from the power supply by holding and pulling the plug. Do not pull the mains lead.
-
Make sure that all parts are correctly assembled and that the product is switched off before it is connected to the power supply.
-
Never operate the product without food in the container.
- Never use the product close to heat sources.
- Only use the included accessories.
- Never use the product for anything other than its intended use.
- Do not use the product if the filter is damaged.
- Do not use the appliance without the pulp bin attached.
- Avoid contact with moving parts.
- Ensure that the appliance is placed on an even and steady surface.
- The mains lead should be checked regularly. Never use appliances with faulty or damaged power leads. The power lead should only be replaced by a qualified tradesman.
- Make sure that all parts are correctly attached and that the appliance is switched off when it is connected to the power supply.
Parts
- Food pusher
- Hopper
- Squeezing screw
- Small cleaning brush
- Strainer
- Spinning brush
- Juice bowl
- Pulp spout
- Juice spout
- Lid
- Motor unit
- Power switch
- Reset switch
- Juice container
- Pulp container
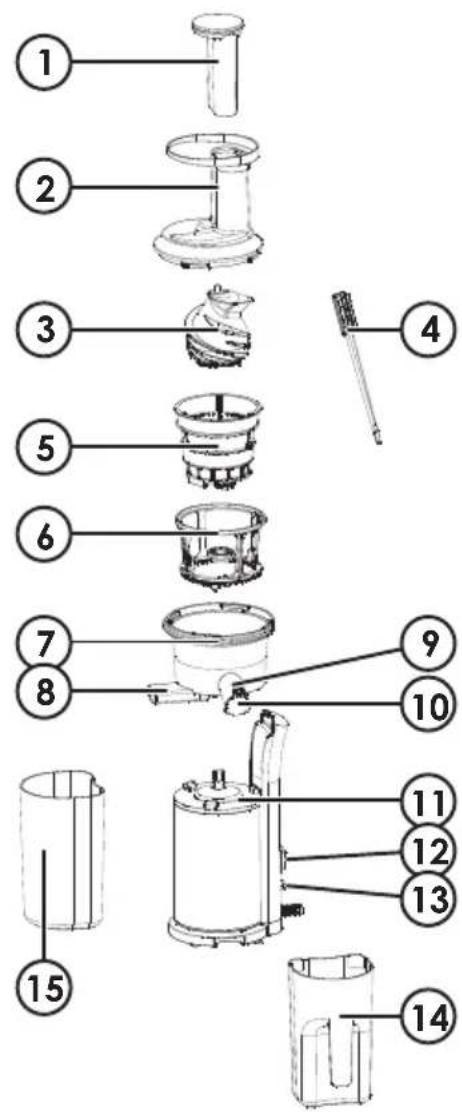
Before initial use
- Carefully unpack the parts and place them on a flat surface.
- Wash all the detachable parts in warm soapy water. Never immerse the motor unit into any type of liquid.
- Allow all the parts to air-dry before reassembling them. Make sure that the mains lead is not plugged into a live electrical socket.
Note: The strainer can be cleaned using the included small brush.
Preparing the fruit and vegetables
- Hard, fibrous foods should be cut into small pieces, 3–5 cm in length and 1.5–2 cm in width.
- Tough skin, peel, stalks and seeds, pips should be removed before juicing.
- Never juice frozen foods or ice.
- Never juice sugar cane, coconut or cereals without first soaking them in water to soften them.
- Do not try to juice too much food at a time.
Assembly
-
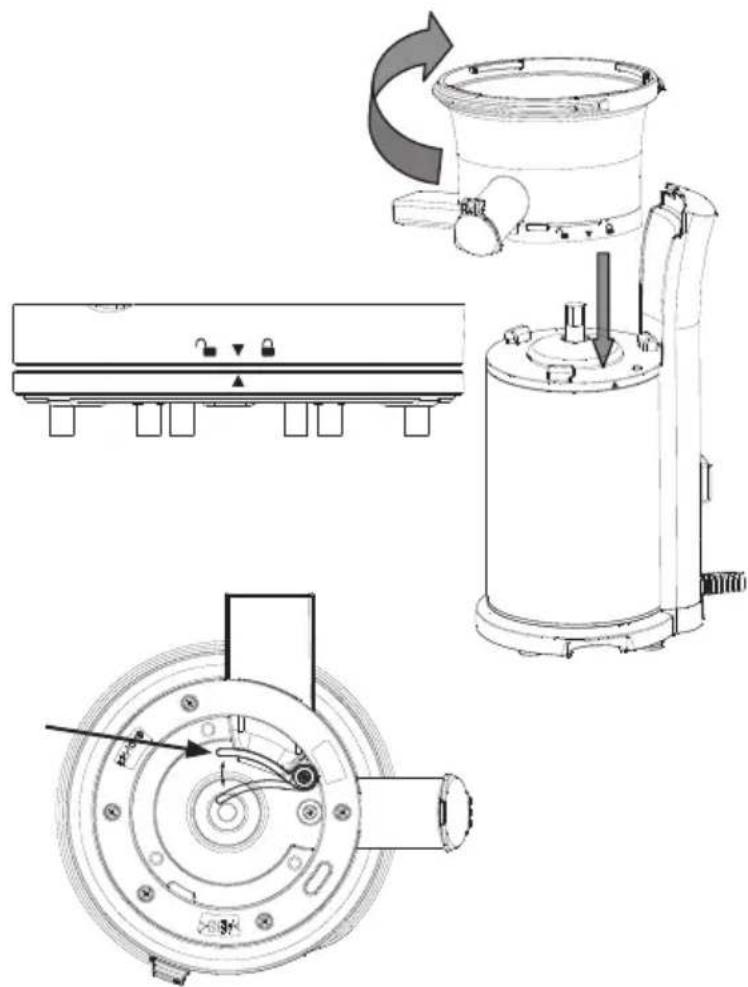
Place the juice bowl (7) onto the motor unit (11) so that the ▼ and ▲ symbols line up with each other. Push the bowl down and twist it clockwise until it locks and the 🔒 lines up with the bottom arrowhead.
-
Make sure that it is tight. The juicer will not start if the bowl is not locked in position.
-
Make sure that the sluice flap is fitted correctly in the pulp spout (8).
natural_image
Technical line drawing of a mechanical device with three views: top view, side view showing internal components, and bottom view with a dial indicator (no text or symbols present)- Place the strainer (5) into the spinning brush (6), line up the ▼ on the strainer with the ▲ on the motor unit (11) and then push the strainer downwards. Make sure that the strainer (5) is securely attached to the juice bowl (7).
- Fit the squeezing screw (3) into the juice bowl (7). The squeezing screw might need to be turned a little until it fits properly.
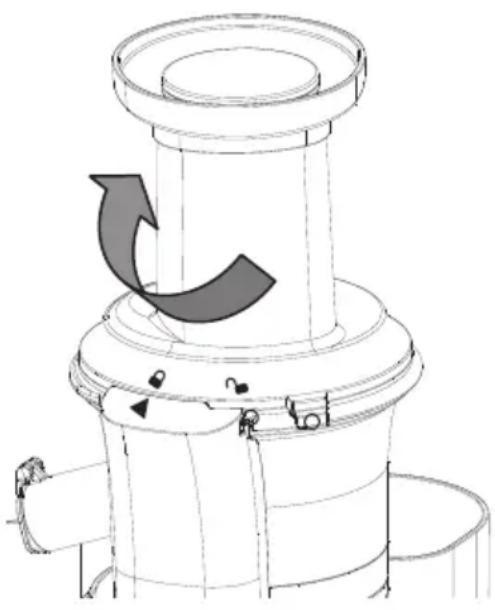
- Attach the hopper (2) to the juice bowl by first lining the ▲ symbol up with the 🔔 symbol and then twisting the hopper clockwise until the tab locks into the slot 🔔.
- Place the juice container (14) under the juice spout (9) and the pulp container (15) under the pulp spout (8).
natural_image
Technical line drawing of a mechanical component with a curved arrow indicating rotation or movement (no text or symbols)Note: Pull back the sluice flap to facilitate the cleaning of the pulp spout (8). Refit the sluice flap before using the juicer again.
Operating instructions
- Before plugging the mains lead into a wall socket, make sure that the power switch (12) is set to the 0 position (OFF). The power switch has 3 positions: "1" symbolises ON, "0" symbolises OFF and "R" symbolises REVERSE (can be used for freeing clogged food).
- Make sure that the juice container (14) and pulp container (15) are placed under the spouts.
- Cut fruits and vegetables into small pieces. For example, carrots can be in pieces sized 1.5 × 1.5 cm before they are fed into the juicer.
- Place the food into the hopper (2) and if necessary push it down carefully using the food pusher (1).
- Set the power switch to position 1 (ON). After a few seconds juice will begin to flow out of the spout.
- If any food becomes stuck during operation, first set the power switch to 0 and then press the reset button (13). Set the power switch (12) to R for a few seconds and then try again. If that does not free the clogged food, you will need to dismantle the juicer to remove the blockage.
- When the juice container (14) is full (approx 600 ml) or there is no more food to be juiced, the juicer should be switched off.
Note:
- Remove any seeds, pits, pips or stones before processing.
- Never process hard foods.
- Remove the peel of oranges, lemons, grapefruits and melons before juicing.
- Never operate the juicer without any food in it.
-
Never push food into the hopper using your fingers when the juicer is switched on.
-
Never use the juicer for longer than 15 minutes at a time. The juicer must rest for at least 30 minutes between operating cycles.
- The motor will stop if the interlock switch between the hopper and the motor unit is disconnected during operation.
Care and maintenance
- Unplug the mains lead and let the juicer cool before cleaning it.
- Unlock the hopper (2) by twisting it anticlockwise and then remove it.
- Detach the squeezing screw (3), strainer (5) and the spinning brush (6).
- Rotate the juice bowl (7) to 📋 and then remove it.
- Empty the pulp container (15) and wash all the parts except the motor unit (11) in running water. The detachable parts (except the motor unit) are also dishwasher safe.
- The motor unit can be cleaned using a soft, damp cloth. Never immerse the motor unit in water.
- Make sure that all the parts are dry before reassembling the juicer.
Note: Pull back the sluice flap to facilitate the cleaning of the pulp spout (8).
Refit the sluice flap before using the juicer again.
Disposal
This product should be disposed of in accordance with local regulations. If you are unsure how to proceed, contact your local council.
Specifications
Voltage 220–240 V, 50/60 Hz
Power 150 W
Slow juicer
Art.nr 18-4655 Modell JE5621G-GS
44-1542
JE5621G-GS
natural_image
Technical line drawings of industrial components including a fan, motor, and control panel (no text or symbols)natural_image
Technical line drawing of a mechanical component with a curved arrow indicating rotation or movement (no text or symbols)Användning
natural_image
Technical line drawings of industrial components including a fan, motor, and control panel (no text or symbols)natural_image
Technical line drawing of a mechanical component with directional arrows indicating motion (no text or symbols)Bruk
natural_image
Technical line drawing of a mechanical device with three views: top shows internal components, middle shows a rotating fan assembly, and bottom shows a circular component with a pointer (no text or symbols)natural_image
Technical line drawing of a mechanical component with directional arrows indicating motion (no text or symbols)natural_image
Technical line drawing of a mechanical device with three views: top shows internal components, middle shows a cylindrical housing, and bottom shows a circular component with a handle (no text or symbols)natural_image
Technical line drawing of a mechanical component with no visible text or symbols10 - 13 Market Place
Kingston Upon Thames
Surrey
KT1 1JZ
DEUTSCHLAND
KUNDENSERVICE

Brand : Coline
Model : CW1542
Category : Juicer