
Baamba Gyro Pro Suction 4400 - Robot vacuum SPC - Free user manual and instructions
Find the device manual for free Baamba Gyro Pro Suction 4400 SPC in PDF.


| Product Type | Smart Robot Wi-Fi Vacuum Cleaner with Sweep, Vacuum, Scrub, and Mop |
| Model | Baamba Gyro Pro Suction 4400 |
| Brand | SPC |
| Dimensions (Robot) | 330 mm × 75 mm |
| Net Weight (Robot) | 3 kg |
| Operating Voltage | 14.4 V DC |
| Nominal Power | 72 W |
| Battery Type | Lithium-ion, 5200 mAh |
| Charging Time | 4–6 hours |
| Operating Time | Up to 160 minutes |
| Suction Power | 2000–4400 Pa (4 modes: Normal, Eco, Low, Pro) |
| Noise Level | ≤ 70 dB |
| Working Temperature Range | 0 °C – 50 °C |
| Working Humidity Range | ≤ 85% RH |
| Navigation Technology | Gyro 4.0 with Smart Navigation |
| Connectivity | Wi-Fi (2.4 GHz), SPC IoT App, Remote Control |
| Voice Control | Compatible with SPC IoT Skill and Action (voice commands) |
| Cleaning Modes | Auto, Wall Follow, Spiral, Mop, Manual, Programmed |
| Water Tank Capacity | Integrated water tank for mopping (exact capacity not specified) |
| Dust Box Capacity | Standard dust box with HEPA filter, pre-filter, and sponge filter |
| Maintenance Interval | Clean pre-filter every 15–30 days; replace HEPA filter every 3 months |
| Safety Features | Anti-fall sensors, bump sensor, virtual walls (magnetic tape), overheat protection |
| Included Accessories | Charging base, remote control, water tank, mop, lateral brushes, cleaning brush |
| Spare Parts / Repairability | Contact SPC after-sales service for replacement battery, brushes, filters; unauthorized disassembly voids warranty |
| General Information | Indoor use only; not suitable for outdoor; warranty void if not maintained per manual |
Frequently Asked Questions - Baamba Gyro Pro Suction 4400 SPC
User questions about Baamba Gyro Pro Suction 4400 SPC
0 question about this device. Answer the ones you know or ask your own.
Ask a new question about this device
Download the instructions for your Robot vacuum in PDF format for free! Find your manual Baamba Gyro Pro Suction 4400 - SPC and take your electronic device back in hand. On this page are published all the documents necessary for the use of your device. Baamba Gyro Pro Suction 4400 by SPC.
USER MANUAL Baamba Gyro Pro Suction 4400 SPC
BAAMBA® GYRO PRO SUCTION 4400
MANUAL
Welcome to the manual for the Baamba® Gyro Pro Suction 4400, a Smart Robot Wi-Fi Vacuum Cleaner with Smart Navigation Gyro 4.0 technology to sweep, vacuum, scrub and mop. Its brand-new Gyro 4.0 technology allows it to keep all types of floor thoroughly clean by using the SPC IoT application.
Control the robot using the main voice commands thanks to SPC IoT Skill and Action.
RECOMMENDATIONS FOR USE
Please pay attention to the following safety measures before using the product:
- Read the instructions carefully. Use the product in accordance with the operating instructions. Keep the instructions in a safe place so you can consult them in the future.
- If you want to give the product to someone else, please include the instructions.
- Incorrect use may lead to serious personal injuries and can damage the product.
WARNINGS
- The warranty shall be void if the fault is caused by a lack of maintenance or failure to clean the removable parts and brushes.
- Remember to keep your robot clean, to prevent faults developing and to extend the working life of the product by doing the maintenance work regularly.
- The instructions for use must be supplied along with the smart cleaning robot so that it can be used safely.
- Unplug the smart cleaning robot before doing any cleaning or maintenance work.
• Always supervise children to ensure that they do not play with the smart cleaning robot. - The smart cleaning robot should only be used with the power cable supplied.
- This smart cleaning robot is intended only for domestic use, it should not be used outdoors.
INDEX
1. Parts and components
1.1 Robot
1.2 Parts of the robot
1.3 Charging base
1.4 Water tank
1.5 Dust box
1.6 Remote control
2. Product installation
2.1 First use
2.2 Placing the water tank
3. Instructions for use
3.1 Turning it on/off
3.2 Operating modes
3.3 Recharge
3.4 Manual mode
3.5 Wall follow
3.6 Mop
3.7 Spiral
3.8 Pause
3.9 Resting
3.10 Error
3.11 Filling the water tank or emptying the compartment when cleaning
3.12 Suction and scrubbing modes
3.13 Specify the area for cleaning
3.14 Programmed cleaning
3.15 Indicator lights
3.16 Configuring the network and updating the firmware
4. Maintenance
4.1 Dust box
4.2 Water tank
4.3 Central brush
4.4 Lateral brush
4.5 Anti-fall sensors and charging terminals
5. Safety instructions
5.1 Safety measures
5.2 Safety
5.3 Information about the battery
5.4 Surfaces where it can be used
5.5 Exceptions
6. Troubleshooting and frequently asked questions
7. Technical specifications
1. PARTS AND COMPONENTS
1.1 ROBOT

natural_image
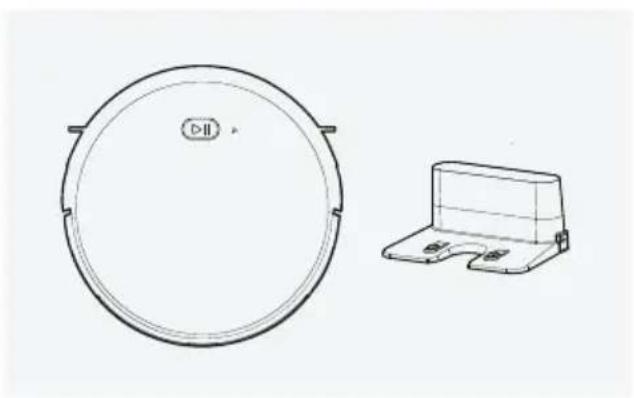
Simple line drawing of a circular device with a play button labeled 'D II' at the top (no text or symbols beyond the label)
Main button
Short press to start and stop cleaning.
Long press to enter synchronization mode.

Connection indicator
When flashing, the robot is in synchronization mode.
When on, the robot is connected to the network.
INDICATOR LIGHTS
| LIGHT MEANING | |
| Rapid flashing green light in the Wi-Fi indicator | The robot is in synchronization mode |
| Slow flashing green light in the Wi-Fi indicator | The robot is in AP synchronization mode |
| Green light in the Wi-Fi indicator The robot is connected to the network | |
| Light off in the Wi-Fi indicator The robot is not connected to the network | |
| Green light in the button The robot is cleaning | |
| Flashing orange light in the button The robot is charging | |
| Orange light in the button The robot is returning to the charging base | |
| Flashing red light in the button A cleaning error has occurred (go to the “Troubleshooting” section at the end of the manual) | |
1.2 PARTS OF THE ROBOT
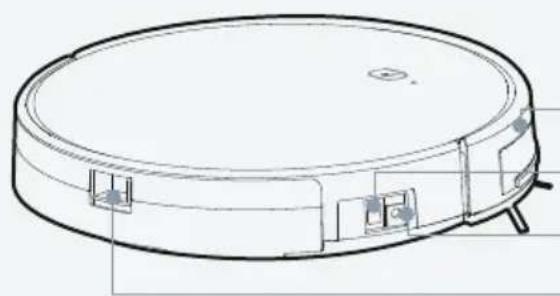
natural_image
Line drawing of a circular vacuum cleaner with mounting brackets and a lid (no text or symbols)Bump sensor
ON/OFF switch
Power connector
Button for removing the compartment

natural_image
Top-down schematic of a circular device layout with labeled components (L, R) and no readable text or symbols.Lateral brush
Charging contacts
All-direction wheel
Battery cover
Drive wheel
Central brush cover
Central brush
Dust box
Anti-fall sensors
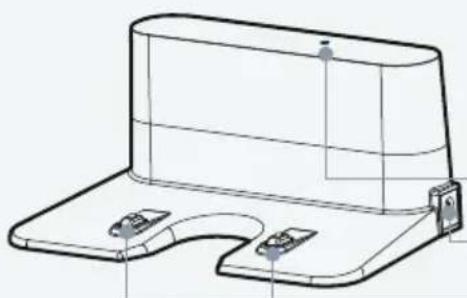
1.3 CHARGING BASE
natural_image
Technical line drawing of a mechanical component with no visible text or symbolsCharge indicator
Power cable connector
Charging contacts
1.4 WATER TANK

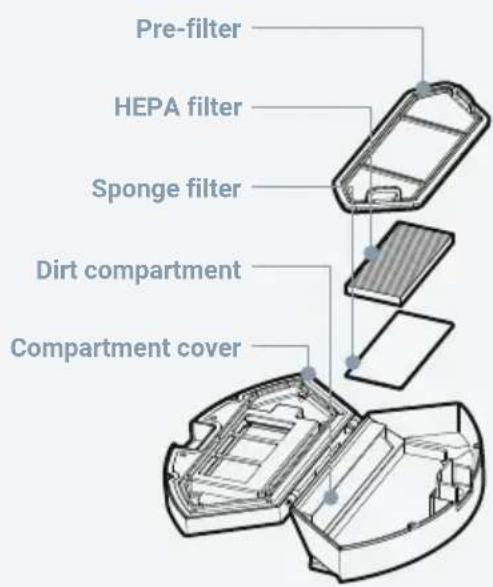
1.5 DUST BOX
1.6 REMOTE CONTROL

2. PRODUCT INSTALLATION
2.1 FIRST USE
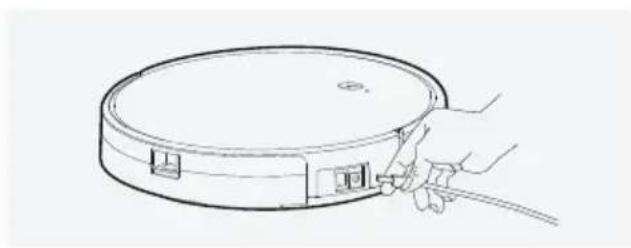
Connect the power cable to the charging base, respecting the recommended distances. The robot can also connect directly to the power cable through the socket in its side.

natural_image
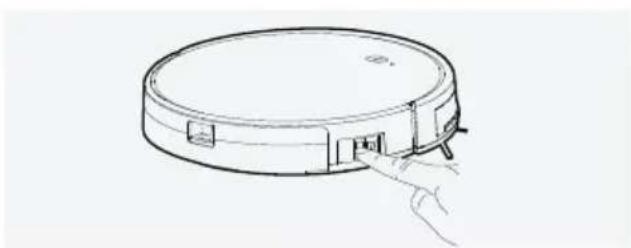
Line drawing of a hand inserting a cable into a circular device (no text or symbols)Turn the robot on using the side switch. If it does not turn on, check that the battery is connected by removing the two screws on the rear cover. Once checked, place the robot on the charging base by lining up the electrodes and checking that the light comes on; if it does not, leave it to charge for 4-6 hours. Attach the lateral brushes that are included in the box, matching them to the letters on the robot.
The robot cannot be turned off while it is charging. If you need to turn it off, remove it from the charging base and turn it off using the switch.
natural_image
Line drawing of a circular device with a handle and internal components, no text or symbols present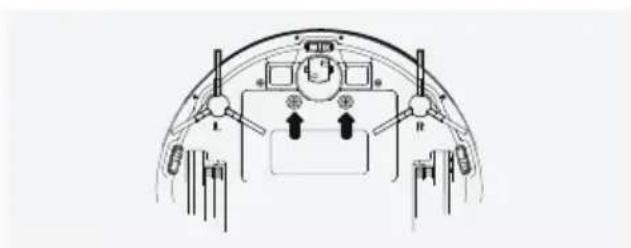
natural_image
Top-down schematic of a vehicle cockpit showing front, rear, and side panels with no text or symbols2.2 PLACING THE WATER TANK
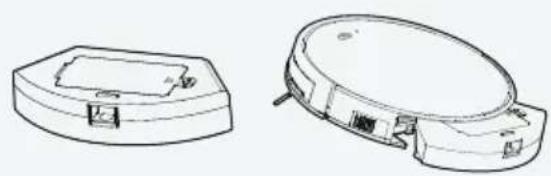
Remove the dust box by pressing the button and sliding it out of the robot.
Insert the water tank by pushing it into the robot until you hear a click.

natural_image
Technical line drawing of two circular mechanical components with internal cutouts and mounting holes (no text or symbols)Advice:
- Do not use the water tank when using the cleaner for the first time.
- Do not use the robot's water tank if you will not be observing it.
- Do not leave the tank installed in the robot unless it is working.
- Remove the water tank before recharging the robot.
- If there are carpets in the home, remove them before starting the cleaning, or make virtual walls using the magnetic tape.
- Avoid using cleaning products because they can clog the water outlets.
- When the cleaning has finished, remove the mop, clean it and allow it to dry before using it again, clean the dust box with a cotton cloth and then check that the solenoid valve contacts are completely dry.
3. INSTRUCTIONS FOR USE
3.1 TURNING IT ON/OFF
Turn the robot fully on and off using the side switch.
The robot will enter resting mode if it has not done anything for 10 minutes.
The robot cannot be turned off if it is charging.
3.2 OPERATING MODES
Make a short press on the ▶ button for the robot to start automatic cleaning when turned on.
Click on Auto in the SPC IoT application for automatic cleaning.
Click on Back to charging base in the SPC IoT application to send the robot to the charging base.
Press the ▶ button on the remote control to start automatic cleaning.
3.3 RECHARGE
When it has finished cleaning, the robot will return to its charging base.
If the battery becomes too low when cleaning, the robot will return to its charging base.
The robot will turn itself off automatically if the battery is completely drained: you can then place it on the charging base by hand, but please make sure that the electrodes are correctly aligned, or you can connect the power cable to the robot's side socket, and the button will flash green.
3.4 MANUAL MODE
You can control the robot manually from the application or the arrows on the remote control.
3.5 WALL FOLLOW
Select this cleaning mode in the application or remote control for more thorough cleaning of the edges of the room.
3.6 MOP
Select this mode from the control panel of the application or from the remote controller 📄 button once the water tank is placed to use the mop.
3.7 SPIRAL
You can select this mode from the application so that the robot cleans one area more intensely and spirals outwards from there.
3.8 PAUSE
Press button ▶ on the robot or ▶ on the remote controller. You can press either button again to continue the cleaning.
3.9 RESTING
The robot will automatically enter resting mode if it has not performed any action for 10 minutes.
You can reactivate the robot by pressing the button or using the SPC IoT application.
The robot will not enter resting mode if it is on the charging base.
3.10 ERROR
If an error occurs, the button will flash red and the robot will emit 3 beeps, go to the "Troubleshooting" section at the end of the manual to find the solution.
3.11 FILLING THE WATER TANK OR EMPTYING THE COMPARTMENT WHEN CLEANING
If you need to fill the water tank or empty the compartment because it is full while the robot is working, press button ▶II to stop it; remove the water tank and refill, or remove the compartment and empty it; then put them back and press button ▶II again to continue cleaning.
3.12 SUCTION AND SCRUBBING MODES
You can select 4 suction modes from the SPC IoT application, Normal, Eco, Low and Pro, with Eco selected by default.
You can also modify the amount of water used when scrubbing, choosing from the 3 modes offered by the robot, Eco, Normal and Pro.
3.13 SPECIFY THE AREA FOR CLEANING
You can create virtual walls with magnetic tape to prevent the robot from entering certain areas. Just put the tape on the floor, and the robot will not pass over it.
3.14 PROGRAMMED CLEANING
You can establish a weekly cleaning schedule with the SPC IoT application. The robot will start cleaning at the set time and return to the charging base when it has finished cleaning.
You can also programme a daily cleaning routine from the remote control. You cannot choose the days of the week so the robot will start at the set time every day. First set the time on the remote by pressing ⏻ button and select the correct time with the arrows; then press ⏻ button and select the time, once selected press the same button again pointing at the robot, the icon ⏻ will appear on the remote control display and the robot will emit a sound.
To remove a programme on the remote control, keep the button 📄 pressed for around 5 seconds, the robot will beep and the icon will disappear from the screen.
3.15 INDICATOR LIGHTS
If the Wi-Fi indicator flashes green, it means that the robot is in synchronization mode.
If the Wi-Fi indicator flashes slowly in green, it means that the robot is in AP synchronization mode.
If the Wi-Fi indicator is green, it means that the robot is correctly connected to the network.
If the Wi-Fi indicator is off, it means that the robot cannot connect to the network.
If the button is green, it means that the robot is working correctly.
If the button is flashing orange, it means that the robot is charging.
If the button is orange, it means that the robot is returning to the charging base.
If the button is flashing red, it means there is a problem with the cleaning, probably a blockage.
3.16 CONFIGURING THE NETWORK AND UPDATING THE FIRMWARE
To reset the network configuration, press the button ▶ for around 5 seconds or use the SPC IoT application (follow the steps in the quick guide to connect the robot to the application) to delete the device; bear in mind that it is not compatible with 5Ghz networks.
If the robot is connected to your Wi-Fi network, you can control it remotely with your smartphone.
To update the firmware, use the SPC IoT application, make sure that the battery is not below 60%.
4. MAINTENANCE
4.1 DUST BOX
- Remove the box from the robot. 2. Open the dust box and tip the dirt collected into the rubbish.

natural_image
Line drawing of a circular mechanical component with mounting brackets (no text or symbols)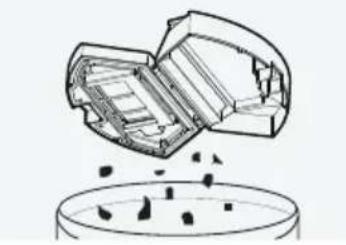
natural_image
Diagram of a capsule-shaped container with internal compartments and scattered particles, no text or symbols present- Remove the pre-filter, the HEPA filter and the sponge filter.

natural_image
Technical line drawings of a device with exploded and assembled views (no text or symbols)- Rinse the compartment under the tap, drying it thoroughly before putting all the parts back together.

natural_image
Exploded view diagram of a robotic vacuum cleaner showing internal components and airflow path (no text or labels)- Reassemble all the parts of the compartment and replace it in the robot.
natural_image
Technical line drawings of two electronic components (no text or symbols)• The pre-filter must be washed once every 15-30 days when the robot is used normally.
• The working life of the HEPA filter is around 3 months of daily use.
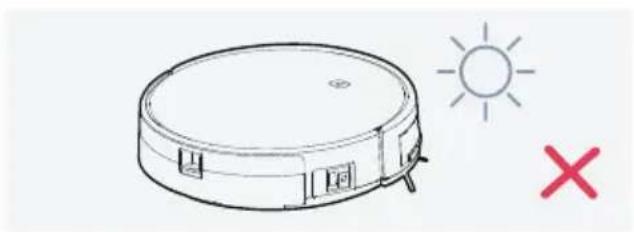
- Do not expose any part of the filter to sunlight.
4.2 WATER TANK
- Remove the water tank.

natural_image
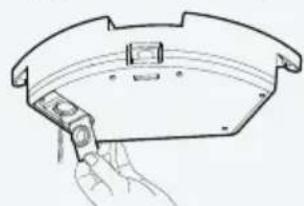
Technical line drawing of a mechanical device with a circular top and internal components (no text or symbols)- Remove the mop and wash it under the tap, then allow it to dry.

natural_image
Illustration of a water dispenser with a faucet and water drop (no text or symbols)- Empty the water tank as well and clean it well with a cotton cloth. When all parts of the water tank are dry, put them back together and it will be ready to start cleaning again.
natural_image
Line drawing of a mechanical component with a hand holding a tool (no text or symbols)
natural_image
Hand holding a small electronic device component (no visible text or symbols)4.3 CENTRAL BRUSH
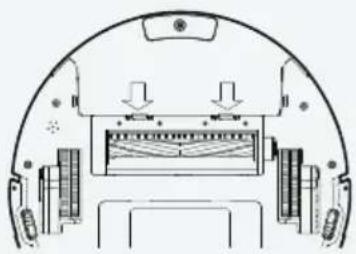
- Remove the cover that holds the roller.
natural_image
Top-down schematic of a mechanical device with internal components and directional arrows (no text or symbols)- Remove the central brush to clean it with the brush; pay special attention to the bearings, because they can accumulate dirt that prevents them from moving freely. Use the cleaning brush included in the box.

natural_image
Diagram of a device interior showing a hand inserting a component into a housing (no text or symbols visible)4.4 LATERAL BRUSH
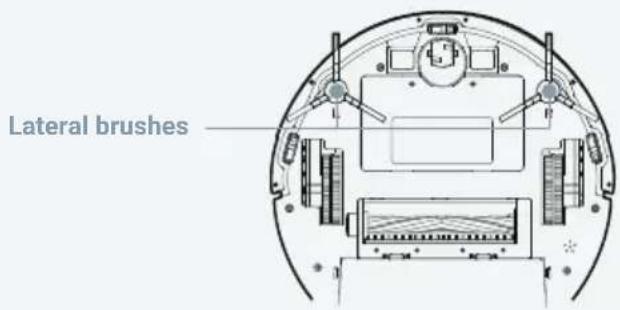
Remove and clean these brushes regularly, because hairs tend to tangle inside, forcing the motors that turn them to overheat when a certain number are trapped. The warranty does not cover faults arising from this cause.
4.5 ANTI-FALL SENSORS AND CHARGING TERMINALS
Clean the anti-fall sensors and charging terminals regularly with a cotton cloth to ensure they work correctly.

5. SAFETY INSTRUCTIONS
5.1 SAFETY MEASURES
WARNING
- Only use the original adaptor, battery and charging base. Using different ones may damage the smart cleaning robot and may cause a fire through a short circuit and the high voltage.
- If you see that the main casing or accessories are damaged, do not use the smart cleaning robot and contact our after-sales service. Removing the main casing, repairing or reassembling the smart cleaning robot will cancel the device's warranty period.
- Unplug the smart cleaning robot before doing any maintenance work.
- Do not touch the battery terminal or the smart cleaning robot with wet hands. This may cause an electrical shock.
- If the main cable is damaged, contact SPC and wait for a professional to replace it to avoid damage.
- The robot cannot go down steps; its anti-fall sensors will prevent possible accidents, as long as they are cleaned on a regular basis. Take special care when there is a risk of falling to the lower floor and there are people present. Use the magnetic tape to create virtual walls.
- Do not place the smart cleaning robot near sources of heat or inflammable, explosive or corrosive materials.
• To avoid injuries, avoid contact with the brushes, wheels... do not put clothes on it or any part of your body (hair, fingers, etc.).
natural_image
Technical line drawing of a circular device with a labeled component and a separate 3D model (no text or symbols)

natural_image
3D architectural diagram showing stairs and a circular object on a platform, with a red X mark indicating a location (no text or symbols present)
natural_image
Simple line drawing of a circular device with a flame and a red X mark, no text or symbols present.IMPORTANT
- The smart robot is only intended for indoor use.
- Pick up the cables and other components from the floor to ensure they do not get tangled in the wheels or brushes, remove any fragile objects as well, such as glass bottles or glasses to prevent accidents and ensure that the robot is not splashed with water, oil or other liquids.
- If you unplug the charging base when the robot is working, it will not be able to recharge when it finishes cleaning. Remember that it must be placed next to the wall and in a flat space. Otherwise, it will not work correctly.
- Turn the smart robot off if you are not going to use it for a long period of time; store it with the batteries charged to 60-70% of their capacity.
- Do not clean up sharp objects with the smart robot, such as broken glass, nails or other materials. It may suffer damage, and this will not be covered by the warranty.
- Do not use the cleaner in wet, inflammable, explosive or corrosive atmospheres. They may damage the device and cause an accident.
natural_image
Simple line drawing of a circular vacuum cleaner with sun and cross symbols (no text or labels)

natural_image
Simple line drawing of a device with a handle and a red X mark, no text or symbols present
natural_image
Line drawing of a circular mechanical component with a handle, no text or symbols present

natural_image
Line drawing of a circular vacuum cleaner with a showerhead and a red X mark (no text or symbols)5.2 SAFETY
- Children should not use the smart robot without supervision.
- Do not allow children to play with the plastic bags supplied with the machine, because they can cause suffocation.

natural_image
Illustration of a robotic vacuum cleaner next to a baby crawling and warning symbol (no text or labels)5.3 INFORMATION ABOUT THE BATTERY
- The smart robot must only be used with the original battery. Do not leave the device without a battery for a long time. If you are not going to use it, keep the batteries charged to 60-70%.
- The battery can be changed by unauthorized personnel as long as the replacement is original. Contact our technical service to find out more.
- Turn the smart robot's switch off before removing the battery.
- The battery must be removed before disposing of the smart robot.
- If you want to change the battery, please contact our after-sales service. Using the cleaner with an incorrect battery can damage it.
- If the battery is leaking, do not touch the liquid. Clean up the liquid with a dry cloth and take the battery to a recycling centre or green point. Do not dispose of it anywhere else.
- Keep the used battery separate from the other parts (such as the remote control). The battery contains hazardous substances. Recycle it in accordance with the original environmental protection regulations.


5.4 SURFACES WHERE IT CAN BE USED
APPLICABLE SURFACES
The cleaner can be used on the following surfaces:


natural_image
Blank or nearly blank image with no discernible text, symbols, or visual content.
natural_image
Close-up of a dark, textured fabric surface with no visible text or symbols5.5 EXCEPTIONS
In the following cases, the product will not be repaired free of charge. The repairs will cost extra:
A. The product fault was caused by the user, who did not use it or store it in accordance with the instructions in the manual.
B. The smart robot and its components are outside the legal warranty period.
C. The product defect was caused by dismantling by a technician without SPC authorization.
D. The product is not accompanied by a valid receipt.
E. The model on the warranty card does not match the product to be repaired or has been modified.
F. The product fault was due to causes beyond our control, such as natural disasters.
G. The product fault or the damages it has suffered are the result of human actions or accidents (such as incorrect operation, contact with liquids, incorrect insertions or extractions, scratches, handling, impacts, incorrect power supply, etc.
6. TROUBLESHOOTING AND FREQUENTLY ASKED QUESTIONS
When the indicator light flashes red or you notice something wrong, you can try to solve the problem by checking the table below:
If you do not find your problem, please contact our technical service by calling +34 944 580 178.
| PROBLEM SOLUTION | |
| The robot does not move Check that the brushes are not blocked and there is no object in front of the robot, place it on the charging base and check that the indicator lights up. Move the robot to a new location and press the button to start cleaning. | |
| The robot does not detect a step | Clean the anti-fall sensors with a cotton cloth; check there is no dirt on them, then press the button to start cleaning again. |
| The robot hits something and does not change direction | Check that nothing is blocking the shock sensor; it must move a little for the sensor to work. |
| The temperature of the robot is too high or low | Stop the robot and leave it to rest until it returns to its normal temperature. |
| It does not charge, or the battery does not fully recharge | Check that there is good contact between the robot's electrodes and those of the charging base; if there is, check that the electrodes are not dirty; if there is dirt, clean them with a cotton cloth (unplug the charging base before cleaning it). |
| The compartment does not fit inside the robot | Check that the HEPA filter is fitted correctly; if it is, check that the spring at the end can move when the filter is fitted. |
| The robot does not turn on or returns to the charging base very soon after starting cleaning. | The battery is too low, place it on the charging base and check that the indicator lights up.The ambient temperature is too low (<0°C) or too high (>50°C). |
| Fault when starting to clean The battery is too low, place the robot on the charging base and wait for it to charge. | |
| The robot does not reach the charging base | There are too many obstacles before the charging base. Clear the area near the base and respect the distances required. Check that the charging base is correctly connected to the mains energy supply. |
| Unusual movements Turn the robot off and on again using the switch. Return to the default parameters using the SPC IoT application. | |
| Strange noises when cleaning or the robot is stopped and showing an red light | Check the central brush, the lateral brush and the rollers (drive wheels and all- directions) to ensure that there are no object blocking its free movement. |
| It does not pick up all the dirt The compartment is full; empty it and restart the robot.The HEPA filter is blocked by dirt, clean the filter and restart the robot, if the filter is dark grey, change it for a new one.The central brush is blocked; check that the bearings do not have built-up dirt and there is no object blocking free movement, then put it down and restart the robot. | |
| Fault when connecting to the Wi-Fi network | The Wi-Fi signal is too weak; put the robot in a place with a good signal.The Wi-Fi function is not working properly; restart the Wi-Fi connection, check that you have the latest version of the SPC IoT application installed and resynchronize the robot. |
| Fault when starting cleaning Check that it is properly loaded and that nothing obstructs or blocks the movement of wheels or brushes. | |
| The robot does not return automatically when the base has been moved | If you have moved the charging base when cleaning and it is now too far from the robot, it will not be able to find its way back; place the robot on the charging base by hand. |
| The robot does not clean as programmed in the application | Check that the robot is connected to the network; if it isn't, resynchro-nize it, the robot must be connected to the network to do the tasks set in the application. |
| You cannot control the robot from the application | Check that the synchronization was successful, and that the robot is always within reach of the Wi-Fi signal. |
| Fault when synchronizing the robot | Check that both the robot and the charging base have a good Wi-Fi signal, make sure they are connected to a 2.4Ghz network. When you have checked this, follow the synchronization instructions in the quick guide. |
| The robot does not respond to orders from the remote control (maximum distance 5 metres) | Check that the batteries in the remote control are ok and that the robot is fully charged; finally make sure there is no other infra-red device that can cause interference. If it continues to have problems after doing these tests, check there is no dirt on the infra- red receiver of the robot and the emitter of the remote control, cleaning them with a cotton cloth. |
| The robot goes out on its own to start cleaning | Check that cleaning is not programmed in the application or the remote control. |
7. TECHNICAL SPECIFICATIONS
| ROBOT SPECIFICATIONS CHARGING BASE SPECIFICATIONS | |||
| Operating voltage | 14.4V CC | Power source | 230V AC |
| Nominal power | 72 W | Input current | 800mA AC |
| Battery | Lithium-ion battery | Frequency | 50/60Hz |
| Battery capacity | 5200mAh | Nominal power | 19W |
| Charging time | De 4-6 H | Output voltage | 19V CC |
| Operating time | 160 min | Output current | 1000mA CC |
| Suction power | 2000-4400Pa | ||
| Working temperature range | 0 °C ~ 50 °C | ||
| Working humidity range | ≤ 85%RH | ||
| Noise | ≤ 70dB | ||
| Net weight | 3kg | ||
| Measurements | 330mm × 75mm | ||
Copyright © 2020 SPC
www.spc.es
The information in this guide may not be broadcast, copied or communicated in any way without written permission from SPC.
BRAND NAMES
SPC is a registered trademark of Smart Products Connection S.A.
NOTE: SPC reserves the right to change the information in this guide at any time, which has been prepared with the utmost care, although all the information and recommendations included do not constitute a guarantee of any kind.
EN · To see more details about the operation of this device or any other technical query, go to: support.spc.es
- BAAMBA® GYRO PRO SUCTION 4400
- MANUAL
- RECOMMENDATIONS FOR USE
- WARNINGS
- INDEX
- Parts and components
- Product installation
- Instructions for use
- Maintenance
- Safety instructions
- Troubleshooting and frequently asked questions
- Technical specifications
- ROBOT
- Main button
- Connection indicator
- PARTS OF THE ROBOT
- CHARGING BASE
- WATER TANK
- DUST BOX
- REMOTE CONTROL
- FIRST USE
- PLACING THE WATER TANK
- Advice:
- TURNING IT ON/OFF
- OPERATING MODES
- RECHARGE
- MANUAL MODE
- WALL FOLLOW
- MOP
- SPIRAL
- PAUSE
- RESTING
- ERROR
- FILLING THE WATER TANK OR EMPTYING THE COMPARTMENT WHEN CLEANING
- SUCTION AND SCRUBBING MODES
- SPECIFY THE AREA FOR CLEANING
- PROGRAMMED CLEANING
- INDICATOR LIGHTS
- CONFIGURING THE NETWORK AND UPDATING THE FIRMWARE
- DUST BOX
- WATER TANK
- CENTRAL BRUSH
- LATERAL BRUSH
- ANTI-FALL SENSORS AND CHARGING TERMINALS
- SAFETY MEASURES
- WARNING
- IMPORTANT
- SAFETY
- INFORMATION ABOUT THE BATTERY
- SURFACES WHERE IT CAN BE USED
- APPLICABLE SURFACES
- EXCEPTIONS
- BRAND NAMES
Brand : SPC
Model : Baamba Gyro Pro Suction 4400
Category : Robot vacuum