
Ida HS2000-26 - Cooker Respekta - Free user manual and instructions
Find the device manual for free Ida HS2000-26 Respekta in PDF.


| Product type | Built-in electric cooker (hob + oven) |
| Brand | Respekta |
| Model | HS2000-26 |
| Hob type | Electric radiant rings, glass ceramic |
| Number of cooking zones | 4 (2x 1800W front left/rear right, 2x 1200W rear left/front right) |
| Hob total power | 6000 W |
| Hob dimensions (W×D×H) | 590 x 520 x 50 mm |
| Hob net weight | 7.8 kg |
| Oven type | Built-in electric fan-assisted oven |
| Oven usable capacity | 56 L |
| Oven total power | 2300 W |
| Energy class | A |
| Energy consumption (conventional) | 0.83 kWh/cycle |
| Energy consumption (fan-forced) | 0.71 kWh/cycle |
| Oven dimensions (W×D×H) | 593 x 520 x 595 mm |
| Oven net weight | 28 kg |
| Oven cooking functions | 7: Light, Static (top+bottom), Fan-assisted (top+bottom+fan), Grill, Fan-assisted grill, Fan bottom heating, Defrosting |
| Oven controls | Mechanical knobs |
| Oven thermostat range | 60–250 °C |
| Grill power | 1300 W |
| Top heating element | 1300 W |
| Bottom heating element | 1000 W |
| Oven light | Yes, E14 25W, replaceable |
| Residual heat indicator (hob) | Yes |
| Overheating protection (hob) | Yes |
| Automatic power off (hob) | Yes, based on power level |
| Child lock | No |
| Power supply | 220-240V~/380-415V~ 50 Hz |
| Accessories included | Fixing brackets, sealing tape, 1 drip pan, 1 chromed grill rack |
| Cleaning hob | Use pH-neutral detergent, avoid abrasives; remove sugar spills immediately |
| Cleaning oven | Remove door for thorough cleaning; use non-abrasive products |
| Spare parts availability | Contact manufacturer authorized service; oven bulb replaceable (E14 25W 300°C) |
| Warranty | 24 months parts and labor from date of purchase (conditions apply) |
Frequently Asked Questions - Ida HS2000-26 Respekta
User questions about Ida HS2000-26 Respekta
0 question about this device. Answer the ones you know or ask your own.
Ask a new question about this device
Download the instructions for your Cooker in PDF format for free! Find your manual Ida HS2000-26 - Respekta and take your electronic device back in hand. On this page are published all the documents necessary for the use of your device. Ida HS2000-26 by Respekta.
USER MANUAL Ida HS2000-26 Respekta
Installation & User Instructions HS2000-26
natural_image
Four white circles arranged in a 2x2 grid on a black background (no text or symbols)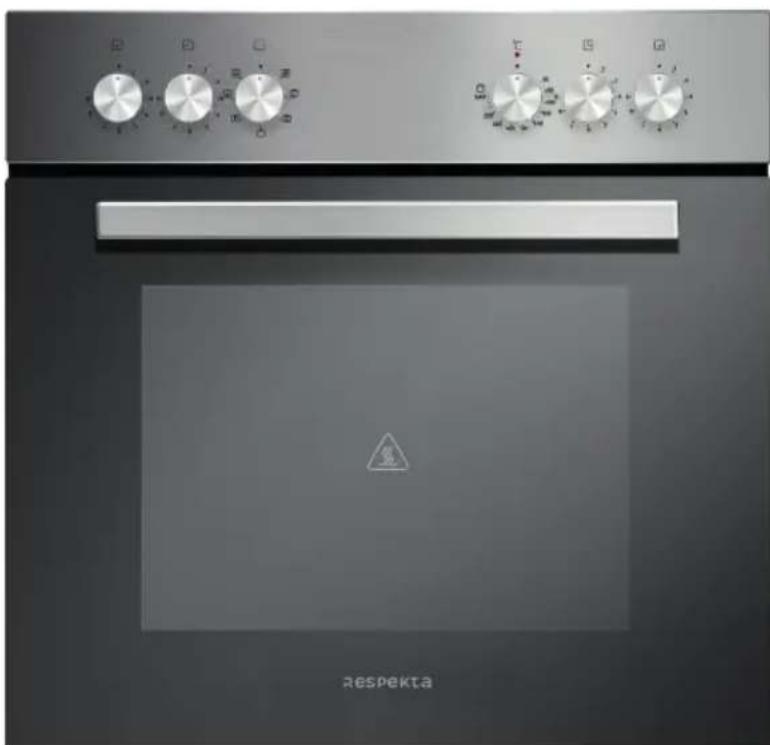
natural_image
Exterior view of a modern kitchen oven with control knobs and a warning symbol (no readable text or symbols beyond branding)Respekta
Mod.-Nr.
HS2000-26
Inhalt
1 : ALLGEMEINE INFORMATIONEN ...... de-3
flowchart
graph TD
    A["Heating plate 1 1800W"] --> B["R"]
    C["Heating plate 2 1200W"] --> D["R"]
    E["Heating plate 3 1800W"] --> F["R"]
    G["Heating plate 4 1200W"] --> H["R"]
    I["L1 L2 N PE"] --> J["thermostat"]
    K["CP1 CP2 CP3 CP4 CP5 CP6"] --> L["thermostat"]
    M["CN1 TC1 TC2 TC3 TC4"] --> N["thermostat"]
    O["TC1 TC2 TC3 TC4"] --> P["thermostat"]
    Q["CP1 CP2 CP3 CP4 CP5 CP6"] --> R["thermostat"]
    S["CP1 CP2 CP3 CP4 CP5 CP6"] --> T["thermostat"]
    U["TC1 TC2 TC3 TC4"] --> V["thermostat"]
Abb. 3.3
natural_image
Illustration of a cooking pot with a green checkmark inside, no text or symbols presentAbb. 4.1
natural_image
Illustration of a cooking pot with a green checkmark inside, no text or symbols present
natural_image
Simple line drawing of a cooking pot with upward and downward arrows, next to a green checkmark (no text or symbols)Abb. 4.3
4.2.3 Energieersparnis
natural_image
Line drawing of a cooking pot with three downward arrows indicating heating or cooling process (no text or symbols)Abb. 4.6
natural_image
Black background with four red dots and a central gray square containing a star-like symbol (no text or labels)Abb. 4.9
Abb. 4.10
Abb. 5.2
natural_image
Pure mechanical diagram showing a lever and shaft assembly without any text, numbers, or symbolsb)
natural_image
Pure mechanical diagram showing a pipe connection with a screw and base plate (no text or symbols)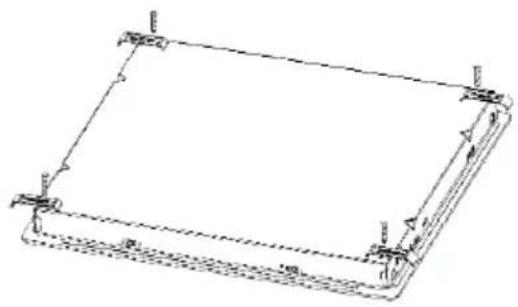
natural_image
Pure technical line drawing of a rectangular frame with corner markers (no text or symbols)Abb. 5.3
a) - Version 1
b) - Version 2

Abb. 5.4
HS2000-26
Abb. 5.5

Abb. 5.11
natural_image
3D rendering of a mechanical assembly or machine component with no visible text or symbolsAbb. 6.1
natural_image
Industrial machinery component with conveyor belt and directional arrow (no visible text or symbols)Abb. 6.4
Abb. 6.5
natural_image
Diagram of a device with a black rectangular panel and downward arrow, no text or symbols presentAbb. 6.6
natural_image
Pure mechanical diagram showing two circular components connected by a spring, with no text or symbols present.Abb. 6.7
7 : STÖRUNGSSUCHE
1.1 Reading the manual......en-3
2 : GENERAL SAFETY PRESCRIPTIONS......en-7
2.1 Important warnings...... en-7
2.2 Environmental protection ...... en-14
3 : TECHNICAL DATA AND CHARACTERISTICS......en-15
3.1 Technical data ...... en-15
3.2 Wiring diagram......en-20
4 : PRESCRIPTIONS FOR USE ...... en-21
4.1 Preliminary recommendations...... en-21
4.2 Using of the electric hob...... en-22
4.3 Using the oven....en-28
5: INSTALLATION......en-38
5.1 List of accessories...... en-38
5.2 Preliminary operations ...... en-38
5.3 Hob installation instructions ...... en-40
5.4 Oven installation instructions ...... en-44
5.5 Connection of the appliance to the electrical supply......en-46
6: MAINTENANCE ...... en-50
6.1 Cleaning and care of the hob......en-50
6.2 Cleaning and care of the oven......en-52
7 : TROUBLESHOOTING ...... en-55
7.1 Hob problem solving ...... en-55
7.2 Oven problem solving ...... en-55
1 : GENERAL INFORMATION
1.1 Reading the manual
1.1.1 Foreword
Thank you for purchasing an appliance from our range.
The appliance you have purchased is designed to meet your domestic requirements. Please read these instructions for use and follow them carefully. They describe the possible uses and operation of your appliance.
These instructions accompany various types of appliances, so they also contain descriptions of functions that may not be present on the specific appliance you have purchased.
The manufacturer declines all liability for injury to persons or damage to property caused by incorrect or improper installation of the appliance.
The manufacturer reserves the right to make any changes it deems fit to the various models in order to comply with the technical standards in force.
In case of complaints, please get in touch your dealer's customer service department.
1.1.2 Manufacturer's data
1.1.3 Assistance service
For technical queries concerning your appliance, contact your dealer's customer service department.
Before calling the assistance service, make sure you know:
- model identification code
1.1.4 Introduction and safety
Before installing and/or using the appliance, read the instructions in this manual carefully.
This will help you gain familiarity with your new appliance.
Keep this document on hand so you can consult it whenever necessary and transfer it to the new owner if the appliance is sold.
Read the safety messages in the introduction to this manual and pay attention to safety information marked: "Caution", "Warning" and "Danger" in the text.
 | This symbol means:NOTEThis symbol denotes useful recommendations and highlights correct procedures and conduct. Paying attention to the instructions accompanied by this symbol will help to prevent possible problems.The function of the symbol is to highlight the specific methods and procedures to adopt for correct use of the appliance. |
 | This symbol means:WARNINGThe function of this symbol is to highlight an operation to be performed with special care because it could jeopardise the structure of the appliance or of its components. |
 | This symbol means:CAUTIONThe function of this symbol is to highlight safety information. Read the information carefully. Also make sure you have fully understood the causes of potentially dangerous accidents. |
 | This symbol means:DANGERThe function of this symbol is to highlight a situation that is potentially dangerous for you and for others. Read the information carefully. Also make sure you have fully understood the causes of potential dangerous or fatal accidents. |
 | This symbol means:DISPOSALThis symbol, on the product or on the pack, shows that the product must not be treated as normal municipal waste but must be disposed of at a specific electrical and electronic equipment collection and recycling centre. By assuring correct disposal of this product, you are helping to protect the environment and the health and well-being of others. Incorrect disposal of the product endangers the environment and health. More information on how to recycle this product can be obtained from local authorities, waste disposal regulations, or the point of sale where you purchased the product. |
1.1.5 Appliance identification
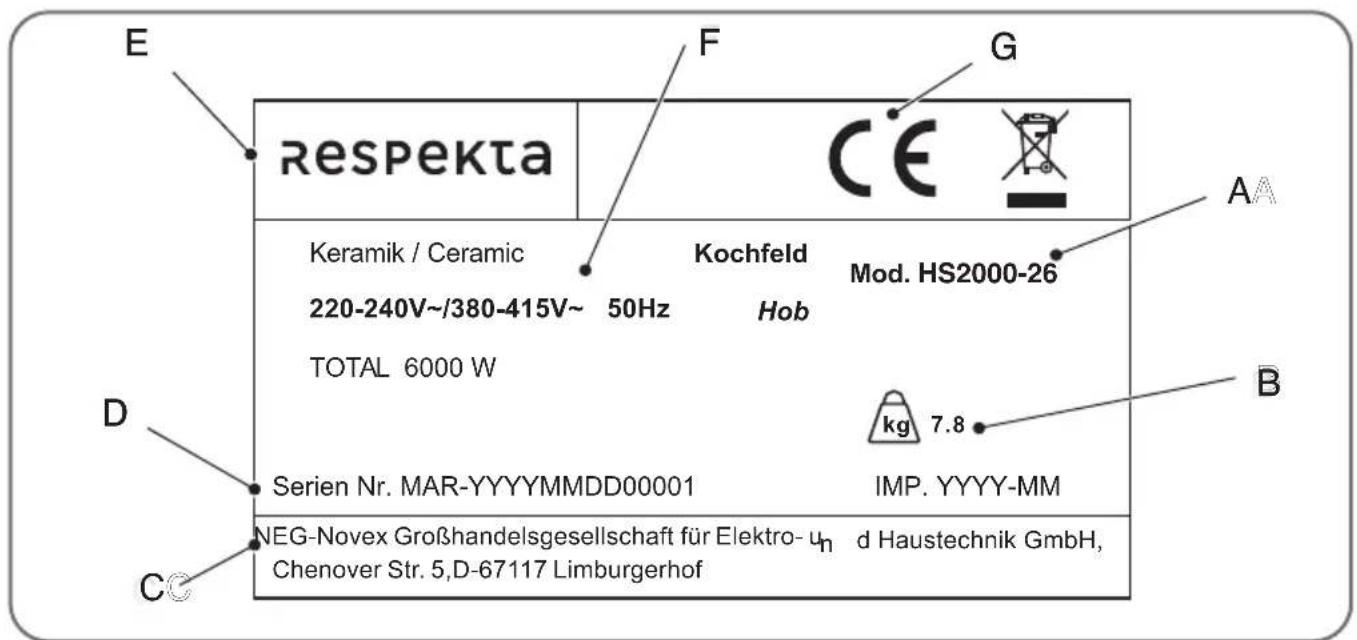
Fig. 1.1
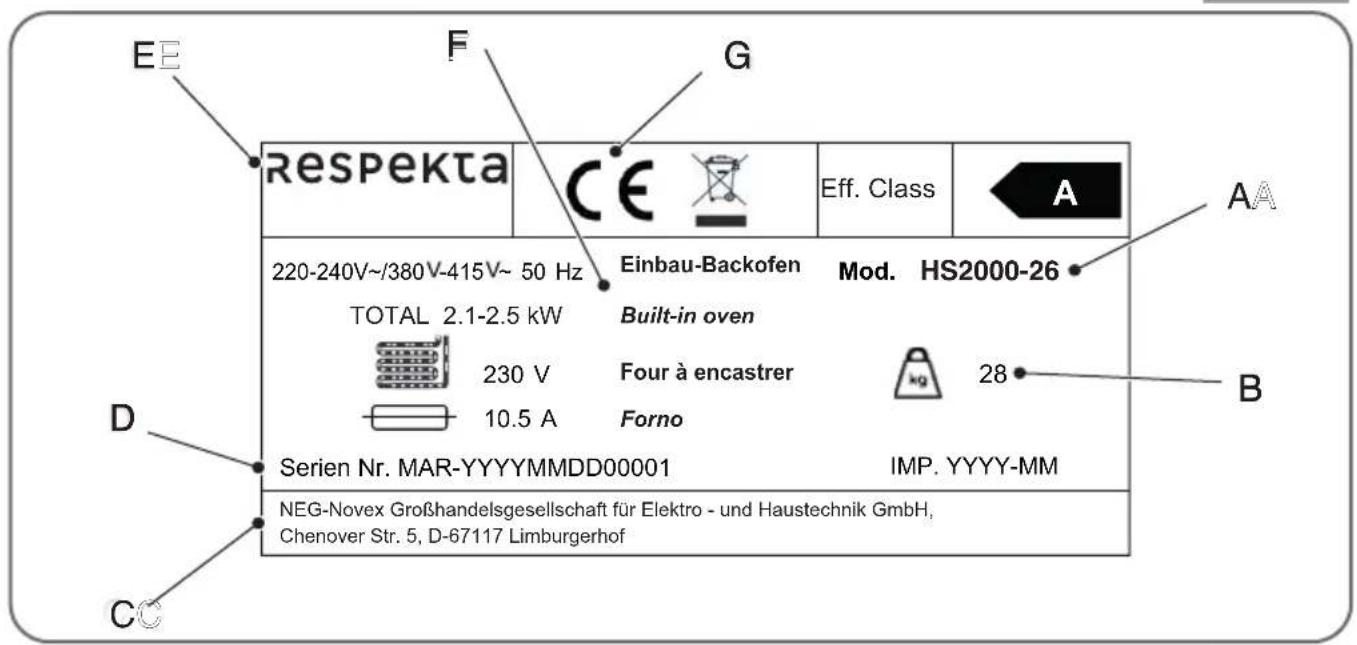
The following data appear on the nameplate:
A - Model
B - Weight
C - Manufacturer's data
D - Serial number
E - Manufacturer
F - Description
G - CE mark

NOTE: We recommend making a separate note of the appliance data and serial numbers to have a readily available record if needed.

NOTE: To maximise efficiency of the assistance and spare parts service, always quote the data on this nameplate.
Nameplate location
The appliance nameplate is located in the lower part of the unit.
CE declaration of conformity
The manufacturer of the appliances described in this document, to which this declaration refers, states under its sole responsibility that the appliances are in compliance with the basic health, safety, and protection requirements of the relevant EC directives and that the related test reports, notably the CE declaration of conformity duly issued by the manufacturer or by its authorised representative, are available for inspection by the competent authorities and can be requested from the appliance dealer. The manufacturer also declares that any parts of the appliance or appliances described in this manual that may come into contact with fresh foods do not contain toxic substances.
1.1.6 Warranty conditions
The manufacturer declines all liability for damage caused by the purchaser.
This appliance is manufactured and tested using the latest available methods. Apart from the legally required 6-month warranty provided by the seller/dealer, the manufacturer provides a warranty for parts and workmanship for a period of 24 months from the date of purchase. Any repairs or alterations carried out by the purchaser or by third parties will automatically invalidate the warranty. The warranty does not cover damage caused by improper use or operation, by incorrect installation or storage, by an improperly made connection, or by causes of force majeure or other external influences. We reserve the right to repair or replace defective parts or replace the appliance in the case of complaints. Only in cases wherein the appliance cannot provide the function specified by the manufacturer following adjustment or replacement can the purchaser request a reduction of the purchase price or cancellation of the purchase contract under warranty within six months, calculated from the date of purchase.
Requests for compensation for damages, also in relation to consequential losses, cannot be considered unless they are based on claims of malice or negligence.
Warranty claims must be validated by the purchaser by submitting the sales receipt. The warranty is valid within the Federal Republic of Germany.
2 : GENERAL SAFETY PRESCRIPTIONS
2.1 Important warnings

DANGER: There is a risk of fire if cleaning is not carried out in compliance with the instructions given in this manual.

DANGER: Risk of fire due to spontaneous ignition of oil and grease vapours. Do not reuse cooking oil: used oil may contain organic residues that increase the likelihood of spontaneous combustion.
If the recipe requires the addition of alcoholic beverages (such as rum, cognac or wine), bear in mind that alcohol evaporates at high temperatures. It may occur therefore that the resulting alcohol fumes could ignite when they come into contact with the heating elements.

DANGER: Do not place flammable products or objects soaked in flammable liquids in, on top of, or near the appliance.
During and following use of the oven, do not touch the heating elements or internal surfaces to avoid the risk of burns. Avoid contact with fabric or other flammable materials until the appliance parts have cooled completely.

DANGER: Danger of hot areas. Failure to comply with these prescriptions could result in burns or scalds.
During use, accessible parts of the appliance could become sufficiently hot to cause burns.
Do not touch the glass ceramic hob until the surface has cooled; do not place clothing or any other objects on the hob while it is still hot.
Do not place metal objects on the hob such as knives, forks, spoons, and pan lids, since they may become hot.
The handles of pans may be hot to the touch. Make sure pan handles are not above any of the hob's cooking zones when they are switched on.
When the oven is in use, the heating elements and parts of the oven door may become extremely hot. Do not touch the heating elements.

DANGER: If the hob surface becomes damaged, disconnect the appliance from the power supply immediately to avoid electric shock.

DANGER: Use caution: the panel edges are sharp.
Risk of injury or cuts if proceeding without due caution.

DANGER: Do not make any modifications to the appliances.
Installation, electrical connection, and possible modifications made to the home electrical system must be carried out by a specialised technician. Failure to comply with these safety prescriptions may result in damage or potentially fatal injury due to electric shock.

DANGER: Do not expose the appliances to weather such as rain or direct sunshine.
 | DANGER: Do not use the appliance (oven/hob) to heat or cook food in cans or other sealed containers. The pressure that forms in the container could cause it to burst, resulting in damage to the appliance. |
 | CAUTION: Before carrying out maintenance or cleaning tasks, the appliance (oven/hob) must be disconnected from the electrical supply.To keep the appliance safe and in good working order, contact exclusively service centres authorised by the manufacturer and use exclusively genuine original replacement parts in the case of breakages or faults. |
 | CAUTION: Make sure the data on the nameplate of the appliances are compatible with the electrical supply in the home in which the appliance is to be installed. In the case of discrepancies, consult a qualified technician. |
 | CAUTION: Be sure to use a correctly rated cable to connect the appliance to the electrical supply.Make sure the appliance has been properly assembled. If unsuitable power cables are used, the connection may become hot.Make sure the power cable connections are tight and the cable is not tangled.Make sure a protection is installed to prevent direct contact with electrical cables.Do not use multiple socket adapters or extension leads.The temperature probe forms part of the thermostat; if it becomes damaged it must be replaced by a specialised technician.Do not pull or damage the power cable to disconnect the appliance from the electrical supply. Contact our authorised customer service or a specialised technician to have a damaged power cable replaced. |
 | CAUTION: Do not drop heavy objects or pans onto the hob. NEVER climb onto the hob as this may damage the surface. |
 | CAUTION: Do not switch on cooking zones if they are not occupied by pans or if the pans are empty. |
 | CAUTION: Do not place sheets of aluminium foil on the hob. |
 | CAUTION: Use exclusively adequate electrical supply disconnecting devices: circuit breakers, fuses (screw-in fuses must be removable from the support), residual current devices, and contactors. |
 | CAUTION: Use exclusively the hob protections designed by the appliance manufacturer or the hob protections incorporated in the appliance. The use of inadequate protections may result in accidents. |
  | CAUTION: The electrical system must be equipped with an isolation device that disconnects the appliance from all poles of the electrical supply. The isolation device must have a minimum contact gap of 3 mm.CAUTION: When the appliance (oven/hob) is connected to the electrical supply, make sure the power cable cannot come into contact with hot parts of the appliance or with hot pans. Make sure the power cables of other home appliances do not come into contact with hot parts of the appliances. |
 | CAUTION: All parts protecting against direct contact and insulated parts must be secured so that they cannot be removed without the use of tools. |
 | CAUTION: The ventilation or heat dissipation openings must never be covered or blocked. |
 | CAUTION: Cast iron pans, forged aluminium pans, or pans with damaged bottoms may scratch the glass ceramic surface. Always lift the pans to move them on the hob. |
 | CAUTION: Before making any connections, make sure the mains voltage matches the voltage shown on the label located inside the appliance (oven/hob). |
 | CAUTION: If the power cable is damaged, it must be replaced by the manufacturer, by the manufacturer's technical service, or by a qualified person, in order to eliminate any possible risks. |
 | CAUTION: Keep children less than 8 years of age away from the appliance. Children must be supervised to ensure they do not use the appliance improperly. Potentially hazardous parts must be made safe when the appliance is no longer in use. |
 | CAUTION: Do not allow children to play with the appliance. |
 | CAUTION: Keep all the packaging material (bags, polystyrene, nails, etc.) out of reach of children. |
 | CAUTION: Cleaning and maintenance must not be entrusted to children without supervision. |
 | CAUTION: Keep children and pets away from the appliances when they are operating or while they are cooling. Accessible parts are hot. |
 | CAUTION: The oven door hinges may be damaged if subjected to excessive weight. Do not place heavy containers on the open oven door and do not rest your weight on it when cleaning the interior of the oven. Do not climb onto the open oven door and do not allow children to sit on it. |
 | CAUTION: Use of the appliances by persons with physical, sensory, or psychological disabilities is permitted only when they are supervised by a carer responsible for their safety. |
 | CAUTION: Remove all packaging material, stickers and protective film (if present) before using the appliance for the first time. |
 | CAUTION: To clean the appliances, first make sure they are switched off. |
 | CAUTION: Do not use a damaged appliance. |
 | CAUTION: Do not use plastic receptacles. |
 | CAUTION: If the appliance (oven/hob) develops a fault, inform customer service. Do not attempt to install/repair the appliance without the assistance of a specialised technician. If in doubt concerning correct operation of the appliance, consult a specialised technician. |
 | CAUTION: The appliances are intended exclusively for cooking food. Any other use, such as space heating, is considered improper.The manufacturer cannot be held liable for any damage caused by incorrect installation, tampering with any part of the appliance, improper use, misuse, or unreasonable use. |
 | CAUTION: Due to the weight of the hob, use caution when installing or moving it.When installing or handling the oven, always use the handle recesses in the sides to avoid injury or damage to the appliance. Due to the weight of the oven, use caution when handling it.Always wear safety gloves and shoes. |
 | CAUTION: Do not use the appliances with wet hands or if you have come into contact with water.Never use the appliances with bare feet. |
 | CAUTION: Molten plastic and plastic films must be removed from the hob immediately. |
 | CAUTION: Make sure you leave a space of at least 30 mm between the worktop and the built-in oven beneath it to allow air circulation. Damage resulting from the absence of a ventilation space is not covered by the warranty. |
 | CAUTION: When the oven is operating or when it is still hot, always use oven gloves to insert or remove dishes/containers, taking care not to touch the heating elements. |
 | CAUTION: Once you have finished cooking, open the oven door carefully, allowing the hot air and steam to escape gradually. |
 | CAUTION: Always grip the oven door handle in the centre, because the ends may heat up due to hot air escaping from the oven. |
 | CAUTION: Do not cook foods in direct contact with the oven racks and drip pans. |
 | WARNING: Installation and electrical connection must be carried out by a specialised technician in compliance with the manufacturer's instructions and statutory legislation. |
 | WARNING: The appliances are not intended to be operated by an external timer or a separate remote control system. |
 | WARNING: Do not use the oven to store beverages or foods. |
 | WARNING: Do not line the oven cavity with aluminium foil and do not place cake tins or other receptacles on the bottom of the oven; a foil lining will prevent air circulation in the oven, impair cooking performance, and can damage the enamel finish. |
 | WARNING: Do not drag pots or dishes across the bottom of the oven as this could damage the enamel finish. |
 | WARNING: Do not use the hob as a worksurface or for storage. |
 | WARNING: Seal the edges of the hob with sealing tape to prevent the worktop from swelling due to the effect of moisture.Protect the underside of the appliance from steam and humidity. |
 | WARNING: Do not place cutlery or pan lids on the cooking zones: items placed on the cooking zones will heat up. |
 | WARNING: If sugar or food with high sugar contents is spilled on the hot glass ceramic hob, clean the hob immediately and remove the sugar with a scraper, even when the hob is still hot. This prompt action will prevent possible damage to the glass ceramic surface. |
 | WARNING: Do not install the appliances near a door or under a window. This precaution avoids the risk of hot pans overturning when the door or window is opened. |
 | WARNING: Switch off the appliances and allow them to cool down before cleaning them.Once the oven has cooled sufficiently, use a damp cloth and a small amount of detergent to remove limescale, water stains, and grease spatters. After cleaning, dry the oven with a soft cloth. |
 | WARNING: Do not leave the appliances unattended when they are operating. |
 | WARNING: Switch off the appliances after use.Make sure that all the knobs are set to “0” when the appliance is not in use. |
 | WARNING: After removing the appliances from the pack, check that they are in perfect condition. If the product (oven/hob) shows signs of damage, do not use it and instead contact the RESPEKTA service network.Do not attempt to cook on a broken or cracked hob. If the surface of the hob is broken or cracked, disconnect the appliance immediately from the electrical supply (wall switch) and contact a qualified technician. |
 | WARNING: Comply with the prescribed minimum distances from other appliances. |
 | WARNING: Before installing and using the appliance, make sure the voltage (V) and frequency (Hz) shown on the appliance are identical to the voltage (V) and frequency (Hz) of the electrical supply in the home in which it is to be installed. |
 | WARNING: Clean the appliances regularly to avoid undue wear of the surfaces. |
 | WARNING: Disconnect the appliance (oven/hob) from the electrical supply before carrying out maintenance tasks. |
 | WARNING: When the appliance (oven/hob) is to remain unused for a prolonged period, disconnect the electrical supply and set the main switch to off. |
 | WARNING: Do not use steam cleaners to clean the interior of the oven or to clean the hob.Clean the appliance with a soft damp cloth.Use exclusively pH neutral detergents to clean the surfaces of the oven.Do not use scouring pads, solvents, or metal objects. |
 | WARNING: All accessories in contact with food must be cleaned carefully with suitable products before use. |
 | NOTE: Before installing and/or using the appliances read the instructions carefully. |
 | NOTE: Clean the appliances after each use. |
 | NOTE: Always make sure pan bottoms are clean. |
 | NOTE: Scratches or dark stains on the surface do not affect operation of the hob. |
 | NOTE: Use a suitable scraper for cleaning glass. |
 | NOTE: The oven and hob are for domestic use only.The appliances described in this document are not intended for professional use. They are designed exclusively for domestic use. |
 | NOTE: This appliance (oven/hob) complies with electromagnetic radiation safety regulations. |
 | NOTE: To benefit from the terms of the warranty, make sure you can produce the warranty card and the sales receipt, otherwise the warranty cannot be offered. |
2.2 Environmental protection
2.2.1 Packaging
The packaging materials are 100% recyclable. Act in compliance with local legislation for their disposal.

WARNING: The packaging material (plastic bags, polystyrene components, etc.) is potentially dangerous for children. Keep the packaging material out of reach of children.
2.2.2 Disposal

WARNING: Dispose of the old appliance in compliance with legal prescriptions. Before disposing of the appliance, cut of the power cable to make it unusable. The appliance must be disposed of by consigning it to an authorised recycling centre.
3 : TECHNICAL DATA AND CHARACTERISTICS
3.1 Technical data
3.1.1 Model HS2000-26 - hob
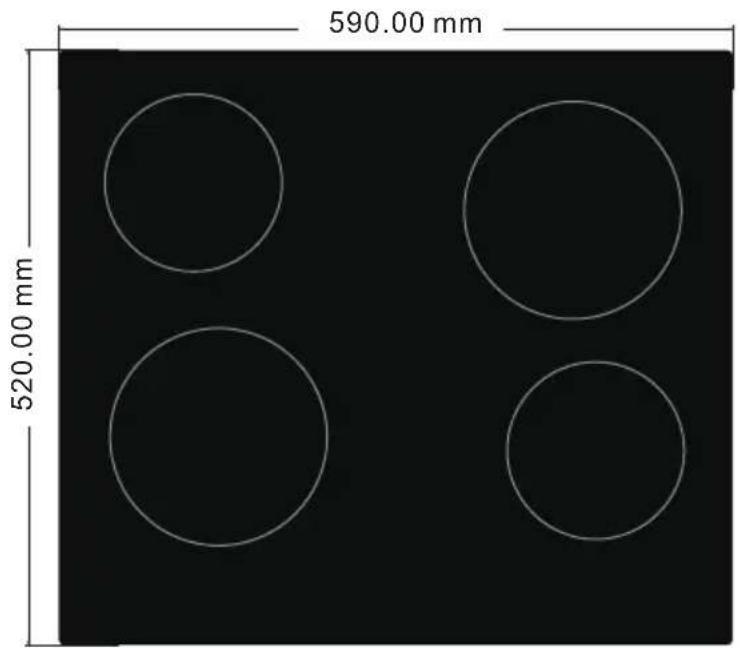
Fig. 3.1
| Model no. HS2000-26 | ||
| Product identification / Brand NEG respekta | ||
| Product family Built-in hob for SET | ||
| Product description Electric hob, 60cm | ||
| Hob type (electric/gas/combined) electric | ||
| Heating type (solid/radiant/induction rings) | radiant rings | |
| Hob finish (stainless steel/glass/glass ceramic) | glass ceramic | |
Characteristics
| Model no. HS2000-26 | ||
| Voltage / Frequency V/Hz 220-240V~/380V-415V~ 50 Hz | ||
| Nominal power Watts 6000 | ||
| Power cable (with/without) plug cable not supplied, without plug | ||
| Hob width cm 60 | ||
| No. of cooking zones no. 4 | ||
| No. of knobs no. 4 | ||
| Front heating zone (left) Watts 1800W | ||
| Rear heating zone (left) Watts 1200W | ||
| Rear heating zone (right) Watts 1800W | ||
| Front heating zone (right) Watts 1200W | ||
| Controls type (knob/touch/slider) | knob | |
| Power range setting no. 0-9 | ||
| Digital timer configuration | minutes | No |
| Child protection function | Yes/No | No |
| Residual heat indicator | Yes/No | Yes |
| Overheating protection | Yes/No | Yes |
| Automatic power off | Yes/No | Yes |
| Appliance dimensions (Length-Width-Depth) | mm | 590 x 520 x 50 |
| Net weight | kg | 7.8 |
Equipment or accessories
| Model no. | HS2000-26 | |
| Fixing brackets (included/not included) | included | |
| Sealing tape (included/not included) | included |
3.1.2 Model HS2000-26 - built-in oven
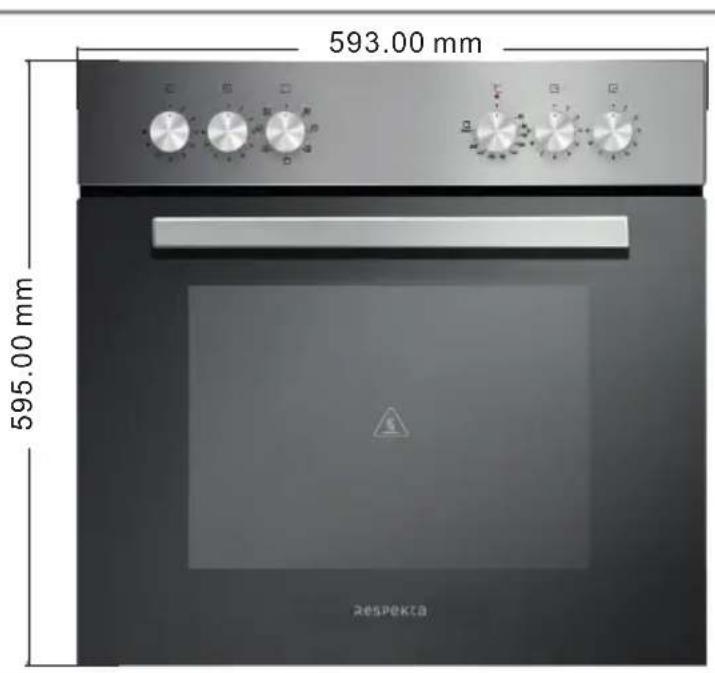
Fig. 3.2
| Model no. HS2000-26 | ||
| Product identification / Brand NEG respekta | ||
| Product family Built-in oven for SET | ||
| Product description Built-in electric oven, 60cm | ||
| Oven type (electric/gas) electric | ||
| Oven cavity usable capacity (EN65) | Litres 56 | |
Characteristics
| Model no. HS2000-26 | ||
| Voltage / Frequency V/Hz 220-240V~/380V-415V~ 50 Hz | ||
| Nominal power Watts 2300 | ||
| Energy consumption class A | ||
| Energy consumption during normal operation kWh/cycle | 0.83 | |
| Energy consumption during fan assisted operation kWh/cycle | 0.71 | |
| Total installed power kW 2.1-2.5 | ||
| Power cable (with/without) plug cable not supplied, without plug | ||
| Oven controls (mechanical/analogue/digital/full touch) | mechanical | |
| Cooking mode (static, fan assisted, etc.) fan assisted | ||
| Oven cavity moulded cavity | ||
| No. of knobs no. 2 | ||
| Knobs type | rotary | |
| Oven door open/closed function | standard | |
| No. of oven door glass panels | no. | 2 |
| Type of inner glass: fixed/removable | removable | |
| Operating temperature | C^o | 60-250 |
| Grill type | electric | |
| Grill heating element | W | 1300 |
| Top heating element | W | 1300 |
| Bottom heating element | W | 1000 |
| Fan element | W | / |
| No. of circulation fans no. 1 | ||
| Oven guides Yes/No No | ||
| Flat walls with removable support rails | Yes/No | No, (moulded cavity) |
| Oven thermostat Yes/No Yes | ||
| Oven light / type | Yes/No | Yes, E14 25W |
| No. of drip pans | no. | 1, enamelled |
| No. of racks | no. | 1 chromed grill rack |
| Appliance dimensions (Length-Depth-Height) | mm | 593 x 520 x 595 (excluding handle/knobs) |
| Net weight | kg | 28 |
| Gross weight SET (including packaging) | kg | 38 |
| Pack dimensions SET (Length-Depth-Height) | mm | 639 x 579 x 775 |
Oven functions
| Model no. HS2000-26 | ||
| No. of cooking functions no. 7Oven functions (symbol and description) | ||
 | Light | |
 | Static, top and bottom convection heating | |
 | Fan assisted, top and bottom heating, fast cooking | |
 | Grill | |
 | Fan assisted grill | |
 | Fan assisted bottom heating, slow cooking | |
 | Defrosting |
Other functions
| Model no. HS2000-26 | ||
| Cooking timer Yes/No No | ||
| Timer knob Yes/No No | ||
| Cooling fan Yes/No Yes | ||
| Thermostat on/off light Yes/No Yes | ||
| Vapour removal Yes/No No |
Equipment or accessories
| Model no. HS2000-26 | ||
| Rotisserie (included/not included) not included | ||
| Telescopic shelf guides (included/not included) | not included | |
| Drip pans (included/not included) no. included, 1, enamelled | ||
| Racks (included/not included) no. | included, 1, chromed stainless steel | |
3.2 Wiring diagram
Hob wiring diagram
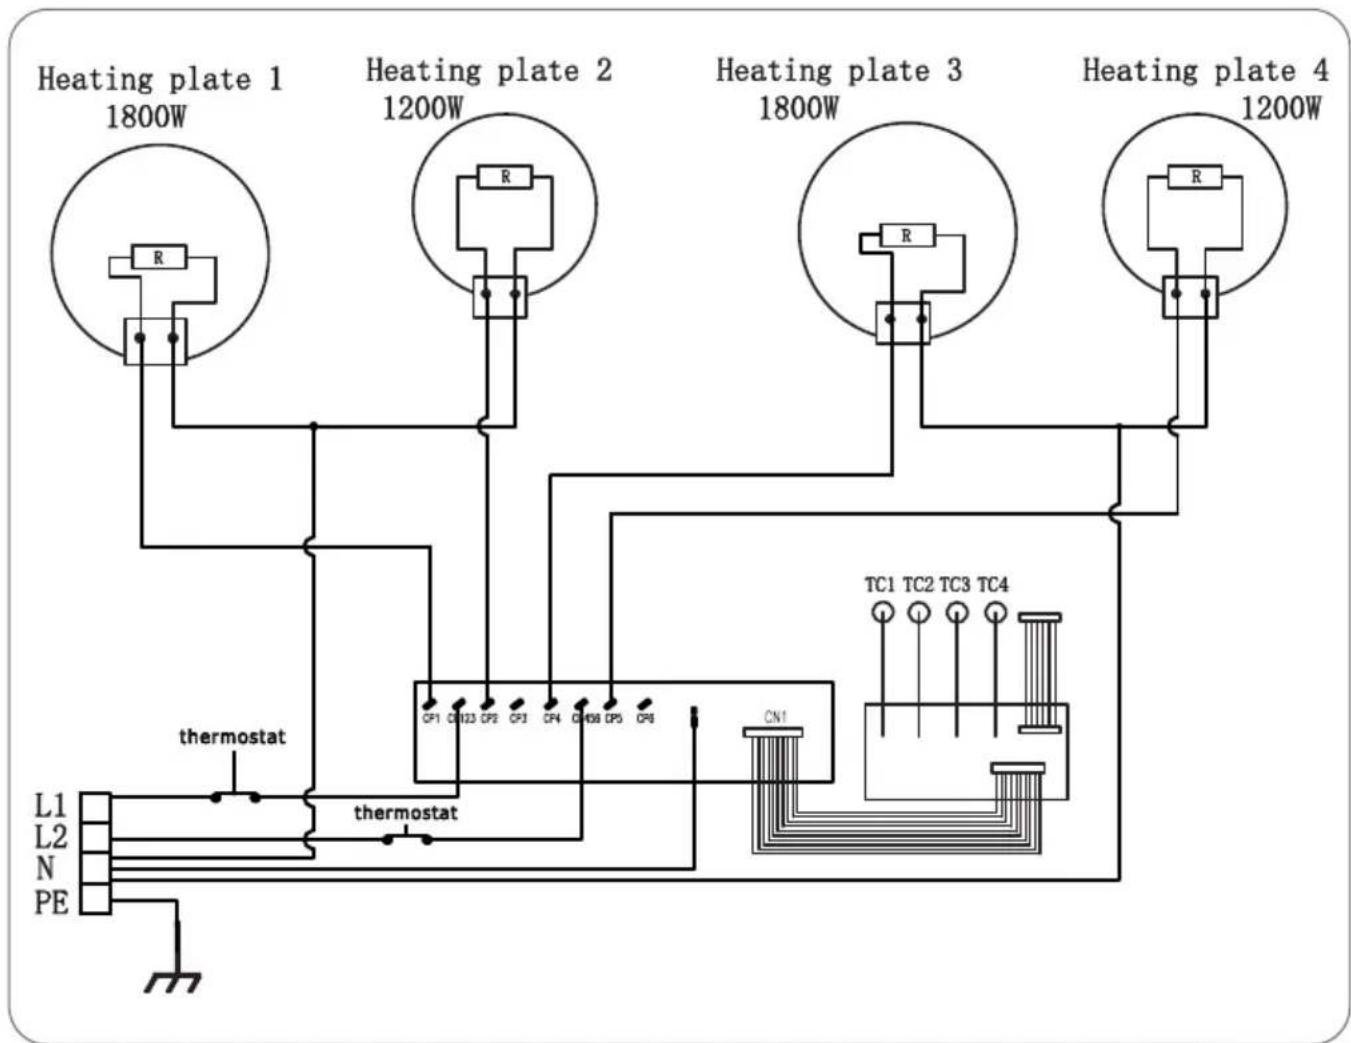
flowchart
graph TD
    A["Heating plate 1 1800W"] --> B["R"]
    C["Heating plate 2 1200W"] --> D["R"]
    E["Heating plate 3 1800W"] --> F["R"]
    G["Heating plate 4 1200W"] --> H["R"]
    I["L1 L2 N PE"] --> J["thermostat"]
    K["CP1 CP2 CP3 CP4 CP5 CP6"] --> L["thermostat"]
    M["CN1 TC1 TC2 TC3 TC4"] --> N["thermostat"]
    O["TC1 TC2 TC3 TC4"] --> P["thermostat"]
    Q["CP1 CP2 CP3 CP4 CP5 CP6"] --> R["thermostat"]
    S["TC1 TC2 TC3 TC4"] --> T["thermostat"]
Fig. 3.3
Oven wiring diagram
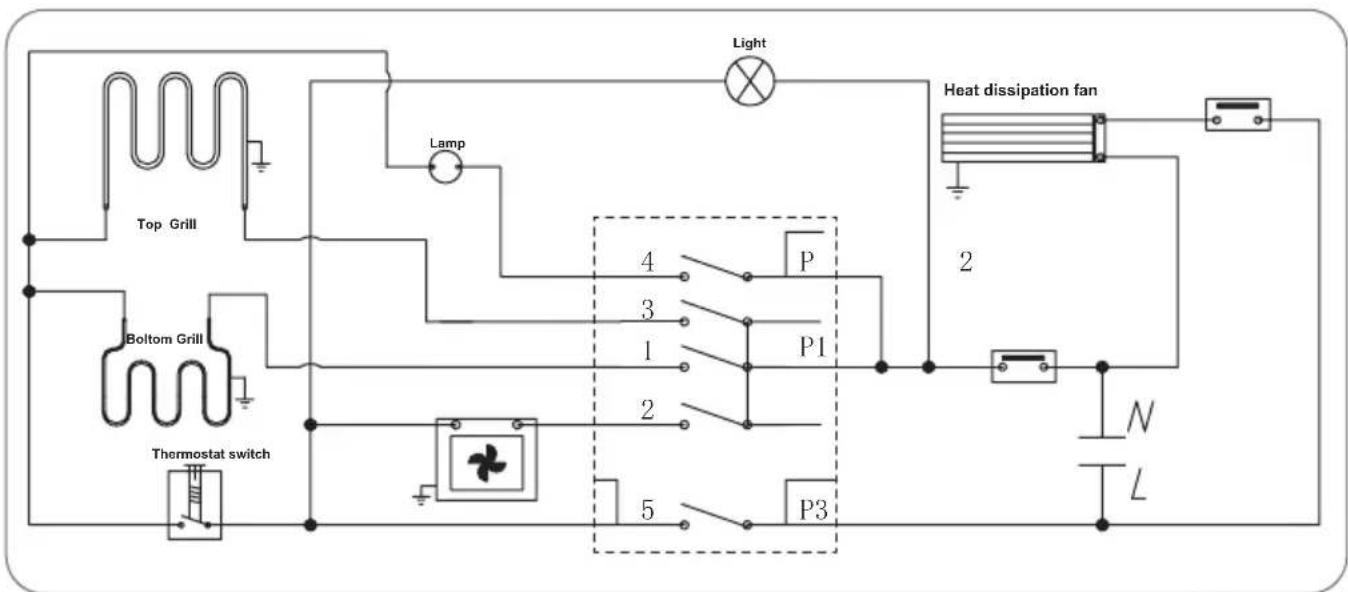
flowchart
graph TD
    A["Top Grill"] --> B["Bottom Grill"]
    B --> C["Thermostat switch"]
    C --> D["Lamp"]
    D --> E["Light"]
    E --> F["Heat dissipation fan"]
    F --> G["2"]
    G --> H["N"]
    G --> I["L"]
    C --> J["4"]
    C --> K["3"]
    C --> L["1"]
    C --> M["2"]
    C --> N["5"]
    C --> O["P1"]
    C --> P["P3"]
Fig. 3.4
4 : PRESCRIPTIONS FOR USE
4.1 Preliminary recommendations

DANGER: Risk of fire due to spontaneous ignition of oil and grease vapours. Do not reuse cooking oil: used oil may contain organic residues that increase the likelihood of spontaneous combustion.
If the recipe requires the addition of alcoholic beverages (such as rum, cognac or wine), bear in mind that alcohol evaporates at high temperatures. It may occur therefore that the resulting alcohol fumes could ignite when they come into contact with the heating elements.

DANGER: Do not place flammable products or objects soaked in flammable liquids in or near the appliance.
During and following use of the oven, do not touch the heating elements or internal surfaces to avoid the risk of burns. Avoid contact with fabric or other flammable materials until the appliance parts have cooled completely.

DANGER: Danger of hot areas. Failure to comply with these prescriptions could result in burns or scalds.
When the appliance is in use, the heating elements and parts of the oven door may become extremely hot. Do not touch the heating elements.

CAUTION: Before carrying out maintenance or cleaning tasks, the appliance must be disconnected from the electrical supply.

CAUTION: Remove all packaging material, stickers and protective film (if present) before using the appliance for the first time.

WARNING: Regular maintenance ensures good working order and optimal performance of the appliances.
WARNING: Remove built-up dirt from the surfaces regularly.

WARNING: Make sure the room is sufficiently ventilated.

WARNING: Check to ensure the appliances have not suffered transport damage.

WARNING: Installation and electrical connection must be carried out by a specialised technician in compliance with the manufacturer's instructions and the regulations in force.
4.2 Using of the electric hob
4.2.1 Operation of the electric hob
The glass ceramic hob is equipped with a microcomputer capable of meeting a range of different cooking requirements, thanks to the micro-automated control heating element with multi-power selection.
The glass ceramic hob is based on infrared heating technology, with the food heated by radiant heat.

WARNING: If sugar or food with high sugar contents is spilled on the hot glass ceramic hob, clean the hob immediately and remove the sugar with a scraper, even when the hob is still hot. This prompt action will prevent possible damage to the glass ceramic surface.

WARNING: Switch off the appliance and allow it to cool down before cleaning it.
Once the hob has cooled sufficiently, use a damp cloth and a small amount of detergent to remove limescale, water stains, and grease spatters. After cleaning, dry the hob with a soft cloth.
4.2.2 Suitable pans
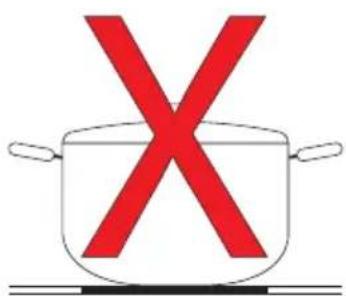
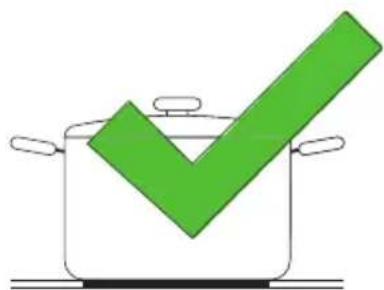
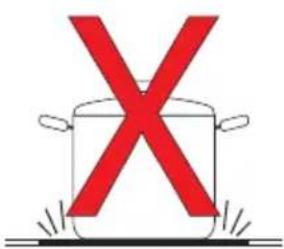
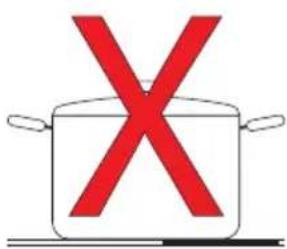
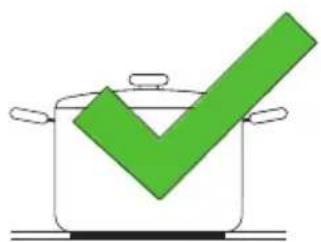
You can use any type of pot or pan, including copper pans, woks, stainless steel pans, glass pans, ceramic casserole dishes and containers.

NOTE: The bottom of the pan should be flat and smooth.
Do not use pans with a rough serrated bottom or with a curved bottom.
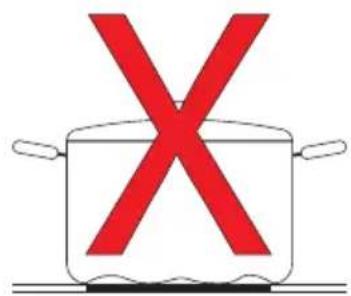
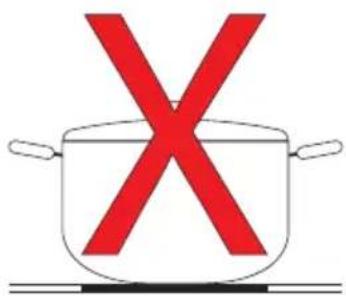
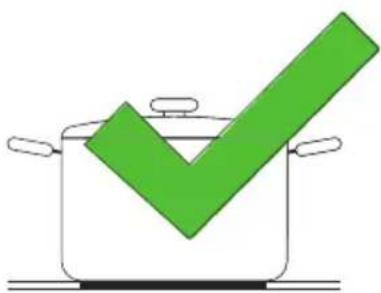
natural_image
Illustration of a cooking pot with a green checkmark inside, no text or symbols presentFig. 4.1
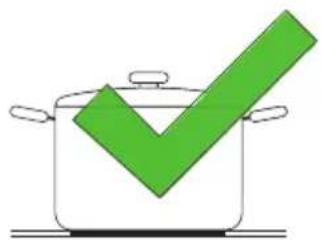
When cooking, the pan must remain in the centre of the cooking zone.
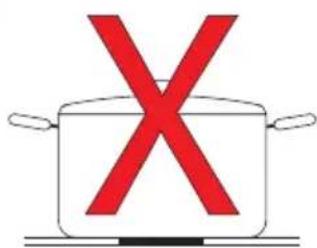
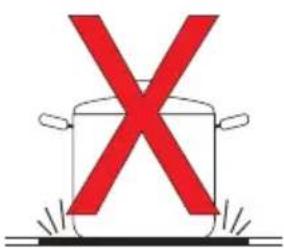
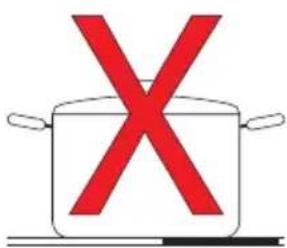
natural_image
Illustration of a cooking pot with a green checkmark inside, no text or symbols presentFig. 4.2

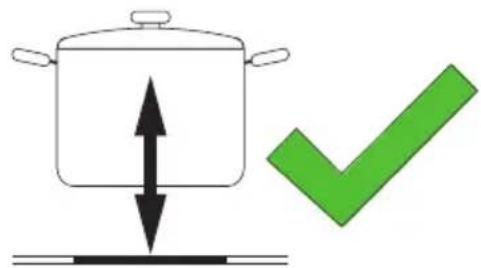
NOTE: Always lift the pans and place them delicately on the glass ceramic surface. Do not slide the pans on the hob or the glass surface may become damaged.
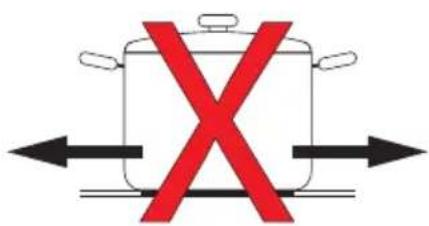
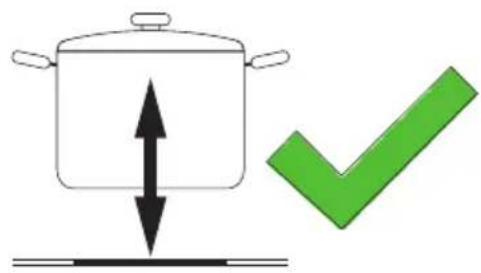
Fig. 4.3
4.2.3 Energy saving
Follow these practical tips to save electricity during your cooking activities.

WARNING: When preparing dishes that require long cooking times in a pressure cooker, make sure the pressure cooker contains sufficient liquid, because leaving an empty pan on the hob could damage both hob and pan.

NOTE: Place the pans on the cooking zone before switching on.

NOTE: Position the pans in the centre of the cooking zone.

NOTE: Use residual heat of the cooking zone to keep food warm. Heat up another dish on a cooking zone that has just been used in order to make use of the residual heat.

NOTE: When heating water, heat only the amount you actually need.

NOTE: Always place a lid of the correct size on pots and pans.

NOTE: Use a suitable size pan for the quantity of food to be cooked. Using a large pan that is only partly full results in energy wastage.
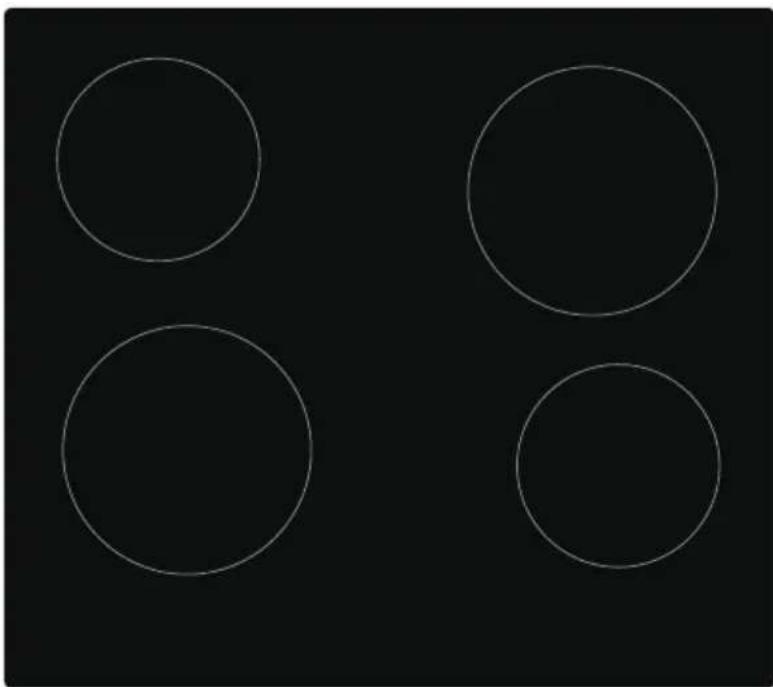
4.2.4 Layout of cooking zones
HS2000-26
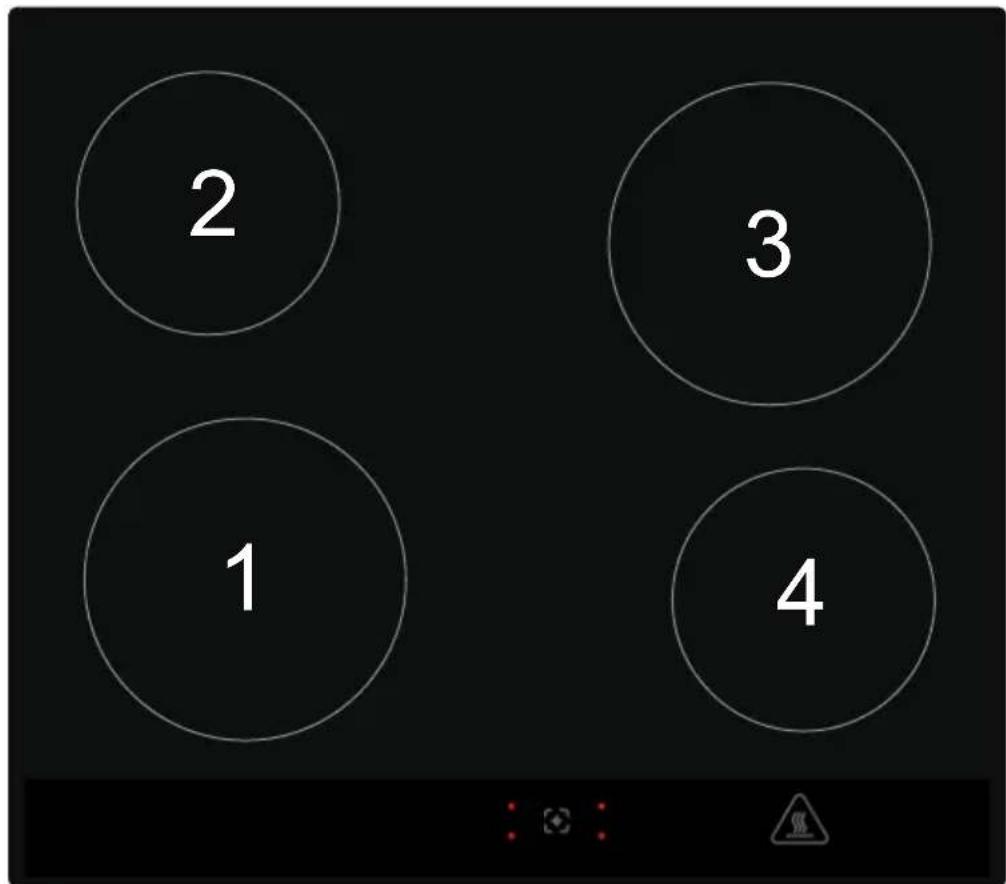
Fig. 4.4
1 - Front left cooking zone (1800W)
2 - Rear left cooking zone (1200W)
3 - Rear right cooking zone (1800W)
4 - Front right cooking zone (1200W)
4.2.5 Control panel (hob control knobs)
Knobs to switch on/switch off the cooking zone
1 - Front left cooking zone selection knob
2 - Rear left cooking zone selection knob
3 - Rear right cooking zone selection knob
4 - Front right cooking zone selection knob



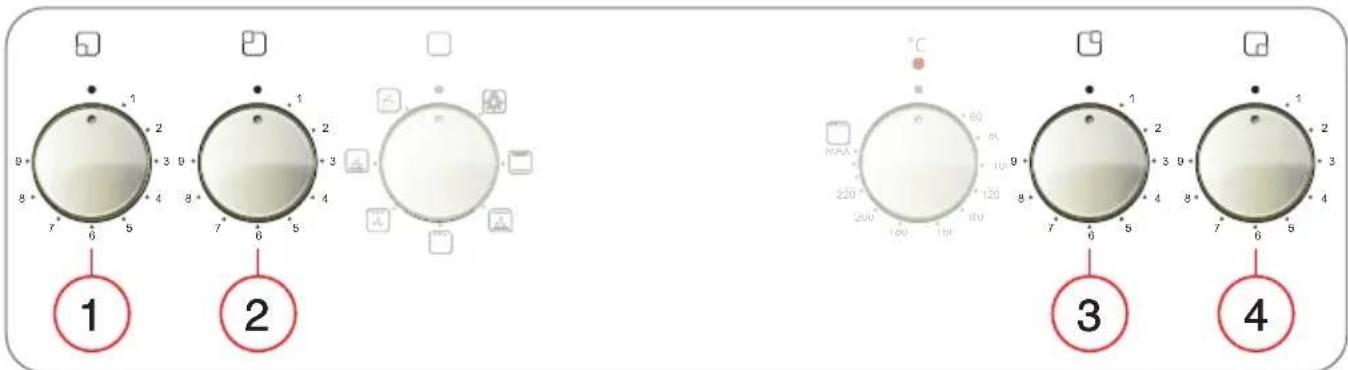
Fig. 4.5
4.2.6 Starting the cooking process
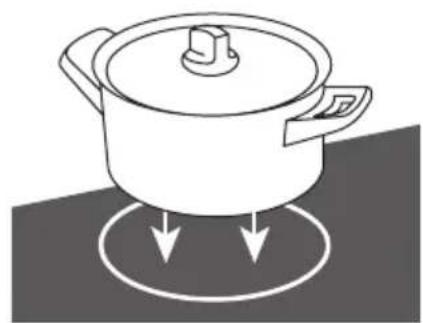
1 - Place your pan on the required cooking zone.
| WARNING:The bottom of the pan and the hob surface must be clean and dry. |
natural_image
Line drawing of a cooking pot with two downward arrows indicating heating or cooling process (no text or symbols)Fig. 4.6
2 - Turn the knob clockwise to switch on the required cooking zone and set the power level from 1 to 9 (on the 0 setting the cooking zone is off).
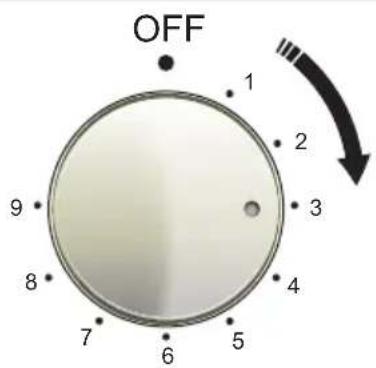
Fig. 4.7

NOTE: You can use several cooking zones simultaneously, simply by turning their knobs.
4.2.7 After cooking
Turn the knob anticlockwise to the "0" (OFF) position to switch off the required cooking zone.
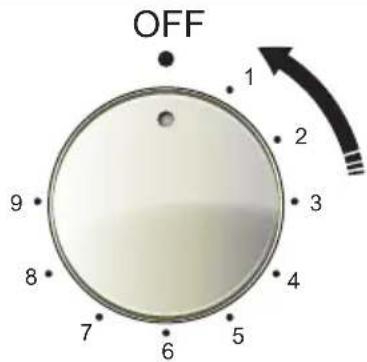
Fig. 4.8

NOTE: If you switch off the hob by means of the main isolator switch or if there is an electric power failure while the appliance is on (knobs set between 1 and 9), when power is restored you will need to return the knob to the "0" position and then switch on the cooking zone again by setting the knob to the heat level required.

CAUTION: Beware of hot surfaces
The illuminated indicator on the hob glass shows which cooking zone in stil hot to touch. The indicator will switch off as soon as the surface has cooled to a safe temperature. This feature can also be exploited to save energy by using cooking zone that retain residual heat to heat up several pans.
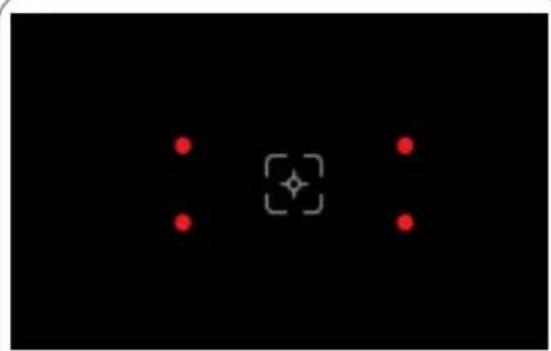
natural_image
Black background with four red dots and a central star-like symbol (no text or labels)Fig. 4.9
4.2.8 Automatic power off
Automatic power off is a protective and safety function for the hob. If you forget to switch off the appliance once you have finished cooking, it will switch off automatically. The pre-set power off times for the different power levels are shown in the table below:
| Power level 1 2 3 4 5 6 7 8 9 | |||||||||
| Standard timer for cooking time (hours) | 8 8 8 4 | 4 4 2 2 | 2 |
4.2.9 Cooking guidelines
Cooking tips

DANGER: Use caution if you intend to heat oil or fat very rapidly. At very high temperatures oil and fat may ignite spontaneously, thus creating a serious fire hazard
- The use of a lid reduces cooking times and saves energy because it reduces heat loss.
- Use only the necessary quantity of oil or fat to reduce cooking times.
- Start cooking by setting a high temperature, then reduce the temperature when the food reaches the required cooking conditions.
| Heat setting Purpose | |
| 0 off, use of residual heat | |
| 1 - 2 melt, heat, heat retention | |
| 3 - 4 slow cooking, defrosting, and heating | |
| 5 - 6 braising, delicate cooking, and toasting of small quantities | |
| 7 - 8 cooking and browning of large quantities | |
| 9 frying, cooking to boiling point |
4.3 Using the oven
4.3.1 Before use
This multifunction oven combines the benefits of traditional convection ovens with those of the latest fan assisted models in a single appliance. It is an extremely versatile appliance that allows different cooking modes to be selected easily and safely.

WARNING: Before using the appliance, clean all the accessories with warm water and normal detergent. Do not use abrasive detergents.

WARNING: When using the oven for the first time, heat it for about half an hour (230°C), and leave the kitchen windows open, if possible. When it is first switched on the oven may release odours due manufacturing residues such as grease, oil, and resins. Once the recommended time has elapsed, the oven is ready to be used for cooking.

WARNING: When grilling foods or when using the rotisserie (available only on some models), place the supplied drip pan on the bottom shelf to prevent liquids and/or grease from dripping onto the bottom of the oven. For all other cooking types, never use the bottom shelf and never place objects on the bottom of the oven, since this could damage the enamel finish. Place containers (cake tins, aluminium sheets, etc.) on the rack supplied with the appliance, inserted on the oven guides.
4.3.2 Suitable containers, casserole dishes and baking trays
Before starting to use the appliance, it is essential to know which types of containers can be placed in the oven.
Aluminium cake tins/trays make it possible to cook food rapidly because aluminium absorbs heat quickly and distributes it evenly.
Stainless steel trays are more rugged than those made of aluminium, but since the material is harder and more resistant it heats up more slowly and does not distribute the heat evenly throughout the entire tray.
Tinplate cake tins (rarely used today) provide uniform cooking results, but cleaning and upkeep are difficult.
Vitrified porcelain dishes (resistant to high temperatures) provide good cooking results.
Toughened glass dishes (normal glass would shatter) provide good cooking results.
Specific silicone pans provide good cooking performance, are easy to clean, and are available in various shapes. This type of material is especially suitable for cakes and desserts.
Baking paper is used to prevent food from sticking to the cake tins/baking trays; do not exceed 220 °C since above this temperature the food may become contaminated by substances released from the paper.

NOTE: Do not drag pots or dishes across the bottom of the oven as this could damage the enamel finish.
4.3.3 Oven components
HS2000-26
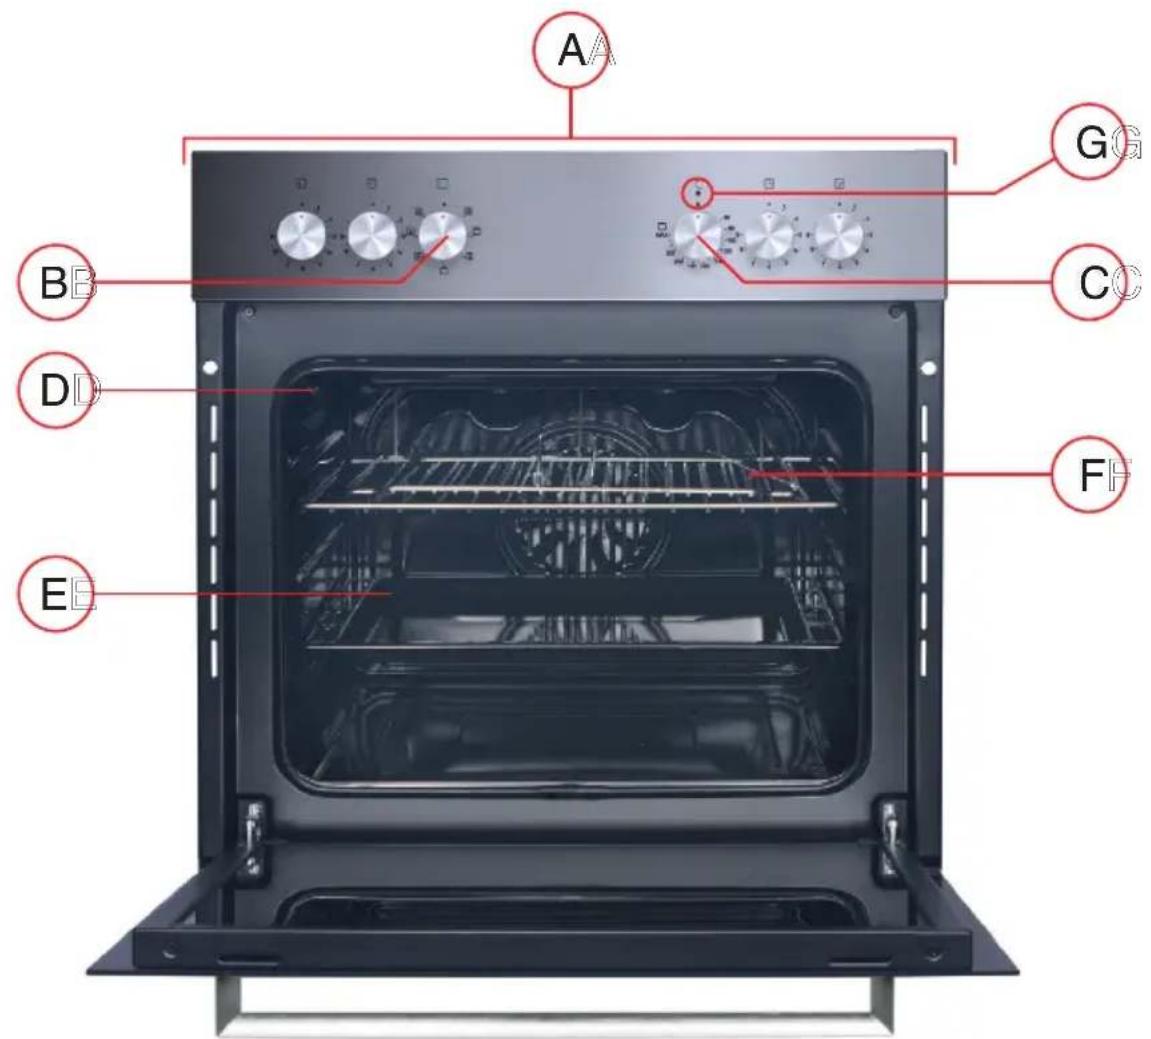
Fig. 4.10
A - Control panel
B - Cooking mode selection knob
C - Cooking temperature selection knob
D - Oven light
E - Drip pan
F - Rack
G - Oven power indicator light
4.3.4 Control panel (oven control knobs)
Oven on/off knob and cooking mode selection knob
B - Cooking mode selection knob
C - Cooking temperature selection knob
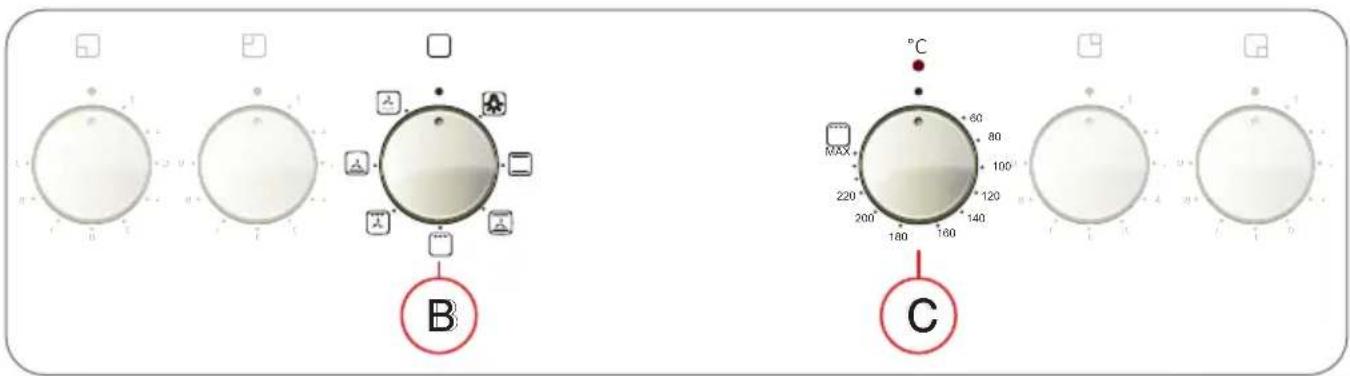
Fig. 4.11
4.3.5 Cooking functions
Cooking mode selection knob
Turn knob (B) to select the cooking function.
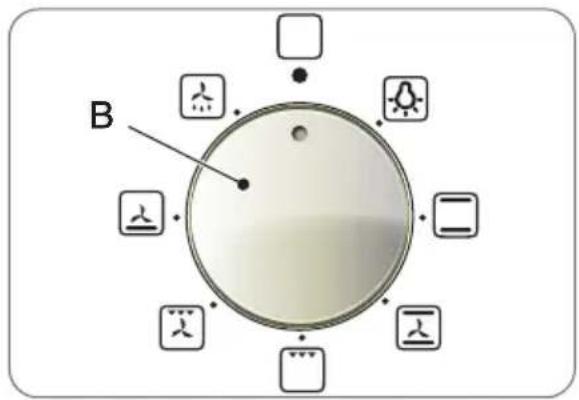
Fig. 4.12
Thermostat knob
Turn knob (C) to set the required temperature.
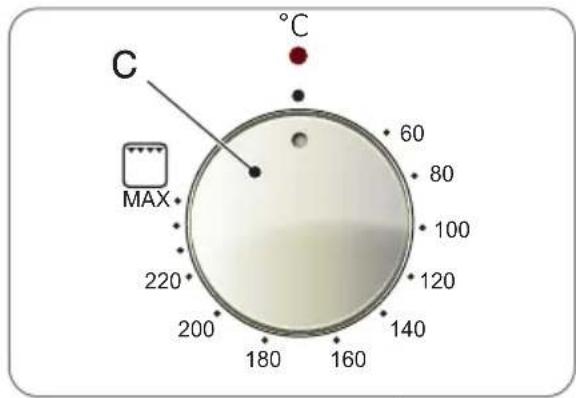
Fig. 4.13
 | NOTE: The settings can be changed also while the oven is operating. |

| Function Knob (B) | Description Proposed | temperature (°C)Knob (C) |
 | LightSet knob (B) to the corresponding symbol to switch on. The light illuminates the interior of the oven and remains on when any of the oven heating elements is switched on. | |
 | Static, top and bottom convection heating.In this setting, the top and bottom heating elements switch on. This is the classic traditional oven, which has been perfected by improving heat distribution and reducing energy consumption. The convection oven remains unsurpassed when preparing dishes such as cabbage with ribs, Baccalao, Ancona stockfish, tender veal strips with rice, etc. Excellent results are also available when preparing veal- or beef-based dishes (braised meat, stews, goulash, game, ham, etc.) that must be cooked slowly. When using the oven in convection mode, use just one drip pan or rack at a time, otherwise heat distribution will be uneven. Using the different rack heights, you can distribute the heat intensity between the upper and lower areas of the oven. | between 60°C and max |
 | Fan assisted, top and bottom heating, fast cooking.The top and bottom heating elements switch on with the fan, guaranteeing constant heat distributed uniformly throughout the oven. This mode is ideal for rapid cooking of pre-packaged foods (no preheating required), such as frozen or precooked foods. The best results when cooking in “Fan assisted” mode are obtained when using a single shelf (second from the bottom); consult the “Guideline cooking times table”. | between 60°C and max |
  | GrillThe central top heating element switches on. In the “Grill” function the food is cooked by radiant heat from the powerful top heating element. The "Grill" function can be used to prepare tender cuts of meat, steaks, chops, sausages, fish, cheese on toast, and other quick cooking foods. Prepare the food with the oven door closed. Preheat the grill for 3 minutes to achieve optimal results. This will help to preserve the natural juices of your steak, ribs, etc. to achieve the best possible flavour. Insert the rack in one of the two top guides.Fan assisted grillThe top heating elements switch on, together with the fan. This combination of characteristics increases the effectiveness of the monodirectional radiant heat from the heating elements by means of forced air circulation throughout the oven. This helps prevent the surface of the food from burning, allowing the heat to penetrate directly into the interior of the items. Optimal results can be obtained with kebabs, sausages, lamb cutlets, chicken in spicy sauce, quails, pork ribs, etc.Cook the food in “Fan assisted grill” mode with the oven door closed. This mode is also ideal for cooking fish steaks (e.g. swordfish), stuffed cuttlefish, etc. | between 60°C and maxfrom 60°C to 200°C |
 | Fan assisted bottom heating, slow cookingfan. Suitable for pizza, pastries, cakes, and puddings in cake tins or moulds. Optimal results are obtained also when preparing dishes that require heating from underneath. The cake tin should ideally be placed on a low shelf. | from 60°C to 220°C |
 | DefrostingThe fan on the base of the oven circulates ambient temperature air over the food. This is recommended for defrosting all types of food, especially delicate items that do not require heating, such as: ice cream cakes, cream desserts, fruit flans. When the fan is used, defrosting times are halved. | from 40°C to 60°C |
4.3.6 Cooking procedure
To switch on and use the oven, simply set the cooking mode selection knob (B, Fig. 4.5) to the required position and then set the temperature on the thermostat knob (C, Fig. 4.13), the oven power indicator light will switch on.
To switch off the oven set both the knobs to the top position "0"; the oven power indicator light will switch off.

External ventilation system
To cool the exterior of the appliance, this model is equipped with a fan that switches on automatically when the oven is hot.
When the fan is on you will notice an air flow between the oven door and the control panel.

4.3.7 Cooking guidelines
The oven offers a vast range of modes to allow optimal cooking of all types of food.
The following indications are only general guidelines and may need to be adjusted based on your personal experience.
Preheating
If the oven must be preheated (usually when baking with leavening agents), "Fan assisted" mode can be used to reach the required temperature as rapidly as possible in order to save electricity. Once the food has been placed in the oven, the appropriate cooking mode can be selected.
Cooking on more than one shelf
When cooking food on multiple shelves, use "Ventilated grill" mode ☐, which allows cooking on 3 shelves simultaneously (1st, 3rd and 5th from the bottom); there are several examples given in the "Guideline cooking times table".
Use of "Fan assisted" mode
Functional, fast and practical for those who use pre-packaged products (e.g.: frozen or precooked foods) together with other foods, several examples are given in the “Guideline cooking times table”.
Use of "Grill" mode
Use “Grill” mode, placing the food in the centre of the rack (3rd or 4th shelf from the bottom), because only the central part of the top heating element is switched on.
Use the bottom shelf (1st from bottom) for the supplied drip pan to collect any fat so that it does not drip onto the bottom of the oven. When using this mode, it is recommended to set the thermostat at the highest setting. This does not however mean that lower temperatures cannot be used simply by setting the thermostat knob at the required temperature.
Use of "Fan assisted grill" mode
This mode is extremely useful to cook foods rapidly, because the heat distribution not only makes it possible to brown the surface of the food, but also to cook the underside. For example, you can brown foods at the end of the cooking process and add a gratinated finish to oven baked pasta.
When using these modes, place the rack on the 2nd or 3rd shelf (from the bottom). Use the bottom shelf (1st from bottom) for the supplied drip pan to collect any fat so that it does not drip onto the bottom of the oven. There are several examples given in the "Guideline cooking times table".
The recommended thermostat setting is 200^ , because this is the most effective for the grill, which cooks by means of infrared radiant heat. This does not however mean that lower temperatures cannot be used simply by setting the thermostat knob at the required temperature.
 | NOTE: In general, when using "Fan assisted grill" mode the best results are obtained by placing the rack on the lower shelves. To avoid grease dripping onto the bottom of the oven, place a drip pan on the 1st shelf (from the bottom).NOTE: To reduce the formation of smoke while cooking, pour water into the drip pan. |
 | NOTE: The oven must be preheated only if this is specified in the recipe or in the "Guideline cooking times table". Heating an empty oven causes high energy consumption, so cooking several cakes or pizzas in succession helps achieve big energy savings because the oven is already hot. |
 | NOTE: Use dark silicone coated cake tins or enamelled containers since they offer high thermal conductivity. |
 | NOTE: When using baking paper, make sure it is resistant to high temperatures. |
 | NOTE: Roasting large cuts of meat or baking cakes results in the production of a significant amount of steam in the oven, which can lead to the formation of condensation in the oven door. This is perfectly normal and will not affect normal operation of the appliance. After cooking, dry the oven door and glass carefully. |
 | NOTE: The oven can be switched off about 10 minutes before the end of the cooking time in order to exploit residual heat and save electricity. |
4.3.8 Guideline cooking times table

NOTE: The values in this table are purely guideline and may change in accordance with personal preferences and experience
| Cooking mode selection knob (B) | Food Weight | (kg) | Position of oven rack (from bottom) | Preheating (minutes) | Thermostat knob setting (C) | Cooking time (minutes) |
| [WSXT] Static | Duck 1 3 15 200 | 65-75 | ||||
| Roasted veal or beef | 1 3 15 200 | 70-75 | ||||
| Roasted pork 1 | 3 15 200 | 70-80 | ||||
| Biscuits (shortbreads) | - 3 15 180 | 15-20 | ||||
| Tarts 1 3 15 180 | 30-35 | |||||
 Grill Grill | Sole and cuttlefish | 1 4 5 Max | 8-10 | |||
| Calamari and prawn kebabs | 1 4 5 Max | 6-8 | ||||
| Cod fillet 1 4 5 | Max 10 | |||||
| Grilled vegetables | 1 3/4 5 Max | 10-15 | ||||
| Veal steak 1 4 5 | Max 15-20 | |||||
| Cutlets 1 4 5 Max | 15-20 | |||||
| Hamburgers 1 | 4 5 Max | 7-10 | ||||
| Mackerel | 1 4 5 Max | 15-20 | ||||
| Toasted sandwiches | - 4 5 Max | 2-3 | ||||
 Defrosting Defrosting | All frozen food |
| Fan assisted grill | Grilled chicken | 1.5 3 5 200 55-60 | |||
| Cuttlefish 1.5 3 | 5 200 30-35 | ||||
| With rotisserie (where present) | |||||
| Veal on the spit | 1.5 - 5 200 70-80 | ||||
| Chicken on the spit | 2 - 5 200 70-80 | ||||
| Chicken on the spit + roast potatoes | 1.5 - 5 200 70-75 | ||||
| Lamb on the spit | 1.5 - 5 200 70-80 |
 Fan assisted Fan assisted | Frozen foods | |||||
| Pizza 0.3 2 - 25 | 0 12 | |||||
| Courgette and prawn pie | 0.4 2 - 20 | 0 20 | ||||
| Spinach pie 0.5 | 2 - 220 30 | -35 | ||||
| Beef tartare 0.3 | 2 - 200 25 | |||||
| Lasagne 0.5 2 | 200 35 | |||||
| Involtini 0.4 2 | 180 20-25 | |||||
| Chicken nuggets | 0.4 2 - 22 | 0 15-20 | ||||
| Roasted veal or beef | 1 1 10 18 | 0 25-30 | ||||
| Chicken 1 2/3 | 10 220 60-70 | |||||
| Precooked foods | ||||||
| Chicken wings | 0.4 2 - 200 | 20-25 | ||||
| Fresh foods | ||||||
| Biscuits (shortbreads) | 0.3 2 - 20 | 0 15-18 | ||||
| Fruit flan 0.6 2 | 180 45 | |||||
| Cheese puffs 0 | 2 2 - 210 | 0-12 | ||||
 Fan assisted bottom heating Fan assisted bottom heating | Pizza 0.5 3 15 | 220 15-20 |

NOTE: In general, when using "Fan assisted grill" mode the best results are obtained by placing the rack on the lower shelves. To avoid grease dripping onto the bottom of the oven, place a drip pan on the 1st shelf (from the bottom).
NOTE: To reduce the formation of smoke while cooking, pour water into the drip pan.
5 : INSTALLATION
5.1 List of accessories
| Item Image | |
| Fixing brackets (supplied bag - the shape of the bracket may vary from one model to another).Sealing tape (pre-installed). | 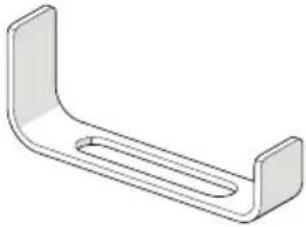 |
5.2 Preliminary operations
5.2.1 Safety instructions for installation
Before installing the hob and the oven:
 | CAUTION: Before carrying out maintenance, cleaning or adjustment operations, the appliance must be disconnected from the electrical supply. |
 | WARNING: Install the appliances only in a suitable location. |
 | WARNING: Make sure the installation space is flat and level and that there are no structural obstructions. |
 | WARNING: Make sure the materials adjacent to the installation space are heat resistant. |
 | WARNING: Make sure the appliance is installed in compliance with all the applicable safety regulations and standards. |
 | WARNING: Make sure the power supply wiring incorporates a switch for complete disconnection of the supply, positioned in a manner that complies with local regulations on electrical wiring. |
 | WARNING: Make sure the isolation switch is of the approved type, assuring a contact gap of at least 3 mm on all poles (or on all active conductors [line] if the local wiring regulations so allow). |
 | WARNING: The isolation switch must be easily accessible by the user once the appliances have been installed. |
| WARNING: If in doubt concerning local regulations, consult the building code authorities. | |


Before fixing the hob mounting brackets
| WARNING: Before fixing the hob mounting brackets the appliance must be placed on a stable and smooth surface (use the appliance box). Do not lift the appliance or grip it using the protruding controls. |
Adjusting the hob bracket position
| WARNING: After installation, secure the hob to the worktop, screwing the four brackets into the underside of the hob. |
5.3 Hob installation instructions
5.3.1 Dimensions of the worktop cut-out
Cut an opening in the worktop in compliance with the dimensions shown in the diagram. For the purposes of installation and use of the appliance, keep minimum clearance of 50 mm (X) around the cut-out, as shown in the figure.
The worktop must be at least 30 mm thick. To avoid deformation of the worktop that may be caused by radiant heat from the hob, use heat resistant material. Use the sealing tape as shown in the figure.

WARNING: The worktop material must be composed of impregnated wood or another insulating material
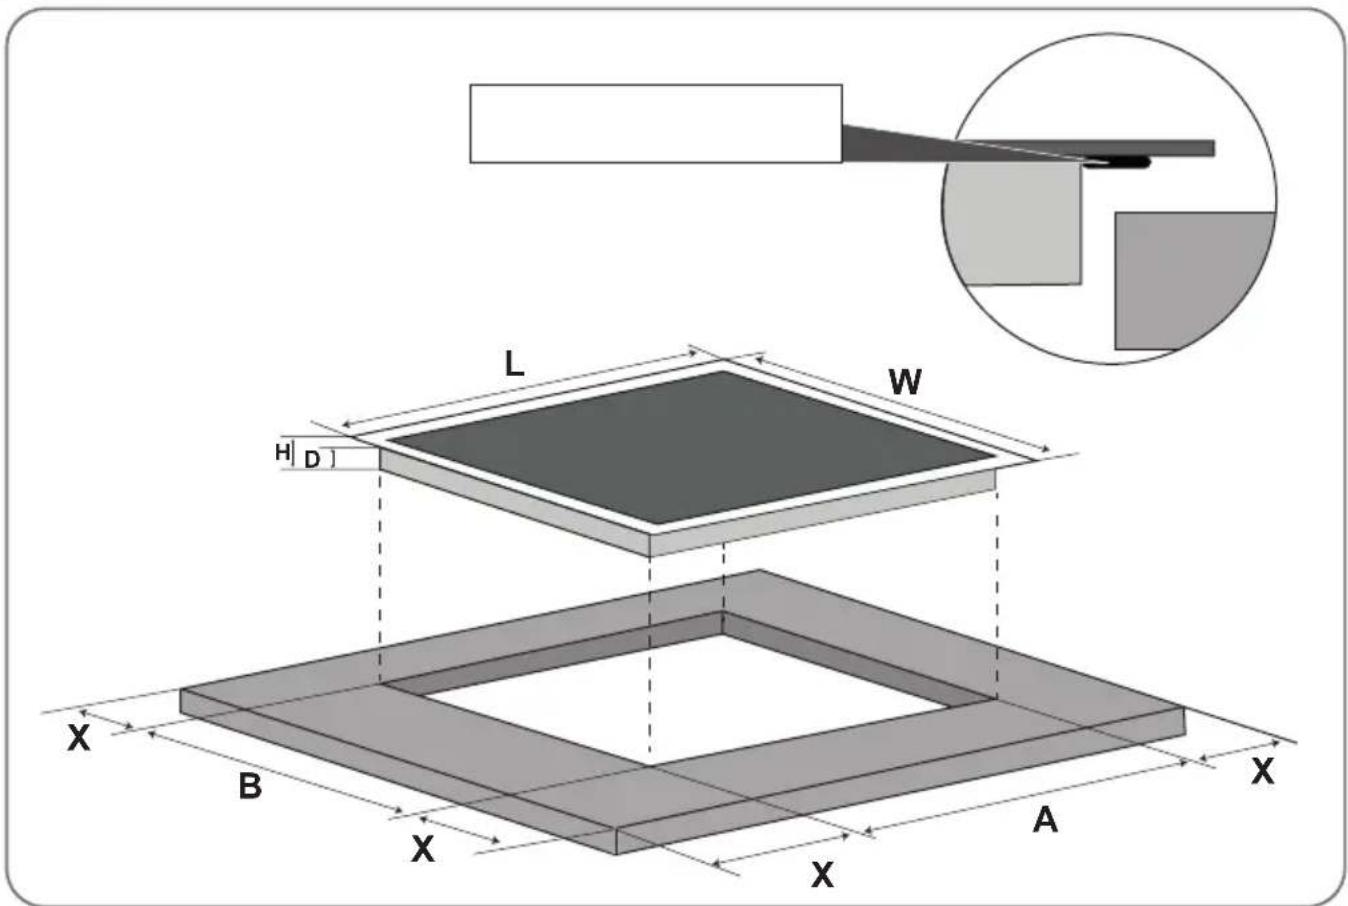
Fig. 5.1
sealing tape
| Model L (mm) W (mm) | H (mm) | D (mm) A | (mm) B (mm) X (mm) | |||
| HS2000-26 | 590 520 | 50 46 560 | 490 50 minimum |

WARNING: Make sure the hob is well ventilated and that the inlet and outlet air flows are not obstructed.
Make sure the hob is always in good condition.
5.3.2 Fitting instructions
Important:
The distance between the underside of the hob and the top of any kitchen unit or appliance beneath it (3) must be at least 50 mm.

WARNING: If the hob is installed over an oven, make sure the oven is a fan-assisted model.
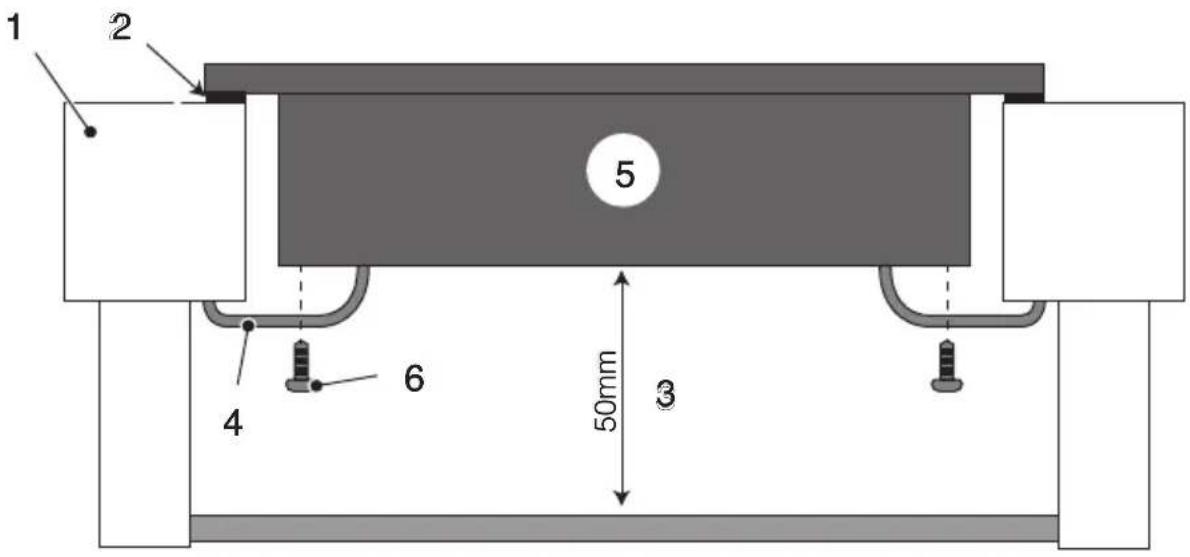
Fig. 5.2
1) - Worktop
2) - Sealing tape
3) - Minimum clearance
4) - Brackets
5) - Electric hob
6) - Screws
Installation steps
1) - Remove the protective film from the pre-installed sealing tape (2).
2) - Place the hob (5) in the worktop cut-out and press gently.
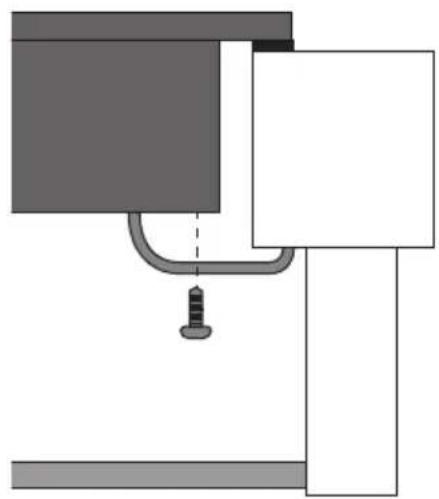
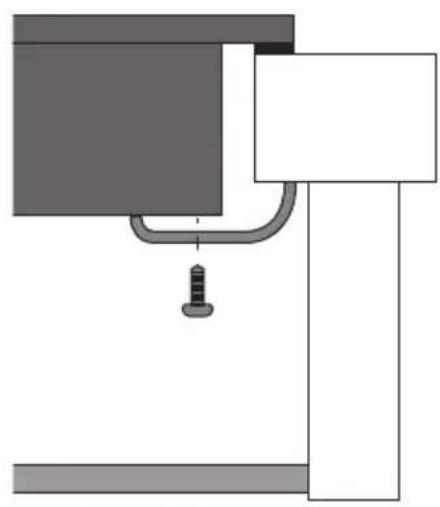
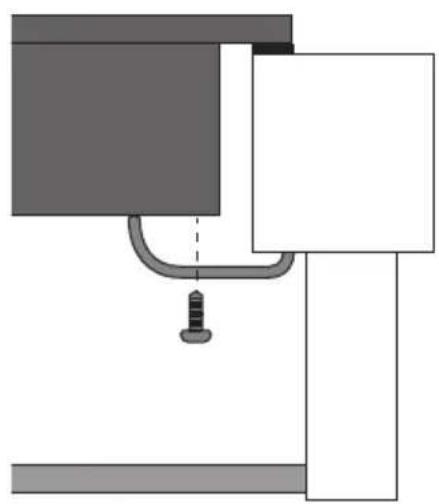
3) - Secure the four fixing brackets (4) to the underside of the hob (5) with screws (6).

CAUTION: Do not apply excessive pressure to the hob to avoid the risk of damaging it.
The fixing brackets can be found in a bag supplied with the appliance. Adjust the position of the brackets to adapt them to different worktop thicknesses.
a)
natural_image
Pure mechanical diagram showing a lever and shaft assembly without any text, numbers, or symbolsb)
natural_image
Pure diagram of a mechanical or electrical component with no text, numbers, or symbols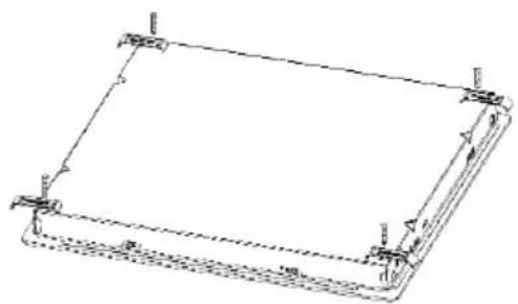
natural_image
Pure technical line drawing of a rectangular frame with mounting brackets and no text or symbolsFig. 5.3
a) - Version 1
b) - Version 2

NOTE: The dimensions of the worktop cut-out are given in the previous section "Worktop cut-out area dimensions".
| WARNING: Make sure the hob is well ventilated and that the inlet and outlet air flows are not obstructed.Make sure the hob is always in good condition. |


WARNING: The safety distance between the hob and any kitchen units mounted above it must be at least 760 mm.
WARNING: The safety distance between the hob and an extractor hood must be at least 650 mm.
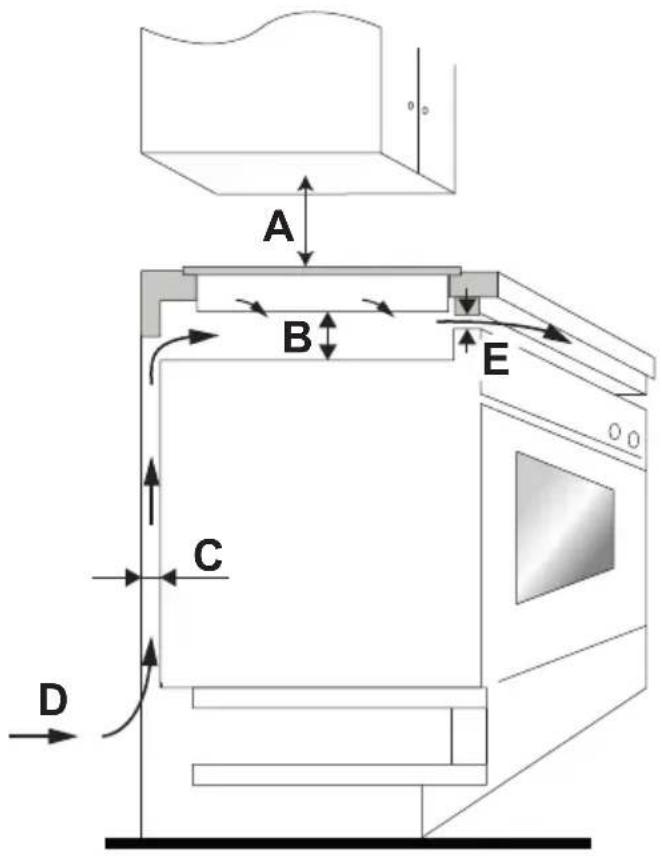
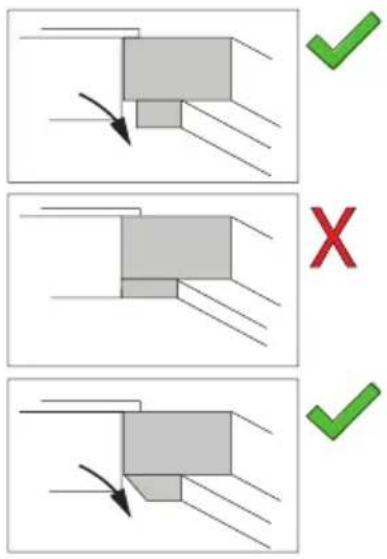
Fig. 5.4
| A (mm) B (mm) C | (mm) D E | |||
| 760 (minimum distance from kitchen unit)650 (minimum distance from extractor hood) | 50 (minimum) 20 (minimum) Air inlet Air outlet of at least | 5 mm |
5.4 Oven installation instructions
5.4.1 Dimensions of the built-in oven installation area
To guarantee efficient operation of the built-in oven, it must be installed in an adequate kitchen unit. The figure below contains the cutting dimensions for installation under a worktop or in a wall cabinet.
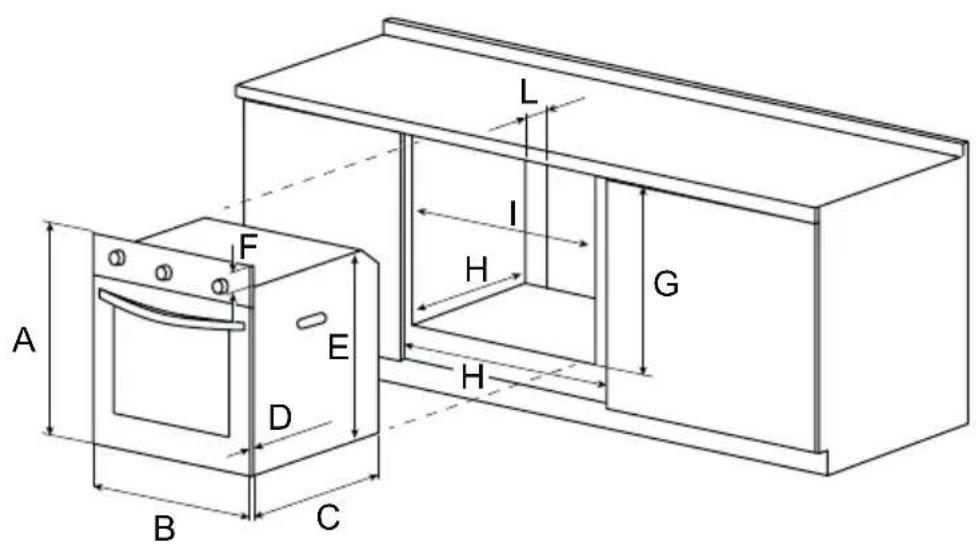
HS2000-26
A) - 594 mm
B) - 594 mm
C) - 498 mm
D) - 21 mm
E) - 577.2 mm
F) - 16.8 mm
G) - 595 mm
H) - 570 mm
I) - 565 mm (minimum)
L) - 45 mm
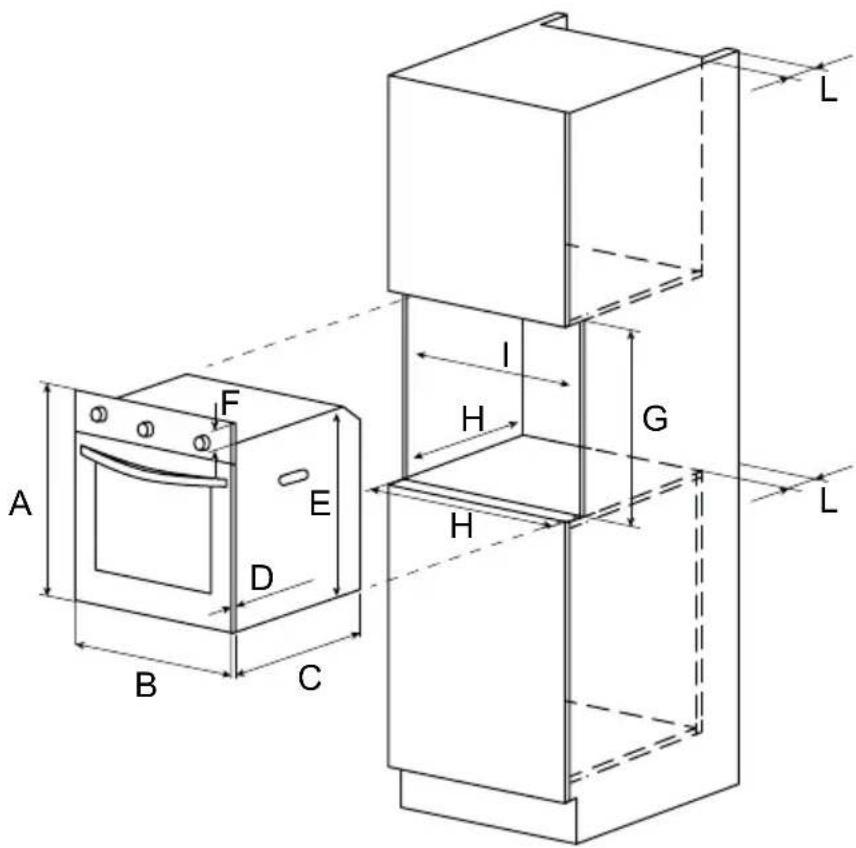
Fig. 5.5

WARNING: To guarantee adequate ventilation, remove the rear panel of the cabinet. It is preferable to install the oven so that it is supported on two wooden battens. If the oven rests on a solid flat surface, said surface must have an opening at the rear of at least 45×560 mm in size.
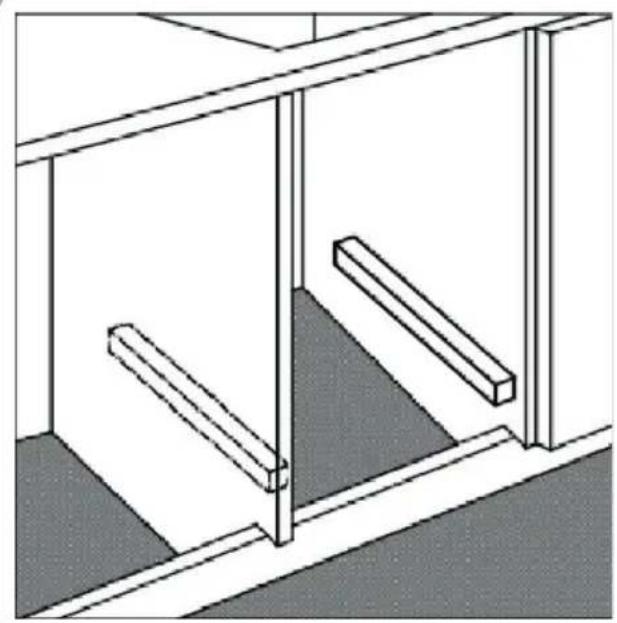
natural_image
Isometric line drawing of a two-level cabinet or enclosure with two horizontal bars and a floor, no text or symbols present.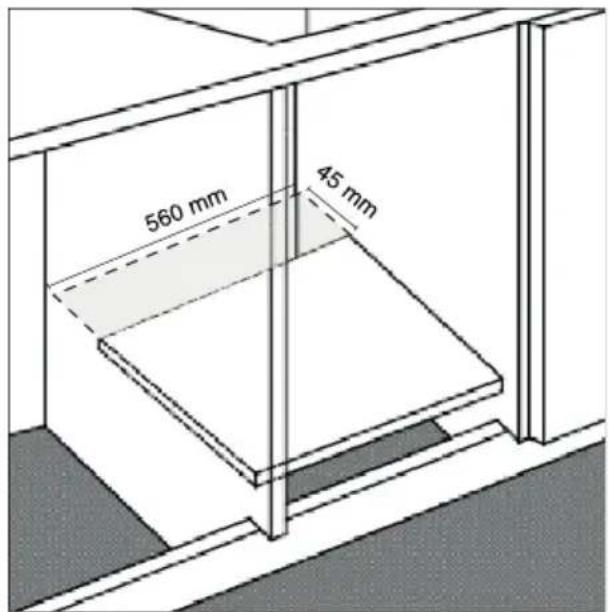
Fig. 5.6
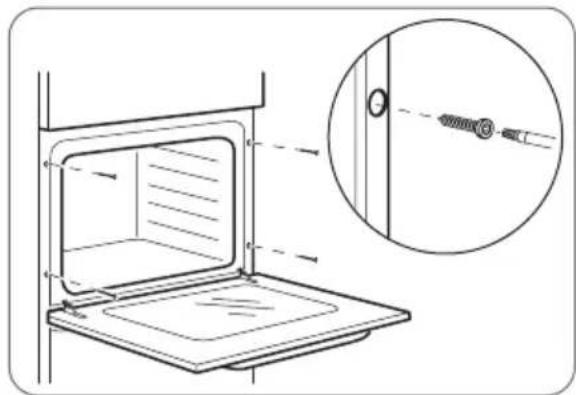
To secure the oven to the cabinet, open the oven door and insert the 4 screws through the 4 holes in the edge of the oven chassis.
natural_image
Diagram of a kitchen oven with an inset showing a screw being inserted into a door (no text or symbols present)Fig. 5.7

CAUTION: All parts protecting against direct contact and insulated parts must be secured so that they cannot be removed without the use of tools.
In compliance with statutory legislation, ensure that there is no risk of direct contact with live electrical parts once the oven has been installed.

WARNING: The panels of adjacent kitchen units must be composed of heat resistant material; in particular, units lined with plywood must be assembled with adhesives capable of withstanding temperatures up to 100^ C.
5.5 Connection of the appliance to the electrical supply
Read the following information before connecting the appliance (oven/hob) to the electrical supply:

DANGER: Do not use adapters, multiple sockets or extension leads to connect the appliance to the electrical supply, to avoid the risk of overheating and fire. If the use of such accessories is unavoidable, use exclusively adapters and extension leads in compliance with the safety regulations in force; do not exceed the maximum current rating for each single / multiple adapter or extension lead.
The power cable must not touch any parts subject to heating and must be routed in such a way that there it is not subject to temperatures greater than 50^ C in any point. If necessary, protect the power cable with a suitable insulating sheath.

CAUTION: Modifications made to the home electrical system can be carried out exclusively by a specialised technician.
If the appliance plug is not compatible with the electrical socket, replace the electrical socket with the required type. This modification can be performed ONLY by a specialised technician. The technician must also ensure that the cross section of the electrical wiring is suitable in relation to the appliance power consumption.

WARNING: Installation and electrical connections must be carried out by a specialised technician in compliance with the manufacturer's instructions and statutory safety regulations.

WARNING: A specialised technician must check that the home electrical system is compatible with the appliance power consumption. Check the values shown on the appliance nameplate.
The appliance nameplate must never be removed.

WARNING: The appliance power supply must be connected via an all-pole isolation switch/contactor in compliance with the local regulations in force.

WARNING: The power cable must be checked regularly.
If the power cable is damaged or must be replaced, this must be carried out only by a specialised technician with suitable tools to avoid the risk of accidents.

WARNING: If the appliance is connected directly to the power supply, install an all-pole isolation switch/contactor with a minimum contact gap of 3 mm.

WARNING: The installer must make sure the electrical connection is carried out correctly in compliance with safety regulations.

WARNING: The appliance power cable must be connected to a suitable electrical socket equipped with a protective earth connection. If in doubt concerning the earth connection, consult a specialised technician.
 | WARNING: The cable must not be kinked or pinched. |
 | WARNING: The plug and power socket must be readily accessible. |
 | WARNING: Ovens equipped with a three-core power cable are designed for use with an AC power supply. The appliance earth wire is green-yellow. |
Connection to the oven terminal board:
1) - Use a screwdriver to press the terminal board cover opening tabs.
2) - Remove the screw from the terminal.
4) - Secure the cable glands and close the terminal board cover.
3) - Insert the wire into the appropriate terminal, then fit and tighten the screw to clamp the wire. Use copper jumpers in the case of single-phase or two-phase supplies, as shown in the figures below.
The power supply must be 220-240V\~/380V-415V\~ 50 Hz. For electric cookers, the fuse must be at least 45A.
Single-phase connection
Two-phase connection
Three-phase connection
WARNING: Connection of the power cable must comply with the instructions given in the table below.
| Conductor cross section (mm ^2 )Connection mode | L1 L2 L3 | N E | |||
| 1N~ (single-phase) Min 6 - - Min 6 Min 6 | |||||
| 2N~ (two-phase) Min 2.5 Min 2.5 - Min 6 Min 6 | |||||
| 3N~ (three-phase) Min 2.5 Min 1.5 Min 1.5 Min 6 | Min 6 |
Fit a suitable plug corresponding to the load shown on the appliance nameplate.
Connecting the hob to the oven
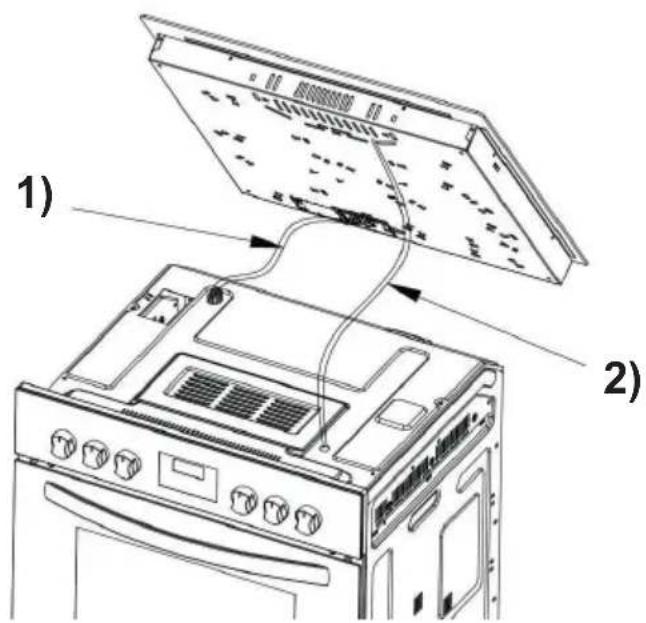
Fig. 5.11
1) - Power cable
2) - Hob control knobs connecting cable
6 : MAINTENANCE
6.1 Cleaning and care of the hob
Before carrying out any maintenance or cleaning operations, make sure the hob is switched off.
| In case of: Procedure: |  WARNINGS WARNINGS | |
| Normal dirt on the glass ceramic surface (fingerprints, marks, food stains or spills of non-sugary food on the glass ceramic surface) | 1. Switch off the hob power supply. • 2. Apply detergent for electric hobs onto the glass ceramic surface while it is still warm (but not hot!).3. Clean with a damp cloth and dry with a clean cloth or a tea towel.4. Switch on the hob power supply. | When the hob is off, the “hot surface” warning light will not function, but the cooking zones may still be hot! Always proceed with the utmost caution.Do not use scouring pads, plastic scrapers or aggressive/abrasive detergents, to avoid the risk of scratching the glass panel. Always check the instruction labels of the detergents or abrasive sponges to see whether they are suitable.Do not leave detergent residues on the hob, to avoid the risk of staining the glass. |
| In case of: Procedure: | WARNINGS^ | |
| Spillage of boiling liquid with molten sugar on the glass ceramic surface | Any such spills must be removed immediately with a fish filleting knife, spatula or scraper suitable for use on glass ceramic hobs, using all the necessary caution when the cooking zones are still hot:1. Disconnect the hob power supply by unplugging the plug from the electrical socket.2. Scrape away food residues and spatters of burnt food in the cool area of the hob.3. Remove food spills, spatters or burnt food with a dishcloth or tea towel.4. Perform steps from 2 to 4 for "Daily grime on the glass ceramic hob". | Remove stains caused by molten and sugary foods or burnt food residues as soon as possible. If such residues are allowed to cool on the glass ceramic hob they will be difficult to remove or may cause permanent damage to the glass ceramic surface.Cutting hazard: scraper blades can be razor sharp; fit the blade guard or store scrapers in a safe place out of reach of children. |
| Spatters/liquids/burnt food residues on the touch control buttons | Switch off the hob power supply. •The hob may emit an acoustic signal and then switch off; the touch control buttons may not operate if they are wet. Make sure the touch controls area is dry before switching the hob on again.2. Mop up spatters/liquids/residues with a wet cloth.3. Clean the touch control buttons area with a clean damp sponge or cloth4. Dry the area completely with a tea towel.5. Switch on the hob power supply. |
6.2 Cleaning and care of the oven

WARNING: Before carrying out any maintenance or cleaning operations, make sure the appliance is switched off.
To extend the life of the oven, clean it regularly.
Especially:
- enamelled or stainless steel parts must be washed with warm water without using scouring powder or corrosive substances that could damage them; even stainless steel may become stained; if the stains are hard to remove, use a commercial oven cleaner. After cleaning, rinse the parts well and dry them carefully.
- the oven and accessories must be cleaned after each use so that dirt does not bake on. Grease is easier to remove with warm water and soap when the oven is still warm. After cleaning, remove the soap and dry the oven interior carefully. Do not use abrasive cleaners (e.g. scouring powder, etc.), acid cleaners (e.g. limescale remover, etc.) or scouring pads, to avoid damaging the enamel surface. For particularly stubborn grease stains and dirt, use a commercial oven cleaner and follow the instructions on the pack. Do not use a steam cleaner to clean the inside of the oven.
- wash accessories (containers, racks, etc.) in warm water with washing up liquid.
- condensation may form when the oven is used for a prolonged period. Dry the oven with a soft cloth.
- the rubber oven door seal ensures perfect operation of the appliance. Check the condition of the seal regularly and clean it if necessary, avoiding the use of abrasive products and tools. If the seal is damaged, contact your nearest service centre and do not use the oven until it has been repaired.
- do not cover the bottom of the oven with aluminium foil as this will lead to a temperature rise that could impair cooking results or even damage the enamel.
- clean the glass door with non-abrasive products or sponges and dry it with a soft cloth.
Removing the oven door
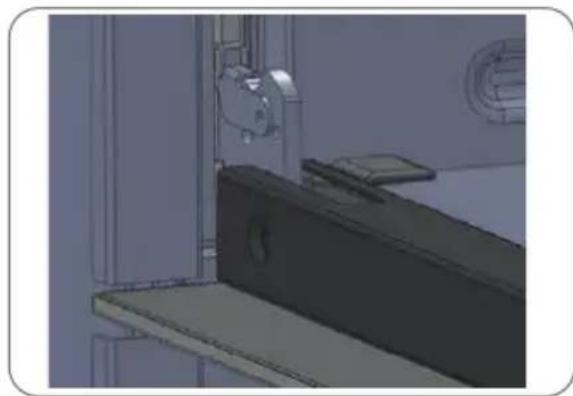
For more thorough cleaning, the oven door can be removed. The removal and refitting procedure is described below.
Open the oven door fully.
natural_image
3D rendered image of a medical imaging machine with monitor, scanner, and screen (no visible text or symbols)Fig. 6.1
Fully open right and left hinge levers (A).
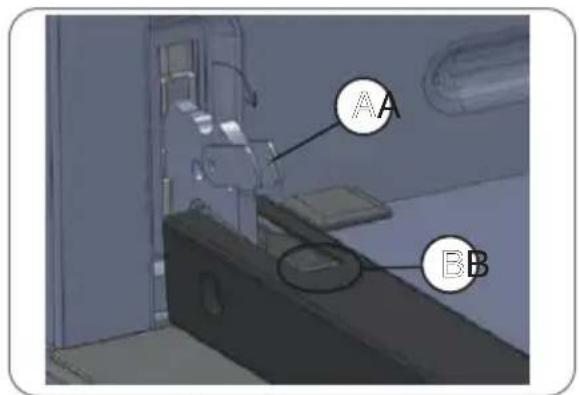
Fig. 6.2
Hold the door as shown in the figure and close it carefully until left and right hinge levers (A) are engaged with part (B) of the door.
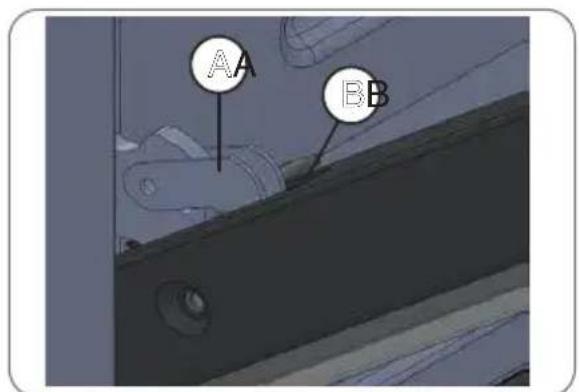
Fig. 6.3
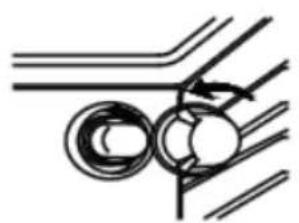
Dislodge the hinge hooks from their seat with a rotary movement as shown by arrow (C).
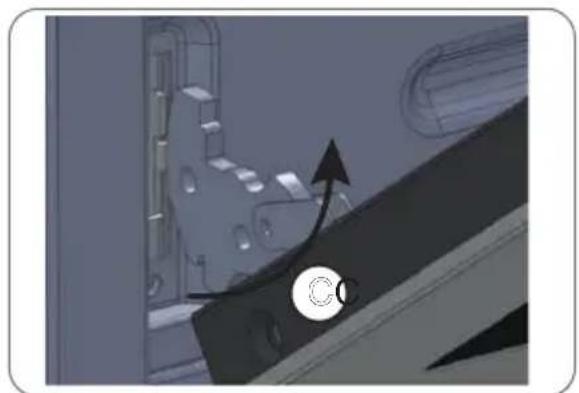
natural_image
Industrial machinery scene with conveyor belt and directional arrow (no visible text or symbols)Fig. 6.4
Place the oven door on a soft surface.
To replace or refit the oven door, repeat the above steps in reverse order.
Removing the oven door internal double-glazed window
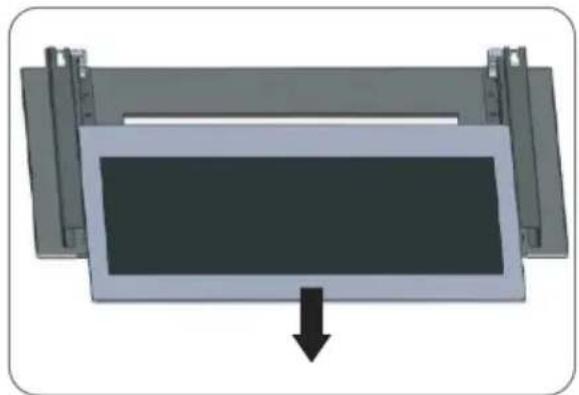
Remove gasket (D) by undoing the two screws shown in the figure.
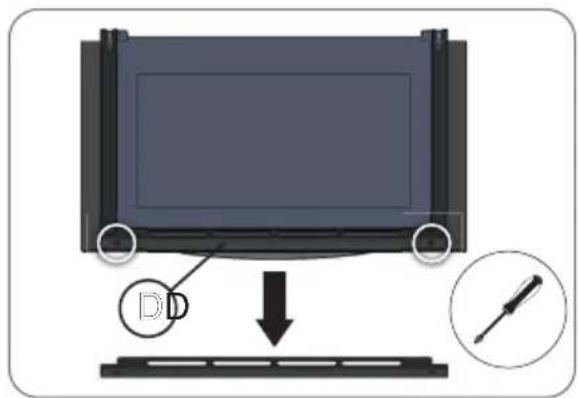
Fig. 6.5
Carefully extract the internal double-glazed window.
natural_image
Diagram of a device with a black arrow pointing downward, showing a rectangular component and two vertical supports (no text or symbols)Fig. 6.6
Place the double-glazed window on a soft surface. Clean the glass with suitable detergent. You can now clean both sides of the double-glazed window. Dry thoroughly with a microfibre cloth.
Changing the oven light bulb

WARNING: Disconnect the oven from the electrical supply or unplug the appliance plug, if easily accessible.
Remove the bulb holder glass cover.
Remove the bulb and replace it with a high temperature resistant oven light bulb (300°C).
The bulb must have the following specifications:
- Voltage: 220-240V
- Power: 25W
- Type: E 14
Refit the glass cover and reconnect the oven to the electrical supply.
natural_image
Pure mechanical diagram showing two rollers connected by a shaft, without any text, numbers, or symbols.Fig. 6.7
7 : TROUBLESHOOTING
7.1 Hob problem solving
| Problem Possible causes Solution | ||
| The hob does not switch on. | No power supply. Make sure the hob is connected to the electrical supply and switched on. Check the main circuit breaker in your home. If the problem persists after carrying out all the checks, call a qualified technician. | |
| The hob control knobs turn without effect or you are unable to set the required cooking function. | Possible internal breakage of the knobs. | If the problem persists, call a specialised technician. Do not attempt to repair the unit without the assistance of a specialised technician. |
| The glass ceramic hob is scratched. | Pans with rough bottoms. Excessively abrasive sponges or unsuitable cleaning products. | Use pans with a flat smooth bottom. Consult the “Suitable pans” section. |
| Some types of pans may emit creaking or ticking sounds. | This may be related to the material of which the pan is made (layers of different metals expand at different rates). | This is normal for the pans in question and is not a sign of a fault. |
7.2 Oven problem solving
| Problem Possible causes Solution | ||
| Oven does not switch on. | No power supply. Make sure the oven | is switched on and connected to the electrical supply. Check the main circuit breaker in your home. If the problem persists after carrying out all the checks, call a specialised technician. |
| The oven control knobs turn without effect or you are unable to set the required cooking function. | Possible internal breakage of the knobs. | If the problem persists, call a specialised technician. Do not attempt to repair the unit without the assistance of a specialised technician. |
Mod. HS2000-26
- Respekta
- Inhalt
- : ALLGEMEINE INFORMATIONEN ...... de-3
- Energieersparnis
- HS2000-26
- : STÖRUNGSSUCHE
- : GENERAL SAFETY PRESCRIPTIONS......en-7
- : TECHNICAL DATA AND CHARACTERISTICS......en-15
- : PRESCRIPTIONS FOR USE ...... en-21
- 5: INSTALLATION......en-38
- 6: MAINTENANCE ...... en-50
- : TROUBLESHOOTING ...... en-55
- : GENERAL INFORMATION
- Reading the manual
- Foreword
- Manufacturer's data
- Assistance service
- Introduction and safety
- Appliance identification
- Nameplate location
- CE declaration of conformity
- Warranty conditions
- : GENERAL SAFETY PRESCRIPTIONS
- Important warnings
- Environmental protection
- Packaging
- Disposal
- : TECHNICAL DATA AND CHARACTERISTICS
- Technical data
- Model HS2000-26 - built-in oven
- Wiring diagram
- : PRESCRIPTIONS FOR USE
- Preliminary recommendations
- Using of the electric hob
- Operation of the electric hob
- Suitable pans
- Energy saving
- Layout of cooking zones
- Control panel (hob control knobs)
- Knobs to switch on/switch off the cooking zone
- Starting the cooking process
- After cooking
- Automatic power off
- Cooking guidelines
- Cooking tips
- Using the oven
- Before use
- Suitable containers, casserole dishes and baking trays
- Oven components
- Control panel (oven control knobs)
- Cooking functions
- Cooking procedure
- External ventilation system
- Cooking guidelines
- Preheating
- Cooking on more than one shelf
- Use of "Fan assisted" mode
- Use of "Grill" mode
- Use of "Fan assisted grill" mode
- Guideline cooking times table
- : INSTALLATION
- List of accessories
- Preliminary operations
- Safety instructions for installation
- Hob installation instructions
- Dimensions of the worktop cut-out
- Fitting instructions
- Important:
- Installation steps
- Oven installation instructions
- Dimensions of the built-in oven installation area
- Connection of the appliance to the electrical supply
- Connection to the oven terminal board:
- Single-phase connection
- Two-phase connection
- Three-phase connection
- : MAINTENANCE
- Cleaning and care of the hob
- Cleaning and care of the oven
- Especially:
- Removing the oven door
- Removing the oven door internal double-glazed window
- Changing the oven light bulb
- : TROUBLESHOOTING
Brand : Respekta
Model : Ida HS2000-26
Category : Cooker