
WZ 1100 - Uncategorized Techno Line - Free user manual and instructions
Find the device manual for free WZ 1100 Techno Line in PDF.


| Product Type | Ultrasonic Distance Meter |
| Brand | Techno Line |
| Model | WZ 1100 |
| Measuring Range | 0.6 m – 16 m |
| Accuracy | ±1% |
| Laser Class | Class 2 (IEC 60825-1:2014) |
| Laser Wavelength | 635–660 nm |
| Laser Output Power | ≤ 1 mW |
| Ultrasonic Frequency | 40 kHz |
| Temperature Measurement Range | -10°C to +40°C (14°F to 104°F) |
| Power Supply | 9V block battery (6LR61) |
| Display | LCD with backlight (not specified in manual, but likely) |
| Units of Measurement | Metric (m) or Imperial (ft/in) |
| Auto Shut-Off | After 60 seconds of inactivity |
| Level Indicator | Yes (built-in bubble level) |
| Functions | Length, area, volume measurement; temperature display; length accumulation |
| Cleaning | Clean exterior with a soft dry cloth only |
| Safety | Do not stare into laser beam; keep away from children; avoid eye exposure |
| Operating Voltage | Max. 9 V |
Frequently Asked Questions - WZ 1100 Techno Line
User questions about WZ 1100 Techno Line
0 question about this device. Answer the ones you know or ask your own.
Ask a new question about this device
Download the instructions for your Uncategorized in PDF format for free! Find your manual WZ 1100 - Techno Line and take your electronic device back in hand. On this page are published all the documents necessary for the use of your device. WZ 1100 by Techno Line.
USER MANUAL WZ 1100 Techno Line
natural_image
Technical line drawing of a mobile phone casing with labeled component '12' (no text or symbols beyond label)Laser Radiation Do not stare into the beam IEC 60825-1:2014 Class 2 laser product Max. power 1 mW at 650nm
LASER KLASSE 2
Nach IEC 60825-1:2014
Please read the manual carefully and familiarize yourself with the functions of the unit before using it. Retain these instructions for future reference and pass them on together with the device when you pass on the device to other users.
Scope of delivery:
1 x Ultrasonic Distance Meter
1 x Instruction manual
Product Overview
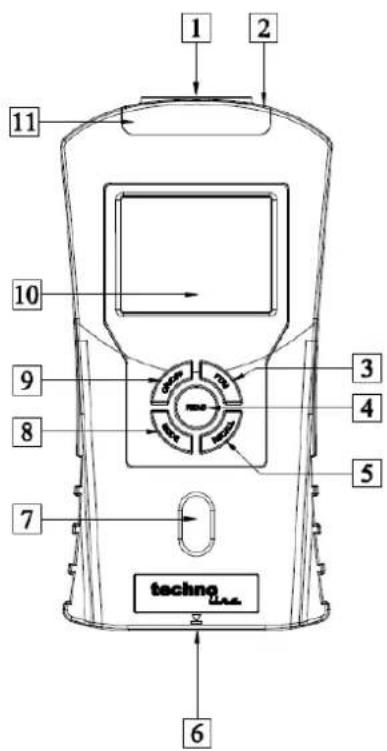
natural_image
Technical line drawing of a mobile phone casing with labeled component '12' (no text or symbols beyond label)- Ultrasonic transmitter/recei ver
- Temperature sensor
- FT/M button
- READ button
- RECALL button
-
Referenc e area
-
Level indicat or
- MODE button
- ON / OFF button
- Display
-
Laser diode
-
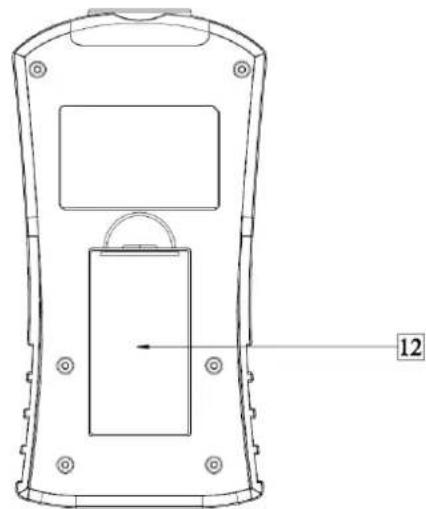
Battery compartment cover
Fig.A:
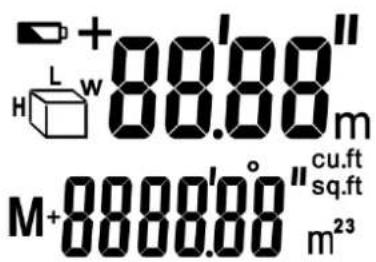
Fig. B:
Technical Data
Operating voltage: max. 9 V
Battery type: 6LR61 (9 V block)
Measuring range: 0.6 m – 16 m
Measuring accuracy: +/- 1%
Capacity display: up to 9999.99
Laser wave length: 635–660 nm, 1 mW
Laser class: 2
Ultrasonic frequency: 40kHz
Thermometer measuring range: -10^ - + 40^ (14°F - 104°F)
General safety information
This unit can be used by children aged 8 years and above and persons with reduced physical, sensory or mental capabilities or lack of experience and knowledge if they are supervised and have been instructed concerning the safe use of the appliance and have understood the resulting risks. Children should never play with the device. Cleaning and user maintenance must not be performed by children without supervision.
Intended use
This ultrasonic rangefinder is intended for measuring lengths and for calculating surface areas and volumes. The device also has a temperature measuring facility. This device is solely intended for private use.
Laser Safety Instructions
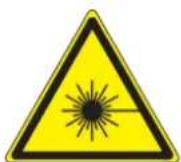
Laser Radiation Do not stare into the beam IEC 60825-1:2014 Class 2 laser product Max. power 1 mW at 650nm
- Use extreme caution when using the laser beam.
• DO NOT point the laser towards yourself, other people's eyes or animals. - DO NOT look directly into the laser beam. This can result in permanent eye damage if the eye's natural reflex to close does not take place.
- Keep out of reach of children. This is not a toy.
- Never direct the laser beam on o objects that can reflect light.
• Even looking briefly into the beam can result in eye damage.
• Any adjustment to increase the power of the laser is not permitted. - Remove the batteries if the device breaks down or is defective.
- Otherwise, there is the danger that the laser may be inadvertently switched on. This could lead to permanent eye damage.
Before using
Before initial use, remove the protective film from the device display (10) and insert the battery.
Inserting / changing the battery
If the battery symbol appears in the display (10), the inserted battery is almost drained and must be replaced. Empty batteries can falsify the measured result.
To insert the battery proceed as follows:
- Open the battery compartment cover (12) on the back of the device. You can remove the used battery more easily with the aid of the material strip, which is inside the battery compartment. Just pull on the material strip.
- Rem ove the used battery.
- Plug the contacts of the 9 V-block battery on the contacts of the profiled plug. Make sure you fit the batteries the right way round. This is specified by the profiled shape of the contacts. Also ensure without fail that the material strip is underneath the battery.
- Insert the battery in the battery compartment and close the cover again, so that it audibly latches into place.
Start-up Measuring length
- Press the ON/OFF button (9) to switch the device on. If you do not press any button for 60s, the display (10) shuts down.
- To switch the device off manually, hold the ON/OFF button pressed down for 3 seconds, until the display goes out and a double tone signal sounds.
- Press the MODE button (8) repeatedly, until the display shows the symbol for length measurement "L" as well as the length designation 0.00m (or 0'00").
- Hold the reference area (6) of the ultrasonic rangefinder at the start point of your measurement. Hold the device in such a way, that the reference area is aligned parallel to the target area of the measurement.
- If necessary use the level indicator (7) to align the ultrasonic rangefinder horizontally. The air bubble of the level indicator should be between the two markings if the alignment is horizontal.
- Press the READ button (4). The laser diode (11) projects a dot of light onto the end point of the measurement. This dot of light will help you to correctly align the ultrasonic rangefinder. After successful measuring, the length will appear in the display.
Avoiding measuring error s
In order to avoid measuring errors, please note the following information:
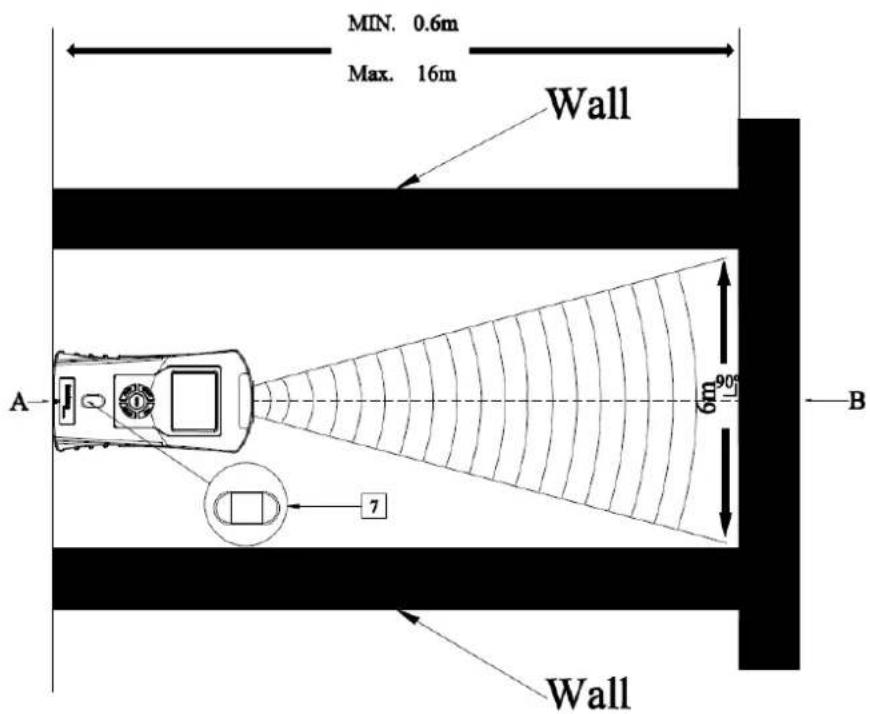
- The measurement is performed by ultrasound, which travels from the ultrasonic transmitter (1) in a conical manner. The ultrasound is reflected from the target area and received by the ultrasonic receiver. The ultrasonic rangefinder calculates the measured length (Fig. B) from the travel time of the signal.
In order to guarantee an exact measurement, the following conditions must be maintained (Fig. B):
● The reference area (A) must be parallel to the target area (B).
● The distance to be measured must be between 0.6 m and 16 m long.
- There must be no objects in the conical path of the ultrasound, which could reflect the ultrasound prematurely. The conical path of the ultrasound has a width of about 6 m at a
length of 16 m.
● The target area must have a smooth surface, so that the ultrasound can be well reflected.
● Transparent surfaces, such as glass, generally reflect the ultrasound.
● The battery must not be empty. An empty battery is shown in the display (10) by the
battery symbol

- If a definitive measurement is not possible, the display shows the "Err" information. The
measurement must then be repeated.
Adding length s to gather
- Measure a length as described in the section "Measuring length". The length appears in the top line of the display (10).
- Now press the RECALL button (5). The length is transferred to the bottom line. This means that it has been saved in the aggregate memory. The character "+" appears at the top of the display. The device displays in this way, that it is ready for a new length measurement.
- Press the READ button (4). The length, which has now been measured, appears at the top of the display.
- Press the RECALL button. The measured value is then transferred to the aggregate memory, and the aggregate of the two measured lengths appears at the bottom of the display. If the measurement is an incorrect measurement, do not press the RECALL button but press the READ button again. The measured value, which is displayed at the top, is overwritten. Press the RECALL button to adopt the value into the aggregate memory.
- You can repeat this procedure as often as you wish, as long as the length of 9999.99 m is not exceeded.
Measuring surface area
Note: In order to avoid errors in the measuring method, please familiarize yourself first with the information about measuring lengths.
- Press the ON/OFF button (9) to switch the device on.
- Press the MODE button (8) repeatedly until the symbol for surface area measurement"
“, as well as the designation 0.00 m (or 0‘00’), appear in the display (10). The symbol “for length measurement flashes. The device displays in this way, that it is ready for the first measurement ent.
- Align the device and press the READ button 4. If the measurement is successful, the
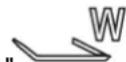
length will appear at the top of the display. The symbol for width measurement "also flashes. The device displays in this way, that it is ready for the measurement of the width.
- Align the device and press the READ button again. If the measurement is successful, the width appears at the top of the display, and at the bottom appears the surface area in the m2 unit of measurement (or sq.ft = square feet).
- Press the MODE button briefly, if a further surface area measurement is required. The figures in the display are reset, and the device is ready for a new surface area measurement.
Measuring volume
Note: In order to avoid errors in the measuring method, please familiarize yourself first with the information about measuring lengths.
- Press the ON / OFF button (9) to switch the device on.
- Press the MODE button (8) repeatedly until the symbol "☐" for volume measurement, as well as the designation 0.00m (or 0'00"), appear in the display 10. The symbol "☐" for length measurement flashes. The device displays in this way, that it is ready for the first measurement.
- Align the device and press the READ button (4). If the measurement is successful, the length will appear at the top of the display. The symbol for width measurement "also flashes. The device displays in this way, that it is ready for the measurement of the width.

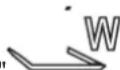
- Align the device and press the READ button. If the measurement is successful, the width
will appear at the top of the display. The symbol for height measurement " H " also flashes. The device displays in this way, that it is ready for the measurement of the height. - Align the device and press the READ button again. If the measurement is successful, the height appears at the top of the display, and at the bottom appears the volume in the m3 unit of measurement (or cu.ft = cubic feet).
- Press the MODE button briefly, if a further volume measurement is required. The figures in the display are reset, and the device is ready for a new volume measurement.
Adding sur face areas or volume s together
- Measure a surface area or volume as described in the section "Measuring surface area" or "Measuring volume". The surface area / volume appears in the bottom line of the display.
- Press the RECALL button (5) to save the measured result. The symbol M+ appears in the display and this indicates that the measured result, which is shown at the bottom of the display, is saved in the device (10).
- Press the MODE button 8 briefly. The device is now ready to measure the next surface area or volume.
● Measure the next surface area or volume in the same way as you performed the first measurement. - Now press the RECALL button again to adopt the new result into the aggregate memory. The result of the addition is shown in the bottom line of the display.
- If you would like to add further surface areas or volumes, repeat steps 3 to 5.
- Hold the MODE button pressed down for seconds in order to leave the Addition mode.
Displaying the last measured values
● After you have measured a surface area or a volume, press the READ button (4) repeatedly in order to display the individual values of the measurement.
● The symbol of the corresponding measured value flashes, and the measured result is
shown in the top line of the display.
Temperature display
- Hold the FT/M button (3) pressed down for approx. 3 seconds. The current room temperature, in the official °C temperature unit, is shown in the display (10).
- In order to switch over to the °F temperature unit, press the FT/M button briefly.
- Press the MODE button (8) briefly in order to leave the temperature display mode.
Changing the unit of measurement
- Press the FT/M button (3) in order to switch over from the official metric unit of measurement to the imperial unit of measurement (display in feet' and inches").
Battery state display
- If the battery charge status is low, the battery symbol 📄 appears in the display (10). Replace the battery as quickly as possible, if this symbol appears. Empty batteries can falsify the measured result. The battery change is described in the section "Inserting/changing the battery".
Switching off / Automatic shut-down
- Switch the device off by holding the ON/ OFF button (9) pressed down for 3 seconds.
Cleaning and Care
The device should only be cleaned on the outside with a soft dry cloth.
Precautions
- Do not subject the unit to excessive force or shock.
- Do not expose the unit to extreme temperatures, direct sunlight, dust or humidity.
-
Do not immerse in water.
-
Avoid contact with any corrosive materials.
- Do not dispose this unit in a fire as it may explode.
- Do not open the inner back case or tamper with any components of this unit.
Batteries safety warnings
- Don't use rechargeable batteries.
• Install batteries correctly by matching the polarities (+/-). - Remove exhausted batteries immediately.
- Rem ove batteri es when not in use.
- Do not recharge and do not dispose of batteries in fire as the batteries may explode.
- Ensure batteries are stored away from metal objects as contact may cause a short circuit.
- Avoid exposing batteries to extreme temperature or humidity or direct sunlight.
- Keep all batteries out of reach from children. They are a choking hazard.
Use the product only for its intended purpose!
Consideration of duty according to the battery law

Old batteries do not belong to domestic waste because they could cause damages of health and environment. You can return used batteries free of charge to your dealer and collection points. As end-user you are committed by bring back needed batteries to distributors and other collecting points!
Consideration of duty according to the law of electrical devices
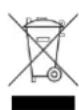
This symbol means that you must dispose of electrical devices separated from the General household waste when it reaches the end of its useful life. Take your unit to your local waste collection point or recycling centre. This applies to all countries of the European Union, and to other European countries with a waste collection system.
separate waste collection system.
- LASER KLASSE 2
- Scope of delivery:
- Product Overview
- Technical Data
- General safety information
- Intended use
- Laser Safety Instructions
- Before using
- Inserting / changing the battery
- To insert the battery proceed as follows:
- Start-up Measuring length
- Avoiding measuring error s
- In order to guarantee an exact measurement, the following conditions must be maintained (Fig. B):
- Adding length s to gather
- Measuring surface area
- Measuring volume
- Adding sur face areas or volume s together
- Displaying the last measured values
- Temperature display
- Changing the unit of measurement
- Battery state display
- Switching off / Automatic shut-down
- Cleaning and Care
- Precautions
- Batteries safety warnings
- Consideration of duty according to the battery law
- Consideration of duty according to the law of electrical devices
Brand : Techno Line
Model : WZ 1100
Category : Uncategorized