
HS1000-33 - Cooker Respekta - Free user manual and instructions
Find the device manual for free HS1000-33 Respekta in PDF.


| Product Type | Built-in electric cooker (oven and cooktop) |
| Brand | Respekta |
| Model | HS1000-33 |
| Dimensions (approx.) | Oven: 595 x 595 x 575 mm (WxHxD); Cooktop: 600 x 500 mm (WxD) |
| Weight (approx.) | 45 kg |
| Power Supply | 220-240 V ~ 50/60 Hz, 16 A fuse |
| Oven Functions | Lower heater, upper heater, grill, turbo heater, fan, multifunctional (3D), pizza mode, steam cleaning |
| Cooktop Hotplates | 4 zones: left front, left rear, right rear, right front (sizes: 80 mm/145 mm/180 mm with rapid options) |
| Oven Capacity | Approximately 70 L (based on standard 60 cm built-in) |
| Temperature Range | 40 °C to 240 °C (Max) |
| Timer | Mechanical or digital timer with auto shut-off and audible signal |
| Accessories Included | Deep tray, standard tray, wire grill, in tray wire grill, roast chicken skewer, pizza stone and peel, tray handle (optional) |
| Cleaning Method | Steam cleaning, catalytic panels on side walls, removable oven door glass |
| Safety Features | Auto shut-off via timer, child safety warnings (supervision recommended), cool-touch handles? (not specified) |
| Energy Efficiency | Class not specified; recommendations for energy saving provided |
| Spare Parts & Repairability | Replaceable oven lamp (G9 or E14, 15-25 W, 220-240 V AC), power cord replaceable by qualified technician, catalytic panel replaceable every 2-3 years |
| Installation Type | Built-in under counter or integrated; requires proper ventilation |
| Operational Life | 10 years (spare parts guaranteed for this period) |
| Compliance | WEEE Directive, CE, RoHS (implied) |
| Warranty | Manufacturer warranty (standard 2 years, check local regulations) |
Frequently Asked Questions - HS1000-33 Respekta
User questions about HS1000-33 Respekta
0 question about this device. Answer the ones you know or ask your own.
Ask a new question about this device
Download the instructions for your Cooker in PDF format for free! Find your manual HS1000-33 - Respekta and take your electronic device back in hand. On this page are published all the documents necessary for the use of your device. HS1000-33 by Respekta.
USER MANUAL HS1000-33 Respekta
natural_image
Four empty circles arranged in a 2x2 grid (no text or symbols)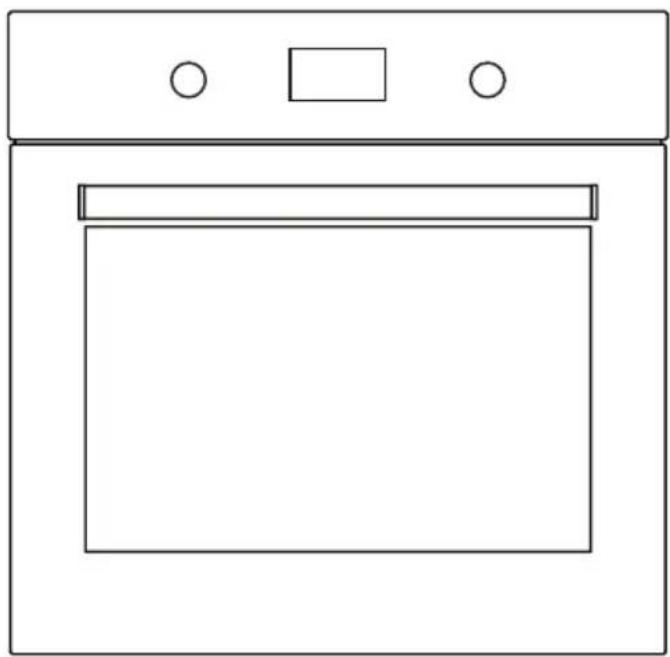
natural_image
Line drawing of a simple oven or oven with two circular handles and a square top (no text or symbols)USER MANUAL GB
Thank you for relying on this product. We aim to allow you to optimally and efficiently use this environment-friendly product produced in our modern facilities under precise conditions with respect to sense of quality in total.
We advise you to read these operating manual thoroughly before using the oven and keep it permanently so that the features of the built-in oven you have purchased will stay the same as the first day for a long time.
Note: This operating manual is prepared for multiple models. Your appliance may not feature some functions specified in the manual.
The product images are schematic.
This product has been produced in modern environment-friendly facilities without adversely affecting nature.
Products marked with (*) are optional.
"Complies with WEEE Regulation"
Contents
Important warnings....4
Methods for protecting ceramic glass cooking surface...12
Electrical connection....13
Introducing the appliance...15
Accessories...16
Technical specifications....17
Installation of appliance...17
Using the oven...24
Using pop-up button...25
Using the grill...26
Using the chicken roasting...26
Program types...27
Usage of your cooktop...28
Cooking recommendations...29
Cooking table...30
Baking with pizza stone 31
Maintenance and cleaning 32
Steam cleaning 32
Cleaning and mounting oven door 33
Cleaning oven glass 34
Catalytic panel 34
Rack positions 35
Replacing oven lamp 35
Troubleshooting 36
Handling rules 38
Recommendations for energy saving 38
Environmentally-friendly disposal 39
Package information 39
IMPORTANT WARNINGS
- Installation and repair should always be performed by “AUTHORIZED SERVICE”. Manufacturer shall not be held responsible for operations performed by unauthorized persons.
- Please read this operating instructions carefully. Only by this way you can use the appliance safely and in a correct manner.
- The oven should be used according to operating instructions.
- Keep children below the age of 8 and pets away when operating.
- The accessible parts may be hot during use. Young children must be kept away.
- WARNING: Danger of fire: do not store items on the cooking surfaces.
- WARNING: During use the appliance becomes hot. Care should be taken to avoid touching heating elements inside the oven.
- Setting conditions of this device are specified on the label. (Or on the data plate)
- The accessible parts may be hot when the grill is used. Small children should be kept away.
- WARNING: This appliance is intended for cooking. It should not be used for other purposes like heating a room.
-
To clean the appliance, do not use steam cleaners.
-
Ensure that the oven door is completely closed after putting food inside the oven.
- NEVER try to put out the fire with water. Only shut down the device circuit and then cover the flame with a cover or a fire blanket.
- WARNING: Children less than 8 years of age shall be kept away unless continuously supervised.
- Touching the heating elements should be avoided.
- CAUTION: Cooking process shall be supervised. Cooking process shall always be supervised.
- This appliance can be used by children aged from 8 years and above and persons with reduced physical, sensory or mental capabilities or lack of experience and knowledge if they have been given supervision or instruction concerning use of the appliance in a safe way and understand the hazards involved. Children shall not play with the appliance. Cleaning and user maintenance shall not be made by children without supervision.
- This device has been designed for household use only.
- Children must not play with the appliance. Cleaning or user maintenance of the appliance shall not be performed by children unless they are older than 8 years and supervised by adults.
- Keep the appliance and its power cord away from children less than 8 years old.
GB
- Put curtains, tulles, paper or any flammable (ignitable) material away from the appliance before starting to use the appliance. Do not put ignitable or flammable materials on or in the appliance.
- Keep the ventilation channels open.
- The appliance is not suitable for use with an external timer or a separate remote control system.
- Do not heat closed cans and glass jars. The pressure may lead jars to explode.
- Oven handle is not a towel drier. Do not hang towels, etc. on the oven handle.
- Do not place the oven trays, plates or aluminium foils directly on the oven base. The accumulated heat may damage the base of the oven.
- While placing food to or removing food from the oven, etc., always use heat resistant oven gloves.
- Do not use the product in states like medicated and/or under influence of alcohol which may affect your ability of judgement.
- Be careful when using alcohol in your foods. Alcohol will evaporate at high temperatures and may catch fire to cause a fire if it comes in contact with hot surfaces.
- After each use, check if the unit is turned off.
- If the appliance is faulty or has a visible damage, do not operate the appliance.
-
Do not touch the plug with wet hands. Do not pull the cord to plug off, always hold the plug.
-
Do not use the appliance with its front door glass removed or broken.
- Place the baking paper together with the food into a pre-heated oven by putting it inside a cooker or on an oven accessory. (tray, wire grill etc.)
- Do not put objects that children may reach on the appliance.
- It is important to place the wire grill and tray properly on the wire racks and/or correctly place the tray on the rack. Place the grill or tray between two rails and make sure it is balanced before putting food on it.
- Against the risk of touching the oven heater elements, remove excess parts of the baking paper that hang over from the accessory or container.
- Never use it at higher oven temperatures than the maximum usage temperature indicated on your baking paper. Do not place the baking paper on the base of the oven. Against the risk of touching the oven heater elements, remove excess parts of the baking paper that hang over from the accessory or container.
- When the door is open, do not place any heavy object on the door or allow children to sit on it. You may cause the oven to overturn or the door hinges to be damaged.
- The packaging materials are dangerous for children. Keep packaging materials away from the reach of children.
GB
- Do not use abrasive cleaners or sharp metal scrapers to clean the glass as the scratches that may occur on the surface of the door glass may cause the glass to break.
- User should not carry the oven alone.
- During usage, the internal and external surfaces of the oven get hot. As you open the oven door, step back to avoid the hot vapour coming out from the interior. There is risk of burning.
- Do not place heavy objects when oven door is open, risk of toppling.
- Oven supply can be disconnected during any construction work at home. After completing the work, re-connecting the oven shall be done by authorized service.
- User should not dislocate the resistance during cleaning. It may cause an electric shock.
- To prevent overheating, the appliance should not be installed behind of a decorative cover.
- Turn off the appliance before removing the safeguards. After cleaning, install the safeguards according to instructions.
- Cable fixing point shall be protected.
- Please don't cook the food directly on the tray / grid. Please put the food into or on appropriate tools before putting them in the oven.
-
Do not place metal utensils such as knife, fork, spoon on the surface of the appliance, since they will get hot.
-
CAUTION: If the glass of the stove is broken, turn off any heating element immediately and disconnect the appliance from power source, do not touch the surface of the appliance and do not use the appliance.
-
When not turning of the cooker during cooking, user can touch hot surfaces causing burns.
Electrical Safety
- Plug the appliance in a grounded socket protected by a fuse conforming to the values specified in the technical specifications chart.
- Have an authorized electrician set grounding equipment. Our company shall not be responsible for the damages that shall be incurred due to using the product without grounding according to local regulations.
- The circuit breaker switches of the oven shall be placed so that end user can reach them when the oven is installed.
- The power supply cord (the cord with plug) shall not contact the hot parts of the appliance.
- If the power supply cord (the cord with plug) is damaged, this cord shall be replaced by the manufacturer or its service agent or an equally qualified personnel to prevent a hazardous situation.
- Never wash the appliance by spraying or pouring water on it. There is a risk of electrocution.
-
WARNING: To avoid electric shock, ensure that the device circuit is open before changing the lamp.
-
WARNING: Cut off all supply circuit connections before accessing the terminals.
- Do not use cut or damaged cords or extension cords other than the original cord.
- Make sure that there is no liquid or humidity in the outlet where the product plug is installed.
- The rear surface of the oven also heats up when the oven is operated. Electrical connections shall not touch the rear surface, otherwise the connections may be damaged.
- Do not tighten the connecting cables to the oven door and do not run them over hot surfaces. If the cord melts, this may cause the oven to short circuit and even a fire.
- Unplug the unit during installation, maintenance, cleaning and repair.
- If the power supply cable is damaged, it must be replaced by its manufacturer or authorized technical service or any other personnel qualified at the same level, in order to avoid any dangerous situation.
- Make sure the plug is inserted firmly into wall socket to avoid sparks.
- Do not use steam cleaners for cleaning the appliance, otherwise electric shock may occur.
-
An omnipolar switch capable to disconnect power supply is required for installation. Disconnection from power supply shall be provided with a switch or an integrated fuse installed on fixed power supply according to building code.
-
Appliance is equipped with a type "Y" cord cable.
- Fixed connections shall be connected to a power supply enabling omnipolar disconnection. For appliances with over voltage category below III, disconnection device shall be connected to fixed power supply according to wiring code.
Intended Use
- This product has been designed for domestic use. Commercial use is not permitted.
- This appliance may only be used for cooking purposes. It shall not be used for other purposes like heating a room.
- This appliance shall not be used to heat plates under the grill, drying clothes or towels by hanging them on the handle or for heating purposes.
- The manufacturer assumes no responsibility for any damage due to misuse or mishandling.
- Oven part of the unit may be used for thawing, roasting, frying and grilling food.
- Operational life of the product you have purchased is 10 years. This is the period for which the spare parts required for the operation of this product as defined is provided by the manufacturer.
Methods for Protecting Ceramic Glass Cooking Surface
Ceramic glass surface is unbreakable and scratch resistant to a certain degree. However, to avoid any damage, please do the following:
- Never pour cold water on hot cookers.
- Do not stand on a ceramic glass plate.
- Sudden pressure, for example, the effect of a falling salt shaker may be critical. So, do not place such objects on a place above the hobs.
- After each use, make sure that the base of the cooking pot and surfaces of cooking zones are clean and dry.
- Do not peel vegetables on the hob surfaces. Sand grains falling from the vegetables may scratch the ceramic glass plate.
- Do not lay flammable materials such as cardboard or plastic on the oven. Objects such as tin, zinc, or aluminium (as well as aluminium foils or empty coffee pots) may melt on hot cooking surfaces and thus cause damage.
- Take care not to let sugary foods or fruit juices contact the hot cooking zones. The ceramic glass surface may be stained by these.
Electrical Connection
This oven must be installed and connected to its place correctly according to manufacturer instructions and by an authorized service.
Appliance must be installed in an oven enclosure providing high ventilation.
Electrical connections of the appliance must be made only via sockets having earth system furnished in compliance with rules. Contact an authorized electrician if there is no socket complying with the earthed system at where appliance will be placed. Manufacturing company is by no means responsible for damage resulting from connection of non-earthed sockets to appliance.
Plug of your oven must be earthed; ensure that socket for the plug is earthed. Plug must be located in a place that can be accessed after installation.
Your oven has been manufactured as 220-240 V 50/60 Hz. AC power supply compliant and requires a 16 Amp fuse. If your power network is different that these indicated values, refer to an electrician or your authorized service.
When you need to replace the electrical fuse, please ensure that electrical connection is made as follows:
- Phase (to live terminal) brown cable
- Blue cable to neutral terminal
- Yellow-green cable to earth terminal
Oven disconnecting switches must be in an accessible place for final user while oven is in its place.
Power supply cable (plug in cable) mustn't touch hot parts of the appliance.
If supply cord (plug in cable) is damaged, this cord must be replaced by the importer or its service agent or an equally competent personnel to prevent a hazardous situation.
Electrical Connection Scheme
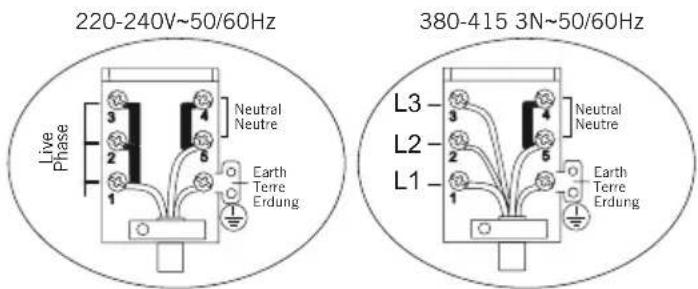
H05 VV-F 3G 4 mm² H05 VV-F 5G 1,5 mm²
Get electrical connection of your appliance done to authorized person in line with the following scheme.
Electrical Connection Of Cooking Zones
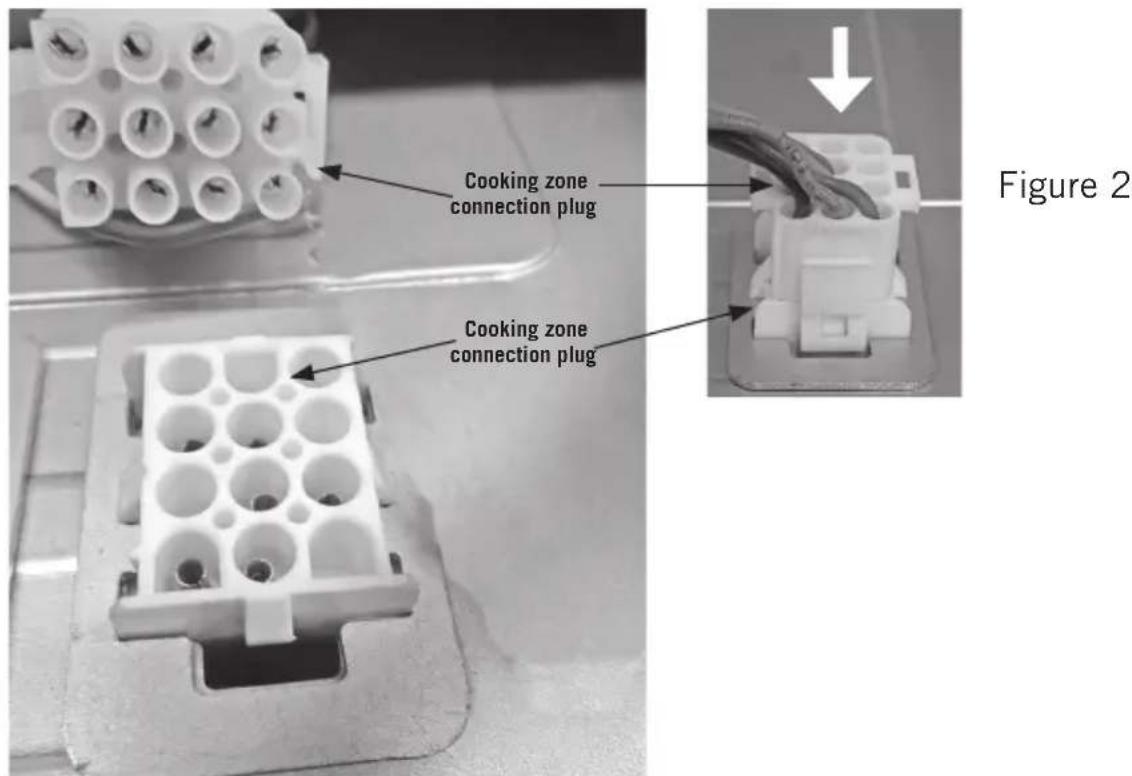
Figure 1
The cooking zone connecting plug will be inserted into the cooking zones connection socket located at upper surface of the housing. (figure 1,2)
INTRODUCING THE APPLIANCE
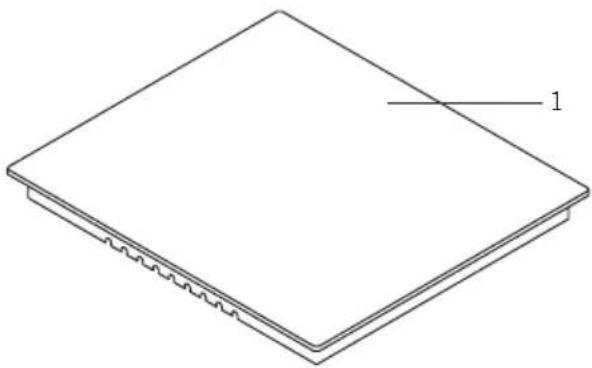
natural_image
Isometric line drawing of a rectangular panel with a wavy edge and labeled section '1' (no text or symbols beyond label)- Glass or metal surface
- Ovaldual heater *
- Double heater *
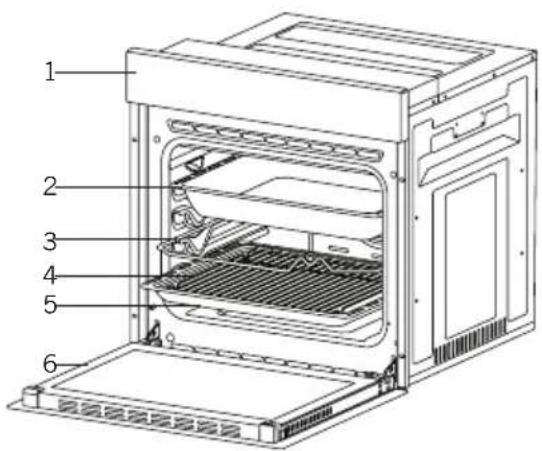
- Control panel
2.Deep tray * -
Roast chicken skewer *
-
In tray wire grill
- Standard tray
6.Oven door
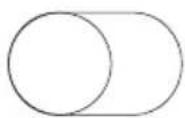
2
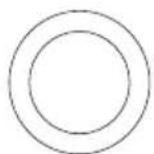
3
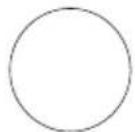
4
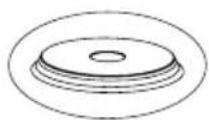
5
- 140 or ∅180 mm heater
- Hotplate *
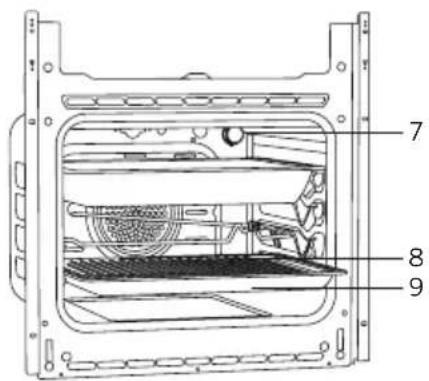
- Lamp
- In tray wire grill
- Standard tray
Control Panel
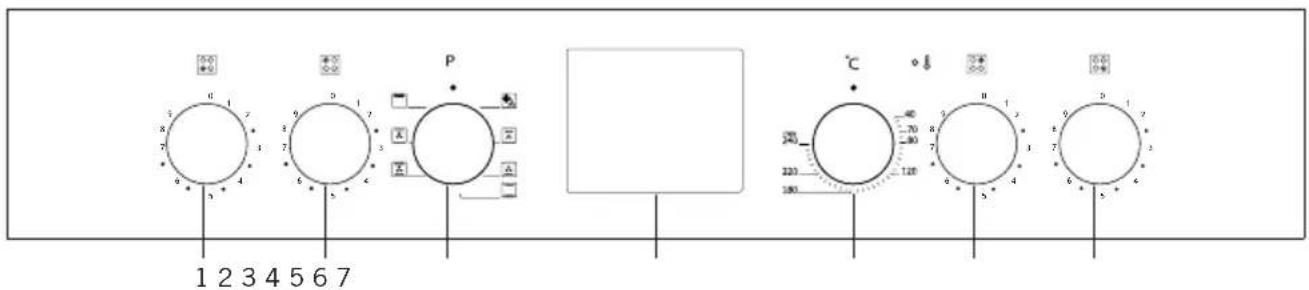
- Left front hob
- Left rear hob
- Functional button
-
Digital timer *
-
Thermostat
- Right rear hob
- Right front hob
WARNING: The control panel above is only for illustration purposes. Consider the control panel on your device.
Accessories (optional)
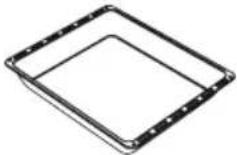 | Deep tray *Used for pastry, big roasts, watery foods. It can also be used as oil collecting container if you roast directly on grill with cake, frozen foods and meat dishes. |
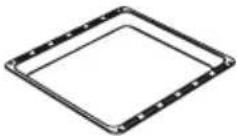 | Tray / Glass tray *Used for pastry (cookie, biscuit etc.), frozen foods. |
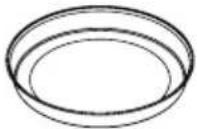 | Circular tray *Used for pastry frozen foods. |
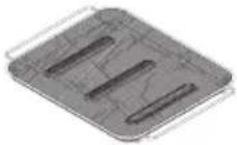 | Drying tray *It is used for foods that want to be dried. |
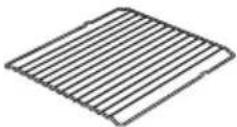 | Wire grillUsed for roasting or placing foods to be baked, roasted and frozen desired rack. |
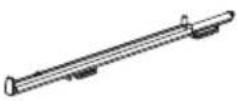 | Telescopic rail *Trays and wire racks can be removed and installed easily thanks to telescopic rails. |
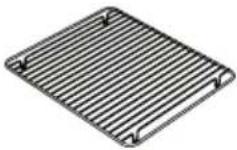 | In tray wire grill *Foods to stick while cooking such as steak are placed on in tray grill. Thus contact of food with tray and sticking are prevented. |
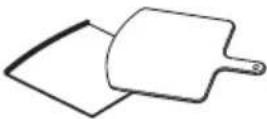 | Pizza stone and peel *They are used for baking pastries such as pizza, bread, pancake and removing baked food from the oven. |
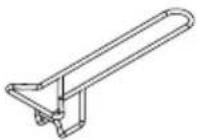 | Tray handle *It is used to hold hot trays. |
Technical Specifications
| Specifications 60 cm built-in oven | ||||
| Lamp power 15-25 W | ||||
| Thermostat | 40-240 / Max °C | |||
| Lower heater 1200 W | ||||
| Upper heater 1000 W | ||||
| Turbo heater 1800 W | ||||
| Grill heater Small grill 1000 W Big grill 2000 W | ||||
| Supply voltage 220-240V 50/60 Hz. | ||||
Technical specifications can be changed without prior notice to improve product quality.
The values provided with the appliance or its accompanying documents are laboratory readings in accordance with the respective standards. These values may differ depending on the use and ambient conditions.
Figures in this guide are schematic and may not be exactly match your product.
INSTALLATION OF APPLIANCE
Ensure that electrical installation is suitable for operationalising the appliance. If not, call an electrician and plumber to make necessary arrangements. Manufacturing firm can't be hold responsible for damages to arise due to operations by unauthorized people and product warranty becomes void.
WARNING: It is customer's responsibility to prepare the location the product shall be placed on and also have power utility prepared.
WARNING: The rules about electrical local standards must be adhered to during product installation.
WARNING: Check for any damage on the product before installing it. Do not have product installed if it's damaged. Damaged products pose danger for your safety.
Important Warnings for Installation:
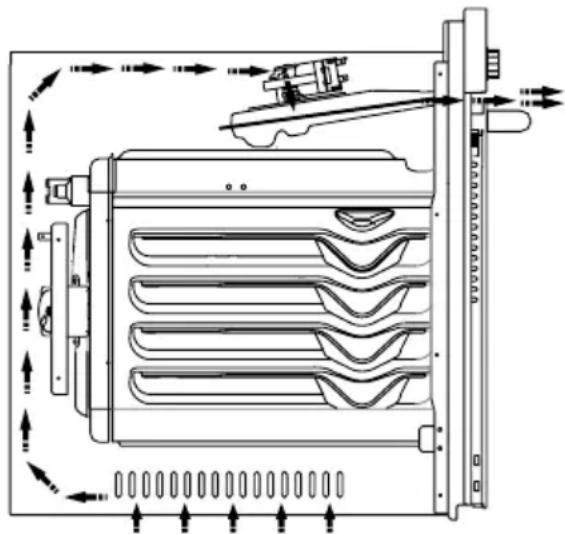
natural_image
Technical line drawing of a refrigerator or condenser unit with heat exchangers and cooling fins (no text or symbols)Figure 4
Cooling fan shall take extra steam out and prevent outer surfaces of appliance from overheating during operation of oven. This is a necessary condition for better appliance operation and better cooking. Cooling fan shall continue operation after cooking is finished. Fan shall automatically stop after cooling is completed. A clearance must be left behind the enclosure where you'll place the appliance for efficient and good operation.
This clearance shouldn't be ignored as it's required for ventilation system of the appliance to operate.
Right Place For Installation
Product has been designed to be mounted to worktops procured from market. A safe distance must be left between the product and kitchen walls or furniture. See the drawing provided on the next page for proper distances. (values in mm).
- Used surfaces, synthetic laminates and adhesives must be heat resistant. (minimum 100 °C)
- Kitchen cupboards must be level with product and secured.
- If there is a drawer below the oven, a rack must be placed between oven and drawer.
WARNING: Do not install the product next to refrigerators or coolers. The heat emitted by the product increases the energy consumption of cooling devices.
WARNING: Do not use door and/or handle to carry or move the product.
Built-In Oven Integrated Installation and Mounting
Place of use for product must be located before starting installation.
Product mustn't be installed in places which are under the effect of strong air flow.
Carry the product with minimum two people. Do not drag the product so that floor isn't damaged.
Remove all transportation materials inside and outside the product. Remove all materials and documents in the product.
Installation Under Counter
Cabin must match the dimensions provided in figure 5.
A clearance must be provided at the rear part of the cabin as indicated in the figure so that necessary ventilation can be achieved.
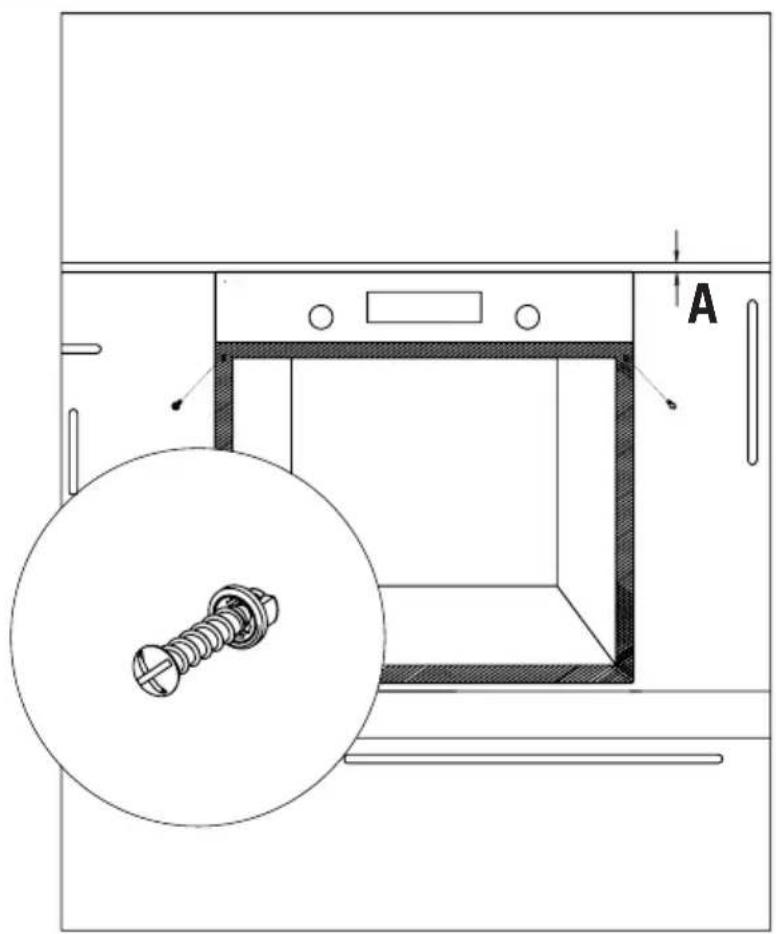
After mounting, the clearance between lower and upper part of the counter is indicated in figure 7 with “A”. It’s for ventilation and shouldn’t be covered.
Installation Requirements
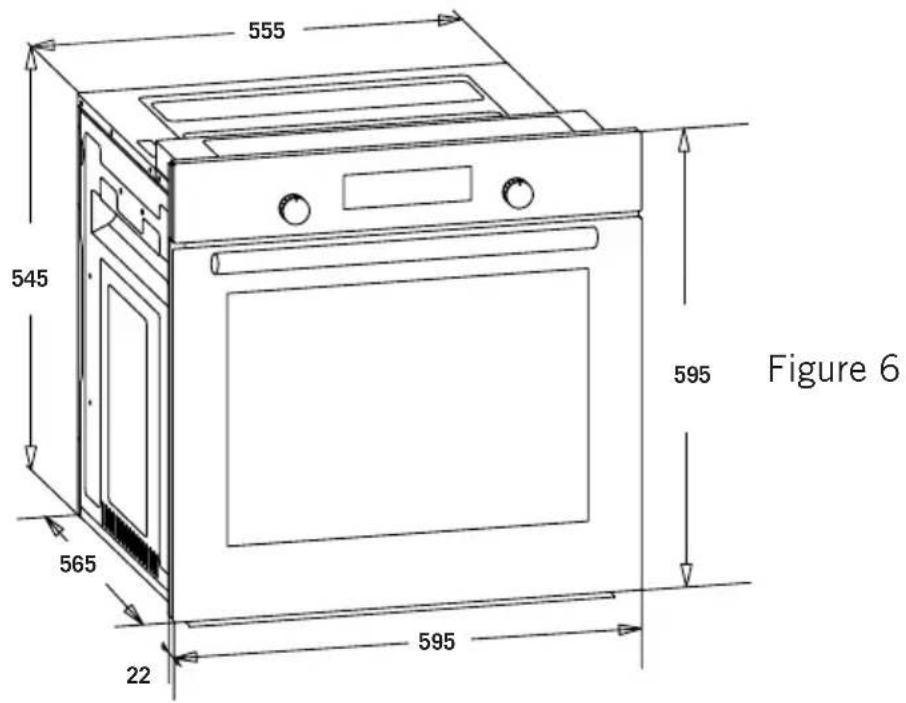
Product dimensions are provided in the figure 6.
Furniture surfaces for mounting and mounting materials to be used must have a minimum temperature resistance of 100 °C .
Mounting cabin must be secured and its floor must be plane for product not to tilt over.
Cabin floor must have a minimum strength that would handle a load of 60 kg.
Placing and Securing the Oven
Place the oven into the cabin with two or more people.
Ensure that oven's frame and front edge of the furniture match uniformly.
Supply cord mustn't be under the oven, squeeze in between oven and furniture or bend.
Fix the oven to the furniture by using the screws provided with the product. Screws must be mounted as shown in figure 7 by passing them through plastics attached to frame of the product. Screws mustn't be overtightened. Otherwise, screw sockets might be worn.
Check that oven doesn't move after mounting. If oven isn't mounted in accordance with instructions, there is a risk of tilt over during operation.
Electrical Connection
Mounting place of the product must have appropriate electrical installation.
Network voltage must be compatible with the values provided on type label of product.
Product connection must be made in accordance with local and national electrical requirements.
Before starting the mounting disconnect network power. Do not connect the product to network until its mounting is completed.
Mounting
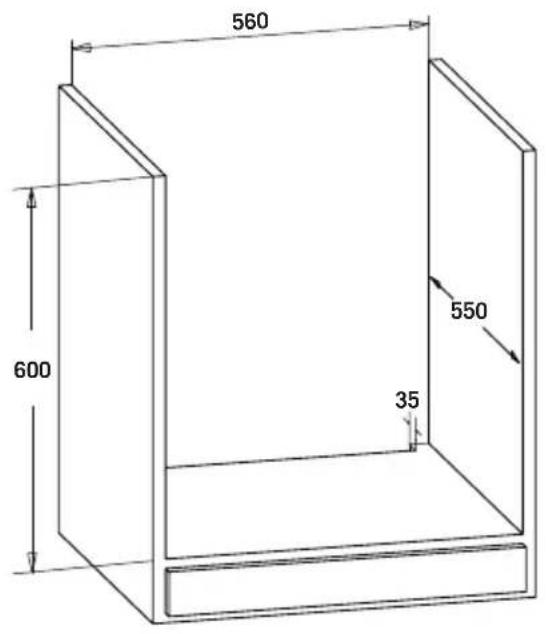
Figure 5
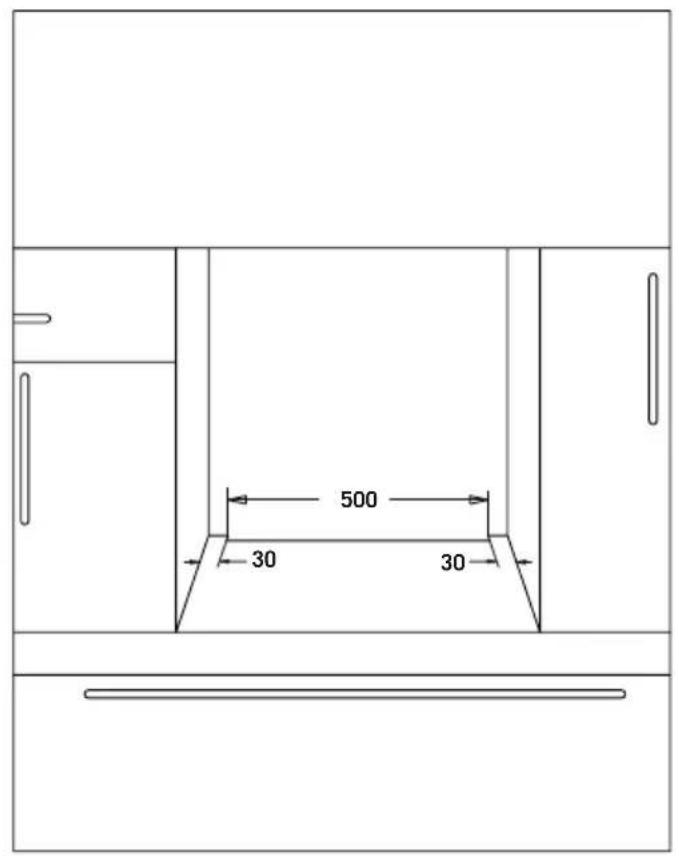
natural_image
Technical line drawing of a mechanical assembly with a circular component and labeled section A (no text or symbols beyond labels)Figure 7
Cooktop Counter Cutting Sizes
Pay attention to the drawing and dimensions given while making cooktop installation and adjusting counter cutting sizes.
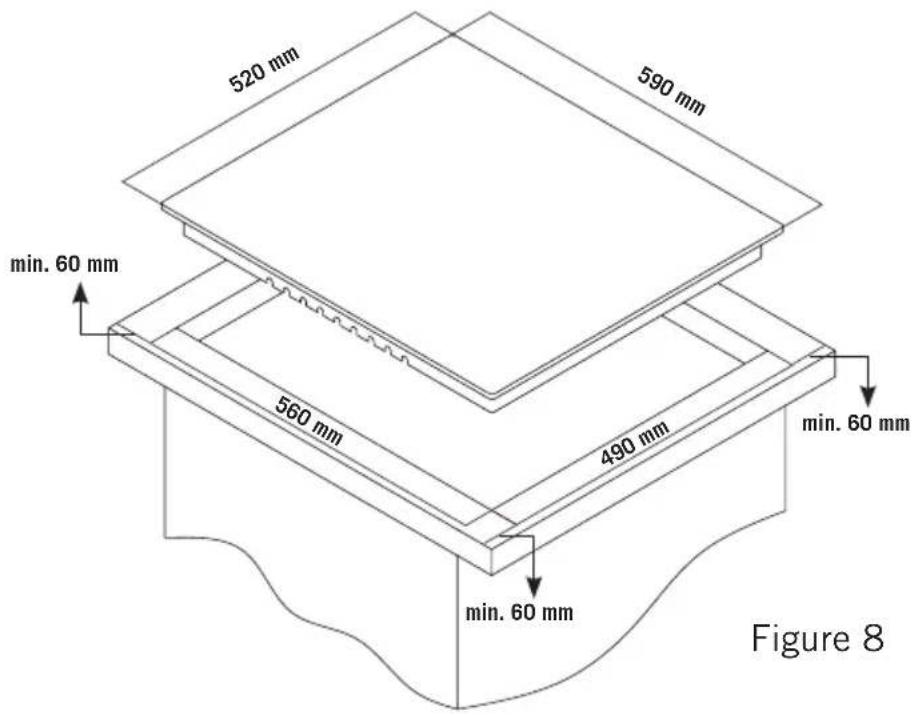
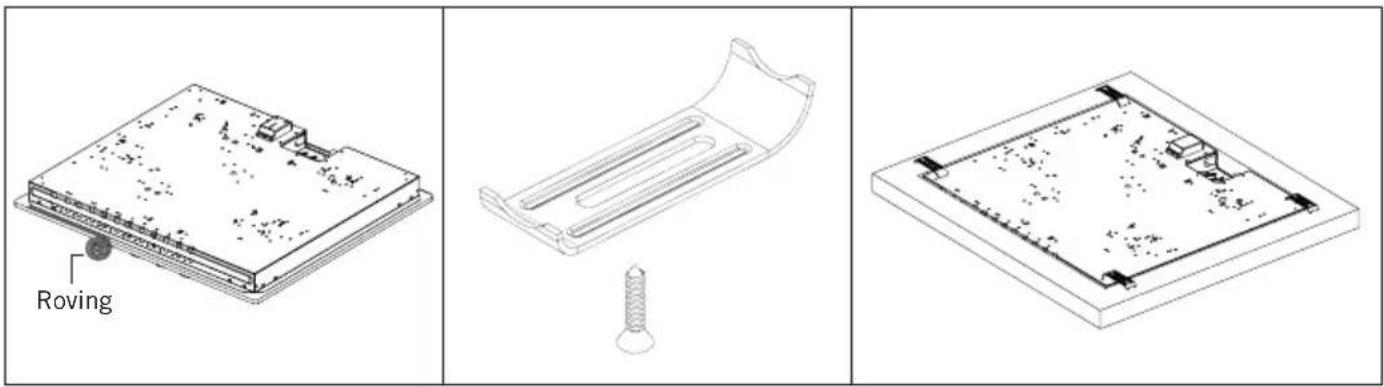
Installation Of Cooktop
- Turn the cooktop down and place on smooth ground.
- In order to prevent entrance of foreign substances and liquids between cooktop and counter, apply the paste given in package to the sides of lower guard of counter. For corners, curl paste and increase curls till filling corner gaps.
- Turn cooktop again and align with and place on counter.
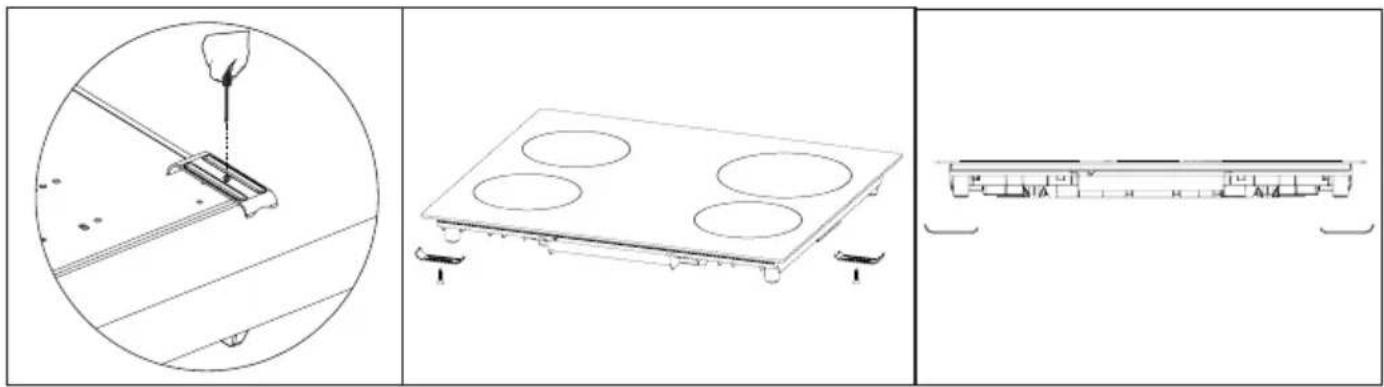
- Fasten up your cooktop on counter by using the clamp and screws supplied.
natural_image
Technical line drawings of a heating appliance with four circular cutouts and a mounted power grid (no text or symbols)
natural_image
Pure diagram of a horizontal beam with two support points, no text or symbols presentFigure 9
- When product is mounted on a drawer, if it is possible to touch lower side of product, this section should be separated with a wooden shelf.
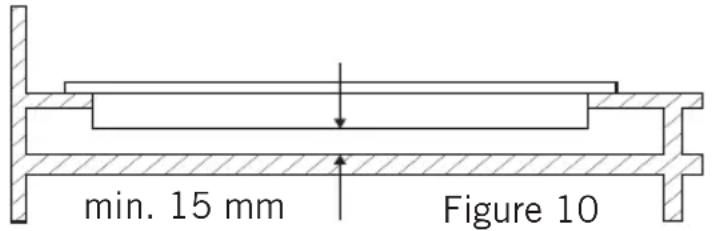
- While mounting cooktop on a closet, as shown in the figure above, in order to separate between closet and cooktop, a shelf should be mounted. If it is mounted on a built-in oven, there is no need to do that.
- If your cooktop will be mounted next to right or left wall, the minimum distance between wall and cooktop should be 50 mm.
Correct Place For Installation
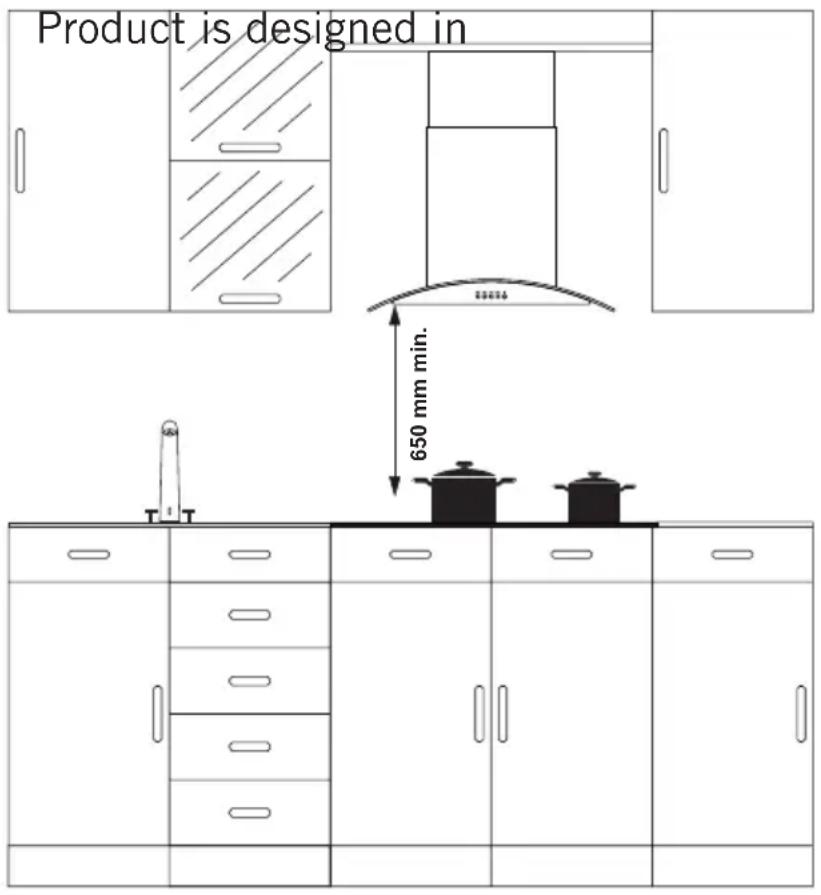
accordance with the kitchen counters supplied from market. A safe distance should be left between the product and kitchen walls and furniture. If hood/aspirator will be installed over your appliance, obey to the recommendation of hood / aspirator manufacturer for assembly height. (min. 65 cm) The gap that cooktop is to be placed on the counter should be cut in line with cooktop installation dimensions.
For installation of the product, the rules specified in local standards related to electricity should be complied.
USING THE OVEN
Initial Use Of Oven
Here are the things you must do at first use of your oven after making its necessary connections as per instructions:
- Remove labels or accessories attached inside the oven. If any, take out the protective folio on front side of the appliance.
- Remove dust and package residues by wiping inside of the oven with a damp cloth. Inside of oven must be empty. Plug the cable of appliance into the electrical socket.
- Set the thermostat button to the highest temperature (240 Max. °C) and run the oven for 30 minutes with its door closed. Meanwhile a slight smoke and smell might occur and that's a normal situation.
- Wipe inside of the oven with a slightly warm water with detergent after it becomes cold and then dry with a clean cloth. Now you can use your oven.
Normal Use Of Oven
- Adjust thermostat button and temperature at which you want to cook the food to start cooking.
- You can set cooking time to any desired time by using the button at models with mechanical timer. Timer will de-energize heaters when time expired and provide warning beep as ringing.
- Timer turns the heaters off and provides audible signal when cooking time expires in line with the information entered in the models with digital timer.
- Cooling system of the appliance will continue to operate after cooking is completed. Do not cut the power of appliance in this situation which is required for appliance to cool down. System will shut down after cooling is completed.
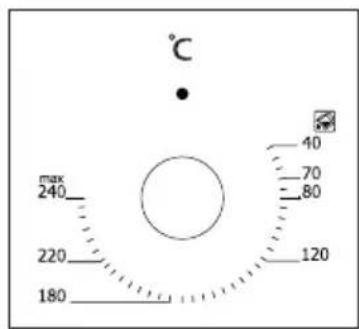
Thermostat Button: Helps to set cooking temperature of the food to be cooked in the oven. You can set the desired temperature by turning the button after placing the food into the oven. Check cooking table related to cooking temperatures of different foods.
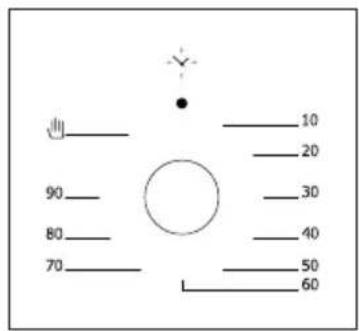
Mechanical Timer Button*: Helps to set time for the food to be cooked in the oven. Timer de-energizes the heaters when set time expires and warns you by ringing. See cooking table for cooking times.
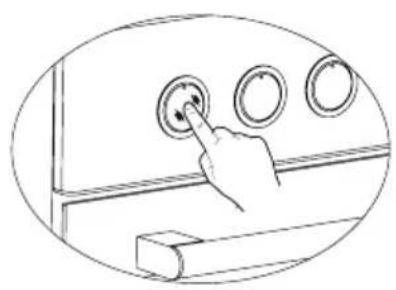
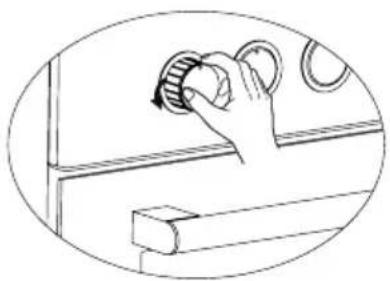
Using Pop-up Button \*
Adjustment can be made only when button is popped for models with pop-up button.
natural_image
Hand pressing a button on a control panel with three circular buttons (no text or symbols visible)Make sure that button is popped by pressing on the button as shown in the figure at left side.
natural_image
Line drawing of a hand holding a knob on a cabinet (no text or symbols)You can make necessary adjustments by turning right or left when button is popped enough.
Using The Grill
- When you place the grill on the top rack, the food on the grill shall not touch the grill.
- You can preheat for 5 minutes while grilling. If necessary, you may turn the food upside down.
- Food shall be in the center of the grill to provide maximum air flow through the oven.
To turn on the grill;
- Place the function button over the grill symbol.
- Then, set it to the desired grill temperature.
To turn the grill off;
Set the function button to the off position.
WARNING: Keep the oven door closed while grilling.
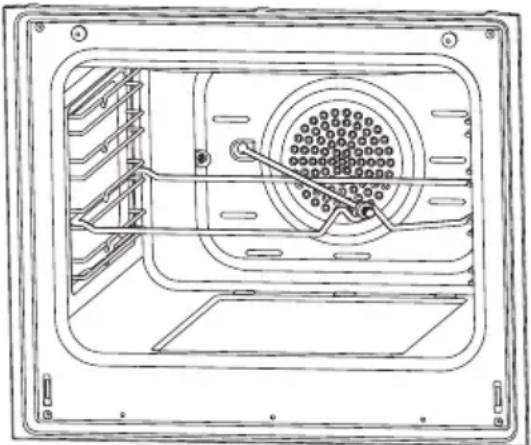
Using The Chicken Roasting *
natural_image
Technical line drawing of a mechanical or electrical component with internal components and mounting holes (no text or symbols)Figure 11
Place the spit on the frame. Slide turn spit frame into the oven at the desired level. Locate a dripping pan through the bottom in order to collect the fast. Add some water in dripping pan for easy cleaning. Do not forget to remove plastic part from spit. After grilling, screw the plastik handle to the skewer and take out the food from oven.
PROGRAM TYPES
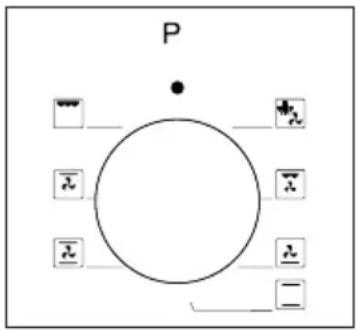
Program Button: Helps to set with which heaters the food placed in oven will be cooked. Heater program types in this button and their functions are stated below. Every model might not have all heater types and thus program types of these heaters.
Heating program types in your appliance and important explanations of them are provided below for you can cook different foods appealing to your taste.
 | Lower and upper heating elements | Fan | |
 | Lower heating element and fan Turbo heater and fan | and fan | |
 | Grill and roast chicken | Lower-upper heating element and fan | |
 | Upper heating element and fan Grill and fan | ||
 | Multifunctional cooking (3D) Gril | ||
 | Lower heating element Upper heating element | ||
 | Small grill and fan Steam cleaning | ||
Lower heating element: Select this program towards end of cooking time if lower part of the food cooked will be roasted.
Upper heating element: Used for post heating or roasting very little pieces of foods.
Lower and upper heating elements: A program that can be used for cooking foods like cake, pizza, biscuit and cookie.
Lower heating element and fan: Use mostly for cooking foods like fruit cake.
Lower and upper heating element and fan: The program suitable for cooking foods like cakes, dried cakes, lasagne. Suitable for cooking meat dishes, as well.
Grill: Grill cooker is used for grilling meat like foods such as steak, sausage and fish. While grilling, tray should be placed in the lower rack and water must be placed in it.
Turbo heater and fan: Suitable for baking and roasting. Keep heat setting lower than “Lower and Upper Heater” program since heat is conveyed immediately via air flow.
Grill and fan: Suitable for cooking meat type foods. Do not forget to place a cooking tray in a lower rack inside the oven and a little water in it while grilling.
Multi Functional Cooking (3D): Suitable for baking and roasting. Lower and upper heaters operate as well as quick transmission of heat via air flow. Suitable for cooking requiring single tray and intense heat.
USAGE OF YOUR COOKTOP
Usage Of Hotplate \*
You can operate electric cooktops by turning the button on control panel you want to use to the level you desire. Cooktop powers as per levels are given in the following table.
| Level 1 Level 2 Level | 3 Level 4 Level 5 Level 6 | |||||
| 80 mm 200 W 250 W 450 W --- --- --- | ||||||
| 145 mm 250 W 750 W 1000 W --- --- --- | ||||||
| 180 mm 500 W 750 W 1500 W --- --- --- | ||||||
| 145 mm rapid | 500 W | 1000 W | 1500 W | --- | --- | --- |
| 180 mm rapid | 850 W | 1150 W | 2000 W | --- | --- | --- |
| 145 mm | 95 W | 155 W | 250 W | 400 W | 750 W | 1000 W |
| 180 mm 115 W 175 W 250 W 600 W | 850 W | 1500 W | ||||
| 145 mm rapid | 135 W 165 W 250 W 500 W | 750 W | 1500 W | |||
| 180 mm rapid | 175 W | 220 W | 300 W | 850 W | 1150 W | 2000 W |
Electrical Heater Power Values Quick
| Level 1 | Level 2 | Level 3 | Level 4 | Level 5 | Level 6 | Level 7 | Level 8 | Level 9 | Mak. | |
| 140 mm Commutator | 130 W | 206 W | 350 W | 500 W | 850 W | 1200 W | --- --- | --- | ||
| 180 mm Commutator | 180 W | 470 W | 790 W | 850 W | 1230 W | 1700 W | --- --- | --- | ||
| 180 mm Regulator | 1800 W | 1800 W | 1800 W | 1800 W | 1800 W | 1800 W | 1800 W | 1800 W | 1800 W | --- |
| 140/250 mm Ovaldual | 1000 W | 1000 W | 1000 W | 1000 W | 1000 W | 1000 W | 1000 W | 1000 W | 1000 W | 1800 W |
| 120/180 mm Double | 700 W | 700 W | 700 W | 700 W | 700 W | 700 W | 700 W | 700 W | 700 W | 1700 W |
COOKING RECOMMENDATIONS
You can find in the following table the information of food types which we tested and identified their cooking values in our labs. Cooking times can vary depending on the network voltage, quality of material to be cooked, quantity and temperature. Dishes to cook by using these values might not appeal to your taste. You can set various values for obtaining different tastes and results appealing to your taste by making tests.
WARNING: Oven must be preheated for 7-10 minutes before placing the food in it.

natural_image
Four black-and-white illustrations showing cooking pots with checkmarks and X marks, one being stirred with a steaming pot (no text or symbols)Correct Incorrect Incorrect Incorrect
Cooking Table
| Food | Cooking function | Cooking temperature (°C) | Cooking rack | Cooking time (min.) |
| Cake Static / Static+fan 170-180 2-3 35-45 | ||||
| Small cake Static / Turbo+fan 170-180 2 25-30 | ||||
| Pie Static / Static+fan 180-200 2 35-45 | ||||
| Pastry Static 180-190 2 20-25 | ||||
| Cookie Static 170-180 2 20-25 | ||||
| Apple pie Static / Turbo+fan 180-190 1 50-70 | ||||
| Sponge cake Static 200/150 * 2 20-25 | ||||
| Pizza Static fan | 180-200 3 20-30 | |||
| Lasagne | Static 180-200 2-3 25-40 | |||
| Meringue | Static | 100 | 2 | 50 |
| Grilled chicken ** | Grill+fan | 200-220 | 3 | 25-35 |
| Grilled fish ** | Grill+fan | 200-220 | 3 | 25-35 |
| Calf steak ** | Grill+fan | Max | 4 | 15-20 |
| Grilled meatball ** | Grill+fan | Max | 4 | 20-25 |
* Do not preheat. First half of cooking time is recommended to be at 200 °C de while the other half at 150 °C.
** Food must be turned after half of the cooking time.
Baking With Pizza Stone \*
When baking with pizza stone, place pizza stone over wire rack and pre-heat the oven in pizza mode (turbo + lower) at 230^ C for 30 minutes. Once pre-heating is completed, without removing pizza stone put pizza over it with the peel (do not place frozen pizza) and bake at 180^ C for 20-25 minutes. Once baking is completed, remove the baked pizza from the oven using the peel.
WARNING: Do not place pizza stone in a pre-heated oven.
WARNING: Once baking is completed, do not remove pizza stone when it is hot and do not place on cold surfaces. Otherwise, pizza stone can be cracked.
WARNING: Do not expose pizza stone to humidity.
Drying
| Food | Cooking function | Cooking temperature (°C) | Cooking rack | Cooking duration (hours) |
| Sliced banana | Fan-cooking functions 100 | 2 4-5 | ||
| Sliced apple | Fan-cooking functions 100 | 4-5 | ||
| Sliced orange | Fan-cooking functions 100 | 2 4-5 |
WARNING: The thinner the slices, the faster the drying duration is and the aroma of the food is preserved better.
WARNING: Do not open the oven door until the drying process is complete.
WARNING: Drying should only be carried out in the drying tray.
MAINTENANCE AND CLEANING
- Remove the power plug from electrical socket.
- Do not clean inner parts, panel, trays and other parts of the product with hard tools such as bristle brush, wire wool or knife. Do not use abrasive, scratching materials or detergent.
-
Rinse after wiping the parts at inner parts of the product with soapy cloth, then dry thoroughly with a soft cloth.
-
Clean glass surfaces with special glass cleaning material.
-
Do not clean your product with steam cleaners.
-
Never use combustibles like acid, thinner and gas while cleaning your product.
-
Do not wash any part of the product in dishwasher.
-
Use potassium stearate (soft soap) for dirt and stains.
Steam Cleaning *
natural_image
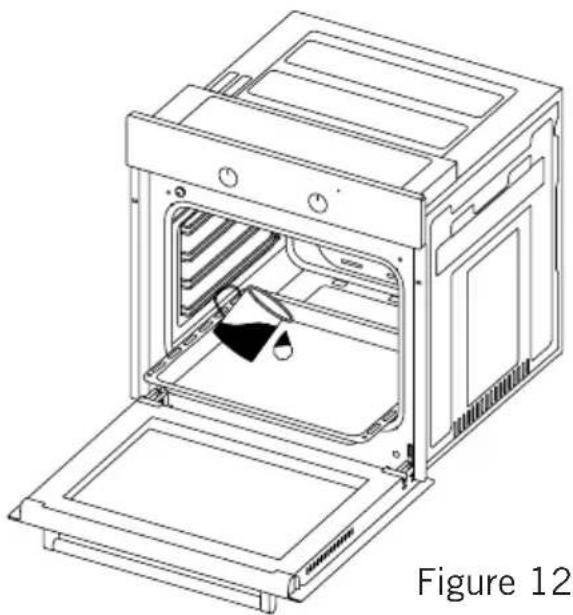
Line drawing of an oven with a black plastic bag inside, labeled as Figure 12 (no text or symbols on the diagram itself)It enables cleaning the soils softened thanks to the steam to be generated in the oven.
- Remove all the accessories in the oven.
- Pour a half litre of water into the tray and Place the tray at the bottom of the boiler.
- Set the switch to the steam cleaning mode.
-
Set the thermostat to 70 °C degrees and operate the oven for 30 minutes.
-
After operating the oven for 30 minutes, open the oven door and wipe the inner surfaces with a wet cloth.
- Use dish-washing liquid, warm water and a soft cloth for stubborn dirt, then dry off the area you have just cleaned with a dry cloth.
Cleaning And Mounting Oven Door
natural_image
Line drawing of an open refrigerator with internal compartments and ventilation slots (no text or symbols)Figure 13
natural_image
Line drawing of an open oven with internal compartments and ventilation slots (no text or symbols)Figure 14
natural_image
Four circular diagrams showing mechanical assembly steps with no visible text or symbolsFigure 13.1 Figure 13.2 Figure 14.1 Figure 14.2
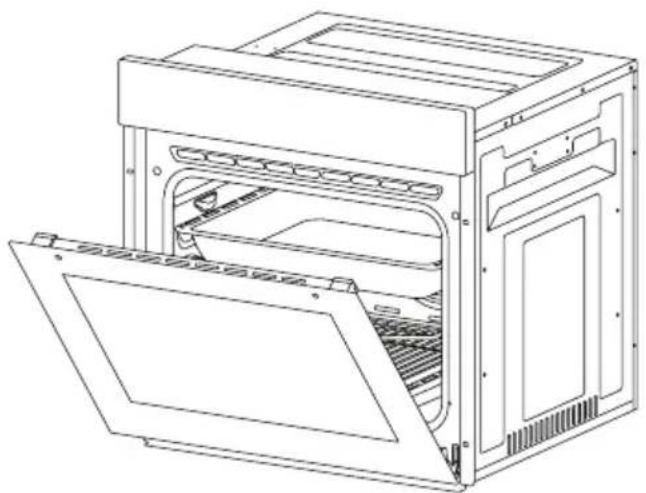
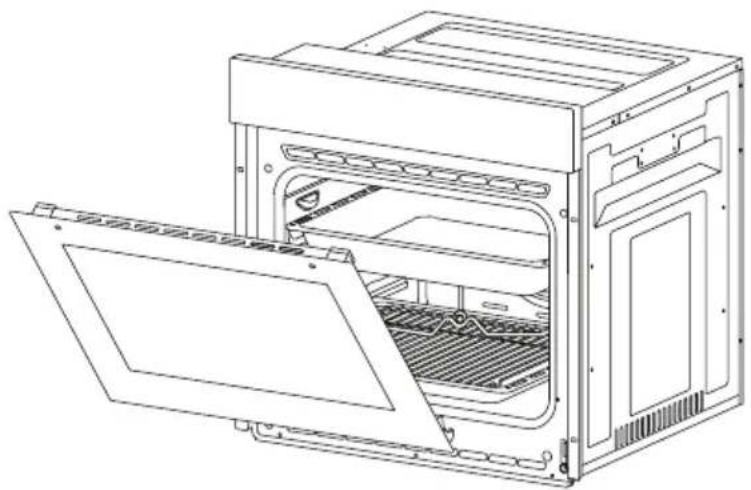
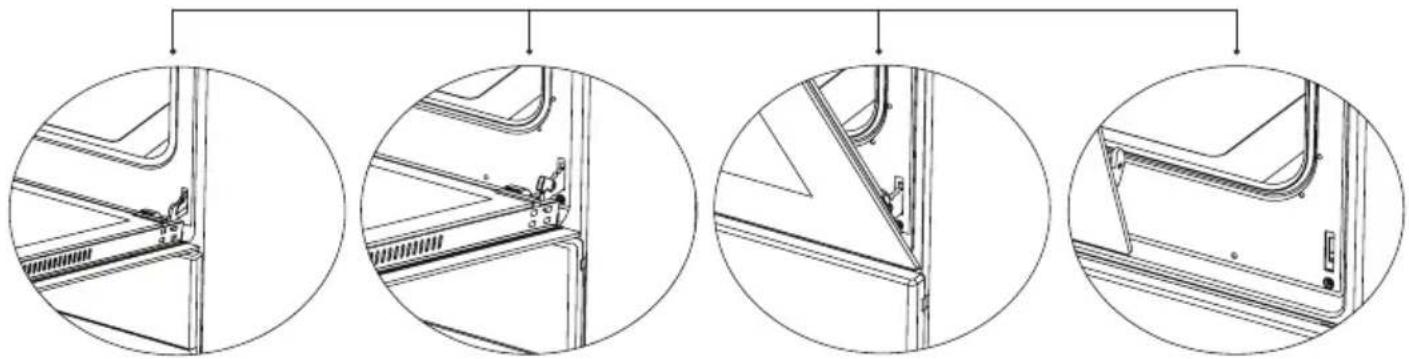
Open the door fully by pulling the oven door toward yourself. Then perform unlock operation by pulling the hinge lock upwards with the aid of screwdriver as indicated in
Set the hinge lock to the widest angle as in figure 13.2. Adjust both hinges connecting oven door to the oven to the same position. Later, close the opened oven door so that it will be in a position to contact with hinge lock as in figure 14.1.
For easier removal of oven door, when it comes close to closed position, hold the cover with two hands as in figure 14.2 and pull upwards.
figure 13.1.
Reversely perform respectively what you did while opening door to reinstall oven door back.
Cleaning Oven Glass
Lift by pressing on plastic latches on left and right side as shown in figure 15 and pulling the profile toward yourself as in figure 16. Glass is released after profile is removed as shown in figure 17. Remove the released glass by pulling toward yourself carefully. Outer glass is fixed to oven door profile. You can perform glass cleaning easily after glasses are released. You can mount glasses back by performing the operations reversely after cleaning and maintenance are completed. Ensure that profile is seated properly in place.
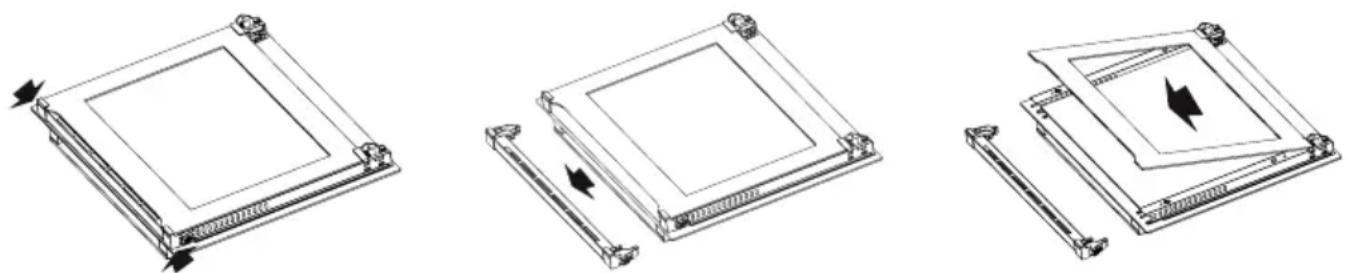
Figure 15 Figure 16 Figure 17
Catalytic Panel \*
It is located behind the wire racks of the oven, at the right and left walls of oven cavity. Catalytic panel removes offensive odour and provides using your appliance at its best performance. Over time, oil and food odours permeate into enamelled oven walls and heating elements. Catalytic panel absorbs any food and oil odours, and burns them during cooking to clean your oven.
Detaching catalytic panel
To remove catalytic panel; first remove the wire racks. Once wire racks are removed, catalytic panel will be free. It is advised to replace the catalytic panel once every 2-3 years.
Rack Positions
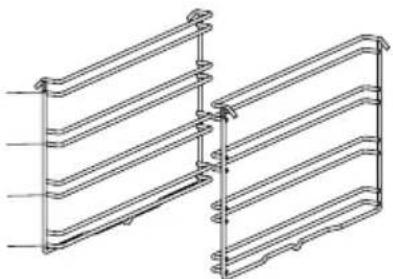
Rack 4 Rack 3 Rack 2 Rack 1
natural_image
Technical line drawing of a multi-tiered structural framework (no text or symbols)It is important to place the wire grill into the oven properly. Do not allow wire rack to touch rear wall of the oven. Rack positions are shown in the next figure. You may place a deep tray or a standard tray in the lower and upper wire racks.
Installing and removing wire racks
To remove wire racks, press the clips shown with arrows in the figure, first remove the lower, and than the upper side from installation location. To install wire racks; reverse the procedure for removing wire rack.
Replacing Oven Lamp
WARNING: To avoid electric shock, ensure that the appliance circuit is open before changing the lamp. (having circuit open means power is off) First disconnect the power of appliance and ensure that appliance is cold.
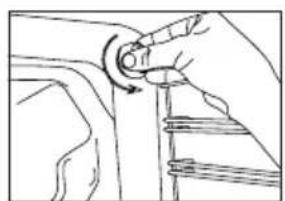
Remove the glass protection by turning as indicated in the figure on the left side. If you have difficulty in turning, then using plastic gloves will help you in turning.
Then remove the lamp by turning, install the new lamp with same specifications.
Reinstall glass protection, plug the power cable of appliance into electrical socket and complete replacement. Now you can use your oven.
Type G9 Lamp
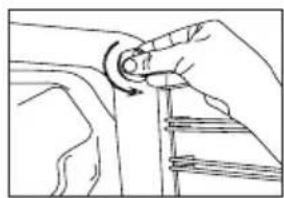
natural_image
Line drawing of a hand adjusting a mechanical component with a curved arrow indicating rotation (no text or symbols)natural_image
Pure diagram of a device with directional arrows and a central symbol, no text or labels present.Figure 18
Type E14 Lamp
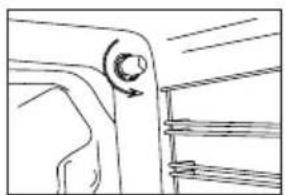
natural_image
Line drawing of a mechanical component with a knob and ladder (no text or symbols)220-240 V, AC 15 W
natural_image
Line drawing of a hand turning a car wheel (no text or symbols)Figure 19
WARNING: This product contains a light source of energy efficiency class G.
TROUBLESHOOTING
You may solve the problems you may encounter with your product by checking the following points before calling the technical service.
Check Points
In case you experience a problem about the oven, first check the table below and try out the suggestions.
| Problem Possible cause What to do | ||
| Oven does not operate. | Power supply not available. | Check for power supply. |
| Oven stops during cooking. | Plug comes out from the wall socket. | Re-install the plug into wall socket. |
| Turns off during cooking. | Too long continuous operation. | Let the oven cool down after long cooking cycles. |
| Cooling fan not operating. | Listen the sound from the cooling fan. | |
| Oven not installed in a location with good ventilation. | Make sure clearances specified in operating instructions are maintained. | |
| More than one plugs in a wall socket. | Use only one plug for each wall socket. | |
| Outer surface of the oven gets very hot during operation. | Oven not installed in a location with good ventilation. | Make sure clearances specified in operating instructions are maintained. |
| Oven door is not opening properly. | Food residues jammed between the door and internal cavity. | Clean the oven well and try to re-open the door. |
| Internal light is dim or does not operate. | Foreign object covering the lamp during cooking. | Clean internal surface of the oven and check again. |
| Lamp might be failed. | Replace with a lamp with same specifications. | |
| Electric shock when touching the oven. | No proper grounding. | Make sure power supply is grounded properly. |
| Ungrounded wall socket is used. | ||
| Water dripping. | Water or steam may generate under certain conditions depending on the food being cooked. This is not a fault of the appliance. | Let the oven cool down and than wipe dry with a cloth. |
| Steam coming out from a crack on oven door. | ||
| Water remaining inside the oven. | ||
| The cooling fan continues to operate after cooking is finished. | The fan operates for a certain period for ventilation of internal cavity of the oven. | This is not a fault of the appliance; therefore you don't have to worry. |
| Oven does not heat. | Oven door is open. Close the door and restart. | |
| Oven controls not correctly adjusted. | Read the section regarding operation of the oven and reset the oven. | |
| Fuse tripped or circuit breaker turned off. | Replace the fuse or reset the circuit breaker. If this is repeating frequently, call an electrician. | |
| Smoke coming out during operation. | When operating the oven for the first time | Smoke comes out from the heaters. This is not a fault. After 2-3 cycles, there will be no more smoke. |
| Food on heater. | Let the oven to cool down and clean food residues from the ground of the oven and surface of upper heater. | |
| When operating the oven burnt or plastic odour coming out. | Plastic or other not heat resistant accessories are being used inside the oven. | At high temperatures, use suitable glassware accessories. |
| Oven does not cook well. | Oven door is opened frequently during cooking. | Do not open oven door frequently, if the food you are cooking does not require turning. If you open the door frequently internal temperature drops and therefore cooking result will be influenced. |
HANDLING RULES
- Do not use the door and/or handle to carry or move the appliance.
- Carry out the movement and transportation in the original packaging.
- Pay maximum attention to the appliance while loading/unloading and handling.
- Make sure that the packaging is securely closed during handling and transportation.
- Protect from external factors (such as humidity, water, etc.) that may damage the packaging.
- Be careful not to damage the appliance due to bumps, crashes, drops, etc. while handling and transporting and not to break or deform it during operation.
RECOMMENDATIONS FOR ENERGY SAVING
Following details will help you use your product ecologically and economically.
- Use dark coloured and enamel containers that conduct the heat better in the oven.
- As you cook your food, if the recipe or the user manual indicates that pre-heating is required, pre-heat the oven.
- Do not open the oven door frequently while cooking.
- Try not to cook multiple dishes simultaneously in the oven. You may cook at the same time by placing two cookers on the wire rack.
- Cook multiple dishes successively. The oven will not lose heat.
- Turn off the oven a few minutes before the expiration time of cooking. In this case, do not open the oven door.
- Defrost the frozen food before cooking.
ENVIRONMENTALLY-FRIENDLY DISPOSAL
natural_image
Symbol of a trash bin crossed with a diagonal line and a horizontal bar below (no text or labels)Dispose of packaging in an environmentally-friendly manner.
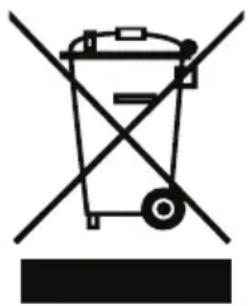
This appliance is labelled in accordance with European Directive 2012/19/EU concerning used electrical and electronic appliances (waste electrical and electronic equipment - WEEE). The guideline determines the framework for the return and recycling of used appliances as applicable throughout to the EU.
PACKAGE INFORMATION
Packaging materials of the product are manufactured from recyclable materials in accordance with our National Environment Regulations. Do not dispose of the packaging materials together with the domestic or other wastes. Take them to the packaging material collection points designated by the local authorities.
natural_image
Isometric line drawing of a rectangular panel with a textured base and labeled section '1' (no text or symbols beyond label)natural_image
Technical line drawing of a refrigerator or oven unit with heat exchangers and cooling fins (no text or symbols)Abbildung 4
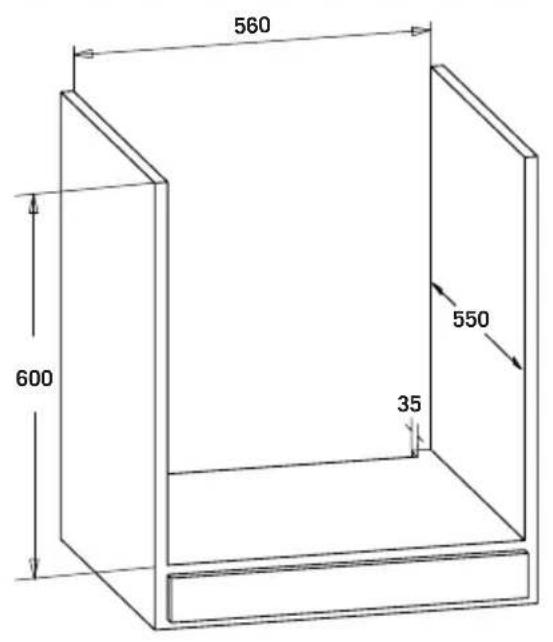
Abbildung 5
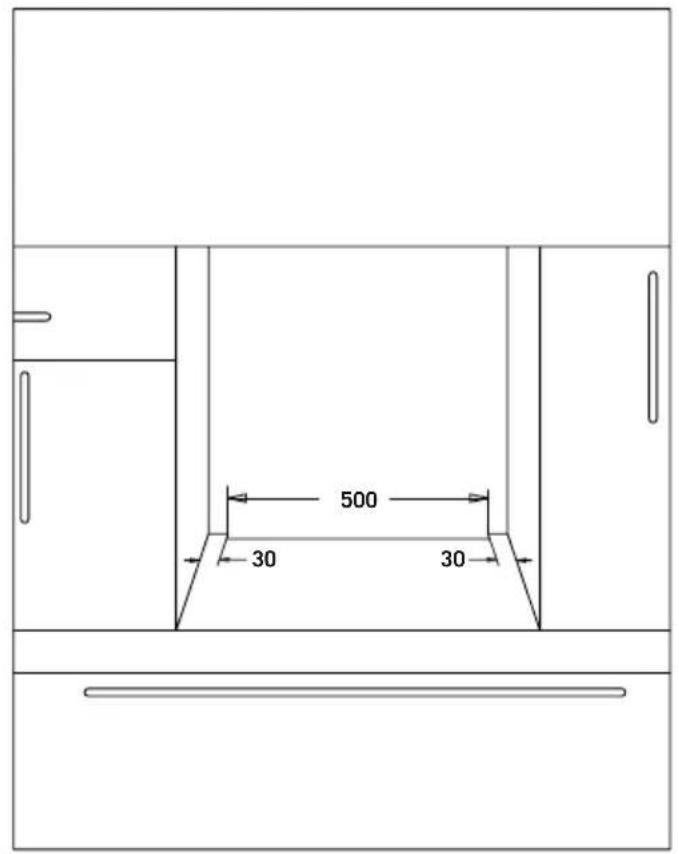
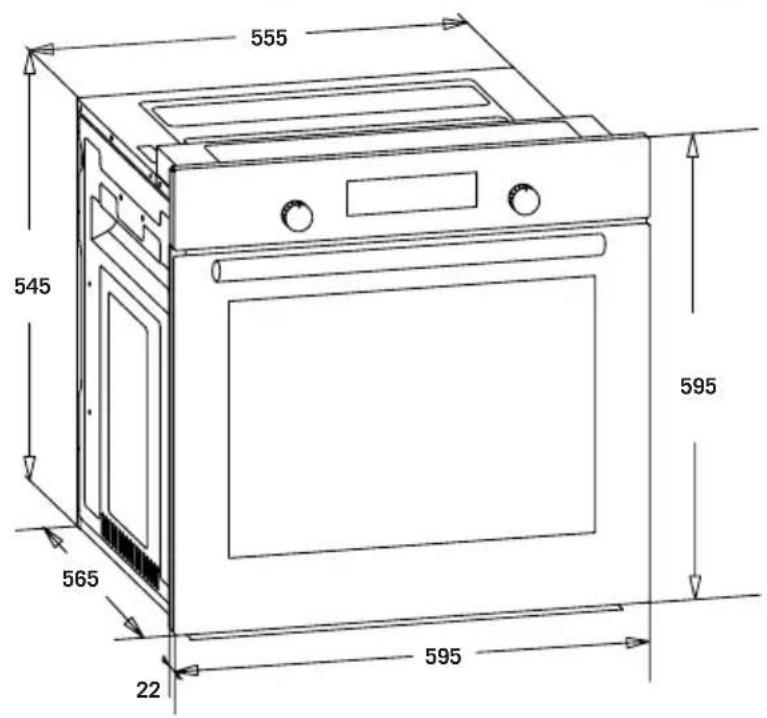
Abbildung 6
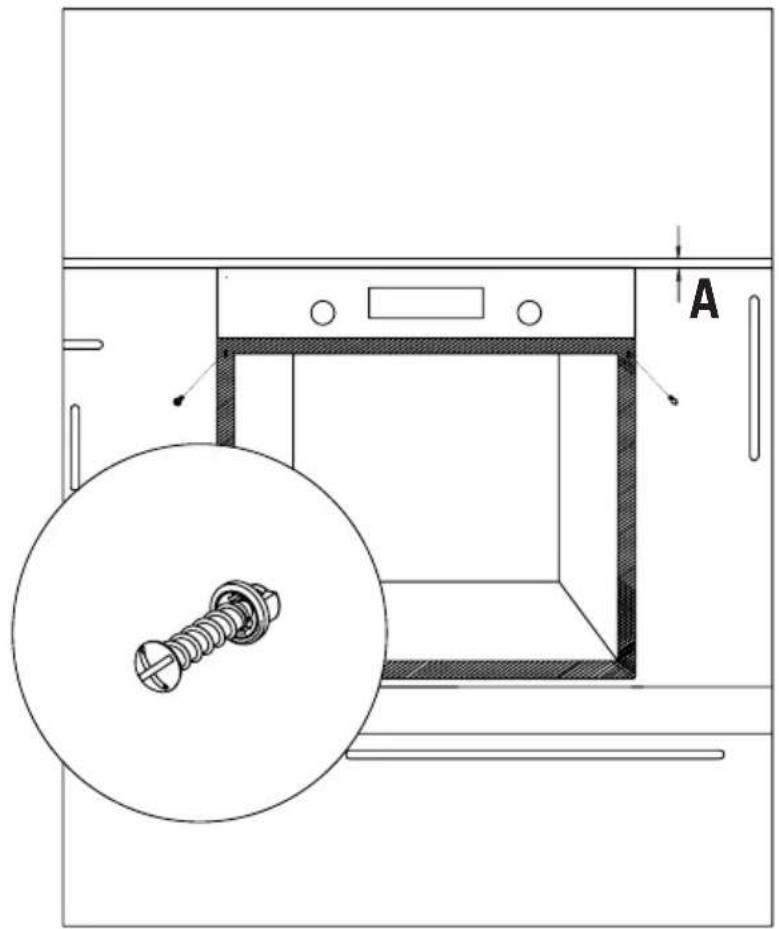
Abbildung 7
natural_image
Technical line drawings of a heating appliance with four circular cutouts and a side view showing internal components (no text or symbols)
natural_image
Pure diagram of a horizontal beam with two supports at both ends (no text or symbols)Abbildung 9
DE
natural_image
Line drawing of a hand pressing a button on a control panel (no text or symbols)natural_image
Line drawing of a hand holding a knob on a window (no text or symbols)natural_image
Technical line drawing of a mechanical device interior with internal components and mounting holes (no text or symbols)Abbildung 11
| Niveau 1 | Niveau 2 Niveau 3 Niveau 4 Niveau 5 Niveau 6 | |||||
| 80 mm 200 W 250 W 4 | 50 W --- | --- | --- | |||
| 145 mm | 250 W | 750 W | 1000 W | --- | --- | --- |
| 180 mm | 500 W | 750 W | 1500 W | --- | --- | --- |
| 145 mm schnell | 500 W | 1000 W | 1500 W | --- | --- | --- |
| 180 mm schnell | 850 W | 1150 W | 2000 W | --- | --- | --- |
| 145 mm | 95 W | 155 W | 250 W | 400 W | 750 W | 1000 W |
| 180 mm | 115 W | 175 W | 250 W | 600 W | 850 W | 1500 W |
| 145 mm schnell | 135 W | 165 W | 250 W | 500 W | 750 W | 1500 W |
| 180 mm schnell | 175 W | 220 W | 300 W | 850 W | 1150 W | 2000 W |
natural_image
Four black-and-white illustrations showing cooking pots with checkmarks and X marks, one being stirred with a steaming pot (no text or symbols)natural_image
Line drawing of an oven with internal heating element, labeled 'Abbildung 12' (no other text or symbols)natural_image
Four circular diagrams showing mechanical assembly steps: front, side, top, and front (no text or symbols)natural_image
Three technical line drawings of a square electronic component with mounting holes and internal structure, showing directional arrows (no text or symbols)natural_image
Line drawing of a hand turning a circular component into a mechanical part (no text or symbols)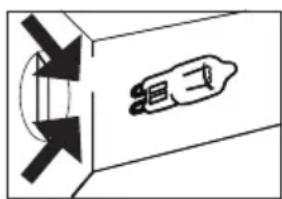
natural_image
Pure diagram of a device with directional arrows and internal components, no text or symbols presentTyp E14 Lampe
natural_image
Pure mechanical component diagram without any text, numbers, or symbols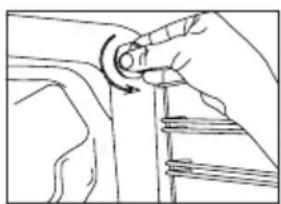
natural_image
Line drawing of a hand turning a knob on a car wheel (no text or symbols)220-240 V, AC 15 W
Abbildung 19
natural_image
Symbol of a trash bin crossed with no visible text or labels- "Complies with WEEE Regulation"
- Contents
- IMPORTANT WARNINGS
- GB
- Electrical Safety
- Intended Use
- Methods for Protecting Ceramic Glass Cooking Surface
- Electrical Connection
- Electrical Connection Scheme
- Electrical Connection Of Cooking Zones
- INTRODUCING THE APPLIANCE
- Control Panel
- Accessories (optional)
- INSTALLATION OF APPLIANCE
- Important Warnings for Installation:
- Right Place For Installation
- Built-In Oven Integrated Installation and Mounting
- Installation Under Counter
- Installation Requirements
- Placing and Securing the Oven
- Cooktop Counter Cutting Sizes
- Installation Of Cooktop
- USING THE OVEN
- Initial Use Of Oven
- Normal Use Of Oven
- Using Pop-up Button \*
- Using The Grill
- To turn on the grill;
- To turn the grill off;
- PROGRAM TYPES
- USAGE OF YOUR COOKTOP
- Usage Of Hotplate \*
- COOKING RECOMMENDATIONS
- Baking With Pizza Stone \*
- MAINTENANCE AND CLEANING
- Cleaning Oven Glass
- Catalytic Panel \*
- Detaching catalytic panel
- Rack Positions
- Installing and removing wire racks
- Replacing Oven Lamp
- TROUBLESHOOTING
- Check Points
- HANDLING RULES
- RECOMMENDATIONS FOR ENERGY SAVING
- ENVIRONMENTALLY-FRIENDLY DISPOSAL
- PACKAGE INFORMATION
- DE
Brand : Respekta
Model : HS1000-33
Category : Cooker