
5C90S8990GB - Microwave BLAUPUNKT - Free user manual and instructions
Find the device manual for free 5C90S8990GB BLAUPUNKT in PDF.
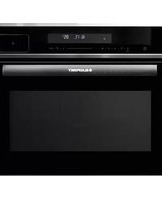


| Product Type | Combination steam oven (microwave, grill, convection, steam) |
| Brand | Blaupunkt |
| Model | 5C90S8990GB |
| Oven Capacity | 50 L |
| Outer Dimensions (H x W x D) | 595 x 568 x 454 mm |
| Net Weight | Approx. 31 kg |
| Rated Voltage | 230 V ~ 50 Hz |
| Maximum Power Consumption | 3250 W |
| Grill Power | 2200 W |
| Circulation Power | 300 W |
| Steam Power | 1500 W |
| Cooking Modes | Top/bottom heat, hot air, hot air ECO, top/bottom heat + circulation, grill with radiant heat, dual grill + circulation, dual grill, bottom heat + hot air, bottom heat, defrost, dough process, steam, steam combi (3 modes), automatic programmes (A01-A16) |
| Temperature Range | 30 °C – 250 °C (depending on mode) |
| Child Lock | Yes (press and hold -☐- for 3 seconds) |
| Steam Function | Yes, with water tank (capacity not specified) |
| Temperature Sensor (Probe) | Yes (cooking modes: hot air, dual grill, top/bottom heat, dual grill + circulation, infrared grill) |
| Fast Preheat | Yes |
| Descaling Function | Yes (programme A15) |
| Clean Function | Yes (programme A16) |
| Included Accessories | Steamer tray, baking rack, baking tray, temperature sensor |
| Installation Type | Built-in (not free-standing) |
Frequently Asked Questions - 5C90S8990GB BLAUPUNKT
User questions about 5C90S8990GB BLAUPUNKT
0 question about this device. Answer the ones you know or ask your own.
Ask a new question about this device
Download the instructions for your Microwave in PDF format for free! Find your manual 5C90S8990GB - BLAUPUNKT and take your electronic device back in hand. On this page are published all the documents necessary for the use of your device. 5C90S8990GB by BLAUPUNKT.
USER MANUAL 5C90S8990GB BLAUPUNKT
Combination steam oven
TABLE OF CONTENTS
2 SAFETY MEASURES 2 SPECIFICATIONS 3 IMPORTANT SAFETY INSTRUCTIONS 5 Risk of injury 6 SETTING THE OVEN 6 Designation of appliance parts and accessories 7 IMPORTANT INFORMATION ON INSTALLATION 7 Built-in appliances 8 Installation dimensions 8 Installation 9 START-UP 9 Initial cleaning and heating 10 OPERATING MANUAL 10 Operating elements 11 Operating panel 22 TROUBLESHOOTING
SAFETY MEASURES
(a) Never use this appliance with the door open. The safety interlock must not be tampered with or rendered inoperative. (b) Do not place any objects between the front of the appliance and the door and make sure that there is no dirt or cleaning residue on the sealing surfaces.
Additional information
If the appliance is not kept properly clean, its surface may be damaged. This can shorten the life of the appliance and create dangerous situations.
SPECIFICATIONS
| Model: Blaupunkt 5C90S8990GB | |
| Rated voltage | 230 V, ~ 50 Hz |
| Rated output (grill) | 2200 W |
| Rated output (circulation) | 300 W |
| Rated output (steam) | 1,500 W |
| Rated output (maximum) | 3250 W |
| Oven capacity | 50 l |
| Outer dimensions | 595 x 568 x 454 mm |
| Net weight | approx. 31 kg |
IMPORTANT SAFETY INFORMATION
WARNING
Always follow these basic precautions to reduce the risk of fire, electric shock, and personal injury when using your appliance:
- Read and follow these instructions: SAFETY MEASURES
- This appliance may be used by children over 8 years of age and by persons with reduced physical, sensory or mental abilities or lack of experience and knowledge provided that they have been instructed in the use of the appliance by a person responsible for them and that they understand and appreciate the risks and dangers involved. Children must not play with the appliance. The appliance may only be cleaned and maintained by children over 8 years of age under the supervision of a responsible adult. Children under 8 years of age must be monitored constantly or kept away from the appliance.
- Ensure that the appliance and its power cable are out of reach of children under 8 years of age.
- If the power cable is damaged, it must be replaced by the manufacturer, the manufacturer's service partner, or a similarly qualified technician to avoid hazards (for appliances with Y-mounting).
- Do not leave the appliance unattended when heating food in plastic or cardboard containers, as there is a risk of fire.
- WARNING: Maintenance or repair work should only be carried out by qualified personnel.
- Only use the temperature sensor recommended for this appliance (for appliances equipped with the option to use a temperature sensor).
- This appliance is intended for use in households and similar environments such as: staff kitchen areas in shops, offices and other work environments; farms; by guests of hotels, motels and other lodging establishments.
- Do not use a steam cleaner to clean the appliance.
- This appliance is a built-in appliance.
- WARNING: Accessible parts of the appliance become hot during use. Small children should be kept away from the appliance.
- The surface of the built-in cabinet in which the appliance is located can become very hot.
- WARNING: The appliance and its accessible parts become hot during use. Do not touch the heating elements. Children under 8 years of age must be monitored constantly or kept away from the appliance.
- The appliance becomes hot during use. Do not touch the heating elements inside the oven.
- To prevent overheating, the appliance must not be installed behind a decorative door. However, this does not apply to appliances with decorative doors.
- WARNING: Do not carry the appliance by the handle. (The oven is very heavy and the handle could break off).
- The water in the collection container, oven and water tank should be removed after each use.
- Do not use paper cups and plastic containers with a temperature resistance below 120 °C. Use containers made of glass, ceramic or stainless steel.
- This appliance is mainly heated with steam.
Read the following information carefully and keep it for future reference.
Danger
Risk of electrical shock! Touching some internal components may result in serious injury or death. Never disassemble this appliance.
Warning
Risk of electrical shock! Improper use of the earthing may result in electric shock. Do not insert the plug into a power outlet until the equipment is properly installed and earthed.
This appliance must be earthed. In the event of an electrical short circuit, earthing reduces the risk of electric shock by providing a means of draining the electrical current. This appliance is equipped with an earthing plug. The plug must be plugged into a properly installed and earthed outlet.
Consult a qualified electrician or service technician if you do not fully understand the earthing instructions, or if you are in doubt as to whether the equipment is properly earthed.
A short power cord is supplied to reduce the risk of tangling or tripping over a longer cord.
Clean
Before cleaning, disconnect the appliance from the power supply.
- After use, clean the cooking chamber with a damp cloth.
- Clean the accessories with soapy water.
- When soiled, the door frame and seal as well as adjacent parts must be carefully cleaned with a damp cloth.
- Do not use sharp abrasive cleaning agents or sharp metal scrapers to clean the glass of the oven door, as these can scratch the surface, which can cause the glass to shatter.
SETTING THE OVEN
DESIGNATION OF APPLIANCE PARTS AND ACCESSORIES
Take the appliance out of the box and remove all materials from the cooking chamber.
Your appliance is equipped with the following accessories:
Operating manual

- Operating panel
- Door
- Left and right suspension
- Steamer tray
- Holder for temperature sensor
- Baking rack
- Cooking chamber
- Baking tray
Your appliance is supplied with several accessories. Here you will find an overview of the accessories supplied and information on their correct use.
Use only original accessories. They are specially designed for your appliance.
You can find the right accessories in our online shop at
www.blaupunkt-einbaugeraete.com or from your specialist dealer.
Note
The accessories can become deformed when hot. This does not affect their function.
Once they have cooled down, they will return to their original shape.
Inserting accessories
The cooking chamber has three guide rails. The guide rails are counted from bottom to top.
The accessories can be pulled out about halfway without tilting.
IMPORTANT INFORMATION ON INSTALLATION
- This appliance is NOT intended for use in a commercial environment.
- Please refer to the supplied installation instructions and note that this equipment should only be installed by a qualified technician.
- This appliance is equipped with a plug and may only be connected to a properly installed earthed socket.
- If a new socket is required, only a qualified electrician may install the appliance and connect the cables.
- If the plug is no longer accessible after installation, a pole separator with a contact gap of at least 3 mm must be provided at the installation site.
- Adapters, socket strips and extension cables must not be used. Overloading can lead to fire.
- If the appliance has no supply line and no plug, the connection device must have an all-pole contact separation for complete disconnection. In addition, the appliance must be installed in the fixed wiring according to the wiring rules.

Accessible parts become hot during operation.
BUILT-IN APPLIANCES
- The appliance is only intended for installation in a kitchen.
- The appliance is not intended for use as a table appliance or inside a cabinet. • The built-in cabinet may not have a rear panel behind the unit.
- A distance of at least 35 mm must be maintained between the wall and the rear wall or the floor of the appliance located above it.
- The built-in cabinet must have a ventilation opening of 200 cm² at the front. For this purpose, the base plate must be cut back or a ventilation grille must be fitted.
- The ventilation slots and air intake openings must not be covered.
- Safe operation of this appliance can only be guaranteed if it has been installed in accordance with these installation instructions. • The installer is liable for all damage caused by improper installation. • The cabinets in which the appliance is installed must be heat-resistant.

INSTALLATION
Do not carry or hold the device by the door handle. The door handle cannot support the weight of the appliance and could break off.
- Carefully push the appliance into the opening and make sure that it is centred.
- Open the door and fasten the appliance with the screws provided.

(a) Push the unit fully in and place it in the middle of the opening. (b) Do not kink the connecting cable. (c) Fasten the appliance with the screws. (d) The gap between the worktop and the appliance must not be closed by additional strips.
Important information
The appliance is designed for permanent installation with a three-pole mains cable and may only be connected by an authorised specialist in accordance with the wiring diagram.
Only a qualified electrician who observes the relevant regulations may replace the connection cable.
Do not use multiple plugs, socket strips or extensions. There is a risk of fire in the event of overload. If the plug is no longer accessible after installation, an all-pole disconnector with a contact gap of at least 3 mm must be provided.
START-UP
INITIAL CLEANING AND HEATING
Remove the protective foil from the front of the steam cooker.
Before using the appliance for the first time:
Remove all accessories and clean the appliance from the inside.
Heat up the oven while empty. New appliances have a typical smell the first time they are used. The appliance should be heated up once before first use. This will eliminate the smell and the food will cook faster.
- Wipe the steam cooker with a damp cloth before heating up. This will remove materials that have accumulated in the appliance or in the packaging material during the packaging process.
- Tap ▷||. The appliance will switch on and the main menu will appear on the display.
- Tap to select Hot Air.
The recommended temperature will be displayed.
- Increase the temperature to the maximum temperature. This is done using the setting buttons.
- Tap ▷|| next to the sensor buttons. Heat the empty oven for at least one hour. Make sure that the room is well-ventilated. Close the door to other rooms so that the smell does not spread throughout the house.
- Let the appliance cool down to room temperature. Mix a neutral cleaning agent with hot water, wipe down the appliance with it and wipe it dry with a clean, soft cloth.
Leave the door open until the appliance is completely dry.
OPERATING MANUAL
OPERATING ELEMENTS

 | 1. ON/OFF | Switches the oven on/off. |
 | 2. Lamp ON/OFF | Switches the lamp on/off. |
 | 3. Oven function | Press this symbol to change the operating mode. Press and hold for 5 seconds to change it quickly. |
 | 4. Automatic programmes | Use this option to select automatic programmes or descaling and cleaning. |
 | 5. Steam cooking | Cooking with hot steam preserves the quality of food and promises the best tasting and healthiest cuisine. |
 | 6. Fast preheat | For fast preheating. |
 | 7. Smart Slider | You can use the Smart Slider or the “+/-” buttons to change the values shown on the display. |
 | 8. Setting the cooking time, clock time and temperature | Set the clock time in standby mode/Switch between time setting and temperature setting. |
 | 9. Start/pause | Starts and interrupts the cooking process. |
 | 10. Water tank | Water tank for the steam function. The water tank opens after the button is pressed. |

This steam cooker has a modern electronic control system. This enables you to set the cooking parameters to best suit your needs.
1. Setting the time
When the appliance is plugged in, "00:00" will flash and the alarm will sound once.
1) Press and hold the F button for 3 seconds. The hour numbers will flash. 2) Tap the minus or plus button, or move the Smart Slider, to set the number of hours. The number entered should be between 0 and 23. 3) Tap the confirm button to confirm your entry. The minute numbers will now flash. 4) Tap the minus or plus button, or move the Smart Slider, to set the minutes. The number entered should be between 0 and 59. 5) Tap the confirm button to confirm the clock setting. The clock now flashes. The time is set. The appliance will enter standby mode.
NOTE:
1) If you wish to change the time, repeat steps 1 to 5. 2) If the clock is not set, the appliance will not work correctly.
You can select the operating mode by pressing the F button.
The available modes are as follows: Top/bottom heat, hot air, hot air (ECO), top/bottom heat + circulation, dual grill + circulation, grilling with radiant heat, dual grill with bottom heat, bottom heat + hot air, defrost, dough process
2. Cooking with top/bottom heat
1) Tap the F button once to activate the top/bottom heat. The default temperature of 180°C will be displayed and the symbol for top/bottom heat will appear. 2) Tap the confirm button to set the time. Tap the minus or plus button, or move the Smart Slider, to set the cooking time.
3) Tap the F button to confirm the cooking time and to set the temperature.
Tap the minus or plus button, or move the Smart Slider, to adjust the temperature.
The temperature can be set from 50 to 230°C.
4) Tap the start/pause button to start the cooking process.
NOTE:
1) If you open the oven door during a cooking process, the cooking process will be interrupted.
After closing the door, tap the start/pause button. The cooking process will continue.
2) The cooking time can be changed during the cooking process. Tap Ⓢ. Then tap — or + or
move the Smart Slider to set the cooking time.
3) The cooking temperature can be changed during cooking. Tap Ⓢ repeatedly until the
temperature flashes. Then tap — or + or move the Smart Slider to set the temperature.
3. Cooking with hot air
1) Tap F 2x to activate the hot air. The default temperature of 160 °C will be displayed and the symbol for hot air will appear.
2) Tap to set the time.
Tap — or + or move the Smart Slider to set the cooking time.
3) Tap Ⓢ to confirm the cooking time and to set the temperature.
Tap — or + or move the Smart Slider to adjust the temperature.
The temperature can be set from 50 to 250 °C.
4) Tap ▶|| to start the cooking process.
4. Cooking with Hot Air ECO
1) Tap F 3x to activate the Hot Air ECO. The default temperature of 160 °C will be displayed and the symbol for Hot Air ECO will appear.
2) Tap to set the time.
Tap — or + or move the Smart Slider ———— to set the cooking time.
3) Tap to confirm the cooking time and to set the temperature.
Tap — or + or move the Smart Slider ———— to adjust the temperature.
The temperature can be set from 150 to 200 °C.
4) Tap ▷|| to start the cooking process.
5. Cooking with top/bottom heat + circulation
1) Tap F 4x to activate top/bottom heat + circulation. The default temperature of 160 °C will be displayed and the symbol for top/bottom heat + circulation will appear.
2) Tap to set the time.
Tap — or + or move the Smart Slider ———— to set the cooking time.
3) Tap F to confirm the cooking time and to set the temperature.
Tap — or + or move the Smart Slider ———— to adjust the temperature.
The temperature can be set from 50 to 230°C.
4) Tap ▷|| to start the cooking process.
6. Cooking with grill and radiant heat
1) Tap F 5x to activate grilling with radiant heat. The default temperature of 150°C will be displayed and the symbol for grilling with radiant heat will appear.
2) Tap to set the time.
Tap – or + or move the Smart Slider to set the cooking time.
3) Tap the circle F to confirm the cooking time and to set the temperature.
Tap – or + or move the Smart Slider to adjust the temperature.
The temperature can be set from 100 to 235 °C.
4) Tap the play/pause button to start the cooking process.
7. Cooking with dual grill + circulation
1) Tap F 6 times to activate dual grill + circulation. The default temperature of 180 °C will be displayed and the symbol for dual grill + circulation will appear.
2) Tap to set the time.
Tap – or + or move the Smart Slider to set the cooking time.
3) Tap to confirm the cooking time and to set the temperature.
Tap – or + or move the Smart Slider to adjust the temperature.
The temperature can be set from 100 to 250 °C.
4) Tap the play/pause button to start the cooking process.
8. Cooking with dual grill
1) Tap F 7x to activate dual grill. The default temperature of 180 °C will be displayed and the symbol for dual grill will appear.
2) Tap to set the time.
Tap — or + or move the Smart Slider ———— to set the cooking time.
3) Tap to confirm the cooking time and to set the temperature.
Tap — or + or move the Smart Slider ———— to adjust the temperature.
The temperature can be set from 100 to 235 °C.
4) Tap ▷|| to start the cooking process.
9. Cooking with bottom heat + hot air
1) Tap F 8x to activate bottom heat + hot air. The default temperature of 180 °C will be displayed and the symbol for bottom heat + hot air will appear.
2) Tap to set the time.
Tap — or + or move the Smart Slider ———— to set the cooking time.
3) Tap to confirm the cooking time and to set the temperature.
Tap — or + or move the Smart Slider ———— to adjust the temperature.
The temperature can be set from 50 to 250 °C.
4) Tap ▷|| to start the cooking process.
10. Cooking with bottom heat
1) Tap F 9 times to activate the bottom heat. The default temperature of 150 °C will be displayed and the symbol for bottom heat will appear.
2) Tap to set the time.
Tap – or + or move the Smart Slider ———— to set the cooking time.
3) Tap to confirm the cooking time and to set the temperature.
Tap – or + or move the Smart Slider ———— to adjust the temperature.
The temperature can be set from 50 to 230 °C.
4) Tap ▷|| to start the cooking process.
11. Defrosting
1) Tap F 10 times to activate the defrost function. The defrost symbol will appear.
2) Tap to set the time.
Tap – or + or move the Smart Slider ———— to set the defrost function.
3) Tap ▷|| to start the defrost process.
12. Dough process
1) Tap F 11 times to activate the dough process. The default temperature of 40 °C will be displayed and the symbol for the dough process will appear.
2) Tap to set the time.
Tap – or + or move the Smart Slider to set the cooking time.
3) Tap the circled F to confirm the cooking time and to set the temperature.
Tap – or + or move the Smart Slider to adjust the temperature.
The temperature can be set from 30 to 45 °C.
4) Tap the play/pause button to start the cooking process.
Instructions for the button:
| Sequence | Function | Temperature setting | Time setting | |
| 1 |  | Top/bottom heat | 50 °C – 230 C° | 0:00 min – 9:00 h |
| 2 |  | Hot air | 50 °C – 250 C° | 0:00 min – 9:00 h |
| 2 |  eco eco | Hot Air ECO | 150 °C – 200 C° | 0:00 min – 9:00 h |
| 4 |  | Top/bottom heat + circulation | 50 °C – 230 C° | 0:00 min – 9:00 h |
| 5 |  | Grilling with radiant heat | 100 °C – 235 C° | 0:00 min – 9:00 h |
| 6 |  | Dual grill + circulation | 100 °C – 250 C° | 0:00 min – 9:00 h |
| 7 |  | Dual grill | 100 °C – 235 C° | 0:00 min – 9:00 h |
| 8 |  | Bottom heat + hot air | 50 °C – 250 C° | 0:00 min – 9:00 h |
| 9 |  | Bottom heat | 50 °C – 230 C° | 0:00 min – 9:00 h |
| 10 | [225K] | Defrosting | / | 0:00 min – 9:00 h |
| 11 |  | Dough process | 30 °C – 45 C° | 0:00 min – 9:00 h |
| 12 |  | Temperature | 50 °C – 100 C° | / |
13. Steam function
1) In standby mode, tap the button once to call up the steam function. 100 °C will be shown on the display.
2) Tap to set the time.
Tap – or + or move the Smart Slider to set the cooking time.
3) Tap the circled F to set the temperature.
Tap – or + or move the Smart Slider to adjust the temperature.
The temperature can be set from 35 to 100 °C.
4) Tap the play/pause button to start the cooking process.
5) The alarm will sound five times to indicate that the cooking process is complete. The appliance will then return to standby mode and the display will show "End".
14. Steam combi function
The 3 operating modes hot air + steam, top/bottom heat + steam and dual grill + circulation are available in this mode.
| Sequence | Function | Temperature setting | Time setting | Steam | |
| F (press 0x) |  | Steam | 35 °C – 100 °CDefault: 100 °C | 0:00 min – 9:00 h | |
| F (press 1x) |   | Hot air + steam | 160 °C – 250 °Cdefault: 160 °C | 0:00 min – 9:00 h | L1L2L3 |
| F (press 2x) |   | Top/bottom heat + steam | 160 °C – 230 °Cdefault: 170 °C | 0:00 min – 9:00 h | |
| F (press 3x) |   | Steam Dual grill + circulation | 160 °C – 250 °Cdefault: 180 °C | 0:00 min – 9:00 h | |
15. Automatic programmes
1) In standby, tap A once to activate the automatic programmes menu. Tap — or + to select one of the various automatic programmes (A01 to A16). 2) Tap to start the cooking process.
NOTE:
1) If the steam cooking function was used in an automatic program, the water pump draws the water into the water tank. A sound will be heard in the process. 2) If the steam cooking function has been used in an automatic program, you must remove the water in the cooking chamber and at the door. 3) If the appliance must be preheated for the programme, the food must not be in the appliance during preheating. Only when the temperature has been reached can you put the food into the appliance to start the cooking process.
Note on steam cooking
Pour water here

1. Before steam cooking:
If the water level is low before steam cooking, an alarm will sound and the low water level symbol will appear on the display. In this case, pour water into the water tank.
NOTE: Clean the water tank before starting the steam cooking process.
2. During steam cooking:
If the water level is low during the steam cooking process, an alarm will sound and the low water level symbol will appear on the display. In this case, pour water into the water tank.
Steam cooking is then continued normally.
3. After steam cooking:
1- When the steam cooking process is finished, the water in the boiler is returned to the water tank. This process takes about 1 minute. 2- If the water tank becomes too full, the system will beep 10 times. In this case, empty the water tank. When the water tank is empty, the system will continue the process.
NOTE: Empty the water tank after steam cooking.
ERROR CODES
During steam cooking, the following error codes may be displayed:
E-06: 1- The water tank is not properly closed.
E-05: The water system is not working properly. Contact customer service.
Possible causes:
1- The water sensor is not working. 2- The water pipe is not working. 3- The water pump is not working. 4- The water tank is not working.
17. Automatic deposit removal function
For best cleaning results, we recommend the use of sodium citrate. Follow the manufacturer's instructions on the packaging. If the steam function has been running for 20 hours, the descaling function should be switched on afterwards.
1) Switch on the system. Remove the water tank and add 1000 ml of fresh water and a pack of descaling agent. 2) Push the water tank back in. 3) In standby mode, tap the Δ button several times until the display shows A15. This means that the appliance has switched on the automatic descaling function. The 40:00 min display will light up. The symbol for the water tank will show the current water level and other symbols will disappear. 4) Press ▷|| to start the program. 5) If 10 min remain, the program will stop and water must be refilled. Remove the water tank and pour the water in. Clean the water tank thoroughly. 6) Replace the fresh water, touch ▷|| to continue. five cooking modes. 7) When remained time count down to 4:00, repeat step 6.
NOTE: Do not interrupt the descaling process. If the descaling process is interrupted before the end, the entire program must be restarted starting from step 3.
18. Temperature sensor
1) You can use the temperature sensor in five cooking modes. When you use it, a signal will sound. The display will show "Prob". 2) In "Temperature sensor" mode, tap F to select the heating mode. The default temperature of the temperature sensor will appear on the display. 3) Touch 🔍 to select the temperature setting mode. 4) Tap — or + or move the Smart Slider — to set the target temperature of the temperature sensor. 5) Press ▷|| to start the program. When the core temperature of the food reaches the target temperature of the temperature sensor, a signal will sound five times and the cooking process will be stopped.
19. Temperature sensor functions
(1) Insert the temperature sensor into the food. When the temperature sensor has reached the target temperature, the temperature setting is finished. (2) In this mode, the operating modes hot air, dual grill, top/bottom heat, dual grill + circulation and infrared grill are available.
| Hot air | Dual grill | Dual grill + circulation | Top/bottom heat | Infrared grill | |
| Operating mode | 200 C° | 200 C° | 200 C° | 200 C° | 200 C° |
| Temperature selection | 50 °C – 100 C° | 50 °C – 100 C° | 50 °C – 100 C° | 50 °C – 100 C° | 50 °C – 100 C° |
| Default temperature | 60 °C | 60 °C | 60 °C | 60 °C | 60 °C |
NOTE:
1) Insert the temperature sensor into the food in standby mode. "Prob" will appear on the display. 2) Press ▷II. When the temperature sensor has reached the target temperature, "Prob" will appear on the display. The process will stop and a signal will sound five times. Pull out the temperature sensor. The appliance will return to standby mode or to the clock. 3) The setting range of the temperature sensor is 50-100°C. The temperature in the centre of the oven is 200°C. 4) The cooking time cannot be set with this function. 5) The tone will sound once when you insert or remove the temperature sensor. 6) When the appliance is in the setting and operation mode, this mode is ended by inserting or removing the temperature sensor. 7) If the temperature has not been set, the signal will sound five times after 9 hours. The process will be cancelled. 8) Dual grill + circulation function, 50-100 °C: If the target temperature is not reached, the dual grill will operate for 20 seconds and stop for 10 seconds. 9) The function can be changed or cancelled.
20. Function of the button
(1) Tap ⏻ to return to standby mode. (2) Child lock: With the child lock activated, press and hold the ⏻ button to deactivate the child lock.
21. Reminder at the end of the cooking process
When the cooking time is finished, "End" will appear on the display and the signal will sound five times. Tap " -C" or open the door to stop the signal and return to standby mode. If you do not perform any operation within 5 minutes, the signal will sound once again. The appliance will enter standby mode.
22. Child lock
Activating child lock: In standby mode, press and hold -☐- for 3 seconds. You will hear a long beep indicating that the child lock has been activated. The 🔒 symbol will also appear.
Deactivating child lock: When the child lock is engaged, press and hold 📄 for 3 seconds. You will hear a long beep indicating that the child lock has been deactivated. The 🔒 symbol will also disappear.
23. Information on the display
1) If you do not perform any further operations when making settings, the selected setting will be confirmed automatically after 6 seconds. Except for the initial setting of the clock. 2) If a selected programme has been set for 6 seconds, it will be confirmed automatically. Except for P01 automatic programme, which will not start without confirmation. 3) If the appliance is in setting or standby mode or in the automatic or defrost programme and no operation is made within 5 minutes, it will switch off. 4) The oven lamp always lights up when the door is open. 5) The oven lamp always lights up when an operation is interrupted. 6) If the oven door is opened during cooking, the ▷|| button must be pressed to continue cooking. 7) The 🔊 button can be pressed in any operating mode to open the water tanks.
| MENU | Display | Weight | Time | Power setting |
| Steamed fish | A01 | 500 g | 10:00 | Steam 100 °C |
| Steamed prawns with garlic powder | A02 | 500 g | 12:00 | Steam 100 °C |
| Steamed Chinese cabbage | A03 | 500 g | 11:30 | Steam 100 °C |
| Roast chicken | A04 | - | 20:00 | Dual grill 220 °C + circulation |
| Grilled prawns | A05 | - | 12:00 | Dual grill 200 °C + circulation |
| Seafood | A06 | - | 10:00 | Top/bottom heat + circulation 210 °C |
| Pizza | A07 | - | 09:30 | Top/bottom heat + circulation 180 °C |
| Biscuits | A08 | - | 10:00 | Top/bottom heat + circulation 180 °C |
| Roast beef | A09 | - | 10:00 | Dual grill 235 °C |
| Sponge cake | A10 | - | 28:00 | Top/bottom heat 175 °C |
| Cod | A11 | - | 22:00 | Top/bottom heat + circulation 200 °C |
| Millefoglie from yellow and purple potatoes | A12 | - | 30:00 | Top/bottom heat 180 °C |
| Roast chicken with early potatoes | A13 | - | 45:00 | Top/bottom heat + circulation 200 °C |
| Roast beef | A14 | - | 10:00 + 50:00 | Dual grill 230°C + Top/bottom heat 120°C |
| Descaling | A15 | - | 40:00 | - |
| Clean | A16 | - | 05:00 | - |
24. Fast preheat
You can shorten the preheating time by using the Fast Preheat function. Select a function, and tap the symbol for Fast Preheat. The symbol for Fast Preheat will light up on the display. If Fast Preheat is not available for the selected function, a beep will be heard. Fast Preheat is not available with the "Defrost" and "Dough process" functions.
TROUBLESHOOTING
NORMAL
| Steam collects on the door, hot air escapes from the ventilation slots | Steam can escape from the food while cooking. It mostly escapes from the ventilation slots. Sometimes it also collects in a cool place like the oven door. This is normal. |
| PROBLEM | Possible causes | Remedy |
| The oven cannot be started. | 1) Power cord not plugged in properly. | Pull out the plug. Plug it in again after 10 seconds. |
| (2) The fuse is blown or the circuit breaker tripped. | Replace the fuse or reset the circuit breaker. Contact a qualified electrician if in doubt. | |
| (3) Problem with the power outlet. | Test the outlet with other electrical devices. | |
| The oven is not heating. | (4) Door not closed properly. | Close the door firmly. |

According to the Directive on Waste Electrical and Electronic Equipment (WEEE), waste electrical and electronic equipment should be collected and treated separately. If you need to dispose of this product in the future, please DO NOT dispose of it with your household waste. Please send this product to WEEE collection points.
PN: 16170000A534
Service




- TABLE OF CONTENTS
- SAFETY MEASURES
- ADDITIONAL INFORMATION
- IMPORTANT SAFETY INFORMATION
- WARNING
- DANGER
- CLEAN
- SETTING THE OVEN
- DESIGNATION OF APPLIANCE PARTS AND ACCESSORIES
- NOTE
- INSERTING ACCESSORIES
- IMPORTANT INFORMATION ON INSTALLATION
- BUILT-IN APPLIANCES
- INSTALLATION
- IMPORTANT INFORMATION
- START-UP
- INITIAL CLEANING AND HEATING
- BEFORE USING THE APPLIANCE FOR THE FIRST TIME
- OPERATING MANUAL
- OPERATING ELEMENTS
- SETTING THE TIME
- COOKING WITH TOP/BOTTOM HEAT
- COOKING WITH HOT AIR
- COOKING WITH HOT AIR ECO
- COOKING WITH TOP/BOTTOM HEAT + CIRCULATION
- COOKING WITH GRILL AND RADIANT HEAT
- COOKING WITH DUAL GRILL + CIRCULATION
- COOKING WITH DUAL GRILL
- COOKING WITH BOTTOM HEAT + HOT AIR
- COOKING WITH BOTTOM HEAT
- DEFROSTING
- DOUGH PROCESS
- STEAM FUNCTION
- STEAM COMBI FUNCTION
- AUTOMATIC PROGRAMMES
- NOTE ON STEAM COOKING
- BEFORE STEAM COOKING
- DURING STEAM COOKING
- AFTER STEAM COOKING
- ERROR CODES
- AUTOMATIC DEPOSIT REMOVAL FUNCTION
- TEMPERATURE SENSOR
- TEMPERATURE SENSOR FUNCTIONS
- FUNCTION OF THE BUTTON
- REMINDER AT THE END OF THE COOKING PROCESS
- CHILD LOCK
- INFORMATION ON THE DISPLAY
- FAST PREHEAT
- TROUBLESHOOTING
- SERVICE
Brand : BLAUPUNKT
Model : 5C90S8990GB
Category : Microwave