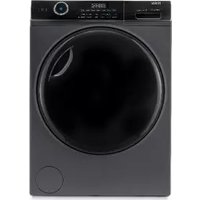
USER MANUAL HW100-BP14959S6 HAIER
User Manual Washing Machine
HW100-BP14959S6
Thank you for purchasing a Haier product.
Please read this manual thoroughly before operating the appliance. This manual contains important information on the installation, use, and maintenance of the appliance.
Keep this manual in a safe and convenient place for future reference.
Please ensure this manual accompanies the appliance if you plan to transfer it to others. This will allow the next user to understand and become familiar with the features and functions of the appliance and to operate it safely.

Warning – Important Safety Information

General Information and Tips

Environmental Information
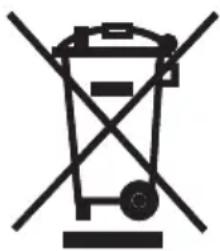
Disposal
Protect the environment and human health by recycling the appliance's packaging in the designated recycling bins. Do not dispose of appliances marked with this symbol together with household waste. Send the appliance to your local recycling center or contact your municipal office.

WARNING!
Risk of injury or suffocation!
Disconnect the appliance from the mains supply. Cut off the mains cable and dispose of it. Remove the door catch to prevent children and pets from getting closed in the appliance.
Content
1-Safety information.... 4 2-Product description....7 3-Control panel....8 4-Programmes....11 5-Daily use....12 6-Eco-friendly washing....17 7-Care and cleaning....18 8-Troubleshooting....21 9-Installation....24 10-Technical data.... 28
Before switching on the appliance for the first time read the following safety instructions!

WARNING!
Before first use
▶ Check the appliance is free from any transport damage. ▶ Remove all the transport bolts. Remove and dispose all packaging materials (plastic bags, polystyrene, etc.) and keep out of children's reach. ▶ Handle the appliance with at least two persons.
Daily use
This appliance can be used by children aged from 8 years and above and persons with reduced physical, sensory or mental capabilities or lack of experience and knowledge if they have been given supervision or instruction concerning use of the appliance in a safe way and understand the hazards involved. - Keep children under 3 years of age away from the appliance unless they are constantly supervised. ▶ Children shall not play with the appliance. Do not let children or pets come close to the appliance when the door is open. Store washing agents out of reach of children. ▶ Pull up zips, fix loose threads and take care for small items to prevent laundry from being entangled. If necessary, use laundry bag or net. Do not press or use the appliance when barefoot or with wet or damp hands or feet. Do not cover or encase the appliance during operation or afterwards to allow moisture or dampness to evaporate. Do not place heavy objects or sources of heat or damp on top of the appliance. Do not use or store flammable detergent or dry cleaning agent in close vicinity to the appliance. ▶ Do not use any flammable sprays in close vicinity to appliance. Do not wash any garments treated with solvents in the appliance without having dried them previously in the air.

WARNING!
Daily use
▶ Do not remove or insert the plug in the presence of flammable gas. ▶ Do not hot wash foam rubber or sponge-like materials. ▶ Do not wash any laundry which is polluted with flour. ▶ Do not open detergent drawer during any wash cycle. ▶ Do not press the door during the washing process, it gets hot. ▶ Do not open the door if the water level is visibly over the port hole. ▶ Do not force the door to open. The door is fitted with a self-lock device and will open shortly after the washing procedure is ended. ▶ Switch off the appliance after each wash programme and before undertaking any routine maintenance and disconnect the appliance from the electrical supply to save electricity and for safety. ▶ Hold the plug, not the cable, when unplugging the appliance.
Maintenance/cleaning
▶ Make sure children are supervised if they carry out cleaning and maintenance. ▶ Disconnect the appliance from the electrical supply before undertaking any routine maintenance. - Keep the lower part of the porthole clean and open door and detergent drawer if appliance is not in use to prevent odours. ▶ Do not use water spray or steam to clean the appliance. ▶ Replace a damaged supply cord only be the manufacturer, its service agent or similarly qualified persons in order to avoid a hazard. Do not try to repair the appliance by yourself. In case of repair please contact our customer service.
Installation
The appliance should be placed in a well-ventilated place. Ensure a location which allows opening the door fully. ▶ Never install the appliance outdoor, in a damp place, or in an area which may be prone to water leaks such as under or near a sink unit, In the event of a water leak, cut power supply and allow the machine to dry naturally.

WARNING!
Installation
▶ Installor use the appliance only where the temperature is above 5 °C. Do not place the appliance directly on a carpet, or close to a wall or furniture. Do not install the appliance in direct sunlight or in the near of heat sources (e.g. stoves, heaters). Make sure the electrical information on the rating plate agrees with the power supply. If it does not, contact an electrician. ▶ Do not use multi-plug adapters and extension cables. ▶ Make sure only the new electric cable and hose sets supplied with the appliance are to be used. ▶ Make sure not to damage the electric cable and the plug. If damaged have it replaced by an electrician. ▶ Use an easy accessible and earthed socket for the power supply. The appliance must be earthed. ▶ Make sure the hose joints and connections are firm and there is no leakage.
Intended use
This appliance is intended for washing machine-washable laundry only. Any-time follow the instructions given on the label of each garment label. It is not intended for commercial or industrial use.
Changes or modifications to the device are not allowed. Unintended use may cause hazards and loss of all warranty and liability claims.
2-Product description

Note:
Due to technical changes and different models, the illustrations in the following chapters may differ from your model.
2.1 Picture of appliance
Front (Fig. 2-1):
Rear side (Fig. 2-2):

1 Detergent/Softener drawer 2 Worktop 3 Control panel 4 Door 5 Filter cover 6 Adjustable feet
1 Transportation bolts (T1-T4) 2 Back cover 3 Back cover screws (7 EA) 4 Power cord 5 Drain hose 6 Water inlet valve
2.2 Accessories
Check the accessories and literature in accordance with this list (Fig. 2-3):

3-1
1 "Power" button
3 Display
5 Function buttons
2 Programme selector
4 Detergent / Softener drawer
6 "Start/Pause" button

Note: Acoustic signal
In the following cases, an acoustic signal sounds:
▶ when pressing a button ▶ at the end of the programme ▶ when selecting the programme ▶ in case of failures
The acoustic signal can be deselected if necessary; see DAILY USE.
Touch this button (Fig. 3-2) gently to switch on the appliance, the display is shining, press it again for about 2 seconds to switch off. If no panel element or programme is activated after a while machine will shut down automatically.

3.2 Programme selector
By turning the knob (Fig. 3-3), you may choose one from 12 programmes and the corresponding programme LED icon will light up.

3.3 Display
The display (Fig. 3-4) shows following information:
▶ Washing time ▶ End time delay ▶ Locking the door ▶ Child lock ▶ Steam washing ▶ Favorites
3-Control panel
3.4 Detergent drawer
Open the drawer, two compartments can be seen (Fig. 3-5):
1 Compartment 1: Powder or Liquid detergent. 2 Compartment 2: Softener, Conditioning agent etc.
The recommendation on the type of detergents is suitable for the various washing temperatures, please refer to the manual of detergent.
This model does not have a disinfection washing programme, and disinfectant can not be added to the disinfection washing inlet.
Choose the extra function from the (Fig. 3-6) before the washing cycle start. The related indicators are light up once selected. You may choose more than one function by pressing the buttons sequentially.


Note: Factory settings
To get best results in each programme, Haier has well defined specific default settings. Default settings are recommended if there is no specific requirement.
Press this button (Fig. 3-7) to start the programme with a delay. End time delay could be increased in intervals of 30 minutes from 0.5-24h. After you select the delay function, the total washing time will be longer than the default programme washing time. For example, display off 6:30 means end of programme cycle will be in 6 hours and 30 minutes. Press Start / Pause" button to activate the time delay.
Press this button (Fig. 3-9) to change the washing temperature of the programme. If the display showing "0", the temperature function will not be activated and the water will not be heated.


3-Control panel
3-9
3-10
Touch this button (Fig. 3-9) to change or deselect the spin of the programme. If the display showing "0" the spinning function is not activated and spinning will not be started.
Touch this button (Fig. 3-10) to rinse the laundry more intense with fresh water. This is recommended for people with sensitive skin. By touching the button, there are 3 selections for the extra rinse count. The display show "P - 0 / P - 1 / P - 2". Different extra rinsing count can be selected for different programme.

Note: Liquid detergent
If using liquid detergent, it is not recommended to activate the end time delay.
3-11
3-12
3-13![graph TD A["Delay"] --> B["Steam"] style A fill:#333,stroke:#000 style B fill:#fff,stroke:#000](/content/2026/05/826523/images/1fedad968e799986707e483af21cc70c2562f714bb224d6fbbbb399e9bdd3429.jpg)
3-14
Touch this button (Fig. 3-11) to select the steam program, then the current program temperature value will be changed to the maximum allowed value. The maximum temperature value can be viewed on the page of the parameters table in the manual. You can select if you require this function when programmers “Cotton, Synthetics, Mix, Baby care, Daily” are used. The icon will light up when using the steam wash function.
Touch this button (Fig. 3-12) gently to start or pause the wash cycle.
3.7 Child lock
Touch button “Delay” and “Steam” (Fig. 3-13) for 3 seconds simultaneously to activate the child lock function. The child lock indicator on the display will light up when it is activated. Press these two buttons simultaneously again to deactivate the feature. The feature is optional when the machine is running. The display shows “clol-” (Fig. 3-14) if the child lock is activated. This feature is to disable controls and prevent children from changing the programme or operating the appliance.
4-Programmes

Detergent compartment for:

Detergent

Softener or care product
o Optional, / No
| Programme | Max. load in kg | Temperature 1) in °C | ▼1 | ▼2 | Fabric type | Preset spin speed in rpm | Function |
| selectable range | Preset | Steam | Extra Rinse | Delay |
| Cotton | 10 | * to 90 | 30 | ○ | ○ | Cotton | 1000 | ○ | ○ | ○ |
| Mix | 5 | * to 60 | 30 | ○ | ○ | Mixed laundry of cotton and synthetics | 1000 | ○ | ○ | ○ |
| Synthetics | 5 | * to 60 | 30 | ○ | ○ | Synthetic or mixed fabric | 1000 | ○ | ○ | ○ |
| Baby Care | 5 | * to 90 | 40 | ○ | ○ | Cotton / Synthetics | 1000 | ○ | ○ | ○ |
| Hygiene | 5 | / | / | ○ | ○ | Cotton | 1000 | ○ | ○ | ○ |
| Daily | 5 | * to 60 | 30 | ○ | ○ | Cotton / Synthetics | 1000 | ○ | / | ○ |
| Jeans | 2 | * to 60 | 30 | ○ | ○ | Jeans | 1000 | ○ | ○ | ○ |
| Delicate | 2 | * to 30 | 30 | ○ | ○ | Delicate laundry and silk | 600 | / | ○ | ○ |
| Refresh 2) | 1 | / | / | / | / | Cotton / Synthetics | / | / | / | / |
| Quick 15 ’ 3) | 1 | * to 40 | * | ○ | ○ | Lightly soiled laundry of cotton or synthetics | 1000 | / | ○ | ○ |
| Spin | 10 | / | / | / | / | Non-fragile fabric | 1000 | / | / | / |
| Drum Clean 4) | / | * 90 | 90 | / | / | / | / | / | / | / |
1) *: Water is not heated up.
Choose 90°C wash temperature only for special hygienic requirements.
2) Only one piece of adult or bulky clothing can be washed, and up to three pieces of children's clothing, only care for dry clothes. 3) Reduce detergent amount because programme duration is short. 4) Do not use detergent instead of use a special machine cleaner.
5.1 Power supply
Connect washing machine to a power supply (Fig. 5-1).
(Malaysia: 220-240V / 50Hz; Philippines: 230V / 60Hz)
Please refer also to section INSTALLATION.
5.2 Water connection
▶ Check the condition of the water inlet hose before connecting it to the water tap. ▶ Turn on the tap (Fig. 5-2).


Note: Tightness
Before use check for leakage in the joints between the tap and the inlet hose by turning on the tap.
5.3 Preparing laundry
▶ Check the care label on the clothing. Sort out clothes according to types of fabric (cotton, synthetics, wool or etc.) and soil level (Fig. 5-3). Separate white clothes from coloured. Wash coloured textiles first by hand to check if they fade or not. ▶ Empty pockets (keys, coins etc.) and remove harder decorative objects (e.g. brooches). - Garments without hems, delicates and finely woven textile such as fine curtains are to be put into a wash bag to care for this delicate laundry (hand or dry cleaning would be better) - Close zippers, velcro fasteners and hooks, make sure the buttons are sewn on tightly. Place sensitive items like laundry without firm hem, delicate underwear and small items such as socks, belts, bras, etc. in a wash bag. ▶ Unfold large pieces of fabric such as bed sheets, bedspreads etc. ▶ Turn jeans and printed, decorated or color-intensive textiles inside out; possibly wash separately.


CAUTION!
Non-textile, as well as small, loose or sharp-edged items may cause malfunctions and damage of clothes and appliance.
5-Daily use
Care chart
Washing
| 95 Washable up to 95°C normal process | 60 Washable up to 60°C normal process | 60 Washable up to 60°C mild process |
| 40 Washable up to 40°C normal process | 40 Washable up to 40°C mild process | 40 Washable up to 40°C very mild process |
| 30 Washable up to 30°C normal process | 30 Washable up to 30°C mild process | 30 Washable up to 30°C very mild process |
| Wash by hand max. 40°C | Do not wash | |
Bleaching
| Any bleaching allowed Only oxygen/non-chlorine | Do not bleach |
Drying
| Tumble drying possible normal temperature | | Tumble drying possible lower temperature | | Do not tumble dryer |
| Line drying Flat drying | | | | |
Ironing
| Iron at a maximum temperature up to 200 °C | | Iron at a medial temperature up to 150°C | | Iron at a low temperature up to 110 °C; without steam (steam ironing may cause irreversible damage) |
| Do not iron | | | |
Professional Textile Care
| P | Dry cleaning in tetra-chloroethene | F | Dry cleaning in hy-drocarbons | × Do not dry clean |
| W | Professional wet clean | Do not professional wet clean | | |
5.4 Loading the appliance
▶ Put in the laundry piece by piece. - Don't overload. Note the different maximum load according to programme! Rule of thumb for maximum load: Check if you can put a hand upright on top of load. ▶ Close the door carefully. Make sure that no pieces of laundry are pinched.
5.5 Selecting detergent
▶ Washing efficiency and performance is determined by detergent quality. ▶ Use only machine wash approved detergent. If needed use specific detergents, e.g. synthetic and woolen fabric. ▶ Mind always detergent manufacturer recommendations. Do not use dry cleaning agents such as trichloroethylene and similar products.
Choose the best detergent
| Kind of detergent |
| Programme | Universal Colour | Delicate | Special Softener | | |
| Cotton | √ | √ | - | - | √ |
| Hygiene | √ | √ | - | - | √ |
| Baby Care -- | | | √ | √ | √ |
| Daily | √ | √ | - | - | √ |
| Delicate | - | - | √ | √ | √ |
| Synthetics | - | √ | - | - | √ |
| Drum Clean | - | - | - | √ | - |
| Spin | - | --- | | | - |
| Mix -- | √L | √ | | | √ |
| Quick 15' - | √L | √L | - | | √ |
| Refresh | - | - | - | - | - |
L = gel/liquid detergent, P = powder detergent, O = optional, - = no, √ = recommended
If using liquid detergent, it is not recommended to activate the time delay.
We recommend by using:
▶ Laundry powder: 20°C to 90°C* (best use: 40-60°C) ▶ Color detergent: 20°C to 60°C (best use: 30-60°C) ▶ Wool / delicate detergent: 0°C to 30°C (best use: 20-30°C)
* Choose 90°C wash temperature only for special hygienic requirements.

It is better to use low or free suds detergent powder.
5-Daily use
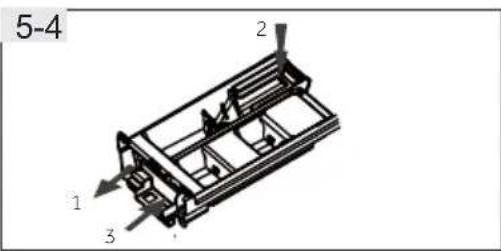
5.6 Adding detergent
- Slide out the detergent drawer.
- Put the required chemicals into corresponding compartments (Fig. 5-4).
- Push back the drawer gently.

Note:
Remove detergent residues before next wash cycle from the detergent drawer. ▶ Do not overuse detergent or softener. ▶ Please follow the instruction on the detergent package. ▶ Always fill the detergent just before the beginning of the wash cycle. ▶ Concentrated liquid detergent should be diluted before adding into compartment 2. The best use of liquid detergent is by using a dosing ball, which is given with the laundry into the washing machine. - Do not use liquid detergent if "end time delay" is selected. - Carefully choose the programme settings according to the care symbols on all laundry labels and according to the programme table.

5.7 Switch on the appliance
Touch the "Power" button to switch on the appliance (Fig. 5-5).

5.8 Select a programme
To get the best washing results, select a programme which fits the degree of soiling and sort of laundry type.
Turn the programme knob (Fig. 5-6) to select the right programme.

Note: Odour removal
Before first use, we recommend running the Drum Clean programme with no load and a small amount of detergent in the washing agent compartment (2) or a special machine cleaner to remove potentially corrosive residues.

5.9 Add individual selections
Select the required options and settings (Fig. 5-7); refer to the CONTROL PANEL.
5.10 Start wash programme
Press the “Start / Pause” button (Fig. 5-8) to start. The appliance operates according to the current settings. Changes are only possible by cancelling the programme.
5.11 Interrupt / cancel wash programme

To interrupt a running programme, gently press “Start / Pause”. The LED in the button will flash. Press it again to resume operation.
To cancel a running programme and all its individual settings:
- Press the "Start / Pause" button to interrupt the running programme.
- Turn the knob to select a new programme and start it.
5.12 After washing

Note: Door lock
For safety reasons, the door is locked partially during the washing cycle. It is only possible to open the door at the end of the programme or after the programme has been cancelled correctly (see description above). In case of high water level, high water temperature, and during spinning, it is not possible to open the door; "Locl-" is displayed.
- At the end of the programme cycle, "End" is displayed.
- The appliance switches off automatically.
- Remove laundry as soon as possible to go easy on it and to prevent more wrinkling.
- Turn off the water supply.
- Unplug the power cord.
- Open the door to prevent formation of moisture and odours. Keep open while not used.

Note: Standby mode / energy - saving mode
The switched on appliance will go into standby mode if it will not be activated within 2 minutes before starting the programme or at the end of programme. The display switches off.
5.13 Activate or deactivate the buzzer
The acoustic signal can be deselected if necessary:
- Switch on the appliance.
- Select the Drum Clean programme.
- Press the "Extra rinse" button "Temp." button and "Steam" button at the same time for about 3 seconds. "bEEP OFF" will be displayed and the buzzer will be deactivated. For activating the buzzer press these three buttons at the same time again, then "bEEP On" will be displayed.
6-Eco-friendly washing

Environmentally responsible use
To achieve the best use of energy, water, detergent, and time, you should use the recommended maximum load size. Do not overload (leave a hand's width of clearance above the laundry). For slightly soiled laundry, select the Quick 15' programme. Apply exact dosages of each washing agent. Choose the lowest adequate washing temperature - low-suds detergents clean efficiently below 60 °C. Change to a different function only if the laundry's soil level is high; otherwise, use the default setting.
7 - Care and cleaning
7.1 Cleaning the detergent drawer
Clean the drawer regularly to ensure there are no detergent residues. (Fig. 7-1):
- Pull out the drawer until it stops.
- Press the release button and remove the drawer.
- Flush the drawer with water until it is clean, then insert the drawer back into the appliance.

7.2 Cleaning the machine
Unplug the machine during cleaning and maintenance. Use a soft cloth with soap liquid to clean the machine case (Fig. 7-2) and rubber components. Do not use organic chemicals or corrosive solvents.

7.3 Water inlet valve and inlet valve filter
To prevent blockage of water supply by solid substances like lime, clean the inlet valve filter regularly.
Unplug the power cord and turn off the water supply. Unscrew the water inlet hose at the back of the appliance as well as at the tap (Fig. 7-3.1). Remove the filters and flush them with water and a brush (Fig. 7-3.2). Insert the filter and install the inlet hose.

7.4 Cleaning the drum
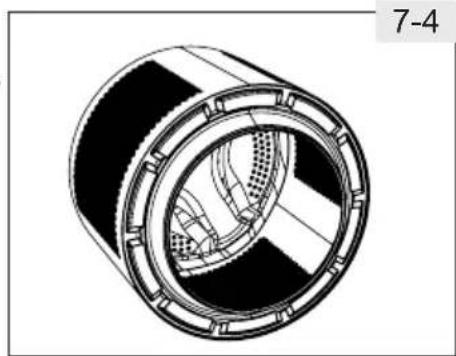
- Remove accidentally washed metal parts such as pins, coins, etc. from the drum (Fig. 7-4) because they cause rust stains and damage. Use a non-chloride cleaner for removing rust stains. Observe the warning hints of the cleaning agent manufacturer. Do not use any hard objects or steel wool for cleaning.

Note: Hygiene
For regular maintenance, we recommend running the Drum Clean programme with no load to remove possible corrosive residues quarterly. Add a small amount of detergent in the washing agent compartment (2) or use a special machine cleaner.
7-Care and cleaning

7.5 Long periods of disuse
If the appliance is left idle for a longer period:
- Pull out the electrical plug (Fig 7-5.1).
- Turn off water supply (Fig 7-5.2).
- Open the door to prevent formation of moisture and odours. Let the door open while not used.
Before next usage, check carefully the power cord, water inlet and drain hose. Make sure everything is properly installed and without leakage.

Note: Hygiene
After long periods of disuse, we recommend running the Drum Clean programme with no load and a small amount of detergent in the washing agent compartment (2) or a special machine cleaner to remove possibly corrosive residues.

7.6 Pump filter
Clean the filter once a month and check the pump filter, for instance if the appliance:
Doesn't drain the water. Doesn't spin. ▶ Causes unusual noise while running.


WARNING!
Scalding Risk! Water in the pump filter can be very hot! Before any action please ensure water has cooled down.
- Turn off and unplug the machine (Fig. 7-6.1).
- Open filter cover. You can push the filter cover to open it (Fig. 7-6.2).
- Provide a flat container to catch leach water (Fig. 7-6.3). There could be bigger amounts!
- Pull the drain hose out and hold its end above the container (Fig. 7-6.3).
- Take the sealing plug out of the drain hose (Fig. 7-6.3).
- After complete drainage close drain hose (Fig. 7-6.4), and push it back into the machine.
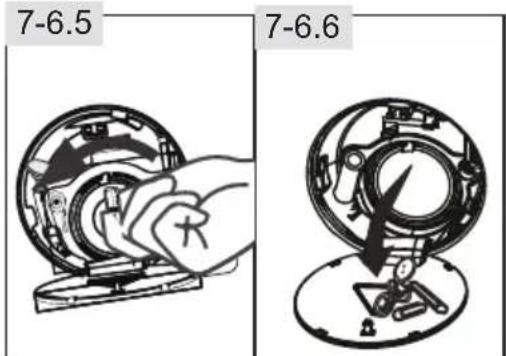
- Unscrew and remove counter clock wise the pump filter (Fig. 7-6.5).
- Remove contaminants and dirt (Fig. 7-6.6).
7-Care and cleaning
- Clean carefully pump filter, e.g. using running water (Fig. 7-6.7).
- Refix it thoroughly (Fig. 7-6.8).
- Close Filter cover.


CAUTION!
▶ Pump filter sealing has to be clean and unhurt. If the lid is not full tightened, water can escape. ▶ The filter must be in place, or it may lead to leakage.
8-Troubleshooting
Many occurring problems could be solved by yourself without specific expertise. In case of a problem please check all shown possibilities and follow below instructions before you contact an after sales service.

WARNING!
Before maintenance, deactivate the appliance and disconnect the main plug from the main socket. Electrical equipment should be serviced only by qualified electrical experts, because improper repairs can cause considerable consequential damages. ▶ A damaged power cable should only be replaced by the manufacturer, its service agent or similarly qualified persons in order to avoid a hazard.
Following codes are displayed only for information referring to the washing cycle. No measures must be performed.
Code Message
| 125 | The remaining wash cycle time will be 1 hour and 25minutes. |
| 630 | The remaining wash cycle time including chosen end-time delay will 6 hours and 30 minutes. |
| End | The washing cycle is finished. The appliance shuts off automatically. |
| cLot | Function child lock is activated. |
| Lock | Door is closed because of high water level, high water temperature or spinning cycle. |
| bEEP On | The buzzer is deactivated. |
| bEEP OFF | The buzzer is activated. |
8.2 Troubleshooting with display code
| Problem Cause Solution | |
| CLR-FLBr | Drainage error, water is not fully drained within 6 minutes. | Clean pump filter.Check drain hose installation. |
| E2 | Lock error. | Shut the door properly. |
| E4 | Water level not reached after 8 minutes, at the latest.Drain hose is self-syphoning. | Make sure that tap is fully opened and water pressure is normal.Check drain hose installation. |
| E8 | Water protective level error. | Contact the After sales service. |
| F3 | Temperature sensor error. | Contact the After sales service. |
| F4 | Heating error. | Contact the After sales service. |
8-Troubleshooting
| Problem Cause Solution | |
| F1 | • Motor error. | • Contact the After sales service. |
| FC0 FC1 or FC2 | • Abnormal communication error. | • Contact the After sales service. |
| UN6 | • Unbalanced load error. | • Check and balance laundry load in the drum. Reduce the load. |
| FA | • Water level sensor error. | • Contact the After sales service. |
8.3 Troubleshooting without display code
| Problem | Cause Solution | |
| Washing machine fails to operate. | Programme is not yet started.Door is not properly closed.Machine has not been switched on.Power failure.Child lock is activated. | Check programme and start it.Close the door properly.Switch the machine on.Check power supply.Deactivate child lock. |
| Washing machine will not be filled with water. | No water.Inlet hose is kinked.Inlet hose filter is blocked.Water pressure is less than 0.03 MPa.Door is not properly closed.Water supply failure. | Check water tap.Check inlet hose.Unblock inlet hose filter.Check water pressure.Close the door properly.Ensure the water supply. |
| Machine is daining while being filled. | Height of drain hose is below 80 cm.Drain hose end could reach into water. | Make sure that drain hose is properly installed.Make sure the drain hose is not in water. |
| Drainage failure. | Drain hose is blocked.Pump filter is blocked.Drain hose end is higher than 100 cm above floor level. | Unblock drain hose.Clean pump filter.Make sure the drain hose is pro-perly installed. |
| Strong vibration while spinning. | Not all transportation bolts have been removed.Appliance has no solid position.Machine load is not correct. | Remove all transportation bolts.Ensure solid ground and a levelled position.Check load weight and balance. |
| Operation stops before completing wash cycle. | Water or electric failure. | Check power and water supply. |
| Operation stops for a period of time. | Appliance displays error code.Problem due to load pattern.Programme performs soaking cycle. | Consider display codes.Reduce or adjust load.Cancel programme and restart. |
| Excessive foam floats drum and/or detergent drawer. | Detergent is not appropriate.Excessive use of detergent. | Check detergent recommendations.Reduce amount of detergent. |
8-Troubleshooting
| Problem Cause Solusion | |
| Automatic adjustment of washing time. | · Washing programme duration will be adjusted. | · This is normal and doesn't affect functionality. |
| Spinning fails. | · Unbalance of laundry. | · Check machine load and laundry and run a spinning programme again. |
| Unsatisfactory washing result. | · Degree of pollution does not agree with selected programme.· Detergent quantity was not sufficient.· Maximum load has been exceeded.· Laundry was unevenly distributed in the drum. | · Select an other programme.· Choose the detergent according to the degree of pollution and according to manufacturer specifications.· Reduce loading.· Loose the laundry. |
| Washing powder residues are on the laundry. | · Insoluble particles of detergent can remain as white spots on the laundry. | · Perform extra rinse.· Try to brush the points from the dry laundry.· Choose an other detergent. |
| Laundry has grey patches. | · Caused by fats such as oils, creams or ointments. | · Pretreat the laundry with a special cleaner. |

If too much foam is detected during spin cycle, motor stops and drain pump will be activated for 90 seconds. If that elimination of foam fails up to 3 times, programme ends without spinning.
Should the error messages reappear even after the taken measures, switch off the appliance, disconnect the power supply and contact the customer service.
8-4
8.4 In case of power failure
The current programme and its settings will be saved. When power supply is restored, operation will be resumed.
In case of power failure during a programme run, the door opening is mechanically blocked. If the laundry is to be removed, the water level must not be visible in the glass door. - Danger of scalding!
▶ Lower the water level according to steps 1 to 6 of chapter CARE AND CLEANING (PUMP FILTER). ▶ Pull lever (A) beneath the filter cover (Fig. 8-4) until the door is unlocked by a gentle click. ▶ Fix all parts and close the filter cover.
9.1 Preparation
▶ Take the appliance out of the packaging. ▶ Remove all packing material including the polystyrene base, and keep them out of children's reach. While opening the package, water drops may be seen on the plastic bag and porthole. This is a normal phenomenon resulting from water tests in the factory.

Note: Packaging disposal
Keep all packaging materials out of children's reach and dispose of them in an environmentally friendly manner.
9.2 OPTIONAL: Adjusting the bottom cover board
When opening the package, you will find a bottom cover (A). The board is used for reducing noise after covering the bottom of the cabinet.
- Lay the washing machine down on its side, with the window side upwards and the bottom side towards the operator.
- Insert the bottom plate into the cabinet, then fix it with 2 screws to the cabinet on the window side. Finally, set the machine upright again (Fig. 9-1).

9.3 Dismantle the transportation bolts
The transportation bolts are designed for clamping anti-vibration components inside the appliance during transportation to prevent internal damage.
- Remove the back cover.
- Fill the 5 holes with blanking plugs (Fig. 9-2).

9-Installation

- Assemble back the back cover by inserting it in the two gaps, with its convexity facing out (Fig. 9-3.3).
- Fill left holes with blanking plugs (Fig. 9-3.4).

Note: Keep in safe place
Keep the transportation bolts in a safe place for later use. Whenever the appliance is to be moved, first reinstall the bolts.
9.4 Moving the appliance
If the machine is to be moved to a distant location, replace the transportation bolts removed before installation to prevent damage:
- Remove the blanking plugs.
- Remove the back cover.
- Insert the plastic spacers and the transportation bolts.
- Tighten the bolts with a spanner.
- Assemble back the back cover.

9.5 Aligning the appliance
Adjust all feet (Fig. 9-5) to achieve a completely level position. This will minimize vibrations and thus noise during use. It will also reduce wear and tear. We recommend using a spirit level for adjustment. The floor should be as stable and flat as possible.
- Loosen the locknut (1) using a wrench.
- Adjust the height by turning the foot (2).
- Tighten locknut (1) against the housing.
9.6 Drain Water Connection
Fix the water drain hose properly to the piping. The hose has to reach at one point a height between 80 and 100 cm above the appliance bottom line!
If possible, always keep the drain hose fixed to the clip at the back of the appliance.

WARNING!
▶ Use only the supplied hose set for the connection. ▶ Never reuse old hose sets! ▶ Only connect to cold water supply. Before connection, check whether the water is clean and clear.
The following connections are possible:
9.6.1 Drain hose to sink
- Hang the drain hose with the U-support over the edge of a sink of adequate size (Fig. 9-6.1). ▶ Protect the U-support sufficiently against slipping.

9.6.2 Drain hose to waste water connection
The internal diameter of the stand pipe with vent-hole must be at least 40 mm. - Put the drain hose for approx. 80 mm into the waste water pipe. ▶ Attach the U-support and secure it sufficiently (Fig. 9-6.2).
9.6.3 Drain hose to sink connection
The junction must lie above the siphon. ▶ A spigot connection is usually closed by a pad (A). That must be removed to prevent any disfunction (Fig. 9-6.3). ▶ Secure the drain hose with a clamp.


CAUTION!
The drain hose should not be submerged in water and should be securely fixed and leak-free. If the drain hose is placed on the ground or if the pipe is at a height of less than 80 cm, the washing machine will continuously drain while being filled (self-siphoning). - The drain hose is not to be extended. If necessary, contact after-sales service.
9-Installation

9.7 Fresh Water Connection
Make sure that the gaskets are inserted.
- Connect the water inlet hose with the angled end to the appliance (Fig. 9-7.1). Tighten the screw joint by hand.
- The other end connect to a water tap with a 3/4" thread (Fig. 9-7.2).

9.8 Electrical Connection
Before each connection check if:
▶ The power supply, socket, and fusing are appropriate to the rating plate. ▶ The power socket is earthed and no multi-plug or extension is used. ▶ The power plug and socket are strictly according.
Put the plug into the socket (Fig. 9-8).

WARNING!
▶ Always ensure all the power supply, drain, and fresh water hose are firmly connected, dry, and leak-free. ▶ Ensure these parts are not crushed, kinked, or twisted. If the supply cord is damaged, it must be replaced by the service agent (see warranty card) in order to avoid a hazard.

Note: Hygiene
After each installation or long periods of disuse, before first use and for regular maintenance, run the Drum Clean programme with no load and a small amount of detergent in the washing agent compartment (2), or with a special machine cleaner to remove possibly corrosive residues.
10 - Technical data
10.1 Additional technical data
| Model Name | HW100-BP14959S6 |
| Dimension height | 850mm |
| Width | 595mm |
| Depth 560mm | |
| Country | Malaysia Philippines |
| 220-240V / 50Hz | 230V / 60Hz Power supply |
| Current 10A | |
| Max. power 1900W | |
| Water pressure 0.03MPa ≤ P ≤ 1MPa |
| Net weight | 63kg |
| Max. spin speed 1400rpm |