
OV60SNT3 - Oven ILVE - Free user manual and instructions
Find the device manual for free OV60SNT3 ILVE in PDF.


| Brand | ILVE |
| Model | OV60SNT3 |
| Product Type | Built-in Electric Oven |
| Power Supply | 230 V ~ 50/60 Hz |
| Total Power | 2.45 kW |
| Number of Functions | 9 (including Pizza, Static, Grill, Fan, Eco, etc.) |
| Cooking Functions | Pizza, Normal Static, Bottom Heat, Top Heat, Eco, Closed Door Grill, Fan Grill, Intensive, Multi-Fan, Quick Start |
| Temperature Range | 50°C – 250°C (MP models) / 30°C – 300°C (M3 models) |
| Controls | Selector knob, Thermostat knob, Programmer (5-key or TFT touch depending on model) |
| Display | Digital (TFT touch on some models) |
| Timer | Yes, up to 180 minutes (E3 models) or with programmer |
| Meat Probe | Available on some models (TFT and E3) |
| Child Lock | Yes, activates by holding thermostat knob |
| Oven Light | Yes, replaceable lamp |
| Door | Removable, triple glazing (some models double) |
| Cleaning | Hand wash with non-abrasive detergent; do not use steam cleaner |
| Installation | Built-in, requires proper cutout (see manual for dimensions) |
| Safety Thermostat | Yes, automatic reset |
| Accessories | Grill, tray, turn-spit (on some models), telescopic runners (optional) |
| Energy Efficiency | Eco cooking function for energy saving |
Frequently Asked Questions - OV60SNT3 ILVE
User questions about OV60SNT3 ILVE
0 question about this device. Answer the ones you know or ask your own.
Ask a new question about this device
Download the instructions for your Oven in PDF format for free! Find your manual OV60SNT3 - ILVE and take your electronic device back in hand. On this page are published all the documents necessary for the use of your device. OV60SNT3 by ILVE.
USER MANUAL OV60SNT3 ILVE
BUILT-IN ELECTRIC OVENS
USER – Use and Maintenance INSTALLER – Installation and maintenance
INDEX
4 IMPORTANT SAFETY WARNINGS
4 Appliances' data
8 First start-up
9 ISTRUZIONI PER L'USO
9 MP-M3 models
11 MP-M3 models with 5 key programmer
13 E3 models with 5 key programmer
18 TFT touch display
21 T3 static model with TFT touch
23 Accessories
24 CLEANING AND MAINTENANCE
24 Oven cleaning and care
25 Oven door disassembly
26 Recommendations for cleaning the oven and the front panel
27 Lamp replacement
28 PROBLEM SOLVING
28 Guide for the resolution
28 Children Lock
29 TFT display errors
30 COOKING CHART
30 Fan oven cooking chart
31 Natural convection oven cooking chart
32 Inside food temperature (°C)
33 INSTALLATION
33 Instructions for installation
34 Electrical connection
34 Installation rules
35 Wiring diagrams
Appliances' data
As well as being shown on the cover, the data plate is applied to the oven door frame and is visible with the door open.
CAUTION
These warnings refer to different types of appliance. Pay attention in properly identifying the type you own (see the data plate).

These warnings are valid for the countries mentioned in the plate.
1 Before using the cooker, read the instructions booklet carefully.
This contains very important information concerning safety during installation, use and maintenance.
The instructions booklet must be kept with care for later consultation.
2 The electrical safety of this cooker is guaranteed only if it is correctly grounded as required by the regulations.
It is fundamental to ensure that these regulations have been respected; if you are in doubt, contact a skilled technician to have the electric system accurately checked.
The manufacturer is not responsible for damage caused by a bad grounding system.
3 Before powering the appliance, check that the technical features shown on the data plate match those of the electrical system perfectly.
Installation/regulation must be carried out by qualified personnel.
4 Check that the electrical system and the sockets have the capacity to withstand the maximum power of the appliance which is shown on the plate.
If in doubt, contact a qualified person.
5 The device must be connected directly to the power supply with the correct polarity.
The connection must have a device ensuring disconnection from the network, with an opening distance of the contacts that allows complete disconnection in the conditions of overvoltage category III, in accordance with installation instructions.
6 If the socket is not suitable for the plug, replace it with a suitable one and in this case contact a qualified person who will also check if the cable section of the socket can withstand the power consumed by the appliance. The power cable does not have a fitted plug. For connection see "Electrical connection" section. The use of adapters, multiple sockets or extension leads, is not recommended.
7 When the appliance is not used for a long time, remove the electrical connection and disconnect the mains switch.
8 Do not block ventilation or heat dissipation slots.
9 If the appliance's electrical power cable is damaged, it must only be replaced by a manufacturer approved service centre.
10 The appliance must only be used for the purposes it is intended for (cooking). Any other use (e.g. heating a room) is improper and dangerous.
The manufacturer declines any responsibility for damages caused by such improper uses.
11 The use of any electrical appliance requires that a number of fundamental rules be respected:
A. Never touch the appliance with wet or damp hands or feet;
B. Never use the appliance with bare feet;
C. Avoid using extension cords and possibly take all possible precautions;
D. Do not pull the electric wire to disconnect it from the socket;
E. Do not expose the appliance to atmospheric agents (rain, sun, etc.)
F. Keep children under the age of 8 away from the appliance if they are not continuously supervised. This appliance can be used by children from 8 years and by persons with reduced physical, sensory or mental capacities or with lack of experience and knowledge if they are under adequate supervision or if they have been instructed about the use of the appliance safely and if they realize the related dangers. Children must not play with the appliance. Cleaning and maintenance operations must not be carried out by children without supervision.
12 The appliance and its accessible parts become very hot during use. Care should be taken not to touch the heating elements. Children must be kept at a distance. Children under 8 years of age must be kept away unless constantly supervised.
13 Before cleaning the appliance or performing maintenance, disconnect the appliance by disconnecting the power cord or by cutting off the electricity using the special switch.
14 In case of breakdown or malfunction switch off the appliance and do not attempt any repairs that must only be performed by an authorized service centre. Always insist on original spare parts.
Failure to comply with these instructions may compromise the appliance's safety.
15 It is strongly recommended not to make accessible the parts that can be dangerous, especially if there are children who could use the appliance for play.
16 Do not use flammable liquids (alcohol, petrol, ...) near the appliance in operation.
17 The materials used for the construction of our appliance are compatible with the environment and therefore recyclable. The packaging residues must not be left within the reach of children, but must be disposed of using the appropriate separate collection channels. For the scrapping of your equipment the disposal options must be used at your retailer and/or at your municipal administration; remember to scrap your appliance before making it useless.
18 Do not use steam cleaners to clean the inside of the oven.
19 Do not use abrasive detergents or sharp metal tools to clean the glass door of the oven, as they could damage the surface and cause it to break.
20 Warning: Make sure the product is off before replacing the lamp to avoid the possibility of electric shock.

IMPORTANT SAFETY WARNINGS
First start-up
When using the oven for the first time, let it work empty for about 1 hour (230 °C), possibly leaving the kitchen windows open.
When you first turn the oven on, a bad smell is emitted due to production residues such as grease, oils or resins.
When the oven has cooled clean it following the instructions in the «Cleaning and care section».
Once the indicated time has elapsed, the oven is ready for its first cooking. Do not cover the inside of the oven with aluminium foil to facilitate the cleaning.
This operation alters the appliance's performance and can damage the enamel.
All accessories in direct contact with food must be thoroughly cleaned using suitable products before their first use.

Cooking food in direct contact with grills and oven trays is not allowed
INSTRUCTIONS FOR USE
MP/M3 models
Description of the 5 keys programmer controls for the standard oven
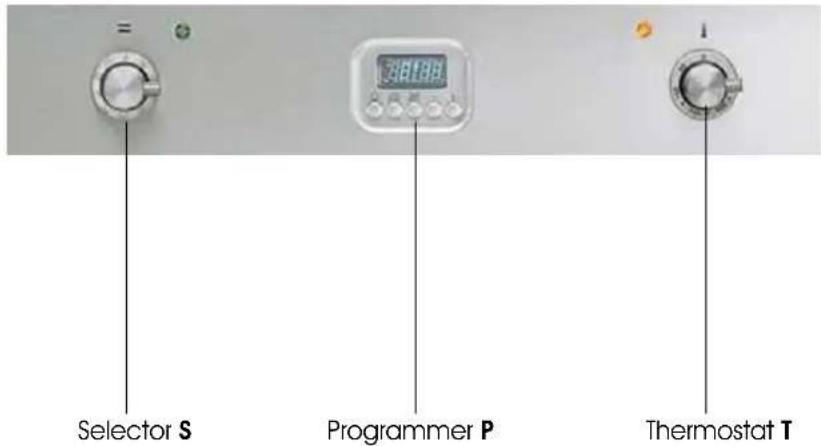
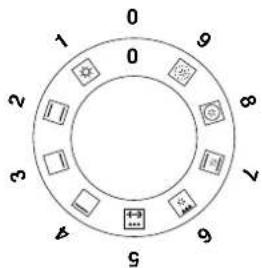
S Multifunction electric oven selector
P Programmer/Clock/Timer
T Thermostat
Use of the thermostat T
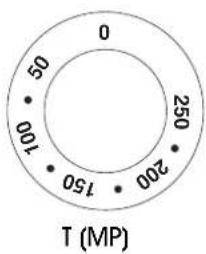
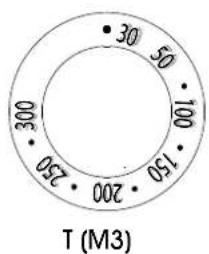
T. Temperatures, from 50°C to 250°C (MP) - 30°C to 300°C (M3), can be selected by using this knob.
Turning on and off
Choose one of the cooking operations by turning the selector (S) and adjust the temperature (from 50°C to 250°C) with the thermostat (T). We recommend putting into the oven after preheating.
Safety thermostat
The oven is equipped with a safety thermostat that disconnects the power supply. The reset of the thermostat, depending on the lowering of the oven temperature, is automatic. To reuse the oven it is sufficient to wait for the cooling. If the intervention of the thermostat is caused by a defect in the components it is necessary to call technical assistance.
How to use the multifunction oven
Choose one of the 9 cooking functions by turning the selector (S) and adjust the temperature (from 50 °C to 250 °C) with the thermostat (T). If your model is equipped with a programmer, set it up for cooking.
Oven light
To turn the light on or off, press the selector knob (S) lightly. The light does not work if the selector is in position (0).
INSTRUCTIONS FOR USE
MP/M3 models
Pos.
Symbol Function

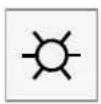

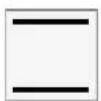

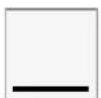

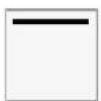

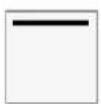

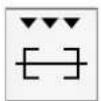

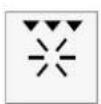





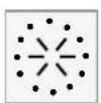
Pizza cooking
This function is particularly suitable for cooking pizza, focaccia and bread. The main source of heat is from the bottom heating element that works in combination with the oven's other resistances.
Normal static cooking
It is the oven's classic function particularly suited to cooking the following foods: pork chops, sausages, cod, braised beef, game, roast veal, meringues and biscuits, baked fruit, etc.
Cooking from underneath
This is the most suitable mode to finish the food cooking, in particular confectionery (biscuits, meringues, leavened cakes, fruit desserts, etc.) and other foods.
Cooking from above
Especially suitable for browning and to give the final touch of colour to many foods; it is recommended for ham- burgers, pork chops, veal steaks, sole, cuttlefish, etc.
Eco cooking (M3)
It is the function that allows you to cook with a considerable saving on electricity consumption. To make the most of it this feature is useful, before inserting the ECO function, introduce the dish inside the oven placing it in the center of the cavity. With the Eco function, cooking times adapt to slow cooking such as: braised meat, white meat, baked pasta, delicate pastry. This cooking cycle is not recommended for frozen foods.
With Eco cooking the programmable temperature goes from a minimum of 30^ C up to a maximum of 300^ C.
Closed door grill cooking
The suitable function for fast and deep grilling, to brown and roast meats in general, fillet steaks, Florentine steaks, grilled fish and also grilled vegetables. Cooking with the electric grill must be made with the thermostat at 180 °C closed door.
Fan grill cooking
Particularly fast and deep with significant energy savings, this function is suitable for many foods such as pork chops, sausages, pork or mixed spits, game, gnocchi alla romana, etc. Cooking with the electric grill must be made with the thermostat at 180 °C.
Intensive cooking
Is the quick and intense cooking function for various dishes; best for: baked fish, braised vegetables, spits, duck, chicken, etc.
Multiple fan cooking
It is the function that allows simultaneous cooking of different dishes without the smells blending; you can cook lasagne, pizza, croissants and brioches, tarts, cakes, etc.
Quick Start (only available for some models)
This function is used to speed up the preheating of your oven. We suggest you use this function when setting a cooking temperature between 200 and 250^ . Using the QuickStart function for temperatures below 200^ does not offer particular advantages.
To use the Quick Start function, turn the selector knob (S) until it is positioned on the symbol (9), then set the desired temperature with the thermostat knob (T). Once the oven has reached the temperature, the orange thermostat light goes off and the oven is ready to receive the food to be cooked.
At this point, set the desired cooking function.
CAUTION: the Quick Start function is not suited to cooking food, it only serves to preheat the oven more quickly.
DO NOT USE THE QUICK START FUNCTION FOR MORE THAN 20 MINUTES.
INSTRUCTIONS FOR USE
MP/M3 models with 5 key programmer
| Functions | 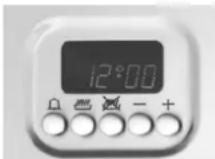 | Timer |
| Duration and manual function | ||
| Automatic program | ||
| Display | Button for timer and buzzer | |
| Automatic cooking duration | ||
| Setting cooking end time | ||
| [-]/[+] Decrease / Increase the selected parameter | ||
| Setting a function | Select the desired function by pressing the corresponding button and set the time using the +/- buttons. | |
| Appliance operation | At first control turning on, the display shows the flashing clock that increases by one unit every minute. Follow the "Setting the clock" procedure in the next paragraph.By pressing the , and , buttons simultaneously you enter the "Manual operation". You can set the temperature using the thermostat knob (T) and select the function using the selector (S). | |
| Setting the clock | The clock function is activated by simultaneously pressing , and cooking duration , end buttons. The time is then set by adjusting the +/- keys. Any previously set programs are automatically deleted. | |
| Manual function | To set this function simultaneously press the , cooking duration and , end buttons.The "A" symbol goes out and the pan symbol appears. The previously set programs are deleted. | |
| Semiautomatic operation with cooking duration | Select the duration function (button , ) and set the time with the +/- buttons. The "A" symbol and the symbol , appear. The oven switches on. When the hour of the day coincides with the final time, viewable through the end of cooking button , the oven will turn off and the pan symbol will disappear. The buzzer will sound.The "A" symbol will flash. | |
| Semiautomatic operation with end of cooking | Select the duration function (button , ) and set the end time with the +/- buttons. The "A" symbol and the pan symbol appear. The oven switches on. When the hour of the day coincides with the final time the oven will turn off and the pan symbol will disappear. The buzzer will sound. The "A" symbol will flash. | |
| Automatic operation with duration and end of cooking | Select the duration function , and set the end time with the +/- buttons. The "A" symbol appears. The oven switches on and the pan symbol , appears. Set the end time by pressing the end of cooking button , Use the +/- buttons to set the end time actually required. The oven switches off and the pan symbol disappears.The pan symbol will appear again when the time of day coincides with the end time less the cooking time. | |
INSTRUCTIONS FOR USE
MP/M3 models with 5 key programmer
| At the end of the automatic program, the “A” symbol will flash.The buzzer will sound, the oven and the pan symbol will turn off. with the end time less the cooking time. At the end of the automatic program, the “A” symbol will flash. The buzzer will sound, the oven and the pan symbol will turn off. | |
| Timer | Select the timer function (button 🔒) and set the end time with the +/- buttons. During the set time the bell symbol 🔒 will remain lit. When the time comes to an end, the buz-zer will sound. |
| Buzzer | The buzzer operates at the end of the cooking duration and timer function, and remains active for 7 minutes.The buzzer can be stopped by pressing any button 🔒 🔒 🔒. The intensity of the buzzer can be changed by pressing the “-” button without selecting a function. You can choose from 3 different sound intensities and duration depends on the time pressure is exerted on the button “-”. |
| Starting a program and control | The selected program starts after the time has been set. The time remaining can be displayed at any time by selecting the corresponding function again. |
| Identifying a programming error | There is a programming error if the time shown by the clock is between the cooking start time and the cooking end time.The error is signaled by the buzzer sounding and by the intermittent flashing of the symbol “A”. |
| Cancellation of a program | The cancellation of a program is done by selecting the manual mode. At the end of the selected program, this will automatically cancel. |
INSTRUCTIONS FOR USE
E3 models with 5 key programmer
Button legend
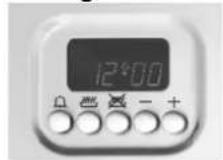

Set minute minder

Setting the cooking start time

Set end time cooking

Decreases the selected parameter

Increases the selected parameter
Display
F4-digit format, shows:
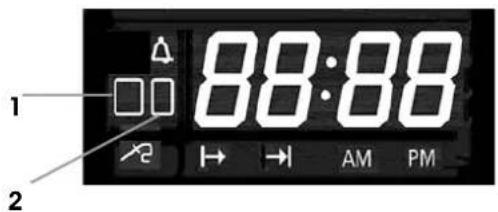
• In stand-by: the actual time.
- During manual cooking: the set temperature.
- During timed automatic cooking: the set temperature.
- During meat probe cooking: the probe's temperature.
- With timer on and oven in stand-by: the actual time.
Icons
1 Main oven icon [1]. If flashing the display shows the temperature and cooking duration settings of the main oven (only in the double oven)*
2 Secondary oven icon [2]. If flashing the display shows the temperature and cooking duration settin- gs of the secondary oven (only in the double oven).*

If lit the timer is on. If flashing it is over. Flashes while the timer is being set.

If lit, the oven is working in delayed start mode. During the delayed start, it stays on.

If lit, the oven is working in automatic end of cooking mode. It flashes during the delayed start mode, and then stays on when cooking is over.

If lit, the clock is in 12-hour a.m. mode.

If lit, the clock is in 12-hour p.m. mode.
INSTRUCTIONS FOR USE
E3 models with 5 key programmer
| Appliance operation | At first control turning on, the display shows the flashing clock that increases by one unit every minute. The oven cannot operate and the possible operations to release it are: "Setting the clock" procedure through the [+] and [-] buttons or alternatively directly turning on the oven which involves the acceptance of the current clock value whatever it is. Detailed clock setting, timer, duration and end of cooking operations are indicated in the respective para-graphs below. Through the various setting buttons( ), ), ) you enter the display and changing mode (indicated by a flashing display), in which [+] and [-] buttons are enabled to adjust the value shown on the display. This value is still accepted after 4 seconds from the last press of a button (the display remains lit). All settings are can be cancelled by pressing keys , and . |
| Setting the clock | Press the buttons , and , simultaneously for 5" (the display starts to flash) and change the time using the [+] and [-] keys. The clock setting is allowed only with the oven in stand-by.It is possible to change the time format: during the time adjustment phase press the button , for 4 seconds; with the [+] key you can choose the option 24 hours or 12 hours AM / PM. |
| Turning the oven on and off | Turn selector [S]. The display shows "On". The light inside the oven comes on after two seconds and the display shows the default temperature expected from the selected cooking mode. To turn off during cooking, turn back the selector to [0], the display shows "OFF". |
| Timer | The function does not interact with the loads, and is available regardless of the oven's status. Press the button , he bell symbol lights up and the display shows "0' 00". Set the time with [+] and [-], up to a maximum of 180 minutes, after 4 seconds without any increase or decrease the information is accepted, the bell remains on. By pressing the button , after changing the timer value it reverts to clock mode, having accepted the just altered value. Upon expiry of the set time a buzzer sounds together with the symbol , flashing. To stop the buzzer and the flashing, simply press any button. |
| Indefinite manual operation | Turn the oven on. Select a cooking function from those available. With knob [T] select the desired temperature. After 4 seconds after the last setting the oven operates for an indefinite time and the selected temperature remains on the display. |
| Semi-automatic end of cooking operation | Turn the oven on. Press button , sthe display shows "End". Set the end of cooking time with [+] and [-] buttons (the maximum cooking time is 10 hours). By pressing the button , after changing the duration value it reverts to clock mode, having accepted the just altered value. After 4 seconds from the last setting the oven is on for the set time. Having reached the programmed time you enter cooking finished mode. |
| Automatic operation | Turn the oven on. Press button , and select the cooking start time with [+] and [-] buttons. Press button , sthe display shows "End". Set the end of cooking time with [+] and [-] buttons. If no cooking time is selected, the oven remains in manual cooking mode indefinitely. After 4 seconds from the last setting the oven is on up to the specified time. You can always select a cooking function from those available and the temperature can be changed. Having reached the programmed time you enter cooking finished mode.At the end of timed cooking, the oven switches off all loads, a triple intermittent acoustic signal is activated of average intensity, the display shows the time, the cavity symbol flashes. To unlock the oven, simply press any of the programmer buttons: the acoustic |
INSTRUCTIONS FOR USE
E3 models with 5 key programmer
| Cooking over mode | signal ends and the oven is ready to receive new commands. This function is not available with the grill and fan grill cooking program. |
| Selection of cooking temperature | The maximum temperature varies depending on the type of function. When you turn the oven temperature is proposed by default on every aspect: the temperature for cooking can be changed. Turning the knob slightly [T] clockwise increases the temperature (in steps of 5 C), counter-clockwise decreases the temperature (in steps of 5 C). When adjusting the temperature (display fl ashes) it is possible to change from c to f and vice versa by pushing the (t) kob for 8". |
| Oven light control | The oven light remains on for 1 minute when the oven is turned on, and again for 1 minute at the end of preheating. Whilst waiting for a delayed start, the oven light is off. The oven light can always be turned on by pressing knob [T] and turns off automatically after 1 minute.During cooking, you can always leave the light on by pressing the knob [T] for 3 seconds. |
| Child safety lock | The oven is equipped with a safety device that prevents unwanted or accidental starting. To activate the safety: with oven off press and hold knob [T] for 3 seconds. A short beep sounds and the screen displays the symbol "n-0". In this situation it is impossible to start the oven. To remove the previously activated safety, keep knob[T] pressed for 3 seconds. |
INSTRUCTIONS FOR USE
E3 models with 5 key programmer
Pos. Symbol Function
| 1 | Pizza cookingThis function is particularly suitable for cooking pizza, focaccia and bread. The main source of heat is from the bottom heating element that works in combination with the oven's other resistances. | |
| 2 | Normal static cookingIs the oven's classic function particularly suited to cooking the following foods: pork chops, sausages, cod, braised beef, game, roast veal, meringues and biscuits, baked fruit, etc. | |
| 3 | Cooking from underneathThis is the most suitable form to finish food cooking, in particular confectionery (biscuits, meringues, leavened cakes, fruit desserts, etc.) and other foods. | |
| 4 | Cooking from aboveEspecially suitable for browning and to give the final touch of colour to many foods; it is recommended for hamburgers, pork chops, veal steaks, sole, cuttlefi sh, etc. | |
| 5 | Closed door grill cookingThe suitable function for fast and deep grilling, to brown and roast meats in general, fillet steaks, Florentine steaks, grilled fish and also grilled vegetables. Cooking with the electric grill must be made with the thermostat at 180 °C closed door. | |
| 6 | Fan grill cookingParticularly fast and deep with significant energy savings, this function is suitable for many foods such as pork chops, sausages, pork or mixed spits, game, gnocchi alla romana, etc. Cooking with the electric grill must be made with the thermostat at 180 °C closed door. | |
| 7 | Intensive cookingIs the quick and intense cooking function for various dishes; best for: baked fish, braised vegetables, spits, duck, chicken, etc. | |
| 8 | Multiple fan cookingIs the function that allows simultaneous cooking of different dishes without the smells blending; you can cook lasagne, pizza, croissants and brioches, tarts, cakes, etc. | |
| 8a | Eco cookingIt is the function that allows you to cook with a considerable saving on electricity consumption. To make the most of this feature it is useful, before inserting the ECO function, to introduce the dish inside the oven, positioning it in the center of the cavity.With the Eco function, cooking times adapt to slow cooking such as: braised meats, white meats, baked pasta, delicate pastries. This cooking cycle is not recommended for frozen foods.To select Eco cooking turn the selector knob "S" to position 8 and then, when the word "ON" appears on the display, hold down the "+" key of the programmer for about 2 seconds until the display shows the message "ECHO". With Eco cooking the programmable temperature ranges from a minimum of 30 °C up to a maximum of 300 °C.Note: Eco cooking cannot be selected with the meat probe inserted. | |
| 9 | Quick Start (kun tilgængelig på nogle modeller)Denne funktion bruges til af fremskynde forvarmningen af din ovn. Det anbefales at bruge denne funktion, når du indstiller en kogetemperatur mellem 200 og 300°C. Brug af QuickStart-funktionen til temperaturer under 200°C giver ikke særlige fordele.For at bruge Quick Start-funktionen skal du dreje på vælgerknappen (S), indtil den er placeret på symbolet (9) og derefter indstille den ønskede temperatur med termostatknappen (T). Når ovnen har nået den rette temperatur, slukker den orange termostatlampe, og ovnen er klar til den ret, der skal steges eller bages.Nu kan du så indstille den ønskede tilberedningsfunktion.ADVARSEL: Quick Start-funktionen er ikke en funktion, der er egnet til selve madlavningen, men tjener kun til hurtigere forvarmning af ovnen.BRUG IKKE HURTIG START-FUNKTIONEN I MERE END 20 MINUTTER. |
KONTROL AF DIN MAD
E3 models with 5 key programmer
Cooking inspection
If you need to inspect the food being cooked, you can open the oven door. In this case the lights come on and the forced fan stops in the case of ventilated cooking, and the spit rotation in the case of grill cooking with the door closed. Closing the door reactivates the previously set function.
Dry/moist cooking
The oven has an automatic device which allows steam from cooking, in some functions, to be expelled from the oven: this is dry cooking (dry). If the cooking needs requires that the moisture remains inside the oven, moist cooking (moisture), the automatic device can be switched off as follows:
after selecting the desired cooking function, when [ON] appears on the display hold down the "-" programmer button for about 2 seconds until [HUM] appears on the display. This involves a choice that allows you to modify dry cooking with moist cooking to your liking. The functions concerned are:
Symbol Function
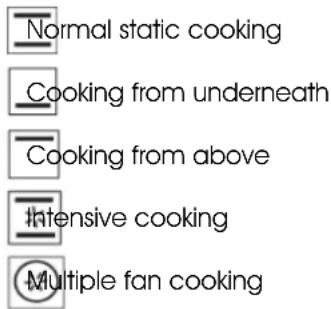
Cooking with probe (only available on some models)
N.B. Cooking with probe cannot be used in the "DEFROST", "QUICK START", "PIZZA" and "ECO" functions. When the oven is in stand-by insert the meat probe into the connecting socket on the left hand wall of the oven: the clock displays "MEAT" for 2 seconds and the "probe" symbol fl ashes. Next the probe's default temperature(75°C) ap-pears on the display. By turning and then pressing the adjustment button, select the end of cooking temperature from the 2 limit values of 40° and 100°C (the food's internal temperature). After 4 seconds from the last setting, the set value is memorized and the probe symbol stays on. Turn on the oven, select the cooking function and the desired temperature using the appropriate knobs. The display will show the probe's temperature reading.
Upon reaching the programmed temperature the oven will turn off, a buzzer sounds and the display shows the message "End" and you enter the cooking over mode.
During cooking it is always possible to change the probe's temperature by pressing and then turning the adjustment knob 3 times.
NOTE: If you insert the probe into the special socket during cooking, the oven will turn off and "Off" appears on the display.
If, during cooking, the probe is removed from the special socket, the oven will turn off and "Off" appears on the dis-play.
INSTRUCTIONS FOR USE
TFT touch display - Icons legend

Pause Home

Start Light
°C - °F Timer

Screen lock Exit - Term

Confirmation Time

Settings Settings Confirmation

Meat probe Off
Knob present in some models (allows to set and confirm the TFT functions besides the Touch)






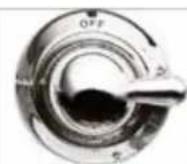
Knob present in some models (allows to set and confirm the TFT functions besides the Touch)
INSTRUCTIONS FOR USE
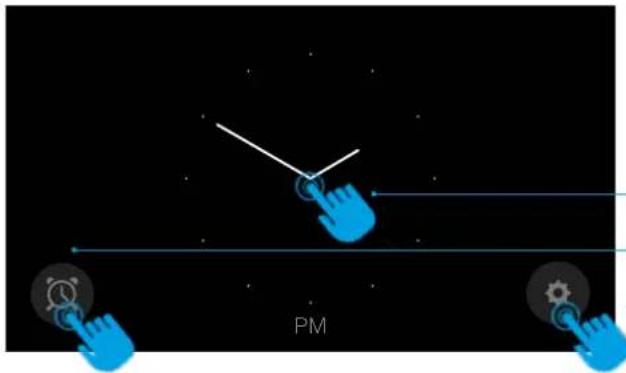
TFT touch display - Settings
natural_image
Diagram showing two blue hand icons with a white cursor pointer and 'PM' label, against a black background with no readable text or symbols.Home: display start page.
3 options
Allows you to proceed to the cavity setting screen
Allows you to set the timer
Allows direct access to the settings
natural_image
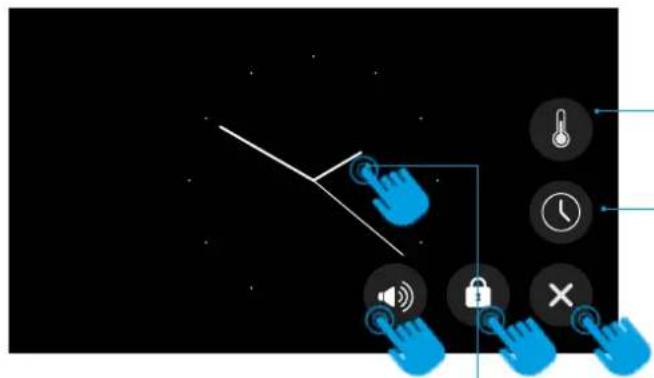
Pure graphical icons without any text, numbers, or symbolsSettings
Choice of degree scale (°C or °F).
Setting the time.
Exit - Term
Screen lock
To unlock, tap on the display for 10 seconds
It allows you to set the volume of the acoustic signal and optionally a sound at the touch of the display
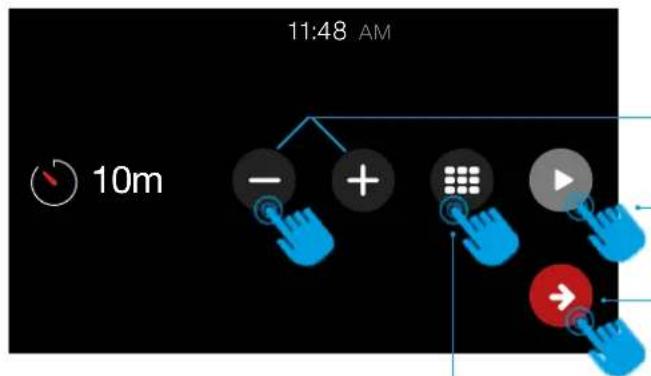
Set a timer
Increase or decrease time.
Confirm once the desired time has been set. An acoustic signal will indicate the term.
Confirm and return to the home page.
Numeric keypad
INSTRUCTIONS FOR USE
TFT touch display - Settings
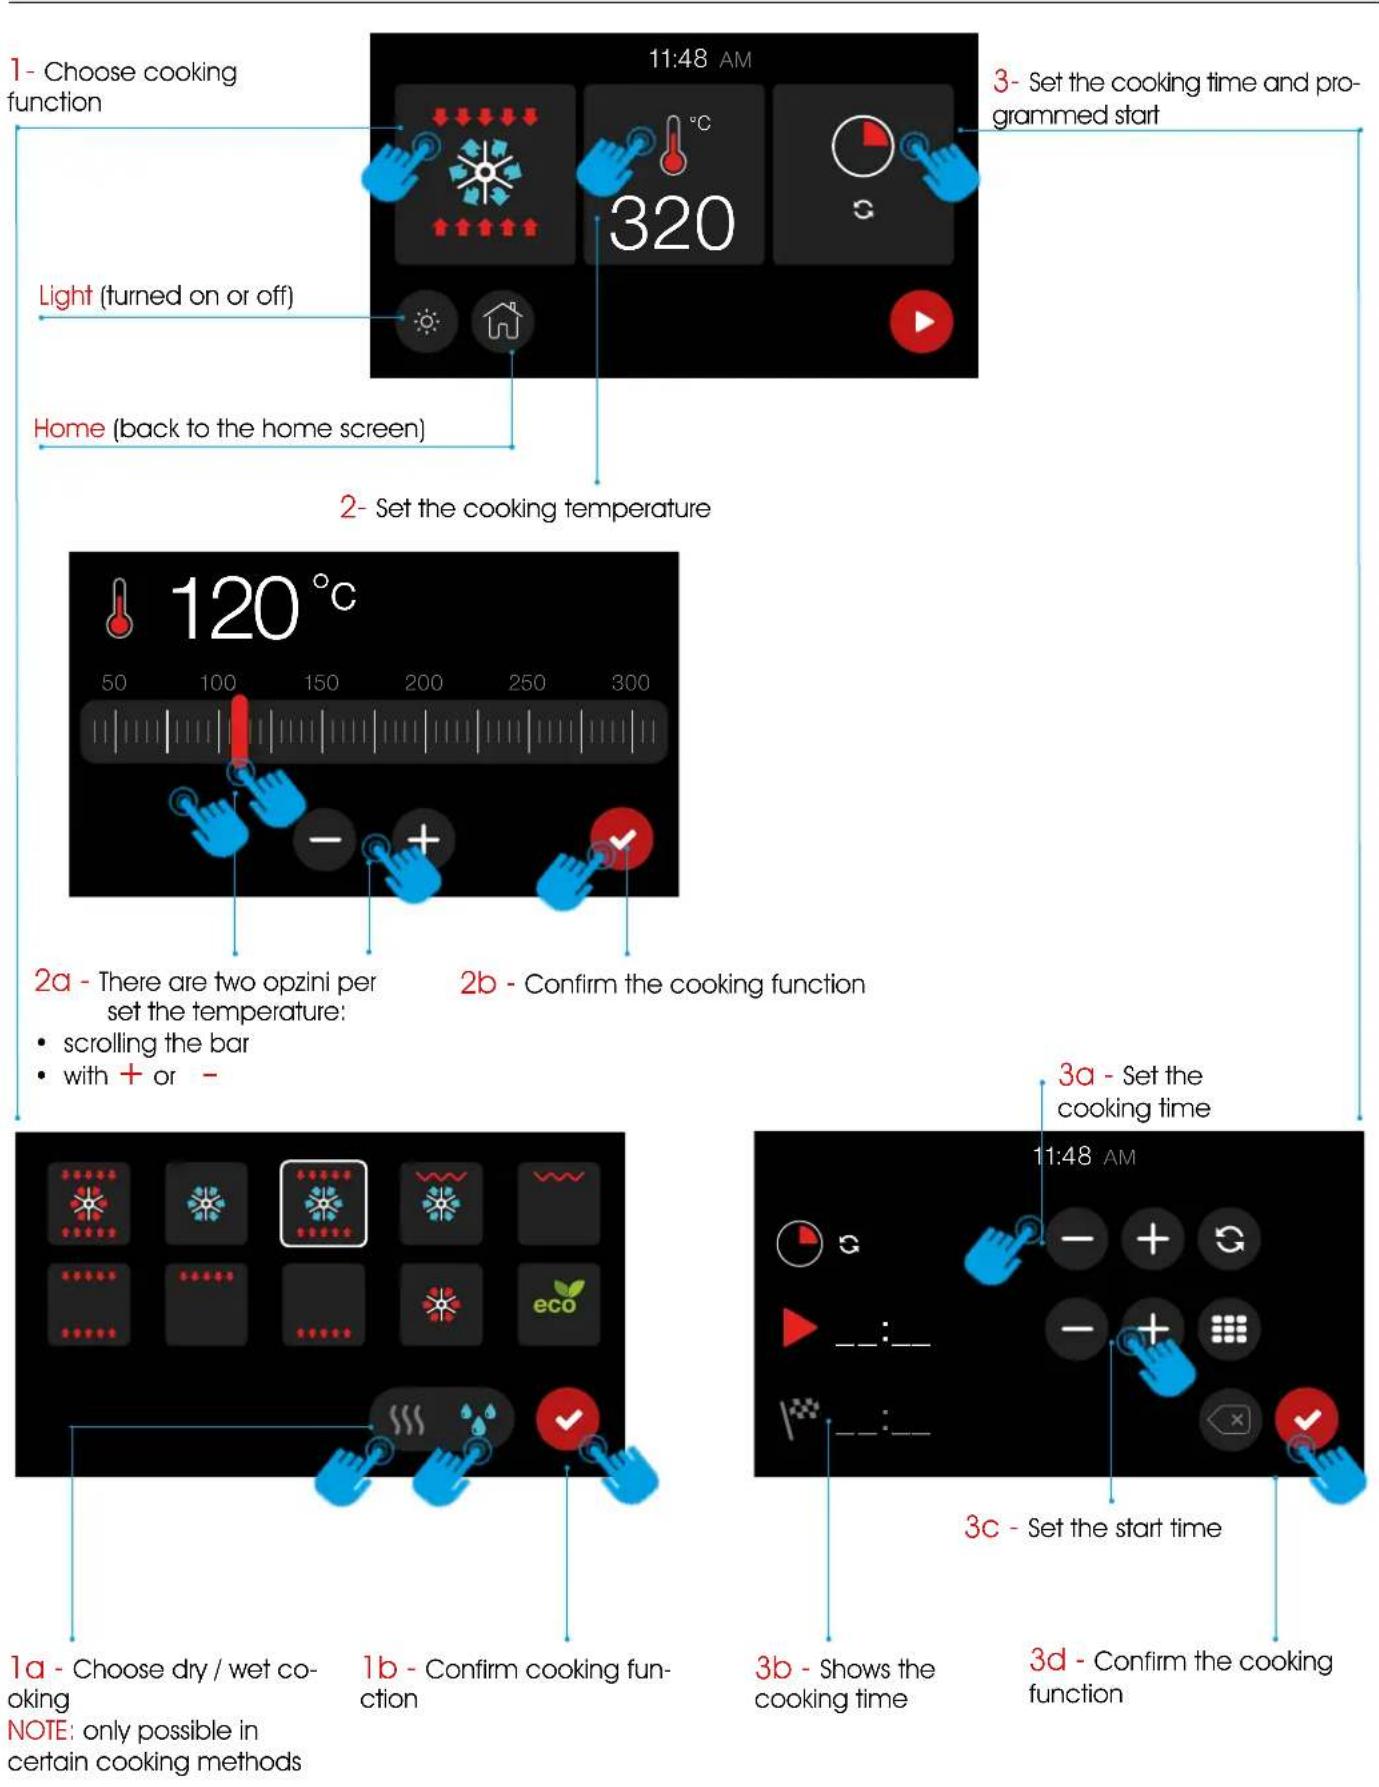
flowchart
graph TD
    A["1 - Choose cooking function"] --> B["Light (turned on or off)"]
    B --> C["Home (back to the home screen)"]
    C --> D["2 - Set the cooking temperature"]
    D --> E["2a - There are two opzini per set the temperature: scrolling the bar with + or -"]
    D --> F["2b - Confirm the cooking function"]
    F --> G["3a - Set the cooking time"]
    G --> H["3c - Set the start time"]
    H --> I["3d - Confirm the cooking function"]
INSTRUCTIONS FOR USE
T3 static model with TFT touch - Cooking process


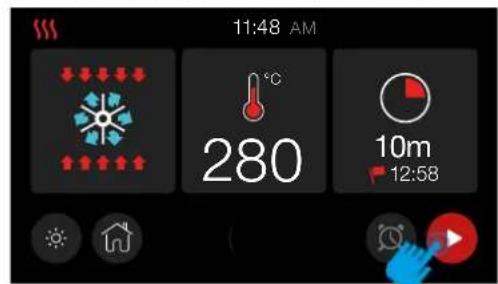
SETTED CAVITY
Once the cavity has been set (cooking function, temperature and timer set) confirm to start preheating. At this point the display will switch to preheating mode
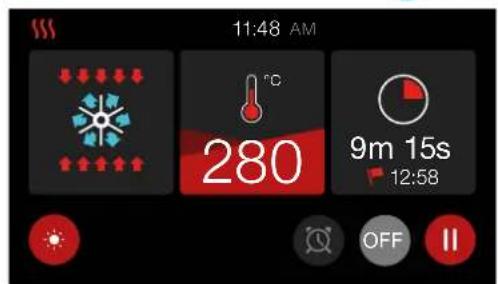
PRE-HEATING PHASE
There are four levels that allow you to monitor the preheating process. The red part will progressively increase until it fills the display
PRERISCALDO ENDED
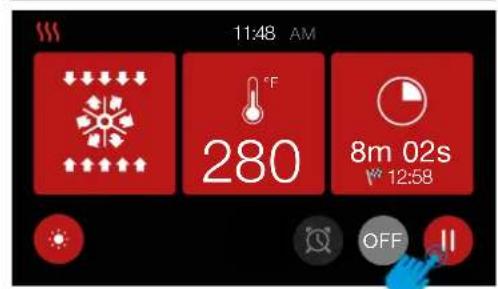
When the set temperature is reached, the display will turn red to indicate the end of the preheating phase, and the start of the cooking phase. If a cooking time was set, the oven will automatically switch off when the time expires.
In case of no cooking time set, it is possible to suspend

and then finish cooking
COOKING WITH MEAT PROBE
N.B. Cooking with probe cannot be used in the "DEFROST", "QUICK START", "PIZZA" and "ECO" functions. When the oven is in stand-by insert the meat probe into the connecting socket on the left hand wall of the oven
PROBE TEMPERATURE SELECTOR
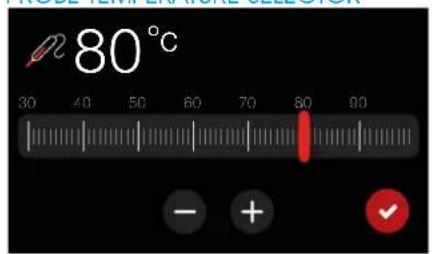
HEATING MODE WITH PROBE
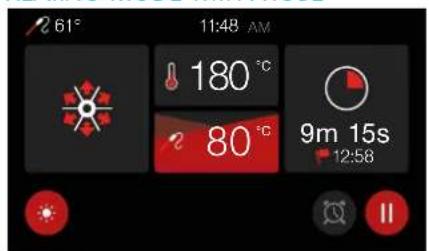

ATTENTION: if the display does not respond to the commands (touch locked), simply open and close the oven door
INSTRUCTIONS FOR USE
T3 static model with TFT touch - Icons

Pizza function
This function is particularly suitable for cooking pizzas, focaccias and bread. The main source of heat comes from the lower heating element which works in combination with the other furnace resistances.
Normal static cooking
It is the classic function of the electric oven particularly suitable for cooking the following foods: pork chop, sausages, cod, braised meat, game, roast veal, meringues and biscuits, baked fruit, etc.
Cooking from below
This is the best cooking to finish cooking food, especially pastry (biscuits, meringues, leavened cakes, fruit desserts, etc.) and other foods.
Cooking from above
Particularly suitable for browning and to give the final touch of color to many foods; it is the recommended function for hamburgers, pork chops, veal steaks, sole, cuttlefish, etc.
Grill cooking with closed door
The function indicated for quick and deep grilling, for grilling and roasting meat in general, fillet, Florentine steak, grilled fish and even grilled vegetables. Cooking with the electric grill must be carried out with the thermostat at 180^ C.
Ventilated grill cooking
Particularly fast and deep with considerable energy savings, this function is suitable for many foods such as: pork chop, sausages, pork or mixed skewers, game, Roman-style gnocchi, etc. Cooking with the electric grill must be carried out with the thermostat at 180 °C.
Intensive cooking
It is the function of the rapid and intense cooking of various dishes; suitable for: baked fish, braised vegetables, skewers, duck, chicken, etc.
Multiple ventilated cooking
It is the function that allows the simultaneous cooking of different dishes without the smells mixing together; you can cook baked lasagna, pizza, croissants and croissants, pies, cakes, etc.
Eco cooking
It is the function that allows you to cook with a considerable saving on electricity consumption. To make the most of this feature it is useful, before inserting the ECO function, to introduce the dish inside the oven, positioning it in the center of the cavity. With the Eco function, cooking times adapt to slow cooking such as: braised meats, white meats, baked pasta, delicate pastries. Note: Eco cooking cannot be selected with the meat probe inserted.
Thawing
Allows quick thawing of all frozen foods in general that are quickly brought to room temperature.
Quick Start (only available on some models)
This function speeds up your oven's pre-heating. We suggest you use this function when you set a cooking temperature from between 200 and 300/320 °C. Use of the QuickStart function for temperatures under 200 °C is not advantageous. WARNING: the Quick Start function is not suitable for cooking foods, it is only for quickly pre-heating the oven. DO NOT USE THE QUICK START FUNCTION FOR MORE THAN TWENTY MINUTES.
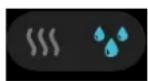
Dry / wet cooking
The oven is equipped with an automatic device that allows the condensation vapors of the cooking, in some functions, to be expelled from the oven: this involves dry cooking (dry). If the need for cooking requires that the humidity remain inside the oven, moist cooking (moisture) the automatic device can be switched off by touching the appropriate icon.
COOKING INSPECTION
If it is necessary to inspect the food during cooking it is possible to open the oven door. In this case the lights come on and forced ventilation stops, in the case of ventilated cooking, and the rotation of the spit, in the case of grill cooking with the door closed. When the door is closed again, the previously set function is reactivated.
INSTRUCTIONS FOR USE
Accessories
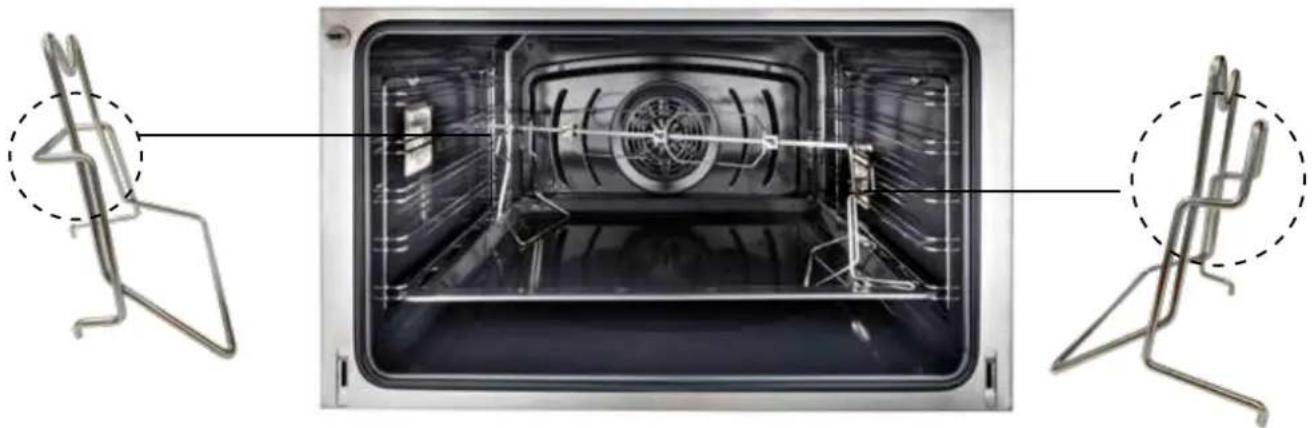
Use of the turn-spit (only on some models)
Slide the meat to be cooked onto the spit, blocking it with the special forks. Place the spit on the special supports previously inserted in the drip pan and insert it in the spit-roast horn. Turn on the static grill with closed door function. To extract the spit together with the drip pan pull it out just enough to allow complete extraction.
natural_image
Interior view of an oven with open doors and internal air ducts, showing structural details (no text or symbols)Telescopic runners (only in certain models)
This solution has been studied to increase the ergonomics, the practica and safety when moving baking trays in the oven. The kit includes completely extendible lateral runners, which slide on ball bearings to facilitate the removal and positioning of the trays. The runners are anti tip-over for better safety. It is possible to remove them to clean them or move them as illustrated in the pictures below.
Pul down the part highlighted in red to remove it from the oven.
Turn over the grill and place it on a flat surface whit the telescopic runner facing down.
To un nook the clip, loosen whit a flathead screwdriver
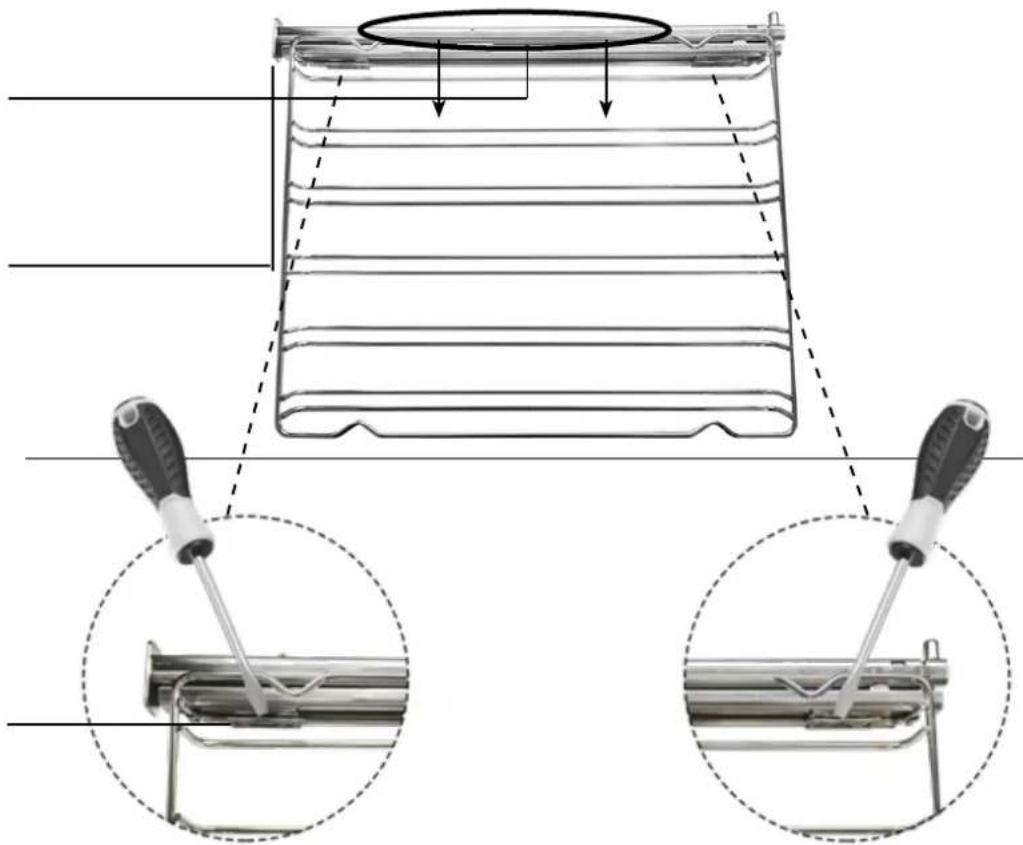
Repeat the operations backwards to repositions the grills.
CLEANING AND MAINTENANCE
Removing the oven
Procedure to follow
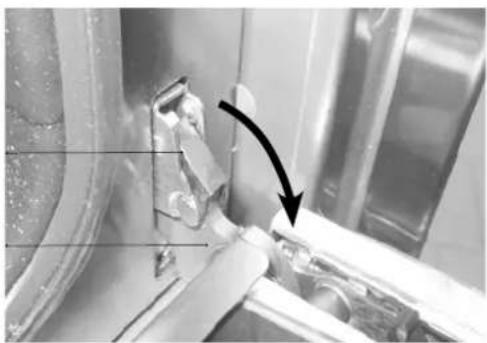
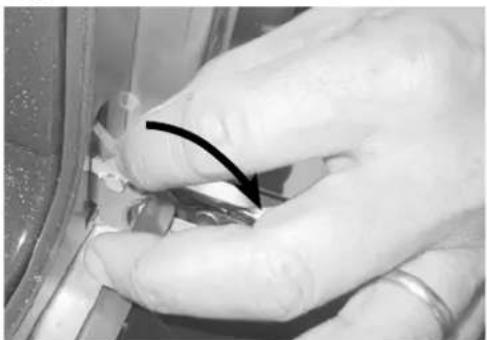
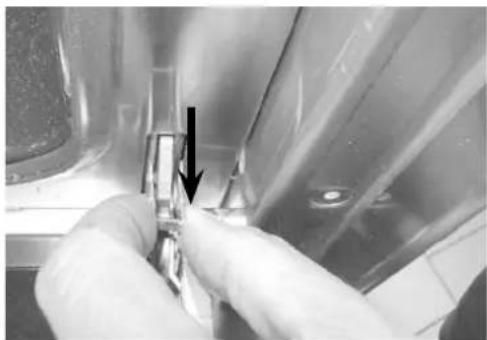
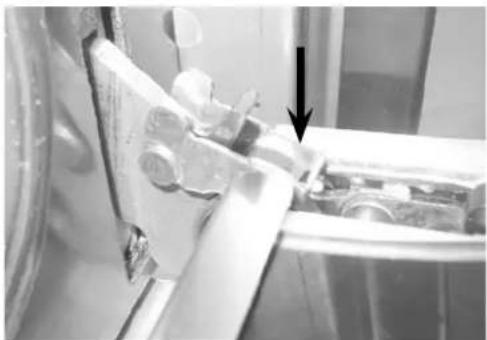
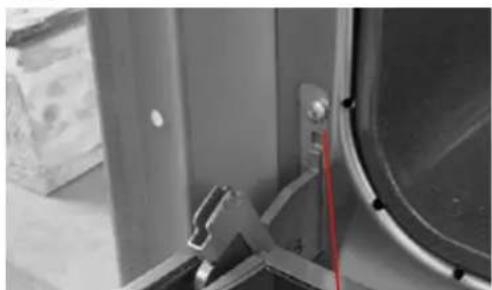
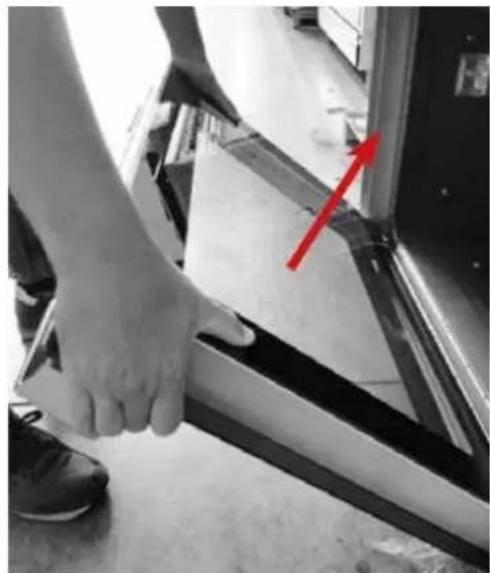
For ease of intensive cleaning it is practical to dismantle the door following these instructions:
- open the door
- mow the hook C to the hinge zone D, following the speps
1
natural_image
Close-up of a mechanical component with a black arrow pointing to a detail (no visible text or symbols)2
natural_image
Close-up of hands holding a small object with a black arrow pointing to it (no visible text or symbols)3
natural_image
Close-up of a hand holding a metallic tool near a transparent surface, with an arrow pointing to a component (no visible text or symbols)4
natural_image
Close-up of mechanical components with a black arrow pointing to a component (no visible text or symbols)⑤ (only in some models)
natural_image
Close-up of a mechanical component with a red wire and metal bracket, no visible text or symbols6
natural_image
Close-up of a person's hand pressing down on a metal door, with a red arrow pointing to the handle (no text or symbols visible)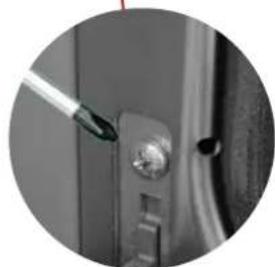
natural_image
Close-up of a mechanical component with a tool inserted, showing a metallic part and a small inset detail (no text or symbols visible)CLEANING AND MAINTENANCE
Glass disassembly and cleaning
Procedure to follow
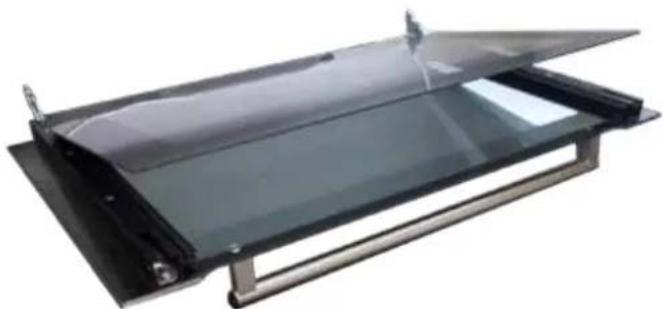
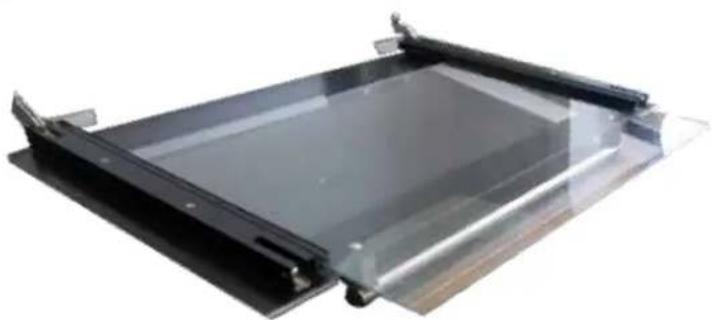
The oven door is composed of three crystals (two in some models). The crystal parts are cleaned using non-abrasive absorbent kitchen paper and a common detergent. Do not use rough abrasive materials or sharp metal scrapers to clean the glass doors of the oven as they can scratch the surface and cause the glass to shatter. The internal crystals are removable to make cleaning easier. For this purpose it is necessary to dismantle the oven door or, alternatively, position it at the intermediate click.
Sequence for removal of the door glass
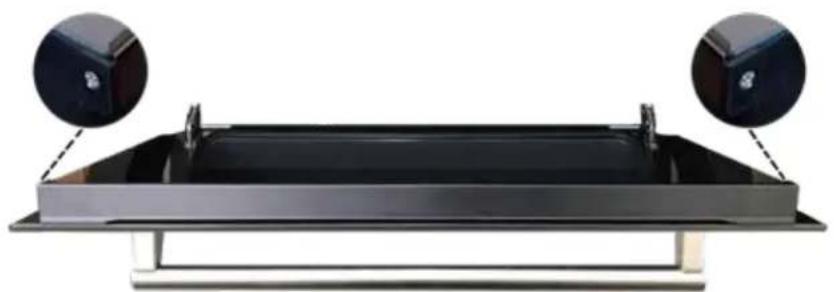
WARNING! Any operation must always be carried out with the door removed from the oven and placed in a suitable shelf so as not to damage the front of the door
Unscrew the 2 right / left side screws in the upper strip
1
natural_image
Exterior view of a modern office building (no signage)Raise the upper glass and remove it
2
natural_image
Exterior view of a modern office building (no signage)Remove the intermediate glass
3
natural_image
Exterior view of a black rectangular electronic device with transparent casing and mounting brackets (no text or symbols visible)CLEANING AND MAINTENANCE
- Recommendations for cleaning the oven and the front panel
OVEN
| COMPONENT | CLEANING METHOD | WARNINGS |
| Oven inside | It is recommended to clean the oven after every use. Dirt is cleaned more easily avoiding to let it burn several times at high temperatures. Remove every removable part and clean it separately with hot water and non-abrasive detergent. The cavity is cleaned with a soft cloth soaked with a solution made of water and ammonia. Rinse and dry. | Do not use vapor cleaner to clean the interior of the oven. Do not use abrasive/corro-sive detergents or sharp tools to clean the glass of the door as they could damage and break the surface. |
| Tray | Immerse in a solution made of water and neutral soap. Dry afterwards. | Remove residual food immediately after use. |
| Grills | Clean with warm water and non-abrasive detergents or with a suitable degreaser. | In case of encrusted and hardened dirt, we recommend soaking the grills for a few hours before cleaning them. |
FRONT PANEL
| COMPONENT | CLEANING METHOD | WARNINGS |
| Steel surfaces | Clean the parts with lukewarm water and non-corrosive liquid detergent and then dry them with a soft cloth or microfiber. | Brilliance is maintained through regular cleaning with specific products which can be found in commerce. Never use abrasive powders |
| Painted surfaces | To maintain the characteristics of the painted parts, it is necessary to frequently clean them with soapy water. | Avoid leaving acid or alkaline substances on the painted parts (vinegar, lemon juice, salt, tomato juice, etc.) and washing when the painted parts are still hot. |
CLEANING AND MAINTENANCE
- Lamp replacement
Procedure to follow
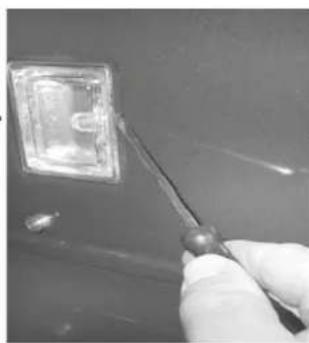
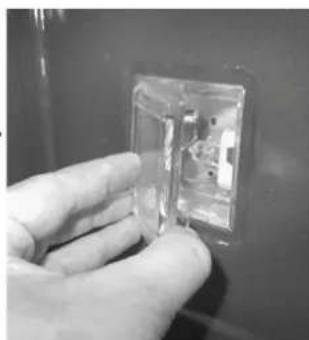
If the oven light does not work, disconnect the appliance from the mains, remove the lamp protection glass and replace the lamp.
It should of course be noted that the lamp to be inserted is indicated for use at high temperatures and has the characteristics for such use.

Loosen with a slotted screwdriver
natural_image
Close-up of a gloved hand holding a small tool near a transparent square component (no visible text or symbols)
Remove the lamp cover glass
natural_image
Close-up of a hand holding a transparent electrical outlet with internal components (no visible text or symbols)
Remove the lamp
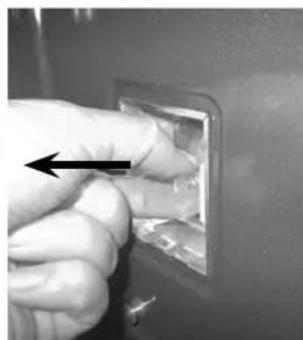
natural_image
Close-up of a hand inserting a small electronic component into a wall socket (no text or symbols visible)
Replace and close again
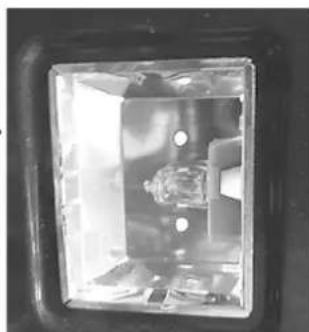
natural_image
Close-up of a transparent mechanical component with internal components and mounting holes (no visible text or symbols)PROBLEM SOLVING
– Guide for the resolution
ATTENTION:

- During the guarantee period repairs can only be carried out by the authorized after-sales service.
- Before repairing, unplug the appliance from the power supply, that is, unplug the power cable or use the appropriate switch.
- Unauthorized interventions and repairs can cause electrocution or short circuit, therefore do not carry them out. Leave these works to authorized technicians.
- In case of small disturbances, it is possible to solve the problem following the instructions.
- After-sales service intervention during the guarantee period is not free, if the appliance does not work because of incorrect use.
- The elimination of the faults or complaints, caused by incorrect use or installation, will not be repaired under guarantee. In such cases, the repair costs will be borne by the user
- Children Lock
How to resolve
Symbol that represents the children lock
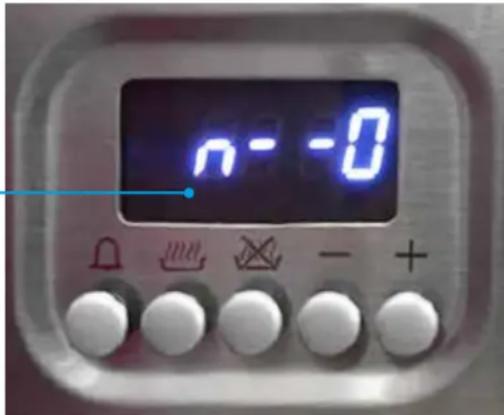
ATTENTION:

If this symbol shows up in your oven, do not worry. The children lock may have accidentally been selected.
The oven is equipped with a safety feature which prevents the unwanted startup of the oven.
How to disable
To disable the safety lock, hold the thermostat knob which regulates the temperature for 5". On the display will appear "n—o" followed by "OFF".
How to activate
To activate the safety lock, hold down the thermostat knob for 5", with the oven turned off. You'll hear a short acoustic signal and, on the display, will appear
“n—o” followed by “ON”. I will then not be possible to start up the oven.
PROBLEM SOLVING
- TFT display errors
System errors
The following errors are detected:
The error code syntax is: "E YY X", where:
YY = error code
x = cavity number when error occurred or '0' for general errors
Description
Error ID
| Cavity probe in open circuit | 00 |
| Cavity probe in short circuit | 01 |
| Meat probe in open circuit | 04 |
| Meat probe in short circuit | 05 |
| Overheating | 08 |
| Tangential fan not working | 16 |
| Incorrect mapping card | 19 |
| Communication error | 20 |
ERROR MESSAGE
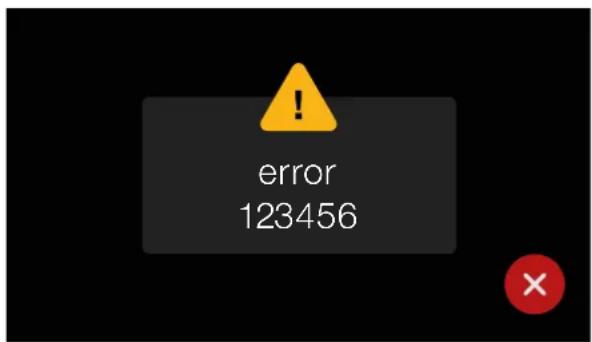
In case of error disconnect and reconnect the appliance.
If the error is present again you will need the intervention of an authorized technician
DOOR OPEN MESSAGE
(DURING OPERATION)
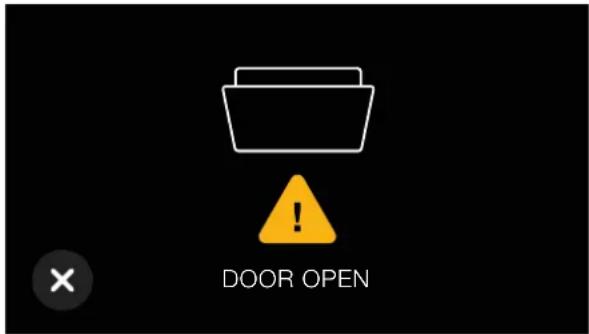
Close the oven door.
COOKING CHART
Fan oven cooking chart (by way of example only)
| DISH | TTEMP. C° | MIN. | |
| MEATS | |||
| Roast beef | 170-180 | 2/3 | 40/50 |
| Roast ox | 170-190 | 2/3 | 40/60 |
| Roast veal | 160-180 | 2/3 | 65/90 |
| Roast lamb | 140-160 | 2 | 100/130 |
| Rare roast beef | 180-190 | 2/3 | 40/45 |
| Roast hare | 170-180 | 2/3 | 80/100 |
| Roast rabbit | 160-170 | 2 | 80/100 |
| Roast turkey | 160-170 | 2 | 160/240 |
| Roast goose | 160-180 | 2/3 | 120/160 |
| Roast duck | 170-180 | 2/3 | 100/160 |
| Roast chicken | 180 | 2/3 | 90/120 |
| FISH | 160-180 | 2/3 | 15/25 |
| CAKES | |||
| Fruit cake | 180-200 | 2 | 40/50 |
| Plain square cake | 180-190 | 2 | 40/45 |
| Brioches | 170-180 | 2 | 40/60 |
| Sponge cake | 190-200 | 2 | 25/35 |
| Plain ring cake | 160-180 | 2 | 35/45 |
| Sweet biscuits | 180-200 | 2 | 20/30 |
| Yeast cake | 190-200 | 2 | 30/40 |
| Strudel | 160 | 2 | 25/35 |
| Savoy biscuits | 150-180 | 2 | 50/60 |
| Apple fritters | 180-200 | 2 | 18/25 |
| Biscuits pudding | 170-180 | 2 | 30/40 |
| BAKERY | |||
| 180-200 | 3 | 45 | |
| Bread | 250 | 3 | 10/20 |
| Pizza | 185-195 | 2 | 7 |
| Toast | |||
Important
Insert the foods when the oven is hot.
Grill baking
Cooking with the electric grill is done at 180^ with the door closed. The food to be grilled should be placed on the relative grid preferably in the fourth shelf.
COOKING CHART
Natural convection oven cooking chart (by way of example only)
| DISH | TEMP. C^o | MIN. | |
| MEATS | |||
| Roast beef | 225 | 2/3 | 60/80 |
| Roast ox | 250 | 2/3 | 50/60 |
| Roast veal | 225 | 2/3 | 60/80 |
| Roast lamb | 225 | 2 | 40/50 |
| Rare roast beef | 230 | 2/3 | 50/60 |
| Roast hare | 250 | 2/3 | 40/50 |
| Roast rabbit | 250 | 2 | 40/50 |
| Roast turkey | 250 | 2 | 50/60 |
| Roast goose | 225 | 2/3 | 60/70 |
| Roast duck | 250 | 2/3 | 45/60 |
| Roast chicken | 250 | 2/3 | 40/45 |
| FISH | 200-225 | 1/2 | 15/25 |
| CAKES | |||
| Fruit cake | 225 | 2 | 35/40 |
| Plain square cake | 175-200 | 2 | 50/60 |
| Brioches | 175-200 | 2 | 25/30 |
| Sponge cake | 220-250 | 2 | 20/30 |
| Plain ring cake | 180-200 | 2 | 30/40 |
| Sweet biscuits | 200-220 | 2 | 15/20 |
| Yeast cake | 250 | 2 | 25/35 |
| Strudel | 180 | 2 | 20/30 |
| Savoy biscuits | 180-200 | 2 | 40/50 |
| Apple fritters | 200-220 | 2 | 15/20 |
| Biscuits pudding | 200-220 | 2 | 20/30 |
| BAKERY | |||
| Bread | 220 | 3 | 30 |
| Pizza | 250 | 2 | 15/20 |
| Pizza | 250 | 3 | 10/20 |
| Toast | 250 | 3 | 5 |
Important
Insert the foods when the oven is hot.
Grill baking
Cooking with the electric grill is done at 180^ with the door closed. The food to be grilled should be placed on the relative grid preferably in the fourth shelf.
COOKING CHART
Inside food temperature (°C)
| COKING CHART | Food | Temperature (°C) |
| Beef | ||
| Roastbeef / beef fillet rare medium well done Roast meat | 40-45 50-55 60-65 80-85 | |
| Pork | ||
| Loin Roast / bacon Neck Pork chop Cutlet Marinated cutlet Meat loaf | 65-70 80-85 80-85 75-80 70 65-70 70-75 | |
| Veal | ||
| Roast veal Roast veal with kidney Veal feet | 70-75 75-80 80-85 | |
| Game | ||
| Game meat Back Rare fillet Medium Welldone fillet | 75-80 60-70 40-45 50-55 60-65 | |
| Lamb | 80-85 | |
| Stuffed roasts | 70-75 | |
| Poultry | 85-90 | |
| Fish | 85-90 | |
Remark
Probe must be in the middle of the roast and not close to the bone or to any fat part
INSTALLATION
Instructions for installation

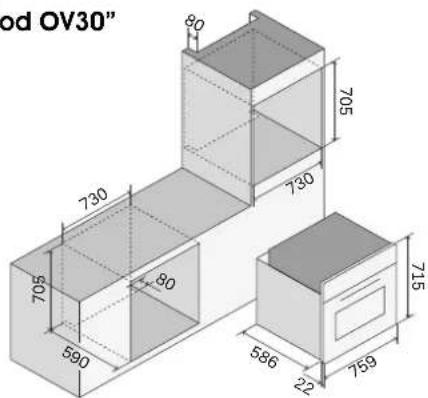
The small plate containing details of the appliance, voltage, consumption, directions for installation including the required aperture is affixed to the flap of the oven door. This plate can be seen when the oven door is open. The appliance must be located in a suitable housing of the correct dimensions (see plate on oven door for details) it is most important the housing is sufficiently rigid and sturdy to adequately carry the weight of the appliance. Care must be taken to ensure all material, coatings and glue can withstand temperatures of at least 150°C, without distortion or melting. Screws and all fittings to complete the in stallation are included. The following illustrations show how to install the oven.
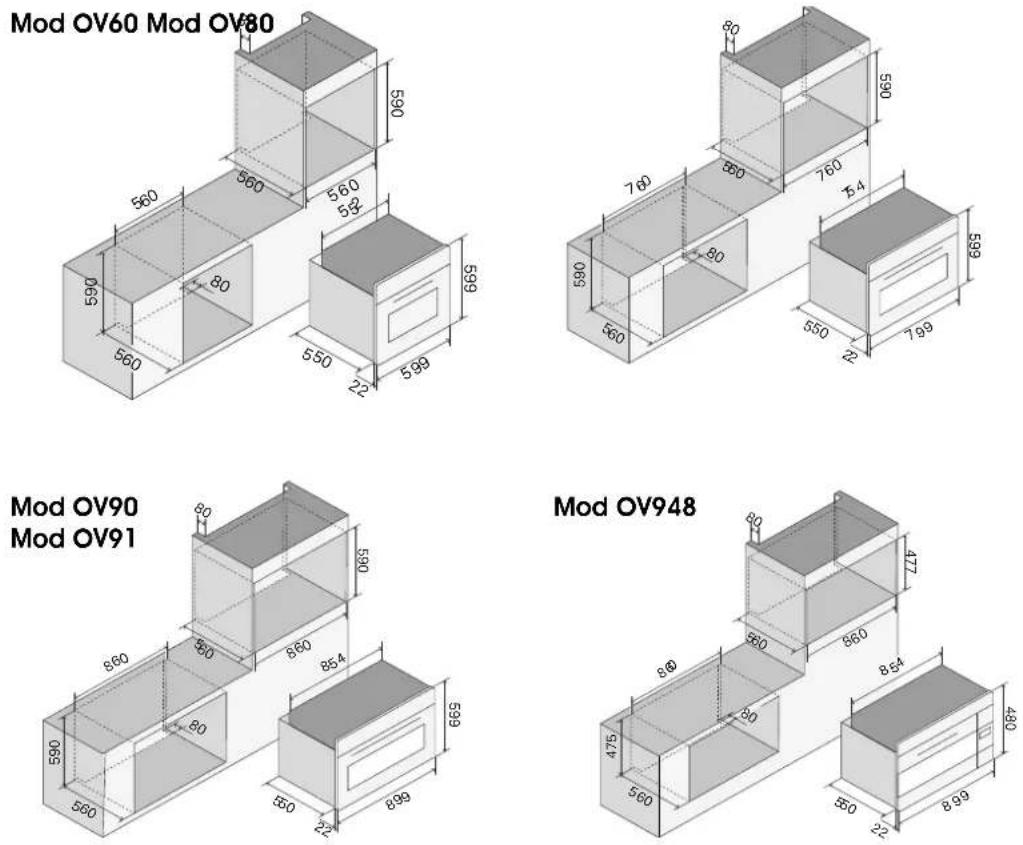
Mod OV30"
Mod OV70
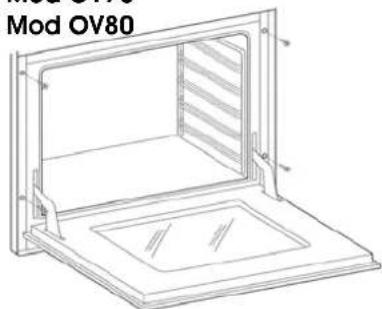
Mod OV80
natural_image
Technical line drawing of a microwave oven (OV80) showing internal structure and mounting base (no text or symbols)Mod OV90Mod OV60 -
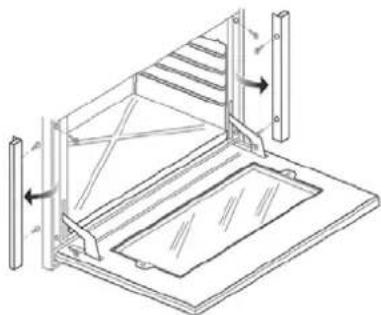
natural_image
Technical line drawing of a mechanical assembly with stairs and supports (no text or symbols)INSTALLATION
Electrical connection

The instructions below are intended for the skilled technician who will install the cooker, regulate it and perform technical maintenance and who will ensure that these operations are carried out in the most correct way possible, in compliance with the regulations in force.
Important: the cooker must be disconnected from the electric socket before performing all regulating or maintenance operations.
Installation rules
This appliance complies with the following directives
DIRECTIVE 2002/96/CE
LOW TENSION DIRECTIVE 2014/35/EU
ELECTROMAGNETIC COMPATIBILITY DIRECTIVE 2014/30/EU
REGULATION No. 1935/2004 (contact with foods)
The installation must be done in a workmanlike manner and in full compliance with the regulations in force concerning electrical installation. Otherwise the manufacturer declines all responsibility. In this booklet you will also find the wiring diagram of your appliance. The appliances are designed to be connected to the voltage shown on the data plate.
Before connecting the appliance to the mains, make sure that:
- The characteristics of the electromagnetic switch or of the socket can withstand the load of the equipment (see data on the plate);
- The power supply system must have an effective earth connection.
The appliance is supplied with a cable without plug: the connection must be made taking into account that the yellow-green cable is the earth conductor and must never be interrupted.
The socket must be visible and reachable so that you can easily disconnect the appliance.
For direct connection to the network, it is necessary that:
- The limiting valve and the domestic system can bear the load of the equipment (see serial number plate);
- The power supply system is equipped with an effective ground connection;
- The socket or omnipolar switch, with a minimum opening of 3 mm, is easily accessible once the appliance has been installed;
- A landline disconnect switch is incorporated in accordance with the installation rules.
The yellow-green earth conductor must never be interrupted even by the switch. The power supply cable must be positioned so that it does not come into contact with surfaces that have a temperature higher than 50^ C above the environment. If it is necessary to replace the power supply cable, contact the assistance service.
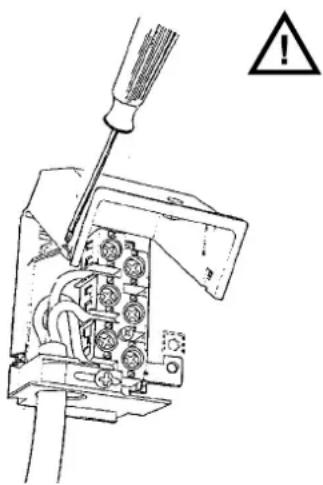
natural_image
Technical diagram of a screwdriver inserted into an electrical socket with warning symbol (no text or labels)INSTALLATION
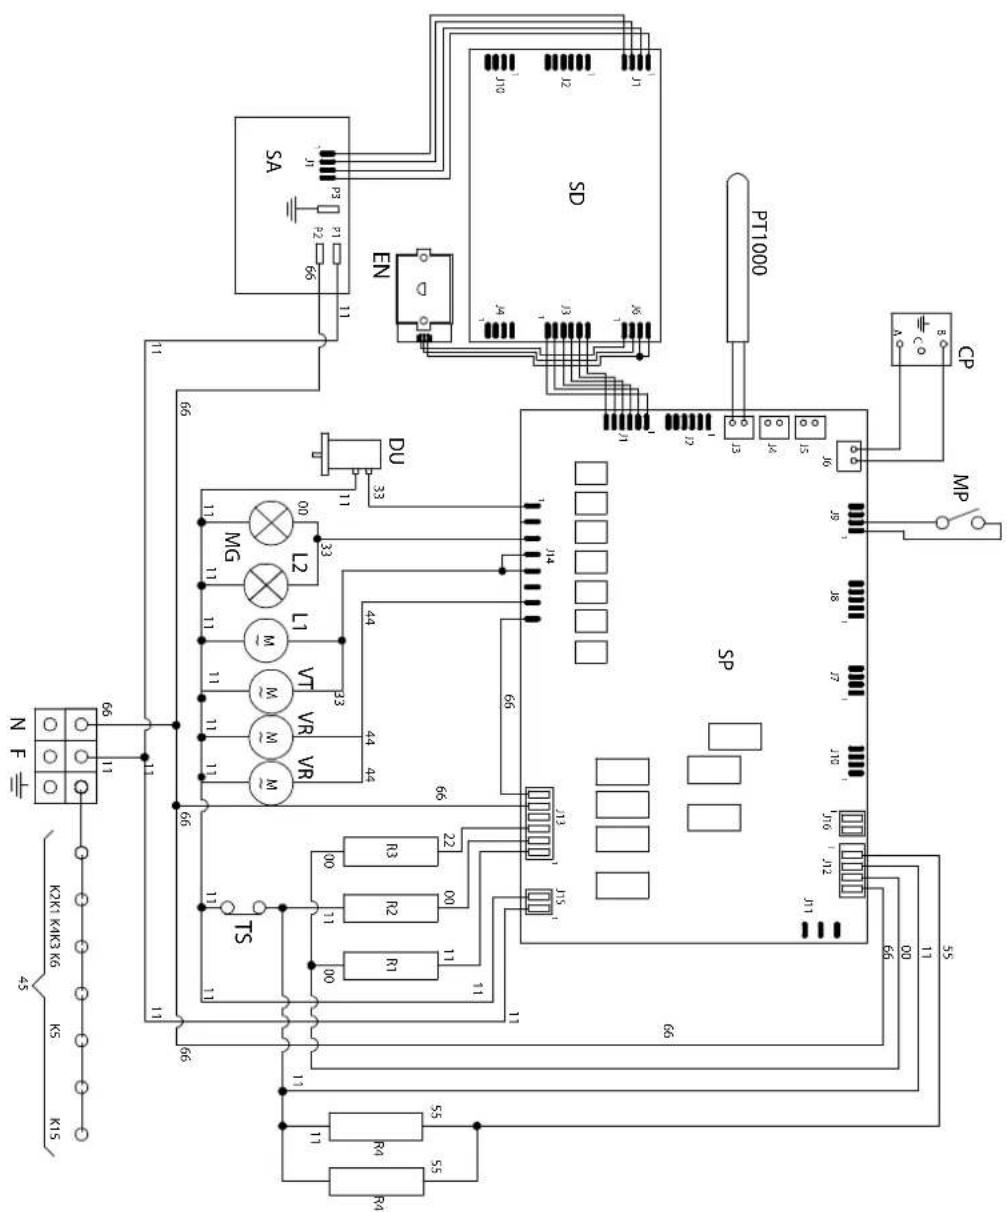
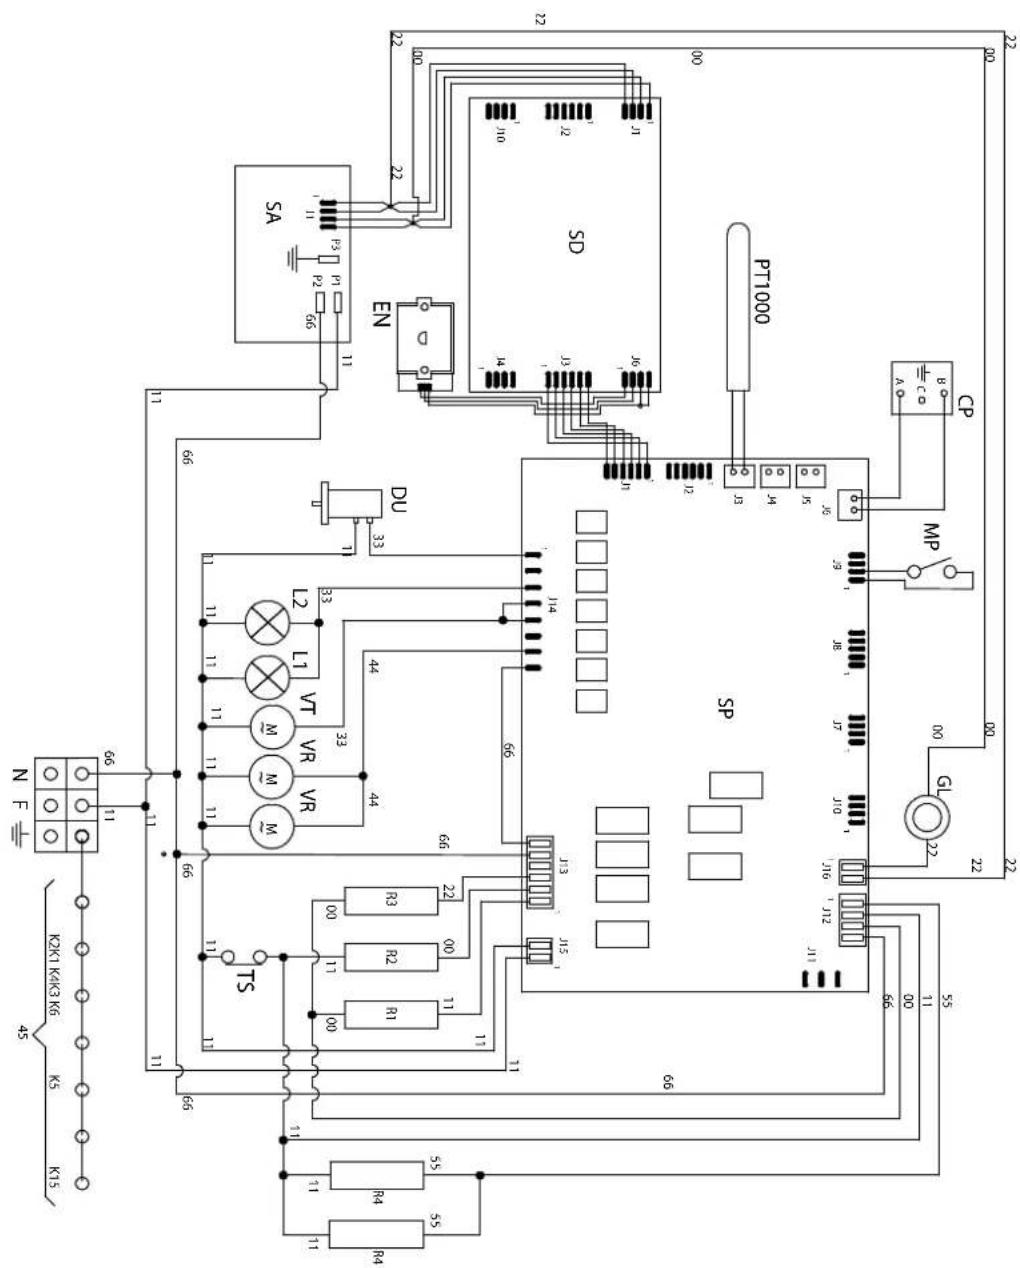
Wiring diagrams
Absorption (kW)
| Model | kW(230V) | Resistance | |||
| Suola (kW) | Cielo (kW) | Grill (kW) | Circolare (kW) | ||
| OV60 | 2,45 | 1,1 | 1 | 2,1 | 2,1 |
| OV80 - OV948OV90 | 2,75 | 1,35 | 1,2 | 2,15 | 2,1 |
| OV30 | 3,1 | 1,6 | 1,2 | 3,0 | 2x1,05 |
| OV91 | 2,95 | 1,6 | 1,2 | 2,15 | 2,1 |
| with Quickstart | -- | -- | -- | -- | |
| OV60 | 3,2 | 1,1 | 1 | 2-1 | 2,1 |
| OV80 - OV948OV90 | 3,40 | 1,35 | 1,2 | 2,15 | 2,1 |
| OV30 | 3,40 | 1,6 | 1,2 | 3,0 | 2x1,05 |
| OV91 | 3,4 | 1,6 | 1,2 | 2,15 | 2,1 |
Key
| 00 | Black | M Terminal block |
| 11 | Brown | MG Roaster |
| 22 | Red | MP Door microswitch |
| 33 | White | N Neutral |
| 44 | Yellow | NTC Temperature probe |
| 45 | Yellow-Green | P Timer/Programmer |
| 55 | Grey | P Timer/Clock |
| 66 | Blue | R1 Upper resistance |
| C | Commutator | R2 Lower resistance |
| CP | Cooking probe | R3 Grill resistance |
| DU | Wax thermal actuator | R4 Circulating resistance |
| discharging steam | S1 Oven warning light | |
| EF | Functions encoder | S2 Mains warning light |
| ET | Thermostat encoder | SD Display board |
| F | Phase | SE Selector |
| FLC | Filter | SP Power board |
| K1 | Earth wire terminal block | SS Probe board |
| K2 | “ “ Lower resistance | T Grill thermostat |
| K3 | “ “ oven fan | TF Oven thermostat |
| K4 | “ “ circulating resistance | TS Safety thermostat |
| K5 | “ “ upper resistance | TT Bypass thermostat |
| K6 | “ “ oven light 1 | TST Safety cooling fan thermostat |
| K7 | “ “ oven light 2 | V Oven fan |
| K8 | “ “ roaster | VT Cooler fan |
| K9 | “ “ cooling fan | SA Power supply board |
| K11 | “ “ oven thermostat | GL LED ring |
| K12 | “ “ programmer/timer | PT1000 Temperature probe PT1000 |
| K15 | “ “ frame |
L1 Oven light
L2 Oven light
INSTALLATION
Wiring diagrams
Quick Start
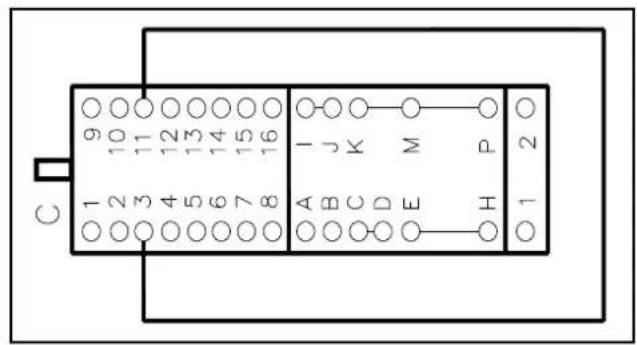
OV 60...M3
OV 80...M3
OV 90...M3
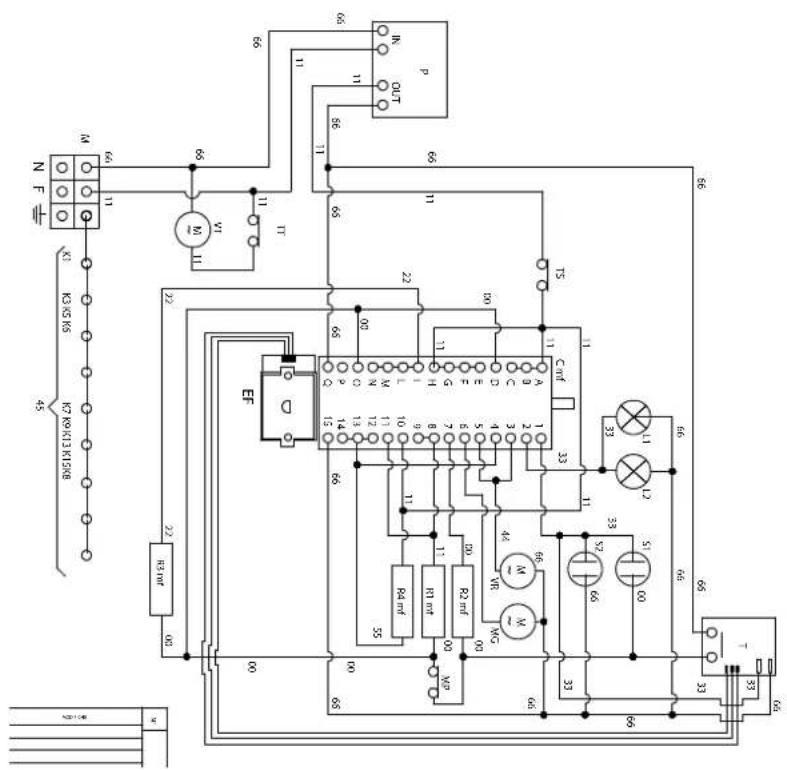
OV 30 ST3
INSTALLATION
Wiring diagrams
OV 30 STCT3
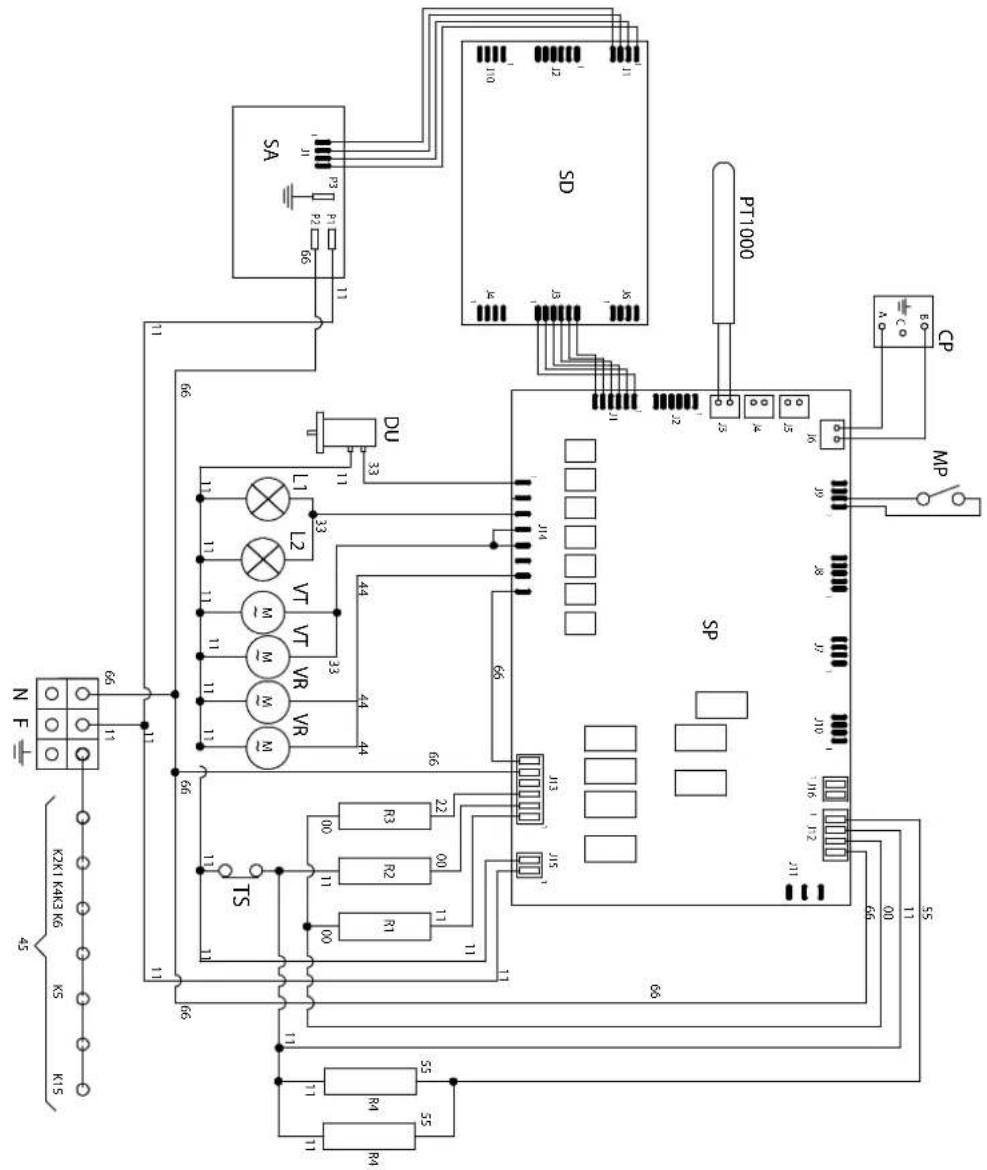
OV 60 ST3
OV 80 ST3
OV 90 ST3
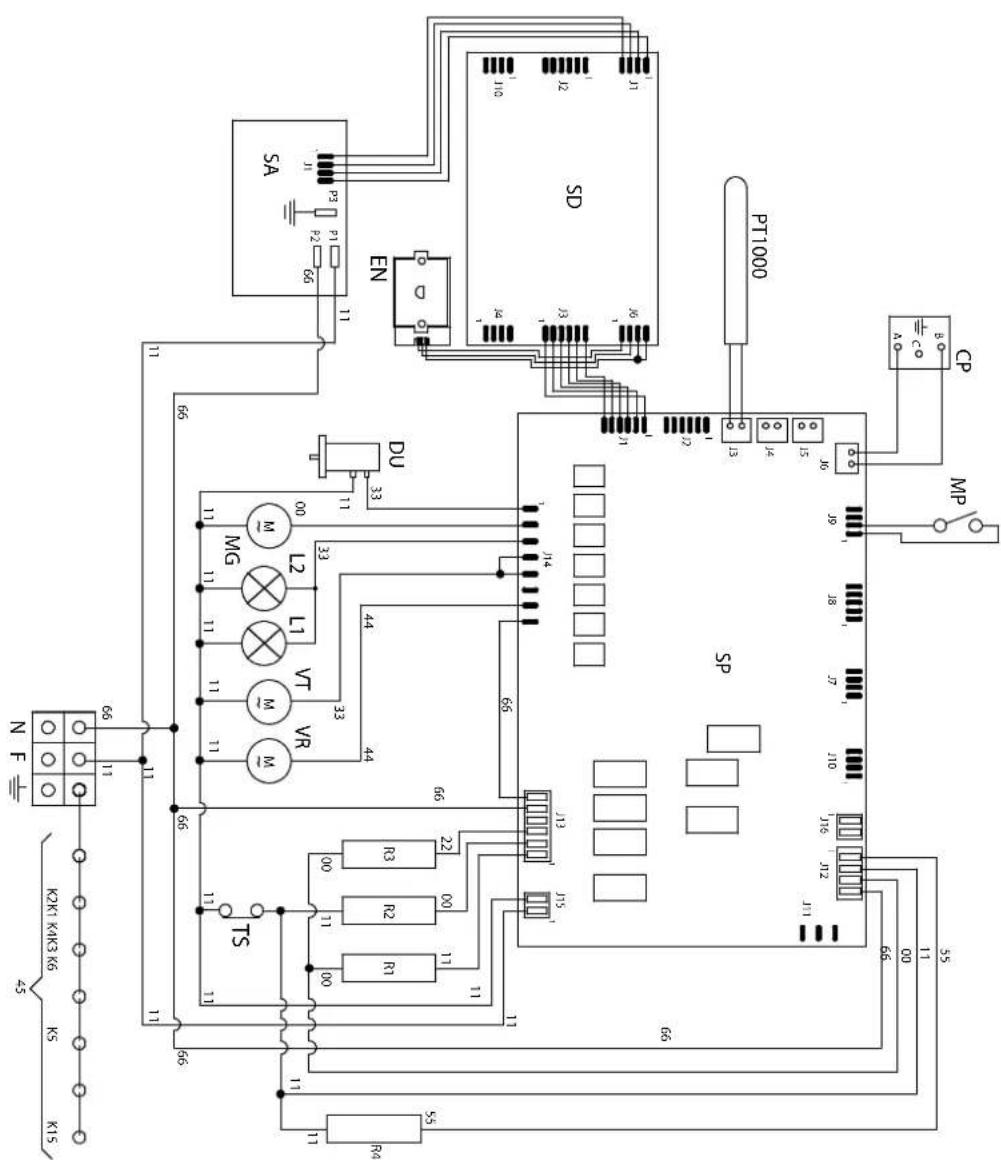
INSTALLATION
Wiring diagrams
OV 60 STCT3
OV 80 STCT3
OV 90 STCT3
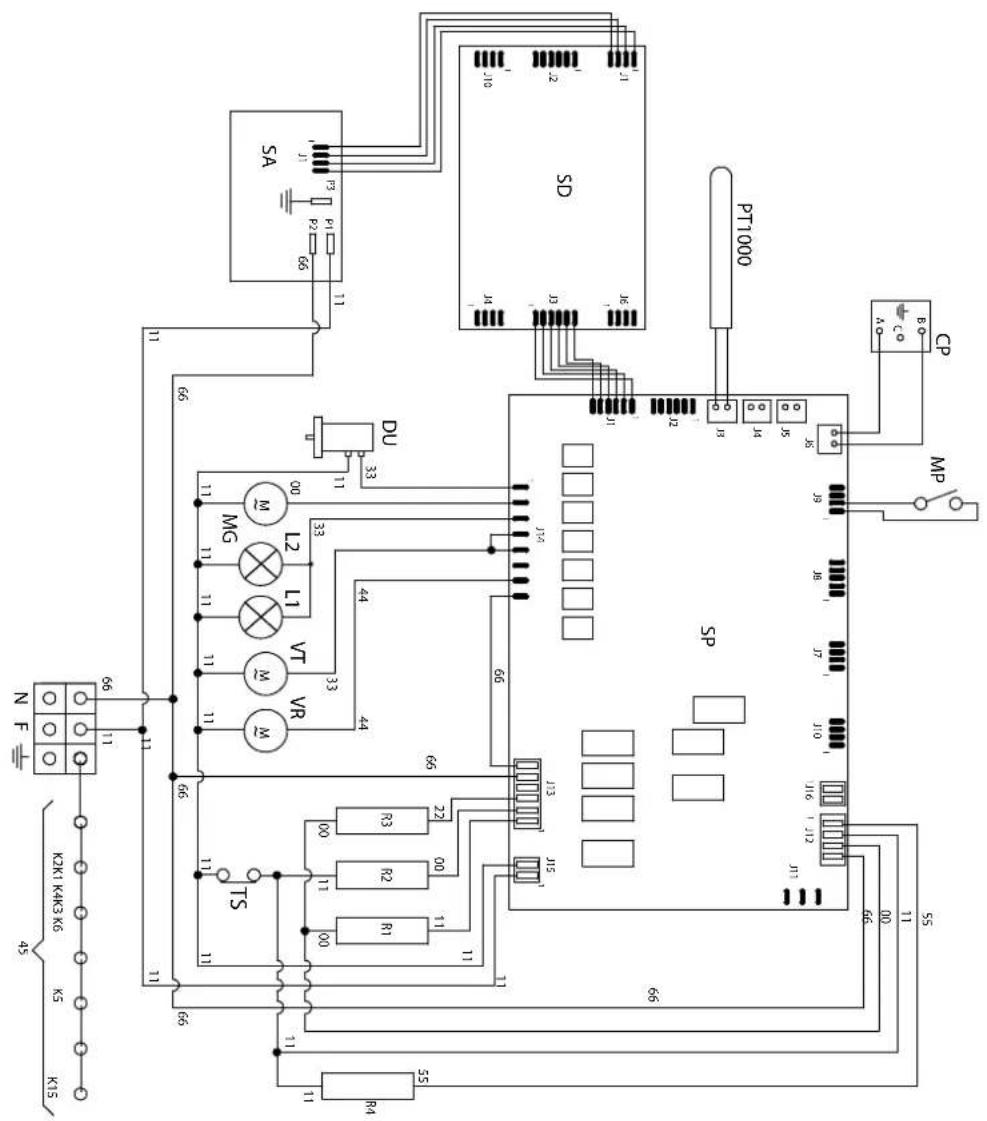
OV 30 PMT3
- BUILT-IN ELECTRIC OVENS
- INDEX
- IMPORTANT SAFETY WARNINGS
- ISTRUZIONI PER L'USO
- CLEANING AND MAINTENANCE
- PROBLEM SOLVING
- COOKING CHART
- INSTALLATION
- Appliances' data
- CAUTION
- These warnings are valid for the countries mentioned in the plate.
- IMPORTANT SAFETY WARNINGS
- First start-up
- INSTRUCTIONS FOR USE
- MP/M3 models
- Pos.
- Symbol Function
- Pizza cooking
- Normal static cooking
- Cooking from underneath
- Cooking from above
- Eco cooking (M3)
- Closed door grill cooking
- Fan grill cooking
- Intensive cooking
- Multiple fan cooking
- Quick Start (only available for some models)
- MP/M3 models with 5 key programmer
- E3 models with 5 key programmer
- Display
- Icons
- KONTROL AF DIN MAD
- Cooking inspection
- Dry/moist cooking
- TFT touch display - Icons legend
- TFT touch display - Settings
- T3 static model with TFT touch - Cooking process
- SETTED CAVITY
- PRE-HEATING PHASE
- PRERISCALDO ENDED
- COOKING WITH MEAT PROBE
- T3 static model with TFT touch - Icons
- Pizza function
- Cooking from below
- Grill cooking with closed door
- Ventilated grill cooking
- Multiple ventilated cooking
- Eco cooking
- Thawing
- Quick Start (only available on some models)
- Dry / wet cooking
- Accessories
- CLEANING AND MAINTENANCE
- Removing the oven
- Procedure to follow
- Glass disassembly and cleaning
- Sequence for removal of the door glass
- - Recommendations for cleaning the oven and the front panel
- - Lamp replacement
- PROBLEM SOLVING
- – Guide for the resolution
- ATTENTION:
- - Children Lock
- How to resolve
- How to disable
- How to activate
- - TFT display errors
- System errors
- Description
- Error ID
- INSTALLATION
- Instructions for installation
- Electrical connection
- Installation rules
- Wiring diagrams
Brand : ILVE
Model : OV60SNT3
Category : Oven