
Z3 - Processor CLARION - Free user manual and instructions
Find the device manual for free Z3 CLARION in PDF.


| Product Type | Digital Signal Processor (DSP) |
| Brand | Clarion |
| Model | Z3 |
| Main Unit Dimensions (W x H x D) | 7" x 1-4/9" x 4-7/12" (178 x 36 x 114 mm) |
| Commander Dimensions (W x H x D) | 3-14/15" x 1" x 1-4/5" (100 x 26.9 x 46 mm) |
| Weight (Main Unit) | 0.66 kg |
| Weight (Commander) | 0.385 kg |
| Power Supply Voltage | 10.8–15.6V DC, negative ground |
| Power Consumption | Less than 15 A |
| Signal-to-Noise Ratio | 110 dB (A-Weighted) |
| Distortion | 0.01% |
| Analog Output | 4 Vrms (vol 0 dB) |
| Tweeter Output (Max Power) | 9W (4.5W × 2 Driver) × 2ch |
| Tweeter Output (Rated Power) | 6W (3W × 2 Driver) × 2ch |
| Speaker Impedance | 6 Ω × 2ch |
| Analog Input | RCA input / Power input |
| Audio Sense Levels | Low: RCA 4V / Power 8V; Mid: RCA 2V / Power 4V; High: RCA 1V / Power 2V |
| Digital Coaxial Input | 0.5 Vp-p / 75 Ω |
| Digital Optical Input | Max 96 kHz / 24 bit / PCM |
| Input Sources | Digital optical, digital coaxial, analog, USB |
| USB Compatibility | Smartphone/tablet with USB audio; not for flash drives/SD cards |
| Supported App | Z-tune (iOS/Android) |
| Intelligent Tune Features | Sound Restorer, Virtual Bass, Tone Filter, Reverb Control |
| Equalizer | 9-band graphic EQ (20 Hz – 20 kHz) |
| Time Alignment | Yes, per speaker distance adjustment |
| Crossover | Adjustable frequency, slope, gain per speaker |
| Custom Memory Presets | 4 (selectable via commander) |
| Commander Controls | Knob and buttons for volume, sound settings, etc. |
| Safety / Compliance | FCC Class B; do not use benzene, thinner, etc. |
Frequently Asked Questions - Z3 CLARION
User questions about Z3 CLARION
0 question about this device. Answer the ones you know or ask your own.
Ask a new question about this device
Download the instructions for your Processor in PDF format for free! Find your manual Z3 - CLARION and take your electronic device back in hand. On this page are published all the documents necessary for the use of your device. Z3 by CLARION.
USER MANUAL Z3 CLARION
Thank you for purchasing this Clarion product.
- Please read this owner's manual in its entirety before operating this device.
• After reading this manual, be sure to keep it in a handy place (e.g., glove compartment). - Check the contents of the enclosed warranty card and keep it carefully with this manual.
Contents
PRECAUTIONS 11
COMMANDER OPERATIONS 12
Sound Settings 13
Other Settings 14
Error Displays 15
Troubleshooting 15
Specifications 15
APPLICATION OPERATIONS 16
Before Operations 16
Sound Settings 17
PRECAUTIONS
WARNING
- For your safety, the driver should not operate the controls while driving.
- Also, while driving, keep the volume to a level at which external sounds can be heard.
The device can set sound effect through the configured commander or download "Z-tune" application to take sound setting through your smartphone or tablet.
This equipment has been tested and found to comply with the limits for a Class B digital device, pursuant to Part 15 of the FCC Rules. These limits are designed to provide reasonable protection against harmful interference in a residential installation. This equipment generates, uses and can radiate radio frequency energy and, if not installed and used in accordance with the instructions, may cause harmful interference to radio communications.
However, there is no guarantee that interference will not occur in a particular installation. If this equipment does cause harmful interference to radio or television reception, which can be determined by turning the equipment off and on, the user is encouraged to try to correct the interference by one or more of the following measures:
- Reorient or relocate the receiving antenna.
- Increase the separation between the equipment and receiver.
- Connect the equipment into an outlet on a circuit different from that to which the receiver is connected.
- Consult the dealer or an experienced radio/TV technician for help.
INFORMATION FOR USERS:
Changes or modifications to this unit not expressly approved by the party responsible for compliance could void the user's authority to operate the equipment.
Do not use benzene or paint thinner, car cleaner, polish spray, or similar fl uids.
- Use of these fluids inside the vehicle will, for example, cause infl ammable gas to ignite and cause fire.
- Also, use of these for daily care of this product will deform material or cause paint to peel off.
About the registered marks, etc.
Made for

iPhone □ iPad
"Made for iPhone" and "Made for iPad" mean that an electronic accessory has been designed to connect specifi cally to iPhone or iPad, respectively, and has been certifi ed by the developer to meet Apple performance standards. Apple is not responsible for the operation of this device or its compliance with safety and regulatory standards. Please note that the use of this accessory with iPhone or iPad may affect wireless performance.
iPhone, iPad and Lightning are trademarks of Apple Inc., registered in the U.S. and other countries. iPad Air and iPad mini are trademarks of Apple Inc.
App Store is a service mark of Apple Inc., registered in the U.S. and other countries.
The trademark "iPhone" is used with a license from Aiphone K.K.
IOS is a trademark or registered trademark of Cisco in the U.S. and other countries and is used under license.
- Google, Android ^TM and GooglePlay ^TM are a trademark or registered trademark of Google Inc.
• Dnote
Trigence Semiconductor's Dnote technology is used for digital signal processing.
Dnote is a registered trademark of Trigence Semiconductor, Inc.
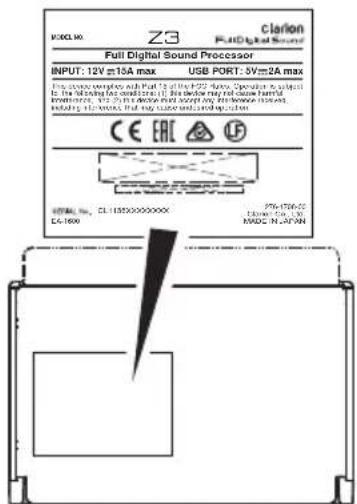
Bottom View of Main Unit
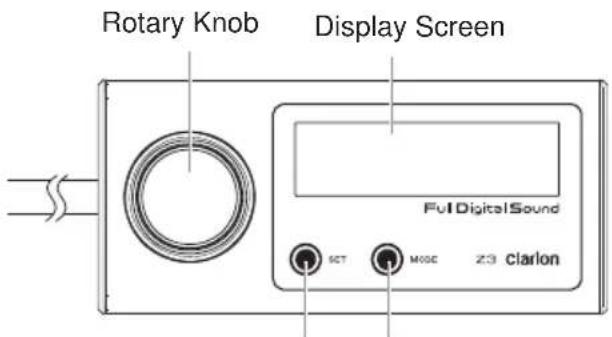
[SET] button [MODE] button
Sound Settings
- Press [MODE] button, and setting item is fl ashing. Then rotate the knob, sound setting is switched according to the following sequences.
Main VOL ⇔ SW VOL ⇔ Memory select * ⇔ Intelligent Tune * ⇔ Intelligent Tune Detail Setting * ⇔ Balance Fader Source ⇔ Audio Sense ⇔ Brightness ⇔ Beep
- Main VOL: Adjust master volume. The master volume of each source is independent of each other.
- SW VOL: Adjust subwoofer volume. The subwoofer volume of each source is independent of each other.
- Memory select: Switch application "Z-tune" saved sound effect Custom Memory (→ Page 17 "Various kinds of settings of Custom Memory")
- Intelligent Tune Detail Setting: Intelligent Tune detailed setting. It can only be displayed when the Intelligent Tune setting is "ON".
- Intelligent Tune: Turn on/off Intelligent Tune sound effect.
• Balance: Adjust volume balance of left and right speakers. - Fader: Adjust volume balance of front and rear speakers.
- Source: Switch the input source of the device.
- Audio Sense: Adjust the input gain of analog input.
- Brightness: Display brightness adjustment.
- Beep: Beep sound ON/OFF.
Note:
* These items will not be displayed when you use "Z-tune" application with connecting your smartphone or tablet.
- Press [SET] button, and then rotate the knob or press [SET] button to adjust the setting value.
Note:
When the setting value is "ON/OFF", please press [SET] button to switch ON/OFF.
- Main VOL: -00 dB \~ -99 dB, 1 dB/step (default: -40 dB)
- SW VOL: -10.0 \~ +10.0, 0.5/1step (default: 00.0)
- Memory select: Custom memory 1 \~ 4 (default: Custom memory 1)
• Intelligent Tune: ON / OFF (default: ON)
- Intelligent Tune Detail Setting: Sound Restorer / Virtual Bass / Tone Filter / Reverb Control (Detailed operation is described in subsequent part additionally)
• Balance: Left 12 \~ Center \~ Right 12 (default: Center)
- Fader: Rear 12 \~ Center \~ Front 12 (default: Center)
- Source: Digital optical / Digital coaxial / Analog / USB (default: Digital optical)
USB: Smartphone or tablet supporting USB audio function. USB fl ash disk and SD card are not supported.
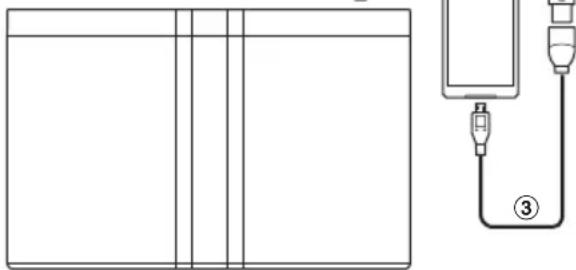
If you want to enjoy the music of Android smartphone or tablet, please connect the smartphone or tablet with the main unit through the USB cables included with this device. (Figure 1)
Note:
Please refer the Clarion website to check the compatible Android smartphone and tablet.
- Audio Sense: Low / Mid / High (default: Low)
Sound Setting
- Brightness: OFF / Level 01 \~ Level 10 (default: Level 05)
- Beep: ON / OFF (default: ON)
① USB cable
(Included with this device)
② USB - micro USB cable (Sold separately)
③ OTG cable (Sold separately)
natural_image
Pure diagram of a device with ports and connecting lines, no text or symbols presentFigure 1
- Press [SET] button to complete setting.
Note:
After completing settings it will be back to "Main VOL" setting automatically if you don't press [MODE] button or rotate the knob. Press [MODE] button to back to previous setting item.
Intelligent Tune Detail Setting
- Press [MODE] button and then rotate the knob to select sound item "Intelligent Tune Detail Setting".
Other Settings
- Press [MODE] button and [SET] button simultaneously, and maintain more than 3s. When the setting item is flashing, rotate the knob to switch setting item.
Initialize Firmware update Navi mix Auto Dimmer Software Ver.
- Initialize: User setting initialization.
- Firmware update: If you want to update the firmware, please consult your dealer.
- Navi mix: When smartphone/tablet and navigation unit are connected simultaneously, you can choose if the navigation guide would be mixed or not.
Note:
The volume of navigation voice can not be adjusted by this unit. The volume of navigation voice depends on which source it outputs from, such as Analog, Coaxial or Optical.
• Auto Dimmer: Automatic dimmer ON/OFF.
- Press [SET] button, and then rotate the knob to switch Intelligent Tune sound according to the following sequences.
Sound Restorer ⇔ Virtual Bass ⇔ Tone Filter ⇔ Reverb Control
• Sound Restorer: Full quality sound reproduction of compressed audio data.
- Virtual Bass: To deliver powerful bass just like an add-on subwoofer.
- Tone Filter: Control the attack sound and the reverberation of sound source (instrument sound etc.).
- Reverb Control: Reproduce the natural reverberation in the car by controlling the reverberation included in the sound source.
-
Press [SET] button, and rotate knob to switch setting value.
-
Sound Restorer / Virtual Bass / Reverb Control: OFF / Low/ Mid / High (default: OFF)
-
Tone Filter: Vivid+2 / Vivid+1 / OFF / Vintage+1 / Vintage+2 (default: OFF)
-
Press [SET] button to complete setting.
Mute
Press the knob to mute ON/OFF.
- Software Ver.: Display the version of software.
- Press [SET] button and rotate the knob or press [SET] button to switch setting value.
Note:
When the setting value is "ON/OFF", please press [SET] button to switch ON/OFF.
- Initialize: Start?/Cancel? Start? - Start initialization. Cancel? - Cancel initialization.
- Firmware update: Start?/Cancel? Start? - Start update. Cancel? - Cancel update.
- Navi mix: ON/OFF (default: ON)
-
Auto Dimmer: ON/OFF (default: ON)
-
Press [SET] button to execute operation.
Error Displays
If an error occurs, one of the following messages is displayed. Take the measures described below to eliminate the problem.
| Error Display Cause Measure | ||
| USB Devicenot responding | USB device cannot be identified. Please | ase unplug the connected device. |
| USB Hubnot supported | This device does not support USB Hub. | |
| USB Devicenot supported | Non-supported device is connected. | |
| USB ErrorCheck port | Over-current protection. Please unplug the connected device and then ACC OFF. | |
If an error display other than the ones described above appears, restart this device. If the problem persists, turn off the power and consult your dealer.
Troubleshooting
| Problem Cause Measure | ||
| Power cannot be turned on. | Fuse is blown. Replace a fuse with the same amperage. If the fuse blows again, consult your dealer. | |
| Incorrect wiring. Consult your dealer. | ||
| Nothing happens when buttons are pressed. Display is not accurate. | Main unit connectors are dirty. | Wipe the dirt off with a soft cloth moistened with cleaning alcohol. |
| No sound heard The speaker | protection circuit is operating. | Turn down sound volume. Function can also be restored by turning the power off and on again. (Speaker volume is reduced automatically when the speaker protection circuit operates). If the sound is muted again, consult our service department. |
Specifications
Tweeter Output:
Maximum Power: 9W (4.5W × 2 Driver) × 2ch
Rated Power: 6W (3W x 2 Driver) x 2ch
Speaker Impedance: 6 Ω x 2ch
Analog Output: 4Vrms (vol 0dB)
Signal to Noise Ratio: 110dB (A-Weighted)
Distortion: 0.01%
Analog Input: RCA input / Power input
Audio Sense:
Low: RCA-in=4Vrms/power-in=8Vrms
Mid: RCA-in=2Vrms/power-in=4Vrms
High: RCA-in=1Vrms/power-in=2Vrms
Digital Coaxial Input: 0.5Vp-p/75Ω
Digital Optical: Max 96kHz/24Bit/PCM
Power Supply Voltage: 10.8\~15.6V DC, negative ground
Power Consumption: Less than 15 A
Weight : 0.66 kg (Main unit)
0.385 kg (Commander)
Dimensions / Main unit:
7" (Width) x 1-4/9" (Height) x 4-7/12" (Depth)
3-14/15" (Width) x 1" (Height) x 1-4/5" (Depth)
100 (W) x 26.9 (H) x 46 (D) mm (Commander)
Note:
Specifications and design are subject to change without notice for further improvement.
APPLICATION OPERATIONS
Adjust the system sound quality through the application. It can be more intuitive and convenient for operations.
Before Operations
- Through personal smartphone or tablet (iOS or Android system), search and install
"Z-tune"

application from the App
Store ^® or the Google Play ^TM .
Note:
Please refer the Clarion website to check the compatible smartphone and tablet.
- After launch "Z-tune" application, please connect the smartphone or tablet installed "Z-tune" application with the main unit through the USB cables included with this device. (Figure 2)
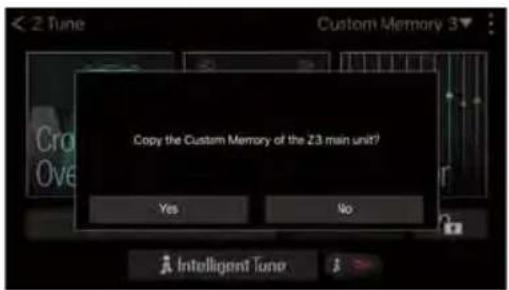
- After the smartphone or tablet is connected with the main unit successfully, following prompt screen will be displayed. If the connection is unsuccessful, please confirm
whether the connection is correct or clear the tasks other than "Z-Tune" on your smartphone or tablet.
Touch "Yes", if you would like to copy the Customer Memory saved in the main unit. The Customer Memory on your application will be replaced.
Touch "No", if you would like to keep the Customer Memory on your application.
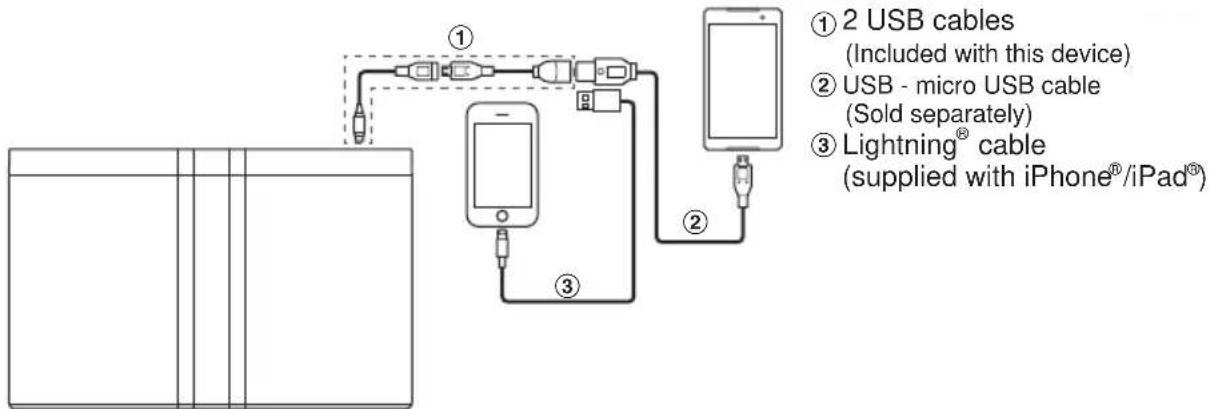
flowchart
graph TD
    A["Device"] -->|① 2 USB cables (Included with this device)| B["USB - micro USB cable (Sold separately)"]
    A -->|② 2 USB cables (Included with this device)| C["Lightning® cable (supplied with iPhone®/iPad®)"]
    A -->|③ Lightning® cable (supplied with iPhone®/iPad®)| D["Smartphone"]
    B -->|④ USB - micro USB cable (Sold separately)| E["Smartphone"]
Figure 2
Sound Settings
- Start "Z-tune" application.
- Enter into precautions prompt screen after initial start-up.
- After reading the precautions carefully, touch OK, and enter into main menu screen of sound settings.
Note:
For the first time to launch application, it will display Speaker Setting. (→ Page 19 "Speaker Setting")
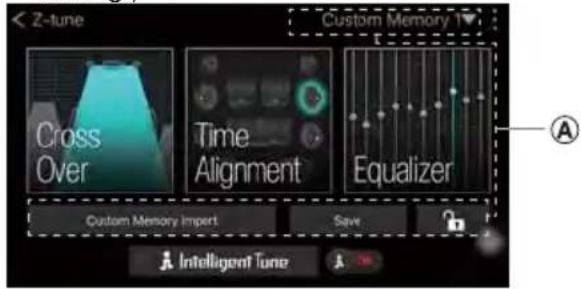
• ZTune-tune" application.
• : Other settings.
- Ⓐ: Various kinds of settings of Custom Memory.
• Cross Over setting.
• Time Alignment setting.
• Equalizer setting.
- on/off Intelligent Tune sound effect. After being turned off, it cannot set Intelligent Tune.
• Intelligent Tune: Intelligent Tune setting.
Various Kinds of Setting of Custom Memory
Save the set sound effect (Cross Over, Time Alignment and Equalizer). Then you can select the sound effect settings through commander. (→ Page 13 setting item "Memory Select").
On the main menu screen, set the Custom Memory through following operation.
- Custom Memory 1 ▼: Select Custom Memory to be saved in pull-down menu.
- Custom Memory import: Import other Custom Memory's sound setting (Cross Over, Time Alignment and Equalizer) into current Custom Memory.
• Save: After all setting items are adjusted,
back to main screen and touch the button to save the settings in currently selected Custom Memory.
Note:
It may need 3s for saving. During the saving period, application cannot be operated. Don't disconnect smartphone or tablet connection and also don't shut off ACC or power. Otherwise, it may cause the set contents are not saved.
- : Lock the currently selected Custom Memory. After being locked, adjustment items (Cross Over, Time Alignment and Equalizer), Custom Memory import and Save function in Custom Memory cannot be applied.
Cross Over Settings
Adjust the frequency and gain of each speaker.
- Touch on the main menu screen and enter into Cross Over setting screen.

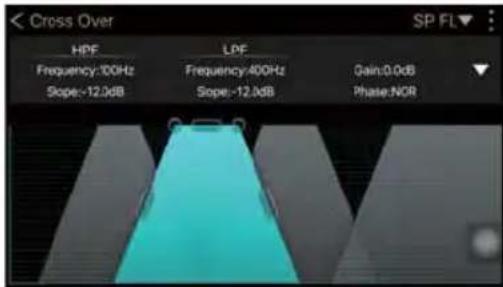
- SPFLV the speaker to be taken Cross Over setting. Or touch other trapezoid to switch to other speakers. 4 graphs mean 4 kinds of speakers.
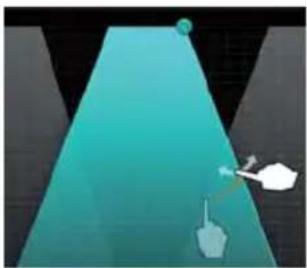
- On the screen, take free adjustment for Cross Over through finger.
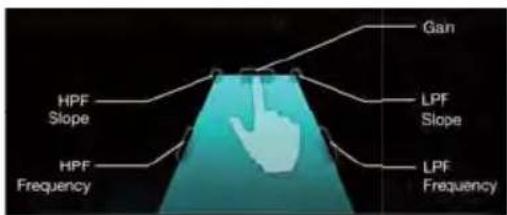
- Frequency adjustment: Click on the point of left or right hypotenuses, and drag two hypotenuses to adjust the frequency according to the arrow direction.
Sound settings

natural_image
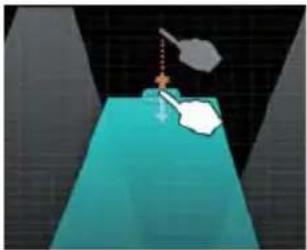
Abstract 3D rendering of a glowing object with a small figure, set against a gradient blue background (no text or symbols)- Slope adjustment: Click on the point of left-up corner or right-up corner, and drag left and right hypotenuses to adjust the slope according to the arrow direction.
natural_image
Abstract 3D rendering of a teal gradient surface with a small white object and a green sphere at the top (no text or symbols)- Gain adjustments: Click on the point on the top, and drag the top side to adjust the gain according to the arrow direction.
natural_image
3D-rendered scene showing a person standing on a teal surface with a small object above, against a dark background (no text or symbols)- Touch ▼ and enter into detailed adjustment screen.
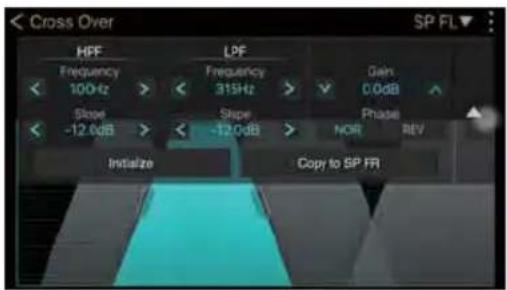
- < > Adjust setting value.
• NOR / REV the phase setting as normal phase or reverse phase.
- Initialize: Reset Cross Over setting (Frequency, Slope, Gain and Phase) to initial values.
Note:
Only the settings of currently selected speaker are reset to initial values.
- Copy to XX XX: Copy current speaker setting value (Gain and Phase) to right or left speaker.
Time Alignment Settings
Set the distance between each speaker and the listening point.
- On the main menu screen, touch Time Alignment, and enter into Time Alignment setting screen.
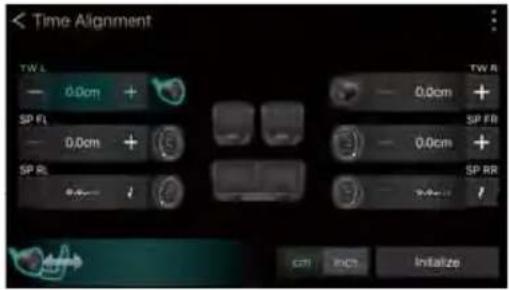
- Decrease or increase the distance of all speakers from the listening point. Continuous touching can take continuous adjustment.
- Dragging adjustment: Touch and select a speaker to be adjusted, and drag the 📁. It can increase or decrease the distance of currently selected speaker from listening point.
- Mute setting: Touch speaker icon to turn ON/OFF each speaker's sound output.
• cm inch : Switch cm/inch.
- Initialize: Reset Time Alignment settings (distance/ mute setting) to initial values.
Note:
Only the settings of currently selected speaker are reset to initial values.
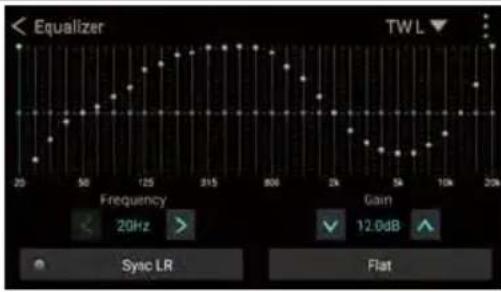
Equalizer Settings
Increase or decrease the gain of frequency band to adjust the sound quality.
- On the main menu screen, touch 📄, and enter into Equalizer setting screen.
Sound settings
line
| Frequency | Gain | | --------- | ---- | | 20 | 12.0 | | 50 | 12.0 | | 125 | 12.0 | | 315 | 12.0 | | 806 | 12.0 | | 2K | 12.0 | | 5K | 12.0 | | 10K | 12.0 | | 20K | 12.0 |• The speaker to be taken Equalizer setting.
- Free adjustment: Draw a line with your finger to adjust the gain.
- Adjust each frequency: Touch one frequency, and drag the slider up and down to adjust the gain.
• / > select frequency. Touch one frequency, and touch the button to select adjustment.
- / / adjust gain. Touch one frequency in selection graph, and touch the button to select frequency.
- Sync LR: Sync the setting value (frequency and gain) to left or right speaker (the object is currently selected speaker).
- Flat: Reset the Equalizer setting to initial values.
- Zoom: Double tap the frequency, and the screen is zoomed-in/out.
Note:
In the zoomed-in screen, it cannot be adjusted by drawing a line. It can be adjusted only by dragging the slider on the selected frequency.
Intelligent Tune Settings
Change various kinds of sound characteristics.
- On the main menu screen, touch Intelligent Tune, and enter into Intelligent Tune setting screen.
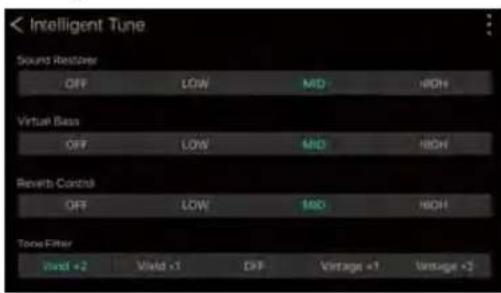
- Choose the items on the menu to change the settings.
Other Settings
- Touch the top right of any screen, and display the pull-down menu.
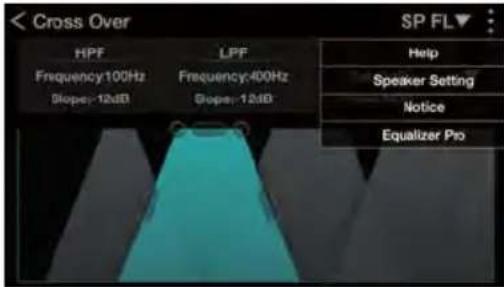
Sound settings
Flat Equalizer Value Settings
1. Select "Equalizer Pro" in pull-down menu of "Other Setting" and enter into initial value setting screen.  See "Equalizer settings" (Page 18) for detailed operation. 2. After the setting is completed, touch Save and select "Yes" to save the settings. The main unit will automatically restart after saving.- Contents
- PRECAUTIONS
- WARNING
- INFORMATION FOR USERS:
- About the registered marks, etc.
- • Dnote
- Sound Settings
- Note:
- Sound Setting
- Intelligent Tune Detail Setting
- Other Settings
- Sound Restorer ⇔ Virtual Bass ⇔ Tone Filter ⇔ Reverb Control
- Mute
- Error Displays
- Troubleshooting
- Specifications
- APPLICATION OPERATIONS
- Before Operations
- Various Kinds of Setting of Custom Memory
- Cross Over Settings
- Time Alignment Settings
- Equalizer Settings
- Intelligent Tune Settings
- Notes:
- Speaker Setting
- Flat Equalizer Value Settings
Brand : CLARION
Model : Z3
Category : Processor