
ReadySHARE Printer - Print Server NETGEAR - Free user manual and instructions
Find the device manual for free ReadySHARE Printer NETGEAR in PDF.


| Product Type | Print Server |
| Brand | NETGEAR |
| Model | ReadySHARE Printer |
| Dimensions (approx.) | 150 x 100 x 30 mm |
| Weight (approx.) | 200 g |
| Power Supply | 5V DC via USB or AC adapter |
| Network Interface | Ethernet 10/100, Wi-Fi 802.11 b/g/n |
| USB Ports | 1 USB 2.0 for printer connection |
| Supported Printers | Most USB printers (check compatibility list) |
| Supported Protocols | TCP/IP, IPP, SMB, LPR |
| Operating Systems | Windows, macOS, Linux, iOS, Android |
| Main Functions | Network printer sharing, mobile printing via app, automatic printer detection |
| Maintenance | Regular firmware updates, keep vents clean, avoid direct sunlight |
| Safety Precautions | Use only supplied power adapter, avoid liquids and heat sources |
| Spare Parts & Repairability | No user-serviceable parts; contact NETGEAR support |
| General Information | Warranty: 1 year; made in China; compliant with FCC, CE, RoHS |
Frequently Asked Questions - ReadySHARE Printer NETGEAR
User questions about ReadySHARE Printer NETGEAR
0 question about this device. Answer the ones you know or ask your own.
Ask a new question about this device
Download the instructions for your Print Server in PDF format for free! Find your manual ReadySHARE Printer - NETGEAR and take your electronic device back in hand. On this page are published all the documents necessary for the use of your device. ReadySHARE Printer by NETGEAR.
USER MANUAL ReadySHARE Printer NETGEAR
natural_image
Abstract geometric composition with overlapping colored triangles (no text or symbols)ReadySHARE Printer
Support
Thank you for purchasing this NETGEAR product. You can visit www.netgear.com/support to register your product, get help, access the latest downloads and user manuals, and join our community. We recommend that you use only official NETGEAR support resources.
Conformity
For the current EU Declaration of Conformity, visit http://kb.netgear.com/app/answers/detail/a_id/11621.
Compliance
For regulatory compliance information, visit http://www.netgear.com/about/regulatory.
See the regulatory compliance document before connecting the power supply.
Trademarks
© NETGEAR, Inc., NETGEAR and the NETGEAR Logo are trademarks of NETGEAR, Inc. Any non-NETGEAR trademarks are used for reference purposes only.
Contents
Chapter 1 Set Up ReadSHARE Printer
Supported NETGEAR Routers 5
Install the Printer Driver and Set Up the Printer.... 5
Download and Install the ReadySHARE Printer Utility 5
Chapter 2 Use NETGEAR USB Control Center
Print Using the NETGEAR USB Control Center 9
View or Change the Status of a Printer 10
Use the Scan Feature of a Multifunction USB Printer 11
Change NETGEAR USB Control Center Settings 12
Turn Off Automatic Startup for NETGEAR USB Control Center.....13
Change the Language in NETGEAR USB Control Center 14
Specify the Time-Out for NETGEAR USB Control Center....15
Set Up ReadSHARE Printer
1
The ReadySHARE Printer utility lets you share a USB printer that is connected to a USB port on your router. You can share this USB printer among the Windows and Mac computers on your network.
This chapter contains the following sections:
• Supported NETGEAR Routers
• Install the Printer Driver and Set Up the Printer
- Download and Install the ReadySHARE Printer Utility
For more information about the topics covered in this manual, visit the support website at http://support.netgear.com. For more information about ReadySHARE features, visit www.netgear.com/readyshare.
Supported NETGEAR Routers
To determine if your NETGEAR router supports ReadySHARE Printer, see your router's user manual, which is available at http://downloadcenter.netgear.com.
Install the Printer Driver and Set Up the Printer
Some USB printer manufacturers (for example, HP and Lexmark) request that you do not connect the USB cable until the installation software prompts you to do so.
To install the printer driver and set up the printer:
- Connect your computer to the router's network.
- Install the USB printer driver software on each computer on your network that shares the USB printer.
If you cannot find the printer driver, contact the printer manufacturer to find and download the most recent printer driver software. - Make sure that your computer can connect to the USB printer and print.
- Connect the USB printer to a USB port on the router using the USB printer cable.
Download and Install the ReadySHARE Printer Utility
You must install the ReadySHARE Printer utility on each computer that will share the printer. After you install it, the utility displays as NETGEAR USB Control Center on your computer.
To download and install the ReadySHARE Printer utility:
- Visit http://support.netgear.com/product/ReadySHARE%2bUSB%2bPrinter.
- In the Downloads section, download the ReadySHARE Printer utility for either Windows or Mac computers.
The file downloads to your computer. -
If necessary, unzip the ReadySHARE Printer utility setup file you downloaded.
-
Double-click the ReadySHARE Printer utility setup file that you downloaded.
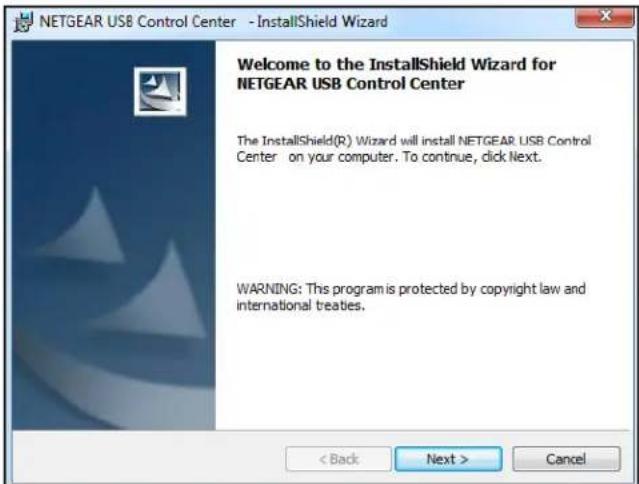
- Follow the wizard instructions to install NETGEAR USB Control Center.
After the InstallShield Wizard completes the installation, the NETGEAR USB Control Center prompts you to select a language:
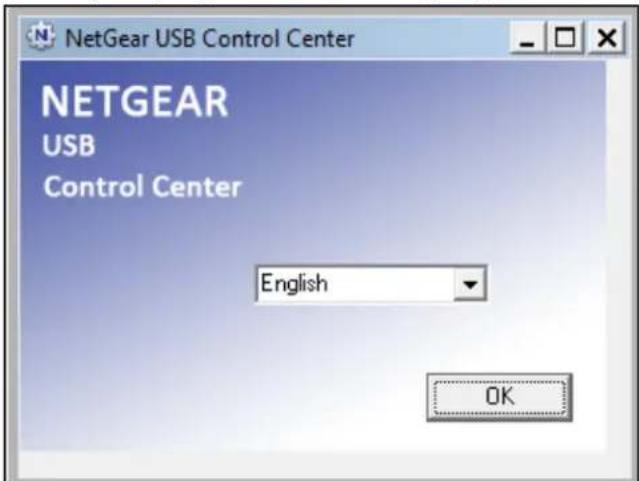
- Select a language from the menu and click the OK button.
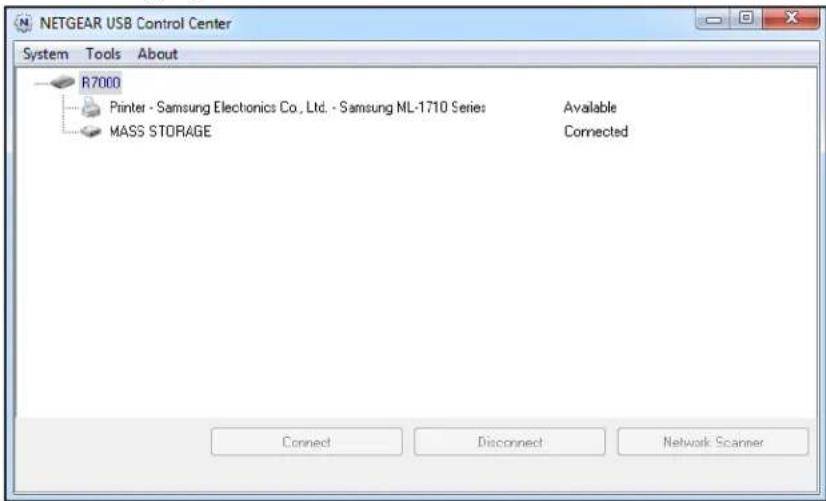
The USB printer connected to the router displays in the NETGEAR USB Control Center window.
Note: Some firewall software, such as Comodo or Norton, blocks NETGEAR USB Control Center from accessing the USB printer. If you do not see the USB printer displayed in the utility, you can disable the firewall temporarily to allow the utility to work.
Use NETGEAR USB Control Center
2
After you install the ReadySHARE Printer utility, the utility displays as NETGEAR USB Control Center on your computer.
This chapter contains the following sections:
• Print Using the NETGEAR USB Control Center
• View or Change the Status of a Printer
- Use the Scan Feature of a Multifunction USB Printer
- Change NETGEAR USB Control Center Settings
Print Using the NETGEAR USB Control Center
For each computer, after you click the Connect and Disconnect buttons once, the utility automatically manages the printing queue and handling. By default, the utility starts automatically whenever you log on to Windows and runs in the background.
To print a document using the NETGEAR USB Control Center:
1. Click the NETGEAR USB Control Center icon

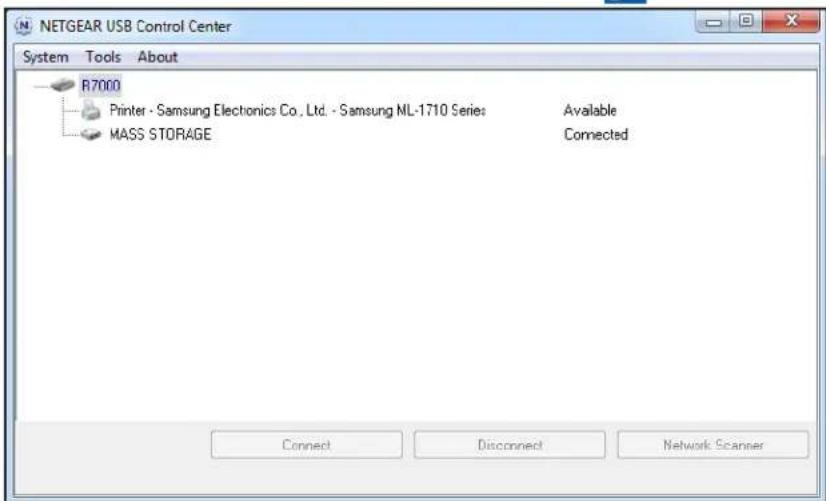
- Select a printer and click the Connect button.
The printer status changes to Manually connected by Mycomputer. Now only the computer you are using can use this printer.
- Use the print feature in your application to print your document.
The NETGEAR USB Control Center automatically connects your computer to the USB printer and prints the document. If another computer is already connected to the printer, your print job goes into a queue to wait to be printed.
- If your document does not print, use the NETGEAR USB Control Center to check the printer status.
For more information, see View or Change the Status of a Printer on page 10.
- To release the printer so that all computers on the network can use it, click the Disconnect button.
The status changes to Available. Now any computers on the network can use the printer.
- To exit the utility, select System > Exit.
View or Change the Status of a Printer
To view or change the status:
1. Click the NETGEAR USB Control Center icon

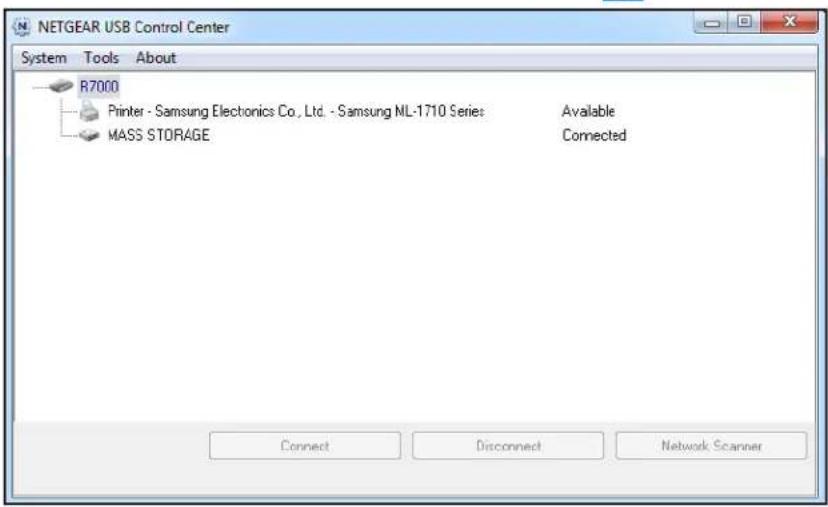
The Status column shows the status for each device:
- A vailable. No print jobs are in progress. You can use the USB printer from any computer in the network.
- Connected. Your computer is connected to the printer and will be released when your print job is done.
• Manually Connected by. Only the connected computer can use the printer. - W aiting to Connect. Your computer is not connected to the shared printer yet.
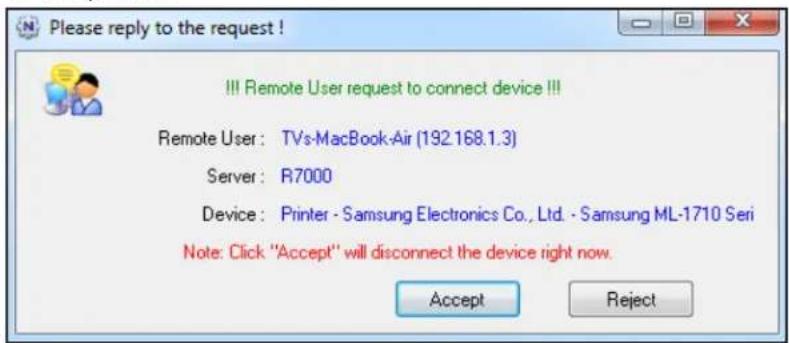
2. To print from your computer when the printer status shows Manually connected by another computer, do the following:
a. Click the Connect button on your computer.
On the other user's computer, a message displays that another user wants to connect to the printer.
ReadySHARE Printer
b. On the other user's computer, click the Accept button.
The printer is released from the connection and the printer status on your computer changes to Available.
- To print from your computer when the status shows Waiting to Connect, do the following:
a. Click the Connect button.
The printer status changes to Manually connected by Mycomputer. Now only your computer can use the printer.
b. To allow the printer to be shared, click the Disconnect button.
The printer is released from the connection and the status changes to Available.
Use the Scan Feature of a Multifunction USB Printer
If your USB printer supports scanning, you can also use the USB printer for scanning.
To use the scan feature of a multifunction USB printer:
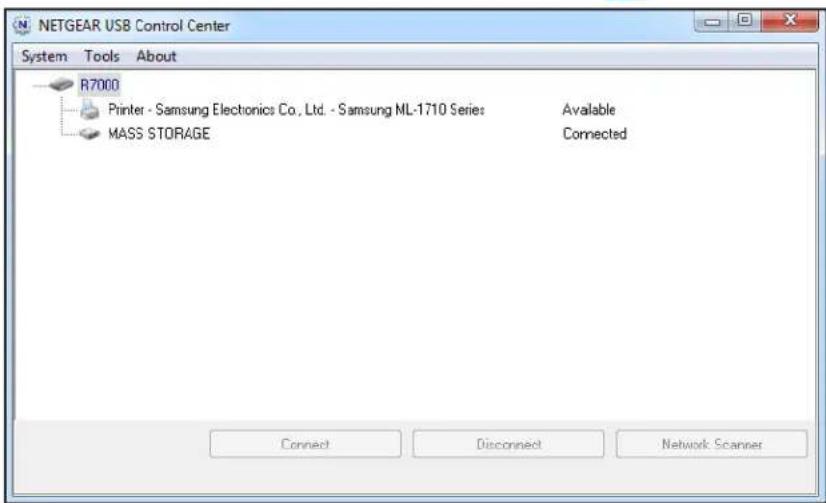
- Click the NETGEAR USB Control Center icon

-
Make sure that the printer status shows as Available.
-
C lick the Network Scanner button.
-
If a Select a Device window displays, select the scanner and click the OK button.
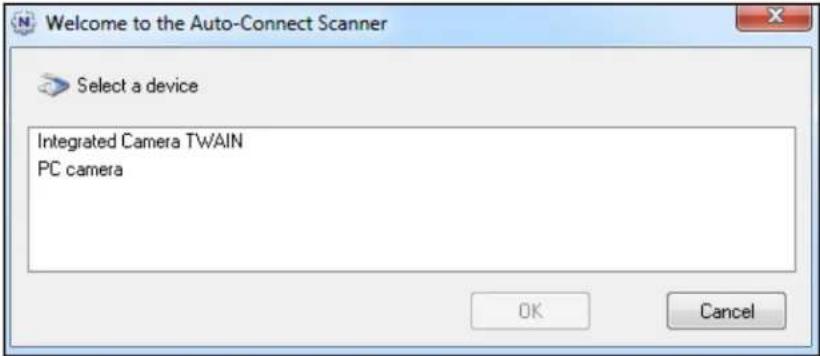
The scanner widow displays so that you can use the USB printer for scanning.
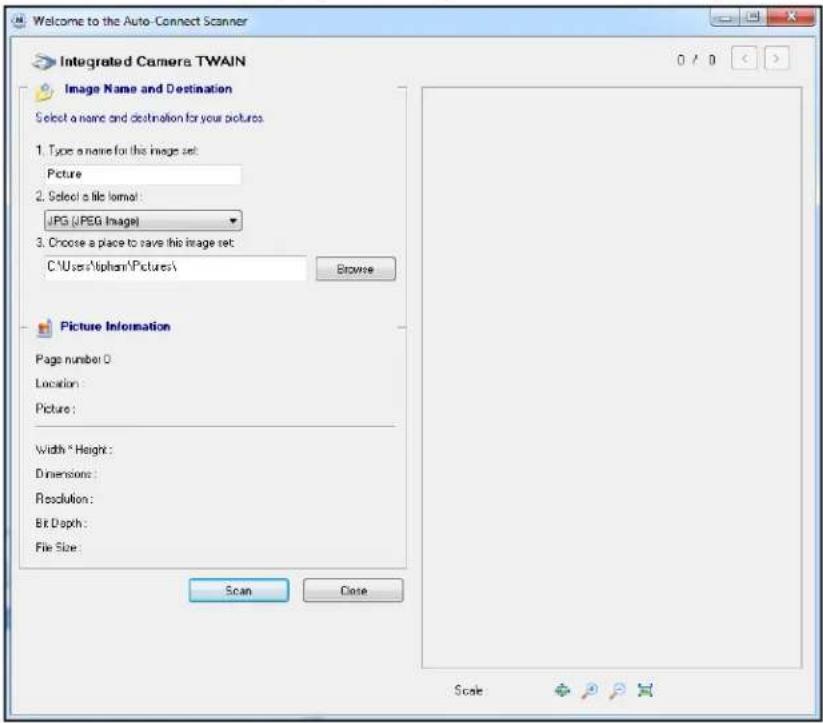
Change NETGEAR USB Control Center Settings
You can stop the NETGEAR USB Control Center from starting automatically when you log in to Windows. You can also change the language and specify the time-out to release the printer connection.
Turn Off Automatic Startup for NETGEAR USB Control Center
You can stop the NETGEAR USB Control Center from starting automatically when you log in to Windows.
To turn off automatic NETGEAR USB Control Center startup:
1. Click the NETGEAR USB Control Center icon

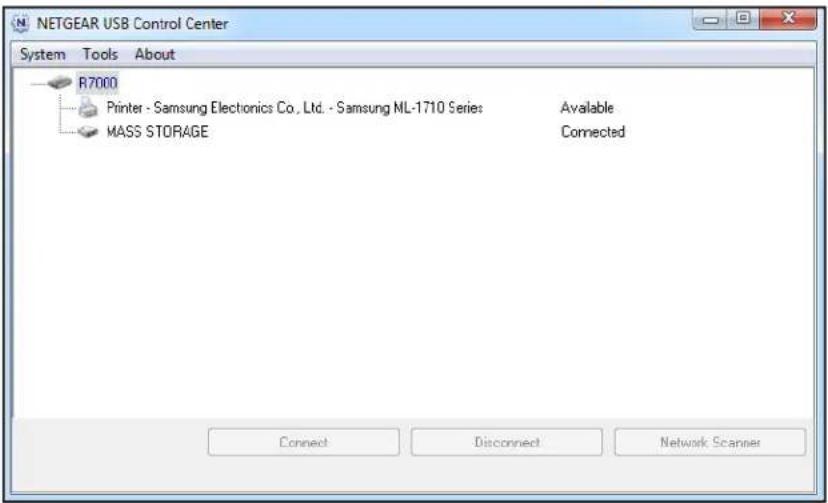
2. Select Tools > Configuration.
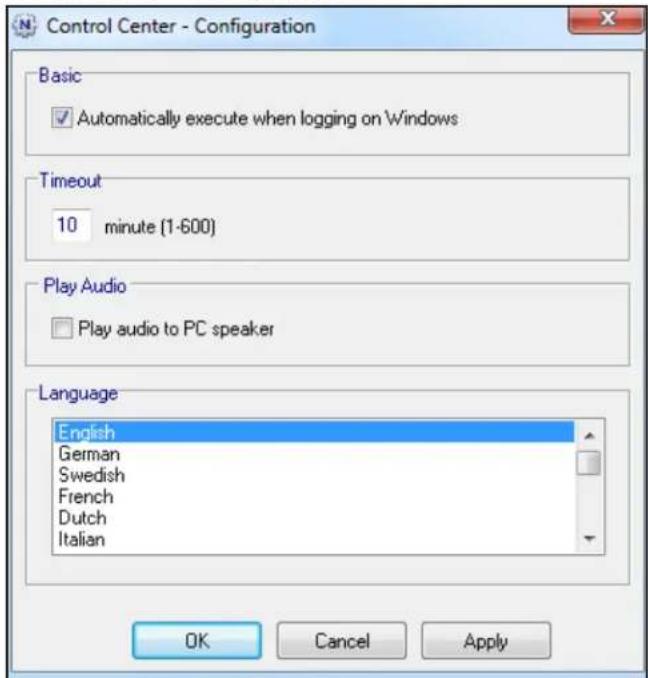
- Clear the Automatically execute when logging on Windows check box.
- Click the OK button.
Your settings are saved.
Change the Language in NETGEAR USB Control Center
To change the language:
1. Click the NETGEAR USB Control Center icon

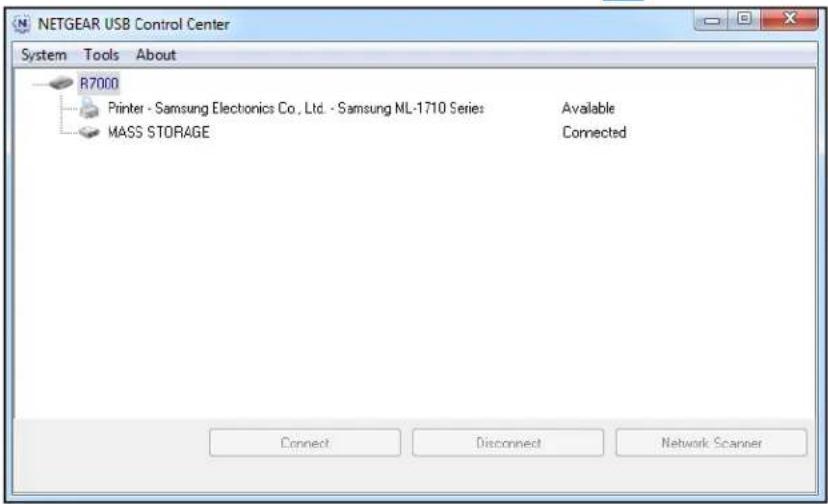
2. Select Tools > Configuration.
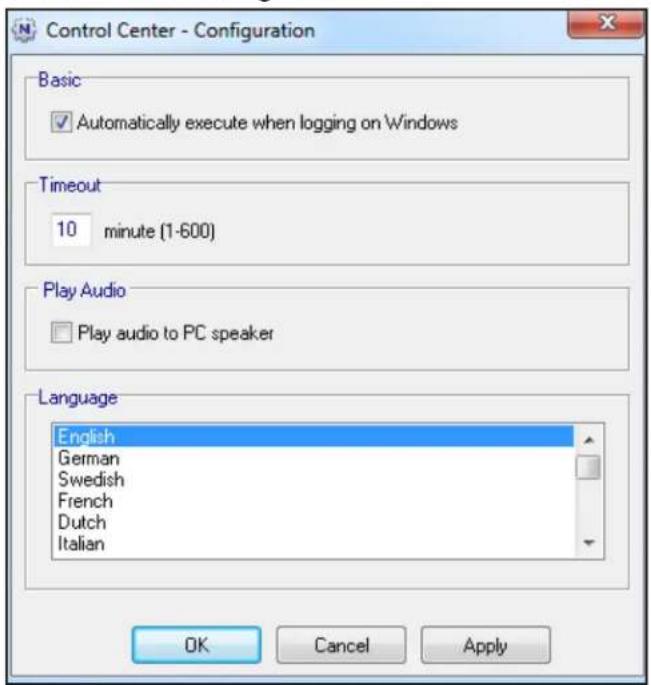
- In the Language menu, select a language.
- Click the OK button.
The next time NETGEAR USB Control Center starts, the language changes.
Specify the Time-Out for NETGEAR USB Control Center
Specify the time-out to release the printer connection.
To specify the time-out:
1. Click the NETGEAR USB Control Center icon

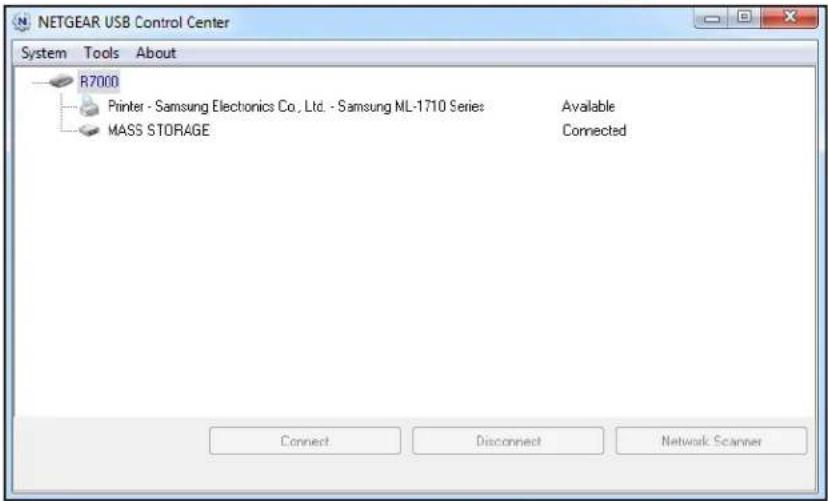
2. Select Tools > Configuration.
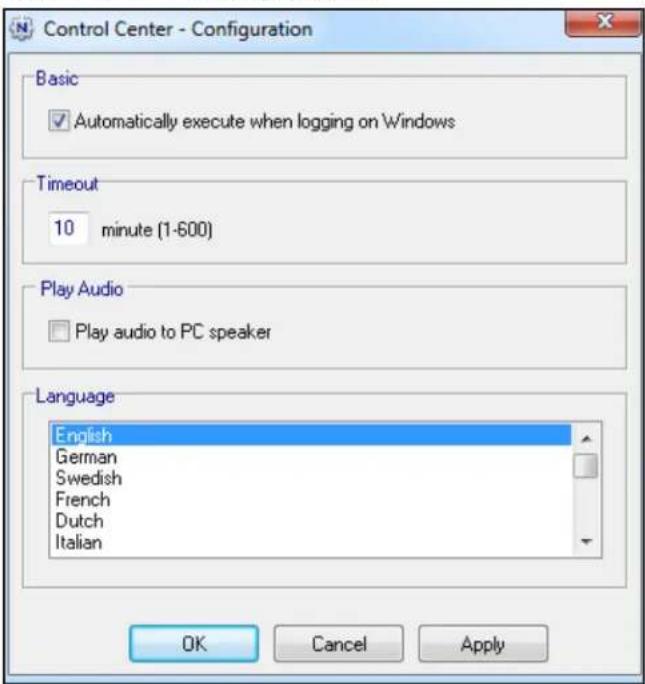
3. In the Timeout field, type the number of minutes.
ReadySHARE Printer
The time-out is the number of minutes that a computer holds its connection to the printer when the connection isn't being used.
- Click the OK button.
Your settings are saved.


- ReadySHARE Printer
- Support
- Conformity
- Compliance
- Trademarks
- Contents
- Chapter 1 Set Up ReadSHARE Printer
- Chapter 2 Use NETGEAR USB Control Center
- Set Up ReadSHARE Printer
- 1
- Supported NETGEAR Routers
- Install the Printer Driver and Set Up the Printer
- To install the printer driver and set up the printer:
- Download and Install the ReadySHARE Printer Utility
- To download and install the ReadySHARE Printer utility:
- Use NETGEAR USB Control Center
- 2
- Print Using the NETGEAR USB Control Center
- To print a document using the NETGEAR USB Control Center:
- Click the NETGEAR USB Control Center icon
- View or Change the Status of a Printer
- To view or change the status:
- To print from your computer when the printer status shows Manually connected by another computer, do the following:
- Use the Scan Feature of a Multifunction USB Printer
- Change NETGEAR USB Control Center Settings
- Turn Off Automatic Startup for NETGEAR USB Control Center
- To turn off automatic NETGEAR USB Control Center startup:
- Select Tools > Configuration.
- Change the Language in NETGEAR USB Control Center
- To change the language:
- Specify the Time-Out for NETGEAR USB Control Center
- To specify the time-out:
- In the Timeout field, type the number of minutes.
Brand : NETGEAR
Model : ReadySHARE Printer
Category : Print Server