CLMF4015K - Lawn mower LawnMaster - Free user manual and instructions
Find the device manual for free CLMF4015K LawnMaster in PDF.


| Product Type | Electric Corded Lawn Mower |
| Brand | LawnMaster |
| Model | CLMF4015K |
| Cutting Width | 15 inches |
| Power Source | 120V AC, 12 Amps |
| Weight | 28 lbs |
| Dimensions (L x W x H) | 30 x 15 x 20 inches |
| Grass Bag Capacity | 1.5 bushels |
| Cutting Height Adjustment | 5 positions, 1-3 inches |
| Deck Material | Steel |
| Wheel Size | 7 inches front / 7 inches rear |
| Safety Features | Blade brake, safety switch |
| Maintenance | Sharpen blade annually; clean deck after use |
| Spare Parts Available | Blade, grass bag, wheel, handle |
| Manual Included | Yes, downloadable PDF |
Frequently Asked Questions - CLMF4015K LawnMaster
User questions about CLMF4015K LawnMaster
0 question about this device. Answer the ones you know or ask your own.
Ask a new question about this device
Download the instructions for your Lawn mower in PDF format for free! Find your manual CLMF4015K - LawnMaster and take your electronic device back in hand. On this page are published all the documents necessary for the use of your device. CLMF4015K by LawnMaster.
USER MANUAL CLMF4015K LawnMaster
Save this manual for future reference
* Maximum initial battery workload voltage (measured without a workload) is 40 volts. Nominal voltage is 36 volts.

natural_image
Line drawing of a lawn mower with extended handle and wheels (no text or symbols)Battery Model Number is 40LB4023-C Charger Model Number is 40LFC17-ETL

Read all safety rules and instructions carefully before operating this tool. Distributed By: Suzhou Cleva Electric Appliance Co., Ltd. NO.8 Ting Rong Street 215122 Suzhou - China
TABLE OF CONTENTS
| Section | Page |
| TABLE OF CONTENTS | 2 |
| SPECIFICATIONS | 3 |
| IMPORTANT SAFETY INSTRUCTIONS | 4-8 |
| SYMBOLS | 9-11 |
| KNOW YOUR LAWN MOWER | 12-13 |
| ASSEMBLY | 14-19 |
| BATTERY PACK AND CHARGER | 20-22 |
| OPERATION | 23-25 |
| MAINTENANCE | 26-30 |
| ENVIRONMENTALLY SAFE BATTERY DISPOSAL | 31 |
| TROUBLESHOOTING | 32-33 |
| LAWNMASTER® WARRANTY | 34 |
| EXPLODED VIEW | 35 |
| PARTS LIST | 36 |
| NOTES | 37-38 |
| Type | Cordless, Battery-powered |
| Motor | Brushless |
| No-load Speed | 3500 RPM |
| Deck Width | 15" |
| Cutting Width | 14.4" |
| Height Adjustments | 6 Positions (1"-3") (25-75 mm) |
| Wheel Size | 5.51 " (140 mm) / 7.87 " (200 mm) |
| Unit Weight (With 4.0Ah Battery) | 25.8 lbs (11.7 kg) |
BATTERY PACK
| Model Number | 40LB4023-C |
| Rated Voltage of Battery | 40 V Max* D.C |
| Capacity of Battery | 4.0 Ah |
| Battery Type | Lithium-Ion |
BATTERY CHARGER
| Model Number | 40LFC17-ETL |
| Charger Input | 120 V ~ 60 Hz 120W |
| Charger Output | 40 V D.C. 2.6A |
| Charging Time | 100 minutes (For 40LB4023-C) |
* Maximum initial battery workload voltage (measured without a workload) is 40 volts. Nominal voltage is 36 volts.
INTRODUCTION
This product has many features for making its use more pleasant and enjoyable.
Safety, performance, and dependability have been given top priority in the design of this product making it easy to maintain and operate.

WARNING
This symbol indicates important safety instructions. If these instructions are not followed, it could endanger the personal safety and/or property of the operator and others. Read and understand all instructions in this manual before attempting to operate the mower. Failure to comply with these instructions may result in personal injury.

DANGER
This mower was built to be operated according to the rules for safe operation that are contained in this manual. As with any type of power equipment, carelessness or error on the part of the operator can result in serious injury. This mower is capable of amputating body parts and throwing objects. Failure to observe the following safety rules could result in serious injury or death.

WARNING
Use of this mower should be restricted to individuals who have read and understood and will follow the warnings and instructions that are printed in this manual and on the mower.
TRAINING AND PREPARATION
- Read the operating and service instruction manual carefully. Be thoroughly familiar with the controls and the proper use of the tool.
■ Avoid operating the lawn mower in a dangerous environment. Do not use the lawn mower in damp or wet conditions or operate in the rain, keep a firm hold on the handle and walk, never run. - Keep children away. All visitors should be kept a safe distance from work area. Stop the equipment if anyone enters the working area.
■ Only allow operators, who are responsible, trained, familiar with the instructions, and physically capable to operate the lawn mower.
■ Never allow children to operate a power mower. - Keep the area of operation clear of all persons, particularly small children, and pets.
- Clear the operating area of any objects which could be thrown by or interfere with operation of the equipment.
■ Do not operate the lawn mower without the collection bag, or other safety devices in place and functioning properly. Check frequently for signs of wear or deterioration and replace as needed.
■ Wear appropriate personal protective equipment such as safety glasses, hearing protection, and footwear.
■ Dress properly. Do not wear loose clothing or jewelry. They can be caught in moving parts. Use of rubber gloves and footwear is recommended when working outdoors.
■ This lawn mower is capable of amputating hands and feet and throwing objects. Failure to observe
all safety instructions could result in serious injury or death.
■ Do not operate the equipment while under the influence of alcohol or drugs.
■ Use lawn mower for the correct purpose. Do not use lawn mower for any job except that for which it is intended.
OPERATION
■ Only operate the equipment in daylight or good artificial light.
■ Extinguish all cigarettes, cigars, pipes and other sources of ignition prior to operating the lawn mower.
■ Avoid holes, ruts, bumps, rocks, or other hidden hazards. Uneven terrain could overturn the machine, or cause operator to lose their balance or footing.
■ Do not put hands or feet near under rotating parts or the lawn mower. Keep clear of the discharge opening at all times.
■ Always wear safety glasses with side shields. Everyday glasses have only impact resistant lenses. They are NOT safety glasses. Following this rule will reduce the risk of eye injury. Use face mask if operation is dusty.
■ Wear safety glasses or goggles that are marked to comply with ANSI Z87.1 standard when operating this product.
■ Do not leave a running lawn mower unattended. Always park on level ground, disengage the attachment, set parking brake, and stop engine.
■ Do not mow in reverse unless absolutely necessary. Always look down and behind before and while backing.
■ Stop the blade(s) when crossing gravel drives, walks, or roads.
■ If the equipment should start to vibrate abnormally, stop the motor and check immediately for the cause. Vibration is generally a warning of trouble.
■ Stop the motor and disconnect the battery whenever leaving the equipment, before cleaning the mower housing, and before making any repairs or inspections.
- Shut the motor off and wait until the blade comes to a complete stop before removing the grass collection bag or before unclogging the chute.
■ Mow across the face of slopes, never up and down. Exercise extreme caution when changing direction on slopes. Do not mow excessively steep slopes.
■ Always keep the equipment in gear when going down slopes. Do not coast downhill.
■ Avoid starting and stopping on slopes. Avoid making sudden changes in speed or direction. Make turns slowly and gradually.
■ Do not wash with a hose; avoid getting water in motor and electrical connections.
■ Tragic accidents can occur if the operator is not alert to the presence of children. Children are often attracted to the machine and the mowing activity. Never assume that children will remain where you last saw them.
- Keep children out of the operating area and under the watchful care of a responsible adult other than the operator.
■ Do not force lawn mower. It will do the job better and safer at the rate for which it was designed.
■ Do not overreach. Keep proper footing and balance at all times.
■ Stay alert. Watch what you are doing. Use common sense. Do not operate lawn mower when you are tired.
■ Avoid mowing wet grass. Poor footing could cause a slip and fall accident.
■ Use extra care while operating the equipment with a grass collection bag or other attachment(s). They can affect the stability of the machine.
■ Thoroughly inspect the area where the equipment is to be used and remove all stones, sticks, wires, bones, and other foreign objects.
■ Never attempt to make a wheel height adjustment while the motor is running.
MAINTENANCE AND STORAGE
■ Use caution when servicing blades. Wrap the blade(s) or wear gloves. Replace damaged blades. Do not repair or alter blade(s).
■ Disconnect lawn mower. Disconnect the battery when not in use, before servicing, when changing accessories such as blades, and the like.
■ Store idle lawn mower indoors. When not in use, lawn mower should be stored in an indoor dry and locked-up place-out of reach of children.
- Maintain lawn mower with care. Keep cutting edges sharp and clean for best and safest performance.
- Check the blade and the engine mounting bolts at frequent intervals for proper tightness.
- Keep all nuts, bolts, and screws tight to be sure the equipment is in safe working condition.
- Check bag frequently for deterioration and wear, and replace worn bags. Check that replacement bags comply with the original manufacturer's recommendations or specifications.
- Replace the blade if it is bent or cracked. An unbalanced blade causes vibration that could damage the motor drive unit or cause personal injury.
■ Clean the blade thoroughly and check its balance by supporting it horizontally on a thin nail through its center hole. The nail should also be in a horizontal position. If either end of the blade rotates downward, shave some metal from the heavy or lower end until the blade is balanced. It is balanced when neither end drops.
■ Follow instructions for lubricating and changing accessories.
- Inspect the lawn mower cord periodically and if damaged, have it repaired by an authorized service facility. Inspect extension cords periodically and replace if damaged. Keep handles dry, clean, and free from oil and grease.
- Keep guards in place and in working order.
- Keep blades sharp.
- Keep hands and feet away from cutting area.
■ Objects struck by the lawn mower blade can cause severe injuries to persons. The lawn should always be carefully examined and cleared of all objects prior to each mowing.
■ If lawn mower strikes a foreign object, follow these steps:
- Stop lawn mower. Release the switch
- disconnect the battery.
- Inspect for damage.
- Repair any damage before restarting and operating the lawn mower.
■ When servicing use only identical replacement parts.
■ Never pull the mower back toward you while you are walking. If you must back the mower away from a wall or an obstruction, first look down and behind in order to avoid tripping, and then follow these steps:
- Step back from the mower in order to fully extend your arms.
- Be sure that you are well balanced.
- Pull the mower back slowly.
BATTERY PACK
■ The battery pack is only compatible with 40LFC17-ETL chargers.
■ Recharge only with the charger specified by the manufacturer and listed in this manual. A charger
that is suitable for one type of battery pack may create a risk of fire when used with another battery pack.
■ Do not charge battery in a damp or wet location. Following this rule will reduce the risk of electric shock.
■ Do not place battery powered lawn mowers or their batteries near fire or heat. This will reduce the risk of explosion and possibly injury.
■ Do not open or mutilate the battery. Released electrolyte is corrosive and may cause damage to the eyes or skin. It may be toxic if swallowed.
■ Do not dispose of battery packs in fire. They will explode or leak and cause injury. Liquid ejected from the battery may cause irritation or burns.
■ Do not crush, drop or damage the battery pack. Do not use a battery pack or charger that has been dropped or received a sharp blow. A damaged battery is subject to explosion. Properly dispose of a dropped or damaged battery immediately.
■ Batteries can explode in the presence of a source of ignition, such as a pilot light. To reduce the risk of serious personal injury, never use any cordless product in the presence of open flame. An exploded battery can propel debris and chemicals. If exposed, flush with water immediately.
■ Under extreme usage or temperature conditions, battery leakage may occur. If liquid comes in contact with your skin, wash immediately with soap and water. If liquid gets into your eyes, flush them with clean water for at least 10 minutes, then seek immediate medical attention. Following this rule will reduce the risk of serious personal injury.
■ When the battery pack is not in use, keep it away from other metal objects, like paper clips, coins, keys, nails, screws, or other small metal objects, that can make a connection from one terminal to another. Shorting the battery terminals together may cause burns or a fire.
- Do not expose a battery pack or lawn mower to fire or excessive temperature. Exposure to fire or temperature above 265°F (130°C) may cause an explosion.
■ Do not modify or attempt to repair the lawn mower or the battery pack (as applicable) except as indicated in the instructions for use and care.
■ Follow all charging instructions and do not charge the battery pack or lawn mower outside of the temperature range specified in the instructions. Charging improperly or at temperatures outside of the specified range may damage the battery and increase the risk of fire.
■ All tool services should be performed by a qualified repair person using only identical replacement parts. This will ensure that the safety of the product is maintained.
BATTERY CHARGER
■ This charger is only compatible with 40LB4023-C lithium-ion batteries.
■ To reduce the risk of injury, charge only the specified lithium-ion rechargeable batteries. Other types of batteries may burst, causing personal injury or damage.
- Keep cord and charger away from heat to prevent damage to housing or internal parts.
■ Do not operate charger with a damaged cord or plug, which could cause shorting and electric shock. If damaged, immediately discontinue use. Replace the charger with the identical unit as listed in the Parts List of this manual.
■ Do not use a charger that has been dropped or received a sharp blow.
■ Do not disassemble charger. Take it to a qualified service center for check or replacement. Incorrect reassembly may result in a risk of electric shock or fire.
■ Do not abuse the charger cord. Never use the cord for carrying, pulling or unplugging.
- Keep cord away from heat, oil, sharp edges or moving parts. Damaged or entangled cords increase the risk of electric shock. If the charger cord is damaged, replace the charger with an identical model as listed in this manual.
■ A charger that is suitable for one type of battery pack may create a risk of fire when used with another battery pack.
■ Charge the battery at the normal charging temperature between 40°F (4°C) and 100°F (38°C).
FCC COMPLIANCE
■ This device complies with Part 15 of the FCC Rules. Operation is subject to the following two conditions:
- This device may not cause harmful interference, and
- This device must accept any interference received, including interference that may cause undesired operation.
■ NOTE: This equipment has been tested and found to comply with the limits for a Class B digital device, pursuant to Part 15 of the FCC Rules. These limits are designed to provide reasonable protection against harmful interference in a residential installation.
■ This equipment generates, uses and can radiate radio frequency energy and, if not installed and used in accordance with the instructions, may cause harmful interference to radio communications. However, there is no guarantee that interference will not occur in a particular installation. If this equipment does cause harmful interference to radio or television reception, which can be determined by turning the equipment off and on, the user is encouraged to try to correct the interference by one or more of the following measures:
- Reorient or relocate the receiving antenna.
- Increase the separation between the equipment and receiver.
- Connect the equipment into an outlet on a circuit different from that of the receiver.
- Consult the dealer or an experienced radio/ TV technician for help.
SAVE THESE INSTRUCTIONS
Refer to them frequently and use them to instruct others who may use this appliance. If you loan someone this appliance, loan them these instructions also.
| Some of the following symbols may be used on this product. Please study them and learn their meaning. Proper interpretation of these symbols will allow you to operate the product better and safer. SYMBOLNAMEDESIGNATION/EXPLANATION | ||
| V Volts | Voltage | |
| --- | Direct Current Type or a characteristic of current | |
| A Amperes | Current | |
| Hz Hertz | Frequency (cycles per second) | |
| W Watts | Power | |
| hrs Hours | Time | |
 | Class II Construction Double-insulated construction | |
 | Safety Alert Precautions that involve your safety | |
 | Read The Operator's Manual | To reduce the risk of injury, user must read and understand Operator's Manual before using this product. |
 | Do not mow up and down slopes! | To avoid the risk of injury do not mow up and down slopes. Always mow across slopes (Angle ≤15°). |
 | Keep all persons and pets at a safe distance from the mower while operating! | To avoid the risk of injury to bystanders keep all persons and pets at a safe distance from the mower while operating. |
 | Keep hands and feet clear of mower deck and discharge opening at all times! | Rotating blades can cause serious injury. Keep hands and feet clear of mower deck and discharge opening at all times. Always be sure blade has stopped after releasing switch lever and unplugging before removing and replacing collection bag, cleaning, servicing, transporting or lifting the mower. |
 | Stay behind the handle when the motor is running! | Objects struck by mower blade can cause serious injury. Stay behind the handle when the moto is running. Always ensure persons and pets are clear of the discharge from the mower while operating. |
 | Wear hearing and eye protection when operating this equipment. | Safety alert precautions that involve your safety. |
| SYMBOLN | NAMEDESIGNATION/EXPLANATION | |
 | Keep hands and feet away | Danger: Keep hands and feet away. |
 | Cutting Width Cutting diameter. | |
 | Lithium-Ion Battery Recycling | Designates that this tool is in compliance with lithium-ion battery recycling program requirements. |
 | Keep Away From Water | Do not dispose of battery packs in rivers or immerse in water. |
 | Keep Away From Fire | Do not dispose of battery packs in explode or leak and cause injury. |
 | Heat Alert | Do not expose battery packs to heat in excess of 60°C (140°F). |
 | Recycle Symbol | This product uses lithium-ion batteries. Local, state or federal laws may prohibit disposal of batteries in ordinary trash. Consult your local waste authority for information regarding available recycling and/or disposal options. |
| The following signal words and meanings are intended to explain the levels of risk associated with this product. SYMBOLSIGNALMEANING | ||
 | DANGER | Indicates an imminently hazardous situation, which, if not avoided, will result in death or serious injury. |
 | WARNING | Indicates a potentially hazardous situation, which, if not avoided, could result in death or serious injury. |
 | CAUTION | Indicates a potentially hazardous situation, which, if not avoided, may result in minor or moderate injury. |
| NOTICE | (Without Safety Alert Symbol) Indicates a situation that may result in property damage. | |
SERVICE
Service requires extreme care and knowledge and should be performed only by a qualified service technician. When servicing, use only identical replacement parts.
For troubleshooting or replacement, please call Customer Service for assistance (Toll free number 866-384-8432).

WARNING
To avoid serious personal injury, do not attempt to use this product until you read thoroughly and understand completely the Operator's Manual.
If you do not understand the warnings and instructions in the Operator's Manual, do not use this product. Call Customer Service for assistance (Toll free number 866-384-8432).

WARNING
The operation of any power tool can result in foreign objects being thrown into your eyes, which can result in severe eye damage. Before beginning power tool operation, always wear safety goggles or safety glasses with side shields and, when needed, a full face shield.

We recommend Wide Vision Safety Mask for use over eyeglasses or standard safety glasses with side shields. Always use eye protection which is marked to comply with ANSI Z87.1.

| Components | 8.Rear Wheel | 16.Safety Switch Button |
| 1.Foam Grip | 9.Deck | 17.Start/Stop Bale |
| 2.Upper Handle | 10.Safety Key (Inside the Battery Pack Compartment) | Switch |
| 3.Locking Knob ( X4) | 18.Battery Pack | |
| 4.Lower Handle | 11.Front Wheel | 19.Battery Charger |
| 5.Grass Collection Bag | 12.Battery Compartment Cover | |
| 6.Support | 13.Carry Handle | |
| 7.Cutting Height | 14.Safety Flap | |
| Adjustment Lever | 15.Cable Clip ( × 2 ) |
NOTE: The above parts and their associated number/letters will be used throughout this manual to identify parts.
KNOW YOUR LAWN MOWER
The safe use of this product requires an understanding of the information on the product and in this Operator's Manual as well as a knowledge of the project you are attempting. Before use of this product, familiarize yourself with all operating features and safety rules.
UNPACKING
This product requires assembly.
■ Carefully remove the product and any accessories from the box. Make sure that all items listed in the packing list are included.
■ Inspect the product carefully to make sure no breakage or damage occurred during shipping.
■ Do not discard the packing material until you have carefully inspected and satisfactorily operated the product.
■ If any parts are damaged or missing, please call Customer Service (Toll free number 866-384-8432).
YOU WILL NEED (ITEMS NOT SUPPLIED)
■ Suitable Personal Protective Equipment
PACKING LIST
(1) Mower
(1) Safety Key (Attached inside the Battery Pack Compartment of Mower)
(1) Grass Collection Bag Assembly (Bag & Metal Frame)
(1) Upper Handle Assembly
(2) Lower Handle Assembly (With two supports pre-installed)
(1) 40V Lithium-ion Battery Charger
(1) 40V 4.0Ah Lithium-ion Battery Pack (Placed inside the rear discharge chute of the mower)
(2) Cable Clips
(4) Locking Knobs
(4) Washers
(2) Bolts
(1) Operator's Manual
NOTE: Remove the battery pack from rear discharge chute of the mower before assembly.
NOTE: The safety key must be installed for mower to operate. The safety key only fits into the switch in one direction.
DO NOT FORCE IT!

WARNING
If any parts are damaged or missing do not operate this product until the parts are replaced. Failure to heed this warning could result in serious personal injury.
Do not attempt to modify this product or create accessories not recommended for use with this product. Any such alteration or modification is misuse and could result in a hazardous condition leading to possible serious personal injury, and will void the warranty.
Do not connect power supply until assembly is complete. Failure to comply could result in accidental starting and possible serious personal injury.
Never operate the mower without the proper safety devices in place and working. Never operate the mower with damaged safety devices. Failure to heed this warning can result in serious personal injury.
ASSEMBLING THE LOWER HANDLE
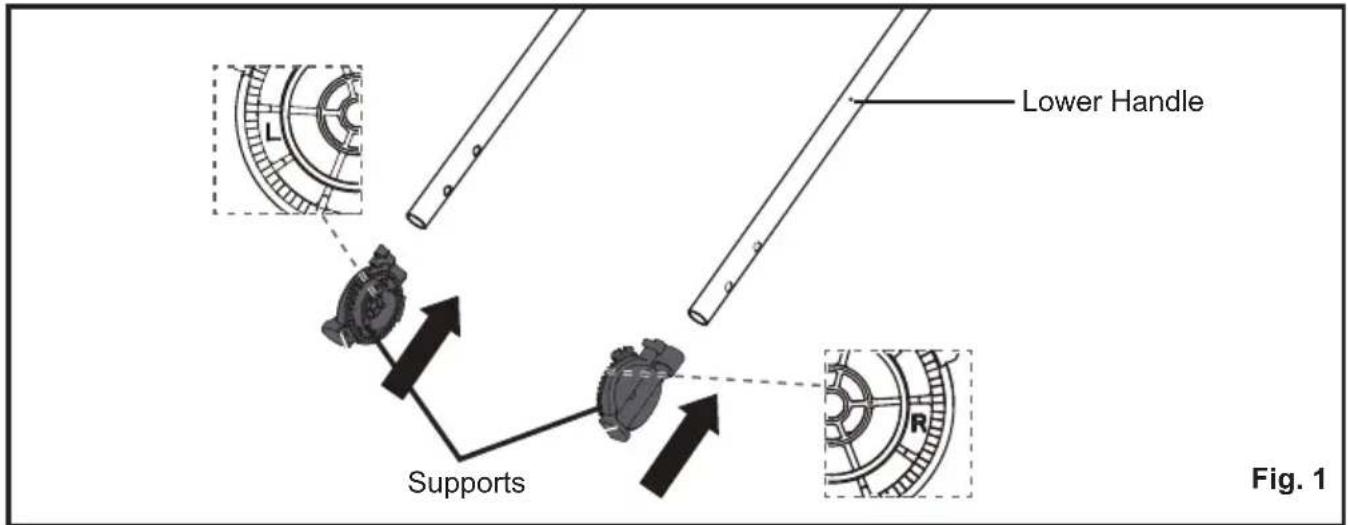
- The supports are pre-installed on the lower handle bar. If not, install the supports onto the lower handle according to the left (L) and right (R) markings (Fig. 1). Make sure the supports are installed into place.
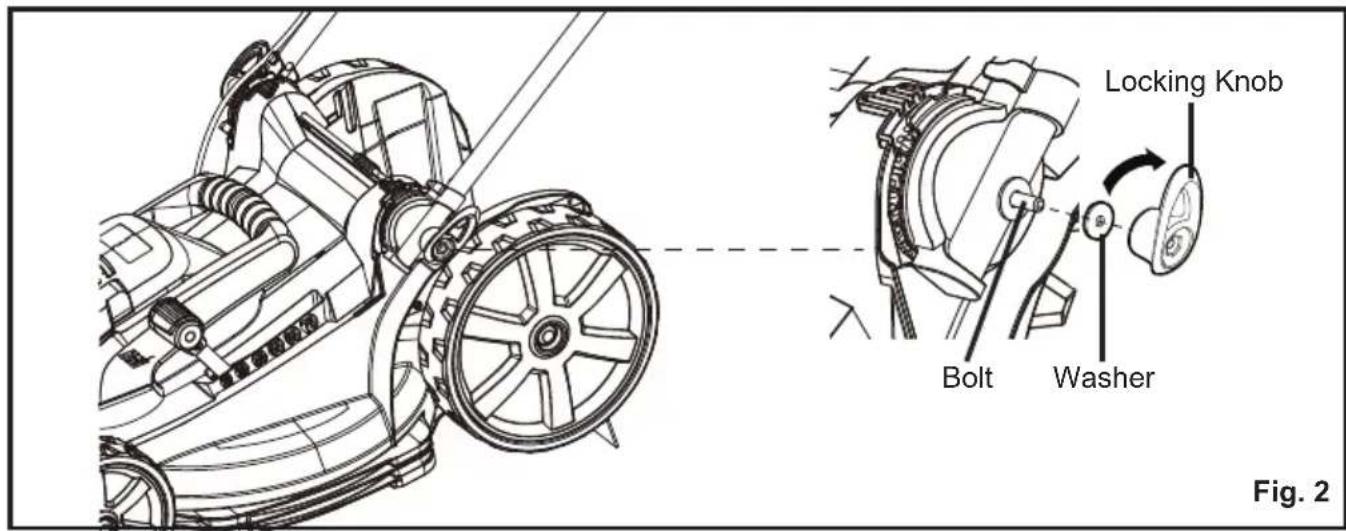
- Insert the lower handle into the bolts on the lawn mower housing. Let the lower handle adjust to the desired operating position. There are two possible positions. Fasten the handle by placing the washer over the support pin, followed by the locking knob and turn the locking knob clockwise to tighten. Do not use excessive force; this may damage the knobs (Fig. 2).
ASSEMBLING THE UPPER HANDLE
- Fix the upper handle using the bolts, washers and the locking knobs as shown in Fig 3, and turn the locking knobs clockwise to tighten (Fig. 3). The handle can be adjusted to 2 different height positions.

- Secure the control cable with the cable clips (Fig. 4).
ASSEMBLING THE COLLECTION BAG
- Check the grass collection bag before assembling to make sure there is no damage.
- Pull the grass collection bag over the metal frame as shown (Fig. 5).
- Pry open the soft plastic clamping sleeves and insert the metal frame into the sleeves. Ensure all sleeves are properly clamped on the frame.
- The completely assembled grass collection bag is as shown as below (Fig. 6).

INSTALLING AND REMOVING THE GRASS COLLECTION BAG
NOTE: The safety flap is spring operated. Ensure you have a firm grip when opening and closing to avoid personal injury.
Installing the grass collection bag:
- Lift the rear safety flap and hold it in position (Fig. 7).
- Lift the grass collection bag by its handle, and align the rods of grass collection bag with the notches under rear safety flap (Fig. 8).
- Release the rear safety flap.
- Make sure both rods are firmly seated on the notches and the safety flap rests firmly against the top of the grass collection bag.

natural_image
Technical line drawing of a mechanical device with rotating wheel and guide rails (no text or symbols)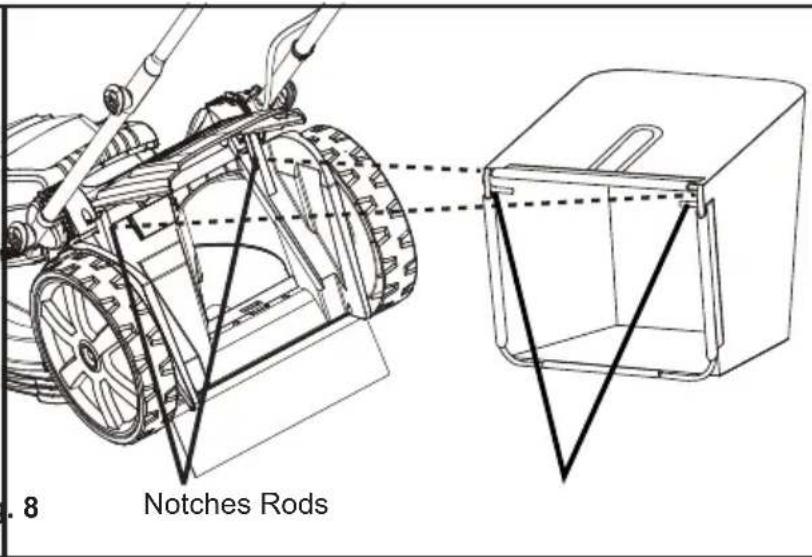
Removing the grass collection bag:
- Lift the rear safety flap and hold it in position.
- Lift the grass collection bag by its handle, and unhook the grass collection bag from the mower.
- Release the rear safety flap.
NOTE: Under normal usage, bag material is subject to wear. To reduce the risk of injury, frequently inspect the bag assembly and replace if there are any signs of wear or deterioration.
ADJUSTING THE CUTTING HEIGHT

WARNING
Do not at any time make any adjustment to the lawn mower without first stopping the motor and removing the safety key. Keep your feet away from the mower deck when adjusting its height.
When shipped, the rear wheels on the mower are set to a low-cutting position. Before using the mower for the first time, adjust the cutting position to the height best suited for your lawn. The mower can be set to 6 cutting heights between 1" (25 mm) and 3" (75 mm). Choose the proper cutting height according to the types and conditions of the grass.
To set the cutting height:
- To raise the cutting height, grasp the cutting height adjustment lever and move it toward the back of the mower (Fig. 9).
- To lower the cutting height, grasp the cutting height adjustment lever and move it toward the front of the mower (Fig. 9).

INSTALLING / REMOVING THE BATTERY PACK

WARNING
If any parts are broken or missing, do not attempt to attach the battery pack to the mower or operate the mower until the broken or missing parts are replaced. Failure to do so could result in serious injury. Do not connect the battery and/or the safety key before the product is completely assembled.
To install battery pack:
- Make sure battery is fully charged.
- Open the plastic battery compartment cover on top of the mower deck.
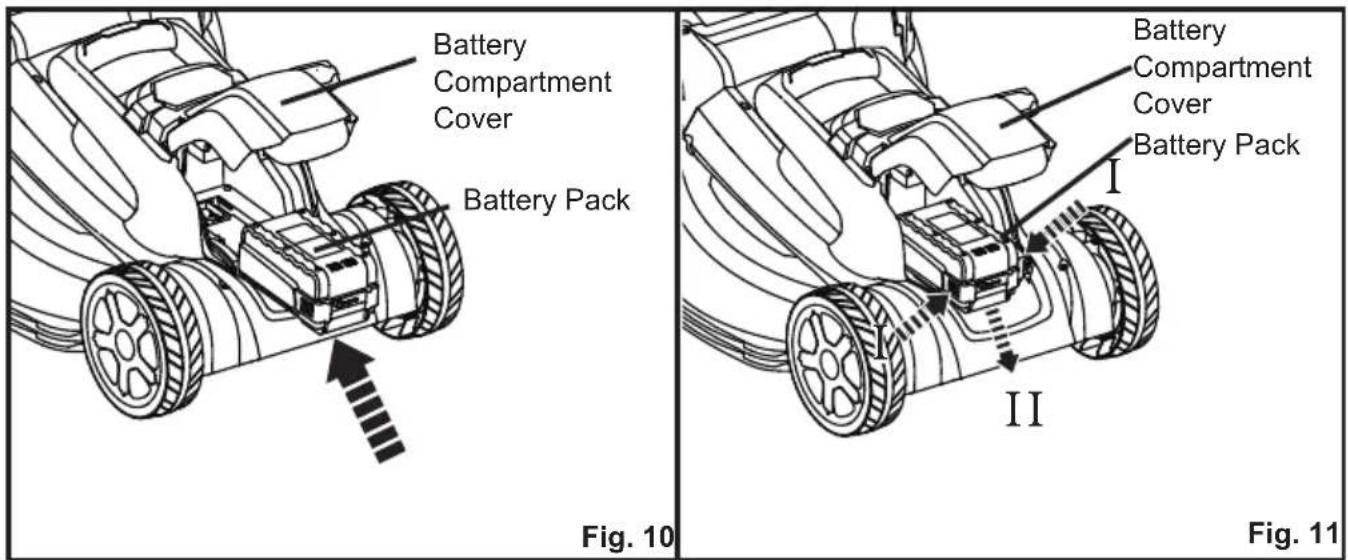
- Align the raised ribs on the mower with the grooves in the battery pack, and then insert the battery pack into the compartment (Fig. 10).
- Push the battery pack until you hear a "click".
- Close the battery compartment cover.
- Your product is now ready to be used.
NOTE: Make sure that the battery pack firmly snaps into place and is secured to the mower before starting operation.
To remove battery pack:
- Stop the lawn mower. Lift the battery compartment cover and remove the safety key.
- Press the release button on the battery pack, grasp the battery pack firmly and pull out of the battery compartment cover (Fig. 11).
- Close the battery compartment cover.
BATTERY CHARGING
- Use only with 40V LawnMaster ^® battery chargers. The battery charger supplied is specifically designed for the lithium-ion battery used in this tool.
- Check the power voltage! Battery chargers operate on 120V.
- The battery is charged between 40^ F ( 4^ C) and 100^ F ( 38^ C). This ensures an optimum battery service life.
- Protect the battery from heat, from continuous exposure to sun and keep away from radiation or other heat sources. Do not leave the battery in the mower in direct sunlight over long periods.
- The battery is supplied uncharged. To ensure full capacity of the battery, charge the battery before using the tool for the first time. The lithium-ion battery can be charged at any time without reducing its service life. Interrupting the charging procedure does not affect the battery.
- Always leave it fully charged if kept in the charger for storage.
LED CHARGER STATUS
- If the battery is not inserted into the charger, a continuous red LED light indicates that the outlet plug is plugged into an outlet socket and the battery charger is ready for operation.
- Charging: a flashing green LED on the charger indicates that the battery is charging normally. The LED's flashing frequency is 1Hz.
- Charged: continuous green LED on the charger indicates that the battery is ready for use.
- Technical Issue: a flashing red LED light on the charger indicates that battery pack has a charging problem or might be defective.
a) One possible condition is the battery temperature is lower than 0^ C or the charging current is too high. As soon as the permitted temperature and the charging current ranges are reached, the battery charger will automatically switch to charging.
b) If the temperature range and charging current are correct and flashing red LED light continues, then remove and reinstall the battery pack. If the LED status repeats a second time, try to charge another identical battery. If the battery charges normally, dispose of the defective battery pack (see Environmental Safe Battery Disposal section).
c) If the flashing red light continues after installing the second battery, the charger may be defective. Replace with a new one. - A flashing green LED light on the charger (the LED's flashing frequency (2Hz) is faster than charging normally (1Hz)), which indicates the battery temperature is higher than 50°C. As soon as the permitted temperature is reached, the battery charger will automatically switch to charging.
- After continuous or repeated charging cycles without interruption, the charger may warm up. This is normal and does not indicate a technical defect of the battery charger.
The indicator lights on the charger show the charger status:
| SYMBOL INDICATOR LIGHTS STATUS | ||
 | Red, continuous. Connected to power supply . | |
 | Green, blinking.(flashing frequency: 1Hz) | Charging. |
| Green, blinking.(flashing frequency: 2Hz) | Battery is overheated. | |
 | Green, continuous. Fully charged. | |
 | Red, blinking.(flashing frequency: 2Hz) | Charging problem:See Technical Issue above. |
BATTERY LED PANEL
- The panel consists of 4 LEDs on the battery. Press and hold the button, then release it, the LEDs will show you the charge levels.
- The battery's charge level can be checked either when the battery is attached on the machine or removed from the machine.
| LEDs on Battery(Continuous Lighting) | Battery Capacity |
| 4 LEDs (inc 2 green) | Fully charged |
| 3 LEDs (inc 1 green) | ≥50% |
| 2 LEDs (orange & green) | ≥25% |
| 1 LEDs (red only) | ≤25% (Recharge required) |

CHARGING THE BATTERY PACK

natural_image
Technical line drawing of a mechanical device before and after assembly, showing internal components and motion arrows (no text or symbols)
WARNING
If any part of the charger is missing or damaged, do not operate it! Replace the charger with a new one.
Failure to heed this warning could result in possible serious injury.
Check the voltage! The voltage must comply with the information on the rating label.
- Align the slot of the battery pack with the rail on the charger. Slide the slot onto the rail until the battery pack secures into place (Fig. 12).
- Connect the charger to the power supply.
- Allow sufficient charging time (see Specifications), and then disconnect the charger from the power supply.
- Press the release button on the battery pack and remove it from the charger.
NOTE: It is normal for the battery pack and the charger to become warm (but not hot) during charging process. If the battery does not charge properly, check to make sure the electrical outlet is operational. Always charge the battery before storage!

WARNING
Do not allow familiarity with this type of product to make you careless. Remember that a careless fraction of a second is sufficient to inflict serious injury.

WARNING
Always wear safety goggles or safety glasses with side shields when operating this product. Failure to do so could result in objects being thrown into your eyes, resulting in possible serious injury.

WARNING
Do not use any attachments or accessories not recommended by the manufacturer of this product. The use of attachments or accessories not recommended can result in serious personal injury.
STARTING/STOPPING THE MOWER
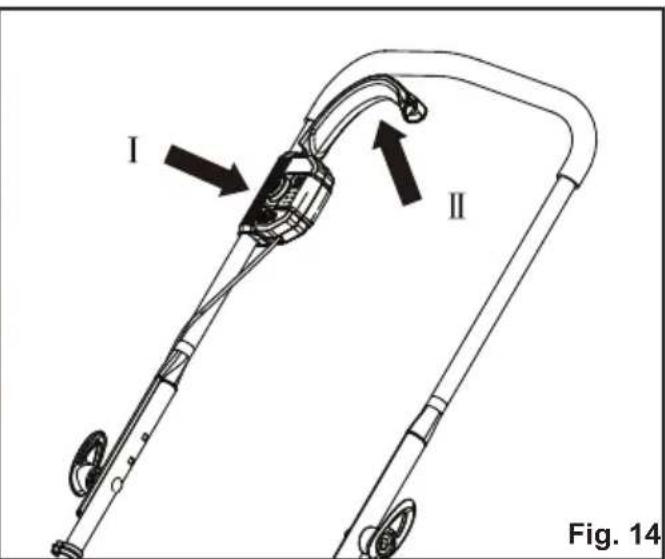
- To switch on, insert the safety key, press and hold the safety switch button and gently pull the start/stop bale switch (Fig. 13 &14). Once started, release the safety switch button.
- To power off the mower, release the start/stop bale switch. Pull out the safety key if the mower is not going to be used immediately.

GENERAL OPERATION
Check the product, its power cord and accessories for damage before each use. Before use, please ensure all power connections are in good working order prior to installing the power key and battery. If damage is present or observed, please stop and have mower serviced before use.
Do not use the product if it is damaged or shows wear.
- Double-check that the blade is properly installed.
- Always hold the product by its handles. Keep the handles dry to ensure safe support.
- Switch the equipment off immediately if someone enters the work area. Always let the equipment come to complete stop before removing the grass collection bag.
- Do not overwork yourself. Take regular breaks to ensure you can concentrate on the work and have full control over the product.
MOWING TIPS
- Make sure the lawn is clear of stones, sticks, wires, and other objects that could damage the lawn mower blades or motor. Such objects could be accidentally thrown by the mower in any direction and cause serious personal injury to the operator and others.
- For a healthy lawn, always cut off one-third or less of the total length of the grass.
- When cutting heavy grass, reduce walking speed to allow for more effective cutting and a proper discharge of the clippings.
- Do not cut wet grass. It will stick to the underside of the deck and prevent proper mulching of grass clippings.
- New or thick grass may require a narrower cut.
- Clean the underside of the mower deck after each use to remove grass clippings, leaves, dirt, and any other accumulated debris.
- Mow in slight overlapping rows. The most effective pattern for mowing lawns is in straight lines along one of the sides. This will keep the rows even and ensure that the lawn is cut without missing any spots (Fig. 15).

Fig. 15
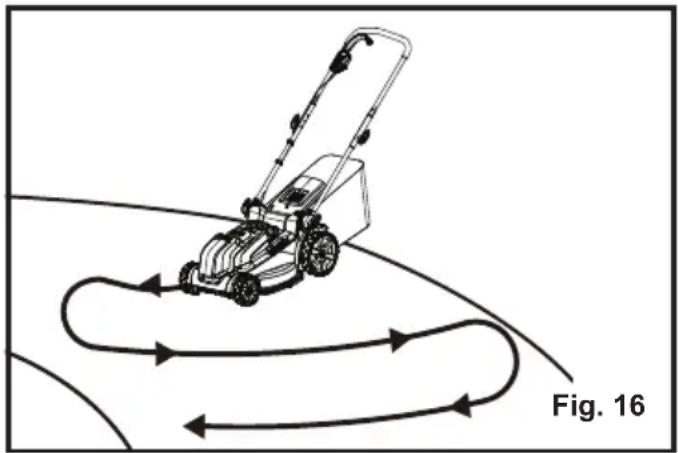
MOWING ON A SLOPE (Fig. 16)
- Slopes are a major factor related to slip and fall accidents that can result in severe injury. Mowing on slopes requires extra caution. If you feel uneasy on a slope, do not mow it. For your safety, do not attempt to mow slopes greater than 15 degrees.
- Mow across the face of slopes, not up and down. Exercise extreme caution when changing direction on slopes.
- Watch for holes, ruts, rocks, hidden objects, or bumps which can cause you to slip or trip. Tall grass can hide obstacles. Remove all objects such as rocks, tree limbs, etc., which could be tripped over or thrown by the blade.
- Always be sure of your footing. A slip and fall can cause serious personal injury. If you feel you are losing your balance, release the start/stop bale switch immediately.
- Do not mow near drop-offs, ditches, or embankments; you could lose your footing or balance.
natural_image
Diagram of a lawn mower on a curved surface with directional arrows indicating motion (no text or symbols)AFTER USE
- Switch the product off, remove the battery pack and let it cool down.
- Check, clean and store the product as described below.

WARNING
When servicing, use only identical replacement parts. Use of any other parts may create a hazard or cause product damage.

WARNING
Always wear safety goggles or safety glasses with side shields during power tool operation or when blowing dust. If operation is dusty, also wear a dust mask.
GENERAL MAINTENANCE
Avoid using solvents when cleaning plastic parts. Most plastics are susceptible to damage from various types of commercial solvents and may be damaged by their use. Use clean cloths to remove dirt, dust, oil, grease, etc.

WARNING
Do not use any attachments or accessories not recommended by the manufacturer of this product. The use of attachments or accessories not recommended can result in serious personal injury.
- Do not at any time make any maintenance to the lawn mower without first stopping the motor and removing the safety key and battery pack. Adjust the handle bar or make other adjustments as illustrated in the manual, if necessary or if it can make it easier for maintenance.
- Periodically check all nuts and bolts for proper tightness to insure safe operation of the mower.
- Remove any buildup of grass and leaves on or around the motor cover. Wipe the mower clean with a dry cloth occasionally. Do not use water.
LUBRICATION
All of the bearings in this product are lubricated with a sufficient amount of high grade lubricant for the life of the unit under normal operating conditions. Therefore, no further bearing lubrication is required. At the beginning and end of each mowing season:
- Lubricate the springs on the rear discharge door with light oil.
- Lubricate the cutting height adjustment lever and related hardware with light oil.
- Remove the wheels and lubricate the surface of the axle bolt and the inner surface of the wheels with light oil.
- Remove the blade and blade hub assembly and lubricate the motor shaft with light oil or engine oil. See Replacing the Cutting Blade section for instructions on removing the blade.

WARNING
Always protect hands by wearing heavy gloves and/or wrapping the cutting edges of the blade with rags and other material when performing blade maintenance. Failure to heed this warning could result in serious personal injury.

WARNING
Before performing any maintenance, make sure the mower is unplugged from the power supply and battery has been removed. Failure to heed this warning could result in serious personal injury.
REPLACING THE MOWER BLADE
NOTE: Remove safety key and battery before performing any maintenance!
NOTE: Only use identical replacement blades. LawnMaster ^® mower blade replacement part #111177128.
- Stop the motor and allow the blade to come to a complete stop.
- With the blade stopped, remove the SAFETY KEY and the BATTERY from the mower and store in safe location.
- Remove the collection bag from the mower if attached.
- Slowly turn the mower onto its side.
- Wedge a block of wood between the blade and the mower deck in order to prevent blade from turning while the blade nut is being removed (Fig. 17).
- Loosen the blade nut using a wrench or socket (not provided).
- Remove the blade nut by turning counter-clockwise, and then remove the blade.
- Place the new blade on the shaft. Make sure it is installed with the curved ends pointing up toward the mower deck and not down toward the ground.
- Thread the blade nut on the shaft and finger tighten.
- Torque the blade nut down using a torque wrench (not provided) to ensure the bolt is properly tightened (Fig. 18).
NOTE: Make certain all parts are replaced in the exact order in which they were removed.

For best mowing performance, the mower blade must be kept sharp. A dull blade does not cut grass evenly and overloads the motor. Under normal circumstances, sharpening the blade twice during the mowing season is usually sufficient. However, if your lawn has sandy soil, more frequent sharpening may be required.
- Following the instructions in the Replacing Mower Blade section (Page 27), remove the mower blade. DO NOT attempt to sharpen the blade while it is attached to the mower.
- Using a fine-tooth file or sharpening stone, sharpen cutting edges on both ends of the blade, removing equal amounts of material from both ends (Fig. 19).

WARNING
When removing, inspect the blade carefully. If blade is bent or damaged, replace immediately with a new blade. Failure to replace a bent or damaged blade could cause an accident resulting in possible serious injury.
BALANCING THE BLADE (Fig. 20)
When sharpening, care should be taken to keep the blade balanced. An unbalanced blade will cause excessive vibration when the mower is running. This vibration will eventually cause damage to the mower, especially the motor.
To check the blade balance:
- Clamp a screwdriver horizontally in a vise as shown.
NOTE: If a vise is not available, a straight nail can also be used. - Place the center hole of blade on the screwdriver (or nail) shank.
- If blade is balanced, it will remain in a horizontal position. If either end of the blade drops downward, sharpen the heavy side until the blade is balanced.

natural_image
Technical line drawing of a mechanical clamp or bracket assembly, showing two views (Fig. 19 and Fig. 20) with no visible text or symbols.STORING THE MOWER
- Remove mower safety key and battery.
- Turn mower on its side and clean grass clippings that have accumulated on the underside of the mower deck.
- Wipe the mower clean with a dry cloth.
- Check all nuts, bolts, knobs, screws, fasteners, etc., for tightness.
- Inspect moving parts for damage, breakage, and wear. Have repairs made on any damaged or missing parts.
-
Store mower indoors in a clean, dry place out of the reach of children.
-
Do not store near corrosive materials such as fertilizer or rock salt. To lower the handle before storing:
-
Remove and clean the grass collection bag.
- Fully loosen the handle locking knobs on the sides of the handle and fold the upper handle down (Fig. 21).
- To save the space, the grass collection bag can be put on the mower (Fig. 22).

natural_image
Technical line drawings of a lawn mower from two different angles (Fig. 21 and Fig. 22), showing mechanical components without any text or symbols.CLEANING THE MOWER

WARNING
To reduce the risk of electric shock, do not expose the mower to water.

WARNING
Do not at any time make any maintenance to the lawn mower without first stopping the motor and removing the safety key and battery pack.
The underside of mower deck should be cleaned after each use as grass clippings, leaves, dirt and other debris will accumulate causing rust and corrosion.
- Remove any buildup of grass and leaves on or around the motor cover (do not use water). Wipe the mower clean with a dry cloth occasionally.
- If debris build up on the underside of the unit while in use, stop the motor and remove the battery pack. Tilt the mower forward, or on its side, and clean.
- Fully charge the battery before placing in storage.
- Recharge the battery pack whenever there is a noticeable reduction in the performance. Do not allow the battery pack to become completely discharged.
- Do not recharge a battery pack that is already fully charged. Overcharging shortens battery life.
- Once the battery pack is fully charged, remove the battery from the charger and disconnect charger from the outlet.
- Do not store the battery pack on the tool or on the charger.
- If the battery pack is hot, allow it to cool down before recharging.
CHARGER MAINTENANCE
- Keep the charger clean and clear of debris. Do not allow foreign material into the recessed cavity or on the contacts. Wipe with a dry cloth. Do not use solvents, water, or place in wet conditions.
- Always unplug the charger when the battery pack is not installed on the charger.
- Do not store the charger in excessive heat. Do not use in direct sunlight.
- Disconnect the charger from the AC power outlet when not in use and once battery has reached a full charge.

The following toxic and corrosive materials are in the batteries used in this battery pack: lithium-ion, a toxic material.

WARNING
All toxic materials must be disposed of in a specific manner to prevent contamination of the environment. Before disposing of damaged or worn out lithium-ion battery packs, contact your local waste disposal agency, or the local Environment Protection Agency for information and specific instructions.

WARNING
If the battery pack cracks or breaks, with or without leaks, do not recharge it and do not use it. Dispose of it and replace with a new battery pack.
DO NOT ATTEMPT TO REPAIR IT!
To avoid injury and risk of fire, explosion, or electric shock, and to avoid damage to the environment:
- Cover the battery terminals with heavy-duty adhesive tape.
- DO NOT attempt to remove or destroy any of the battery pack components.
- DO NOT attempt to open the battery pack.
- If a leak develops, the released electrolytes are corrosive and toxic. DO NOT get the solution in eyes or on skin, and do not swallow it.
- DO NOT place damaged or defective batteries in your regular household trash.
• DO NOT incinerate. - DO NOT place batteries where they will become part of any waste landfill or municipal solid waste stream.
• Take batteries to a certified recycling or disposal center.
Suspected malfunctions are often due to causes that the user can fix themselves.
Therefore check the product using this section. In most cases the problem can be solved quickly.

WARNING
Only perform the steps described within these instructions!
All further inspection, maintenance and repair work must be performed by an authorized service center or a similarly qualified specialist if you cannot solve the problem yourself!
| Problem Possible Cause Solution | ||
| Mower fails to start. | The safety key is not installed. | Install the safety key securely. |
| The battery is not installed correctly. | Check connection of battery to mower. | |
| The battery is not charged or power is too low. | Charge the battery. | |
| The blade is jammed. | Stop mower and remove battery; check for grass and debris under the deck, clean to make blade free to move. | |
| The battery is defective or old. | Replace the battery (call the toll free helpline, at 866-384-8432). | |
| The switch is defective. | Replace the switch (call the toll free helpline, at 866-384-8432). | |
| Mower cuts unevenly. | Rough or uneven lawn. Check the mowing area. | |
| Cutting height not set properly. | Set the mower at a higher position. | |
| The blade is dull. Sharpen or replace the blade. | ||
| Mower does not mulch properly. | Wet grass clippings sticking to the underside of the deck. | Wait until the grass dries before mowing. |
| Mower is hard to push. | High grass and low cutting height. Rear of mower housing and blade dragging in heavy grass. | Raise the cutting height. |
| Mower vibrates overly and makes excessive noise. | The cutting blade is not assembled securely. | Tighten the blade bolts. |
| The blade is not balanced. | Sharpen and balance the blade following instructions in this manual (see page 28). Or replace the blade. | |
| The motor shaft is bent. | Stop the mower and remove the battery. Have the mower inspected and repaired by an authorized service center before restarting. | |
LAWNMASTER® WARRANTY
We take pride in producing a high quality, durable product. This Lawnmaster® product carries a limited two (2) year warranty against defects in workmanship and materials from date of purchase under normal household use. If product is to be used for commercial, industrial or rental use, a 30 day limited warranty will apply. Batteries carry a one-year warranty against defects in workmanship and materials. Batteries must be charged in accordance with the operator's manual directions and regulations in order to be valid. Warranty does not apply to defects due to direct or indirect abuse, negligence, misuse, accidents, repairs or alterations and lack of maintenance. Please keep your receipt/packing list as proof of purchase. This warranty gives you specific legal rights, and you may have other rights, which vary from state to state. For product service call Customer Service at 1-866-384-8432.
Items not covered by warranty :
- Any part that has become inoperative due to misuse, commercial use, abuse, neglect, accident, improper maintenance, or alteration;
- The unit, if it has not been operated and/or maintained in accordance with the owner's manual;
- Normal wear, except as noted below;
- Routine maintenance items such as lubricants, blade sharpening;
- Normal deterioration of the exterior finish due to use or exposure.
Transportation Charges : Transportation charges for the movement of any power equipment unit or attachment are the responsibility of the purchaser. It is the purchaser's responsibility to pay transportation charges for any part submitted for replacement under this warranty unless such return is requested in writing by LawnMaster.
SAVE YOUR RECEIPTS. THIS WARRANTY IS VOID WITHOUT THEM.
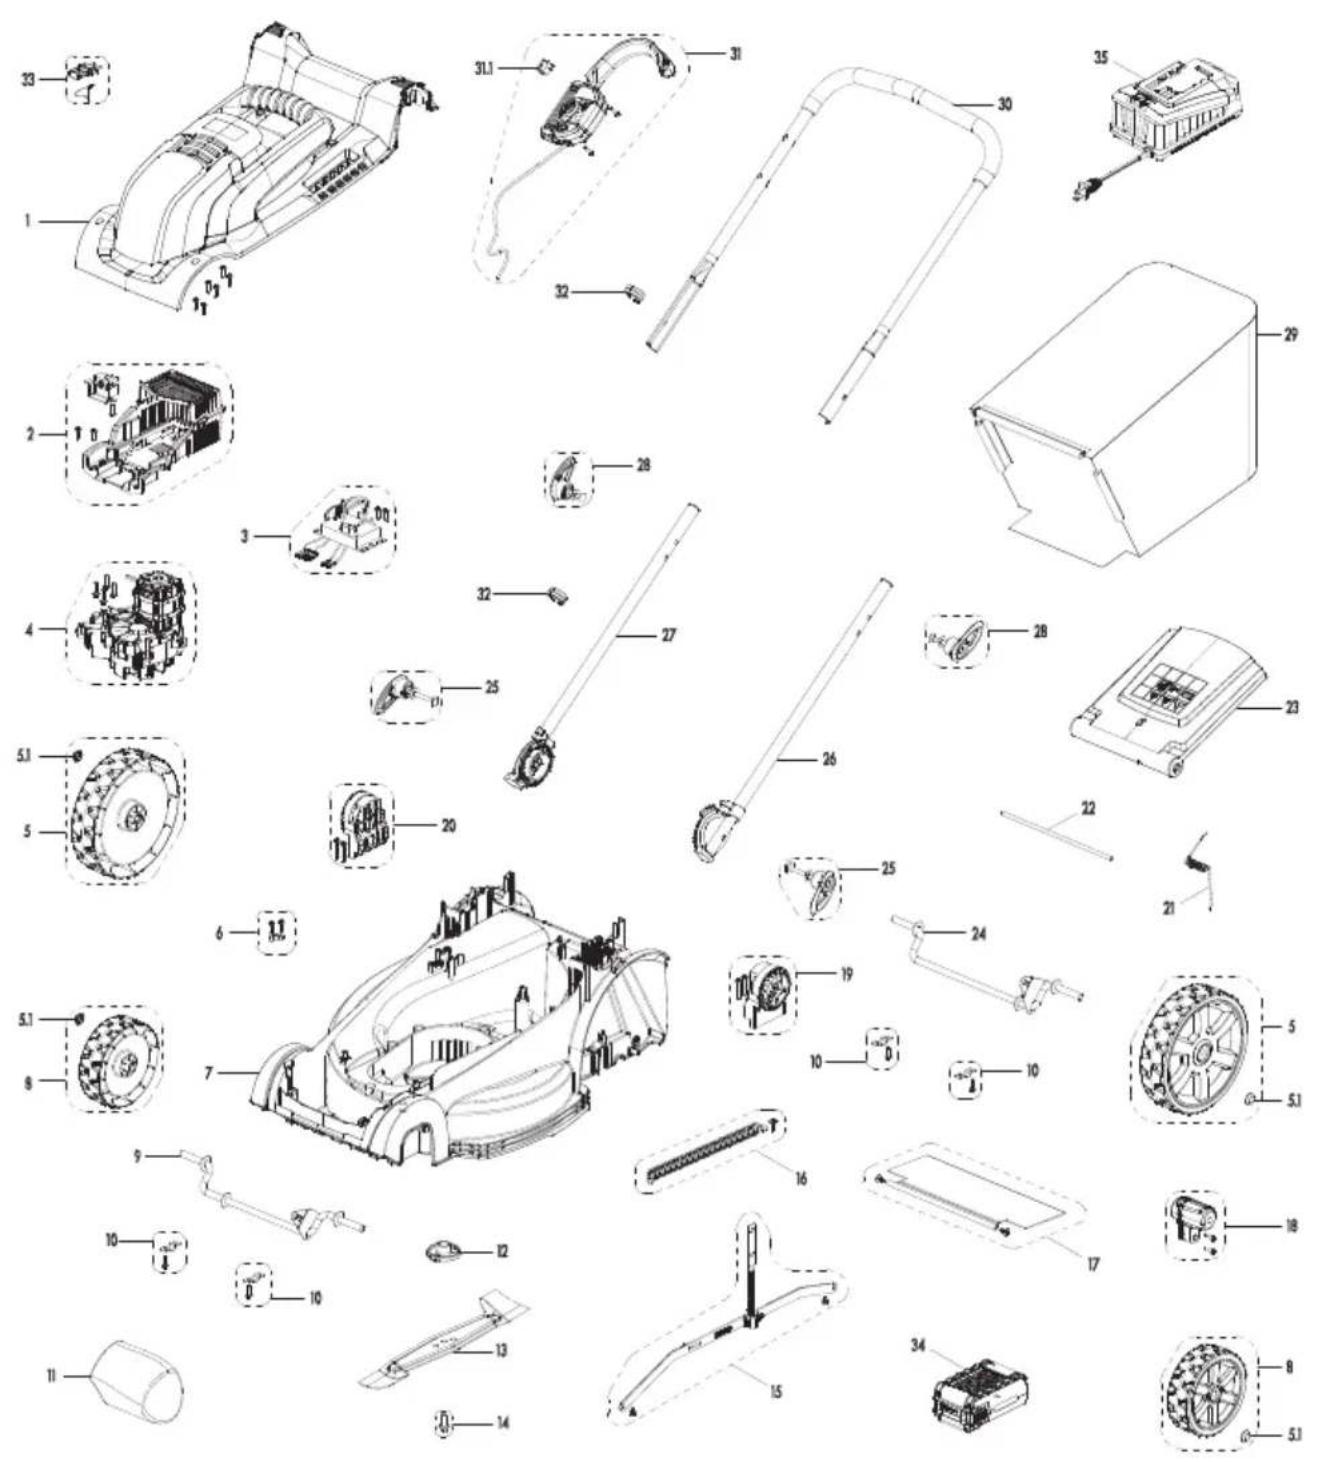
| Key Number | Drawing Number | Description Quantity | |
| 1 Upper motor cover assembly 1.0 | |||
| 2 Lower motor cover assembly 1.0 | |||
| 3 PCB board assembly 1.0 | |||
| 4 Reduction gear box assembly 1.0 | |||
| 5 111309102 Rear wheel assembly (7.87") 2.0 | |||
| 5.1 111005107 Rear wheel cap 2.0 | |||
| 6 Cable clamp 1.0 | |||
| 7 Deck 1.0 | |||
| 8 111309104 Front wheel assembly (5.51") 2.0 | |||
| 5.1 111005107 Front wheel cap 2.0 | |||
| 9 | 111155102 | Front axle | 1.0 |
| 10 | 111088110 | Wheel shaft clamp | 4.0 |
| 11 | Ballast assembly | 1.0 | |
| 12 | 211002110 Locating ring 1.0 | ||
| 13 | 111177128 | Blade | 1.0 |
| 14 | 211002111 | Bolt | 1.0 |
| 15 | Height adjustment handle | 1.0 | |
| 16 | 111035144 Spring assembly 1.0 | ||
| 17 | 211066106 | Rear debris sheild | 1.0 |
| 18 | Adjustment handle assembly | 1.0 | |
| 19 | Right lower handle bracket assembly | 1.0 | |
| 20 | Left lower handle bracket assembly | 1.0 | |
| 21 | 111018102 Safety Door Spring 1.0 | ||
| 22 | 111036120 Safety Door Shaft 1.0 | ||
| 23 | 111309106 Safety Flap 1.0 | ||
| 24 | 111155104 | Rear axle | 1.0 |
| 25 | 111308114 | Lower handle locking knob assembly | 2.0 |
| 26 | Right Lower handle assembly 1.0 | ||
| 27 | Left Lower handle assembly | 1.0 | |
| 28 | 111308111 | Upper handle locking knob assembly | 2.0 |
| 29 | 111309109 Grass collection bag 1.0 | ||
| 30 | Upper handle | 1.0 | |
| 31 | Switch box assembly | 1.0 | |
| 31.1 | Switch | 1.0 | |
| 32 | Cable clip | 2.0 | |
| 33 | 211063106 | Safety key | 1.0 |
| 34 | 211063110 40V 4.0Ah battery 1.0 | ||
| 35 | 211063111 | 40V Charger | 1.0 |
Replacement parts highlighted in grey are available for after sales purchase. Replacement of repair or internal parts should only be done by a qualified service professional. Please contact your authorized service dealer or Customer Service at 866-384-8432.
NOTES
NOTES

- INTRODUCTION
- WARNING
- DANGER
- TRAINING AND PREPARATION
- OPERATION
- MAINTENANCE AND STORAGE
- BATTERY PACK
- BATTERY CHARGER
- FCC COMPLIANCE
- SAVE THESE INSTRUCTIONS
- SERVICE
- KNOW YOUR LAWN MOWER
- UNPACKING
- YOU WILL NEED (ITEMS NOT SUPPLIED)
- PACKING LIST
- ASSEMBLING THE LOWER HANDLE
- ASSEMBLING THE UPPER HANDLE
- ASSEMBLING THE COLLECTION BAG
- INSTALLING AND REMOVING THE GRASS COLLECTION BAG
- Installing the grass collection bag:
- ADJUSTING THE CUTTING HEIGHT
- INSTALLING / REMOVING THE BATTERY PACK
- To install battery pack:
- To remove battery pack:
- BATTERY CHARGING
- LED CHARGER STATUS
- BATTERY LED PANEL
- CHARGING THE BATTERY PACK
- STARTING/STOPPING THE MOWER
- GENERAL OPERATION
- MOWING TIPS
- MOWING ON A SLOPE (Fig. 16)
- AFTER USE
- GENERAL MAINTENANCE
- LUBRICATION
- REPLACING THE MOWER BLADE
- BALANCING THE BLADE (Fig. 20)
- STORING THE MOWER
- CLEANING THE MOWER
- CHARGER MAINTENANCE
- DO NOT ATTEMPT TO REPAIR IT!
- To avoid injury and risk of fire, explosion, or electric shock, and to avoid damage to the environment:
- LAWNMASTER® WARRANTY
- NOTES
Brand : LawnMaster
Model : CLMF4015K
Category : Lawn mower