CLPS4008K - Lawn mower LawnMaster - Free user manual and instructions
Find the device manual for free CLPS4008K LawnMaster in PDF.

| Product Type | Lawn Mower |
| Brand | LawnMaster |
| Model | CLPS4008K |
| Power Source | 40V Lithium-Ion Battery |
| Cutting Width | 16 inches |
| Cutting Height Adjustment | Single lever, 6 positions |
| Cutting Height Range | 1.5 - 4 inches |
| Grass Bag Capacity | 40 liters |
| Mulching Capability | Yes (mulch plug included) |
| Side Discharge | Yes |
| Self-Propelled | No (push mower) |
| Wheel Size (Front) | 7 inches |
| Wheel Size (Rear) | 9 inches |
| Weight (without battery) | 35 lb |
| Battery Type | 40V 4.0 Ah Li-Ion |
| Charger Included | Yes |
| Runtime (typical) | Up to 45 minutes |
| Handle Type | Foldable for compact storage |
| Safety Features | Blade brake, safety key |
| Warranty | 2 years limited |
| Recommended Maintenance | Clean after each use, sharpen blade annually |
Frequently Asked Questions - CLPS4008K LawnMaster
User questions about CLPS4008K LawnMaster
0 question about this device. Answer the ones you know or ask your own.
Ask a new question about this device
Download the instructions for your Lawn mower in PDF format for free! Find your manual CLPS4008K - LawnMaster and take your electronic device back in hand. On this page are published all the documents necessary for the use of your device. CLPS4008K by LawnMaster.
USER MANUAL CLPS4008K LawnMaster
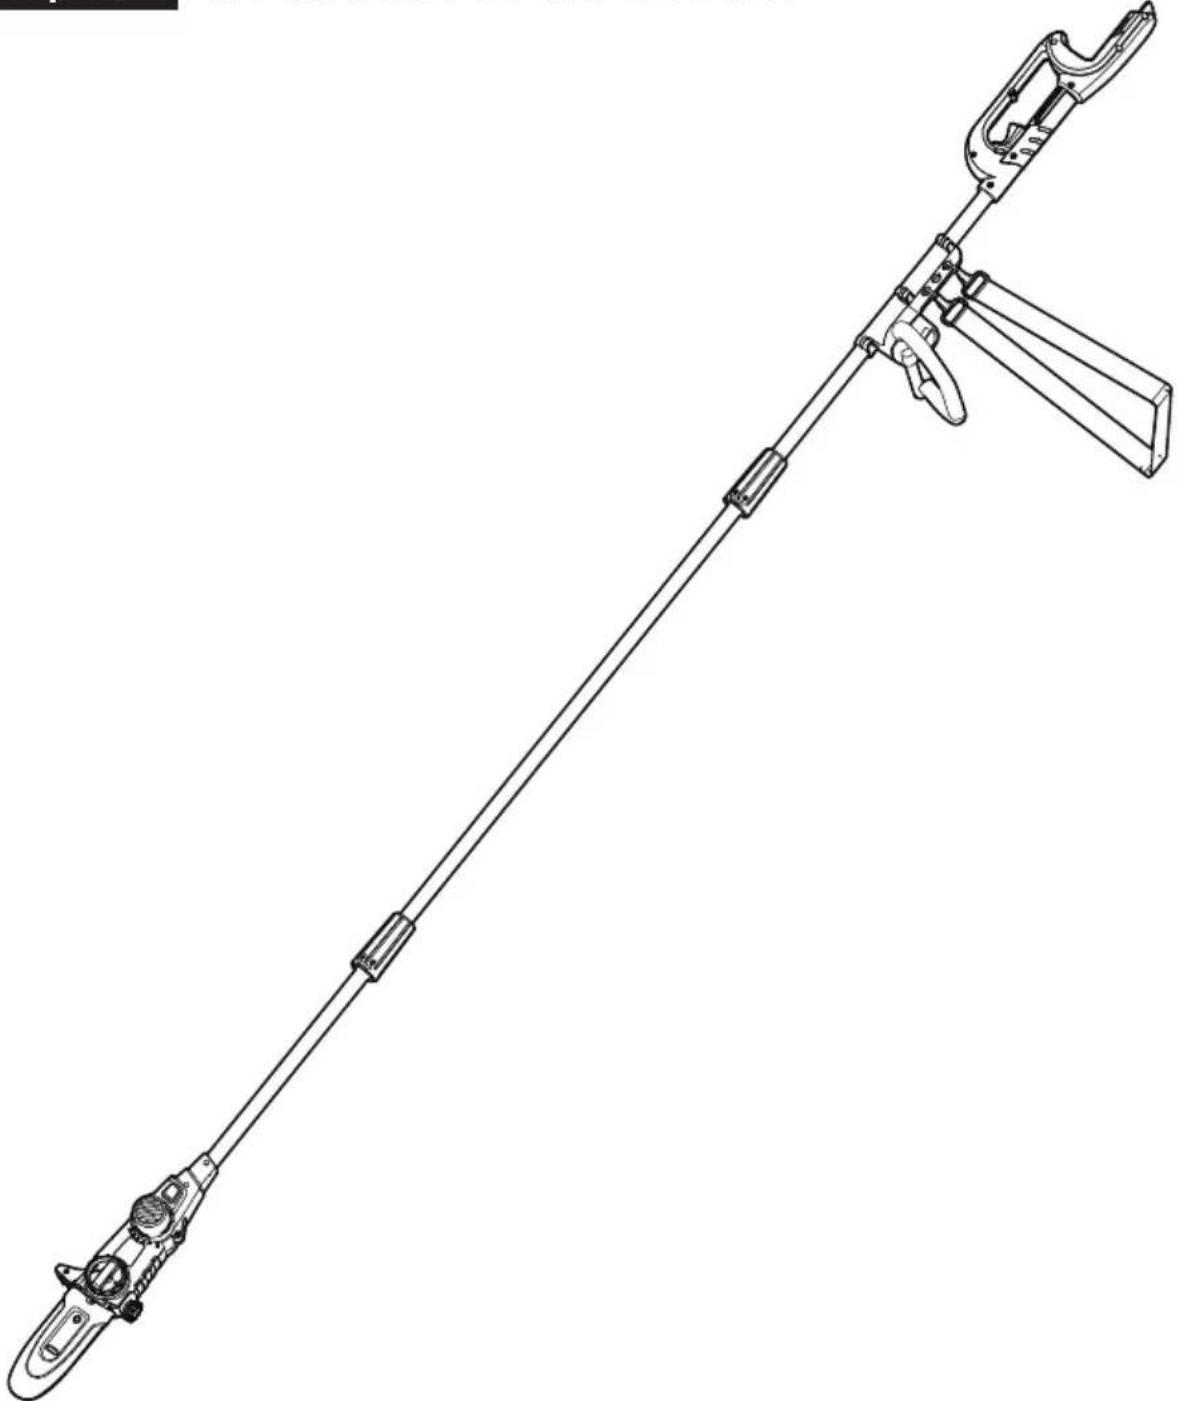
40V Cordless Pole Saw CLPS4008
natural_image
Technical line drawing of a mechanical lever assembly (no text or symbols)CLPS4008

| CONTENTS | 2 |
| PRODUCT SPECIFICATIONS | 2 |
| GENERAL SAFETY RULES | 3-9 |
| SYMBOLS | 10-11 |
| KNOW YOUR CORDLESS POLE SAW | 12-13 |
| ASSEMBLY | 14-20 |
| BATTERY PACK AND CHARGER (MAY NOT BE INCLUDED) | 21 |
| OPERATION | 22-26 |
| CARE AND MAINTENANCE | 27-31 |
| TROUBLESHOOTING | 32 |
| ENVIRONMENTAL SAFE BATTERY DISPOSAL | 33 |
| WARRANTY POLICY | 34 |
| EXPLODED VIEW | 35 |
| PARTS LIST | 36 |
| NOTES | 37 |
PRODUCT SPECIFICATIONS
40V LITHIUM-ION CORDLESS POLE SAW
| Type | Cordless, Battery-Powered |
| Rated No Load Speed | 2500 r/ min |
| Cutting dia. | 6" |
| Maximum Length Without Extension | 6.4 feet (76.8 inch) |
| Maximum Length With Extension | 9.5 feet (108.5 inch) |
| Guide Bar Length | 8" |
| Net Weight | 9.9 lbs |
| Cutting Head Pivot Angle(s) | 45^/30^/15^/0^/-15^/-30^ |
| Bar Length | 8" (20.3 cm) |
| Chain Pitch | 3/8" (9.5 mm) |
| Chain Type | 8" Chain 91PX033X (Oregon) |
| Guide Bar Type | 8" Bar 547980 (Oregon) |
WARNING
Read and understand all instructions before using this product. Failure to follow all instructions listed below may result in electric shock, fire, and/or serious personal injury.
Work Area Safety
- Keep work area clean and well lit. Cluttered or dark areas invite accidents.
- Do not operate power tools in explosive atmospheres, such as in the presence of flammable liquids, gases or dust. Power tools create sparks which may ignite the dust or fumes.
- Keep children and bystanders away while operating a power tool. Distractions can cause you to lose control.
Electrical Safety
- Power tool plugs must match the outlet. Never modify the plug in any way. Do not use any adapter plugs with earthed (grounded) power tools. Unmodified plugs and matching outlets will reduce risk of electric shock.
- Avoid body contact with earthed or grounded surfaces, such as pipes, radiators, ranges and refrigerators. There is an increased risk of electric shock if your body is earthed or grounded.
- Do not expose power tools to rain or wet conditions. Water entering a power tool will increase the risk of electric shock.
- Do not abuse the cord. Never use the cord for carrying, pulling or unplugging the power tool. Keep cord away from heat, oil, sharp edges or moving parts. Damaged or entangled cords increase the risk of electric shock.
- When operating a power tool outdoors, use an extension cord suitable for outdoor use. Use of a cord suitable for outdoor use reduces the risk of electric shock.
- If operating a power tool in a damp location is unavoidable, use a residual current device (RCD) protected supply. Use of an RCD reduces the risk of electric shock.
Personal Safety
- Stay alert, watch what you are doing and use common sense when operating a power tool. Do not use a power tool while you are tired or under the influence of drugs, alcohol or medication. A moment of inattention while operating power tools may result in serious personal injury.
- Use personal protective equipment. Always wear eye protection. Protective
equipment such as dust mask, non-skid safety shoes, hard hat, or hearing protection used for appropriate conditions will reduce personal injuries.
- Use personal protective equipment. Always wear eye protection. Protective equipment such as dust mask, non-skid safety shoes, hard hat, or hearing protection used for appropriate conditions will reduce personal injuries.
- Prevent unintentional starting. Ensure the switch is in the off-position before connecting to power source and/or battery pack, picking up or carrying the tool. Carrying power tools with your finger on the switch or energizing power tools that have the switch on invites accidents.
- Remove any adjusting key or wrench before turning the power tool on. A wrench or a key left attached to a rotating part of the power tool may result in personal injury.
- Do not overreach. Keep proper footing and balance at all times. This enables better control of the power tool in unexpected situations.
- Dress properly. Do not wear loose clothing or jewelry. Keep your hair, clothing and gloves away from moving parts. Loose clothes, jewelers or long hair can be caught in moving parts.
- If devices are provided for the connection of dust extraction and collection facilities, ensure these are connected and properly used. Use of dust collection can reduce dust-related hazards.
Power Tool Use And Care
- Do not force the power tool. Use the correct power tool for your application. The correct power tool will do the job better and safer at the rate for which it was designed.
- Do not use the power tool if the switch does not turn it on and off. Any power tool that cannot be controlled with the switch is dangerous and must be repaired.
- Disconnect the plug from the power source and/or the battery pack from the power tool before making any adjustments, changing accessories, or storing power tools. Such preventive safety measures reduce the risk of starting the power tool accidentally.
- Store idle power tools out of the reach of children and do not allow persons unfamiliar with the power tool or these instructions to operate the power tool. Power tools are dangerous in the hands of untrained users.
- Maintain power tools. Check for misalignment or binding of moving parts, breakage of parts and any other condition that may affect the power tool's operation. If damaged, have the power tool repaired before use. Many accidents are caused by poorly maintained power tools.
- Keep cutting tools sharp and clean. Properly maintained cutting tools with sharp cutting edges are less likely to bind and are easier to control.
- Use the power tool, accessories and tool bits etc. in accordance with these instructions, taking into account the working conditions and the work to be performed. Use of the power tool for operations different from those intended could result in a hazardous situation.
Battery Tool Use And Care
- Recharge only with the charger specified by the manufacturer. A charger that is suitable for one type of battery pack may create a risk of fire when used with another battery pack.
- Use power tools only with specifically designated battery packs. Use of any other battery packs may create a risk of injury and fire.
- When battery pack is not in use, keep it away from other metal objects, like paper clips, coins, keys, nails, screws or other small metal objects, that can make a connection from one terminal to another. Shorting the battery terminals together may cause burns or a fire.
- Under abusive conditions, liquid may be ejected from the battery; avoid contact. If contact accidentally occurs, flush with water. If liquid contacts eyes, additionally seek medical help. Liquid ejected from the battery may cause irritation or burns.
Service
- Have your power tools serviced by a qualified repair person using only identical replacement parts. This will ensure that safety of the power tool is maintained.
Pruner Safety Warnings
- Interrupt your work when you feel tired or exhausted. Make regular breaks to regenerate. A moment of inattention while operating the product may result in serious personal injury.
- Keep all parts of the body away from the chain. Do not remove cut material or hold material to be cut when chain is moving. Make sure the switch is off when clearing jammed material. A moment of inattention while operating the product may result in serious personal injury.
- Hold the product by insulated gripping surfaces only, because the chain may contact hidden wiring. Chains contacting a “live” wire may make exposed metal parts of the product “live” and could give the operator an electric shock.
-
Keep all parts of the body away from the chain when the product is operating. Before you start the product, make sure the chain is not contacting anything. A moment of inattention while operating products may cause entanglement of your clothing or body with the chain.
-
Always hold the product with both hands on the handles. Holding the product with only one hand or on parts not intended for that increases the risk of personal injury and should never be done.
- Wear safety glasses and hearing protection. Further protective equipment for head, hands, legs and feet is recommended. Adequate protective clothing will reduce personal injury by flying debris or accidental contact with the chain.
- Do not operate a product in a tree. Operation of a product while up in a tree may result in personal injury.
- Always keep proper footing and operate the product only when standing on fixed, secure and level surface. Slippery or unstable surfaces such as ladders may cause a loss of balance or control of the product.
- When cutting a limb that is under tension be alert for spring back. When the tension in the wood fibres is released the spring loaded limb may strike the operator and/or throw the product out of control.
- Use extreme caution when cutting brush and saplings. The slender material may catch the chain and be whipped toward you or pull you off balance.
- Carry the product by the soft grip with the product switched off and away from your body. When transporting or storing the product always fit the guide bar cover. Proper handling of the product will reduce the likelihood of accidental contact with the moving chain.
- Follow instructions for lubricating, chain tensioning and changing accessories. Improperly tensioned or lubricated chain may either break or increase the chance for kickback.
- Keep handles dry, clean, and free from oil and grease. Greasy, oily handles are slippery causing loss of control.
- Cut wood only. Do not use product for purposes not intended. For example: do not use product for cutting plastic, masonry or non-wood building materials. Use of the product for operations different than intended could result in a hazardous situation.
- Pay attention to national and local regulations. National and local regulations may restrict the use of this product.
- Only use replacement guide bars and chains specified by the manufacturer or equivalent replacements. Using non-approved cutting attachments can result in personal injuries and damage to property.
- Before using the product and after any impact or dropping, check for signs of wear or damage and repair as necessary.
- Never remove or modify any guard or safety component. Ensure that guards and other safety components necessary for machine operation are in position, in good working condition and properly maintained to avoid injuries.
CAUSES AND OPERATOR PREVENTION OF KICKBACK
Kickback may occur when the nose or tip of the guide bar touches an object, or when the wood closes in and pinches the chain in the cut. Tip contact in some cases may cause a sudden reverse reaction, kicking the guide bar up and back towards the operator.
Pinching the chain along the top of the guide bar may push the guide bar rapidly back towards the operator. Either of these reactions may cause you to lose control of the saw which could result in serious personal injury. Do not rely exclusively upon the safety devices built into your saw. As a product user, you should take several steps to keep your cutting jobs free from accident or injury. Kickback is the result of tool misuse and/or incorrect operating procedures or conditions and can be avoided by taking proper precautions as given below:
- Maintain a firm grip, with thumbs and fingers encircling the product handles, with both hands on the saw and position your body and arm to allow you to resist kickback forces. Kickback forces can be controlled by the operator, if proper precautions are taken. Do not let go of the product.
- Do not overreach. This helps prevent unintended tip contact and enables better control of the product in unexpected situations.
- Only use replacement bars and chains specified by the manufacturer. Incorrect replacement bars and chains may cause chain breakage and/or kickback.
- Follow the manufacturer's sharpening and maintenance instructions for the chain. Decreasing the depth gauge height can lead to increased kickback.
Vibration And Noise Reduction
To reduce the impact of noise and vibration emission, limit the time of operation, use low-vibration and low-noise operating modes as well as wear personal protective equipment.
Take the following points into account to minimise the vibration and noise exposure risks:
- Only use the product as intended by its design and these instructions.
- Ensure that the product is in good condition and well maintained.
- Use correct cutting attachments for the product and ensure they in good condition.
- Keep tight grip on the handles/grip surface.
- Maintain this product in accordance with these instructions and keep it well lubricated (where appropriate).
- Plan your work schedule to spread any high vibration tool use across a longer period of time.
EMERGENCY
Familiarise yourself with the use of this product by means of this instruction manual. Memorise the safety directions and follow them to the letter. This will help to prevent risks and hazards.
• Always be alert when using this product, so that you can recognise and handle risks early. Fast intervention can prevent serious injury and damage to property.
- Switch off and disconnect from the power supply if there is any malfunction. Have the product checked by a qualified specialist and repaired, if necessary, before you put it into operation again.
Residual Risks
Even if you are operating this product in accordance with all the safety requirements, potential risks of injury and damage remain. The following dangers can arise in connection with the structure and design of this product:
- Health defects resulting from vibration emission if the product is being used over long periods of time or not adequately managed and properly maintained.
- Injuries and damage to property due to broken accessories or the sudden impact of hidden objects during use.
- Danger of injury and property damage caused by flying objects.
- Kickback
- Prolonged use of this product expose the operator to vibrations and may produce ‘white finger’ disease. In order to reduce the risk, please wear gloves and keep your hands warm. If any of the ‘white finger’ symptoms appear, seek medical advice immediately. ‘White finger’ symptoms include: numbness, loss of feeling, tingling, pricking, pain, loss of strength, changes in skin color or condition.
These symptoms normally appear in the fingers, hands or wrists.
The risk increases at low temperatures.
Child Safety
Tragic accidents can occur if the operator is not aware of the presence of children.
- Keep children out of the working area and under the watchful care of a responsible adult.
- Do not allow children under the age of 14 to operate this pole saw. Children who are 14 years of age and older must read and understand the operating instructions and safety rules in this manual and must be trained and supervised by a parent.
- Stay alert, and turn the pole saw off if a child or any other person enters the working area.
- Look behind and down for small children before and while cutting backwards.
- Use extreme care when approaching blind corners, doorways, shrubs, trees, or other objects that may obscure your view of a child who may run into the path of the pole saw.
⚠ WARNING (PROPOSITION 65)
Some dust created by power sanding, sawing, grinding, drilling, and other construction activities contains chemicals known to cause cancer, birth defects or other reproductive harm. Some examples of these chemicals are:
- Lead from lead-based paints
- Crystalline silica from bricks and cement and other masonry products, and
- Arsenic and chromium from chemically treated lumber.
Your risk of exposure to these chemicals varies depending on how often you do this type of work. To reduce your exposure to these chemicals, work in a well-ventilated area, and work with approved safety equipment, such as dust mask that are specially designed to filter out microscopic particles.
On the product, the rating label and within these instructions you will find among others he following symbols and abbreviations. Familiarise yourself with them to reduce hazards like personal injuries and damage to property.
| NOITANALPXE | ||
| V Volts | Voltage | |
| A | Amperes | Current |
| Hz | Hertz | Frequency (cycles per second) |
| W | Watts | Power |
| hrs | Hours | Time |
| n_o | No Load Speed | Rational speed, at no load |
| Class II Construction | Double-insulated construction | |
| /min | Per Minute | Revolutions, strokes, surface speed, orbits etc., per minute |
 | Lithium-Ion Battery Recycling | Designates that this tool is in compliance with Lithium-Ion battery recycling program requirements |
 | Safety Alert Symbol | Precautions that involve your safety. |
| Read the Operator's Manual | To reduce the risk of injury, user must read and understand operator's manual before using this product. | |
| Eye and Head Protection | Wear eye and head protection when operating this equipment. | |
| Gloves | Wear non-slip, heavy-duty protective gloves when handling the pole saw and the blade. | |
| Safety Footwear | Wear non-slip safety footwear when using this equipment. | |
| Kickback | DANGER! Beware of kickback. | |
| Risk of Electrocution | DANGER! Risk of electrocution! | |
| Electric Shock | Failure to use in dry conditions and to observe safe practices can result in electric shock. | |
| No Hands Symbol | Failure to keep your hands away from the blade will result in serious personal injury. | |
| Keep Bystanders Away | Keep all bystanders at least 50' (15 m) away. | |
The following signal words and meanings are intended to explain the levels of risk associated with this product.
| SYMBOL | SIGNAL | MEANING |
 | DANGER | Indicates an imminently hazardous situation, which, if not avoided, will result in death or serious injury. |
 | WARNING | Indicates a potentially hazardous situation, which, if not avoided, could result in death or serious injury. |
 | CAUTION | Indicates a potentially hazardous situation, which, if not avoided, may result in minor or moderate injury. |
| CAUTION | (Without Safety Alert Symbol) Indicates a situation that may result in property damage. |
Service
Servicing requires extreme care and knowledge and should be performed only by a qualified service technician. For service we suggest you return the product to your nearest AUTHORIZED SERVICE CENTER for repair. When servicing, use only identical replacement parts.

WARNING
To avoid serious personal injury, do not attempt to use this product until you have read this Owner's Manual thoroughly and understand it completely. If you do not understand the warnings and instructions in this Owner's Manual, do not use this product. Call the Toll-free Helpline (866)-384-8432 for assistance. The operation of any power tool can result in foreign objects being thrown into your eyes, which can result in severe eye damage. Before operating a power tool, always wear safety goggles, safety glasses with side shields, or a full face shield when needed. We recommend a Wide Vision Safety Mask for use over eyeglasses or standard safety glasses with side shields. Always use eye protection that is marked to comply with ANSI Z87.1.

WARNING

The operation of any power tool can result in foreign objects being thrown into your eyes, which can result in severe eye damage. Before beginning power tool operation, always wear safety goggles or safety glasses with side shields and, when needed, a full face shield.
We recommend Wide Vision Safety Mask for use over eyeglasses or standard safety glasses with side shields. Always use eye protection which is marked to comply with ANSI Z87.1.
SAVE THESE INSTRUCTIONS
Know Your Product (Fig. 1)
The safe use of this product requires an understanding of the information on the product and in this operator's manual as well as a knowledge of the project you are attempting. Before use of this product, familiarize yourself with all operating features and safety rules.
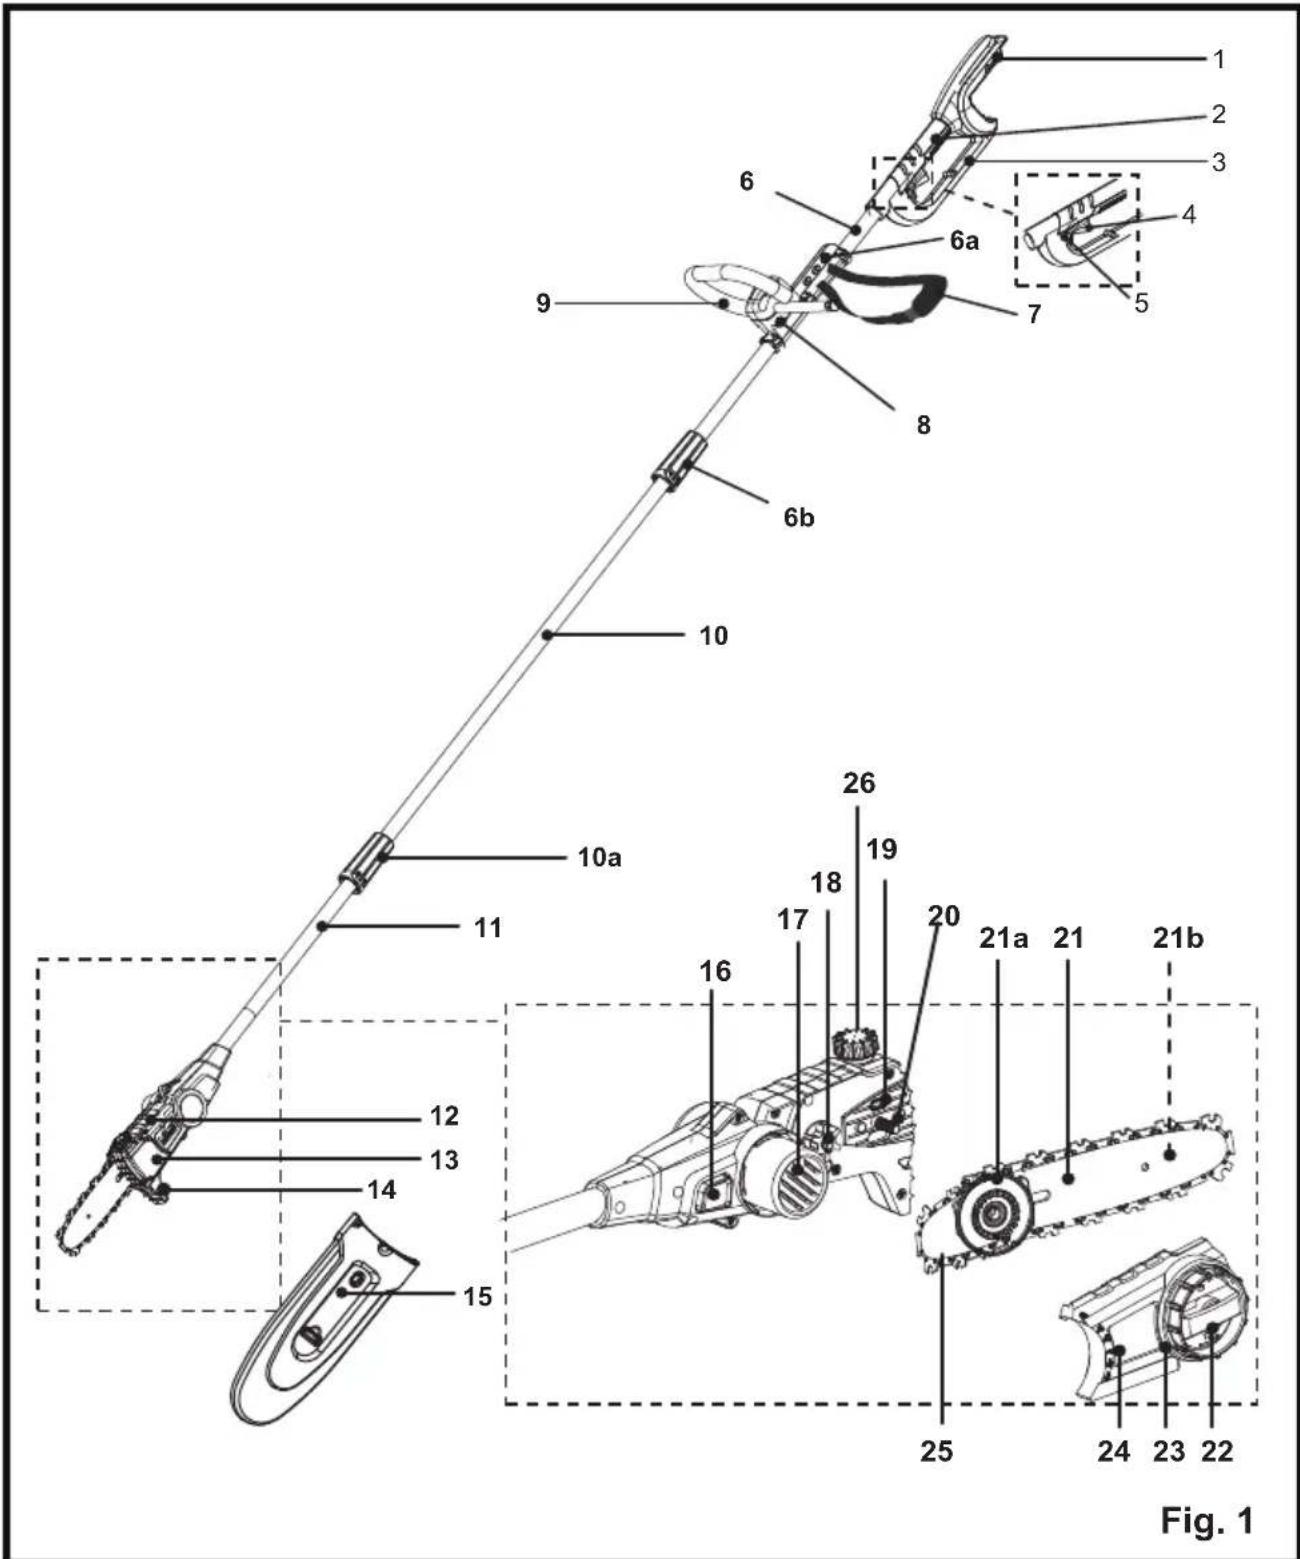
- Battery Dock
- Rear Handle
- Rear Safeguard
- On/off Switch
- Lock-off Button
- Lower Pole
6a. Shoulder Strap Connector
6b. Locking Collar - Shoulder Strap
- Front Handle Connector
- Front Handle
- Pole Extension
10a. Upper Locking Collar - Upper Pole
- Cutting Head
- Chain Oil Reservoir
- Bucking Spikes
- Scabbard
- Pivot Button
- Air Vents
- Drive Sprocket
- Oiling Port
- Support Bolt
- Guide Bar
21a. Tensioning Sprocket
21b. Sprocket Wheel - Locking Wheel
- Tension Wheel
- Cover
- Chain
- Oil Cap
NOTE: The above identifier numbers will be used throughout the manual to aid in calling out features.
Unpacking
- Unpack all parts and lay them on a flat, stable surface.
- Remove all packing materials and shipping devices if applicable.
- Make sure the delivery contents are complete and free of any damage. If you find that parts are missing or show damage do not use the product but contact your dealer. Using an incomplete or damaged product represents a hazard to people and property.
- Ensure that you have all the accessories and tools needed for assembly and operation. This also includes suitable personal protective equipment.
WARNING
The product and the packaging are not children's toys! Children must not play with plastic bags, sheets and small parts! There is a danger of choking and suffocation!
You Will Need
(Items Not Supplied)
Suitable Personal Protective Equipment
Suitable Crosshead Screwdriver
Sharpening Set
Battery Pack 40LB4001
Charger 40LC01-ETL
Chain Oil
Lubrication Grease
(Items Supplied)
Shoulder Strap
Scabbard
WARNING
The product must be fully assembled before operation! Do not use a product that is only partly assembled or assembled with damaged parts! Follow the assembly instructions step-by-step and use the pictures provided as a visual guide to easily assemble the product! Do not connect the product to the power supply until it is completely assembled! Always wear gloves during assembly!
Front Handle Assembly (Fig. 2)
WARNING
Never use the product without the front handle properly fitted! Failure to heed this warning could result in serious personal injury.
NOTE: The screws need to be removed priot to attaching the front handle.
- Remove the screws (9a) from the Front handle connector (8) of the front handle (9).
- Align the front handle (9) with the Front handle connector (8) on the lower pole (6).
- Secure the front handle (9) with the screws (9a) (Fig. 2).

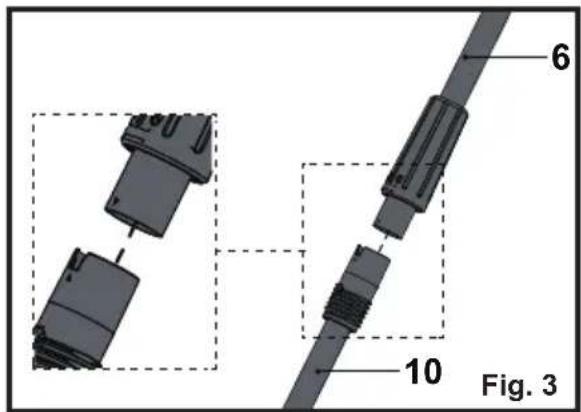
Pole Assembly (Fig. 3-6)
- Align the lower pole (6) with the pole extension (10). The triangle-shaped recesses must face each other (Fig. 3).
- Remove all packing materials and shipping devices if applicable.
- Insert the lower pole (6) into the pole extension (10) (Fig. 4, step 1). Secure the connection with the locking collar (6b) (Fig. 4, step 2).
- Align the pole extension (10) with the upper pole (11). The triangle-shaped recesses must face each other (Fig. 5).
- Insert the pole extension into the upper pole (Fig. 6, step 1). Secure the connection with the locking collar (Fig. 6, step 2).

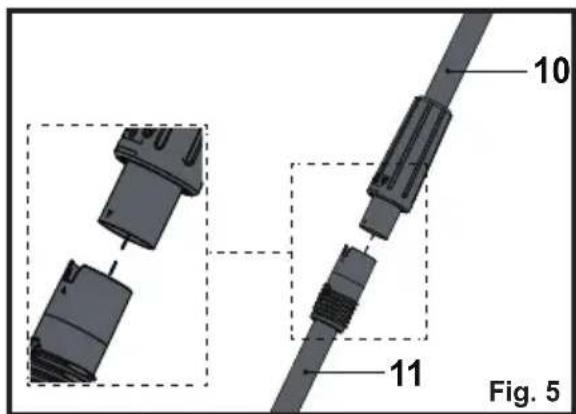

NOTE: The product can also be used without the pole extension according to the required operation.
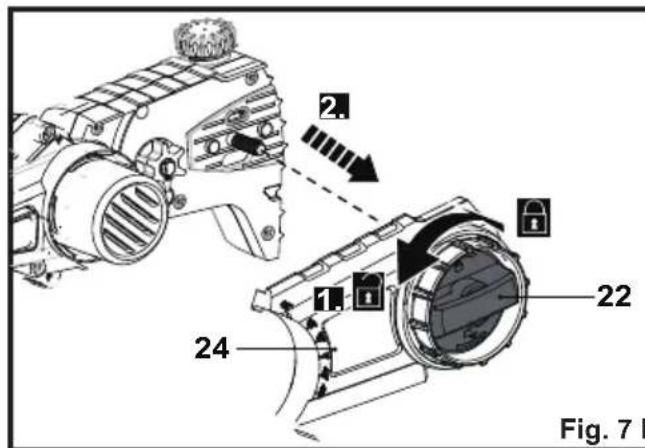
Chain And Guide Bar Assembly (Fig. 7-10)
The chain (25) and guide bar (21) are pre-assembled at delivery. Inspect and re-assemble them before operation if necessary. Use only the guide bar (21) and chain (25) according to the technical data of the product.
- Place the product on a suitable flat surface.
- Loosen the locking wheel (22) and remove the cover (24) (Fig. 7).
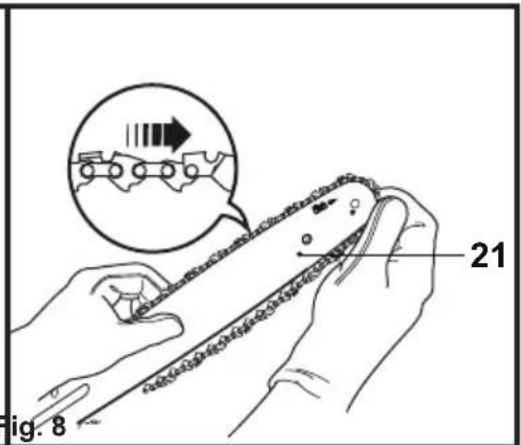
- Spread the chain (25) out with the cutting edges of the chain pointing in the rotational direction and slide the chain into the groove around the guide bar (21) (Fig. 8).
WARNING
Always use a chain designed as “low-kickback” or a chain which meets the low-kickback requirements! A standard chain (a chain which does not have the kickback reducing guard links) should only be used by an experienced professional operator! Failure to heed this warning could result in serious personal injury.
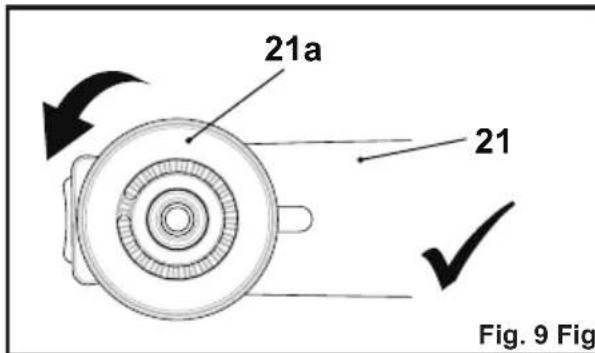
- Ensure the tensioning sprocket (21a) is adjusted to outer right position, turn anticlockwise if required (Figs. 9, 10).

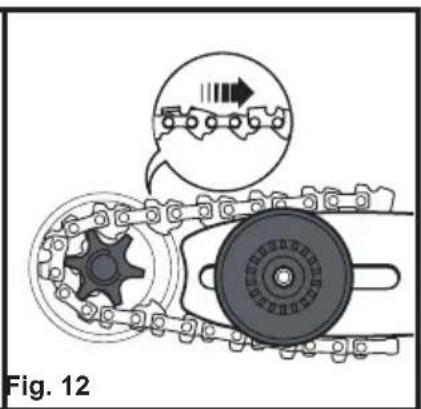
natural_image
Diagram of a circular mechanical component with concentric rings and a labeled cross (no text or symbols on the main diagram)- Align the guide bar (21) and chain (25) assembly with the drive sprocket (18) and support bolt (20). Lay the chain around the drive sprocket (18) and then lower the guide bar (21) to install it to the support bolt (20) (Figs. 11, 12).

natural_image
Mechanical gear assembly diagram showing two connected chains with a gear mechanism and a magnified inset (no text or symbols)WARNING
The direction of the chain 'cutters' must be as indicated by the symbol and arrow on the guide bar!
- The chain movement is as indicated by the arrow (Fig. 13). Make sure the chain (25) is properly placed over the sprocket wheel (21b) of the guide bar (21).
- Replace the cover (24) onto the product and slightly tighten the locking wheel (22) (Fig. 14). Do not tighten the locking wheel completely; chain tensioning is required first.
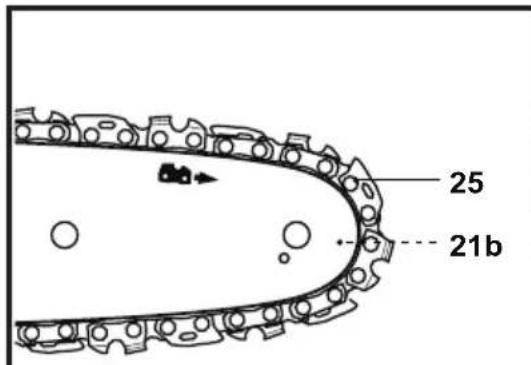
Fig. 13
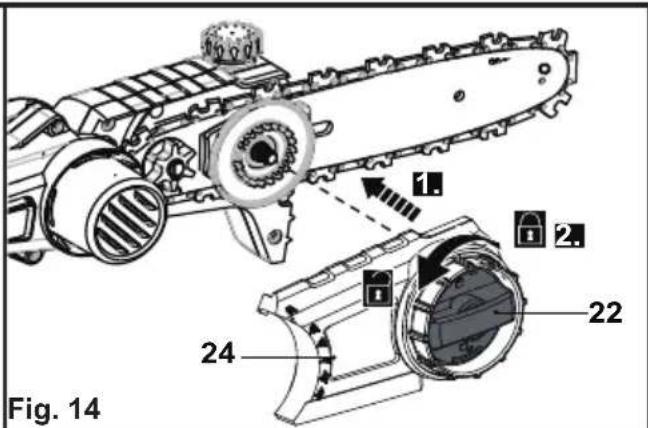
NOTE: The chain (25) has not yet been tensioned. Tension the chain as described under “chain tensioning”.
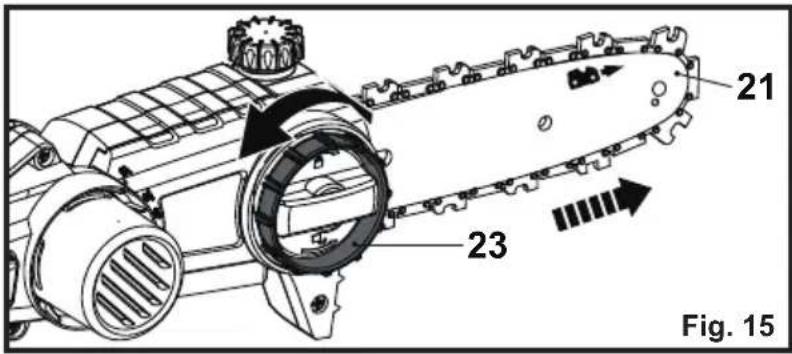
Chain Tensioning (Fig. 15)
Always check the chain tension before use, after the first cuts, regularly during use, approx. every five cuts. Upon initial operation, new chains can lengthen considerably. This is normal during the break-in period and the interval between future adjustments will lengthen quickly.
WARNING
Switch the product off and remove the battery pack before adjusting chain tension!
The cutting edges of the chain are sharp! Always wear protective gloves when handling chain! Always maintain proper chain tension! A loose chain increases the risk of kickback!
A loose chain may jump out of the guide bar groove! This may injure the operator and damage the chain! A loose chain will cause rapid wear to the chain, guide bar and sprocket!
Tensioning the chain too tightly will overload the motor and cause damage, and insufficient tension can cause chain derailing, whereas a correctly tightened chain provides the best cutting characteristics and prolonged working life! The chain life mainly depends upon sufficient lubrication and correct tensioning! Failure to heed this warning could result in serious personal injury.
- Place the product on a suitable flat surface.
- Turn the tension wheel (23) clockwise until the chain 'tie straps' are just touching the bottom edge of the guide bar (21) (Fig. 15).
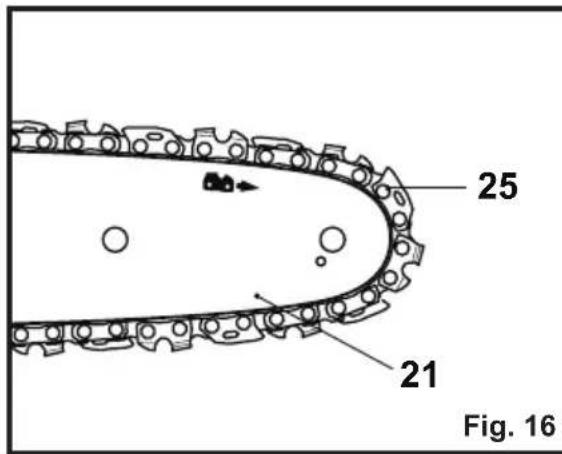
Tension Test (Fig. 16-18)
- Check the chain tension using one hand to lift the chain against the weight of the product. The correct chain tension is achieved when the chain can be lifted by approximately 2 - 4 mm from the guide bar in the center (Figs. 16, 17).
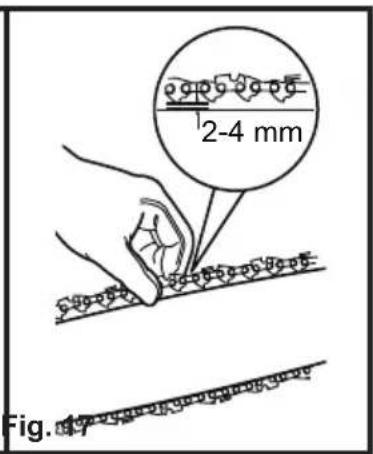
- Adjust the tension if you find that the chain is too loose or tight. Pull the chain (25) along the top of the guide bar (21) by hand from one end to the other, several times. The chain should feel tight but still move freely.
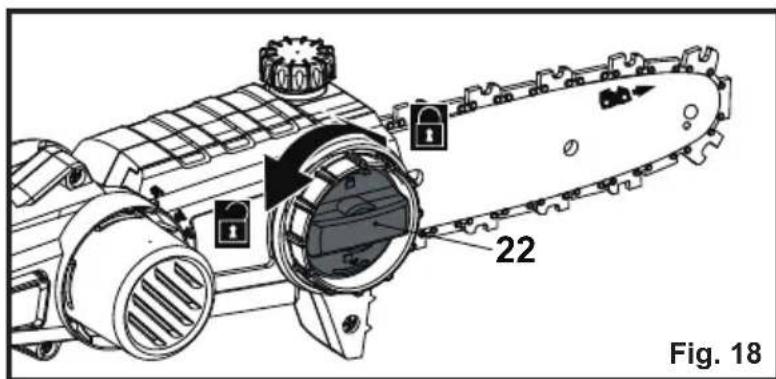
- Turn the locking wheel (22) to tighten the cover (24) completely (Fig. 18).
Chain Lubrication (Fig. 19-20)
WARNING
The product is not filled with chain oil! It is essential to fill with oil before using! Never operate the product without chain oil or an empty oil tank, as this will result in extensive damage to the product! Never run the bar and chain without lubrication oil! Running the saw dry or with too little oil will decrease cutting efficiency, shorten product life, and cause rapid wear to the chain and bar from overheating! Insufficient oil is evidenced by smoke or bar discoloration! Adequate lubrication of the chain during cutting operations is essential to minimise friction with the guide bar! This product is equipped with an automatic oiling system! The oiling system automatically delivers the proper amount of oil to the bar and chain!
- Place the product on a suitable flat surface with oil tank cap facing upward.
- Unscrew and remove the oil tank cap.
- Add lubricant oil into the tank. We recommend using environmentally friendly chain oil specially intended to be used with this product.
NOTE: Use a funnel with a filter to prevent debris entering the tank and to avoid splitting and overfilling the tank. Use motor oil SAE#10W-30 all year round or SAE#30 in summer and SAE#10 in winter, or if the trees have excessive sap.
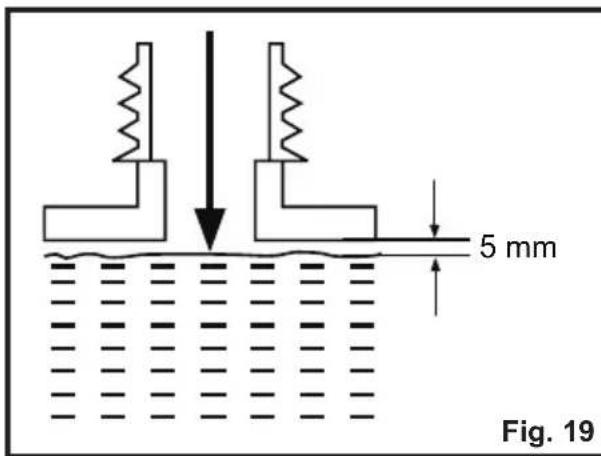
- Do not overfill. Leave approximately 5 mm of space to the lower edge to allow the lubricant to expand (Fig. 19).
NOTE: Towards the end of the season, it is advisable to put only as much lubricant oil in the tank as you need for each cut, so that it is completely used up before you store the product.
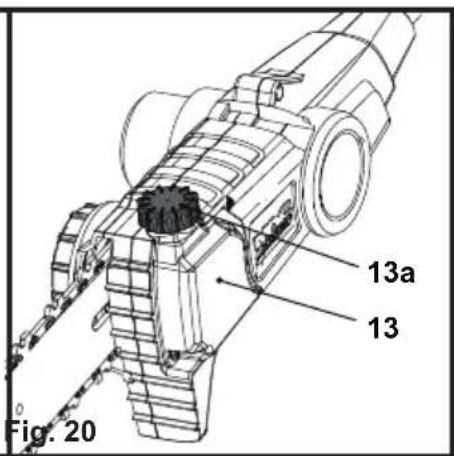
- Check the oil level prior to switching on and regularly during operation. Refill oil when the oil level is lower than the "MIN" marking (Fig. 20).
- Wipe up spilled lubricant with a soft cloth and refit the tank cap.
NOTE: Always dispose of lubricant, used oil and objects contaminated with them in accordance with local regulations.
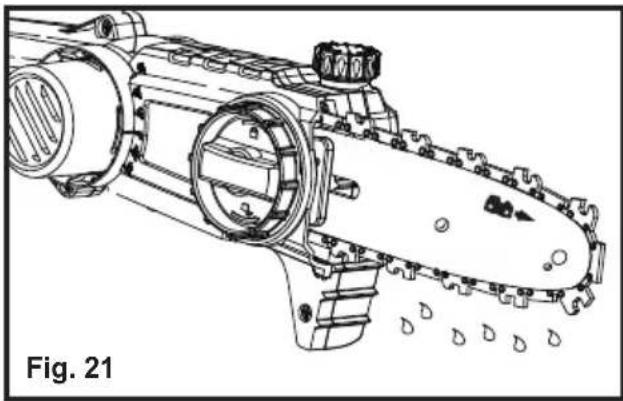
Pre-use Test (Fig. 21)
NOTE: Perform the following test before operating your product. This product is equipped with an automatic oiling system! The oiling system automatically delivers the proper amount of oil to the bar and chain! Before checking, the product must be fully assembled and all instructions must have been read.
- Check the chain lubrication before each use.
• Make sure the guide bar (21) and the chain (25) are in place when you check the oil delivery. - Switch on the product (see section "on/off switch" below); keep pressing the on/off switch (4) and check if the chain oil is delivered as shown in the figure (Fig. 21).
- Have the chain oil flow adjusted by a qualified person if required.
natural_image
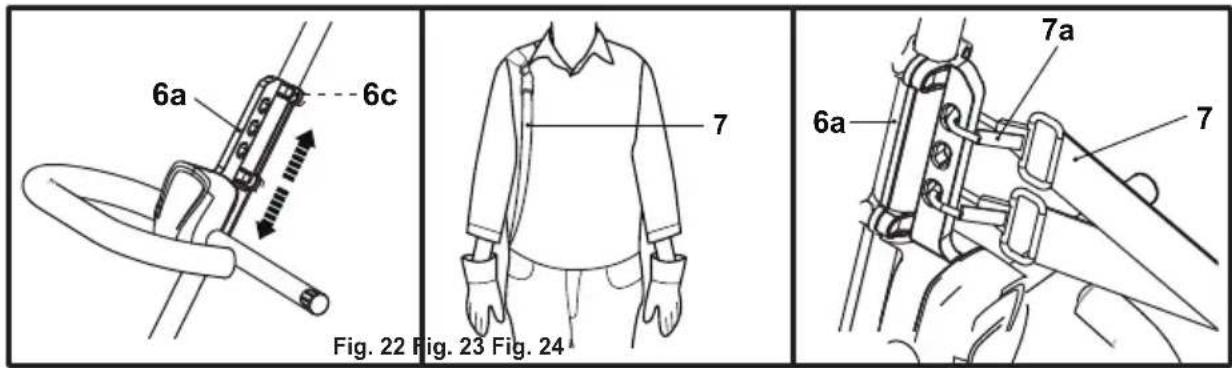
Technical line drawing of a mechanical device with chainings and water droplets (no text or symbols)Shoulder Strap (Fig. 22-24)
The shoulder strap (7) aids the operator during use by allowing operator to adjust to comfortable position.
- Loosen the 6 screws (6c) until the shoulder strap connector (6a) can slide up or downward freely.
- Adjust the shoulder strap connector (6a) to the desired height position. Tighten the screws (6c) to secure it (Fig. 22).
- Place the shoulder strap (7) on the right shoulder. The snap clips (7a) must be located at the right hip (Fig. 23)..
- Attach the snap clips (7a) onto the shoulder strap connector (6a) (Fig. 24).
WARNING
Always use the product with the shoulder strap! Do not carry it only with your hands!
- Adjust the length of the shoulder strap (7) if required.
- Press open the snap clips (7a) to remove the shoulder strap (7) from the shoulder strap connector (6a).
• In case of emergency remove the shoulder strap from your shoulder.
Battery Pack And Charger (Fig. 25-26) (Not Included)
NOTE: Please consult the instructions for use supplied with battery pack and charger for more details.
Attach / Release
- Align the battery pack (A) to the slots of the battery dock and slide in until it snaps in place (Fig. 25).
- Press the release buttons (both sides) (B) on the battery pack (A) and remove it from the product (Fig. 26).

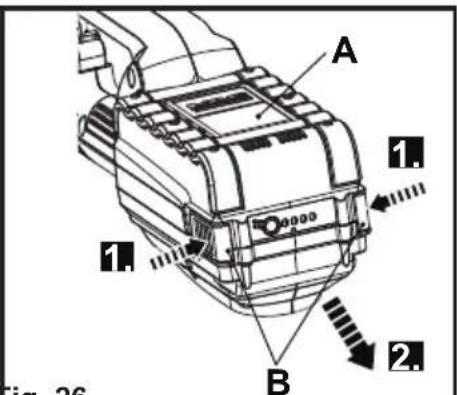
Fig. 25 Fig. 26
Connect battery pack
• Make sure the on/off switch is in its off position.
- Attach the battery pack to the product. Ensure it snaps in place.
- Your product is now ready to be used.
Intended Use
This cordless pole saw is designated with rated voltage of 40 V. It is designed only to be used with the battery packs 40LB4001.
The product is intended for cutting and pruning limbs up to a maximum thickness of 6" / 150mm. It must not be used for cutting other materials, such as plastic, stone, metal or wood that contains foreign objects, or materials that are harmful to health.
The product may only be used with the guide bar/chain combination stated within these instructions. The use of other types or sizes is not allowed. For safety reasons it is essential to read the entire instruction manual before first operation and to observe all the instructions therein.
This product is intended for private domestic use only, not for any commercial trade use. It must not be used for any purposes other than those described.
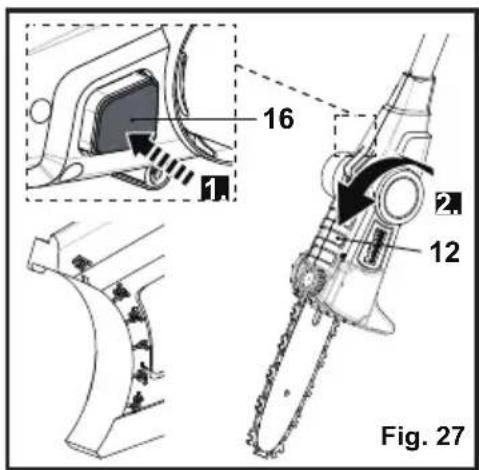
Cutting Head Pivot Adjustment (Fig. 27)
Adjust the angle of the cutting head (12) to fit the operation conditions.
- Press the pivot button (16) and hold it in position (Fig. 27, step 1).
- Move the cutting head slightly up or downward.
- Release the pivot button (16) and keep moving the cutting head until it locks in place (Fig. 27, step 2).
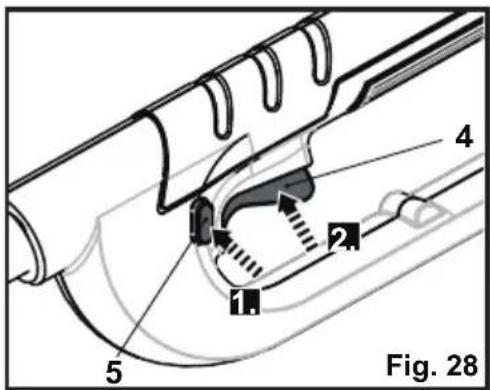
Switching ON / OFF (Fig. 28)
- Ensure the chain (25) and guide bar (21) do not come into contact with anything before starting the product.
- Press the lock-off button (5) (either from left or right side) and hold it in position (Fig. 28, step 1).
- Press the on/off switch (4) to switch the product on (Fig. 28, step 2). The lockoff button (5) can then be released.
- Release the on/off switch (4) to switch the product off.
Chain Stop Test
The product must always be held with two hands when switching it on.
- Hold the front handle with the left hand, the rear handle with your right hand.
- When switching on, the guide bar and the chain must not be in contact with any object.
- Release the on/off switch to switch the product off. The chain must come to a stop.
Overload Protection
This product features a battery protection, which cuts off the power when the product is overloaded.
- Release the on/off switch to switch the product off.
- Remove the product from the work piece, to remedy the overload.
- Press the lock-off button, hold it position and then press the on/off switch. If the product does not work, change the battery pack and repeat.
NOTE: The indicated battery capacity may differ slightly from its actual capacity. Recharge the battery pack when necessary.
General Operation
- Check the product, its battery pack and charger as well as accessories for damage before each use. Do not use the product if it is damaged or shows wear.
- Double check that accessories and the guide bar chain are properly fixed.
- Check the chain oil level, refill if necessary.
- Always hold the product firmly by its handles. Keep the handles dry and clean to ensure safe support.
- Ensure that the air vents are always unobstructed and clear. Clean them if necessary with a soft brush. Blocked air vents may lead to overheating and damage the product.
- Switch the product off immediately if you are disturbed while working by other people entering the working area. Always let the product come to complete stop before putting it down.
- Do not overwork yourself. Take regular breaks to ensure you can concentrate on the work and have full control over the product.
PRUNING
Kickback

WARNING!
Beware of kickback! Kickback can lead to dangerous loss of control of the product and result in serious or fatal injury to the operator or anyone standing close by! Always be alert because rotational kickback and pinch kickback are major product operational dangers and the leading cause of most accidents! Failure to heed this warning could result in serious personal injury.
- Kickback is the sudden backward/upward motion of the product, occurring when the chain (at the tip of the guide bar) comes in contact with a log or wood, or when the chain becomes jammed.
- When kickback occurs the product reacts unpredictably and can cause severe injuries to the operator or bystanders.
- With a basic understanding of ‘kickback’, the element of surprise can be reduced or eliminated. Sudden surprise contributes to the majority of accidents.
- Read all the safety warnings and user instructions carefully before attempting to operate this product.
To Avoid Kickback:
- Never work with a loose, widely stretched or heavily worn chain.
• Always use a low kickback chain. - Use bucking spikes (14) to secure the product onto the limb being sawed.
- Ensure correct chain tension.
- Ensure the chain is sharpened correctly.
- Never work with the tip of the guide bar.
- Saw with the guide bar at a flat angle.
• Always hold the product firmly with both hands.
Pruning (Fig. 29-30)

natural_image
Line drawing of a worker using a tool to extend a tree trunk, labeled 'Fig. 29' (no text on diagram)
- Always hold the product firmly with both hands on front handle (9) and rear handle (2). Never operate this product using only one hand (Fig. 29).
- Maintain a firm grip with your thumbs and fingers encircling the handles. A firm grip will help you reduce 'kickback' and maintain control of the product.
- Always hold the product at an angle of not more than 60^ from the horizontal level. Otherwise safe operation is not possible (Fig. 30).
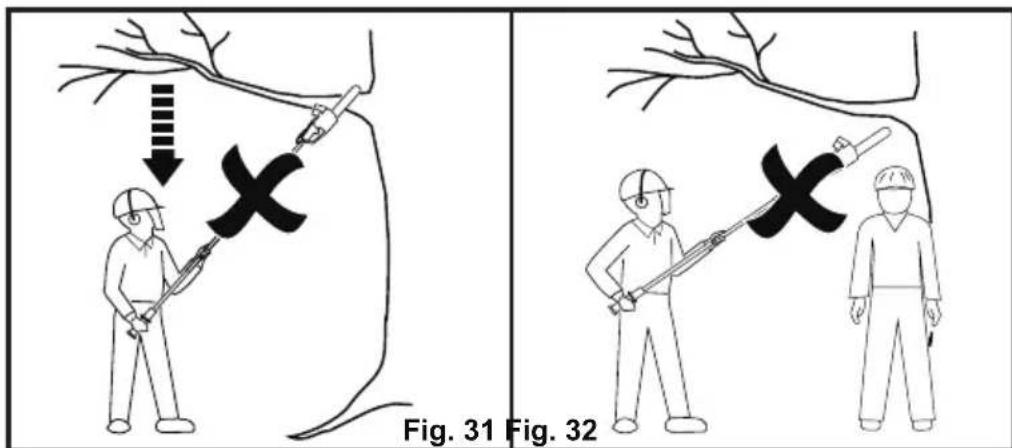
- Never stand directly under the limb you are sawing. Objects may fall different than expected. There is risk of being struck by falling branches or by those that rebound after hitting the ground. Always position yourself out of the path of falling limps (Fig. 31).
- Keep other persons away from cutting end of product and at a safe distance from the work area. Maintain a minimum distance of 10m / 33 Feet to bystanders (Fig. 32).
- Never stand on a ladder or other type of unstable support while using the product. Insecure stand invites hazards (Fig. 33).

WARNING!
Never climb into a tree to prune! Do not stand on ladders, platforms, logs, or in any position which may cause you to lose your balance or control of the product! When pruning trees, it is important not to make the flush cut next to main limb or trunk until you have cut off the limb further out to reduce the weight! This prevents stripping the bark from the main member!
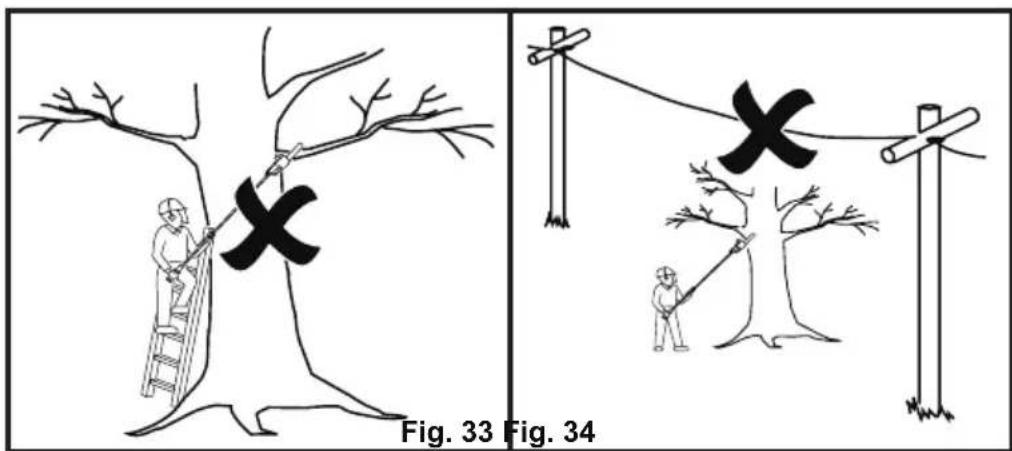

WARNING!
This product has not been designed to provide protection from electric shock in the event of contact with overhead electric lines! Therefore do not use product near cable, electric power or telephone lines. Keep a minimum distance of 10m / 33 Feet to all electric lines (Fig. 34)!
- Use the product only with secure footing. Hold the product at the right-hand side of your body. Regularly change the working position and include rest periods during operation.
- Do not operate the product with arms fully extended or attempt to cut areas which are difficult to reach.
- Keep a firm, steady pressure on the product while working with it. Do not try to force the product through the wood, let the cutting device do the work, using the gripping teeth to apply minimal leverage pressure.
- Beware when reaching the end of the cut. The weight of the product may change unexpectedly as it cuts free from the wood. Accidents can occur to the legs and feet. Always remove the product from a wood cut while it is running.
NOTE: The chain must be running at full speed before it comes into contact with the wood.
Thin Branches (Fig. 35-38)
- Thin branches can be cut off with one single cut. To prevent the branch from slivering and buckling the branch should be cut off in several pieces (Fig. 35).
Thick Branches
When cutting off larger branches three cuts are necessary.
- First cut into the branch from below outside the place where you intend to cut off the branch. The cut should go from one third to halfway through the branch (Fig. 36).
- Cut into the branch from the top outside at the same height the branch is sawn from top (Fig. 37).
- Last, cut off the stump with one clean cut from top to bottom (Fig. 38).
- You might want to seal the cut with a suitable compound.
NOTE: Remove the branches lying on the floor regularly to avoid stumbling hazards. Check the oil level regularly and fill up if necessary. Switch the power off and disconnect from power source when leaving the product.

natural_image
Abstract black silhouette of a tree with dashed diagonal line (no text or symbols)Fig. 35 Fig. 36 Fig. 37 Fig. 38

natural_image
Abstract black silhouette of a symmetrical geometric shape resembling a stylized tree or mechanical part (no text or symbols)
natural_image
Abstract black silhouette of a teapot-like shape on white background (no text or symbols)
natural_image
Abstract black silhouette of a teapot with a handle, no text or symbols presentAfter Use
- Switch the product off, remove the battery back and let it cool down.
- Check, clean and store the product as described below.
General Care

WARNING!
Always switch the product off, remove the battery pack and let the product cool down before performing inspection, maintenance and cleaning work!
- Keep the product clean. Remove debris from it after each use and before storage.
- Regular and proper cleaning will help ensure safe use and prolong the life of he product.
- Inspect the product before each use for worn and damaged parts. Do not perate it if you find broken and worn parts.

WARNING!
Only perform repairs and maintenance work according to these instructions! All further works must be performed by a qualified specialist!
General Cleaning
- Clean the product with a dry cloth. Use a brush for areas that are hard to reach.
- In particular clean the air vents after every use with a cloth and brush.
- Remove stubborn dirt with high pressure air (max. 3 bar).
- Check for any damage and wear. Repair damages in accordance with this instruction manual.
NOTE: Do not use chemical, alkaline, abrasive or other aggressive etergents or isinfectants to clean this product as they might be harmful to its surfaces.
Sprocket Wheel
NOTE: It is not necessary to remove the chain to lubricate the sprocket. Lubrication can be done on the job.
- Clean the sprocket wheel.
- Using a disposable lube gun, insert the needle nose into the lubrication hole and inject grease until it appears at the outside edge of the sprocket (Fig. 39).
- Rotate the chain by hand. Repeat the lubrication procedure until the entire sprocket has been greased.

GUIDE BAR AND CHAIN MAINTENANCE
Guide Bar
Most guide bar problems can be prevented merely by keeping the product well maintained. Incorrect filing and non-standard cutter and depth gauge settings are the causes of most guide bar problems, primarily resulting in uneven bar wear. As the bar wears unevenly, the rails widen, which may cause the chain to clatter and make it difficult to complete straight cuts. If the guide bar is insufficiently lubricated and the product is operated with a chain which is too tight, this will contribute to rapid bar wear. To help minimise bar wear, maintenance of the guide bar as well as the chain is
recommended.
- Disassemble the guide bar and chain in reversed order from assembly.
- Check the oiling port for clogging and clean if necessary to ensure proper lubrication of the guide bar and chain during operation. Use a soft wire small enough to insert into the oil discharge hole (Fig. 40).
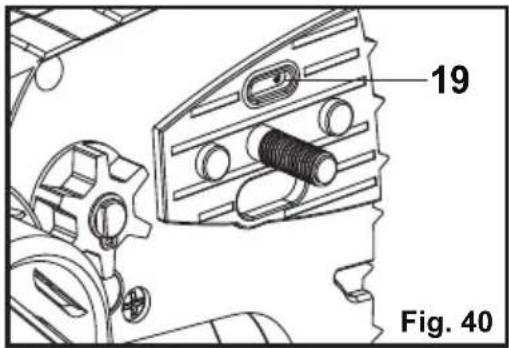
NOTE: The condition of the oil passages can be easily checked. If the passages are clear, the chain will automatically give off a spray of oil within seconds of the product starting.
Your product is equipped with an automatic oiling system.
- Check the drive sprocket. If it is worn or damaged due to strain, have it replaced by an authorised service agent.
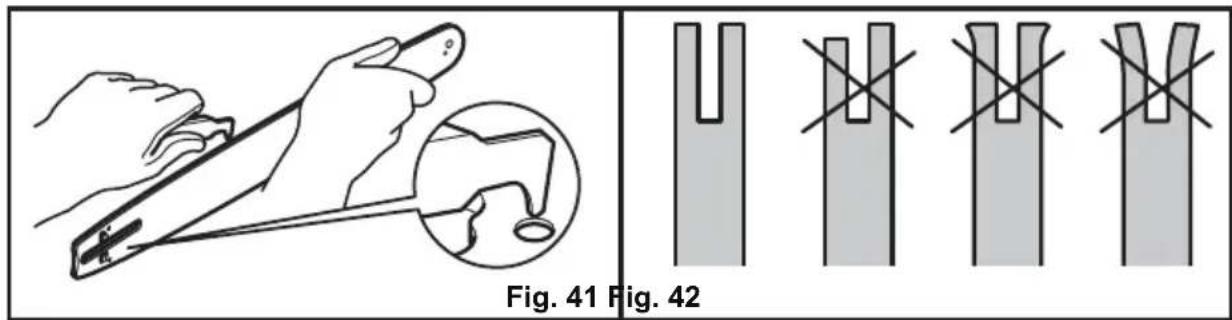
- Clear residue from the rails on the guide bar using a screwdriver, putty knife, wire brush or other similar tool. This will keep the oil passages open to provide proper lubrication to the bar and chain (Fig. 41).
- Check the guide bar 'rail' for wear: Hold a ruler (straight edge) against the side of the guide bar and 'cutter side plates'. If there is a gap between the ruler and guide bar the guide bar 'rail' is normal. If there is no gap (ruler flush against the side of the guide bar) the guide bar 'rail' is worn and needs to be replaced with a new one of the same type (Fig. 42).
- Turn the guide bar 180^ to allow even wear, thereby extending the life span of the guide bar.
- Loosen the screw and remove the tensioning sprocket (21A) from the guide bar (21). Turn the guide bar (21) and fix the tensioning sprocket (21A) with the screw. Apply a drop of suitable glue to the screw to ensure its safe positioning when reassembly. (Fig. 43).
- Check the chain for possible wear and damages. Replace it with a new one if required. Experienced user can sharpen a dull chain (see section "chain sharpening" below).
- Refit the chain and the guide bar as described under "Assembly".

Chain Sharpening
NOTE: Chain sharpening may be required:
- after damp wood is cut (mealy sawdust),
- when handling the product becomes difficult (pulls to the left or right),
- when the chain is blunt (excessive force is required to penetrate the wood), or obviously damaged. Never saw with a blunt chain. The chain is blunt if you have to push the product into the tree and the chips are very small.

WARNING!
Only sharpen the chain yourself if you are trained and have experience! Use proper tools to sharpen the chain!
- Have the chain sharpened professionally or sharpen the chain yourself by using a proper sharpening kit. Also observe the sharpening instructions supplied with the sharpening kit.
-
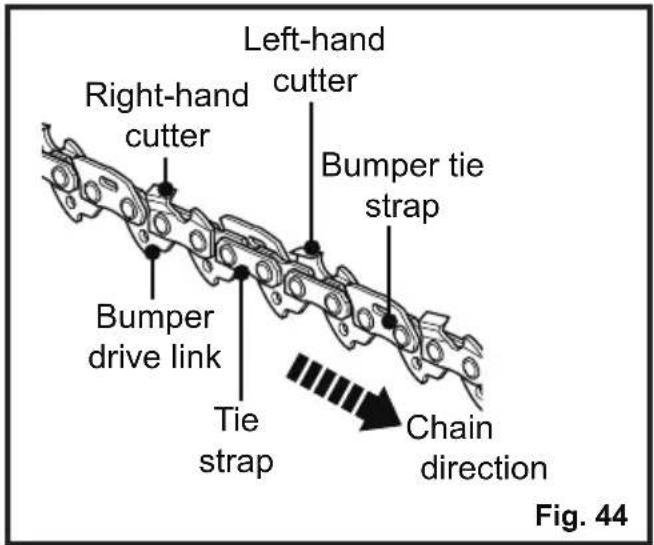
The height difference between the tooth and the ridge is the cutting depth. When sharpening the chain you have to consider the following points (Fig. 44).
-
File angle
- Cutting angle
- File position
- Diameter of round file
-
File depth
• To sharpen the chain proceed as follows: -
Use protective gloves.
- Ensure the chain is correctly tensioned.
- Engage the chain brake to lock the chain on the bar.
- Use a chain file, whose diameter is 1.1 times the cutting tooth depth. Make sure 20 % of the file diameter is above the cutter's top plate.
NOTE: A file guide is available from most reputable tool merchants and is the easiest way to hold the file at the correct position.
- File at an angle perpendicular to the bar, and at an angle of 25^ to the direction of travel (Fig. 45).
- File each tooth from the inside towards outside only. File one side of the chain first than turn the saw around and repeat the process.
- Sharpen each tooth equally by using the same number of strokes.
- Keep all cutter lengths equal. Check the safety depth gauge height every 5 sharpenings. If the depth gauges are also trimmed it is essential that the original profile be restored.
- Use a depth gauge measuring instrument to check the height of the depth gauge. Depth gauge measuring jigs are available from most reputable tool merchants (Fig. 46).
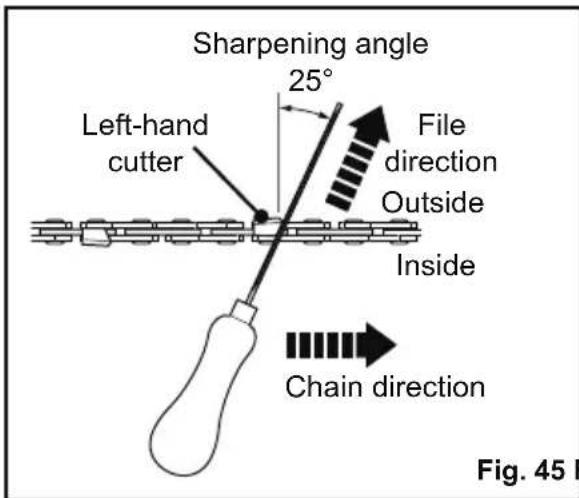

Fig. 45 Fig. 46
Maintenance
Before and after each use, check the product including accessories and attachments for loose fasteners, leaks and worn or damaged parts. If required, exchange them for new ones as described in this instruction manual. Observe the technical requirements.
Battery Pack And Charger (Not Included)
NOTE: Please consult the instructions for use supplied with battery pack and charger for more details.
Storage
- Switch the product off and remove the battery pack.
- Clean and maintain the product before storage as described above.
- Attach the scabbard (15).
- Store the product and its accessories in a dry, frost-free place.
- Always store the product in a place that is inaccessible to children. The ideal storage temperature is between 10^ C and 30^ C.
- We recommend using the original package for storage or covering the product with a suitable cloth or enclosure to protect it against dust.
Transportation
- Switch the product off and remove the battery pack.
- Attach transportation guards, if applicable.
• Always carry the product on its handles (2, 9). - Protect the product from any heavy impact or strong vibrations which may occur during transportation in vehicles.
- Secure the product during transport to prevent loss of lubricant, damage or injury.
Suspected malfunctions, are often due to causes that the user can fix themselves.
Therefore check the product using this section. In most cases the problem can be solved quickly.

WARNING:
Only perform the steps described within these instructions!
All further inspection, maintenance and repair work must be performed by a similarly qualified specialist if you cannot solve the problem yourself!
| Problem | Possible cause | Solution |
| 1. Product does not start | 1.1 . Battery pack not properly attached1.2. Battery pack discharged1.3. Battery pack damaged1.4. Other electrical defect to the product | 1.1 Attach properly1.2. Remove and charge battery pack1.3. Replace with a new one of the same1.4. Check by a specialist electrician |
| 2. Product does not reach full power | 2.1. Battery pack capacity too low2.2. Air vents are blocked | 2.1. Charge battery pack2.2. Clean the air vents |
| 3. Unsatisfactory result | 3.1. Chain not tensioned properly3.2. Blunt chain | 3.1. Tension properly3.2. Sharpen or replace the chain |
| 4. Excessive vibration/noise or exhaust | 4.1. Chain is dull / damaged4.2. Bolts/nuts are loosen4.3. Oil is incorrect | 4.1. Sharpen or replace the chain4.2. Tighten bolts/nuts4.3. Empty out unused oil and refill with the correct oil |
| 5. Product runs hot, smoke comes off | 5.1. Chain oil tank empty5.2. Chain tension too tight | 5.1. Refill with the correct oil5.2. Adjust the chain tension |
| 6. Chain is not rotating but motor runs | 6.1. Chain tension too loose6.2. Guide bar or chain damaged6.3. Chain oil tank empty | 6.1. Adjust the chain tension6.2. Replace with new parts6.3. Refill with the correct oil |
ENVIRONMENTALLY SAFE BATTERY DISPOSAL
- The product comes in a package that protects it against damage during shipping. Keep the package until you are sure that all parts have been delivered and the product is working properly. Recycle the package afterwards.
- Waste electrical products should not be disposed of with household waste. Please recycle where facilities exist. Check with your Local Authority or local store for recycling advice.
- Lubricant, oil and used oil as well as objects contaminated with oil, e. g. cleaning cloths; do not belong with household waste. Dispose of oil-contaminated items in accordance with the local guidelines and hand them in at recycling centers.
We take pride in producing a high quality, reliable product. That's why LawnMaster tools carry a limited two (2) year warranty against defects in workmanship and materials from date of purchase under normal household use. If product is to be used for commercial, industrial or rental use, a thirty (30) day limited warranty will apply. Batteries and chargers carry a limited one (1) year warranty against defects in workmanship and materials.
Returning Product for Warranty:
- Dated proof of purchase is required for warranty service.
- Please register your product on www.lawnmaster.com.
• Shipping and processing fees may apply.
- Contact Customer Service at (866) 384-8432 to initiate the warranty process.
Not Covered by Warranty:
- Any part that has become inoperative due to misuse, negligence, direct/indirect abuse, accidents, improper maintenance, repairs or alteration;
- Batteries that are not charged in accordance with the operator's manual directions and regulations;
- Any parts subject to normal wear and tear including but not limited to: the spool of trimmer line, trimmer head spool cover, mower blade, collection bag, brush cutter blade, pole saw chain and guide bar;
- The unit, if it has not been operated and/or maintained in accordance with the operator's manual;
• Normal wear and tear;
• Routine maintenance items such as lubricants, blade sharpening;
• Normal deterioration of the exterior finish due to use or exposure;
• Any product where serial number/data label is tampered with or removed;
• Any product purchased from unauthorized retailers.
This warranty gives you specific legal rights, and you may have other rights, which vary from state to state.
CLPS4008 EXPLODED VIEW

CLPS4008 PARTS LIST
| NO. | PART NO. PART DESCRIPTION | QTY |
| 1 | GE70DC.10.10.X3.01 | Main Handle |
| 2 G | E70DC.10.45.X1.02 1 | Lower Front Handle Connection Bracket |
| 3 | GWA0PR.00.16 | Shoulder Strap |
| 4 | GWA0PR.50.01.X2.01 | Cover |
| 5 | GW15DC.00.11 | Chain |
| 6 | GW15DC.40.01.X1.01 | Guide Bar With Tensioning Sprocket |
| 7 | TMDC77.01.00.X2.01 | Motor Assembly |
| 7.1 | GW10DC.30.00 | Oil Cap |
| 8 | GW15DC.00.07 | Scabbard |
| 9 | GWA0PR.60.01.X2.01 | Pole Extension |
| 10 | GE70DC.10.44.X1.02 | Upper Front Handle Bracket |
| 11 | GWA0PR.70.20.X1.02 | Front Handle |
NOTES

- PRODUCT SPECIFICATIONS
- WARNING
- Work Area Safety
- Electrical Safety
- Personal Safety
- Power Tool Use And Care
- Battery Tool Use And Care
- Service
- Pruner Safety Warnings
- CAUSES AND OPERATOR PREVENTION OF KICKBACK
- Vibration And Noise Reduction
- EMERGENCY
- Residual Risks
- Child Safety
- ⚠ WARNING (PROPOSITION 65)
- SAVE THESE INSTRUCTIONS
- Know Your Product (Fig. 1)
- Unpacking
- You Will Need
- Front Handle Assembly (Fig. 2)
- Pole Assembly (Fig. 3-6)
- Chain And Guide Bar Assembly (Fig. 7-10)
- Chain Tensioning (Fig. 15)
- Tension Test (Fig. 16-18)
- Chain Lubrication (Fig. 19-20)
- Pre-use Test (Fig. 21)
- Shoulder Strap (Fig. 22-24)
- Battery Pack And Charger (Fig. 25-26) (Not Included)
- Attach / Release
- Connect battery pack
- Intended Use
- Cutting Head Pivot Adjustment (Fig. 27)
- Switching ON / OFF (Fig. 28)
- Chain Stop Test
- Overload Protection
- General Operation
- PRUNING
- Kickback
- WARNING!
- To Avoid Kickback:
- Pruning (Fig. 29-30)
- Thin Branches (Fig. 35-38)
- Thick Branches
- After Use
- General Care
- General Cleaning
- Sprocket Wheel
- GUIDE BAR AND CHAIN MAINTENANCE
- Guide Bar
- Chain Sharpening
- Maintenance
- Battery Pack And Charger (Not Included)
- Storage
- Transportation
- WARNING:
- ENVIRONMENTALLY SAFE BATTERY DISPOSAL
- Returning Product for Warranty:
- Not Covered by Warranty:
- NOTES
Brand : LawnMaster
Model : CLPS4008K
Category : Lawn mower