
MF-DFS - Toilets DOMETIC - Free user manual and instructions
Find the device manual for free MF-DFS DOMETIC in PDF.

| Product Type | Electronic flush switch for toilets |
| Compatible Toilet Models | 8000 and 9000 series (DFS, DFP, DFSHW); also 4000 series via internal switches |
| Dimensions (DFS, DFP, DFSHW) | Width: 3", Height: 3.4" |
| Weight | Approx. 0.5 lb (230 g) |
| Power Supply | From toilet electrical system (12V DC) |
| Cable Length | Ethernet cable included, length sufficient for typical installation |
| Flush Modes | Normal (adds water after flush) and Dry Bowl (no water added) |
| Water Usage per Flush (Normal Mode, 8000 Series) | 0.85 gal (3.2 liters) |
| Water Usage per Flush (Dry Bowl Mode, 8000 Series) | 0.45 gal (1.7 liters) |
| Motion Sensor Range (DFSHW models) | 4" (10 cm) |
| Backlight Modes | Always ON (full brightness), Always ON (dim), Energy saving (motion sensor), Always OFF |
| Operating Temperature | Indoor use only, temperature range typical for RV/boat |
| Installation Method | Wall-mount with bracket; requires 2" clearance behind wall |
| Certifications | Complies with NEC, CEC, RV codes |
| Warranty | Limited warranty; details at dometic.com/warranty |
| Country of Origin | USA (manufactured by Dometic Corporation) |
| Included Parts | Flush switch assembly, Ethernet cable, mounting screws |
| Required Tools | Phillips screwdriver, drill |
| Safety Features | Do Not Flush indicator when tank full; electrical shock hazard warnings |
| Maintenance | Clean with mild soap; avoid harsh chemicals; service mode for cleaning seals |
| Disposal | Recycle packaging; dispose per local regulations |
Frequently Asked Questions - MF-DFS DOMETIC
User questions about MF-DFS DOMETIC
0 question about this device. Answer the ones you know or ask your own.
Ask a new question about this device
Download the instructions for your Toilets in PDF format for free! Find your manual MF-DFS - DOMETIC and take your electronic device back in hand. On this page are published all the documents necessary for the use of your device. MF-DFS by DOMETIC.
USER MANUAL MF-DFS DOMETIC
VFS, VFP, VF SHW, DFS, DFP, DF SHW
EN
Electronic Flush Switches
Installation and Operation Manual
NORTH AMERICAN ADDRESS INFORMATION
U.S.A. & CANADA
Service Office
Dometic Corporation
13128 St. Rte. 226
Big Prairie, OH 44611
Service Center & Dealer Locations
Refer to "10 Customer Service" on page 13.
Form No. 600347477_A 01/19 | ©2019 Dometic Corporation
Read these instructions carefully. These instructions MUST stay with this product.
CONTENTS
1 Explanation of symbols and safety instructions. 3
2 General information....4
3 Intended use 4
4 Specifications.... 5
5 Prepare for installation....6
6 Installation 7
7 Operation....8
8 Wall Templates....12
9 Disposal 13
10 Customer Service....13
11 Limited warranty....13
1 EXPLANATION OF SYMBOLS AND SAFETY INSTRUCTIONS
This manual has safety information and instructions to help you eliminate or reduce the risk of accidents and injuries.
1.1 Recognize safety information

This is the safety alert symbol. It is used to alert you to potential physical injury hazards. Obey all safety messages that follow this symbol to avoid possible injury or death.
1.2 Understand signal words
A signal word will identify safety messages and property damage messages, and will indicate the degree or level of hazard seriousness.
⚠ WARNING indicates a hazardous situation that, if not avoided, could result in death or serious injury.
⚠️ CAUTION indicates a hazardous situation that, if not avoided, could result in minor or moderate injury.
NOTICE
is used to address practices not related to physical injury.

indicates additional information that is not related to physical injury.
1.3 Supplemental directives

Read and follow all safety information and instructions to avoid possible injury or death. Read and understand these instructions before installation or use of this product. Incorrect installation or operation of this product can lead to serious injury.
The installation must comply with all applicable local or national codes, including the latest edition of the following standards:
U.S.A.
• ANSI/NFPA70, National Electrical Code (NEC)
• ANSI/NFPA 1192, Recreational Vehicles Code
• ABYC guidelines for marine installations
Canada
• CSA C22.1, Parts I & II, Canadian Electrical Code
• CSA Z240 RV Series, Recreational Vehicles
1.4 General safety messages
WARNING
Failure to obey the following warnings could result in death or serious injury:
- This product must be installed and serviced by a qualified service technician.
- Do not modify this product in any way. Modifi cation can be extremely hazardous.
NOTICE
RISK OF PROPERTY DAMAGE. Failure to obey the following notices may caus
damage to the toilet or toilet system.
- Only flush water, bodily wastes, and rapid-dissolving toilet tissue.
- Do not overfill the holding tank, or serious damage can occur to the sanitation system. Overfilling the holding tank can rupture the holding tank or release tank contents into the bilge.
2 GENERAL INFORMATION
Included Parts Quantity
Flush switch assembly 1
Ethernet cable 1
Mounting screws 4
Recommended Tools
Phillips Screwdriver Drill
3 INTENDED USE
This flush switch is designed and intended for use only inside a boat or recreational vehicle (hereinafter referred to as "RV") for which it is supplied. Use the instructions to ensure correct installation and operation of the flush switch. Dometic accepts no liability for damage in the following cases:
- Faulty assembly or connection.
- Damage to the product resulting from mechanical influences and excess voltage.
• Alterations to the product without expressed permission from the Dometic Corporation. - Use for purposes other than those described in the operating manual.
Dometic Corporation reserves the right to modify appearances and specifications without notice.
4 SPECIFICATIONS
4.1 Dimensions
VFS, VFP
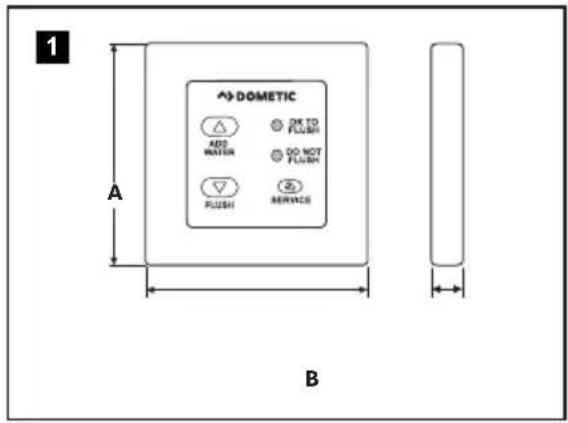
DFS, DFP
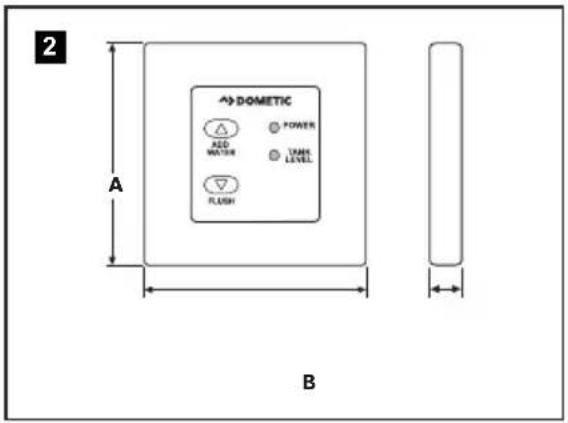
VFSHW
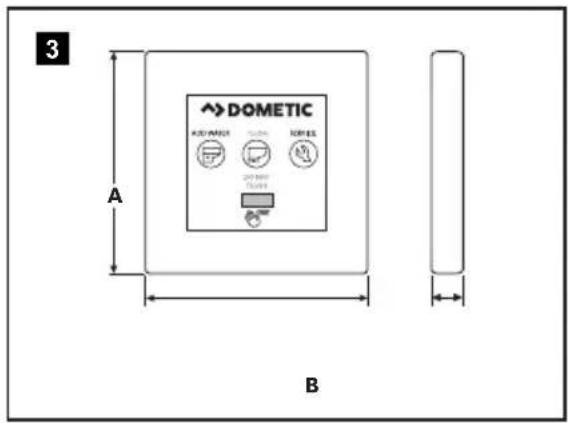
DFSHW
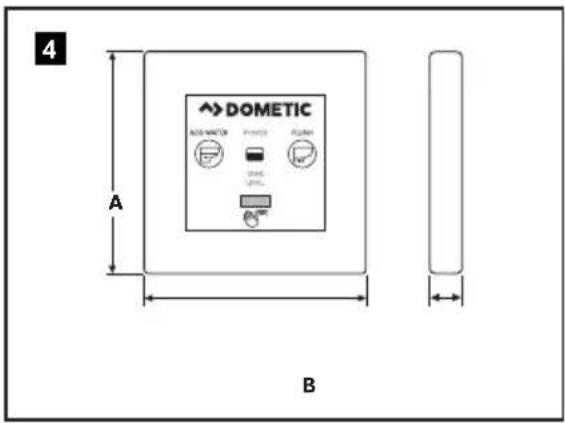
| Dimension | VFS, VFP, and VFSHW | DFS, DFP, and DFSHW |
| A 3" 3" | ||
| B 3.4" 3.4" |
4.2 Compatible models
| Flush Switch Toilet Model(s) |
| VFS, VFP, and VFSHW 4000 series |
| DFS, DFP, and DFSHW 8000 and 9000 series |
5 PREPARE FOR INSTALLATION
WARNING ELECTRIC SHOCK HAZARD. Disconnect electrical power before installing this product. Failure to obey this warning could result in death or serious injury.
5.1 Preparing the flush switch for use with older toilets
VFS, VFP, DFS, and DFP flush switches have internal function switches that allow them to be used with older toilets. Use the following procedure to prepare the flush switch for use with a toilet that has a serial number containing the prefix "223" or lower.
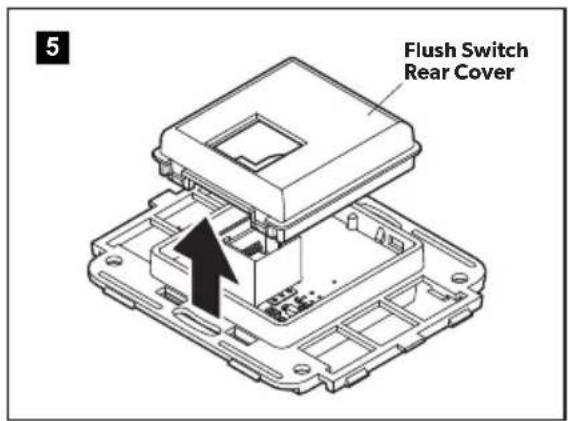
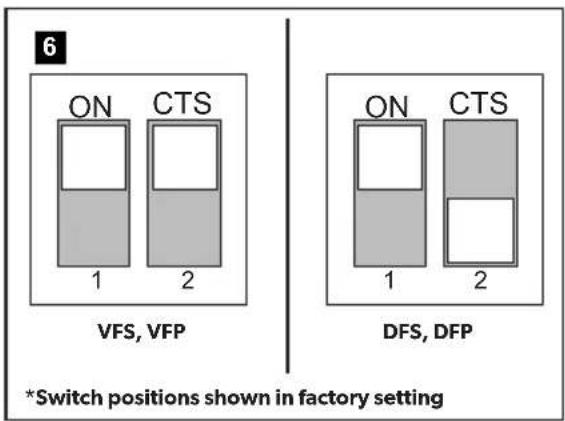
Remove the back cover from the switch panel using a small, flat head screw driver and locate the internal function switches.
▶Push both switches to the lower position.
This setting disables the backlighting of the Service button on VFS and VFP flush switches, since the Service button does not operate on older VacuFlush toilets.
▶Reassemble the panel and proceed to installation.
VFSHW and DFSHW flush switches are not compatible with toilets that have a serial number containing the prefix "223" or lower. In order to use VFSHW or DFSHW flush switches with an older toilet, a new circuit board must be installed.
5.2 Planning the electrical connections
If replacing a previous electronic flush switch, disconnect the wiring from the old switch before installing the new switch.
Plan the flush switch location so the cable can reach the toilet circuit board. Ensure that the cable will not get wet.
6 INSTALLATION
6.1 Installing the flush switches
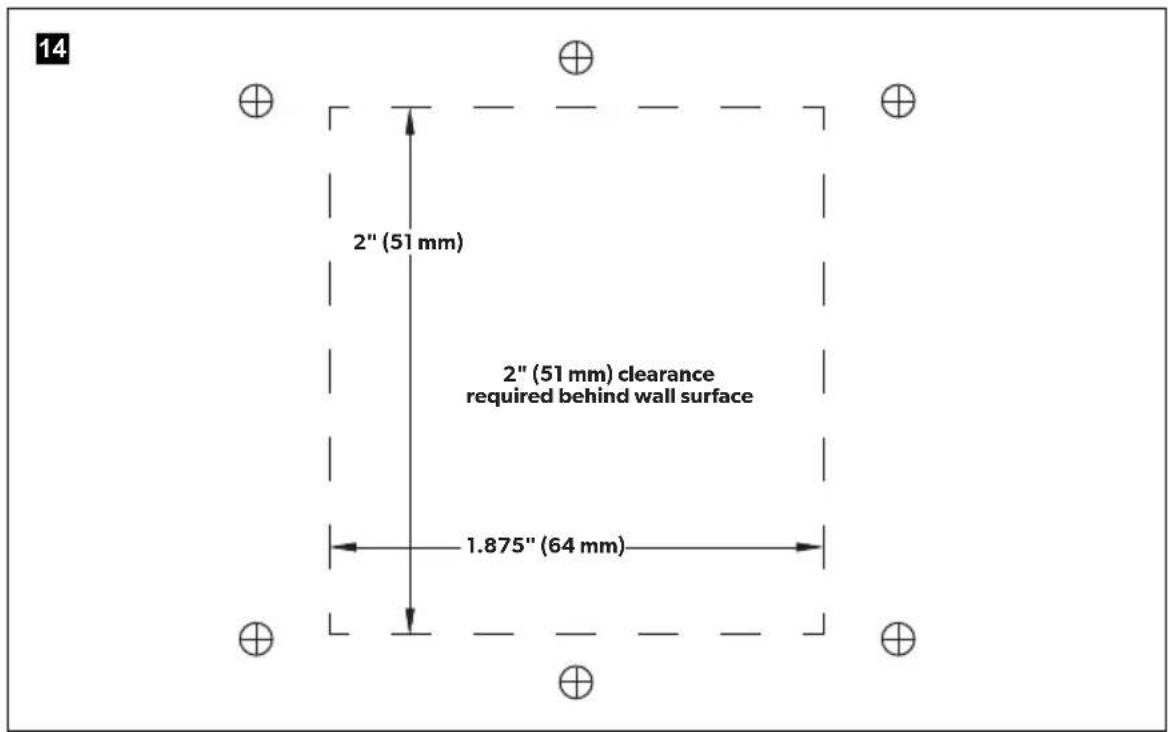
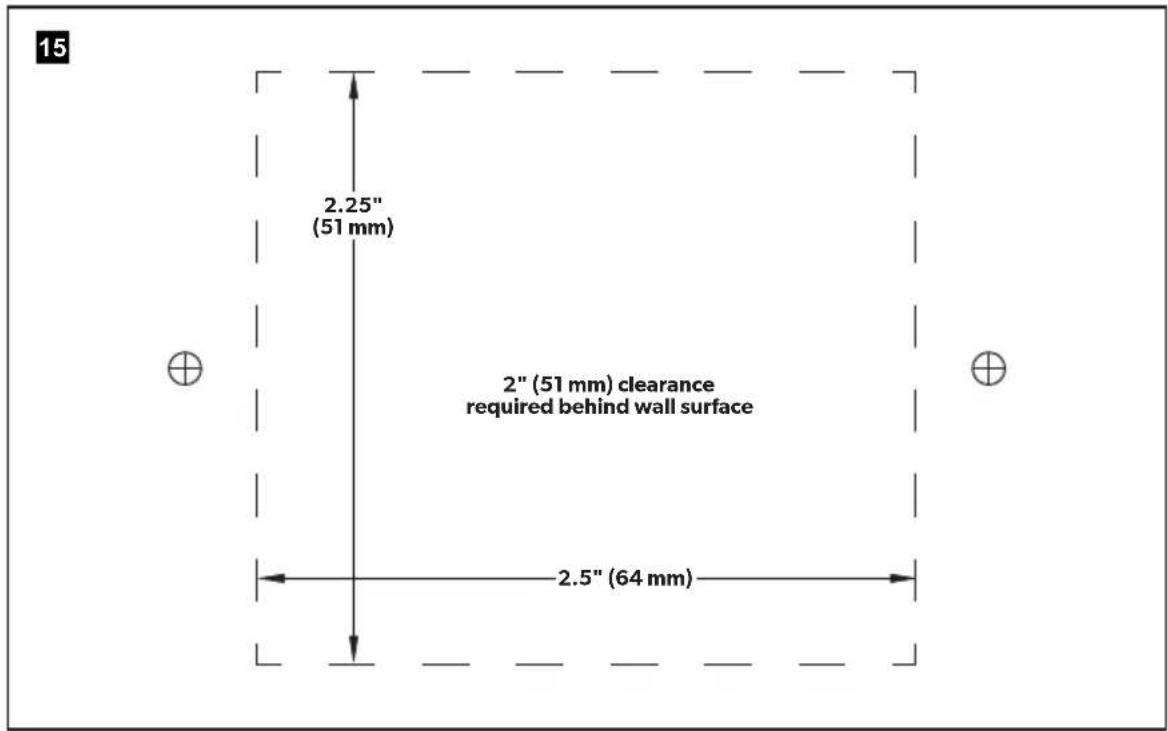
There must be at least 2" of clearance behind the wall surface.
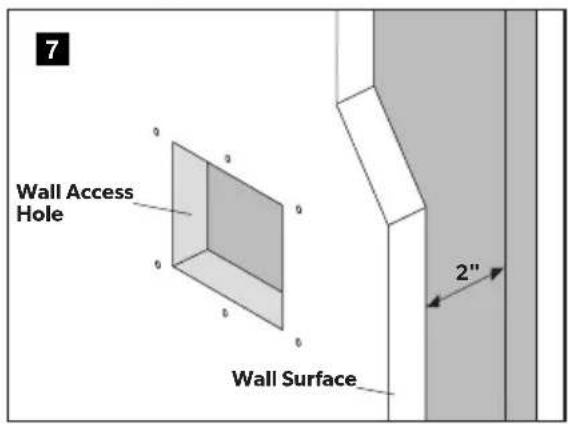
▶Use the appropriate Dometic, Vima ^® , or Gewiss ^® template to mark the center access and fastener holes.
▶Cut out the square access hole.
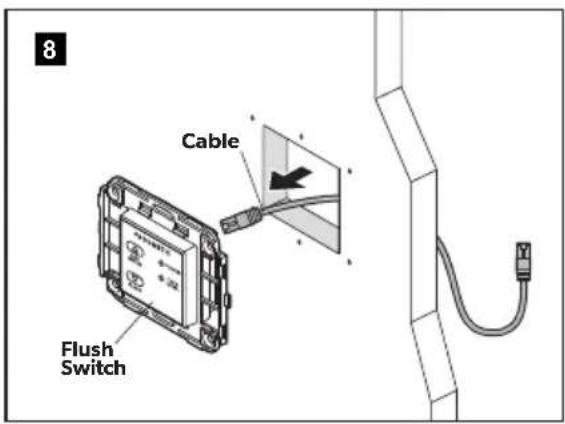
▶Route the flush switch cable from the wall access hole to the floor access hole at the toilet base. Leave about 12" of extra cable at the toilet.
▶Plug the cable into the back of the flush switch panel.
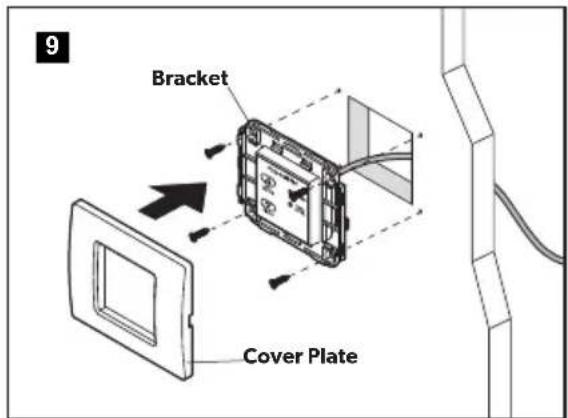
▶ Secure the flush switch bracket to the wall using the screws provided.
▶Snap the cover plate onto the bracket.
▶Connect the flush switch cable to the Ethernet port on the toilet switch board.
7 OPERATION
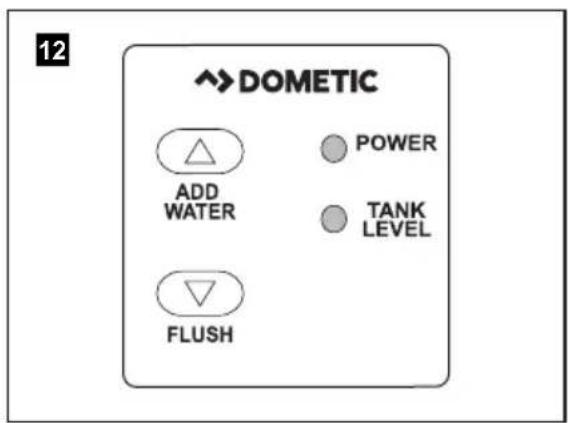
7.1 Operating VFS, VFP, and VFSHW (4000 Series)
Toilet system startup
▶Turn ON electrical power and water supply to the toilet.
Flush the toilet five times by pressing the Flush button or waving a hand over the motion sensor (VFSHW only). Allow each flush cycle to complete until the OK TO FLUSH light indicates the system is ready for the next flush. This ensures that flush water is present throughout the entire vacuum system.
Normal toilet operation (VFS, VFP, and VFSHW)
▶ Press and hold the Add Water button until the desired water level is achieved in the bowl.
▶ Press the Flush button to flush the toilet. Do not attempt to flush the toilet when the red DO NOT FLUSH light is ON.
▶ Press the Add Water button twice quickly to toggle through backlight modes:
- Always ON (full brightness, default)
- Always ON (dim) (VFSHW only)
- Energy saving (ON when motion is sensed) (VFSHW only)
- Always OFF
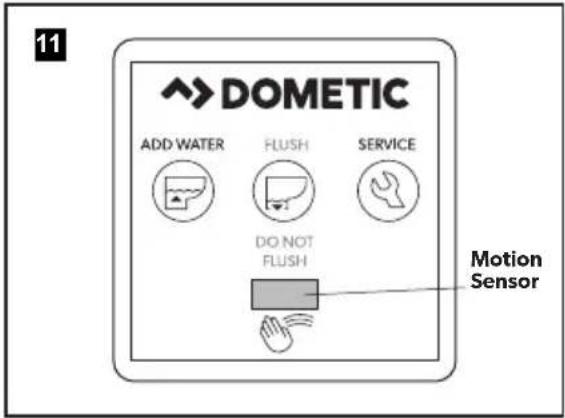
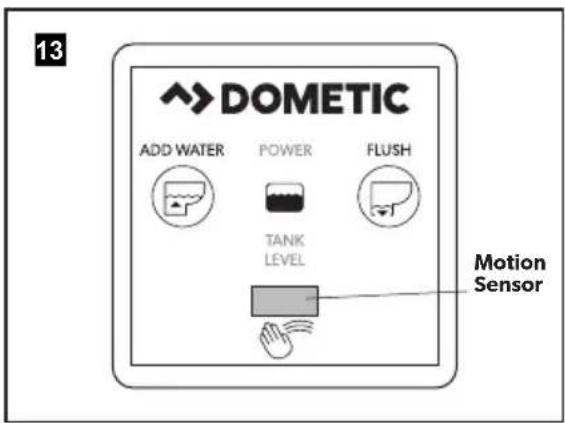
Using the hand wave feature (VFSHW only)
The motion sensor range is 4" (10 cm).
▶Hold your hand in front of the Motion Sensor to fill the bowl with water. Water will start to flow after three seconds. Continue to hold your hand in front of the motion sensor until the desired water level is achieved.
Wave your hand in front of the Motion Sensor to flush the toilet. Do not attempt to flush the toilet when the red DO NOT FLUSH light is ON.
The handwave function can be toggled on/off by holding in BOTH the left and right buttons for 5 seconds. A backlighting fade sequence will follow indicating the handwave operation has been toggled:
- Backlight fade-to-on indicates handwave has been toggled to 'enabled'.
- Backlight fade-to-off indicates handwave has been toggled to 'disabled'.
Understanding the indicator lights
Indicator Light Status
OK TO FLUSH Steady green The toilet is ready to flush
Flashing green The flush mode is changing
DO NOT FLUSH Red The holding tank is full*
The toilet system is recharging the vacuum
*Flush actuation is disabled to prevent overfilling the holding tank
Service mode
To clean the toilet bowl or seals, or to perform other servicing that requires keeping the flush ball open without running water, use the Service button.
▶ Push and hold the Service button for three seconds. The backlight will change to a steady flash while the toilet is in service mode.
▶Perform the required servicing.
After servicing is complete, push and hold the Service button for three seconds to change back to normal operation.
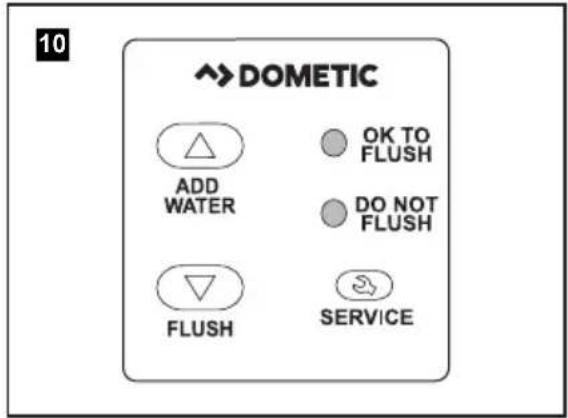
7.2 Operating the DFS, DFP, DFSHW switches (8000 and 9000 Series)
Toilet system startup
▶Turn ON electrical power and water supply to the toilet.
Flush the toilet by pressing the Flush button or waving a hand over the motion sensor (DFSHW only). Allow the flush cycle to complete.
▶ Toss several sheets of toilet tissue into the bowl and flush the toilet again. The bowl should be completely clear.
9000 Series: If the bowl is not completely clear after flushing, adjust the rim and jet water flow timing on the toilet control module to a higher setting. Repeat the flush test after each adjustment.
Normal toilet operation (DFS, DFP, and DFSHW)
▶ Press and hold the Add Water button until the desired water level is achieved in the bowl.
▶ Press the Flush button to flush the toilet.
▶ Press the Add Water button twice quickly to toggle through backlight modes:
- Always ON (full brightness, default)
- Always ON (dim) (DFSHW only)
- Energy saving (ON when motion is sensed) (DFSHW only)
- Always OFF
Using the hand wave feature (DFSHW)
The motion sensor range is 4" (10 cm).
▶Hold your hand in front of the Motion Sensor to fill the bowl with water. Water will start to flow after three seconds. Continue to hold your hand in front of the motion sensor until the desired water level is achieved.
Wave your hand in front of the Motion Sensor to flush the toilet.
The handwave function can be toggled on/off by holding in BOTH the left and right buttons for 5 seconds. A backlighting fade sequence will follow indicating the handwave operation has been toggled:
- Backlight fade-to-on indicates handwave has been toggled to 'enabled'.
- Backlight fade-to-off indicates handwave has been toggled to 'disabled'.
Understanding the indicator lights
Indicator Light Status
Power on Steady green Electrical power to the toilet is
activated
Flashing green Flush mode is changing
Tank level Amber The holding tank is 75% full
Red The holding tank is 100% full*
*Flush actuation is disabled to prevent overfilling the holding tank
7.3 Changing flush modes (4000 and 8000 Series)
▶ Press and hold the Flush button for approximately five seconds to toggle between normal and dry bowl mode.
Release the Flush button when the OK TO FLUSH or POWER light begins flashing.
| Flush modes Action | Water used per flush (4000 Series) | Water used per flush (8000 Series) | |
| Normal Adds water to the bowl after every flush | 1 quart (0.95 liters) | 0.85 gal. (3.2 liters) | |
| Dry bowl | Does not add water to the bowl after every flush | 1 pint (0.5 liters) | .45 gal (1.7 liters) |
8 WALL TEMPLATES
8.1 VFSHW, VFS, DFSHW, and DFS Wall Bracket
8.2 VFP and DFP Wall Bracket
9 DISPOSAL
Place the packaging material in the appropriate recycling waste bins, whenever possible. Consult a local recycling center or specialize dealer for details about how to dispose of the product in accordance with all applicable national and local regulations.
10 CUSTOMER SERVICE
For the Authorized Service Center near you, call between 8:00 a.m. and 5:00 p.m. (ET), Monday through Friday, or contact the nearest Parts Distributor.
Telephone: 1 800-321-9886 U.S.A. and Canada
330-439-5550 International
Fax: 330-496-3097 U.S.A. and Canada
330-439-5567 International
Website: www.dometic.com
11 LIMITED WARRANTY
LIMITED WARRANTY AVAILABLE AT: dometic.com/warranty.
IF YOU HAVE QUESTIONS, OR TO OBTAIN A COPY OF THE LIMITED WARRANTY FREE OF CHARGE, CONTACT:
DOMETIC CORPORATION
SANITATION CUSTOMER SUPPORT CENTER
13128 STATE ROUTE 226
BIG PRAIRIE, OHIO, USA 44611
+1 800-321-9886