
AeroStar T700 - Vacuum Cleaner TESLA - Free user manual and instructions
Find the device manual for free AeroStar T700 TESLA in PDF.


| Product Type | Vacuum Cleaner |
| Brand | Tesla |
| Model | AeroStar T700 |
| Power Source | Mains powered (corded) |
| Vacuum Type | Canister vacuum cleaner |
| Filtration System | HEPA (inlet and outlet filters) |
| Number of Filters | 2 (1 inlet, 1 outlet) |
| Filter Maintenance | Rinse under running water; dry thoroughly before reuse. For rough cleaning, knock dirt off. |
| Maximum Filter Washes | 3 times per filter |
| Filter Replacement Interval | Inlet: every 6 months; Outlet: every 12 months (or when damaged) |
| Included Accessories | Universal floor nozzle, crevice nozzle 2v1, upholstery nozzle, telescopic tube, suction hose |
| Nozzle Features | Universal floor nozzle with retractable brush for hard floors and carpets |
| Cord Rewind | Yes, with one-button rewind |
| Suction Control | Engine power regulator and suction force regulation |
| Safety Features | Important safety instructions provided; do not use without filters; do not vacuum wet or hazardous materials |
| Intended Use | Domestic indoor use only |
| Storage | Vertical storage position; handle for transport |
| Warranty | Contact dealer; exclusions apply (see manual) |
Frequently Asked Questions - AeroStar T700 TESLA
User questions about AeroStar T700 TESLA
0 question about this device. Answer the ones you know or ask your own.
Ask a new question about this device
Download the instructions for your Vacuum Cleaner in PDF format for free! Find your manual AeroStar T700 - TESLA and take your electronic device back in hand. On this page are published all the documents necessary for the use of your device. AeroStar T700 by TESLA.
USER MANUAL AeroStar T700 TESLA
natural_image
Illustration of three different cleaning or cleaning techniques: a vacuum cleaner, a handheld tool, and a handheld device (no text or symbols present)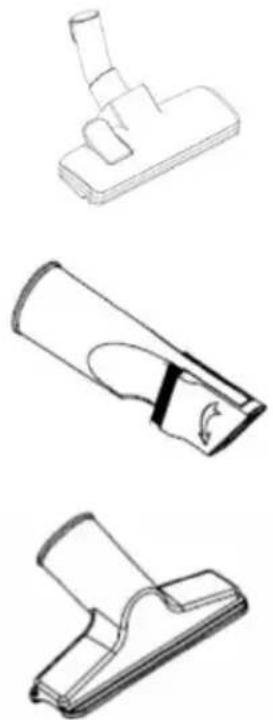
natural_image
Technical line drawing of a mechanical device with three views: top view, side view, and bottom view (no text or symbols)natural_image
Three-step diagram showing a vacuum cleaner, its internal structure, and a handheld device with motion arrows (no text or symbols)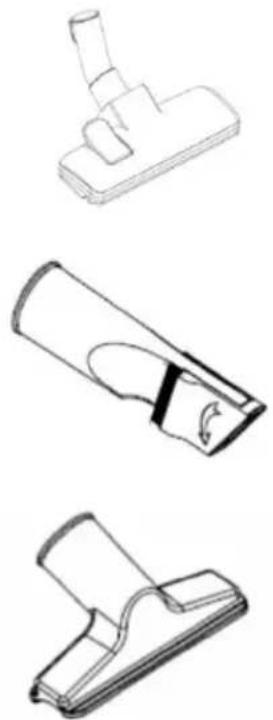
natural_image
Technical line drawing of a mechanical device with three views: top view, side view, and internal components (no text or symbols)natural_image
Illustration of a vacuum cleaner's step-by-step assembly: adding cable, adjusting handle, and adjusting lever (no text or symbols)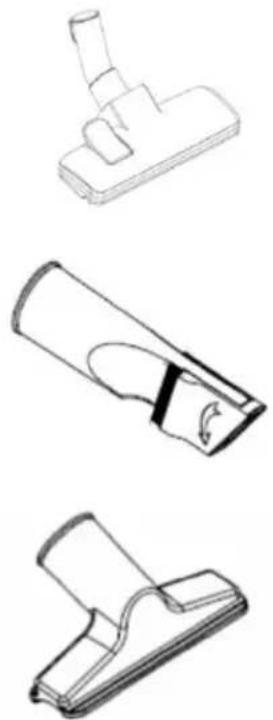
natural_image
Technical line drawings of three different vacuum cleaner components with directional arrows indicating assembly or operation (no text or symbols present)natural_image
Technical line drawing of a mechanical device with three views: top view, front view, and side view (no text or symbols)natural_image
Three-step diagram showing a vacuum cleaner, a handheld tool, and a hand holding a brush (no text or symbols present)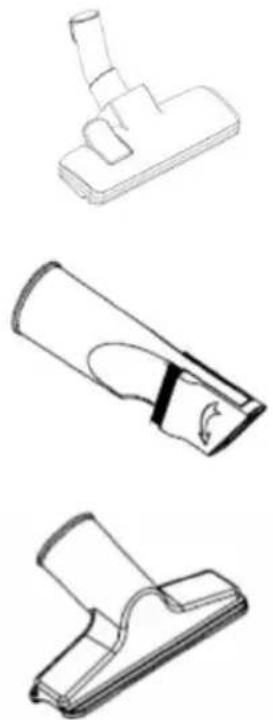
natural_image
Three technical line drawings of mechanical components or tools, no text or symbols presentnatural_image
Technical line drawings of three different components: a vacuum cleaner, a mechanical housing, and a fan-like device (no text or symbols present)natural_image
Technical line drawing of a mechanical device with three views: top view, side view, and internal components (no text or symbols)natural_image
Illustration of three different vacuum cleaner components: a pump, a handheld tool, and a mechanical clamp (no text or symbols present)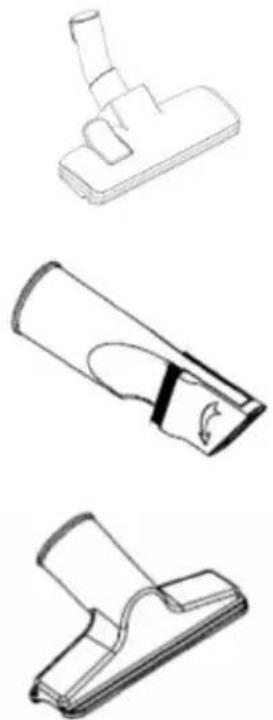
natural_image
Technical line drawings of three different mechanical components with directional arrows indicating motion (no text or symbols present)natural_image
Technical line drawing of a mechanical device with three views: top view, side view, and internal components (no text or symbols)VAŽNA SIGURNOSNA UPOZORENJA
OVAJ PROIZVOD NAMIJENJEN JE SAMO ZA UPORABU U KUĆANSTVU.
natural_image
Technical line drawing of a mechanical device with three views: top view, side view, and bottom view (no text or symbols)- Za grubo čišćenje lagano tapkajte prljavštinu s HEPA filtra u smeće.
- Oba HEPA filtra također se mogu isprati pod tekućom vodom. Ostavite filtre da se temeljito osuše prije ponovne upotrebe.
- Vratite oba HEPA filtra na mjesto.
natural_image
Technical line drawings of three different components: a vacuum cleaner, a mechanical housing, and a fan-like device (no text or symbols present)natural_image
Technical line drawing of a mechanical device with three views: top view, side view, and internal components (no text or symbols)natural_image
Technical line drawings of three different components: a vacuum cleaner, a mechanical housing, and a fan-like device (no text or symbols present)natural_image
Technical line drawing of a mechanical device with three views: top view, side view, and internal components (no text or symbols)Thank you for choosing the TESLA AeroStar T700.
Please, read the safety rules carefully and follow all common safety rules before using a robotic vacuum cleaner.
IMPORTANT SAFETY INSTRUCTIONS
This device is a complex electromechanical device, please pay attention to the following instructions:
• This appliance is intended for domestic use only
- The brand bears no responsibility for improper use or for use contrary to the instructions for use and is not covered by the warranty.
• The device is only intended for indoor use at room temperature (max. 40°C).
- If the cord is damaged, do not use the appliance. Avoid the danger and have the entire vacuum cleaner reel and cord replaced by an authorized service center.
- Never leave the appliance switched on unattended.
- Keep the suction nozzle or the end of the tube away from the eyes or ears.
- Do not vacuum wet surfaces, water or liquid of any nature, hot or very fine substances (gypsum, cement, ash, etc.), large sharp fragments (glass shards), harmful products (solvents, paint strippers, etc.), aggressive substances (acids, cleaning agents), flammable and explosive substances (based on petrol or alcohol).
- Never immerse the appliance in water, spray water on it or rinse it under the tap water and do not store it outdoors.
• If the appliance falls and shows visible damage or malfunctions, do not use it.
- This appliance is intended for use by children under the age of 8 and persons without sufficient experience or knowledge, or by persons with reduced physical, sensory or mental capabilities, provided that they have been instructed and advised in the safe use of the appliance and are aware of the potential risks. Children should be supervised to ensure that they do not play with the appliance.
- User cleaning and maintenance must not be performed by children without supervision. Keep the appliance and its power cord out of the reach of children.
- Use only original accessories designed for this model.
- Do not touch the parts that are connected to the mains when your hands are wet.
- Do not open or repair the device, as there is a risk of electric shock and loss of warranty.
• Vacuuming can cause an electrostatic charge, which can be dangerous to the user.
- Do not use the device if its collection basket is full.
- The manufacturer and importer into the European Union are not liable for damages caused by the operation of the device, such as injury, scalding, fire, injury, deterioration of other items, etc.
PACKAGE CONTENTS
Carefully check that you have unpacked all the supplied accessories, we recommend that you keep the original paper box, user manual and packing material during the warranty period.
DESCRIPTION
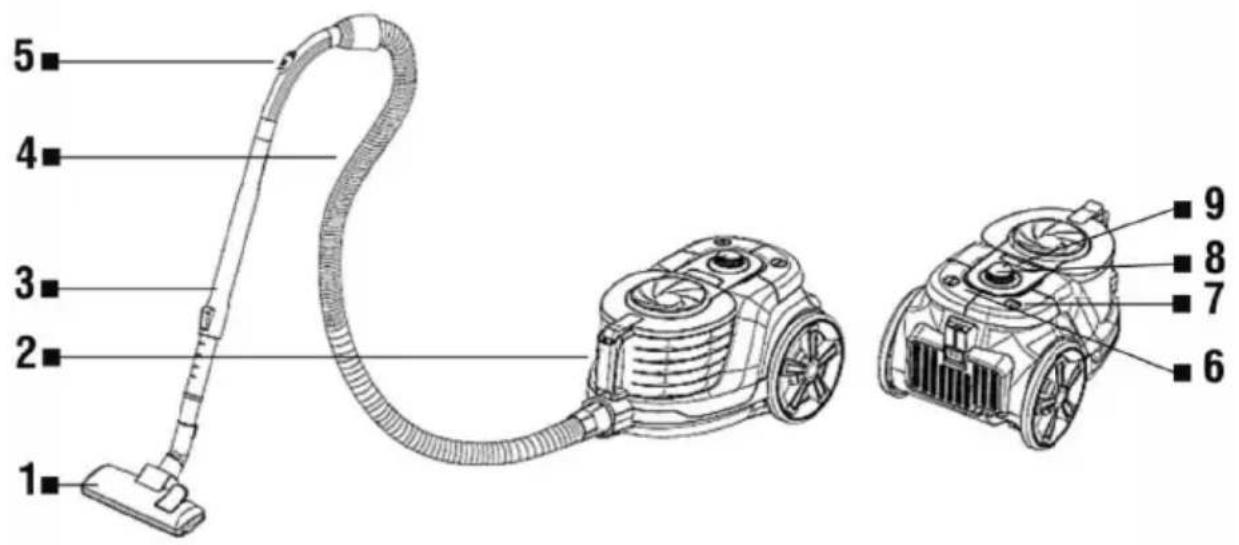
1 Universal floor nozzle
2 Dust tank
3 Telescopic tube
4 Suction hose
5 Suction force regulation
6 On/Off button
7 Cable rewind button
8 Engine power regulator
9 Dust tank eject button
TRANSPORT AND STORAGE
You can lift and transport the vacuum cleaner with the help of a handle. Never pull or lift the vacuum cleaner by the cord. After cleaning, always turn off the power, unplug the power cord, and press the cord rewind button until the cord is fully charged. To save space, the vacuum cleaner can be stored in a vertical position.
BEFORE THE FIRST CLEANING
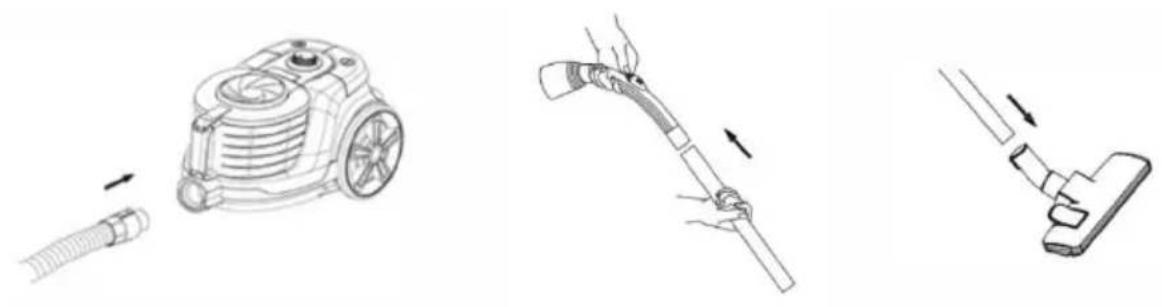
Remove all packing material, vacuum cleaner and accessories. Remove any transparencies, stickers, or paper. Check that the appliance and any part of it is not damaged. Attach the flexible hose to the vacuum cleaner until you hear a click. To remove the hose, press the button on the side of the hose and pull it out. Insert the end of the flexible hose into the wider end of the telescopic tube. Place the selected nozzle on the narrower end of the telescopic tube. Set the required length of the telescopic tube by unlocking the safety button, after setting the length, release the button.
natural_image
Illustration of three different vacuum cleaner components: a connected hose, a handheld vacuum cleaner, and a manual clamp (no text or symbols present)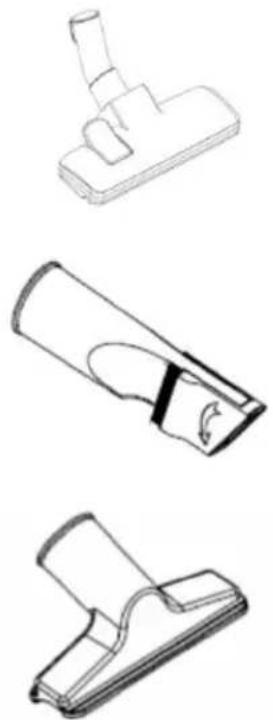
natural_image
Three technical line drawings of mechanical components or tools, no text or symbols presentThe universal floor nozzle with a pull-out brush is designed for all types of floors. When vacuuming smooth hard surfaces, pull out the brush and when vacuuming carpets, slide it in.
Crevice nozzle 2v1 - for radiators, corners, strips, etc.
Upholstery nozzle - for sofas, beds, upholstered armchairs, etc.
USING A VACUUM CLEANER
Before using the appliance, first pull out a sufficient length of power cord and connect it to the mains socket. The yellow mark on the network cable is the maximum length that must not be exceeded. To switch on the device, press the On/Off button (6). To insert the mains cable back into the vacuum cleaner, press the Cable rewind button (7). Hold the cord with one hand and guide it to avoid injury. Use the Engine power regulator (8) to control the engine intake power.
CLEANING AND MAINTENANCE
Before cleaning, disconnect the mains plug from the mains socket. Clean the vacuum cleaner with a damp cloth and then make sure it is dry. Do not use solvents or abrasive cleaners.
The maximum suction effect will always be achieved with clean HEPA filters and an empty dirt tank. We also recommend cleaning the HEPA filters after each emptying of the tank. When vacuuming very fine dust, the pores of the filters may become clogged. This can reduce air permeability and reduce the suction power of the vacuum cleaner. Therefore, in such a case, it is advisable to clean the filters even if the dirt tank is not yet full.
CLEANING THE INPUT AND OUTPUT HEPA FILTER
-
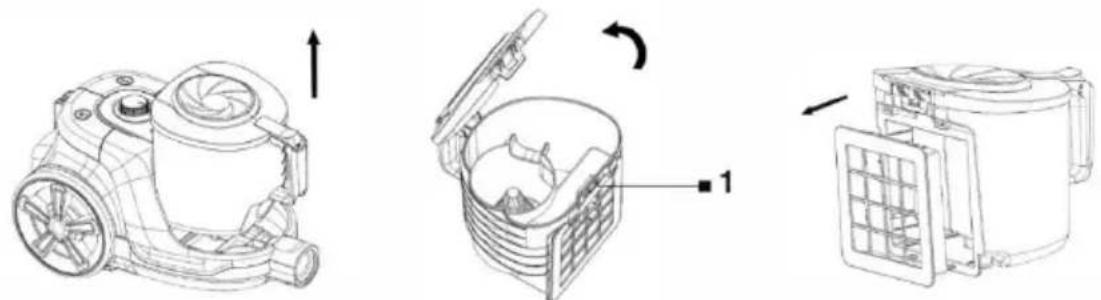
Switch off and unplug the vacuum cleaner.
-
Remove the dust tank from body of vacuum cleaner.
natural_image
Technical line drawings of three different components: a vacuum cleaner, a mechanical housing, and a fan-like device (no text or symbols present)-
Press the latch to open the tray (1) and empty the dirt and dust.
-
Pull the HEPA inlet filter out of the dirt tank.
-
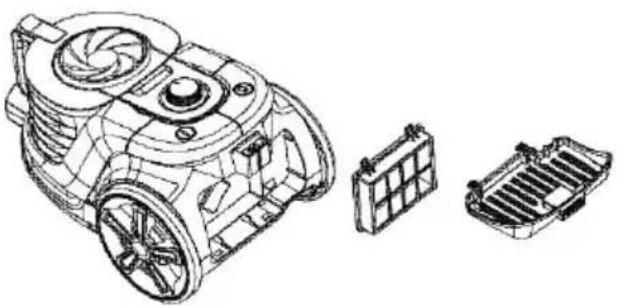
Open the HEPA outlet filter cover on the vacuum cleaner and remove the HEPA outlet filter.
natural_image
Technical line drawing of a mechanical device with three views: top view, side view, and internal components (no text or symbols)- For rough cleaning, gently knock the dirt from the HEPA filter into the waste bin.
- Both HEPA filters can also be rinsed under running water. Allow the filters to dry thoroughly before using them again.
- Replace both HEPA filters.
HEPA inlet filter: in case of heavy impurity or poor vacuum cleaner performance, replace it with a new one. We recommend replacing it at least once every 6 months.
HEPA outlet filter: in case of heavy impurity or poor vacuum cleaner performance, replace it with a new one. We recommend replacing it at least once every 12 months.
WARNING
• Failure to clean or replace the filters can lead to a vacuum cleaner failure!
• Do not use any aggressive detergents or cleaning agents or hot water to clean the filters.
• To maintain the filtration parameters of the HEPA filter, we recommend dry cleaning.
- If you decide to wash the HEPA filter with water, its filtration capacity will be reduced. The maximum number of filter washes is 3 times, then it is necessary to purchase a new HEPA filter.
- Replace the filters if they can no longer be cleaned properly or are damaged.
• The filters are not dishwasher safe.
• Make sure that the seating surfaces and sealing elements are clean and functional.
- Before putting the filters back in the vacuum cleaner, make sure that they are completely dry, ideally after 24 hours.
All of the above instructions are very important if you feel that the vacuum cleaner has poor performance or is poorly vacuuming dirt from the floor. This condition is a clear indication that the vacuum cleaner's filtration system requires cleaning.
IMPORTANT - never use the vacuum cleaner without HEPA filters installed!
CLEANING THE DUST TANK
Use a soft brush to clean the plastic dust filter, then rinse it with clean water and dry thoroughly before inserting.
WARRANTY REPAIR
For warranty repair, contact the dealer where you purchased the TESLA product.
The warranty DOES NOT APPLY to:
• using the device for other purposes than it was designed to
• normal wear and tear
- failure to observe the "Important safety instructions" stated in the user manual
• electrical or mechanical damage caused by improper use
- damage caused by natural elements such as water, fire, static electricity, power surges etc.
• damage caused by an unauthorized repair
- unreadable serial number
DECLARATION OF CONFORMITY
We, INTER-SAT LTD, org. složka, declare that this device complies with the essential requirements and other relevant provisions of the standards and regulations relevant to the type of equipment.

This product complies with the requirements of the European Community.
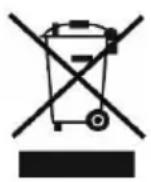
When this crossed-out wheeled bin symbol is attached to a product it means that the product is covered by the European Directive 2002/96/EC. Please inform yourself about the local separate collection system for electrical and electronic products. Please act according to your local rules and do not dispose of your old products with your normal household waste. Correct disposal of your old product helps to prevent potential negative consequences for the environment and human health.
Due to the fact that the product is being developed and improved, we reserve the right to edit the user manual. You can always find the latest version of the this user manual at www.tesla-electronics.eu.
Design and specification may be changed without prior notice, print errors reserved.

- VAŽNA SIGURNOSNA UPOZORENJA
- IMPORTANT SAFETY INSTRUCTIONS
- PACKAGE CONTENTS
- DESCRIPTION
- TRANSPORT AND STORAGE
- BEFORE THE FIRST CLEANING
- USING A VACUUM CLEANER
- CLEANING AND MAINTENANCE
- CLEANING THE INPUT AND OUTPUT HEPA FILTER
- WARNING
- IMPORTANT - never use the vacuum cleaner without HEPA filters installed!
- CLEANING THE DUST TANK
- WARRANTY REPAIR
- The warranty DOES NOT APPLY to:
- DECLARATION OF CONFORMITY
Brand : TESLA
Model : AeroStar T700
Category : Vacuum Cleaner