
Smart Plug - Smart plug OLYMPIA - Free user manual and instructions
Find the device manual for free Smart Plug OLYMPIA in PDF.


| Product Type | Smart Plug |
| Brand | Olympia |
| Model | Smart Plug |
| Dimensions (approx.) | 5.0 x 5.0 x 5.0 cm |
| Weight (approx.) | 50 g |
| Rated Voltage | 230 V AC |
| Max Current | 16 A |
| Max Power | 3680 W |
| Wireless Connectivity | Wi-Fi 2.4 GHz |
| Smartphone App | Compatible with iOS and Android |
| Voice Control | Amazon Alexa, Google Assistant |
| Scheduling | On/off timer and countdown |
| Energy Monitoring | Real-time power consumption tracking |
| Remote Control | Via app from anywhere |
| Cleaning | Wipe with a dry cloth; do not use liquids |
| Safety Features | Overheat protection, fire-resistant casing |
| Spare Parts | Not user-replaceable; contact support for issues |
| Repairability | No user-serviceable parts; consult professional |
| Operating Temperature | 0°C to 40°C |
| Certifications | CE, RoHS |
Frequently Asked Questions - Smart Plug OLYMPIA
User questions about Smart Plug OLYMPIA
0 question about this device. Answer the ones you know or ask your own.
Ask a new question about this device
Download the instructions for your Smart plug in PDF format for free! Find your manual Smart Plug - OLYMPIA and take your electronic device back in hand. On this page are published all the documents necessary for the use of your device. Smart Plug by OLYMPIA.
USER MANUAL Smart Plug OLYMPIA
More Sensors/Actuators in Development
OLYMPIA
Accessories
for the ProHome Series
Operating Manual
natural_image
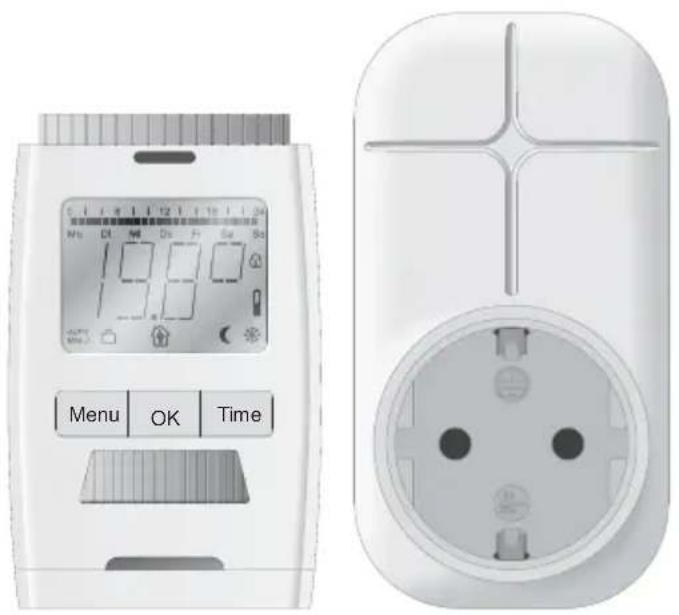
Two white electronic devices: one displaying a digital timer with '18:00' and 'Menu OK Time', the other showing a separate electrical socket (no text or symbols on the device itself)Hello,
We are delighted that you have decided to purchase this reliable device from Olympia.
The descriptions on the following pages will explain how easy it is to make your home more safe and secure.
Before You Start .... 4
Important Information on Accessories ..... 4
Safety Instructions....5
Smart Plug 6
Intended Use 6
Scope of Delivery 6
Safety Instructions 6
General View 7
Plugging In 7
Registering 7
Safety Functions 7
Technical Data 8
Heating Regulator 9
Intended Use 9
Scope of Delivery 9
Safety Instructions....10
General View....11
Menu 12
Inserting the Batteries....13
Installation....13
Disassembly 15
Pairing the Heating Regulator and Base Unit ....15
Technical Data 16
Appendix....17
Troubleshooting....17
Information on Disposal 17
Cleaning and Service....18
Information on Conformity .....18
Guarantee....19

BEFORE YOU START
Before You Start
The sensors and actuators used in the alarm systems in the ProHome series are passive security products and have been developed for use as deterrents. Additional measures are necessary to prevent and hinder burglary and theft. You can obtain all the necessary information on this from your local police station.

Read the operating manual thoroughly and observe all the information contained when using the alarm system. Keep the operating manual close by for future reference.
Pay attention to this symbol. Texts which are highlighted by this symbol provide helpful information on handling the alarm system.
Important Information on Accessories
- The sensors and actuators are intended for private use indoors.
- The sensors and actuators only work in combination with an alarm system from the ProHome series.
- All the individual sensors and actuators must be installed within transmission range of the base unit of the ProHome series alarm system.
- Detailed information on how to configure the sensors and actuators (e.g. creating time schedules) is available in the operating manual provided for the ProHome app.

For more information, please scan the QR code.

Safety Instructions
Read and observe all the safety information to protect yourself and the environment from any harm.
The following warnings indicate potentially dangerous situations which could lead to serious injuries or even fatal injuries if the information is ignored.
NEVER complete any repairs to the sensors and actuators yourself. Never open the sensors and actuators because they do not contain any parts which need to be serviced by the user. In the event of a fault, contact our Service Department.
WARNING! Risk of suffocation from small parts, packaging and protective foil! Children can swallow small parts, packaging and protective foils. Keep children away from the sensors and actuators as well as from the packaging.
The following warnings indicate potentially dangerous situations which could lead to minor or slight injuries if the information is ignored.
Caution! These sensors and actuators can be used by children from the age of 8 and persons with restricted physical, sensory or mental capabilities or a lack of experience and knowledge as long as they are supervised or have been instructed with regard to safe use of the sensors and actuators and are aware of the potential risks involved with their use. Children must not play with the sensors and actuators. Cleaning and user maintenance may not be completed by children without any supervision.
IMPORTANT! Risk of property damage through environmental influences! Prevent exposing the device to environmental influences such as smoke, dust, vibration, chemicals, moisture, heat or direct sunlight.

SMART PLUG
Smart Plug
Intended Use
The Smart Plug is used to control electrical devices in interior rooms via the ProHome system.
A condition for complying with the intended use is that the equipment is installed correctly and the information in the manual is observed and maintained. Any other use is considered unintended use.
Scope of Delivery
Please check the contents of the package carefully. If anything is missing or damaged, do NOT put the Smart Plug into operation!
Smart Plug 1
Operating manual 1
Safety Instructions

DANGER! Risk of fatal injury from electric shock! There is a danger of electric shock if you touch damaged or live parts! Always inspect the Smart Plug for damage before putting it into operation. If you find damage to the housing, on no account use the Smart Plug.

CAUTION! Property damage due to unsuitable power supply! Only use the Smart Plug according to the details in the Technical Data. Only connect the Smart Plug to a power socket with a correctly installed protective conductor (PE).

CAUTION! Risk of fire! The Smart Plug can become hot. Pay attention that any consumers connected do not exceed the maximum connected load specified. Do not cover the Smart Plug. Never block access to the Smart Plug with furniture or other objects.
General View
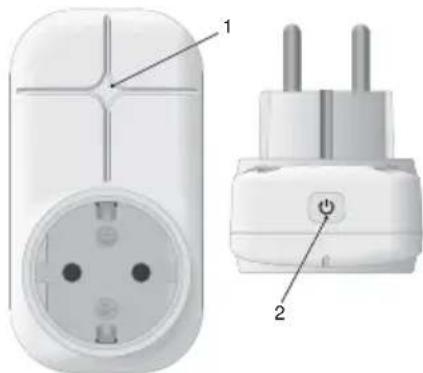
natural_image
Two views of a white electrical plug with two terminal pins, one showing internal socket and the other showing a power button (no text or symbols present)1 LED
2 ∅n/Off switch
Plugging In
1 Plug the Smart Plug into a correctly installed power socket.

CAUTION! Risk of property damage due to exceeding the maximum connected load! Do not use any multiple socket connector strips and pay attention that the consumers connected do not exceed the maximum connected load.
Registering
2 Select the Register menu option on the base unit.
3 Press and hold the On/Off switch on the Smart Plug until the LED fl ashes.
4 The base unit display indicates that registration has been completed successfully on the alarm system.

If registration of the Smart Plug fails, wait 30 seconds and attempt to register the Smart Plug again.
5 Plug the required electrical device into the Smart Plug.
6 Conf i gure the Smart Plug using the ProHome app on your smartphone.
Safety Functions
The Smart Plug is provided with several safety functions in order to protect the Smart Plug and consumers connected from damage.
Continual Current Measurement
The power socket continually measures the current strength caused by the consumers connected. If the current strength exceeds a value of max. 10 A, the Smart Plug switches off automatically.

HEATING REGULATOR
Overheating Protection
Specific overheating protection elements provide protection from overheating of the electronics. If a defined threshold value is exceeded, the Smart Plug switches off automatically.
Overvoltage Protection
The overvoltage protection protects the consumers connected from voltage peaks (e.g. through a lightning strike or electrostatic discharge). If a voltage peak occurs, the Smart Plug switches off automatically.

After one of the protective functions has been tripped and the Smart Plug switched off automatically, disconnect the Smart Plug from the power socket and wait a few minutes before switching the Smart Plug on again.
Technical Data
| Power supply 100 - 250 VAC, 50 - 60 Hz | |
| Max. connected load 2300 W | |
| Max. current strength 10 A | |
| Radio frequency 868.5 MHz | |
| Max. transmission power 0.73 mW | |
| Permissible ambient conditions | 0 °C to +40°C at 30% to 75% rel. humidity |
Heating Regulator
Intended Use
The heating regulator is used to control the heating system via the base unit of the ProHome series alarm system.
The heating regulator enables time-controlled regulation of the room temperature. The heating regulator moves a radiator valve to control the heat flow in the radiator.
The heating regulator may only be operated indoors. The device is exclusively intended for private use.
Any other use is considered unintended use and results in annulment of rights within the terms of guarantee and liability. This also applies to any reconstruction and modification.
Scope of Delivery
Please check the contents of the package carefully. If anything is missing or has been damaged during transport, DO NOT put the heating regulator into operation!
Heating regulator 1
Adapters (Danfoss RA, RAV, RAVL) 3
Plunger extension 1
Coupling ring 1
Batteries (AA mignon), 1.5V 2
Operating manual 1

HEATING REGULATOR
Safety Instructions
Avoid potential dangers by reading the following safety instructions carefully.
WARNING! Risk of fatal injury and accidents to infants and children! The packaging material represents a risk of suffocation. Never leave children unattended when the packaging material is nearby. Children often underestimate the risks involved. Always keep children away from the packaging material. The device is not a toy.
Attention! This device can be used by children from the age of 8 and persons with restricted physical, sensory or mental capabilities or a lack of experience and knowledge as long as they are supervised or have been instructed with regard to safe use of the device and are aware of the potential risks involved with its use. Children must never play with the device. Cleaning and user maintenance may not be completed by children without any supervision.
Important! Never open the device because it contains no components which you may service yourself. In the event of any faults, send the device to the Service Department.
Important! Never attempt to recharge non-rechargeable batteries and do not short circuit or open them. This could result in the risk of overheating, fire or bursting. Never throw batteries in a fire or water. The batteries could explode.
Important! Leaking batteries could damage the device. Be particularly careful when handling damaged or leaking batteries and wear protective gloves.
General View

HEATING REGULATOR
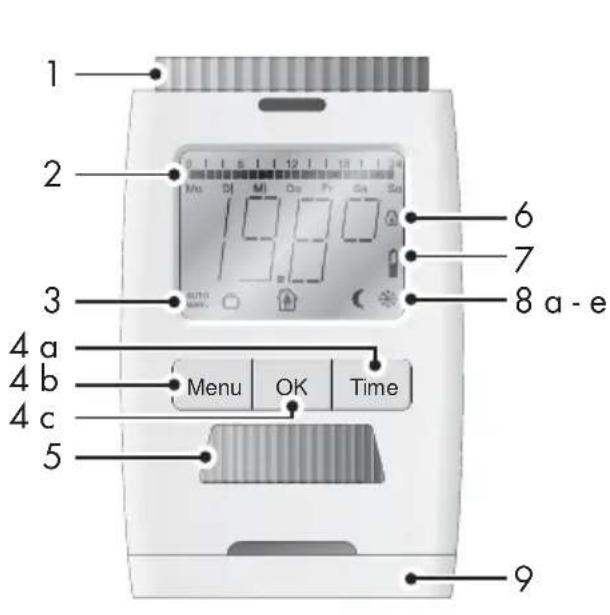
The illustration depicts the heating regulator and accessories supplied in detail.
1 Union nut
2 Heating times
3 AUTO or MANU mode
4a Time button - timer function
4b 4b [Menu] button - changes to main menu (starting from the standard display); within the menu, pressing this button goes back one menu level
4c OK button - confirms the settings
5 Adjusting wheel
6 Child safety lock
7 Battery icon
8a-e Various display icons
9 Battery compartment
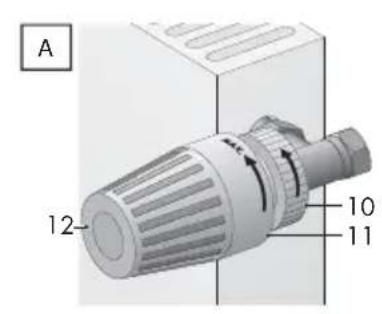
10 Fixation
11 Maximum value, radiator
12 Thermostat head
13 Notch
14 Adapters
15 Plunger extension
Menu
Use the [Menu] button to open the menu. Turn the adjusting wheel to select the function you want. Press the OK button to access the function settings. Use the adjusting wheel to change the settings available. Use the OK button to confirm your settings. Use the [Menu] button to go back to the standard display.
The table below indicates the individual entries in the menu and their significance.
PAIR | Ready for connection to the ProHome base unit
R3AP | Adapt to the radiator valve
INST | Installation function
RES | Reset the default factory settings
STby Standby mode
VERS | Version information
Inserting the Batteries
1 Remove the battery compartment cover.
Only use batteries of the type described in Section "Technical Data". Do not use rechargeable batteries to operate the device.
2 Insert the batteries (2 x mignon, AA) in the battery compartment paying attention to correct polarity.
A3AP appears in the display.
Attention! Risk of damage to the device through reverse poling when inserting the batteries. Pay attention the batteries are correctly aligned when inserted.
3 Replace the battery compartment cover.
Installation
Caution! Risk of burns through hot radiator valve! Contact could lead to hands being burned. Allow the radiator to cool down before completing any installation, disassembly or repair work on the device! Wear work gloves!
Installation of the device is easy. It is not necessary to drain the heating water or alter the heating system. It is not necessary to use any special tools or switch off the heating system.
The union nut fixed firmly to the device fits on all radiator valves from the most popular manufacturers with a thread dimension M30 x 1.5 mm. The adapters contained in the supply package enable the device to be fitted to Danfoss RA, Danfoss RAV and Danfoss RAVL radiator valves.
Disassembling the Old Thermostat Head
1 Set the thermostat head to the temperature range ON (or position 5).
This means the thermostat head is no longer pressing on the spindle of the radiator valve and can be removed more easily.
2 Unscrew the fixing element of the thermostat head and remove the thermostat head.
Installing the New Thermostat Head
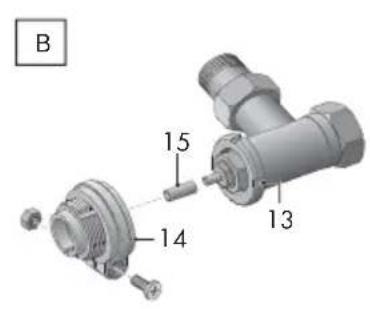
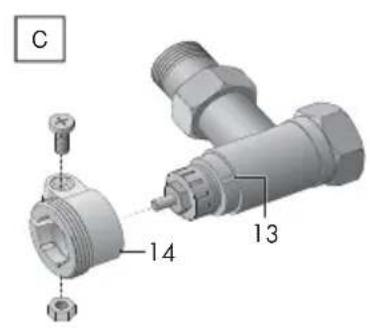
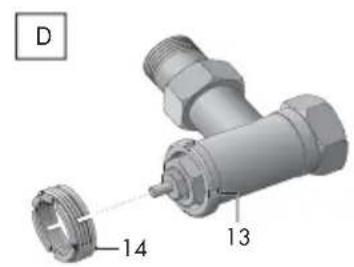
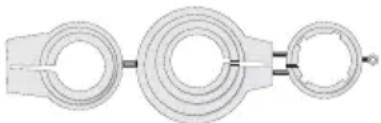
To fit the device to Danfoss radiator valves, you need the adapter provided. Please refer to the illustration to determine the adapter appropriate for the radiator valve.

HEATING REGULATOR
Caution! During assembly, be careful not to jam your fingers between the halves of the adapter!
natural_image
Pure mechanical component diagram without any text, numbers, or symbolsCaution! The adapters supplied are joined together with plastic tabs. Snapped off edges can be sharp. Break out the plastic tabs carefully and smoothen the sharp edges on the adapter you use with a suitable tool.
The notches on the circumference ensure the adapter fits perfectly.
1 If required, slide the adapter that fi ts the radiator valve onto the valve until the adapter snaps into place.
If necessary, use a screwdriver to slightly prise open the adapter in the area of the screw.
2 Fix the adapter with the screw and nut supplied. In the case of a RAV type valve, the stem extension must also be fitted on the valve pin.
3 Screw the device either on the adapter, if one is assembled, or directly on the radiator valve.
4 The adaptation starts automatically.
The device adjusts to the stroke of the radiator valve. For this purpose, the radiator valve is opened and closed several times so that the device learns the end points. This process may take a few minutes under certain circumstances.
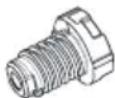
Due to the continuous thread, the pressure piece fitted on the underside can drop out if the regulator has not been mounted on the valve.
Fit the pressure piece back in place in such cases. The continuous thread turns and tightens the pressure piece. Restart the adaptation, if necessary.
After successful adaptation, the device enters Automatic mode.
Disassembly
Caution! Risk of burns through hot radiator valve! Contact could lead to hands being burned. Allow the radiator to cool down before completing any installation, disassembly or repair work on the device! Wear work gloves!
1 Turn the adjusting wheel (5) clockwise beyond the maximum temperature of 28 °C until ON appears in the display.
2 Wait a few seconds until the radiator valve is fully open.
3 Turn the union nut clockwise to separate it from the radiator valve.
Pairing the Heating Regulator and Base Unit
The heating regulator can be paired with the ProHome base unit.
1 Select the Register menu option on the ProHome base unit.
2 Select the PAIR menu option on the heating regulator.
3 JOIN appears in the display. A timer counts down, beginning at 90 seconds.
4 When pairing is completed successfully, OK appears in the display.
The heating regulator is displayed in the device list on the ProHome base unit.
For more information, please scan the QR code.

HEATING REGULATOR
ProHome App
You can configure and control the device with the ProHome App.

The ProHome App can be used with iOS from Version 8 and Android from Version 5.0.
The following conditions must be fulfilled in this case:
- You have downloaded the ProHome App and installed it on your smartphone or tablet PC.
- You have paired the ProHome base unit with the ProHome App.
- You have connected the heating regulator with the ProHome base unit successfully.
For more information, please scan the QR code.
Technical Data
| Supply voltage 3 V == | |
| Power consumption (max.) | 100 mA |
| Batteries 2 x AA mignon, | 1.5 V |
| Frequency (radio) | 868.5 MHz |
| Transmission power (max.): Battery service life Approx. 1 year Display LCD | 8 mW |
Dimensions 74 x 65 x 54 mm
Weight (incl. adapter and batteries) 191 g
Connection M30 x 1.5 mm
Ambient temperature 5 °C to 55 °C
Surface temperature Max. 90 °C (on radiator)
Linear stroke 4.3 mm
Appendix
Troubleshooting
I cannot register the sensors or actuators on the base unit of the alarm system. The maximum number of sensors or actuators which can be registered on the base unit has been reached - deregister sensors or actuators from the base unit before attempting to register another sensor or actuator on the base unit.
Ensure that the Register option has been selected on the base unit before attempting to register a sensor or actuator. More detailed information is available in the operating manual supplied with the base unit.
The sensor or actuator does not respond or does not work. The batteries are weak or empty. Replace the empty batteries with new ones and try again.
The solutions proposed proved unsuccessful or my specific problem is not described here.
Contact our Service department. You can find more solutions to various problems at www.olympia-vertrieb.de.
Information on Disposal
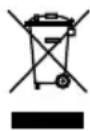
The adjacent symbol indicates that electrical and electronic apparatus and batteries no longer required must be disposed of separate from domestic waste in accordance with legal directives.
You are legally obliged to dispose of batteries and battery packs at shops which sell batteries or collection points which provide the corresponding containers.
Disposal is free of charge. The symbols indicate that the batteries must not be disposed of in normal domestic waste and that they must be brought to collection points provided by local public waste authorities.

Packaging materials must be disposed of according to local regulations.

APPENDIX
Cleaning and Service
1 Disconnect the sensors and actuators from the power outlet before cleaning, if necessary!
2 Clean the surface of the housing with a soft, lint-free cloth. Never use any chemicals or scouring agents.
3 Check the functionality of each sensor and actuator registered once a month and after changing the batteries.
4 Change the batteries at least once a year or after receiving the relevant message from the alarm system.
Information on Conformity
CE Olympia Business Systems Vertriebs GmbH, Zum Kraftwerk 1, 45527 Hattingen hereby declares that these devices fulfil the basic requirements and other relevant provisions stipulated in the Directive 2014/53/EU. The CE mark on the devices confirms conformity.
More detailed information on the Declaration of Conformity is contained on the supplementary sheet issued with the respective sensor and actuator.

More detailed information on the Declaration of Conformity is provided under http://productip.com/?f=67ca1 or scan this QR code.
More detailed information on the Declaration of Conformity is provided under http://productip.com/?f=6ef5f or scan this QR code.
Guarantee
More detailed information on the alarm system base unit is provided in the full operating manual under www.olympia-prohome.de or scan this QR code.
More detailed information on the ProHome app is provided in the full operating manual under www.olympia-prohome.de or scan this QR code.
Dear Customer,
we are delighted that you have chosen this equipment.
In the case of a defect, please return the device together with the receipt and original packing material to the point-of-sale.
OLYMPIA
v1.0, 12.2017
Smart Plug
Heating regulator
6110
6112
- OLYMPIA
- Accessories
- Before You Start .... 4
- Important Information on Accessories ..... 4
- Safety Instructions....5
- Smart Plug 6
- Heating Regulator 9
- Appendix....17
- Before You Start
- Important Information on Accessories
- Safety Instructions
- Smart Plug
- Intended Use
- Scope of Delivery
- General View
- Plugging In
- Registering
- Safety Functions
- Continual Current Measurement
- HEATING REGULATOR
- Overheating Protection
- Overvoltage Protection
- Technical Data
- Menu
- Inserting the Batteries
- Installation
- Disassembling the Old Thermostat Head
- Installing the New Thermostat Head
- Disassembly
- Pairing the Heating Regulator and Base Unit
- ProHome App
- Appendix
- Troubleshooting
- Information on Disposal
- Cleaning and Service
- Information on Conformity
- Guarantee
Brand : OLYMPIA
Model : Smart Plug
Category : Smart plug