
CPF 10A1 - Digital photo frame XORO - Free user manual and instructions
Find the device manual for free CPF 10A1 XORO in PDF.


| Product Type | Digital Photo Frame |
| Model | CPF 10A1 |
| Brand | Xoro |
| Display Size | 10.1 inches |
| Display Type | TFT LCD |
| Resolution | 1024 x 600 pixels |
| Power Supply | DC 5V via included adapter |
| Wi-Fi | 802.11 b/g/n |
| Card Slot | SD/SDHC up to 32GB |
| USB Port | Mini USB 2.0 (host) |
| Audio | Built-in speaker, headphone jack |
| Supported Photo Formats | JPEG |
| Supported Video Formats | MPEG-4, AVI |
| Supported Audio Formats | MP3 |
| Cloud Connectivity | Facebook, Twitter, PhotoPartner app |
| Local Transfer | USB storage, SD card, FTP (LAN) |
| Remote Control | Included |
| Calendar & Weather | Built-in with auto city detection |
| Clock & Alarm | Multiple layouts and alarm settings |
| Slideshow Modes | Zoom, transition effects, background music |
| Dimensions (approx.) | 260 x 180 x 30 mm |
| Weight (approx.) | 0.5 kg |
| Package Contents | Photo frame, power adapter, remote control, user manual |
| Cleaning | Soft lint-free cloth, no ammonia or alcohol |
| Safety Features | Automatic shutdown, overheat protection (via ventilation) |
Frequently Asked Questions - CPF 10A1 XORO
User questions about CPF 10A1 XORO
0 question about this device. Answer the ones you know or ask your own.
Ask a new question about this device
Download the instructions for your Digital photo frame in PDF format for free! Find your manual CPF 10A1 - XORO and take your electronic device back in hand. On this page are published all the documents necessary for the use of your device. CPF 10A1 by XORO.
USER MANUAL CPF 10A1 XORO
FREE TO CHOOSE INNOVATIONS
XORO®
Cloud Fotorahmen

natural_image
Black-framed digital display showing a child's face with red maple leaves, framed by a curved black border (no text or symbols)Kalender, Wetter....21
Uhr, Wecker....22
Problembehebung 23
WIFI Einstellungen
oder
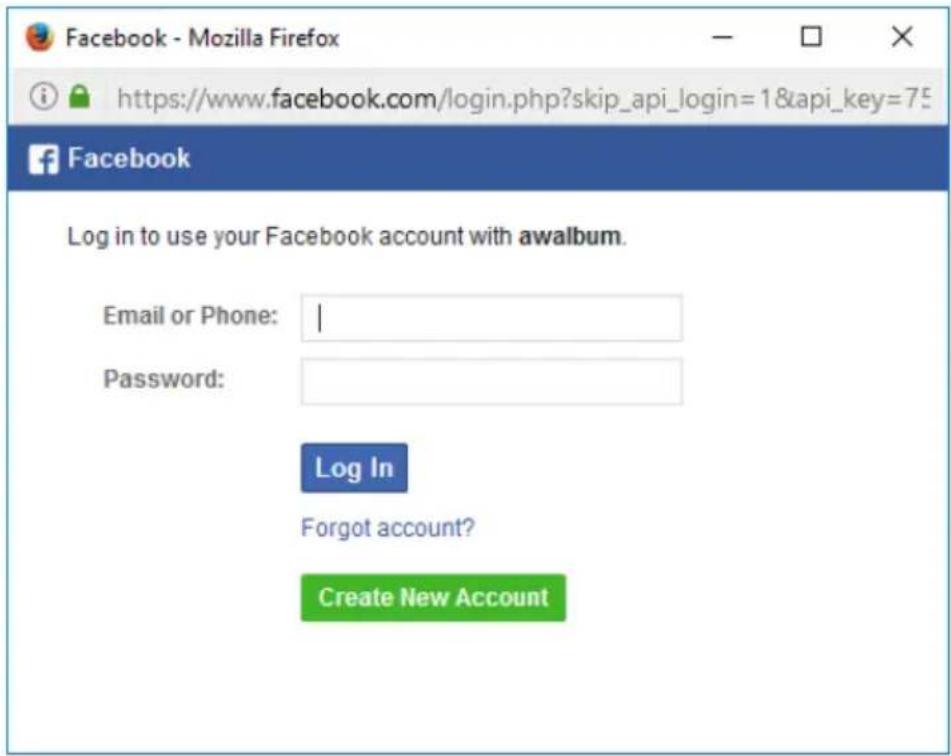
Please login to your Facebook account so that the Wifi Frame can be linked. All pictures after the binding process will be pushed directly to the Wifi Frame after it is posted on your Facebook account.

Facebook / Twitter
Equipment Management

CPF10A1(9442148633)
Unbind
Continue to bind
oder
natural_image
Grid of video thumbnails showing animals, landscapes, and scenes (no text or symbols)Musik hören
Kalender
FREE TO CHOOSE INNOVATIONS
XORO®
Cloud,,Fotorahmen,

natural_image
Black-framed digital display frame showing a child's face with red maple leaves, framed by a curved black border (no text or symbols)USER'S GUIDE (ENG)
Privacy Policy
For Cloud Photo Frame Facebook Connection
Introduction
frame.cloudalbum.site is a service/platform provider for intelligent device manufactures. We provide an Internet based interface between intelligent devices and the 3rd party social medias. This privacy policy describes the information we collect from Facebook, and the data we pass to digital photo frame.
Information we collect
According to the terms of services describes, we will collect user's photo from the 3rd party social media (in this case, the Facebook), and pass the photo to user's digital photo frame. The following data source (Facebook interface) could be used to collect the photo:
√·Posts by the user
√·Album of the user
√·Liked posts
√·Messages from other user
We only collect the photos since the users combine their digital photo frame to the 3rd party social media, which means we will NOT collect the historical photos from Facebook. The combination process is described at terms of services.
How we use information we collect
The information (photo) we collected from the 3rd party social media will be temporally saved to our server provided by Amazon AWS. Once the photo was passed to the digital photo frame, the photo will be permanently deleted from our server.
Information Security
Our service (digital center) is located at Amazon AWS, which means the users' photos were temporally saved at AWS, meanwhile the information security assurance is also provided by AWS.
The data (photo) transmission between AWS server and Facebook sserver, and the transmission between AWS server and digital frame are encrypted by SSL via HTTPS.
We will forever NOT share users information to ANY other organizations, parties, companies, persons for ANY purpose.
When this Privacy Policy applies
This policy applies since the draft day (April 21, 2015), and it will be reviewed annually to ensure the policy is up-to-date to meet the 3rd party social media's privacy policy. If there is any change of this privacy policy, all users will be informed via email that register on our server, or via the message through the 3rd party social media.
The awalbum's privacy policy team will organize the review process. The planned next review date is April 21, 2018.
Safety Information
Electrical Safety....4
Electrical Safety, Package Content, USB Ports % Memory Cards .... 5
What is a XORO Cloud Photo Frame?
How do i send the pictures to the XORO Cloud Photo Frame 6
Operation
Remote Control, Overview CPF 8A1 7
Overview CPF 10A1, Overview CPF 16B1....8
Items and Cleaning....9
Settings 10
First Steps, Homescreen, WIFI Settings 11
WIFI Settings, Connections of the CPF / Facebook 12
Facebook....13-15
Twitter....15-17
Photopartner APK....17-18
Sending data using the Windows Explorer 18
View Photos (Album) 19
Watch Videos, Listen Music 20
Calendar, Weather....21
Clock, Alarm Clock 22
Troubleshooting 23
Warranty 24
Recycling Information 25
Digital Photo Frame
Electrical Safety

The lightning flash with an arrowhead symbol within an equilateral triangle is intended to alert the user of the presence of un-insulated "dangerous voltage" within the product's enclosure that may be of sufficient magnitude to constitute a risk of electric shock to persons.
The exclamation point within an equilateral triangle is intended to alert the user of the presence of important operating and maintenance (servicing) instructions in the literature accompanying the appliance. This device complies with part 15 of the FCC rules.
User Manual
• All the safety and operating instructions should be read before the product is operated.
- Retain instructions - The safety and operating instructions should be retained for future reference.
• All warnings on the product and in the operating instructions should be adhered to.
• All operating and use instructions should be followed.
Safety Instructions
• Never touch the plug with wet hands.
- Only operate the machine if the electrical voltage stated on the type plate beneath the machine agrees with the voltage on your plug socket. The wrong voltage can destroy the machine.
• Do not place this device near water or wet areas.
• Do not place this product on an unstable cart, stand, tripod, bracket, or table. The product may fall, causing serious injury to a child or adult, and serious damage to the product.
• Make sure that the power cable is not wound around the device while in operation.
• If you want to pull the plug out of the plug socket, always pull directly on the plug. Never pull on the cable as it could tear.
• Pull out the mains plug if the appliance is not to be used over a longer period of time.
- Only use extension cables that are designed for the power consumption level of the machine.
- Never stick any kind of illegal objects such as needles for example in the openings. This could cause electrical shocks or fire.
• For cleaning the device, pull the power cable out of the socket and device.
• Do not use any kind of liquids for cleaning the device. Do only use a light wet wipe.
• Do not connect accessories on the device which are not defined by the manufacture.
- Slots and openings in the cabinet are provided for ventilation and to ensure reliable operation of the product and to protect it from overheating, and these openings must not be blocked or covered.
Electrical Safety
• Make sure that the power cable is not bent, caught or run over and that it does not come into contact with heat sources.
• Do not place vases etc. on the appliance (neither empty nor filled with any liquids).
• Do not operate the device near heat sources such as heaters or ovens.
- Do not use the device in dusty environments. Strong cigarette smoke can cause damage at electrical devices. Damage caused due to cigarette smoke, is not covered by the legal warranty and will be at your expose for the repair.
- Keep the appliance away from rain and any moisture
• Do not expose the device to direct sunlight.
Package Contents
The following components are included:
• Xoro CloudPhoto Frame
- Power Adapter
- User Manual
- Remote Control
If any of these items are missing, please contact your dealer as soon as possible. Keep the original packaging in the event the unit needs to be returned to the dealer.
USB Ports & Memory Cards
The device has a MiniUSB 2.0 port. At this port, USB-devices such as (USB-sticks, HDD, SSD) or USB-input devices (mouse, keyboard etc.) can be plugged in. The device has a SDcard slot too. The device supports memory cards up to 32gb. Supported formats are: FAT & NTFS.
Notes:
• Only FAT/FAT32/NTFS are official supported formats. If your memory card is formatted with another format, it might not be detected by the device.
• The USB Ports are not for charging external devices.
- As there are many different USB devices on the market, a general compatibility cannot be granted.
With the XORO Cloud Photo Frame (CPF) you can upload files from your smartphone, tablet, laptop or desktop PC and display them - where ever you are, as long as you are connected to the internet. XORO CPF makes sharing moments with your beloved ones so much easier, by streaming photos and videos of your actual activities, directly to your XORO CPF. This is the perfect gift, that is always there. Of course the XORO CPF is a „Digital Photo Frame“ too, which means that he can display Photos and Videos from an USB-Medium and SDCards.
How do i send the pictures to the XORO Cloud Photo Frame?
There are 4 methods for sending the pictures and videos to the XORO Cloud Photo Frame.
1) With the APP PhotoPartner you can:
- Manage Up to 10 XORO Cloud Photo Frames with a Smartphone via the device number.
- Simply send photos and videos to the digital photo frame.
- Record photos and videos and send them directly to the digital photo frame.
Note: you can download the PhotoPartner App via the Apple App Store or the Google Play Store for Android.
2) With Twitter you can:
- Manage Up to 10 XORO Cloud Photo Frames with a Smartphone via the device number.
- Simply send photos and videos to the digital photo frame.
3) With Facebook you can:
- Manage Up to 10 XORO Cloud Photo Frames with a Smartphone via the device number of the devices.
- Simply send photos and videos to the digital photo frame.
4) With the Windows Explorer (Local Network) you can:
- Send fotos via FTP.
- Send fotos via USB.
Remote Control
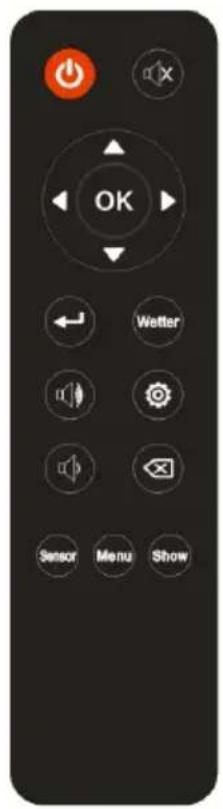
 | Power Button-Turns the power on / off | |
 | mute | |
 | OK buttons / Confirm / Save | |
 | navigation keys | |
 | Back / Exit button | |
 | Changes directly to weather station | |
 | Volume control, volume up / down | |
 | setting | |
 | delete | |
 | Motion sensor | |
 | Menu | |
 | Playback Setting |
Overview CPF 8A1
- SDHC-Cardreader
- USB-2.0-Port
- Power supply
- Control panel
- On/Off
- Speaker
- Menü

Overview CPF 10A1
- SDHC-Cardreader
- USB-2.0-Port
- Mini USB Port
- Power supply
- Control panel
( On/Off / Menü etc.) - Speaker
- Headphone jack

Overview CPF 16B1
- SDHC-Cardreader
- USB-2.0-Port
- Mini USB Port
- Power supply
- Control panel
( On/Off / Menü etc.) - Speaker
- Headphone jack

Items and Cleaning
Power Supply
For charging your XORO CPF, do only use the original charging cable. Please observe the information on the nameplate of the charging cable.
Notes:
• The charging cable provides the required power supply. Using any other power cable for charging the device, may cause damages.
• If possible, do only charge the device when it's on low voltage. This will increase the lifetime of the internal battery.
USB Ports & Memory Cards
The device has a MiniUSB 2.0 port. At this port, USB-devices such as (USB-sticks, HDD, SSD) or USB-input devices (mouse, keyboard etc.) can be plugged in. The device has a SD card slot too. The device supports memory cards up to 32gb. Supported formats are: FAT & NTFS.
Notes:
• Only FAT/FAT32/NTFS are official supported formats. If your memory card is formatted with another format, it might not be detected by the device.
• The USB Ports are not for charging external devices.
• As there are many different USB devices on the market, a general compatibility cannot be granted.
Cleaning
Before cleaning your photo frame, make sure the unit is turned off. Use only suitable cleaning fluids and a clean, soft, lint-free cloth to clean the surface.
Notes:
• We do not recommend using ammonia or alcohol based cleaners on the screen or plastic housing. Some chemical cleaning agents can damage the screen or the display housing.
- The manufacturer is not liable for damage resulting from the use of ammonia or alcohol-based detergents!
Settings
| Device-Info The QR-Code | se and the Frame-ID used for linking the device. |
| WiFi Settings For the WiFi | settings. |
| Album Settings | |
| Slideshow | Automatically plays back images in random order. |
| Zoom In Slide Transition | Increases the time between the change of images. |
| Background Music Playing | background music. |
| Background Music Path | Declare the path to background music. |
| Background Music Mode | Set the playmode to either random or complete. |
| Slideshow Mode Effects for | the diashow while switching the picture. |
| Slideshow Interval Time, until the picture changes. | |
| Slideshow Photo Limit | Limitate the amount of pictures that will be displayed. |
| Auto Power On / Off To set | whether the idle state should be active at certain times of the day. |
| Auto-Off Time Shutdown time. | |
| Auto-On Time | Boot time. |
| Delete all Photos | Delete all fotos. |
| Reset All Settings Reset all settings to the factory state. | |
| System Settings | |
| Sound Set the system volume. | |
| Display Set the brightness. | |
| PC Management | Displays the IPV4 address of the XORO CPF and the passwordfield for the data transfer via FTP. |
| Time and date Set the time and date. | |
| Language Set the system's language. | |
| Factory Data Reset | Deletes all connected accounts and files from the device and reset all settings to the factory state. |
| About | Displays the software version, WiFi-Mac address, device number and picture frame + network status. |
First Steps
Place the device in a suitable place. Use the built-in stand or a standard VESA wall bracket for TV sets. Then connect the supplied power supply unit to the unit. Press and hold the power button on the back of the unit for 3 seconds or use the remote control to turn on / off.
The main menu of the digital photo frame will appear immediately after switching on.
Homescreen

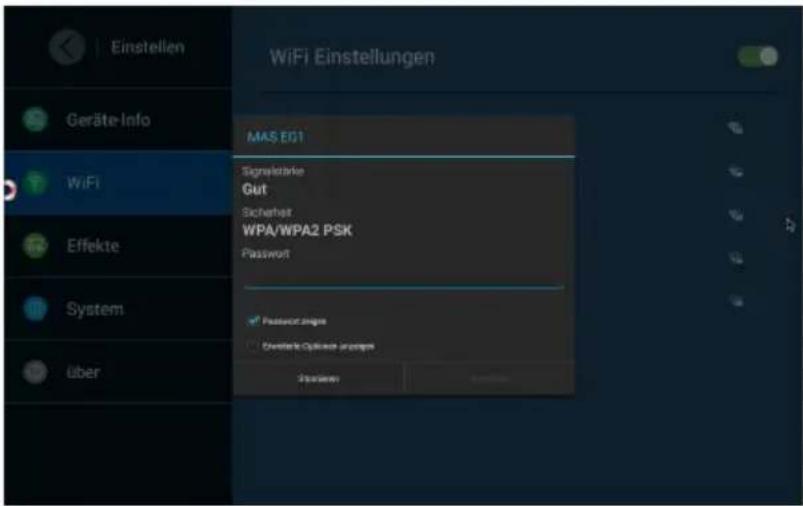
WIFI Settings
Go to Settings / WIFI, select the WiFi network you want to connect to, and press "OK / Play" to connect.

Enter the WiFi password and then confirm with the "Connect" button.
Connections of the CPF / Facebook
There are 4 ways to send pictures and videos to the CPF. First you must first connect the CPF.
Connect with the Facebook Account
You can either scan the QRCode below or search for the website directly to connect with Facebook.
- Scan the QR-Code.

- Or search for: https://www.facebook.com/AWcloudalbum/
- On the next page, click the "APP" button.
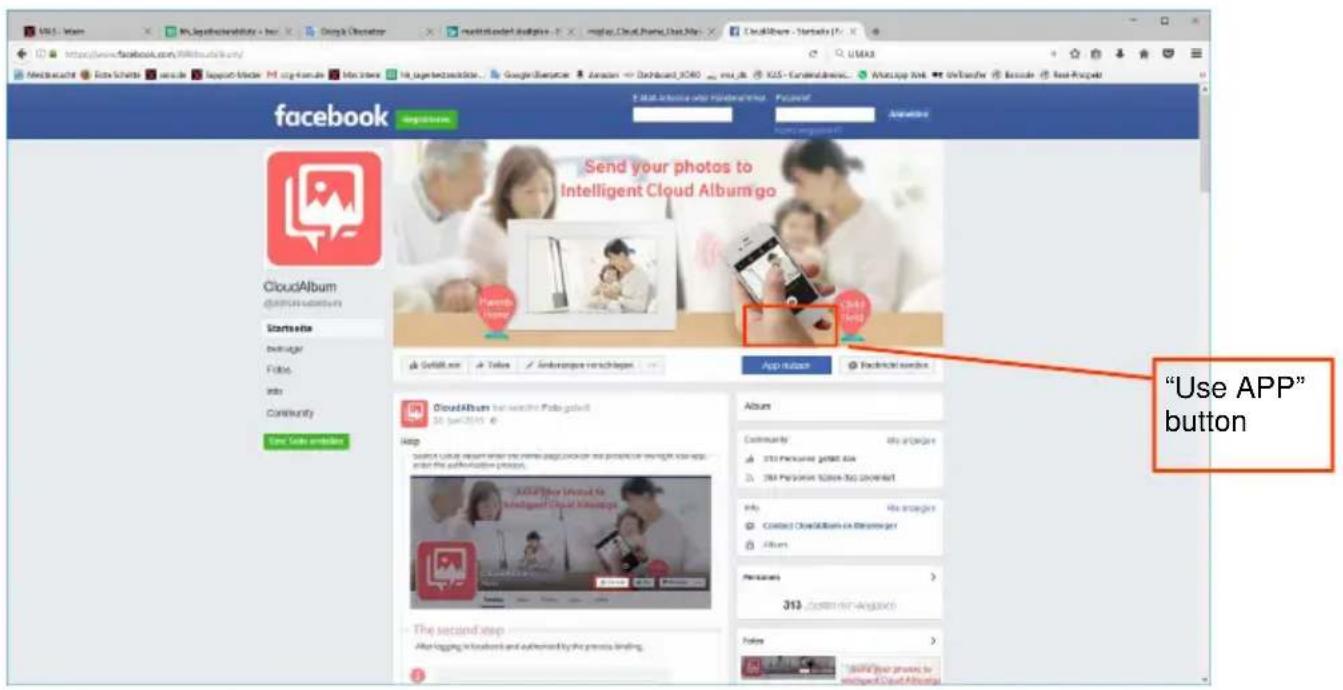
- Then click the login button and enter the login data from your Facebook account.

Please login to your Facebook account so that the Wifi Frame can be linked. All pictures after the binding process will be pushed directly to the Wifi Frame after it is posted on your Facebook account.


- After entering the correct login data, follow the instructions to enter the serial number and the device alias name and then Click "TO bind".
![Binding Equipment This page is for users to bind their digital photo frame to their Facebook account. Please fill in the UN Code (the unique ID of the photo frame can be found under Device Info menu in Settings) and click [To bind] button. If the UN Code is valid, a confirmation message will be sent to your photo frame. If the UN Code is not valid, an error message will be shown. Please double check the UN Code entered. UN Code 9442148633 The UN code at account settings view. RM Name CPF10A1 The remarks name of the photo frame TO bind To the list page. "TO bind" button klicken](/content/2026/05/823836/images/73d20534f3d89b23066a20d92571a634ef5c8154ec2c77a4e79f0f8ac82cd696.jpg)
Facebook / Twitter
- After connecting successfully, the following screen appears.

- Click "Unbind" to remove the device from the list for connected devices.
Note:
If multiple CPFs are connected to a Facebook account and you want to send the photos to a couple of friends and family only, you can select the CPF before sending them, by checking the box in front of the device name, no data will be streamed to CPFs without hooks.
Connect with the Twitter Account
You can either scan the QRCode below or search for the website directly to connect with Twitter.
- Scan the QR-Code.

- Or search for: https://www.twitter.com/AWcloudalbum/
- On the following page, you must enter the login data from your Twitter account.

- Now you can send messages to CloudAlbum by clicking the "message" butten.
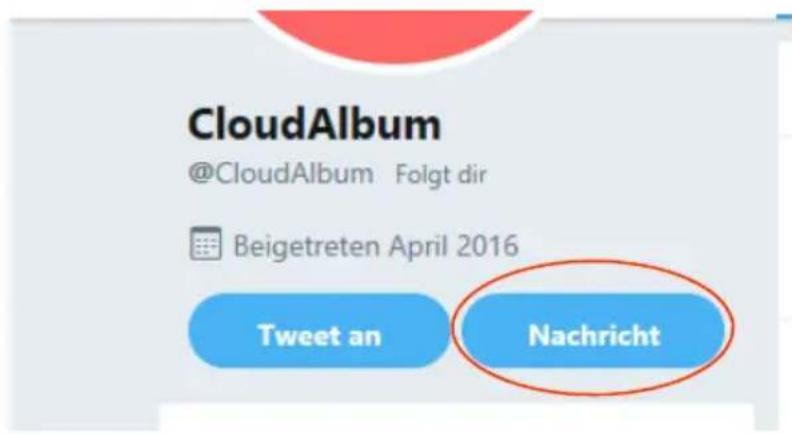
You can enter the following commands in the message field:
- Manager: All CPFs associated with Twitter are displayed
- Binding: bd + CPF device number (e.g. bd1234567890)
• Unbinding: unbd + CPF (e.g. unbd1234567890)
Connect with the Photopartner APK
Download the "Photo Partner" app from the Apple App Store or Google Play Store. To do this, call the store of your operating system manufacturer. Look for and download the Photo Partner app in the store. After the app is installed, open it. You are directed directly to the main menu.


- Take Picture: For taking a picture. After you have took the picture you have to confirm by clicking the „send“ button.
- Record Video: for recording a video. After you have recorded the video you have to confirm by clicking the „send“ button.
- Galerie: Send pictures and videos from your storage.
- Manage Devices: Displays the connected devices.
- Message: Here you can see your sent data.
- Link Frame: Here you can link your XORO CPF.
- Settings: Here you can see and change the settings.
Send data using the Windows Explorer
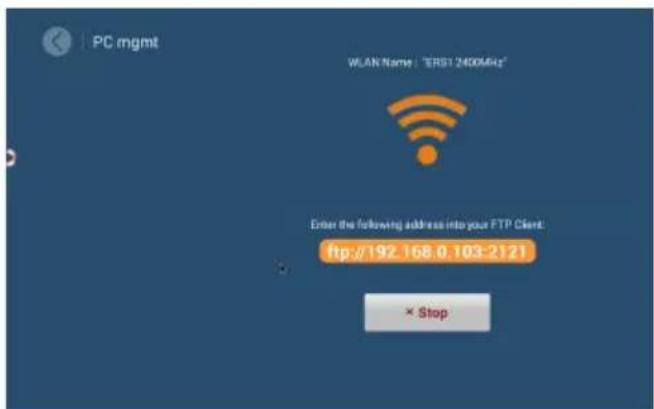
You can send data using the Windows Explorer. This is done either via USB or via FPT (data transfer protocol).
- By USB: Connect the CPF via USB to your Windows desktop PC. Access the CPF's memory in the File Explorer. Copy the images directly into the memory of the CPF.
- By FTP: You can send pictures to your CPF via your IP address. To find out your PV4 address, go to: Settings -> System Settings -> PC Management -> "Yellow bar", here you will find the text field ("ftp://192.168.178.2:2121"). Enter this IPV4 address into your Windows Explorer.
View Photos (Album)
The options are:
- Cloud-Photo
- Favorites
- Internal Memory
-
USB/SD-Card
. -
With Cloud photo you can send to this device via Facebook, Twitter or Photo Partner Watch pictures.
- With Favorites you can view your saved favorites.
- Use Internal Memory to view images stored on this unit.
- With the USB / SD card, you can view images stored on a USB / SD memory medium.

Watch Videos
With the Digital Photo Frame you can watch movies in the MPEG-4 / AVI file format. You may need to convert your videos to a compatible format for viewing.
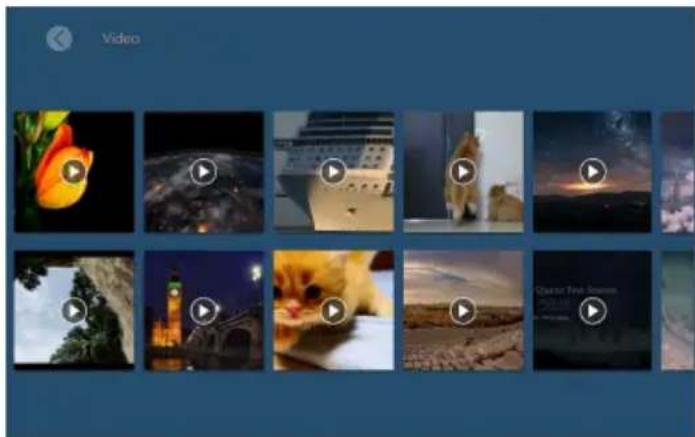
- Select the "Video" option from the main menu and press the "ENTER" button. A list of available videos is displayed.
- Select the desired video and press the "ENTER" button to play.
- Press the arrow keys to navigate and the "ENTER" key to execute the function.
Listen Music
The digital photo frame can play music in the MP3 file format.
- Select the "Music" option in the main menu and press the "ENTER" button. A list of available music tracks from the connected mass storage device is listed.
- Select the desired track with the arrow buttons and press the "ENTER" button to play.

Calendar
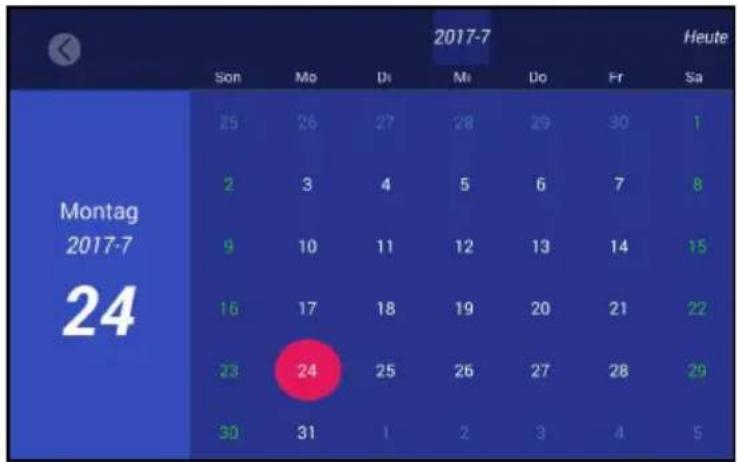
To access the calendar, press the "Calendar" (bottom right) option on the main menu (date).
other
| Day | Mon | Mo | Di | Ma | Do | Fr | Sa | |---|---|---|---|---|---|---|---| | Montag 2017-7 | 25 | 26 | 27 | 28 | 29 | 30 | 1 | | 24 | 2 | 3 | 4 | 5 | 6 | 7 | 8 | | 24 | 9 | 10 | 11 | 12 | 13 | 14 | 15 | | 24 | 16 | 17 | 18 | 19 | 20 | 21 | 22 | | 24 | 23 | 24 | 25 | 26 | 27 | 28 | 29 | | 24 | 30 | 31 | 1 | 2 | 3 | 4 | 5 |Weather
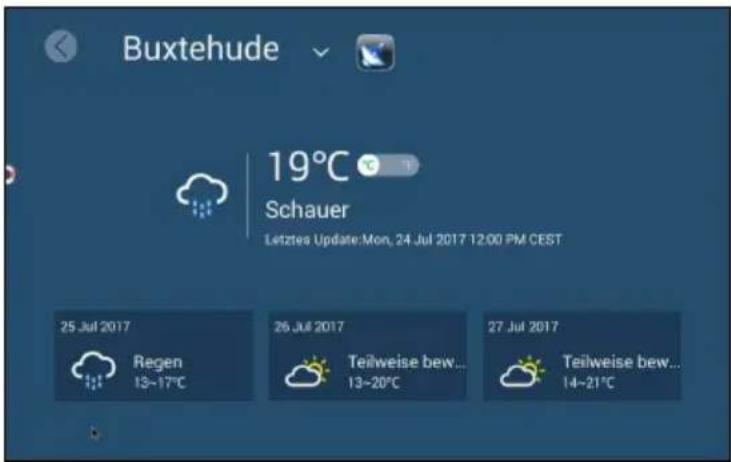
To view the weather, press the "Weather" (top right) option in the main menu (X ° C / X ° F).
- Select city: You can select your city by going to the current city (in the example picture "Buxtehude") and confirm by pressing the "ENTER" key. Now search for your city and confirm with the "ENTER" key again.
- City automatically: Use the satellite button to access the weather station near you.
- ° Unit: You can switch between ° C and ° F with the slider.
Clock
To call the clock, press the "Clock" (bottom left of "Alarm") option in the main menu. Use the left and right arrow buttons to change the layout.

Alarm Clock
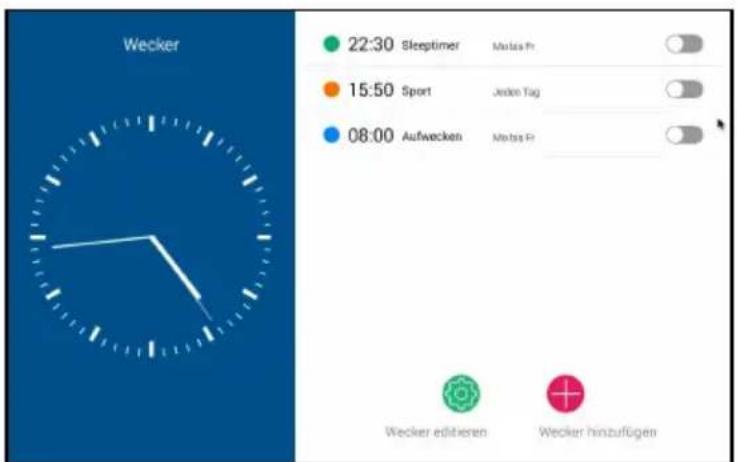
To call the alarm, press the "Alarm" (bottom left) option in the main menu.
- Edit alarm: allows you to edit and delete alarm functions.
- Add alarm: allows you to add new alarm functions.
Please read the following information to find out the possible cause of a problem before contacting our costumer service.
| Problem Solution | |
| Device does not turn on | Check whether the power adapter is properly connected to the power outlet.Check if the cable of the power supply is properly connected to the device.Pull out the plug, wait for 1 minute and then plug the connector back on. |
| No Sound | Check if mute is activated in the volume control (mute)Turn up the volume until you hear the soundCheck the sound settings |
| No Internet Connection | Check if the wireless router is working properly.Check whether the parameters on XORO CPF are correct. Check for example the DHCP setting.Run the automatic search for networks again.Enter the correct password (this is set in the router configuration).Choose no foreign networks.The Internet server may be temporarily unavailable or may be overloaded. |
| Time or Date are wrong | Check the settings for the timezone and set the time zoneonce again. |
More questions?
Our customer service is available on weekdays from 11:00 -17.00 clock:
MAS Elektronik AG
In case the products delivered are not free from defects in material or workmanship, MAS Electronic AG has the right to either repair or replace the defective product at its choice. MAS Electronic AG manufactures and repairs goods using components which are new or equivalent to new in accordance with industry standards and practice. The warranty for wearing parts (e.g. rechargeable batteries) is limited to 6 months. In case the device is equipped with internal data storage (e.g. hard disc drive, Flash drive), the customer is responsible to backup his data before sending the device. MAS Elektronik AG is not liable for any data loss on returned devices. MAS Electronic AG reserves the right to reset returned devices to factory defaults. Please note your personal settings for this reason.
MAS Electronic AG is not liable for any accessories not belonging to original package content such as DVDs, hard disc drives, Flash storage devices, batteries, etc. This limited warranty covers the warranty requirements set by authorities in your country.
This limited warranty does not cover finishes, accessories or batteries, nor does it cover damage resulting from accident, misuse, abuse, dirt, water, battery leakage, tampering, servicing performed or attempted by unauthorized service agencies. This limited warranty does not cover damages resulting from firmware upgrades. Only in case of firmware upgrades needed to add functions promised at time of purchase, such damages are covered by this limited warranty. For a correct and frictionless completion of warranty or repairs you need a RMA No. You may obtain a RMA on the internet at www.mas.de/FAQ or by telephone.
Please send the device in its original packing material, all standard accessories and a copy of the invoice, a description of defect and the RMA No. to following address. Please note the RMA number clear and in large numbers on the outer package.
Contact with the Xoro-Customer support:
Telephone: +49 4161 800 24 24 (Mo-Fr: 11-17:00 Uhr)
Recycling of electronic devices
This product is designed and manufactured with high quality materials and components which can be recycled and reused. This symbol means that electrical and electronic equipment, at their end-of-life, should be disposed of separately from your household waste. Please, dispose of this equipment at your local community waste collection/recycling centre. In the European Union there are separate collection systems for used electrical and electronic product. Please, help us to conserve the environment we live in!

Recycling of paper and carton
The material recycling symbol on the carton and user manual denotes that they are recyclable. Dispose them not with the normal household waste.

Recycling of plastic parts
The material recycling symbol on the plastic parts denotes that they are recyclable. Do not dispose them in household waste.

Green Dot
The “Grüne Punkt” denotes that the MAS Elektronik AG pays a duty to the “Society for Waste Prevention and Secondary Resource Generation”.

EC Declaration
EC Declaration
With the CE mark declares XORO, a registered trademark of the MAS Elektronik AG that the XORO CPF 8A1 / CPF10A1/ CPF 16B1 meets the guidelines 2014/53/EU The full text of the EU Declaration of Conformity is available under the following Internet address available: http://www.xoro.de/downloads/



- XORO®
- Cloud Fotorahmen
- WIFI Einstellungen
- Facebook / Twitter
- Musik hören
- Kalender
- Privacy Policy
- For Cloud Photo Frame Facebook Connection
- Introduction
- Information we collect
- How we use information we collect
- Information Security
- When this Privacy Policy applies
- Safety Information
- What is a XORO Cloud Photo Frame?
- Operation
- Electrical Safety
- User Manual
- Safety Instructions
- Package Contents
- USB Ports & Memory Cards
- Notes:
- How do i send the pictures to the XORO Cloud Photo Frame?
- Remote Control
- Overview CPF 8A1
- Overview CPF 10A1
- Overview CPF 16B1
- Items and Cleaning
- Power Supply
- Cleaning
- Settings
- First Steps
- Homescreen
- WIFI Settings
- Connections of the CPF / Facebook
- Connect with the Facebook Account
- Note:
- Connect with the Twitter Account
- Connect with the Photopartner APK
- Send data using the Windows Explorer
- View Photos (Album)
- Watch Videos
- Listen Music
- Calendar
- Weather
- Clock
- Alarm Clock
- Contact with the Xoro-Customer support:
- Recycling of electronic devices
- Recycling of paper and carton
- Recycling of plastic parts
- Green Dot
- EC Declaration
Brand : XORO
Model : CPF 10A1
Category : Digital photo frame