
FL-R750V - Lecteur vidéo CD LG - Free user manual and instructions
Find the device manual for free FL-R750V LG in PDF.

| Product Type | Video CD Player |
| Model | FL-R750V |
| Brand | LG |
| Playable Disc Formats | Video CD (VCD), Audio CD, MP3 disc, CD-R/RW |
| Laser Type | Semiconductor laser, wavelength 780 nm |
| Signal Format | NTSC, PAL (switchable) |
| Frequency Response | 20 Hz to 18 kHz (±2.0 dB) |
| Signal-to-Noise Ratio | 83 dB (1 kHz, 0 dB, IHF-A) |
| Video Output | 1.0 Vp-p, 75 ohms (phono jack) |
| Audio Output | 2 Vrms, 47 kohms (phono jacks) |
| Microphone Inputs | MIC 1, MIC 2 (phone jacks, 4.0 mVrms) |
| Power Supply | AC 110-240 V ~ 60/50 Hz |
| Power Consumption | 10 W |
| Dimensions (W x H x D) | 430 x 96 x 250 mm |
| Weight | 3.95 kg |
| Karaoke Features | Key control, echo adjustment, score display, microphone volume control |
| Playback Control | PBC (Playback Control) for Video CDs, Program/Repeat/Random play |
| MP3 Playback Capabilities | Up to 999 files, 254 folders; sampling 44.1 kHz, bitrate 128 kbps recommended |
| Special Functions | Digest play, intro scan, time search, resume play |
| Supplied Accessories | Remote control, audio/video connecting cords, batteries |
| Cleaning Instructions | Use soft dry cloth; mild detergent for stubborn dirt; avoid solvents |
| Safety Precautions | Do not expose to moisture; laser radiation; refer servicing to qualified personnel |
Frequently Asked Questions - FL-R750V LG
User questions about FL-R750V LG
0 question about this device. Answer the ones you know or ask your own.
Ask a new question about this device
Download the instructions for your Lecteur vidéo CD in PDF format for free! Find your manual FL-R750V - LG and take your electronic device back in hand. On this page are published all the documents necessary for the use of your device. FL-R750V by LG.
USER MANUAL FL-R750V LG
Before connecting, operating or adjusting this product, please read this instruction booklet carefully and completely.
Safety Precautions

CAUTION
RISK OF ELECTRIC SHOCK DO NOT OPEN

WARNING: TO REDUCE THE RISK OF ELECTRIC SHOCK
DO NOT REMOVE COVER (OR BACK) NO USER-SERVICEABLE PARTS INSIDE REFER SERVICING TO QUALIFIED SERVICE PERSONNEL.

This lightning flash with arrowhead symbol within an equilateral triangle is intended to alert the user to the presence of uninsulated dangerous voltage within the product's enclosure that may be of sufficient magnitude to constitute a risk of electric shock to persons.

The exclamation point within an equilateral triangle is intended to alert the user to the presence of important operating and maintenance (servicing) instructions in the literature accompanying the product.
WARNING: TO REDUCE THE RISK OF FIRE OR ELECTRIC SHOCK, DO NOT EXPOSE THIS PRODUCT TO RAIN OR MOISTURE.
CAUTION:
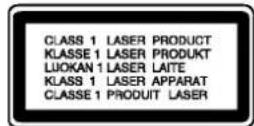
This Digital Video Disc Player employs a Laser System.
To ensure proper use of this product, please read this owner's manual carefully and retain for future reference, should the unit require maintenance, contact an authorized service location-see service procedure.
Use of controls, adjustments or the performance of procedures other than those specified herein may result in hazardous radiation exposure.
To prevent direct exposure to laser beam, do not try to open the enclosure. Visible laser radiation when open. DO NOT STARE INTO BEAM.
CAUTION: The apparatus shall not be exposed to water, dripping or splashing and that no objects filled with liquids, such as vases, shall be placed on the apparatus.
SERIAL NUMBER: The serial number is found on the back of this unit. This number is unique to this unit and not available to others. You should record requested information here and retain this guide as a permanent record of your purchase.
Model No. ____
Serial No.
About the symbols for instructions

Indicates hazards likely to cause harm to the unit itself or other material damage.

Indicates special operating features of this unit.

Indicates tips and hints for making the task easier.

Contents
Introduction
Safety Precautions .....2
Contents 3
Before Use 4-6
playable Discs 4
Precautions ....5
Preparation
Preparations 6-7
Setting the color system .....6
Connecting the AC power cord .....6
Transporting the player ....6
Connections 7
Operation
Playing a VIDEO CD 8
KARAOKE Function .....9-10
Using the On-Screen Display .....11
Using the Front Panel Display .....12
Resume Play 13
Location a Specific Track .....14
Time Search ....14
Locating a Particular Point in a Scene or Track 15
Digest Play 16-17
Disc Digest .....16
Track Digest .....17
Intro Scan ....17
Playing Repeatedly .....18
Program Play 19
Random Play 20
Switching the Sound .....20
Operation with MP3 Disc .....21-22
Notes on MP3 .....21
Playing MP3 disc .....22
PBC Playback .....23-24
Reference
Glossary .24
Additional Information .....25
Troubleshooting .....26
Specifications .....27
Before Use
playable Discs
| Video CD (VCD)(8 cm / 12 cm disc) | |
| Audio CD(8 cm / 12 cm disc) |
In addition, this unit can play a CD-R or CD-RW that contains audio titles or MP3 files.
Notes
- Do not attach any seal or label to either side (the labeled side or the recorded side) of a disc.
- Do not use irregular shaped CDs (e.g., heart-shaped or octagonal). It may result in malfunctions.
Notes on Video CDs
Some playback operations of Video CDs may be intentionally fixed by software manufacturers. As this unit plays Video CDs according to disc content designed by the software manufacturer, some playback features of the unit may not be available, or other functions may be added.
Refer also to the instructions supplied with the Video CDs.
Disc-related terms
Track (Video CD and audio CD only)
Sections of a picture or a musical piece on a video CD or an audio CD. Each track is assigned a track number, enabling you to locate the track you want.
Scene
On a video CD with PBC (Playback control) functions, moving pictures and still pictures are divided into sections called "Scenes".
Each scene is displayed in the menu screen and assigned a scene number, enabling you to locate the scene you want.
A scene is composed of one or several tracks.
Types of video CDs
There are two types of video CDs:
Video CDs equipped with PBC (Version 2.0)
PBC (Playback control) functions allow you to interact with the system via menus, search functions, or other typical computer-like operations. Moreover, still pictures of high resolution can be played if they are included in the disc.
Video CDs not equipped with PBC (Version 1.1)
Operated in the same way as audio CDs, these discs allow playback of video pictures as well as sound, but they are not equipped with PBC.
Before Use (Continued)
Precautions
Handling the unit
When shipping the unit
The original shipping carton and packing materials come in handy. For maximum protection, re-pack the unit as it was originally packed at the factory.
When setting the unit
The picture and sound of a nearby TV, VCR, or radio may be distorted during playback. In this case, position the unit away from the TV, VCR, or radio, or turn off the unit after removing the disc.
To keep the surface clean
Do not use volatile liquids, such as insecticide spray, near the unit. Do not leave rubber of plastic products in contact with the unit for a long period of time. They will leave marks on the surface.
Cleaning the unit
To clean the cabinet
Use a soft, dry cloth. If the surfaces are extremely dirty, use a soft cloth lightly moistened with a mild detergent solution. Do not use strong solvents, such as alcohol, benzine, or thinner, as these might damage the surface of the unit.
Notes on Discs
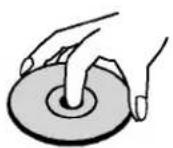
Handling discs
Do not touch the playback side of the disc. Hold the disc by the edges so that fingerprints will not get on the surface. Do not stick paper or tape on the disc.
Storing discs
After playing, store the disc in its case. Do not expose the disc to direct sunlight or sources of heat, or leave it in a parked car exposed to direct sunlight, as there may be a considerable temperature increase inside the car.
Cleaning discs
Fingerprints and dust on the disc can cause poor picture quality and sound distortion. Before playing, clean the disc with a clean cloth. Wipe the disc from the center out.

natural_image
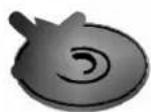
Two hands holding a circular object, one open and one crossed (no text or symbols)Do not use strong solvents such as alcohol, benzine, thinner, commercially available cleaners, or anti-static spray intended for older vinyl records.
About Symbols
About the 🔊 symbol display
" " may appear on the TV screen during operation. This icon means the function explained in this owner's manual is not available on that specific Video CD.
Preparations
Setting the color system
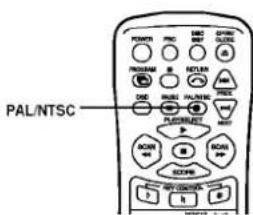
This player conforms to the NTSC and PAL color systems. Press PAL/NTSC on the remote to the appropriate position, according to your TV.
- If the color system of your TV is NTSC: Press PAL/NTSC on the remote to select NTSC. "NTSC" appears in the front panel display. Pictures will not be displayed if you set the PAL. When you play a VIDEO CD based on PAL system, the picture will be stretched vertically and will be displayed with the lower part of the picture cut off.
- If the color system of your TV is PAL: Press PAL/NTSC on the remote to select PAL. "PAL" appears in the front panel display. Pictures will not be displayed if you set the NTSC. When you play a VIDEO CD based on NTSC system, the picture will be stretched horizontally and will be displayed with the upper and lower parts of the screen masked in black.
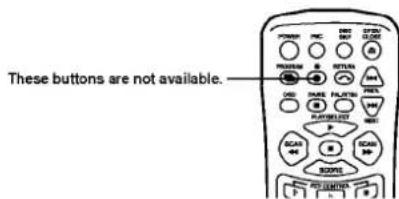
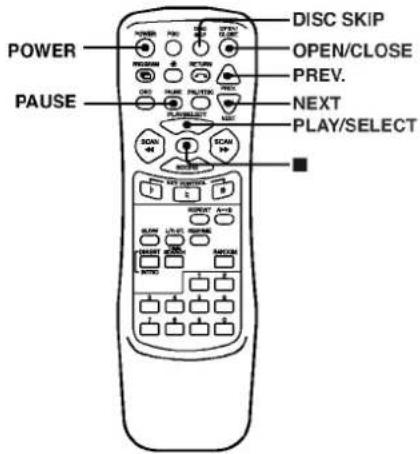
Additional information for remote
Connecting the AC power cord
Connect the AC power cord to a wall outlet.
Transporting the player
Before transporting the player, follow the procedure below to return the internal mechanisms to their original position.
- Remove the disc from the disc tray.
- Press OPEN/CLOSE to close the dis tray. "no dISC" appears in the display.
- Wait for 10 seconds, then press POWER to turn off the player.
- Disconnect the AC power cord from a wall outlet.
- Put the player in the original carton and transport the player.
Inserting Batteries into the Remote
You can control the player using the supplied remote. Insert two R03 (size AAA) batteries by matching the ⊕ and ⊖ ends on the batteries to the markings inside the compartment. When using the remote, point it at the remote sensor on the player.


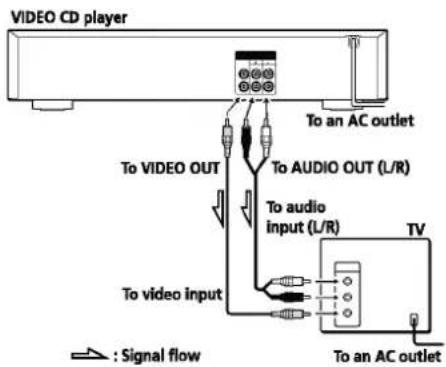
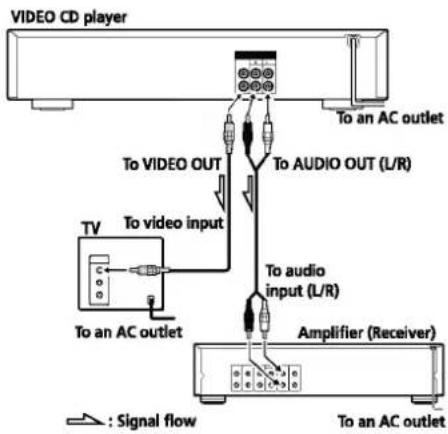
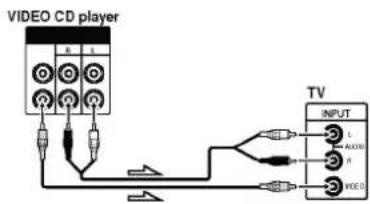
Connections
Overview
This section describes how to hook up the VIDEO CD player to a TV (with audio/video input jacks) and/or an amplifier. Be sure to turn off the power of each component before making the connections.
- When listening to the sound through TV speakers
- When listening to the sound through speakers connected to an amplifier
flowchart
graph TD
    A["TV"] -->|To video input| B["Amplifier (Receiver)"]
    B -->|To audio input (L/R)| C["To audio OUT (L/R)"]
    C --> D["To AC outlet"]
    D --> E["To video OUT"]
    E --> F["VIDEO CD player"]
    style A fill:#f9f,stroke:#333
    style B fill:#ccf,stroke:#333
    style C fill:#cfc,stroke:#333
    style D fill:#fcc,stroke:#333
    style E fill:#cff,stroke:#333
    style F fill:#ffc,stroke:#333
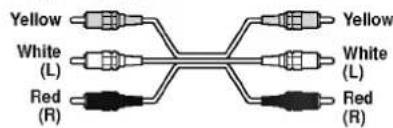
What cords will I need?
Video connecting cord (supplied) (1)

Audio connecting cord (supplied) (1)
Audio and video connecting cord (not supplied) (1)
Hookups
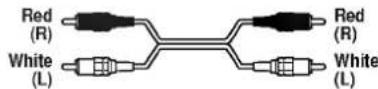
When connecting the cord, be sure to match the color-coded cord to the appropriate jacks on the components: Yellow (video) to Yellow, Red (right) to Red and White (left) to White. Be sure to make connections firmly to avoid hum and noise.
- When listening to the sound through TV speakers
- When listening to the sound through speakers connected to an amplifier
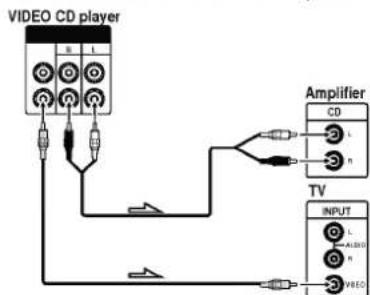
• See page 7 for the hookup information.
- You can also play audio CDs just like VIDEO CDs.
- When you turn on the player, "LG" logo appears on the TV screen.
When playing VIDEO CDs with PBC functions
In step 4, the menu screen appears on the TV screen. You can play the VIDEO CD interactively, following the instructions on the menu screen. (PBC Playback, see page 23.)
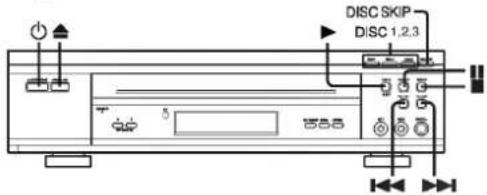
1 When using a TV
Turn on the TV and select the video input so that you can view the pictures from this player.
2 Press POWER to turn on the player.
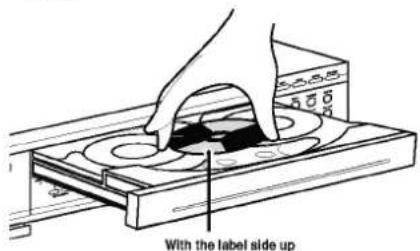
3 Press OPEN/CLOSE, and place the disc into the disc tray.
The disc on the left (DISC 1) is played first.
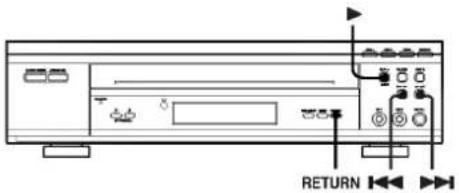
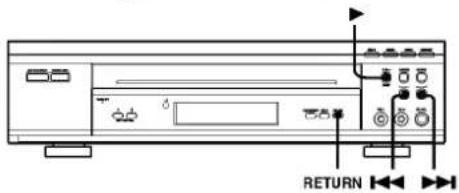
Press PLAY.
The disc tray closes and the player plays the disc in the player.
5 Adjust the volume on the TV or the amplifier.
To stop playback
Press ■.
You can resume playback from the point you stopped the VIDEO CD (Resume Play, see page 13).
| To | Operation |
| Stop playback | Press ■. |
| Pause | Press PAUSE. |
| Resume play after pause | Press PAUSE or PLAY. |
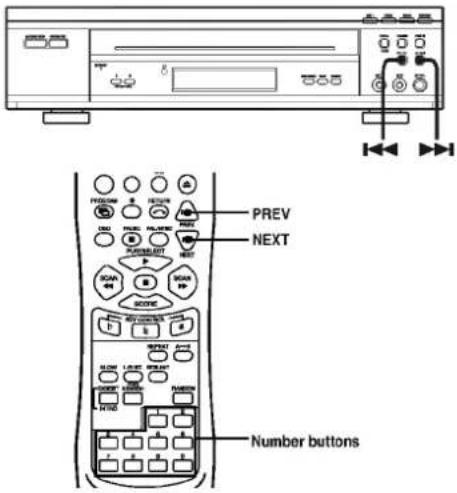
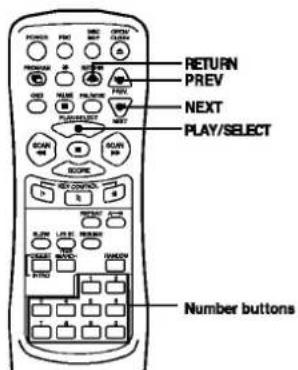
| Go to the next track, or scene in play mode | Press NEXT. |
| Go back to the preceding track, or scene in play mode | Press PREV. |
| Take out the disc | Press OPEN/CLOSE, which ever contains the disc you want to remove after stopping play. |
| Play disc directly | Press DISC1,2 or 3. |
| Go to the next disc, or scene in play mode | Press DISC SKIP. |
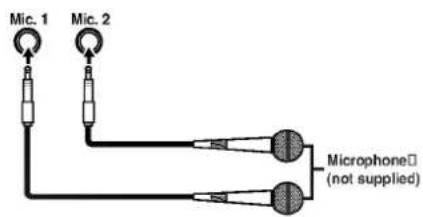
You can play karaoke (singing along) with CDs.
1 Load a karaoke Video CD.
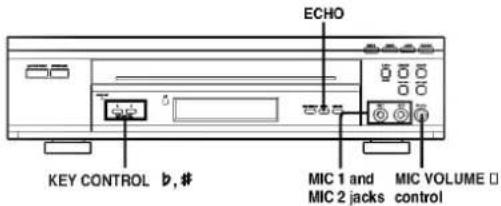
2 Set the MIC VOLUME control to the minimum level to prevent acoustic feedback (e.g. a loud howling sound) before connecting the microphone.
3 Connect a microphone to MIC1 or MIC2 or to both sockets.
Notes
If howling occurs:
- Move the microphone(s) away from the TV or the speakers.
- Lower the volume of the TV or the amplifier.
- Lower the microphone volume or echo off.
- Lower the microphone volume and music level.
If the sound is distorted when the player is connected to a TV:
4 Press SCORE to enter KARAOKE mode.
"KARAOKE" indicator appears in the front panel display.
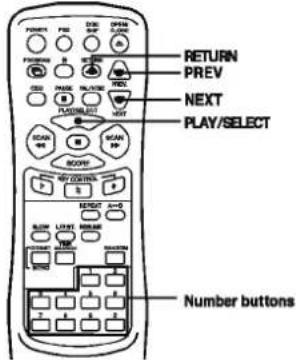
5 Press the number buttons or press PREV./NEXT to select the track you want to sing.
6 Press PLAY to start playback.
7 Adjust MIC VOLUME control and then sing a song.
KARAOKE Function (Continued)
Score Indication
Song score appears on the TV screen after a track of song is ended, and this unit is paused. To sing another song, repeat steps 5-7.
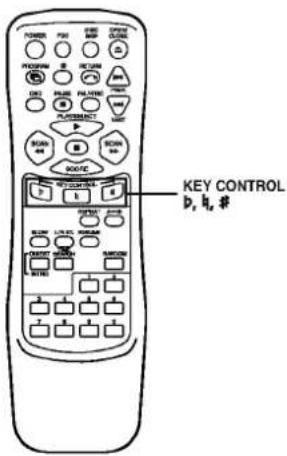
Changing the key (Key Control)
You can change the key to suit your vocal range. While playing karaoke, press one of the KEY CONTROL buttons repeatedly to find the key that suits your vocal range
| To | Operation |
| Raise the key | Press #. |
| Lower the key | Press b. |
| Return to the original key | Press h (on the remote). |
You can adjust the key to 15 steps (7 steps higher, 7 steps lower and the original key). The setting appears on the TV screen.
Adjusting the echo level
You can give an echo effects to the sound from the microphones. Press ECHO on the player to adjust the strength of echo. Each time you press ECHO while using microphone(s), the front panel display changes as follows.

The same echo level is applied to both microphones connected to the Mic 1 and Mic 2 jacks.
To exit KARAOKE mode
Press SCORE until "KARAOKE" indicator disappears.

When you don't use the microphone(s)
Unplug the microphone(s), switch the microphone(s) off and turn the MIC VOLUME control to MIN.

Notes
- If you press SCORE when a VIDEO CD with PBC functions is inserted, the PBC mode is set to OFF automatically.
- If you don't want any echo effect, set the Echo OFF position.
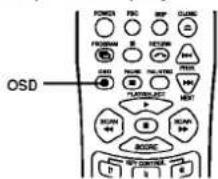
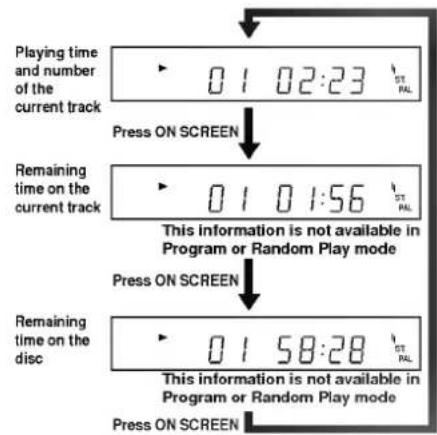
Using the On-Screen Display
You can check the operating status of the player and the information about the disc with the on-screen display on the TV screen.
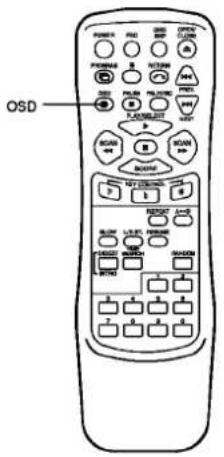
Press OSD button.
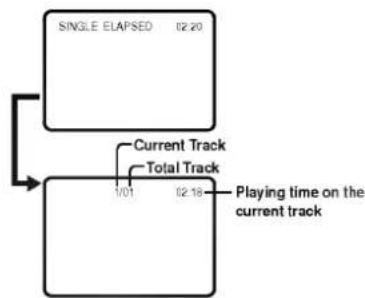
Each time you press OSD while playing disc, the on-screen display change as follows. Note that you cannot check the remaining time during PBC Playback (page 23).
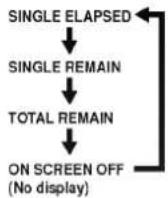
- Display information of SINGLE ELAPSED mode
flowchart
graph TD
    A["SINGLE ELAPSED 02.20"] --> B["Current Track"]
    A --> C["Total Track"]
    B --> D["1/01 02.18"]
    C --> E["Playing time on the current track"]
- Display information of SINGLE REMAIN mode
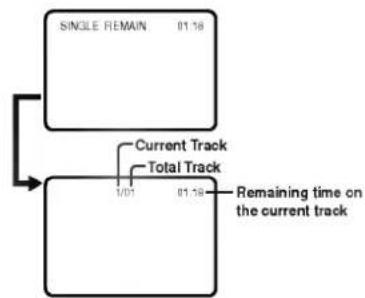
flowchart
graph TD
    A["SINGLE REMAIN 01:16"] --> B["Current Track"]
    A --> C["Total Track"]
    B --> D["0/01 01:58"]
    C --> E["Remaining time on the current track"]
- Display information of TOTAL REMAIN mode
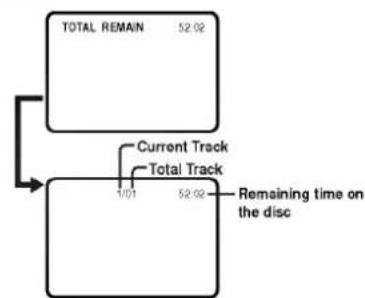
flowchart
graph TD
    A["TOTAL REMAIN 52:02"] --> B["Current Track"]
    A --> C["Total Track"]
    B --> D["1/01 52:02 Remaining time on the disc"]
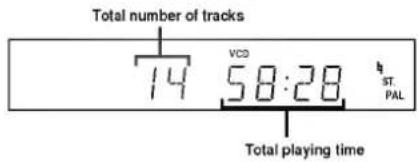
Using the Front Panel Display
You can check information about the disc using the front panel display.
Checking the total number and playing time of the tracks before you start playing
The front panel display shows the total number of tracks, and total playing time.
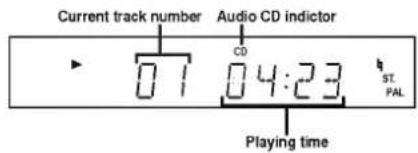
Display information while playing an audio CD
The front panel display shows the current track number, and playing time of the track.
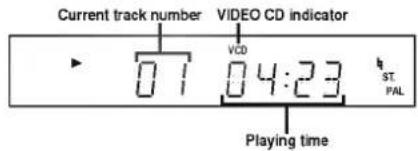
Display information while playing a VIDEO CD without PBC functions
The front panel display shows the current track number, and playing time of the track.
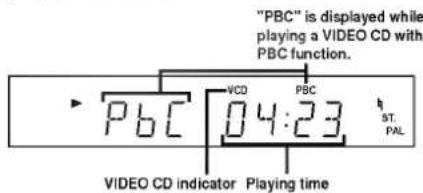
Display information while playing a VIDEO CD with PBC functions
The front panel display shows the PBC, and playing time of disc.
Checking the remaining time
Each time you press OSD while playing a disc, the display changes as shown in the chart below.
Note that you cannot check the remaining time during PBC Playback (page 23).
Resume Play
The player memorizes the point you stopped a VIDEO CD and you can resume playback from that point. Press RESUME and play will resume from this point.
Note that while playing a VIDEO CD with PBC function is available only during play-back in PBC OFF (PBC OFF, page 23). Note that Resume Play is not available while playing an audio CD.

1 While playing a VIDEO CD, press ■ to stop playback.
2 Press RESUME. "RESUME" appears on the TV screen, and the player starts playback from the point you stopped the VIDEO CD in Step 1. If "RESUME" does not appear, Resume. Play is not available.
To play from the beginning of the disc, press PLAY.
Notes
- Depending on where you stopped the VIDEO CD, the player may not resume playback from exactly the same point.
- The point at which you stopped playing is cleared when:
- To turn off the unit.
- You press number buttons.
- You remove the VIDEO CD from the player.
- You unplug AC power cord of the player.
Location a Specific Track
You can quickly locate any scene or track while playing a disc using the PREV, NEXT buttons or number buttons. Note that while playing a VIDEO CD with PBC function is available only during play-back in PBC OFF (PBC OFF, page 23).
| To locate | Operation |
| The next or subsequent tracks (AMS). | Press NEXT repeatedly until you find the scene or track. |
| The current or preceding tracks (AMS). | Press PREV. repeatedly until you find the scene or track |
| A specific track directly. | Press Number button of the track. |
Note
During PBC Playback, PREV and NEXT buttons have different functions from the ones explained above (PBC playback, see page 23).
Locating a Point by Elapsed
Time (Time Search)
This function lets you use elapsed time as a guide to find a certain point on a VIDEO CD. To use Time Search function with VIDEO CDs, see the explain below. "Elapsed" means the time from the beginning of the disc and is not the playing time of the current track. Time Search function is especially useful when playing discs that have only a few track divisions.
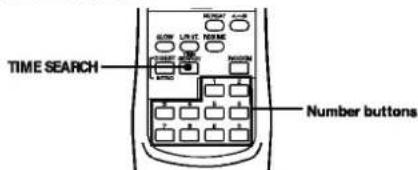
1 Press TIME SEARCH while playing a disc or before you start playing.
The following menu appears on the TV screen
TV screen
2 Press the number buttons to enter the time (in minutes and seconds) of the point that you want to locate.
The entered time appears on the TV screen and playback starts from the entered time.
If you've made a mistake
Press TIME SEARCH again, then press the correct number button.
To use Time Search function with VIDEO CDs with PBC function (Ver. 2.0 discs)
Set the PBC mode to OFF by pressing PBC (PBC OFF, page 23) and do steps 1 and 2 above.
Locating a Particular Point in a Scene or Track
You can also locate a particular point in a scene or track while playing a disc. During PBC Playback (page 23), this function is available only while playing moving pictures. While playing an audio CD or a CD audio track in a VIDEO CD, changing the search speed while locating a point or a Slow-motion Play is not available.
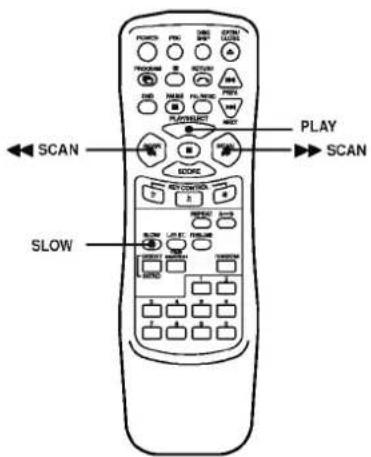
| To locate a point | Operation |
| While monitoring the picture or sound | Press ▶▶ SCAN (forward) or ◀◀ SCAN (back ward) repeatedly to select the speed (FF x1 or FR x1, FF x2 or FR x2, FFx3 or FR x3, or FF x4 or FR x4). When you find the point, press PLAY to return to the normal speed. You will not hear the sound while playing a VIDEO CD. Note that you cannot change the search speed on audio CDs. |
| Slowly by observing the TV screen | Press SLOW. You will not hear the (Slow motion Play) sound during the operation.When you find the point, press PLAY to return to the normal speed. |
If you want to change the playback speed during Slow-motion Play
Press SLOW repeatedly until you find the playback speed you want. Three speeds are available: SLOW 1, SLOW 2 and SLOW 3. Each time you press SLOW, the indication changes as follows.
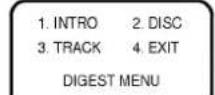
Locating by Observing Several Scenes at One Time (Digest Play)
This function is available only when a VIDEO CD is inserted. You can locate the disc or scene you want by observing several still pictures at one time on the TV screen. Note that Digest Play is not available when an audio CD inserted.

Locating the track you want on a disc (Disc Digest)
You can locate the track you want by observing the first picture of up to 9 tracks on the disc at one time on the TV screen.
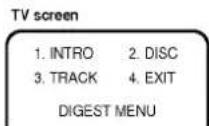
1 Press DIGEST/INTRO in stop mode.
The following menu appears on the TV screen.
TV screen
The TV screen shows still pictures of the first scenes of tracks 1 to 9 on the disc.

To view still pictures of the tracks numbered over 9
Press NEXT. The TV screen shows still pictures of tracks 10 to 18.
To go back to the previous screen, press PREV.
3 Press the number button to select the track.
The player starts playing from the selected track.
To cancel Disc Digest
Press ■.
Note
If you press DIGEST/INTRO in stop mode when a VIDEO CD with PBC functions is inserted, the PBC mode is set to OFF automatically.
Digest Play (Continued) / Into Scan
Locating the point you want in a track (Track Digest)
You can have the player divide a track into 9 sections. You can locate the point you want by viewing the first picture of each section at one time on the TV screen. This might be useful when you play a disc which is divided into few tracks, such as a movie.
1 Press DIGEST/INTRO in stop mode.
The following menu appears on the TV screen.
TV screen
Press button 3.
The player divides the track into 9 sections and the TV screen shows still pictures of each section in order.
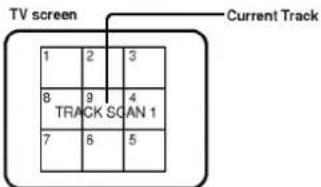
3 Press the corresponding number button to select the point you want.
The player starts playing from the selected point.
The player may start playing from a point which is a little different from the one displayed during Track Digest.
To cancel Track Digest
Press ■
During Track Digest, you can start Track Digest on another track Press PREV. or NEXT.
Notes
- If you press DIGEST/INTRO in stop mode when a VIDEO CD with PBC functions is inserted, the PBC mode is set to OFF automatically.
- When a track is shorter than about 40 seconds, the player may divide the track into less than 9 sections.
Locating the beginning part of each track or scene (Intro Scan)
The first portion of each track will be played 10 seconds sequentially. While the disc is being played as Intro Scan, the front panel display will show track number and elapsed time.
1 Press DIGEST/INTRO in stop mode.
The following menu appears on the TV screen.
2 Press button 1. The first portion of each track will be played 10 seconds sequentially.
3 Press PLAY to start playback when the track you want to play back is selected.
To cancel Intro Scan Press ■.
Playing Repeatedly
You can play all the tracks, a single track or a specific portion repeatedly.
In Random or Program Play mode, the player repeats the track in the random or programmed order.
Note that while playing a VIDEO CD with PBC function is available only during play-back in PBC OFF (PBC OFF, page 23).
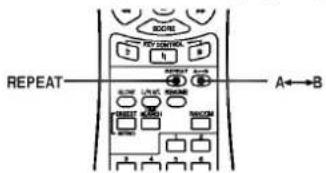
Press REPEAT while playing a disc.
Each you press the button the indication changes as follows.

flowchart
graph TD
    A["REPEAT 1"] --> B["REPEAT"]
    B --> C["REPEAT ALL"]
    C --> D["REPEAT OFF"]
    D --> E["(No display)"]
* Any indication REP-ONE, REP-ALL, or REP-OFF appears on the TV screen.
Repeating the current track (when "REPEAT 1" is selected.)
| When the disc is played in | The player repeats |
| Play (page 8) | current track |
| Random Play (page 20) | current track |
| Program Play (page 19) | current track |
Repeating only selected a disc (when "REPEAT" is selected.)
| When the disc is played in | The player repeats |
| Play (page 8) | All the track selected a disc. |
| Random Play (page 20) | All the tracks in random order on selected a disc |
| Program Play (page 19) | All the programmed tracks on selected a disc |
Repeating the all track (when "REPEAT ALL" is selected.)
| When the disc is played in | The player repeats |
| Play (page 8) | All the tracks on disc |
| Random Play (page 20) | All the tracks on the disc in random order |
| Program Play (page 19) | All the programmed tracks |
Repeating a specific portion (A↔B Repeat)
You can play a specific portion in a track repeatedly.
This might be useful when you want to memorize lyrics. Note that you cannot repeat a portion extending to two tracks. During PBC Playback (page 23), A↔B Repeat may not be available depending on scenes.
1 While playing a disc, press A↔B when you find the starting point (point A) to be played repeatedly.
"REPEAT A-" appears in the front panel display.
2 When you reach the ending point (point B), press A↔B again.
"REPEAT A-B" appears in the front panel display. The player plays this specific portion repeatedly.

To cancel A-B Repeat
Press A↔B or ■.

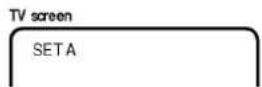
Program Play
Creating Your Own Program
You can arrange the order of the tracks on the disc and create your own program. The program can contain up to 20 tracks. Note that while playing a VIDEO CD with PBC function is available only during play-back in PBC OFF (PBC OFF, page 23).

1 In stop mode, press PROGRAM. "PROGRAM" appears in the front panel display.
2 Select the tracks you want to program.
On the remote
Press the number buttons of the tracks you want to program in the order you want or press PREV./NEXT until the number of the track you want to program appears in the front panel display.
On the player
With playback stopped, press.
until the
number of the track you want to program appears in the front panel display.
3 Press PROGRAM.
4 Repeat 2-3.
5 Press to PLAY/SELECT start Program Play.
Checking the track order
You can check your program before you start playing.
Press PROGRAM on the remote.
Each time you press this button, the front panel display shows the track number of each step in the programmed order. After the last step in the program, the front pane display shows "00" and returns to the original display.
Changing the track order
You can change your program before you start playing.
| To | Operation |
| Add steps to the end of the program | Press PROGRAM to repeatedly to find the track number is "00". And select a track using number buttons then press PROGRAM. |
| Change a track number of the program. | Press PROGRAM repeatedly to find the track number you want to change then change the track number using number buttons. |
| Erase the whole program completely. | Press PROGRAM then press. ■ Create a new program following the programming procedure. |
You can check the contents of the TV screen.
The program remains even after the Program Play ends
Press PROGRAM until "PROGRAM" appears in the front panel display then press PLAY/SELECT you can play the same program again.
Random Play / Switching the Sound
Playing in Random Order
You can play all of the tracks in random order. Note that while playing a VIDEO CD with PBC function is available only during playback in PBC OFF (PBC OFF, page 23).
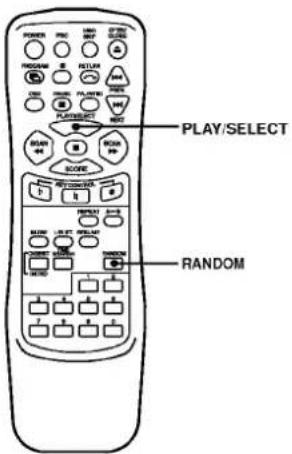
During playing or in stop mode, press RANDOM and starts Random Play.
"RANDOM" appears in the front panel display.
To cancel Random Play
Press RANDOM or ■ "RANDOM" will disappears in the front panel display.
Switching the Sound
You can select the sound from the right or left channel and listen to the sound of the selected channel through both the right and left speakers. In this case, the sound loses the stereo effect.
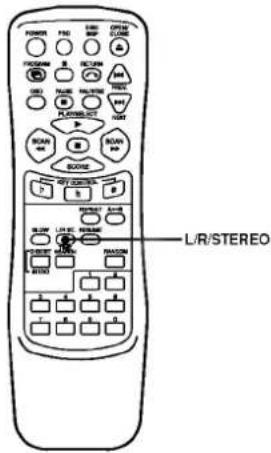
Press L/R/ST. while playing a disc.
Each time you press the button, the indication and the sound from the speakers change as follows:
| Press | Indication* | Operation |
| Once | MONO L | The sound of the left channel |
| Twice | MONO R | The sound of the right channel |
| Three times | STEREO | The standard stereo sound |
* Any indication L, R, or ST. appears in the front panel display.
Operation with MP3 Disc
The VIDEO CD Player can play MP3 format recordings on CD-ROM, CD-R or CD-RW discs. Before playing MP3 recordings, read the following notes.
Notes on MP3
About MP3
- An MP3 file is audio data compressed by using MPEG1, the audio layer-3 file-coding scheme. We call files that have the ".mp3" file extension "MP3 files."
- The player can not read an MP3 file that has a file extension other than ".mp3."
- Noises may be heard if you play a non-MP3 file that has the ".mp3" extension.
The restriction of playing MP3
- The player can play up to 999 files and display 254 folders per disc. A disc having more than 999 files and 254 folders cannot be played and displayed.
- The folder is not displayed in the front panel display and track number is displayed only. To select another folder, use the MP3 menu as described on page 22.
• The player may not play MP3 files in the order that you recorded them on the disc - With a multi-session disc, the player cannot play the disc.
- It may take over 30 seconds to read the MP3 files, depending on the contents of the disc.
The limitation of indications
- Up to five characters are displayed on the TV screen.
- Characters other than uppercase letters ("A" to "Z"), numbers ("0" to "9") and underscore("_") may not be displayed, or may be displayed in different characters.
- The elapsed playing time on the display may not be correct when playing MP3 files.
Tips on recording MP3
• To enjoy high quality sound, convert to MP3 files with a sampling frequency of 44.1kHz and a fixed bit rate of 128 kbps.
To play MP3 files in the order that you recorded them
- Writing software that is capable of recording MP3 files in numerical and alphabetical order is required.
- Include a two or three digit number at the beginning of each file name. (e.g. "01," "02," ...or "001," "002," ...)
- It's recommended that you use only the root folder (do not create a child folder under the root folder).
Glossary
Extension:
An extension is the last three characters that divide a file name by a period. The extension shows the attribution of the file or the software in which the file was created.
Session:
A session is one section on a disc between the beginning of data and the end of written data. A multi-session disc has more than two sessions.
Note
Depending on the state of MP3 recording, there may be sound skips and noise during playback.
Playing MP3 disc
1 Insert a disc and close the tray. The MP3 menu appears on the TV screen.
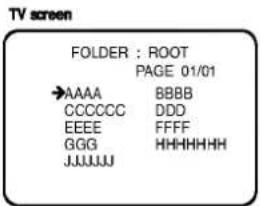
2 Press PREV. or NEXT to select the folder where MP3 files that you want to play are located and then press PLAY/SELECT.
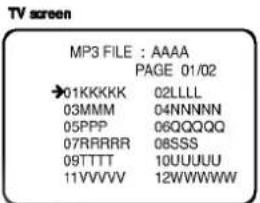
3 Press PREV. or NEXT to select the desired MP3 file of the selected directory on your disc then press PLAY/SELECT
Playback starts; playback will end when all tracks of the disc have played.
To stop
Press ■ during playback.
To skip to another track during playback
- Press PREV or NEXT to play the next track or previous track during playback.
- Press number buttons to select the desired track.
To pause playback
Press PAUSE during playback, press PLAY/SELECT or PAUSE to return to normal playback.
To move to the first menu (Root Directory) Press RETURN.
To play MP3 files repeatedly
• To playback a track repeatedly, press REPEAT once during playback. "REPEAT 1" indicator appears in the front panel display. The current track will be played back repeatedly.
- To playback all tracks of current folder repeatedly, press REPEAT twice during playback. "REPEAT ALL" indicator appears in the front panel display.
All of the tracks within the folder will be played back repeatedly.
- To cancel repeat playback, press REPEAT repeatedly until the REPEAT indicator disappears in the front panel display.
Playing VIDEO CDs with
PBC Function
When playing VIDEO CDs with PBC Function (Ver. 2.0 discs), you can enjoy playing simple interactive software, software with search functions, etc. PBC Playback allows you to play VIDEO CDs interactively, following the menu screen in the TV screen. On this player, you can use the number buttons, PREV, NEXT and RETURN during PBC Playback.
Also refer to the instructions supplied with the disc, as the operating procedure may differ according to the VIDEO CD.
1 Start playing a VIDEO CD with PBC functions, following Step 1 through 4 in "Playing a VIDEO CD" on page 8.
The menu screen appears on the TV screen.
2 Select the item number you want. On the remote
Press the number button of the item you want. When you want to select an item number, press corresponding number buttons.
Example : To select the item number 30 Press 3 on the remote first, then 0 on the remote.
3 Follow the instructions on the menu screen for interactive operations.
| When | Do the following |
| Selecting the item | Press number button of item you want on the remote. |
| Going back to the menu screen | Press RETURN, PREV or NEXT (Also refer to the instructions supplied with the disc, as the operating procedure may differ according to the VIDEO CD.) |
When “ 🔊 ” appears on the TV screen
You've pressed an invalid button. Press the correct button, following the instructions in the menu screen.
To cancel PBC Playback of a VIDEO CD with PBC functions
There are three ways.
- Press PBC ON/OFF on the front panel or PBC on the remote until "PBC OFF" appears in the front panel display.
- In stop mode, press DIGEST/INTRO and "PBC OFF" appears in the front panel display.
- Before you start playing, select the track number using the number buttons. "PBC OFF" appears in the front panel display and the player starts playback. You cannot play still pictures such as a menu screen.
PBC Playback (Continued) / Glossary
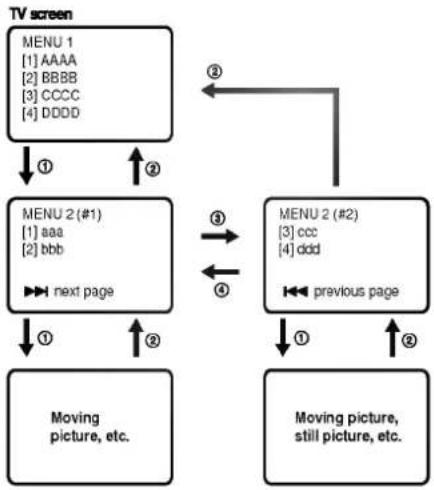
Example of PBC Playback
This is an example of PBC Playback. Also refer to the instructions supplied with the disc, as the operating procedure may differ according to the VIDEO CD.
flowchart
graph TD
    A["TV screen"] --> B["MENU 1\n[1"] AAAA\n["2"] BBBB\n["3"] CCCC\n["4"] DDDD]
    B --> C["MENU 2 (#1)\n[1"] aaa\n["2"] bbb]
    C --> D["→ next page"]
    D --> E["Moving picture, etc."]
    E --> F["MENU 2 (#2)\n[3"] ccc\n["4"] ddd]
    F --> G["← previous page"]
    G --> H["Moving picture, still picture, etc."]
    H --> I["→"]
    I --> J["②"]
    J --> K["③"]
    K --> L["④"]
    L --> M["③"]
    M --> N["②"]
    N --> O["②"]
    O --> P["②"]
    P --> Q["②"]
    Q --> R["②"]
    R --> S["②"]
    S --> T["②"]
    T --> U["②"]
    U --> V["②"]
    V --> W["②"]
    W --> X["②"]
    X --> Y["②"]
    Y --> Z["②"]
① To select the item:
Press the number button of the item you want.
② To go to the preceding menu: Press RETURN.
③ To go to the next page of the menu: Press NEXT.
④ To go to the preceding page of the menu: Press PREV.
Glossary
PBC Playback
Playback using the menu screens recorded on VIDEO CDs with PBC functions. You can enjoy simple interactive operations using the PBC Playback function.
Playback Control (PBC)
Signals encoded on VIDEO CDs (Version 2.0) to control playback.
By using menu screens recorded on VIDEO CDs with PBC functions, you can enjoy playing simple interactive programs, programs with search functions, and so on.
When you insert a VIDEO CD with PBC functions on this player, "PBC" appears in the front panel display.
Track
Sections of a picture or a music piece on a disc. Each track is assigned a track number enabling you to locate the track you want.
VIDEO CD
A compact disc that contains moving pictures. The picture data uses the MPEG 1 format, one of the worldwide standards of digital compression technology. The picture data is compressed to about 1/140 of its original size. Consequently, a 12 cm VIDEO CD can contain up to 74 minutes of moving pictures.
VIDEO CDs also contain compact audio data. Sounds outside the range of human hearing are compressed while the sounds we can hear are not compressed. VIDEO CDs can hold 6 times the audio information of conventional audio CDs. There are 2 versions of VIDEO CDs.
- Version 1.1: You can play only moving pictures and sounds.
- Version 2.0: You can play high-resolution still pictures and enjoy PBC functions.
This player conforms to both versions.
Additional Information
On placement
- Do not install the appliance in a confined space, such as a bookcase or built-in cabinet.
- Allow adequate air circulation to prevent internal heat buildup.
- Do not install the unit in an inclined position. It is designed to be operated in a horizontal position only.
- Keep the unit and discs away from equipment with strong magnets, such as microwave ovens, or large loudspeakers.
- Do not place heavy objects on the unit.
- Place the player in a location with adequate ventilation to prevent heat buildup in the player.
- Do not block the ventilation slots by putting anything on the player. If the ventilation slots on the bottom surface are blocked, the unit can overheat and malfunction.
- Do not place the player on a soft surface such as a rug that might block the ventilation holes on the bottom.
- Do not place the player in a location near heat sources, or in a place subject to direct sunlight, excessive dust, or mechanical shock. On transportation See page 6. On disc tray Do not pull or push the disc tray forcefully by hand. It may damage the player. If you have any questions or problems concerning your player, please consult your nearest dealer.
On safety
- If anything falls into the cabinet, unplug the unit and have it checked by qualified personnel before operating it any further.
- The unit is not disconnected from the AC power source as long as it is connected to the mains outlet, even if the unit itself has been turned off.
- Unplug the unit from the wall outlet if you do not intend to use it for an extended period of time. To disconnect the cord, pull it out by the plug, never by the cord.
- Caution – The use of optical instruments with this product will increase eye hazard.
- Should any solid object or liquid fall into the cabinet, unplug the player and have it checked by qualified personnel before operating it any further.
- AC power cord must be changed only at a qualified service shop.
On cleaning
Clean the cabinet, panel and controls with a soft cloth slightly moistened with a mild detergent solution. Do not use any type of abrasive pad, scouring powder or solvent such as alcohol or benzine.
On operation
- If the player is brought directly from a cold to a warm location, or is placed in a very damp room, moisture may condense on the lenses inside the player. Should this occur, the player may not operate properly. In this case, remove the disc and leave the player turned on for about half an hour until the moisture evaporates.
- When you move the player, take out any discs. If you don't, the discs may be damaged.
Troubleshooting
If you experience any of the following difficulties while using the player, use this troubleshooting guide to help remedy the problem before requesting repairs. Should any problem persist, consult your nearest qualified service ship dealer.
Power
The power is not turned on.
- Check that the AC power cord is connected securely.
Picture
There is no picture.
- The connecting cords are not connected securely.
- The connecting cords are damaged. Replace it with a new one.
- The player is not connected to the correct TV input jack (page 7).
- The video input on the TV is not set so that you can view pictures from the player.
Picture noise appears.
• The disc is dirty or flawed. Clean the disc.
The picture is black and white.
• Make sure you set the color system mode correctly, according to your TV (page 6).
Sound
There is no sound.
- The connecting cord is not connected securely.
• Make sure you connect the player to the audio input connector on the amplifier. (page 7) - Make sure you select the appropriate position on the amplifier so that you can listen to the sound from the player.
• Make sure you turn on the TV and the amplifier. - The audio connecting cord is damaged. Replace it with a new one.
- The player is in pause mode or in Slow motion Play mode. Press PLAY/SELECT to return to normal play mode.
- Fast forward or fast reverse is performed. Press PLAY/SELECT to return to normal play mode.
There is no sound from the microphone.
- Switch the microphone on.
• Turn the MIC VOLUME controls clockwise.
Howling occurs.
- Move the microphone away from the speakers.
- Lower the volume.
- Lower the microphone volume or echo level.
The sound loses stereo effect when you play a CD.
- "L" or "R" appears in the front panel display (page 20).
• Make sure you connect the player appropriately.
Operation
The remote does not function.
- There are obstacles between the remote and the player.
- he distance between the remote and the player is too far.
- The remote is not pointed at the remote sensor on the player.
• The batteries in the remote are weak.
The disc does not play.
• There is no disc inside.
- The disc is turned over.
Insert the disc with the playback side facing down on the disc tray.
• The disc is skewed.
• The player cannot play CD-ROMs, etc.
- Moisture has condensed inside the player. Remove the disc and leave the player turned on for about half an hour.
"no dlSC" is displayed.
You have placed a disc into the compartment for the disc being played. Remove the disc and close the disc tray.
Specifications
| System | VIDEO CD player |
| Laser | Semiconductor laser, wavelength 780nmEmission duration: continuous |
| Signal format system | NTSC, PAL |
| Playable discs | VIDEO CD, audio CD, MP3 disc, CD-R/RW DISC |
| Frequency response | 20 Hz to 18 kHz (±2.0 dB) |
| Signal-to-noise ratio | 83dB (1kHz 0dB, IHF-A) |
| Outputs | |
| VIDEO OUT (Phono jacks) | 1.0 V, 75 ohms |
| AUDIO OUT (Phono jacks) | 2 Vrms, 47kilohms |
| Input | |
| MIC 1, MIC 2 (Phone jacks) | 4.0mVrms (±1.5 dB) |
| General | |
| Power requirements | AC 110-240V~60/50 Hz |
| Power consumption | 10W |
| Dimensions (approx.) | 430 x 96 x 250 mm (w x h x d) |
| Mass (approx.) | 3.95 kg |
Supplied accessories
| Audio connecting cord | 1 |
| Video connecting cord | 1 |
| Remote control | 1 |
| R03 (size AAA) batteries | 2 |
- Design and specifications are subject to change without notice.

LG Electronics Inc.
- Safety Precautions
- CAUTION
- CAUTION:
- About the symbols for instructions
- Contents
- Introduction
- Preparation
- Operation
- Reference
- Before Use
- Notes
- Notes on Video CDs
- Disc-related terms
- Track (Video CD and audio CD only)
- Scene
- Types of video CDs
- Video CDs equipped with PBC (Version 2.0)
- Video CDs not equipped with PBC (Version 1.1)
- Before Use (Continued)
- Precautions
- Handling the unit
- When shipping the unit
- When setting the unit
- To keep the surface clean
- Cleaning the unit
- To clean the cabinet
- Notes on Discs
- Handling discs
- Storing discs
- Cleaning discs
- About Symbols
- About the 🔊 symbol display
- Preparations
- Setting the color system
- Connecting the AC power cord
- Transporting the player
- Inserting Batteries into the Remote
- Connections
- Overview
- Hookups
- When playing VIDEO CDs with PBC functions
- When using a TV
- Press POWER to turn on the player.
- Press OPEN/CLOSE, and place the disc into the disc tray.
- Press PLAY.
- Adjust the volume on the TV or the amplifier.
- To stop playback
- You can resume playback from the point you stopped the VIDEO CD (Resume Play, see page 13).
- If howling occurs:
- If the sound is distorted when the player is connected to a TV:
- KARAOKE Function (Continued)
- Score Indication
- Changing the key (Key Control)
- Adjusting the echo level
- To exit KARAOKE mode
- When you don't use the microphone(s)
- Using the On-Screen Display
- Press OSD button.
- Using the Front Panel Display
- Checking the total number and playing time of the tracks before you start playing
- Display information while playing an audio CD
- Display information while playing a VIDEO CD without PBC functions
- Display information while playing a VIDEO CD with PBC functions
- Checking the remaining time
- Resume Play
- Location a Specific Track
- Note
- Locating a Point by Elapsed
- Time (Time Search)
- Press TIME SEARCH while playing a disc or before you start playing.
- Press the number buttons to enter the time (in minutes and seconds) of the point that you want to locate.
- If you've made a mistake
- To use Time Search function with VIDEO CDs with PBC function (Ver. 2.0 discs)
- Locating a Particular Point in a Scene or Track
- If you want to change the playback speed during Slow-motion Play
- Locating by Observing Several Scenes at One Time (Digest Play)
- Locating the track you want on a disc (Disc Digest)
- Press DIGEST/INTRO in stop mode.
- To view still pictures of the tracks numbered over 9
- Press the number button to select the track.
- To cancel Disc Digest
- Digest Play (Continued) / Into Scan
- Locating the point you want in a track (Track Digest)
- Press button 3.
- Press the corresponding number button to select the point you want.
- To cancel Track Digest
- During Track Digest, you can start Track Digest on another track Press PREV. or NEXT.
- Locating the beginning part of each track or scene (Intro Scan)
- Press button 1. The first portion of each track will be played 10 seconds sequentially.
- Press PLAY to start playback when the track you want to play back is selected.
- Playing Repeatedly
- Press REPEAT while playing a disc.
- Repeating a specific portion (A↔B Repeat)
- While playing a disc, press A↔B when you find the starting point (point A) to be played repeatedly.
- When you reach the ending point (point B), press A↔B again.
- To cancel A-B Repeat
- Program Play
- Creating Your Own Program
- Checking the track order
- Changing the track order
- Random Play / Switching the Sound
- Playing in Random Order
- To cancel Random Play
- Switching the Sound
- Operation with MP3 Disc
- Notes on MP3
- About MP3
- The restriction of playing MP3
- The limitation of indications
- Tips on recording MP3
- To play MP3 files in the order that you recorded them
- Glossary
- Extension:
- Session:
- Playing MP3 disc
- Playing VIDEO CDs with
- PBC Function
- Start playing a VIDEO CD with PBC functions, following Step 1 through 4 in "Playing a VIDEO CD" on page 8.
- Select the item number you want. On the remote
- Follow the instructions on the menu screen for interactive operations.
- When “ 🔊 ” appears on the TV screen
- To cancel PBC Playback of a VIDEO CD with PBC functions
- PBC Playback (Continued) / Glossary
- Example of PBC Playback
- PBC Playback
- Playback Control (PBC)
- Track
- VIDEO CD
- Additional Information
- On placement
- On safety
- On cleaning
- On operation
- Troubleshooting
- Power
- Picture
- Sound
Brand : LG
Model : FL-R750V
Category : Lecteur vidéo CD