AWM 201 - Washing machine WHIRLPOOL - Free user manual and instructions
Find the device manual for free AWM 201 WHIRLPOOL in PDF.


User questions about AWM 201 WHIRLPOOL
0 question about this device. Answer the ones you know or ask your own.
Ask a new question about this device
Download the instructions for your Washing machine in PDF format for free! Find your manual AWM 201 - WHIRLPOOL and take your electronic device back in hand. On this page are published all the documents necessary for the use of your device. AWM 201 by WHIRLPOOL.
USER MANUAL AWM 201 WHIRLPOOL
natural_image
Cartoon illustration of a washing machine with a sad face on its side, being clothed by hands (no text or symbols)BEFORE USING THE APPLIANCE FOR THE FIRST TIME:
• IMPORTANT: MAKE SURE YOU HAVE READ THE "INSTALLATION INSTRUCTIONS"
- REMOVE THE TRANSIT BOLTS BEFORE USING THE MACHINE FOR THE FIRST TIME
- First wash cycle without laundry:
- Open the tap(s).
- Close the door.
- Pour a little detergent (about 100 ml) into the detergent compartment ☐
- Select a short wash programme (see programme chart).
- Press the "ON/OFF" button.
This will remove any water remaining in the machine from the manufacturer's test run.
ROUTINE WASHES:
- Open the tap(s).
- Sort the laundry according to fabric type and colour and load the machine.
- Close the door.
- Add detergent and any additives required.
- Select the programme, temperature, spin speed and special options (as available on your machine).
- Press the "ON/OFF" button.
CONTENTS GB
APPLIANCE AND ACCESSORIES PAGE 22
PROTECTING THE ENVIRONMENT PAGE 23
SAFETY INSTRUCTIONS PAGE 23
MOVING AND TRANSPORTING THE APPLIANCE PAGE 23
SORTING THE WASH PAGE 24
DETERGENT AND ADDITIVES PAGE 25
DYEING AND BLEACHING PAGE 26
SELECTING THE PROGRAMME AND SPECIAL OPTIONS /PROGRAMME START PAGE 27
PROGRAMME SEQUENCE PAGE 28
DOOR LOCK / PROGRAMME END / PROGRAMME RESELECTION PAGE 29
REMOVING THE FILTER / DRAINING RESIDUAL WATER PAGE 30
CARE AND MAINTENANCE PAGE 31
CHILD SAFETY DEVICE PAGE 31
TROUBLE-SHOOTING GUIDE PAGE 32
AFTER-SALES SERVICE PAGE 32
INSTALLATION INSTRUCTIONS PAGE 33
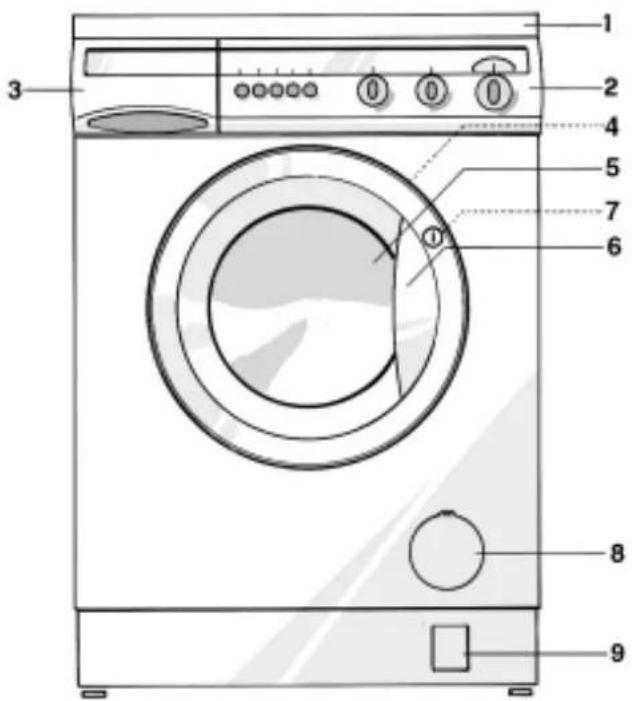
APPLIANCE AND ACCESSORIES
text_image
Diagram of a front-loading washing machine with numbered parts labeled for identification.- Worktop
- Control panel
- Detergent drawer
- After-Sales Service sticker (inside door)
- Door
- Door handle
- To open: pull handle
- To lock: press the door firmly (the lock will click into place)
-
Door lock child safety device (inside door)
-
Filter
-
Residual water drain (depending on model).
PROTECTING THE ENVIRONMENT
- Packing
The packaging is marked with the recycling symbol ▲signifying that it can be 100% recycled.
- Appliance
The appliance is made of recyclable materials. Dispose of the appliance in conformity with environmental regulations. Make it inoperable, pull out the plug and cut off the power cable so that the appliance cannot be connected to the mains.
- Eco-tips
- A full load (depending on the programme selected) gives the best energy and water consumption.
- Laundry which is lightly to moderately soiled does not require a prewash.
- Lightly soiled laundry should be washed at a low temperature or with a short programme.
- When washing small loads press the "Lightly Soiled" / "Half Load" √2/ button (if present) and use less detergent.
- If you wish to dry the laundry in a domestic tumble-dryer, use the highest spin speed (depending on the programme). The dryer will then consume less energy.
- Do not exceed the recommended dosages on the detergent packet.
- Only use stain remover or bleach if absolutely necessary.
SAFETY INSTRUCTIONS
- The appliance must only be used in the household for the prescribed uses.
- All connections to the water and electrical mains must be made in accordance with the manufacturer's instructions and following local utility company safety regulations (see "Installation Instructions").
- Before any cleaning and maintenance switch off the machine or disconnect it from the mains.
- Switch off the washing machine and turn off the tap(s) whenever the machine is not in use.
• Never use excessive force to open the door.
- Children must not be allowed to play with or inside the machine. Do not rest any weight on the door.
- Packaging materials can be dangerous for children. Keep the packaging material (plastic bags, polystyrene, etc.) well out of their reach.
- The appliance conforms to European safety regulations, EC directive 93/68 EWG and EN 60555.
MOVING AND TRANSPORTING THE APPLIANCE
- Pull out the mains plug.
- Shut off the water tap(s).
-
Disconnect the inlet and drain hoses.
-
Drain residual water from the appliance and hoses (see "Draining Residual Water").
- Fit the transit bolts (see "Installation Instructions").
SORTING THE WASH
1. Sort the load according to:
• Fabric type / care label symbol
Cotton, mixed fibres, synthetics, wool, silk, viscose.
- Colours
Separate coloured and white articles. Wash new coloured articles separately.
- Article size
Washing articles of different sizes together improves wash efficiency and distributes the load better in the drum.
- Fabric delicacy
Wash delicates separately. Select the appropriate special programme for machine-washable wool, curtains or silk. Either remove curtain hooks or tie into a cloth bag. Only wash machine-washable fabrics. Wash small articles (e.g. nylon stockings, belts etc.) and articles with hooks (e.g. bras) in a cloth bag or pillow case with zip.
2. Empty all pockets
Coins, safety pins etc. can damage the laundry, drum and tub.
3. Closures
Close zips and hooks and eyes. Loose belts or ribbons should be tied together.
WASHING AND CARING FOR SILK ARTICLES
Washing: To ensure correct care of silk articles
-
Check the care instructions on the label and make sure that the article is machine-washable (30°C).
-
Wash articles of the same colour preferably together.
Important Note: Check that new articles are colour fast and wash them separately the first time.
-
Use only special detergent for silk or wool.
-
This programme has no spin cycle.
-
If you select the "Rinse Hold" function, do not leave the wash in the rinse water for too long.
Drying and ironing
- Open the garment out on a towel and squeeze the water out without wringing.
• Never dry silk garments in the sun.
- Iron from the reverse side when the fabric is still slightly damp.
- To avoid water marks, don't spray on water and don't use a steam iron.
text_image
Illustration showing three steps of washing machine cleaning: opening, discolorating, and cleaning with a fan.STAIN REMOVAL
• Blood, milk, egg, and other organic substances are generally removed by the enzyme phase of the program.
- To remove red wine, coffee, tea, grass and fruit stains, etc. add a biological stain removing agent to the main wash in chamber or a chlorine bleach in chamber of the detergent drawer (depending on the model).
• Particularly stubborn stains can be treated with stain remover before the wash.
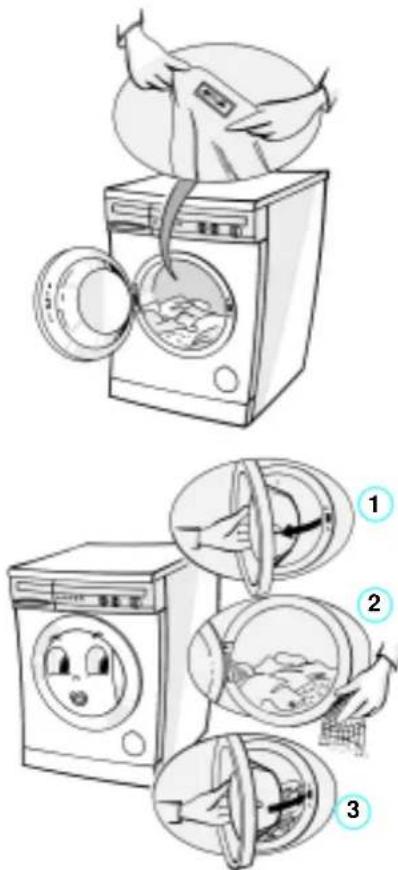
LOADING THE WASH
- Open the door.
- Load the articles one at a time, loosely into the drum, without overfilling.
- Close the door.
LOAD CAPACITY
See the programme overview.
Note: Overloading the machine reduces the wash efficiency and encourages creasing.
DETERGENT AND ADDITIVES
CHOOSING THE RIGHT DETERGENT
The type of detergent depends on:
- the type of fabric (cottons, synthetics, delicates, wool, silk);
Note: Use only specific detergents for washing wool and silk articles;
- colour;
- wash temperature;
• degree and type of soiling.
Note:
- Whitish residues on dark fabrics are due to the insoluble water softeners in modern phosphate-free detergents. If this occurs, shake or brush out the fabric or use liquid detergents.
- Keep detergents and additives in a safe, dry place out of the reach of children.
- Use only detergent and fabric conditioner specifically produced for automatic domestic washing machines.
- When using water softeners, descaling agents, dyes or bleaches, make sure that they are suitable for use in domestic washing machines.
- Do not use solvents in the machine (e.g. turpentine, benzine, etc.). Do not wash fabrics in the machine which have been treated with solvents or flammable liquids.
DETERGENT DOSAGES
Do not exceed manufacturers' recommended dosages as shown on the detergent package. The amounts depend on:
• degree and type of soiling;
- size of wash;
- Full-load: according to manufacturers' instructions;
- Half-load: 3/4 of the normal amount;
- Minimum load (about 1 kg): 1/2 the amount used for full load;
• water hardness in your area (request information from the water company): soft water requires less detergent than hard water.
Note:
• Overdosing the detergent results in excessive foaming and reduces the wash efficiency. If the washing machine detects too much foam, it may prevent spinning.
Using insufficient detergent results in grey laundry. The heating elements and drum also build up scale.
- If using chlorine bleach, follow the bleach instructions carefully.
Overdosing the bleach can damage the wash.
WATER HARDNESS CHART
| WATER HARDNESS CATEGORY | CHARACTERISTICS GERMAN | FRENCH °fH | ENGLISH °eH | |
| °dH | ||||
| 1 | soft | 0-7 | 0-12 | 0-9 |
| 2 | medium | 7-14 | 12-25 | 9-17 |
| 3 | hard | 14-21 | 25-37 | 17-26 |
| 4 | very hard | over 21 | over 37 | over 26 |
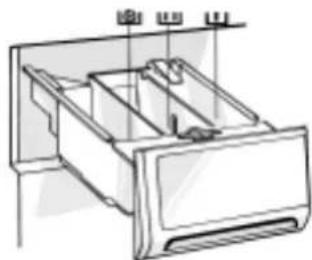
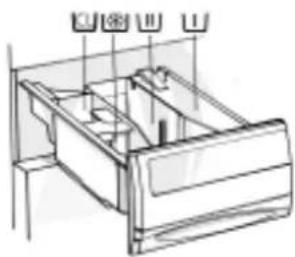
If the machine has a three chamber detergent drawer set the hardness pointer to the domestic water hardness level. Move the hardness pointer sideways to the desired position.
DETERGENT AND ADDITIVES
FILLING THE DETERGENT AND ADDITIVES
-
Pull out the detergent drawer. The drawer will have three or four chambers depending on the model.
-
Filling the detergent:
- Programmes with pre-and main wash.

- Main wash programme without prewash.

When using liquid detergent, extract the coloured insert from the drawer and put it in the compartment ☐ The insert has a scale to make dosing easier.
- Add fabric softeners and conditioners - no further than the "Max" mark (three chamber models) or the "100 ml" mark (four chamber models).

- Fill chlorine bleach only to the "Max" mark (if model is suited to its use).

- Stain remover.

• Water softener (water hardness class 4).

- Starch (diluted in water). In this case select the programme "Rinse and Spin". After pouring the starch fill about 1 litre of water into chamber.

- Slide the drawer in until it clicks shut.
Notes:
- When using highly concentrated detergents, use the detergent ball provided with the detergent and place it directly in the drum to avoid dispensing problems (for programmes without pre-wash only).
- For programmes with prewash: liquid detergents can be used for the prewash. For the main wash then a powder detergent has to be used.
- Dose the correct amount of concentrated fabric softener and dilute with water up to the maximum level marked in the softener compartment.
natural_image
Technical line drawing of a refrigerator drawer with internal compartments and mounting points (no text or labels)Detergent drawer with 3 chambers
natural_image
Technical line drawing of a mechanical device with no visible text or symbolsDetergent drawer with 4 chambers
DYEING AND BLEACHING
Dyeing: Commercially available products usually consist of a dye colour, fixing agent and salt.
Pour the dye colour, fixing agent and salt directly into the empty drum, and only then load the laundry.
- Only use products designed for use in washing machines.
• Follow the manufacturer's instructions. - Plastic and rubber components of the machine can be stained by dyes or bleaches.
SELECTING THE PROGRAMME AND SPECIAL OPTIONS / PROGRAMME START
SELECTING THE PROGRAMME
(See also the separate programme chart and consumption data).
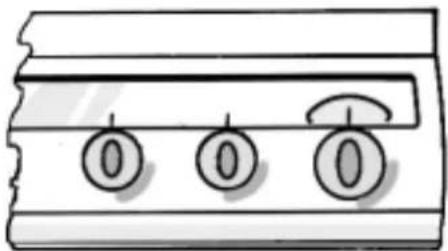
For appliances WITH temperature selector knob
- Turn the programme selector knob clockwise to the desired programme.
- Set the temperature knob to the desired temperature.
For appliances WITHOUT temperature selector knob
- Turn the programme selector knob clockwise to the programme with the desired temperature.
For appliances WITH spin speed selector knob
- Turn the spin speed selector to the desired speed.
For appliances WITHOUT spin speed selector knob
- The spin speed can be reduced by the spin speed reduction button (if fitted). (See also Important Note 2).
natural_image
Simple line drawing of a mechanical component with three circular buttons and a curved handle (no text or symbols)Important Note
-
When "No Spin" (6) is selected:
-
The "Wool" and "Delicates" programmes do not run a spin cycle.
-
The "Cotton" and "Synthetic" programmes run a reduced speed spin cycle between rinses to ensure effective rinsing. At the end of the programme a short spin is run.
-
Each programme has a predetermined automatic maximum spin speed as follows:
| PROGRAMME MAX. SPIN SPEED in rpm (depending on model) | ||||||
| 1200 1 | 100 1000 900 | 800 600 | ||||
| Cotton 1200 1100 1000 900 800 600 | ||||||
| Synthetic 900* 900* 900* 900 800 600 | ||||||
| Delicates 900* 900* 900* 900 800 600 | ||||||
| Wool 900* 900* 900* 900 800 600 | ||||||
| Silk / viscose 0 0 0 0 0 0 | ||||||
| Rinse + spin | 1200 | 1100 | 1000 | 900 | 800 | 600 |
| Intensive spin | 1200 | 1100 | 1000 | 900 | 800 | 600 |
| Gentle spin | 900* | 900* | 900* | 900 | 800 | 600 |
* To protect the wash, the real spin speed is here reduced to 900 rpm.
SELECTING THE PROGRAMME AND SPECIAL OPTIONS / PROGRAMME START
PRESS THE DESIRED SPECIAL OPTION BUTTON
(Depending on model, see also the separate programme chart).
Spin speed reduction button
- For models without spin speed selector, press this button to reduce the predetermined automatic maximum spin speed. No spin cycle is run during the "Silk" programme.
Prewash button 📊
- Do not select together with "Quick Wash" ("Rapid") or other short programmes.
- Only select for washing heavily soiled laundry.
- The prewash cycle adds 15 minutes to the programme time.
Rinse hold / Spin delay button ☐
- The laundry remains in the last rinse water without being spun, to avoid heavy creasing.
- Especially suitable for the "Synthetic" or "Delicate" programmes, if the laundry is not to be unloaded immediately after the end of the programme. This function is particularly useful if you want to postpone spinning to a later time or when you do not wish to spin the clothes.
Stopping Rinse hold:
Press the Rinse hold button again; the load will be spun according to the selected programme. If you do not wish to spin the clothes, turn the programme knob to the corresponding drain programme.
Energy save / Eco button
- Increases the programme time and reduces the temperature. This reduces energy consumption by about 30% without compromising the excellent results of the wash.
Quick wash / Rapid button
- Select for quick, economical washes.
- Especially suitable for small, lightly soiled loads.
Note: If "Quick wash" is selected, only the "Rinse Hold" and "Spin speed reduction" options can be activated.
Lightly Soiled / Half load button 1/2
- Reduces water consumption, above all during the rinse.
- Especially suitable for lightly soiled or small loads (reduce the detergent quantity).
Intensive Rinse button
- Increases the rinsing time and water quantity, for an even more thorough rinse.
- The intensive rinse function is especially suitable for areas with particularly soft water, for baby clothes and to help people with allergies.
PROGRAMME START
- Plug in the appliance.
- Turn on the water supply tap.
- Press the "ON/OFF" button. The indicator light will come on.
PROGRAMME SEQUENCE
PROGRAMME SEQUENCE INDICATOR
Each colour indicates a washing cycle by fabric type corresponding to the detergent drawer information.
SYMBOLS
Main wash
Rinse
• • • Final spin
Stop: Programme end
The symbols (if fitted) represent the various washing phases (washing/rinsing/spinning).
DOOR LOCK / PROGRAMME END / PROGRAMME RESELECTION
DOOR LOCK
The door locks automatically after the programme start until the end of the programme. If the programme is stopped or the electrical supply is terminated, the door lock will open after approximately 2 minutes.
PROGRAMME END
The programme sequence indicator is at "Stop".
- Press the "ON/OFF" button. The indicator light turns off.
- Cancel the special options by pressing the appropriate buttons.
- Turn the water supply tap(s) off.
- Wait for the door to unlock (about 2 minutes).
- Open the door and unload the machine.
Note: Do not fully close the door but leave it ajar to allow the drum to dry out.
PROGRAMME RESELECTION
- Press the "ON/OFF" button. The indicator light turns off.
- Select the new programme/temperature.
- Press the "ON/OFF" button. The indicator light will come on.
REMOVING THE FILTER / DRAINING RESIDUAL WATER
WHEN TO REMOVE THE FILTER
- Check and clean the filter at least 2 or 3 times a year.
- When the pump is blocked by an object (buttons, coins, safety pins).
- When the appliance does not drain or spin properly.
Important: Before draining, make sure that the water has cooled.
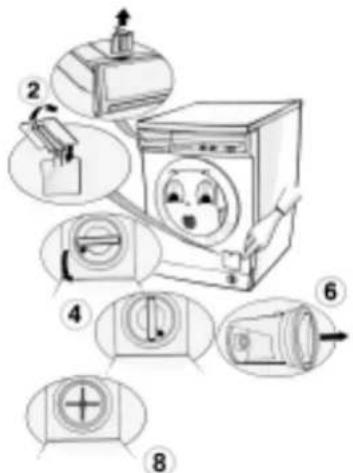
REMOVING THE FILTER
- Switch off the appliance (press the "ON/OFF" button).
- Open the filter cover with the coloured insert from the detergent drawer.
- Place a tub or container beneath it.
- Slowly turn the filter anticlockwise until its handle is vertical without unscrewing it completely.
- Wait until all the water has drained.
- Now unscrew the filter completely and remove it.
- Remove any foreign material from the filter.
- Check that the pump rotor moves freely.
- Insert the filter and screw it in clockwise until it locks (until the grip is horizontal).
- Close the cover.
- Pour 1/2 litre of water into the detergent drawer to reactivate the Eco system.
Some models have no filter, since they are fitted with a self-cleaning pump.
Note: If the filter needs to be cleaned during a programme, reset the appliance by switching it off and then on again. Then select a new programme.
WHEN TO DRAIN RESIDUAL WATER
- When transporting (moving) the machine.
- If there is danger of freezing in the installation room. In this case the machine should be drained after every wash.
text_image
Diagram illustrating the steps of washing machine operation with numbered instructions for each step.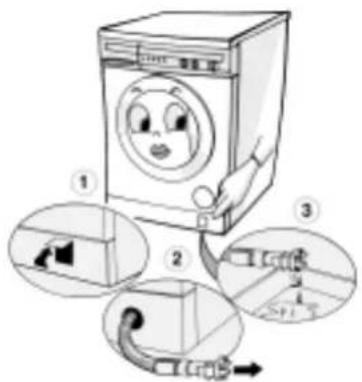
text_image
Illustration of a washing machine with numbered instructions for cleaning and refueling stepsDRAINING RESIDUAL WATER
The residual water drain hose is located in the machine plinth.
- Lift the cover upwards with light pressure.
- Pull out the hose by about 15 cm (6 inches). Pull off its endcap.
- Let the water drain into a flat container until the flow stops. Close the drain hose and replace it.
- Before a new programme start: pour 1 litre of water into the detergent drawer to reactivate the Eco System. If your washing machine is not provided with a drain hose in the plinth, to drain the residual water please follow the instructions given in the chapter "Removing the Filter".
CARE AND MAINTENANCE
APPLIANCE EXTERIOR AND CONTROL PANEL
- Clean using normal household detergent (do not use abrasive products).
• Dry with a soft cloth.
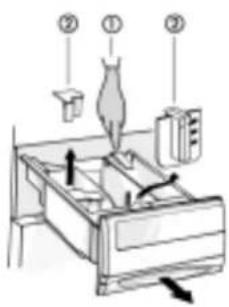
DETERGENT DRAWER
text_image
Diagram of a cat's head and torso positioning on a computer keyboard, with numbered labels indicating positions.• Disengage the drawer by pressing down the release lever and extract it.
- Remove the inserts (the siphon from the softener compartment, the siphon from the chlorine bleach compartment and the coloured insert for liquid detergent).
- Wash all the parts under running water.
- Reposition the inserts, make sure to push the siphons in until they lock and refit the drawer.
DOOR SEAL
• Clean with a damp cloth when necessary.
- Check the seal folds for foreign parts periodically.
WATER HOSE MESH FILTER
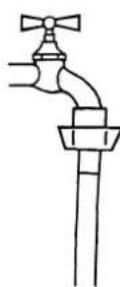
Check and clean periodically. For machines with a straight water supply hose:
- Turn off the tap(s).
- Unscrew the hose(s) from the tap(s).
- Remove the mesh filter and clean it.
-
Refit the filter and screw the hose connection to the tap.
-
Unscrew the hose(s) from the machine.
- Remove the filter from the washing machine with pliers and clean it.
- Replace the filter and screw the hose connection back on to the machine.
- Turn on the tap(s) and ensure that the connections are completely water-tight.
For machines with "Water Stop" hose:
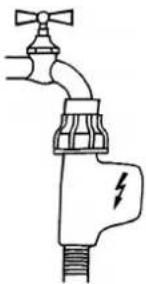
natural_image
Simple line drawing of a faucet with a lightning bolt symbol (no text or labels)- Turn off the tap.
- Unscrew the "Water Stop" hose from the tap.
- Remove only the loose filter and clean it.
- Refit the filter and screw the "Water Stop" hose to the tap.
- Turn on the tap and ensure that the connection is completely water-tight.
FILTER
- Check and clean the filter at least 2 or 3 times a year (see "Removing the Filter").
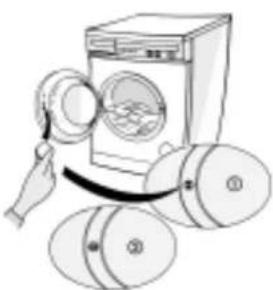
CHILD SAFETY DEVICE
To prevent improper use of the machine, turn the plastic screw on the inside of the appliance door with the thick, rounded edge of the coloured insert or with a coin.
- Vertical slot - Safety position: door cannot lock into place.
- Horizontal slot - Normal position: door can be closed as before.
natural_image
Illustration of a hand using a magnifying glass to clean a washing machine with three wheels nearby (no text or symbols)TROUBLE-SHOOTING GUIDE
The appliance will not switch on or stops in the middle of the programme.
• Power plug properly inserted in mains socket?
- Mains fuse OK?
- Power failure?
- Tap turned on? Is water coming through?
- Door closed?
• Programme selected?
- "On/Off" button pressed?
No water or insufficient water supply.
• Tap turned on completely?
- Kink in water hose?
- Water hose filter clogged? (See "Care and Maintenance").
• Water hose frozen up?
Waste water not pumped out.
- Drain hose installed correctly? (See "installation Instructions").
- Filter clogged? (See "Removing the Filter / Draining Residual Water").
- Drain hose frozen up?
• Is the rinse hold button pressed?
Detergent and additive product residues in detergent drawer at end of wash.
• Siphon installed correctly?
- Siphon clogged?
• Not enough water delivered? (See above).
- Also see "Detergent and Additives" and "Care and Maintenance".
Machine vibrates during spin cycle.
- Machine perfectly horizontal with all four feet on ground? (See "Installation Instructions").
- Transit bolts removed? The transit bolts must be removed before the machine is used (see "Installation Instructions").
Final spin results are poor.
- Pump impeller obstructed? (See "Removing the Filter / Draining Residual Water").
- Wash consists of a single heavy/large size article (bathrobe, etc.)? If this is the case the wash machine may detect load imbalance at the start of the spin cycle and interrupt the spin. The machine breaks up the load and starts a new spin cycle.
- If this happens several times in a row, the spin is run at reduced speed or if the imbalance is too great is not run at all.
- If the load is too wet at the end of the programme, add further garments and run a new spin cycle.
Important: This machine is fitted with a safety system. The programme is interrupted after a few minutes if one of the following happens:
- No water supply.
- Pump blocked.
- To restart the machine, switch it off and on again.
AFTER-SALES SERVICE
Before contacting After-Sales Service:
- Try to remedy the problem (see "Trouble-Shooting Guide").
- Restart the programme to see if the fault is repeated.
- If the malfunction persists, call After- Sales Service and specify:
• The nature of the problem.
• The exact model of the appliance. - The service code (number after the word SERVICE).
The After-Sales Service sticker is on the inside of the door.
SERVICE
0000 000 00000

- Your full address.
- Your telephone number and area code.
- The After-Sales Service telephone number and address can be found in the warranty or on application to the retailer.
INSTALLATION INSTRUCTIONS
TRANSIT BOLTS
The appliance is fitted with transit bolts to prevent internal damage while it is being moved.
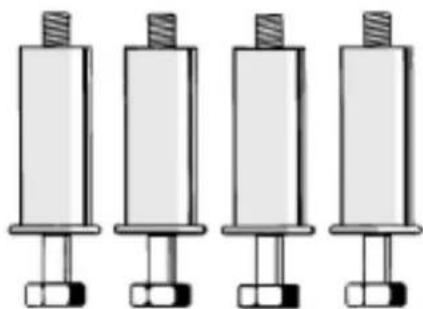
Before using the appliance the transit bolts MUST be removed (Fig. 1).
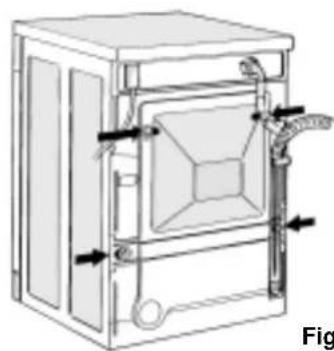
- Slacken the bolts with the spanner supplied (Fig. 2).
- Unscrew the bolts by hand.
- Hold each bolt head and pull the bolts complete with red plastic spacer through the wide part of the holes.
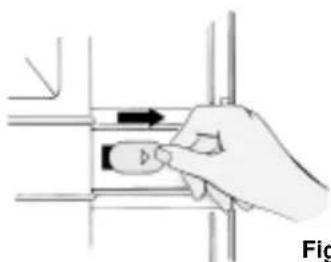
- Close the holes with the provided plastic caps. Fit the caps in the direction indicated by the arrow in the large opening and slide them into the narrow slot until they sit properly (Fig. 3).
- Keep the transit bolts for future use.
Note:
Fit the transit bolts before transporting the appliance as follows:
- Pry up the plastic caps with a screwdriver, slide them out against the direction indicated with the arrow and remove them.
- Fit the transit bolts by following the above procedure in reverse order.
natural_image
Four identical mechanical components with threaded ends and base connectors, arranged in a row (no text or symbols visible)Fig. 1
natural_image
Technical line drawing of a mechanical device with internal components and directional arrows (no text or symbols)Fig. 2
natural_image
Hand holding a small object with an arrow, next to a vertical line (no text or symbols visible)Fig. 3
INSTALLATION INSTRUCTIONS
INSTALLATION
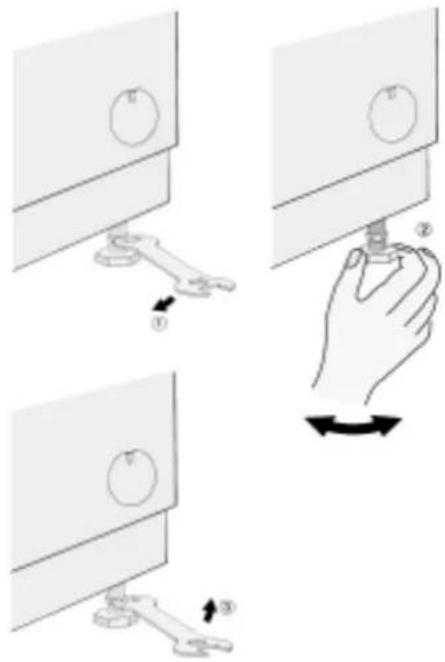
• Install the appliance on a solid and level floor surface, preferably in a corner of the room.
- Make sure that all four feet are resting firmly on the floor and check that the appliance is perfectly level (use a spirit level).
- If the floor is uneven, adjust the levelling feet as required (do not insert pieces of wood, cardboard etc. under the feet).
- Slacken the locknut using the spanner supplied.
- Adjust the height of the foot, turning it by hand.
- Tighten the locknut anticlockwise towards the washing machine.
- If the appliance is to be installed on a wooden floor, distribute the weight by placing it on a 60 x 60 cm sheet of plywood at least 3 cm in thickness. Secure the plywood sheet to the floor.
BUILD-UNDER / WORKTOP
The appliance must be installed only under a fitted, continuous kitchen worktop.
The appliance must only be built under using the built under set UBS.
• Unplug the appliance from the mains.
-
Unscrew the worktop fixing screws from the rear of the appliance.
-
Slide the worktop fully backward and lift it upwards to remove.
Install the cover panel (available through Service or from your local dealer) following the relative instructions.
- Refit the fixing screws and tighten them.
BUILD-UNDER OPENING DIMENSIONS
Width: 600 mm
Height: 825 mm
Depth: 600 mm
WARNING:
Only plug the machine into the mains power socket after you have fitted the cover panel or the machine worktop.
text_image
Diagram illustrating a hand holding a knob on a computer monitor, with labeled steps ① and ② showing the movement.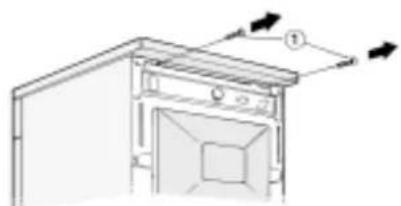
natural_image
Technical line drawing of a door frame with directional arrows indicating movement (no text or symbols)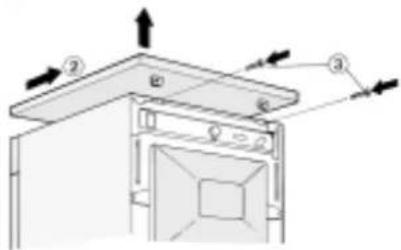
text_image
Technical diagram showing a mechanical assembly with labeled components and directional arrows indicating motion or force.INSTALLATION INSTRUCTIONS
WATER SUPPLY
• Water supply: only cold water.
- Tap: 3/4" threaded hose connector.
• Water pressure (mains pressure): 10-100 N/cm ^2 (1-10 bar).
For Great Britain & Ireland only:
• Water inlet: hot and cold fill. The warm water inlet temperature must not exceed 60^ C.
INLET HOSE(S)
Note: If the inlet hose is already fitted to the rear panel on the appliance, ignore points 1 and 4.
- Remove the inlet hose from the drum.
- Fit the mesh filter supplied in the thread between the straight end of the inlet hose(s) and the tap(s).
- Carefully screw the straight end of the inlet hose(s) to the tap(s) by hand.
- Screw the curved end of the hose to the appliance taking care that the hose is not kinked.
- Turn the tap(s) on fully and check that the joints at the washing machine and the tap(s) are watertight.
- If the hose is not long enough, replace it with a suitable length of pressure-resistant hose (approved under EN 500 65 to withstand a minimum of 10 bar).
- Check the hose regularly for brittleness and cracks and replace if necessary.
- The washing machine may be connected without a non-return valve.
- Observe any special local regulations regarding connection to the water supply.
WATER STOP (depending on model)
- The inlet hose and the plastic enclosure at the water connection contain electrical components.
- Do not cut the flexible hose and do not immerse the plastic enclosure in water.
- If the hose is damaged, unplug the appliance from the mains immediately.
- If the hose is not long enough, replace it with a 3 m long "Water Stop" hose (available from After-Sales Service or a specialist dealer). This must be done only by a qualified electrician.
INSTALLATION INSTRUCTIONS
DRAIN HOSE
- Drain hose connection to water outlet.
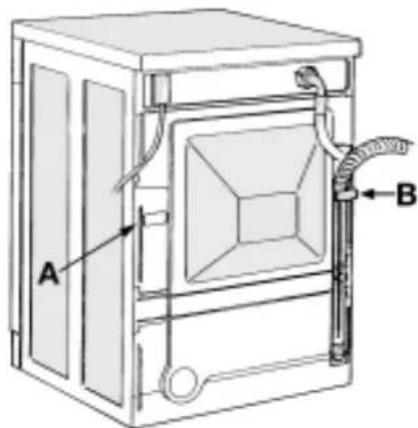
- Unhook the drain hose from the left clip, see arrow A in Fig. 1. Do NOT loosen the right drain hose connection, see arrow B in Fig. 1, otherwise there is the risk of leakage (danger of scalding with hot water).
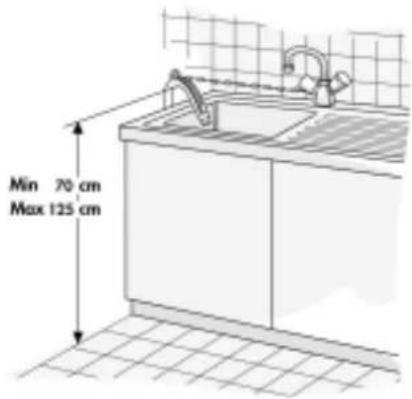
- Fit the drain hose either to the siphon or hook it over the edge of a sink or bath tub with the "U" bend (Fig. 2). Small hand basins are not suitable. The edge of the tub must be no higher than 125 cm above the floor.
- Minimum drain height: 70 cm. Maximum drain height ("U" bend): 125 cm.
- If you need to add an extension, use a flexible hose of the same type and secure the union with screw-on hose clips. Maximum overall drain hose length 2.5 m.
Important
Make sure that there are no kinks in the drain hose run and take precautions against it falling while the appliance is running (Fig. 2).
CONNECTION TO THE MAINS
- Observe local utility company regulations.
• The connection must be made with a correctly installed, earthed and insulated socket.
• The system must be earthed by law. - The manufacturer declines all responsibility for injury to persons or pets and damage to property caused by disregarding the above instructions.
- The data concerning voltage, consumption and electrical protection are supplied on the inside of the appliance door.
- The mains connection cable may only be replaced by a qualified electrician.
- The appliance conforms to European safety regulations, EC directive 93/68 EWG and EN 60555.
• Do not use extension leads or multisockets.
text_image
A BFig. 1
text_image
Min 70 cm Max 125 cmFig. 2
INSTALLATION INSTRUCTIONS
1) ELECTRICAL CONNECTIONS
"Warning - this appliance must be earthed"
This appliance is normally supplied with a mains lead having a plug fitted in the factory which has been checked for correct earth continuity.
If the fitted plug is not suitable for your socket outlet, or if the machine's mains lead is not fitted with a plug, you should fit a suitable new, good quality plug by following the instructions in (2) below.
Any unsuitable plug should be cut off and disposed of in order to avoid a possible shock hazard should it be inserted into a socket.
2) CONNECTION TO A REWIRABLE PLUG - to be carried out only by a qualified electrician
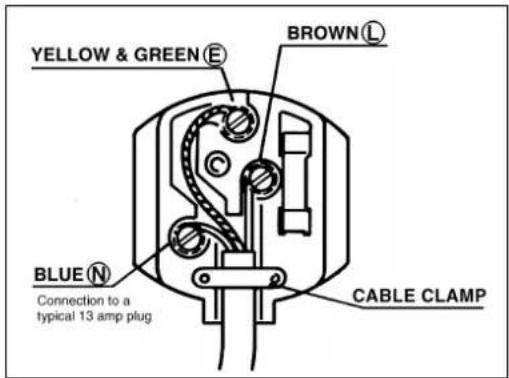
The wires in the mains lead are coloured in accordance with the following code:
BLUE - "NEUTRAL" ("N")
BROWN - "LIVE" ("L")
GREEN AND YELLOW - "EARTH" ("E")
To fit a new plug, proceed as follows:
2.1 Polarized Plugs (e.g. 3 pin, 13 amp plug conforming to BS 1363A)
a. The GREEN AND YELLOW wire must be connected to the terminal in the plug which is marked with the letter "E" or by the Earth symbol or coloured yellow or green and yellow.
b. The BLUE wire must be connected to the terminal which is marked with the letter "N" or coloured black.
c. The BROWN wire must be connected to the terminal which is marked with the letter "L" or coloured red.
text_image
YELLOW & GREEN BROWN BLUE Connection to a typical 13 amp plug CABLE CLAMP2.2 Non-polarized plugs (e.g. 2 pin with side earth contact)
The wire which is coloured GREEN AND YELLOW must be connected to the earth contact. The other two wires should be connected to the two pins, irrespective of colour.
3) FUSE REPLACEMENT
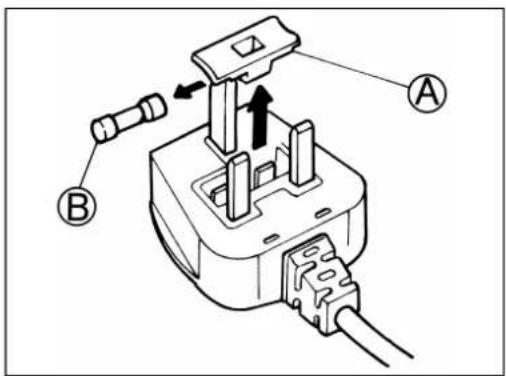
If the mains lead of this appliance is fitted with a BS 1363A 13 amp fused plug, replace the fuse only with an A.S.T.A. approved type conforming to BS 1362 and proceed as follows:
text_image
Technical diagram of a plug electrical socket with labeled components A and B, showing internal wiring and adjustment arrows.- Remove the fuse cover (A) and the fuse (B).
- Fit the replacement 13 A fuse into the fuse cover.
- Refit both into the plug.
For all other types of plug, the supply socket should be protected by a 16 A fuse or circuit breaker at the distribution board.
INSTALLATION INSTRUCTIONS
MOBILITY WHEELS
(for UK only)
Depending on model, your washing machine is provided with mobility wheels.
You will find these wheels in the accessory kit supplied with the machine, or you can order them from our After-Sales Service.
text_image
Diagram showing a mechanical assembly with an inset image of a vehicle and a numbered label '1' pointing to a component.MOUNTING INSTRUCTIONS
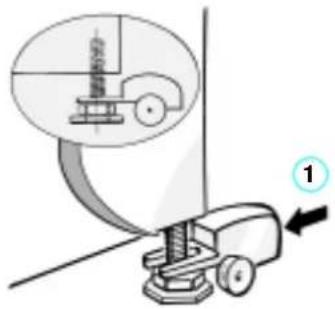
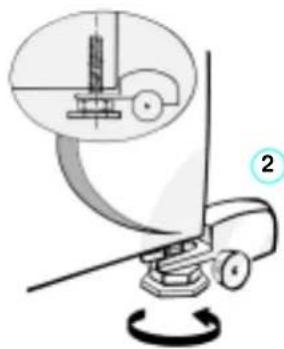
- Tilt the machine forward.
- Loosen the two rear feet.
- Insert the wheels as close as possible to the screw (1).
- Tighten the screw completely (2).
- Pull the machine in an upright position.
- Adjust the front feet making sure that the machine is completely level with the floor.
Note: Levelling is extremely important to avoid any risk of instability and vibrations.
natural_image
Mechanical assembly diagram showing a rotating arm with a magnified inset of a mechanical component (no text or symbols)MOVING THE MACHINE
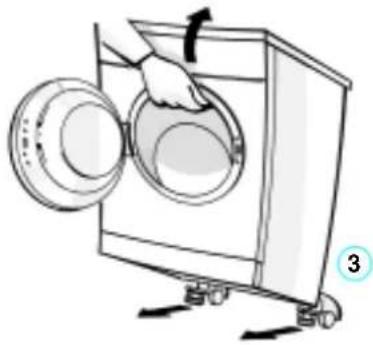
- Open the door of the machine.
- Lift the machine by 1 or 2 cm (3).
- Push or pull the machine according to your need.