
AKZ 202 WH - Oven WHIRLPOOL - Free user manual and instructions
Find the device manual for free AKZ 202 WH WHIRLPOOL in PDF.


User questions about AKZ 202 WH WHIRLPOOL
0 question about this device. Answer the ones you know or ask your own.
Ask a new question about this device
Download the instructions for your Oven in PDF format for free! Find your manual AKZ 202 WH - WHIRLPOOL and take your electronic device back in hand. On this page are published all the documents necessary for the use of your device. AKZ 202 WH by WHIRLPOOL.
USER MANUAL AKZ 202 WH WHIRLPOOL
CLEANING THE OVEN AND ITS ACCESSORIES PAGE 23
CARE AND MAINTENANCE OF CONVENTIONAL ELECTRIC COOKTOPS PAGE 25
CARE AND MAINTENANCE OF THE GLASS-CERAMIC COOKTOP PAGE 25
TROUBLESHOOTING GUIDE PAGE 25
AFTER SALES SERVICE PAGE 26
DECLARATION OF CONFORMITY CE PAGE 26
INSTALLATION
Technical information for the installer
OVEN
- After removing the oven from its packaging, before making the connections place it on the polystyrene foam base to protect it from damage.
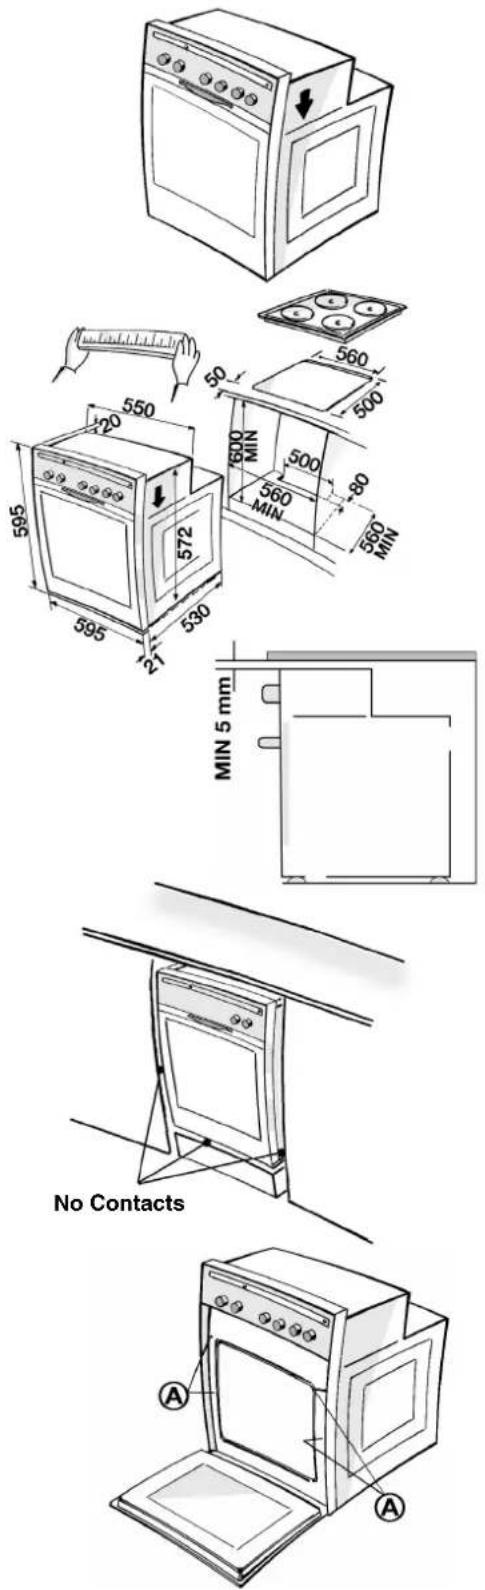
- Do not attempt to lift the oven by the handle. Lift at the sides as shown in the figure (see arrow).
- Check that the appliance has not been damaged in transit.
- Oven dimensions and kitchen unit dimensions are shown in the figure opposite.
- Kitchen units in contact with the oven must be heat resistant (80°C).
- If plastic laminates or cement are not sufficiently heat-resistant, warping, bubbling or detachment of the finish may result.
- Install the oven in the housing, lifting it at the sides, taking care not to trap the wires of the electrical supply cable.
text_image
560 500 550 120 595 572 530 595 21 600 MIN 500 80 560 MIN MIN 5 mm No Contacts A A- For correct ventilation, follow the ventilation opening directions shown in the figure (500 x 80 mm min). An additional opening of 5 mm is required between the oven top rim and the cooktop lower rim: this opening must not be closed by strips or housing crosspieces.
- During oven installation, care must be taken to ensure that the sides are not touching the front edges of the housing or adjacent drawers and doors (see picture).
- Carry out the electrical connections between cooktop and oven (see "Electrical connection").
- Secure the oven to the kitchen unit with screws (A) as shown.
INSTALLATION
Cooktop
- The cooktop must be set into a worktop between 20 mm and 50 mm thick. There must be nothing between the cooktop and the oven (cross rails, brackets, etc.).
- If the cooktop is to be installed next to a column unit, leave a distance of at least 100 mm from the edge of the cooktop to the side of the column unit.
- Cut an opening in the worktop of the dimensions shown in the Product Description Sheet supplied separately.
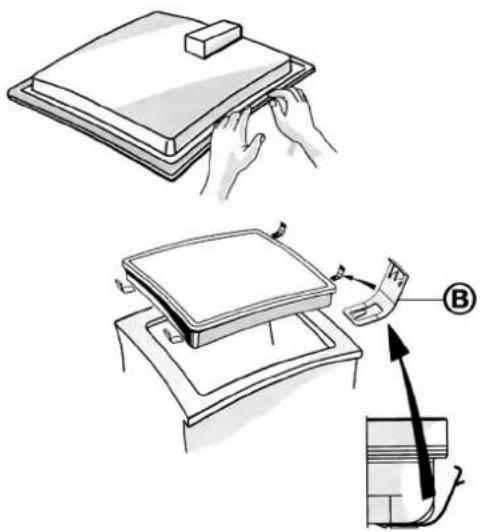
- If not already present, fit the supplied seal to the cooktop flange after cleaning the contact area as shown in the top figure.
Cooktop with electric hotplates
- If the worktop is made of wood, fit the supplied clips.
- Position the 4 spring clips (B) and fit them in their locations on the underside of the cooktop.
- Fit the cooktop into the worktop.
- If the worktop is made of marble, plastic, ceramics, natural stone, etc., the cooktop must be secured with brackets (C) code 4819 310 18528 (to be requested from After Sales Service).
- Position the brackets over the holes and secure them with the supplied screws.
- Fit the cooktop into the worktop.
Glass-ceramic cooktop
N.B.: Remove the protective film before installing the cooktop.
- If the worktop is made of wood, use the supplied spring clips and screws.
- Position the 4 clips (D) as shown and at the specified dimensions.
- Secure the clips using screws (E).
- Fit the cooktop into the worktop.
- If the worktop is made of marble, plastic, ceramics, natural stone, etc., the cooktop must be secured with brackets (F) code 4819 404 78697 (to be requested from After Sales Service).
- Fit the cooktop into the worktop.
- Position the 4 brackets (F) as shown in the figure, in accordance with the thickness of the worktop.
- Fix the 4 screws (G) in holes (H).
natural_image
Illustration showing a hand holding a rectangular object above a stack of books, with a magnified view of the book being inserted into a container (no text or symbols present)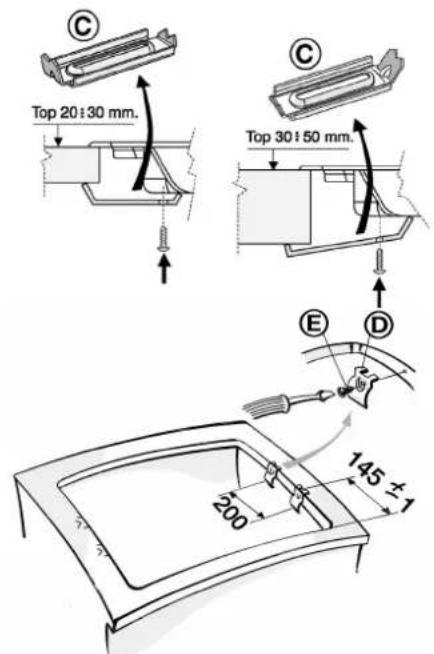
text_image
C Top 20:30 mm. C Top 30:50 mm. E D 200 145±1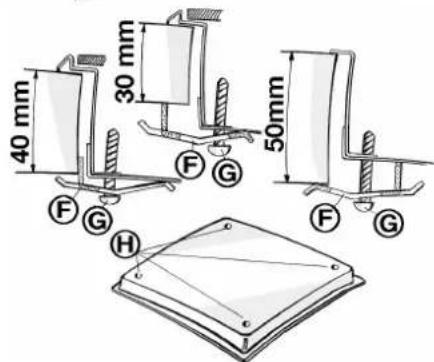
text_image
40 mm 30 mm 50mm F G F G HELECTRICAL CONNECTION
- Make sure the appliance is installed and connected to the electricity supply by a qualified technician in accordance with the manufacturer's instructions and in compliance with local regulations.
-
The installer is responsible for the correct electrical connection of the appliances and the observance of the relative safety recommendations.
-
The appliance must be connected to the electricity supply by means of an all-pole disconnect switch with minimum contact gap of 3 mm.
• The appliances must be earthed by law. - Do not use multiple plug adapters or extension leads.
• After the oven has been installed, the electrical components must be concealed.
Connecting the oven to the power supply
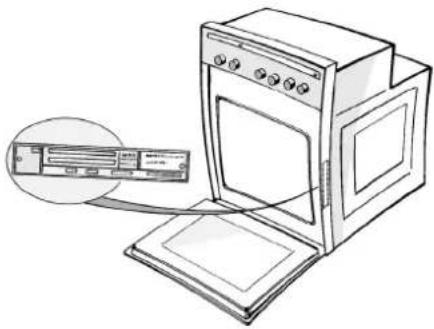
- Make sure that the voltage shown on the rating plate is the same as the power supply voltage in your home. The service number is located on the front edge of the oven cavity (visible when the oven door is open).
- Use a type H05RR-F power cord (minum length: 800 mm).
- Warning: All the oven's components operate at 230-240V. When using a 400 V connection, make sure that the voltage reaching the oven is 230-240V, as illustrated in the side table.
| Conductors X number E | Electrical connection |
| 1N+ 1= ~ | H05 RR-F 3X4 mmq |
| 2N+ 1= ~ | H05 RR-F 4X2.5 mmq |
| 3 + 1= ~ | H05 RR-F 4X2.5 mmq |
| 3N+ 1= ~ | H05 RR-F 5X1.5 mmq |
natural_image
Line drawing of an open oven with a close-up inset showing a small electronic device (no text or symbols)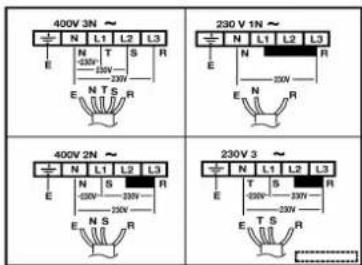
text_image
400V 3N ~ N L1 L2 L3 E N T S R -250V 250V E N T S R 230 V 1N ~ N L1 L2 L3 E N R 250V E N R 400V 2N ~ N L1 L2 L3 E N S R -250V 250V E N S R 230 V 3 ~ N L1 L2 L3 E T S R -250V 250V E T S RInterconnecting cooktop and oven
- Before connecting the oven to the power supply, check that the cooktop is among the ones listed in the cooktop/oven pairing product sheet.
- Connect the 3 pole and 4 pole connectors to the respective connectors on the oven.
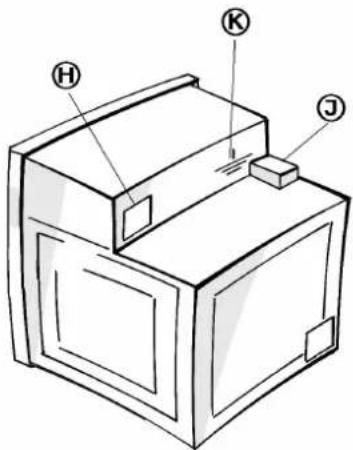
The 3 pole connectors (H) is located at the rear right hand side of the control panel, the 4 pole connector (J) is located at the top of the oven in the left hand corner (see figure).
- Connect the yellow/green striped earth wire ( ) (K) from the cooktop to the screw located near the 3 pole connector.
WARNING: DO NOT CONNECT TO THE POWER SUPPLY BEFORE YOU HAVE FINISHED CONNECTING THE OVEN AND THE COOKTOP.
- Mount the oven in the kitchen unit. Make sure the power cord is not entrapped.
text_image
Technical diagram of a mechanical device with labeled components H, K, and JBEFORE USING THE APPLIANCES
- To make the most of your new appliances read the users instructions carefully and keep them on hand for consultation in the future.
- Remove the cardboard protections and the protective plastic film.
- Remove the accessories from the oven and heat it at 200°C for about an hour to eliminate the smell of protective grease and insulating materials. Keep the window open during this procedure.
N.B.: The cooling fan runs continuously at different speeds according to the temperature value of the components when the cooktop or the oven are in use.
Full speed: when the components are hot. Reduced speed (on/off mode): when the components are not hot.
The on/off mode must be considered the normal mode when the fan is at reduced speed. The fan may continue to run for the time necessary to ensure sufficient cooling of the components and adjacent kitchen units after the appliances have been switched off.
PROTECTING THE ENVIRONMENT
1. Packing
- The packaging material is 100% recyclable and it is marked with the recycle symbol (△).
2. Appliances
- The appliances are built from recyclable materials. If you decide to scrap the appliances please observe local waste disposal regulations. When you scrap them, cut off the power cords so that the appliances cannot be connected to the mains.

natural_image
Simple black-and-white sketch of a four-leaf clover with a leafy top, enclosed in a square frame (no text or symbols)PRECAUTIONS AND GENERAL RECOMMENDATIONS
- Before any maintenance on the appliances disconnect them from the power supply.
- Keep children away from the appliances when they are in use.
- The oven must be repaired or adjusted only by a qualified technician.
- Make sure that the electrical wires of other electrical appliances near the oven do not come into contact with hot parts and do not become entrapped in the oven door.
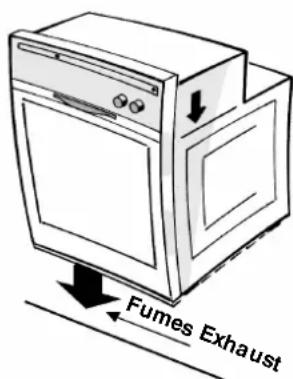
- During the cooking process, water evaporates from food. All ovens require this steam and other fumes to be vented from the oven cavity. For reasons of safety and aesthetics, we have determined that an opening at the bottom of the door is the optimum solution.
Consequently, vapour may be seen to be coming from this area on occasions (see picture). This is a normal occurrence and the bottom trim can be cleaned after removal of the door as described on page 23. - Heavy weights must not be placed on the open door as this may result in damage to the cavity and hinges. Max weight: 7 kg (15lbs).
text_image
Fumes ExhaustOven
- Never stand or sit on the oven open door. Never hang any weight at the handle of the oven door when open.
- Use oven gloves to remove baking trays and accessories when the oven is hot.
- Do not cover the bottom of the oven with aluminium foil.
- Do not place inflammable material in the oven - risk of fire if the oven is inadvertently switched on.
PRECAUTIONS AND GENERAL RECOMMENDATIONS
Conventional electric / glass-ceramic cooktop
- Do not switch on the hotplates / cooking areas when there is no pan in position.
- The cooktop features hotplates/cooking areas of different size. Use pans whose base diameter is the same as or slightly larger than the diameter of the hotplate/cooking zone.
- Use flat-bottomed pans. The use of pans with concave or convex bottoms is not recommended.
- Do not use the cooktop as a work or support surface.
- Do not leave the appliance unattended when frying food -risk of fire.
Specific recommendations for glass-ceramic cooktops
- When using the Fast Boiling function, use stainless steel pans with double bottom only.
- If the glass-ceramic surface should break or crack due to violent impact (falling objects, etc.) do not use it and call After Sales Service immediately.
- Do not place food wrapped in aluminium foil, plastic containers or cloths on the hot cooking zones.
- Do not drag pans across the glass-ceramic surface - risk of scratches.
- If the cooktop is fitted with halogen lamps, do not stare at them when they are switched on.
- Avoid spilling sugar and similar substances on the cooktop. Should this happen, clean the cooktop carefully following the care and maintenance instructions in this handbook.
ENERGY SAVING TIPS
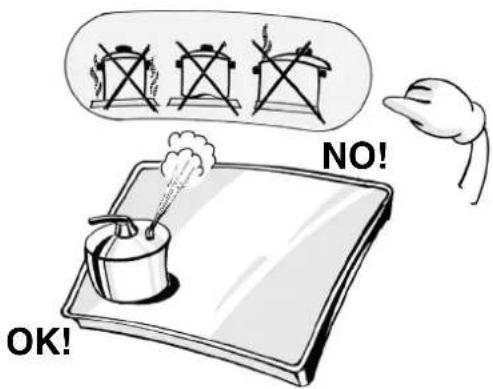
- Use pots and pans whose bottom diameter is equal to that of the cooking zone or slightly larger.
• Only use flat-bottomed pots and pans. - If possible, keep the pots covered when cooking.
• Cook vegetables, potatoes, etc. with little water in order to cut down on cooking time.
• A pressure cooker allows you to save even more energy and time.
text_image
NO! OK!OVEN ACCESSORIES
- Accessories supplied depend on the model (refer to the Product Description Sheet supplied separately).
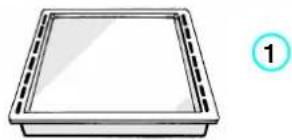
Drip tray 1
The drip tray is designed to collect fat and food particles when it is positioned under the grid; it can also be used as a griddle to cook meat, chicken and fish, with or without vegetables. To avoid spatters of fat and smoke, pour a little water into the drip tray.
Baking tray 2
For cooking biscuits, meringues and pizzas.
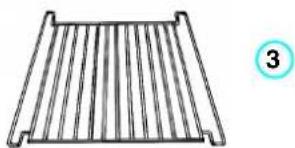
Grid 3
The grid can be used to grill food or as a support for baking trays, cake tins and other cooking receptacles. It can be placed in two different ways (or) and on any of the runners in the oven.
Catalytic panels 4
The catalytic panels have a microporous coating that absorbs fat spatters. We recommend an automatic cleaning cycle after cooking particularly fatty food.
- To clean the oven heat it to 200^ C when empty and leave it switched on for about an hour.
- At the end of the cycle, when the oven is cool, use a moist sponge to remove food residues. Do not use detergent or cleaners - risk of damaging the catalytic enamel coating.
Spit 5
Use the spit as indicated in the relevant chapter in the Product Description Sheet supplied separately.
Pan Set Kit 6
The set comprises a grid 6a strip tray and one or two tongs 6c
This accessory must be set on the grid and used with the Grill function.
natural_image
Simple line drawing of a rectangular tray with dashed edges and a circular label containing the number 1 (no text or symbols on the tray itself)
natural_image
Simple line drawing of a rectangular grid structure with no text or symbols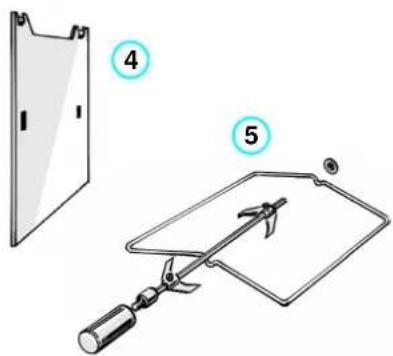
text_image
Diagram showing a device with labeled parts, including a panel and a tool with a handle.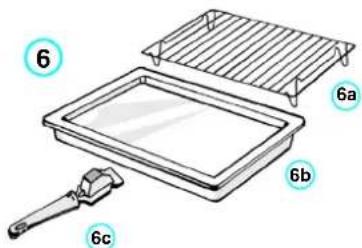
text_image
6 6a 6b 6cCOOKTOP ACCESSORIES
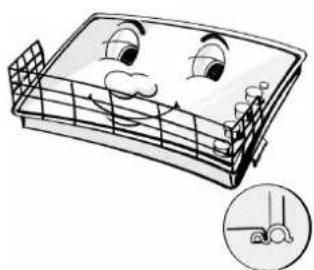
Child guard accessory AMH 122
This accessory can be obtained from the After Sales Service under Part N° 4819 310 18436 or from your dealer under Ref. 017124.
natural_image
Illustration of a cartoon-style cleaning or repair device with eyes and a curved handle, shown with a magnified inset (no text or symbols)OVEN FUNCTIONS
The functions actually available depend on the model (see the Product Description Sheet supplied separately).
STATIC FUNCTION
This function is used to cook food on the same runner level.
The function allows temperature control; the temperature can be set in the range of 50^ C to 250^ C. The default setting is 200^ C.
- Preheat the oven until the required temperature is reached and place the food into the oven when all the indicators on the scale °C are on.
- When using this function, it is advisable to put the food in the middle of the oven.
GRILL FUNCTION
This function is ideal to grill small pieces of meat (steaks, sausages) and for making toast.
The function allows five settings, 1, 2, 3, 4, 5, each corresponding to an increased heating level of the heating element at the top.
The default setting is 3.
- During cooking, the oven door may be open or closed.
• Preheat the oven for 3/5 minutes. - When cooking meat, to avoid spatters of fat and smoke, pour a little water into the drip tray.
• Turn the food half-way through grilling time.
"MLTF" FUNCTION
(Heat maintenance)
This function keeps one of two temperature levels of temperature (either 35^ C or 60^ C) inside the oven.
- Setting the temperature at 35^ C is particularly useful to raise dough for bread and pizza.
- The default setting is 35°C. For this function it is advisable to use the first shelf level.
- Use the 60°C temperature setting to keep the food warm once it is cooked.
FAN FUNCTION
This function is especially useful for simultaneously cooking different foods at more than one shelf level (for example: fish, vegetables, pasta).
This function allows temperature control; the temperature can be set in the range 50^ C to 250^ C.
The default setting is 160^ C.
- If possible choose dishes that require the same cooking temperature.
• It is not necessary to preheat the oven. - If the dishes in the oven have different cooking times, remove completed dishes and leave remaining foods until cooked.
PASTRY FUNCTION (Static + Fan)
This function is useful when cooking at two levels and when baking cakes. The function allows temperature control; the temperature can be set in the range of 50^ C to 250^ C.
The default setting is 175°C.
• It is not necessary to preheat the oven.
- Switch the position of the dishes inside the oven during cooking time.
- If the dishes in the oven have different cooking times, remove completed dishes and leave remaining foods until cooked.
TURBOGRILL FUNCTION (Grill + Fan)
This function is ideal to cook large chunks of meat (i.e. roast beef, roasts).
The function allows five settings, 1, 2, 3, 4, 5, each corresponding to an increasing heating level of the heating element at the top. The default setting is 3.
- Keep the oven door closed while cooking.
- Lay the meat onto the grid and position the drip tray on the first shelf level. To avoid spatters of fat and smoke, pour a little water into the drip tray.
- Turn over the meat half-way through cooking time.
TURBOFAN FUNCTION
This function is useful when cooking at two runner levels; the temperature can be set in the range of 50^ C to 250^ C.
The default setting is 160°C.
This function is ideal for:
• Large fruitcakes
- Timbales
- Stuffed vegetables
• Poultry (weighing more than 3 kg)
It is not necessary to preheat the oven.
PROGRAM FUNCTION
This function is useful to bake pizzas, bread and focaccia. The function provides 3 cooking programs (P1, P2, P3 is available depending on model). The temperature levels in each program are preset and can be selected by the user.
The temperature values that can be selected in each program are limited by the programmer, in order to obtain good cooking results.
Each program corresponds to a recipe for the preparation of the dish you want (consult the Bread/Pizzas cookbook).
• The default setting of this function is P1.
BOOSTER FUNCTION
This function allows fast preheating of the oven. The function allows temperature control; the temperature can be set in the range of 50^ C to 250^ C.
The default setting is 200°C.
As the temperature in the oven increases, the indicators ----°C light up in sequence. When the selected temperature is reached, an acoustic signal is emitted and the oven switches automatically to Static Function.
This function is ideal when cooking meat, fish and poultry.
COOKTOP FUNCTIONS
The cooktop control knobs are marked with a numerical scale corresponding to different power settings, and a series of function symbols.
KEEP WARM FUNCTION
This function uses a low power setting so that food can be kept warm when cooking is finished.
How to operate:
- Turn the knob to ≈
- To deactivate the Keep Warm function, change the knob position.
DUAL ZONE FUNCTION (dependent on model)
This function is available on the front left and rear left cooking zones. The dual-zone function extends the heated area of the cooktop so that you can use large, oval or rectangular pans.
How to operate:
-
Turn the knob to and wait for the residual heat indicator for the chosen hotplate to start flashing.
-
Select the required power by turning the knob anti-clockwise. The residual heat indicator remains lit to show that the cooktop is switched on.
-
To deactivate the function return the knob to "0".
>> ICP FUNCTION (INITIAL COOKING PHASE)
This function accelerates the heating of the selected cooking zone for a specified amount of time during the first part of the cooking cycle.
How to operate:
- Turn the knob to >>.
- Wait until the residual heat indicator starts flashing, then turn the knob anti-clockwise to the desired power level. For example: if the power level is "1", the cooking zone will operate at full power for 1 minute, then it will switch to power level "1" for the remainder of the cooking cycle,
unless the position of the knob is changed. If the power level is "6", the cooking zone will operate at full power for 6 minutes, then will switch to level "6" for the rest of the cooking cycle, unless the position of the knob is changed. This applies to all power levels with the exception of level "10".
FAST BOILING FUNCTION
This function makes it possible to bring water to the boil fast; the Fast Boiling function remains active for a preset time. Once the preset time has elapsed, the cooktop returns automatically to maximum power level. The Fast Boiling function can be activated also once you have already started cooking.
Warning: Make sure you have placed the pan on the cooking zone before activating the fast boiling function or the glass-ceramic surface may be damaged.
Specified performance values for the Fast Boiling function are guaranteed for all types of glass-ceramic cooktops.
How to operate:
-
Place the pan on the chosen cooking zone.
-
Set the knob to √
GENTLE HEAT FUNCTION
Can be used to raise dough, soften hard butter from the fridge, keep a baby's bottle or a baby food warm, for yoghurt making, melting chocolate, etc... This function is available only when the residual heat indicator light is on.
How to operate:
- Make sure that the relative cooking zone residual heat indicator light is on.
- Turn the knob to
- To deactivate the function change the knob position.
This symbol does not correspond to any cooktop mode; the heating element is not powered
CLEANING THE OVEN AND ITS ACCESSORIES
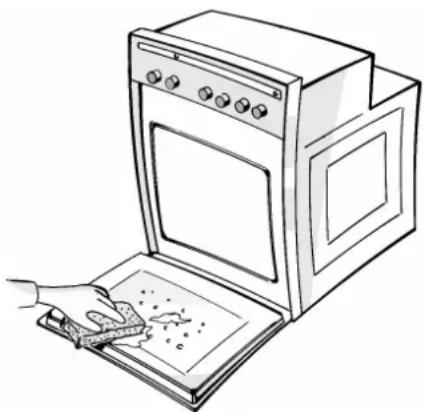
- When you finish cooking wait for the oven to cool and then clean it to prevent the build-up of baked-on residues.
- If the food residues are baked on, use a specific oven cleaner and follow the manufacturer's instructions.
- Clean the exterior of the oven with a sponge and warm water.
- Do not use abrasive cleaners or pan scourers.
- Use a liquid detergent to clean the oven door window.
- Wash the accessories in a dishwasher or in the sink, using an oven cleaner.
- After the oven has been in prolonged use and when cooking on different levels (especially food with high water contents such as pizzas, stuffed vegetables, etc.) condensation may form on the inside of the door and of the door seal. When the oven is cool, dry any condensation with a cloth or a sponge.
natural_image
Line drawing of an oven with a hand cleaning the lid (no text or symbols)CLEANING THE OVEN AND ITS ACCESSORIES
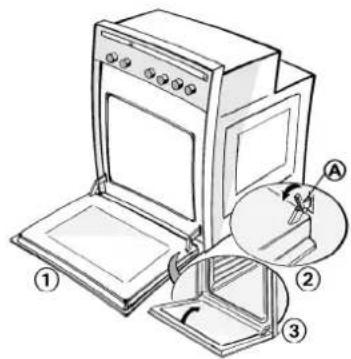
Removing the oven door (for cleaning)
- Open the oven door.
- Press hinge catches (A) forwards.
- Lift the catches until they engage and then remove the door.
- While you are cleaning the oven, ensure you do not disengage the hinge retainer catches.
- Refit the oven door by following the above steps in reverse order.
How to clean the oven roof, pulling out the grill element (if fitted) and lowering it as far as it will go
- Do not attempt to clean the oven until it is cool.
- To clean the oven roof, pull out the grill element and lower it as far as it will go.
- Clean the oven roof and then return the grill element to its original position.
Changing the oven lamp
- Disconnect the oven from electrical supply.
- Unscrew the lamp cover.
- Change the lamp (see N.B.).
- Refit the lamp cover.
- Reconnect the electrical supply.
Changing the lateral lamp (depending on model)
- Disconnect the oven from the electrical supply.
- Remove the left hand side grid.
- Using a screwdriver, prize off the lamp cover.
- Change the lamp (see N.B.).
- Reposition the lamp cover and press it against the oven wall until it clicks into place.
- Refit the side grid.
- Reconnect the electrical supply.
N.B.: Use exclusively 25 W 230 V lamps, type E-14, T300°C, available from After Sales Service.
text_image
Diagram of a kitchen appliance with labeled parts and directional arrows indicating movement or assembly.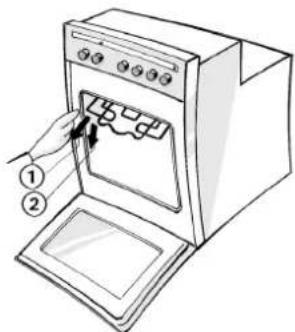
text_image
Diagram of a kitchen appliance with labeled parts, showing a hand inserting a button into the oven.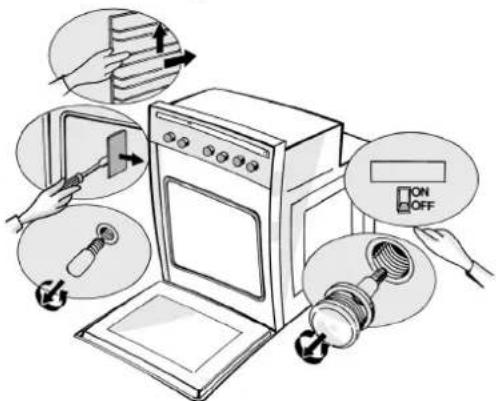
text_image
Illustration of a kitchen appliance with labeled parts including oven, switch, and lamp control buttonsCARE AND MAINTENANCE OF CONVENTIONAL ELECTRIC COOKTOPS
Before cleaning the cooktop, disconnect it from the electrical supply and wait until it has cooled.
Care and Maintenance of conventional electric cooktop
• Use a cloth and warm soapy water.
- Do not use abrasives, corrosive cleaners, cleaners containing chlorine or pan scourers.
- Do not leave acidic substances on the cooktop (vinegar, salt, lemon juice, etc.).
Stainless steel cooktop
- Use a proprietary cleaner for stainless steel. N.B.: prolonged use of the cooktop may result in slight discoloration of the stainless steel surfaces around the hotplates. This is caused by the high temperature of the hotplates.
Cleaning the hotplates
Clean the hotplates when they are warm (not hot!). Use a cloth moistened with water and salt. Dry and clean with a cloth moistened with cooking oil.
CARE AND MAINTENANCE OF THE GLASS-CERAMIC COOKTOP
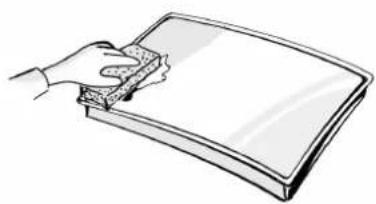
Clean the cooktop, when it is cool, after each use. This will prevent the build-up of dirt and make cleaning easier.
- Use a clean cloth, absorbent kitchen wipes and washing up liquid or a specific glass-ceramic hob cleaner.
- Remove baked-on dirt with the supplied scraper tool and specific cleaning products.
- Food spills should be cleaned off before they bake onto the glass-ceramic surface.
- Do not use abrasive products, bleach, oven-cleaner sprays or pan scourers.
- The cooktop should be treated periodically with a proprietary brand of protective wax for glass-ceramic hobs.
natural_image
Line drawing of a hand cleaning a rectangular object (no text or symbols)TROUBLESHOOTING GUIDE
Oven not working
- Switch the oven off and then on again to see if the problem persists.
- Check for the presence of mains electrical power.
- Check that the oven selector is not on position "0".
- If the electronic display presents the message "STOP", press the button 2 to reset the oven and then set the clock (see the Programmer Description Sheet supplied separately).
- If the electronic display shows the message "Fxx", contact the After Sales Service, quoting the error code displayed.
Cooktop not working
- Check for the presence of mains electrical power.
- Check that the control know is not set to "0".
- Set to "OFF" the all-pole disconnect switch for a few minutes, then set it back to "ON".
AFTER SALES SERVICE
• Before contacting After Sales Service:
- Try to solve the problem (see "Troubleshooting guide").
- Turn off the appliance and restart it to see if the fault is repeated.
If after the above checks the fault still occurs, get in touch with the nearest After Sales Service. Please give:
• the nature of the problem.
• the exact type and model.
- the service number (number after the word Service on the rating plate), located under the cooktop or on the Product Description Sheet or, finally, on the right hand edge of the oven cavity (visible when the oven door is open). The service number is also indicated on the guarantee booklet.
- your complete address (including postal code) and phone number.
natural_image
Cartoon illustration of a man holding a briefcase and glasses (no text or symbols)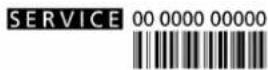
DECLARATION OF CONFORMITY CE
- These appliances are designed to come into contact with foodstuffs and they are constructed in compliance with Directive 89/109/EEC.
-
They are designed solely for use as domestic cooking appliances. Any other use of the appliances (e.g. for room heating) is considered as improper use and potentially dangerous.
• These appliances are designed, built and sold in compliance with: -
the safety requirements of "Low Voltage" Directive 73/23/EEC;
- the protection requirements of EMC Directive 89/336/EEC;
- the requirements of Directive 93/68/EEC.
- This appliance complies with Class "Y" fire protection category.