SP15 - Microphone Sonic Presence - Free user manual and instructions
Find the device manual for free SP15 Sonic Presence in PDF.


User questions about SP15 Sonic Presence
0 question about this device. Answer the ones you know or ask your own.
Ask a new question about this device
Download the instructions for your Microphone in PDF format for free! Find your manual SP15 - Sonic Presence and take your electronic device back in hand. On this page are published all the documents necessary for the use of your device. SP15 by Sonic Presence.
USER MANUAL SP15 Sonic Presence
Sonic Presence SP15 USB-C Spatial Microphone™ Applications Manual for Sound Recording with iOS
iPhone Version 3.0
Sonic Presence SP15 captures three-dimensional audio on iOS devices by connecting through the USB-C port. This manual will help you get started and offer useful tips to get the most out of your SP15.
Table of Contents
- SP15 Spatial Microphone
- Making a Great Sound Recording
- Connecting the SP15 to iOS Devices
- Digital Audio File Formats Table
- iOS App Comparison Table
- Recommended Apps for iOS
a. Voice Memos
b. ShurePlus™ Motiv Audio
c. Apogee MetaRecorder
d. Voice Record Pro 7
e. Twisted Wave
f. Garage Band
g. Røde
h. Apple Camera
i. ShurePlus™ Motiv Video
j. Pro Movie
k. FiLMiC Pro
- Troubleshooting
- Dynamic Range
- Our Testing Methods
BEST PRACTICES
- Put your iOS device in Airplane Mode.
- Plug in SPI5 before launching a recording app.
- Close other apps running in the background.
1. SP15 Spatial Microphone™
Sonic Presence captures sound with stunning realism. It's as if you are there. The sound is a perfect match for today's mobile devices, especially the latest 4K/HD models. What's been missing up until now is the ability to capture sound with a realism that matches the picture. The SP15 Spatial Microphone solves the problem. You'll capture the sounds of live concerts, shows, band rehearsals and those special moments as if you are there.
Our engineers developed Sonic Presence by taking a fresh, new approach to sound recording using mobile devices. We asked the question: Why are sound files so one dimensional when our sense of hearing has a fantastic ability to locate sounds coming from all around us?
Research in the field of cognitive psychology tells us the Head Related Transfer Function (HRTF) and its associated time and level differences are critical for cueing our mind's auditory perception. Yet traditional microphones and the way they're engineered into mobile devices do not adequately capture this function. We've replaced them with our SP15 Spatial Microphone. It embeds the HRTF into the file while you're making the recording, so it captures sound the way you hear it.
When you play back a Sonic Presence file your mind detects the perceptual cues. The sound image expands outside your head and beyond. Left, right, in front, above and behind – you’ll hear the full 360-degree soundstage all around you. We’ve engineered our SP15 Spatial Microphone to capture live audio signals the way your mind has evolved to process them. We feed your ears the perceptual cues that lets your mind recreate the audio image. The result is incredibly realistic; it’s as if you are there.
You wear the VR15 Spatial Microphone on your ears. You become the sound engineer. It's made of a malleable material, so you can shape it to fit your own ears. The slip-on design is comfortable to wear and very discrete. It's shockproof, waterproof, and it plugs directly into your mobile device's charging port*. Plug-in, go wild!
*Adaptors sold separately. iPhone: Lightning to USB Camera Adapter. Android: Micro USB to USB-A Female OTG Adapter.
LEGAL DISCLAIMER: Recordings you make with Sonic Presence are strictly for your own personal use. You may not sell the recordings or use them for any commercial purpose unless you first obtain the permission of the performers and the copyright owners. Doing so without their permission may be a violation of law.
2. Making a Great Sound Recording - by Russ Hamm
People ask me why is it so difficult to make a great sound recording? I know the challenge well. When I started out as a young sound engineer, I struggled to find answers to questions like: what's the right placement for the microphones? How many microphones do I need to use? How do I set levels, so I don't get distortion? It's a steep learning curve.
Then one day I sat down in the studio and just listened to the sound of the instruments. It was an enlightening experience. So simple. There was “air” in the sound and a three-dimensional quality with dynamics that I could never capture with traditional microphones. It was an experience I would never forget. And it planted the seed, which years later, grew into Sonic Presence and the SP15 Spatial Microphone.
Sonic Presence captures sound exactly as you hear it. The recording is a perfect replica of what your ears hear and what your mind remembers. You don't need to learn any special, new techniques. Just listen with your ears. Position yourself where you like the sound you hear. Hook the SP15 on your ears and press "record." Sonic Presence will take care of the technical stuff. You'll make a great sound recording.
Recording Jazz, Pop and Rock bands playing live in clubs is a passion of mine. There is nothing like capturing a performance with a live audience reaction. If you're using an iPhone, choose an App like Camera or Twisted Wave. For Android try Open Camera or Field Recorder Pro. Either choice will record stunning audio. You'll get best results if you position yourself 6 to 15 feet (2 to 5 meters) from the performers. For soloist performers like an acoustic guitarist or a violin recital, it's better if you get a little closer. Not too close though, because you'll want to capture the acoustics of the room that's so important to the sound of these instruments.
Recording Music lessons and Band rehearsals for instant replay is another great use of Sonic Presence. Have you ever heard yourself play? How good do you really sound? How's your technique? Sports players study hours of replays to perfect their skills. Now musicians can do the same. Hook the SP15 on your ears and push "record." Sonic Presence will make a great sounding recording of your performance. You can play it back instantly while the memory is fresh in your mind. Reality often differs from what we remember, but a recording doesn't lie. Replay is your personal teacher that tells you the truth and helps you improve your skills.
Symphonic Orchestra recordings present a formidable challenge. You've probably noticed the forest of microphones for live broadcasts. Sonic Presence eliminates this complexity. Recording an orchestra is as simple as finding a good seat 6 to 10 rows from the conductor. Hook the SP15 on your ears and press "record." You'll capture the full dynamic range of the performance from the delicate sound of the wood winds to the thunder of the percussion and brass. It's like being there!
3. Connecting the SP15 to iOS Devices
The SP15 uses the industry standard USB-C plug to connect to your iOS device. A short male to male cable is included that plugs directly into the USB-C port on the current generation of iPads. Apple has not upgraded the iPhone to directly support USB-C as of this writing.
iPhones use a proprietary “Lightning” connector. Apple began using this 8-pin connector in September 2012 with the introduction of iPhone 5. You must use the Apple USB “Camera Adapter” to convert from USB-C to Lightning. The cable that comes with the iPhone is a USB-C to Lightning “Power Charging” cable, which does not support external accessories.
We advise you to use Apple's USB Camera Adapter. While there are other adapter cables available on the market that may seem more cost effective, many of them are not suitable for use with high performance Apps.
4. Digital Audio File Formats Table
| Quality | Ultra | High | CD | Good | Fair |
| Sampling | 96kHz | 48kHz | 44.1kHz | 44.1kHz | 44.1kHz |
| Word Size | 24bit | 24bit | 16bit | 16bit | 16bit |
| Format | PCM | PCM | PCM | AAC | MP3 |
| Bit Rate | 4,608kbps | 2,304kbps | 1,411kbps | 320kbps | 128kbps |
5. iOS App Comparison Table
| Apple IOS Audio Recording Apps | Video Apps with USB Sound | |||||||||
| Motiv | Twisted Wave | Røde | Garage Band | VR Pro 7 | Apple Camera | Motiv Video | ProMovie | Filmic Pro | ||
| Operation | Intermediate | Advanced | Intermediate | Intermediate | Intermediate | Basic | Intermediate | Intermediate | Advanced | |
| USB Device Indicator | Y | N | N | Y | Y | N | Y | Y | Y | |
| Mic Volume Control | Y | Y | Y | Y | Y | N | Y | Y | N | |
| Meters | ||||||||||
| Visibility | excellent | excellent | small | good | good | NA | excellent | fair | good | |
| Calibrated | Y | Y | N | Y | Y | NA | Y | N | N | |
| Accuracy | excellent | excellent | good | good | poor | NA | excellent | good | good | |
| PPM | Y | Y | Y | N | Y | Y | Y | Y | Y | |
| VU | N | N | Y | Y | Y | N | N | N | N | |
| Sampling Frequencies | ||||||||||
| 96kHz | N | Y | N | N | Y | N | N | N | Y | |
| 48kHz | Y | Y | Y | N | Y | N | Y | Y | Y | |
| 44.1kHz | Y | Y | Y | Y | Y | Y | Y | Y | Y | |
| Others | N | Y | Y | N | Y | N | Y | N | N | |
| Word Size in bits | 24 | 24/32 | 24 | 16 | 16/24 | 16 | 16 | 16 | 16 | |
| Transport Controls | Medium | Small | Large | Small | Large | Small | Small | Small | Small | |
| Timecode Display | Y | Y | Y | Ruler | Y | N | Y | Y | Y | |
| Digital File Types | ||||||||||
| WAV/PCM | Y | Y | Y | N | Y | N | Y | Y | Y | |
| AAC | Y | Y | Y | N | Y | Y | Y | Y | Y | |
| MP3 | Y | Y | N | Y | N | N | N | |||
| Others | Y | Y | AIFF | Y | N | N | N | |||
| File Export to Cloud | Y | Y | Y | Y | Y | Y | Y | Y | ||
| Waveform Display | Y | Y | Y | Y | N | N | Y | N | N | |
6. Recommended Audio and Video Apps for iOS
The following Apps record stereo sound on iOS devices using Sonic Presence's SP15 Spatial Microphone. This manual describes each App's functions for making an original Audio Recording. Many of the Apps have additional signal processing functions (editing, equalization, dynamics) that are not addressed here. For details about these functions, please consult each App's Instruction Manual. We give you the URL for each developer's website where you can find additional information.
Each App is the creation of an individual developer. There are no industry standards for audio recording on mobile devices, so you'll find the User Interface (UI) as well as the signal processing vary widely between Apps. Some Apps will hijack control of Sonic's internal Digital Signal Processing (DSP) in unexpected ways. We'll try to point these out in the following descriptions of each App.
One function we find very handy is the “lock screen” button. It’s the button on the top right edge of your iPhone also called the Power Button. When any of these Audio Apps are running, pressing “lock screen” will lock all controls and shut off the screen. The Audio App keeps running. You can put the phone in your pocket and not have to worry about accidentally hitting a wrong button. To exit “lock screen” mode, hit the “Home” button. That will return you to the Audio App screen.
The International standard for testing microphone output level is 94dB Sound Pressure Level (SPL), which is equal to a pressure of 1 Pascal. That is loud! When we do our final testing of the Sonic Presence Spatial Microphones however, we do it at an even higher level of 120 dB SPL. That is as loud as it gets at a heavily amplified Rock Concert. Our reason for this choice is to guarantee you will not have any distortion caused by the microphone. If there is distortion in your recording, it's because the App's Mic Volume (Input Level) is not set correctly.

You set the Mic Volume by watching the colors displayed on the meter scale. You want to set the Volume, so the meters show green most of the time, yellow some of the time, and red only once in a while when the sound reaches its peak loudness.
6a. Voice Memos
Audio Recording App – sampling frequency 48kHz, Apple Lossless and AAC files
www.apple.com
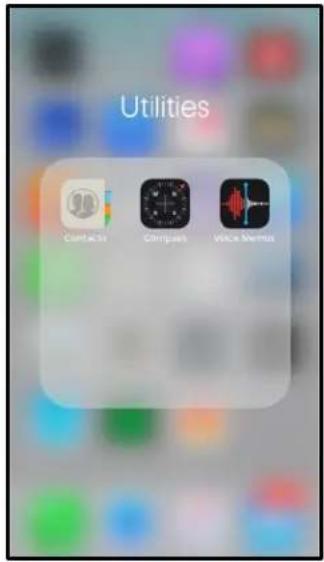
Voice Memos is a very simple and easy to use App that comes installed on every iPhone. You find this App in the iPhones "Utilities" folder. It's intended for mono recording with the built-in mic, however when you plug-in the SP-15 Spatial Microphone, it records in Stereo.
text_image
Utilities Contacts Compass Vika MemusThe Voice Memos main screen has one button: Record. It's bright red. Push it to start recording. Push again to stop recording. The file is automatically saved and tagged with your location. You playback directly from the file list. Just select the file and the player pops up.
text_image
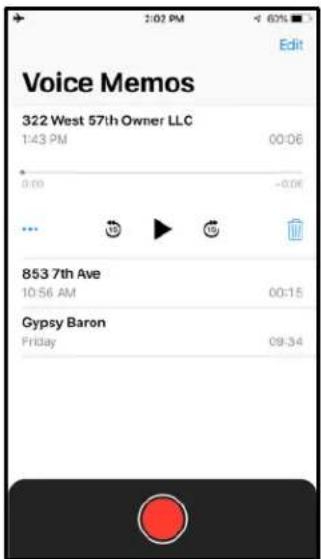
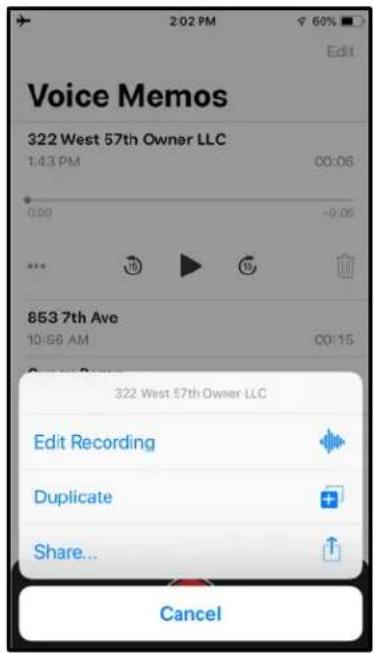
Voice Memos 322 West 57th Owner LLC 1:43 PM 00:06 * 0:00 -0.06 ... 853 7th Ave 10:56 AM 00:15 Gypsy Baron Friday 09:34Pushing the three dots (...) opens a menu to Edit, Duplicate or Share. The Share menu gives you a wide range of choices for exporting the file and sending it to other Applications on your phone.
text_image
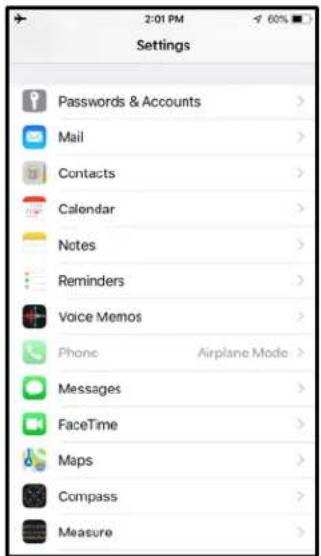
Voice Memos 322 West 57th Owner LLC 1:43 PM 00:06 -0:06 853 7th Ave 10:56 AM 00:15 322 West 57th Owner LLC Edit Recording Duplicate Share... CancelThe Apps default setting records files in the AAC format. It is 48kHz sample rate with 128kbit compressed quality. That's OK for voice memos, but for Music you want something much better. If you go to the iPhone "Settings", you'll find a menu under the Voice Memo icon where you can switch from "Compressed" to "Lossless". Now your recordings will be very high quality in the Apple Lossless format, which is comparable in quality to .wav files.
text_image
Settings Passwords & Accounts > Mail > Contacts > Calendar > Notes > Reminders > Voice Memos > Phone Airplane Mode > Messages > FaceTime > Maps > Compass > Measure >Unfortunately, this App has no indication that the source is your SP15, nor is there any way to control the Input volume. The SP15 is calibrated to record maximum level at a Sound Pressure Level of 120dB. That's very loud, almost painful. You'll make really good sounding recordings with this App in most situations and it's so simple to use.
6b. ShurePlus™ Motiv Audio
Audio Recording App – sampling frequency 44.1/48kHz, 16 or 24-bit output file size
www.shure.com
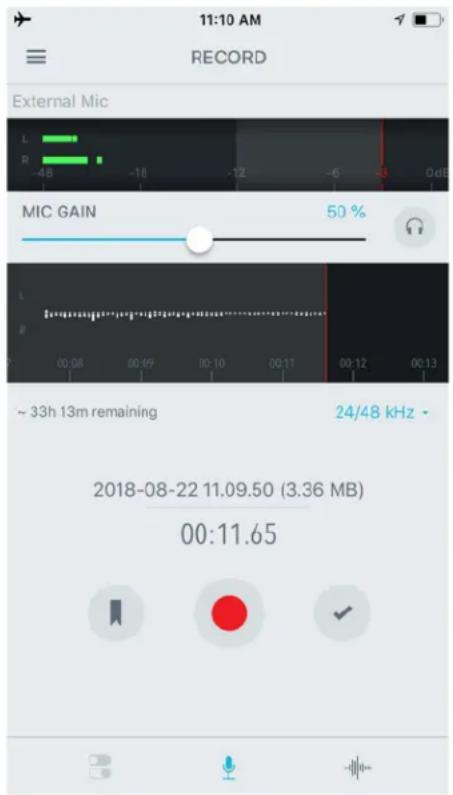
ShurePlus™ Motiv is a clear, straight forward App for recording stereo audio. The main screen has the basic transport controls, a simple waveform display of the audio track and easy to read level meters. There is a clear indication at the top of the screen whether the source is External Mic (Sonic VR15 USB-C) or Built-in Mic. When the input is External Mic the meter will show the left channel (top bar) and right channel (bottom bar). Located below the meters is the MIC GAIN. If you don't see this slider control, then do this:
IMPORTANT:
FIRST: plug the USB Camera Adaptor Cable into your iOS device.
SECOND: plug the SP15 into the Camera Adaptor Cable.
THIRD: launch the App. Following this procedure will ensure your device recognizes the SP15.
text_image
11:10 AM RECORD External Mic L R -48 -18 -12 -6 3 00:00 MIC GAIN 50 % 00:08 00:09 00:10 00:11 00:12 00:13 ~ 33h 13m remaining 24/48 kHz - 2018-08-22 11.09.50 (3.36 MB) 00:11.65The MIC GAIN should be set to 50% when the App starts up. That's the nominal setting for the SP15 so when the meter registers the top red led, the level is 120dB SPL. Located just below the waveform display on the right is the sampling rate selector. It toggles between 16 and 24-bits and 44.1 and 48kHz. The recording file format is .wav. There is a utility for converting the .wav file to .aac after the recording is finished. Operation of this App is very simple: You push the red
"Record" button to start recording. Push the "Pause" button to stop recording. Push the "Check" button to save your recording. That's it!
USB Mic Input control not showing
The USB interface sometimes gets confused trying to figure out what controls are available. This is particularly true when you switch between Apps. Best practice is to make sure you close all Apps that may be running in background. Once you do that, restart your choice App. The Mic Input should appear correctly. If not, do this:
FIRST: plug the USB Camera Adapter Cable into your iOS device. SECOND: plug the SP15 into the Camera Adapter Cable. THIRD: launch your choice App.
text_image
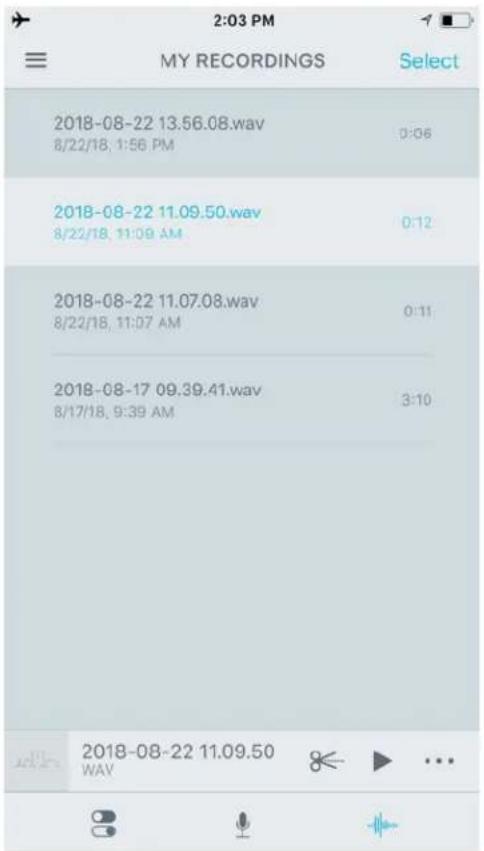
2:03 PM MY RECORDINGS Select 2018-08-22 13.56.08.wav 8/22/18, 1:56 PM 0:06 2018-08-22 11.09.50.wav 8/22/18, 11:09 AM 0:12 2018-08-22 11.07.08.wav 8/22/18, 11:07 AM 0:11 2018-08-17 09.39.41.wav 8/17/18, 9:39 AM 3:10 2018-08-22 11.09.50 WAVPressing the MY RECORDINGS button at the bottom right of the screen shows the library of recorded files. Select a track from the menu and push the PLAY button on the bottom right of the screen. You can also press the "scissors" icon to show a waveform display, which allows you to position the play cursor anywhere in the track. The meters do not function in playback mode.
Our Meter check and Level testing (see Section 7) reveal the following:
The meter scale calibration is a tapered log scale, which is very useful for monitoring the recording level. The two red segments indicate a 3dB range, which borders on the maximum level before distortion. The yellow segments show the signal level between -12 and -3 where the normal level peaks should register. The green segments show the levels below -12dB where the average signal levels should lie.

bar
| Value | |---| | -24 | | -18 | | -12 | | -6 | | -3 | | 0dB |This App's audio processing is very linear with no signal compression. The table shows the playback output signal tracks the input exactly and conforms to the level displayed by the meters when making the recording.
| Motiv | ||||||
| scale | green | green | green | yellow | yellow | red |
| scale marking | -48 | -18 | -12 | -6 | -3 | 0 |
| generator mV rms | 6 | 17 | 35 | 50 | 70 | |
| calculated level in dB | na | -21.3 | -12.3 | -6.0 | -2.9 | 0 |
| PB level dB(analog) | na | -18 | -12 | -6 | -3 | 0 |
| reference acoustic level | 94dB SPL | 120dB SPL | ||||
The Audio Gain control is calibrated from 0% to 100%. We measured the actual gain/attenuation in dB with a reference of 0dB at the center or 50%. As you can see there is a wide range of adjustment. We recommend you stay within plus or minus 12dB to avoid distortion.
| Motiv Mic Gain | |||||||
| Scale 0% 20% | 40% 50% 60% | 80% 100% | |||||
| Gain dB | -30 | -20 | -10 | 0 | +10 | +20 | +30 |
6c. Apogee MetaRecorder(coming soon)
6c. TwistedWave
Audio Recording App – sampling frequency up to 96kHz, 24-bit output file size.
www.twistedwave.com
IMPORTANT:
FIRST: plug the USB Camera Adaptor Cable into your iOS device.
SECOND: plug the SP15 into the Camera Adaptor Cable.
THIRD: launch the App. Following this procedure will ensure your device recognizes the SP15.
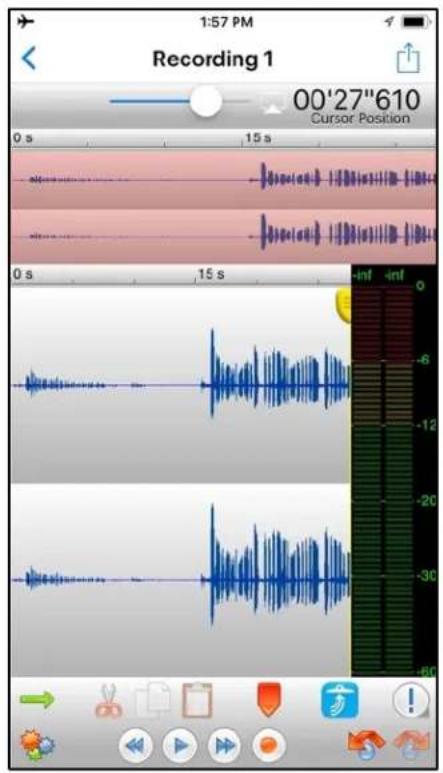
TwistedWave's Main Screen shows waveform displays, large meters, transport buttons at the bottom of the screen and the time code display at the top.
text_image
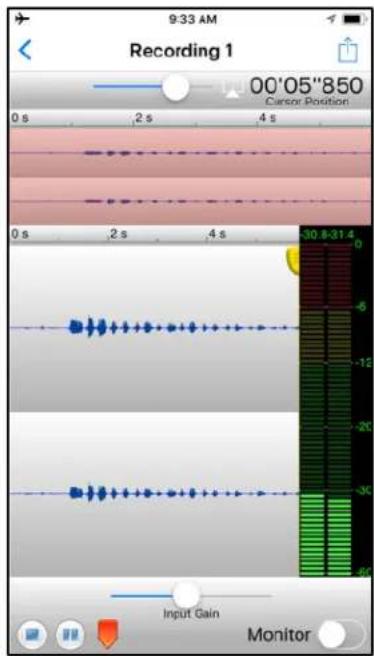
Recording 1 00'27"610 Cursor Position 0 s 15 s 0 s 15 s inf inf 0 -6 -12 -20 -30 -60 → ← → → → → → → → → → → → → → →The meters do not monitor the Microphone Input until you start recording, so the best way to set recording levels is to hit "Record" (red button) and then immediately hit "Pause". This puts the App in Input Monitor Mode. An Input Gain (Mic Volume) control appears at the bottom of the screen. You can now adjust your Recording Level using the meters as your guide. The Input Gain control is not calibrated, so there is no reference point for repeating exact levels. However, the meters in this App are easy to read and are remarkably accurate. Once you have the signal level adjusted properly, hit "Pause" again to start Recording.
text_image
9:33 AM Recording 1 00'05"850 Cancer Position 0 s 2 s 4 s 0 s 2 s 4 s 30.8-31.4 -6 -12 -20 -30 -40 Input Gain MonitorWhen starting a New Recording, the following screen pops up, so you can select the sampling frequency and track format.
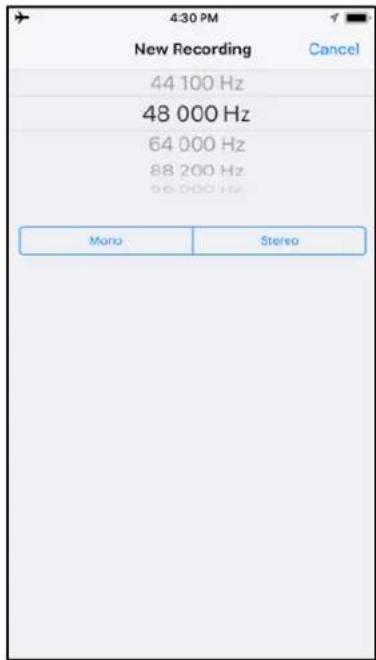
text_image
4:30 PM New Recording Cancel 44 100 Hz 48 000 Hz 64 000 Hz 88 200 Hz 96 000 Hz Mono StereoYou access the Settings menu from the Main Screen by pressing the "Gear" icon. Set the App to record 32-bit temporary files These files will be stored internally. Later, you can process them to 24-bit or 16-bit when you output the file in its final format.
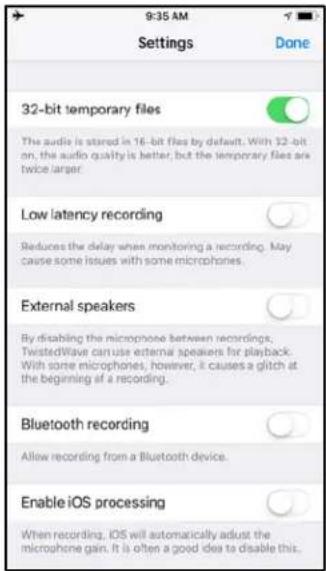
text_image
9:35 AM Settings Done 32-bit temporary files The audio is stored in 16-bit files by default. With 32-bit on, the audio quality is better, but the temporary files are twice larger. Low latency recording Reduces the delay when monitoring a recording. May cause some issues with some microphones. External speakers By disabling the microphone between recordings, TwistedWave can use external speakers for playback. With some microphones, however, it causes a glitch at the beginning of a recording. Bluetooth recording Allow recording from a Bluetooth device. Enable iOS processing When recording, iOS will automatically adjust the microphone gain. It is often a good idea to disable this.The choice of file type and word size in bits, is set in the Export File menu. You access the menu by pressing the Export icon located at the upper right of the Main Screen. The Export menu allows you to send files by email or cloud services using the Wi-Fi network connection. Pressing "Format" on the Export menu brings up this screen:
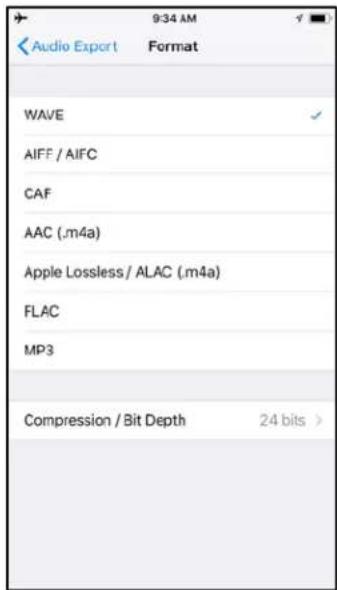
text_image
9:34 AM Audio Export Format WAVE AIFC / AIFC CAF AAC (.m4a) Apple Lossless / ALAC (.m4a) FLAC MP3 Compression / Bit Depth 24 bits >WAV, AIFF, CAF are all linear formats with no compression of the data. ALAC and FLAC are lossless, compressed formats, while AAC and MP3 are compressed data formats. The last item on the menu allows you to set Compression and Bit Depth.
Meter Check and Level Test
We made the tests with the "Input Gain" set to the center of the slider. We recommend this gain setting as a good starting point. Our acoustic signal generator calibrated to 114dB.SPL registers "-10" on the meter display. That same source set to 94dB SPL registers -30 on the meters. This confirms the App responds linearly to a change in level, which means that changes in the Output Level accurately follow changes in the Input Level. There is no compression effect due to signal processing.
The meter's scale markings are calibrated in dB. Our electrical measurement confirms these meters are 100% accurate. The red scale is 0dB to -6dB, the yellow -6dB to -12dB and the green scale is from -12dB down to infinity.
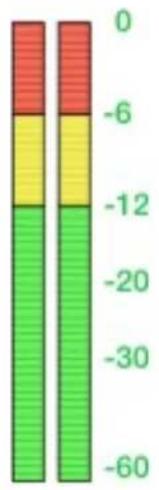
bar_stacked
| Category | Red Segment | Yellow Segment | Green Segment | |---|---|---|---| | Top Left | -4 | -7 | -12 | | Top Right | -4 | -7 | -12 | | Bottom Left | -3 | -8 | -12 | | Bottom Right | -3 | -8 | -12 |Twisted Wave Level Meters
The “Input Gain” for this App sets the Recording Level. The gain is unity or 0dB when the slider is in the center position. We’ve calibrated the VR15-USB, so it can record sounds up to 120dBSPL without distortion when the slider is set to the center position. You can choose to move the slider, cautiously, to increase or decrease the Recording Level. Moving the slider to the right will increase the level by up to 30dB, while moving it to the left will decrease the level down to -30dB. We strongly suggest you leave the Input Gain in the center position most of the time. If the sound is extremely loud, a slight nudge to the left is all that’s needed. Same rule of thumb for softer sounds. A slight nudge to the right is all that’s needed.
| Twisted Wave Mic Volume | |||||||
| Scale | --- | -- | - | center | + | ++ | +++ |
| Gain dB | -30 | -20 | -10 | 0 | +10 | +20 | +30 |
This table shows the detailed test results for this App's performance.
| Twisted Wave Mic Volume = center | ||||||
| scale | green green | green green | yellow red | |||
| scale marking | -60 -30 -20 | 12 -6 0 | ||||
| generator mV rms | na | 6 | 19 | 49 | 95 | 190 |
| calculated level in dB | na | -30.0 | -20.0 | -11.8 | -6.0 | 0 |
| PB level dB(analog) | na | 30 | 20 | 12 | 6 | 0 |
| reference acoustic level | 94dB SPL | 120dB SPL | ||||
6d. GarageBand
Audio Recording App – sampling frequency 44.1kHz, output files in compressed format.
www.apple.com
text_image
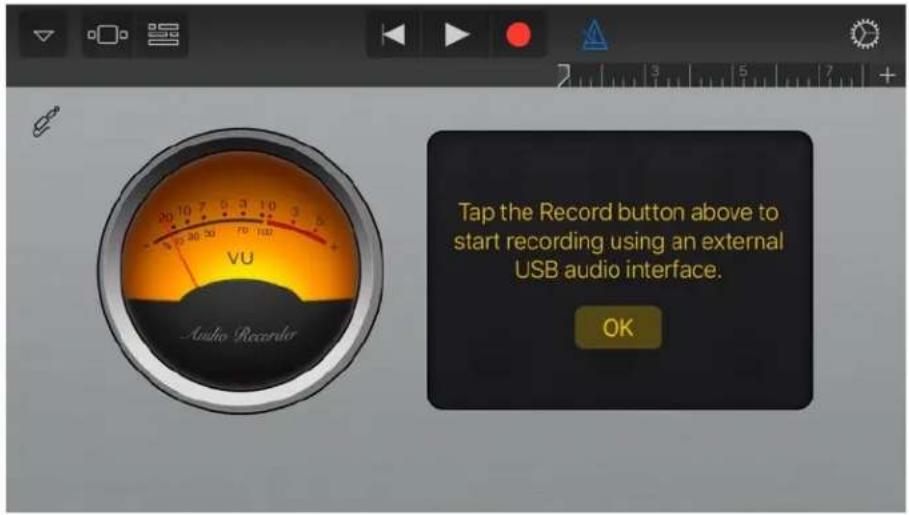
Tap the Record button above to start recording using an external USB audio interface. OKGarageBand for iPhone has a very clean Main Screen layout, but with limited controls. There are no controls in GarageBand to set sampling frequency (it's fixed at 44.1kHz) or word size (it's fixed at 16 bits). There's a VU meter that monitors the level of the combined audio channels. The display on the right shows a message confirming the presence of a USB interface. That's our Sonic Presence SP15 microphone that it's detected, although it doesn't say that specifically.
IMPORTANT:
FIRST: plug the USB Camera Adaptor Cable into your iOS device.
SECOND: plug the SP15 into the Camera Adaptor Cable.
THIRD: launch the App. Following this procedure will ensure your device recognizes the SP15.
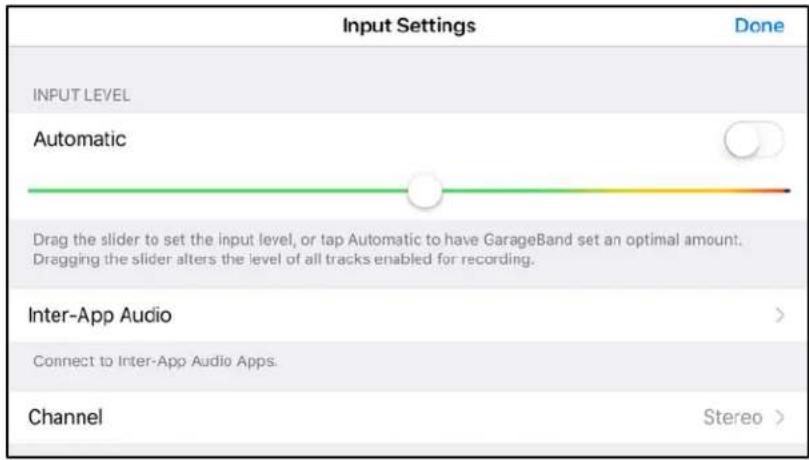
There's an Input Selector icon on the upper left of the Main Screen, that looks like a phone jack. If you click on the phone jack icon, you will see this menu:
text_image
Input Settings Done INPUT LEVEL Automatic Drag the slider to set the input level, or tap Automatic to have GarageBand set an optimal amount. Dragging the slider alters the level of all tracks enabled for recording. Inter-App Audio > Connect to Inter-App Audio Apps. Channel Stereo >This screen shows you the Input Level (Mic Volume) slider control. It's not calibrated, but behind it is a meter showing the recording level with green, yellow and red indications. We set the slider to the mid position, which worked well for our tests.
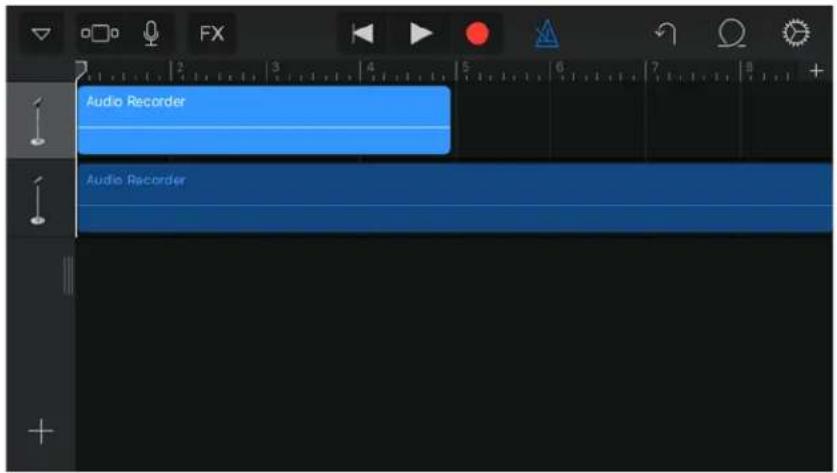
You access this track layout screen by clicking on the “...” icon from the Main Screen. With this App, you can record and overdub multiple tracks although we only used it for Stereo.
text_image
Audio Recorder Audio RecorderThe red LED at the top of the screen indicates when you are in Recording mode. There is no timecode display, but there is a ruler calibrated in musical bars that indicates the relative time position in the track. GarageBand has many built in audio effects such as echo, reverb and EQ.
Meter Check and Level Test
Garage Band's front panel meter appears to be a VU meter, but actually it's not. A standard VU meter would show a red scale of 3dB above zero. Interestingly, our tests reveal that the '+5dB mark is in fact at +3dB. Maybe it is a VU meter!
We set the input level control to the center position, which gave our 120dB SPL acoustic test signal a reading '+5dB on the front meter. You can see from the record and playback readings in the table they follow our generator level very closely. That means this App exhibits good signal linearity, which means that changes in the Output Level accurately follow changes in the Input Level. The meter scale differs somewhat from the test values, but this is due to the positioning of the graphics. In our opinion, this is an accurate meter for setting record levels. The analog output level measured at the headphone jack also shows very good linearity.
| GarageBand Mic Volume = center | |||||||
| scale | yellow yellow | yellow yellow | yellow red red | ||||
| scale marking | -20 -15 -10 | -6 0 +3 +5 | |||||
| generator mV rms | 8 | na | 26 | 60 | 120 | 145 | 170 |
| calculated level in dB | 26.5 | na | 16.3 | 9.0 | 3.0 | 1.4 | 0 |
| PB level dB(analog) | -27 | na | -16.5 | -9.2 | -3.2 | -1.5 | 0 |
| reference acoustic level | 94dB SPL | 120dB SPL | |||||
6e. R∅DE
Audio Recording App – sampling frequency 44.1/48kHz, output file 24-bits resolution.
www.rode.com
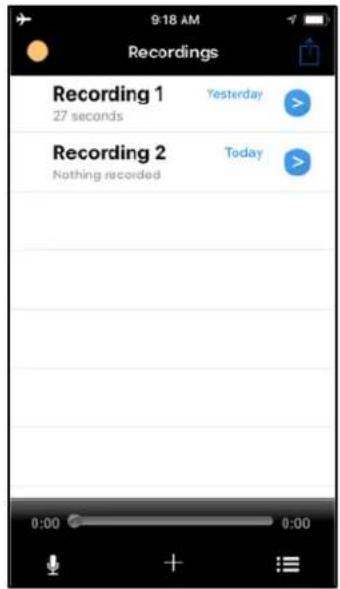
The Initial Screen for the Røde App is actually your library of Recordings. To make a new recording, click on the microphone icon at the bottom left of the screen.
text_image
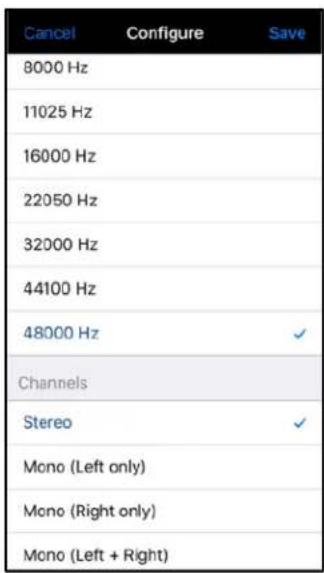
9:18 AM Recordings Recording 1 27 seconds Recording 2 Nothing recorded Yesterday Today 0:00 0:00Here you see the Configure Screen where you can select the sampling frequency from 8kHz to 48kHz. You also have the option to select mono or stereo modes. The bit depth for the recording is fixed at 24 bits.
text_image
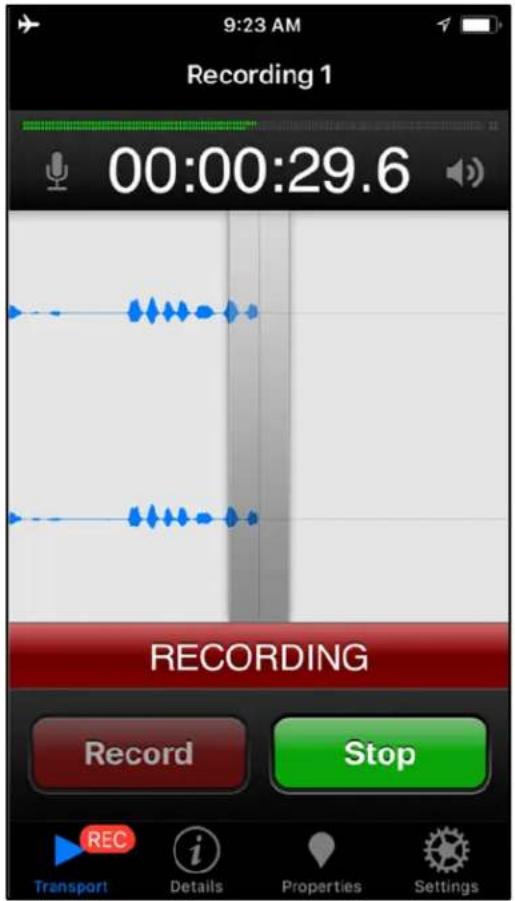
Cancel Configure Save 8000 Hz 11025 Hz 16000 Hz 22050 Hz 32000 Hz 44100 Hz 48000 Hz Channels Stereo Mono (Left only) Mono (Right only) Mono (Left + Right)The Main Screen of the Røde App features a clean layout with audio meters at the top, just above the time code display. The waveform monitor is in the middle of the screen with big buttons for transport control at the bottom. The meters are a bit small, but they do show both tracks of the stereo signal. The meters are in Monitor Mode, so you can see your input levels immediately without hitting Record. These meters use the K scale. You can switch them to K12, K14 and K20. For more info on Bob Katz and K scales see: https://en.wikipedia.org/wiki/K-system.
text_image
9:23 AM Recording 1 00:00:29.6 RECORDING Record Stop REC i Transport Details Properties SettingsIMPORTANT:
FIRST: plug the USB Camera Adaptor Cable into your iOS device.
SECOND: plug the SP15 into the Camera Adaptor Cable.
THIRD: launch the App. Following this procedure will ensure your device recognizes the SP15.
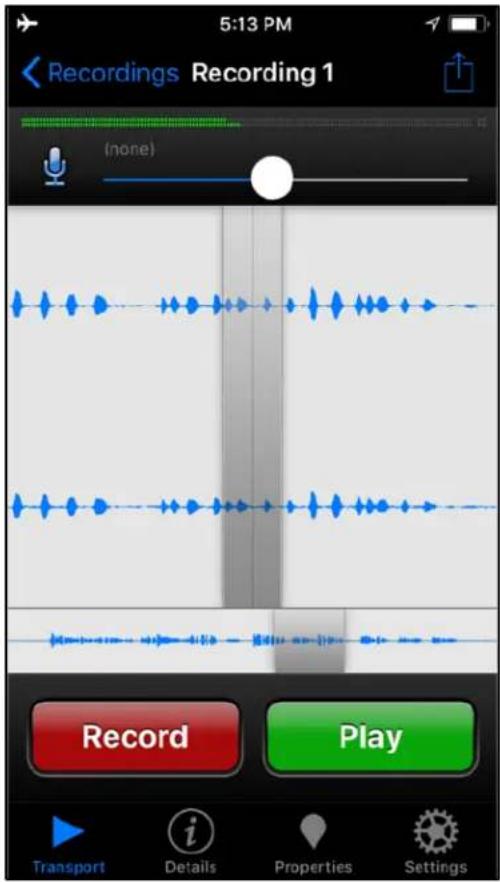
The Mic Volume control appears when you press the microphone icon to the left of the time code display.
text_image
5:13 PM Recordings Recording 1 (none) Record Play Transport Details Properties SettingsWe suggest you start with the Mic Volume set to its mid position just to the right of the cursor. (see screen photo). That's the setting we used for our tests with good results. You adjust the signal level with the slider control using the meters as your guide. Here is a graphic to illustrate the settings we used in our tests. The center of the range aligns just to the right of the waveform display's cursor. Here we show three relative gain settings.
0 + ++ +++

We found that the 0-gain setting near the center works best for recording live music concerts. You can use the + and ++ gain settings for recording voice or softer, acoustic instruments. The setting +++ should be used with caution because it can cause distortion due to clipping. The control is not calibrated, so there is no reference for repeating exact levels, although the App remembers your last setting.
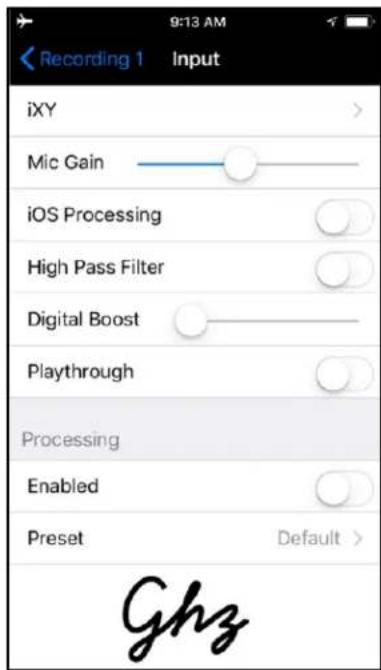
You access the full menu of controls by pressing the "gear" icon at the bottom right of the App's Main Screen.
text_image
Recording 1 Input iXY Mic Gain iOS Processing High Pass Filter Digital Boost Playthrough Processing Enabled Preset Default > GhzOn the Control Screen you see many functions in addition to the Mic Gain (Input Level) control. Be sure to turn the “iOS Processing” to OFF. This is a type of Automatic Level processing that compresses the audio signal often in undesirable ways. Note: “Digital Boost” is actually the Playback Level. This control does not have an effect on the Record Level. Unfortunately, there is no indication of whether the Input selection is set to Sonic Presence. You can double check this selection by observing the main screen meters. When the input is set to Sonic Presence, there are two level meters showing the Left and Right stereo signals.
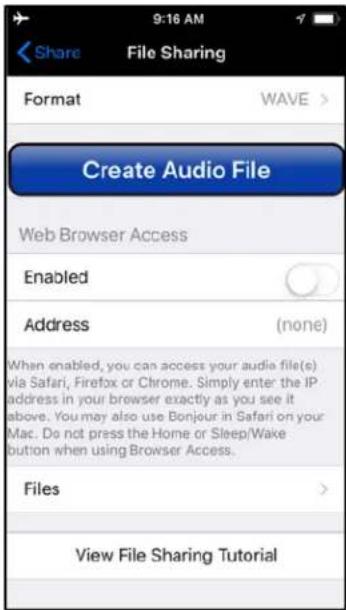
One peculiarity of the Røde App is the way in which you access your files. They are not visible in the iTunes File Finder until you process the file with "Create Audio File". You hit the upload icon on the main screen's upper right to bring up this File Sharing menu.
text_image
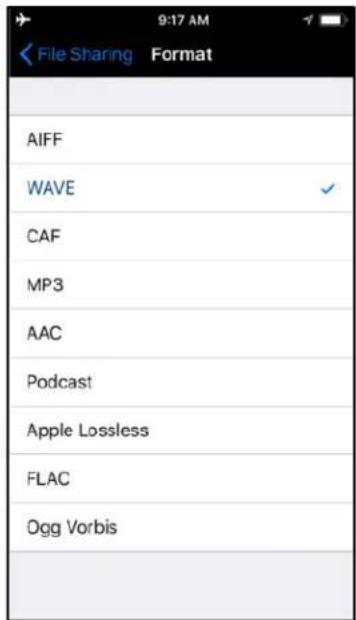
Share File Sharing Format WAVE > Create Audio File Web Browser Access Enabled Address (none) When enabled, you can access your audio file(s) via Safari, Firefox or Chrome. Simply enter the IP address in your browser exactly as you see it above. You may also use Bonjour in Safari on your Mac. Do not press the Home or Sleep/Wake button when using Browser Access. Files > View File Sharing TutorialBefore hitting the Create Audio File, you select the Format. Here are the formats you can choose for your output file.
text_image
File Sharing Format AIFF WAVE CAF MP3 AAC Podcast Apple Lossless FLAC Ogg VorbisYou can repeat the Create Audio File process for each type of file you want to output. Now when you go to the iTunes File Finder, the files will appear in the Røde folder. If you selected the WAV file Format, the shorter files will be WAV, while longer files will be in CAF Format. Don't panic, CAF files are compatible with WAV files.
Meter check and Level Test
We ran our tests with the Mic Volume (Input Gain) set to the center position or "0". We use this gain setting as a reference point. You can see from the following table that the Input Gain is adjustable over a wide range. In fact, the range is too wide for the small size of the slider control. Be cautious when making adjustments, since a slight nudge can make a big change. We strongly suggest you leave the Input Gain in the center position most of the time. If the sound is extremely
loud, a slight nudge to the left is all that's needed. Same rule of thumb for softer sounds. A slight nudge to the right is all that's needed.
| Røde Mic Volume | |||||||
| Scale | --- | -- | - | center | + | ++ | +++ |
| Gain dB | -30 | -20 | -10 | 0 | +15 | +25 | +35 |
Our acoustic signal generator calibrated to 120dB.SPL registers in the red scale on the meter display. That same acoustic generator set to 94dB SPL registers in the mid green scale on the meter display. This confirms the app has a Linear response, which means that changes in the Output Level accurately follow changes in the Input Level.
The meter's scale markings are not calibrated in dB. However, our electrical measurement confirms these meters are 100% accurate to the K scales. This particular one is the K 12 scale. The red scale range is 0dB to -8dB, the yellow -8dB to -12dB and the green scale is from -12dB down to infinity. Here is a graphic with our test calibration marks.

heatmap
| Røde Level Meters K12 Scale | Value | | --------------------------- | ----- | | -48 | Green | | -36 | Green | | -24 | Green | | -12 | Yellow | | -8 | Yellow | | 0 | Red |This table shows the detailed test results for this app's performance.
| Røde | |||||||
| scale | green | green | green | green | yellow | red | red |
| scale marking | na | na | na | na | na | na | na |
| generator mV rms | 5 | 10 | 13 | 20 | 50 | 80 | 160 |
| calculated level in dB | -30.1 | -24.1 | -21.8 | -18.1 | -10.1 | -6.0 | 0 |
| PB level dB(analog) | -32 | -24 | -18 | na | -12 | -8 | -4 |
| reference acoustic level | 94dBSPL | 120dB SPL | |||||
6f. Voice Recorder Pro 7
Audio Recording App – sampling frequency up to 96kHz, output files 24-bit resolution.
www.bejbej.com
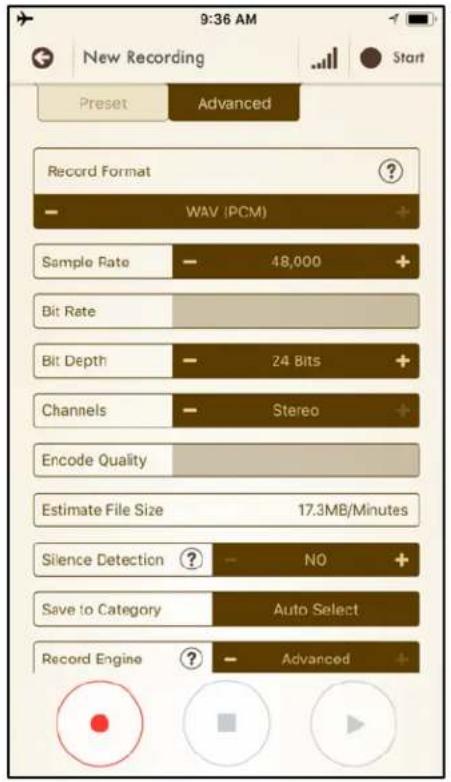
The Main Screen of Voice Record 7 displays all the important settings for this App. Select “Advanced” at the top of the screen to show all the audio settings. You can select Sample Rate, Bit Depth and Channels all from this one screen.
text_image
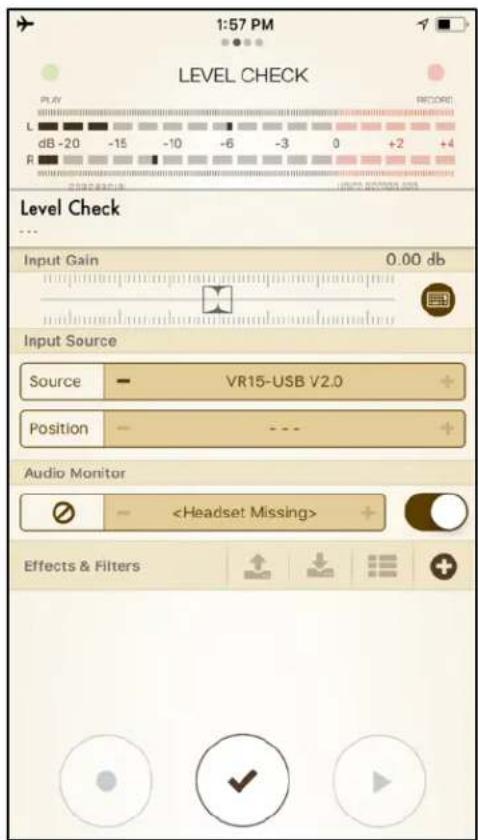
9:36 AM New Recording Start Preset Advanced Record Format WAV (PCM) Sample Rate 48,000 Bit Rate Bit Depth 24 Bits Channels Stereo Encode Quality Estimate File Size 17.3MB/Minutes Silence Detection ? NO + Save to Category Auto Select Record Engine ? AdvancedThe big red button on the bottom left starts the recording. The small "Start" button at the top right also starts recording. The "iill" icon on the upper right brings up the Level Check screen.
text_image
1:57 PM LEVEL CHECK Play RECORD L dB -20 -15 -10 -6 -3 0 +2 +4 R Level Check ... Input Gain 0.00 db Input Source Source VR15-USB V2.0 Position --- + Audio MonitorHere you can see the input Source is set to Sonic Presence. Just above the Input Source you have the Mic Volume slider (Input Gain). You should set this to "0" for most situations. That's the level we chose to calibrate this App for our tests. At the top of the screen are the meters, which are switchable to VU or PPM. This is everything you need to set your levels before pushing Record.
IMPORTANT:
FIRST: plug the USB Camera Adaptor Cable into your iOS device.
SECOND: plug the SP15 into the Camera Adaptor Cable.
THIRD: launch the App. Following this procedure will ensure your device recognizes the VR15 USB-C.
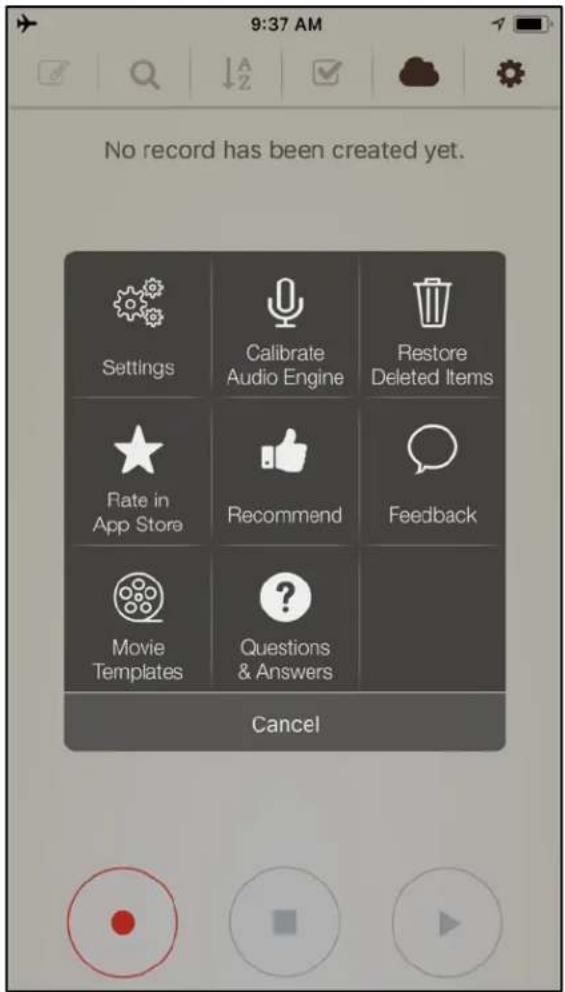
The Voice Recorder Pro 7 App automatically detects and switches to Sonic Presence when you follow our procedure. If you don't see Sonic Presence as the source, try running the "Calibrate Engine" in the Utilities menu. You access this menu by clicking the "gear" icon on the upper right.
text_image
9:37 AM No record has been created yet. Settings Calibrate Audio Engine Restore Deleted Items Rate in App Store Recommend Feedback Movie Templates Questions & Answers CancelMeter check and Level Test
This measurement table shows our test generator's signal levels together with the VRP 7 App's meter readings and the headphone analog output level. We set the Input Gain to "0" for these tests. The headphone analog output level is 6dB below the other iOS Apps we tested. We do not know why this is the case.
| VR 7 Pro Input Gain = 0 | ||||||||||
| scale | grey | grey | grey | grey | grey | grey | grey | grey | red | red |
| scale marking | -10 | -6 | -3 | 0 | +4 | |||||
| generator mV rms | 4 | 7 | 10 | 12 | 18 | 50 | 80 | 120 | 190 | clip |
| calculated level in dB | -33.5 | -28.7 | -25.6 | -24.0 | -20.5 | -11.6 | -7.5 | -4.0 | 0 | |
| PB level dB(analog) | -40 | -35 | -32 | -30 | -27 | -18 | -14 | -10 | -6 | |
| reference acoustic level | 94dB SPL | 114dB SPL | ||||||||
The following graphic shows the meter scale for the VRP 7 App. The meter markings shown beneath the scale in normal type are taken from the App's display. Our measurements are shown in italics above the scale. There are significant discrepancies, which explains why we had difficulties setting our recording levels with this App.

bar
| Position | Value | |---|---| | -20 | -15 | | -18 | -10 | | -12 | -6 | | -6 | -3 | | -3 | 0 | | -2 | +2 | | 0 | +4 |The Input Gain in this App is actually calibrated, and you can set it with the slider or you can key in a number. That's a really nice feature, except the gain varies wildly from what you set. For example, setting gain to +3 gave us gain of +10dB. Reducing the gain to -3 gave us a gain of -10dB. Be careful using this Input Gain control. Small changes result in big variations that can cause distortion. Here is a table showing our gain measurements.
| VR 7 Mic Volume | |||||||
| Scale | -10 | -6 | -3 | 0 | +3 | +6 | +10 |
| Gain dB | -26 | -20 | -10 | 0 | +10 | +18 | +30 |
There's a lot to like with this App's especially the User Interface. However, the meters are inaccurate, and we found the Input Gain setting is very inconsistent. Variations of 6 to 10dB happen for no apparent reason. We also encountered unexpected shifts in the balance between channels sometimes by as much as 20dB.
Caution: these gain changes and channel imbalances can happen randomly by just stopping and starting the recording. We found that the best way to cure them is to shut down the App and start it up again.
6g. ShurePlus Motiv™ Video
Video App with Sound Recording – Sample rate 44.1 & 48kHz, WAV and AAC file formats
www.shure.com
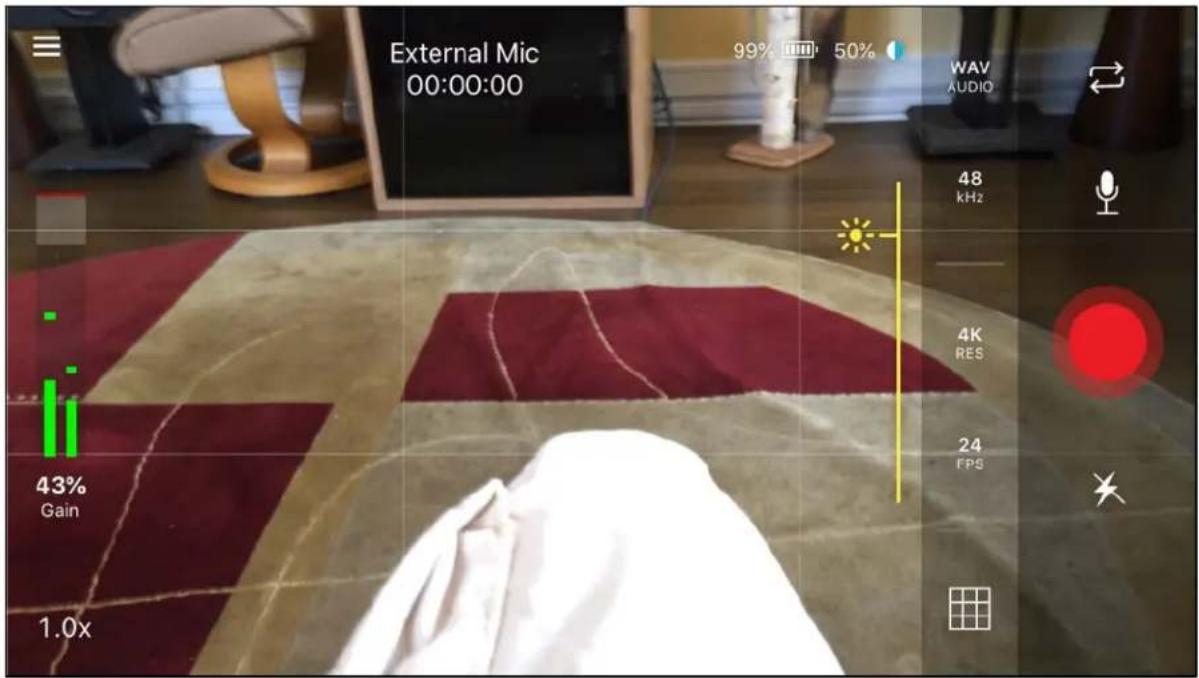
ShurePlus Motiv™ Video is a straight forward, easy to use video App with great audio features. Here is the main screen:
text_image
External Mic 00:00:00 99% 50% WAV AUDIO 48 kHz 4K RES 24 EPS 1.0xThere are controls for adjusting picture contrast, exposure resolution and so on. To understand these Video Control functions, refer to the App's manual. This manual focuses on the options for audio.
The first feature that catches our attention is the audio level meters on the left side of the screen. They are clearly visible while shooting video and just below the meters is the input gain setting. If the setting indicates AGC, then do this:
IMPORTANT:
FIRST: plug the USB Camera Adapter Cable into your iOS device.
SECOND: plug the SP15 into the Camera Adapter Cable.
THIRD: launch the App. Following this procedure will ensure your device recognizes the SP15
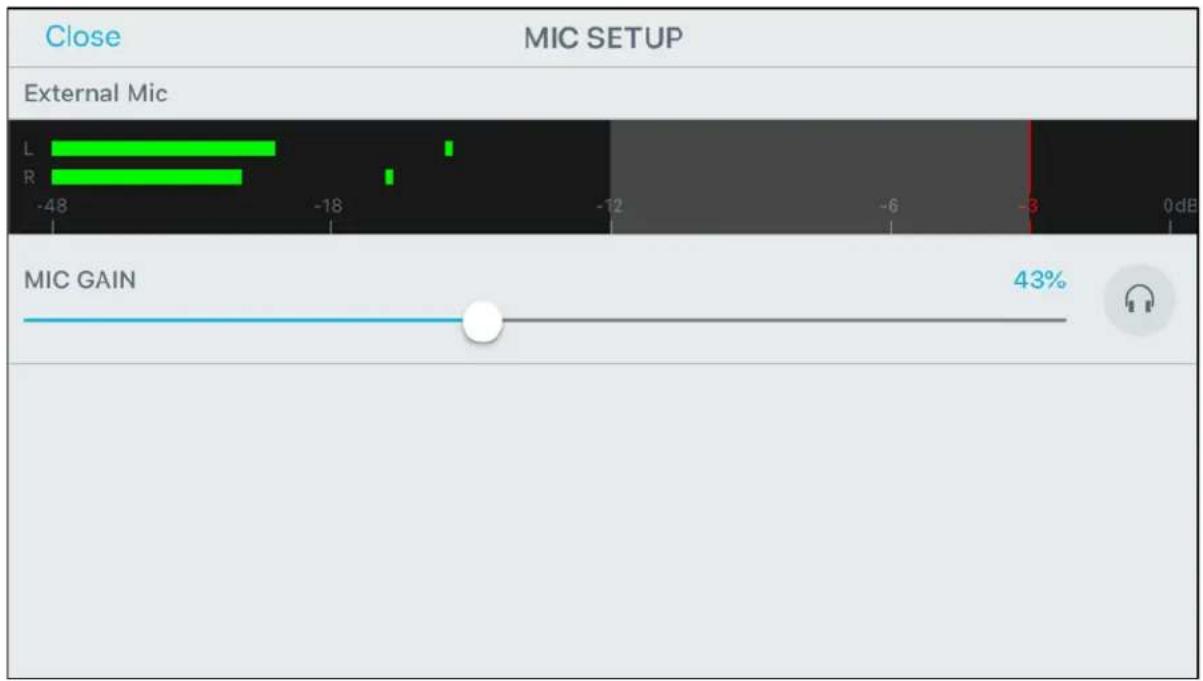
You see the message "External Mic." at the top center of the screen. Below that is the time code. On the right side of the screen are settings for audio file type, audio sample frequency, video resolution and frame rate. Slightly further to the right is a Microphone icon. Pressing that brings up this screen:
bar
| Category | Value | | -------------- | ----- | | External Mic | -48 | | L | -18 | | R | -12 | | MIC GAIN | 43% |You see “External Mic.” Indicated at the top and the large audio level meters. Below the meters is the Input level control. It should initially be set to 50%, which is the calibrated level of the SP15. That level is set so that 0dB on the meter scale is equal to a level of 120dB SPL.
Meter check and Level Testing
The meter scale calibration is a tapered log scale, which is very useful for monitoring the recording level. The two red segments indicate a 3dB range, which borders on the maximum level before distortion. The yellow segments show the signal level between -12 and -3 where the normal level peaks should register. The green segments show the levels below -12dB where the average signal levels should lie.

bar
| Position | Value | |---|---| | 1 | 24 | | 2 | 18 | | 3 | 12 | | 4 | 6 | | 5 | 3 | | 6 | 0dB |This App's audio processing is very linear with no signal compression. The table shows the playback output signal tracks the input exactly and conforms to the level displayed by the meters when making the recording.
| Motiv | ||||||
| scale | green | green | green | yellow | yellow | red |
| scale marking | -48 | -18 | -12 | -6 | -3 | 0 |
| generator mV rms | 6 | 17 | 35 | 50 | 70 | |
| calculated level in dB | na | -21.3 | -12.3 | -6.0 | -2.9 | 0 |
| PB level dB(analog) | na | -18 | -12 | -6 | -3 | 0 |
| reference acoustic level | 94dB SPL | 120dB SPL | ||||
The Audio Gain control is calibrated from 0% to 100%. We measured the actual gain/attenuation in dB with a reference of 0dB at the center or 50%. As you can see there is a wide range of adjustment. We recommend you stay within plus or minus 12dB to avoid distortion.
| Motiv Mic Gain | |||||||
| Scale 0% 20% 40% 50% 60% 80% 100% | |||||||
| Gain dB -30 | -20 | -10 | 0 +10 | +20 +30 | |||
6h. Apple Camera
Video App with Sound Recording – sample rate 44.1kHz, output file in compressed format. www.apple.com
natural_image
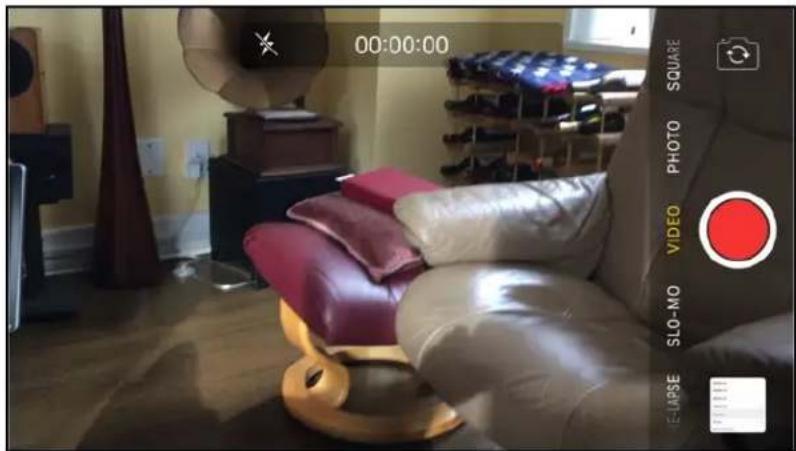
Interior scene of a modern living room with a purple armchair, beige cushions, and a red-lit studio lamp (no readable text or symbols)Here you see the Main Screen of the Apple standard camera App. It's a very simple "point and shoot" App that records sound in stereo using Sonic Presence's SP15 Spatial Microphone. Unfortunately, there is no indication on the screen of any kind that there is sound. There's no meter nor is there any Mic Volume control. The only way to tell if you have stereo audio is to shoot some footage and then play it back on headphones.
IMPORTANT:
FIRST: plug the USB Camera Adapter Cable into your iOS device.
SECOND: plug the SP15 into the Camera Adapter Cable.
THIRD: launch the App. Following this procedure should ensure the Apple Camera recognizes the SP15.
This App has very limited video controls and sometimes exhibits unpredictable behavior for audio. Make sure you put your iPhone in Air Plane mode to avoid disruptions due to phone calls and message notifications.
6i. ProMovie Recorder
Video App with Sound Recording – sample rate 44.1/48kHz, output file in PCM format.
www.promovieapp.com
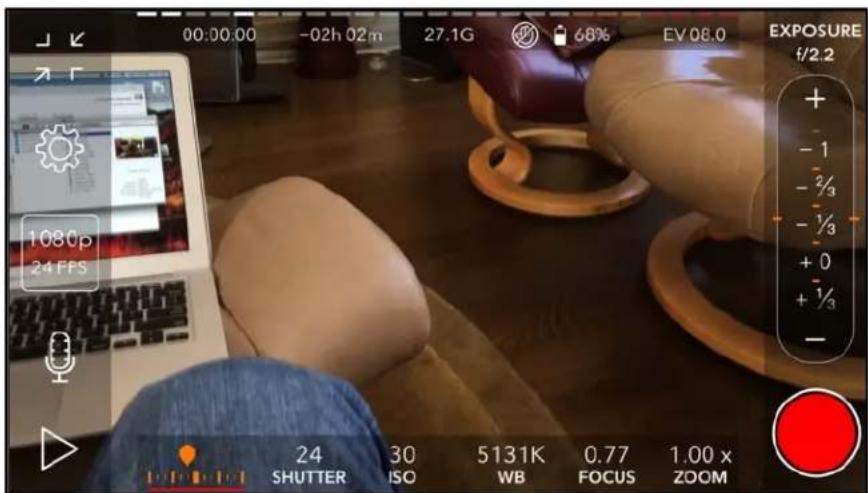
Here you see the Main Screen of the ProMovie Recorder App. There are many controls for adjusting picture contrast, exposure resolution and so on. To understand these Video Control functions, refer to the App's manual. This manual focuses on the options for audio.
Look carefully at the very top of the screen and you'll see some white dashes. That's the audio level meter. It displays the signal level of the combined stereo audio channels. The meter is actually quite precise as you will see from our measurements.
text_image
00:00:00 -02h 02m 27.1G 68% EV 08.0 EXPOSURE f/2.2 + - -1 -3/3 -1/3 +0 +1/3 - 1080p 24 FPS 24 SHUTTER ISO 5131K 0.77 1.00 x WB FOCUS ZOOMThere's a microphone icon on the left side of the screen. Tap the microphone icon and the Audio Controls menu appears.
IMPORTANT:
FIRST: plug the USB Camera Adapter Cable into your iOS device.
SECOND: plug the SP15 into the Camera Adapter Cable.
THIRD: launch the App. Following this procedure will ensure your device recognizes the SP15.
text_image
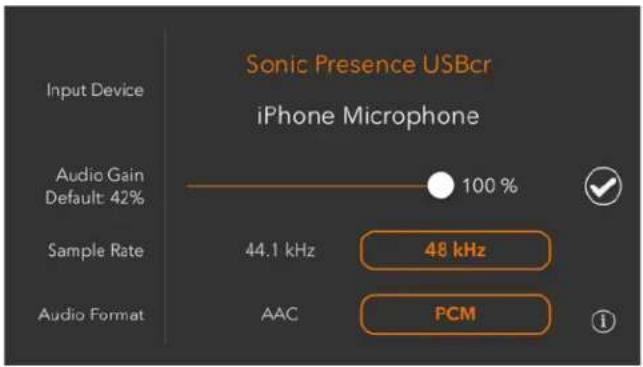
Sonic Presence USBcr iPhone Microphone Input Device Audio Gain Default: 42% 100 % Sample Rate 44.1 kHz 48 kHz AAC PCM Audio FormatYou see the App recognizes the Sonic Presence USB Input Device provided you've followed our procedure. Below the microphone indication is an Audio Gain slider that adjusts the Mic Volume. It's calibrated from 0 to 100% , which is not exactly a pro audio standard, but is sufficient as a reference. Our testing showed the best results when the slider was at 50% . You can select the sampling rate of 44.1kHz or 48kHz. The audio word sample size is fixed at 16-bit. You can select the audio file format. AAC is a compressed file format with a bit rate of 256kbps, while PCM is an uncompressed linear format. Click on the "checkmark" icon to return to the App's main screen.
Meter Check and Level Testing
The Audio Gain control is calibrated from 0% to 100%. We measured the actual gain/attenuation in dB with a reference of 0dB at the center or 50%. As you can see there is a wide range of adjustment. We recommend you stay within plus or minus 6dB to avoid distortion.
| ProMovie | ||||||||
| Scale 10% 25 | 5% 38% 50% | 62% 75% 88% | 100% | |||||
| Gain dB | -26 | -18 | -8 | 0 | +6 | +14 | +22 | +30 |
The audio level meter on the Main Screen of this App is quite accurate. Unfortunately, it does not have any calibration marks to guide you. We set the Audio Gain to 50%, which gave us these dB scale calibration marks. If you keep your peak audio levels in the yellow, you'll get very good sound quality.

text_image
-24 -18 -12 -6 -3 0dBWe also checked the meter level with a calibrated acoustic sound source. It showed -3.0dB at a Sound Pressure Level (SPL) of 120dB. That's loud! We actually calibrate our Sonic Presence mics at this level, so the dynamic range of this App is a good match.
This table shows the relationship between our signal generator, the meter readings and the analog output level of the headphone jack. You can see the linearity is really quite excellent, which means that changes in the Output Level accurately follow changes in the Input Level.
| ProMovie iOS | ||||||
| scale generator mV rms | white | white | white | white | yellow | red |
| 510204080160 | ||||||
| calculated level in dB | -30.1-24.1-18.1-12.0-6.0 | 0 | ||||
| PB level dB(analog) | -32 | -26 | -20 | -14 | -8 | -2 |
| Comment | Clean | |||||
6j. FiLMiC Pro
Video App with Sound Recording – sampling frequency up to 96kHz, output file 24-bit PCM format.
www.filmicpro.com
Here's the Main Screen for the Filmic Pro App for iPhone. Along the bottom of the screen you see some of the video settings. In dead center under the timecode indicator is an Audio Level Meter! It's a stereo meter that shows levels for both stereo audio channels. The meter ballistics are smooth with a peak hold indicator segment.

natural_image
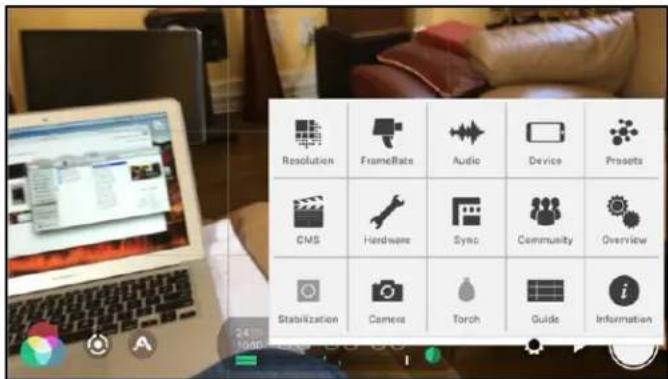
Interior scene with a sofa, coffee table, laptop, and camera interface (no readable text or symbols)Pressing the "gear" to the right of the audio meter opens the Controls Menu. To understand the Video Control functions, refer to the App's manual. This manual focuses on the options for audio.
text_image
Resolution FrameRate Audio Device Prosets CMS Hardware Sync Community Overview Stabilization Camera Torch Guide InformationThe Audio menu select icon is in the top middle row. Pressing this Icon opens another menu.
text_image
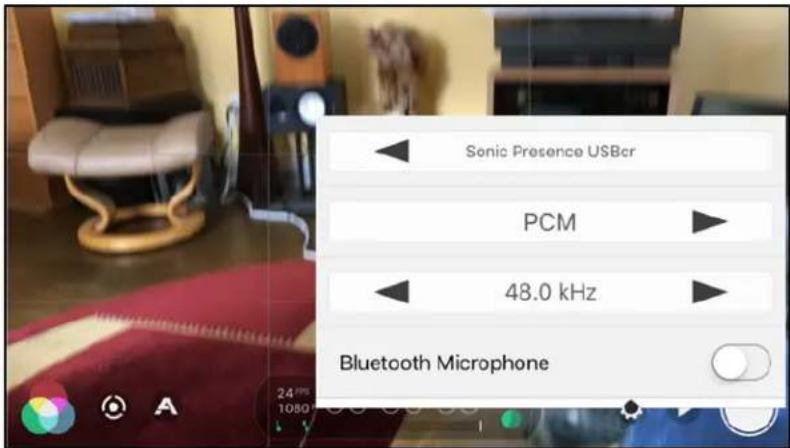
Sonic Presence USBcr PCM 48.0 kHz Bluetooth MicrophoneThe top selector bar indicates which microphone connects to the audio input. In this case it clearly indicates that Sonic Presence is the selected input device.
IMPORTANT:
FIRST: plug the USB Camera Adapter Cable into your iOS device.
SECOND: plug the SP15 into the Camera Adapter Cable.
THIRD: launch the App. Following this procedure will ensure your device recognizes the SP15.
The middle selector shows the selected audio file format, in this case linear PCM. The other file selections are AAC, which is compressed and AIFF, which is an Apple linear file format. Next you can select the sample frequency, which allows up to 96kHz. Caution: We found the audio works best at 44.1kHz and 48kHz. For our tests, 96kHz just made digital noise.
Scroll down and there are more menu options. The “Bluetooth” microphone doesn’t actually exist. Select “Video Only” to return to the era of silent movies. Be sure to switch “Automatic Gain Correction” and “Voice Processing” OFF, since in our testing they actually impair sound quality.
Once you've chosen the audio settings, go back to the Control Menu and select the "Presets" group (top right). Now Save the settings you've chosen to a "Preset" file, one that you name. You must do this, or the App will simply use the default values when it boots up next time.
Meter Check and Level Testing
The stereo meter on the Main Screen shows the audio Input Level. In this case the SP15 microphone. The meter has no calibration marks, but our measurements show the approximate dB values you see on this scale. By keeping the audio peaks in the yellow area, you will get really good sound quality.

heatmap
| Value | |---| | -24 | | -18 | | -12 | | -6 | | 3 | | 0dB |While this App has a meter, there is no way to control the audio input level. We've calibrated the internal level of the VR15-USB so 0dB is equal to 120 dB SPL. That is as loud as it gets at a heavily amplified Rock Concert. If you see the meters hitting Red, then back away. You're damaging your hearing!
Here is our table showing the audio performance. You can see the linearity is really quite excellent, which means that changes in the Output Level accurately follow changes in the Input Level.
| FiLMiC Pro iOS | ||||||
| scale | green | green | green | green | yellow | red |
| generator mV rms | 5 | 10 | 20 | 40 | 80 | 160 |
| calculated level in dB | -30.1 | -24.1 | -18.1 | -12.0 | -6.0 | 0 |
| PB level dB(analog) | -31 | -25 | -19 | -13 | -7 | -1 |
| Comment | Clean | |||||
7. Troubleshooting/FAQ
iOS device does not recognize the SP15
- Unplug the VR15-USB from your iOS device.
- Reboot your iOS device.
- Plug your SP15 back into your iOS device.
- Relaunch your recording App.
USB Mic Input control not showing
The USB interface sometimes gets confused trying to figure out what controls are available. This is particularly true when you switch between Apps. Best practice is to make sure you close all Apps that may be running in background. Once you do that, restart your choice App. The Mic Input should appear correctly. If not, do this:
FIRST: plug the USB Camera Adapter Cable into your iOS device.
SECOND: plug the SP15 into the Camera Adapter Cable.
THIRD: launch your choice App.
Recording has RF interference
RF interference may occur in urban areas. Make sure your device is set to "Airplane Mode".
Left and right channels are reversed
Make sure to put your SP15 Spatial Microphone on the correct ears. Left and Right are marked "L" and "R".
8. Dynamic Range
Our basic design concept for the SP15 was to develop a sound recording device which simulates human hearing as closely as possible. That means it must be capable of operating over an enormous dynamic range without a level adjustment and without distortion. Basically, a “point and shoot” microphone anyone can use to record sound the way they hear it.
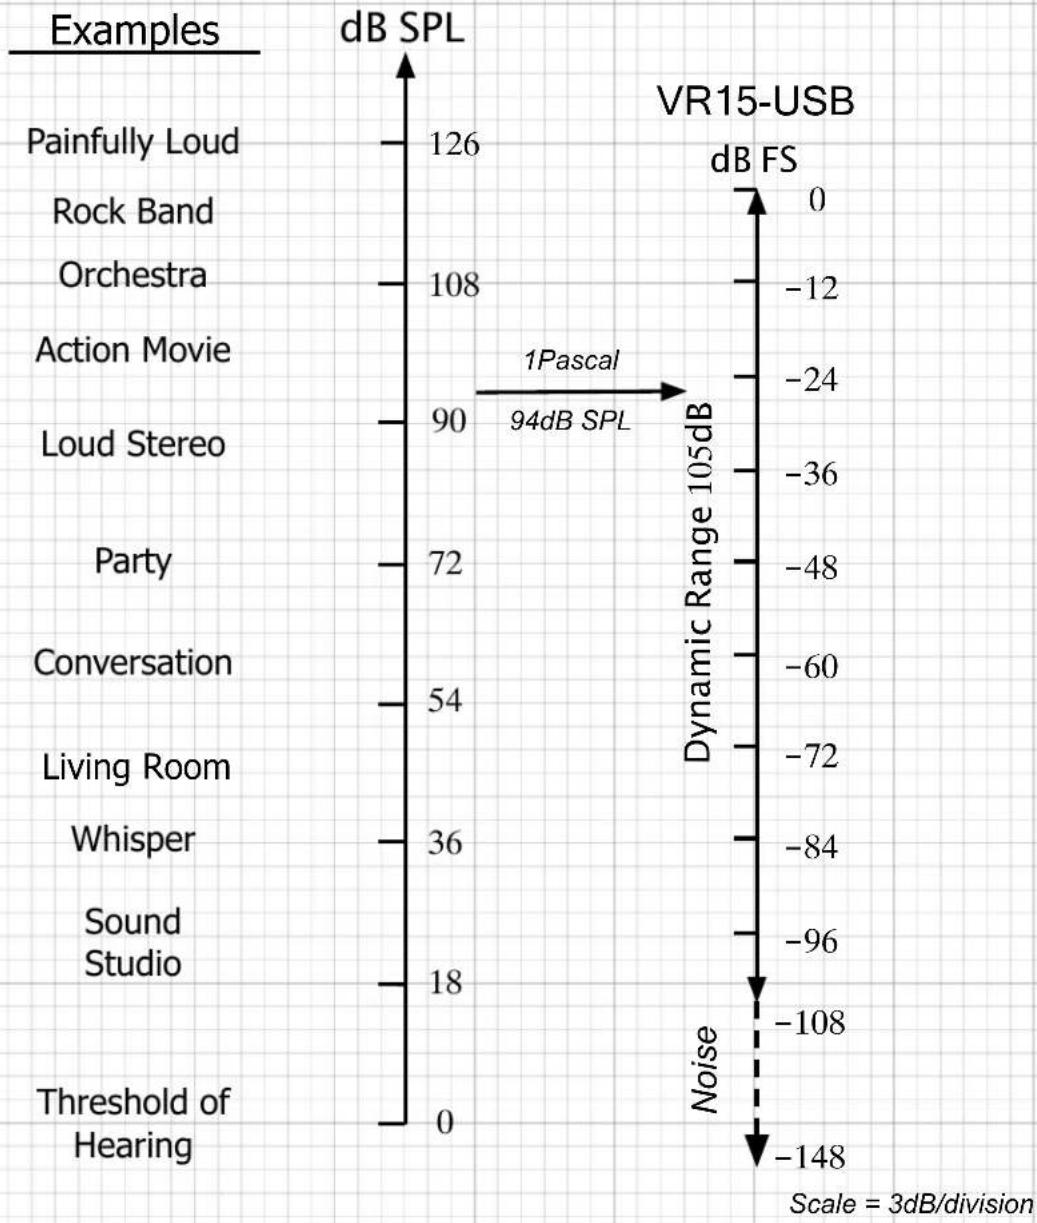
First, we determine what's the maximum Sound Pressure Level (SPL) we can expect. Tests with musical groups, rock bands, orchestras and in live clubs revealed peaks up to 114dBSPL are common. We decided to add an extra 6dB of headroom and set 0dB Full Scale equal to 120dB SPL. Looking at the figure below you can observe that sound at this level is so painfully loud that listening to it is unbearable. This is the point at which our level meter scale registers 100% or 0dB or the maximum number of bits for our digital converter.
Today we have hardware capable of processing 24-bit audio samples at bit rates of 96kHz or even higher. That's means it's possible to handle a dynamic range of 144dB (ratio of 16,000,000:1) and a frequency range of up to 40kHz (12 octaves). These are greater than the range of human hearing according to what we know from current scientific research.
The limits of dynamic range for audio hardware are determined by the maximum amplitude before the onset of distortion on the loud side and the amplitude of the noise floor on the quiet side. If we dimension our signal levels so the quiet side is equal to 0dBSPL, which is the threshold of human hearing, then the maximum level of a 24-bit signal chain on the loud side is 144dBSPL. That's well beyond the level of human pain and will permanently damage our ear's hearing.
What we've described so far is the theoretical range of a 24-bit system. On the practical side, however, there are some limitations. The conversion of real-world analog signals to digital samples is not a perfect process. This is particularly so on the quite side where electronic noise and manufacturing imperfections creep into the precision of the analog to digital conversion process. Today's technology achieves a precision of 20-bits on the high side while more typically achieving 16 to 18-bits in commercial devices. Still, this is an enormous dynamic range, which can exceed 100dB or a ratio of 1:100,000.
The VR15-USB microphone design incorporates a 24-bit analog converter. We've chosen 120dBSPL as the level at which we generate a full scale 24-bit digital sample. Our experience with live music proves this is sufficient for recording extremely loud concert performances of amplified bands and very large orchestras.
On the quiet side, our experience shows dynamic range is limited by the noise of the acoustic environment. In the real world we live in, acoustic noise levels below 40dBSPL are rare. The very quietest recording studios and concert halls can sometimes achieve 20dBSPL, but that's without people. Our experience with live recordings shows that 100dB dynamic range is what's practically achievable.

Audio Dynamic Range
bar
| Category | Value | | :--- | :--- | | Painfully Loud | 126 | | Rock Band | 108 | | Orchestra | 90 | | Action Movie | 72 | | Loud Stereo | 54 | | Party | 36 | | Conversation | 18 | | Living Room | 0 | | Whisper | -148 | | Sound Studio | -108 | | Threshold of Hearing | -148 | VR15-USB dB FS (1Pascal) and Dynamic Range 105dB (Noise) Scale = 3dB/division9. Testing Methods
Sonic Presence's Level Test Setup and Measurement Procedure
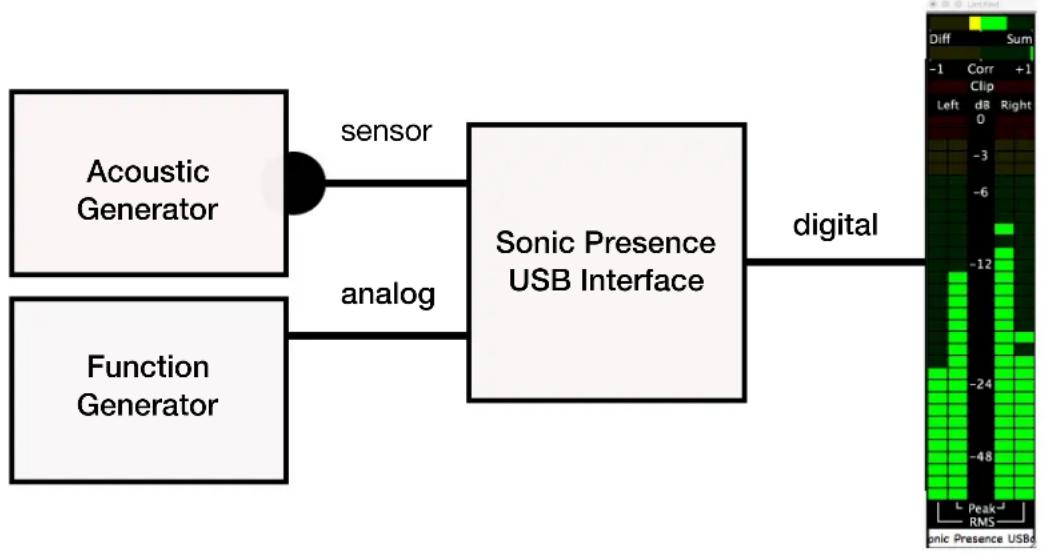
In order to accurately measure signal levels and determine the precision of meter readings you must use calibrated test signals. For our acoustic tests we used an ANSI S1.40 - 1984 calibrated sound generator. It produces a 1kHz sine wave signal, which is switchable between 114dB and 94dB SPL (Sound Pressure Level). The International standard for testing microphones is 94dB, which is equal to a pressure of 1 Pascal. When we do our final testing of the Sonic Presence Spatial Microphones, we set the output level to equal 0dB Full Scale at 124 dB SPL. That is as loud as it gets at a heavily amplified Rock Concert. This choice of signal level guarantees there will be no distortion caused by the microphone. If there is distortion in your recording, it's because the Input Gain is set Incorrectly.
We made our test measurements by inserting the Sonic Presence sensors directly into the sound generator's calibrated sound chamber. For our digital measurements, we used a 1kHz function generator with an output signal amplitude that we could adjust in steps of 0.1 millivolt. We then injected that signal into the analog sensor input of the Sonic USB Interface. (CAUTION: You should not try this at home. You could permanently damage the unit.)
For both of these measurements, the Sonic Presence's digital output signal is then plugged into the USB port of the test device to determine the digital signal levels. We used three different measurement Apps to insure the accuracy of our digital test signal. The first is the ProLevel Meter App from Katasura Shareware. The second is Apple's Logic Pro X App and the third App is MusicScope from XiVero. All of these Apps are running on a MacBook Pro computer under OSX.
flowchart
graph LR
    A["Acoustic Generator"] -->|sensor| B["Sonic Presence USB Interface"]
    C["Function Generator"] -->|analog| B
    B --> D["digital"]
    D --> E["Digital Display with RMS values"]
This Reference Table shows the output level of the signal generator in millivolts in the left column. We calculate the level in dB in the next column to the right. The next three columns are the actual readings in dB shown on the scale of the three measuring Apps.
| Reference Table | ||||
| generator | calculate | ProLevel | Logic | MusicScope |
| mV rms dB | dB dB dB | |||
| 800 | 0 | 0 | 0 | |
| 55 | -3 | -3 | -3.5 | -3 |
| 40 | -6 | -6 | -6 | -6 |
| 20 | -12 | -12 | -12 | -12 |
| 10 | -18 | -18 | -18 | -18 |
| 5 | -24 | -24 | -24 | -24 |
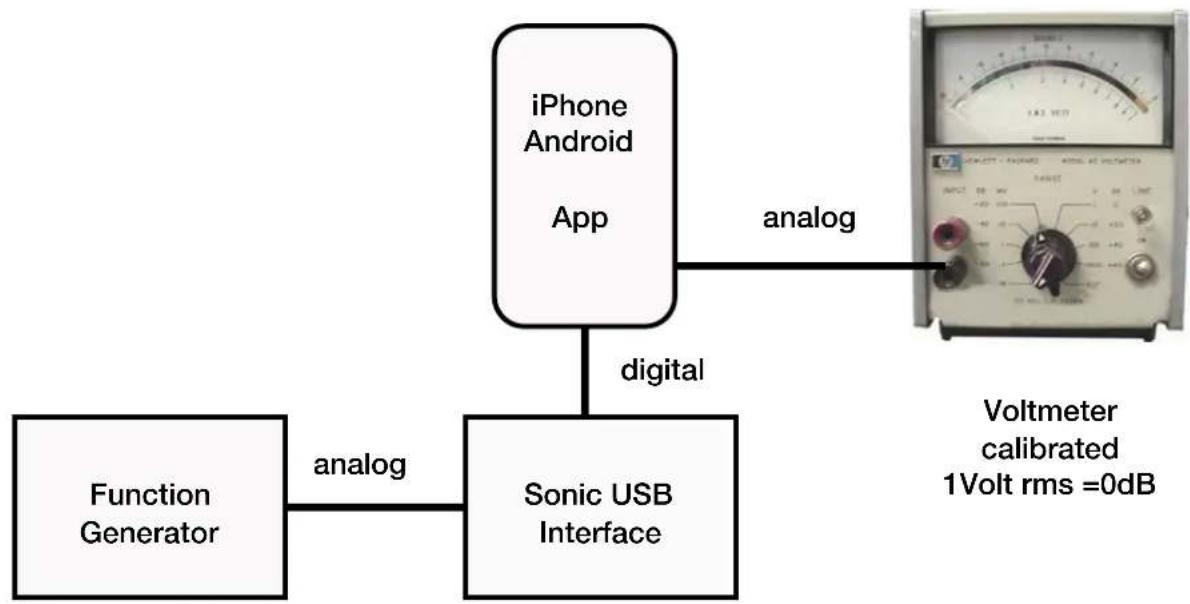
We measure the signal levels and meter indications of each App using our reference test signals. The digital output of the Sonic Presence Interface feeds directly into the phone's USB port.
We record a test file for each App noting the Input Level meter readings for each step of the test signals. Then we played back the file with the App and note the meter readings on the screen and measure the analog output levels. We do this by connecting a calibrated dB meter to the phone's output. In most cases the output is the phone's headphone jack. However, there are some Apps and phones that have no headphone output. In those cases, we used an AudioQuest DragonFly Digital to Analog Converter (DAC) plugged into the phone's USB output. The phone's volume control was set to maximum to insure output amplitude consistency for all of these measurements.
flowchart
graph TD
    A["Function Generator"] -->|analog| B["Sonic USB Interface"]
    B -->|digital| C["iPhone Android App"]
    C -->|analog| D["Voltmeter calibrated 1Volt rms =0dB"]
This table shows our test results for the Røde App. Note the Apps meter is not calibrated, so we indicate the playback level by noting the lit LEDs: red, yellow and green.
Now you can see how the Apps meter readings correspond to the digital input signal level and the phone's analog output. We're looking for linearity, meaning a 50% decrease in the generator mV signal level should correspond to a 6dB decrease in the output level. You might notice some slight discrepancies at the top of the scale as the level approaches 0dB. That's the reason you want to keep your maximum recordings levels below -6dB or lower to avoid any distortion. Don't worry about noise as you would with analog recording. This is digital. The noise floor is more than 90dB below your recording level. For practical purposes, we can say there is no noise!
| Røde | |||||||
| scale | green | green | green | green | yellow | red | red |
| scale marking | na na na na na na na | ||||||
| generator mV rms | 5 10 13 20 50 80 160 | ||||||
| calculated level in dB | -30.1 | -24.1 | -21.8 | -18.1 | -10.1 | -6.0 | 0 |
| PB level (analog) | -32 | -24 | -18 | na | -12 | -8 | -4 |
| reference acoustic level | 94dB SPL | 114dB SPL | |||||