WandVac WV361RGUK - Vacuum Cleaner SHARK - Free user manual and instructions
Find the device manual for free WandVac WV361RGUK SHARK in PDF.


User questions about WandVac WV361RGUK SHARK
0 question about this device. Answer the ones you know or ask your own.
Ask a new question about this device
Download the instructions for your Vacuum Cleaner in PDF format for free! Find your manual WandVac WV361RGUK - SHARK and take your electronic device back in hand. On this page are published all the documents necessary for the use of your device. WandVac WV361RGUK by SHARK.
USER MANUAL WandVac WV361RGUK SHARK
Shark. WANDVAC™ SYSTEM Cordless Handheld Vacuum
WV361UK/WV362UK Series INSTRUCTIONS
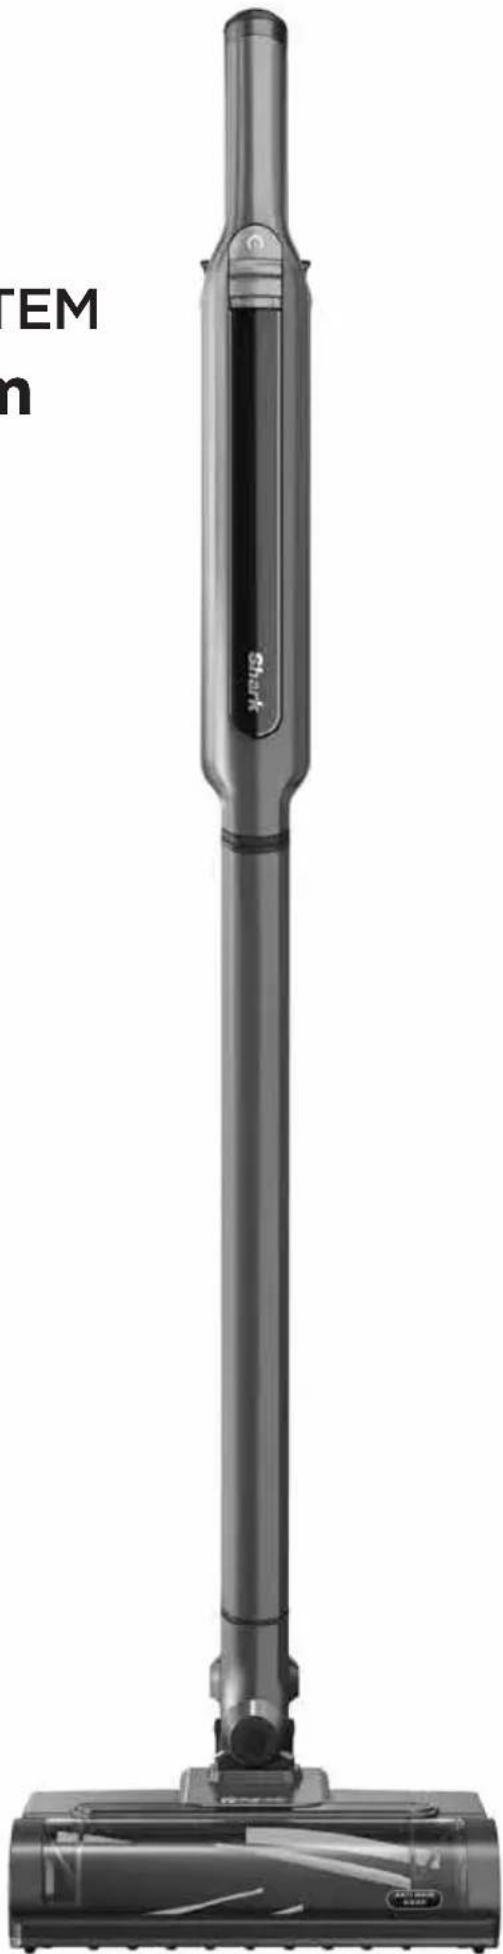
natural_image
Black vacuum cleaner with attached circuit board (no visible text or symbols)THANK YOU
for purchasing the Shark® Cordless Handheld Vacuum


TIP: You can find the model and serial numbers on the QR code label which is located on the bottom of the dust cup.

To benefit from your product's extended guarantee, simply register your purchase at:
Sharkclean.co.uk/register-guarantee/
0800 862 0453
Scan QR code using mobile device
Please note, products purchased directly from Shark ^® are automatically registered.
RECORD THIS INFORMATION
Model Number:
Date of Purchase (Keep receipt):
Store of Purchase:
TECHNICAL SPECIFICATIONS
Voltage: 11.1v=
PLEASE READ CAREFULLY AND KEEP FOR FUTURE REFERENCE.
This instruction manual is designed to help you get a complete understanding of your new Shark® Vacuum.
If you have any questions, please call the Customer Service line on 0800 862 0453.
CONTENTS
Important Safety Instructions....4
Assembling your Shark ^4 Cordless Vacuum....6
Using Your Lithium ION Battery 7
LED battery Power and Charging Indicators 7
Recycling your Lithium ION Battery 7
Charging Your Lithium ION Battery 8
Using Control Settings 9
Cleaning Modes....10
Maintaining your Vacuum Cleaner....11
Emptying the Dust Cup....11
Cleaning the Dust Cup....11
Cleaning the Filters....11
Maintaining the Floor Nozzle 12
Checking for blockages....13
Troubleshooting Guide....14
Additional Accessories Available 15
Guarantee 16
Battery Warranty....19

This marking indicates that this product should not be disposed with other household wastes throughout the EU. To prevent possible harm to the environment or human health from uncontrolled waste disposal, recycle it responsibly to promote the sustainable reuse of material sources. To return your used device, please use the return and collection systems or contact the retailer where this product was purchased. They can take this product for environmentally safe recycling.
IMPORTANT SAFETY INSTRUCTIONS
FOR HOUSEHOLD USE ONLY • PLEASE READ ALL INSTRUCTIONS BEFORE USING THIS VACUUM.
To reduce the risk of shock and unintended operation, turn off power and remove the ION Power Pack battery before servicing.
NOTE: If you have delicate or wool carpets, particularly loop pile, please try the vacuum on a hidden area first to ensure the spinning brush-rolls do not damage or unpick carpet fibres.
WARNING
REDUCE THE RISK OF FIRE, ELECTRIC SHOCK, INJURY, OR PROPERTY DAMAGE:
1 This vacuum consists of a motorised nozzle, ward, and handheld vacuum. These components contain electrical connections, electrical wiring, and moving parts that potentially present risk to the user.
2 Before each use, carefully inspect all parts for any damage. If a part is damaged, discontinue use.
3 Use only identical replacement parts.
4 This vacuum contains no serviceable parts.
5 Use only as described in this manual. DO NOT use the vacuum for any purpose other than those described in this manual.
6 With the exception of the filters and dust cup, DO NOT expose any parts of the vacuum to water or other liquids.
7 DO NOT allow the appliance to be used by children. Keep the appliance and its cord out of reach of children. Do not allow to be used as a toy. Close supervision is necessary when used near children.
GENERAL USE
8 This appliance can be used by persons with reduced physical, sensory or mental capabilities or lack of experience and knowledge if they have been given supervision or instruction concerning use of the appliance in a safe way and understand the hazards involved. Cleaning and user maintenance shall not be done by children.
9 Always turn off the vacuum before connecting or disconnecting any current carrying hoses, motorised nozzles, chargers, batteries, or other electrical or mechanical parts.
10 DO NOT handle plug or vacuum with wet hands.
11 DO NOT use without dust cup, filters, and brush-roll in place.
12 Only use Shark ^® branded filters and accessories. Damage caused by non-Shark filters and accessories may not be covered by the warranty.
13 DO NOT put any objects into nozzle or accessory openings. DO NOT use with any opening blocked; keep free of dust, lint, hair, and anything that may reduce airflow.
14 DO NOT use if nozzle or accessory airflow is restricted. If the air paths or the motorised floor nozzle become blocked, turn the vacuum off. Remove all obstructions before you turn on the unit again.
15 Keep nozzle and all vacuum openings away from hair, face, fingers, uncovered feet, or loose clothing.
16 DO NOT use if vacuum is not working as it should, or has been dropped, damaged, left outdoors, or dropped into water.
17 Use extra care when cleaning on stairs.
18 DO NOT leave the vacuum unattended while powered on.
19 When powered on, keep the vacuum moving over the carpet surface at all times to avoid damaging the carpet fibres.
20 If you have delicate or wool carpets, particularly loop pile, please try the vacuum on a hidden area first to ensure the spinning brush-rolls do not damage or unpick carpet fibres.
21 DO NOT use to pick up:
a) Liquids
b) Large objects
c) Hard or sharp objects (glass, nails,
screws, or coins)
d) Large quantities of dust (including
drywall, fireplace ash, or embers). DO NOT use as an attachment to power tools for dust collection.
e) Smoking or burning objects (hot coals, cigarette butts, or matches)
f) Flammable or combustible materials (lighter fluid, petrol, or kerosene)
g) Toxic materials (chlorine bleach, ammonia, or drain cleaner)
22 DO NOT use in the following areas:
a) Poorly lit areas
b) Wet or damp surfaces
c) Outdoor areas
d) Spaces that are enclosed and may contain explosive or toxic fumes or vapours (lighter fluid, petrol, kerosene, paint, paint thinners, mothproofing substances, or flammable dust)
23 Turn off the vacuum before plugging in or unplugging the charger.
24 Turn off the vacuum before any adjustment, cleaning, maintenance or troubleshooting.
25 During cleaning or routine maintenance, DO NOT cut anything other than hair, fibres, or string wrapped around the brush-roll.
26 Allow all filters to air-dry completely before replacing in the vacuum to prevent liquid from being drawn into electric parts.
27 DO NOT modify or attempt to repair the vacuum or the battery yourself, except as indicated in this manual.
DO NOT use the battery or vacuum if it has been modified or damaged. Damaged or modified batteries may exhibit unpredictable behavior resulting in fire, explosion or risk of injury.
28 Turn off all controls before unplugging.
29 Always turn off this appliance before connecting or disconnecting motorised nozzle or hand tool.
BATTERY PACK
30 The battery is the power source for the vacuum. Carefully read and follow all charging instructions.
31 To prevent unintentional starting, ensure the vacuum is powered off before picking up or carrying the vacuum. DO NOT carry the appliance with your finger on the power switch.
32 Use only Dongguan DongKun Power Technology Co. LTD charger DK72-135090A-B or E-TEK ZD012AI33090BS. Use of an incorrect charger may result in no charging, and/or unsafe conditions. Use only Shark battery X5BT330EU.
33 Keep the battery away from all metal objects such as paper clips, coins, keys, nails, or screws. Shorting the battery terminals increases the risk of fire or burns.
34 If the battery is damaged, liquid may be ejected from the battery. Avoid contact with this liquid, as it may cause irritation or burns. If contact occurs, flush with water. If liquid comes into contact with eyes, seek medical help.
35 Battery should not be stored at temperatures below 37.4^ F ( 3^ C) or above 104^ F ( 40^ C) to maintain long-term battery life.
36 DO NOT charge battery at temperatures below 40°F (5°C) or above 104°F (40°C).
37 Store the appliance indoors. DO NOT use or store it below 37.4°F (3°C). Ensure the appliance is at room temperature before operating.
38 DO NOT expose the battery to fire or temperatures above 265°F (130°C) as this may cause an explosion.
SAVE THESE INSTRUCTIONS
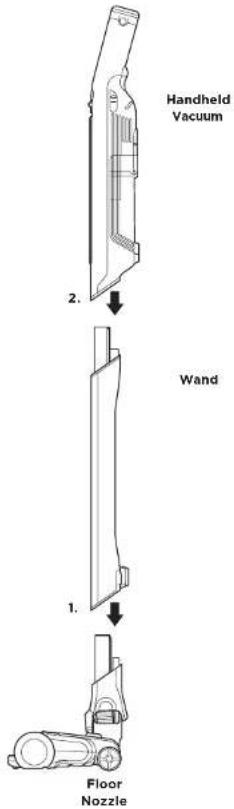
ASSEMBLY
-
Insert Wand into Nozzle.
-
Insert Handheld Vacuum into wand.
For proper operation, ensure all components are completely connected and clicked into place.
text_image
Handheld Vacuum 2. Wand 1. Floor NozzleNOTE: Your vacuum's model and serial numbers can be found on the QR code label on the bottom of the back of the handheld vacuum.
- Make sure the Dock Plate is facing upright. Slide the Charging Post into the slot on the back of the dock until it clicks into place.
- Place the dock on the floor near a power socket. Plug the Wall Charger into the socket, then connect the cord to the port on the back of the charging post.
- Store Duster Crevice on the mount on the dock plate.
NOTE: Once the charging post is installed, it can't be removed.
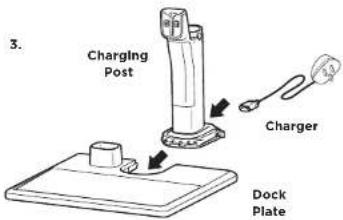
text_image
3. Charging Post Charger Dock Plate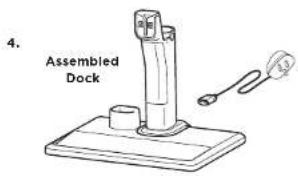
text_image
4. Assembled Dock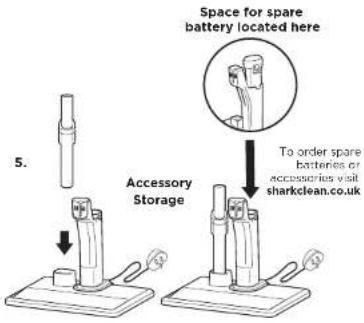
text_image
Space for spare battery located here To order spare batteries or accessories visit sharkclean.co.uk 5. Accessory StorageLI-ION BATTERY
Prior to first use, charge the battery completely. A full charge takes approximately 3 hours.
RUNTIMES PER FULLY CHARGED BATTERY
Visit Sharkclean.co.uk online or review the included Quick Start Guide.
LED BATTERY POWER AND CHARGING INDICATORS
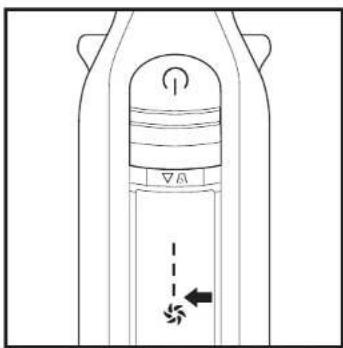
text_image
Technical diagram of a mechanical component with labeled parts and directional arrows indicating movement or forceCharging
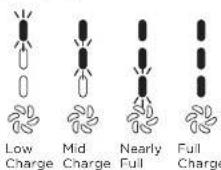
NOTE: Full charge takes approximately 3 hours.
LEDs will shut off 10 minutes after achieving full charge.
In Use
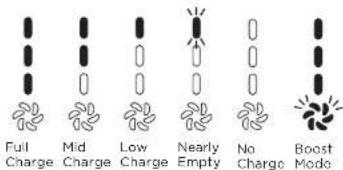
text_image
Full Charge Mid Charge Low Charge Nearly Empty No Charge Boost ModeRECYCLING THE LI-ION BATTERY
This product uses a Li-ion rechargeable and recyclable battery. When the battery no longer holds a charge, it should be removed from the vacuum and recycled. DO NOT incinerate or compost the battery. When your Lithium ION Power Pack Battery needs to be replaced, dispose of it or recycle it in accordance with local regulations. In some areas, it is illegal to place spent lithium-ion batteries in the bin or in a municipal solid waste stream. Return spent power packs to an authorised recycling center or to retailer for recycling. Contact your local recycling center for information on where to drop off the spent power pack.
NOTE: A complete charge takes approximately 3 hours. The Li-ion battery will naturally decrease in capacity over time from the 100% capacity of a new battery.
CHARGING AND STORAGE
text_image
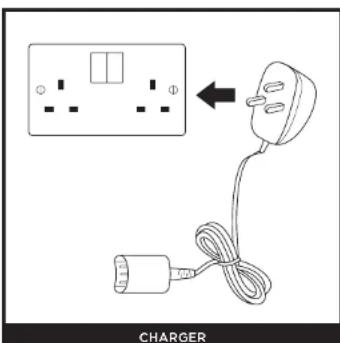
CHARGERPlug the Charger into a wall outlet.
text_image
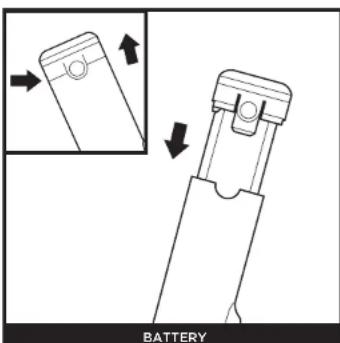
BATTERYTo remove the battery from the hand vac or the charging post, press the release tabs on the battery cap and slide out the battery. To reinstall, slide the battery into the compartment in the handle unit it clicks, or into, or into the slot in the dock charging post.
text_image
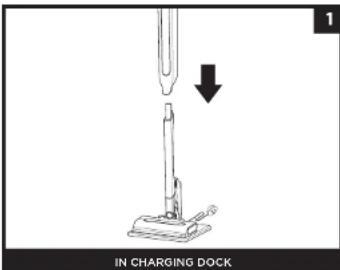
IN CHARGING DOCKOPTION 1 - IN CHARGING DOCK
When the dock is assembled and plugged in, charge the unit by placing it on the dock plate, with the hook on the back of the wand over the charging post. Make sure the contacts on the wand are aligned with the contacts on the charging post. When docked properly, the charging lights on the handheld vacuum will blink, indicating that charging has begun. When charging is complete, all three indicator lights will illuminate steadily.
text_image
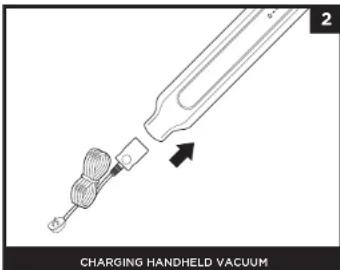
2 CHARGING HANDHELD VACUUMOPTION 2 - CHARGING HANDHELD VACUUM
To charge the handheld vacuum alone without the dock, unplug the charger cord from the dock and connect it directly to the port on the handheld vacuum, near the nozzle opening.
NOTE: The main unit comes with a partial charge. For maximum runtime, charge fully before first use (approximately 3 hours). Leaving the unit plugged in will not damage battery life..

sharkclean.co.uk
CONTROLS
text_image
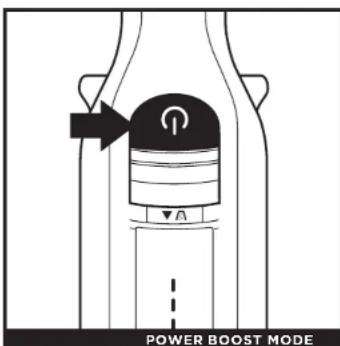
POWER BOOST MODEPress the On/Off button on the handle to turn on ION power. To turn off power, press the button again.
text_image
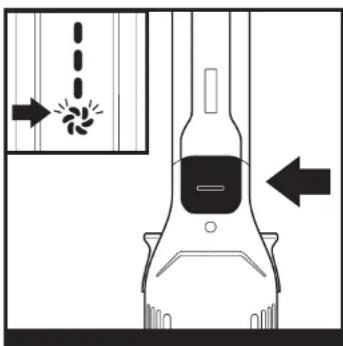
Diagram illustrating a mechanical or fluid system with labeled components and directional arrows, including a zoomed-in section showing flow or particle behavior.For an added boost in power, press and hold the Button at the base of the handle of the handheld vacuum. The Boost light will turn white in this mode. Release the button to return to standard power.
CLEANING MODES
text_image
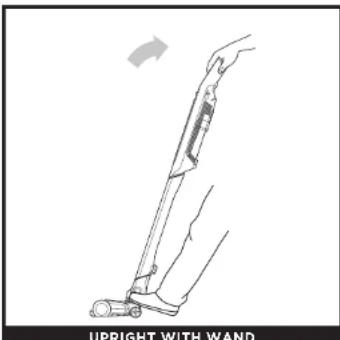
UPRIGHT WITH WANDTo clean floors, place foot on floor nozzle and tilt handheld vacuum back.
NOTE: To remove accessories from the handvac, press the two release tabs on the side of the unit.
text_image
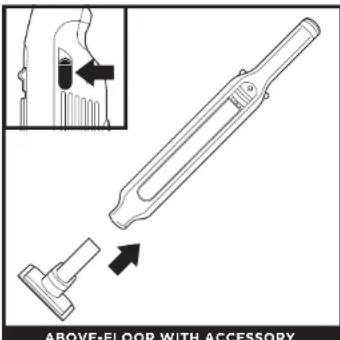
ABOVE-FLOOR WITH ACCESSORYAttach desired accessory to handheld vacuum. Press buttons on both sides of the handle to remove accessory.
text_image
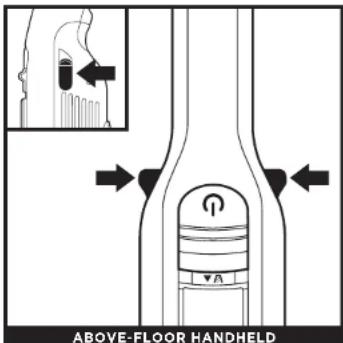
ABOVE-FLOOR HANDHELDTo detach the handheld vacuum from the wand, press the buttons on both sides of the handle, and lift the handheld vacuum off the wand.
To reattach the handhold vacuum to the wand, align the nozzle over the top of the wand and slide it on until it clicks into place.
natural_image
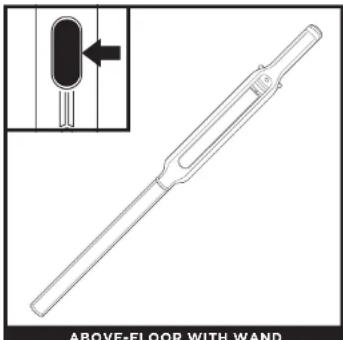
Technical line drawing of a mechanical component with an inset showing a close-up of a component (no text or symbols)For more reach to clean above-floor areas, detach the floor nozzle from the wand. Step on the floor nozzle, and press the nozzle release button at the bottom of the wand. Lift the wand to remove it.
To reattach the wand, align it over the nozzle neck then slide it on until it clicks into place.
NOTE: All accessories are compatible with both the wand and the handheld vacuum.
text_image
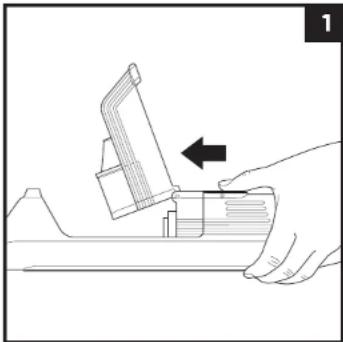
Technical diagram showing a mechanical device with labeled components and directional arrows indicating flow or movement.- With the power off, slide the release button forward, and the dust cup will swing open. Tap the filter screen lightly to knock off dust and debris.
natural_image
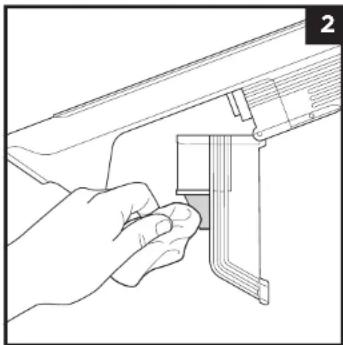
Line drawing of a hand inserting a component into a bracket (no text or symbols)- Wipe dust screen lightly with cloth to remove dust and dirt.
CLEANING THE DUST CUP AND FILTER
natural_image
Line drawing of a hand holding a device with an arrow indicating direction (no text or symbols)- With the dust cup open and the power off, press the filter release latch on the bottom of the handle and pull out the filter housing.
natural_image
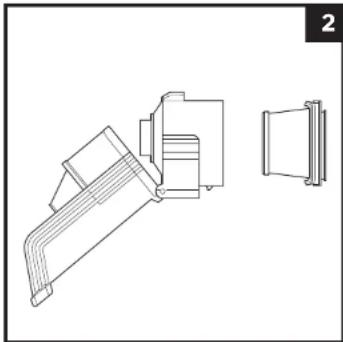
Technical line drawing of a mechanical component with two views (no text or symbols)- Press the tabs on both sides of the filter housing and pull out the filter. To clean the dust cup and filter, rinse them with lukewarm water only. Allow all parts to air-dry completely. To reinstall the filter, slide it back into the housing and press into place.
MAINTAINING YOUR VACUUM
CLEANING THE DUST CUP AND FILTER
natural_image
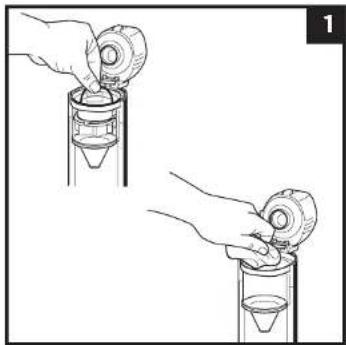
Illustration of two hands pouring liquid from a container into a glass (no text or symbols)- To deep clean the dust cup and cyclone, use gentle force to push the filter housing away from the dust cup until the parts are separated at a 90 degree angle, as shown above. Locate the wire handle on the cyclone frame and use this to pull the cyclone frame out of the dust cup.
Rinse or wipe clean the exposed dust cup and let air-dry for 24 hours.
natural_image
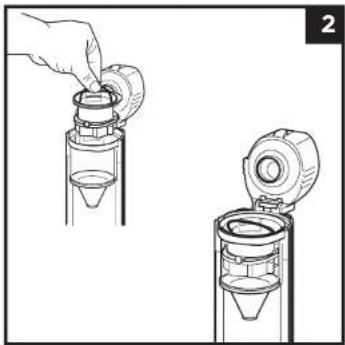
Illustration of a hand inserting a container into a device, showing the process (no text or symbols present)- When the dust cup is completely dry, put the cyclone frame back into place, making sure the wire handle is tucked away before reassembling the handvac. Use gentle force to reduce the 90 degree angle between the filter housing and the dustcup. Reassemble the dust cup and filter housing with a click back in place inside the handvac body.
CLEANING FLOOR NOZZLE
If you run over a hard or sharp object or notice a noise change while vacuuming, check for blockages or objects caught in the brushroll.
natural_image
Technical line drawing of a floor nozzle assembly (no text or symbols)- Tum off the vacuum.
- Press the nozzle release button to detach the nozzle from the wand.
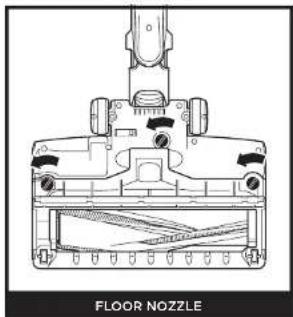
- Using a coin, turn the four locks counterclockwise to open, then lift off the cover and tilt back the neck of the nozzle.
- Clear any blockages and remove any debris from the brushroll and floor nozzle.
- Replace the cover by sliding the tabs into the slots. Press down firmly on all sides. Turn locks clockwise to close, until they click into place.
MAINTAINING YOUR VACUUM
CHECKING FOR BLOCKAGES
natural_image
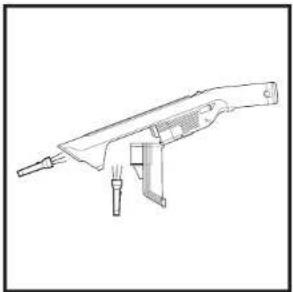
Line drawing of a handheld electric shaver tool with lever and base (no text or symbols)Checking for Blockages In the Handheld Vacuum:
- Turn off vacuum.
- Remove the handheld vacuum from the wand.
- Check all intake openings to the dust cup and remove any debris or blockages.
natural_image
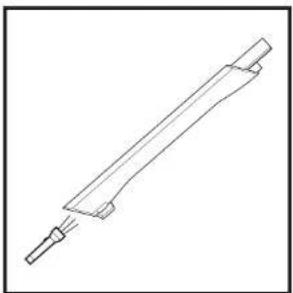
Line drawing of a mechanical tool or probe with a handle and spout (no text or symbols)Checking for Blockages In the Wand:
- Turn off vacuum.
- Detach the handheld vacuum and floor nozzle from the wand.
- Check both ends of the wand for blockages and debris.
- Clear away any debris or blockages.
natural_image
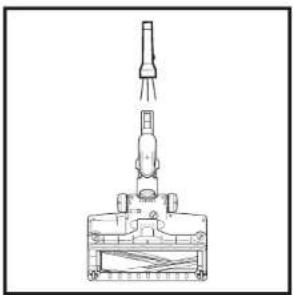
Technical line drawing of a mechanical device with a vertical shaft and base mount (no text or symbols)Checking for Blockages in the Floor Nozzle:
- Turn off vacuum.
- Detach the wand.
- Use the edge of a coin to open the four locks on the bottom of the floor nozzle.
- Remove the cover and tilt back the neck of the floor nozzle.
- Check the opening and remove any debris or blockages.
- Replace cover by firmly pressing down on all sides and turning the locks clockwise to close.
MAINTAINING YOUR VACUUM
WARNING: To reduce the risk of shock and unintended operation, turn off power and remove the battery before servicing.
Vacuum is not picking up debris. No suction or light suction. Third indicator light on hand vacuum is solid yellow.
(Refer to Checking for Blockages section for more information.)
- Dust cup may be full; empty dust cup.
- Check floor nozzle for blockages; clear blockages if required.
- Remove any string, carpet fibres, or hair that may be wrapped around the brushroll.
- Check connection between hand vacuum and wand for blockages; clear blockages if required.
- Check filters to see if they need cleaning. Follow instructions for rinsing and completely air-drying the filters before reinstalling them.
Vacuum lifts area rugs.
• Make sure you are not engaging Boost mode. Take care when vacuuming area rugs or rugs with delicately sown odgos.
• Turn off the unit to disengage from the carpet, then restart.
My vacuum's brushroll doesn't spin.
- Immediately turn off the vacuum. Remove any blockages before turning the vacuum back on. Make sure the handheld vacuum is tilted back far enough for the brushroll to engage while in use.
Vacuum turns off on its own.
There are several possible reasons for the vacuum turning off on its own, including blockages, battery issues, and overheating. If vacuum turns off on its own, perform the following steps:
1. Turn on the vacuum and check the battery indicator lights on the hand vacuum. If recharging is needed, make sure vacuum power is off before plugging in the charger.
2. Empty dust cup and clean filters (See the Cleaning the Dust Cup and Filter section).
3. Check wand, accessories, and inlet openings and remove any blockages.
4. Allow unit and battery to cool for at least 45 minutes, until they return to room temperature.
5. Press the On/Off switch to restart the vacuum.
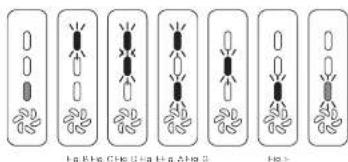
Battery Indicator Lights on hand vacuum are flashing.
- Bottom LED is solid yellow (Fig. A): Nozzle clog. (See the Maintaining Your Vacuum section.)
- Top LED is flashing (Fig. B): Battery needs to be charged.
Contact Customer Service at 0800 862 0453 or Sharkclean.co.uk if you experience any of the indications listed below:
- Top two LEDs are flashing (Fig. C): Overcurrent or short.
- Top and bottom LEDs are flashing (Fig. D): Motor is overheating.
• Middle LED is flashing (Fig. E): Overspeed. - Bottom LED is flashing (Fig. F): Communication.
- Bottom LED blinking yellow (Fig. G): There may be an electrical problem with the nozzle.
text_image
Fig. B: Mg, C: Mg, H: Ag, A: Ag S Fig. 3NOTE: If vacuum still does not operate properly, contact Customer Service at 0800 862 0453 or Sharkclean.co.uk.
STANDARD ACCESSORIES
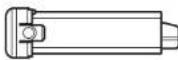
A Battery
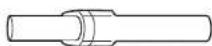
B Crevice Tool
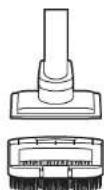
© Multi Surface Tool
A
B
C
ADDITIONAL ACCESSORIES
Motorised Pet Tool (included with some models)
Second Battery (included with some models)
D
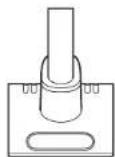
E
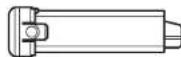
NOTE: Not all accessories come with all units. Please see the Quick Start Guide for your unit's configuration. To order additional accessories, visit Sharkclean.co.uk.
Shark NINJA
TWO-YEAR LIMITED GUARANTEE
When a consumer buys a product in the UK, they get the benefit of legal rights relating to the quality of the product (your "statutory rights"). You can enforce these rights against your retailer. However, at Shark ^a we are so confident about the quality of our products that we give you an additional manufacturer's guarantee of up to two years (1 year as standard plus 1 year when you register). Those terms and conditions relate to our manufacturer's guarantee only - your statutory rights are unaffected.
Every Shark ^® machine comes with a free parts and labour guarantee. Our customer service helpline (0800 862 0453) is open from 9.00am to 6.00pm Monday - Friday. It's free to call, and you'll be put straight through to a Shark ^® representative. You'll also find online support at www.Sharkclean.eu/uk.
How do I register my extended Shark guarantee?
You can register your guarantee online within 28 days of purchase. To save time, you'll need the following information about your machine:
- Model Number
- Serial Number (only if available)
- Date you received the machine (from your in-store receipt or delivery note)
To register online, please visit www.Sharkclean.eu/uk/register-guarantee. Products purchased directly from Shark are automatically registered.
IMPORTANT
• The manufacturer's guarantee covers your product for 12 months (or for 2 years, if registered) starting on the date of delivery.
- Please keep your receipt at all times. Should you need to use your guarantee (standard 1 year or further 1 year extended) we will need your receipt to verify the information you have supplied to us is correct. The inability to produce a valid receipt may invalidate your guarantee.
How long are new Shark ^+ machines guaranteed for?
Our confidence in our design and quality control means that your new Shark ^® vacuum cleaner is guaranteed for a total of two years (12 months plus an extended guarantee of 1 year).
What is covered by the free Shark guarantee?
Repair or replacement of your Shark ^® machine (at Shark's discretion to decide whether to replace or repair) including all parts and labour. A Shark ^® guarantee is in addition to your legal rights as a consumer.
What is not covered by the free Shark guarantee?
-
Blockages - for details of how to unblock your vacuum cleaner, please refer to the Instructions.
-
Normal wear and tear of parts which require regular maintenance and/or replacement to ensure the proper functioning of your unit.
-
Accidental damage, faults caused by negligent use or care, misuse, neglect, careless operation or handling of the vacuum cleaner which is not in accordance with the Shark® Instructions supplied with your machine.
-
Use of the vacuum cleaner for anything other than normal domestic household purposes.
-
Use of parts not assembled or installed in accordance with the operating instructions
-
Use of parts and accessories which are not Shark ^® spares
-
Faulty installation (except where installed by Shark®).
Where can I buy genuine Shark ^x spares and accessories?
Shark® spares and accessories are developed by the same engineers who developed your Shark® vacuum. You'll find a full range of Shark® spares, replacement parts and accessories for all Shark® machines at www.Sharkclean.eu. Please remember that using non-Shark® spares may invalidate your manufacturer's guarantee. However, your statutory rights are unaffected.
NOTES
NOTES NOTES
Euro-Pro Europe Limited
3150 Century Way
Thorpe Park
Leeds
LS15 8ZB
0800 862 0453
sharkclean.co.uk
Illustrations may differ from actual product. We are constantly striving to improve our products; therefore the specifications contained here in are subject to change without notice.
© 2020 Shark Ninja Operating LLC. SHARK is a registered trademark of SharkNinja Operating LLC.
WANDVAC is trademark of SharkNinja Operating LLC
WV361UK_WV362UK Series_IB_MP_201125_Mv2
PRINTED IN CHINA
f @Sharkcleaninguk
@Sharkcleanuk
@Sharkcleanuk