
VM5808H - Switch ATEN - Free user manual and instructions
Find the device manual for free VM5808H ATEN in PDF.


User questions about VM5808H ATEN
0 question about this device. Answer the ones you know or ask your own.
Ask a new question about this device
Download the instructions for your Switch in PDF format for free! Find your manual VM5808H - ATEN and take your electronic device back in hand. On this page are published all the documents necessary for the use of your device. VM5808H by ATEN.
USER MANUAL VM5808H ATEN
natural_image
Two ATEN ATEN 84102 microcontroller units shown in front and back views, no visible text or symbols on the device body.EMC Information
FEDERAL COMMUNICATIONS COMMISSION INTERFERENCE STATEMENT: This equipment has been tested and found to comply with the limits for a Class A digital device, pursuant to Part 15 of the FCC Rules. These limits are designed to provide reasonable protection against harmful interference when the equipment is operated in a commercial environment. This equipment generates, uses, and can radiate radio frequency energy and, if not installed and used in accordance with the instruction manual, may cause harmful interference to radio communications. Operation of this equipment in a residential area is likely to cause harmful interference in which case the user will be required to correct the interference at his own expense.
The device complies with Part 15 of the FCC Rules. Operation is subject to the following two conditions: (1) this device may not cause harmful interference, and (2) this device must accept any interference received, including interference that may cause undesired operation.
FCC Caution: Any changes or modifications not expressly approved by the party responsible for compliance could void the user's authority to operate this equipment.
Warning: This equipment is compliant with Class A of CISPR 32. In a residential environment, this equipment may cause radio interference.
This product is RoHS compliant.
Safety
This product has been classified as Information Technology Equipment.
User Information
Online Registration
Be sure to register your product at our online support center:
| International http://eservice.aten.com |
Telephone Support
For telephone support, call this number:
| International 886-2-86 | 92-6959 |
| China 86-400-810-0-8 | 10 |
| Japan 81-3-5615-581 | 1 |
| Korea 82-2-467-6789 | |
| North America 1-888- | 999-ATEN ext 4988 |
| 1-949-428-1111 |
User Notice
All information, documentation, and specifications contained in this manual are subject to change without prior notification by the manufacturer. The manufacturer makes no representations or warranties, either expressed or implied, with respect to the contents hereof and specifically disclaims any warranties as to merchantability or fitness for any particular purpose. Any of the manufacturer's software described in this manual is sold or licensed as is. Should the programs prove defective following their purchase, the buyer (and not the manufacturer, its distributor, or its dealer), assumes the entire cost of all necessary servicing, repair and any incidental or consequential damages resulting from any defect in the software.
The manufacturer of this system is not responsible for any radio and/or TV interference caused by unauthorized modifications to this device. It is the responsibility of the user to correct such interference.
The manufacturer is not responsible for any damage incurred in the operation of this system if the correct operational voltage setting was not selected prior to operation. PLEASE VERIFY THAT THE VOLTAGE SETTING IS CORRECT BEFORE USE.
Package Contents
The VM5404H / VM5808H package consists of:
◆ 1 VM5404H / VM5808H HDMI Matrix Switch with Scaler
♦ 1 Power Cord
◆ 1 IR Remote Control
◆ 1 IR Receiver
◆ 1 Mounting Kit
◆ 1 User Instructions*
Check to make sure that all the components are present and that nothing got damaged in shipping. If you encounter a problem, contact your dealer.
Read this manual thoroughly and follow the installation and operation procedures carefully to prevent any damage to the unit, and/or any of the devices connected to it.
* Features may have been added to the VM5404H / VM5808H since this manual was published. Please visit our website to download the most up-to-date version.
© Copyright 2020 ATEN® International Co., Ltd.
ATEN and the ATEN logo are registered trademarks of ATEN International Co., Ltd. All rights reserved.
All other brand names and trademarks are the registered property of their respective owners.
Contents
EMC Information ii
RoHS....ii
Safety ii
User Information....iii
Online Registration .....iii
Telephone Support ....iii
User Notice ....iii
Package Contents iv
Contents ...... v
About this Manual ix
Conventions x
Product Information....x
1. Introduction
Overview 1
Features 2
Requirements 3
Source Devices 3
Display Devices....3
Cables 3
Source Device Operating Systems 4
Browsers 4
Components 5
VM5404H Front View 5
VM5404H Rear View 6
VM5808H Front View 7
VM5808H Rear View 8
IR Remote Control 9
2. Hardware Setup
Rack Mounting 11
Grounding 12
Cable Connection ....13
Installation Diagram 14
3. Front Panel Configuration
Overview 15
Front Panel Pushbuttons....15
Enter Password 16
Main Screen 17
Port Switching 17
Input Port Selection....17
Output Port Selection....19
LCD Menu Organization 21
Menu Pushbutton 22
IP Setting....22
IP Address / Subnet Mask. 22
Gateway 23
Serial Port Setting 24
Baud Rate 24
Operation Mode 25
EDID Mode 25
CEC. 26
OSD. 27
Output Status 28
Security Mode 30
Mode 30
Change Password 31
Save to a Profile 32
Play/Stop the Profile Schedule 33
Profile Pushbutton 34
IR Remote Control Operation 35
Change the Input source of an Output display 35
Power on/off individual Output displays 35
Power on/off all Output displays 36
4. Browser Operation
Overview....37
Logging In 37
Main Page 38
Menu Bar 38
Profile List 39
Adding/Playing a Profile 39
Importing/Exporting a Profile. 41
Profile List Options 42
Profile 42
Play Window 42
Other 43
Profile Scheduling 44
Connection Profiles 46
Digital Signage Profile 46
Output Icon 47
Select Source 47
Grid View....48
Output Options 48
Video Wall Profile 49
Video Wall Options 49
Number of Displays / Bezel Dimensions .... 50
Blank Output 51
Independent Output 51
Grouping 52
Group. 52
Display Preferences ....53
Video Wall Example. 53
Output Options 55
HDMI Video Options 55
System Settings 57
General 58
Fan Status ....58
Device Info 58
Other 58
User Account 59
Add Account 60
Permission Level 61
Port Name 62
Network 63
EDID 64
EDID Mode 65
Customized Mode 66
EDID & CEA Description 67
Customized EDID Settings 68
CEA Settings 71
Video Data 72
Maintenance....74
HDCP 75
OSD/CEC 76
5. Mobile Control
Overview 77
The Video Matrix Control App 78
Requirements 78
Installation and Connections .....78
The Control Interface....79
6. CLI Commands
Overview 81
Connecting to the Matrix Switch via Telnet....81
Connecting to the Matrix Switch via RS-232 .82
Command Verification 83
Commands....83
Switch Port Command....83
EDID Mode Command 85
Mute Command 87
CEC Command 88
Scaling Command 89
Fan Speed Command 93
Echo Command 94
Black Screen Command 95
Read Command 96
Reset Command 96
Baud Rate Command 97
Save/Load Profile Command 98
OSD Command.... 99
Alert Command 100
Appendix
Safety Instructions 101
General 101
Rack Mounting 103
Technical Support 104
International 104
North America 104
Specifications 105
Telnet Operation 106
Configuration Menu....106
-
H - Call up the command list for help 106
-
GT – Set gateway address ..... 106
-
IM – Set IP subnet mask 106
-
IP – Set IP address ..... 107
-
LO – Load connections from profile ..... 107
-
PW - Change password ..... 107
-
RI - Read what input is connected to nn output ..... 107
-
RO – Read what output is connected to nn input ..... 107
-
SB – Set serial port baud rate ..... 107
-
SS - Switch input to specified output ..... 107
-
SV – Save the current connections into a profile ..... 108
-
TI – Set timeout ..... 108
-
VR – Software version information ..... 108
Limited Warranty....109
About this Manual
This User Manual is provided to help you get the most from your VM5404H / VM5808H system. It covers all aspects of installation, configuration and operation. An overview of the information found in the manual is provided below.
Chapter 1 Introduction, introduces you to the VM5404H / VM5808H system. Its purpose, features and benefits are presented, and its front and back panel components are described.
Chapter 2 Hardware Setup, describes how to set up your VM5404H / VM5808H installation.
Chapter 3 Front Panel Configuration, explains the fundamental concepts involved in operating the VM5404H / VM5808H at the local site via the front panel LCD display using pushbuttons.
Chapter 4 Browser Operation, provides a complete description of the VM5404H / VM5808H's Browser Graphical User Interface (GUI), and how to use it to remotely configure and operate the VM5404H / VM5808H.
Chapter 5 Mobile Control, introduces you to the Video Matrix Control app and provides details on its installation requirements.
Chapter 6 CLI Commands, provides a complete list of the serial control protocol commands used when utilizing the RS-232 Serial Port so that an extra source device can be utilized in the installation.
Appendix, which provides specifications and other technical information regarding the VM5404H / VM5808H.
Conventions
This manual uses the following conventions:
Monospaced Indicates text that you should key in.
[] Indicates keys you should press. For example, [Enter] means to press the Enter key. If keys need to be chorded, they appear together in the same bracket with a plus sign between them: [Ctrl+Alt].
- Numbered lists represent procedures with sequential steps.
◆ Bullet lists provide information, but do not involve sequential steps.
→ Indicates selecting the option (on a menu or dialog box, for example), that comes next. For example, Start → Run means to open the Start menu, and then select Run.

Indicates critical information.
Product Information
For information about all ATEN products and how they can help you connect without limits, visit ATEN on the Web or contact an ATEN Authorized Reseller. Visit ATEN on the Web for a list of locations and telephone numbers:
| International http://www.aten.com |
| North America http://www.aten-usa.com |
Overview
The ATEN VanCryst VM5404H / VM5808H 4 x 4 / 8 x 8 HDMI Matrix Switch with Scaler is a versatile solution that provides an easy way to route high definition video and audio from any of 4/8 HDMI sources to any of 4/8 HDMI displays at the same time. As a Matrix Switch, each input can be independently connected to any or all outputs, giving you the ultimate in flexibility and control in any multi-display audio/video installation.
The VM5404H / VM5808H features Seamless Switch™, which employs FPGA matrix system architecture to seamlessly switch between multiple sources and multiple displays. With EDID Expert technology, the VM5404H / VM5808H selects the optimum EDID settings for smooth power-up and the highest quality display. It also features a high-performing scaling engine that converts the video resolution into the display's native resolution to give you the best image quality.
You can easily configure the VM5404H / VM5808H via the front panel LCD display and pushbuttons, and through the use of an IR Remote Control. The LCD provides a quick view of all port connections, and lets operators access the unit's built-in configuration utility.
Furthermore, the VM5404H / VM5808H allows convenient configuration and operation via an intuitive Graphical User Interface (GUI) using any web browser. The web GUI provides you with advanced features which include easy setup of custom Video Wall and Digital Signage configurations that can be saved and recalled. Because your VM5404H / VM5808H can be controlled over a standard TCP/IP connection, it conveniently integrates into any existing network for easy remote access. For complete system and install integration, serial control is standard through the VM5404H / VM5808H's built-in RS-232 port that allows the switch to be controlled through a high-end controller or PC. You can also have mobile access to frequently used features such as switching of profile and AV inputs using the Video Matrix Control App.
The VM5404H / VM5808H is an ideal solution for applications that require HDMI outputs from multiple sources to be conveniently delivered to multiple destinations, such as for stage presentations, competitions, control centers, and system installations that require real-time reports.
Features
- Connects up to 4 (VM5404H) or 8 (VM5808H) HDMI sources to any of 4/8 HDMI displays
- Long Distance Transmission – supports up to 15 m (24 AWG)
♦ HDMI (3D, Deep color); HDCP 1.4 compatible - Video wall – allows you to create custom video wall layouts via intuitive web GUI
◆ Features a built-in high-performance scaler function for best image quality - Seamless Switch™ – ATEN FPGA design unifies video formats to provide continuous video streaming, real-time switching and stable signal transmissions*
- EDID Expert – selects optimum EDID settings for smooth power-up and high quality display
- Multiple Control Methods – system management via front-panel pushbuttons, IR, RS-232 and Ethernet (Telnet / Web GUI) connections
◆ Supports free mobile control using the Video Matrix Control App
Built-in bi-directional RS-232 serial port for high-end system control - Superior video quality – HDTV resolution of 480p, 720p, 1080i and 1080p (1920 x 1080)
◆ Supports Dolby True HD and DTS HD Master audio
◆ Consumer Electronics Control (CEC) support
◆ ESD protection for HDMI connections - Firmware upgradeable
♦ Rack mountable all metal casing
Note:
When Seamless Switch ^TM is enabled, mind the following:
- Video output will not display 3D, Deep Color or interlace (i.e., 1080i) resolutions correctly. To use these features, make sure to first disable Seamless Switch™.
- Videos may not display within range, in which case make sure to adjust the display settings on your device.
Requirements
The following devices are required for a complete VM5404H / VM5808H installation:
Source Devices
◆ Computer or A/V source device with HDMI Type A output connector(s)
Note: A DVI/HDMI adapter is required when connecting a DVI source device.
Display Devices
◆ Display devices or receivers with an HDMI Type A input connector
Cables
◆ 1 HDMI cable for each source device you will be connecting
◆ 1 HDMI cable for each display device you will be connecting
◆ 1 Cat 5e cable
◆ 1 RS-232 serial cable
Note: No cables are included in this package. We strongly recommend that you purchase high-quality cables of appropriate length since this will affect the quality of the audio and video display. Contact your dealer to purchase the correct cable sets.
Source Device Operating Systems
Supported operating systems are shown in the table below:
| OS Version | ||
| Windows 2000 and higher | ||
| Linux RedHat | 6.0 and higher | |
| SuSE 8.2 and higher | ||
| Mandriva (Mandrake) 9.0 and higher | ||
| UNIX AIX 4.3 | and higher | |
| FreeBSD 3.51 and higher | ||
| Sun Solaris 8 and higher | ||
| Novell Netware | 5.0 and higher | |
| Mac OS 9 and higher | ||
| DOS 6.2 and higher | ||
Browsers
Supported web browsers are shown in the table below:
| OS | Java Version | Browser | Version |
| Windows 8.1 | V1.8.0_60 | Chrome | 45.0.2454.85 m |
| Firefox | 40.0.3 | ||
| Safari | 5.1.7 | ||
| Opera | 31.0.1889.174 | ||
| IE11 | 11 | ||
| Windows 2012 R2 (64bit) | V1.8.0_60 (64bit) | IE11 | 11 (64bit) |
| Windows 2008 R2 (64bit) | V1.8.0_60 (64bit) | IE8 | 8 |
| Windows 7 SP1(64bit) | V1.8.0_60 (64bit) | IE10 10 (64bit) | |
| Windows XP | V1.8.0_60 | IE8 | 8 |
| CentOS 7.0 (64Bit) | V1.8.0_60 (64bit) | Firefox | 40.0.3 |
| Ubuntu 12.04 | V1.8.0_60 | Chrome | 45.0.2454.85 |
| Solaris 11(64bit) | V1.8.0_25 | Firefox | 33 |
| Mac 10.10 | V1.8.0_25 | Safari | 8 |
Components
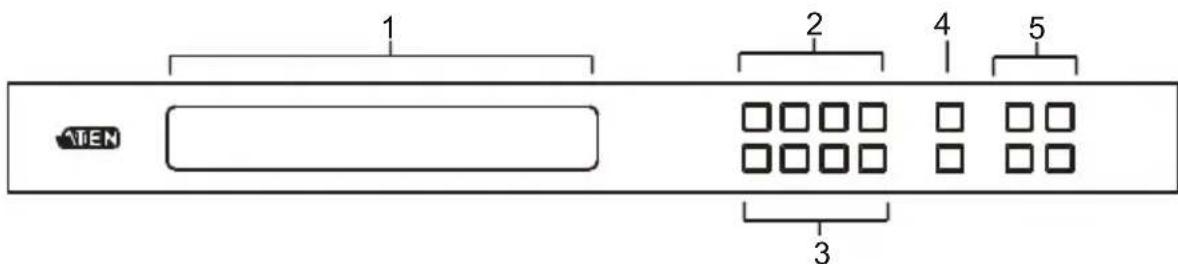
VM5404H Front View
text_image
1 2 4 5 TIEN 3| No. | Component Description | |
| 1 | LCD Display The LCD Display gives a quick view of all port connections, and shows the various options for configuring and operating the VM5404H. For full details, see Main Screen, page 17. | |
| 2 | Input Pushbuttons These pushbuttons refer to the HDMI Input ports found on the VM5404H rear panel. Press to select the Input port. These pushbuttons may also correspond to menu options, connection profiles (P1-P4) and so on.Note: The INPUT (1-4) front panel pushbuttons have built-in LEDs that light to indicate they have been selected. | |
| 3 | Output Pushbuttons These pushbuttons refer to the HDMI Output ports found on the VM5404H rear panel. Press to select the Output port. These pushbuttons may also correspond to connection profiles (P5-P8).Note: The OUTPUT (1-4) front panel pushbuttons have built-in LEDs that light to indicate they have been selected. | |
| 4 | Pre v / Pushbuttons | These pushbuttons allow you to cycle through the menu options on the LCD display. |
| 5 | Function Pushbuttons | The function pushbuttons (MENU, PROFILE, ENTER and CANCEL) are for navigating the LCD built-in configuration utility. For full details, see Front Panel Pushbuttons, page 15.Note: The MENU and PROFILE front panel pushbuttons have built-in LEDs that light to indicate they have been selected. |
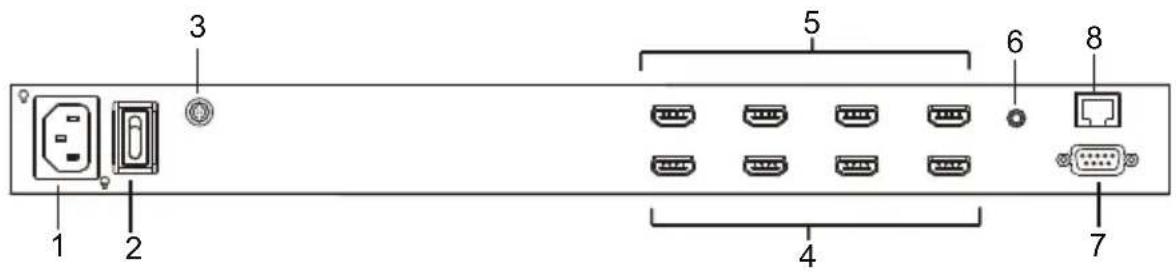
VM5404H Rear View
text_image
1 2 3 4 5 6 7 8| No. | Component Description | |
| 1 | Power Socket This is a standard 3-pin AC power socket. The power cord from an AC source plugs in here. | |
| 2 | Power Switch This is a standard rocker switch that powers the unit on and off. | |
| 3 | Grounding Terminal | The grounding wire attaches here. See Grounding, page 12, for further details. |
| 4 | HDMI Input Ports The cables from your HDMI source devices plug into these ports. | |
| 5 | HDMI Output Ports The cables from your HDMI display devices plug into these ports. | |
| 6 | IR Port Connect the IR Receiver unit included with your product via this 3.5 mm Mini Stereo Jack. | |
| 7 | RS-232 Serial Port Connect a computer or high-end system controller via this serial port. | |
| 8 | Ethernet Port In order to access the VM5404H's Browser Graphical User Interface (GUI), the VM5404H must be connected to your network. The cable that connects the VM5404H to your LAN plugs in here. See Cable Connection, page 13, for further details | |
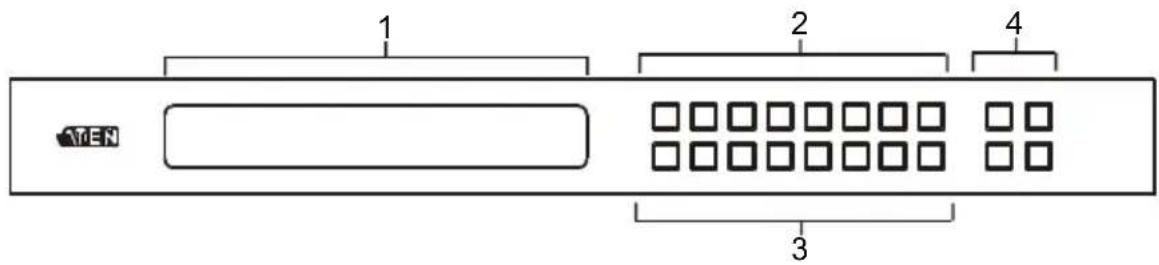
VM5808H Front View
text_image
1 2 3 4 MEN| No. | Component Description | |
| 1 | LCD Display The LCD Display gives a quick view of all port connections, and shows the various options for configuring and operating the VM5808H. For full details, see Main Screen, page 17. | |
| 2 | Input Pushbuttons These pushbuttons refer to the HDMI Input ports found on the VM5808H rear panel. Press to select the Input port. These pushbuttons may also correspond to menu options, connection profiles (P1-P8) and so on.Note: The INPUT (1-8) front panel pushbuttons have built-in LEDs that light to indicate they have been selected. | |
| 3 | Output Pushbuttons These pushbuttons refer to the HDMI Output ports found on the VM5808H rear panel. Press to select the Output port. These pushbuttons may also correspond to connection profiles (P9-P16).Note: The OUTPUT (1-8) front panel pushbuttons have built-in LEDs that light to indicate they have been selected. | |
| 4 | Function Pushbuttons | The function pushbuttons (MENU, PROFILE, ENTER and CANCEL) are for navigating the LCD built-in configuration utility. For full details, see Front Panel Pushbuttons, page 15.Note: The MENU and PROFILE front panel pushbuttons have built-in LEDs that light to indicate they have been selected. |
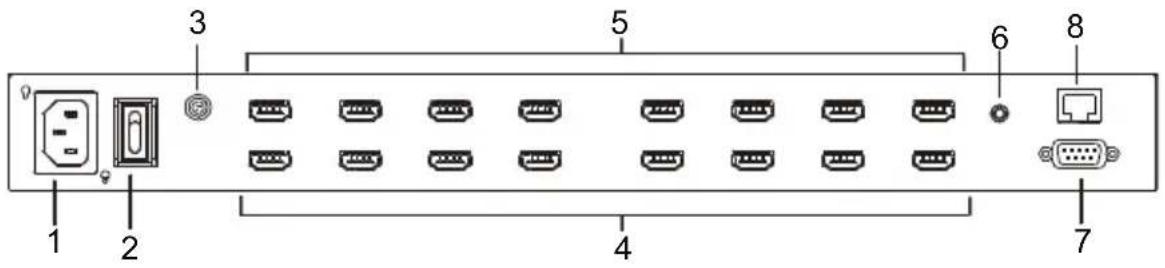
VM5808H Rear View
text_image
1 2 3 4 5 6 7 8| No. | Component Description | |
| 1 | Power Socket This is a standard 3-pin AC power socket. The power cord from an AC source plugs in here. | |
| 2 | Power Switch This is a standard rocker switch that powers the unit on and off. | |
| 3 | Grounding Terminal | The grounding wire attaches here. See Grounding, page 12, for further details. |
| 4 | HDMI Input Ports The cables from your HDMI source devices plug into these ports. | |
| 5 | HDMI Output Ports The cables from your HDMI display devices plug into these ports. | |
| 6 | IR Port Connect the IR Receiver unit included with your product via this 3.5 mm Mini Stereo Jack. | |
| 7 | RS-232 Serial Port Connect a computer or high-end system controller via this serial port. | |
| 8 | Ethernet Port In order to access the VM5808H's Browser Graphical User Interface (GUI), the VM5808H must be connected to your network. The cable that connects the VM5808H to your LAN plugs in here. See Cable Connection, page 13, for further details | |
IR Remote Control
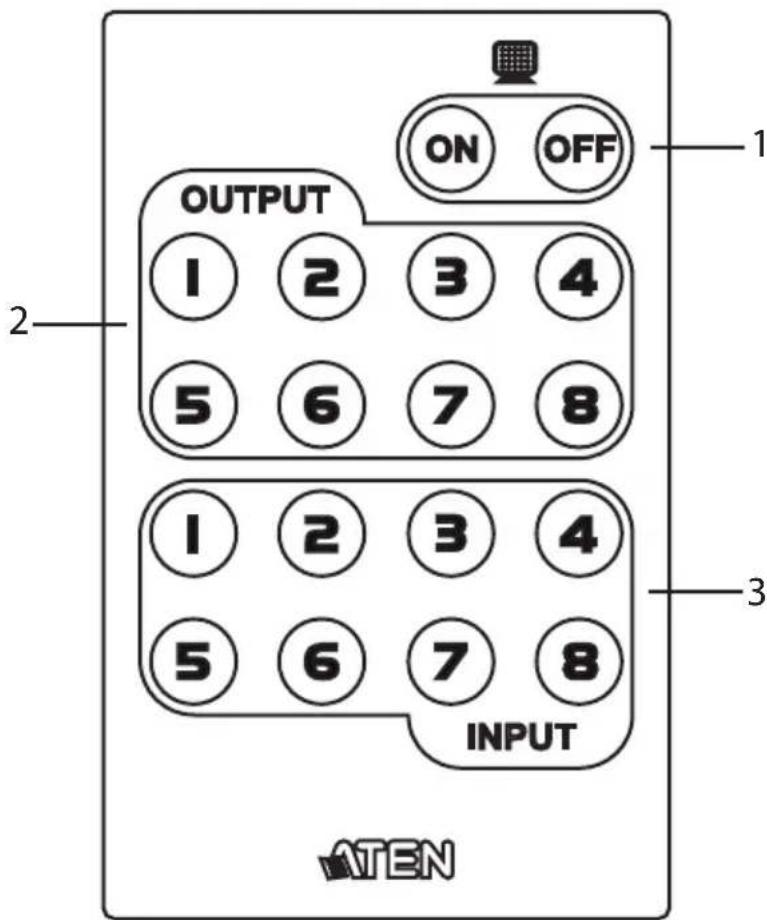
text_image
OUTPUT 1 2 3 4 5 6 7 8 1 2 3 4 5 6 7 8 INPUT 10EN ON OFF 1 2 3 4 3 5 6 7 8| No. | Component Description | |
| 1 | Power ON/OFF | Use the ON and OFF pushbuttons to turn the Output displays on or off – by individual port, or all ports. (see IR Remote Control Operation, page 35) |
| 2 | Output Pushbuttons1–8 | Press Output display pushbuttons 1–8 to select the Output display you want to configure (see IR Remote Control Operation, page 35). |
| 3 | Input Pushbuttons1–8 | Press Input source pushbuttons 1–8 to select the Input source you want to display on a selected output (see IR Remote Control Operation, page 35). |
Note: The VM5404H's IR remote control only supports use the 1\~4 Input and 1\~4 Output pushbuttons.
This Page Intentionally Left Blank
Chapter 2
Hardware Setup

-
Important safety information regarding the placement of this device is provided on page 101. Please review it before proceeding.
-
Make sure that the power to all devices connected to the installation are turned off. You must unplug the power cords of any computers that have the Keyboard Power On function.
Rack Mounting
The VM5404H / VM5808H can be mounted in a 19" (1U) system rack. For the most convenient front panel pushbutton configuration and operation at the local site, mount the unit at the front of the rack, as follows:
- Use the M3 x 8 Phillips head hex screws supplied with the Mounting Kit to screw the rack mounting brackets onto the front of the unit.
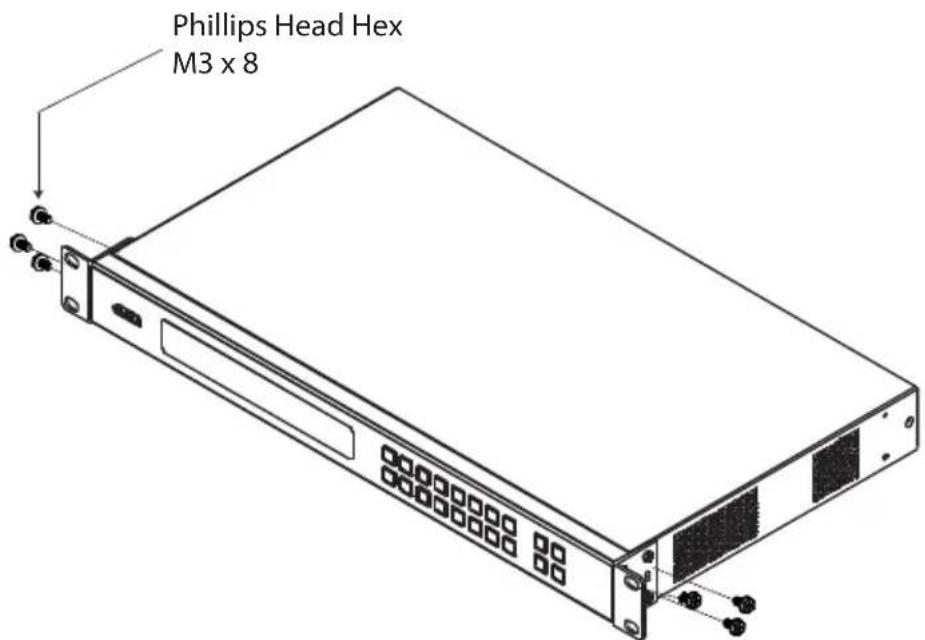
text_image
Phillips Head Hex M3 x 8-
Position the unit in the front of the rack and align the holes in the mounting brackets with the holes in the rack.
-
Screw the mounting brackets to the rack.
Grounding
To prevent damage to your installation, it is important that all devices are properly grounded.
- Use a grounding wire to ground the VM5404H / VM5808H by connecting one end of the wire to the grounding terminal, and the other end of the wire to a suitable grounded object.

natural_image
Front panel of a computer interface showing ports, connectors, and a power outlet (no text or labels visible)- Make sure that all devices in your VM5404H / VM5808H installation are properly grounded.
Cable Connection
Installation of the VM5404H / VM5808H is simply a matter of connecting the appropriate cables. Refer to the installation diagram on the following page (the numbers in the diagram correspond to the steps below), and do the following:
- Use a grounding wire to ground the unit by connecting one end of the wire to the grounding terminal, and the other end of the wire to a suitable grounded object.
Note: Do not omit this step. Proper grounding helps to prevent damage to the unit from surges or static electricity.
-
Connect up to 4 (VM5404H) or 8 (VM5808H) HDMI video sources to the HDMI Input ports
-
Connect up to 4 (VM5404H) or 8 (VM5808H) HDMI display devices to the HDMI Output ports
-
Connect the IR Receiver into the IR port.
-
(Optional) To access the features in the web interface or use the Video Matrix Control App, plug a Cat 5e cable from the LAN into the VM5404H / VM5808H's Ethernet port.
-
(Optional) If you are using the serial control function, use an appropriate RS-232 serial cable to connect the computer or serial controller to the VM5404H / VM5808H's female RS-232 Serial port.
-
Plug the power cord supplied with the package into the VM5404H / VM5808H's 3-prong AC socket, and then into an AC power source.
-
Power on the VM5404H / VM5808H and all devices in the installation.
Installation Diagram
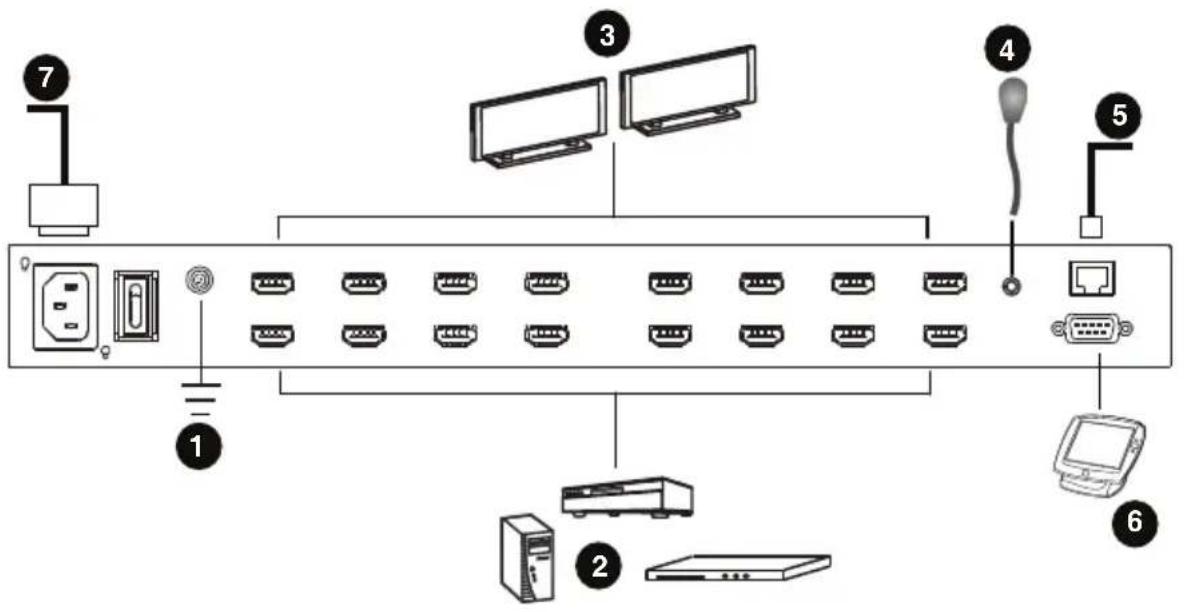
text_image
Diagram of a network device rack with labeled components including ports, connectors, and power connectionsFront Panel Configuration
Overview
The VM5404H / VM5808H can be configured and operated locally via the front panel LCD/pushbuttons and IR Remote Control; remotely over a standard TCP/IP connection via graphical user interface (GUI) using a web browser; via a remote terminal session using Telnet; or by a RS-232 serial controller.
The local front panel operation is discussed in this chapter. Web GUI Operation is discussed in Chapter 4, and RS-232 serial control is discussed in Chapter 6.
Front Panel Pushbuttons
The front panel features an LCD display and pushbuttons for convenient operation locally. This allows users to perform operations such as selecting which source shows on which display, viewing the IP settings, configuring the serial port, setting the EDID Mode / CEC / OSD / Output Status, selecting security settings, and loading/saving profiles.
Note the following front panel pushbutton functions:
- Use the MENU pushbutton to access the Menu page options: IP Setting, Serial Port Setting, Operation Mode, Security Mode, and Save to a Profile (see LCD Menu Organization, page 21).
- Use the PROFILE pushbutton to switch between the connection profiles which have been added to the Profile List (see Profile List, page 39). Pressing this pushbutton for longer than 3 seconds displays the Save to a Profile page (see Save to a Profile, page 32).
- Use the CANCEL pushbutton to go back to a previous page, return to the Main Screen, stop or exit an operation.
◆ Use the ENTER pushbutton to select options and confirm operations.
- Use the INPUT / OUTPUT (1–8) or (1-4) pushbuttons to select the Input/Output port. These pushbuttons may also correspond to menu options, connection profiles, and so on.
- The VM5404H provides Prev / Next pushbuttons to navigate the menus.
◆ Use pushbuttons 7/8 (Prev/Next) to navigate the VM5808H menus.
Enter Password
Upon VM5404H / VM5808H startup, check the front panel LCD to view the loading progress. If the Password screen / LCD Menu fails to load, an error message displays. Reset the unit and try again.
If you are accessing the VM5404H / VM5808H for the first time, the Password screen appears as soon as the LCD loading process is done. Enter the default password 1234 to continue to the Main Screen (see Main Screen, page 17).
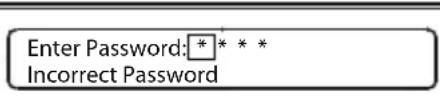
text_image
Enter Password: * * * Incorrect Password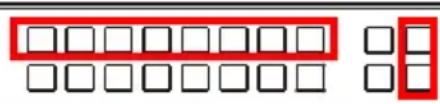
text_image
Image showing a grid of white squares with red-outlined boxes, possibly indicating selection or status.Additionally, the Password Screen appears if the VM5404H / VM5808H has been configured to require a password for Front Panel operation (see Security Mode, page 30).
To enter a password, do the following:
- In the Enter Password field, check that the cursor is at the first asterisk (*) and flashing.
- Use the front panel Input Port pushbuttons (1–8) or (1–4) to enter the 4-digit password. After the fourth digit has been entered correctly, the Main Screen displays.
- Press Cancel to clear the password. The digits revert to 4 asterisks and the cursor goes back to the first asterisk.
Note: 1. The VM5404H / VM5808H password can be any four digit combination between 1111 to 8888 (VM5808H) or 1111 to 4444 (VM5404H). The default password is 1234.
2. If you enter an incorrect password, the cursor goes back to the first digit and reverts to flashing. The Incorrect Password message displays at the bottom of the screen, but clears as soon as a new password is entered.
3. If Password option is Enabled (see Security Mode, page 30), the LCD display time-out is 5 minutes by default.
Main Screen
The Main Screen shows the Input ports in the top row, which are tied to the Output ports shown in sequential order (1–8) or (1–4) at the bottom row.

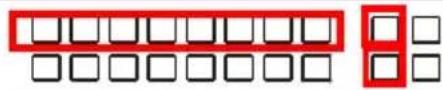
text_image
Two rows of small white squares, one highlighted in red, the other outlined in red.- The front panel pushbutton label (1–8) or (1–4) corresponds to the Input ports and Output ports on the unit's rear panel.
- Use the Menu pushbutton to view the LCD Menu (see LCD Menu Organization, page 21).
- Use the Profile pushbutton to switch between profile connections (see Profile List, page 39).
Port Switching
From the Main Screen, users can configure the Input-to-Output port connections to associate an Input source device to an Output display.
Input Port Selection
Use the Input Port pushbuttons to select the Input port you want to configure.


To select which input source displays on each output port, do the following:
- Press any Input port pushbutton (1–8) or (1-4). The Output port LED(s) tied to the said Input port will begin to flash. Available output port LED(s) will light up (steady).
In the example below, pressing Input port 1 shows it is tied to Output ports 1 and 2.
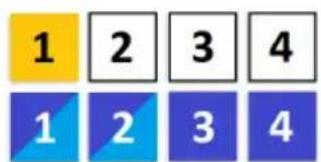
text_image
1 2 3 4 1 2 3 4(Continues on next page.)
(Continued from previous page.)
- To disconnect an Output port from an Input port, press the corresponding Output port pushbutton.
In the example below, Output port 2 has been disconnected from Input port 1.
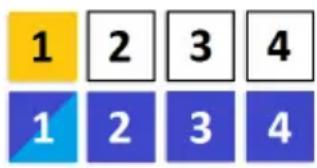
text_image
1 2 3 4 1 2 3 4- To switch to another Input port, press any Input port pushbutton. The Output port LED(s) tied to the said Input port will flash.
In the example below, pressing Input port 2 shows it is tied to Output ports 3 and 4.
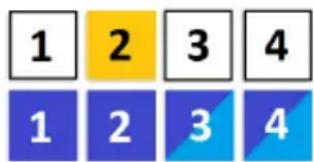
text_image
1 2 3 4 1 2 3 4- To connect Output port 2 to Input port 2 in the example above, then press the Output port 2 pushbutton. The Output port 2 LED will also begin to flash (0.5 sec on, 0.2 sec off). This indicates that Input port 2 is now connected to Output ports 2, 3 and 4.
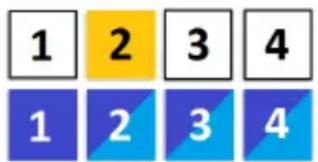
text_image
1 2 3 4 1 2 3 4Once the signal from the selected Input port is successfully tied to the Output port, the LEDs turn off and the LCD information is updated.
Note: 1. Pressing an Input port a second time deselects it.
-
Input ports that are not configured or tied to any output port do not in the LCD screen.
-
Pressing the Cancel pushbutton once stops the Input Port Selection operation and the LCD displays the active setting. Pressing the Cancel pushbutton again turns all LEDs off.
-
After 10 seconds of inactivity, all the LEDs turn off.
Output Port Selection
Use the Output Port pushbuttons to select the Output port you want to configure.


To select which output display corresponds to each input source device, do the following:
- Press any Output port pushbutton (1-8) or (1-4).
In the example below, Output port 1 pushbutton has been pressed. Available Input ports light up. Because no Input LEDs are flashing, no ports have already been assigned to Output port 1.
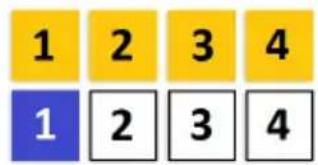
text_image
1 2 3 4 1 2 3 4-
If an Output port pushbutton is pressed a second time, it is deselected and the LED turns off.
-
To connect the selected Output port(s) to an Input port, press the Input port pushbutton. to which you want the Output port(s) tied. The newly selected Input port LED flashes (0.5 sec on, 0.2 sec off), and the LCD information is updated.
In the example below, pressing Input port 2 ties it to Output ports 2, 3 and 4.
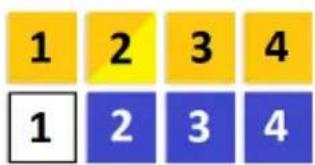
text_image
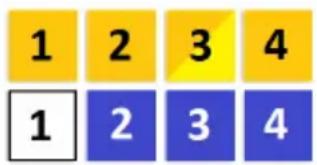
1 2 3 4 1 2 3 4- To switch Output ports 2, 3 and 4 to another Input port (and disconnect it from Input port 2), press another Input port pushbutton to which you want them tied.
In the example below, Input port 3 has been pressed and is now connected to Output ports 2, 3 and 4.
text_image
1 2 3 4 1 2 3 4Note: 1. Pressing an Output port a second time deselects it.
- Pressing the Cancel pushbutton once stops the Output Port Selection operation, and the LCD displays the active setting. Pressing the Cancel pushbutton again turns all LEDs off.
- After 10 seconds of inactivity, all the LEDs turn off.
LCD Menu Organization
The VM5404H / VM5808H has a built-in configuration utility via the front panel LCD, which can be controlled by pressing the MENU and front panel Input pushbuttons (1–8) or (1–4). User can cycle through the menu options, starting from IP Setting page, in the order shown in the table below:
| Menu Page Sub-Me | Menu Page(s) | ||
| IP Setting IP Address | |||
| Subnet Mask | |||
| Gateway | |||
| Serial Port Setting | Baud Rate | 9600 / 19200 / 38400 / 115200 | |
| Operation Mode | EDID | Default / Port1 / Remix / Customized | |
| CEC On / NA | |||
| OSD On / NA | |||
| Output Status Video On / NA | NA | ||
| Output Resolution | 01-04 (VM5404H);01-08 (VM5808H) | ||
| Security Mode Mode None | |||
| Password Enable | |||
| Lock Screen | |||
| Change Password | Old Password | New Password | |
| Save to a Profile | Save to a Profile No. | 01-08 (VM5404H); 01-16 (VM5808H) | |
| Play/Stop the Profile Schedule | |||
| Turn Video Wall Off | |||
Note: The highlighted values are the default settings of the VM5404H / VM5808H.
Menu Pushbutton
Press the MENU pushbutton to switch between the Main Screen and LCD Menu page. When the Menu is active, the MENU pushbutton's built-in LED lights up:


From the Menu page:
- Press 1 to go to the IP Setting page (see IP Setting, page 22)
- Press 2 to go to the Serial Port Setting page (see Serial Port Setting, page 24)
- Press 8 or Next to go to the next page(s) for the sub-menu pages
- Press Menu or Cancel to return to the Main Screen
IP Setting
The IP Setting page displays the VM5404H / VM5808H's IP configuration. The values in the LCD Menu are read-only and can be edited via the Browser GUI (Network, page 63).
IP Address / Subnet Mask
To view the VM5404H / VM5808H's IP address and Subnet Mask, do the following:
- From the Menu page, press 1 to see the IP Setting submenu. The IP address and Subnet Mask are then shown.


Note: The VM5404H / VM5808H default IP address is 192.168.0.60. The default Subnet Mask is 255.255.255.0
- Press 8 or Next to go to the next page.
- Press Menu to return to the Menu page.
- Press Cancel to return to the previous page without saving.
Gateway
To view the VM5404H / VM5808H's gateway address, do the following:
- From the Menu page, press 1 to see the IP Setting submenu, then press 8 or Next to get to the next page. The gateway address displays.

text_image
Gateway: 192.168.0.1 7: BackNote: The default Gateway is 192.168.0.1.
-
Press 7 or Prev to go to the previous page.
-
Press Menu to return to the Menu page.
-
Press Cancel to return to the previous page without saving.
Serial Port Setting
To configure the VM5404H / VM5808H's baud rate for its serial port connection, select Serial Port Setting from the Menu page.


Baud Rate
To set the VM5404H / VM5808H's baud rate, do the following:
- Select Baud Rate Setting from the Serial Port Setting submenu by pressing 1:
1: Baud Rate Setting

- Press pushbuttons 1–4 to make your selection.
1: 9600 3: 38400 2: 19200 (In use) 4: 115200

Baud Rate options are:
◆ 1:9600
2:19200
3:38400
4:115200
Note: The default baud rate is 19200.
- Press Menu to return to the Menu page.
- Press Cancel to return to the previous step without saving.
Operation Mode
The EDID Mode, CEC, OSD and Output Status features can be configured from the Operation Mode page.
- EDID (Extended Display Identification Data) is used to have the VM5404H / VM5808H automatically apply a preset video configuration or EDID Mode, which utilizes the best resolution across different monitors
- Consumer Electronics Control (CEC) allows interconnected HDMI devices to communicate and respond to one remote control
- The OSD, when enabled for a port, lets an attached display/monitor show real-time port switching information
- The Output Status shows whether the video/audio of an Output port is turned on or off and allows viewing and setting of the Output Resolution
To configure the VM5404H / VM5808H's operation mode settings from the Main Screen, use the Menu pushbutton to access the Menu page, press 8 or Next to navigate to the next page, then press pushbutton 1 to access the Operation Mode page.

text_image
1: Operation Mode 7: Back 2: Security Mode 8: NextEDID Mode
To configure the EDID Mode, do the following:
- From the Operation Mode page, press pushbutton 1:

text_image
1: EDID Mode 2: CEC 8: Next ▼(Continues on next page.)
- Press pushbuttons 1–4 to make your selection.

text_image
1: Port 1 3: Remix 2: Default (In use) 4: CustomizedEDID Mode options are:
| EDID Option Description | |
| 1: Port1 The EDID from port1 is passed to all video sources. | |
| 2: Default The default EDID is passed to all video sources. | |
| 3: Remix Uses the EDID of each connected display according to its connection when the VM5404H / VM5808H is first powered on, or immediately after pressing 3 to select the Remix option. | |
| 4: Customized Automatically retrieves and saves the EDID settings of a connected monitor/display device to an input source port. This can be configured using the Browser GUI. See Customized EDID Settings, page 68. |
-
Press Menu to return to the Menu page.
-
Press Cancel to return to the previous step without saving.
CEC
To configure the CEC setting, do the following:
- From the Operation Mode page, press pushbutton 2:

text_image
1: EDID Mode 2: CEC 8: Next ▼- Press pushbuttons (1–8) or (1–4) to enable (ON) or disable (NA) the CEC feature for the output port. If the port does not support CEC, an NA is shown.

Note: The default CEC setting is NA.
-
Press Menu to return to the Menu page.
-
Press Cancel to return to the previous step without saving.
OSD
The On-Screen Display or OSD feature enables real-time text updates to appear on the display device's screen for any configuration changes made to the Output port via the VM5404H / VM5808H's front panel, IR remote control or Browser GUI.
To configure the OSD setting for each output port, do the following:
- From the Operation Mode page, press 8 or Next to go to the next page, then press pushbutton 1:

text_image
1: OSD 2: Output Status 7: Back ▲- From the Output Status page, press pushbutton 1:

text_image
1:Video- Press pushbuttons (1–8) or (1–4) to enable (ON) or disable (NA) the OSD feature for the output port.

text_image
OUTPUT 1 2 3 4 5 6 7 8 ON ON ON NA ON NA ON NANote: The default OSD setting is On.
-
Press Menu to return to the Menu page.
-
Press Cancel to return to the previous step without saving.
Output Status
To configure the Output Status settings for each output port, do the following:
- From the Operation Mode page, press 8 or Next to go to the next page, then press pushbutton 2:

text_image
1: OSD 2: Output Status 7: Back- From the Output Status page, press 1 to select Video.

text_image
1: Video 2: Output Resolution- Press pushbuttons (1–8) or (1–4) to enable (ON) or disable (NA) the video/audio of the output port.

text_image
OUTPUT 1 2 3 4 5 6 7 8 ON ON ON NA ON NA ON NANote: The default Output Status setting is On.
- Press Menu to return to the Menu page.
- Press Cancel to return to the previous step without saving.
To configure the Output Resolution settings for each output port, do the following:
- From the Operation Mode page, press 8 or Next to go to the next page, then press pushbutton 2:

text_image
1: OSD 2: Output Status 7: Back- From the Output Status page, press 2 to select Output Resolution.

text_image
1: Video 2: Output Resolution- Press pushbuttons (1–8) or (1–4) to select an output port whose resolution will be changed.

text_image
OUTPUT 1 2 3 4 5 6 7 8- Available options include:
Native Resolution
1024x768@60Hz
1280x720@60Hz
1280x1024@60Hz
1400x1050@60Hz
1600x1200@60Hz
1920x1080@60Hz
1920x1200@60Hz
1280x720@50Hz
1920x1080@50Hz
1280x800@60Hz
720x576@50Hz
1600x900@60Hz
-
Press Menu to return to the Menu page.
-
Press Cancel to return to the previous step without saving.
Security Mode
The Security Mode page allows users to manage the VM5404H / VM5808H's security-related settings. Three security modes are available: None, Password Enable and Lock Screen. The VM5404H / VM5808H's password can also be changed here.
To configure the VM5404H / VM5808H's security settings from the Main Screen, use the Menu pushbutton to access the Menu page, press 8 or Next to navigate to the next page, then press pushbutton 2 to access the Security Mode page.

text_image
1: Operation Mode 2: Security Mode 7: Back 8: NextMode
- To change the VM5404H / VM5808H's security mode, press pushbutton 1 in Security Mode.

text_image
1. Mode: None 2. Change Password- In the Mode menu, to disable security settings, press pushbutton 1. The menu will then return to Security Mode. To require a password after the LCD display times out or is powered off/on, press pushbutton 2. The menu will then return to the home screen.

text_image
1. None (In Use) 2. Password Enable 8: Next □□□□□□□□ □□□□□□□□□□ □□□□□□□□□Note: If Password is Enabled, the LCD display's default time-out is 5 minutes. The VM5404H / VM5808H's default password is 1234.
- To enable a lock screen, press 8 or Next to navigate to the next page, then press pushbutton 1. The menu will then return to the home screen. When Lock Screen is enabled, pressing any pushbutton from the home screen will trigger the following message: Please press "Menu" to start.

text_image
1. Lock Screen 7: Back ▲- Press Menu to return to the Menu page.
- Press Cancel to return to the previous step without saving.
Change Password
- To change the password for accessing the unit, press pushbutton 2.

text_image
1. Mode: None 2. Change Password- In the Old Password field, the cursor flashes at the first digit. Enter the old password (see Enter Password, page 16). If the old password is entered correctly, you can proceed to the next step.

text_image
Old Password: * * * * Incorrect PasswordNote: If you entered an incorrect password, an error message appears and the cursor goes back to the first digit (flashing). The Incorrect Password message clears as soon as a new digit is entered.
- In the New Password field, the cursor flashes at the first digit. Enter the new password using the front panel number pushbuttons VM5808H: (1111-8888) or VM5404H: (1111-4444).

text_image
New Password: ****- Re-enter the new password in the following screen. The new password is applied by the VM5404H / VM5808H immediately.

If the password you entered does not match the one entered in the previous screen, an error message appears. Enter the new password correctly.
- Press Menu to return to the Menu page.
- Press Cancel to return to the previous step without saving.
Save to a Profile
The switch allows users to store up to 8 (VM5404H) or 16 (VM5808H) (numbered P1–P16) different connection profiles that can be saved and recalled later.
The active Input-to-Output port connections on the LCD Main Screen is the configuration saved to a profile. When a user loads a profile, the change is immediate and the profile number is shown on the lower right corner of the LCD screen.
To save a profile once the desired port connections are set, do the following:
- Press the Menu pushbutton to access the Menu page, then 8 or Next to navigate to the next pages. Press pushbutton 1 to open the select Save to a Profile page.


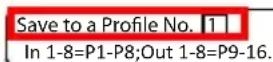
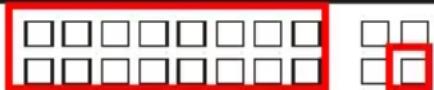
- On the page that opens, you are asked to give the profile a number. Use the front panel number pushbuttons to select a profile number into which you want to save the configuration.
text_image
Two rows of empty squares with red-outlined boxes in the top row, likely indicating a selection or status.VM5404H: Options are P1–P8 (when saving a profile via the LCD), where:
- Input port pushbuttons 1–4 correspond to Profile P1 to P4
Output port pushbuttons 1–4 correspond to Profile P5 to P8
VM5808H: Options are P1–P16 (when saving a profile via the LCD), where:
Input port pushbuttons 1–8 correspond to Profile P1 to P8
Output port pushbuttons 1–8 correspond to Profile P9 to P16
- Press Enter to store the configuration – the LCD shows Profile Saved.
- Press Menu to return to the Menu page,
- Press Cancel to return to the previous step without saving.
Note: Access the Save to a Profile page quickly by pressing the Profile pushbutton for longer than 3 seconds.
Play/Stop the Profile Schedule
Inputting port pushbutton 2 will Play or Stop the active Profile Schedule.

text_image
1: Save to a Profile 2: Play/Stop the Profile ScheduleTurn Video Wall Off
If a video wall is currently playing, a submenu will appear.

- Selecting Turn video wall off will return port assignments to their default (i.e. disassemble the video wall).
Profile Pushbutton
The PROFILE pushbutton lets users conveniently switch between connection profiles that have been saved or added to the Profile List (see Profile List, page 39).
When a Profile is in use, its profile number (P1–P16) is shown on the lower right corner of the LCD display.


The Profile pushbutton functions as follows:
- After pressing the Profile pushbutton, available profile numbers will light up. The active profile number will flash. use the Input/Output pushbuttons to switch to a specific profile (P1 to P16) or (P1 to P8). Note that:
- Input ports 1–8 or 1-4 correspond to Profile P1 to P8 or P1 to P4
- Output ports 1–8 or 1-4 correspond to Profile P9 to P16 or P5 to P8 (where Output Port 1=Profile 9, Output Port 2=Profile 10... Output Port 8=Profile 16)
The selected pushbutton's light flashes, and the VM5404H / VM5808H immediately applies the port connections configured in the selected profile. If the light changes to a steady state, it means the profile is valid.
- After pressing the Profile pushbutton, pressing it again will change to next profile in Profile Scheduling (see page 44), not the profile list. This feature is only available while a schedule is playing.
- Press the Cancel pushbutton to exit
Note: If there are no profiles configured on the VM5404H / VM5808H device, an error message “No Available Profile” is displayed when the Profile pushbutton is pressed.
A Profile's port connections can be edited using the front panel pushbuttons (see Port Switching, page 17) or from the Connections page of the Browser GUI (see Connection Profiles, page 46). Additionally, the Profile List can be configured via the Profile page of the Browser GUI (see Profile List, page 39).
IR Remote Control Operation
The IR remote control (IR Remote Control, page 9) included with the VM5404H / VM5808H can be used to:
◆ change the Input source of any Output display
◆ power on/off individual Output displays; or
◆ power on/off all Output displays simultaneously
Before using the remote control, a user must first plug the IR External Receiver into the rear panel of the VM5404H / VM5808H and place the receiver where the IR signal can be reached (see IR Port, page 8).
Change the Input source of an Output display
To change the Input source of an Output display, using the remote control, do the following:
- Press the Output port number (1-8) or (1-4) you want to change.
- Within 2 seconds press the Input port number (1-8) or (1-4) you want the Output port to display.*
- Repeat steps 1-2 to change additional ports.
*For the change to occur the Input number must be pressed within 2 seconds of pressing the Output number.
Power on/off individual Output displays
To power on/off individual Output displays, using the remote control, do the following:
- Press the Output port number (1-8) or (1-4) you want to power on/off.
- Within 2 seconds press the ON or OFF pushbutton.*
- Repeat steps 1-2 to change the power status back on/off.
*If the ON or OFF pushbutton is pressed after 2 seconds of pressing the Output port number, all the displays are powered on or off instead of just the intended Output port.
Power on/off all Output displays
To power on/off all Output displays simultaneously, with the remote control, do the following:
- Press the ON or OFF pushbutton.*
- Repeat step 1 to simultaneously change back the power status of all Output ports, to on or off, respectively.
*The ON or OFF pushbuttons bring all displays to the same power status, regardless of the individual power statuses.
Overview
The VM5404H / VM5808H can be configured over a standard TCP/IP connection via its built-in Graphical User Interface (GUI). Because it can be accessed from anywhere over a network or the Internet, operators can easily log in via web browser. Security is ensured by password protection and user-configurable time-out. The VM5404H / VM5808H supports three levels of remote users with various privileges, and up to 16 users can log into the GUI at one time. For full details, see the sections that follow.
Logging In
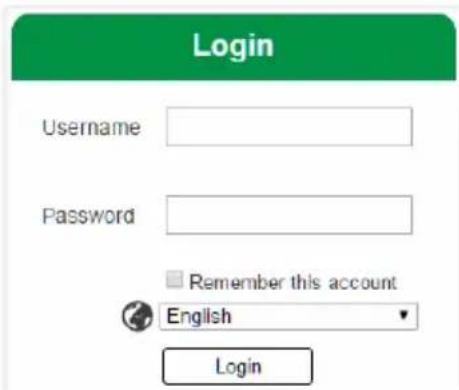
To access the GUI, type the VM5404H / VM5808H's IP address into the address bar of any browser. If a Security Alert dialog box appears, accept the certificate – it can be trusted. The login screen appears:
text_image
Login Username Password Remember this account English Login◆ The default IP address is http://192.168.0.60
◆ The default Username and Password are: administrator / password
- Enter the username and password, then click Login.
◆ The same user can not be logged in simultaneously.
◆ Use the drop-down menu to select the GUI language
- English, French, German, Italian, Japanese, Korean, Portuguese, Russian, Spanish, Simplified Chinese and Traditional Chinese
Note: The username supports lower case letters only.
Main Page
The Main Page opens to the Profile List. This is where you configure the input to output connections by creating profiles. The page is divided into three parts: the Menu Bar, Profile List, and Profile Scheduling.
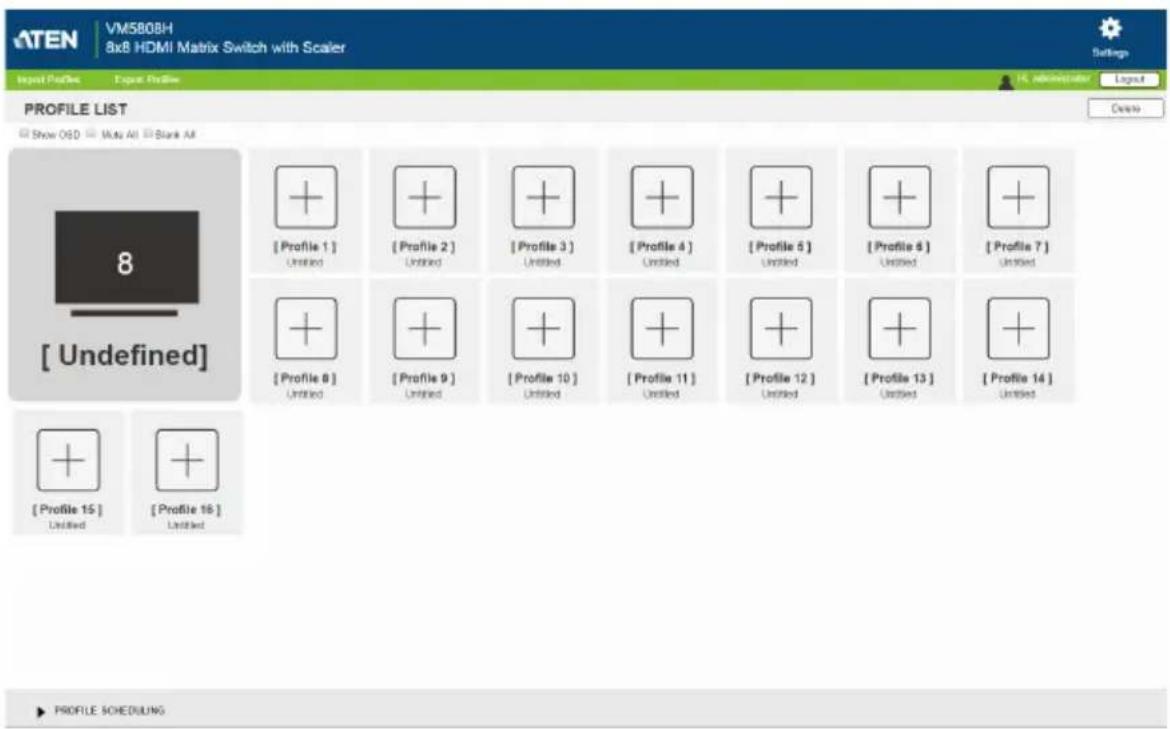
text_image
ATEN VM580BH 8x8 HDMI Matrix Switch with Scaler Settings Input Profiles Output Profiles Profile List Show OSD Menu All Blank All Profile 1 [ Profile 1 ] [ Profile 2 ] [ Profile 3 ] [ Profile 4 ] [ Profile 5 ] [ Profile 6 ] [ Profile 7 ] [ Profile 8 ] [ Profile 9 ] [ Profile 10 ] [ Profile 11 ] [ Profile 12 ] [ Profile 13 ] [ Profile 14 ] [ Profile 15 ] [ Profile 16 ] [ Profile SCHEDULINGMenu Bar
The Menu Bar consists of the Settings icon and Logout button.
text_image
Settings Hi, administrator. Logout- Click Settings to enter the System Settings (see page 57).
- Click the Logout button to log out of the GUI.
Profile List
The Profile List lets you configure the input to output port connections by creating profiles to use. You can store up to 8 (VM5404H) or 16 (VM5808H) differently configured profiles that can be saved and played by two methods: locally via the unit's front panel pushbuttons and via the web GUI.
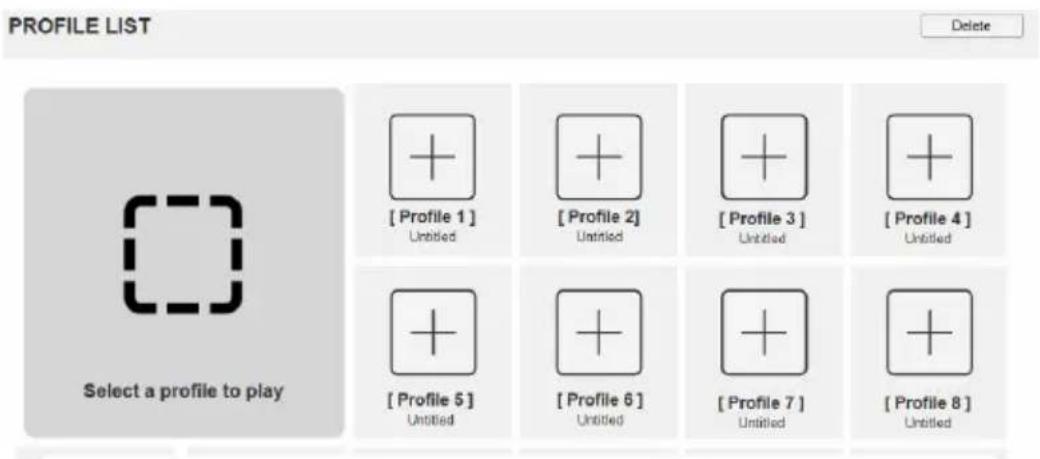
text_image
PROFILE LIST Delete Select a profile to play [ Profile 1 ] Untitled [ Profile 2 ] Untitled [ Profile 3 ] Untitled [ Profile 4 ] Untitled [ Profile 5 ] Untitled [ Profile 6 ] Untitled [ Profile 7 ] Untitled [ Profile 8 ]Adding/Playing a Profile
To configure a connection profile:
- From the Profile List, click a [Profile].
- Select the profile type:
Digital Signage
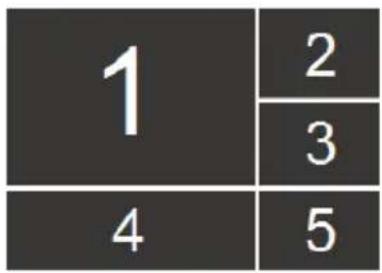
other
| Row | Top Left (1) | Top Right (2) | Bottom Left (3) | Bottom Right (4) | |---|---|---|---|---| | 1 | 1 | 2 | 0 | 0 | | 2 | 0 | 0 | 0 | 0 | | 3 | 0 | 0 | 0 | 0 | | 4 | 0 | 0 | 0 | 0 | | 5 | 0 | 0 | 0 | 0 |Video Wall
Digital Signage: Select this option for video that is displayed independently on separate monitors (page 46).
Video Wall: Select this option for monitors that are displayed together - tiled or as a large screen (page 49).
- Configure the input to output connections for a Digital Signage (page 46) or Video Wall (page 49) profile.
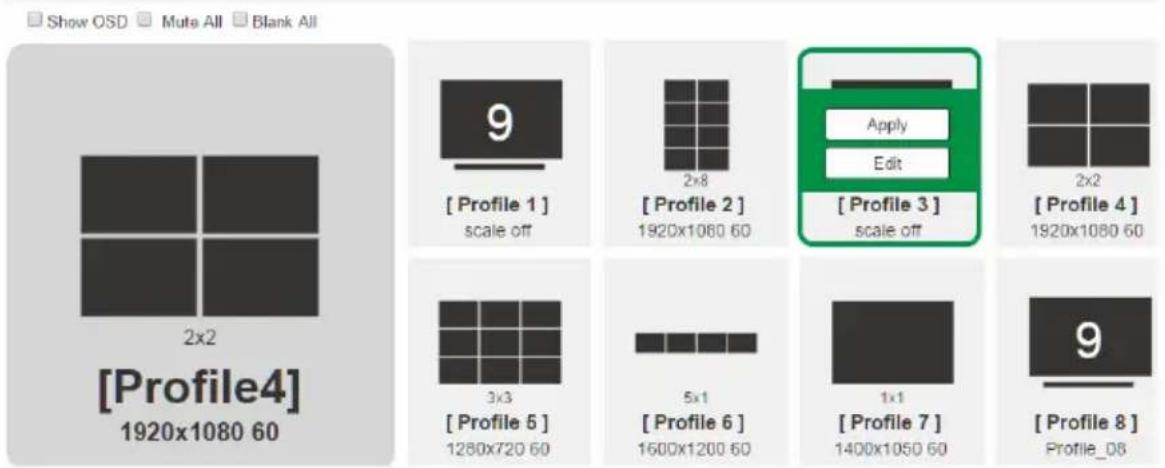
- New profiles appear in the Profile List, as shown here:
PROFILE LIST
text_image
[Profile4] 1920x1080 60 9 [Profile 1] scale off 2x8 [Profile 2] 1920x1080 60 Apply Edit [Profile 3] scale off 2x2 [Profile 4] 1920x1080 60 3x3 [Profile 5] 1280x720 60 5x1 [Profile 6] 1600x1200 60 1x1 [Profile 7] 1400x1050 60 9 [Profile 8] Profile_08- Select the profile and click Apply.
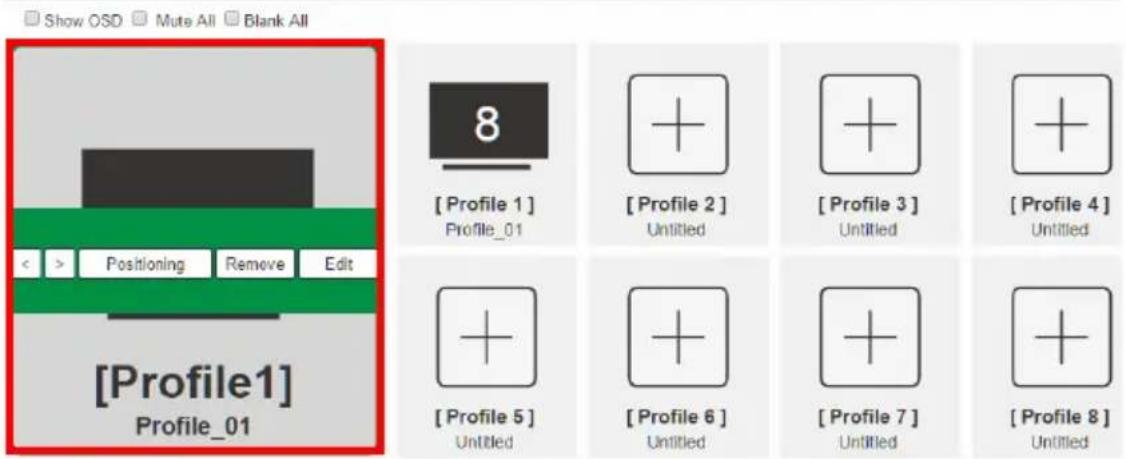
- The profile appears in the large Play window and the connections start:
PROFILE LIST
text_image
[Profile1] Profile_01 8 [Profile 1] Profile_01 [Profile 2] Untitled [Profile 3] Untitled [Profile 4] Untitled [Profile 5] Untitled [Profile 6] Untitled [Profile 7] Untitled [Profile 8] UntitledNote: More information about Profile List page options are provided on the next page.
Importing/Exporting a Profile
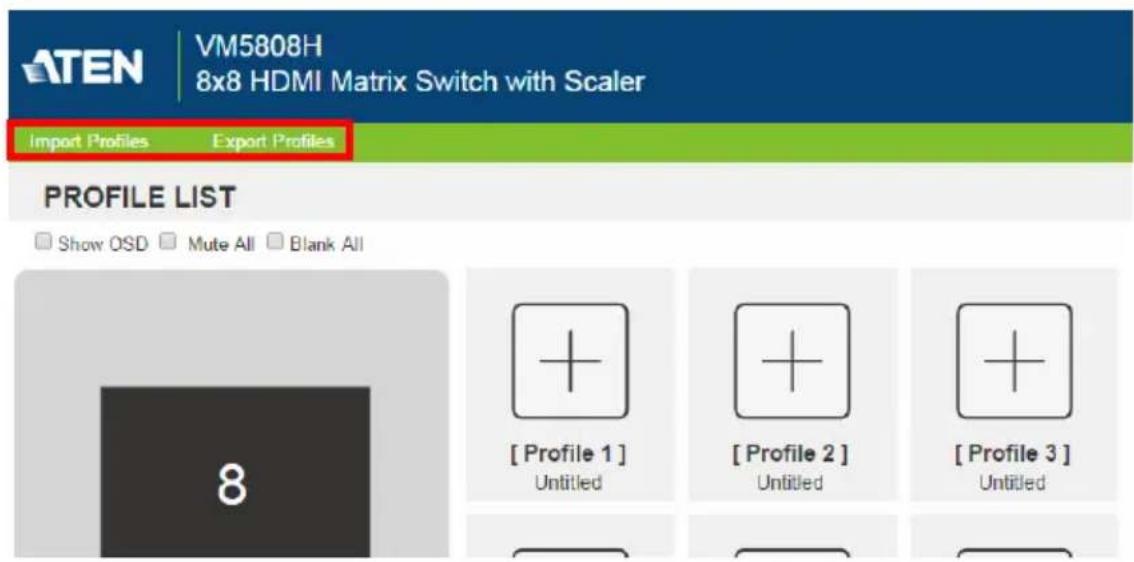
To export the VM5404H / VM5808H's connection profiles, do the following:
- Click Export Profiles. A configuration file will then begin downloading.
To import connection profiles to the VM5404H / VM5808H, do the following:
-
Click Import Profiles.
-
Browse to the configuration file, select it and click Open.
Note: Importing a connection profile database will overwrite the current profiles.
text_image
ATEN VM5808H 8x8 HDMI Matrix Switch with Scaler Import Profiles Export Profiles PROFILE LIST Show OSD Mute All Blank All [ Profile 1 ] Untitled [ Profile 2 ] Untitled [ Profile 3 ] UntitledProfile List Options
Clicking a Profile or the Play window opens a pop-up menu with options.
Profile
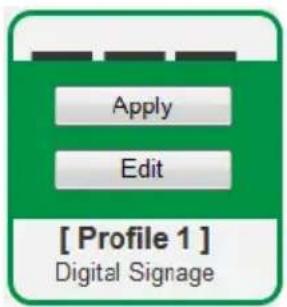
text_image
Apply Edit [ Profile 1 ] Digital Signage| Option Description | |
| Apply | Click Apply to put the profile in the Play window. This allows you to start the profile connections. |
| Edit | Click Edit to configure the profile's input to output connections. |
Play Window
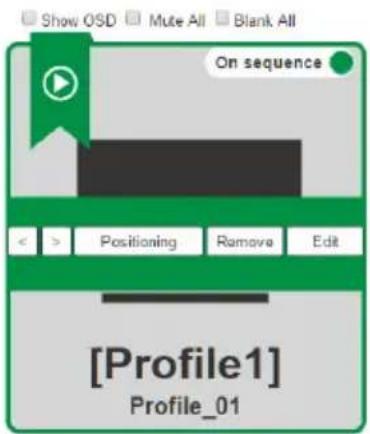
text_image
Show OSD Mute All Blank All On sequence Positioning Remove Edit [Profile1] Profile_01| Option Description | |
| On Sequence | On Sequence will appear when a profile schedule is playing (see page 44). |
| < Click < to go back | ck to the previous profile in the sequence, when Profile Scheduling is in use. Only available with On Sequence. |
| >Click >to advance | nce to the next profile in the sequence, when Profile Scheduling is in use. Only available with On Sequence. |
| Positioning | Click Positioning to open a window that allows you to adjust the image position on each display. For Video Wall profiles, you can also set the Bezel Dimension, which is the frame thickness between each display. |
| Remove Removes | s the profile from the Play window. |
| Edit | Click Edit to configure the profile's input to output connections. |
Other
| Option Description | |
| Show OSD | Check Show OSD to show text updates that appear on the display when configuration or port changes are made. |
| Mute All Check Mute All to mute the audio for all ports. | |
| Blank All | Check Blank All to turn off the video to all displays. |
Profile Scheduling
Profile Scheduling is located below the Profile List. Scheduling allows you to queue and play connection profiles in sequence for a specific amount of time.
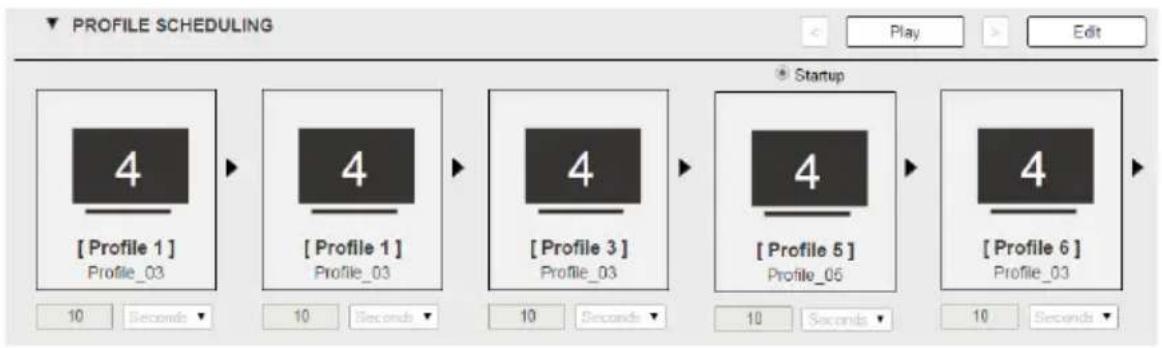
flowchart
graph LR
    A["Profile 1"] --> B["Profile_03"]
    C["Profile 1"] --> D["Profile_03"]
    E["Profile 3"] --> F["Profile_03"]
    G["Profile 5"] --> H["Profile_06"]
    I["Profile 6"] --> J["Profile_03"]
| Option Description | |
| Edit | Click to edit profile schedule. |
| Play | Click to play profile schedule. |
| Stop | Click to stop profile schedule. |
| Click to change to next or previous profile when a profile schedule is playing. | |
After selecting Edit, you will be presented with the following options.
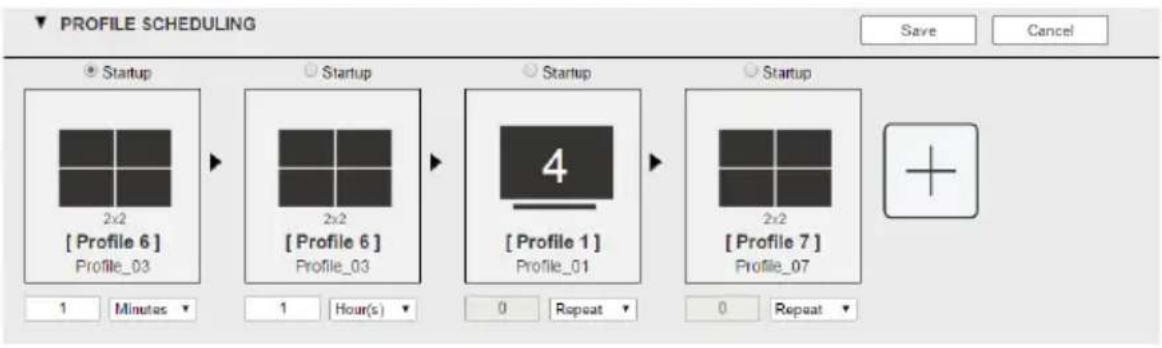
flowchart
graph LR
    A["Startup 2x2 [Profile 6"] Profile_03] --> B["Startup 2x2 [Profile 6"] Profile_03]
    B --> C["Startup 4 [Profile 1"] Profile_01]
    C --> D["Startup 2x2 [Profile 7"] Profile_07]
| Option Description | |
 | Click to add profiles to the schedule in the order to be played, left to right, then set the amount of time each profile plays. |
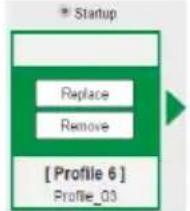 | Click a profile for a pop-up menu to appear:Select Startup to use the profile as the starting point for the schedule.Click Replace to replace the selected profile with another profile.Click Remove to delete the profile from the schedule.Use <> to change the profile's position in the schedule. |
 Repeat Repeat | Use the drop-down menu to select the duration (Hours, Minutes, or Seconds) and enter the amount of time for the profile to play. After the time expires, the schedule switches to the next profile.Use Repeat to stop switching between schedules and stay on the currently selected profile. If Repeat isn't used, the schedule will loop back to the first profile. If Repeat is used, a specific number of hours, minutes and seconds cannot be set and later profiles will not be played. |
| Save | Click Save to save the schedule as it appears. After saving, the Profile Scheduling window will close.When a Profile Schedule is playing the On Sequence box will appear in the Play window. |
| Cancel | Click Cancel to discard changes and return to the Profile Schedule page. |
Connection Profiles
There are two types of profiles: Digital Signage and Video Wall. Digital Signage profiles are for displays where video is viewed on separate monitors. Video Wall profiles are for displays that are tiled together, where multiple monitors form one large screen – in various arrangements.
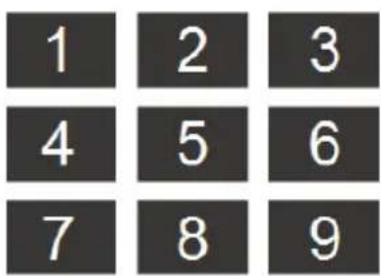
text_image
1 2 3 4 5 6 7 8 9Digital Signage
| 1 | 2 |
| 3 | |
| 4 | 5 |
Video Wall
Digital Signage Profile
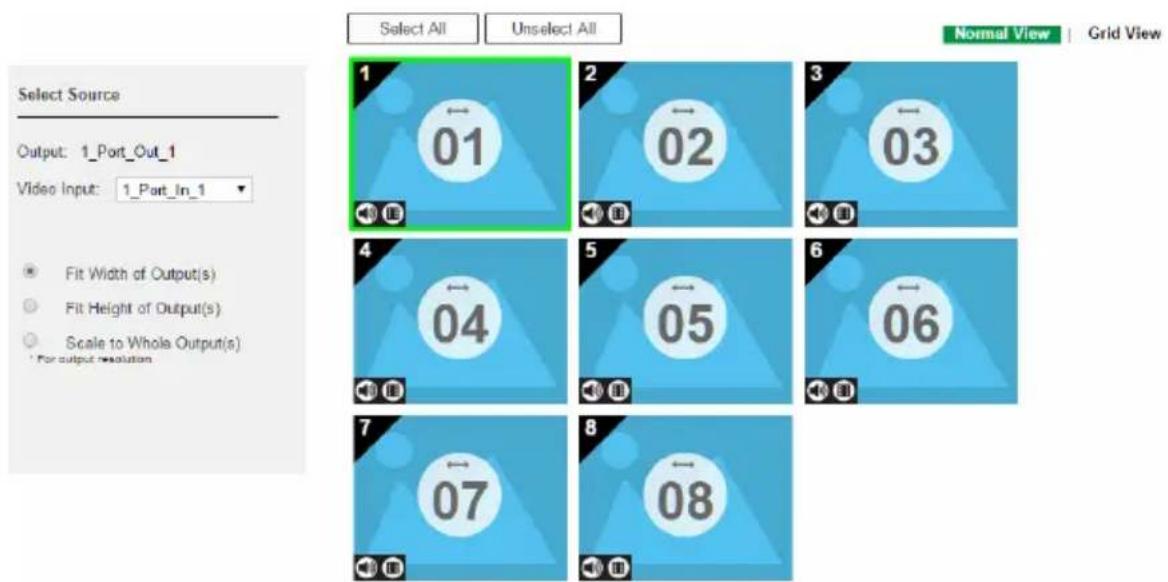
Each icon represents an output port and the connected display. The large number is the Input port selected for the display. The small number (upper-left corner) is the Output port for the display. Click the icons to select options.
text_image
Select All Unselect All Normal View | Grid View Select Source Output: 1_Port_Out_1 Video Input: 1_Port_In_1 Fit Width of Output(s) Fit Height of Output(s) Scale to Whole Output(s) For output resolution 1 01 2 02 3 03 4 04 5 05 6 06 7 07 8 08- Select icons to choose the Video Input from the Select Source menu.
- Click the PEN icon or name to edit the profile name.
- Click Select All to select all outputs.
- Click Unselect All to unselect all outputs.
- Click Save to save the profile or Save as to save as a different profile number.
- Click Grid View to use an alternate method for configuring connection profiles (see page 48).
Output Icon
text_image
01| Option Description | |
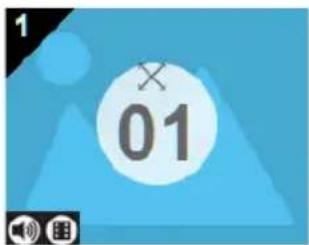
| Output Icon Click | an Output icon(s) to highlight it in green and use the Select Source menu to set the video options (see Select Source below).The large number is theVideo Inputport selected for the display.The small number (upper-left corner) is theOutputport of the display. |
| Mute / Video | Click thespeakericon to mute the audio on/off.Click thevideoicon to turn the video off/on. |
Select Source
text_image
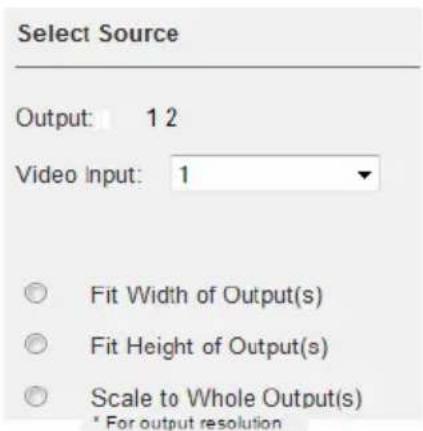
Select Source Output: 1 2 Video Input: 1 Fit Width of Output(s) Fit Height of Output(s) Scale to Whole Output(s) * For output resolution| Option Description | |
| Select Source | The Select Source menu appears when you click an Output icon. |
| Output Displays the Outputs that are selected for the configuration change. | |
| Video Input | Use the drop-down menu to select the Video Input.Click Save or Save as to save the changes. |
| Radio Button | ◆ Fit Width of Output(s): fits the video to the width of the display.◆ Fit Height of Output(s): fits the video to the height of the display.◆ Scale to Whole Output(s): fits the video on the entire display. |
Grid View
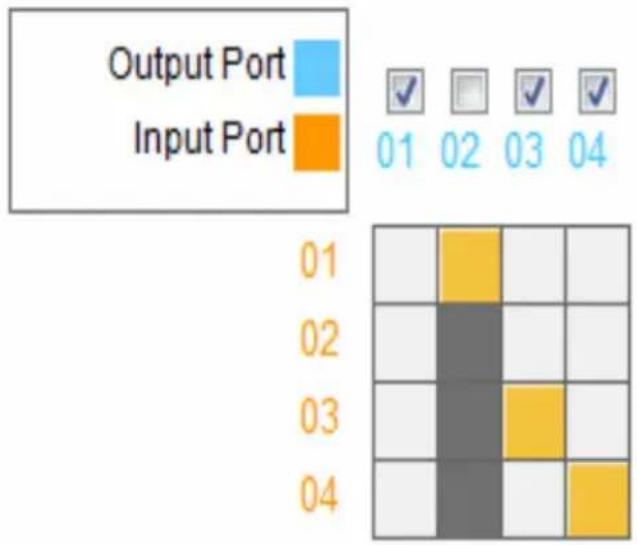
The Grid View allows you to select the Input to Output connections using a simple grid.
heatmap
| Output Port | Input Port | |---|---| | 01 | 01 | | 02 | 02 | | 03 | 03 | | 04 | 04 |- Select a box to coordinate Input Ports to Output Ports. By default, ports will be aligned so that i01 will correspond to o01, etc.
- Uncheck a box to disable the video for that Output Port. The column will no longer contain a yellow box.
- Check an Input Port radio button to align all Output Ports to that Input Port.
- Click Test to play current profile without saving.
- Click Save & Apply to save a profile and begin playing it.
- Click Save to save the profile.
- Click Save as to save the profile as a different profile number.
- Click Cancel to undo all unsaved changes.
Output Options
For instructions on the Output Options, see Output Options, page 55.
Video Wall Profile
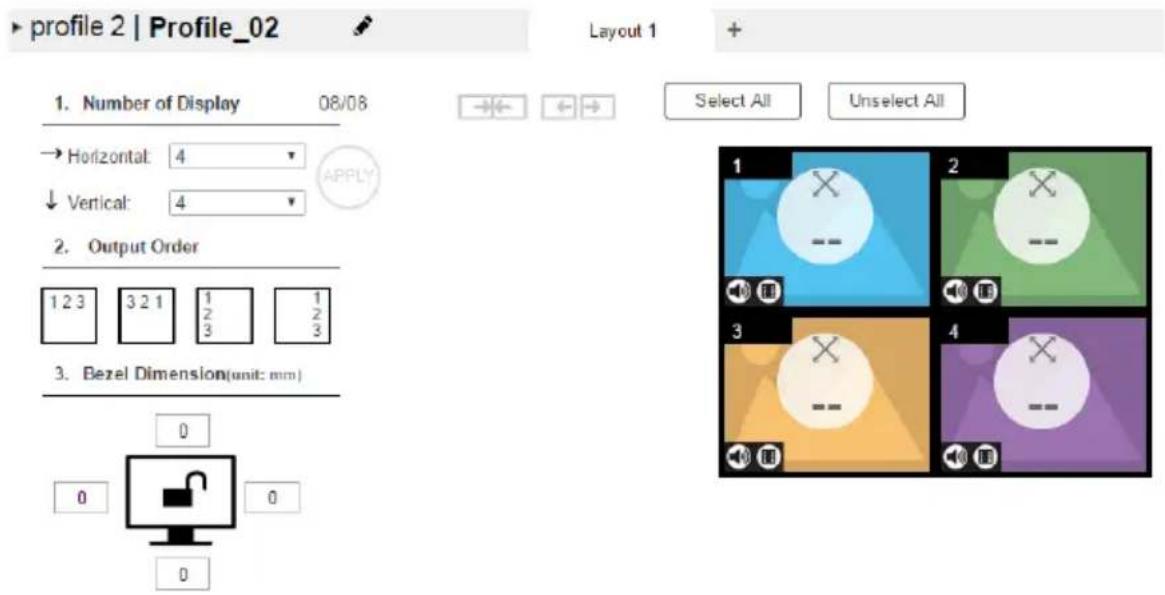
Each blank icon represents an Output port and the connected display. Use the icons to create Independent and Grouped Outputs. Independent Outputs will display video on a single monitor. Grouped Outputs will display video across multiple monitors as one large screen.
text_image
profile 2 | Profile_02 Layout 1 + 1. Number of Display 08/08 → Horizontal: 4 ↓ Vertical: 4 2. Output Order 1 2 3 3 2 1 1 2 1 1 3. Bezel Dimension(unit: mm) 0 0 0 0 Select All Unselect AllVideo Wall Options
- Click an icon to choose its Output and Video Input from the Display Preference menu (see page 51).
- Click multiple icons to Group Outputs (see Grouping, page 52) and choose the Video Input from the Display Preference menu.
- Use+ next to Display Layout_1 to create additional layouts under the same profile.
- Click the PEN icon or name to edit the profile name.
- Click Select All to select all outputs.
- Click Unselect All to unselect all outputs.
- Click Test to play current profile without saving.
- Click Save & Apply to save the profile and put it in the Play window (see page 42).
- Click Save to save the profile.
- Click Save as to save the profile as a different profile number.
- Click Cancel to discard changes and return to the Profile List.
Number of Displays / Bezel Dimensions
text_image
1. Number of Display 08/08 → Horizontal: 4 ↓ Vertical: 4 2. Output Order 1 2 3 3 2 1 1 1 2 3 2 3 2 3 3. Bezel Dimension(unit: mm) 0 0 0 0| Option Description | |
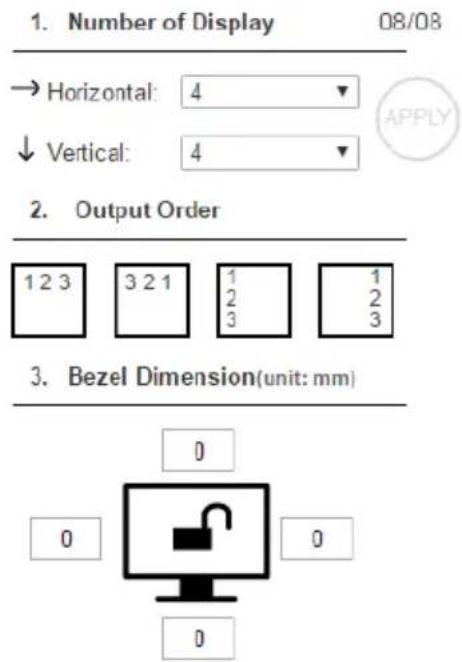
| Number of Displays | Use the Horizontal and Vertical drop-down menu to select the number of displays that make up the video wall (a maximum of 64 are supported). Match this to the physical layout of the displays.Click Apply to set the layout. |
| Output Order Automatically assign output ports by selecting one of the following options: Left to right (top to bottom), right to left (top to bottom), top to bottom (left to right) or top to bottom (right to left). | |
| Bezel Dimension | Use the four boxes to increase/decrease the frame size for each active display. |
Monitor Lock / Unlock | Click the monitor icon to Lock the (4) bezel settings, so that when one size is changed they all change.Click the monitor icon to Unlock the (4) bezel settings, so that each size can be set independently. |
Blank Output
natural_image
Blue square icon with a white circle containing an 'X' and a minus sign, surrounded by a play button and grid (no text or symbols)| Option Description | |
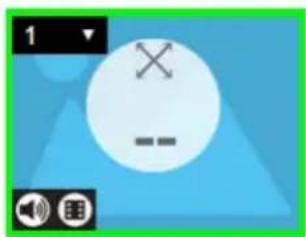
| Blank Icon Click B | Blank Output icons to highlight icons in green and use the Display Preferences menu to set the video options (see Display Preferences, page 53).Select a single icon to set the Output and Video Input for an independent display (see Independent Output, page 51).Select multiple icons and set the Video Input to group displays as one screen (see Grouping, page 52). You must first set the Output port for each icon. |
| Drop-down Menu | Use the drop-down menu to select the Output port. |
Independent Output
text_image
3 02| Option Description | |
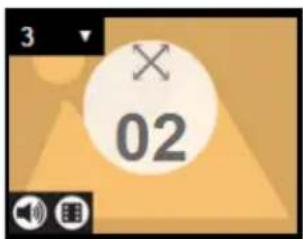
| Independent Output | Independent Outputs are displays that have their ownVideo InputandOutputselected. Independent Outputs:◆ Display their own video◆ Icons have their own color and Video InputSelect an Independent Output and use theDisplay Preferences(page 53) menu select theVideo Input. |
| Drop-down Menu | Use the drop-down menu to select the Output port. |
Mute / Video | Click thespeakericon to mute the audio on/off.Click thevideoicon to turn the video off/on. |
Grouping
Select All
Unselect All
text_image
1 01 2 01 3 -- 4 -- 5 -- 6 -- 7 -- 8 --| Option Description | |
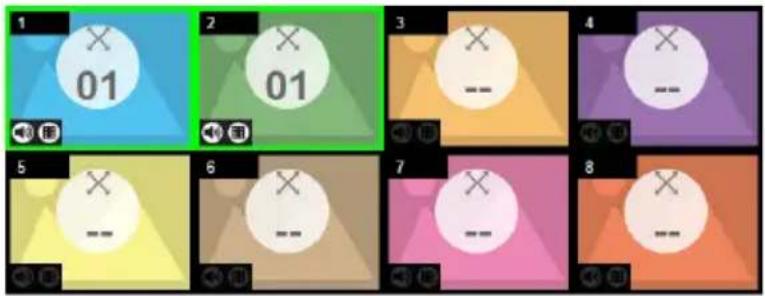
| Grouping Click m | multiple icons to Group Outputs (highlighted in green) and click→|← to group the displays into one screen*. Use the Display Preferences menu to select the Video Input for the group - each Output icon in the Group will appear with the same Video Input number and icon color (see Group, page 52).Note: Before grouping you must set the Output port for each icon. |
| Ungroup | Select a group and click ←|→ to ungroup the displays. |
Group
text_image
1 ← 02 2 ← 02| Option Description | |
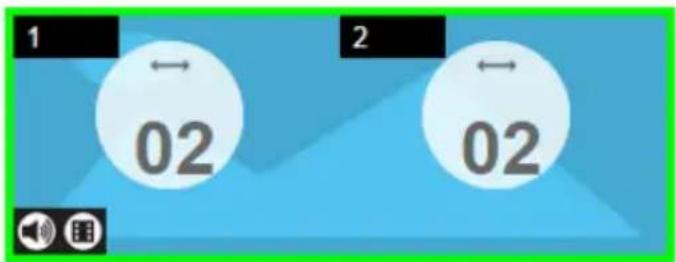
| Group | A Group (of Outputs) shares the same Video Input and displays the video together as one large screen. A Group of Outputs:◆ Displays video across multiple monitors to form one screen◆ Icons have the same color and Video Input number.◆ Select a Group and use the Display Preferences menu to select the Video Input.◆ To group outputs see Grouping, page 52. |
Mute / Video | Click the speaker icon to mute the audio on/off.Click the video icon to turn the video off/on. |
Display Preferences
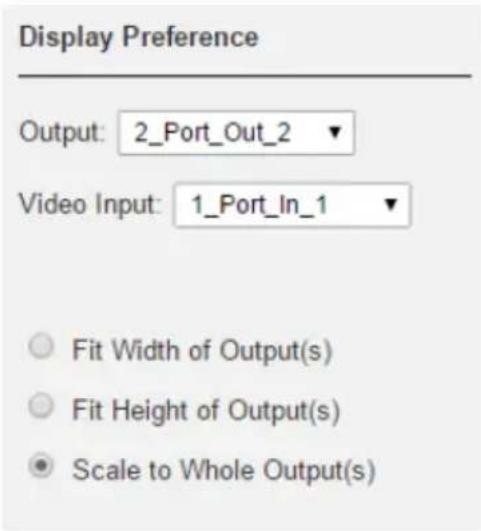
text_image
Display Preference Output: 2_Port_Out_2 Video Input: 1_Port_In_1 Fit Width of Output(s) Fit Height of Output(s) Scale to Whole Output(s)| Option Description | |
| Display Preferences | Click Output icons for the Display Preferences menu to appear- to select the Output and/or Video Input port. |
| Output | Use the drop-down menu to select the Output port (Independent and single Blank icons only).If you select multiple displays the output ports selected will appear here. You can use the output icon's drop-down menu to change the output port for the display. |
| Video Input | Use the drop-down menu to select the Video Input port. |
| Radio Button | ◆ Fit Width of Output(s): fits the video to the width of the display.◆ Fit Height of Output(s): fits the video to the height of the display.◆ Scale to Whole Output(s): fits the video on the entire display. |
Video Wall Example
The example below shows a video wall with 8 displays.
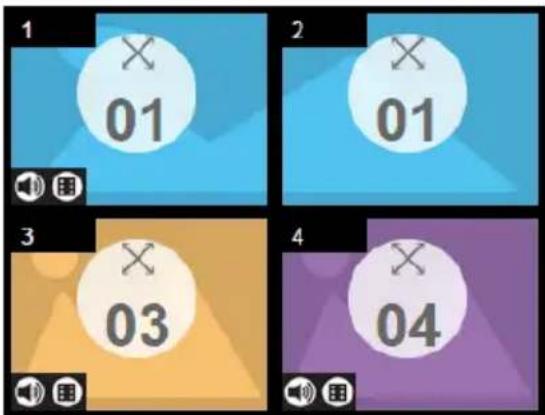
text_image
1 01 2 01 3 03 4 04◆ Each Group and Independent Output has a unique color.
- This video wall has 1 Group and 2 Independent displays.
- The Group will show Video Input 01 across both displays as one large screen.
- The Independent displays will show the video from their own Video Input – 03 and 04.
- Add Display Layouts to create separate video walls (see Video Wall Options, page 49).
Output Options
The Output Options page is used to configure HDMI Video options.
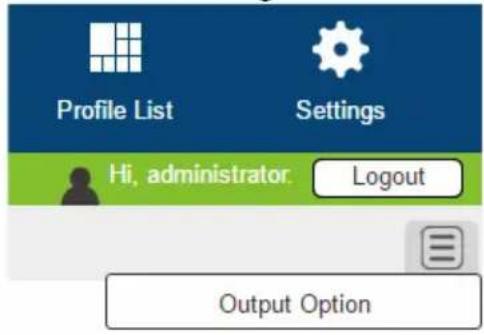
text_image
Profile List Settings Hi, administrator: Logout Output OptionHDMI Video Options
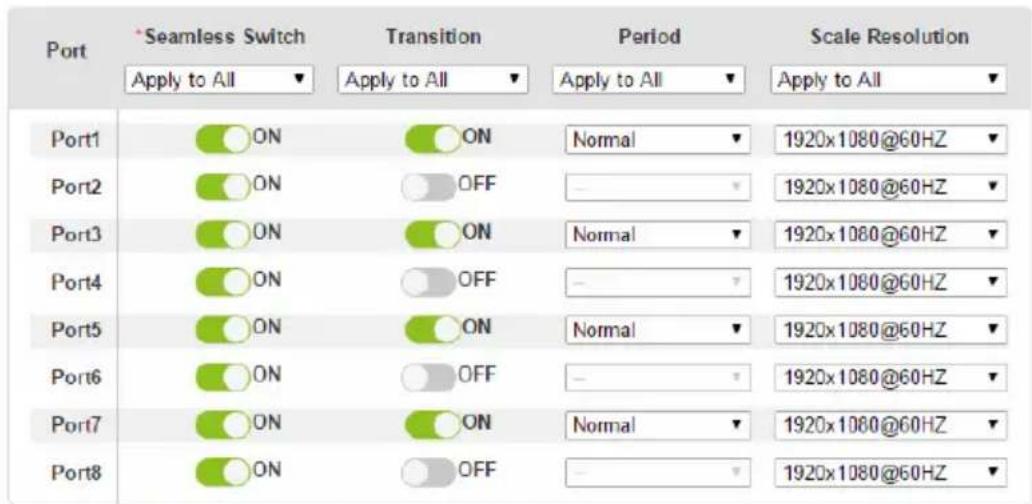
HDMI Video Options allow you to set Seamless Switch™ options which determine how a display performs when the input port is changed.
text_image
Port *Seamless Switch Transition Period Scale Resolution Apply to All Apply to All Apply to All Apply to All Port1 ON ON Normal 1920x1080@60HZ Port2 ON OFF - 1920x1080@60HZ Port3 ON ON Normal 1920x1080@60HZ Port4 ON OFF - 1920x1080@60HZ Port5 ON ON Normal 1920x1080@60HZ Port6 ON OFF - 1920x1080@60HZ Port7 ON ON Normal 1920x1080@60HZ Port8 ON OFF - 1920x1080@60HZ"The Seamless Switch function cannot be turned off from the video wall editor.
Note: When Seamless Switch ^TM is enabled:
- The Transition, Period and Scale Resolution options can be enabled.
- Video outputs will not display 3D, Deep Color, or interlace (i.e., 1080i) resolutions correctly. To use these features, first disable Seamless Switch ^TM .
- Videos may not display within range (fit on the screen), in which case, make sure to adjust the display settings on your device.
Enable Seamless Switch ^TM to remove the video distortion and delay seen when an input port is switched. Use the drop-down menu to apply to all ports, or the ON/OFF button to enable/disable Seamless Switch ^TM per port. With Seamless Switch ^TM enabled, the following options are enabled:
- Transition: Allows you to fade the video display when the input port is changed. Use the period option to set the fade speed.
- Use the drop-down menu to apply to all ports, or ON/OFF button to enable/disable Transitions per port.
- Period: Sets the fade speed for the Transition option.
- Use the drop-down menu to apply an option (Slow, Normal, or Fast) to all ports, or lower drop-down menus to apply options per port.
- Scale Resolution: Forces the port to scale the video displayed to the selected resolution. Use the top drop-down menu to apply an option to all ports, or use the lower drop-down menus to apply options per port. Options are:
560x360@60HZ
720x576@50HZ
768x480@60HZ
1024x768@60HZ
1280x720@50HZ(720p)
1280x720@60HZ(720p)
1920x1080@30HZ(1080p)
1280x800@60HZ
1280x1024@60HZ
1366x768@60HZ
1400x1050@60Hz
1600x900@60HZ
1600x1200@60HZ
1920x1200@60HZ
1920x1080@50HZ(1080p)
1920x1080@60HZ(1080p)
- Click Test to play current profile without saving.
- Click Save to save the profile or Save as to save as a different profile number.
- Click Save & Apply to save the profile and put it in the Play window (see page 42).
- Click Cancel to discard changes and return to the Profile List.
System Settings
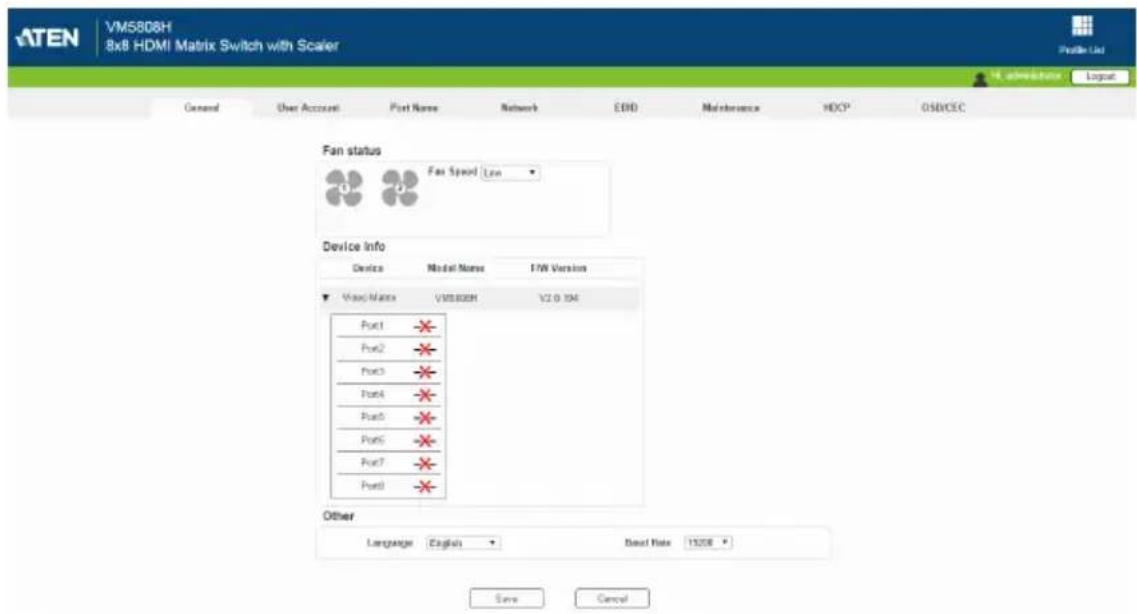
Click the Settings link from the Main page for the System Settings to open on the General page:
text_image
ATEN VM5808H 8x8 HDMI Matrix Switch with Scaler General User Account Port Name Network EHD Maintenance HDCP OSBCEC Fan status Fan Speed Low Device Info Device Model Name F/W Version Visual Matrix VM5808H V2.0 194 Port1 * Port2 * Port3 * Port4 * Port5 * Port6 * Port7 * Port8 * Other Language English Bind Rate 1920E Sens Cancel- The General page allows you to edit Baud, Language and Fan settings and view device information.
- The User Account page allows you to add and edit user accounts.
- The Port Name page allows you to name each input and output port.
- The Network page allows configuration of the network settings.
◆ The EDID page is used to set the EDID modes. - The Maintenance page is for upgrading the device’s firmware.
- The HDCP page is lets users view and set HDCP key settings.
- The OSD/CEC page allows users to control port OSD and CEC settings.
- Click Back to Profile List to return to the Main page.
General
The General page has three sections: Fan Status, Device Info and Other.
Fan status

text_image
Fan Speed LowFan Status
- This section displays the VM5404H / VM5808H's two fans' statuses.
- The VM5404H / VM5808H also includes a drop-down menu which allows for manual selection of fan speed.
Note: If the fans have stopped working or are switched off, they will appear as follows.

Device Info
text_image
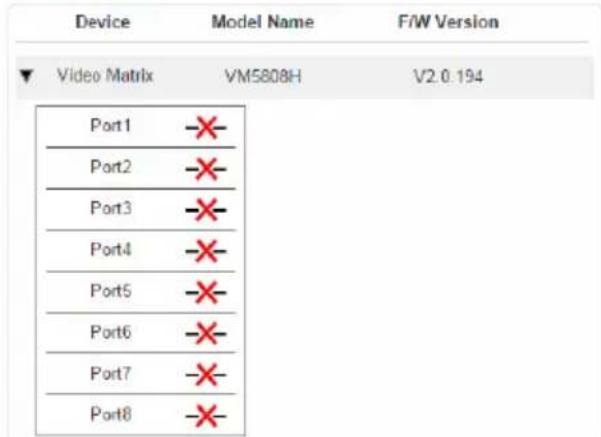
Device Model Name F/W Version Video Matrix VM5808H V2.0.194 Port1 -X Port2 -X Port3 -X Port4 -X Port5 -X Port6 -X Port7 -X Port8 -XDevice Info
- This section lists the device’s type, Model Name, Firmware Version and port statuses.

text_image
Other Language English Baud Rate 19200Other
- Use the Language drop-down menu to select a preferred user interface language.
- Options include: English, French, German, Italian, Japanese, Korean, Portuguese, Russian, Spanish, Simplified Chinese and Traditional Chinese.
- Use the Baud Rate drop-down menu to select a serial port setting.
- Options include: 9600, 19200, 38400 and 115200.
User Account
The User Account page lets you add, edit, or delete users and change the password for accessing the VM5404H / VM5808H's GUI.
Note: This is an Administrator only function.

text_image
User Name ↓ Administrator user_1 Level Administrator Basic User Description Default_User User_Account + Add account Edit- Add account – Click the Add account button to add another user to the list. The VM5404H / VM5808H supports up to 32 users and allows up to 16 concurrent logins (see page 59 for more details).
- Edit – Click the Edit button to change user information. This option allows an Administrator to edit individual accounts.
| User Name | Level | Description |
| Edit 111111 | Administrator | 111111 |
| Edit 12345 | Administrator | |
| Edit administrator | Administrator | Default_user |
- Edit – Rename the user account, set the password, add a description, and set the user’s permission level (see page 61 for more details).
◆ Delete – Removes the user account.

- The default username and password are: administrator/password.
Add Account
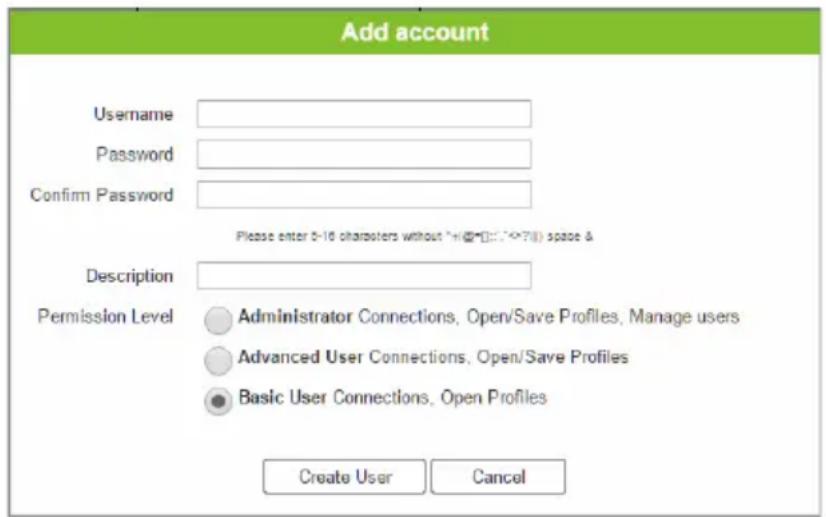
Use the Add Account / Edit buttons to create a user account, set the user's password, add a description, and set the user's permission level (see, page 60) when accessing the VM5404H / VM5808H's GUI.
text_image
Add account Username Password Confirm Password Please enter 0-16 characters without "+@": <>?() space & Description Permission Level Administrator Connections, Open/Save Profiles, Manage users Advanced User Connections, Open/Save Profiles Basic User Connections, Open Profiles Create User Cancel◆ Fill in a username or edit an existing one.
- Enter a password and re-type the password to confirm.
Note: Usernames and passwords accept multi-lingual characters, and must be 5–16 alphanumeric characters (excluding :;=[]+=/?). Passwords are case sensitive. Usernames only support lower case letters.
- Add or edit the description for the user.
- Select the permission level that you want to grant the user (see, page 60).
- Click Create User to save the data.
- Click Cancel to discard the changes and exit.
- If a user is logged into the VM5404H / VM5808H's GUI, their user settings cannot be edited, and the fields in this screen are grayed out.
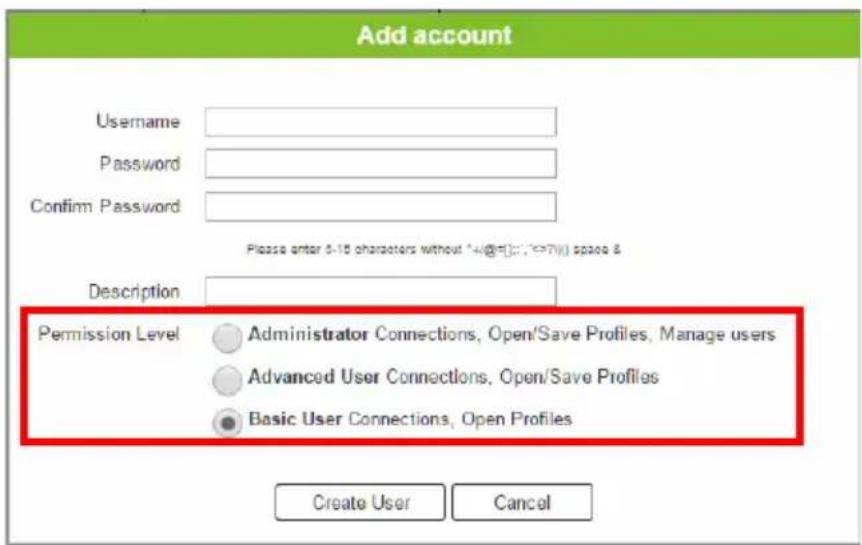
Permission Level
At the bottom of the New/Edit User page is the permission section, which is used to set a user's permission level.
text_image
Add account Username Password Confirm Password Please enter 5-15 characters without "4@E":(1)*7(1) space & Description Permission Level Administrator Connections, Open/Save Profiles, Manage users Advanced User Connections, Open/Save Profiles Basic User Connections, Open Profiles Create User CancelThe three available permission levels are as follows:
- Administrator – this level provides full access and control of the VM5404H / VM5808H, in addition to full User Management privileges.
- Advanced User – this level provides full access and control with no User Management privileges.
- Basic User – this level only provides basic functions (connections and open profiles).
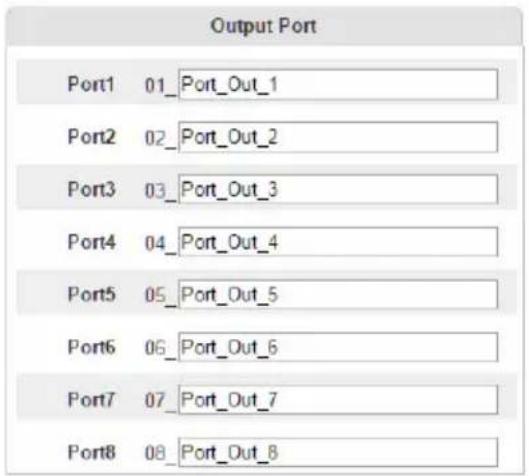
Port Name
The Port Name page lets you name the input and output ports for easy identification.
text_image
Output Port Port1 01_Port_Out_1 Port2 02_Port_Out_2 Port3 03_Port_Out_3 Port4 04_Port_Out_4 Port5 05_Port_Out_5 Port6 06_Port_Out_6 Port7 07_Port_Out_7 Port8 08_Port_Out_8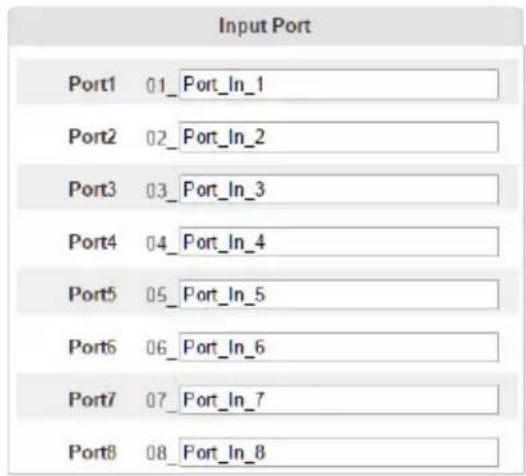
text_image
Input Port Port1 01_Port_In_1 Port2 02_Port_In_2 Port3 03_Port_In_3 Port4 04_Port_In_4 Port5 05_Port_In_5 Port6 06_Port_In_6 Port7 07_Port_In_7 Port8 08_Port_In_8
- To name an Input/Output port, enter a descriptive name of up to 16 multi-language characters (excluding :;=[]+=/?) in the corresponding field and click Save.
Language characters available include: English, French, German, Italian, Japanese, Korean, Portuguese, Russian, Spanish, Simplified Chinese and Traditional Chinese. - To change an Input/Output port's name, enter another value and click Save.
- Input and Output port names can be the same.
- Press Cancel to go back a level, return to the initial screen, or exit.
Note: The VM5404H will only have four Output Port and four Input Port fields to name.
Network
The Network page lets you configure the IP settings, website timeout, and Telnet settings for connecting to the VM5404H / VM5808H.
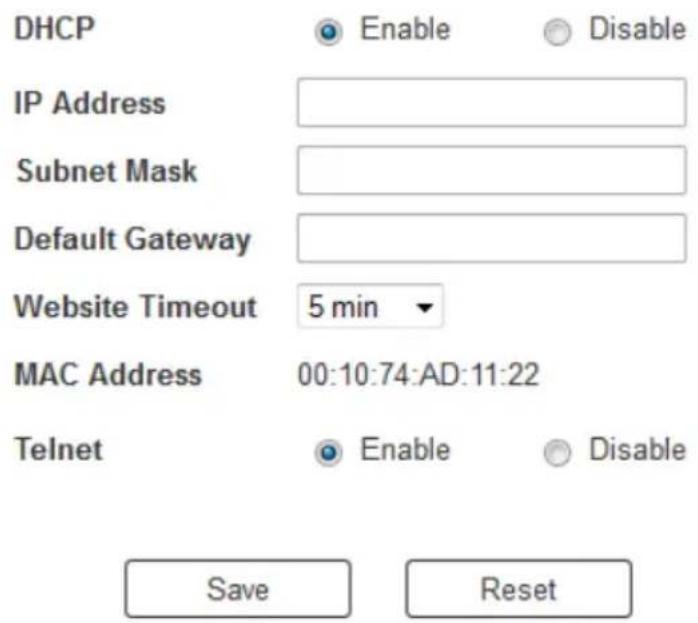
text_image
DHCP Enable Disable IP Address Subnet Mask Default Gateway Website Timeout 5 min MAC Address 00:10:74:AD:11:22 Telnet Enable Disable Save ResetEnable DHCP to allow the DHCP server to assign an IP address to the VM5404H / VM5808H. Select Disable to enter your own static IP address settings for the device.
Click Reset to use the following default values:
IP Address - 192.168.0.60
Subnet Mask - 255.255.255.0
♦ Default Gateway – 192.168.0.1
Website Timeout* - 5 minutes
- Telnet Enabled
Enter the values, then click Save. Changes may take a few seconds and after refreshing the page automatically redirects you to the IP address specified.
EDID
The EDID Settings page lets users view and select an EDID Mode so that the VM5404H / VM5808H can use the best resolution for its display(s).
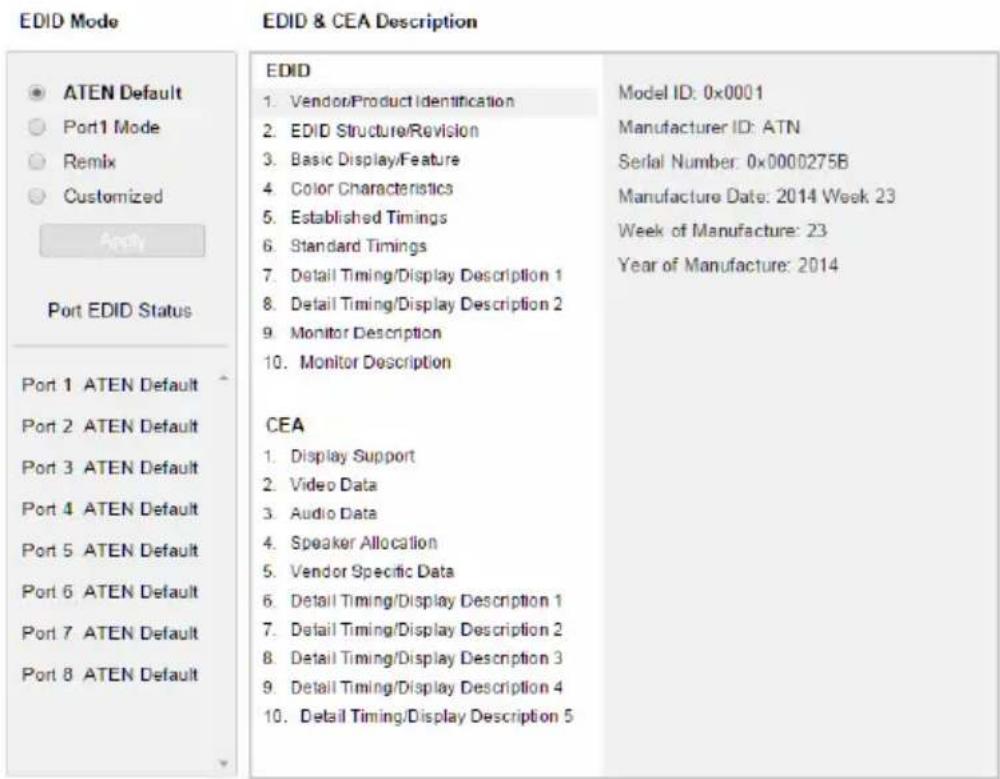
text_image
EDID Mode ATEN Default Port1 Mode Remix Customized Apply Port EDID Status Port 1 ATEN Default Port 2 ATEN Default Port 3 ATEN Default Port 4 ATEN Default Port 5 ATEN Default Port 6 ATEN Default Port 7 ATEN Default Port 8 ATEN Default EDID 1. Vendor/Product Identification 2. EDID Structure/Revision 3. Basic Display/Feature 4. Color Characteristics 5. Established Timings 6. Standard Timings 7. Detail Timing/Display Description 1 8. Detail Timing/Display Description 2 9. Monitor Description 10. Monitor Description CEA 1. Display Support 2. Video Data 3. Audio Data 4. Speaker Allocation 5. Vendor Specific Data 6. Detail Timing/Display Description 1 7. Detail Timing/Display Description 2 8. Detail Timing/Display Description 3 9. Detail Timing/Display Description 4 10. Detail Timing/Display Description 5 Model ID: 0x0001 Manufacturer ID: ATN Serial Number: 0x0000275B Manufacture Date: 2014 Week 23 Week of Manufacture: 23 Year of Manufacture: 2014Note: The EDID Mode can also be selected via the Front Panel pushbuttons – see EDID Mode, page 25.
Extended Display Identification Data (EDID) is a data format that contains a display's basic information and is used to communicate with the video source/system.
EDID Mode
In the left panel of the page, users can select a pre-configured EDID Mode using the EDID Mode radio buttons.
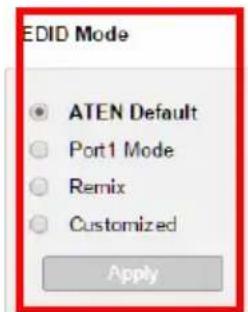
text_image
EDID Mode • ATEN Default ○ Port1 Mode ○ Remix ○ Customized ApplyPort EDID Status
Port 1 ATEN Default
Port 2 ATEN Default
Port 3 ATEN Default
Port 4 ATEN Default
Port 5 ATEN Default
Port 6 ATEN Default
Port 7 ATEN Default
Port 8 ATEN Default
EDID & CEA Description
EDID
- Vendor/Product Identification
- EDID Structure/Revision
- Basic Display/Feature
- Color Characteristics
- Established Timings
- Standard Timings
- Detail Timing/Display Description 1
- Detail Timing/Display Description 2
- Monitor Description
- Monitor Description
CEA
- Display Support
- Video Data
- Audio Data
- Speaker Allocation
- Vendor Specific Data
- Detail Timing/Display Description 1
- Detail Timing/Display Description 2
- Detail Timing/Display Description 3
- Detail Timing/Display Description 4
- Detail Timing/Display Description 5
Model ID: 0x0001
Manufacturer ID: ATN
Serial Number: 0x0000275B
Manufacture Date: 2014 Week 23
Week of Manufacture: 23
Year of Manufacture: 2014
Select the EDID Mode to use and click Apply. The VM5404H / VM5808H uses the settings configured for that EDID mode.
Options are:
- ATEN Default: All ports' EDID are the same as the hardware default EDID.
◆ Port 1 Mode: All ports' EDID are the same as Port1's EDID.
♦ Remix: All ports' EDID use the best display resolution. - Customized: See Customized Mode, see page 68.
Customized Mode
Use the Customized Mode to automatically retrieve and save the EDID settings of a connected monitor/display device to an input source port.
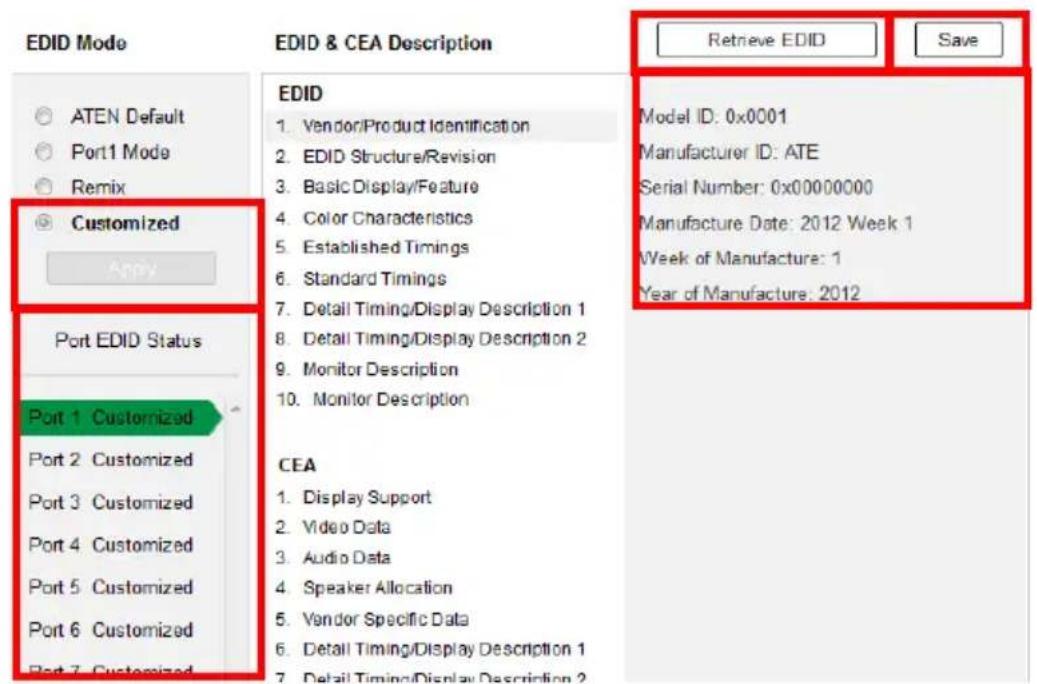
text_image
EDID Mode ATEN Default Port1 Mode Remix Customized Apply Port EDID Status Port 1 Customized Port 2 Customized Port 3 Customized Port 4 Customized Port 5 Customized Port 6 Customized Port 7 Customized EDID & CEA Description EDID 1. Vendor/Product Identification 2. EDID Structure/Revision 3. Basic Display/Feature 4. Color Characteristics 5. Established Timings 6. Standard Timings 7. Detail Timing/Display Description 1 8. Detail Timing/Display Description 2 9. Monitor Description 10. Monitor Description CEA 1. Display Support 2. Video Data 3. Audio Data 4. Speaker Allocation 5. Vendor Specific Data 6. Detail Timing/Display Description 1 7. Detail Timing/Display Description 2 Retrieve EDID Save Model ID: 0x0001 Manufacturer ID: ATE Serial Number: 0x00000000 Manufacture Date: 2012 Week 1 Week of Manufacture: 1 Year of Manufacture: 2012- In the left-most panel of the page, select Customized from the EDID Mode section and click Apply.
- Port EDID Status: Select which input source port you want to store the EDID configuration (01–08).
- Retrieve EDID: Click and a pop-up window appears to retrieve the EDID settings of a stored EDID configuration: Customized EDID 01-08, or ATEN Default. Select the port to retrieve:
Caution
Select a port to retrieve.

text_image
Customized Customized EDID 01 OK Cancel- The right panel displays a summary of the acquired EDID settings that you can edit. Click Save and select the configuration for the Current or All Ports for the duration of the session.
Save
Save changes to the current port or all ports?
Current
All Ports
Cancel
EDID & CEA Description
The right panel of the screen lets users view the configuration of the EDID and CEA Modes selected:
EDID Mode
ATEN Default
Port1 Mode
Remix
Customized
Apply
Port EDID Status
Port 1 ATEN Default
Port 2 ATEN Default
Port 3 ATEN Default
Port 4 ATEN Default
Port 5 ATEN Default
Port 6 ATEN Default
Port 7 ATEN Default
Port 8 ATEN Default
EDID & CEA Description
EDID
- Vendor/Product Identification
- EDID Structure/Revision
- Basic Display/Feature
- Color Characteristics
- Established Timings
- Standard Timings
- Detail Timing/Display Description 1
- Detail Timing/Display Description 2
- Monitor Description
- Monitor Description
CEA
- Display Support
- Video Data
- Audio Data
- Speaker Allocation
- Vendor Specific Data
- Detail Timing/Display Description 1
- Detail Timing/Display Description 2
- Detail Timing/Display Description 3
- Detail Timing/Display Description 4
- Detail Timing/Display Description 5
Model ID: 0x0001
Manufacturer ID: ATN
Serial Number: 0x0000275B
Manufacture Date: 2014 Week 23
Week of Manufacture: 23
Year of Manufacture: 2014
- From the left column, click the option that you want to view and/or edit. There are two categories: EDID (Extended Display Identification Data) and CEA (Consumer Electronics Association).
- When you highlight the menu items on the left column, the right column displays the current settings for the corresponding EDID configuration. Some of the screens are read-only.
- See Customized EDID Settings, page 68 for more information on these two columns.
Customized EDID Settings
The EDID structure is comprised of 128 bytes in total – each heading shown in the left column corresponds to a specific number of bytes.
The pages for the pre-configured EDID Modes (Port 1, Default and Remix) cannot be edited. The pages for the Customized EDID, which can be edited, are discussed in the proceeding sections:
Established Timings
This page lists video resolutions/timings that display devices can support.
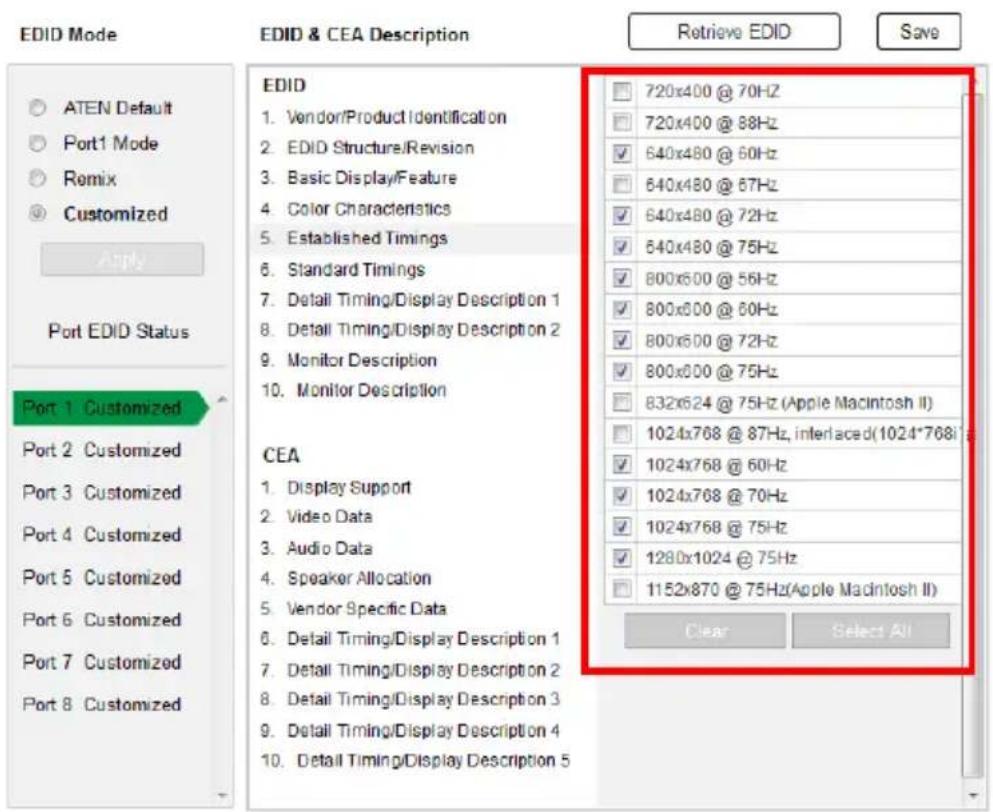
text_image
EDID Mode ATEN Default Port1 Mode Remix Customized Apply Port EDID Status Port 1 Customized Port 2 Customized Port 3 Customized Port 4 Customized Port 5 Customized Port 6 Customized Port 7 Customized Port 8 Customized EDID & CEA Description Retrieve EDID Save EDID 1. Vendor/Product Identification 2. EDID Structure/Revision 3. Basic Display/Feature 4. Color Characteristics 5. Established Timings 6. Standard Timings 7. Detail Timing/Display Description 1 8. Detail Timing/Display Description 2 9. Monitor Description 10. Monitor Description CEA 1. Display Support 2. Video Data 3. Audio Data 4. Speaker Allocation 5. Vendor Specific Data 6. Detail Timing/Display Description 1 7. Detail Timing/Display Description 2 8. Detail Timing/Display Description 3 9. Detail Timing/Display Description 4 10. Detail Timing/Display Description 5 720x400 @ 70Hz 720x400 @ 88Hz 640x480 @ 60Hz 640x480 @ 67Hz 640x480 @ 72Hz 640x480 @ 75Hz 800x600 @ 56Hz 800x600 @ 60Hz 800x600 @ 72Hz 800x600 @ 75Hz 832x624 @ 75Hz (Apple Macintosh II) 1024x768 @ 87Hz, interlaced(1024*768) 1024x768 @ 60Hz 1024x768 @ 70Hz 1024x768 @ 75Hz 1280x1024 @ 75Hz 1152x870 @ 75Hz(Apple Macintosh II) Clear Select All- Select the resolution(s) you want to use for the attached monitor/display device.
- Click Clear to deselect all the items.
- Click Select All to check all the items.
- Click Save to apply the changes.
Standard Timings
This page shows eight resolutions/timings that display devices can support in addition to those listed in the Established Timings page.
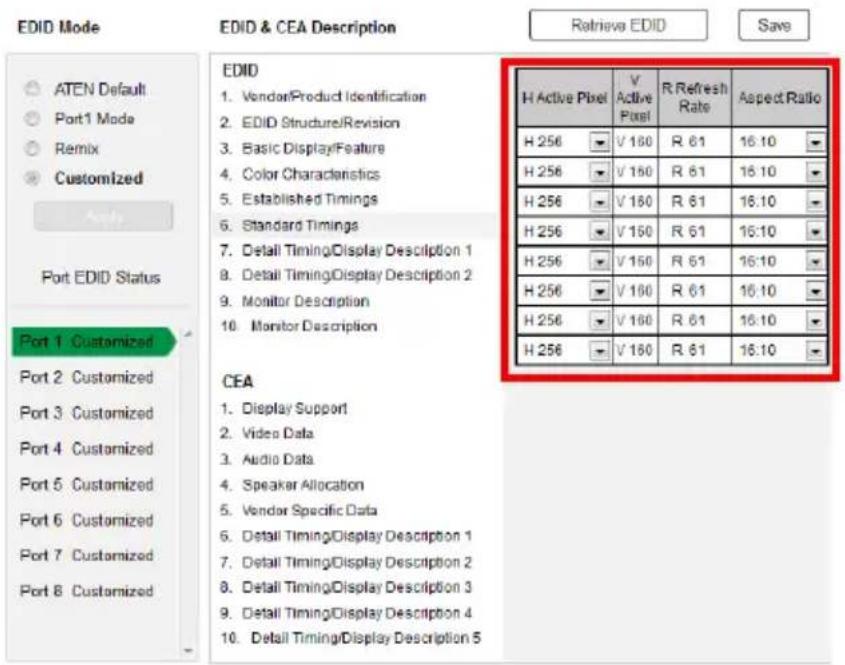
text_image
EDID Mode ATEN Default Port1 Mode Remix Customized Port EDID Status Port 1 Customized Port 2 Customized Port 3 Customized Port 4 Customized Port 5 Customized Port 6 Customized Port 7 Customized Port 8 Customized EDID & CEA Description Retrieva EDID Save EDID 1. VendorProduct Identification 2. EDID Structure/Revision 3. Basic Display/Feature 4. Color Characteristics 5. Established Timings 6. Standard Timings 7. Detail Timing/Display Description 1 8. Detail Timing/Display Description 2 9. Monitor Description 10. Monitor Description CEA 1. Display Support 2. Video Data 3. Audio Data 4. Speaker Allocation 5. Vendor Specific Data 6. Detail Timing/Display Description 1 7. Detail Timing/Display Description 2 8. Detail Timing/Display Description 3 9. Detail Timing/Display Description 4 10. Detail Timing/Display Description 5 H Active Pixel V Active Pixel R Refresh Rate Aspect Ratio H 256 V 160 R 61 16:10 H 256 V 160 R 61 16:10 H 256 V 160 R 61 16:10 H 256 V 160 R 61 16:10 H 256 V 160 R 61 16:10 H 256 W 160 R 61 16:10- Select the H Active Pixel from the drop-down menu.
- Select the Aspect Ratio from the drop-down menu.
- Click Save to apply the changes.
Detail Timing / Display Description
This screen gives more video resolution options, and provides resolution/timing details.
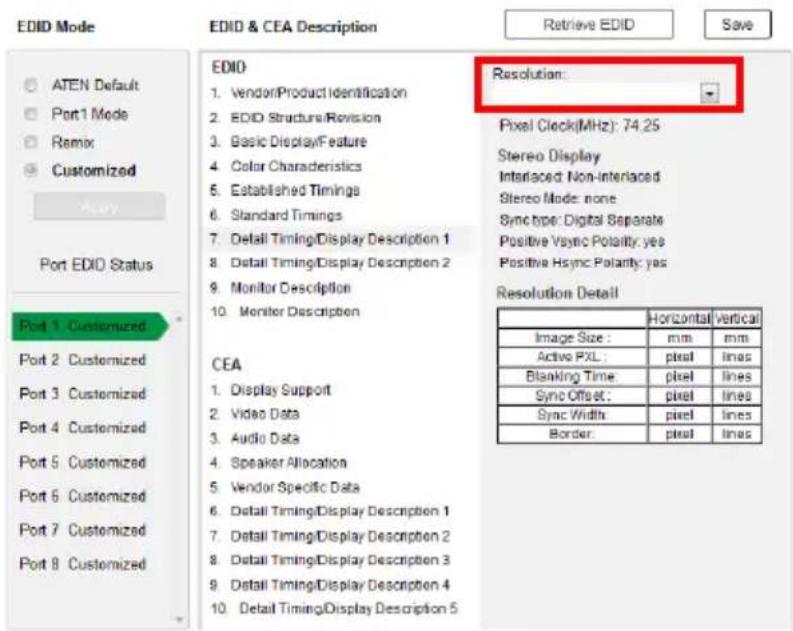
text_image
EDID Mode ATEN Default Port1 Mode Remox Customized Port EDID Status Port 1 Customized Port 2 Customized Port 3 Customized Port 4 Customized Port 5 Customized Port 6 Customized Port 7 Customized Port 8 Customized EDID & CEA Description Retrieve EDID Save EDID 1. Vendor/Product Identification 2. EDID Structure/Revision 3. Basic Display/Feature 4. Color Characteristics 5. Established Timings 6. Standard Timings 7. Detail Timing/Display Description 1 8. Detail Timing/Display Description 2 9. Monitor Description 10. Monitor Description CEA 1. Display Support 2. Video Data 3. Audio Data 4. Speaker Allocation 5. Vendor Specific Data 6. Detail Timing/Display Description 1 7. Detail Timing/Display Description 2 8. Detail Timing/Display Description 3 9. Detail Timing/Display Description 4 10. Detail Timing/Display Description 5 Resolution: Pixel Clock(MHz): 74.25 Stereo Display Interlaced: Non-Interlaced Stereo Mode: none Sync type: Digital Separate Positive Vsync Polarity: yes Positive Hsync Polarity: yes Resolution Detail Horizontal Vertical Image Size : mm mm Active PXL : pixel lines Blanking Time pixel lines Sync Offset : pixel lines Sync Width pixel lines Border pixel linesIn the drop down menu, choose a resolution with values that fit the attached monitor/display device and click Save.
Monitor Description
This screen lets you specify the viewing specifications, namely horizontal and vertical scan ranges and pixel clock rate, of your monitor/display device.
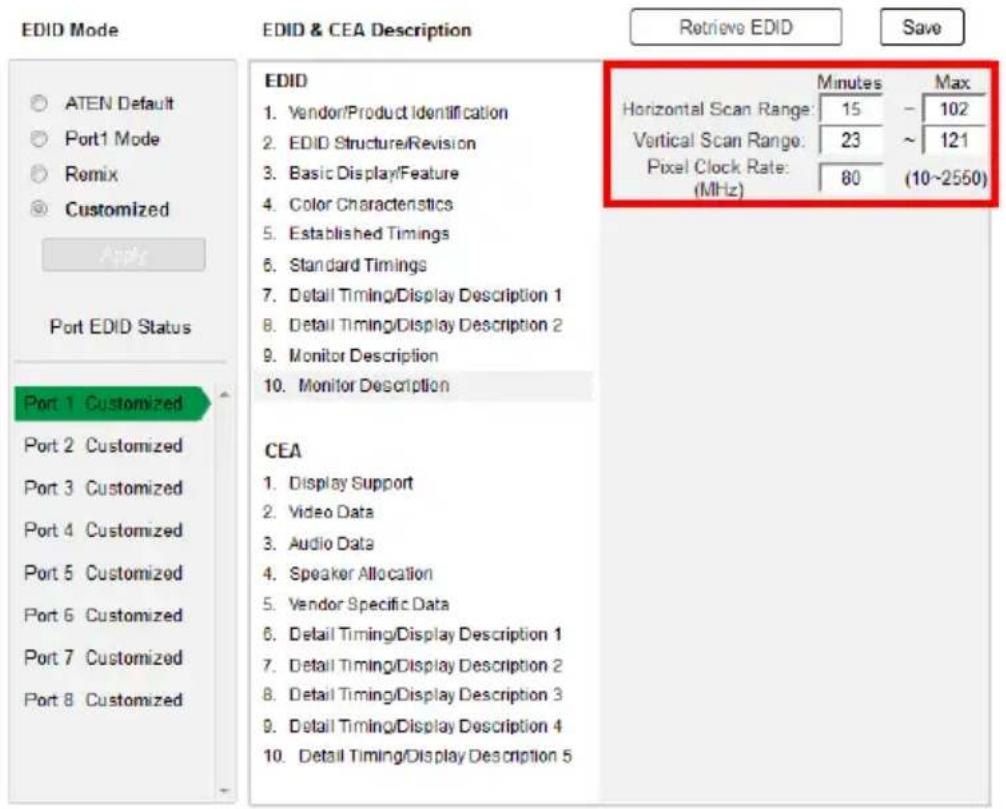
text_image
EDID Mode ATEN Default Port1 Mode Remix Customized Port EDID Status Port 1 Customized Port 2 Customized Port 3 Customized Port 4 Customized Port 5 Customized Port 6 Customized Port 7 Customized Port 8 Customized EDID & CEA Description Retrieve EDID Save EDID 1. Vendor/Product Identification 2. EDID Structure/Revision 3. Basic Display/Feature 4. Color Characteristics 5. Established Timings 6. Standard Timings 7. Detail Timing/Display Description 1 8. Detail Timing/Display Description 2 9. Monitor Description 10. Monitor Description CEA 1. Display Support 2. Video Data 3. Audio Data 4. Speaker Allocation 5. Vendor Specific Data 6. Detail Timing/Display Description 1 7. Detail Timing/Display Description 2 8. Detail Timing/Display Description 3 9. Detail Timing/Display Description 4 10. Detail Timing/Display Description 5 Minutes Max Horizontal Scan Range: 15 - 102 Vertical Scan Range: 23 ~ 121 Pixel Clock Rate: 80 (10~2550) (MHz)Enter the values that correspond to your device and click Save to apply the changes.
CEA Settings
CEA is an extension data of the EDID structure, which further extends the standard definitions of EDID to support advanced features of monitors/display devices.
Display Support
This screen describes the display's basic digital components.
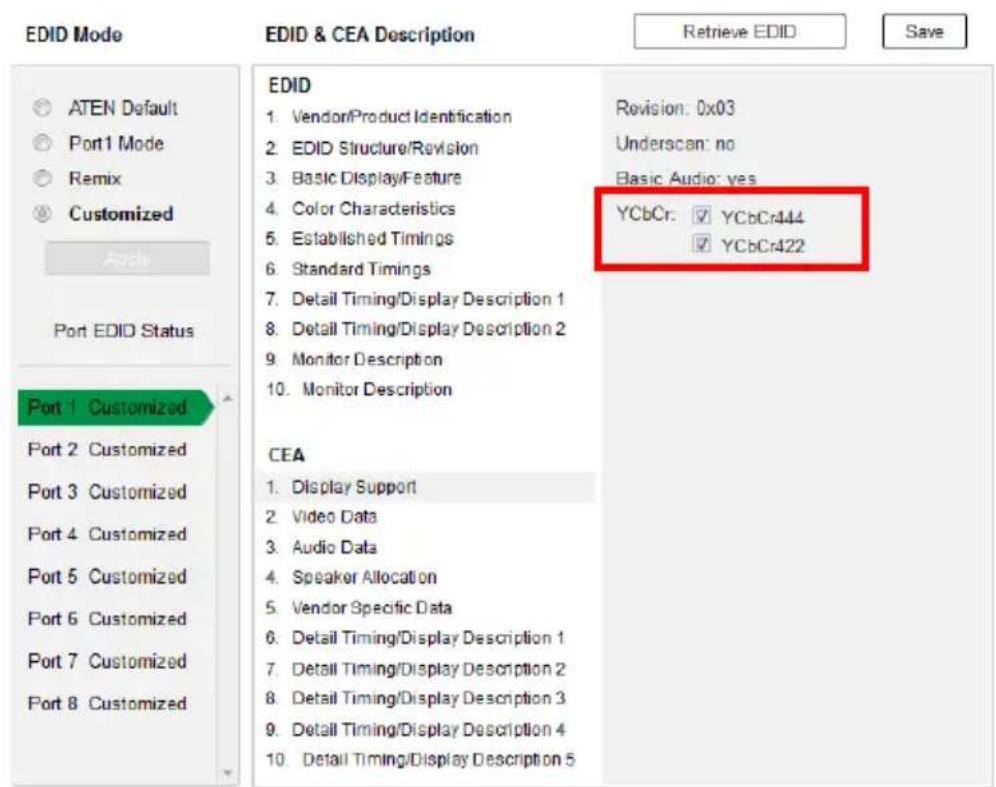
text_image
EDID Mode ATEN Default Port1 Mode Remix Customized Port EDID Status Port 1 Customized Port 2 Customized Port 3 Customized Port 4 Customized Port 5 Customized Port 6 Customized Port 7 Customized Port 8 Customized EDID & CEA Description Retrieve EDID Revision: 0x03 Underscan: no Basic Audio: yes YCbCr: ✓ YCbCr444 ✓ YCbCr422 CEA 1. Display Support 2. Video Data 3. Audio Data 4. Speaker Allocation 5. Vendor Specific Data 6. Detail Timing/Display Description 1 7. Detail Timing/Display Description 2 8. Detail Timing/Display Description 3 9. Detail Timing/Display Description 4 10. Detail Timing/Display Description 5Select the YCbCr mode applicable to your display and click Save.
Video Data
This screen lists additional video resolution/timing displays that may be supported by devices other than PC monitors (for example, 1080i).
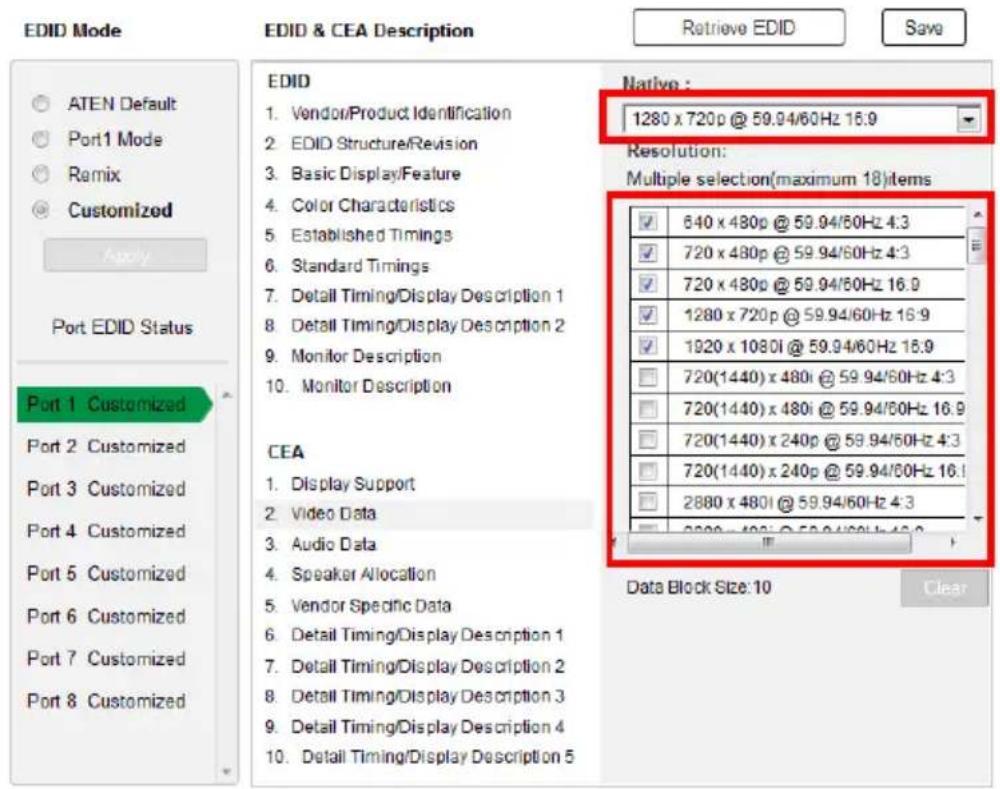
text_image
EDID Mode ATEN Default Port1 Mode Remix Customized Apply Port EDID Status Port 1 Customized Port 2 Customized Port 3 Customized Port 4 Customized Port 5 Customized Port 6 Customized Port 7 Customized Port 8 Customized EDID & CEA Description Retrieve EDID Save Native : 1280 x 720p @ 59.94/60Hz 16:9 Resolution: Multiple selection(maximum 18)items ✓ 640 x 480p @ 59.94/60Hz 4:3 ✓ 720 x 480p @ 59.94/60Hz 4:3 ✓ 720 x 480p @ 59.94/60Hz 16:9 ✓ 1280 x 720p @ 59.94/60Hz 16:9 ✓ 1920 x 1080i @ 59.94/60Hz 16:9 □ 720(1440) x 480i @ 59.94/60Hz 4:3 □ 720(1440) x 480i @ 59.94/60Hz 16:9 □ 720(1440) x 240p @ 59.94/60Hz 4:3 □ 720(1440) x 240p @ 59.94/60Hz 16:1 □ 2880 x 480i @ 59.94/60Hz 4:3 Data Block Size: 10 Clear- Select the native resolution of the attached display device.
- Select the resolutions that work with the attached monitor/display device.
- Click Clear All to deselect all the items.
- Click Save to apply the changes.
Audio Data
This screen lets you select advanced audio configurations for your device.
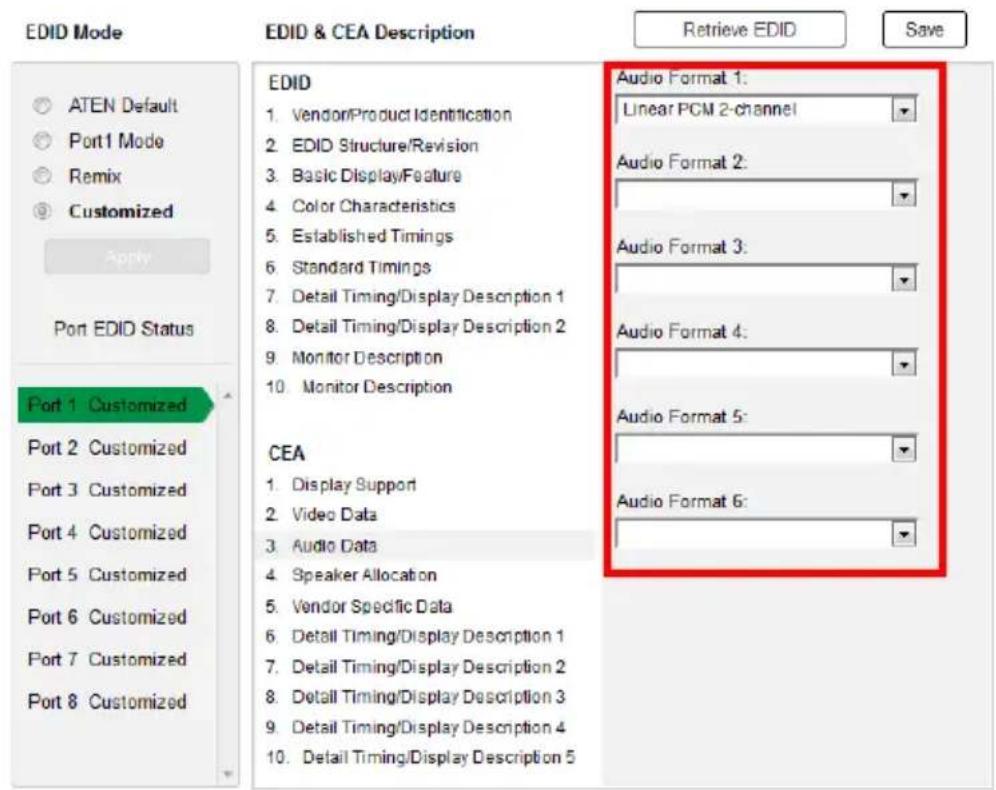
text_image
EDID Mode ATEN Default Port1 Mode Remix Customized Apply Port EDID Status Port 1 Customized Port 2 Customized Port 3 Customized Port 4 Customized Port 5 Customized Port 6 Customized Port 7 Customized Port 8 Customized EDID & CEA Description Retrieve EDID Save EDID 1. Vendor/Product Identification 2. EDID Structure/Revision 3. Basic Display/Feature 4. Color Characteristics 5. Established Timings 6. Standard Timings 7. Detail Timing/Display Description 1 8. Detail Timing/Display Description 2 9. Monitor Description 10. Monitor Description CEA 1. Display Support 2. Video Data 3. Audio Data 4. Speaker Allocation 5. Vendor Specific Data 6. Detail Timing/Display Description 1 7. Detail Timing/Display Description 2 8. Detail Timing/Display Description 3 9. Detail Timing/Display Description 4 10. Detail Timing/Display Description 5 Audio Format 1: Linear PCM 2-channel Audio Format 2: Audio Format 3: Audio Format 4: Audio Format 5: Audio Format 6:Use the drop down menu to select the Audio Format (1\~6) applicable to your audio output device, and click Save to apply the changes.
Detail Timing / Display Description
This screen gives more video resolution options, and provides resolution/timing details (in addition to those specified in the EDID structure).
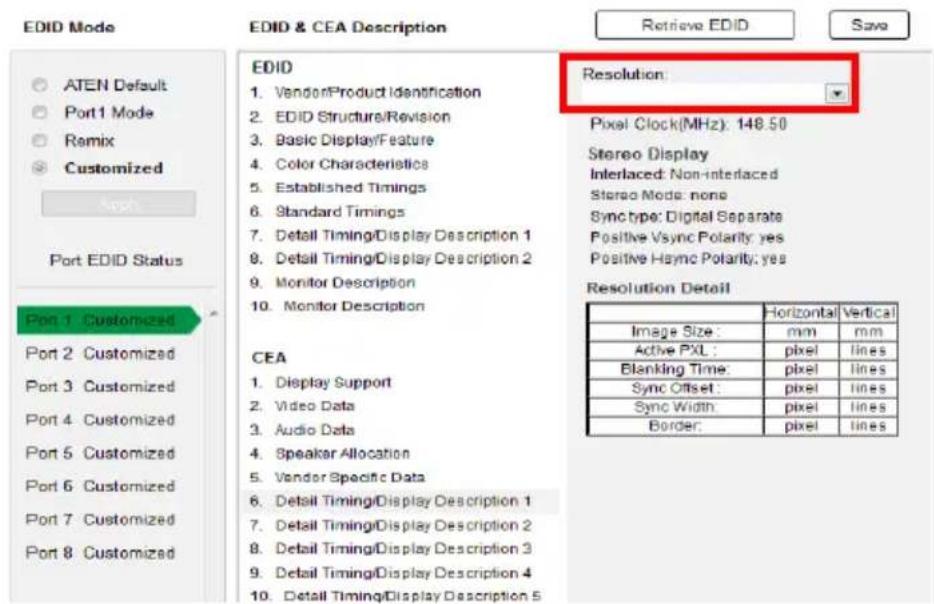
text_image
EDID Mode ATEN Default Port 1 Mode Ramix Customized Port EDID Status Port 1 Customized Port 2 Customized Port 3 Customized Port 4 Customized Port 5 Customized Port 6 Customized Port 7 Customized Port 8 Customized EDID & CEA Description EDID 1. Vendor/Product Identification 2. EDID Structure/Revision 3. Basic Display/Feature 4. Color Characteristics 5. Established Timings 6. Standard Timings 7. Detail Timing/Display Description 1 8. Detail Timing/Display Description 2 9. Monitor Description 10. Monitor Description CEA 1. Display Support 2. Video Data 3. Audio Data 4. Speaker Allocation 5. Vendor Specific Data 6. Detail Timing/Display Description 1 7. Detail Timing/Display Description 2 8. Detail Timing/Display Description 3 9. Detail Timing/Display Description 4 10. Detail Timing/Display Description 5 Resolution: Pixel Clock(MHz): 148.50 Stereo Display Interlaced: Non-interlaced Stereo Mode: none Sync type: Digital Separate Positive Vsync Polarity: yes Positive Hsync Polarity: yes Resolution Detail Horizontal Vertical Image Size: mm mm Active PXL: pixel lines Blanking Time: pixel lines Sync Offset: pixel lines Sync Width: pixel lines Border: pixel linesIn the Resolution drop down menu, choose a resolution with values that fit the attached monitor/display device and click Save.
Maintenance
The Maintenance page lets users upgrade the VM5404H / VM5808H's firmware and back up or restore system settings. This is an Administrator only function.
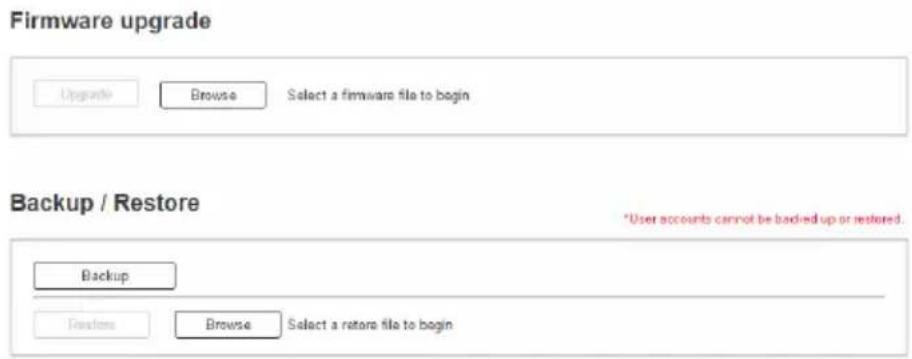
text_image
Firmware upgrade Upgrade Browse Select a firmware file to begin Backup / Restore *User accounts cannot be backed up or restored. Backup Restore Browse Select a restore file to beginTo upgrade the VM5404H / VM5808H's firmware, do the following:
- Use the Browse button to locate the firmware upgrade file. Make sure you have the correct file saved on your PC.
- Click Upgrade to begin the upgrade procedure.
Note: After updating the firmware, it's recommended that you clear your web browser's cache and then close and reopen the web browser. This will ensure the GUI refreshes and functions properly.
To back up the VM5404H / VM5808H's system settings, do the following:
- Click Backup. A configuration file will then begin downloading.
To restore the VM5404H / VM5808H's system settings, do the following:
-
Use the Browse button to locate the configuration file. Make sure you have the correct file saved on your PC.
-
Click Restore to begin the restoration procedure.
Note: User accounts cannot be backed up or restored.
HDCP
The HDCP page lets users view and set HDCP key settings between input and output ports for digital copy protection and to ensure seamless switching between different devices. This is an Administrator and Advanced User only function.
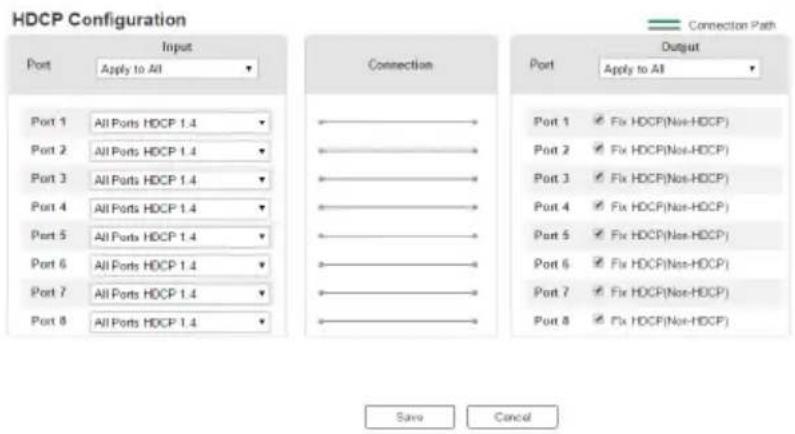
text_image
HDCP Configuration Port Input Apply to All Port 1 All Ports HDCP 1.4 Port 2 All Ports HDCP 1.4 Port 3 All Ports HDCP 1.4 Port 4 All Ports HDCP 1.4 Port 5 All Ports HDCP 1.4 Port 6 All Ports HDCP 1.4 Port 7 All Ports HDCP 1.4 Port 8 All Ports HDCP 1.4 Connection Output Apply to All Port 1 Fix HDCP(Non-HDCP) Port 2 Fix HDCP(Non-HDCP) Port 3 Fix HDCP(Non-HDCP) Port 4 Fix HDCP(Non-HDCP) Port 5 Fix HDCP(Non-HDCP) Port 6 Fix HDCP(Non-HDCP) Port 7 Fix HDCP(Non-HDCP) Port 8 Fix HDCP(Non-HDCP) Save CancelInput
Here users can select whether input port content is HDCP 1.4 or non-HDCP enabled.
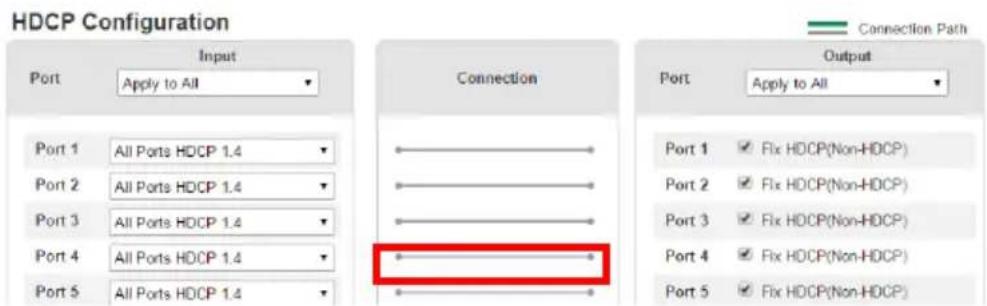
text_image
HDCP Configuration Port Input Apply to All Port 1 All Ports HDCP 1.4 Port 2 All Ports HDCP 1.4 Port 3 All Ports HDCP 1.4 Port 4 All Ports HDCP 1.4 Port 5 All Ports HDCP 1.4 Connection Output Apply to All Port 1 ✓ Fix HDCP(Non-HDCP) Port 2 ✓ Fix HDCP(Non-HDCP) Port 3 ✓ Fix HDCP(Non-HDCP) Port 4 ✓ Fix HDCP(Non-HDCP) Port 5 ✓ Fix HDCP(Non-HDCP)Connection
Here users can find a visual display of connection paths between inputs and outputs. When selecting an input, its path is displayed in green.
Output
Here users can define whether or not HDCP settings are fixed, either by individual port or by applying one setting to all ports. By prearranging and fixing keys, this setting ensures that the Seamless Switch ^™ feature is possible even when switching between HDCP and non-HDCP enabled devices.
OSD/CEC
The OSD/CEC page lets users view and set OSD and CEC settings for all ports.
OSD / CEC
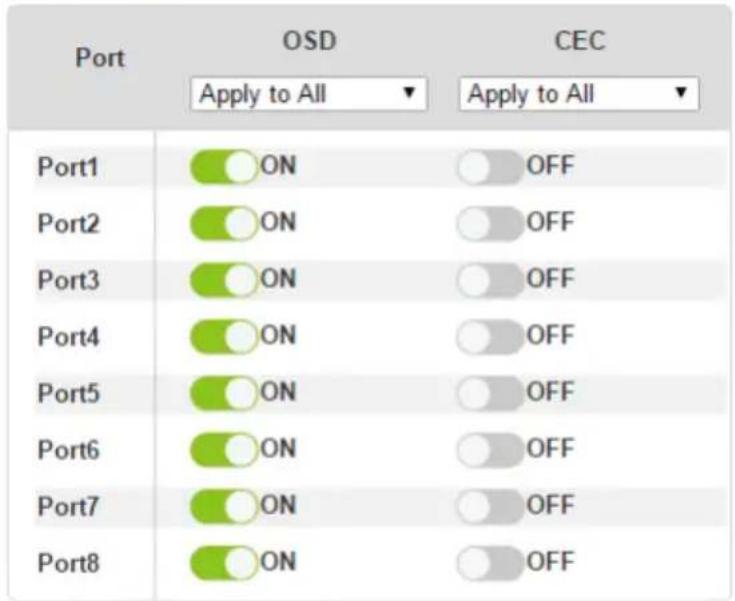
bar
| Port | OSD | CEC | |-------|------|------| | Port1 | ON | OFF | | Port2 | ON | OFF | | Port3 | ON | OFF | | Port4 | ON | OFF | | Port5 | ON | OFF | | Port6 | ON | OFF | | Port7 | ON | OFF | | Port8 | ON | OFF |* The CEC setting is only for output boards, please make sure all devices have this capability.
Save
Cancel
- OSD: Sets the default OSD option for the port. When OSD is on, real-time text updates appear on the display for 10 seconds when configuration and port changes are made to its output.
- Use the drop-down menu to apply options to all ports, or ON/OFF button to enable/disable the OSD for each port.
- CEC: Consumer Electronics Control (CEC) allows interconnected HDMI devices to communicate and respond to one remote control.
- Use the drop-down menu to apply options to all ports, or On/Off button to enable/disable CEC for a port.
- Click Save to save the settings or Cancel to exit without saving the settings.
Overview
The VM5404H / VM5808H supports Video Matrix Control App, a free mobile app that allows you to switch profiles, audio inputs and video inputs, and also reminds you when any new firmware is available, all through a local area network to which the target VM5404H / VM5808H is connected. This mobile application is especially useful for profile and AV source switching when you do not have access to the VM5404H / VM5808H's front panel or the web interface.
The Video Matrix Control App
Requirements
Make sure your mobile device uses a supported version of the mobile operating system listed below before installing the app.
| Mobile Operating System Supported Version | |
| iOS 12.0 or later | |
| Android 8.0 or later | |
- The VM5404H / VM5808H needs to be connected to a local area network via the Ethernet port.
Installation and Connections
To install the Video Matrix Control App on a mobile device, do the following:
-
From the mobile device, tap the App Store 🎨 or Google Play ➕ icon.
-
In the search box, type "Video Matrix Control App".
-
Tap Video Matrix Control App and then download and install the app.
-
Tap the app icon.
-
Follow the on-screen instructions to connect to the target VM5404H / VM5808H device by scanning the network, selecting from connection history, or specifying the device IP address and password.
Note:
- The Video Matrix Control App is designed to control one VM5404H / VM5808H device at a time.
If you cannot find the VM5404H / VM5808H device, make sure that the VM5404H / VM5808H is connected to LAN and that the app is connected to the same LAN and then try again.
The Control Interface
The functions in the Video Matrix Control App are categorized into four tabs – Profile, Control, Audio, and Settings. See the table below for an overview of each tab.
Control Interface Description
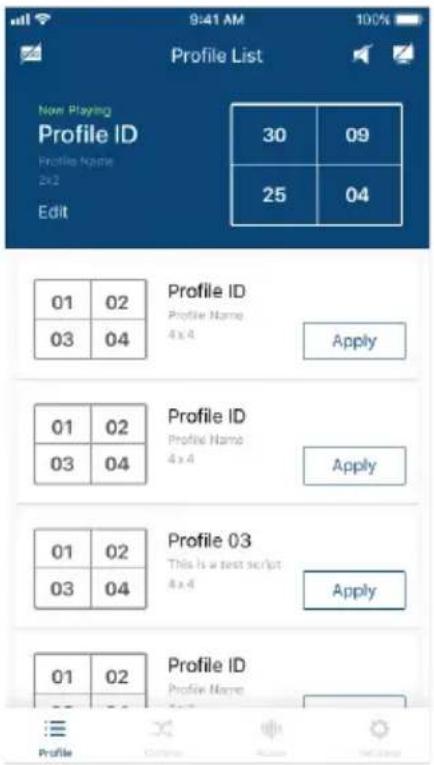
text_image
Profile List Now Playing Profile ID Profile Name 2x2 Edit 30 09 25 04 Profile ID Profile Name 4 x 4 Apply Profile ID Profile Name 4 x 4 Apply Profile ID Profile Name 4 x 4 Apply Profile ID Profile Name 4 x 4 Apply Profile ID Profile Name 4 x 4 ApplyIn the Profile tab, you can switch profiles for display or change the video input for the profile that is playing.
Note:
The Video Matrix Control App can not be used to create profiles. Before using the app, make sure to create the profiles you need via the web interface. For details, see Adding/Playing a Profile, page 39.
◆ Any configuration change made to a profile via Video Matrix Control App is only effective while the profile is being played and will not be saved to the VM5404H / VM5808H unit.
◆ Previews of input assignment, as indicated by input numbers in the control interface on the left, are not supported for VM0404HB, VM0808HA, and VM0808HB.
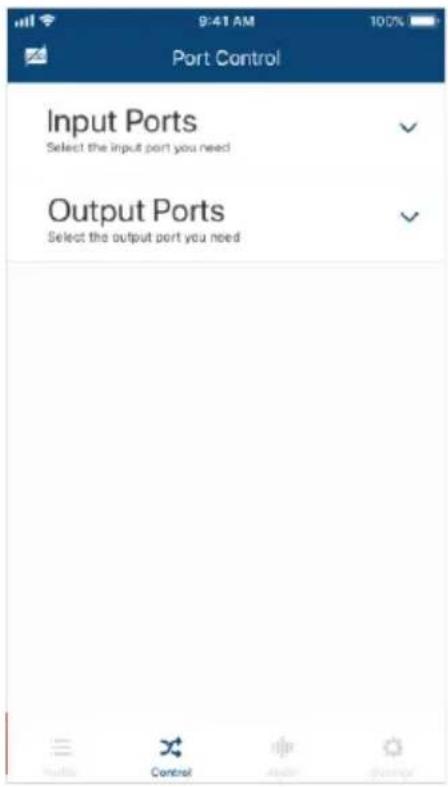
text_image
9:41 AM Port Control Input Ports Select the input port you need Output Ports Select the output port you needIn the Control tab, you can instantly switch video inputs for each of the output.
Control Interface Description
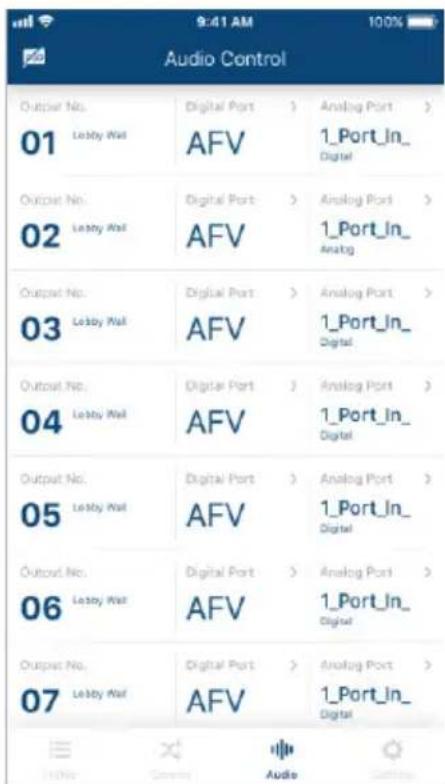
text_image
9:41 AM Audio Control Output No. 01 Lobby Wall Digital Port > AFV Analog Port > 1_Port_In_ Digital Output No. 02 Lobby Wall Digital Port > AFV Analog Port > 1_Port_In_ Analog Output No. 03 Lobby Wall Digital Port > AFV Analog Port > 1_Port_In_ Digital Output No. 04 Lobby Wall Digital Port > AFV Analog Port > 1_Port_In_ Digital Output No. 05 Lobby Wall Digital Port > AFV Analog Port > 1_Port_In_ Digital Output No. 06 Lobby Wall Digital Port > AFV Analog Port > 1_Port_In_ Digital Output No. 07 Lobby Wall Digital Port > AFV Analog Port > 1_Port_In_ DigitalIn the Audio tab, you can specify the audio input for the digital and analog outputs of the VM5404H / VM5808H.
Note: The fields available in this tab may vary for the connected device.
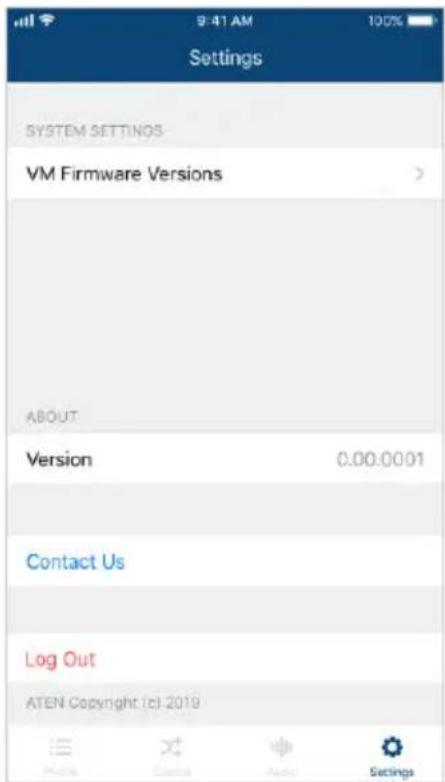
text_image
9:41 AM 100% Settings SYSTEM SETTINGS VM Firmware Versions > ABOUT Version 0.00.0001 Contact Us Log Out ATEN Copyright (c) 2019In the Settings tab, you can look up notification for system firmware upgrades, the current app version, and technical support contact, or log out of the app.
Overview
The VM5404H / VM5808H can be configured and controlled via RS-232 or Telnet commands when connected to a host computer or other device, such as a control system. This chapter provides information on how to connect to the VM5404H / VM5808H via RS-232/Telnet and command syntax.
Connecting to the Matrix Switch via Telnet
To establish a Telnet session with the VM5404H / VM5808H, do the following:
- Connect a host computer or control system to a shared network with the VM5404H / VM5808H.
- Open a command-line interpreter program from your computer.
- In the command-line interpreter, type the VM5404H / VM5808H's IP address in the following way:
telnet [IP address]:23
-
Press Enter. The login screen appears.
-
At the login prompt, type the login username and password for the VM5404H / VM5808H.
-
When a session is established with the VM5404H / VM5808H, you can control and configure the VM5404H / VM5808H via RS-232 commands. For more information on commands, see Commands, page 83
Note: If a user logs in using a username that is already in session, the newest login takes effect and the previous session will be replaced.
Connecting to the Matrix Switch via RS-232
You can control and operate the VM5404H / VM5808H using a high-end controller or PC. To connect to the VM5404H / VM5808H via RS-232, do the following:
- Connect the RS-232 serial port on the VM5404H / VM5808H to the RS-232 serial port on your computer using a 9-wire straight cable, with only pin 2 to pin 2, pin 3 to pin 3, and pin 5 to pin 5 connected.
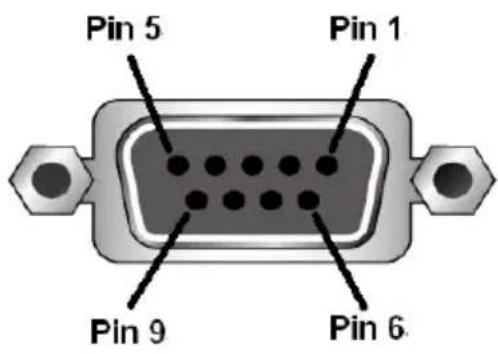
text_image
Pin 5 Pin 1 Pin 9 Pin 6| Pin Description | |
| 1 Not connected | |
| 2 | RXD |
| 3 | TXD |
| 4 Not connected | |
| 5 | GND |
| 6 Not connected | |
| 7 Not connected | |
| 8 Not connected | |
| 9 Not connected | |
- The controller's serial port should be configured as follows:
| RS-232 Protocol | |
| Baud Rate 19200 | |
| Data Bits 8 | |
| Parity None | |
| Stop Bits 1 | |
| Flow Control None | |
- When a session is established with the VM5404H / VM5808H, you can control and configure the VM5404H / VM5808H via RS-232 commands. For more information on commands, see Commands, page 83.
Command Verification
After entering a command, a verification message appears at the end of the command line as follows:
- Command OK - indicates that the command is correct and successfully performed by the switch
- Command incorrect - indicates that the command has the wrong format and/or values.
Commands
After connecting to the VM5404H / VM5808H via Telnet or RS-232, you can operate the system using the following commands.
Switch Port Command
The Switch Port command allows you to switch ports on the VM5404H / VM5808H.
The formula for the Switch command is as follows:
$$ \text { Command } + \text { Input } + \text { Number } + \text { Output } + \text { Number } + \text { Control } + [ \text { Enter } ] $$
- For example, to switch input port 02 to output port 05, type:
$$ \text { sw i02 o05 [Enter] } $$
- To switch output port 04 to the next port, type:
$$ \text { sw o04 } + [ \text { Enter } ] $$
- To turn off video output on port 03, type:
$$ \text { sw o03 off [Enter] } $$
The following tables show the possible values for the Switch Port command:
| Command Description | |
| sw Switch command | |
| Input Command Description | |
| i Input command | |
| Port number Description | |
| xx 01-08 port | |
| Output Command Description | ||
| o Output command | ||
| Port number Description | ||
| yy 01-08 port | ||
| * All output ports | ||
| Control Description | ||
| on Turn on the display | ||
| off Turn off the display | ||
| + | N | e x |
| - Previous Port | ||
P
Note: 1. By default, input port 01 is tied to output port 01; input port 02 is tied to output port 02; and so on until port 08 (i.e., o01 i01, o02 i02).
-
Each command string can be separated with a space.
-
The Port Number can be skipped, and the default value will be used.
The following table lists the available Switch Port commands:
| Command | Input Command | Input Port | Output Command | Output Port | Control | Enter Description |
| sw i xx | o | yy | * | [Enter] Switch Input Port xx to Output Port yy(xx:01~08; yy:01~08,*) | ||
| sw | o | yy* | on off | [Enter] Turn on Output Port yyTurn off Output Port yy(yy:01~08, *) | ||
| sw | o | yy* | + - | [Enter] Switch Output port yy to next Output port.Switch Output port yy to previous Output port.(yy:01~08, *) |
EDID Mode Command
Extended Display Identification Data (EDID) is a data that contains a display's basic information and is used to communicate with the video source.
The formula for the EDID command is as follows:
$$ \text { Command } + \text { Control } + [ \text { Enter } ] $$
- For example, to use the Port1 EDID mode, type:
edid port1 [enter]
The following tables show the possible values for the EDID command:
| Command Description | |
| edid EDID Mode command | |
| Control Description | |
| port1 Implement the EDID of the connected display to Port 1, and pass it to the video source. | |
| remix Implement the EDID of each connected display according to its connection when the VM5404H / VM5808H is first powered on, or immediately after selecting the Remix option. | |
| default Implements ATEN's default EDID. (default) | |
| custom Implements the customized mode as set in the EDID system settings. (See Customized EDID Settings, page 68) |
Note: Each command string can be separated with a space.
The following table lists the available EDID commands:
| Command | Control Enter Description | ||
| edid port1 | [Enter] | The EDID from Port 1 is passed to the video source. | |
| edid | remix | [Enter] | The VM5404H / VM5808H implements the EDID of each connected display according to its connection when the VM5404H / VM5808H is first powered on, or immediately after selecting the Remix option. |
| edid | default | [Enter] | ATEN's default EDID is passed to the video source. |
| Command | Control Enter | Description |
| edit custom [Enter] | Implements | the customized mode. |
Mute Command
Mute allows you to enable or disable an output port(s) audio.
The formula for the Mute command is as follows:
$$ \text { Command } + \text { Output } + \text { Number } + \text { Control } + [ \text { Enter } ] $$
- For example, to mute the audio coming from output port 1, type: mute o01 on [enter]
The following tables show the possible values for the Mute command:
| Command Description | |
| mute Mute command | |
| Output Command Description | |
| o Output command | |
| Port number Description | |
| yy 01-08 port (default is 01) | |
| * All output ports | |
| Control Description | |
| on Mute on; audio from HDMI output port is disabled | |
| off Mute off; audio output enabled (default) |
Note: 1. Each command string can be separated with a space.
- Skip the output port command to mute or enable the audio of all output ports.
The following table lists the available Mute commands:
| Command | Output Command | Output Port | Control Enter Description | ||
| mute | o | yy* | on | [Enter] | Audio on for output port yy (yy:01~08, *) |
| mute | o | yy* | off | [Enter] | Audio off for output port yy (default)(yy:01~08, *) |
CEC Command
Consumer Electronics Control (CEC) allows interconnected HDMI devices to communicate and respond to the same remote control.
The formula for the CEC command is as follows:
$$ \text { Command } + \text { Output } + \text { Number } + \text { Control } + [ \text { Enter } ] $$
- For example, to enable the CEC function on output port 1, type:
$$ \text { cec o01 on [enter] } $$
The following tables show the possible values for the CEC command:
| Command Description | |
| cec CEC command | |
| Output Command Description | |
| o Output command | |
| Port number Description | |
| yy 01-08 port (default is 01) | |
| * All output ports | |
| Control Description | |
| off Disable CEC (default) | |
| on Enable CEC |
Note: Each command string can be separated with a space.
The following table lists the available CEC commands:
| Command | Output Port | Control Enter Description | |
| cec | yy* | off [Enter] | CEC off for output port yy (default)(yy:01~08, *) |
| cec | yy* | on [Enter] | CEC on for output port yy(yy:01~08, *) |
Scaling Command
The Scaling command allows you to set a resolution for scaling the display connected to an output port.
The formula for the Scaling command is as follows:
$$ \begin{array}{l} \text {Command + Output + Number 1 + Horizontal Resolution + Number 2} \ + \text {Vertical Resolution + Number 3 + Frequency + Number 4 + Control} \ + [ \text {Enter} ] \end{array} $$
- For example, to turn scaling off for output port 02, type:
$$ \text { scaling o02 off [Enter] } $$
- To set the scaling for output port 04 to 1920x1080@60Hz, type:
$$ \text { scaling o04 1080p [Enter] } $$
- To set the scaling for all output ports to the connected display's native resolution, type:
$$ \text { scaling } o ^ {*} \text { native [Enter] } $$
The following tables show the possible values for the Scaling command:
| Command Description | |
| scaling Scaling | command |
| Output Description | |
| o Output command | |
| Port Number Description | |
| yy 01-08 port | |
| * All output ports | |
| Horizontal Resolution | Description |
| hor Horizontal resolution command for scaling | |
| Resolution Number Description | |
| hhhh Horizontal resolution | |
| Vertical Resolution Description | |
| ver Vertical resolution command for scaling | |
| Resolution Number Description | |
| vvvv Vertical resolution | |
| Frequency Description | |
| freq Frequency command for scaling | |
| Frequency Number Description | |
| fff Frequency resolution | |
| Control Description | |
| off Turn off the scaling function(by pass mode) | |
| native Map display's native resolution for scaling (default) | |
Note: 1. Each command string can be separated with a space.
2. The Port Number command string can be skipped, and the default value will be used.
The following table lists the available Scaling commands:
| Command | Output | Port Number | Horizontal Resolution | Number | Vertical Resolution | Number | Frequency | Number | Control | Enter | Description |
| scaling | o | yy* | off [Enter] | Turn off scaling for port yy (by pass mode)yy: 01 ~ 08 or * | |||||||
| scaling | o | yy* | native | [Enter] | Enable display's native resolution for scaling on output port yy (default)yy: 01 ~ 08 or * | ||||||
| scaling | o | yy* | hor 19 | 20 ver | 1080 freq | 60 [Enter | ] | Scale output port yy to 1920x1080@ 60Hz yy: 01 ~ 08 or * | |||
| scaling | o | yy* | hor 12 | 80 ver | 720 freq | 60 [Enter | ] | Scale output port yy to 1280x720@60Hz yy: 01 ~ 08 or * | |||
| scaling | o | yy* | hor 19 | 20 ver | 1200 freq | 60 [Enter | ] | Scale output port yy to 1920x1200@ 60Hz yy: 01 ~ 08 or * | |||
| scaling | o | yy* | hor 16 | 600 ver | 1200 freq | 60 [Enter | ] | Scale output port yy to 1600x1200@ 60Hz yy: 01 ~ 08 or * | |||
| scaling | o | yy* | hor 14 | 400 ver | 1050 freq | 60 [Enter | ] | Scale output port yy to1400x1050 @60Hz yy: 01 ~ 08 or * | |||
| scaling | o | yy* | hor 12 | 80 ver | 1024 freq | 60 [Enter | ] | Scale output port yy to 1280x1024@ 60Hz yy: 01 ~ 08 or * | |||
| scaling | o | yy* | hor 10 | 24 ver | 768 freq | 60 [Enter | ] | Scale output port yy to 1024x768@60Hz yy: 01 ~ 08 or * | |||
| scaling | o | yy* | hor 1280 ver 800 freq | 60 [Enter | ] | Scale output port yy to 1280x800@60Hzyy: 01 ~ 08 or * | |||||
| scaling | o | yy* | hor 720 ver 576 freq | 50 [Enter | ] | Scale output port yy to 720x576@50 Hzyy: 01 ~ 08 or * | |||||
| scaling | o | yy* | hor 1600 ver 900 freq | 60 [Enter | ] | Scale output port yy to 1600x900@60Hzyy: 01 ~ 08 or * | |||||
Fan Speed Command
The Fan Speed command allows you to set the internal fan speed that cools the VM5404H/VM5808H.
To set the fan speed, use the following command:
$$ \text { Command } + \text { Control } + [ \text { Enter } ] $$
- For example, to set the fan to low speed, type:
$$ \text { fan low } [ \text { Enter } ] $$
The following tables show the possible values for the Fan Speed command:
| Command Description | |
| fan Fan Speed Command | |
| Control Description | |
| low Set internal fan to low speed (default) | |
| mid Set internal fan to normal speed | |
| high Set internal fan to high speed |
Note: Each command string can be separated with a space.
The following table lists the available Fan Speed commands:
| Command Control Enter Description | |||
| fan low [Enter] Sets fan speed to low | |||
| fan mid | [Enter] Sets fan speed to normal | ||
| fan | high | [Enter] Sets fan speed to high | |
Echo Command
The Echo function updates the RS232 controller when operations are made via the front panel pushbuttons, web browser, or telnet. The changes echo back to the RS232 controller to keep the settings in sync with the device.
The formula for the Echo command is as follows:
$$ \text { Command } + \text { Control } + [ \text { Enter } ] $$
- For example, to enable the echo feature, type:
$$ \text { echo on } [ \text { Enter } ] $$
The following tables show the possible values for the Echo command:
| Command Description |
| echo Echo command |
| Control Description |
| on Turns Echo function on |
| off Turns Echo function off (default) |
Note: Each command string can be separated with a space.
The following table lists the available Echo commands:
| Command Control Enter Description | |||
| echo on [Enter] Turn on Echo function | |||
| echo off [Enter] Turn off Echo function | |||
Black Screen Command
The Black Screen command turns a display screen black when no source signal is detected. This prevents the display from showing the default blue or other color used when no source signal is detected.
The formula for the Black Screen command is as follows:
$$ \text { Command } + \text { Control } + [ \text { Enter } ] $$
- For example, to enable the Black Screen function, type:
$$ \text { blackscreen on [Enter] } $$
The following tables show the possible values for the Black Screen command:
| Command Description | |
| blackscreen Black | Screen command |
| Control Description | |
| on Turns Black Screen function on (default) | |
| off Turns Black Screen function off | |
Note: Each command string can be separated with a space.
The following table lists the available Black Screen commands:
| Command Control Enter Description | |||
| blackscreen on [Enter] Turn on Black Screen function | |||
| blackscreen off [Enter] Turn off Black Screen function |
Read Command
The Read command allows you to view the current configuration, firmware and other information about the device.
The formula for the Read command is as follows:
$$ \text { Command } + [ \text { Enter } ] $$
- To view information about the device, type:
$$ \text { read } [ \text { Enter } ] $$
The following table shows the possible values for the Read command:
| Command Description |
| read Read command |
Note: Each command string can be separated with a space.
The following table lists the available Read commands:
| Command Enter Description | ||
| read [Enter] View information about the device |
Reset Command
The Reset command allows you to reset the VM5404H / VM5808H to the default factory settings.
The formula for the Reset command is as follows:
$$ \text { Command } + [ \text { Enter } ] $$
The following tables show the possible values for the Reset command:
| Command Description | |
| reset Reset command |
Note: Each command string can be separated with a space.
The following table lists the available Reset commands:
| Command Enter Description | ||
| reset [Enter] Resets the device settings |
Baud Rate Command
The Baud Rate command allows you to set the RS-232 data rate for the VM5404H / VM5808H to use. Options are 9600, 19200 (default) 38400 and 115200.
The formula for the Baud Rate command is as follows:
$$ \text { Command } + \text { Control } + [ \text { Enter } ] $$
- For example, to set 38400 as the baud rate, type:
$$ \text { baud 38400 [Enter] } $$
The following tables show the possible values for the Baud Rate command:
| Command Description | |
| baud Sets the | RS-232 baud rate |
| Control Description | |
| 9600 Use 9600 | baud rate |
| 19200 Use 19200 | baud rate (default) |
| 38400 Use 38400 | baud rate |
| 115200 Use 115200 | baud rate |
Note: Each command string can be separated with a space.
The following table lists the available Baud Rate commands:
| Command Control Enter Description | |||
| baud 9600 | / 19200 / 38400 / 115200 | [Enter] Sets the RS-232 baud rate | |
Save/Load Profile Command
The Save/Load Profile command allows you to save and load connection profiles. Saving profiles will save the connections currently in use.
The formula for the Save/Load Profile command is as follows:
$$ \text { Command } + \text { Profile } + \text { Number } + \text { Control } + [ \text { Enter } ] $$
- For example, to save the current connection configuration to profile 02, type:
profile f 02 save [Enter]
The following tables show the possible values for the Save/Load Profile commands:
| Command Description | |
| profile Save / Load profile | |
| Profile Description | |
| f Profile command | |
| Profile Number Description | |
| yy VM5404H: 01-08 (default is 01) | |
| Control Description | |
| save Save the connection configuration | |
| load Load a saved profile |
Note: Each command string can be separated with a space.
The following table lists the available Save/Load Profile commands:
| Command | Profile | Profile Number | Control | Enter Description |
| profile | f | yy* | save [Enter] | Save the connections as profile yy. VM5404H: (yy:01~08, *) |
| VM5808H: (yy:01~16, *) | ||||
| profile | f | yy* | load | [Enter] Load profile yy. VM5404H: (yy:01~08, *) |
| VM5808H: (yy:01~16, *) |
OSD Command
To enable or disable the On-Screen Display (OSD) for displays, use the following command:
$$ \text { Command } + \text { Output } + \text { Number } + \text { Control } + [ \text { Enter } ] $$
- For example, to enable the OSD for output 07, type:
$$ \text { osd o07 on [Enter] } $$
- For example, to disable the OSD for all outputs, type:
$$ \text { osd } \mathrm{o} ^ {*} \text { off } [ \text { Enter } ] $$
The following tables show the possible values for the OSD command:
| Command Description | |
| osd OSD command | |
| Output Description | |
| o Output port command | |
| Number Description | |
| yy Output port01~16 port (default is 01) | |
| * All output ports | |
| Control Description | |
| on Enable OSD function | |
| off Disable OSD function (default) |
Note: Each command string can be separated with a space.
The following table lists the available OSD commands:
| Command | Output Command | Output Port | Control Enter Description | ||
| osd | o | yy* | on | [Enter] | OSD on for output yy yy:01~16,* |
| osd | o | yy* | off | [Enter] | OSD off for output yy (default) yy:01~16,* |
Alert Command
To trigger a warning when issues arise for a specific input port, use the following command:
$$ \text { Command } + \text { Input } + \text { Number } + \text { Control } + [ \text { Enter } ] $$
- For example, to enable the basic Alert function for input port 1, type: alert i01 m1 [enter]
The following tables show the possible values for the Alert command:
| Command Description | |
| alert Alert command | |
| Input Description | |
| i Input command | |
| Port number Description | |
| yy 01-08 port | |
| Control Description | |
| off Disable Alert (default) | |
| m1 Show basic Alert (flashing border) | |
| m2 Show detailed Alert (flashing border and port information) |
Note: Each command string can be separated with a space.
The following table lists the available Alert commands:
| Command | Input Command | Input Port | Control Enter Description | ||
| alert | i | yy | off | [Enter] | Alert off for input port yy (yy:01~08) |
| alert | i | yy | m1 | [Enter] | Basic Alert on for input port yy (yy:01~08) |
| alert | i | yy | m2 | [Enter] | Detailed Alert on for input port yy (yy:01~08) |
Safety Instructions
General
- Read all of these instructions. Save them for future reference.
◆ Follow all warnings and instructions marked on the device. - This product is for indoor use only.
- Do not place the device on any unstable surface (cart, stand, table, etc.). If the device falls, serious damage will result.
♦ Do not use the device near water. - Do not place the device near, or over, radiators or heat registers.
- The device cabinet is provided with slots and openings to allow for adequate ventilation. To ensure reliable operation, and to protect against overheating, these openings must never be blocked or covered.
- The device should never be placed on a soft surface (bed, sofa, rug, etc.) as this will block its ventilation openings. Likewise, the device should not be placed in a built-in enclosure unless adequate ventilation has been provided.
- Never spill liquid of any kind on the device.
- Unplug the device from the wall outlet before cleaning. Do not use liquid or aerosol cleaners. Use a damp cloth for cleaning.
- The device should be operated from the type of power source indicated on the marking label. If you are not sure of the type of power available, consult your dealer or local power company.
- The device is designed for IT power distribution systems with 230V phase-to-phase voltage.
- To prevent damage to your installation it is important that all devices are properly grounded.
- The device is equipped with a 3-wire grounding type plug. This is a safety feature. If you are unable to insert the plug into the outlet, contact your electrician to replace your obsolete outlet. Do not attempt to defeat the purpose of the grounding-type plug. Always follow your local/national wiring codes.
-
Do not allow anything to rest on the power cord or cables. Route the power cord and cables so that they cannot be stepped on or tripped over.
-
If an extension cord is used with this device make sure that the total of the ampere ratings of all products used on this cord does not exceed the extension cord ampere rating. Make sure that the total of all products plugged into the wall outlet does not exceed 15 amperes.
- To help protect your system from sudden, transient increases and decreases in electrical power, use a surge suppressor, line conditioner, or un-interruptible power supply (UPS).
- Position system cables and power cables carefully; Be sure that nothing rests on any cables.
- Never push objects of any kind into or through cabinet slots. They may touch dangerous voltage points or short out parts resulting in a risk of fire or electrical shock.
- Do not attempt to service the device yourself. Refer all servicing to qualified service personnel.
-
If the following conditions occur, unplug the device from the wall outlet and bring it to qualified service personnel for repair.
-
The power cord or plug has become damaged or frayed.
♦ Liquid has been spilled into the device. - The device has been exposed to rain or water.
- The device has been dropped, or the cabinet has been damaged.
- The device exhibits a distinct change in performance, indicating a need for service.
- The device does not operate normally when the operating instructions are followed.
- Only adjust those controls that are covered in the operating instructions. Improper adjustment of other controls may result in damage that will require extensive work by a qualified technician to repair.
- Avoid circuit overloads. Before connecting equipment to a circuit, know the power supply’s limit and never exceed it. Always review the electrical specifications of a circuit to ensure that you are not creating a dangerous condition or that one does not already exist. Circuit overloads can cause a fire and destroy equipment.
Rack Mounting
Before working on the rack, make sure that the stabilizers are secured to the rack, extended to the floor, and that the full weight of the rack rests on the floor. Install front and side stabilizers on a single rack or front stabilizers for joined multiple racks before working on the rack.
- Always load the rack from the bottom up, and load the heaviest item in the rack first.
- Make sure that the rack is level and stable before extending a device from the rack.
- Do not overload the AC supply branch circuit that provides power to the rack. The total rack load should not exceed 80 percent of the branch circuit rating.
- Make sure that all equipment used on the rack – including power strips and other electrical connectors – is properly grounded.
- Ensure that proper airflow is provided to devices in the rack.
- Ensure that the operating ambient temperature of the rack environment does not exceed the maximum ambient temperature specified for the equipment by the manufacturer.
- Do not step on or stand on any device when servicing other devices in a rack.
Technical Support
International
- For online technical support – including troubleshooting, documentation, and software updates: http://eservice.aten.com
- For telephone support, see Telephone Support, page iii:
North America
| Email Support support@aten-usa.com | ||
| Online Technical Support | Troubleshooting Documentation Software Updates | http://www.aten-usa.com/support |
| Telephone Support 1-888-999-ATEN | ext 4988 | |
When you contact us, please have the following information ready beforehand:
- Product model number, serial number, and date of purchase.
- Your computer configuration, including operating system, revision level, expansion cards, and software.
◆ Any error messages displayed at the time the error occurred. - The sequence of operations that led up to the error.
◆ Any other information you feel may be of help.
Specifications
| Function VM5404H VM5808H | |||
| Video Input | Interface 4 x HDMI Type A Female (Black) | 8 x HDMI Type A Female (Black) | |
| Impedance 100 Ω | |||
| Max. Distance 1.8 m | |||
| Video Output | Interface 4 x HDMI Type A Female (Black) | 8 x HDMI Type A Female (Black) | |
| Impedance 100 Ω | |||
| Max. Distance 15 m | |||
| Video Max. | Data Rate 6.75 Gbps (2.25 Gbps per Lane) | ||
| Max. Pixel Clock 225 MHz | |||
| Compliance | HDMI (3D, Deep Color) HDCP 1.4 Compatible Consumer Electronics Control (CEC) | ||
| Max. Resolution Up to 1080p | |||
| Max. Distance Up to 15 m | |||
| Control RS-232 Connector: 1 x DB-9 Female (Black) Baud rate and protocol: Baud Rate: 19200, Data Bits: 8, Stop Bits:1, Parity: No, Flow Control: No | |||
| EDID Settings | EDID Mode: Default / Port1 / Remix / Customized | ||
| Power | Connector | 1 x 3-Prong AC Socket | |
| I/P Rating | 100-240VAC; 50-60Hz; 1.0A | ||
| Consumption | 120 VAC, 60W; 230 VAC, 62W | ||
| Environment | Operating Temp. | 0-50°C | |
| Storage Temp. | -20-60°C | ||
| Humidity | 0-80% RH, Non-condensing | ||
| Physical Properties | Housing | Metal | |
| Weight | 4.10 kg | 4.03 kg | |
| Dimensions (L x W x H) | 43.24 x 26.23 x 4.40 cm | ||
| Carton Lot | 1 pcs | ||
Telnet Operation
To connect to VM5404H / VM5808H via Telnet, follow the steps in Connecting to the Matrix Switch via Telnet, page 81.
Configuration Menu
Once a Telnet connection to the VM5404H / VM5808H is established, the device's text-based Configuration Menu comes up, with the following items:
1. H – Call up the command list for help
Command list:
GT - Set gateway address
IM - Set IP subnet mask
IP - Set IP address
LO - Load connections from profile nn
PW - Change password
RI- Read what input is connected to nn output
RO - Read what output is connected to nn input
SB - Set the serial port baud rate
SS - Switch input to specified port
SV - Save the current connections into profile nn
TI - Set timeout
VR – Software version information
Ctrl-Q - Quit
2. GT – Set gateway address
GT
Old gateway address: 192.168.0.1
New gateway address:
3. IM - Set IP subnet mask
IM
Old IP subnet mask: 255.255.255.0
New IP subnet mask:
4. IP – Set IP address
IP
Old IP address: 192.168.0.60
New IP address:
5. LO – Load connections from profile
LO 01
Load profile 01 OK.
6. PW – Change password
PW
Old password: *****
New password:
7. RI - Read what input is connected to nn output
RI 01
Input port 02 04 08 is connected to output port 01
8. RO - Read what output is connected to nn input
RO 01
Output port 02 is connected to input port 01
9. SB – Set serial port baud rate
SB 96
Serial port baud rate is set to 9600
10. SS - Switch input to specified output
SS 01,03
Switch input 01 to output 03
11. SV – Save the current connections into a profile
SV 01
Save the current connections into profile 01
12. TI - Set timeout
TI 30
Set 30 minute timeout
13. VR – Software version information
VR
Software version 1.0.
Limited Warranty
ATEN warrants its hardware in the country of purchase against flaws in materials and workmanship for a Warranty Period of two [2] years (warranty period may vary in certain regions/countries) commencing on the date of original purchase. This warranty period includes the LCD panel of ATEN LCD KVM switches. Select products are warranted for an additional year (see A+ Warranty for further details). Cables and accessories are not covered by the Standard Warranty.
What is covered by the Limited Hardware Warranty
ATEN will provide a repair service, without charge, during the Warranty Period. If a product is detective, ATEN will, at its discretion, have the option to (1) repair said product with new or repaired components, or (2) replace the entire product with an identical product or with a similar product which fulfills the same function as the defective product. Replaced products assume the warranty of the original product for the remaining period or a period of 90 days, whichever is longer. When the products or components are replaced, the replacing articles shall become customer property and the replaced articles shall become the property of ATEN.
To learn more about our warranty policies, please visit our website: http://www.aten.com/global/en/legal/policies/warranty-policy/