
SN3001 - Server ATEN - Free user manual and instructions
Find the device manual for free SN3001 ATEN in PDF.


User questions about SN3001 ATEN
0 question about this device. Answer the ones you know or ask your own.
Ask a new question about this device
Download the instructions for your Server in PDF format for free! Find your manual SN3001 - ATEN and take your electronic device back in hand. On this page are published all the documents necessary for the use of your device. SN3001 by ATEN.
USER MANUAL SN3001 ATEN
This equipment has been tested and found to comply with the limits for a Class A digital device, pursuant to Part 15 of the FCC Rules. These limits are designed to provide reasonable protection against harmful interference when the equipment is operated in a commercial environment. This equipment generates, uses, and can radiate radio frequency energy and, if not installed and used in accordance with the instruction manual, may cause harmful interference to radio communications. Operation of this equipment in a residential area is likely to cause harmful interference in which case the user will be required to correct the interference at his own expense.
This device complies with Part 15 of the FCC Rules. Operation is subject to the following two conditions: (1) this device may not cause harmful interference, and (2) this device must accept any interference received, including interference that may cause undesired operation.
FCC Caution
Any changes or modifications not expressly approved by the party responsible for compliance could void the user's authority to operate this equipment.
Warning
Operation of this equipment in a residential environment could cause radio interference.
Achtung
Industry Canada Statement
This Class A digital apparatus complies with Canadian ICES-003.
CAN ICES-003 (A) / NMB-003 (A)
RoHS
This product is RoHS compliant.
About This Manual
This manual is provided to help you get the most out of your Secure Device Server. It covers all aspects of the device, including installation, configuration, and operation.
The Secure Device Server models covered in this user manuals include:
| Models | Product Names |
| SN3001 1-Port RS-232 Secure Device Server | |
| SN3001P 1-Port RS-232 Secure Device Server with PoE | |
| SN3002 2-Port RS-232 Secure Device Server | |
| SN3002P 2-Port RS-232 Secure Device Server with PoE | |
An overview of the information found in the manual is provided below.
Chapter 1, Introduction, introduces Secure Device Server. Its purpose, features and benefits are presented, and its front and back panel components are described.
Chapter 2, Hardware Setup, provides step-by-step instructions for setting up Secure Device Server.
Chapter 3, Network Configuration and Login, explains how to log into the Secure Device Server from a web browser.
Chapter 4, Web Console, explains the administrative procedures that are employed to configure the Secure Device Server's working environment.
Chapter 5, User Management, details login accounts and third-party authentication services supported, such as RADIUS.
Chapter 6, Port Operating Modes, introduces the Secure Device Server's operating modes, and explains the purpose of each.
Chapter 7, Port Access, describes how to access the COM ports of the Secure Device Server and start SNViewer.
Chapter 8, Remote Terminal Operation, describes how the Secure Device Server can be accessed via remote terminal sessions, such as Telnet, SSH, and PuTTY.
Chapter 9, Virtual Serial Port Manager, shows how to install the virtual COM port driver and to set up and manage the virtual COM port.
Chapter 10, Serial Network Device Manager, explains how to use the Serial Network Device Management utility to create and maintain device groups for easy management of the serial ports on your installation; and as an AP alternative to the browser-based management utilities.
Appendix, provides technical and troubleshooting information at the end of the manual.
Conventions
This manual uses the following conventions:
Monospaced Indicates text that you should key in.
[ ] Indicates keys you should press. For example, [Enter] means to press the Enter key. If keys need to be chorded, they appear together in the same bracket with a plus sign between them: [Ctrl+Alt].
- Numbered lists represent procedures with sequential steps.
◆ Bullet lists provide information, but do not involve sequential steps.
Indicates selecting an option (such as on a menu or dialog box), that comes next. For example, Start > Run means to open the Start menu, and then select Run.
Indicates critical information.

Package Contents
SN3001 / SN3002
The standard SN3001 / SN3002 package consists of:
1 Secure Device Server (SN3001 / SN3002)
1 power adapter
1 terminal block
1 foot pad set (4 pcs)
1 DIN rail mount kit
1 user instructions*
SN3001P / SN3002P
The standard SN3001P / SN3002P package consists of:
1 Secure Device Server with PoE (SN3001P / SN3002P)
1 terminal block
1 foot pad set (4 pcs)
1 DIN rail mount kit
1 user instructions*
Check to make sure that all of the components are present and in good order. If anything is missing, or was damaged in shipping, contact your dealer for assistance.
Read this manual thoroughly and follow the installation and operation procedures carefully to avoid any damage to the Secure Device Server or to any other devices on the Secure Device Server installation.
Product Information
For information about all ATEN products and how they can help you connect without limits, visit ATEN on the web or contact an ATEN authorized reseller. Visit ATEN on the web for a list of locations and telephone numbers:
| International http://www.aten.com |
| North America http://www.aten-usa.com |
User Information
Online Registration
Be sure to register your product at our online support center:
| International http://eservice.aten.com |
Telephone Support
For telephone support, call this number:
| International 886-2 | 8692-6959 |
| China 86-400-810-0 | 810 |
| Japan 81-3-5615-5811 | |
| Korea 82-2-467-6789 | |
| North America 1-88 | 8-999-ATEN ext 4988 |
| 1-949-428-1111 | |
User Notice
All information, documentation, and specifications contained in this manual are subject to change without prior notification by the manufacturer. The manufacturer makes no representations or warranties, either expressed or implied, with respect to the contents hereof and specifically disclaims any warranties as to merchantability or fitness for any particular purpose. Any of the manufacturer's software described in this manual is sold or licensed as is. Should the programs prove defective following their purchase, the buyer (and not the manufacturer, its distributor, or its dealer), assumes the entire cost of all necessary servicing, repair and any incidental or consequential damages resulting from any defect in the software.
The manufacturer of this system is not responsible for any radio and/or TV interference caused by unauthorized modifications to this device. It is the responsibility of the user to correct such interference.
The manufacturer is not responsible for any damage incurred in the operation of this system if the correct operational voltage setting was not selected prior to operation. PLEASE VERIFY THAT THE VOLTAGE SETTING IS CORRECT BEFORE USE.
Contents
EMC Information....ii
About This Manual ....iii
Conventions iv
Package Contents v
SN3001 / SN3002 v
SN3001P / SN3002P v
Product Information ...... vi
User Information ......vi
Online Registration....vi
Telephone Support....vi
User Notice....vii
Contents......viii
Chapter 1.
Introduction
Overview....1
Features 2
Serial-to-Ethernet Connectivity 2
Hardware....2
Security 3
System Management .... 3
SN3001 / SN3001P / SN3002 / SN3002P Front View .... 4
SN3001 / SN3001P / SN3002 / SN3002P Rear View 4
SN3001 / SN3001P / SN3002 / SN3002P Top View . . . . . . . . . . . . . . . . . . . . . . . . . . . 5
Chapter 2.
Hardware Setup
Before you Begin 7
Placement Options 7
Wall Mount 7
DIN Rail Mount 8
Parallel DIN Rail Mount 8
Perpendicular DIN Rail Mount. 9
Rack Mount....10
Installation....13
Serial Port Pin Assignments....15
Chapter 3.
Network Configuration and Login
IP Address Determination....17
IP Installer Utility 17
Without IP Installer (non-DHCP only)....18
Logging In 19
Quick Setup Wizard 20
General 20
Network 21
Serial 22
Chapter 4.
Web Console
Web Interface 23
Serial Ports 24
Editing Serial Ports 24
Properties 25
Port Buffering....26
Operating Mode 27
Network....32
System 33
General Settings 34
General 34
Time. 36
Notification....37
SMTP 37
SNMP 38
Syslog 39
Advanced....40
Security 41
Access Protection (IP Filter) 41
Security Level 42
Account Policy 42
Security Certificate. 43
Update & Restore 44
Firmware Update 44
Backup & Restore 45
User Accounts....46
Logs 47
Chapter 5.
User Management
Overview 49
User....49
Adding Users....50
Editing Users....51
Deleting Users....52
Online Users....52
Authentication Services ....53
RADIUS....53
Chapter 6.
Port Operating Modes
Overview....55
Selecting Operating Mode 55
Operating Mode 57
Real COM....57
TCP Server & Client 57
TCP Server 57
TCP Client....58
Serial Tunneling Server & Client. 58
UDP Mode. 58
Console Management....59
Console Management Direct. 59
Disable 60
Chapter 7.
Port Access
Overview....61
Telnet / SSH....62
SNViewer 62
Control Panel Functions 63
Data Import 64
Encode 64
Terminal Settings 64
Chapter 8.
Remote Terminal Operation
Overview....67
Terminal Login 67
Telnet Login 67
SSH Login (Linux)....68
Third-party Utility (Windows) 68
Terminal Main Menu....69
Chapter 9.
Virtual Serial Port Manager
Overview....71
Real COM Port Management — Virtual Serial Port Manager....72
Utility Interface....72
Menu and Toolbar 73
Target Information 73
Target List 74
Port List 75
Port Mapping and Unmapping....76
Port Mapping 76
Mapped COM Port. 76
Port Unmapping....77
Real COM Port Management — Linux Commands .....78
Mapping / Unmapping Virtual Ports. 78
Virtual Port Naming Rules....78
Appendix
Safety Instructions....79
General 79
DC Power 81
Rack Mounting 82
Technical Support....83
International....83
North America 83
Specifications 84
Clear Login Information....86
Troubleshooting 87
Limited Warranty....88
This Page Intentionally Left Blank
Overview
The Secure Device Server provides security-assuring, IP-based LAN connectivity for RS-232 serial devices and supports a wide range of operation modes. It empowers everyday RS-232 serial device — PLCs, meters, and sensors — to be connected to a network, and allowing them to be accessed and managed from anywhere over the network.
Equipped with extensive security features, such as Secure Real COM, Secure TCP Client and Server, Secure Serial Tunneling, and Secure Console Management, the Secure Device Server is the ideal solution for managing RS-232 serial device in a wide range of security-critical applications.
Fully compatible with existing serial communication software, the Secure Device Server ensures that your former investments in software development are protected. Software designed to work with COM or TTY ports can access the serial devices connected over a TCP/IP network by utilizing the Secure Device Server's Real COM or TTY drivers. This feature also breaks through the port number and distance limitation barriers encountered with PC hardware.
With SSL and SSH protocol support — for encrypting data transmission — the Secure Device Server ensures secured data transmission over both private and public networks.
Installing the Secure Device Server is fast and easy: plugging cables into their appropriate ports is all that is entailed. It also offers a browser-based GUI, Telnet / SSH console sessions, and a Windows software utility, making configuration and operation swift and smooth.
SN3001P / SN3002P provides PoE function, IEEE 802.3af compliant, thus can be powered through an Ethernet cable, by a PoE switch/adapter, without requiring an additional power supply.
All in all, with its advanced features and ease of operation, the Secure Device Server is the most convenient, reliable, and cost-effective way to remotely manage your serial devices.
Features
Serial-to-Ethernet Connectivity
- 1 or 2 RS-232 serial ports for secured serial data over Ethernet transmission
- Secured operation modes — Secured Real COM, Secured TCP Server/Client, Secured Serial Tunneling, Console Management (SSH), and Console Management Direct (SSH)
Standard operation modes — Real COM, TCP Server/Client, Serial Tunneling, UDP, Console Management (Telnet), and Console Management Direct (Telnet)
Real COM, Real TTY, and Fixed TTY drivers for Windows, Linux, and UNIX - Convenient console management access via Java viewer (SSH/Telnet) or third-party clients such as PuTTY
- Easy console port access via Java viewer and Sun Solaris ready (“break-free”)
- Multiple users can simultaneously access the same port — up to 16 connections per port
Hardware
- Redundant power input (power jack and terminal block) for fail-safe power
- IEEE 802.3af-compliant PoE power device equipment (SN3001P / SN3002P only)
◆ Surge protection for serial, Ethernet, and power - Wall and DIN-rail mounting, rack mounting (optional kit VE-RMK1U required), and desktop installation available
◆ Supports baud rates of 110, 134, 150, 300, 600, 1200, 1800, 2400, 4800, 7200, 9600, 19200, 38400, 57600, 115200, 230.4k, 460.8k, 921.6k bps
Security
- Supports secured login from browsers with TLS 1.2 data encryption and RSA 2048-bit certificates
◆ Configurable user permissions for port access and control - Local and remote authentication and login
- Third-party authentication (e.g. RADIUS)
◆ IP address filter for security protection
System Management
◆ Browser access with an intuitive GUI
- Web-based quick setup wizard for fast configuration
◆ Terminal-based access with a menu-driven UI via Telnet / SSH
- Online / offline detection of connected serial devices (including terminal blocks) — automatically send event notifications when the devices are offline (e.g. power failure) for device status monitoring
- System event logs will be saved to internal memory or Syslog server
- Port logs will be saved to internal memory or Syslog server
- SNMP agent (v1/v2c)
- Event notification — supports notification of SMTP email and SNMP trap (v1/v2c)
◆ Backup / restore system configuration and upgradable firmware
◆ 64 Kbyte port buffer prevents data loss when the network is down
◆ NTP for time server synchronization
♦ Multi-language web-based GUI
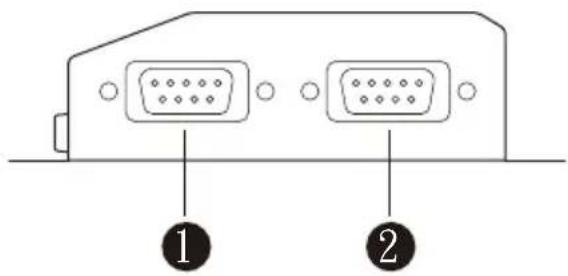
SN3001 / SN3001P / SN3002 / SN3002P Front View
text_image
① ②| No. | Component Description | |
| 1 RS | 232 serial port 1 | Connects to an RS-232 serial device. |
| 2 RS | 232 serial port 2 | Connects to a second RS-232 serial device. (SN3002 / SN3002P only) |
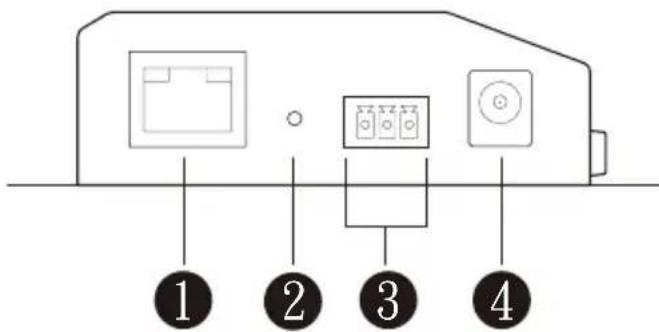
SN3001 / SN3001P / SN3002 / SN3002P Rear View
text_image
1 2 3 4| No. | Component Description |
| 1 LAN | port Connects the Secure Device Server to the network. For SN3001P / SN3002P (PoE 802.3af compliant), it can be simultaneously supplied power through a PoE switch. |
| 2 reset | button Pressing and holding for less than three seconds performs a system restart. Pressing and holding for more than three seconds returns its settings (excluding user account settings and privileges) to their default status. |
| 3 power | terminal Connects the Secure Device Server to power via DC electric leads and the terminal block provided. |
| 4 power | jack Connects the Secure Device Server to power using a power adapter. |
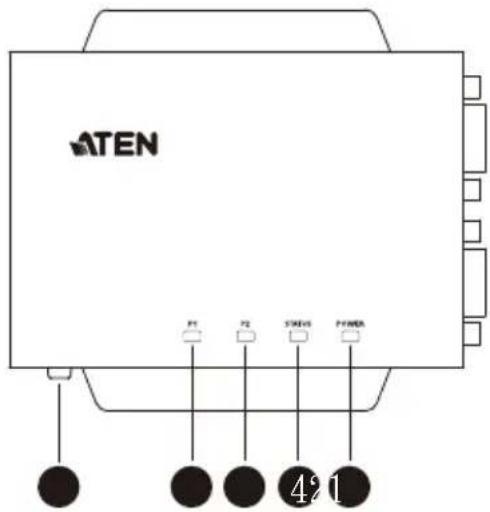
SN3001 / SN3001P / SN3002 / SN3002P Top View
text_image
ATEN P1 P2 SENS P4 1| No. | Component Description | |
| 1 | grounding terminal | Grounds the unit by connecting to a suitable grounded object using a grounding wire. |
| 2 | serial port 1 LED | Lights green or orange when data is being sent or received via the unit's RS-232 serial port 1. |
| 3 | serial port 2 LED | Lights green or orange when data is being sent or received via the unit's RS-232 serial port 2. (SN3002 / SN3002P only) |
| 4 | status LED Lights or | blinks yellow/green respectively for normal operation or startup, and lights red when an error (i.e. hardware failure and DHCP irregularity) occurs. |
| 5 | power LED Lights green when the Secure Device Server is powered and ready. | |
This Page Intentionally Left Blank
Before you Begin

-
Important safety information regarding the placement of this device is provided on page 79. Please review it before proceeding.
-
Make sure the power of all devices to be connected have been turned off.
Placement Options
For flexibility and convenience, Secure Device Server can be mounted onto a wall or DIN rail, as described below.
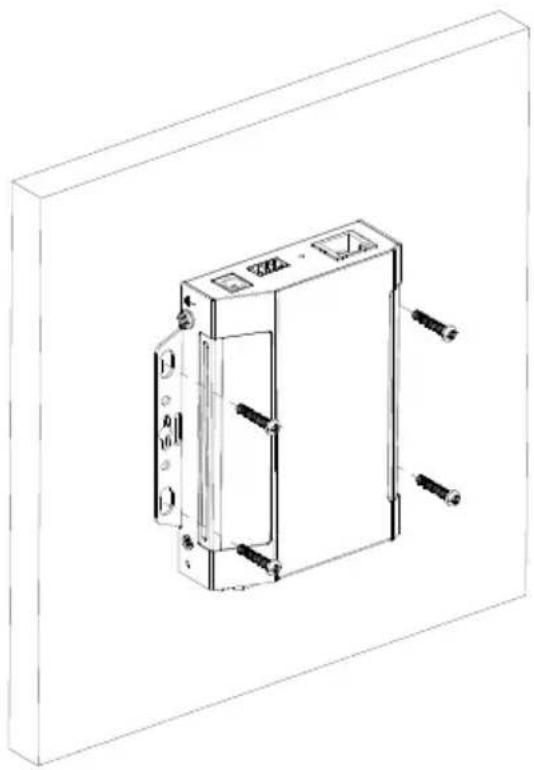
Wall Mount
To wall mount the Secure Device Server, doe the following:
Using 4 self-supplied screws, users can mount the unit onto a wall via the screw holes at its sides, as shown below.
natural_image
Technical line drawing of a mechanical device with mounting holes and connectors (no text or symbols)DIN Rail Mount
Use the DIN rail mount kit included to mount the Secure Device Server onto a DIN rail, as instructed below:
Parallel DIN Rail Mount
- To mount the unit parallel to the DIN rail, attach 2 DIN rail mount brackets onto the unit with the 4 screws provided, via its center screw holes.
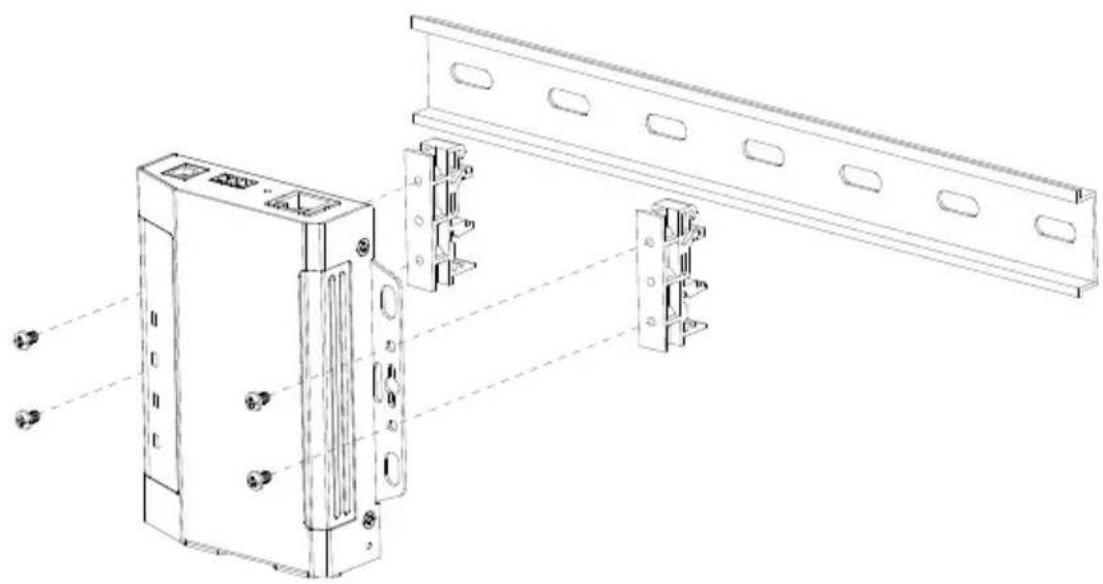
natural_image
Technical line drawing of an electronic device with mounting bracket and panel, showing internal components and wiring (no text or symbols)- Hang the unit onto the DIN rail.
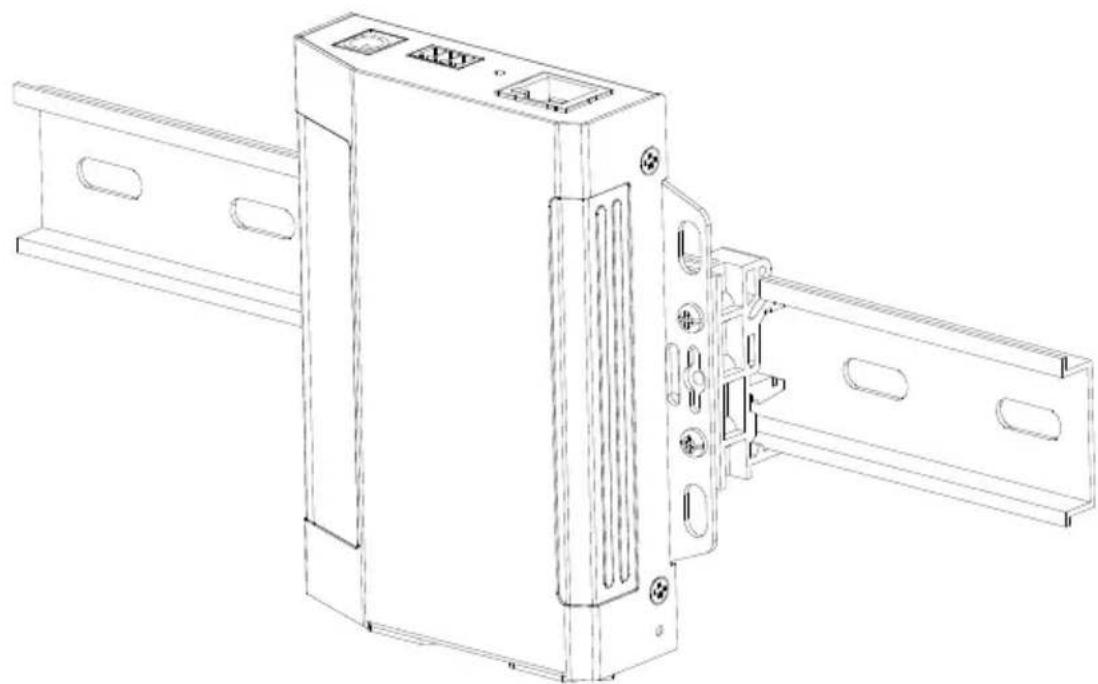
natural_image
Technical line drawing of a mechanical device with mounting brackets and internal components (no text or symbols)Perpendicular DIN Rail Mount
-
Attach the L-shape mounting bracket onto the unit with 2 M3x6 screws, via its center screw holes at the side opposite to its grounding terminal.
-
Using 2 of the 4 screws enclosed, attach 1 DIN rail mount bracket onto the side of the L-shape mounting bracket.
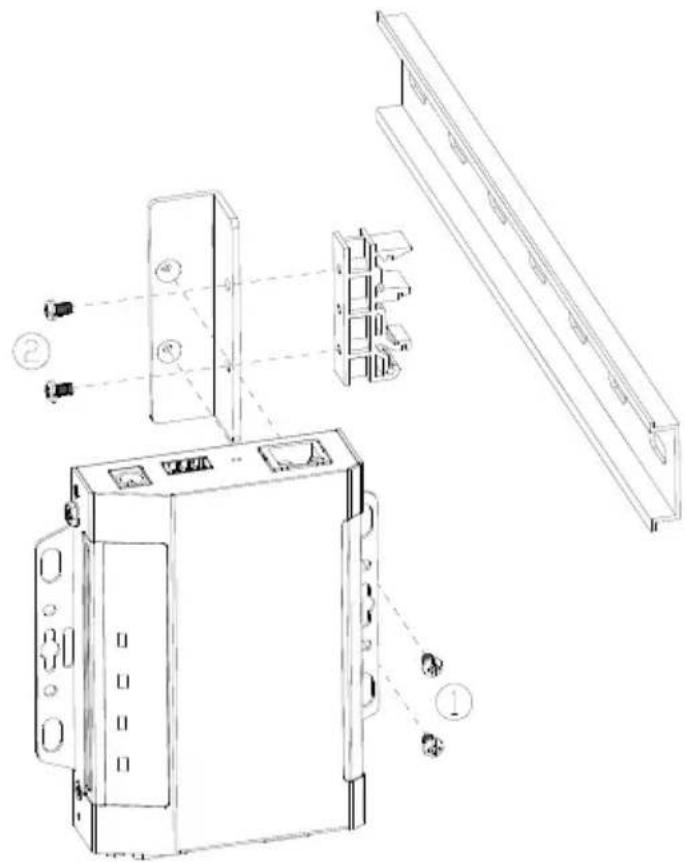
text_image
Technical diagram of an electronic device with labeled components and exploded view- Hang the unit onto the DIN rail.
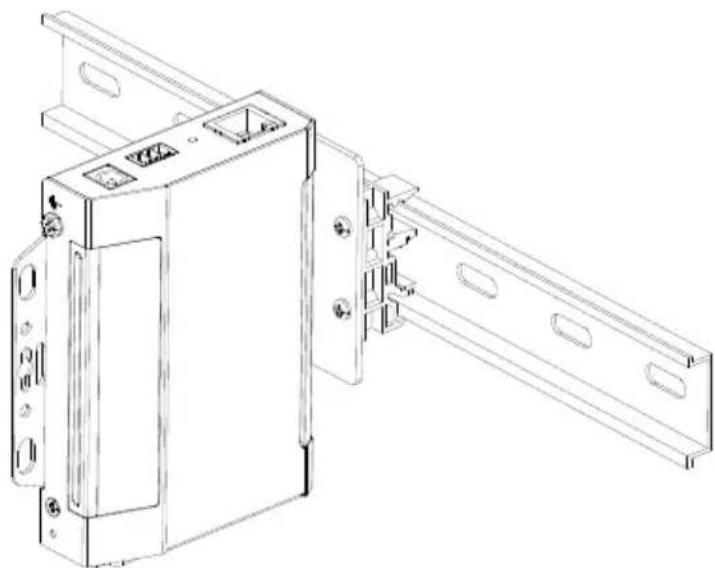
natural_image
Technical line drawing of a mechanical assembly with mounting brackets and mounting holes (no text or symbols)Rack Mount
The Rack Mount Kit (VE-RMK1U) is required for mounting the Secure Device Server onto a rack, as instructed below:
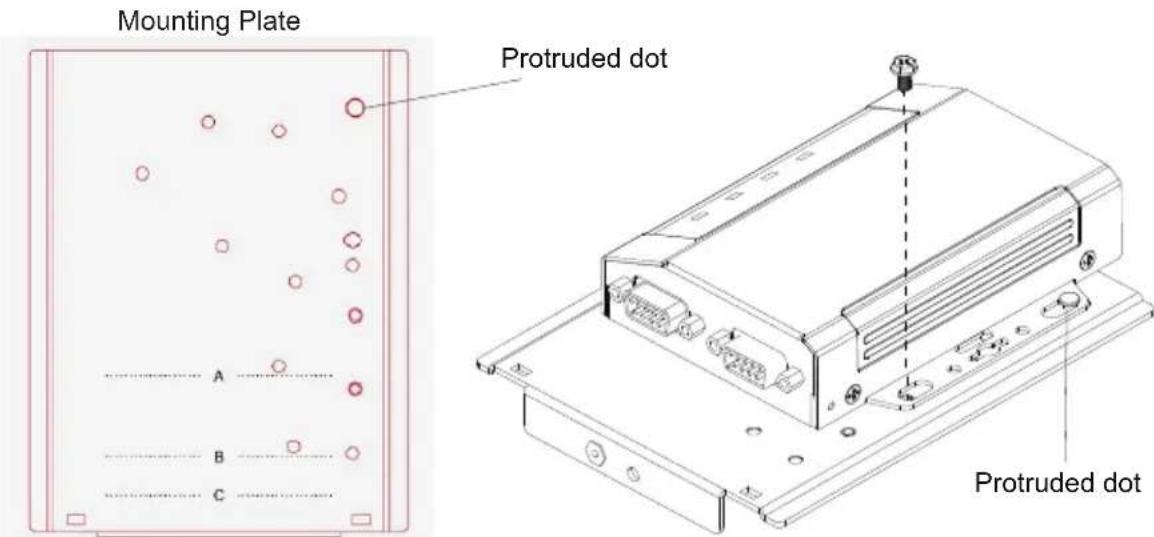
- Place the device onto the mounting plate while latching one of its rack ears onto the plate's protruded dot, as illustrated below.
text_image
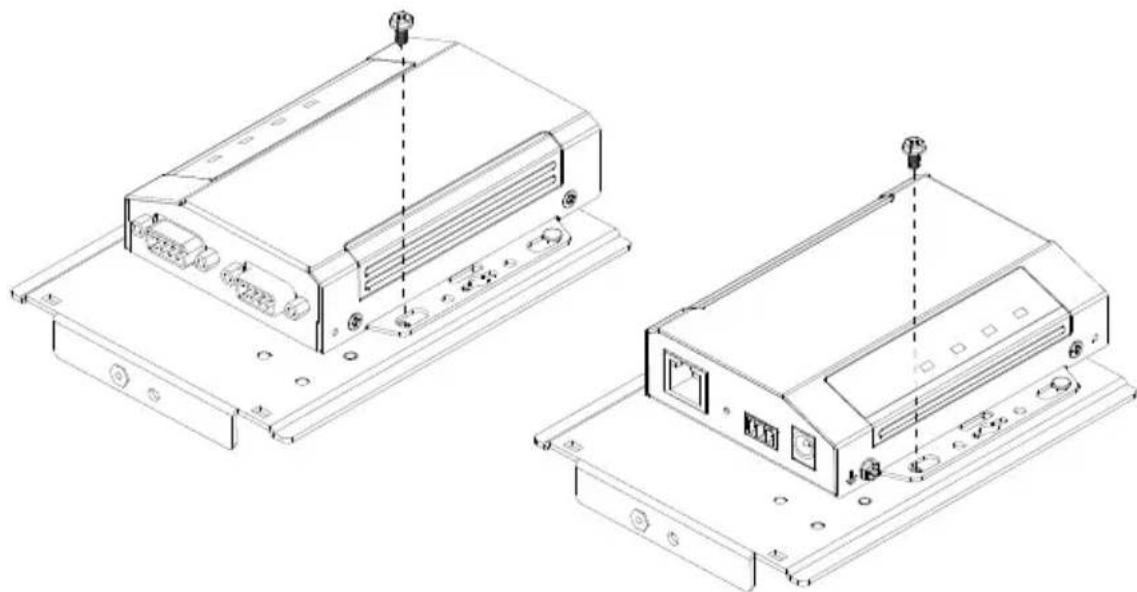
Mounting Plate A B C Protruded dot Protruded dot- Secure the device to the mounting plate using the hexagon head screw supplied. Users can secure the Secure Device Server either with its serial port(s) facing inward or outward.
natural_image
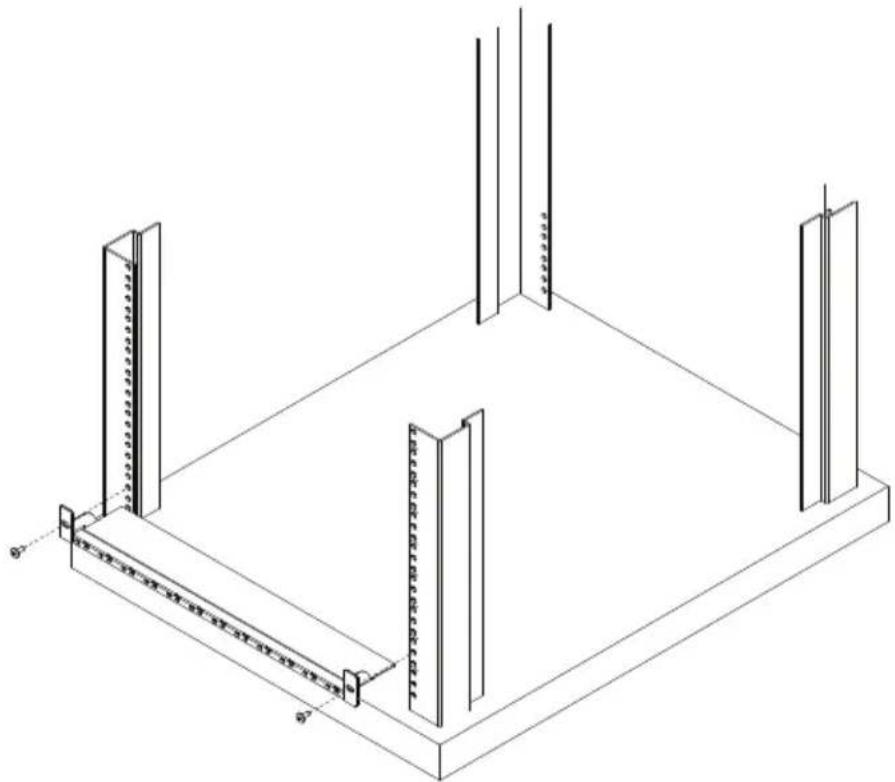
Technical line drawing of two electronic device modules with mounting hardware (no text or symbols)- Position and align the holes on the VE-RMK1U frame with that of the rack, and secure the frame onto the rack with 2 self-supplied screws, as illustrated below.
natural_image
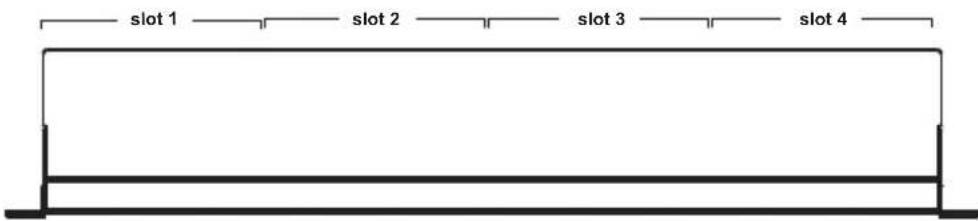
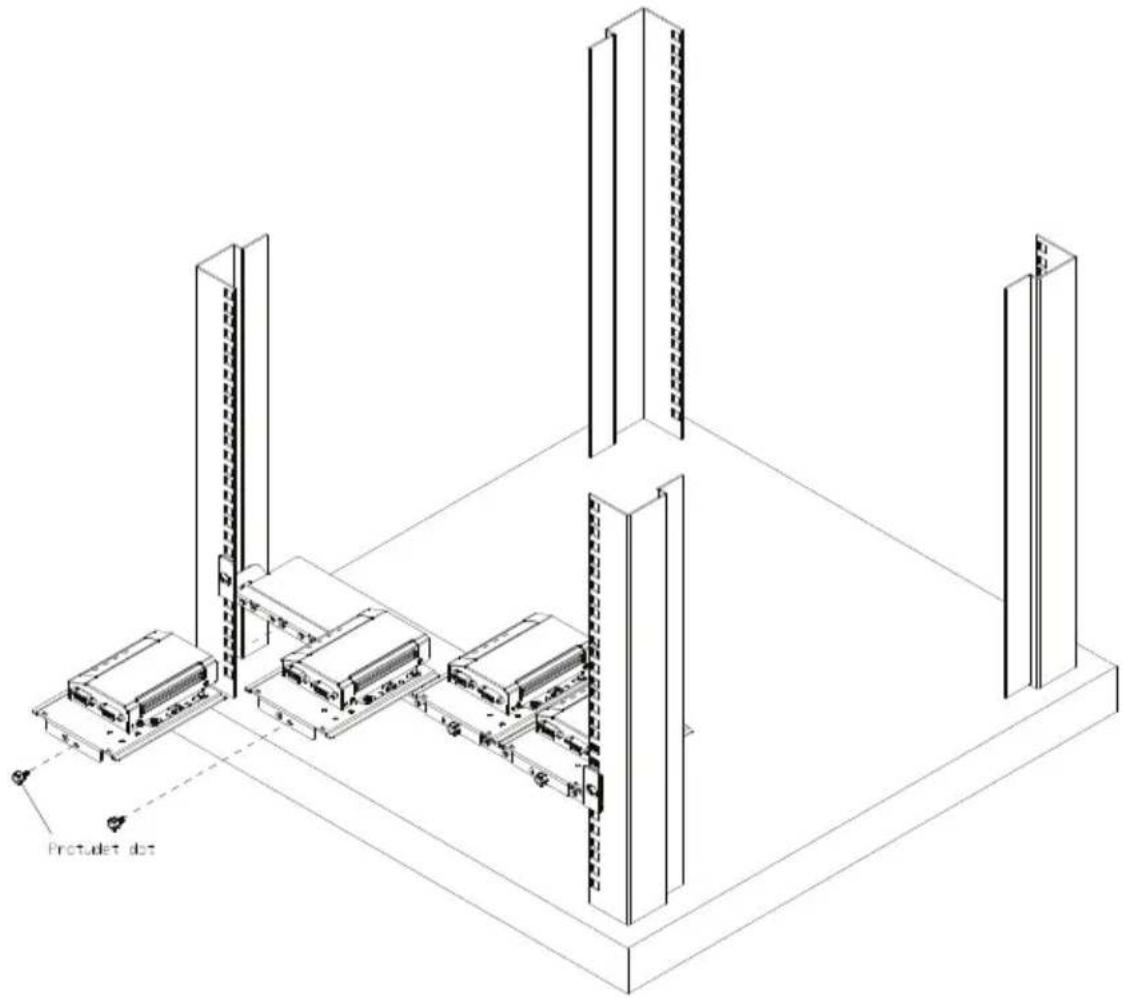
Isometric line drawing of a structural frame with vertical supports and a central support beam (no text or symbols)- Align the device and mounting plate assembly to one of the slots on the VE-RMK1U frame, and then secure the mounting plate to the frame with the plastic captive screw provided.
text_image
slot 1 slot 2 slot 3 slot 4VE-RMK1U Frame
natural_image
Isometric technical diagram of a modular server or rack system with vertical connectors and labeled 'Protulet dot' (no text or symbols beyond label)Note: Up to 4 Secure Device Servers can be secured onto a VE-RMK1U frame.
Installation
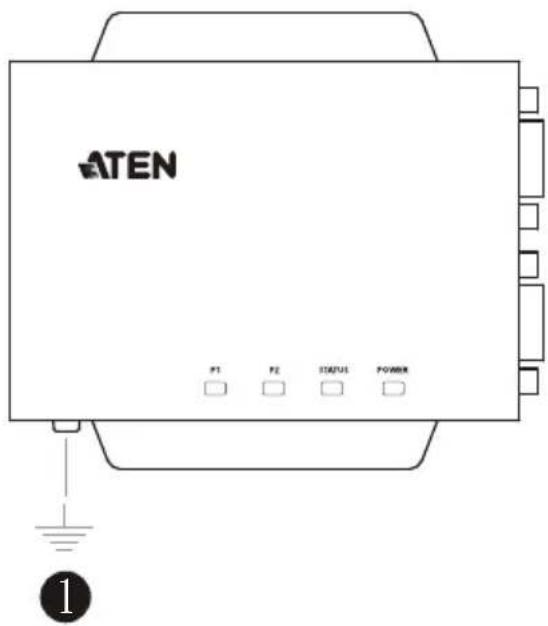
To install the Secure Device Server, follow the steps below and refer to the diagram on the following page (the number labels correspond to the installation steps).
- Use a grounding wire to ground the unit by connecting one end of the grounding terminal and the other end to a suitable grounded object.
text_image
ATEN PT F2 STATUS POWER ①Note: Do not omit this step. Proper grounding helps prevent damage to the unit from power surges and static electricity.
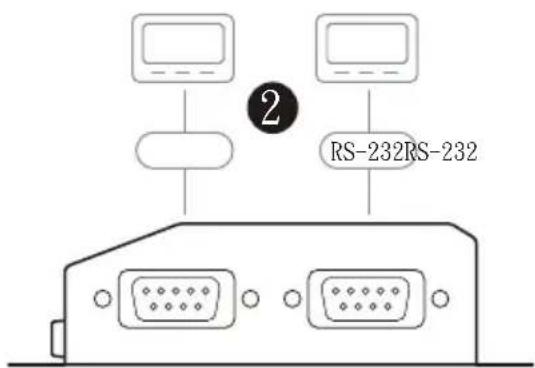
- Connect the unit's RS-232 serial port(s) to one or up to two serial device(s).
text_image
2 RS-232RS-232-
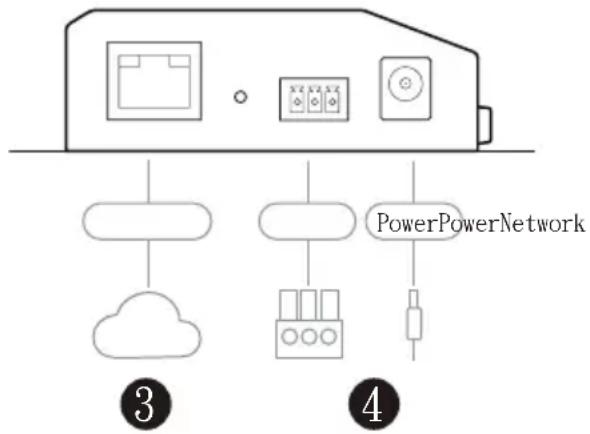
Connect the unit's LAN port to the network using a Cat 5e/6 cable. For SN3001P / SN3002P (PoE 802.3af compliant), users can simultaneously supply power to the unit through a PoE switch and skip 4.
-
Connect the unit to power, thereby turning it on, by doing one, or both of the following for power redundancy:
- Plug the power adapter provided (not included for SN3001P / SN3002P) into an AC power source, and plug its cable into the unit's power jack.
Note: The temperature tolerance of the power adapter is 0 – 40 °C. If your environment temperature is 40 – 60 °C, you can only power the device via the power terminal.
- Connect DC + and - wires (DC 9 – 48 V) to the unit’s power terminal with the terminal block provided.
flowchart
graph TD
    A["Server"] --> B["Cloud"]
    C["PowerPowerNetwork"] --> D["Server"]
    D --> E["Server"]
    F["PowerPowerNetwork"] --> G["Power"]
- After supplying power, wait for about 50 seconds for the Secure Device Server to be ready and lights its status LED in constant green.
Note: When more than one power supply is connected, the additional power connections maintain operation when the other is interrupted. For example, if you have the device connected to power via both its power jack and power terminal, the power terminal maintains operation when the power from the power jack fails, and vice versa.
Serial Port Pin Assignments
The pin assignments of Secure Device Server's RS-232 serial ports are provided below:
| Pin | Configuration |
| RS-232 | |
| 1 DCD | |
| 2 | RxD |
| 3 | TxD |
| 4 | DTR |
| 5 | GND |
| 6 | DSR |
| 7 | RTS |
| 8 | CTS |
This Page Intentionally Left Blank
Network Configuration and Login
IP Address Determination
Before you start, make sure the PC you're using is within the same LAN as the Secure Device Server.
There are two methods for determining / setting the IP address of your Secure Device Server, one through the IP Installer Utility on a Windows PC, and one just using a PC (only applicable to non-DHCP network), as described below:
IP Installer Utility
Using a Windows PC, users can search for Secure Device Server's IP address or assign an IP address to it, in a DHCP or non-DHCP network, with the IP Installer Utility.
- Download IP Installer zip file under the Support and Downloads tab from the product web page.
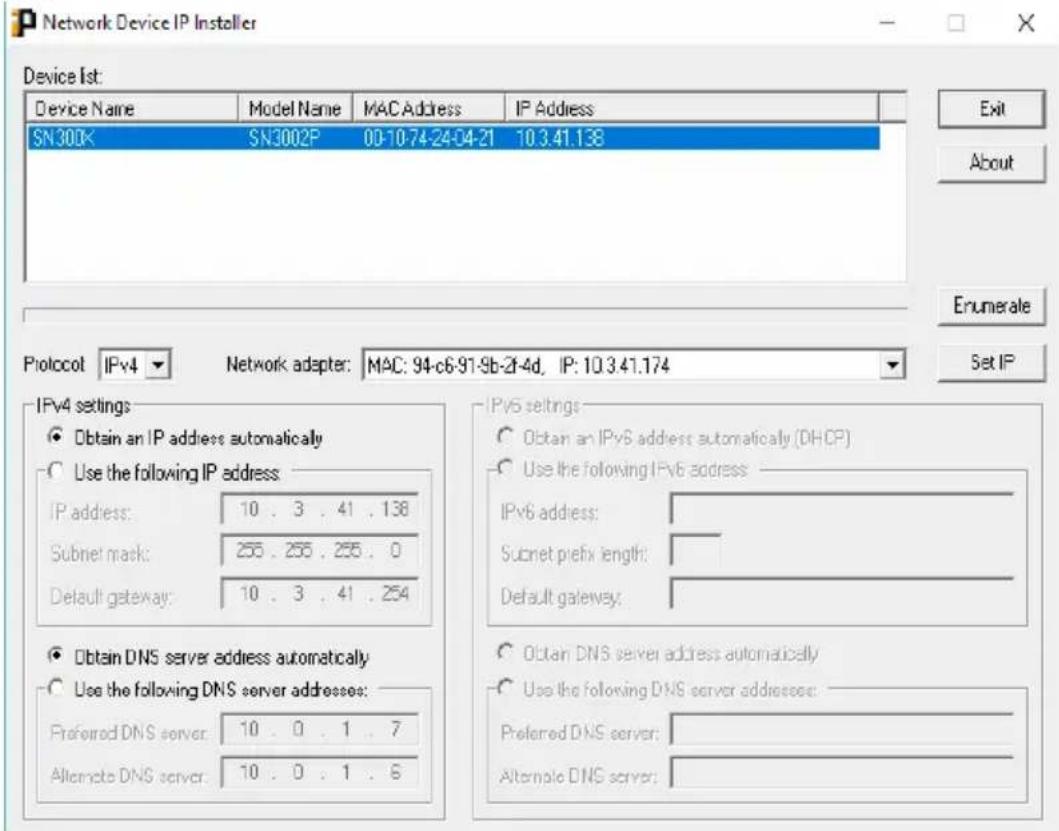
- Extract and execute IPInstaller.exe. A dialog box similar to the one below appears.
text_image
Network Device IP Installer Device List: Device Name Model Name MAC Address IP Address SN300K SN3002P 00-10-74-24-04-21 10.3.41.138 Exit About Protocol IPv4 Network adapter: MAC: 94-c6-91-9b-2f-4d, IP: 10.3.41.174 Set IP IPv4 settings Obtain an IP address automatically Use the following IP address: IP address: 10 . 3 . 41 . 138 Subnet mask: 255 . 255 . 255 . 0 Default gateway: 10 . 3 . 41 . 254 IPv6 settings Obtain an IPv6 address automatically (DHCP) Use the following IPv6 address: IPv6 address: Subnet prefix length: Default gateway: Obtain DNS server address automatically Use the following DNS server addresses: Preferred DNS server: 10 . 0 . 1 . 7 Alternate DNS server: 10 . 0 . 1 . 6 Preferred DNS server: Alternate DNS server:- :Select the Secure Device Server in the Device List.
Note: 1. If the list is empty, or your device doesn't appear, double-check that you have the correct network adapter selected and click Enumerate to refresh the Device List.
-
If there is more than one device in the list, use the MAC address to distinguish your device. The Secure Device Server's MAC address is located on its bottom panel.
-
To check the IP address of the Secure Device Server or set an IP address for it, respectively select Obtain an IP address automatically or Use the following IP address.
- For setting an IP address, fill in the required IP address, subnet mask and gateway information according to your network environment.
-
Click Set IP. The IP address of the Secure Device Server is displayed in the Device List.
-
Click Exit to close the program.
Without IP Installer (non-DHCP only)
On a non-Windows system, under non-DHCP network, users can assign a static IP address to the Secure Device Server, different from its default of 192.168.0.60, by following the steps below.
- Set your PC's IP address to 192.168.0.XXX, where XXX can be any number except for 10.
- Type the device's default IP address — 192.168.0.60 — in your browser's URL location bar.
- Log in with a valid username and password (see page 19).
- On the Secure Device Server's web interface, assign a fixed IP address for it according to your network environment.
- Save the settings and log out. After you log out, make sure to reset your PC's IP address to its original value.
Logging In
To access Secure Device Server from a web browser, do the following:
- Open your browser and specify the IP address of the Secure Device Server you want to access in the browser's URL location bar.
Note: If you are the administrator, and are logging in for the first time, the various ways to determine the Secure Device Server's IP address are described in IP Address Determination (see page 17).
- If a Security Alert dialog box appears, accept the certificate — it can be trusted (see Security Certificate, page 43, for details). If a second certificate appears, accept it as well.
- On the login page that appears, provide a valid username and password to log in. The default Username and Password are administrator and password, respectively.
Welcome
Username
Password
SIGN IN
- Once successfully logged in, the main screen of the Secure Device Server appears. Upon first-time login, users are required to change the login password of the Secure Device Server.
- Upon first-time login, users are required to change the login password of the Secure Device Server.
- Once logged in, the Quick Setup Wizard is displayed, which takes you through the basic settings of the Secure Device Server.
Quick Setup Wizard
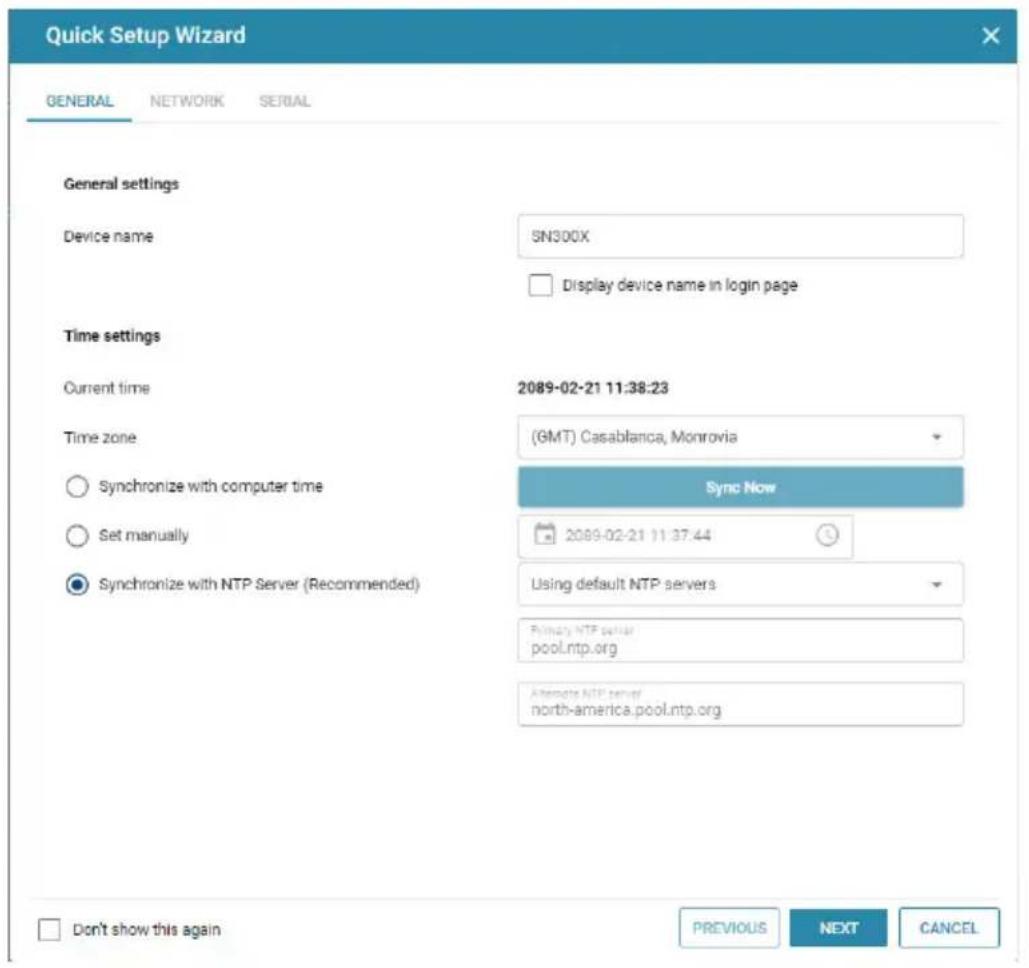
The Quick Setup Wizard gets you started with the basic settings of the Secure Device Server.
General
text_image
Quick Setup Wizard GENERAL NETWORK SERIAL General settings Device name SN300X Display device name in login page Time settings Current time 2089-02-21 11:38:23 Time zone (GMT) Casablanca, Monrovia Sync Now Synchronize with computer time Set manually Synchronize with NTP Server (Recommended) Using default NTP servers Primary NTP server pool.ntp.org Alternate NTP server north-america.pool.ntp.org Don't show this again PREVIOUS NEXT CANCEL| Item Description | |
| Device name Displays | the name of the Secure Device Server. Change the device name if needed. |
| Current time Displays | the current time of the device. |
| Time settings | Sets the time settings of the device. For details, refer to Time, page 36. |
Network
text_image
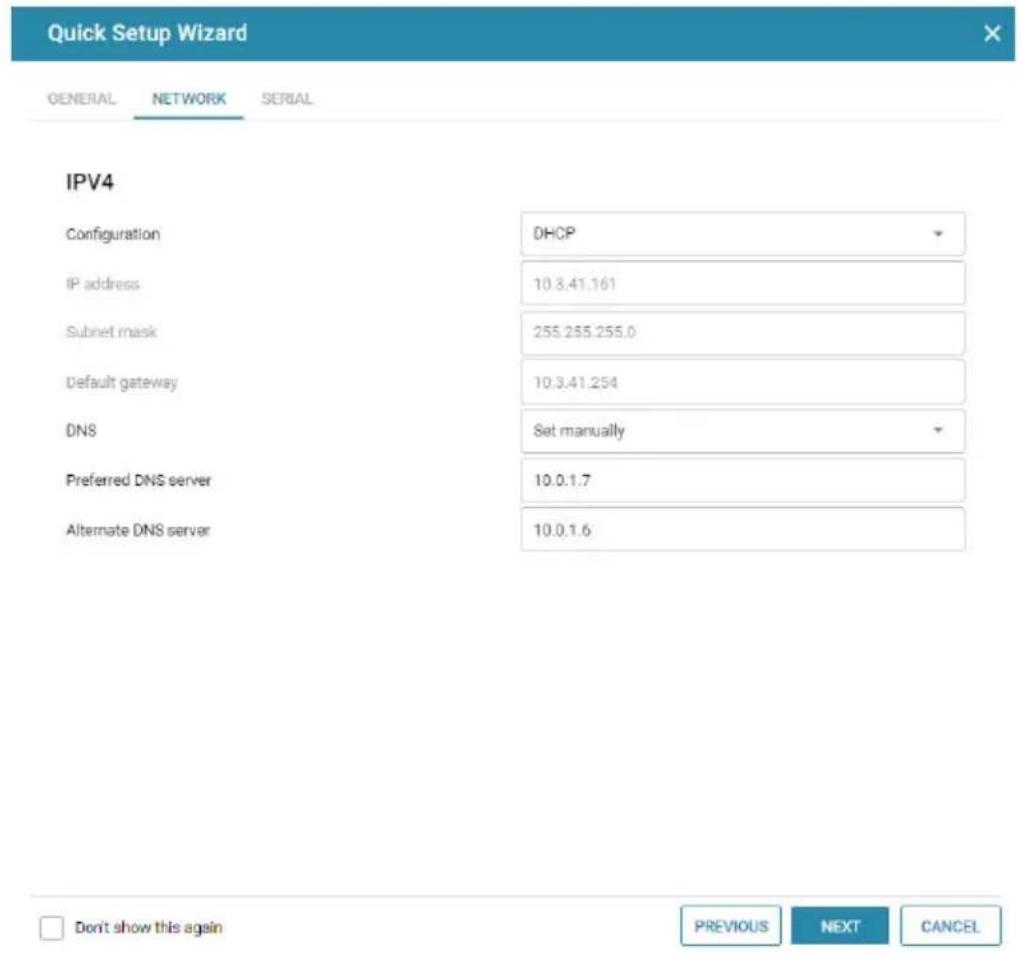
Quick Setup Wizard GENERAL NETWORK SERIAL IPV4 Configuration DHCP IP address 10.3.41.161 Subnet mask 255.255.255.0 Default gateway 10.3.41.254 DNS Set manually Preferred DNS server 10.0.1.7 Alternate DNS server 10.0.1.6 Don't show this again PREVIOUS NEXT CANCELThe Network tab sets the network settings of the Secure Device Server. For details, refer to Network, page 32.
Serial
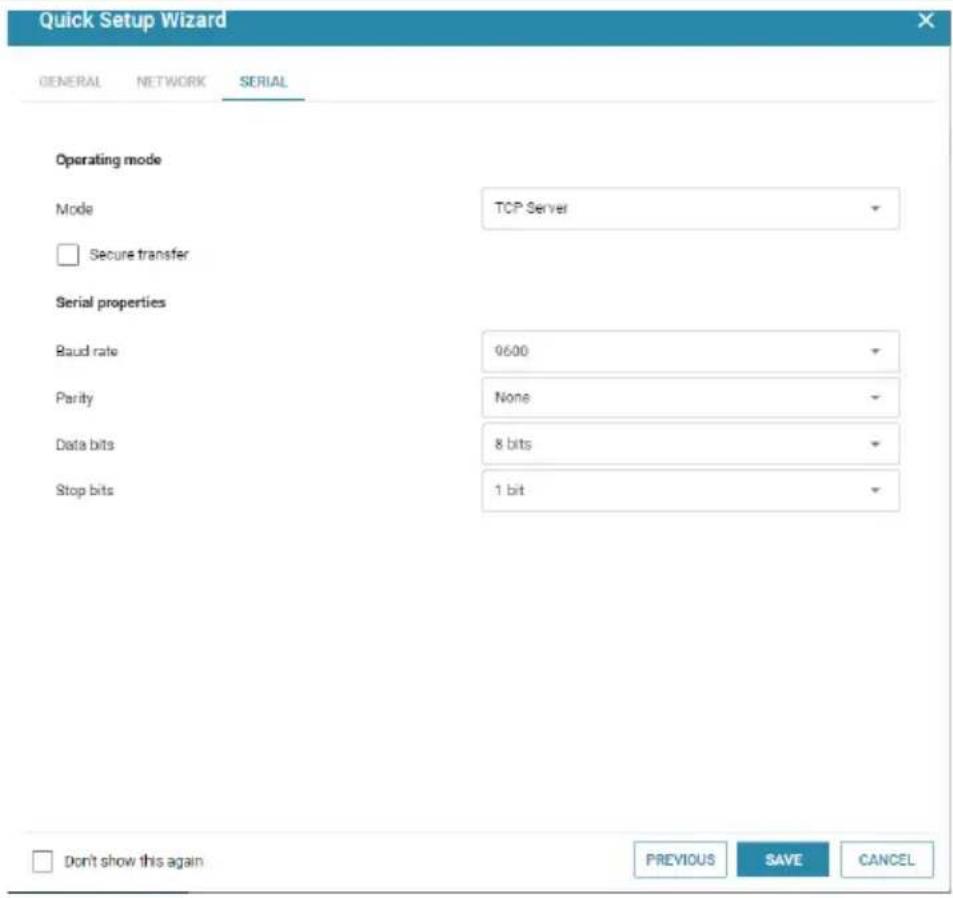
Note: Settings on the Serial tab applies to all serial ports of the Secure Device Server.
text_image
Quick Setup Wizard GENERAL NETWORK SERIAL Operating mode Mode TCP Server Secure transfer Serial properties Baud rate 9600 Parity None Data bits 8 bits Stop bits 1 bit Don't show this again PREVIOUS SAVE CANCEL| Item Description | |
| Mode Selects the operation mode for the Secure Device Server's serial port(s). See Port Operating Modes. | |
| Secure transfer Check for secured data transmission. | |
| Baud rate Selects the serial ports' data transfer speed. | |
| Parity Selects to check the integrity of the data transmitted, which shall match the parity setting of the serial device(s) connected | |
| Data bits Selects the number of bits used to transmit one character of data, and matching the data bit setting of the serial device(s) connected. | |
| Stop bits Selects the stopping bit, indicating a character has been transmitted, and matching the stop bit setting of the serial device(s) connected. |
Click Save for the settings to take effect. The Secure Device Server's web console main screen is displayed. See Web Console for details.
Chapter 4
Web Console
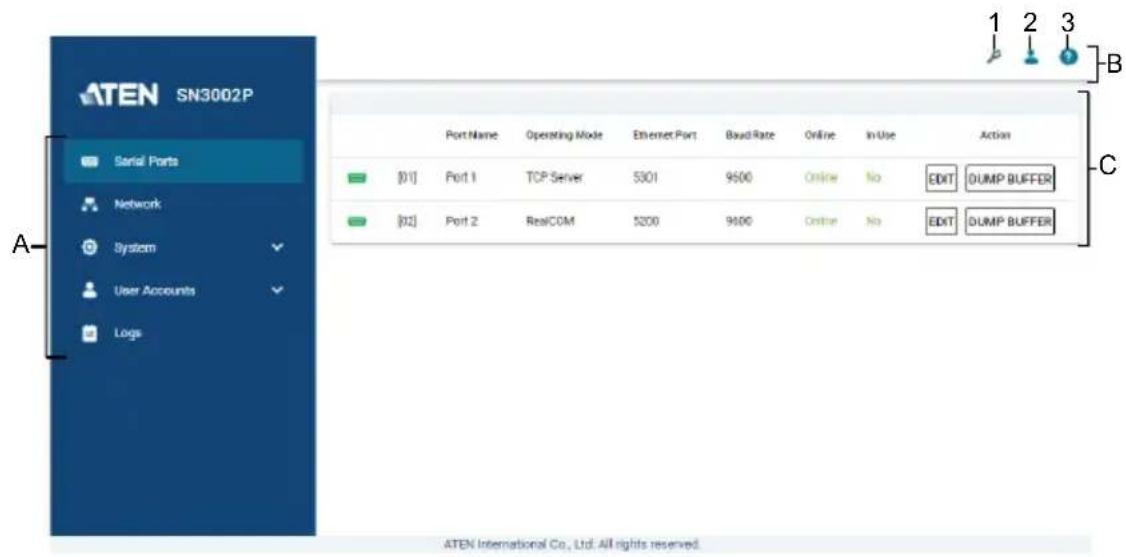
Web Interface
The web interface of the Secure Device Server and its components are shown and explained below:
text_image
ATEN SN3002P Serial Ports Network System User Accounts Logs Port Name Operating Mode Ethernet Port Baud Rate Online In Use Action [01] Port 1 TCP Server 5301 9500 Online No EDIT DUMP BUFFER [02] Port 2 RealCOM 5200 9500 Online No EDIT DUMP BUFFER ATEN International Co., Ltd. All rights reserved.| No. | Item Description | |
| A | Sidebar Menu | Provides a selection of configuration pages. Click to select a configuration page and/or expand submenus. |
| B | Task Bar Contains access to the Quick Setup Wizard, user settings (including logout) and the device info. | |
| C | Interactive Display Panel | Displays the configuration page currently selected. |
| 1 | Quick Setup Wizard | Takes users through the basic settings of the Secure Device Server. See p. 20. |
| 2 | Personal Click to display the user currently logged in, the time of login, user preference option, change password, and logout options.Click Preferences to change the language of the interface.Click Change password to change the password for the current user account. | |
| 3 | About Click to display the model number and the firmware version of the device. | |
Serial Ports
The Serial Ports page provides an overview of the Secure Device Server's serial COM ports, including its settings and the serial devices connected.
| Port Name | Operating Mode | Ethernet Port | Baud Rate | Online | In Use | Action | ||
| [WS42] | [WD36] |  | [HOKW] | [SCZX] | [6063] | [5007] | [TX17] | [OTOT] [AB4A] |
| [308C] | [WCHX] | [WSX6] | [DBT3] | [WZD1] | [0420] | [2482] | [78XW] |  [WHDX] [WHDX] |
| Item Description | |
| Indicates whether the serial port is online or offline. | |
| Port Name Displays the name of the serial port. | |
| Operating Mode Displays the current operating mode of the serial port.See Operating Mode, page 27. | |
| Ethernet Port Displays the network port value of the serial port. | |
| Baud Rate Displays the baud rate of the serial port. | |
| Online Indicates whether the serial port is online or offline. | |
| In Use Indicates whether the serial port has active data transmission. | |
| Action | ◆ Edit: Click to edit the serial port's settings.◆ Dump Buffer: Click to download the port activity logs of the serial port from the device as a .txt file. This function is only available when the port activity logs are saved to the device's memory. See Port Buffering, page 26.◆ Telnet / SSH: Click to configure the Secure Device Server or access and control the connected serial device via Telnet / SSH protocol. This function is only available when the port's operating mode is set to Console Management.See Operating Mode, page 27, and Telnet / SSH, page 62.Note: The maximum number of simultaneous connections to any one serial port is 16. |
Editing Serial Ports
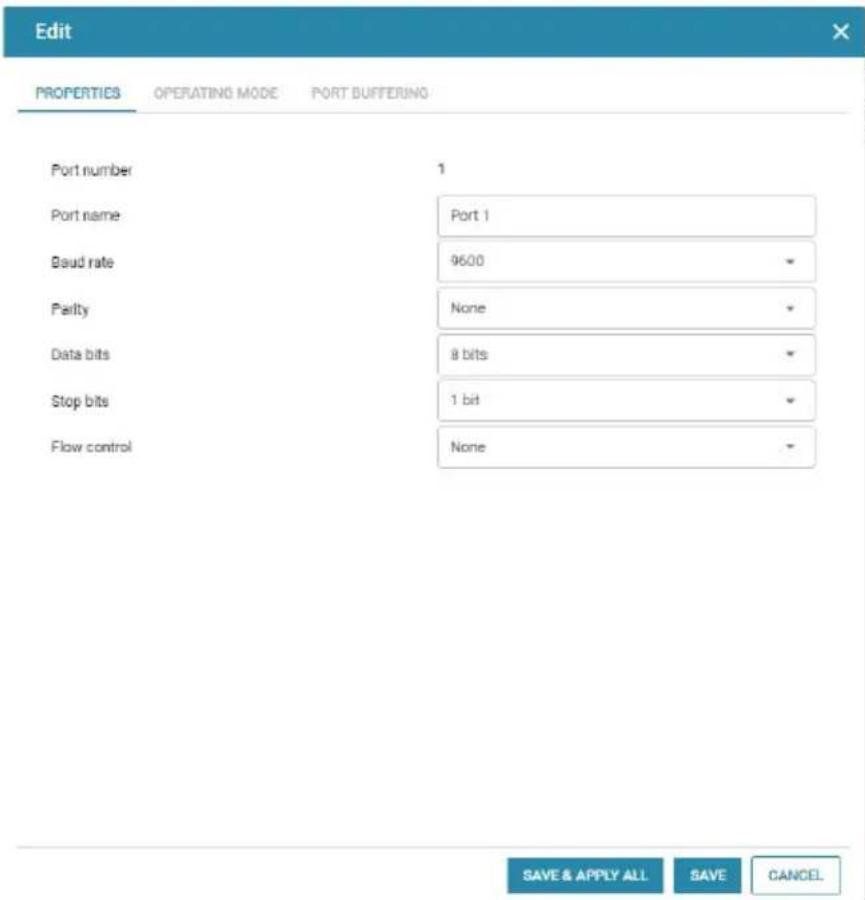
Click the EDIT button to modify the settings of a serial COM port. The edit window, with Properties, Operating Mode, and Port Buffering tabs, appears.
Properties
text_image
Edit PROPERTIES OPERATING MODE PORT BUFFERING Port number 1 Port name Port 1 Baud rate 9600 Parity None Data bits 8 bits Stop bits 1 bit Flow control None SAVE & APPLY ALL SAVE CANCEL| Item Description | |
| Port number Displays the number of the serial port. | |
| Port name Sets the name of the serial port. | |
| Baud rate Selects the serial ports' data transfer speed. Default = "9600" | |
| Parity Selects to check the integrity of the data transmitted, which shall match the parity setting of the serial device connected. Default = "None" | |
| Data bits Selects the number of bits used to transmit one character of data, and matching the data bit setting of the serial device connected. Default = "8" | |
| Stop bits Selects the stopping bit, indicating a character has been transmitted, and matching the stop bit setting of the serial device connected. Default = "1" | |
| Flow control Selects how the data flow is controlled, and matching the flow control setting of the serial device connected. Default = "None" |
Click Save for the changes to take effect.
Optionally click Save & Apply All to apply the same settings to all of the Secure Device Server's serial ports.
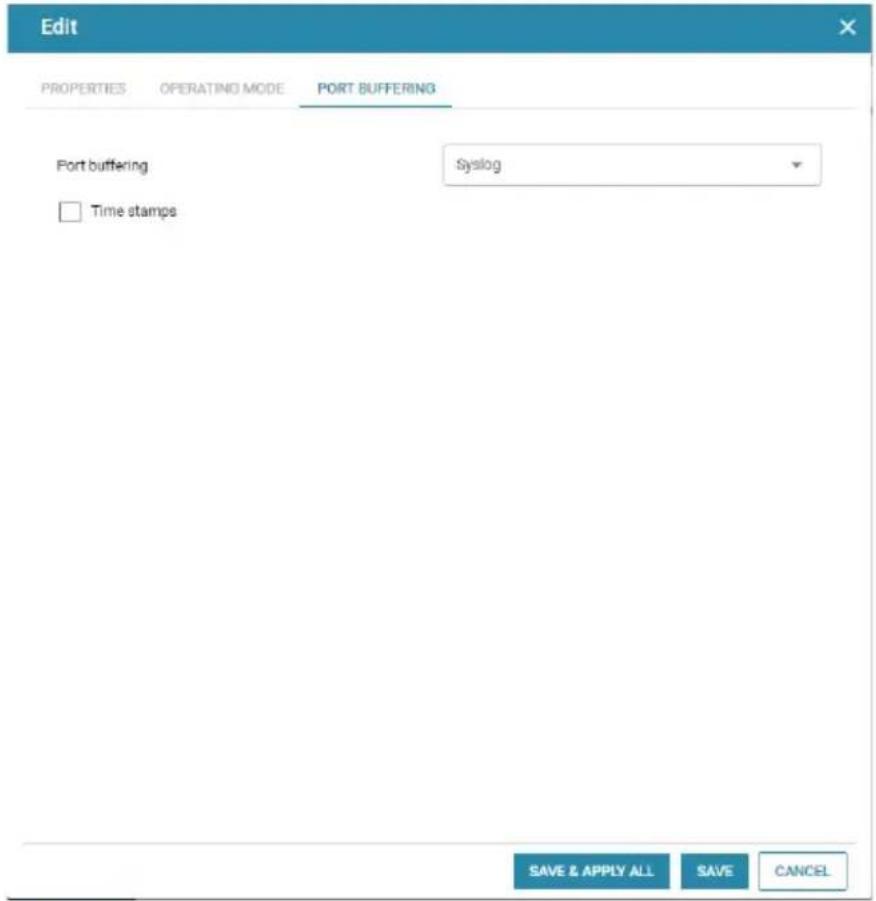
Port Buffering
Port buffering creates a log of the activities conducted when a port is accessed. You can save the log to the internal memory of the Secure Device Server, for up to 128 KB, or a Syslog server.
To enable Port Buffering, select Memory or Syslog Server from the drop-down list in the Port Buffering tab. Optionally check Time Stamps to add time stamps to the logs created.
text_image
Edit PROPERTIES OPERATING MODE PORT BUFFERING Port buffering Syslog □ Time stamps SAVE & APPLY ALL SAVE CANCELClick Save for the changes to take effect.
Note: Before Syslog can be selected, make sure to enable Syslog server, see Syslog, page 39.
Optionally click Save & Apply All to apply the same settings to all of the Secure Device Server's serial ports.
Operating Mode
The Operating Mode tab determines how the serial COM port of the Secure Device Server is accessed.
Note: The maximum number of simultaneous connections to any one serial port is 16.
For detailed information of the various port operating modes, see Chapter 6, Port Operating Modes.
Real COM
Mode
RealCOM


Secure transfer
Check Secure transfer to encrypt all data being transferred, using SSL, through the serial COM port.
Note: Real COM operating mode must be used in conjunction with ATEN's Virtual COM Port Utility, see Virtual Serial Port Manager, page 71.
■ TCP Server
Mode
TCP Server


Secure transfer
| Item Description |
| Secure transfer Check to encrypt all data being transferred between Secure Device Servers’ serial COM ports via TCP Server-Client modes, using SSL. |
TCP Client
| Mode | TCP Client | |
| Secure transfer | ||
| Destination host 1 | IP / Domain | Port0 |
| Destination host 2 | IP / Domain | Port0 |
| Destination host 3 | IP / Domain | Port0 |
| Destination host 4 | IP / Domain | Port0 |
| Destination host 5 | IP / Domain | Port0 |
| Destination host 6 | IP / Domain | Port0 |
| Destination host 7 | IP / Domain | Port0 |
| Destination host 8 | IP / Domain | Port0 |
| Destination host 9 | IP / Domain | Port0 |
| Destination host 10 | IP / Domain | Port0 |
| Destination host 11 | IP / Domain | Port0 |
| Destination host 12 | IP / Domain | Port0 |
| Destination host 13 | IP / Domain | Port0 |
| Item Description | |
| Secure transfer Check | to encrypt all data being transferred between Secure Device Servers' serial COM ports via TCP Client-Server modes, using SSL. |
| Destination host | Enter the IP address and service port of a destination host for data transmission. The device can simultaneously send data to up to 16 destination hosts. |
■ UDP
Mode
UDP
▼
Start IP
End IP
Destination host 1
Port 0
Start IP
End IP
Destination host 2
Port D
Start IP
End IP
Destination host 3
Port D
Start IP
End IP
Destination host 4
Port D
Start IP
End IP
Destination host 5
Port 0
Theorem 1.2. (Theorem of [10, Theorem 1.1]) Let be a finite field and let (x) be the set of all elements of such that
| Item Description |
| Destination host Enter the range of IP address(es) and the port values for connections to destination hosts via the UDP protocol. The Secure Device Server can simultaneously connect to up to 16 destination hosts. |
■ Serial Tunneling Server
Mode
TCP port
Serial Tunneling Server
5301

Secure transfer
| Item Description | IP port value of the serial port operating as a serial tunneling server. |
| TCP port Sets the TCP | |
| Secure transfer Check | to encrypt all data being transferred through the serial COM ports between two Secure Device Server via Serial Tunneling Server-Client., using SSL. |
■ Serial Tunneling Client
Mode
Destination
Serial Tunneling Client
IP
Port 0

Secure transfer
| Item Description | |
| Destination Enter the IP | address and port value of the serial tunneling server for sending data to. |
| Secure transfer Check | to encrypt all data being transferred through the serial COM ports between two Secure Device Servers via Serial Tunneling Client-Server, using SSL. |
■ Console Management
Mode
Console Management

General settings
Connection protocol

SSH

Telnet

Direct connection
Logout timeout (0\~180min)
1
Suspend character
D
Exit Macro
CRLF
Map
| Item Description | |
| Connection protocol Check / uncheck to enable / disable SSH and Telnet connection protocols. | |
| Direct connection Select for Console Management Direct operating mode. For detailed information on the various available operating modes, see Chapter 6, Port Operating Modes. | |
| Logout timeout(0 ~ 180 min) | Automatically logs out user(s) accessing when there is no input by the user for the amount of time set. “0” means the user will never be automatically logged out. |
| Suspend character The | suspend character is used to bring up the Suspend Menu in Telnet sessions. Valid characters include A – Z, except for H, I, J, and M. |
| Exit Macro Sets the Exit | Macro that will be executed upon exiting the serial device. |
| MapSelect to send Carriage Return (CR) and/or Line Feed (LF) signals. | |
■ Disable
Select to disable the use of the serial port.
Network
The Network page contains the network settings of the Secure Device Server, as described in the table below.
LAN1
IPv4
Configuration
IP address
Subnet mask
Default gateway
DNS
Preferred DNS server
Alternate DNS server
DHCP
10.3.41.138
255,255,255.0
10.3.41.254
Obtain automatically
10.0.1.7
10.0.1.6
| Item Description | |
| Configuration Selects the type of configuration for setting the Secure Device Server's IP address, from DHCP or Static IP. | |
| IP addressSubnet maskDefault gateway | For static IP, set the IP address, subnet mask, and gateway of the device according to your network environment. |
| DNS Selects the method of obtaining DNS server, from Obtain automatically or Set manually. | |
| Preferred DNS serverAlternate DNS server | For setting the DNS server manually, type the preferred and alternate DNS server address for the device. |
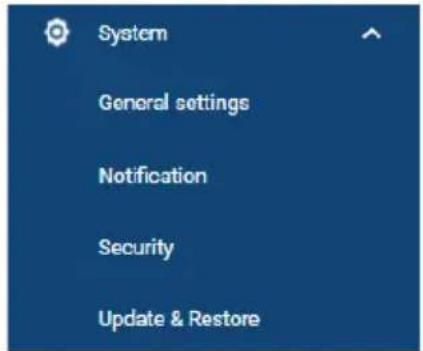
System
Click to expand the System submenu for all of the system related settings of the Secure Device Server, including General settings, Notification, Security, and Update & Restore.
text_image
System General settings Notification Security Update & RestoreGeneral Settings
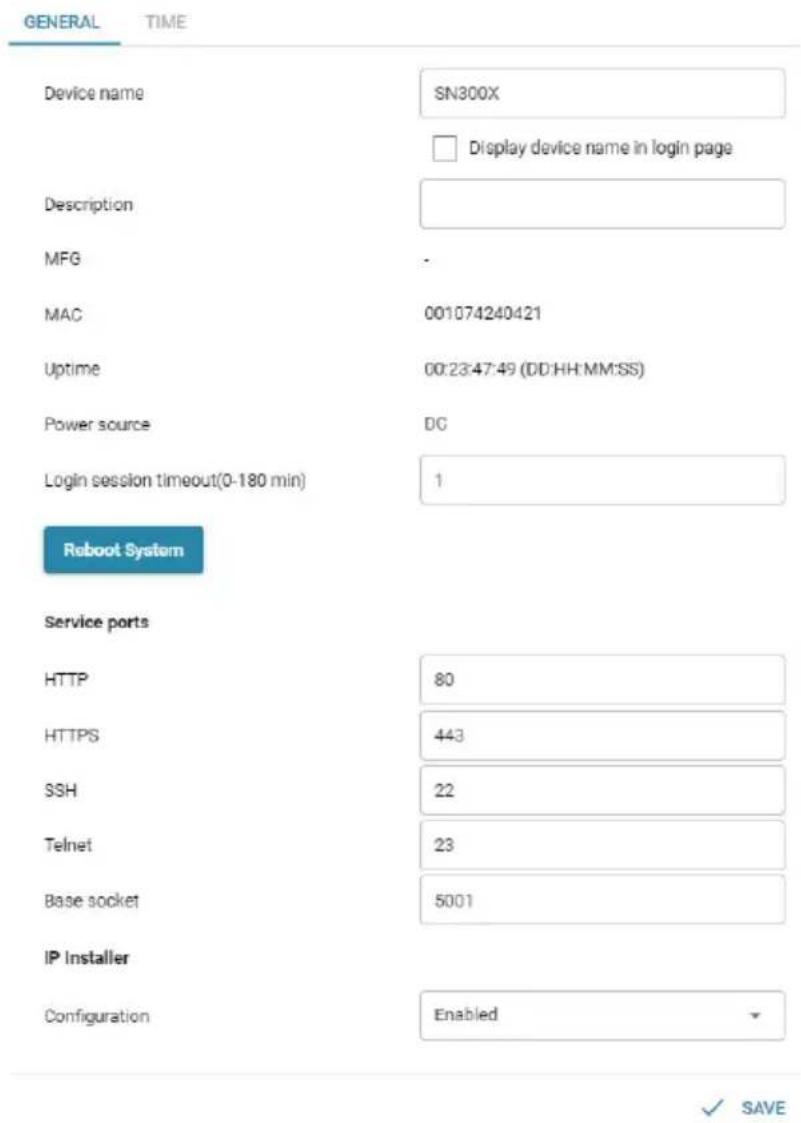
The General Settings contains 2 tabs: General and Time.
General
text_image
GENERAL TIME Device name SN300X Display device name in login page Description MFG - MAC 001074240421 Uptime 00:23:47:49 (DD:HH:MM:SS) Power source DC Login session timeout(0-180 min) 1 Reboot System Service ports HTTP 80 HTTPS 443 SSH 22 Telnet 23 Base socket 5001 IP Installer Configuration Enabled ✓ SAVE| Item Description | |
| Device name Sets the device name for the Secure Device Server. | |
| Description Enter a description for the device if needed. | |
| MFG Displays the MFG (Manufacturing Number) of the device.Note: The Manufacturing Number is an internal serial number used by ATEN's factory and technical support staff to identify products. | |
| MAC Displays the MAC address of the Secure Device Server. | |
| Uptime Displays the amount of time the device has been running for. | |
| Power source Displays the device's current power source. | |
| Login session timeout (0 ~ 180 min) | Automatically logs out user(s) when there are no actions done on the Secure Device Server's web interface for the amount of time set. “0” means the user will never be automatically logged out. |
| Reboot System Reboots the Secure Device Server. | |
| Service ports Sets the service port values for the following:◆ HTTP: used for browser access (default = 80)◆ HTTPS: used for secure browser access (default = 443)◆ SSH: used for SSH access (default = 22)◆ Telnet: used for Telnet access. (default = 23)◆ Base socket: used for receiving and accepting TCP connections (default = 5001). For example, when the base socket value is 5001, the device's TCP port value for Port 1/2 via Telnet and SSH will be 5001/5002 and 5101/5102, respectively.Note:1. Valid entries for all service ports are from 1 – 65535.2. A system restart is required when any of the service port settings have been changed. | |
| IP Installer Configuration | Select to determine if the IP Installer utility can detect for and/or change the Secure Device Server's IP address.◆ Enabled: IP Installer can detect for and change the unit's IP address.◆ View Only: IP Installer can only detect for but unable to change the unit's IP address.◆ Disabled: IP Installer cannot detect for and change the unit's IP address. |
Click Save for the changes to take effect.
Time
The Time tab contains the time settings of the Secure Device Server, as described in the table below.
GENERAL TIME
Current time
Time zone
○ Synchronize with computer time
○ Set manually
Synchronize with NTP Server (Recommended)
2089-04-03 08:44:55
(GMT) Casablanca, Monrovia
Sync Now
2089-04-03 08:44:33
Using default NTP servers
Primary NTP server pool.rtp.org
Alternate NTP server north-america.pool.ntp.org
Update Now
| Item Description | |
| Time zone Select one of the following to set the time of the Secure Device Server.◆ Synchronize with computer time: Synchronizes with the time of the client PC.◆ Set manually: Manually set a desired time for the device.◆ Synchronize with NTP Server: Synchronizes the time of the device using an NTP server. | |
| Note: If you use Synchronize with computer time or Set manually, the time settings must be reconfigured whenever the Secure Device Server is restarted. | |
Notification
The Notification page contains 4 tabs: SMTP, SNMP, Syslog, and Advanced.
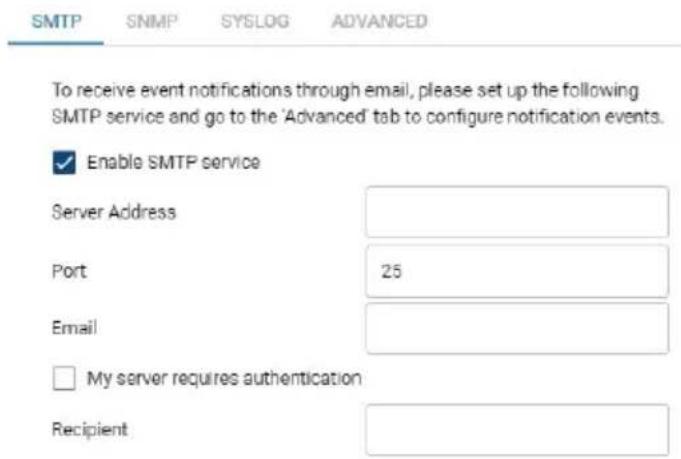
SMTP
text_image
SMTP SNMP SYSLOG ADVANCED To receive event notifications through email, please set up the following SMTP service and go to the 'Advanced' tab to configure notification events. ✓ Enable SMTP service Server Address Port 25 Email □ My server requires authentication Recipient| Item Description | |
| Enable SMTP service | Check to enable SMTP service for sending event notifications via email, as specified by the Advanced tab (see page 40). |
| Server Address / Port | Enter the SMTP server's address and service port value. |
| Email Enter the sender's email address. | |
| My server requires authentication | Check if your SMTP server requires authentication and enter a valid username and password. |
| Recipient Enter the recipient's email address. | |
SNMP
Note: Before SNMP can be used, make sure to Enable SNMP Agent service in System > Security > Security Level.
SMTP SNMP SYSLOG ADVANCED
SNMP Traps
You can set the system to push SNMP traps, which are event notifications, to an existing SNMP manager on the network
Send SNMP traps
IP/Server Address
Port
Community
162
public
SNMP Agent
You can manage the access control of SNMP agent for SNMP manager to query.
Port
Community
151
public
| Item Description | |
| Send SNMP traps Check to enable SNMP service for sending SNMP trap event notifications, as specified by the Advanced tab (see page 40). SNMP v1 and v2c are supported. | |
| IP/Server Address Enter the IP/server address to receive the SNMP trap events. | |
| Port Enter the service port of the server to receive SNMP trap events. | |
| Community Enter the SNMP community. | |
| SNMP Agent Enter the service port and community for an SNMP agent. |
Syslog
SMTP SNMP SYSLOG ADVANCED
To send event logs to a Syslog server, please set up the following Syslog service and then go to the 'Advanced' tab to configure notification events.

Enable Syslog service
Server Address
10.3.167.235
Port
514
| Item Description | |
| Enable Syslog service | Check to enable Syslog service for sending event notifications to a Syslog server, as specified by the Advanced tab (see page 40). |
| Server Address / Port | Enter the Syslog server's address and port value. |
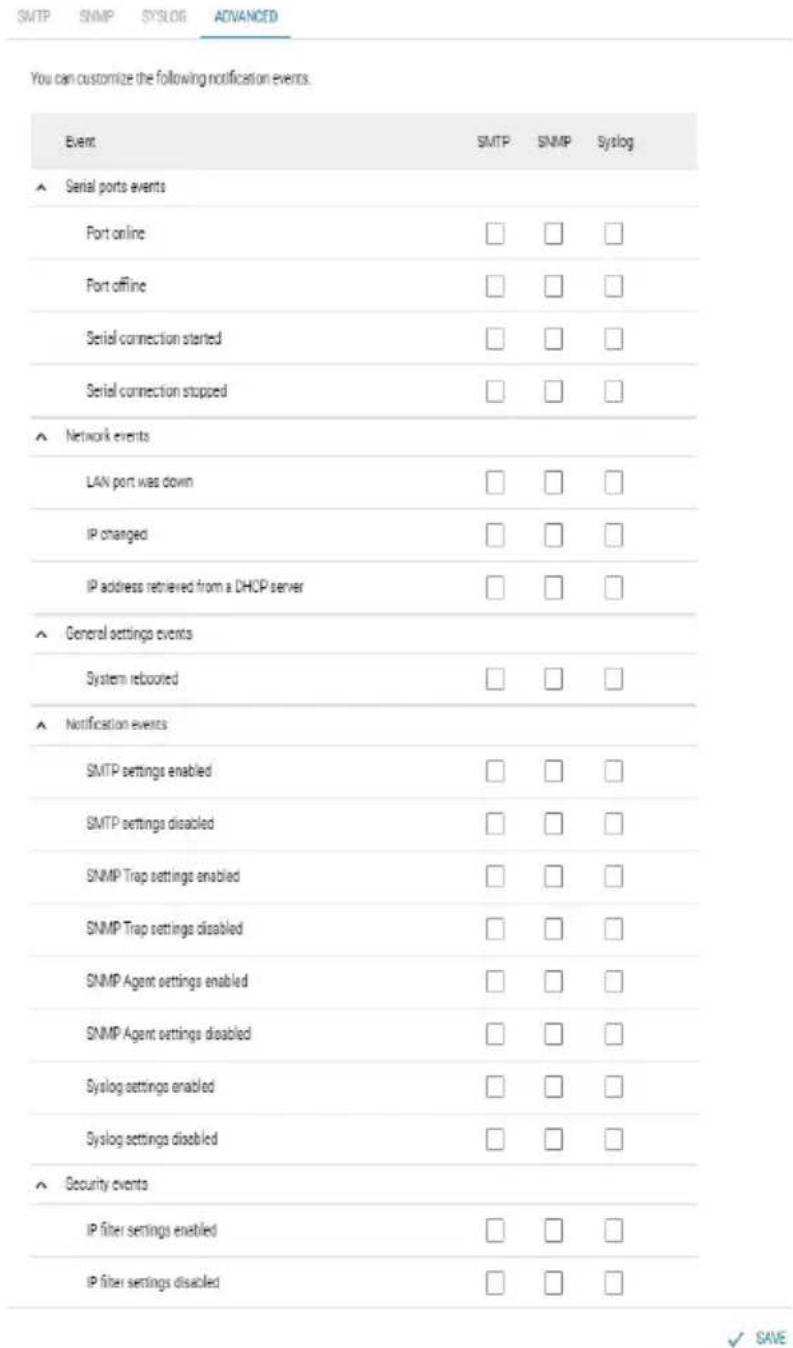
Advanced
The Advanced tab sets the types of event notifications to be sent via SMTP, SNMP, and/or Syslog server. Options include but are not limited to the example given below
text_image
You can customize the following notification events. Event SMTP SNMP Syslog ▲ Serial ports events Port online □ □ □ Port offline □ □ □ Serial connection started □ □ □ Serial connection stopped □ □ □ ▲ Network events LAN port was down □ □ □ IP changed □ □ □ IP address retrieved from a DHCP server □ □ □ ▲ General settings events System rebooted □ □ □ ▲ Notification events SMTP settings enabled □ □ □ SMTP settings disabled □ □ □ SNMP Trap settings enabled □ □ □ SNMP Trap settings disabled □ □ □ SNMP Agent settings enabled □ □ □ SNMP Agent settings disabled □ □ □ Syslog settings enabled □ □ □ Syslog settings disabled □ □ □ ▲ Security events IP filter settings enabled □ □ □ IP filter settings disabled □ □ □ ✓ SAVECheck the SMTP / SNMP / Syslog checkboxes next to each event type for sending SMTP / SNMP / Syslog notifications when those events occur.
Note: For the specified notifications to be sent, make sure the required SMTP / SNMP / Syslog service have been properly configured.
Security
The Security page contains the security settings and certificate information of the Secure Device Server, distributed into 4 tabs: Access Protection, Security Level, Account Policy, and Certificate.
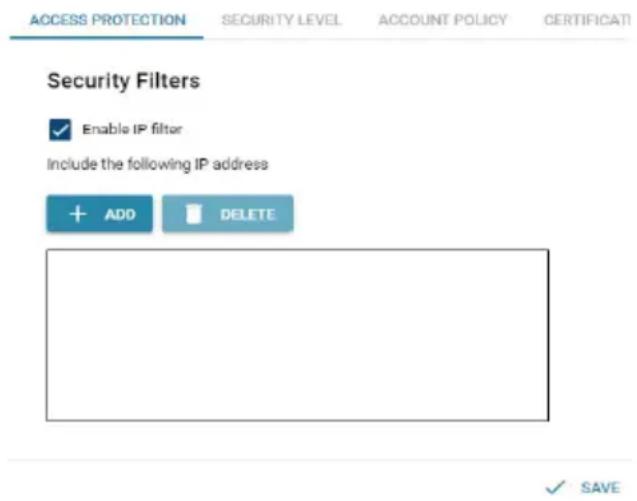
Access Protection (IP Filter)
The Access Protection function sets IP filters to allow remote access only from the IP address(es) added, and denying all other remote access.
text_image
ACCESS PROTECTION SECURITY LEVEL ACCOUNT POLICY CERTIFICATI Security Filters ✓ Enable IP filter Include the following IP address + ADD DELETE ✓ SAVETo enable exclusive access only for certain IP address(es), check Enable IP filter, and click the ADD button to add the desired IP address(es).
Click Save for the changes to take effect.
Security Level
ACCESS PROTECTION SECURITY LEVEL ACCOUNT POLICY CERTIFICATE
Enable Telnet service
Enable SNMP Agent service
Enable ICMP service
Enable SSH service
Enable HTTP and redirect to HTTPS
| Item Description | Check or uncheck to enable or disable Telnet / SNMP Agent / ICMP / SSH service. |
| Note: A system restart is required when the SNMP Agent setting has been changed. | |
| Enable HTTP and redirect to HTTPS | Check to enable HTTP and automatically redirect all HTTP access to HTTPS, for secured web browser access. |
| Note: A system restart is required when this setting has been changed. |
Account Policy
ACCESS PROTECTION SECURITY LEVEL ACCOUNT POLICY CERTIFICATE
Password Policy
Minimum length for username
Minimum length for password
Password must contain at least
6
6
One uppercase
One lowercase
One number
One special character

| Item Description | |
| Minimum length for username / password | Sets the minimum number of characters required for all newly set login usernames / passwords. Default = “6” |
| Password must contain at least | Check to require at least one uppercase / lowercase / number / special character for all newly set passwords. |
Security Certificate
The Security Certificate tab displays the information of the security certificate used.
ACCESS PROTECTION SECURITY LEVEL ACCOUNT POLICY CERTIFICATE
You can import a private certificate or signed certificates from a third-part certificate authority for secure SSL service such as a web connection (https) certificate.
| Issued To | |
| Common Name(CN) | ATEN INTERNATIONAL CO.,LTD |
| Organization(O) | ATEN INTERNATIONAL CO.,LTD |
| Organization Unit (OU) | R&D |
| Country(C) | TW |
| State or Province (ST) | New Taipei City |
| Locality (L) | Sijhn District |
| Email Address (E) | eservice@aten.com.tw |
| Serial Number | 00C915DC9CC9CACA65 |
| Issued By | |
| Common Name(CN) | ATEN INTERNATIONAL CO.,LTD |
| Organization(O) | ATEN INTERNATIONAL CO.,LTD |
| Organization Unit (OU) | R&D |
| Validity | |
| Issued On | Mon, 18 Jan 2021 08:04:07 GMT |
| Expires On | Sun, 19 Jan 2031 08:04:07 GMT |
| Fingerprints | |
| SHA1 Fingerprint | A0:0B:DE:A8:18:A0:81:9B:E2:E3:80:F1:80:70:F2:3E:0E:2A:C8:FD |
| MD5 Fingerprint | 9F:F8:29:9E:B5:DF:02:60:EF:89:68:6C:52:D6:A8:B1 |

For enhanced security, users can use their own private encryption key and signed certificate, rather than the default ATEN certificate.
There are two methods for establishing your private certificate:
- Generating a Self-Signed Certificate
If you wish to create your own self-signed certificate, a free utility — openssl.exe — is available for download over the web.
- Obtaining a CA-Signed SSL Server Certificate
To ensure security, it is recommended to use a third-party CA-signed SSL certificate obtained from a CA (Certificate Authority) website. Make sure to save the obtained certificate and its private encryption key on the PC.
| Item Description | |
| Import Certificate Imports | a private or CA-signed security certificate from the PC. |
| Restore Defaults Reverts to using the default ATEN certificate. | |
Update & Restore
The Update & Restore page can upgrade the Secure Device Server's firmware and back up and/or restore its device settings.
Firmware Update
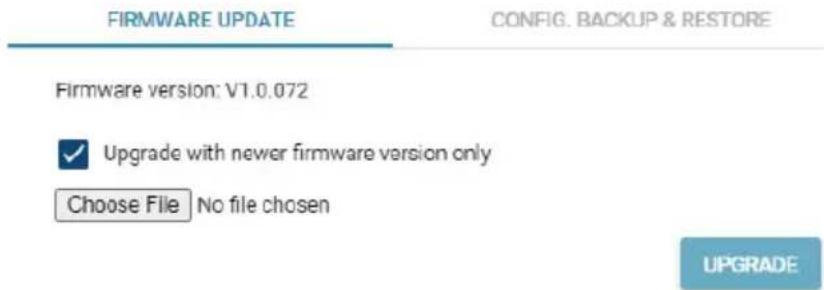
text_image
FIRMWARE UPDATE CONFIG. BACKUP & RESTORE Firmware version: V1.0.072 ✓ Upgrade with newer firmware version only Choose File No file chosen UPGRADE| Item Description | |
| Firmware version Displays the current firmware version. | |
| Upgrade with newer firmware version only | Check to only permit firmware upgrades with newer firmware versions. |
| Choose File Selects the firmware update file to be used for upgrading. | |
| UPGRADE Upgrades the device firmware with the firmware file selected. | |
Backup & Restore
The Backup & Restore page allows users to back up or restore the system settings of the Secure Device Server.
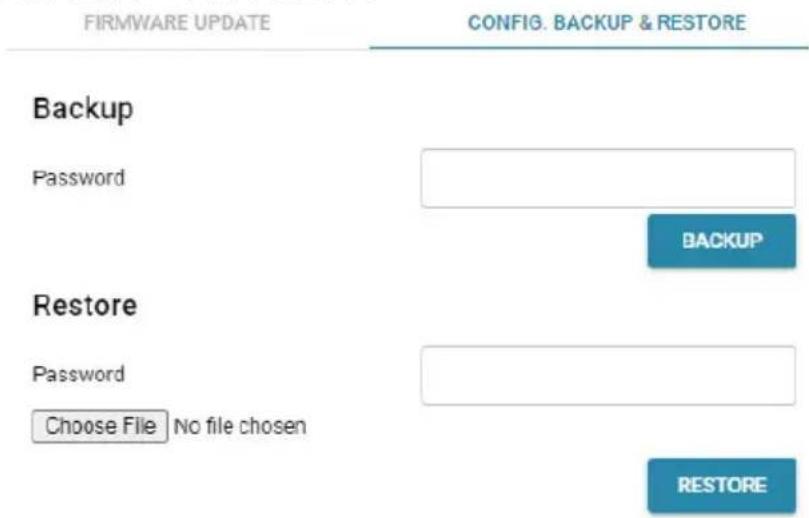
text_image
FIRMWARE UPDATE CONFIG. BACKUP & RESTORE Backup Password BACKUP Restore Password Choose File No file chosen RESTORE■ Backing up System Settings
To back up the system settings of the Secure Device Server, enter a Password, which will be used for restoring, and click Backup to save the system setting backup file, as System.conf, to the PC, which also include account-related settings, such as passwords and user privileges.
■ Restoring System Settings
To restore a previously backed up system settings file, enter its Password, click Choose File to locate it on the PC, and click Restore.
User Accounts
The User Accounts submenu consists of User and Authentication Services pages, which allow users to add/edit login accounts or utilize third-party authentication services for managing the user accounts of the Secure Device Server, respectively.
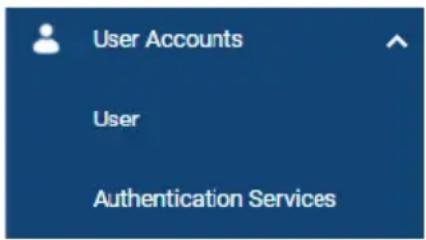
text_image
User Accounts User Authentication ServicesFor details on configuring user accounts and third-party authentication services, see Chapter 5, User Management.
Logs
The Logs page lists all of the system log information of the Secure Device Server.
SYSTEM LOGS

EXPORT

CLEAR ALL
| Severity | User | Description | Date/Time |
| Information | - | NTP get new time:2089-02-23 12:51:22 | 2089-02-23 12:51:22 |
| Information | administrator | HTTPS,Login succeeded at 10.3.41.174:54530 | 2089-02-23 12:51:16 |
| Information | - | NTP get new time:2089-02-23 12:41:36 | 2002-07-01 01:01:13 |
| Information | - | LAN port was up. | 2002-07-01 01:01:13 |
| Information | - | IP address retrieved from a DHCP server | 2002-07-01 01:01:07 |
| Information | - | Port 2 online. | 2002-07-01 01:01:07 |
| Information | - | Port 1 online. | 2002-07-01 01:01:07 |
| Information | - | NTP get new time:2021-02-05 08:57:48 | 2021-02-05 08:57:48 |
| Information | - | NTP get new time:2021-02-05 08:27:48 | 2021-02-05 08:27:48 |
| Information | - | NTP get new time:2021-02-05 07:57:48 | 2089-02-23 11:11:54 |
| Information | - | NTP get new time:2089-02-23 10:41:54 | 2021-02-05 07:27:47 |
| Information | - | NTP get new time:2021-02-05 06:57:48 | 2021-02-05 06:57:49 |
| Information | administrator | HTTPS,Timeout at 10.3.41.112 | 2021-02-05 06:51:38 |
| Item Description | |
| Export | Exports and downloads the logs onto the PC as a log.txt file. |
| Clear All Clears all log information. | |
Up to 2048 logs can be stored and displayed on this page.
This Page Intentionally Left Blank
Chapter 5
User Management
Overview
This chapter takes users through how to add or edit the login accounts of Secure Device Server, including the administrator, as well as using third-party authentication services.
User
The Secure Device Server supports up to 16 user accounts, with two types of users, as described below:
| User Type Role | |
| Administrator Able to access and configure all serial ports, and manage other login accounts | |
| User Only able to access | and/or configure the authorized serial ports, as permitted by the administrator, and unable to configure any of the device's system settings. |
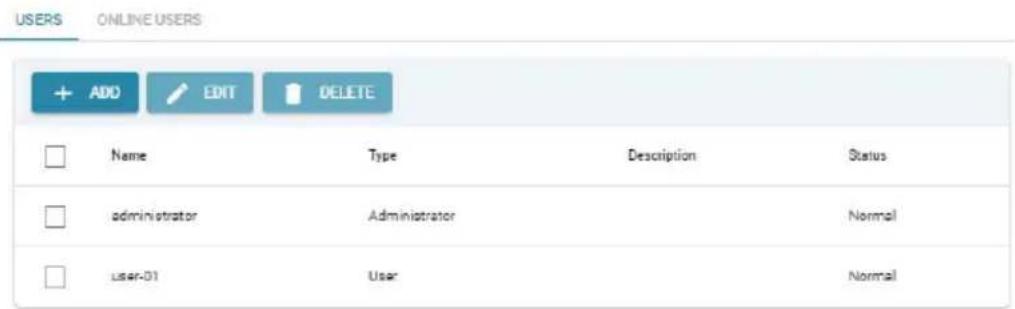
text_image
USERS ONLINE USERS + ADD EDIT DELETE Name Type Description Status administrator Administrator Normal User-01 User Normal| Item Description | |
| Name Displays the username of the user account. | |
| Type | Displays the account type, Administrator or User. |
| Description Additional information used to describe the user account. | |
| Status Displays the status of the user account, which includes:♦ Normal: The account functions normally.♦ Password Expired: The account's password has expired and must be changed. | |
Adding Users
- Click User Accounts > User > Users on the web interface of the Secure Device Server.
- Click Add. The Add User window's General tab appears. Enter the required fields, as described in the table below.
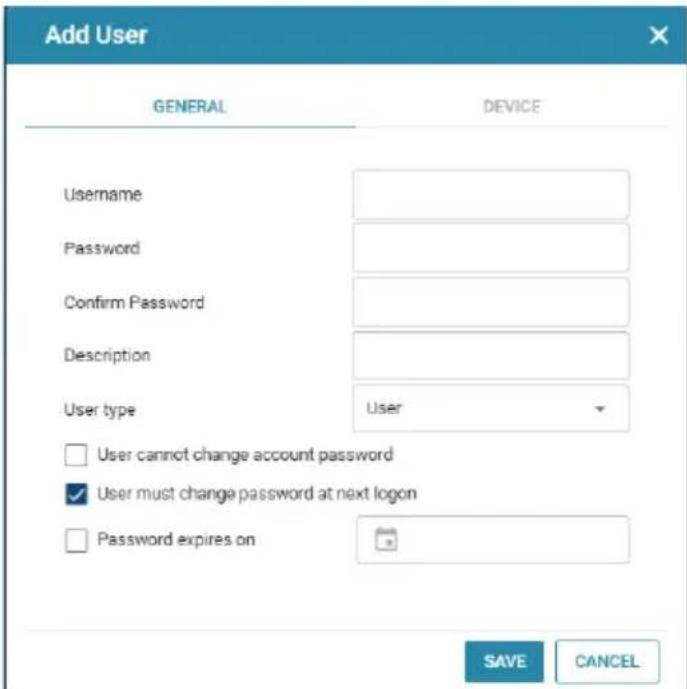
text_image
Add User GENERAL DEVICE Username Password Confirm Password Description User type User ✓ User cannot change account password ✓ User must change password at next logon Password expires on SAVE CANCEL| Item Description | |
| Username From 1 to | 32 characters are allowed depending on the Account Policy settings. See Account Policy, page 42. |
| Password From 1 to | 6 characters are allowed depending on the Account Policy settings. See Account Policy, page 42. |
| Confirm Password | Match the Password field to confirm the password entry. |
| Description Additional | information about the user that you may wish to include. |
| User type Select Administrator for full access and configuration rights or select User permit only the access and configuration rights of the serial ports, as set. | |
| User cannot change account password | Check to restrict the user from changing the account's password |
| User must change password at next login | Check to require the user to change his password upon next login. |
| Password expires on | Specifies the date on which the password of the login account shall expire, and be redefined.Note: After a user's password expires, he can still log in with the old password, but will be forced to change it upon login. |
- Only for user types — User, click the Device tab to permit access and/or configure rights for each serial port, as described in the table below.
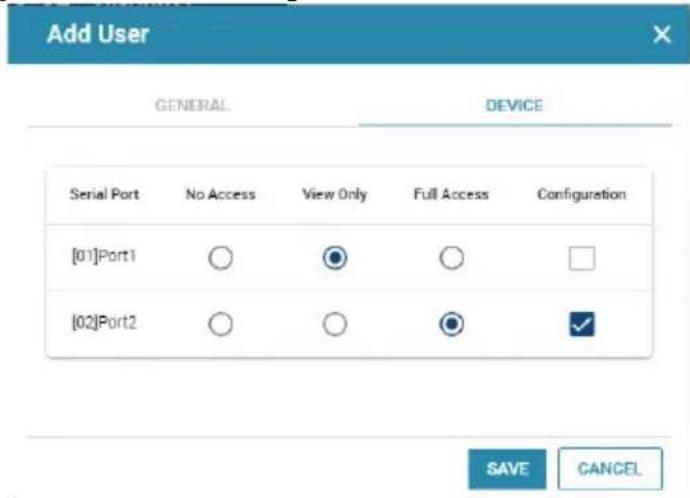
text_image
Add User GENERAL DEVICE Serial Port No Access View Only Full Access Configuration [01]Port1 ◯ ◯ ◯ ◯ [02]Port2 ◯ ◯ ◯ ✓ SAVE CANCEL| Item Description | |
| No Access Select to | restrict access to the serial port. |
| View Only Select to | only allow view access to the serial port, while restricting Telnet and SSH sessions. |
| Full Access Select to | allow full access to the serial port. |
| Configuration Check | to allow configuration for the serial port, including its Properties, Operating Mode, and Port Buffering settings.See Editing Serial Ports, page 24. |
- Click Save to finish.
- When the Operation Succeeded message appears, click OK.
Editing Users
To edit a user account, select it and click Edit.
In the Edit User window, make your changes by referring to Adding Users, page 50, then click Save.
Deleting Users
To delete user account(s), select them and click Delete.
When asked Are you sure to delete?, Click OK to confirm.
Online Users
The Online Users tab displays the user accounts that are currently accessing the Secure Device Server.
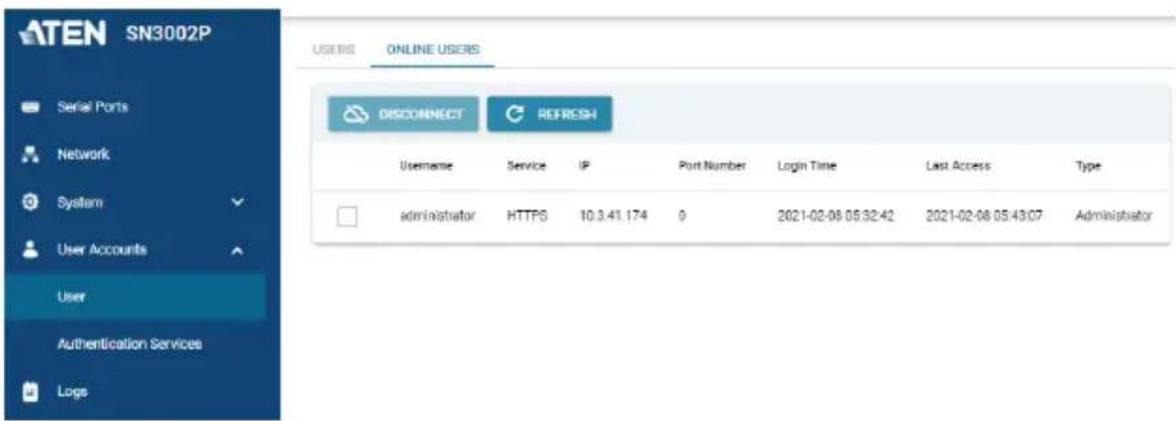
text_image
ATEN SN3002P Serial Ports Network System User Accounts User Authentication Services Logs USERS ONLINE USERS DISCONNECT REFRESH Username Service IP Port Number Login Time Last Access Type administrator HTTPS 10.3.41.174 0 2021-02-08 05:32:42 2021-02-08 05:43:07 AdministratorThe administrator can check to select any other user accounts currently logged in, and click Disconnect to terminate those users' access sessions.
Authentication Services
The Secure Device Server allows external, third-party authentication services, namely RADIUS for managing and authenticating its user accounts.
Note: When using RADIUS for authentication, only PAP is supported.
To enable such services, click User Accounts > Authentication Services on its web interface.
RADIUS
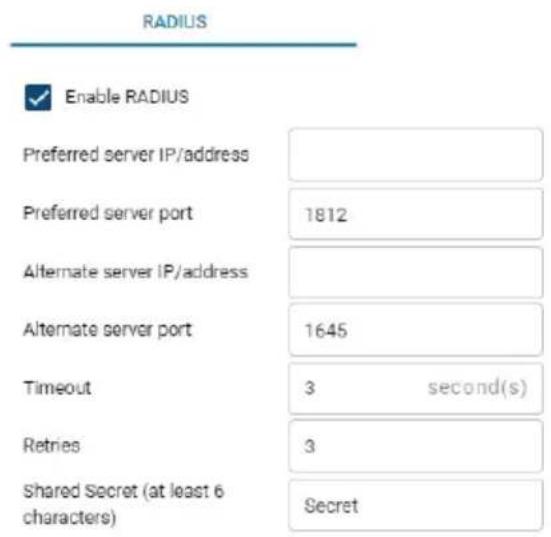
text_image
RADIUS Enable RADIUS Preferred server IP/address Preferred server port 1812 Alternate server IP/address Alternate server port 1645 Timeout 3 second(s) Retries 3 Shared Secret (at least 6 characters) Secret- To use authentication via RADIUS, enable the service on the Secure Device Server, by referring to the table below.
| Item Description | |
| Preferred server IP/address and server port | Fill in the IP address and service port of the primary (preferred) RADIUS server. |
| Alternate server IP/address and server port | Fill in the IP address and service port of the alternate RADIUS server. |
| Timeout Sets the time | in seconds, that the Secure Device Server shall wait for the RADIUS server for. |
| Retries Sets the number of allowed RADIUS retries. | |
| Shared Secret (at least 6 characters) | Enter the character string that you want to use for authentication between the Secure Device Server and the RADIUS server. |
- On the RADIUS server, set the access rights for each according to the attribute information provided in the following table.
| Attribute | Description |
| U | (User) The user has the authority to access and configure some ports. This attribute must be specified for all users who access the device. |
| T | (True) The user has the authority to access and configure the ports that are specified with it. |
| F (False) | The user cannot configure any ports. |
| A (All) | The user has the authority to access and configure all ports. |
Example:
U, T, 1
The user can access and configure port 1.
Note: 1. The characters are not case sensitive, i.e. uppercase and lowercase work equally well, and comma-separated.
2. An invalid character in the string will prohibit access to the Secure Device Server for the user.
Overview
To cover a broad range of serial applications, the Secure Device Server's COM port supports several port operating modes.
These include Real COM, TCP Server & Client, UDP, and Serial Tunneling Server & Client modes for serial-to-Ethernet connectivity, Console Management, and Console Management Direct for device control, as well as applications that require COM ports, serial tunneling, or where TCP/UDP socket functionality is needed.
Note: The maximum number of simultaneous connections to any one serial port is 16.
Selecting Operating Mode
The following are some of the questions to consider when selecting the operating mode.
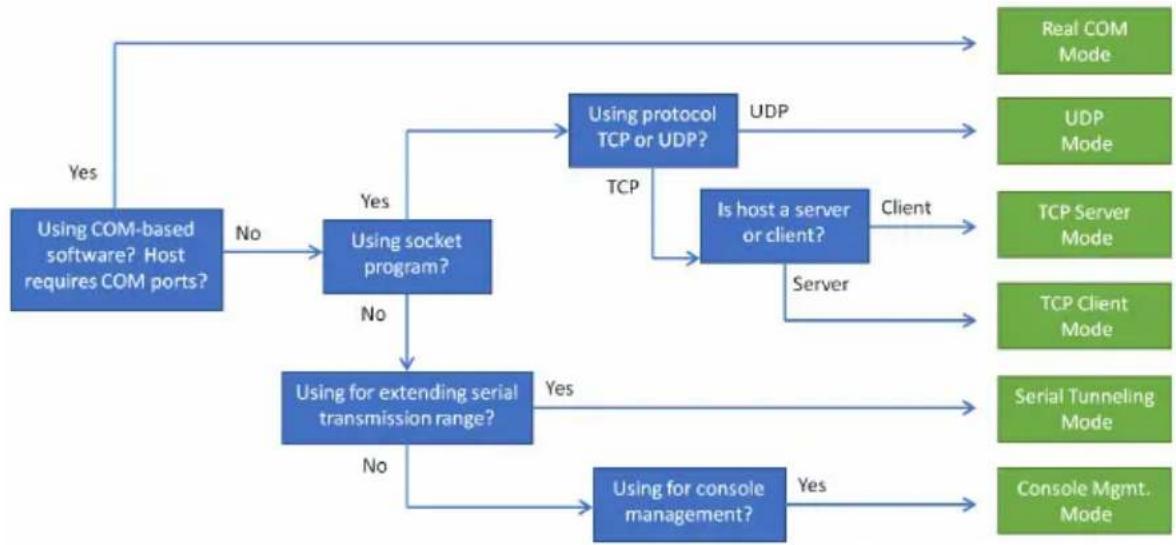
flowchart
graph TD
    A["Using COM-based software? Host requires COM ports?"] -->|Yes| B["Using socket program?"]
    A -->|No| C["Using for extending serial transmission range?"]
    B -->|Yes| D["Using protocol TCP or UDP?"]
    B -->|No| C
    D -->|UDP| E["Real COM Mode"]
    D -->|TCP Server Mode| F["UDP Mode"]
    D -->|Server| G["TCP Client Mode"]
    C -->|Yes| H["Using for console management?"]
    C -->|No| H
    H -->|Yes| I["Serial Tunneling Mode"]
    H -->|No| J["Using for extended serial transmission range?"]
The Operating Mode is selectable from Serial Ports > Edit > Operating Mode, as shown below..
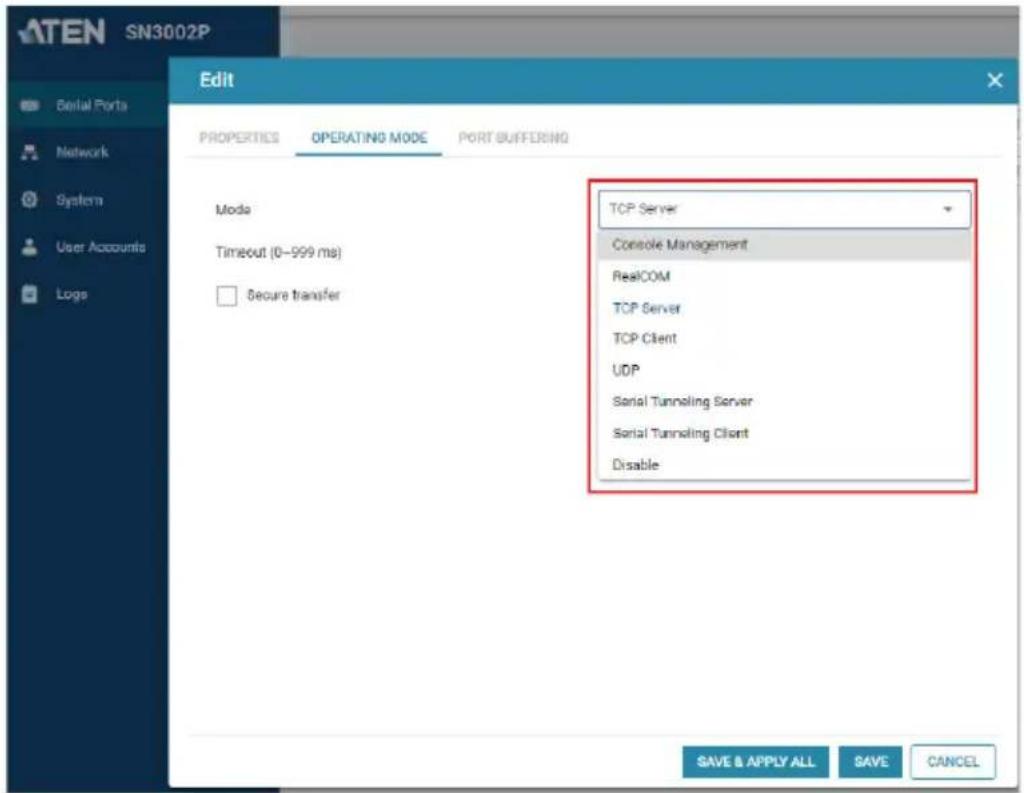
text_image
ATEN SN3002P Edit PROPERTIES OPERATING MODE PORT SUFFERING Mode Timeout (0-999 ms) Secure transfer TCP Server Console Management RealCOM TCP Server TCP Client UDP Serial Tunneling Server Serial Tunneling Client Disable SAVE & APPLY ALL SAVE CANCELFrom this page, users can set the serial ports of the Secure Device Server to the various Port Operating modes available, as explained below
Operating Mode
To configure the serial ports' operating mode, see Operating Mode, page 27.
Real COM
This mode is used in conjunction with a virtual COM port driver installed on a remote PC. (See Chapter 9, Virtual Serial Port Manager) When the Secure Device Server's COM port is set to this mode, the device connected appears as if it were directly connected to a COM port on the remote PC.

flowchart
graph LR
    A["Application Server with Virtual COM driver* for data analysis and monitoring (e.g SCADA)"] --> B["Network"]
    B --> C["SN3001P"]
    C --> D["RS232"]
    D --> E["Power Meter, Temperature and Humidity Sensor"]
This mode is useful with devices such POS terminals, bar code readers, serial printers, etc. since it allows users to use software that was written for pure serial communication applications.
The Secure Device Server comes with Real COM drivers for Windows systems (Virtual Serial Port Utility) and TTY drivers for Linux systems.
TCP Server & Client
TCP (Transmission Control Protocol) provides a reliable transport layer for transmitting serial data over the TCP protocol via socket programming.

flowchart
graph LR
    A["Application Server as TCP Server/Client for remote control"] --> B["Network"]
    B --> C["SN3001P (TCP Client/Server)"]
    C --> D["R5232"]
    D --> E["CNC machine, PLC"]
TCP Server
In TCP Server mode, data transmission is bidirectional. In this mode, the host computer initiates contact with the Secure Device Server and requests a connection to its serial port.
Once the connection is established, the host receives data from the serial device. From this point on, data can be transmitted between the host and the device in both directions. SSL data encryption is supported in this operating mode.
The Secure Device Server supports simultaneous connections from up to 16 host computers in this mode, allowing multiple computers to communicate with the serial device at the same time.
Note: Be sure that the Base socket entry specified on the General Settings page corresponds to the port that the device listens on. 5001 is the Secure Device Server's default setting. (See General, page 34.)
TCP Client
In TCP Client mode, when serial data comes into the serial port, the Secure Device Server initiates contact with the host computer and begins sending serial data to the to the host. The Secure Device Server can send data to up to 16 host computers simultaneously, and supports SSL data encryption in this operating mode.
For configuring the serial port's operating mode, see Operating Mode, page 27.
Serial Tunneling Server & Client
Serial Tunneling involves establishing a direct connection between two Secure Device Servers over Ethernet, working in a Client-Server relationship. One unit is designated as the Serial Tunneling Client, while the other designated as the Serial Tunneling Server.

flowchart
graph LR
    A["Application Server for Warehouse Mgmt."] -->|RS232| B["SN3001P (Serial Tunneling Server)"]
    B --> C["Network"]
    C --> D["SN3001P (Serial Tunneling Client)"]
    D -->|RS232| E["Barcode Scanner, Card Reader"]
Note: In this configuration, it doesn't matter which is designated as the Client and/or Server.
The COM port of one of the two units connects to the COM port of a computer, while the COM port of the other unit connects to the serial device to be accessed.
The two units then communicate with each other via their IP and port addresses, and supports SSL data encryption. The port address is set by the Base socket entry on the General Settings page. See General, page 34, for details.
UDP Mode
UDP (User Datagram Protocol) Mode is faster and more efficient at communications than TCP. In UDP mode, communications are bilateral. A
serial device can send data to, and receive data from, up to 16 host computers via the Secure Device Server's COM port.

flowchart
graph LR
    A["Application Server for message broadcasting"] --> B["Network"]
    B --> C["SN3001P"]
    C --> D["RS232"]
    D --> E["Safety FIRST"]
    E --> F["LED Sign Board"]
Because it doesn't perform error checking in the thorough way that TCP does, UDP is more suitable for real time applications (such as message display) than the slower TCP, which is optimized for data accuracy.
Console Management
Console Management allows users to establish Telnet and/or SSH sessions to the Secure Device Server for managing and controlling the serial devices connected. Users can log in using Java SNViwer application via Telnet or SSH, or remotely via Telnet, SSH, or PuTTY.

flowchart
graph LR
    A["Remote console port management through Telnet/SSH connection"] --> B["Network"]
    B --> C["SN3001P"]
    C --> D["RS232"]
    D --> E["Network* Switch"]
Note: 1. Be sure that the Base socket entry specified on the General Settings page corresponds to the port that the device listens on. 5001 is the Secure Device Server's default setting (see General, page 34).
- In this mode, the Secure Device Server can also be connected to a Cisco Network Switch using the Cisco console cable (DB-9 to RJ-45).
Console Management Direct
When the Direct option under Console Management mode is enabled, users can establish a Telnet or SSH session directly from a PC to a serial device connected to the Secure Device Server without requiring to log in via a web browser. Users can log in to a connected serial device using Telnet, SSH, or PuTTY directly from a PC.
For configuring the serial port's operating mode, see Operating Mode, page 27.
Disable
In this mode, the serial port of the Secure Device Server is disabled.
For configuring the serial port's operating mode, see Operating Mode, page 27.
Chapter 7
Port Access
Overview
Upon login of the Secure Device Server's web interface, the Serial Ports page appears. Use the buttons, described below, to access and control the device's serial COM ports.
| Button Function | |
| EDIT | Edits the serial port's settings. See Editing Serial Ports, page 24. |
| TELNET | Opens a Telnet session with the Secure Device Server using SNViewer to access either its configuration menu, or a serial device connect to its COM port. See Telnet / SSH, page 62, for details. |
| SSH | Opens an SSH session with the Secure Device Server using SNViewer to access either its configuration menu, or a serial device connect to its COM port. See Telnet / SSH, page 62, for details. |
| DUMP BUFFER | Downloads the port activity logs (up to 128 KB) of the serial port as a log.txt file. See Port Buffering, page 26. |
Note: Buttons are only active for the functions that the user is authorized to perform.
Telnet / SSH
To access the Secure Device Server's configuration menu, or a serial device connected to its COM port via Telnet or SSH, click the Telnet or SSH button on the Serial Ports page. A Java application — SNViewer — appears and opens a Telnet / SSH session, as exemplified below.
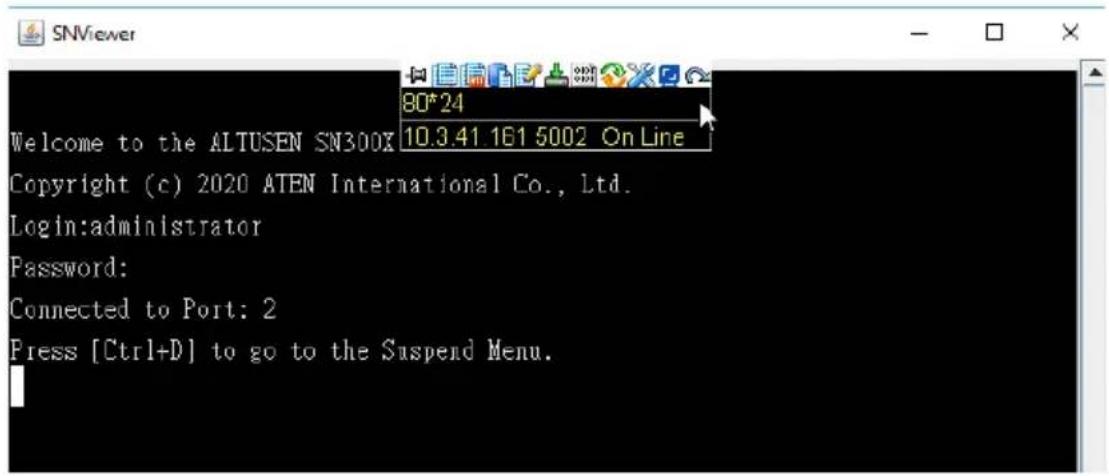
text_image
SNViewer 80*24 Welcome to the ALTUSEN SN300X 10.3.41 161 5002 On Line Copyright (c) 2020 ATEN International Co., Ltd. Login:administrator Password: Connected to Port: 2 Press [Ctrl+D] to go to the Suspend Menu.Note: 1. JRE 8 must be installed to run SNViewer.
- In order for the Telnet / SSH buttons to appear, the Secure Device Server's COM port must be set to Console Management mode (see Operating Mode, page 27).
SNViewer
The SNViewer is a Java application used to access serial devices connected to the Secure Device Server on the web via Telnet / SSH protocol.
Moving the mouse cursor over the SNViewer brings up its control panel, which consists of three rows: an icon row and two text rows.
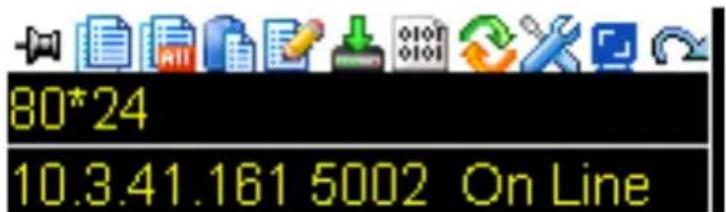
text_image
80*24 10.3.41.161 5002 On Line- By default, the upper text row shows the width and height of the window. As the mouse cursor moves over the icons in the control panel, the information in the upper text row changes to indicate the icon's function.
- The lower row shows the IP address and port of the device you are accessing, along with the current connection status.
Control Panel Functions
The Control Panel functions are described in the table below and the sections that follow.
| Icon Function | |
 | Pins / unpins the Control Panel to appear Always On Top or Auto Hide mode. |
 | Copies the selected text on the screen. |
 | Copies all text displayed on the screen. |
 | Pastes the copied text. |
 | Toggles Logging on / Logging off. This starts a log file of characters sent from the serial device to the SNViewer. You must first create and import a text-based log file (see Logs, page 47). |
 | Browses for data files to import (see Data Import, page 64). |
 | Changes the page encoding (see Encode, page 64). |
 | Resets the terminal to its default settings. |
 | Changes the font, color and other display settings of the SNViewer (see Terminal Settings, page 64). |
 | Adjusts the width of the SNViewer window. |
 | Exits the viewer. |
Data Import
The Data Import option opens a standard browse menu to import data files, as shown below.
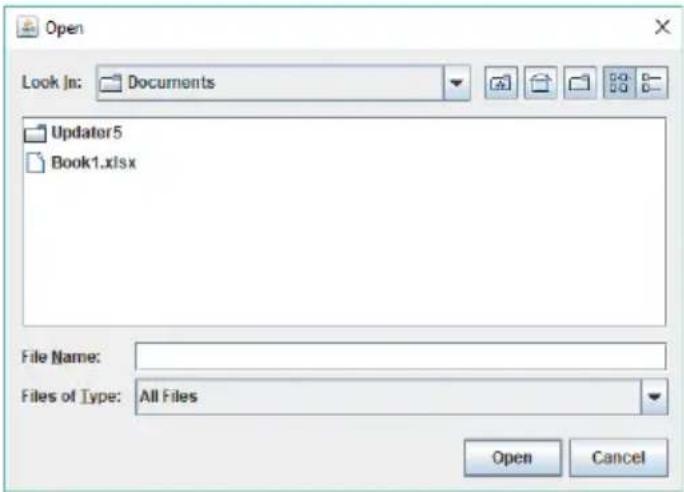
text_image
Open Look In: Documents Updater5 Book1.xlsx File Name: Files of Type: All Files Open CancelEncode
The Encode option selects the type of encoding to be used, as illustrated below.
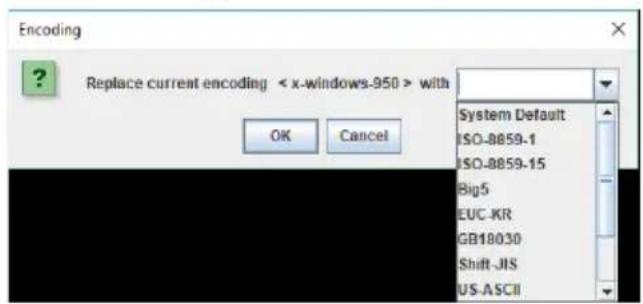
text_image
Encoding Replace current encoding < x-windows-950 > with System Default ISO-8859-1 ISO-8859-15 Big5 EUC-KR GB18030 Shift-JIS US-ASCIITerminal Settings
The Terminal Settings option allows users to change the display parameters and settings of the terminal session, as described below.
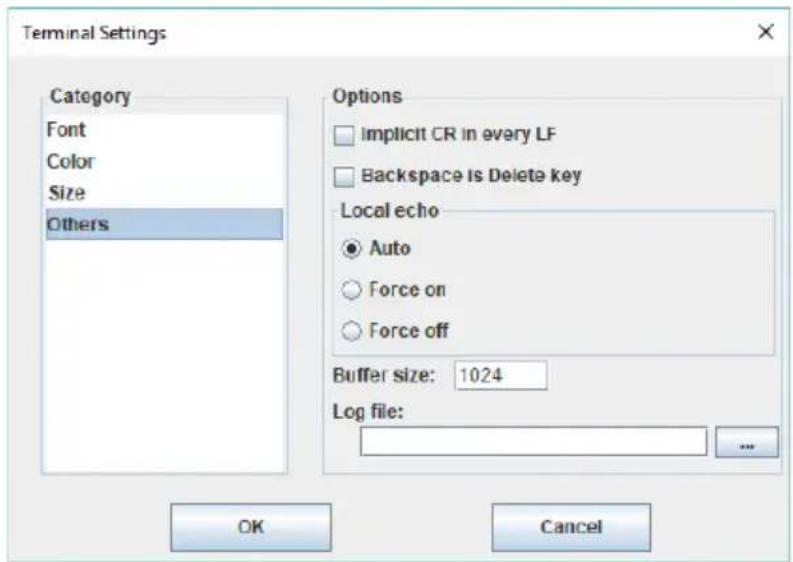
text_image
Terminal Settings Category Font Color Size Others Options Implicit CR in every LF Backspace is Delete key Local echo Auto Force on Force off Buffer size: 1024 Log file: OK Cancel| Category Description | |
| Font Configures | the SNViewer's font settings, including the font type, size, and style. An example of the setting is displayed on the right. |
| Color | Changes theForeground, Background, Cursor Text, and/or Cursor colors.Use theHSL, Swatches, and HSV tabs to make detailed adjustments and select the colors.Below the tab is aPreviewof how the color changes will look like.ClickOKto save the changes; Cancelto remove the changes and exit; orResetto revert to default color settings. |
| Size The size of | the window determines the amount of information displayed. Change the SNViewer's window size by configuring the Column and Row sizes. |
| Others Use this section to set the following:◆ Implicit CR in every LF: Checking this box adds an extra Carriage Return when the [Enter] key is used, so the cursor returns aligned on the left margin. Use this function if the text is not lining up on the left margin after you hit [Enter].◆ Backspace is Delete Key◆ Local echo: An echo is a response from the serial device of character(s) that have been inputted.◆ Auto: Characters that are typed in are echoed but not displayed on the screen.◆ Force On: Characters that are typed in are echoed and displayed on the screen as they are entered. Passwords are displayed when enabled.◆ Force Off: Characters are not echoed from the serial device.◆ Buffer Size: This is the maximum size of the Log file.◆ Log File: The log file generates a log of characters sent from the connected serial device to the SNViewer. The log must first be created as a text file using an external editor such as Note or Microsoft Word, then opened here. Next, you must enable Logging on from the SNViewer Control Panel (see Control Panel Functions, page 63). | |
This Page Intentionally Left Blank
Overview
The Secure Device Server can be accessed via remote terminal sessions via several methods, including Telnet, SSH, or PuTTY, as described in the sections that follow.
Terminal Login
Aside from using a web browser, users can also log in remotely using a text-based terminal application, such as Telnet, SSH, or PuTTY.
Telnet Login
Start a terminal (command line) session and type the IP address of the Secure Device Server in the following format:
telnet [IP Address]
Press [Enter]
Note: The default telnet port is 23. To control a device connected to the Secure Device Server's COM port — rather than opening its main menu — specify the port number as set by the Base socket entry in General Settings (see General Settings, page 34). For example: telnet 192.168.0.605001
A login prompt appears:
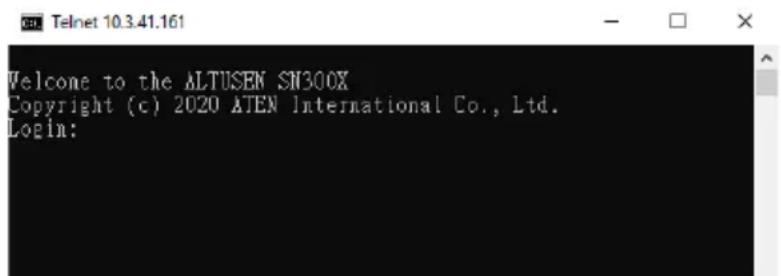
text_image
Welcome to the ALTUSEN SN300X Copyright (c) 2020 ATEN International Co., Ltd. Login:For first-time login, type the default username — administrator, press [Enter], then type the default password — password, and press [Enter] again to log in.
SSH Login (Linux)
Start a terminal (command line) session and type the IP address of the Secure Device Server in the following format:
ssh [username@IP Address]
Press [Enter] then enter the password of the Secure Device Server to log in.
Note: The default SSH port is 22. To control a device connected to the Secure Device Server's COM port — rather than opening its main menu — specify the port number that was sby the Base socket entry in General Settings (see General Settings, page 34). For example: ssh administrator@192.168.0.60-P5001.
Third-party Utility (Windows)
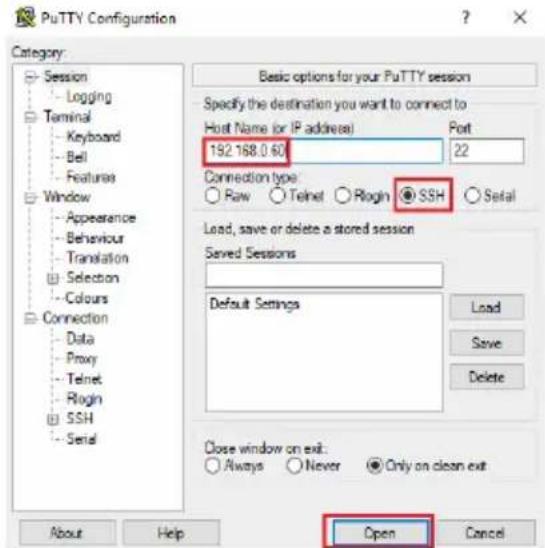
SSH sessions can also be accessed on Windows with the use of third-party utilities, such as PuTTY — a free implementation of Telnet and SSH for Win32 and Unix platforms. To make an SSH connection via PuTTY, do the following:
- Under Host Name, enter IP address of the Secure Device Server.
text_image
PuTTY Configuration Category: Session Logging Terminal Keyboard Bell Features Window Appearance Behaviour Translation Selection Colours Connection Data Proxy Telnet Rlogin SSH Serial Basic options for your PuTTY session Specify the destination you want to connect to Host Name (or IP address) Port 192.168.0.60 22 Connection type Raw Telnet Rlogin SSH Serial Load, save or delete a stored session Saved Sessions Default Settings Load Save Delete Close window on exit: Always Never Only on clean exit Open Cancel About Help-
Select SSH under Protocol and click Open.
-
Once connected, provide a valid username and password to log in to the Secure Device Server.
Note: If the login fails, the SSH protocol doesn't allow you to try again. You must close the PuTTY and start over.
Terminal Main Menu
Once logged in, the following text-based main menu appears.
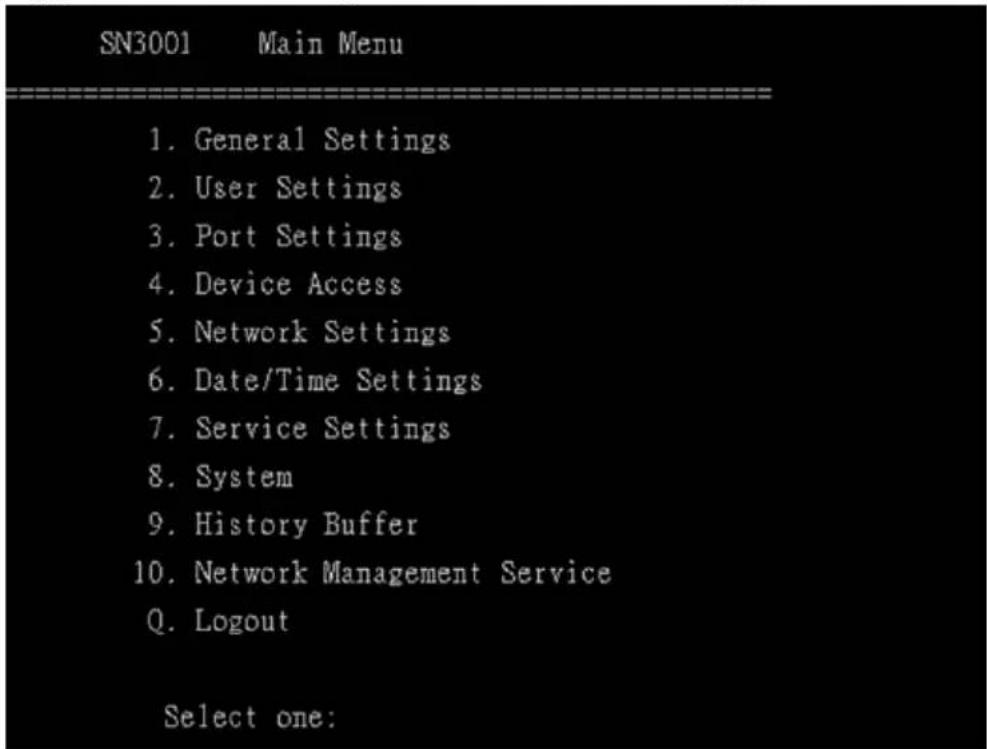
text_image
SN3001 Main Menu 1. General Settings 2. User Settings 3. Port Settings 4. Device Access 5. Network Settings 6. Date/Time Settings 7. Service Settings 8. System 9. History Buffer 10. Network Management Service Q. Logout Select one:The terminal session main menus contain text-based configurations similar to that of the web browser previously described, but with a few limitations, such as unable to perform firmware upgrade and setting backup & restore.
Users can refer to the information provided in the browser version (see Web Console, page 23) while working through the submenus.
Note: As with the browser version, access to many of these submenus are restricted to the administrator or users with COM port access permissions. If you select a submenu that you are not authorized for, nothing will happen.
Users can access the serial devices connected to the Secure Device Server via 4. Device Access.
Note: To access a connected serial device, the Operating Mode of the serial port must be set to Console Management (see Operating Mode, page 27).
To close the terminal session, bring up the Main Menu and press [Q] to log out. Then close the window.
This Page Intentionally Left Blank
Chapter 9
Virtual Serial Port Manager
Overview
The Secure Device Server offers a Virtual COM port driver for Windows, Real TTY driver for Linux, and Fixed TTY driver for OpenServer, Solaris, FreeBSD, AIX, and Mac.
By running the driver on a PC, devices connected to the Secure Device Server's COM ports, appear as if they were directly connected to the COM ports of that PC.
Note: The Operating Mode of the serial ports must be set as Real COM to be configured as a virtual port (see Operating Mode, page 27).
Data transmission takes place over the Ethernet between the PC's virtual COM port and the devices connected to the Secure Device Server's COM ports.
Users can download and install the driver corresponding to their PC OS from the Secure Device Server's product web page.
Real COM Port Management — Virtual Serial Port Manager
The Virtual Serial Port Manager is a utility that provides a convenient interface for COM port mapping.
Note: The Virtual Serial Port Manager only supports Windows and Linux with Kernel 4.15.0-43 and 4.2.0-27. For other versions of Linux systems, see Real COM Port Management — Linux Commands, page 78.
Start Virtual Serial Port Manager (Start > Virtual Port Management Utility > Virtual Serial Port Manager). The following dialog box appears.
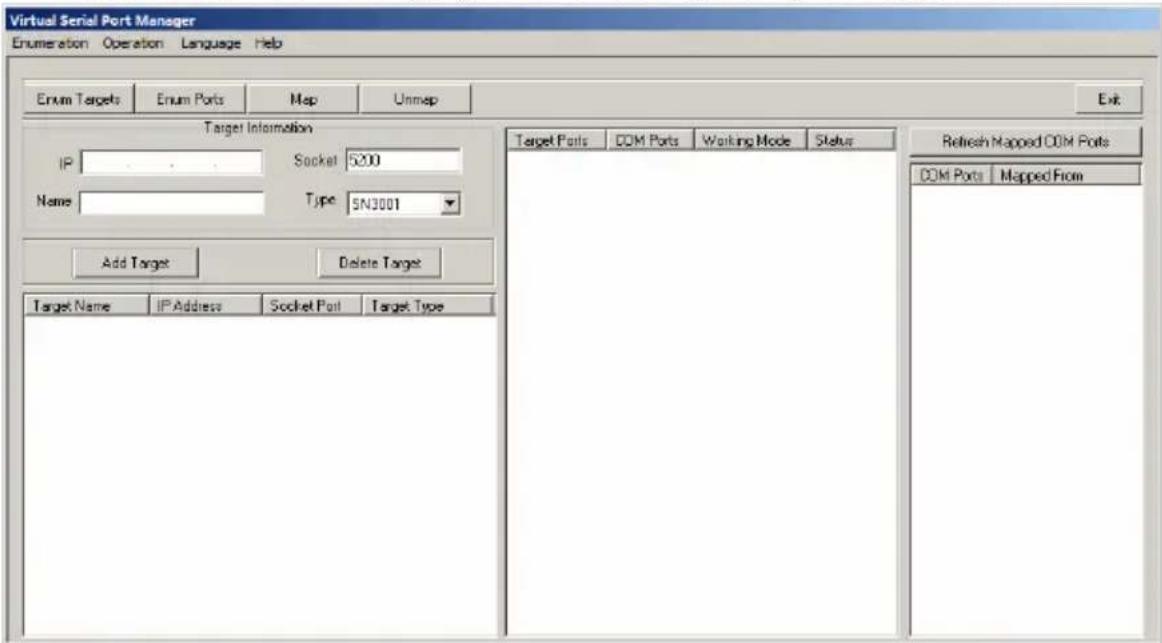
text_image
Virtual Serial Port Manager Enumeration Operation Language Help Enum Targets Enum Ports Map Unmap Exit Target Information IP Socket 5200 Name Type SNJ001 Add Target Delete Target Target Name IP Address Socket Port Target Type Target Ports DOM Ports Walking Mode Status Refresh Mapped COM Ports COM Ports Mapped FromUtility Interface
The Virtual Serial Port Manager's interface is laid out as follows:
- The menu and button bars allow the automatic enumeration and listing of devices and ports.
Below the menu and button bars is an area to input the required information for manually listing devices if the target device doesn't appear using the automatic enumeration method. - All devices found through enumeration or manually entered are listed in the left panel.
- All ports found on the device selected are enumerated in the central panel.
- The right panel displays any virtual COM port mapping that have been made.
Menu and Toolbar
The Virtual Serial Port Manager menu and toolbar consist of the same functions. Users can either click the menu items or buttons to invoke the desired function, as described in the table below.
| Item Action | |
| Enum Targets | This function searches and lists all SN devices within the LAN — these include Secure Device Server, as well as ATEN Serial Console Servers. The results are shown in the Target List panel (see Target List, page 74, for details). Beware that all devices listed in the Target List will be deleted when the delete function is invoked. Be sure to remove any devices from the list that you don’t want to delete before invoking the delete function. |
| Enum Ports This function | lists the existing ports for the target device currently selected in the Target List. The results are shown in the Port List panel. |
| Map | After selecting a port from the Port List panel, selecting this function maps the device’s COM port to a virtual COM port on the user’s PC. |
| Unmap | After selecting a port from the Mapped Ports list, selecting this function removes the mapping between the PC and the device’s COM port. |
Target Information
The Target Information fields allow users to install (map) ports on an offline target device, as described below.
| Field Action | |
| Target IP Address | Input the IP address of the target that you want to map COM ports to. |
| Base Socket Port | The base socket port of the target device. For Real COM port operation, the default base socket port is 5200. |
| Target Name The name | of the target. If it is different from the target's real name, will be replaced by the real one. Note that the name is not related to the mapping / unmapping process. Only the IP address, socket port and target type are relevant. |
| Target Type The type of | target to be mapped. SN3001 / SN3002 and ATEN Serial Console Servers are valid target types.Note:SN3001 includes SN3001P, and SN3002 includes SN3002P. |
| Add Target Creates an | entry in the Target List based on the above information. |
| Delete Target Remove | the currently selected target from the Target List. |
Target List
The left panel displays all the devices that were found with the Enumeration function, as well as any devices that were manually added with the Target Information fields.
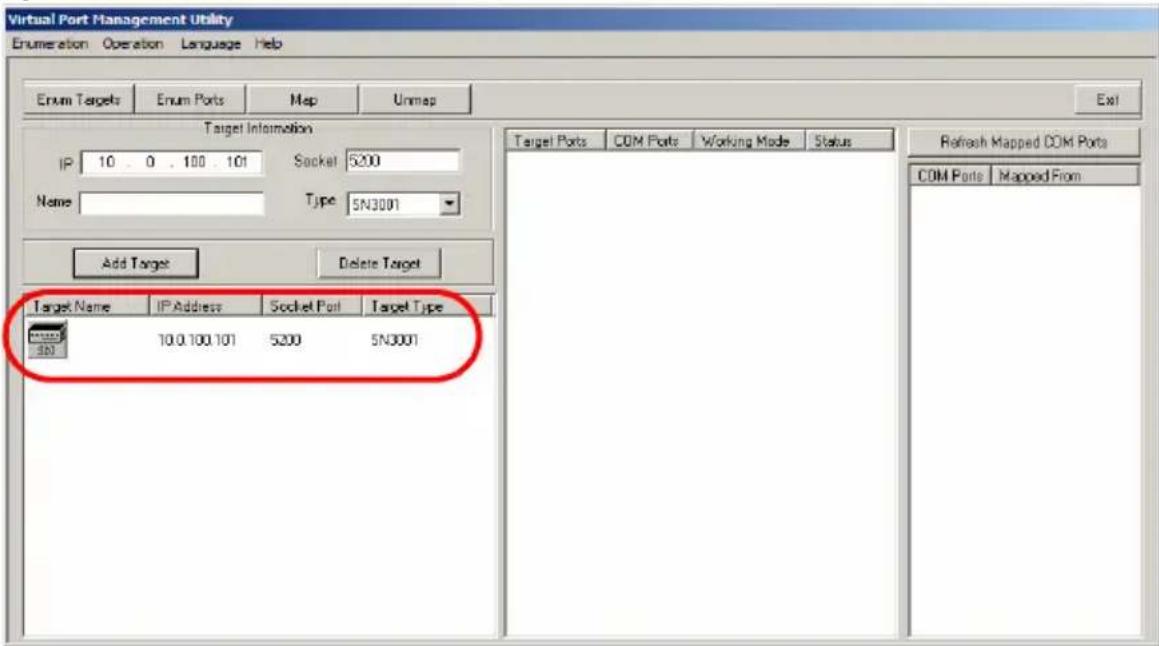
text_image
Virtual Port Management Utility Enumeration Operation Language Help Enum Targets Enum Ports Map Unmap Target Information IP 10 0 100 101 Socket 5200 Name Type SN3001 Add Target Delete Target Target Name IP Address Socket Port Target Type 10.0.100.101 5200 SN3001 Refresh Mapped COM Ports COM Ports Mapped FromNote: Double-clicking an item in the list invokes the same function as selecting Enum Ports, which displays the numbers and working modes of the selected target's ports in the Port List column.
If a device was automatically listed as a result of the Enumeration procedure, the icon to its left is drawn with green dots and lines to show that the target is online and ready to be mapped.
If a device was added to the list manually and is offline, the icon to its left is drawn with black dots and lines. Double-clicking a manually added item shall display its information in the Port List, but the working mode information is not accurate and we must assume that all the device's ports are in Real COM mode. See Operating Mode, page 27, for details about port modes.
If the target is offline or is online but does not respond within 2 seconds of asking to enumerate its ports, the working mode information is not accurate and we must assume that all the device's ports are in Real COM mode. See Operating Mode, page 27, for details about port modes.
Port List
This list displays the port information of the selected target (only one target can be selected at a time).
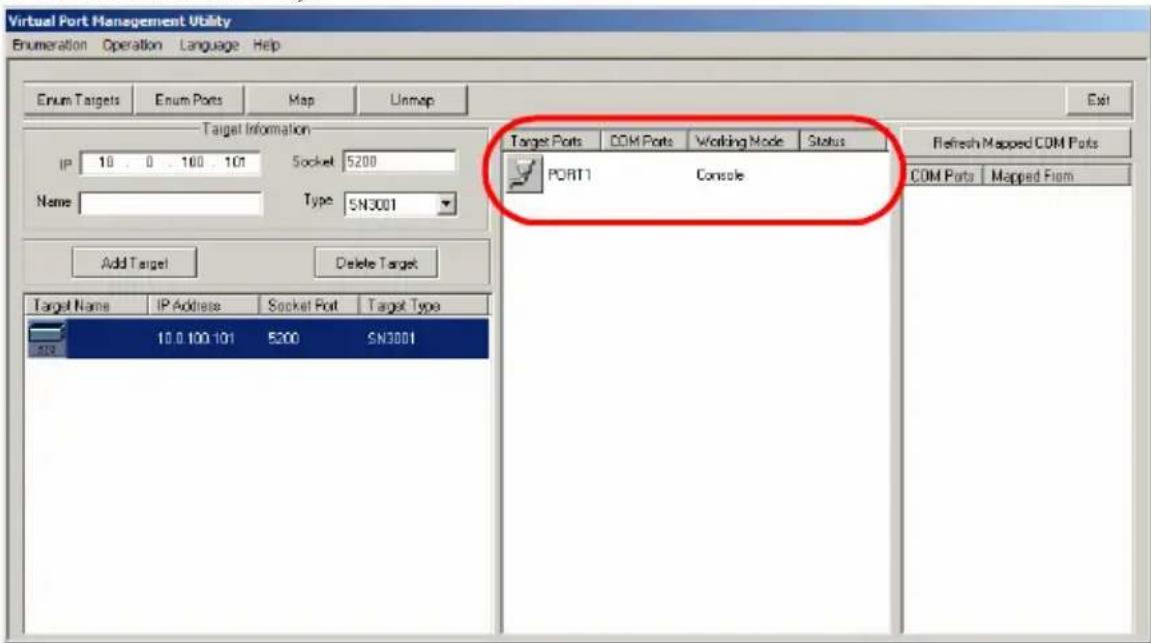
text_image
Virtual Port Management Utility Enumeration Operation Language Help Enum Targets Enum Ports Map Unmap Target Information IP 10 0 100 101 Socket 5200 Name Type SN3001 Add Target Delete Target Target Name IP Address Socket Port Target Type 10.0.100.101 5200 SN3001 Target Ports COM Ports Working Mode Status PORT1 Console Refresh Mapped COM Ports COM Ports Mapped From- The left column lists the target's port number, the second column shows the COM port it is mapped to (if any), the third column shows its working mode, and the right column shows its status.
Note: The working mode refers to the operating mode that the serial port is set as. See Operating Mode, page 27, for details.
- Double-clicking a port in the Port List brings up the Port Mapping dialog box. See Port Mapping, page 76 for mapping details.
Note: The Port Mapping dialog box can also be invoked either by clicking MapTo... on the toolbar or selecting MapTo... from the menu.
Port Mapping and Unmapping
Port Mapping
To map a virtual COM port:
- Double-click your Target item in the Port List to brings up the Port Mapping dialog box:
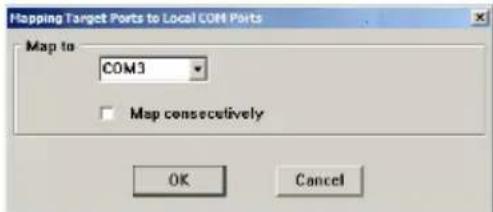
text_image
Mapping Target Ports to Local COM Ports Map to COM3 Map consecutively OK Cancel-
From the drop-down list, select the desired COM port to map the Target port to.
-
Click OK.
Note: If a warning dialog box comes up, you can safely ignore it. Click Continue Anyway to complete the operation
Mapped COM Port
The far-right panel on the Virtual Port Management displays the mapped COM port. The entry is generated as soon as the application starts, and is updated whenever the mapped COM port configuration changes as a result of installations and removals.
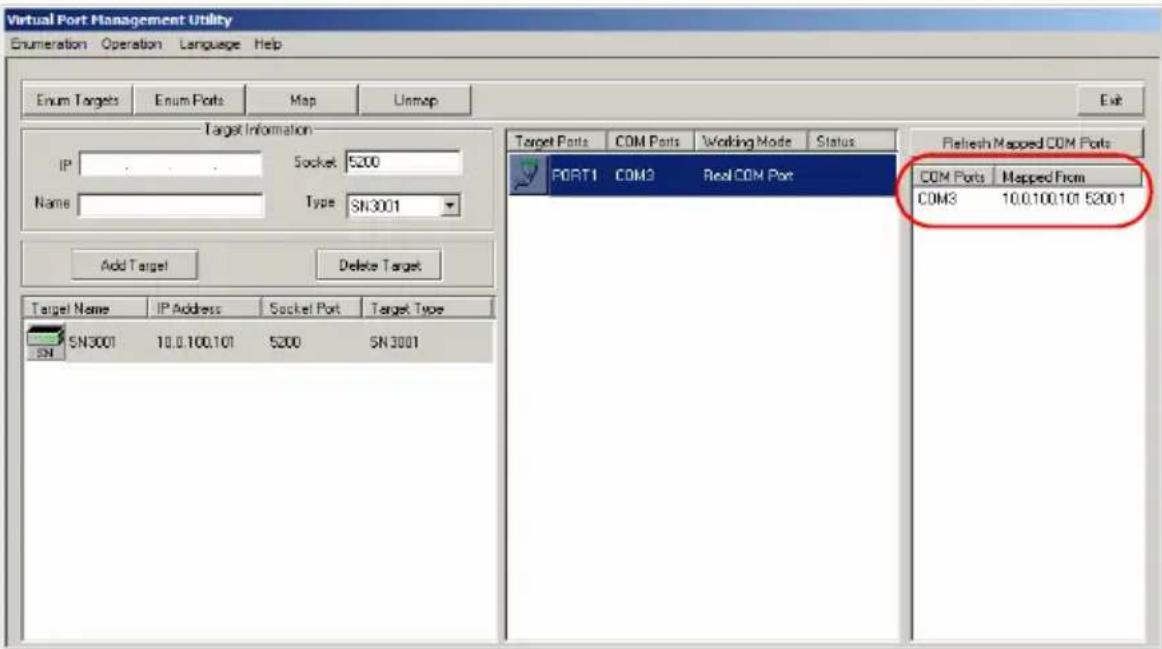
text_image
Virtual Port Management Utility Enumeration Operation Language Help Enum Targets Enum Ports Map Unmap Target Information IP Socket 5200 Name Type SN3001 Add Target Delete Target Target Name IP Address Socket Port Target Type SN SN3001 10.0.100.101 5200 SN3001 Target Ports COM Ports Working Mode Status PORT1 COM3 RealCOM Port Refresh Mapped COM Ports COM Ports Mapped From COM3 10.0.100.101 52001Up to 256 ports can be mapped on a Windows system.
Port Unmapping
To unmap a virtual COM port, do the following:
- Select the mapped COM port (in the far-right panel) to bring up the Port Unmapping dialog box:
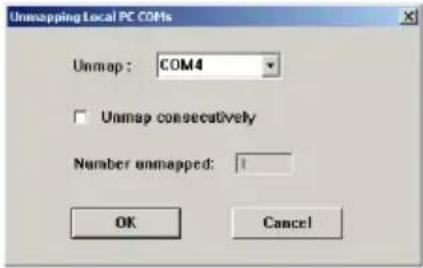
text_image
Unmapping Local PC COMs Unmap : COM4 □ Unmap consecatively Number unmapped: 1 OK CancelNote: If the dialog box doesn't come up, either click Unmap... on the button bar, or select Unmap... from the menu.
- Click OK to complete the operation.
Real COM Port Management — Linux Commands
Mapping / Unmapping Virtual Ports
To map or unmap virtual ports, do the following:
- As root, go to the /usr/lib/AtenVPort directory.
- Issue the following command:
/AtenVPMapping
The process can run in either Interactive mode or Fast mode. With Interactive mode, users are not required to specify any parameters on the command line. They make mapping/unmapping choices based on questions generated as the program runs.
With Fast mode, users must specify parameters on the command line to indicate their mapping/unmapping choices — as shown in the following examples:
-
Mapping (input should be all within one line):
./AtenVPMapping map(1) PCPort(0-255) TargetIP(a.b.c.d)
TargetPort(1-48) NumberofMapping(1-48) -
Unmapping (input should be all within one line):
./AtenVPMapping unmap(0) PCPort(0-255) NumberofUnMapping(1-48)
Up to 256 ports can be mapped on a Linux system.
Virtual Port Naming Rules
All of the ATEN SN virtual ports under Linux have the prefix ttya.
Mapped virtual ports can be found in the /dev dir. They all have a prefix of ttya (ttya000, ttya001, etc.). The range is from ttya000 - ttya255.
Safety Instructions
General
- Read all of these instructions. Save them for future reference.
- This product is for indoor use only.
◆ Follow all warnings and instructions marked on the device. - Do not place the device on any unstable surface (cart, stand, table, etc.). If the device falls, serious damage will result.
♦ Do not use the device near water. - Do not place the device near, or over, radiators or heat registers.
- The device cabinet is provided with slots and openings to allow for adequate ventilation. To ensure reliable operation, and to protect against overheating, these openings must never be blocked or covered.
- The device should never be placed on a soft surface (bed, sofa, rug, etc.) as this will block its ventilation openings. Likewise, the device should not be placed in a built-in enclosure unless adequate ventilation has been provided.
- Never spill liquid of any kind on the device.
- Unplug the device from the wall outlet before cleaning. Do not use liquid or aerosol cleaners. Use a damp cloth for cleaning.
- The device should be operated from the type of power source indicated on the marking label. If you are not sure of the type of power available, consult your dealer or local power company.
- To prevent damage to your installation it is important that all devices are properly grounded.
- Do not allow anything to rest on the power cord or cables. Route the power cord and cables so that they cannot be stepped on or tripped over.
- Position system cables and power cables carefully; Be sure that nothing rests on any cables.
- Never push objects of any kind into or through cabinet slots. They may touch dangerous voltage points or short out parts resulting in a risk of fire or electrical shock.
- Do not attempt to service the device yourself. Refer all servicing to qualified service personnel.
- When connecting or disconnecting power to hot-pluggable power supplies, follow the guidelines below:
- Install the power supply before connecting the power cable to the power supply.
- Unplug the power cable before removing the power supply.
- If the system has multiple sources of power, disconnecting power from the system by unplugging all power cables from the power supplies.
- If the following conditions occur, unplug the device from the wall outlet and bring it to qualified service personnel for repair.
- The power cord or plug has become damaged or frayed.
♦ Liquid has been spilled into the device. - The device has been exposed to rain or water.
- The device has been dropped, or the cabinet has been damaged.
- The device exhibits a distinct change in performance, indicating a need for service.
- The device does not operate normally when the operating instructions are followed.
- Only adjust those controls that are covered in the operating instructions. Improper adjustment of other controls may result in damage that will require extensive work by a qualified technician to repair.
- The socket-outlet shall be installed near the equipment and shall be easily accessible.
DC Power
- The system relies on the protective devices in the building installation for protection against short-circuit, overcurrent, and earth (grounding) fault. Ensure that the protective devices in the building installation are properly rated to protect the system, and that they comply with national and local codes.
- Ensure that there is a readily accessible disconnect device incorporated in the building's installation wiring.
- A separate protective earthing terminal is provided on this product and shall be permanently connected to earth.
-
For the DC supply circuit, select a DC supply cable that is certified by UL, AWM VW-1 Style 1015, minimum 16 AWG, minimum 105^ , minimum 300V .
CAUTION: This equipment is designed to permit the connection of the earthed conductor of the DC supply circuit to the earthing conductor at the equipment. If this connection is made, all of the following conditions must be met: -
This equipment shall be connected directly to the DC supply system earthing electrode conductor or to a bonding jumper from an earthing terminal bar or bus to which the DC supply system earthing electrode conductor is connected.
- This equipment shall be located in the same immediate area (such as adjacent cabinets) as any other equipment that has a connection between the earthed conductor of the same DC supply circuit and the earthing conductor, and also the point of earthing of the DC system. The DC system shall not be earthed elsewhere.
- The DC supply source is to be located within the same premises as this equipment.
- Switching or disconnecting devices shall not be in the earthed circuit conductor between the DC source and the point of connection of the earthing electrode conductor.
- WARNING: This unit is intended for installation in restricted access areas. A restricted access area (server room, data center, etc.) is where access can only be gained by service personnel through the use of a special tool, lock and key, or other means of security, and is controlled by the authority responsible for the location.
Rack Mounting
Before working on the rack, make sure that the stabilizers are secured to the rack, extended to the floor, and that the full weight of the rack rests on the floor. Install front and side stabilizers on a single rack or front stabilizers for joined multiple racks before working on the rack.
- Always load the rack from the bottom up, and load the heaviest item in the rack first.
- Make sure that the rack is level and stable before extending a device from the rack.
- Use caution when pressing the device rail release latches and sliding a device into or out of a rack; the slide rails can pinch your fingers.
- After a device is inserted into the rack, carefully extend the rail into a locking position, and then slide the device into the rack.
- Do not overload the AC supply branch circuit that provides power to the rack. The total rack load should not exceed 80 percent of the branch circuit rating.
- Make sure that all equipment used on the rack – including power strips and other electrical connectors — is properly grounded.
- Ensure that proper airflow is provided to devices in the rack.
- Ensure that the operating ambient temperature of the rack environment does not exceed the maximum ambient temperature specified for the equipment by the manufacturer
- Do not step on or stand on any device when servicing other devices in a rack.
Technical Support
International
- For online technical support – including troubleshooting, documentation, and software updates: http://support.aten.com
- For telephone support, see Telephone Support, page vi.
North America
| Email Support support@aten-usa.com | ||
| Online Technical Support | Troubleshooting Documentation Software Updates | http://support.aten.com |
| Telephone Support 1-888-999-ATEN | ext 49881-949-428-1111 | |
When you contact us, please have the following information ready beforehand:
◆ Product model number, serial number, and date of purchase.
- Your computer configuration, including operating system, revision level, expansion cards, and software.
◆ Any error messages displayed at the time the error occurred.
◆ The sequence of operations that led up to the error.
◆ Any other information you feel may be of help.
Specifications
| Function Specification | |||
| Connectors Serial 1 x DB-9 Male (Black) | 1 x DB-9 Male (Black; SN3002 / SN3002P only) | ||
| Power PWR1 | 1 x DC Jack (Balck) | ||
| PWR2 1 x 3-pole Terminal (Green) | |||
| PWR3 1 x RJ-45 PoE, IEEE 802.3af(SN3001P / SN3002P only) | |||
| Switches Reset 1 x Semi-recessed button | |||
| LEDs Power 1 x Green | |||
| Port 1 / Port 2 1 x Green / Orange | 1 x Green / Orange (SN3002 / SN3002P only) | ||
| 10 / 100 Mbps 1 x Green | 1 x Orange | ||
| Power Input Power Jack 9 V DC | |||
| Power Terminal | 9 - 48 V DC | ||
| PoE | 48 V DC (SN3001P / SN3002P only) | ||
| Power Consumption | SN3001 | DC 9 V: 0.634 W: 3 BTUDC 48 V: 0.804 W: 4 BTU | |
| SN3002 | DC 9 V: 0.769 W: 4 BTUDC 48 V: 0.939 W: 4 BTU | ||
| SN3001P | DC 9 V: 0.805 W: 4 BTUDC 48 V: 0.975 W: 5 BTUPoE: 1.22 W: 6 BTU | ||
| SN3002PRS-232 | DC 9 V: 0.94 W: 4 BTUDC 48 V: 1.11 W: 5 BTUPoE: 1.39 W: 7 BTU | ||
| Interfaces Serial Standards | |||
| Baud Rate 110, 134 | 4, 150, 300, 600, 1200, 1800, 2400, 4800, 7200, 9600, 19200, 38400, 57600, 115200, 230400, 460800, 921600 | ||
| RS-232 Signals Tx | D, RxD, RTS, CTS, DTR, DSR, DCD, GND | ||
| Parity None, Even, | Odd, Mark, Space | ||
| Data Bits 5, 6, 7, 8 | |||
| Stop Bits 1, 1.5, 2 | |||
| Flow Control RTS/ | CTS, DTR/DSR, XON/XOFF, None | ||
| Network Standards 10/100Base | TX; Autosensing | ||
| Protection 1.5 KV | Magnetic Isolation | ||
| Protocols ARP, DH | HCP, DNS, HTTP, HTTPS, ICMP, IP, TCP, UDP, NTP, PPP, RADIUS, Telnet, SNMP, SNMP Trap, SMTP, SSH | ||
| Standard and Compliance | EMC | EN55032/35 | |
| EMI | CISPR 32, FCC Part 15B Class A | ||
| EMS | IEC 61000-4-2 ESD: Contact: 4 kV; Air: 8 kVIEC 61000-4-3 RS: 80 MHz to 1 GHz: 3 V/mIEC 61000-4-4 EFT: Power: 1 kV; Signal: 0.5 kVIEC 61000-4-5 Surge: Power: 2 kV (Power Adapter), 1 kV (Terminal Block); Signal: 1 kVIEC 61000-4-6 CS: 150 kHz to 10 MHz: 3 V/m; 10 kHz to 30 MHz: 3 to 1 V/m; 30 kHz to 80 MHz: 1 V/mIEC 61000-4-8 PFMFIEC 61000-4-11 DIPs | ||
| Safety | UL 60950-1 and UL 62368-1 standards compliant | ||
| RoHS | |||
| Environment | Operating Temp. | 0 - 60 °C | |
| Storage Temp. | -40 - 75 °C | ||
| Humidity | 5 - 95% RH, Non-condensing | ||
| Physical Properties | Housing | Metal | |
| Weight | SN3001 | 0.20 kg | |
| SN3002 | 0.21 kg | ||
| SN3001P | 0.21 kg | ||
| SN3002P | 0.22 kg | ||
| Dimensions (L x W x H) 9.80 x 1 | 1.7 x 2.60 cm | ||
Clear Login Information
If you are unable to perform an Administrator login (such as due to login credentials being corrupted or lost) you can clear the login information by doing the following.
Note: Performing this procedure also reverts all settings back to their factory default.
- Power off the Secure Device Server and remove its housing.
- Use a jumper cap to short the jumper labeled J1 (DEFAULT PASSWORD).
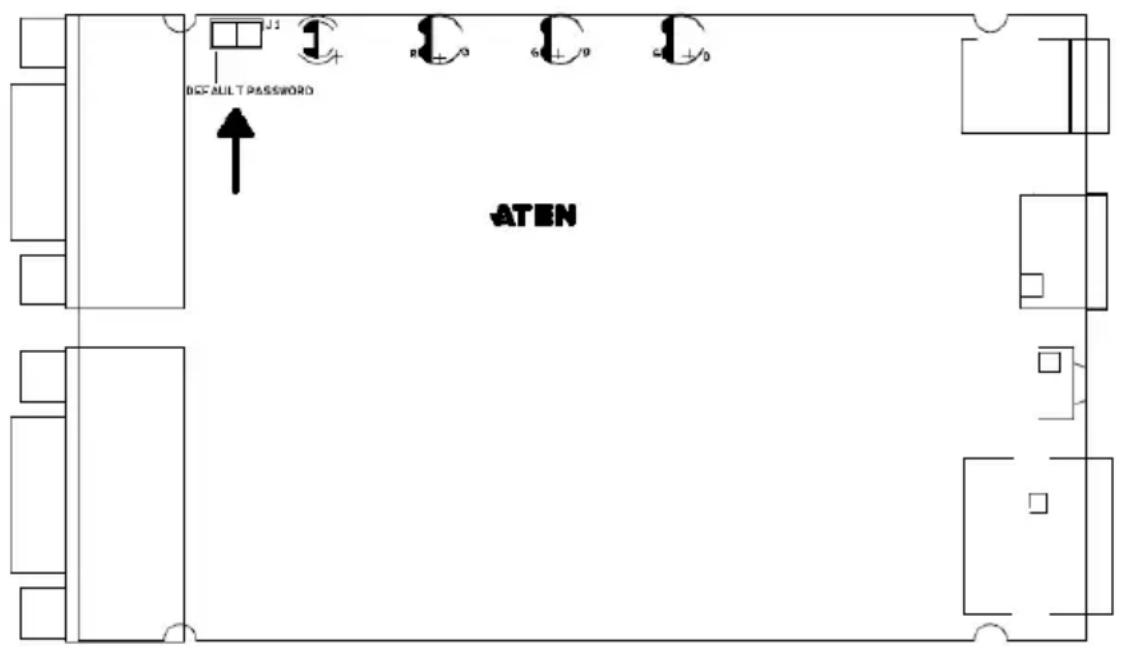
text_image
J1 DEFAULT PASSWORD ATEN- Power on the Secure Device Server.
- When the Status LED flashes, power off the device.
- Remove the jumper cap from J1.
- Close the housing and start the device.
After powering on, you can use the default Administrator username and password to log in, see Logging In, page 19.
You will be prompted to change the password upon your first-time login after performing this procedure.
Troubleshooting
Operation problems can be due to a variety of causes. The first step in solving them is to make sure that all cables are securely attached and seated completely in their sockets.
In addition, updating the product's firmware may solve problems that have been discovered and resolved since the prior version was released. If your product is not running the latest firmware version, we strongly recommend that you upgrade. See Firmware Update, page 44, for upgrade details.
Limited Warranty
ATEN warrants its hardware in the country of purchase against flaws in materials and workmanship for a Warranty Period of two [2] years (warranty period may vary in certain regions/countries) commencing on the date of original purchase. This warranty period includes the LCD panel of ATEN LCD KVM switches. Select products are warranted for an additional year (see A+ Warranty for further details). Cables and accessories are not covered by the Standard Warranty.
What is covered by the Limited Hardware Warranty
ATEN will provide a repair service, without charge, during the Warranty Period. If a product is detective, ATEN will, at its discretion, have the option to (1) repair said product with new or repaired components, or (2) replace the entire product with an identical product or with a similar product which fulfills the same function as the defective product. Replaced products assume the warranty of the original product for the remaining period or a period of 90 days, whichever is longer. When the products or components are replaced, the replacing articles shall become customer property and the replaced articles shall become the property of ATEN.
To learn more about our warranty policies, please visit our website:
http://www.aten.com/global/en/legal/policies/warranty-policy/
Copyright © 2021 ATEN® International Co., Ltd.
Released: 2021-04-21
ATEN and the ATEN logo are registered trademarks of ATEN International Co., Ltd. All rights reserved. All other brand names and trademarks are the registered property of their respective owners.