
WFO 3O33 DLX IN - Dishwasher WHIRLPOOL - Free user manual and instructions
Find the device manual for free WFO 3O33 DLX IN WHIRLPOOL in PDF.


User questions about WFO 3O33 DLX IN WHIRLPOOL
0 question about this device. Answer the ones you know or ask your own.
Ask a new question about this device
Download the instructions for your Dishwasher in PDF format for free! Find your manual WFO 3O33 DLX IN - WHIRLPOOL and take your electronic device back in hand. On this page are published all the documents necessary for the use of your device. WFO 3O33 DLX IN by WHIRLPOOL.
USER MANUAL WFO 3O33 DLX IN WHIRLPOOL
natural_image
Simple line drawing of a rectangular device with a handle, enclosed in a rounded square frame (no text or symbols)Daily Reference Guide
Dear Homemaker,
Congratulations on your new appliance, and welcome to the Whirlpool family of homemakers. We believe that happiness begins at home and aim to have our products deliver the very best for a happier home.
At Whirlpool, we endeavour to make your life easier and more enjoyable with an extended range of products from washing machines, refrigerators, cooking products and air conditioners to water purifiers, built in appliances and dishwashers. Always helping you to make a happier home.
Please go through this instruction guide to know your appliance better and simply call the Whirlpool Home Care Center in case of any queries.
We look forward to years of happiness and a lifelong relationship with you and your family.
Yours Sincerely,
Kapil Agarwal
Vice President - Marketing
Whirlpool of India Limited
DAILY REFERENCE GUIDE

THANK YOU FOR BUYING A WHIRLPOOL PRODUCT.

You can download the Safety Instructions and the Use and Care Guide, by visiting our website www.whirlpoolindia.com and following the Instructions on the back of this booklet.
Before using the appliance carefully read Health and Safety guide.
PRODUCT DESCRIPTION
APPLIANCE
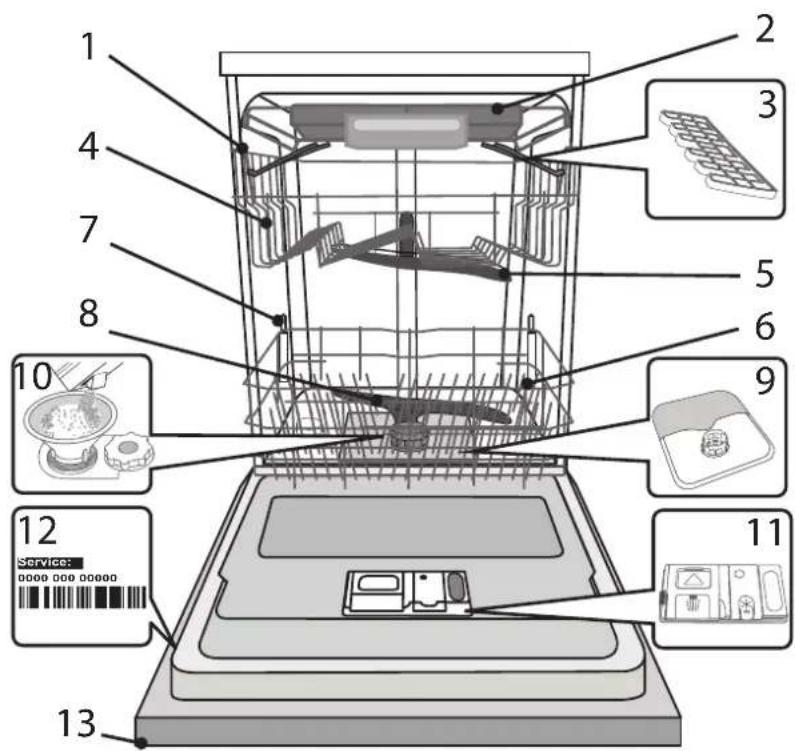
text_image
1 2 3 4 5 6 7 8 9 10 Service: 0000 000 00000 11 12 13- Upper rack
2.Cutlery rack
3.Foldable flaps
-
Upper rack height adjuster
-
Upper spray arm
-
Lower rack
-
Space Zone
-
Lower spray arm
9.Filter Assembly
10.Salt reservoir
- Detergent and Rinse Aid dispensers
12.Rating plate
- Control panel
CONTROL PANEL
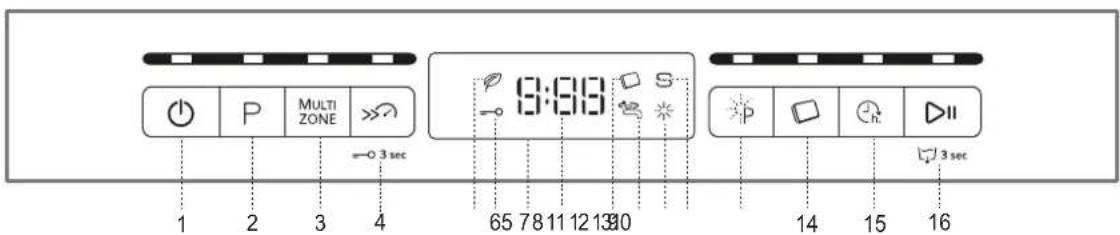
text_image
MULTI ZONE 3 sec 1 2 3 4 65 78 11 12 13 30 9:19 3 sec 14 15 16- On-Off/Reset button with indicator light
- Program selection button with indicator light
- Multizone button with indicator light
- Turbo button with indicator light / Key lock
- Eco program indicator light
- Key lock indicator light
- Display
-
Program number and remaining time indicator
-
Tablet (Tab) indicator light
- Closed water tap indicator light
- Rinse Aid refill indicator light
- Salt refill indicator light
- Power Clean button with indicator light
- Tablet (Tab) button with indicator light
- Delay button with indicator light
- Start/Pause button with indicator light / Drain out
FIRST TIME USE
SALT, RINSE AID AND DETERGENT
ADVICE REGARDING THE FIRST TIME USE
After installation, remove the stoppers from the racks and the retaining elastic elements from the upper rack.
FILLING THE SALT RESERVOIR
The use of salt prevents the formation of LIMESCALE on the dishes and on the machine's functional components.
- It is important that the salt reservoir be never empty.
- It is important to set the water hardness.
The salt reservoir is located in the lower part of the dishwasher (see PROGRAMS DESCRIPTION) and should be filled when the SALT REFILL indicator light in the control panel is lit.
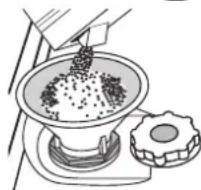
- Remove the lower rack and unscrew the reservoir cap (anticlockwise).
- Position the funnel (see figure) and fill the salt reservoir right up to its edge (approximately 1 kg); it is not unusual for a little water to leak out.
- Remove the funnel and wipe any salt residue away from the opening.
Make sure the cap is screwed on tightly, so that no detergent can get into the container during the wash program (this could damage the water softener beyond repair).
Whenever you need to add salt, we recommend carrying out the procedure before the washing cycle is started.
SETTING THE WATER HARDNESS
To allow the water softener to work in a perfect way, it is essential that the water hardness setting is based on the actual water hardness in your house. This information can be obtained from your local water supplier.
The factory setting is for average (3) water hardness.
- Switch on the appliance by pressing the ON/OFF button.
- Switch off the appliance by pressing the ON/OFF button.
- Hold down button START/PAUSE for 5 seconds, until you hear a beep.
- Switch on the appliance by pressing the ON/OFF button.
- The current selection level number and the salt indicator light both flash.
- Press button P to select the desired hardness level (see Water Hardness Table)..
| Water Hardness Table | ||
| Level PPM | ||
| 1 Soft 0 - 100 | ||
| 2 Medium 110 - 20 | ||
| 3 Normal | 210 - 300 | |
| 4 | Hard | 310 - 600 |
| 5 | Very hard | 610 - 900 |
- Switch off the appliance by pressing the ON/OFF button.
Setting is complete!
As soon as this procedure is complete, run a program without loading.
Only use salt that has been specifically designed for dishwashers.
After the salt has been poured into the machine, the SALT REFILL indicator light switches off.
If the salt container is not filled, the water softener and the heating element may be damaged as a result.
FILLING THE RINSE AID DISPENSER
Rinse aid makes dish DRYING easier. The rinse aid dispenser A should be filled when the RINSE AID REFILL indicator light ✦ in the control panel is lit.
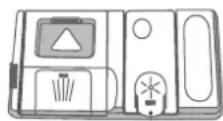
B
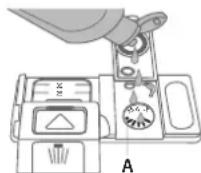
- Open the dispenser B by pressing and pulling up the tab on the lid.
- Carefully introduce the rinse aid as far as the maximum (110 ml) reference notch of the filling space - avoid spilling it. If this happens, clean the spill immediately with a dry cloth.
- Press the lid down until you hear a click to close it.
NEVER pour the rinse aid directly into the tub.
ADJUSTING THE DOSAGE OF RINSE AID
If you are not completely satisfied with the drying results, you can adjust the quantity of rinse aid used.
- Switch the dishwasher on using the ON/OFF button.
- Switch it off using the ON/OFF button.
- Press button START/PAUSEthree times - a beep will be heard.
- Switch it on using the ON/OFF button.
- The current selection level number and rinse aid indicator light flash.
- Press button P to select the level of rinse aid quantity to be supplied.
- Switch it off using the ON/OFF button
Setting is complete!
If the rinse aid level is set to 1 (ECO), no rinse aid will be supplied. The LOW RINSE AID indicator light will not be lit if you run out of rinse aid.
A maximum of 4 levels can be set according to the dishwasher model. The factory setting is for a medium level.
- If you see bluish streaks on the dishes, set a low number (2-3).
- If there are drops of water or limescale marks on the dishes, set a high number (4-5).
FILLING THE DETERGENT DISPENSER
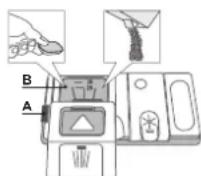
To open the detergent dispenser use the opening device A.
Introduce the detergent into the dry dispenser B only.
Place the amount of detergent for pre-washing directly inside the tub.
- When measuring out the detergent refer to the (see
PROGRAMS TABLE) to add the proper quantity. Compartment B comprises a level showing the maximum quantity of liquid or powder detergent that can be added to each cycle.
- Remove detergent residues from the edges of the dispenser and close the cover until it clicks.
- Close the lid of the detergent dispenser by pulling it up until the closing device is secured in place.
The detergent dispenser automatically opens up at the right time according to the program.
If all-in-one detergents are used, we recommend using the TABLET button, because it adjusts the program so that the best washing and drying results are always achieved.
PROGRAMS TABLE
| Program | Drying phase | Available options*) | Detergent container | Duration of wash program (h:min)**) | Water con-sumption (litres/cycle) | Energy con-sumption (kWh/cycle) | ||||
| Tub | B | |||||||||
| 1. Eco 50° 3:40 9.5 | 0.83 | √ |  | √ | √ | |||||
| 2. 6thSense |  | 50-60° | 1:25 | 31007 ZONE |  | √ | √ | |||
| 3. 1h Wash&Dry 5 |  | 0 10.5 1.20 | √ |  | √ | √ | ||||
| 4. Intensive 65° 2: |  | .0 1.50 | √ | MULTI ZONE |  | √ | √ | |||
| 5. Daily |  | 50° 1:30 | √ | .0 1.15 |  | √ | √ | |||
| 6. Silent |  | 50° | √ |  | - | √ | 3:30 15.0 | 1.15 | ||
| 7. Rapid 30' |  | 50° | - |  | - | √ | 0:30 | 9.0 | 0.50 | |
| 8. Cristal |  | 45° | √ |  | - | √ | 1:40 11.0 | 1.10 | ||
| 9. PreWash |  | - | - |  | - | - | 0:12 | 4.50 | 0.01 | |
| 10. ing Sar |  | 65° | √ |  | - | √ | 1:40 | 10.0 | 1.30 | |
| 11. Self-Clean |  | 65° | - | - | - | 0:50 | 8.0 | 0.80 | ||
ECO program data is measured under laboratory conditions.
*) Not all options can be used simultaneously.
**) The duration of the program shown on the display or in the booklet is an estimate calculated on standard conditions. The actual time may vary depending on many factors such as temperature and pressure of the incoming water, room temperature, amount of detergent, quantity and type of load, load balancing, additional selected options and sensor calibration. The sensor calibration can increase program duration up to 20 min.
Standby consumption: Left-on mode consumption: 5 W - Off mode consumption: 0.5 W
PROGRAMS DESCRIPTION
Instructions on wash cycle selection.
ECO
Normally soiled crockery. Standard program, the most efficient in terms of its combined energy and water consumption.
6^th SENSE®
For normally soiled dishes with dried food residues. Senses the level of soiling on the dishes and adjusts the program accordingly. When the sensor is detecting the soil level an animation appears in the display and the cycle duration is updated.
1 HOUR WASH & DRY
Light to normally soiled crockery. Everyday program suitable for non-dried and fresh soiling, assuring clean and dried dishes in just 60 min of time.
INTENSIVE
Program recommended for heavily soiled crockery, especially suitable for pans and saucepans (not to be used for delicate items).
DAILY
Normally soiled crockery. Everyday cycle, that ensures optimal cleaning performance in shorter time.
SILENT
Suitable for night-time operation of the appliance. Optimum performance ensured.
RAPID 30'
Program to be used for lightly-soiled dishes with no dried food residues. (Ideal for 2 place settings).
CRISTAL
Cycle for delicate items, which are more sensitive to high temperatures, for example glasses and cups.
PRE-WASH
Crockery to be washed later. No detergent to be used with this program.
SANITIZING
Normally or heavily soiled crockery, with additional antibacterial wash.
SELF-CLEAN
Cycle to be used to perform maintenance of the dishwasher. It cleans the interior of the appliance using hot water.
Notes:
Optimum performance levels when using the "1 Hour" and "Rapid" programs can be achieved by observing the maximum amounts of specified place settings.
To reduce consumption even further, only run the dishwasher when it is full.
OPTIONS AND FUNCTIONS
OPTIONS can be selected directly by pressing the corresponding button (see CONTROL PANEL).
If an option is not compatible with the selected program see PROGRAMS TABLE, the corresponding LED flashes rapidly 3 times and beeps will sound. The option will not be enabled.
MULTI ZONE
MULTIZONE
If there are not many dishes to be washed, a half loading may be used in order to save water, electricity and detergent.
Select the program and then press the MULTIZONE button: the indicator over the button lights up and the symbol of the chosen rack will appear on the display. By default the appliance washes dishes in all racks.
To wash only the specific rack, press this button repeatedly:

shown on the display (only lower rack)

shown on the display (only upper rack)

shown on the display (only cutlery rack)

shown on the display (option is OFF and the appliance will wash dishes in all racks).
Remember to load the upper or lower rack only, and to reduce the amount of detergent accordingly.

TURBO
This option can be used to reduce the duration of the main programs while maintaining the same washing and drying performance levels.
After selecting the program, press the TURBO button and the indicator light will switch on. To deselect the option, press the same button again.

TABLET (Tab)
This setting allows you to optimize the performance of the program according to the type of detergent used. Press the TABLET button (the indicator light will light up/the corresponding symbol will light up) if you use combined detergents in tablet form (rinse aid, salt and detergent in 1 dose).
If you use powder or liquid detergent, this option should be off.

DELAY
The start of the program may be delayed for a period of time between 0:30 and 24 hours.
- Select the program and any desired options. Press the DELAY button (repeatedly) to delay the start of the program. Adjustable from 0:30 to 24 hours. With each press of the button, the delay start increases by: 0:30 if selection below 4 hours, 1:00 if selection is below 12 hours, 4 hours if selection is above 12 hours. If 24 hours reached, and the button is pressed, the delayed start is deactivated.
- Press the START/PAUSE button: the timer will begin counting down;
- Once this time has elapsed, the indicator light switches off and the program begins automatically. If at the time of the countdown the START/PAUSE button is pressed again the DELAY option is cancelled and the selected program starts automatically.
The DELAY function cannot be set once a program has been started.

KEYLOCK
A long press (for 3 seconds) of TURBO button, will activate the KEYLOCK function. The KEYLOCK function will block the control panel except the ON/OFF button. To deactivate the KEYLOCK, long press again.

WATER TAP CLOSED - Alarm
Flashes when there is no inlet water or water tap is closed.

DRAIN OUT
To stop and cancel the active cycle, the Drain Out function can be used.
A long press of START/PAUSE button, will activate the DRAIN OUT function. The active program will be stopped and the water in the dishwasher will be drained out.

POWER CLEAN
Thanks to the additional power jets this option provides a more intensive and powerful wash in the lower rack, in the specific area. This option is recommended for washing pots and casseroles. Press this button to activate Power Clean (the indicator lights up).
DAILY USE
1. CHECK WATER CONNECTION
Check that the dishwasher is connected to the water supply and that the top is open.
2. SWITCH ON THE DISHWASHER
Press the ON/OFF button.
3. LOAD THE RACKS
(see LOADING THE RACKS)
4. FILLING THE DETERGENT DISPENSER
(see PROGRAMS TABLE).
5. CHOOSE THE PROGRAM AND CUSTOMISE THE CYCLE
Select the most appropriate program in accordance with the type of crockery and its soiling level (see PROGRAMS DESCRIPTION) by pressing the P button.
Select the desired options (see OPTIONS AND FUNCTIONS).
6. START
Start the wash cycle by pressing the START/PAUSE button. When the program starts you hear a beep.
7. END OF WASH CYCLE
The end of the wash cycle is indicated by beeps and the display shows END. Open the door and switch off the appliance by pressing the ON/OFF button.
Wait for a few minutes before removing the crockery - to avoid burns. Unload the racks, beginning with the lower one.
After the program completion the additional drying phase can be occurs for further 30 min. You can unload the dishwasher in any time after the program is completed. To ensure better drying effect we recommend to let it run for 30 min.
The machine will switch off automatically during certain extended periods of inactivity, in order to minimise electricity consumption. If the crockery is only lightly soiled or if it has been rinsed with water before being placed in the dishwasher, reduce the amount of detergent used accordingly.
ADVICE AND TIPS
TIPS
Before loading the baskets, remove all food residues from the crockery and empty the glasses. You do not need to rinse beforehand under running water.
Arrange the crockery so that it is held in place firmly and does not tip over; and arrange the containers with the openings facing downwards and the concave/convex parts placed obliquely, thus allowing the water to reach every surface and flow freely.
Warning: lids, handles, trays and frying pans do not prevent the sprayer arms from rotating.
Place any small items in the cutlery basket.
Very soiled dishes and pans should be placed in the lower basket because in this sector the water sprays are stronger and allow a higher washing performance.
After loading the appliance, make sure that the sprayer arms can rotate freely.
HYGIENE
To avoid odour and sediment which can be accumulated in the dishwasher please run a high temperature program at least one a month. Use a tea spoon of detergent and run it without the loading to clean your appliance.
MODIFYING A RUNNING PROGRAM
If a wrong program was selected, you can stop within 2 minutes from start: press and hold the ON/OFF button, the machine with get switched off.
Switch the machine back on using the ON/OFF button and select the new wash cycle and any desired options; start the cycle by pressing the START/PAUSE button.
ADDING EXTRA CROCKERY
Without switching off the machine, open the door (be ware of HOT steam!) and place the crockery inside the dishwasher. Close the door and press the START/PAUSE button the cycle will begin from the point at which it was interrupted.
ACCIDENTAL INTERRUPTIONS
If the door is opened during the wash cycle, or if there is a power cut, the cycle stops. Once the door has been closed or the electricity supply is restored, to start again the cycle from where it was interrupted, press the START/PAUSE button.
UNSUITABLE CROCKERY
- Wooden crockery and cutlery.
- Delicate decorated glasses, artistic handicraft and antique crockery. Their decorations are not resistant.
- Parts in synthetic material which do not withstand high temperatures.
• Copper and tin crockery.
- Crockery soiled with ash, wax, lubricating grease or ink.
The colours of glass decorations and aluminium/silver pieces can change and fade during the washing process. Some types of glass (e.g. crystal objects) can become opaque after a number of wash cycles too.
DAMAGE TO GLASS AND CROCKERY
- Only use glasses and porcelain guaranteed by the manufacturer as dishwasher safe.
- Use a delicate detergent suitable for crockery
- Collect glasses and cutlery from the dishwasher as soon as the wash cycle is over.
LOADING THE RACKS
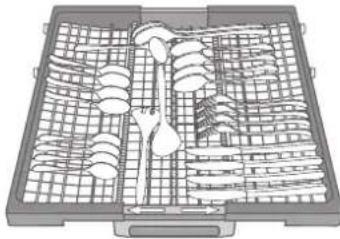
CUTLERY RACK
natural_image
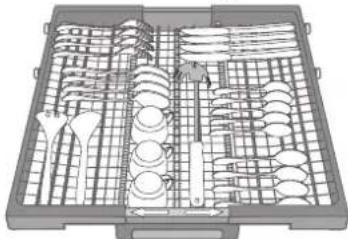
Illustration of a toolbox containing various mechanical components (no text or symbols visible)The third rack was designed to house the cutlery. Arrange the cutlery as shown in the figure.
A separate arrangement of the cutlery makes collection easier after washing and improves washing and drying performance.
Knives and other utensils with sharp edges must be positioned with the blades facing downwards.
natural_image
Illustration of a toolbox containing various kitchen utensils and kitchenware (no text or labels visible)The geometry of the rack makes it possible to place such small items as coffee cups in the area in the middle.
natural_image
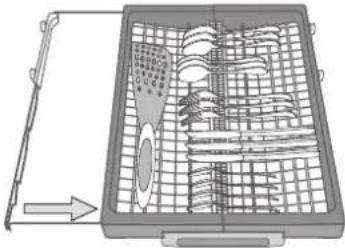
Diagram of a grating tray with cutouts and a tool, showing internal components (no text or symbols)The cutlery basket is equipped with two sliding side trays to make the most of the height of the space below and enable the loading of high items into upper rack.
UPPER RACK
natural_image
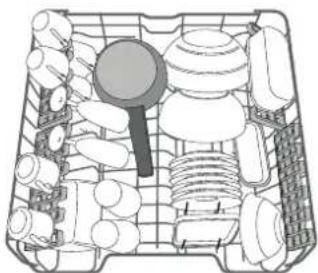
Top-down schematic of a multi-compartment storage unit with cylindrical and cylindrical components (no text or labels)Load delicate and light dishes: glasses, cups, saucers, low salad bowls.
(loading example for the upper rack)
ADJUSTING THE HEIGHT OF THE UPPER RACK
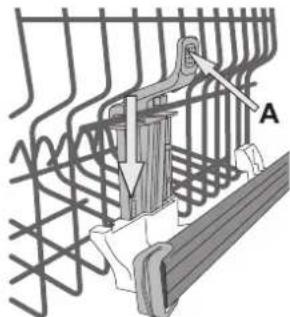
The height of the upper rack can be adjusted: high position to place bulky crockery in the lower basket and low position to make the most of the tip-up supports by creating more space upwards and avoid collision with the items loaded into lower rack.
The upper rack is equipped with a
Upper Rack height adjuster
(see figure), without pressing the levers, lift it up by simply holding the rack sides, as soon as the rack is stable in its upper position.
To restore to the lower position, press the levers A at the sides of the rack and move the basket downwards.
We strongly recommend that you do not adjust the height of the rack when it is loaded.
NEVER raise or lower the basket on one side only.
natural_image
Technical line drawing of a mechanical assembly with spring-loaded components and a labeled section A (no text or symbols beyond label)FOLDABLE FLAPS WITH ADJUSTABLE POSITION
The side foldable flaps can be positioned at three different heights to optimize the arrangement of crockery inside the rack. Wine glasses can be placed safely in the foldable flaps by inserting the stem of each glass into the corresponding slots.
For optimum drying results incline the foldable flaps more. To change the inclination, pull up the foldable flap, slide it slightly and position it as you wish.
LOWER RACK
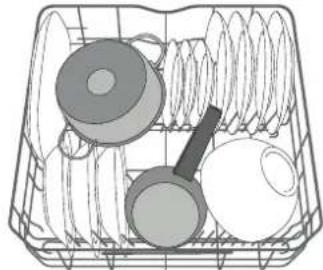
For pots, lids, plates, salad bowls, cutlery etc. Large plates and lids should ideally be placed at the sides to avoid interferences with the spray arm.
natural_image
Line drawing of a basket containing three circular objects, possibly kitchen utensils or containers (no text or symbols)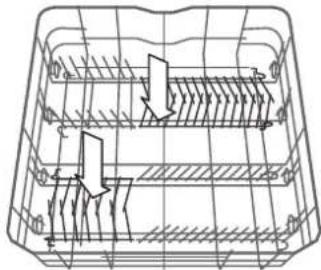
natural_image
Technical line drawing of a mechanical component with internal channels and arrows indicating flow or movement (no text or symbols)(loading example for the lower rack)
The lower rack has tip-up supports which can be used in a vertical position when arranging plates or in a horizontal position (lower) to load pans and salad bowls easily.
POWER CLEAN IN LOWER RACK
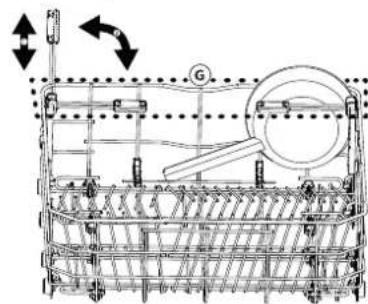
Power Clean uses the special water jets in the rear of cavity to wash more intensively the high dirty items. The lower rack has a Space
Zone, a special pull-out support in the rear of the rack that can be used to support frying pans or baking pans in upright position, thus taking up less space. Placing the pots/casseroles faced to the Power Clean component please activate the POWER CLEAN on the panel.
How to use Power Clean:
-
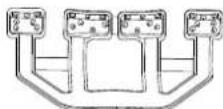
Adjust the Power Clean area (G) folding down the rear plate holders to load pots.
-
Load pots and casseroles inclined vertically in Power Clean area. Pots have to be inclined towards the power water jets.
natural_image
Technical line drawing of a mechanical device with gears and shafts, no visible text or symbolsCARE AND MAINTENANCE
CLEANING THE FILTER ASSEMBLY
Regularly clean the filter assembly so that the filters do not clog and that the waste water flows away correctly.
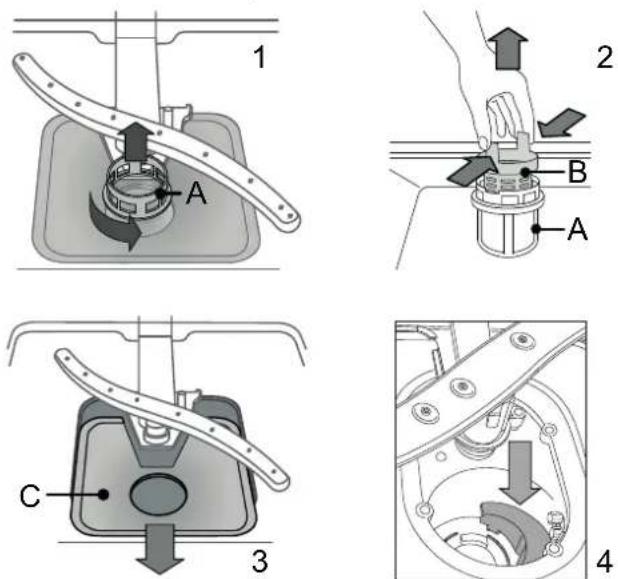
The filter assembly consists of three filters which remove food residues from the washing water and then recirculate the water: to obtain the best washing results, you need to keep them clean.
The dishwasher must not be used without filters or if the filter is loose.
After several washes, check the filter assembly and if necessary clean it thoroughly under running water, using a non-metallic brush and following the instructions below:
- Turn the cylindrical filter A in an anti-clockwise direction and pull it out (Fig 1).
- Remove the cup filter B by exerting a slight pressure on the side flaps (Fig 2).
- Slide out the stainless-steel plate filter C (Fig 3).
- Inspect the trap and remove any food residues.
NEVER REMOVE the wash-cycle pump protection (black detail) (Fig 4).
After cleaning the filters, re-place the filter assembly and fix it in position correctly; this is essential for maintaining the efficient operation of the dishwasher.
CLEANING THE SPRAY ARMS
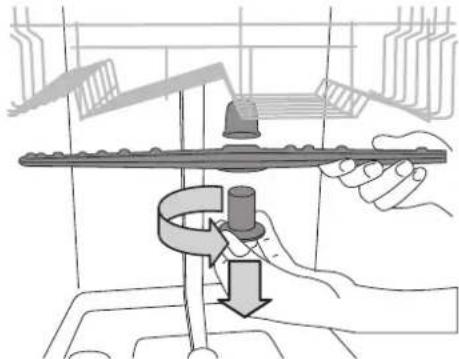
On occasions, food residue may become encrusted onto the spray arms and block the holes used to spray the water. It is therefore recommended that you check the arms from time to time and clean them with a small non-metallic brush.
natural_image
Illustration of a hand using a mechanical tool to lift a cylindrical component, with no visible text or symbols.To remove the upper spray arm, turn the plastic locking ring in an anticlockwise direction. The upper spray arm should be replaced so that the side with the greater number of holes is facing upwards.
natural_image
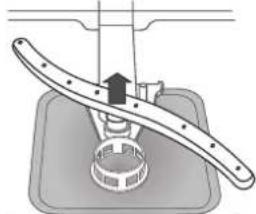
Mechanical assembly diagram showing a lever mechanism with a central rotating component (no text or symbols)The lower spray arm may be removed by pulling it upwards.
CLEANING THE WATER INLET HOSE
If the water hoses are new or have not been used for an extended period of time, let the water run to make sure it is clear and free of impurities before performing the necessary connections. If this precaution is not taken, the water inlet could become blocked and damage the dishwasher.
TROUBLESHOOTING
In case your Dish Washer does not work properly, please verify below mentioned check points before contacting Whirlpool Service Centre.
| PROBLEMS POSSIBLE CAUSES SOLUTIONS | ||
| The dishwasher won't start or does not respond to commands. | The appliance has not been plugged in properly. | Insert the plug into the socket. |
| Power outage. The dishwasher starts automatically when the power returns. | ||
| The dishwasher door is not closed. | Gently push the door until you hear the "click" sound. | |
| It does not respond to commands. | Switch off the appliance by pressing the ON/OFF button, switch it back on after approximately one minute and reset the program. | |
| The dishwasher won't drain. | The wash cycle has not finished yet. Wait until the wash cycle finishes. | |
| The drain hose is bent. | Check that the drain hose is not bent (see INSTALLATION INSTRUCTION). | |
| The sink drain pipe is blocked. Clean the sink drain pipe. | ||
| The filter is clogged up with food residues | Clean the filter (see CLEANING THE FILTER ASSEMBLY). | |
| The dishwasher makes excessive noise. | The dishes are rattling against each. | Arrange the crockery correctly (see LOADING THE RACKS). |
| An excessive amount of foam has been produced. | The detergent has not been measured out correctly or it is not suitable for use in dishwashers (see FILLING THE DETERGENT DISPENSER). Reset dish-washer by pressing the DRAIN button (see OPTIONS AND FUNCTIONS) and run new program without detergent. | |
| The dishes are not clean. | The crockery has not been arranged properly. | Arrange the crockery correctly (see LOADING THE RACKS). |
| The spray arms cannot rotate freely, being hindered by the dishes. | Arrange the crockery correctly (see LOADING THE RACKS). | |
| The wash cycle is too gentle. | Select an appropriate wash cycle (see PROGRAMS TABLE). | |
| An excessive amount of foam has been produced. | The detergent has not been measured out correctly or it is not suitable for use in dishwashers (see FILLING THE DETERGENT DISPENSER). | |
| The cap on the rinse aid compartment has not been shut correctly. | Make sure the cap of the rinse aid dispenser is closed. | |
| The filter is soiled or clogged. | Clean the filter assembly (see CARE AND MAINTENANCE). | |
| There is no salt. | Fill the salt reservoir (see FILLING THE SALT RESERVOIR). | |
TECHNICAL DATASHEET
The technical data containing the energy consumption data can be downloaded from the website: www.whirlpoolindia.com
CONTACTING AFTER-SALES SERVICE
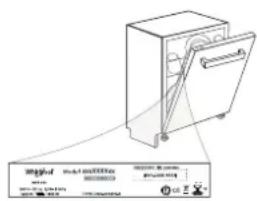
You can find our contact details in the warranty manual. When contacting our Client After-sales Service, please state the codes provided on your product's rating plate.
text_image
Model 1000000 Status Control Panel Status Control Panel Status Control Panel Status Control Panel Status Control Panel Status Control Panel Status Control Panel Status Control Panel Status Control Panel Status Control Panel Status Control Panel Status Control Panel Status Control Panel Status Control Panel Status Control Panel Status Control Panel Status Control Panel Status Control Panel Status Control Panel Status Control Panel Status Control Label Control Label Control Label Control Label Control Label Control Label Control Label Control Label Control Label Control Label Control Label Control Label Control Label Control Label Control Label Control Label Control Label Control Label Control Label Control Label Control Label Control Label Control Label Control Label Control Label Control Label Control Label Control Label Control Label Control Label Control Label Control Label Control Label Control LabelWARRANTY CARD
Whirlpool Dish Washer Warranty Registration Card
2 Years Warranty\*
Serial Number:
Model:
Date of Purchase:
Original Purchaser:
Address:
Contact number:
Dealer's name:
Address:
Dealer's Signature With Rubber Stamp
Purchaser's Signature
Note: 1. Please retain the bill of purchase
2. Please quote Serial Number, model and date of purchase in all your correspondence.
WHIRLPOOL OF INDIA LIMITED (WOIL) warrants to the original purchaser of the Whirlpool Dish Washer the benefit of 2 years warranty as detailed below provided the Dish Washer is still in the possession of and used by the purchaser during these 2 year term of warranty from the date of purchase mentioned in the original Invoice.
\*2 YEARS COMPREHENSIVE WARRANTY
The Dish Washer and all parts hereof to be free from defects in material and workmanship under normal use and service. WOIL's obligation under this warranty shall be limited to repairing or providing replacement of any part / spare of the said Dish Washer which proves defective within two years from the date of original purchase mentioned in the original Invoice and which on WOIL's examination discloses to its satisfaction to be defective.
Service on Sundays
In some of the cities where WOIL is providing service and Sunday Service is available, purchasers can avail Sunday Service on specific requests. For details, please contact branch office. If you have any query about the products, please write to: Head – Consumer Care Cell, Whirlpool of India Limited, 28, N.I.T., Faridabad–121001, Haryana
text_image
Whirlpool magicare SERVICE SMS WPL TO 58558 CALL 1800 208 1800 (TOLL FREE) 1860 180 4558 (BSNL & MTNL SUBSCRIBERS)2 YEARS\* WARRANTY
-
This warranty does not apply if in WOIL's opinion:
-
Damage is caused by accident, alteration, abuse, misuse, improper installation by unauthorized person (not authorized by WOIL), and neglect in following instructions of the user manual issued by WOIL.
- Damage is caused due to defects in electrical installations of fittings outside the Dish Washer or by any defective electrical supply, voltage fluctuations, pulled out power cord, blown fuse or improper electrical circuit which results in non-operation of the Dish Washer.
- Damage is caused by rodents/insects, fire, flood or other acts of God.
- Any part of the Dish Washer has been tampered with, altered, opened, repaired or serviced or attempted to be repaired or serviced, replaced by any person not authorized by WOIL.
- The serial number on the Dish Washer is tarnished, defected, missing or altered
- Sea water or any substandard detergent has been used in the Dish Washer
– Leakage is caused due to foreign particle entry - The product is not used and maintained as per the guidelines and instructions given in the use and care guide.
Charges for repair of this nature, if carried out by WOIL's authorized service franchise, will have to be borne by the customer.
-
The warranty shall cease to apply if the Dish Washer is taken out of India.
-
While WOIL will make every effort to carry out repairs/replacement of parts under this warranty as soon as possible, it is expressly made clear that WOIL shall not be liable to do so within any specified period of time.
-
In the event of repairs/replacement of any parts, this warranty will thereafter continue to remain in force only for the remaining unexpired period of warranty.
-
This warranty is not applicable if the Dish Washer is used for commercial purposes or at places like institutions, hospitals, community halls, hostels and other similar applications.
-
This warranty will continue to be in force for the term herein specified irrespective of what repairs/replacements may be provided under it and such repairs/replacements shall not attract any fresh warranty.
-
In case of any replacement of any part or entire product, the defective part or entire product should be returned to WOIL.
-
WOIL's employees and/or dealer and / or Authorized Service Franchisee have no authority to vary the terms of this warranty.
-
The 2 year warranty will automatically terminate on the expiry of the warranty period of two years from date of purchase as provided in the original invoice, even if the Dish Washer may not be in use for any time during the warranty period for any reason whatsoever including any technical breakdowns and the time taken for such repairs / replacements of parts and transit, whether under this warranty or otherwise shall not be excluded from the warranty period.
-
It is entirely left to WOIL's discretion to effect, repair/replacements of parts at the site of installation or at any service station of its branches or of its authorized Service Franchisee.
-
WOIL shall be absolved from all liability in case where the following situations are found by the service engineer during their visits to customer premises on service call :
-
House wiring issues
- Rat bite issues on wiring harness
- Foreign particles entry
- Choke due to filer/muck accumulation
- Inlet/outlet water pipe re-fixing
In cases the above conditions are observed at the time of visit by the WOIL Service Engineer then the customer shall be liable to bear the charges of Rs. 200/-* over and above the other repair charges incurred during the process and price of other consumables/spares not covered in warranty incurred during the process.
* The Company reserves the right to revise the visit charges at its own discretion and the customer will be liable to pay the revised visit charges as may be applicable on the date of visit. The customer at all times shall preserve the original invoice for necessary verification and produce, as and when required by WOIL.
-
The warranty does not cover any accessories external to the product, like trolleys, covers etc. even those marketed by Whirlpool.
-
Only courts at National Capital Region of Delhi or the District within the Municipal limits shall have jurisdiction for settling claims or disputes arising out of present warranty.
-
WOIL reserves the right to alter the terms and conditions of the present warranty at any time in its sole discretion without any prior notice.
-
Whirlpool products without barcode label affixed on the product will not be covered under warranty.
-
This warranty shall be restricted to and valid in India.
* Two years comprehensive warranty to original purchaser of the Dish Washer as mentioned on the warranty card.
For FREE INSTALLATION and DEMONSTRATION\*
Call Whirlpool service @
1800 208 1800 (Toll Free)
Your Dish Washer Package Contains
The following items are included in the package. If something is missing, please contact the retail outlet / Whirlpool customer care number.
Water inlet pipe
Water outlet pipe
Daily Reference Guide
Health & Safety and Installation Guide
*Terms & Conditions apply
text_image
Whirlpool magicare SERVICE SMS WPL TO 58558 CALL 1800 208 1800 (TOLL FREE) 1860 180 4558 (BSNL & MTNL SUBSCRIBERS)In case you find any transit damage to your product if delivered by dealer, contact the dealer within 24 hours of delivery.
WHIRLPOOL OF INDIA LIMITED
CIN NO. L29191PN1960PLC020063
"WHIRLPOOL HOUSE", PLOT NO. 40, SECTOR 44, GURGAON - 122 022 (HARYANA), INDIA, TEL: (+91) 124 - 4591300, FAX: (+91) 124 - 4592309
http://www.whirlpoolindia.com