
Acendo Core ACR-5100 - Video Conferencing System AMX - Free user manual and instructions
Find the device manual for free Acendo Core ACR-5100 AMX in PDF.


| Product Type | Video Conferencing System |
| Brand | AMX |
| Model | Acendo Core ACR-5100 |
| Main Functions | One-click Skype for Business meeting launch, document sharing, web browsing, room scheduling, screen sharing (AirPlay, Google Cast, Miracast), remote desktop, calculator, media player |
| Screen Sharing Support | AirPlay, Google Cast, Miracast |
| Video Playback | .mp4 with H.264 video and AAC audio; max resolution 1080p (no 4K) |
| Connectivity | USB (Mass Storage Device), Wired Ethernet, Wi-Fi |
| Integrated Applications | Calculator, Media Player (VLC), Remote Desktop, Skype for Business, Web Browser (Microsoft Edge) |
| Room Scheduling | Integrated with Microsoft Exchange/Office 365; supports booking from panel or desktop |
| Document Sources | Local Downloads, Remote Shared Drives, USB Drives |
| Security | Guest session data purged on logout; no user-serviceable parts; ESD warnings; safety disconnect via power cord |
| Warranty | 3 years limited warranty (defects in material and workmanship) |
| Compliance | FCC Part 15 Class B, CAN ICES-3 (B)/NMB-3(B), CE, WEEE, RoHS2 |
| Power Supply | Use only provided power supply; operates on listed voltages (typical 100-240V AC) |
| Cleaning Instructions | Clean only with dry cloth |
| User Interface | Touch display or keyboard/mouse; Application Toolbar and System Toolbar |
| Operating System | Windows-based (embedded) |
| Spare Parts / Repairability | No user-serviceable parts; refer all servicing to qualified personnel |
Frequently Asked Questions - Acendo Core ACR-5100 AMX
User questions about Acendo Core ACR-5100 AMX
0 question about this device. Answer the ones you know or ask your own.
Ask a new question about this device
Download the instructions for your Video Conferencing System in PDF format for free! Find your manual Acendo Core ACR-5100 - AMX and take your electronic device back in hand. On this page are published all the documents necessary for the use of your device. Acendo Core ACR-5100 by AMX.
USER MANUAL Acendo Core ACR-5100 AMX
MEETING COLLABORATION SYSTEM

natural_image
Front view of a gray server rack with two ports and a power button (no text or symbols visible)AMX Limited Warranty and Disclaimer
This Limited Warranty and Disclaimer extends only to products purchased directly from AMX or an AMX Authorized Partner which include AMX Dealers, Distributors, VIP's or other AMX authorized entity.
AMX warrants its products to be free of defects in material and workmanship under normal use for three (3) years from the date of purchase, with the following exceptions:
- Electroluminescent and LCD Control Panels are warranted for three (3) years, except for the display and touch overlay components are warranted for a period of one (1) year.
• Disk drive mechanisms, pan/tilt heads, power supplies, and MX Series products are warranted for a period of one (1) year. - AMX lighting products are guaranteed to switch on and off any load that is properly connected to our lighting products, as long as the AMX lighting products are under warranty. AMX also guarantees the control of dimmable loads that are properly connected to our lighting products. The dimming performance or quality there of is not guaranteed, impart due to the random combinations of dimmers, lamps and ballasts or transformers.
- AMX software is warranted for a period of ninety (90) days.
- Batteries and incandescent lamps are not covered under the warranty.
- AMX AutoPatch Epica, Modula, Modula Series4, Modula CatPro Series and 8Y-3000 product models will be free of defects in materials and manufacture at the time of sale and will remain in good working order for a period of three (3) years following the date of the original sales invoice from AMX. The three-year warranty period will be extended to the life of the product (Limited Lifetime Warranty) if the warranty card is filled out by the dealer and/or end user and returned to AMX so that AMX receives it within thirty (30) days of the installation of equipment but no later than six (6) months from original AMX sales invoice date. The life of the product extends until five (5) years after AMX ceases manufacturing the product model. The Limited Lifetime Warranty applies to products in their original installation only. If a product is moved to a different installation, the Limited Lifetime Warranty will no longer apply, and the product warranty will instead be the three (3) year Limited Warranty.
All products returned to AMX require a Return Material Authorization (RMA) number. The RMA number is obtained from the AMX RMA Department. The RMA number must be clearly marked on the outside of each box. The RMA is valid for a 30-day period. After the 30-day period the RMA will be canceled. Any shipments received not consistent with the RMA, or after the RMA is canceled, will be refused. AMX is not responsible for products returned without a valid RMA number.
AMX is not liable for any damages caused by its products or for the failure of its products to perform. This includes any lost profits, lost savings, incidental damages, or consequential damages. AMX is not liable for any claim made by a third party or by an AMX Authorized Partner for a third party.
This Limited Warranty does not apply to (a) any AMX product that has been modified, altered or repaired by an unauthorized agent or improperly transported, stored, installed, used, or maintained; (b) damage caused by acts of nature, including flood, erosion, or earthquake; (c) damage caused by a sustained low or high voltage situation or by a low or high voltage disturbance, including brownouts, sags, spikes, or power outages; or (d) damage caused by war, vandalism, theft, depletion, or obsolescence.
This limitation of liability applies whether damages are sought, or a claim is made, under this warranty or as a tort claim (including negligence and strict product liability), a contract claim, or any other claim. This limitation of liability cannot be waived or amended by any person. This limitation of liability will be effective even if AMX or an authorized representative of AMX has been advised of the possibility of any such damages. This limitation of liability, however, will not apply to claims for personal injury.
Some states do not allow a limitation of how long an implied warranty last. Some states do not allow the limitation or exclusion of incidental or consequential damages for consumer products. In such states, the limitation or exclusion of the Limited Warranty may not apply. This Limited Warranty gives the owner specific legal rights. The owner may also have other rights that vary from state to state. The owner is advised to consult applicable state laws for full determination of rights.
EXCEPT AS EXPRESSLY SET FORTH IN THIS WARRANTY, AMX MAKES NO OTHER WARRANTIES, EXPRESSED OR IMPLIED, INCLUDING ANY IMPLIED WARRANTIES OF MERCHANTABILITY OR FITNESS FOR A PARTICULAR PURPOSE. AMX EXPRESSLY DISCLAIMS ALL WARRANTIES NOT STATED IN THIS LIMITED WARRANTY. ANY IMPLIED WARRANTIES THAT MAY BE IMPOSED BY LAW ARE LIMITED TO THE TERMS OF THIS LIMITED WARRANTY. EXCEPT AS OTHERWISE LIMITED BY APPLICABLE LAW, AMX RESERVES THE RIGHT TO MODIFY OR DISCONTINUE DESIGNS, SPECIFICATIONS, WARRANTIES, PRICES, AND POLICIES WITHOUT NOTICE.
IMPORTANT SAFETY INSTRUCTIONS!
1) READ these instructions.
2) KEEP these instructions.
3) HEED all warnings.
4) FOLLOW all instructions.
5) DO NOT use this apparatus near water.
6) CLEAN ONLY with dry cloth.
7) DO NOT block any ventilation openings. Install in accordance with the manufacturer's instructions.
8) DO NOT install near any heat sources such as radiators, heat registers, stoves, or other apparatus (including amplifiers) that produce heat.
9) DO NOT defeat the safety purpose of the polarized or grounding type plug. A polarized plug has two blades with one wider than the other. A grounding type plug has two blades and a third grounding prong. The wider blade or the third prong are provided for your safety. If the provided plug does not fit into your outlet, consult an electrician for replacement of the obsolete outlet.
10) PROTECT the power cord from being walked on or pinched, particularly at plugs, convenience receptacles, and the point where they Escape from the apparatus.
11) ONLY USE attachments/accessories specified by the manufacturer.

12) USE ONLY with a cart, stand, tripod, bracket, or table specified by the manufacturer, or sold with the apparatus. When a cart is used, use caution when moving the cart/apparatus combination to avoid injury from tip-over.
13) UNPLUG this apparatus during lightning storms or when unused for long periods of time.
14) REFER all servicing to qualified service personnel. Servicing is required when the apparatus has been damaged in any way, such as power-supply cord or plug is damaged, liquid has been spilled or objects have fallen into the apparatus, the apparatus has been exposed to rain or moisture, does not operate normally, or has been dropped.
15) DO NOT expose this apparatus to dripping or splashing and ensure that no objects filled with liquids, such as vases, are placed on the apparatus.
16) To completely disconnect this apparatus from the AC Mains, disconnect the power supply cord plug from the AC receptacle.
17) Where the mains plug or an appliance coupler is used as the disconnect device, the disconnect device shall remain readily operable.
18) DO NOT overload wall outlets or extension cords beyond their rated capacity as this can cause electric shock or fire.

The exclamation point, within an equilateral triangle, is intended to alert the user to the presence of important operating and maintenance (servicing) instructions in the literature accompanying the product.
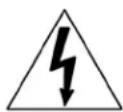
The lightning flash with arrowhead symbol within an equilateral triangle is intended to alert the user to the presence of uninsulated "dangerous voltage" within the product's enclosure that may be of sufficient magnitude to constitute a risk of electrical shock to persons.

ESD Warning: The icon to the left indicates text regarding potential danger associated with the discharge of static electricity from an outside source (such as human hands) into an integrated circuit, often resulting in damage to the circuit.
WARNING: To reduce the risk of fire or electrical shock, do not expose this apparatus to rain or moisture.
WARNING: No naked flame sources - such as candles - should be placed on the product.
WARNING: Equipment shall be connected to a MAINS socket outlet with a protective earthing connection.
This product is intended to be operated ONLY from the voltages listed on the back panel or the recommended, or included, power supply of the product. Operation from other voltages other than those indicated may cause irreversible damage to the product and void the products warranty. The use of AC Plug Adapters is cautioned because it can allow the product to be plugged into voltages in which the product was not designed to operate. If the product is equipped with a detachable power cord, use only the type provided with your product or by your local distributor and/or retailer. If you are unsure of the correct operational voltage, please contact your local distributor and/or retailer.
ESD WARNING
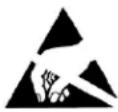
To avoid ESD (Electrostatic Discharge) damage to sensitive components, make sure you are properly grounded before touching any internal materials.
When working with any equipment manufactured with electronic devices, proper ESD grounding procedures must be followed to make sure people, products, and tools are as free of static charges as possible. Grounding straps, conductive smocks, and conductive work mats are specifically designed for this purpose.
Anyone performing field maintenance on AMX equipment should use an appropriate ESD field service kit complete with at least a dissipative
work mat with a ground cord and a UL listed adjustable wrist strap with another ground cord
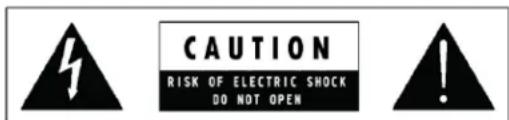
WARNING: Do Not Open! Risk of Electrical Shock. Voltages in this equipment are hazardous to life. No user-serviceable parts inside. Refer all servicing to qualified service personnel. Place the equipment near a main power supply outlet and make sure that you can easily access the power breaker switch.
FCC AND CANADA EMC COMPLIANCE INFORMATION:
This device complies with part 15 of the FCC Rules. Operation is subject to the following two conditions:
(1) This device may not cause harmful interference, and (2) this device must accept any interference received, including interference that may cause undesired operation. NOTE: This equipment has been tested and found to comply with the limits for a Class B digital device, pursuant to part 15 of the FCC Rules. These limits are designed to provide reasonable protection against harmful interference in a residential installation. This equipment generates, uses and can radiate radio frequency energy and, if not installed and used in accordance with the instructions, may cause harmful interference to radio communications. However, there is no guarantee that interference will not occur in a particular installation. If this equipment does cause harmful interference to radio or television reception, which can be determined by turning the equipment off and on, the user is encouraged to try to correct the interference by one or more of the following measures:
•Reorient or relocate the receiving antenna.
- Increase the separation between the equipment and receiver.
- Connect the equipment into an outlet on a circuit different from that to which the receiver is connected.
- Consult the dealer or an experienced radio/TV technician for help.
Approved under the verification provision of FCC Part 15 as a Class B Digital Device.
Caution: Changes or modifications not expressly approved by the manufacturer could void the user's authority to operate this device.
CAN ICES-3 (B)/NMB-3(B)
EU COMPLIANCE INFORMATION:
Eligible to bear the CE mark; Conforms to European Union Low Voltage Directive 2006/95/EC; European Union EMC Directive 2004/108/EC; European Union Restriction of Hazardous Substances Recast (RoHS2) Directive 2011/65/EU, European Union WEEE (recast) Directive 2012/19/EU; European Union Registration, Evaluation, Authorization and Restriction of Chemicals (REACH) Directive 2006/121/EC.
You may obtain a free copy of the Declaration of Conformity by visiting http://www.amx.com/techcenter/certifications.asp
WEEE NOTICE
natural_image
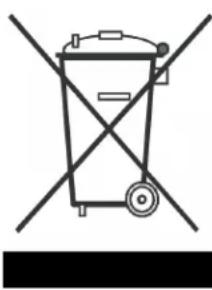
Simple line drawing of a trash bin with crossed lines indicating no waste or discharge (no text or symbols)This appliance is labeled in accordance with European Directive 2002/96/EC concerning waste of electrical and electronic equipment (WEEE). This label indicates that this product should not be disposed of with household waste. It should be deposited at an appropriate facility to enable recovery and recycling.
Table of Contents
User Interface ....1
Overview .... 1
Navigating an Acendo Core Session.... 1
Applications Tool bar.... 2
System Tool Bar 2
Room Scheduling 2
USB Memory Stick Mounted 2
Network Status 2
WiFi Status.... 3
Volume 3
System Clock.... 3
Screen Sharing Icon .... 3
Applications Manager 4
Finish 4
Room Booking/Scheduling 5
Using the Scheduling View.... 5
Book a Room 6
Browse Rooms (Room Grouping) 8
Extend/Book/Browse 9
Start a Meeting....9
Scheduled....9
Unreserved (Use Room Now) 10
Meeting Statuses.... 11
Extend A Meeting 12
Documents 13
Local Downloads 13
Remote Shared Drives 15
USB (Mass Storage Device) 16
Last Document Location 20
Recent Documents.... 20
Applications 21
Overview 21
Calculator.... 21
Media 22
Remote Desktop 24
Locating Computer Name (Locally) 24
Remote Connection.... 25
Remote Login 25
Remote Desktop Connection Task Bar 26
Closing Remote Connection 27
Helpful Shortcut Keys.... 27
Skype for Business 28
Scheduling a Skype for Business Meeting 28
Auto-Start a Skype for Business Meeting 29
User Initiated Skype for Business Meeting 30
Unreserved User Initiated Skype for Business Meeting 31
Room Booked without Web Conference Info in Invite 33
Web Browser 34
Launching the Browser 34
Launch Web Browser from Applications 35
Saving Files from the Web Browser 35
Screen Sharing (AirServer) 37
Start Session 37
AirPlay and Google Cast.... 37
Connect Device to Network 37
Android Devices.... 38
Stop Presenting.... 39
Apple iOS.... 39
Stop Presenting.... 40
Miracast Compatible Devices 40
Disconnect from Acendo Core using Miracast.... 42
Forget this Network 42
User Interface
Overview
This chapter provides details on how to navigate the Acendo Core interface to access documents, web pages, and presentation features. FIG. 1 displays a typical Acendo Core Welcome screen with scheduling and room booking enabled. This is the Acendo Core screen that appears when the user enters the room. Simply select Use Room Now to begin using Acendo Core.
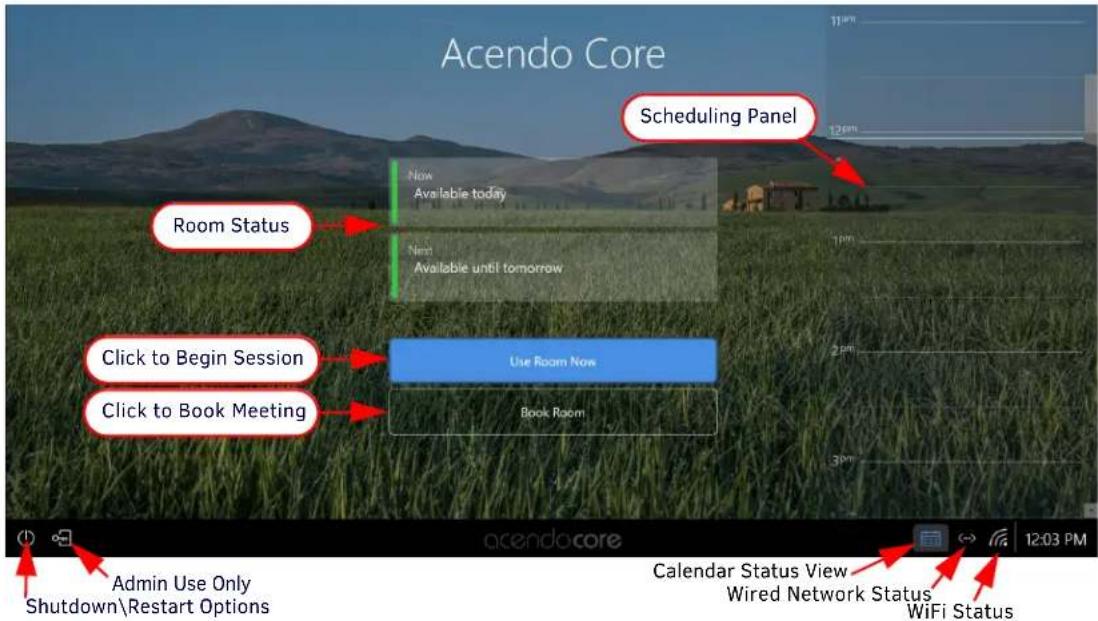
FIG. 1 Acendo Core Welcome Screen
Navigating an Acendo Core Session
On the left-side of the main screen is an Application Toolbar (FIG. 2) with Icons that can be selected to launch Applications, Documents, a Remote Connection screen or the Web Browser. Administrators may add up to four more applications that can appear below these system defaults.
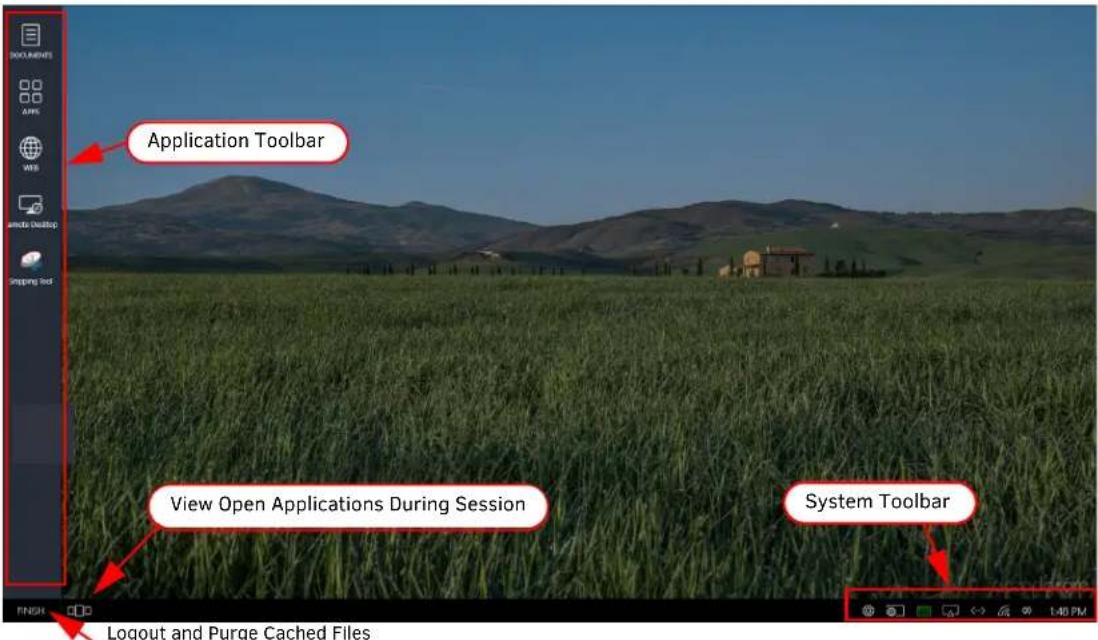
FIG. 2 Guest Users Screen
The larger desktop area of the screen displays any recently-used documents that have been opened in this session. (These documents are purged from memory when the session is closed.) The desktop area is blank when starting a new session as shown.
Applications Tool bar
The Applications tool bar displays a list of icons for quick access to the apps you need. Up to four additional "Favorites" applications may appear below the system defaults when programmed by your system administrator. Refer to Applications on page 21 for more details on these included Applications.
System Tool Bar
The System Tool Bar (FIG. 3) provides the Guest User with quick access to system status, screen sharing credentials, and room availability and other Icons that are further defined in the following sections.

FIG. 3 Room Schedule
Room Scheduling
If Room Booking/ Scheduling is enabled on your system, this calendar will be visible at the bottom right of the screen (FIG. 4). Click on the calendar to view the current reserved status of the room, the remaining availability before the next meeting, or to book this or another connected room. Refer to Room Booking/Scheduling on page 5.
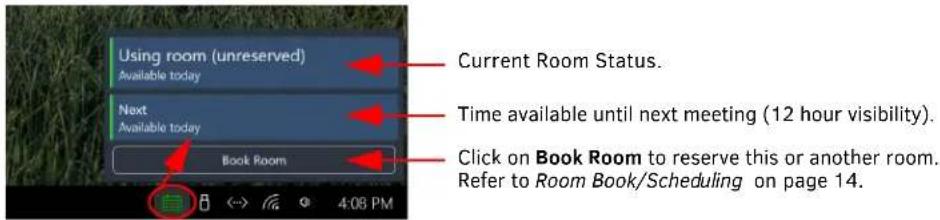
FIG. 4 Room Schedule
USB Memory Stick Mounted
If a USB Memory stick is mounted, you will see this USB stick icon on the System Toolbar (FIG. 5). Click on the Icon to bring up the Eject button and click again to safely eject the memory stick. For more details on the USB Memory stick, refer to USB (Mass Storage Device) section on pages 16.
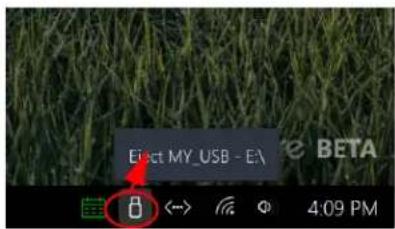
FIG. 5 Eject a USB Memory Stick
Network Status
If having difficulties with the browser or other connections (shared drives, etc.), click on the Wired Network Status icon (FIG. 6) to check on the condition of the wired Ethernet connection. Check your Ethernet cable connection or contact the Administrator if anything but Connected is shown.
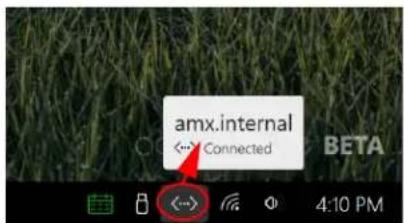
FIG. 6 Wired Network Status
WiFi Status
The WiFi Icon can be used to check on the WiFi status and SSID. Contact the Administrator if anything but Enabled with Internet Access is shown.
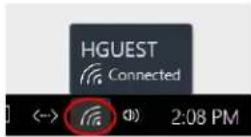
FIG. 7 WiFi Network Status
Volume
Use the Speaker Icon to adjust the volume or mute the Acendo Core audio output.
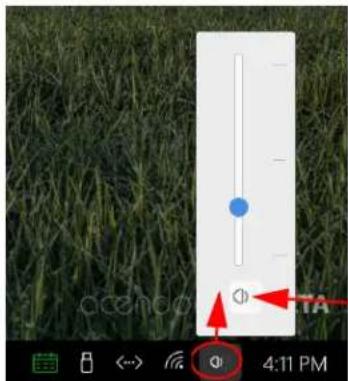
Click on this speaker to Mute the audio output.
FIG. 8 Wired Network Status
System Clock
Click on the system time to view the day of the week and date. Any time adjustment requires Administrator level access.
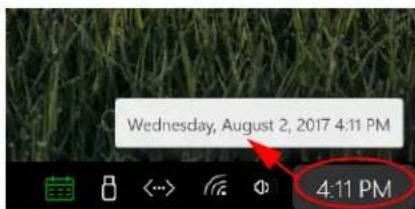
FIG. 9 Wired Network Status
Screen Sharing Icon
The screen sharing instructions can be displayed by clicking on the screen sharing icon in the lower right System Tool Bar (FIG. 10). These fields are used for wireless presenting from a Guest Users tablet or phone using these apps available for download from your device store:
- Miracast - if using Miracast, enter the device name listed in the displayed instructions.
- Airplay and Googlecast - if using Airplay or Googlecast, enter the device name and password listed in the displayed instructions.
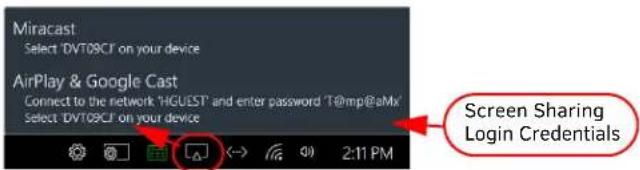
FIG. 10 Access Point Connection Information
Refer to Screen Sharing (AirServer) on page 37 for more details.
NOTE: If the Screen Sharing icon is not visible in the lower right corner of your screen, then the Administrator has not enabled Screen Sharing.
Applications Manager
The Applications Manager is used to view all of the applications and files open during the current session and provides a quick way to switch between them. When selected, any windows that are left unclosed by the user will appear in the workspace for selection or closing (FIG. 11). Have over the top right of each app to show the red X used to close the app.
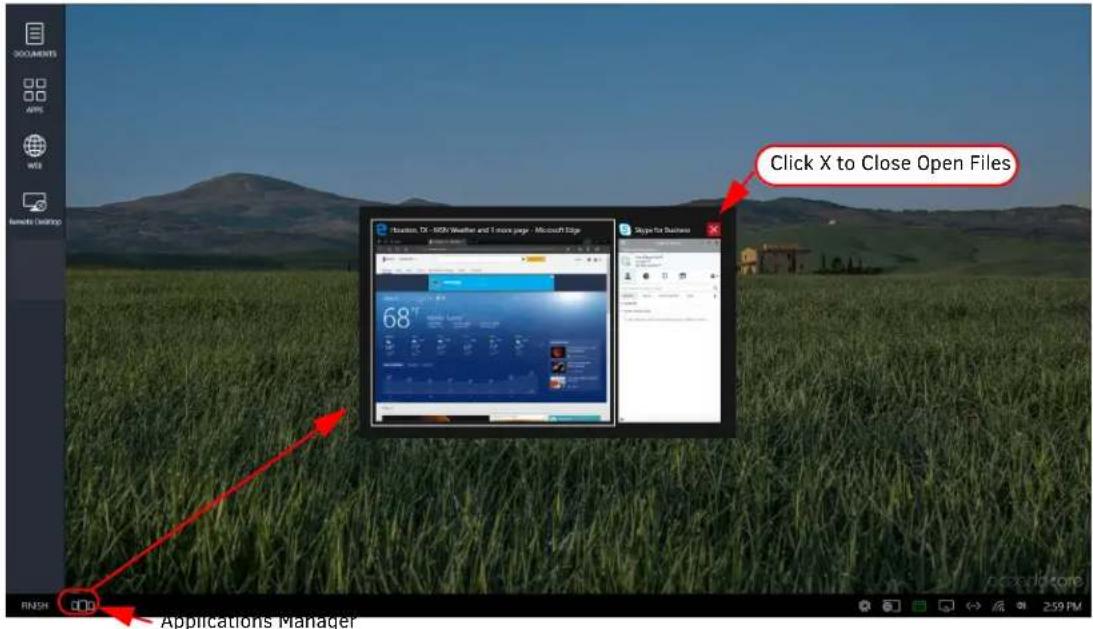
FIG. 11 Accessing Open Files Using the Applications Manager
Finish
At the end of your meeting, and once you have all of the documents you want to retain loaded onto a Remote Shared Drive (page 15) or USB Memory Stick (page 16), click on FINISH to exit out of your session. This will clear out all guest user history from this session including any downloaded documents, browser history, etc.
- Click on FINISH at the bottom left-hand corner of the Acendo Core Guest User screen to bring up the menu (FIG. 12).
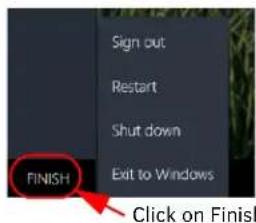
FIG. 12 Ending a Session - FINISH
- Select Sign out to exit the session.
- The system responds with the following message (FIG. 13).
? Exit Session
Are you sure you want to sign out and exit the current session? Exiting the session will purge all downloaded and cached files.

FIG. 13 Exit Session - Purge Warning
- Click Yes to continue and purge all data.
Room Booking/Scheduling
Room Booking is an option that can be turned on or off by the System Administrator. Core can be integrated into existing Exchange or Office installations on corporate servers enabling desktop calendar usage to reserve conference rooms from your work space. The following sections explain how to use the scheduling and booking features of Acendo Core.
• Using the Scheduling View on page 5
• Book a Room on page 6
• Start a Meeting on page 9
• Meeting Statuses on page 11
Using the Scheduling View
When entering the room, users may see the 24 hour schedule, when enabled by Administrators, on the right side of the screen (FIG. 14). Users may use the scroll bar to scroll up to 12 am of the current day or down to 12 am of the following day and book any period that is available below the light blue line across the scheduler which indicates the current time.
NOTE: Meetings may not be booked in periods that have passed.
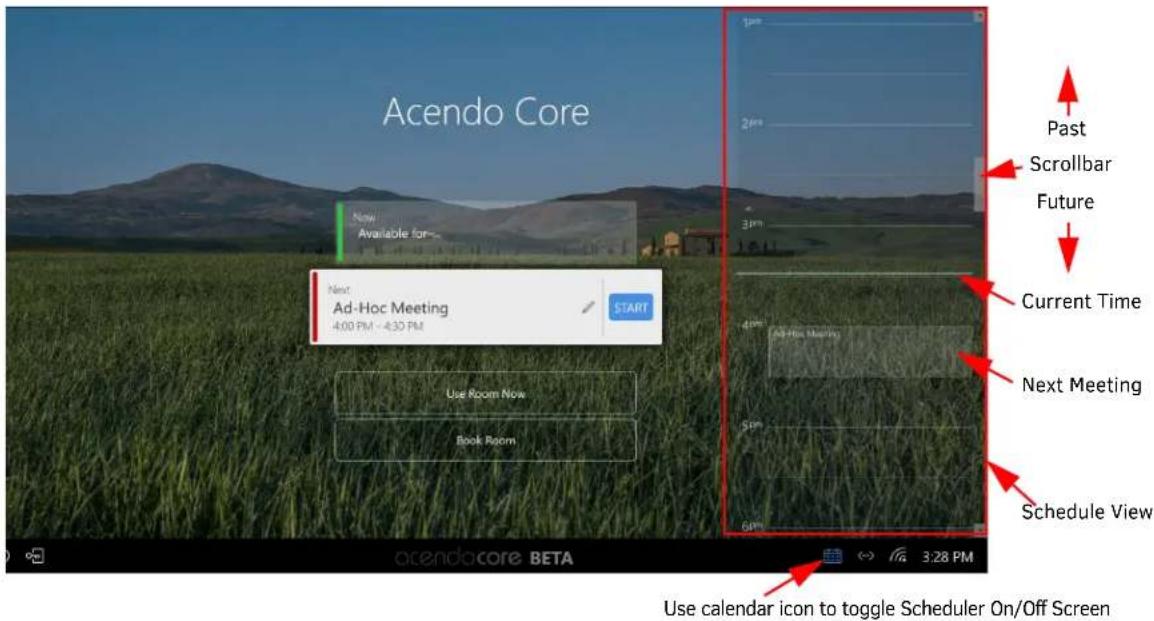
FIG. 14 Acendo Core Scheduler View Option
Use the Calendar Status icon at the bottom right of the screen prior to a user session, to toggle the screen scheduler on and off. With the scheduler displayed and no meetings scheduled, the icon appears Blue. With the scheduler off screen and no meetings scheduled, the icon appears white. For more details on meeting statuses and calendar icon colors, see Meeting Statuses on page 11.
Once in a user session (meeting), the calendar icon is used to:
• Book Room (see Book a Room on page 6)
- Browse Rooms (if enabled, see Browse Rooms (Room Grouping) on page 8)
- Status of the meeting (time remaining or availability, see Meeting Statuses on page 11)
- Extend a Meeting time (see Extend A Meeting on page 12)
Book a Room
- Using the Scheduler View (outlined in red in FIG. 15), users can scroll to the desired time slot and click on it, or click on the Book Room button to launch the Book Room dialog..
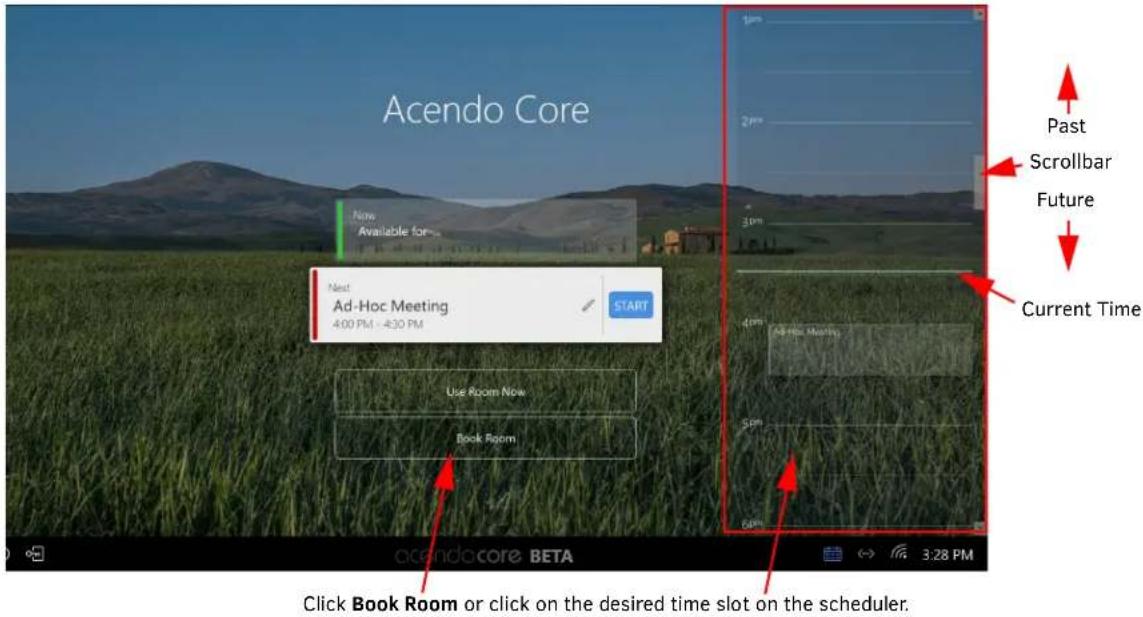
FIG. 15 Book Room Options
-
When the Book Room dialog appears (FIG. 16) enter the meeting details as needed:
-
Book for - Using the left and right arrows, increase or decrease the meeting length. The Administrator will set a default.
- Start-End - Using the left and right arrows, move to the desired start time. The End time will show according to the Book for field.
- Date - Date is a static field that shows the current day.
- Subject - Administrators may have a default static text defined here or may allow users to enter their own meeting subject.
- Comments - Enter and further details for your meeting that others will be able to view from the room panel or desktop view.
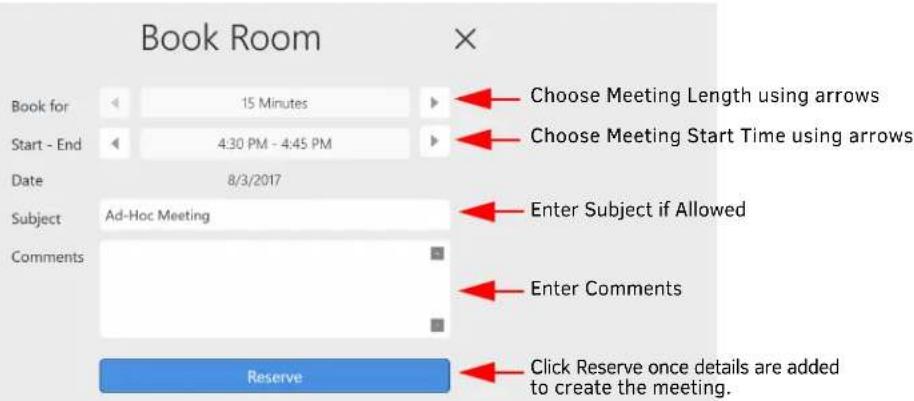
FIG. 16 Book Room Dialog
- The new meeting appears in the scheduler view (if enabled) (FIG. 17). Notice users may still have some time in the room before the next meeting starts.
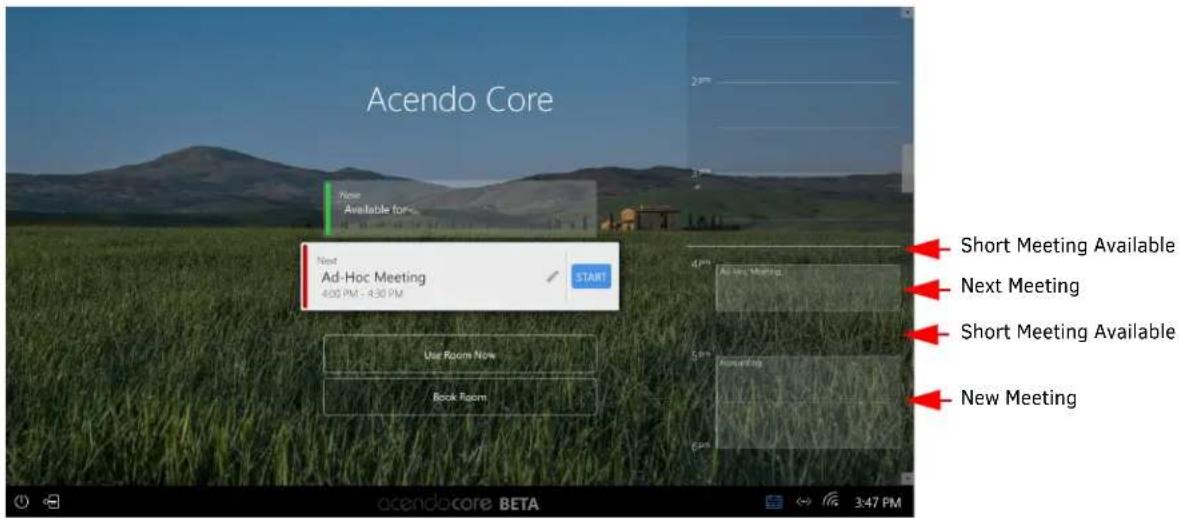
FIG. 17 Short Meeting Time Available Before Next Meeting
- Once the time encroaches on the next meeting, the Next available field drops below the current meeting start field (FIG. 18) and presents a 30 minute window available for an ad-hoc meeting after this meeting and before the next scheduled meeting time.
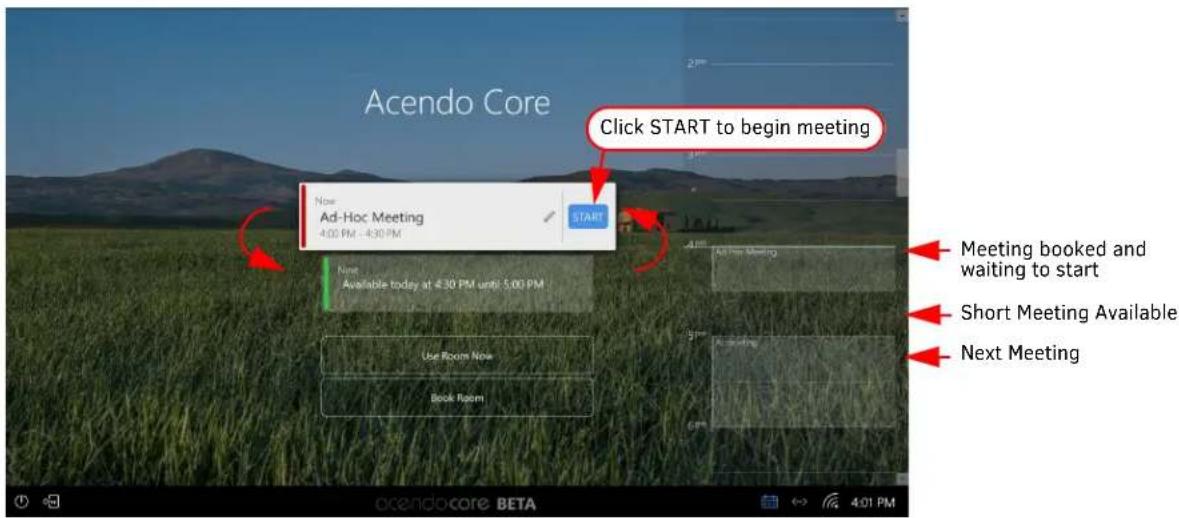
FIG. 18 Next Meeting Start Time
Browse Rooms (Room Grouping)
If the Administrator has equipped multiple meeting rooms in an organization with Acendo Core units or ModeroX G5 panels, they can be configured together in a Group. In a Group, one unit is set up as the Master with the remaining units being set up as Members. The Master disseminates the calendar information to Member units, acting as a Master scheduler, and updates the Exchange server with any and all Room Booking changes. This frees up the network by only having to deal with one Core unit polling the server.
With multiple Acendo Core units in a group, a Browse button appears on the Welcome screen (FIG. 19) that enables users to browse remote meeting rooms and find one available to book.
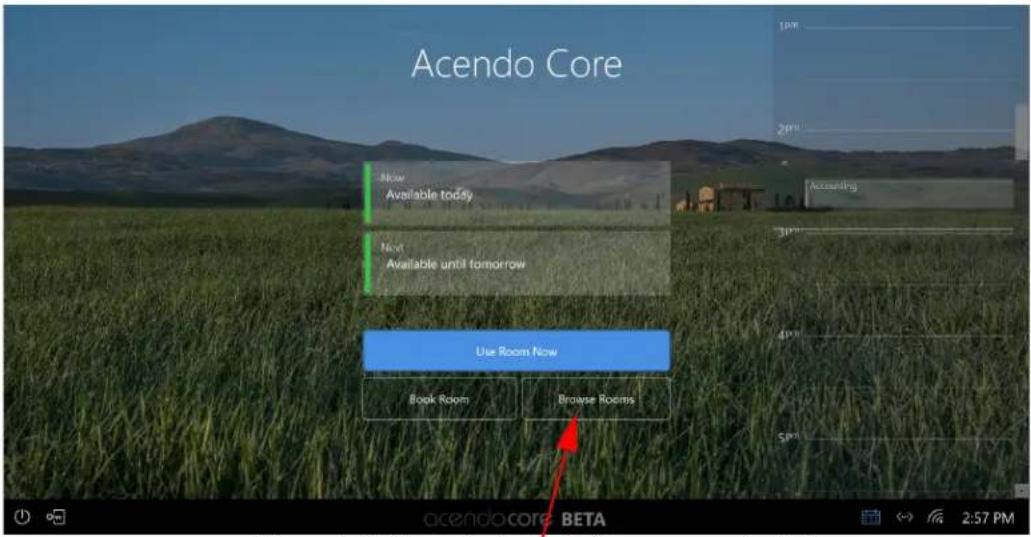
When part of a Group, the Browse button appears on the Welcome screen.
FIG. 19 Welcome Screen with Browse Button
Users can also access the Browse button by pressing the Calendar Status View button (FIG. 20).
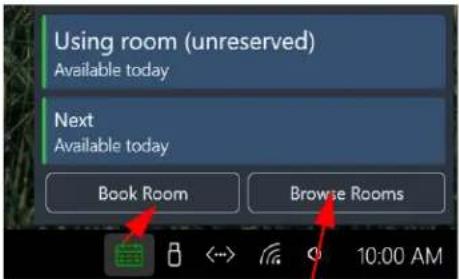
When part of a Group, the Browse button appears on the Calendar Status view.
FIG. 20 Calendar Status View with Browse Button
- Press the Calendar Status icon and select the Browse Rooms button to start the process of reserving a remote meeting room.
- When the Browse Rooms button is pressed, the Browse Rooms dialog (FIG. 21) displays any additional rooms that are part of this Group. Select a room from the list.
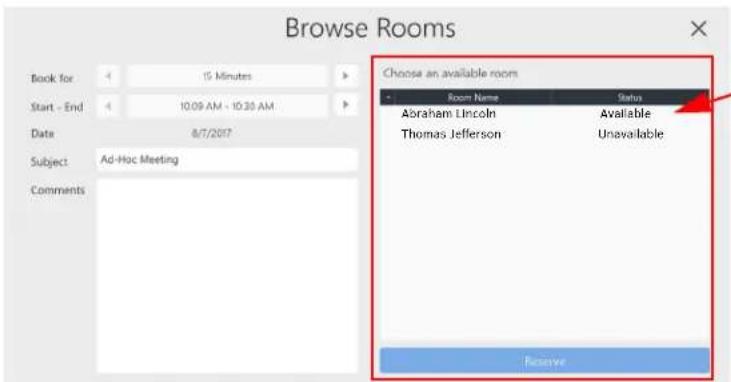
Additional rooms in this Group are displayed here. Click on a room, set the duration and Subject, then press the Reserve button below.
FIG. 21 Calendar Status View with Browse Button
- Set the Book for meeting period, and a Start - End time.
- If any comments are needed to inform meeting attendees, type them in the Comments field. These comments will note appear in the Scheduling view.
- Press the blue Reserve bar to reserve the remote room.
Extend/Book/Browse
- Sometimes three buttons are available in the Calendar Status view. This happens when a current meeting time is running out of time and an Extend Meeting button appears next to the Browse and Book buttons (FIG. 22). See Extend A Meeting on page 12 for more details.
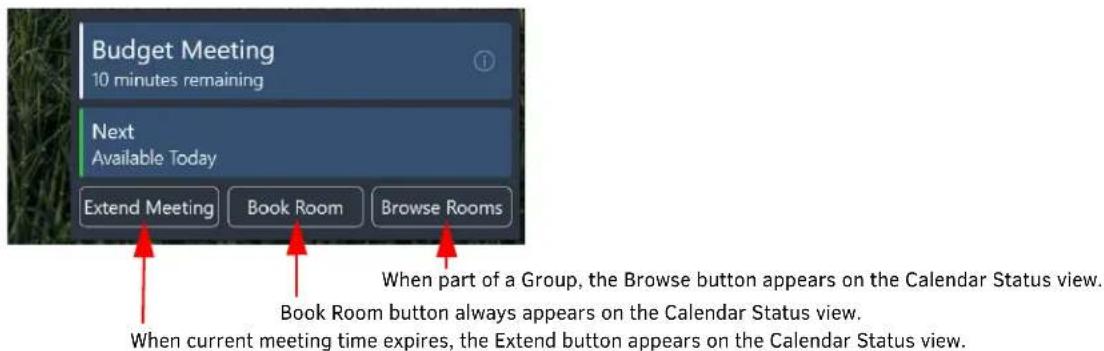
FIG. 22 Calendar Status View with Three Buttons
Start a Meeting
There are two philosophies for starting a meeting using Acendo Core; Scheduled and Unreserved.
Scheduled
A scheduled meeting is one that appears on the schedule that was booked ahead of time. This may have been scheduled from a local room panel, a remote room panel if part of a group (see Browse Rooms (Room Grouping) on page 8) or remotely from a desktop using Outlook on Exchange or Office 365.
- To start a scheduled meeting, press on the START button (FIG. 23).
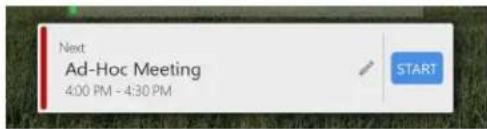
FIG. 23 Short Meeting Time Available Before Next Meeting
- The system will prepare the desktop and bring up the following user session screen (FIG. 24). Refer to the other chapters in this manual for system features.
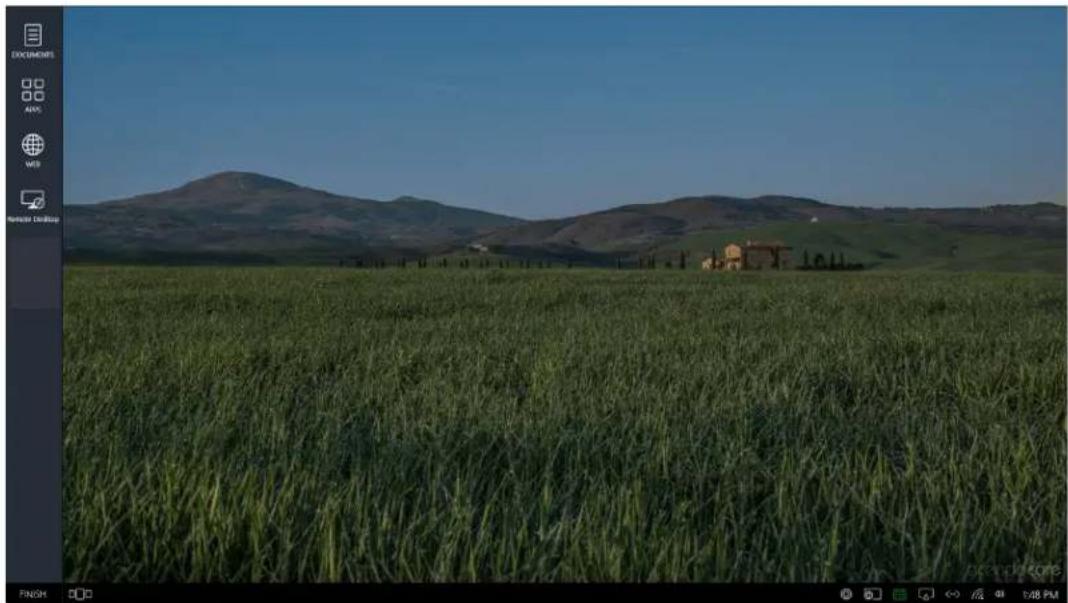
natural_image
Landscape photo of a green wheat field with rolling hills and distant buildings under a clear blue sky (no text or symbols visible)FIG. 24 User Session Screen
Unreserved (Use Room Now)
An unreserved meeting is when a user walks into the room and presses the Use Room Now button.
NOTE: The Use Room Now option may not appear if the System Administrator has enabled Force Booking. Force Booking requires all meeting room users to book the room before using it. No Unreserved meetings are permitted.
- From the Welcome screen, check the scheduling panel for room availability and then click on the Use Room Now button to start a user session (FIG. 25)..
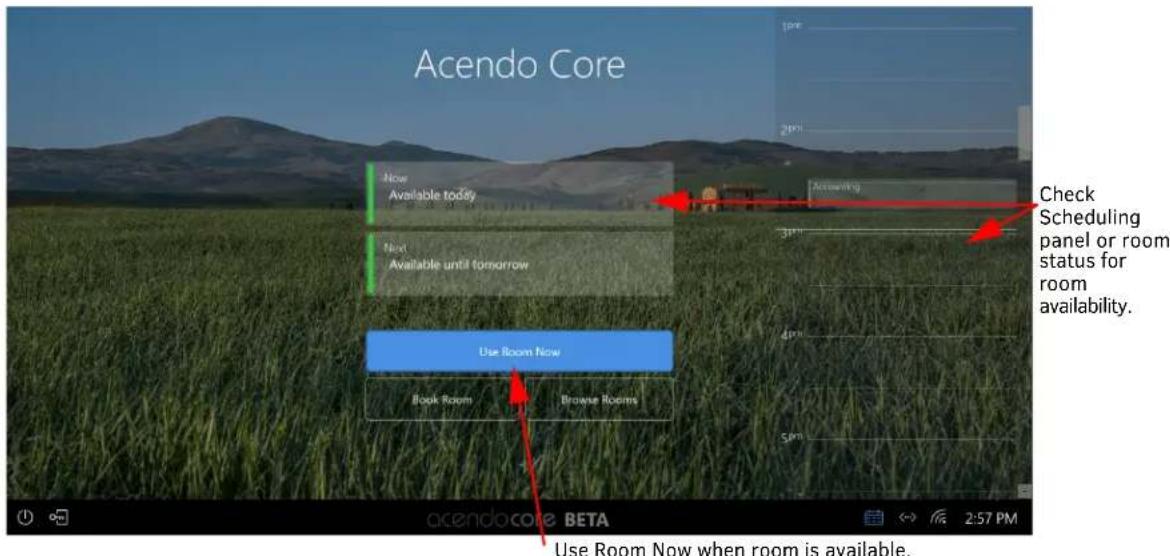
FIG. 25 Acendo Core Welcome Screen with Browse Button
- The system will prepare the desktop and bring up the following user session screen (FIG. 26). Refer to the other chapters in this manual for system features.
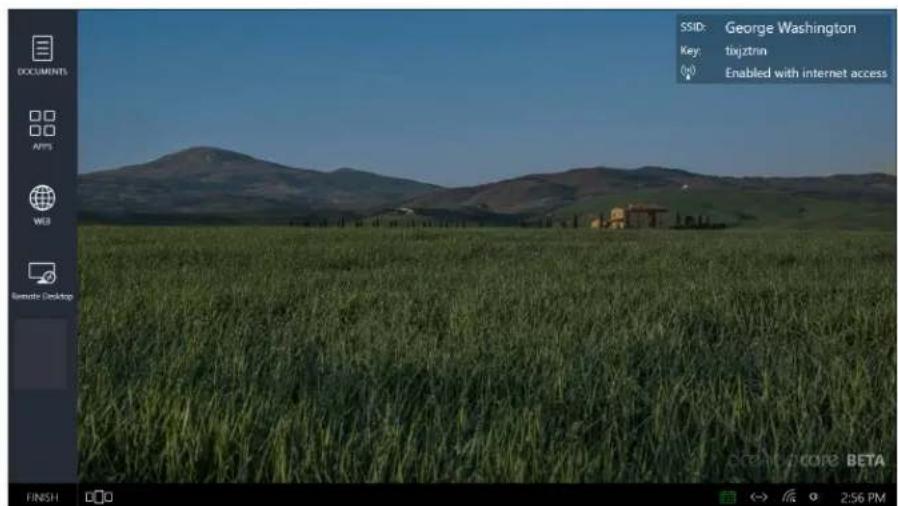
FIG. 26 User Session Screen
Meeting Statuses
The calendar in the lower right System Tool bar is used to check room availability, extending meeting time, and provides another way to access the Book Room button. Refer to the table below for calendar color changes and how it represents the meeting room status.
| Color Status Image | ||
| During Unreserved Meeting | ||
| RED Calendar | icon turns RED when a user presses Use Room Now and uses the room during a reserved session. Click on the calendar to display the status. Note the second field shows Now which indicates the occupants may need to vacate the room if the meeting scheduler shows up. | 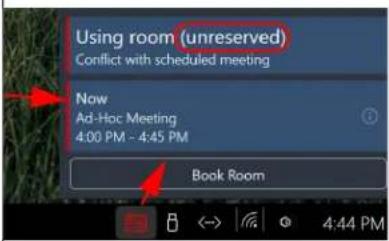 |
| GREEN Calendar | dar icon turns GREEN when using the room unreserved without conflicts. Click on the calendar to display the status. Note the green field shows 14 minutes remain available while the second field shows the Next scheduled meeting time starts at 5:00. | 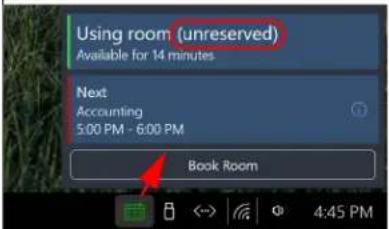 |
| During Reserved Meeting | ||
| WHITE Calendar | dar icon turns WHITE when a user presses "START" to begin a reserved meeting. Click on the calendar to display the status. Note the White field shows 14 minutes available while the green field shows the Next scheduled meeting time. | 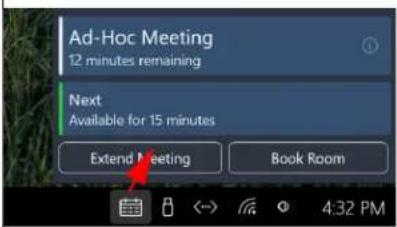 |
| YELLOW Calendar | dar icon turns YELLOW when 5 minutes or less are remaining in the current session. Click on the calendar to display the status. | 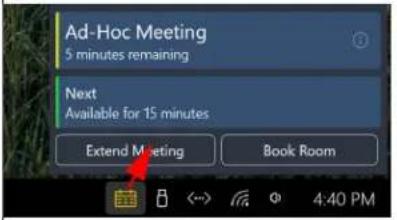 |
| RED Calendar | icon turns RED when a meeting goes over scheduled time. Click on the calendar to display the status. Note the red field indicates 1 minute over scheduled time. The green field indicates 28 minutes available following. Users may Extend their meeting if time is available. See Extend A Meeting on page 12. | 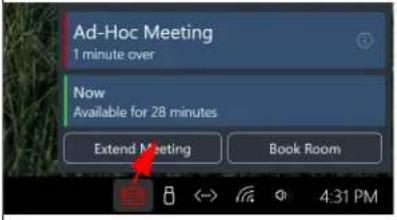 |
| During Out of Session Welcome Screen | ||
| BLUE The calendar | indar icon will appear BLUE if the scheduler is displayed on the right side of the screen. Use the calendar icon to toggle the scheduler on or off. With the scheduler off, and no meeting scheduled, it will appear white. | 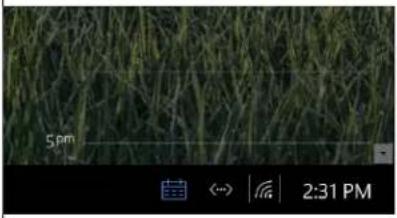 |
Extend A Meeting
If a meeting needs to run over as they tend to do, the calendar turns red indication a conflict.
- Click on the calendar icon to check the status and see how much time is available before the next meeting (FIG. 27).
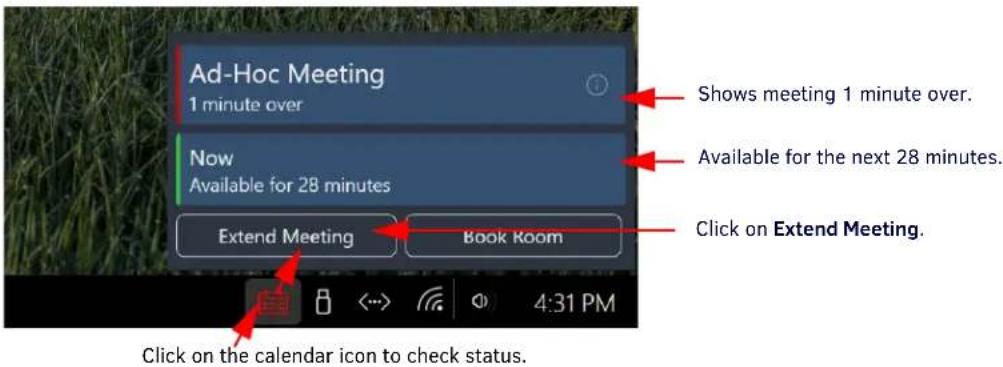
FIG. 27 Meeting Remaining Time
- If the Now field indicates green and enough time is available, the meeting may be extended by clicking on Extend Meeting.
- The system responds with the Extend Meeting dialog (FIG. 28). Use the arrows to extend the meeting through the next increments up until the next meeting time.
- Click OK when done.
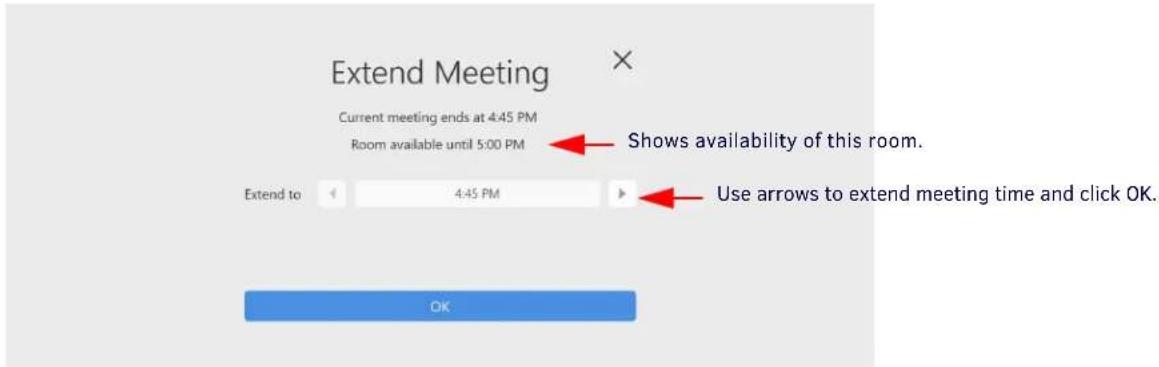
FIG. 28 Meeting Remaining Time
- If another meeting is booked immediately following this meeting, the Extend button will be grayed out (FIG. 29) and the current user will need to end this meeting and or book another room.
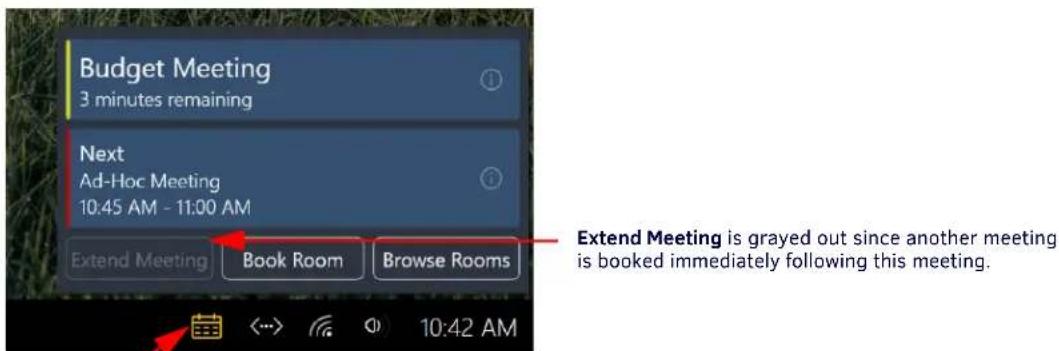
Less than 5 minutes remaining (yellow). Click on the calendar status icon to Extend/Book/Browse.
FIG. 29 Meeting Remaining Time
Documents
This section defines the document sources that may be used with Acendo Core. Use Core to download, edit and save modified files for future reviews. One of the following methods may be used to access documents:
- Local Downloads on page 13
• Remote Shared Drives on page 15
• USB (Mass Storage Device) on page 16
• Last Document Location on page 20
• Recent Documents on page 20
NOTE: If any of these options are not displayed, they may not be enabled in the device settings. Refer to system Administrator for more information.
- Clicking on the Documents Icon on the home screen will open a drop-down menu of document sources (FIG. 30).
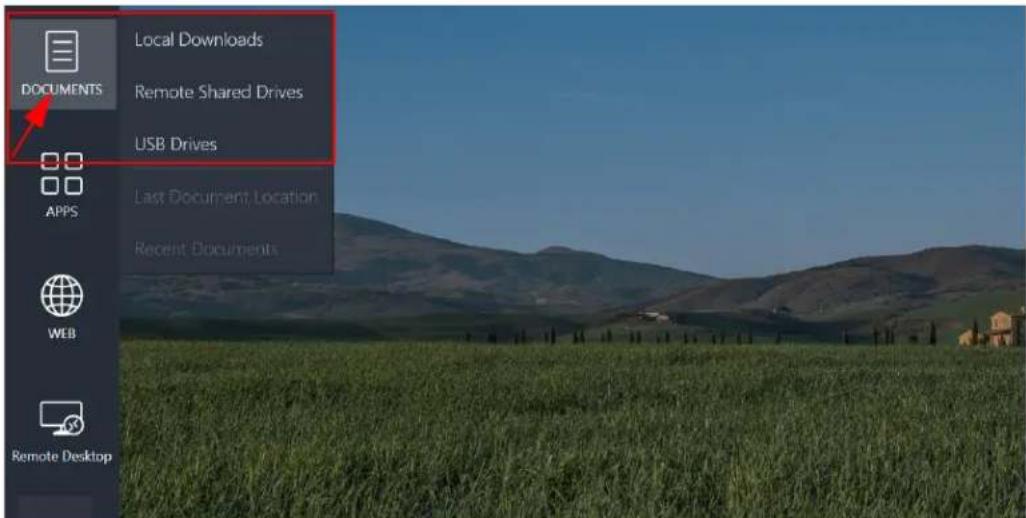
FIG. 30 Documents Drop-Down Menu
Local Downloads
The Local Downloads option shows all files downloaded from the Web during the current user session for easy access. Users may save images or documents to Documents, Downloads, Music, Pictures, or Videos folders but once the user logs off from this session, these folders will be purged for the next user.
NOTE: Ensure all downloads that are meant to be retained are saved onto a USB memory stick or Remote Shared Drive before clicking on Finish to end the session.
- Click on the Documents Icon and select Local Downloads to access the system folders (FIG. 32).

FIG. 31 Documents - Local Downloads
- The system will display a list of folders where Guest Users may temporarily save files for presentation (FIG. 32).
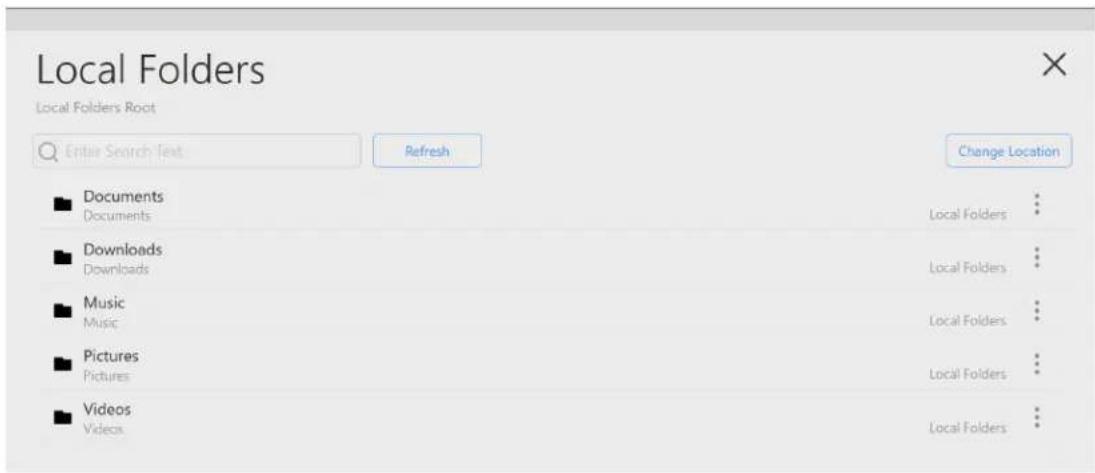
FIG. 32 Local Downloads
- Click on the folder where you have saved a downloaded file during this session (Documents shown in FIG. 33).
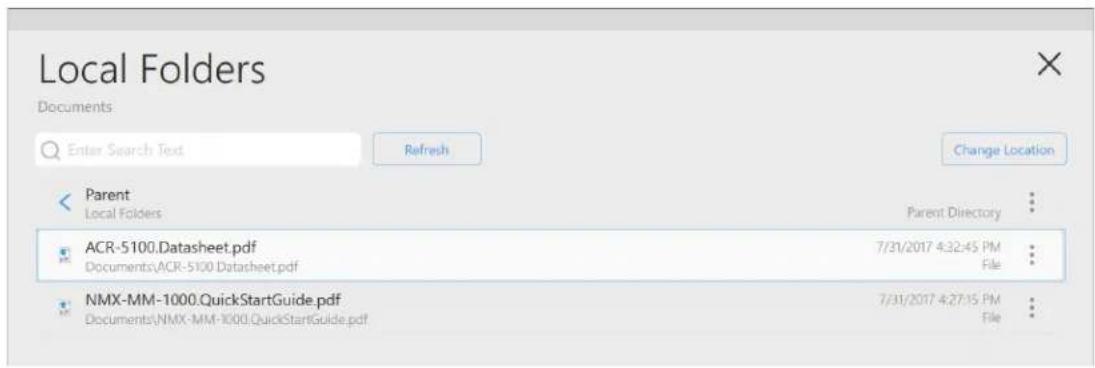
FIG. 33 Local Documents Folder with Files
- Click on the downloaded file to open it. FIG. 34 shows an open PDF file being viewed in the Browser.
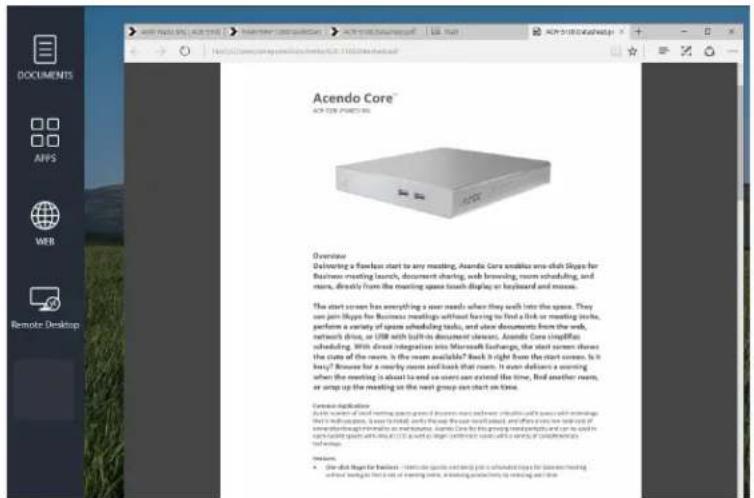
FIG. 34 Viewing a Document
- Guest users can click on the Change Location button to select other document sources (Remote Shared Drives or USB Drives) (FIG. 35).
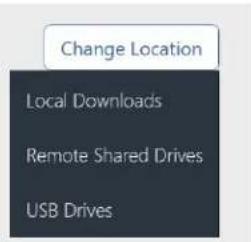
FIG. 35 Change Location Button
NOTE: All files downloaded during the session are purged when the session is exited. Once the system times out or a User Ends Session, these files will no longer be accessible via Acendo Core unless downloaded during subsequent sessions.
Remote Shared Drives
Shared Drives must be set up by the Administrators for each Acendo Core prior to Guest users accessing them.
- Select the Documents Icon and click on Remote Shared Drives (FIG. 36).
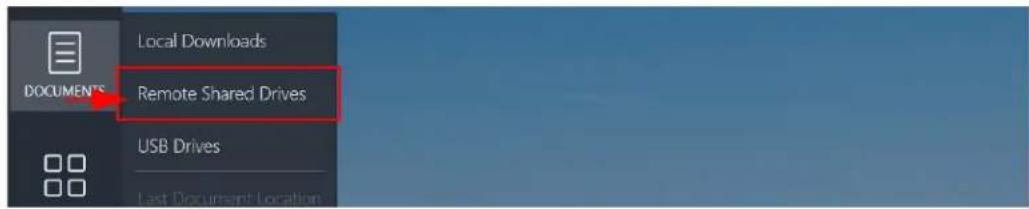
FIG. 36 Documents - Local Downloads
- A list of drives will appear (FIG. 37). The following example shows an AMXDOCS location that has been set up on this Core device previously.
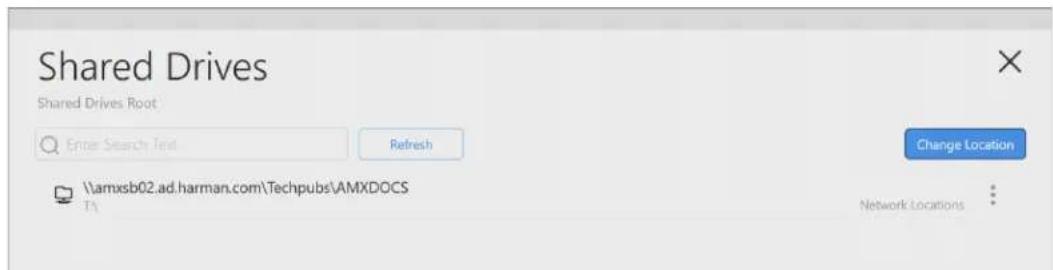
FIG. 37 Shared Drives Selection
- Click on the Shared Drive to drill down to sub folders to access documents or videos that you have saved previously in these locations (FIG. 38).
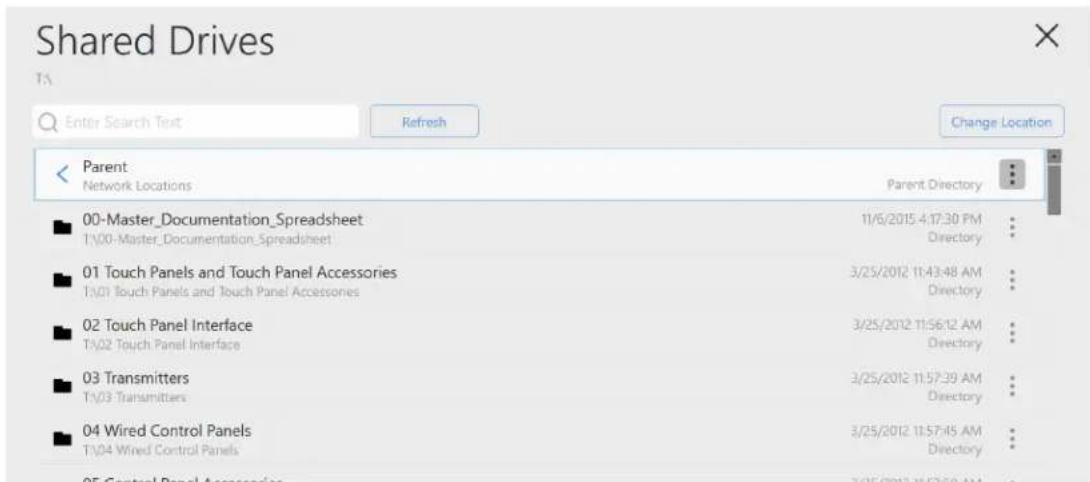
FIG. 38 Shared Drive Drill Down
- If you forgot to transfer these files to the Shared Drive before your meeting, you may wish to Remote Desktop to your workstation to access these files there. Refer to Remote Desktop on page 24.
- Guest users can click on the Change Location button to select other document sources (Local Downloads or USB Drives) (FIG. 39).
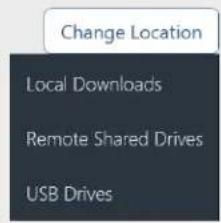
FIG. 39 Change Location Button
NOTE: All files downloaded during the session are purged when the session is exited. Once the system times out or a User Ends Session, these files will no longer be accessible via Acendo Core unless downloaded during subsequent sessions.
USB (Mass Storage Device)
Files may be loaded into Acendo Core from a USB drive by connecting the USB drive to one of the USB ports on the device. When a USB stick is mounted to the Acendo Core, a pop up message will appear (FIG. 40).
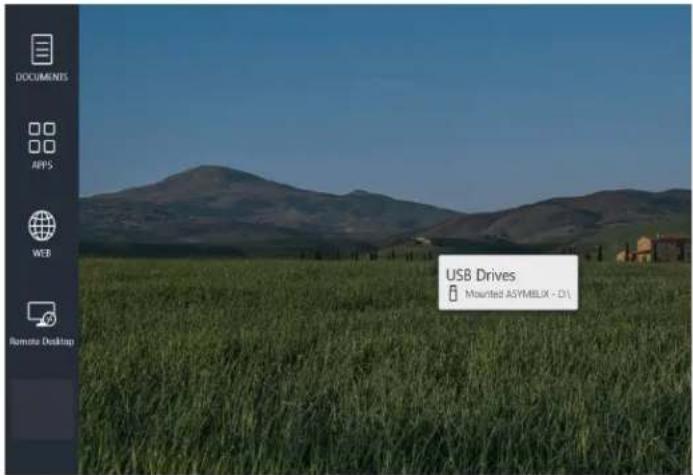
FIG. 40 USB Device Mounted
- Access the USB by clicking on the Documents Icon on the left panel of the main screen to open the drop down menu (FIG. 41). Select USB Drives.
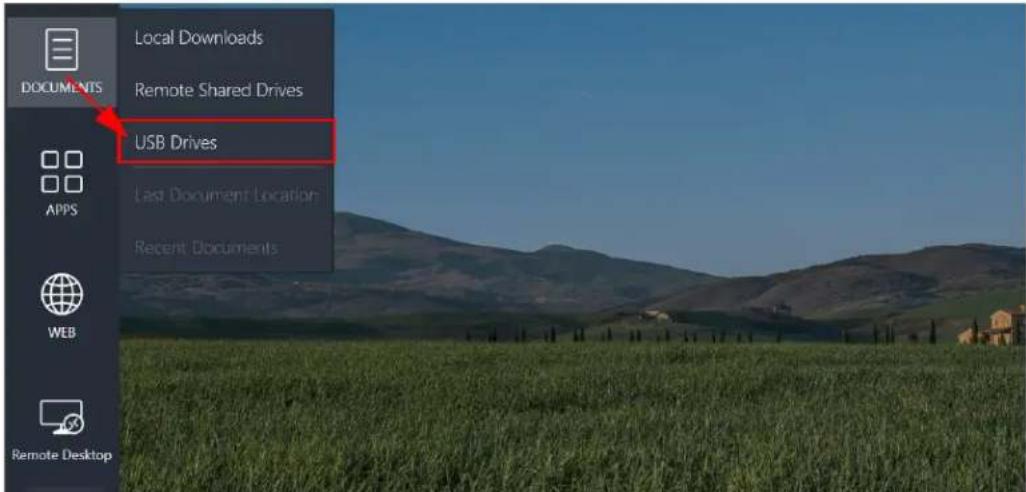
FIG. 41 Documents Drop-Down Menu
- If a USB drive is not mounted into any of the USB slots on the Core you will get the following notice (FIG. 42).
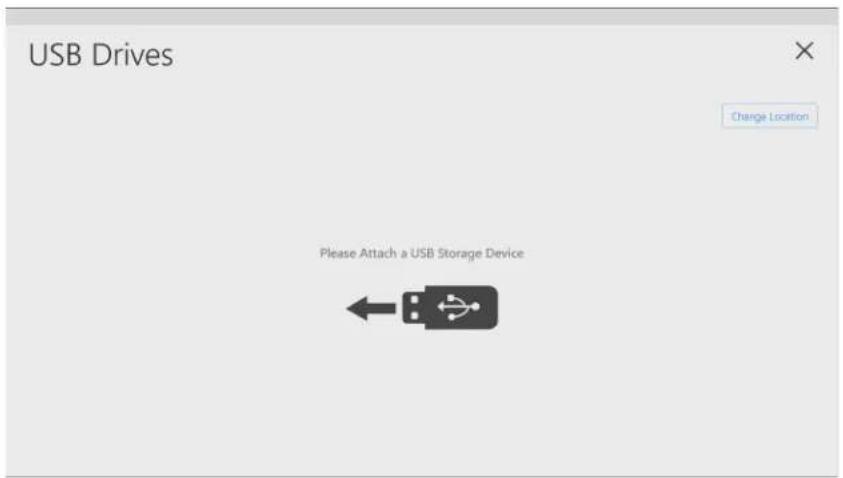
FIG. 42 USB device - Not Attached
- The USB drive will be displayed when it is properly mounted (FIG. 43). Click on the drive to reveal its contents.
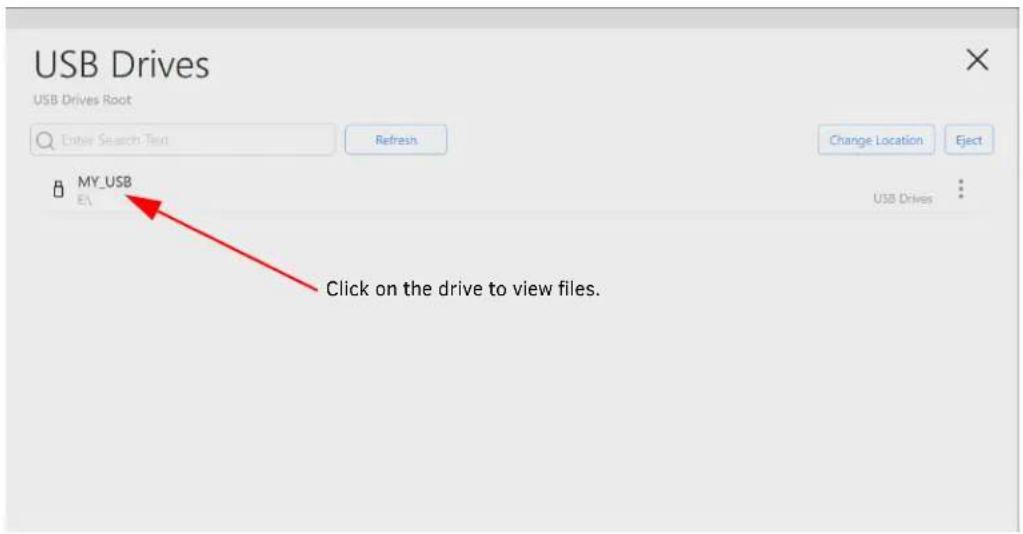
FIG. 43 USB Device Listed
- With the contents displayed (FIG. 44), select a file to view. Files may be images, spreadsheets, documents or movies.
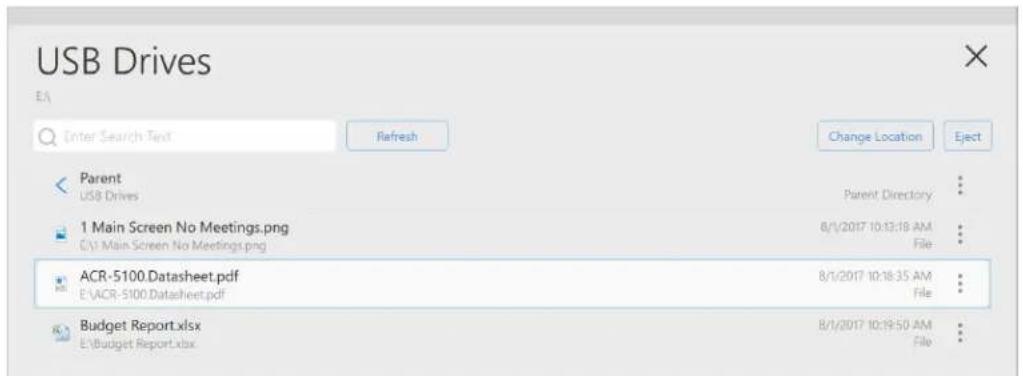
FIG. 44 USB Device Contents Listed
- Guest users can click on the Change Location button to select other document sources (Local Download, Remote Shared Drive (FIG. 45).
- The file will open for viewing (FIG. 46).
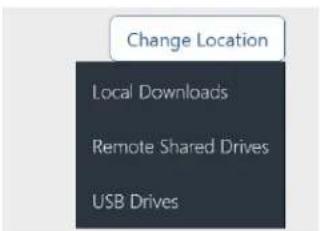
FIG. 45 Change Location Button
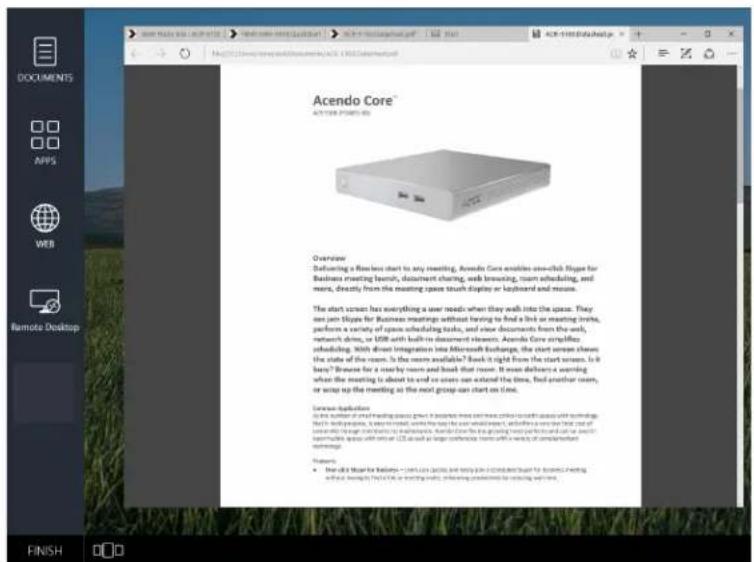
FIG. 46 Viewing a Document
- Before removing the USB storage device, click on the Documents Icon again and go to the USB Drives. Use the Eject button shown in the top right panel of FIG. 47.
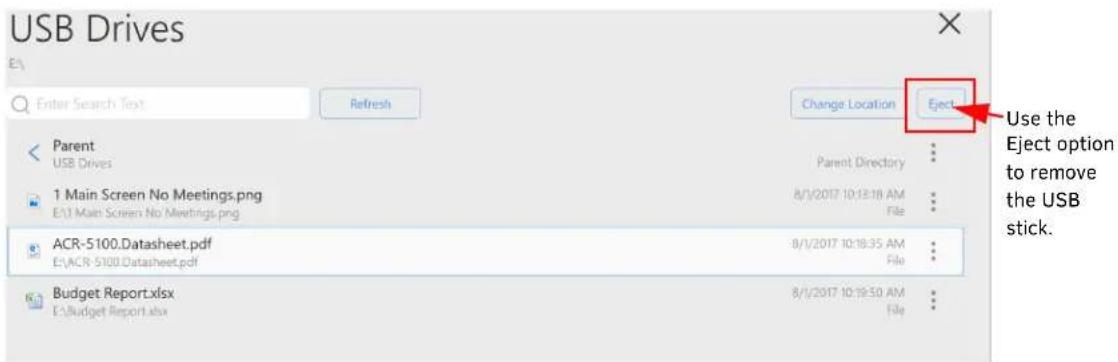
FIG. 47 Ejecting a USB
- If a document on the memory stick is still open, you will receive the following failure message (FIG. 48).
⚠️ Problem Ejecting USB (Mass Storage Device)
This device is currently in use. Close any programs or windows that might be using the device, and then try again.

FIG. 48 Problem Ejecting USB
-
Click OK to close the window.
-
Click on the Application Manager at the bottom left of the screen to view any files that remain open on the system (FIG. 49).
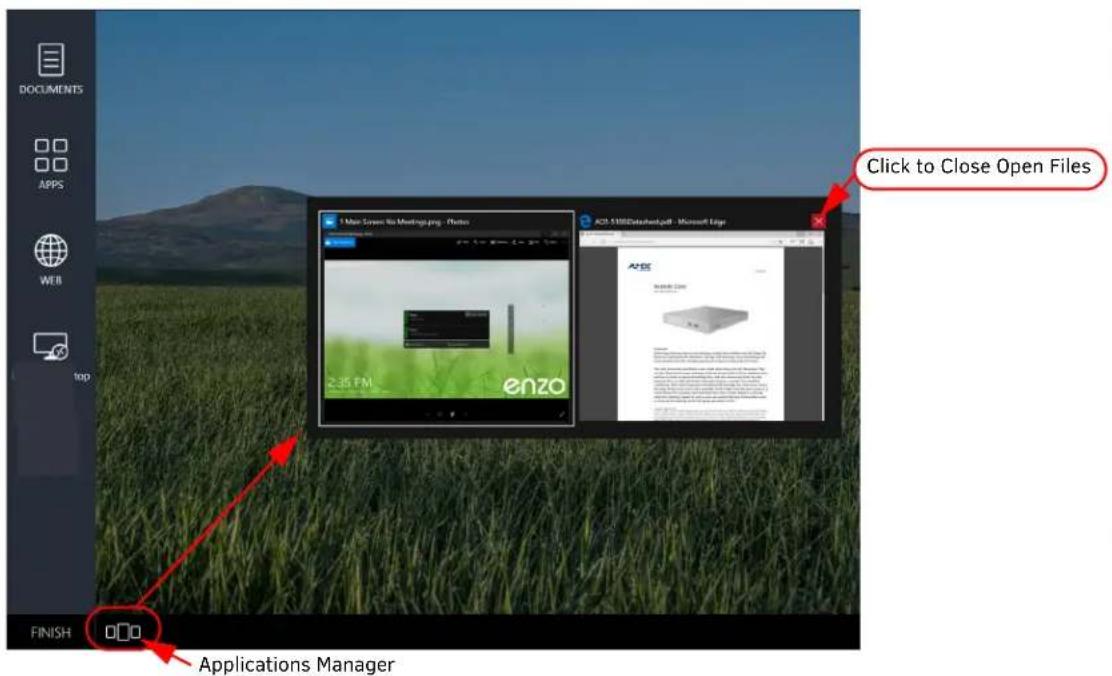
FIG. 49 Closing Open Files Using the Applications Manager
-
Once the open files are closed you may reattempt to eject the USB drive (Step. 7).
-
Once a document has been access on the Acendo Core, the bottom two options are available to click on in the Documents drop-down menu (FIG. 50).
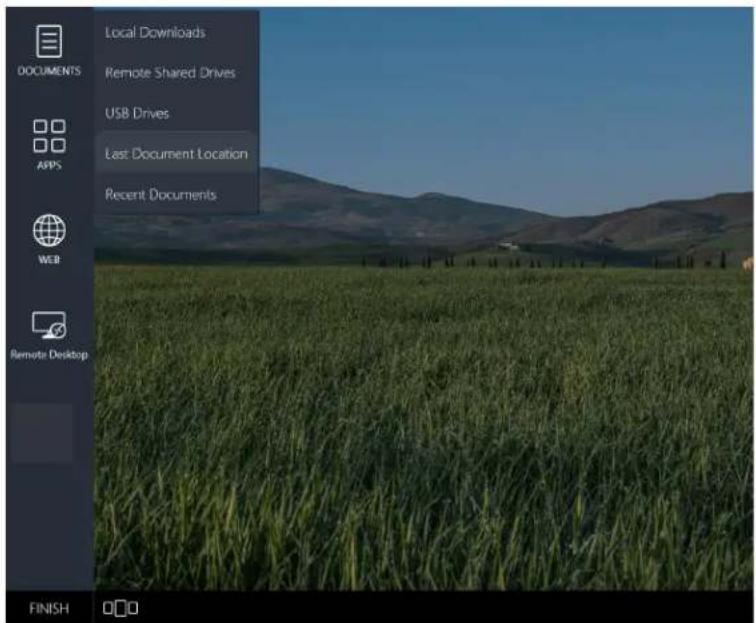
FIG. 50 Last Document Location Option
Last Document Location
- Clicking on Last Document Location will take the user to the Browser, Remote Shared Drive, or USB stick that was used to open the last file (FIG. 51). In this example, the USB stick files are again displayed. Click on a file to reopen it.
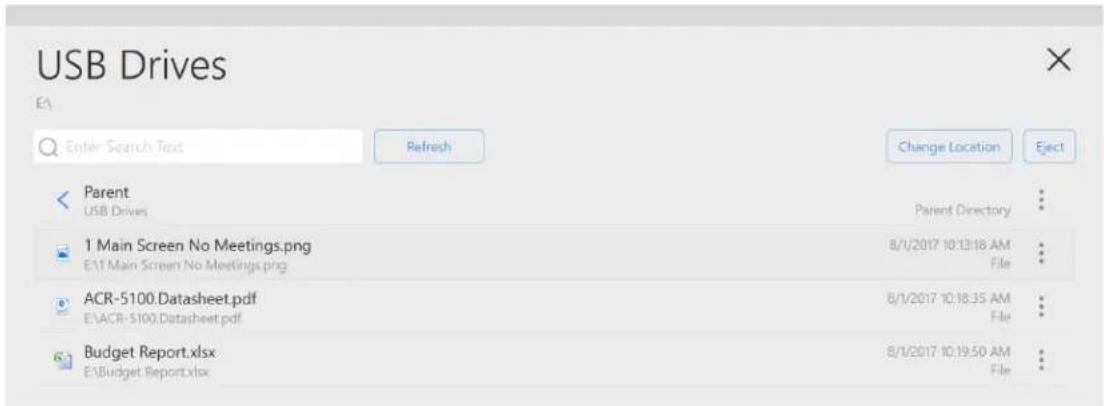
FIG. 51 Last Document Location
Recent Documents
- Clicking on Recent Documents will display the recent files that were viewed (FIG 52).
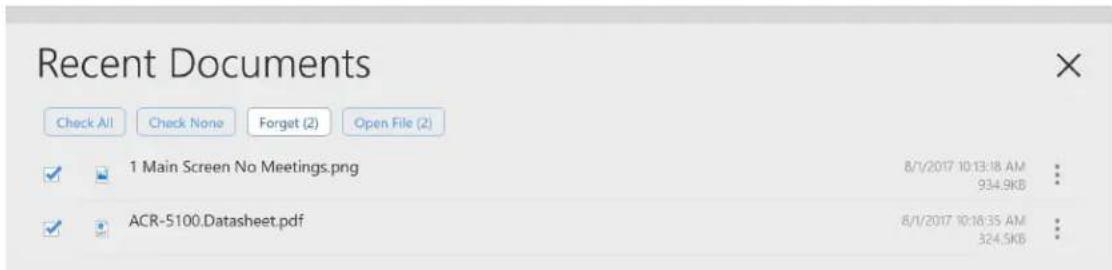
FIG. 52 Recent Documents
- Users may Check All, Check None, Forget the checked files, or Open File for the checked files in this window.
Applications
Overview
Enzo allows Administrators to add third-party web browser-based applications for use through the Acendo Core interface. Refer to the Administrators Guide available at http://www.amx.com for more details.
The main Guest User screen provides an Applications button that provides users quick access to installed applications. Core has the following factory loaded apps preloaded in the favorites fields:
• Calculator on page 21
• Media on page 22
• Remote Desktop on page 24
- Skype for Business on page 28
• Web Browser on page 34
The following sections of this manual further define the functionality of each of these apps.
The applications available on Enzo can be found by clicking on the Apps Icon from the Acendo Core Guest User screen (FIG. 53).
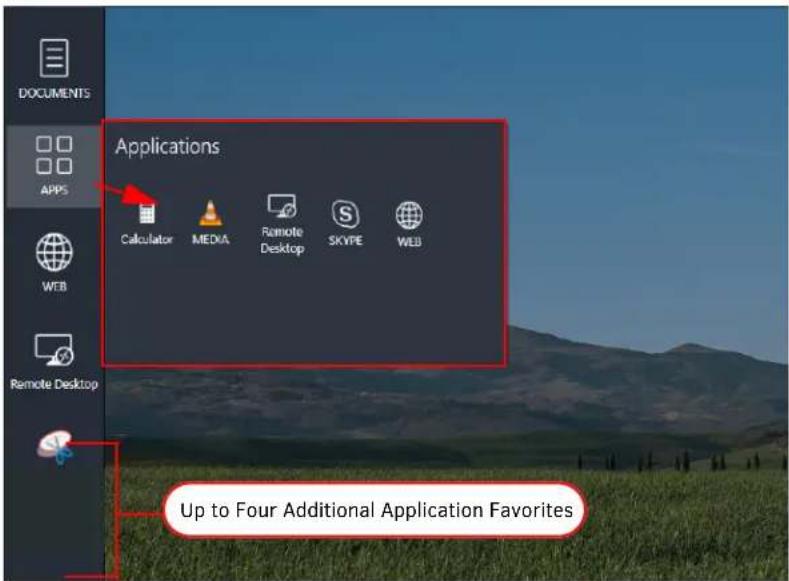
FIG. 53 Applications List
An Administrator may assign up to four additional preferred apps (Favorites) on the Enz are listed under the Applications button shown above. These Favorites provide a fast, one-click option to launch apps for users.
Calculator
Click on the calculator icon to use the on-board app (FIG. 54).
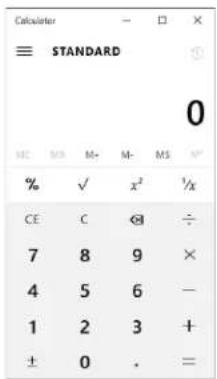
FIG. 54 On-board Calculator
Media
The Media app is a VLC Media Player that provides an on-board solution for viewing most video files from any of the document sources and supports the following video formats:
• .mp4 with H.264 video and AAC audio
• Max video playback resolution is 1080p
NOTE: Will not play 4K video content.
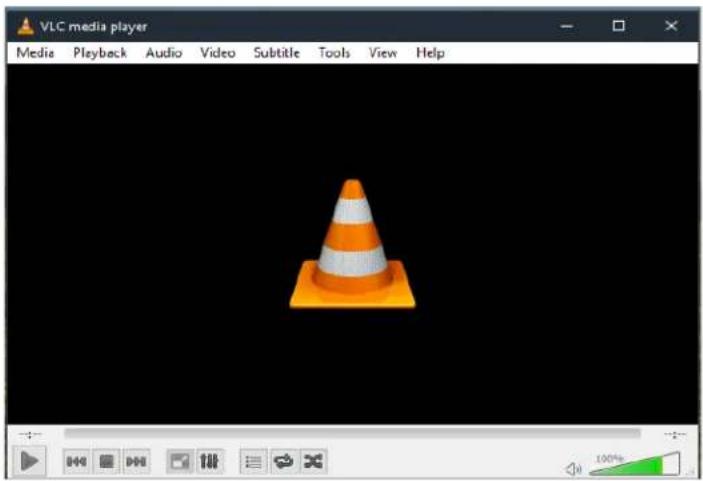
FIG. 55 On-board Media Player
- Click on the Media heading to access the drop-down menu and select Open File (FIG. 56).
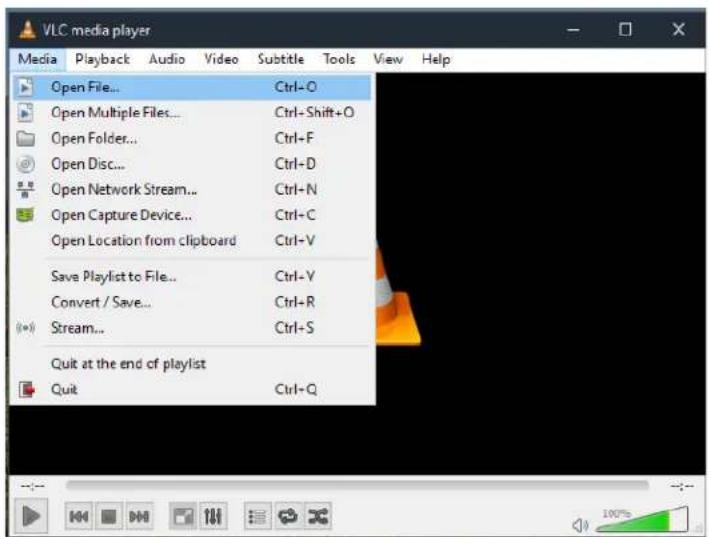
FIG. 56 Media Player - Open File
- Chose the location of your stored file from the list of options. Files may be located in a folder from downloaded Web Browser content, on a Remote Shared Drive, or USB drive (FIG. 57). Refer to Saving Files from the Web Browser section on pages 35 for steps on saving web content.
NOTE: All files downloaded during the session are purged when the session is exited. Once the system times out or a User Ends Session, these files will no longer be accessible via Acendo Core unless downloaded during subsequent sessions.
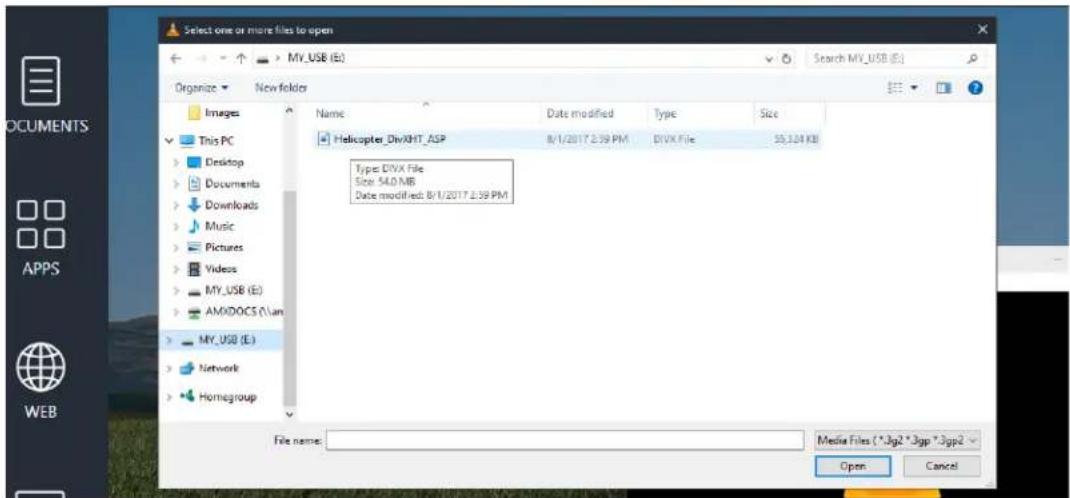
FIG. 57 Media Player - Locating File
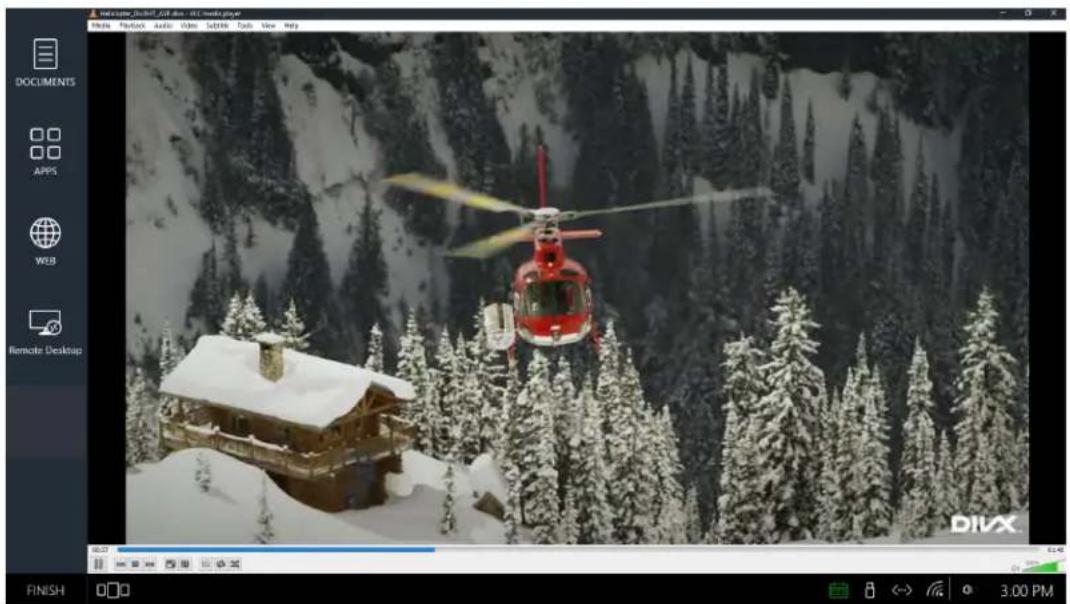
- Select the file and click Open. The file will begin to play in the VLC Media Player (FIG. 58).
natural_image
Helicopter flying over a snowy forest with a wooden cabin in the background (no visible text or symbols)FIG. 58 Media Player - Locating File
Remote Desktop
Locating Computer Name (Locally)
- To locate your computer name, right-click on your desktop Windows Start Menu icon to bring up the menu as shown (FIG. 59). Select System as outlined below.
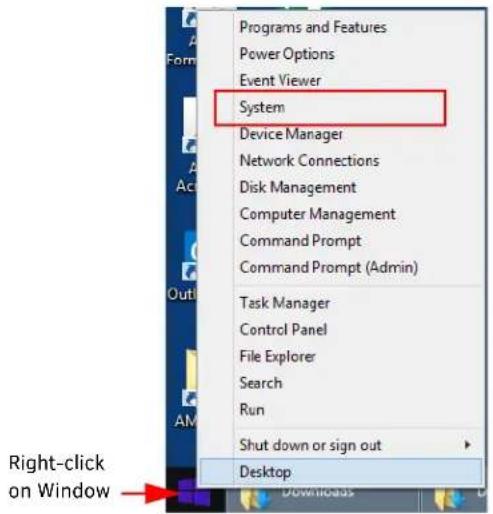
FIG. 59 Windows Start Menu
- The System window appears with the System Name displayed that will be needed to remotely connect to it (FIG. 60).
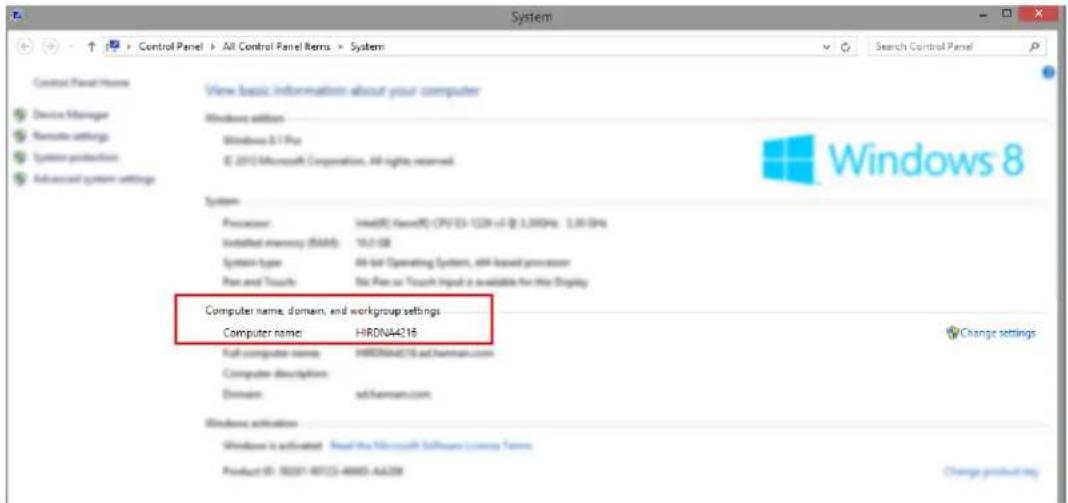
FIG. 60 Finding your Remote Desktop Name
Remote Connection
Follow these steps to remotely connect to your workplace desktop from Acendo Core for meetings, presentations or just to access files and emails remotely.
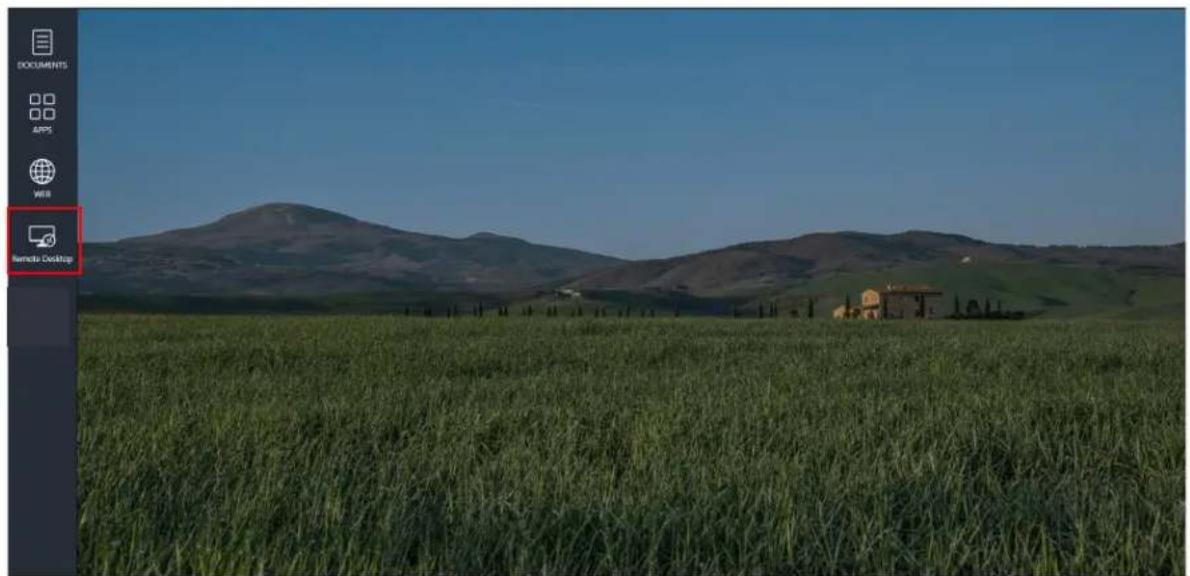
- Click on the Remote Desktop Icon identified in FIG. 61.
natural_image
Landscape view of rolling green hills under a clear blue sky, with a red 'Remote Desktop' tab on the left (no text or symbols on the landscape itself)FIG. 61 User Session Screen - Remote Desktop
- The Remote Desktop Connection Popup appears as shown in FIG. 62. Enter your computer name as it appears on your network. The following steps will help you identify your computer name.
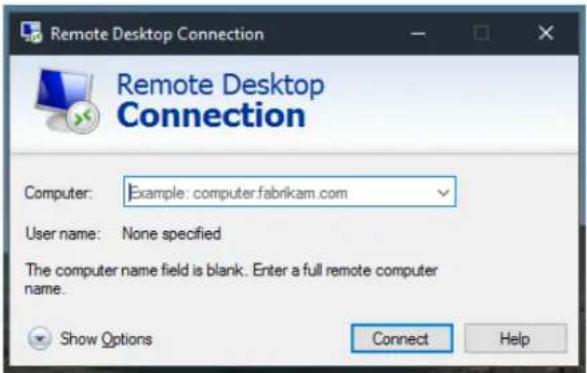
FIG. 62 Remote Desktop Connection Popup
Remote Login
- Return to the Meeting space and enter the computer name into the Remote Desktop Connection popup and hit Enter.
- The Enter your credentials popup appears (FIG. 63).
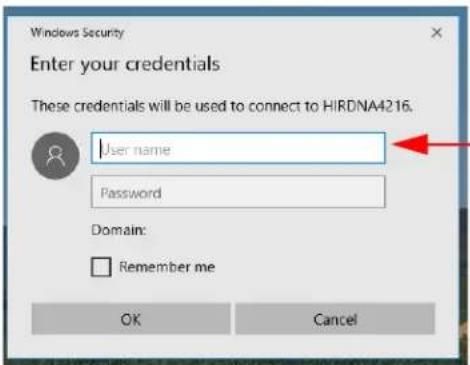
Enter your network User name and Password
FIG. 63 Remote Desktop Credentials Popup
NOTE: If "Remember Me" is checked, the system will still purge this information when the session ends.
- Enter your user name and password as you would on your work computer every morning. The system will connect and now display the desktop from your computer. You are now accessing and displaying emails and files and/or present any materials from your computer onto the Acendo Core display.
Remote Desktop Connection Task Bar
- The Remote Desktop Connection provides a task bar at the top center of the screen. You may need to move the mouse to the top of the screen for it to pop down from the edge (FIG. 64).
NOTE: Click on the tack icon to pin the task bar to your desktop and it wont disappear under the edge of the screen.
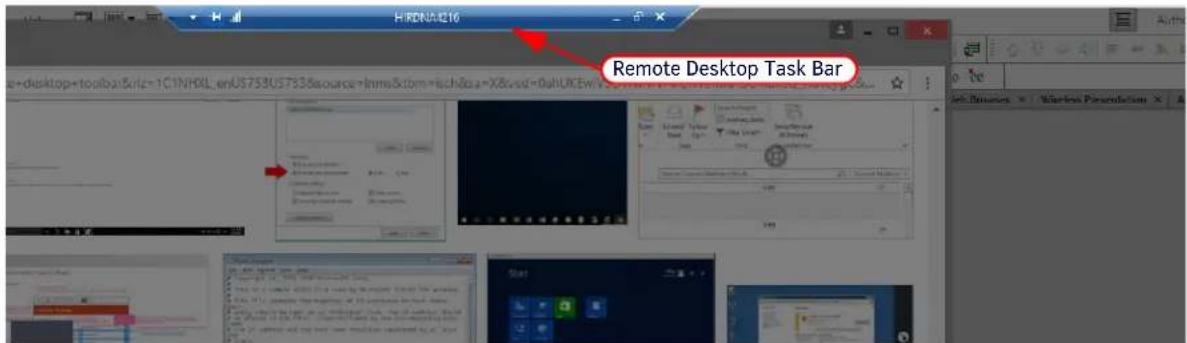
FIG. 64 Access the Remote Desktop Task Bar
- Clicking on the short dash (FIG. 65) will close the window and display the Acendo Core Guest User screen though the connection is still active.

FIG. 65 Remote Desktop Task Bar Options
- Clicking on the Applications Manager will bring up the active Remote Desktop Connection (FIG. 66).
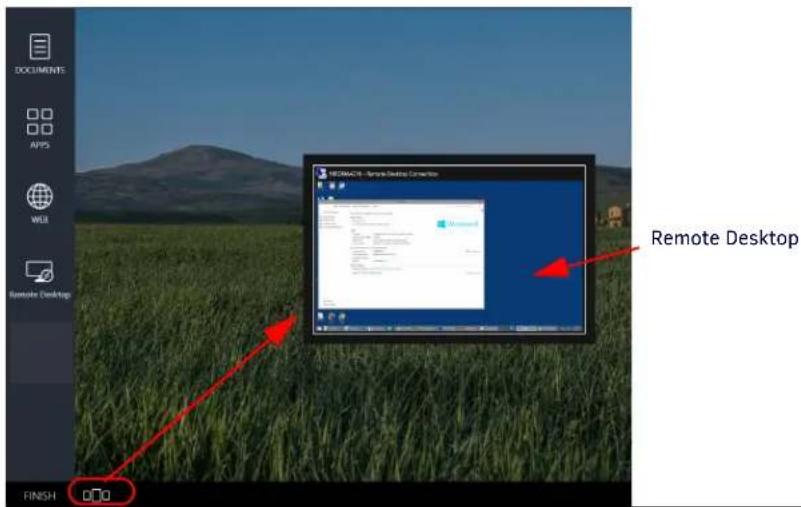
FIG. 66 Using the Applications Manager to Access the Active but Missing Remote Desktop Connection Window
-
Click on the Applications Manager active window to launch back into the remote desktop. This way Guest Users may toggle to use features of each platform.
-
Clicking on the double windows icon on the Remote Connection task bar will reduce the Remote Connection window but leave it in the Acendo Core workspace (FIG. 67).
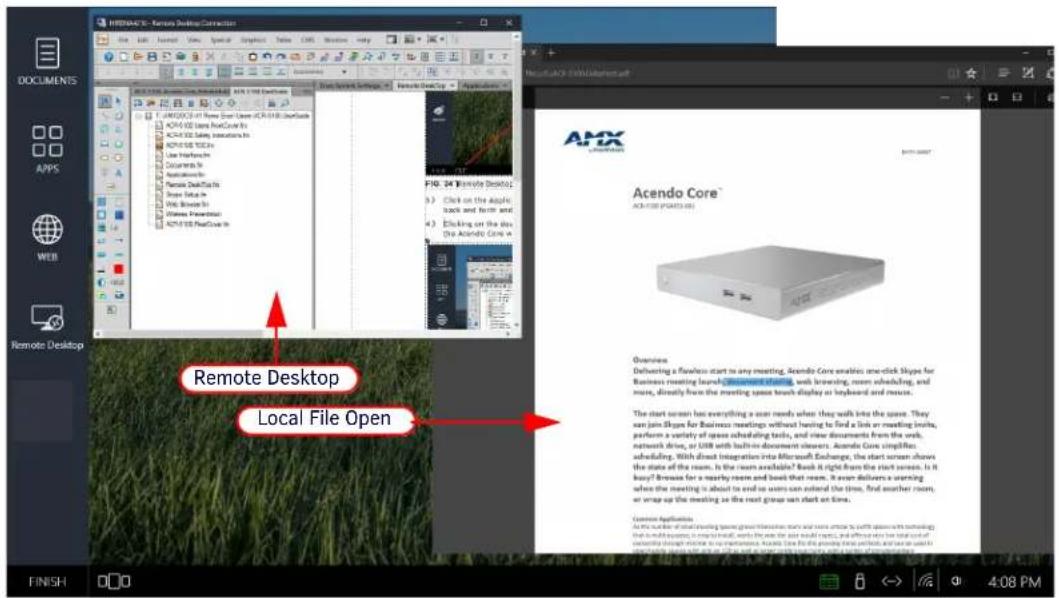
FIG. 67 Remote Desktop Connection Reduced to Multi Windows
-
In this example, a Guest User may copy and paste text only from a local file being viewed in Acendo Core into the remote file. Closing Remote Connection
-
Click on the "X" in the Remote Connection task bar to bring up a confirmation window (FIG. 68). Click on OK to disconnect.
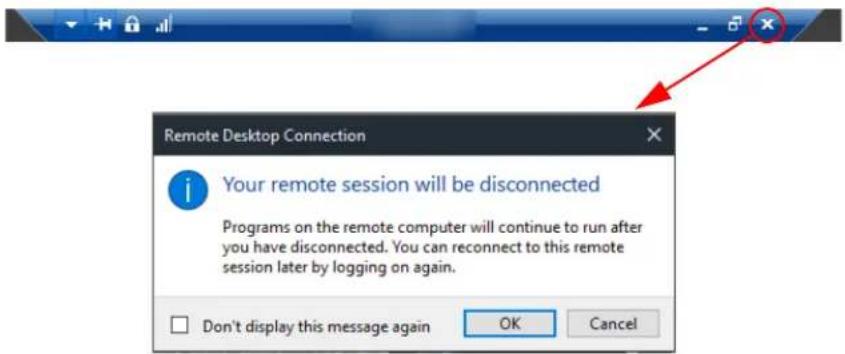
FIG. 68 Close Remote Desktop Connection Confirmation
NOTE: During the session, if the Remote Connection is closed, the ID of the remote computer will be retained in the connection window as well as the User name on the credentials popup (FIG. 63).
Helpful Shortcut Keys
Use the following shortcut keys during your remote session to make navigation easier.
| Shortcut key Description | |
| CTRL+ALT+HOME Activates the connection bar | |
| CTRL+ALT+BREAKCTRL+ALT+PAUSE | Switches the client between full-screen mode and window mode.If these shortcuts don't work, or the keys aren't available, you can try the following alternative. |
| CTRL+ALT+END Brings up the Windows Security dialog box for the Remote Desktop Session Host (RD Session Host) (provides the same functionality as pressing CTRL+ALT+DEL on the local computer). | |
| ALT+HOME Displays the remote Windows Start menu. | |
Skype for Business
Scheduling a Skype for Business Meeting
Meeting organizers schedule a Skype for Business meeting on using their scheduling system (e.g. Outlook365) and include the Acendo Core meeting room in the invite. When the room is successfully booked, users will see a confirmation message that the room has accepted the booking.
NOTE: Skype for Business meetings are only booked from Exchange/Office365 and cannot be booked locally from Acendo Core. An AdHoc meeting however can still use the Skype for Business app by launching it through the Applications icon. Refer to Unreserved User Initiated Skype for Business Meeting on page 31.
When the meeting organizers or attendees go to the Acendo Core meeting room, they select the meeting they are there for and click on the Start button. To help identify the web meeting, the Start button shows a Skype for Business "S" icon indicating it as reserved as a Skype for Business meeting (FIG. 69).
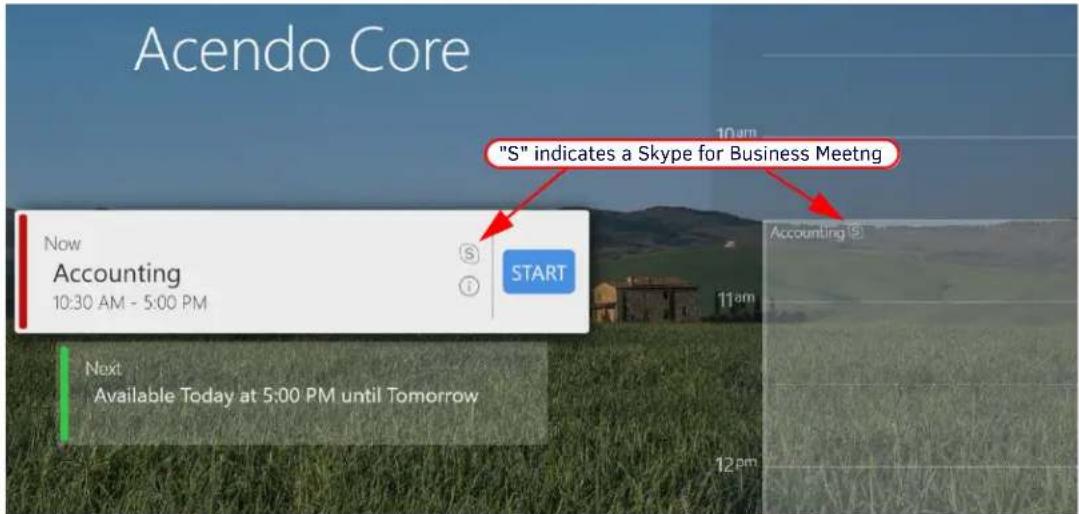
FIG. 69 Skype for Business Meeting Indications on Welcome Screen
When the web conference is completed, the Start button will remain available on the Acendo Core Welcome screen in case the user needs to get back into it until the scheduled meeting time ends.
- Click on the information icon or in the highlighted meeting in the scheduling panel to display the meeting details.
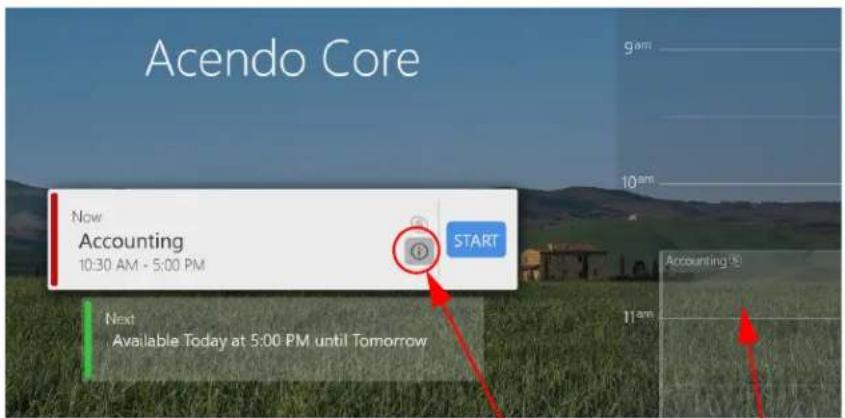
Click on the "i" icon or on the scheduling panel meeting to view the Meeting Details.
FIG. 70 Meeting Details Information Icon
- The Meeting Details screen appears displaying the title, scheduled meeting time, and any notes the organizer may have included (FIG. 71).
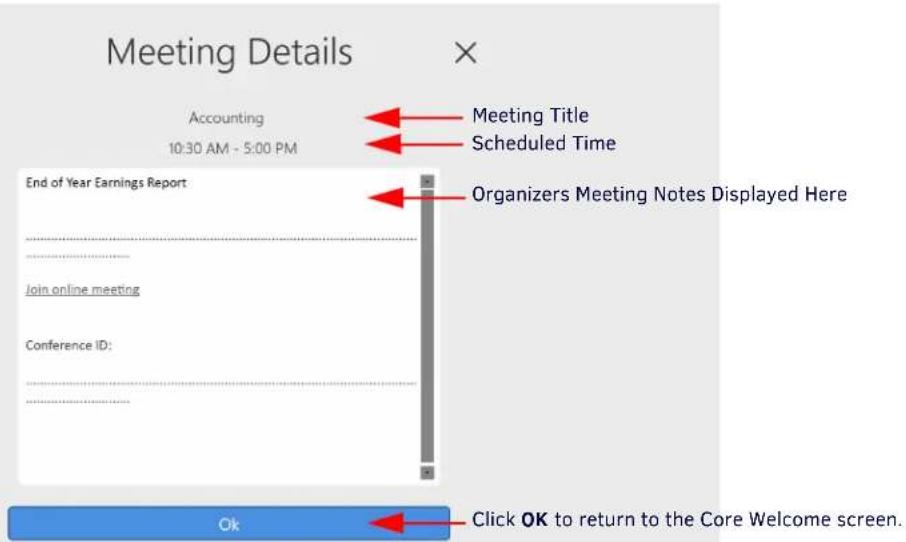
FIG. 71 Meeting Details Information Icon
Auto-Start a Skype for Business Meeting
When the Administrator has configured the Skype for Business app for Auto-start, users press the Start button on the Welcome screen and the system will automatically launch and login to Skype for Business taking the user to a live meeting.
- From the Acendo Core Welcome screen, click Start on the Skype for Business meeting (indicated by the "S") to start the user session (FIG. 72).
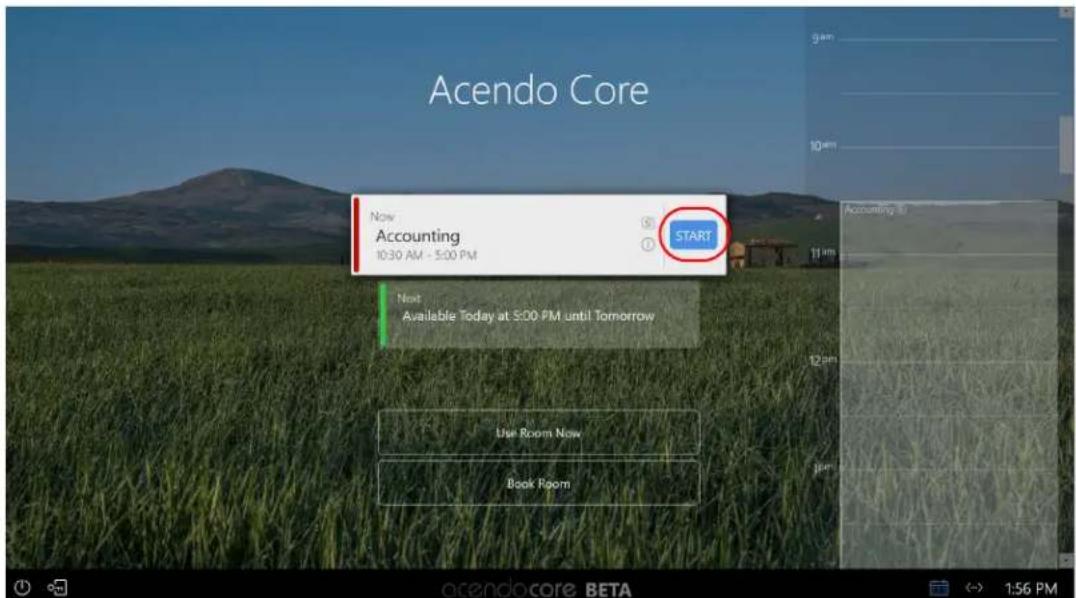
FIG. 72 Skype for Business Meeting on Welcome Screen
- The system will automatically load Skype for Business and connect you to the meeting with no other button presses (FIG. 73).
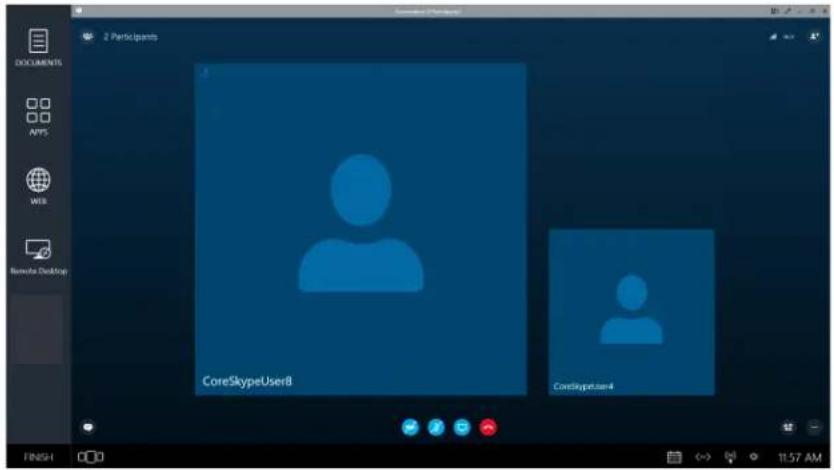
FIG. 73 Skype for Business Meeting Initiated by User
User Initiated Skype for Business Meeting
When the system is NOT set up for AutoStart, users have time to start a user session on Core and set up for the meeting prior to connecting with Skype for Business. Users then click the Calendar Icon to start Web Conference as defined below.
- From the Acendo Core Welcome screen, click Start on the Skype for Business meeting (indicated by the "S") to start the user session (FIG. 74).
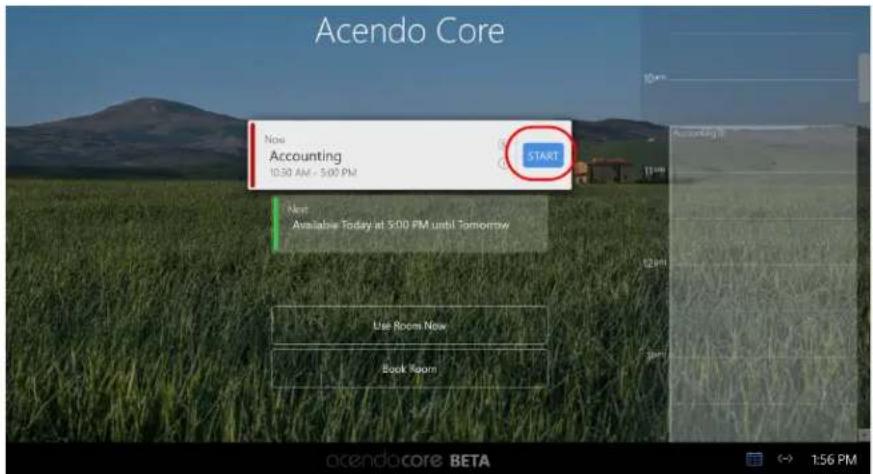
FIG. 74 Skype for Business Meeting on Welcome Screen
- Click on the Calendar icon to view the calendar status (FIG. 75).
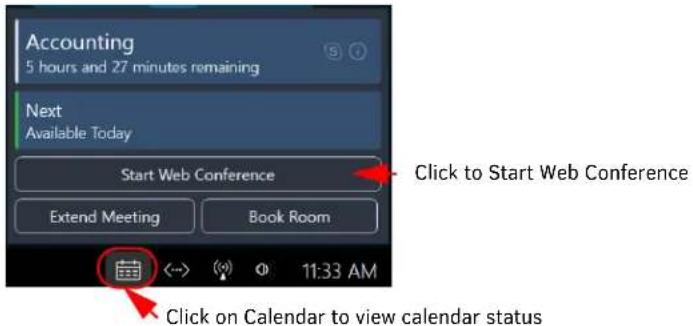
FIG. 75 Skype for Business Meeting on Home Screen
- The system will launch Skype for Business and automatically connect you to the meeting (FIG. 76).
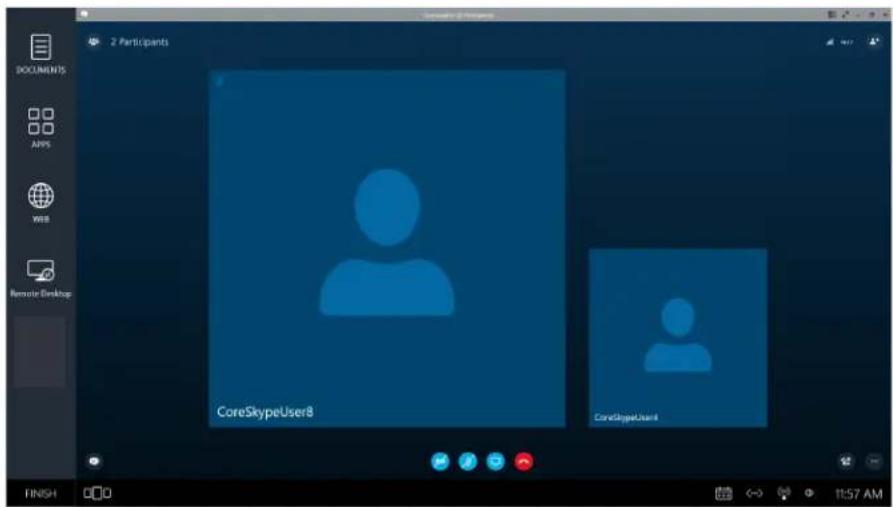
FIG. 76 Skype for Business Meeting Initiated by User
Unreserved User Initiated Skype for Business Meeting
An unreserved meeting is when a user walks into the room and presses the Use Room Now button.
NOTE: The Use Room Now option may not appear if the System Administrator has enabled Force Booking. Force Booking requires all meeting room users to book the room before using it. No Unreserved meetings are permitted.
- From the Welcome screen, check the scheduling panel for room availability and then click on the Use Room Now button to start a user session (FIG. 77).
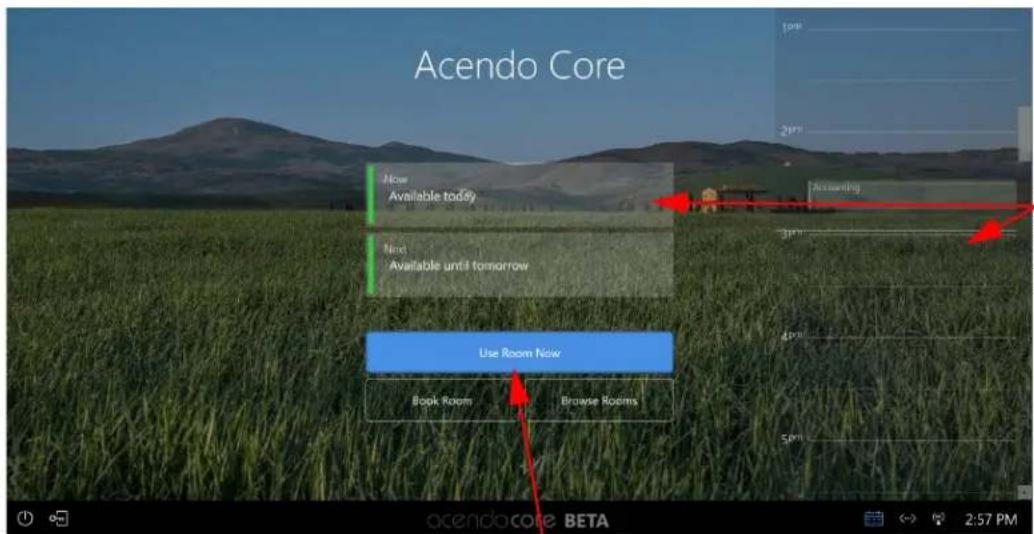
Check
Scheduling
panel or room
status for room
availability.
Use Room Now when room is available.
FIG. 77 Welcome Screen with Browse Button
- The system will prepare the desktop and bring up the following user Home screen (FIG. 78). Click on the APPs icon in the Applications tool bar to display the loaded applications.
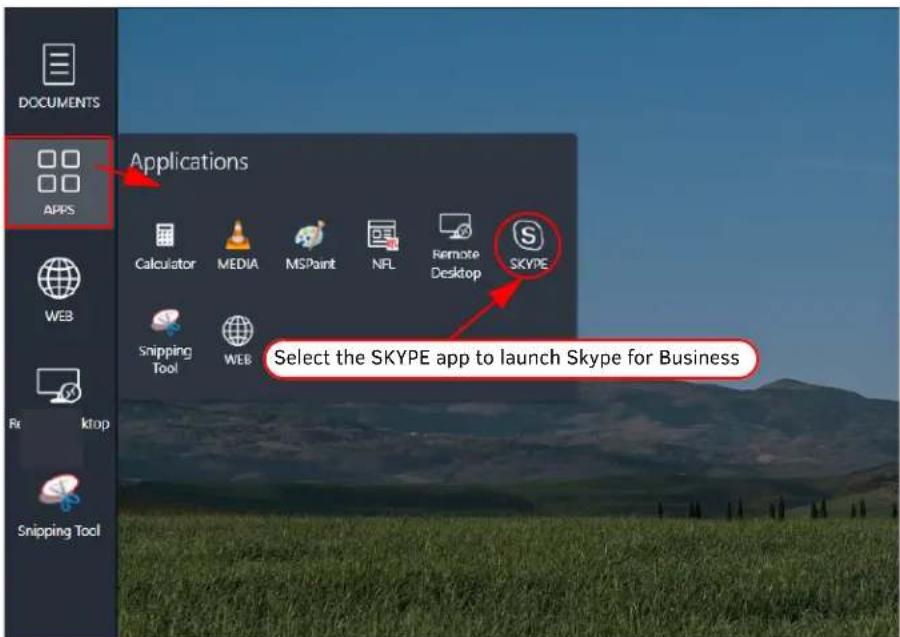
FIG. 78 Applications List
- Select the SKYPE icon to launch the Skype for Business app.
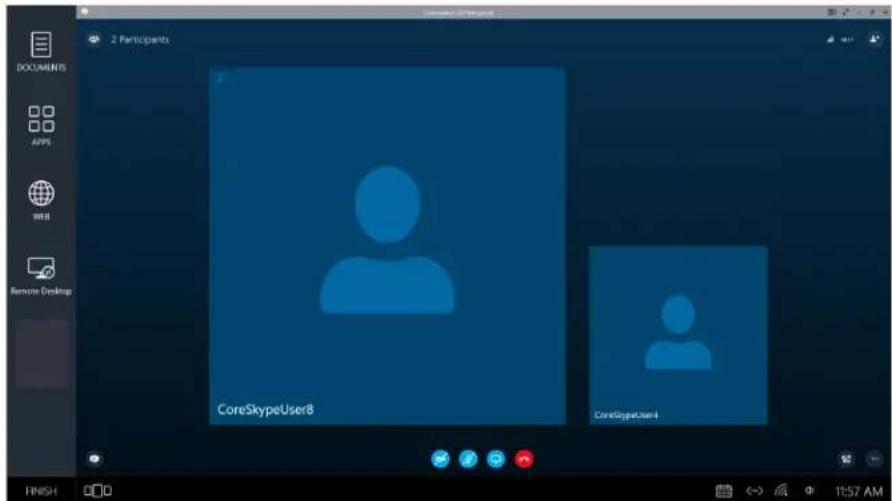
FIG. 79 User Session Screen
Room Booked without Web Conference Info in Invite
The meeting organizer schedules a web conference using their scheduling system, but does not include the meeting room in the invite.
- Enter the room and either start a session by selecting the meeting Start button, or click on Use Room Now..
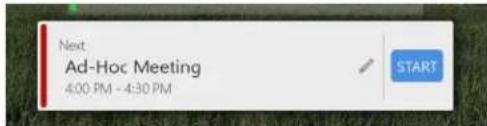
FIG. 80 Start Meeting
- Click on the Web Icon to open a web browser and use it to locate the web-based calendar and click the link for the web conference.
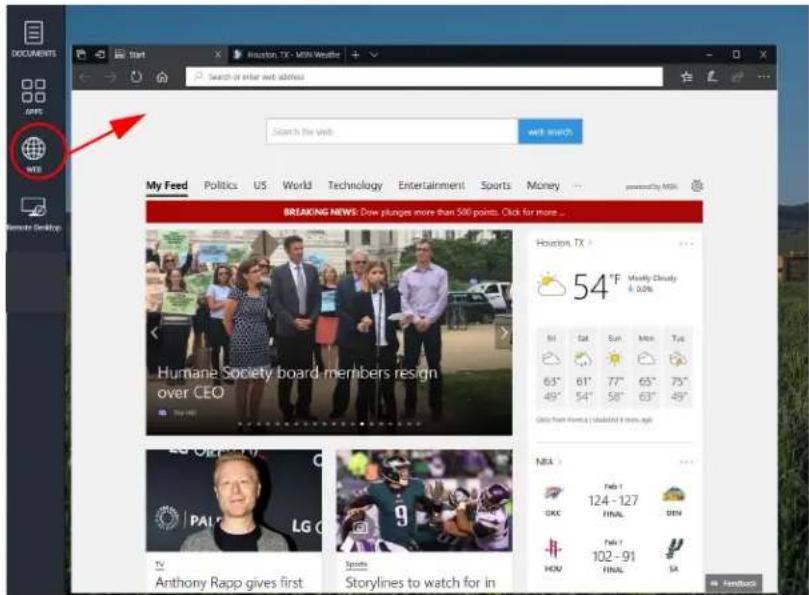
FIG. 81 Web Icon Selection
- The Skype for Business web conferencing software will launch and join the meeting.
Web Browser
Acendo Core features an on board Web Browser called Microsoft Edge, that is used to view standard web content. This chapter is divided into the following topics:
- Launching the Browser on page 34
- Launch Web Browser from Applications on page 35
- Saving Files from the Web Browser on page 35
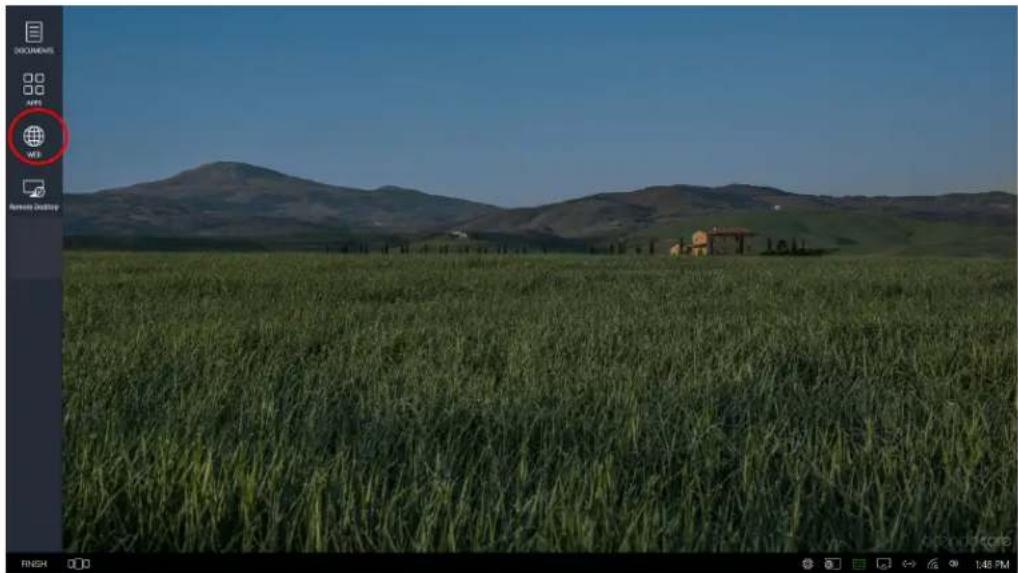
Launching the Browser
- To launch the Web Browser, click on the Web Icon identified on the Acendo Core main screen in FIG. 82.
natural_image
Landscape photo of a vast green crop field with rolling hills and distant trellises under a clear blue sky (no text or symbols visible)FIG. 82 Enzo Main Screen Favorites Browser
- The browser will immediately launch and go to the Microsoft Edge Homepage or any Homepage configured by the network Administrator (FIG. 83).
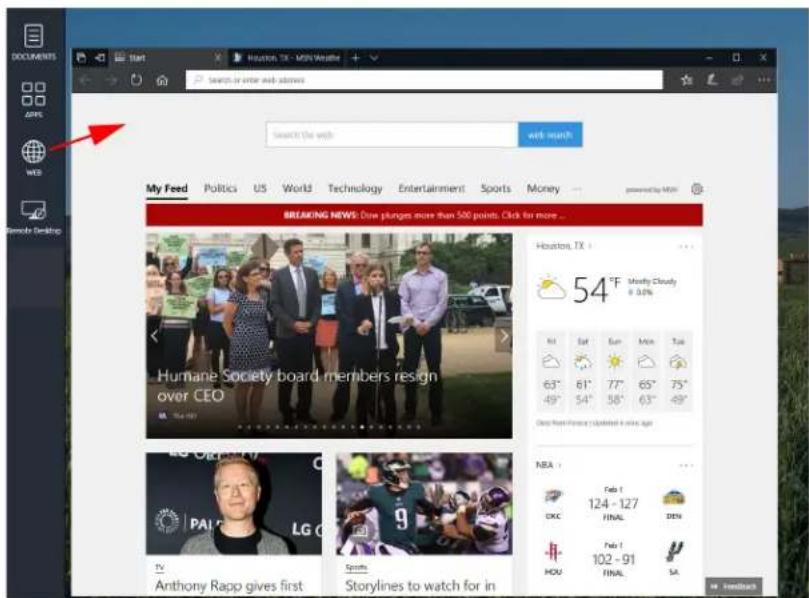
FIG. 83 Enzo Main Screen Favorites Browser
NOTE: Any tasks performed by the Guest User in this app will be purged when the session is ended.
Launch Web Browser from Applications
The Web app is also listed under the Applications when the App icon is selected (FIG. 84).
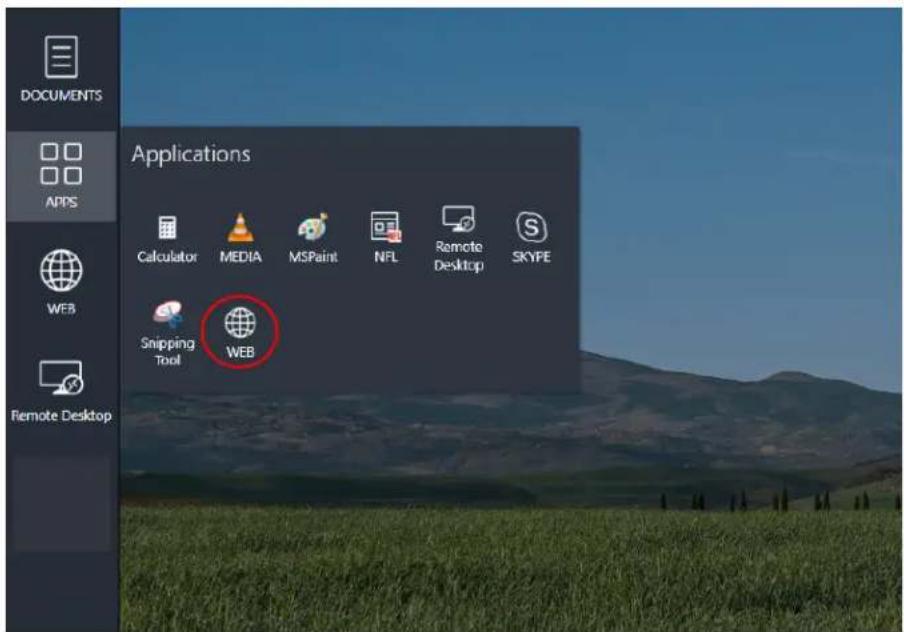
FIG. 84 Acendo Core Guest User Screen - Applications
The Web browser will immediately launch and go to the Homepage configured by the network Administrator.
NOTE: Any tasks performed by the Guest User in this app will be purged when the session is ended.
Saving Files from the Web Browser
- When using the Web browser and you come across a file that you want to save for the meeting, you can right click on the file and a Save As button appears (FIG. 85).
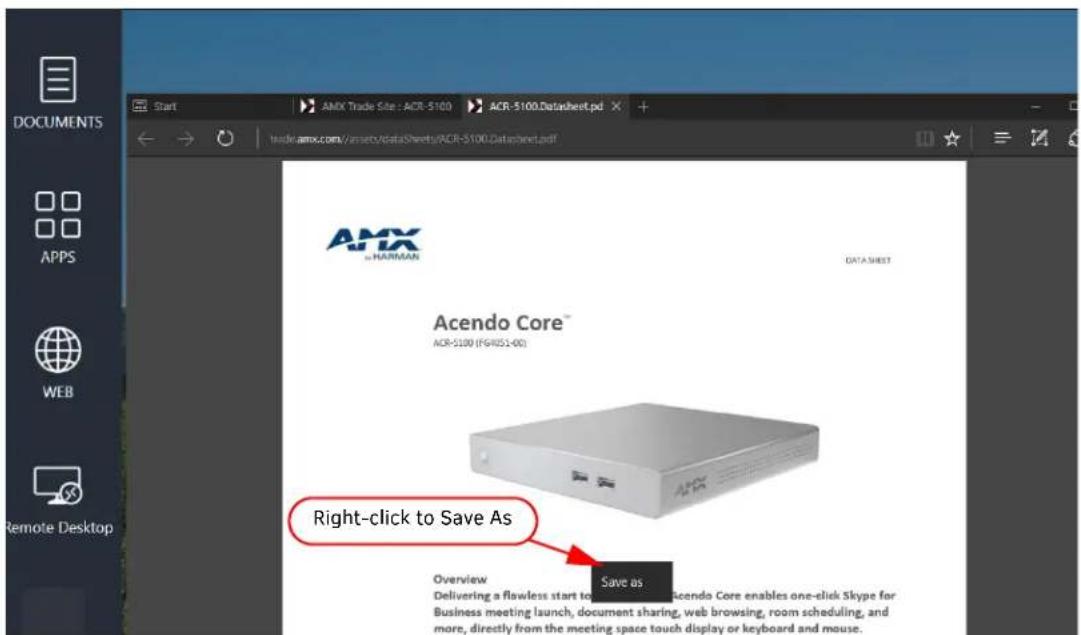
FIG. 85 Web Browser - Save File As
- The Save As options appear as shown in FIG. 86.
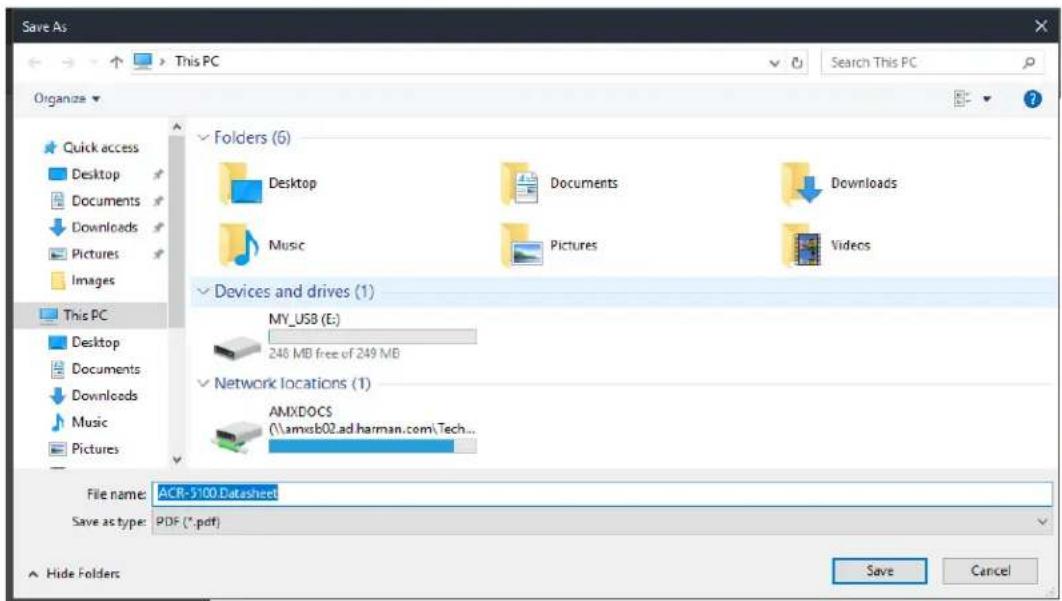
FIG. 86 Web Browser - Save File Locations
- If you only need the file for the meeting and intent to delete it following the meeting, just save it to one of the listed Folders, like Documents, that will be easy to locate during the meeting.
NOTE: All files downloaded during the session are purged when the session is exited. Once the system times out or a User Ends Session, these files will no longer be accessible via Acendo Core unless downloaded during subsequent sessions.
6. To save a file that you can access post meeting, select your personal USB drive that is listed under Devices and drives, or select a Remote Shared drive listed under Network locations that can be accessed from your desktop to retrieve the files.
NOTE: Ensure all downloads that are meant to be retained are saved onto a USB memory stick or Remote Shared Drive before clicking on Finish to end the session.
Screen Sharing (AirServer)
Follow these steps to use the on-board AirServer app and present anything displayed on the screen of an Android or iOS device onto Acendo Core screen.
Start Session
- Click on Use Room Now or Book Room and Start meeting if Force Booking is enabled by Administrator.
- Click on the Screen Sharing icon on the lower right Systems Tool Bar. If no symbol is shown then contact your system administrator to enable Screen Sharing on your unit. Clicking on the icon will show the instructions to connect to the AcendoCore device and begin presenting (FIG. 87).
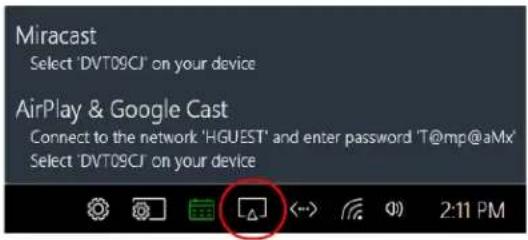
FIG. 87 User Session Screen - WiFi Enabled
AirPlay and Google Cast
Connect Device to Network
- On your device, go to your settings and select WiFi (FIG. 88).

Apple Devices ↑ Android Devices
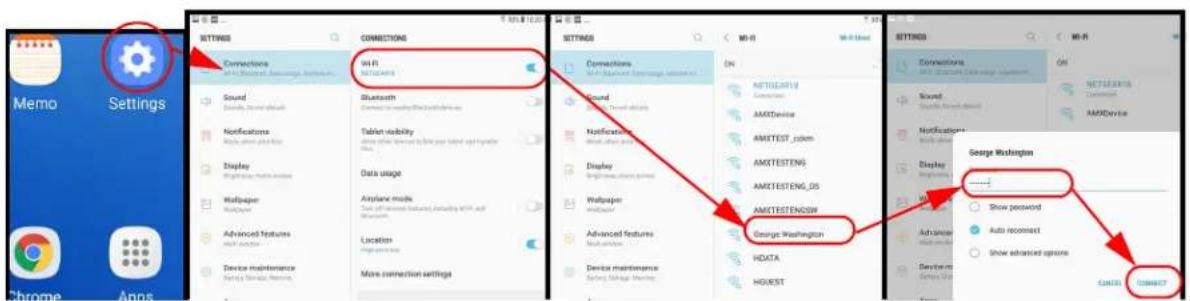
FIG. 88 WiFi Connections for Android and Apple Devices
- A list of available networks will be displayed. Look for the Acendo Core SSID shown on the screen and select it.
- The device will prompt for a password. Provide the Key displayed on screen into the Password field (juiavxbd in FIG. 87 example).
- Refer to Android devices Home app or iOS devices Airplay Mirroring as follows below.
Android Devices
Ensure that the Home app is loaded on the device before continuing.
a. From the Home Screen, click on the Google Home app on your device. (FIG. 89)
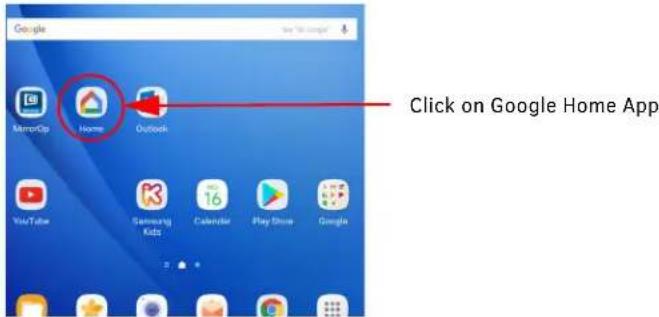
FIG. 89 Android Home App
b. Select the Menu at the top left of the screen (FIG. 90).
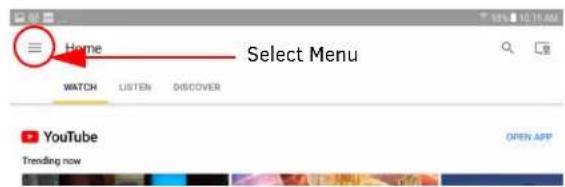
FIG. 90 Android Home App Menu Icon
c. Select Cast screen / audio from the menu (FIG. 91)
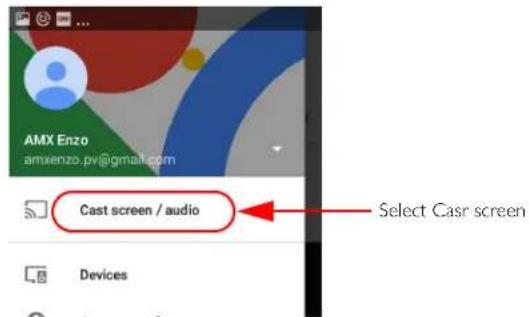
FIG. 91 Android Home App Menu
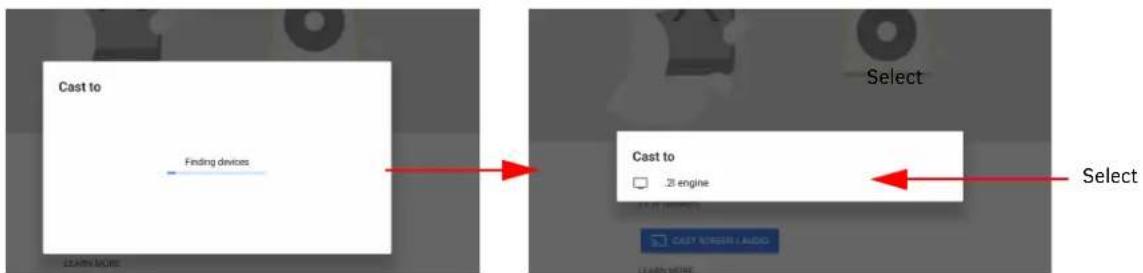
d. The device will search for a compatible TV to cast to (FIG. 92). Select the Core device from the list.
flowchart
graph LR
    A["Find devices"] --> B["Select"]
    B --> C[".28 engine"]
FIG. 92 Cast to Progress Screen to Results
e. The device should now be casting onto the Core display.
NOTE: When the random password option is turned on by Administrators when setting up the Access Point for wireless presentation, it may cause connection issues with user devices. Some devices will have to "forget this network" and then reconnect to the Acendo Core Access Point using the latest session password. See Forget this Network on page 42 for more details.
Stop Presenting
To stop presenting, swipe down on your device screen and select Disconnect (FIG. 93).
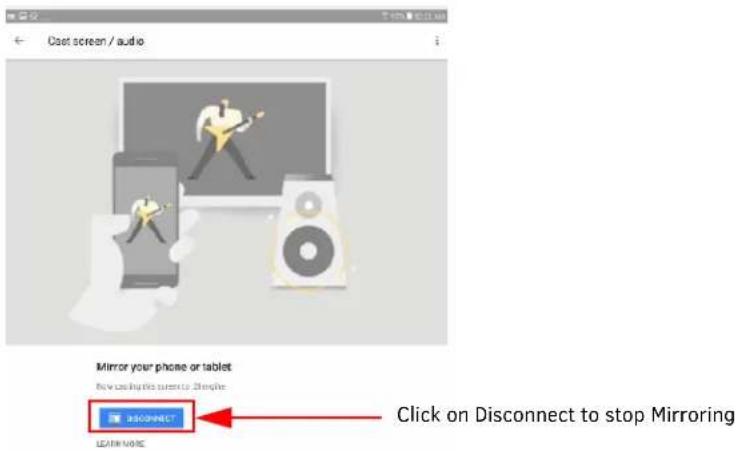
FIG. 93 Disconnect to Stop Mirroring
Apple iOS
Ensure that the Airserver app is loaded on your device before continuing.
a. Swipe up from your home screen and click on AirPlay Monitoring to search for a compatible device (FIG. 94).
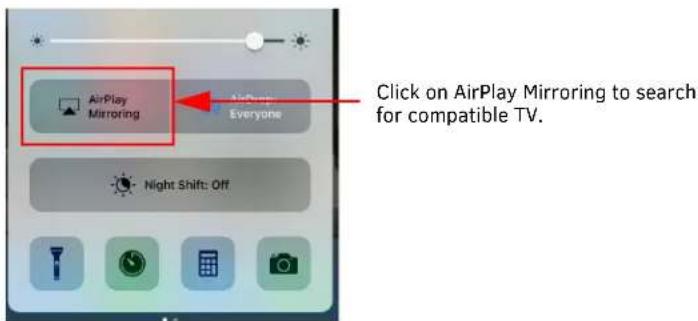
FIG. 94 Airplay Mirroring App
b. Select the Core device listed from the search results (FIG. 95).
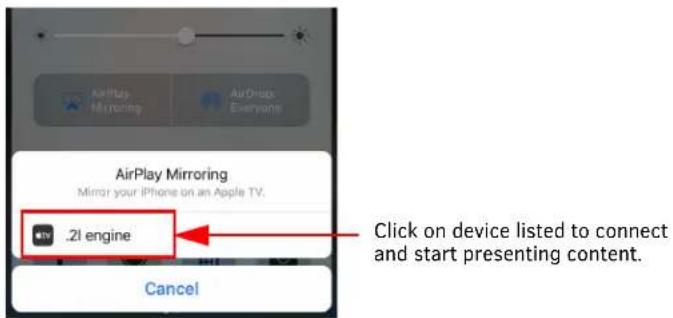
FIG. 95 Airplay Mirroring Search Results
c. The device should now be casting onto the Core display.
Stop Presenting
- To stop presenting, swipe up on your device screen to bring the AirPlay Mirroring App back up select the Acendo Core device displayed.
- Select Turn Off AirPlay Mirroring (FIG. 96).
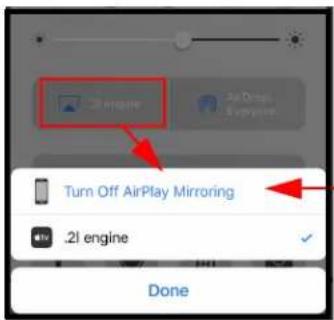
Select to stop presenting from user device.
FIG. 96 Turn Off AirPlay Mirroring
- Select "Done" to close the app.
NOTE: When the random password option is turned on by Administrators when setting up the Access Point for wireless presentation, it may cause connection issues with user devices. Some devices will have to "forget this network" and then reconnect to the Acendo Core Access Point using the latest session password. See Forget this Network on page 42 for more details.
NOTE: If you are still having trouble casting/presenting, have the system Administrator check the firewall settings as described in the Administrators guide.
Miracast Compatible Devices
With Miracast compatible devices (Tablets/Laptops), WIFI needs to be enabled on both the Acendo Core and the Presenting device to communicate between them.
WARNING: If the Acendo Core has Internet Connection Sharing enabled, Miracast screen sharing will not function properly.
- Click on the Screen Sharing Icon on the Acendo Core to discover the correct device ID (FIG. 97).
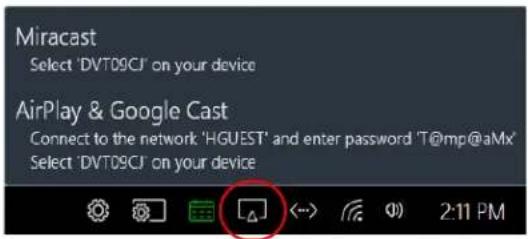
FIG. 97 User Session Screen - Screen Sharing
- Next on your Miracast compatible device, select the Windows Icon or keyboard button to access the Settings Icon (FIG. 98).
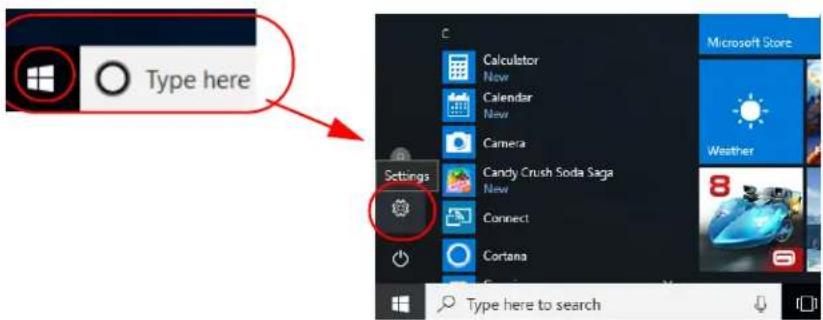
FIG. 98 Windows - Settings Icon
- Select the System Icon to display system settings (FIG. 99).
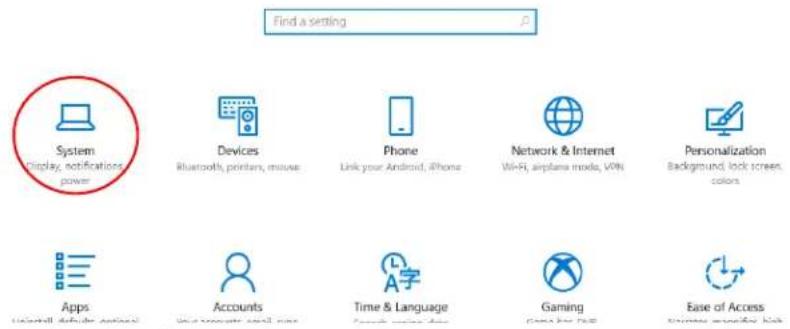
FIG. 99 Windows Settings - System Icon
- In the System window, scroll down under Multiple Displays and select Connect to a wireless display (FIG. 100).
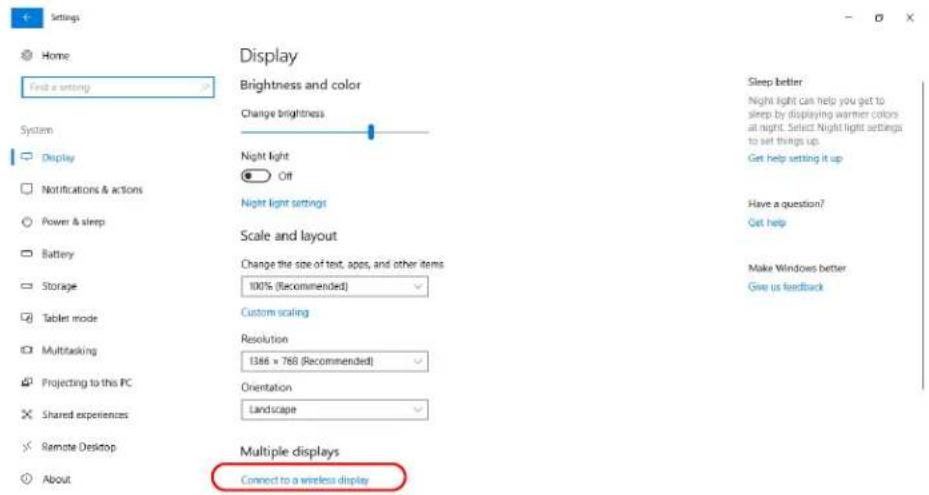
FIG. 100 System - Multiple Displays - Connect to a Wireless Display
- A list of available devices will appear on the right side of the screen under CONNECT(FIG. 101). Select the device that matches the system name on the Acendo Core Screen Sharing pop up.
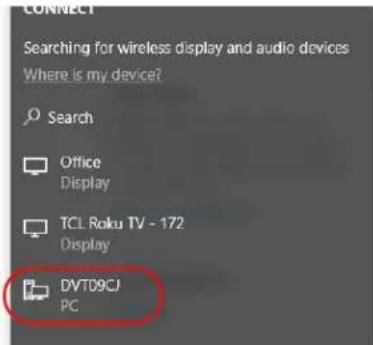
FIG. 101 List of Wireless Devices
- The device will now attempt to connect to the Acendo Core device. If a Passcode is required on Acendo Core, a text field will appear below the device in the Connect list (FIG. 102).
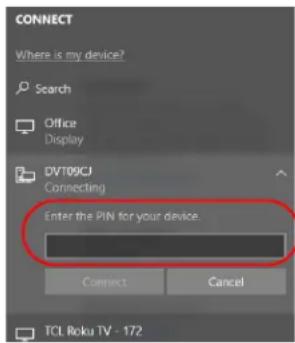
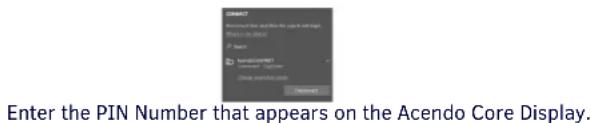
FIG. 102 List of Wireless Devices
Disconnect from Acendo Core using Miracast
- To disconnect after your presentation, go back to the System screen and again click on Connect to a wireless display. The list of devices will again appear on the right of the screen (FIG. 103).
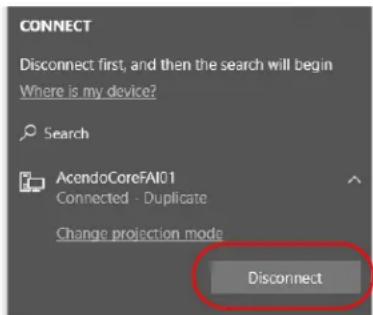
FIG. 103 List of Wireless Devices - Click to Disconnect
- On the current connection there will be a Disconnect button shown. Click on Disconnect to return the Acendo Core to its user home page. Remember to log out of Acendo Core, when done.
Forget this Network
With each user session, the password Key shown on the Core display will change. The user will need to enter the new Key to connect to the SSID in the WiFi list. In order to do this, the WiFi Network needs to be forgotten on the user's device.
- Go to the phone/tablet device Settings and select the WiFi settings (FIG. 104).
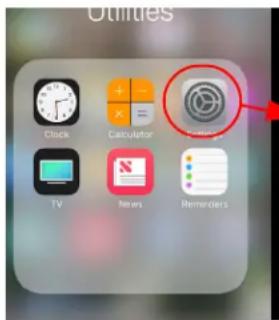
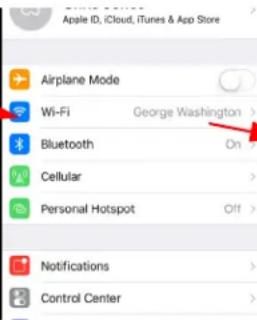
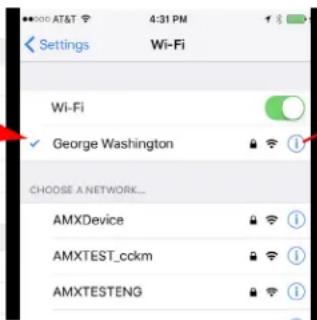
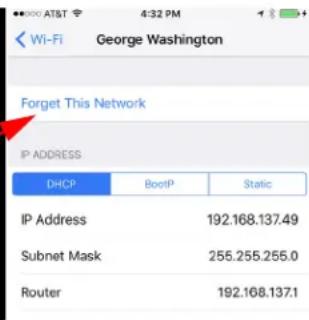
FIG. 104 Device Settings - Forget This Network (iPhone Example)
- Click on the current network to display the network details and click on Forget this Network.
- The device will prompt to forget the network (FIG. 105) Click Forget.
- Users may now reconnect to the Acendo Core and use the new Password as defined at the beginning of this chapter.
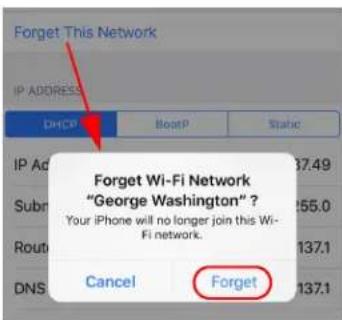
FIG. 105 Forget This Network Confirmation
- AMX Limited Warranty and Disclaimer
- IMPORTANT SAFETY INSTRUCTIONS!
- ESD WARNING
- FCC AND CANADA EMC COMPLIANCE INFORMATION:
- EU COMPLIANCE INFORMATION:
- WEEE NOTICE
- Table of Contents
- User Interface ....1
- Room Booking/Scheduling 5
- Documents 13
- Applications 21
- Remote Desktop 24
- Skype for Business 28
- Web Browser 34
- Screen Sharing (AirServer) 37
- User Interface
- Overview
- Navigating an Acendo Core Session
- Applications Tool bar
- System Tool Bar
- Room Scheduling
- USB Memory Stick Mounted
- Network Status
- WiFi Status
- Volume
- System Clock
- Screen Sharing Icon
- Applications Manager
- Finish
- ? Exit Session
- Room Booking/Scheduling
- Using the Scheduling View
- Book a Room
- Browse Rooms (Room Grouping)
- Extend/Book/Browse
- Start a Meeting
- Scheduled
- Unreserved (Use Room Now)
- Meeting Statuses
- Extend A Meeting
- Documents
- Local Downloads
- Remote Shared Drives
- USB (Mass Storage Device)
- Last Document Location
- Recent Documents
- Applications
- Calculator
- Media
- Remote Desktop
- Locating Computer Name (Locally)
- Remote Connection
- Remote Login
- Remote Desktop Connection Task Bar
- Helpful Shortcut Keys
- Skype for Business
- Scheduling a Skype for Business Meeting
- Auto-Start a Skype for Business Meeting
- User Initiated Skype for Business Meeting
- Unreserved User Initiated Skype for Business Meeting
- Room Booked without Web Conference Info in Invite
- Members
- Web Browser
- Launching the Browser
- Launch Web Browser from Applications
- Saving Files from the Web Browser
- Screen Sharing (AirServer)
- Start Session
- AirPlay and Google Cast
- Connect Device to Network
- Android Devices
- Stop Presenting
- Apple iOS
- Miracast Compatible Devices
- Disconnect from Acendo Core using Miracast
- Forget this Network
Brand : AMX
Model : Acendo Core ACR-5100
Category : Video Conferencing System