SUN4B-IR - Contact grill Sunstone - Free user manual and instructions
Find the device manual for free SUN4B-IR Sunstone in PDF.


User questions about SUN4B-IR Sunstone
0 question about this device. Answer the ones you know or ask your own.
Ask a new question about this device
Download the instructions for your Contact grill in PDF format for free! Find your manual SUN4B-IR - Sunstone and take your electronic device back in hand. On this page are published all the documents necessary for the use of your device. SUN4B-IR by Sunstone.
USER MANUAL SUN4B-IR Sunstone
Welcome & Congratulaons
Congratulations on your purchase of a new grill! We are very proud of our product and we are completely commied to providing you with the best service possible. Your sasfacon is our #1 priority. Please read this manual carefully to understand all the instrucons about how to install, operate and maintain for opmum performance and longevity. We know you'll enjoy your new grill and thank you for choosing our product. We hope you consider us for future purchases.
How to Obtain Service
Before you call
Is there Gas supplied to the Grill?
Is the baery inserted into igniter box?
Have you recently relled the LP Tank?
Please make sure you have the following informaon:
Model Number | Date of Purchase | Serial Number. (The serial number can be located on the range plate, which is located on the right under side of grill, above gas manifold pipe.)
For warranty service, contact SUNSTONE Customer Service Department at (888)-934-9449 or email service@texasbbqwholesalers.com, we will response back within 24 hours.
Must keep copy of your sales slip for proof of purchase.
YOUR NAME
DATE OF PURCHASE ____
ADDRESS
MODEL NO ____ SERIAL NO
COMPANY THAT YOU PURCHASED FROM
Unpacking and Assembly
Your grill arrives nearly ready to use and requires lile assembly. Carefully follow these steps, unpack the grill, removing all packing material and protecve lm.
-
Cut black plasc straps and li grill from pallet (WARNING: Grill is very heavy, you will need help), and posion grill near your island where the grill is being installed.
-
Remove the green straps from around the grill box carton.
-
Li the cardboard box up and o, be sure to lt it back then turn it upside down so the Rosserie Rod and any other packaging materials are retained in box. (It may require two people). Or open top of box rst and remove rosserie rod, and other packaging material.
-
Remove the plasc wrap that protects the grill.
-
Raise hood and unpack all parts
-
Cut plasc es that hold the warming rack, side shelves and spit rod.
-
Remove warming rack at the back of grill by liing up and sliding out.
-
Remove rosserie motor plus care and use manual
-
Reposition the warming rack at the back of the grill

ATTENTION: Improper installaon, adjustment, alteraon, service or maintenance can cause injury property damage. Read the installaon, operang and maintenance instrucons thoroughly before calling or servicing this equipment.
Placement and Locaon
- Never locate this island in an enclosed room, under any sealed overhead structure, or any type of enclosed area such as a garage, shed, or breezeway, and keep clear of trees and shrubs.
- Do not build or place island under or near windows or vents that can be opened into your home.
- Maintain sucient distance as to not overheat any overhead combustible material such as a pao cover.
- The area surrounding your island should be kept clean and free from ammable liquids and other combustible materials such as mops, rags or brooms, as well as solvents, cleaning uids, and gasoline.
- Do not use the island cabinet for storage of ammable or plasc items.
- Do not store the liquid propane (LP) cylinder in the vicinity of the grill or other appliance when it is not being used.
- Do not block any island vent in such a way that will cause venlaon issue. Fresh air must be able to pass through installed vents to safeguard against residual gas accumulaon.

WARNING: Either for Modular or Built-in island installaon, you MUST install proper air venlaon e upper side and lower side of island face wall, if adequate air venlaon is not installed, risk of re, y or explosion may result.
For Built-in Installaons
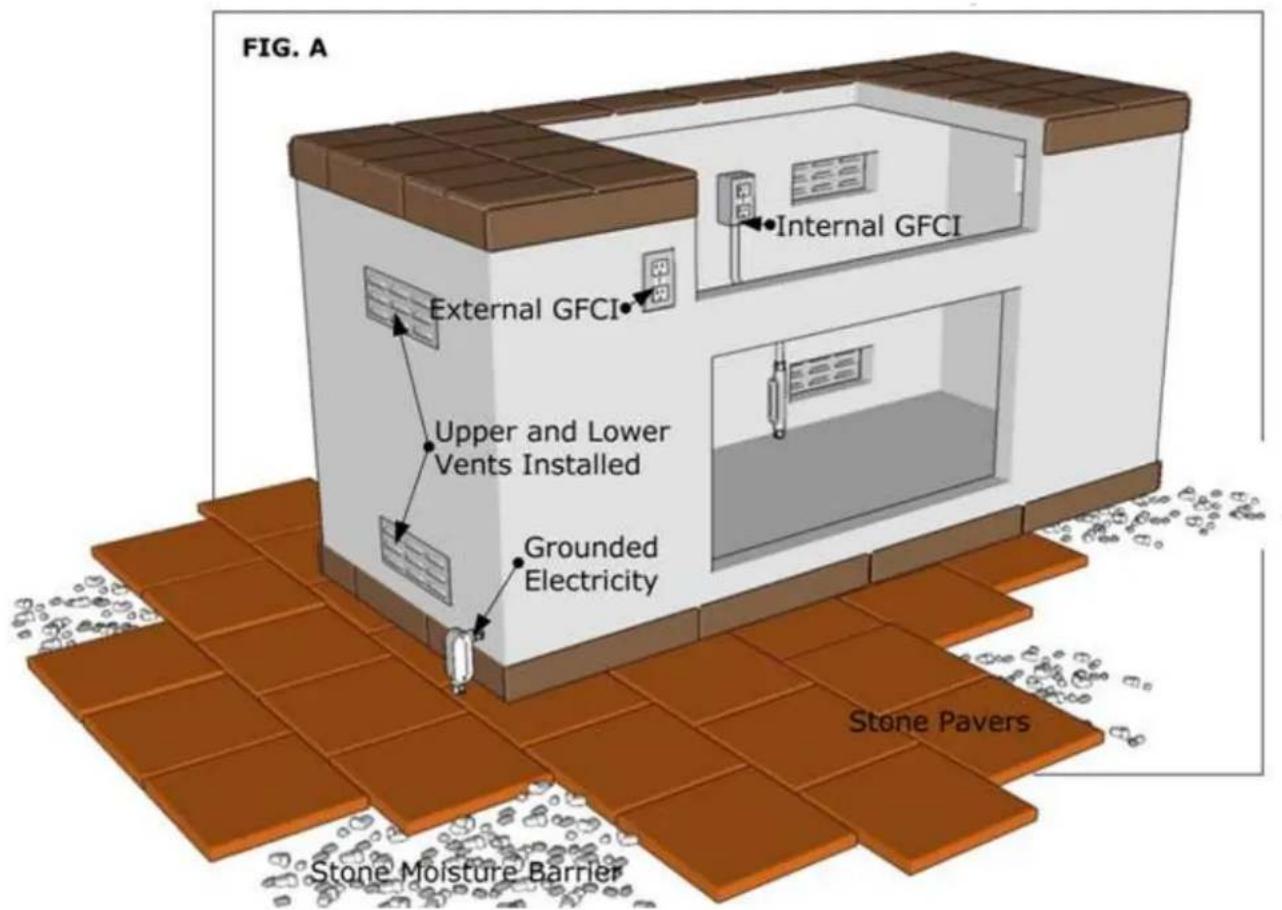
Outdoor Kitchen Island should be built with NON-Combusble applicaons, including masonry stone or brick. Never build deck below grill; grill is supported by counter edge. It is recommended that the enclosure have several venlaon holes or vents to prevent gas build-up in the event of a leak. (See Fig. A-page 7) The deck ledges and counter should be at and level in reference to the oor. If your grill is equipped with a rosserie or lights, electrical service should be provided. GFCI electrical plugs are required for outdoor use. If your grill is equipped with a rosserie, a minimum of 24" (609.6mm) of clearance is needed on each side of the grill for the motor and skewer.
For Modular Installaons
Outdoor Kitchen Island should be built with Non-Combusble applicaons, including Steel Welded Frame, or Steel Stud Frame nished with Cement Board. For modular installaons, a moisture barrier is recommended, using pressure treated composite board under base of island. Interior should be lined with ABS plasc liner as additional protecon. No deck below grill is required; grill is supported by counter edge. It is recommended that the enclosure have several venlaon holes or vents to prevent gas build-up in the event of a leak. (See Fig. A-page 7) The deck ledges and counter should be at and level in reference to the oor. If your grill is equipped with a rosserie or lights, electrical service should be provided. GFCI electrical plugs are required for outdoor use. If your grill is equipped with a rosserie, a minimum of 24" (609.6mm) of clearance is needed on each side of the grill for the motor and skewer.
text_image
FIG. A Internal GFCI External GFCI Upper and Lower Vents Installed Grounded Electricity Stone Pavers Stone Moisture BarrierATTENTION: Upper and lower air vents (20 sq. in. minimum each) MUST BE PROVIDED on both sides of built-in construcon. The height from upper air vent to top surface of island is 5", and the height from lower air vent to the boom is 5".
Island units must have vents cut into the island sides regardless of whether the grill is kept as NG or is converted to LP. If no vent openings are made in the island unit, the grill will overheat and cause a re hazard! If you have an L.P. model with a 20lb cylinder stored in the enclosure, ensure that there at least two air venlaon openings of 20sq inches 180 degrees apart and they are level with the cylinder valve. Another two openings with the same dimensions and distance are required to be level with the base of the cylinder.
- Do not use an extension cord to supply power to your island, or appliance. Such use may result in a re, Electrical shock or other personal injury.
- Do not install a fuse in the neutral or ground circuit. A fuse in the neutral or ground circuit may result in an Electrical shock hazard.
- Use only Ground Fault Interrupter (GFI) protected circuit with this outdoor kitchen island.
- Keep all electrical components covered and secured away from any water or other liquids.
- Use only extension cords with a 3 prong grounding plug, rated for power of equipment, and approved for outdoor use with a W-A marking.

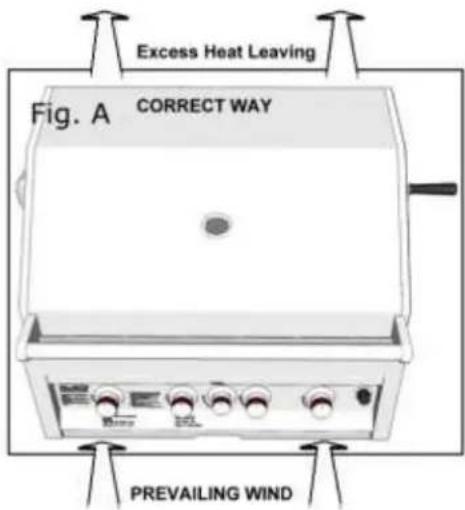
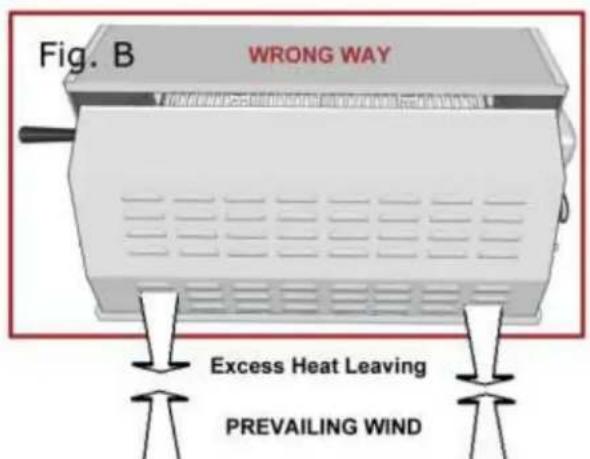
CAUTION: Wind blowing into or across the rear oven lid vent (see g. B page 9) can cause poor performance and/or dangerous overheang. Orient the grill so that the prevailing wind blows toward front of grill. (See g. A page 9)
Windy Condions
Your Sunstone™ grill is specially designed to draw fresh air in through the front, and in direct to the boom burners. When grilling the hot gases are then released through the back of grill through a venng system. Using your grill in windy condions may disrupt the front-to-back air ow.
If, while the hood is closed and you fail to see the hood temperature gauge rise, use extreme cauon, turn gas ow to OFF posion, if knobs are very hot, turn gas o at source.
- For breezy days, be careful not to leave the front hood down for more than 15 minutes, when the burners are on. (Never leave grill unaended when in operaon)
- If you suspect the grill is overheang, using an oven mi, open the front hood. Then adjust the burner control knob to o posion.
- Orient the grill so the Prevailing winds are not blowing into the rear or side of grill. (See gure A Correct Way, and gure B Wrong Way. Page 9)

CAUTION: Any damage resulting from windy conditions causing overheang, including melted s or igniter wires and impulse igniter box. Also any discoloraon from heat buildup, is excluded warranty coverage.

NOTICE: Ensure grill is installed with proper air ow for correct combuston air and cooling air. Airrow MUST be maintained for the grill to perform as it was designed. If airrow is blocked, weang will occur and poor combuston will result.
Locaon
Locate the grill only in a well venlated area. Never locate the grill in a building, garage, breezeway, shed or other such enclosed areas without an approved venlaon system. During heavy use, the grill will produce a lot of smoke. Ensure there is adequate area for it to dissipate.
IMPORTANT: Gas ngs, regulator, and installer supplied shut-o valves must be easily accessible.

ATTENTION: Check your local building codes for the proper method of installaon. In the absence of local codes, this unit should be installed in accordance with the Naonal Fuel Gas Code No. 223.1-8 USA or CAN/CGA-B149.1/.2 Natural Gas/Propane Code (Canada) latest edition or the Naonal Electrical Code ANSI/NFPA No. 70 or the Canadian Electrical Code CSA C22.1, 1990 or latest version.
text_image
Excess Heat Leaving Fig. A CORRECT WAY PREVAILING WINDIn FIG. B, Excess heat leaves through back of grill, but is blocked by Prevailing Wind, causing overheang of grill.
text_image
Fig. B WRONG WAY Excess Heat Leaving PREVAILING WIND1. Slide Grill in Place
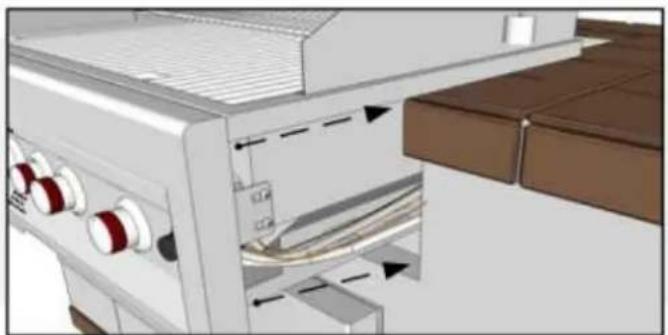
Your Sunstone™ grill is specially designed with an internal built in hanger lip located at the Right, Le and Back sides. The grill lip allows it to hang by the three supported edges on the right, le and back. The front control panel requires no supporting edge; it is designed to hang down the front of your cut-out.
natural_image
3D rendering of a stainless steel kitchen appliance with internal components and piping (no visible text or symbols)2. Allow for Venlaon
Your Sunstone™ grill is engineered with special vents on the back of unit, which allow proper airrow out of the back of grill, also increased airrow into Infra-red Burner gas chamber. Be sure you allow a minimum of 4" behind grill for proper air venlaon. Slide grill all the way into cut-out, so there are no gaps present to inside of island frame.

natural_image
Mechanical assembly diagram showing a lever mechanism with motion arrows (no text or symbols)3. Securing in Place
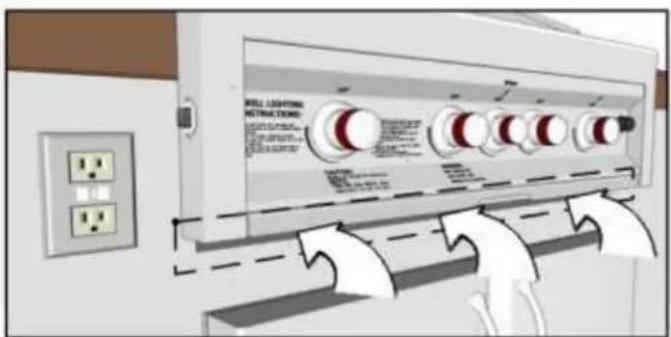
The control panel is designed to sit ush against the island face. If counter top extends beyond the islands face, creang a countertop overhang, it must be cut ush with the island face where the width of the control panel or a gap will be created exposing the forward porons of the le and right side rewalls. Also be sure to allow at least a 1" of clearance below grills drip pan, for proper airow venlaon.
text_image
WELL LIGHTING RETIRECTIONS: 1. 100% 50% 2. 50% 100% 3. 100% 150% 4. 150% 200% 5. 200% 250% 6. 250% 300% 7. 300% 350% 8. 350% 400% 9. 400% 450% 10. 450% 500% 11. 500% 550% 12. 550% 600% 13. 600% 650% 14. 650% 700% 15. 700% 750% 16. 750% 800% 17. 800% 850% 18. 850% 900% 19. 900% 950% 20. 950% 1000%
NOTICE: Ensure grill is installed with proper air ow for correct combuston air and cooling airow.
Airow MUST be maintained for the grill to perform as it was designed. If airow is blocked, overheang will occur and poor combuston will result. DO NOT INSTALL PLATFORM DIRECTLY UNDER GRILL.
Minimum Clearances
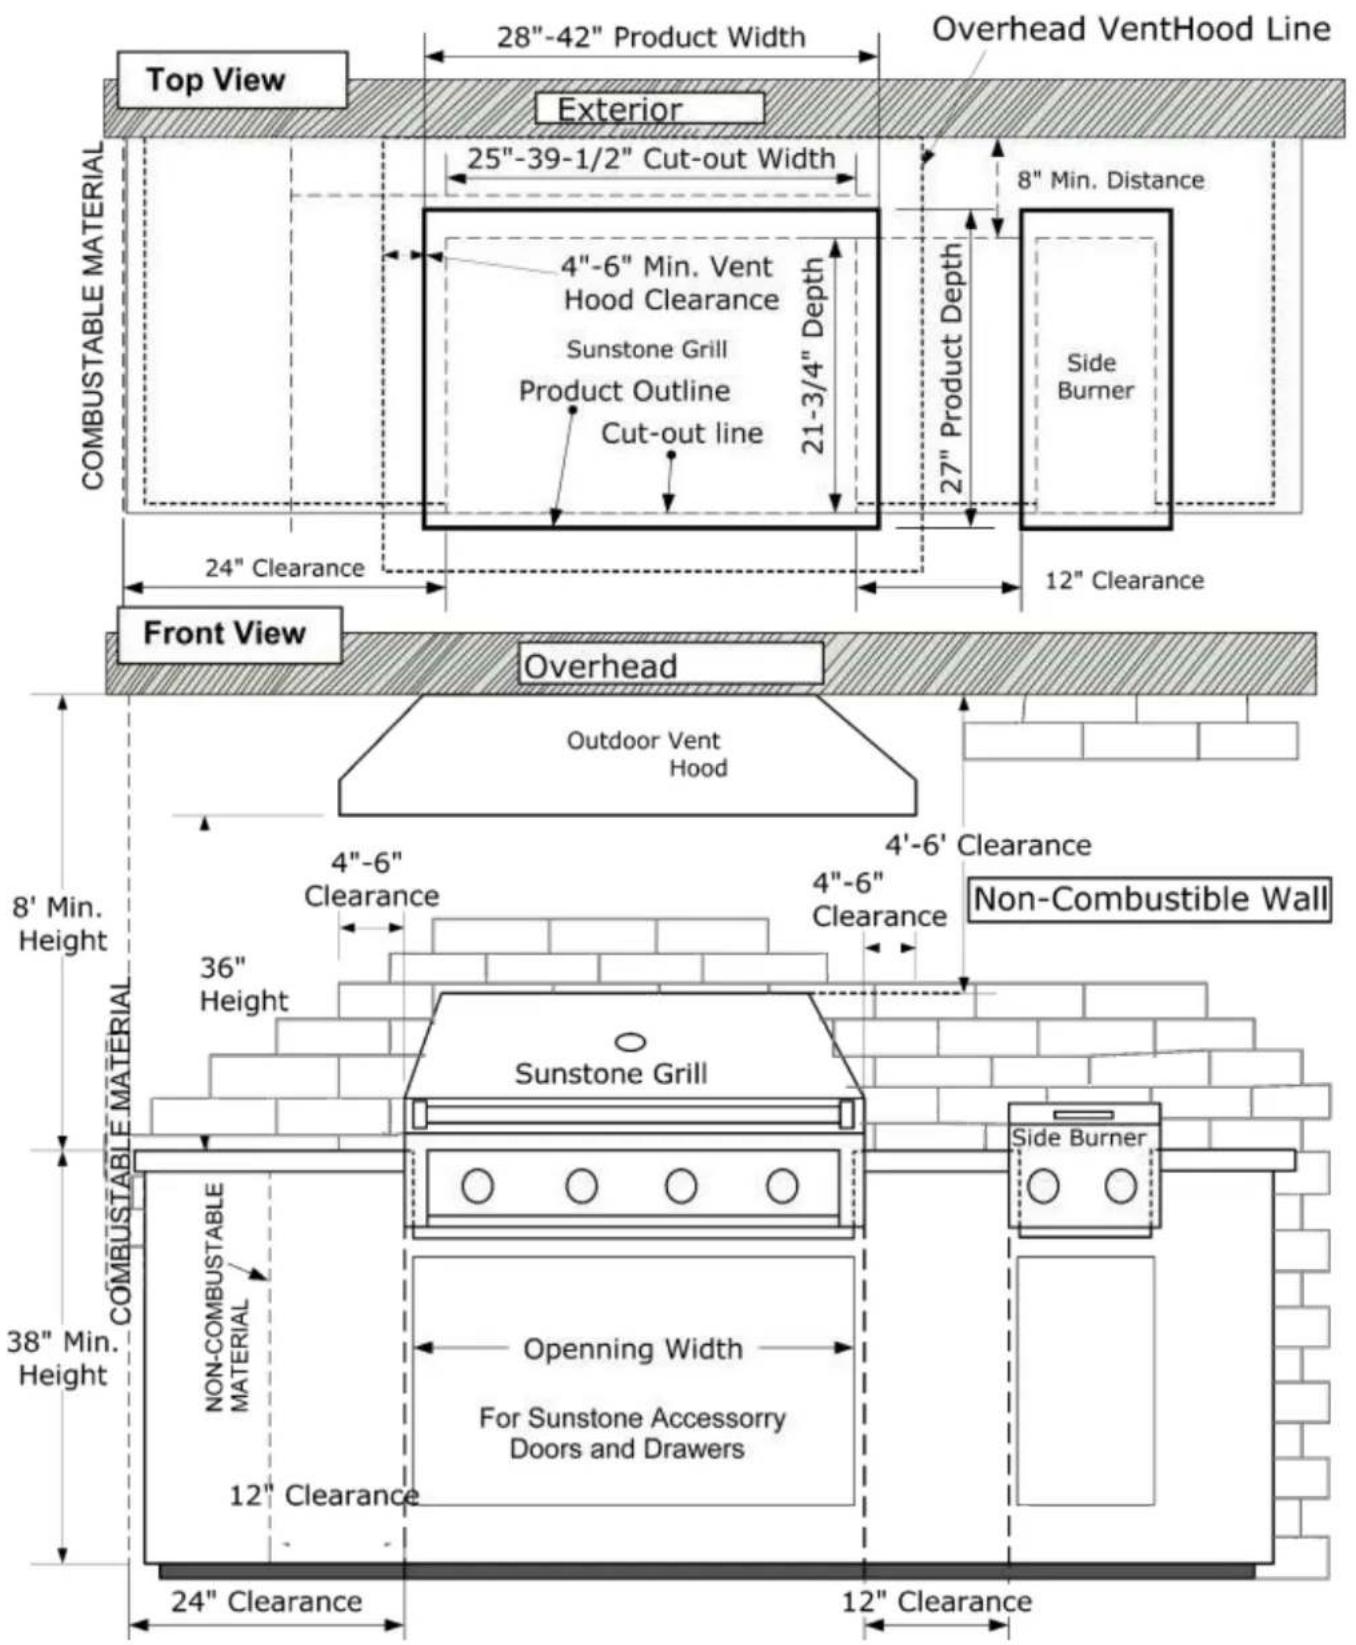
When installing the grill in any area was an exterior wall, or overhead structure is nearby, pay close aenon to the minimum distance requirements. For installaons with a wall behind grill, it is especially important to allow enough room for adequate airrow, or issues may occur. For islands that are built using combustible materials, you must not surround same materials around any appliance, or risk re. You MUST use Non-Combustible building materials within 24" around all sides of appliance, ie. Stone blocks, steel studs. Never locate the grill where the exhaust will be dicult to clean. If you wish to use the rosserie opon, the space is essenal for motor and skewer clearance.
Minimum Requirements
| TOP VIEW See Diagram (Page 11) to Right | |
| From Back Cut-Out Grill Line to Wall | 8" Min. Clearance |
| From Counter to Outdoor Vent Hood | 36" Min. Clearance |
| From Floor to Counter Top | 38" Min. Clearance |
| From Grill to Vent Hood Width | 4"-6" Min. Clearance |
| From Appliance to Appliance | 12" Min. Clearance |
| From Appliance to Combusble Material | 24" Min. Clearance |

ATTENTION: This grill MUST NOT be located in any fully enclosed area of any kind. There should a minimum of 4-6 feet clearance from the top hood of grill and any overhead combustible structure.
Vent Hood Exhaust
If installed or used under a pao roof, the cooking grid area must be fully covered by an exhaust hood with a vent. An exhaust fan with a rang of a minimum 1,000 CFM (cubic feet per minute) (472 liters per second) or more may be necessary to eecvely remove smoke and other cooking by-products from the area under the unprotected overhead combustible construcon.
Minimum Requirements
| FRONT VIEW See Diagram (Page 11) to Right | |
| From Counter to Overhead Structure | 8' . Min. Clearance |
| From Counter to Outdoor Vent Hood | 36" Min. Clearance |
| From Floor to Counter Top | 38" Min. Clearance |
| From Grill to Vent Hood Width | 4"-6" Min. Clearance |
| From Appliance to Appliance | 12" Min. Clearance |
| From Appliance to Combusble Material | 24" Min. Clearance |
text_image
Overhead VentHood Line 28"-42" Product Width Top View Exterior 25"-39-1/2" Cut-out Width 8" Min. Distance COMBUSTABLE MATERIAL 4"-6" Min. Vent Hood Clearance Sunstone Grill Product Outline Cut-out line 21-3/4" Depth 27" Product Depth Side Burner 24" Clearance 12" Clearance Front View Overhead Outdoor Vent Hood 4'-6" Clearance Non-Combustible Wall 8' Min. Height 4"-6" Clearance 36" Height Sunstone Grill 38" Min. Height NON-COMBUSTABLE MATERIAL 12" Clearance 12" Clearance Opening Width For Sunstone Accessory Doors and Drawers Side Burner 24" ClearanceINSTALLATION AND ASSEMBLY -Cooking Zones
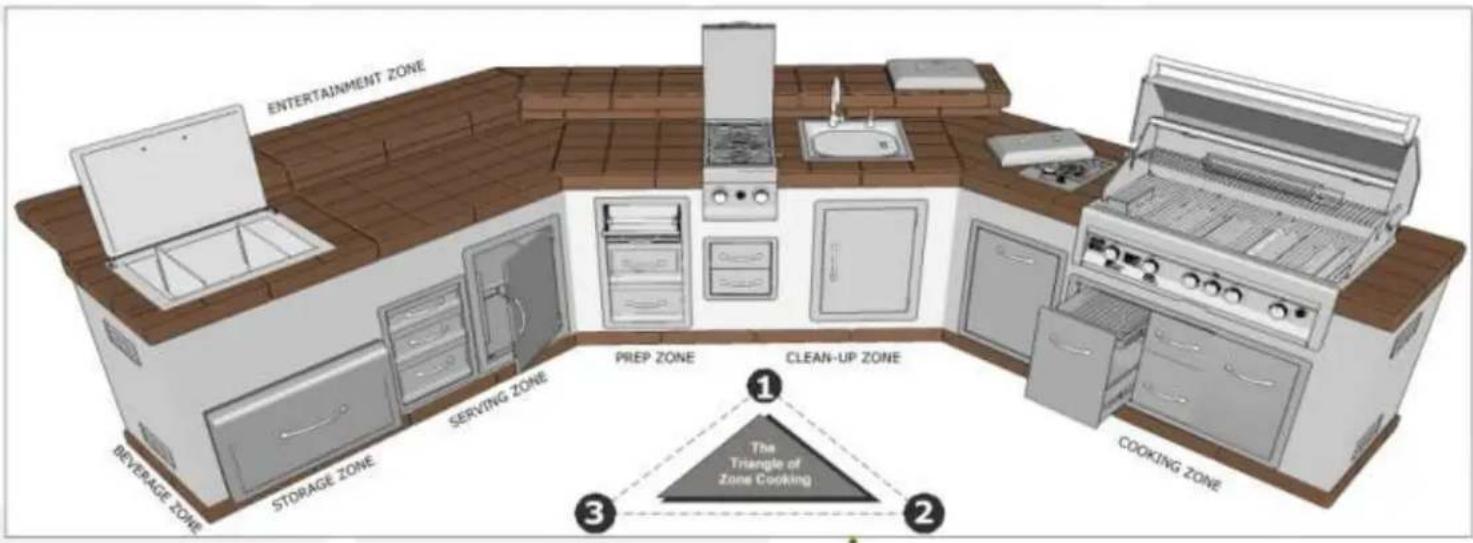
ENTERTAINMENT ZONE:
The best locaon for your entertainment zone is on one end of the island, far away from your cooking zone, but right next to your beverage zone. Make sure you have plenty of comfy chairs situated here.
SERVING ZONE:
The best locaon for your serving zone is in the center or heart of the island, adjacent from the entertainment zone, and easily accessible to all your many guests at once.
PREP ZONE:
The best locaon for your food preparaon zone is the longest counter space that is near the sink and your grill top or near the ice chest.
text_image
ENTERTAINMENT ZONE BEVERAGE ZONE STORAGE ZONE SERVING ZONE PREP ZONE CLEAN-UP ZONE COOKING ZONE The Triangle of Zone Cooking 1 2 3CLEAN-UP ZONE:
The best locaon for your cleanup zone is as close to your sink as possible. Items located near your cleanup zone will include not only items you'll use to clean up your outdoor kitchen and dishes, below access storage, and trash drawer for easy clean-up.
COOKING ZONE:
For the best cooking zone locaon, posion it nearest to the 'triangle' as possible either on one end, or opposite of entertainment zone. It's always best to give this area its own space, so the chef can be more focused on cooking great food.
BEVERAGE ZONE:
The best locaon for your beverage zone is on one end of the island, far away from your cooking zone, but right next to your entertainment zone. This makes it far more ease of use for your many guests.
STORAGE ZONE:
The best locaon for your storage zone is the either on one end of the island or right in the middle. This zone should always be in an area that is easily accessible, when mulple people are using the same space.