R580 - Robot vacuum Coredy - Free user manual and instructions
Find the device manual for free R580 Coredy in PDF.


User questions about R580 Coredy
0 question about this device. Answer the ones you know or ask your own.
Ask a new question about this device
Download the instructions for your Robot vacuum in PDF format for free! Find your manual R580 - Coredy and take your electronic device back in hand. On this page are published all the documents necessary for the use of your device. R580 by Coredy.
USER MANUAL R580 Coredy
1.1 Use Restrictions 01
1.2 Battery and Charging 02
2 Product Diagram 04
2.1 Robot 04
2.2 Accessories 06
2.3 Charging Dock 07
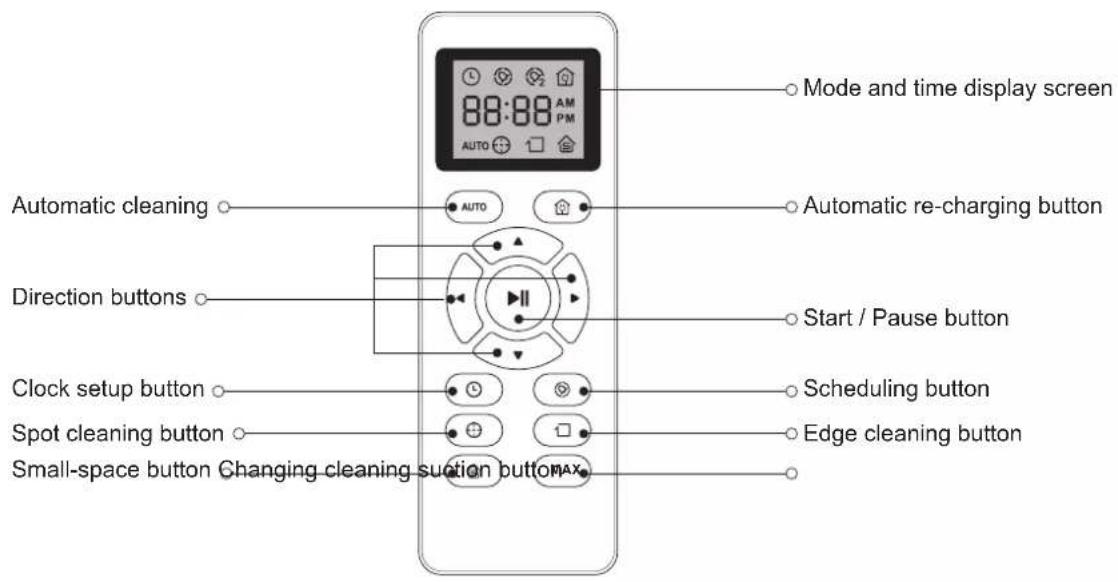
2.4 Remote Control 08
3 Operating and Programming 09
3.1 Notes Before Cleaning 09
3.2 Quick Start 10
3.3 Control with the "Coredy Robot" APP....12
3.4 How Coredy R580 Clean Your Home ....18
3.5 Floor Mopping Cleaning ....20
3.6 Cleaning Schedule 22
4 Regular Robot Care 24
4.1 Emptying Robot's Bin and Cleaning Robot's Filter.... 25
4.2 Cleaning Robot's Water Tank and Mop Cloth (Sold Separately).... 26
4.3 Cleaning Robot's Side Brush 27
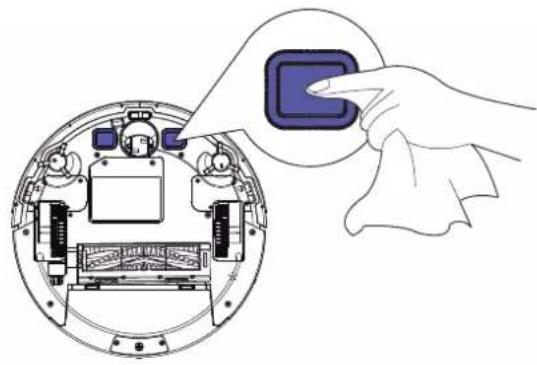
4.4 Cleaning Robot's Cliff Sensors and Charging Contacts 27
4.5 Cleaning Robot's Floor Tracking Sensor 28
4.6 Cleaning Robot's Rolling Brush 28
4.7 Battery and Charging Information 29
5 Troubleshooting 31
6 Specifications 34
7 Customer Service 35
1 Important Safety Information
This appliance can be used by children aged from 8 years and above and persons with reduced physical, sensory or mental capabilities or lack of experience and knowledge if they have been given supervision or instruction concerning use of the appliance in a safe way and understand the hazards involved. Children shall not play with the appliance. Cleaning and user maintenance shall not be made by children without supervision.
The robot must be used in accordance with the directions in this Instruction Manual. Coredy inc cannot be held liable or responsible for any damages or injuries caused by improper use.
To reduce the risk of injury or damage, keep these safety precautions in mind when setting up, using and maintaining your robot:
- Read all safety and operating instructions before operating your robot.
- Retain the safety and operating instructions for future reference.
- Heed all warnings on your robot, battery, charging Dock and in the owner's manual.
- Follow all operating and use instructions.

The symbol on the product or its packaging indicates:
Do not dispose of electrical appliances as unsorted municipal waste, use separate collection facilities. Contact your local authority for information regarding the collection systems available. If electrical appliances are disposed of in landfills or dumps, hazardous substances can leak into the groundwater and get into the food chain, damaging your health and well-being. Please contact your local or regional waste authority for more information on collection, reuse and recycling programs.
1.1 Use Restrictions
- Your robot is for indoor use only. Do not use the robot outdoor, commercial or industrial environments.
-
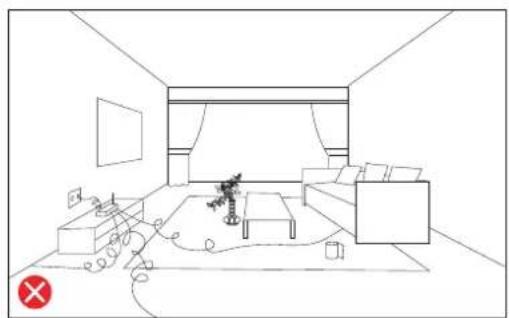
Before using this device, pick up objects like clothing, loose papers, pull cords for blinds or curtains, power cords, and any fragile objects. If the device passes over a power cord and drags it, there is a chance an object could be pulled or a table or shelf.
-
Your robot is not a toy. Do not sit or stand on this device. Small children and pets should be supervised when your robot is operating.
- Store and operate your robot in room temperature environments only.
- Do not use this device to pick up anything that is burning or smoking.
- Do not use this device to pick up spills of bleach, paint, or other chemicals, or anything wet.
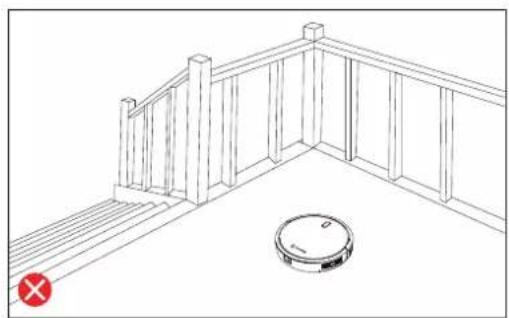
- If the room to be cleaned contains a balcony, a physical barrier should be used to prevent access to the balcony and ensure safe operation.
- This appliance is not intended for use by persons (including children) with reduced physical, sensory or mental capabilities, or lack of experience and knowledge, unless they have been given supervision or instruction concerning use of the appliance by a person responsible for their safety.
- Children should be supervised to ensure they do not play with the robot. Cleaning and maintenance shall not be performed by children without supervision.
- Do not place anything on top of your robot.
- Be aware that the robot moves on its own. Take care when walking in the area that the robot is operating in to avoid stepping on it.
- Do not operate the robot in areas with exposed electrical outlets in the floor.
1.2 Battery and Charging
- Use only rechargeable battery packs with the correct specification approved by Coredy.
- Charge using a standard outlet only. Product may not be used with any type of power converter. Use of other power converters will immediately void the warranty.
- Do not use a Charging Dock with a damaged cord or plug. If the cord or plug is damaged, it must be serviced by the manufacturer or similarly qualified persons.
• Always charge and remove the battery from your robot and accessories before long-term storage or transportation. -
Charge indoors only.
-
Your robot's Charging Dock may be protected with a surge protector in the event of severe electrical storms.
- Never handle the Charging Dock with wet hands.
• Always disconnect your robot from the Charging Dock before cleaning or maintaining it. - Please ensure voltage rating for enclosed Charging Dock matches standard outlet voltage.
- Used battery packs should be placed in a sealed plastic bag and disposed of safely according to local environmental regulations.
- Before every use, check the battery pack for any sign of damage or leakage. Do not charge damaged or leaking battery packs.
- If the battery pack is leaking, contact Coredy Customer Service for disposal.
- The battery pack must be removed from the robot before disposal.
- Do not crush or dismantle battery packs. Do not heat or place the battery pack near any heat source.
- Do not incinerate the battery pack. Do not short-circuit the battery pack.
- Do not immerse the battery pack in any liquid.
This device complies with Part 15 of the FCC Rules. Operation is subject to the following two conditions: (1) this device may not cause harmful interference, and (2) this device must accept any interference received, including interference that may cause undesired operation.
2 Product Diagram
2.1 Robot
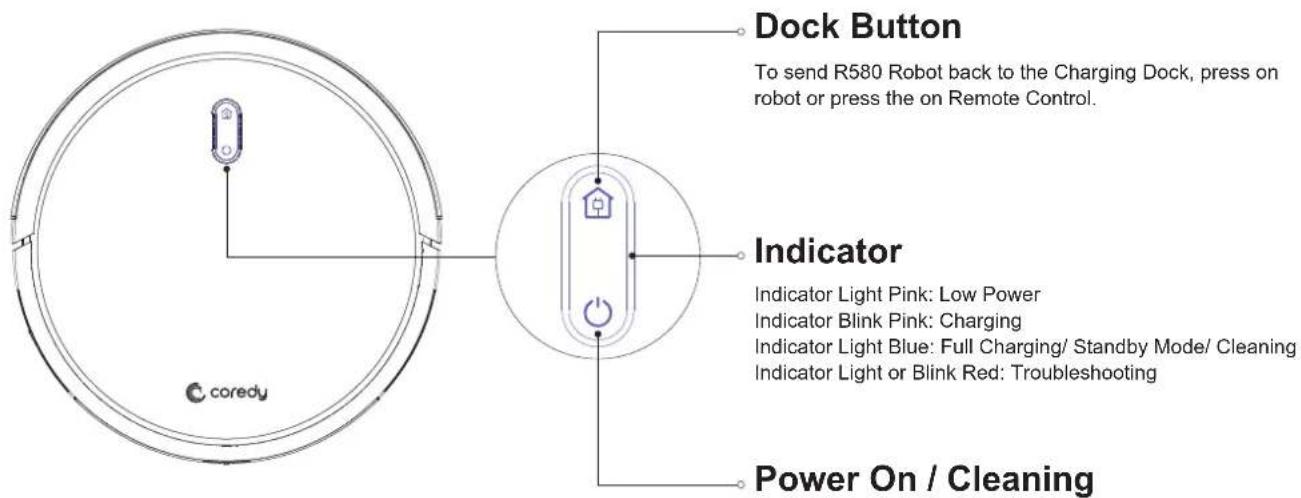
text_image
Dock Button To send R580 Robot back to the Charging Dock, press on robot or press the on Remote Control. Indicator Indicator Light Pink: Low Power Indicator Blink Pink: Charging Indicator Light Blue: Full Charging/ Standby Mode/ Cleaning Indicator Light or Blink Red: Troubleshooting Power On / CleaningReset the Wi-Fi Connection
Press and hold the 🔒 and ⏻ button on Robot for 3 seconds to reset the Wi-Fi connection.
Press and Hold On to Power On or Power Off
Press to Start Cleaning
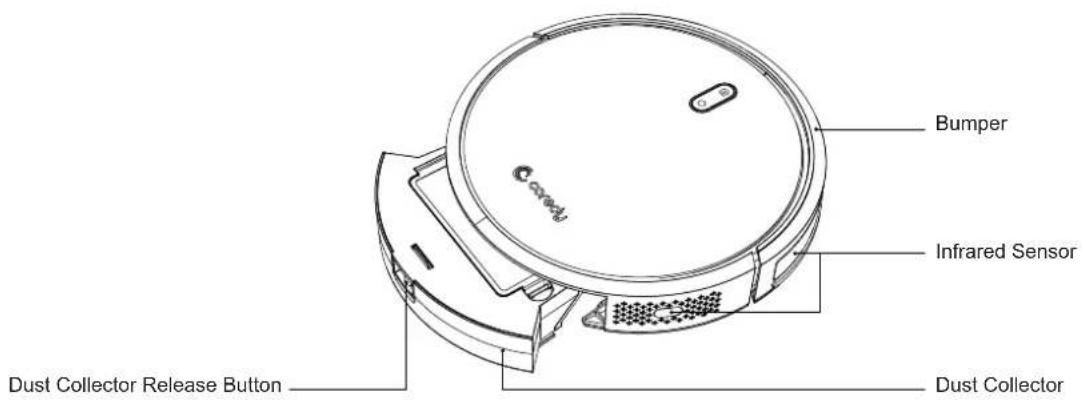
text_image
Bumper Infrared Sensor Dust Collector Release Button Dust Collector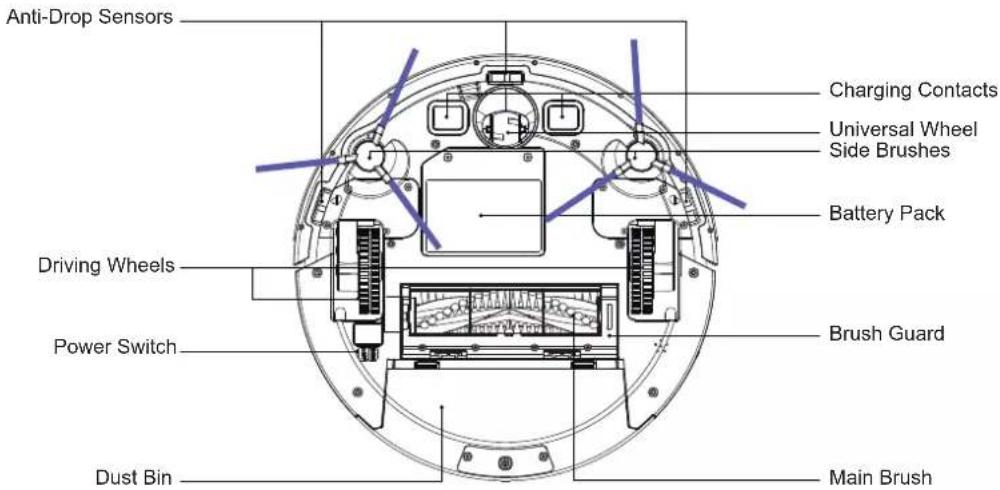
text_image
Anti-Drop Sensors Charging Contacts Universal Wheel Side Brushes Battery Pack Driving Wheels Power Switch Brush Guard Dust Bin Main Brush2.2 Accessories
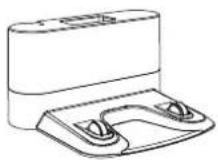
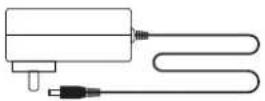
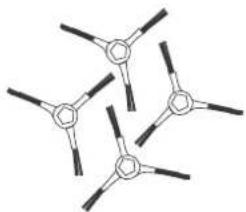
1 x Charging Dock 1 x Adapter 1 x Remote Control
chemical
Chemical structure diagram showing a central hexagonal ring with three substituents and four surrounding rings connected by single bonds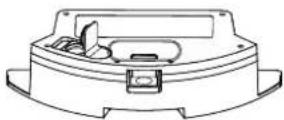
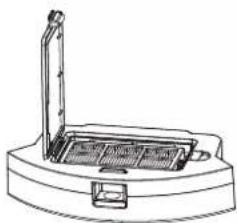
1 x Water Tank (Sold Separately)
natural_image
Line drawing of a mechanical device with a handle and internal components (no text or symbols)1 x Dust Bin4 x Side Brushes
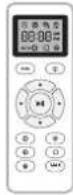
(with 2 x AAA batteries)
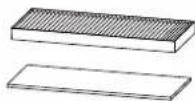
1 x Washable HEPA Filter and Sponge Filter
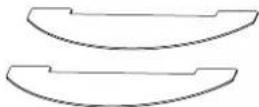
2 x Cleaning Cloths (Sold Separately)
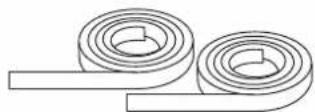
2 x Boundary Strips 6.6 ft/2m Length (Sold Separately)
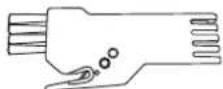
1 x Cleaning Brush
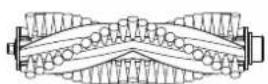
1 x Main Brush
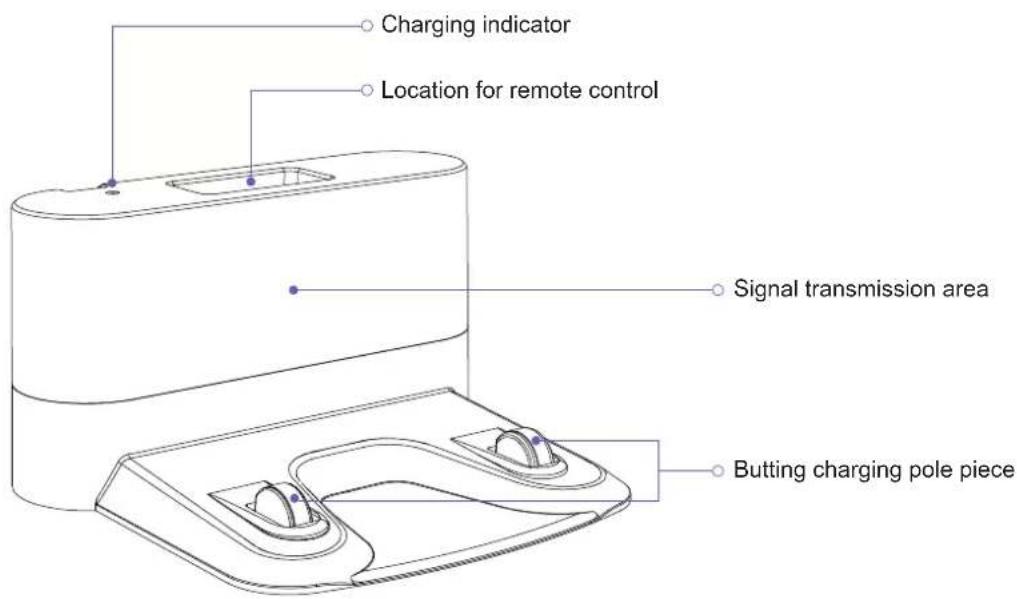
2.3 Charging Dock
text_image
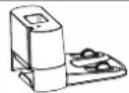
Charging indicator Location for remote control Signal transmission area Butting charging pole piece2.4 Remote Control
text_image
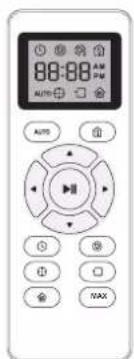
Mode and time display screen 88:88 AM PM AUTO Automatic cleaning Auto Automatic re-charging button Direction buttons Start / Pause button Clock setup button Scheduling button Spot cleaning button Edge cleaning button Small-space button Changing cleaning suction button MAX*Install 2 AAA batteries (included in the package) before using the remote control for the first time.
3 Operating and Programming
3.1 Notes Before Cleaning
natural_image
Line drawing of a cozy living room with sofa, coffee table, lamp, and wall (no text or symbols)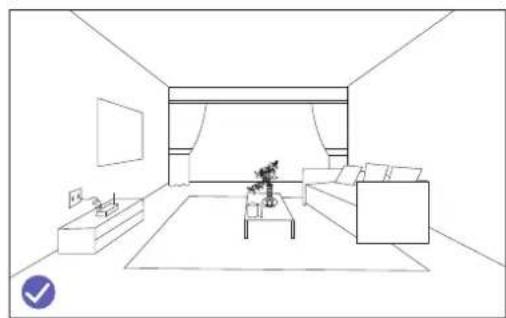
natural_image
Line drawing of a modern living room interior with sofa, coffee table, and wall (no text or symbols)Before using Robot, pick up objects like clothing, loose papers, pull cords for blinds or curtains, power cords, and any fragile objects. If the Robot passes over a power cord and drags it, there is a chance an object could be pulled off a table or shelf.
natural_image
Line drawing of a balcony with railings and a circular object, no text or symbols present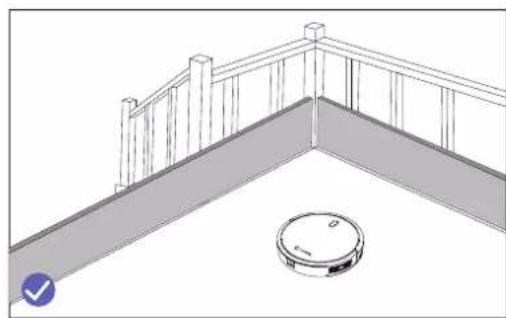
natural_image
Architectural sketch of a balcony with railing and a circular vacuum cleaner (no text or symbols)If the room to be cleaned contains a balcony, a physical barrier should be used to prevent access to the balcony and ensure safe operation.
3.2 Quick Start
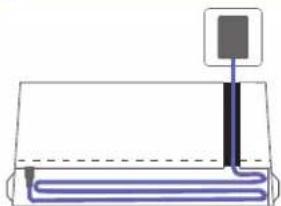
- Plug in the Charging Dock and place the remaining wire into the trunking at the bottom of the Charging Dock
Note: Failure to place the remaining wire into the trunking, may cause Robot to become stuck while charging or cleaning.
natural_image
Simple line drawing of a rectangular object with a vertical line and a curved blue line, no text or symbols present.- Place the Charging Dock on a hard level surface and against a wall.
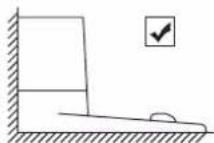
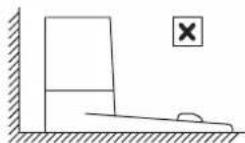
- Charging Dock Position
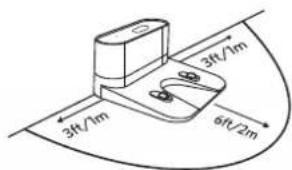
Place the Charging Dock against the wall and make sure it is in an open and uncluttered area leaving at least:
- 2 meters (6 feet) in the front of the Charging Dock.
• 1 meter (3 feet) on both sides of the Charging Dock.
text_image
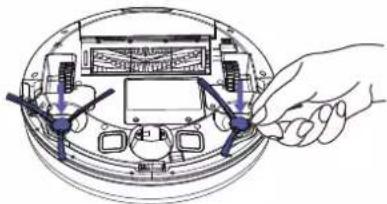
3ft/1m 3ft/1m 6ft/2m- Install Side Brushes
Attach Side Brushes to the bottom of Coredy R580 by pressing a brush into each slot until it clicks.
natural_image
Hand holding a small electronic device with labeled ports and components (no text or symbols visible)- Activate the Robot
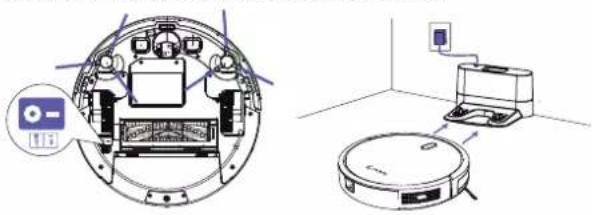
Place Coredy R580 onto the Charging Dock, making sure the metal charging contacts on the Charging Dock match up with those underneath the robot.
Note: Initial Use, Switch on the Power Button on the Bottom.
If successful, you will hear a series of tones. Once the ⏻ Power button illuminates, Coredy R580 is ready for use.
natural_image
Technical diagram showing a circular device with internal components and a robotic vacuum cleaner in a room (no text or symbols present)6. Start Cleaning Cycle
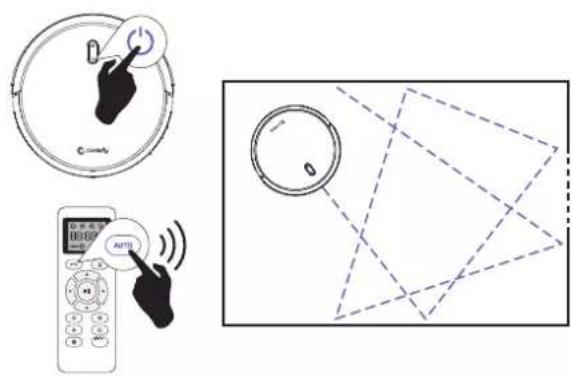
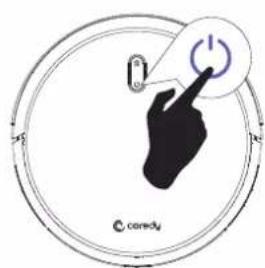
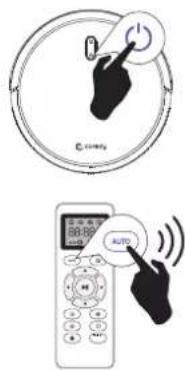
- Press the ⏻ power button once to wake up the robot.
- Press the ⏻ power button again to start a cleaning cycle (or AUTO button on Remote Control).
If its battery gets low before finishing a cleaning cycle, robot returns to the Charging Dock to recharge.
If the Charging Dock is inaccessible, Robot will not be able to recharge, please place the robot manually on Charging Dock for charging. (Refer Activate the Robot)
Note: Please refer to section 3.4 for more Cleaning Mode.
text_image
Diagram showing three UI elements: a CD player with control knob, a remote control with 'AUTO' button, and a camera screen with dashed-line perspective view.7. Pause
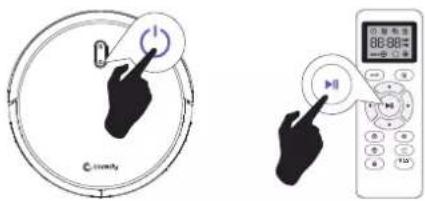
- To pause the robot during a cleaning cycle press the ⏻ button on robot or press the ▶ button on the Remote Control.
• To resume the cleaning cycle, press ⏻ button again.
• To send robot back to the Charging Dock, press 🏠 button.
Note: The actions listed above can also be managed from the Remote Control.
text_image
Diagram showing hand interacting with a circular device and a remote control panel, both with Chinese labels.8. Reset
- Press and hold the 🔒 and ⏻ button on Robot for 3 seconds to reset the Wi-Fi connection.
text_image
comedy3.3 Control with the "Coredy Robot" APP
To enjoy all available features, it is recommended to control your Robot via the Coredy Robot app.

Scan the QR code as below to download the latest version of APP or download from the App Store (iOS devices) or Google Play (Android devices).

text_image
QR code with a central logo, likely linking to a digital resource or website.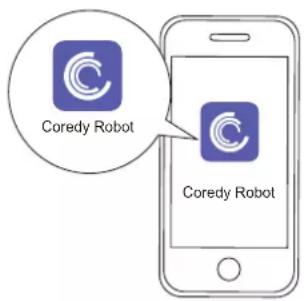
text_image
Coredy Robot Coredy Robot

Before you start, make sure that:
- Your smartphone or tablet is connected to a 2.4GHz Wi-Fi network (Only support 2.4GHz network).
- Your smartphone or tablet is running iOS 8.0 (or above) or Android 4.4 (or above).
- The Wi-Fi status light on Robot is rapidly flashing blue.
- Robot is attached to the Charging Base to ensure it has enough power during setup.
1. Create a user account
-
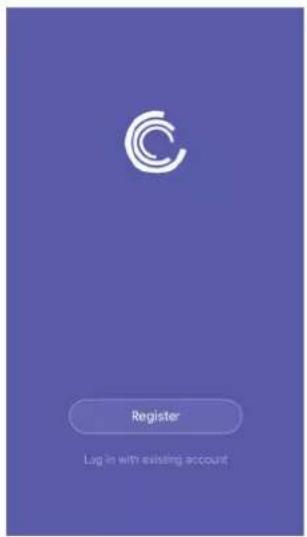
Open the app and create a user account.
-
Agree the "privacy Policy" 3. Create your account with the mobile phone number or E-mail ID.
-
Enter verification code
text_image
Register Log in with existing account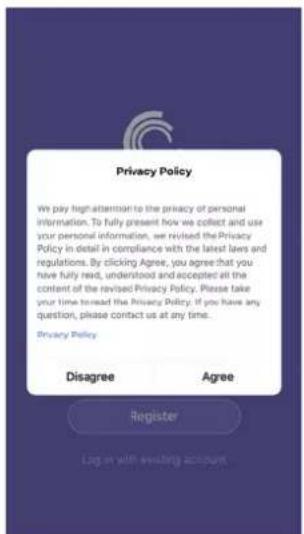
text_image
Privacy Policy We pay high attention to the privacy of personal information. To fully present how we collect and use your personal information, we revised the Privacy Policy in detail in compliance with the latest laws and regulations. By clicking Agree, you agree that you have fully read, understood and accepted all the content of the revised Privacy Policy. Please take your time to read the Privacy Policy. If you have any question, please contact us at any time. Privacy Policy Disagree Agree Register Log on with existing accounts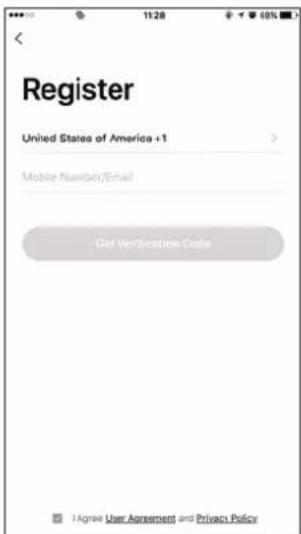
text_image
Register United States of America +1 Mobile Number/Email Get Verification Code I Agree User Agreement and Privacy Policy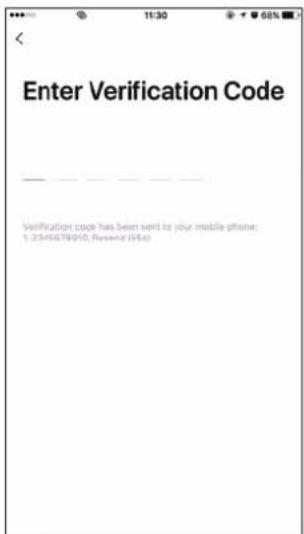
text_image
Enter Verification Code Verification code has been sent to your mobile phone: 1.23/5478910, Present (USE)- Set your password with 6-20 characters.
2. Add Device
-
Press "Add Device" or tap the "+" in the top right corner to add.
-
Add a Coredy 580 Robot to your Coredy account.
Wifi Connection
- Turn on the main power switch on the bottom of Robot, make sure the Wi-Fi indicator light on Robot is flashing rapidly, then press "Next".

text_image
Set Password Password contains 6 to 20 characters, including letters and digits Done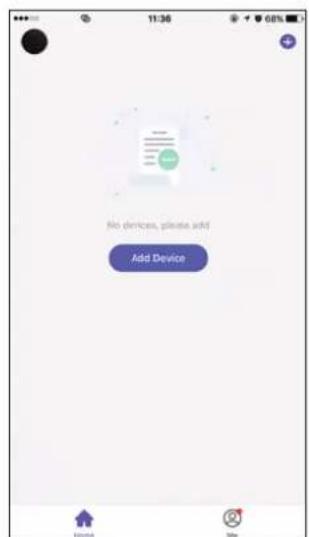
text_image
No devices, please add Add Device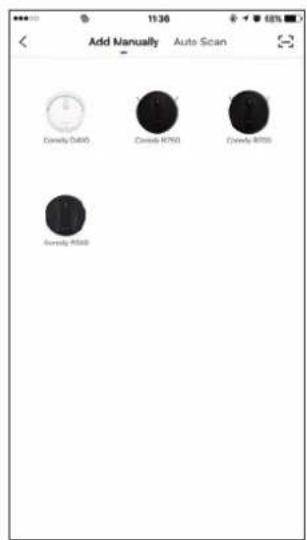
text_image
Add Manually Auto Scan Candy 0400 Candy 1750 Candy 8750 Candy 9550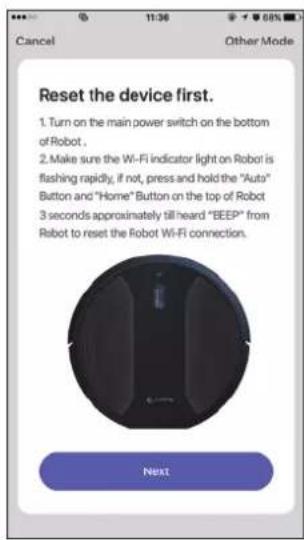
text_image
Reset the device first. 1. Turn on the main power switch on the bottom of Robot. 2. Make sure the Wi-Fi indicator light on Robot is flashing rapidly, if not, press and hold the "Auto" Button and "Home" Button on the top of Robot 3 seconds approximately till heard "BEEP" from Robot to reset the Robot Wi-Fi connection. Next-
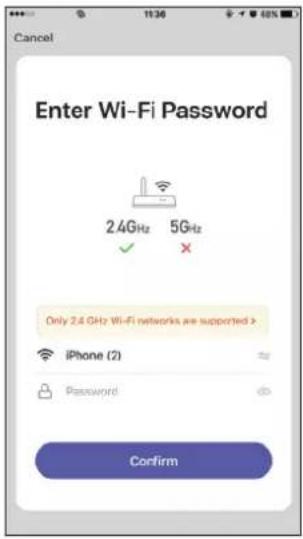
Select the network you want Robot to use. You need to select an exact Wi-Fi as your usually using network. If no Wi-Fi network list for you choosing, check and set your phone Wi-Fi setting first, then press "⇌" to connect and choose the exact network you need. Enter Wi-Fi password, press "Confirm" to connect.
-
Waiting for the connecting until "100%".
-
Device added successfully, then press "Done".
-
Wait 1-2 seconds, Coredy R580 is on standby.
text_image
Enter Wi-Fi Password 2.4GHz 5GHz Only 2.4 GHz Wi-Fi networks are supported > iPhone (2) Password Confirm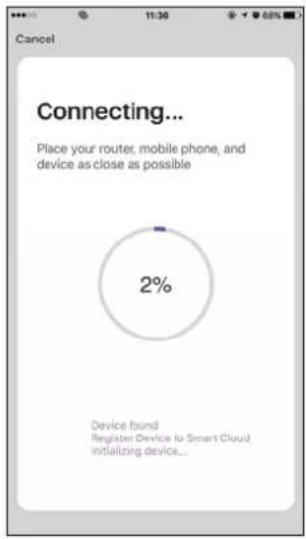
text_image
Cancel Connecting... Place your router, mobile phone, and device as close as possible 2% Device found Register Device to Smart Cloud Initializing device...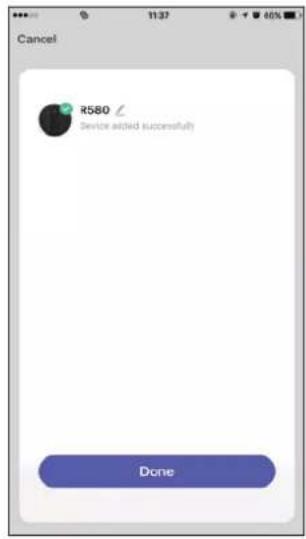
text_image
Cancel R580 Device added successfully Done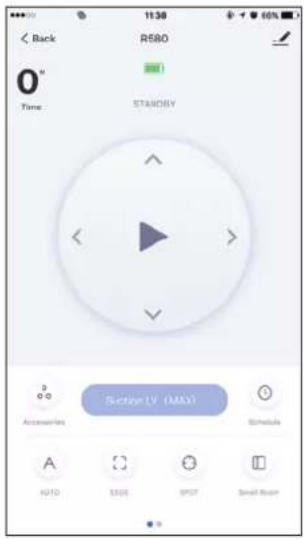
text_image
< Back R580 0° Time STANDRY Sective LV (MAY) Accessories Schedule AUTO 360 SPOT Small Room4. Coredy APP Control
Follow the instructions in the app to set up the Wi-Fi connection. - After connecting successfully, you can control Robot via the app. - With the app, you can select a cleaning mode, set the time, schedule a cleaning, view the system status, receive notifications and access additional features.
Note: If you have any problems during the Wi-Fi setup process, refer to the "Troubleshooting > FAQ" section in APP. If Robot gets stuck in any space, tap "Find me" in the app to find the machine.
5. Reset the Wi-Fi Connection
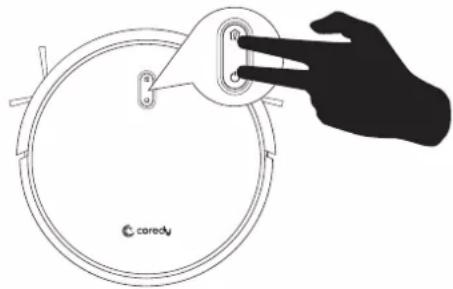
Press and hold the ⏻ and ⏱ button on Robot for 3 seconds to reset the Wi-Fi connection.
If Wi-Fi connection reset successfully, 2 "beep" will sound and Wi-Fi status light will flash blue rapidly. Then you can follow the Wi-Fi instructions in the Coredy Robot app to set up the Wi-Fi connection.
natural_image
Diagram of a hand inserting a component into a circular container with a logo (no text or symbols on the diagram itself)6. Using Amazon Alexa
Follow the instructions to control your Coredy devices with Amazon Alexa. If you run into any difficulties during the process, please scroll down to the bottom for Troubleshooting.
Before you start, make sure that:
Your Coredy Devices are connected with the Coredy Robot app.
You have an Alexa-enabled device (i.e. Amazon Echo, Echo Dot and Amazon Tap).
The Amazon Alexa app is installed on your smart device and you have created an account.
To control Coredy devices with Amazon Alexa:
For Robot only, do the following steps:
- Open the Alexa app and select "Skills & Game" from the menu.
- On the Skills screen, search for "Smart Life".
- Select your Smart Life skill, then press "Enable".
- Login with your Coredy Robot account so Alexa can control your Coredy devices.
- Using "Smart Life" skill (for Robot only):
You do not need to discover your device as you can control the Robot with your voice.
Say simple commands to Alexa. Examples:
• "Alexa, turn on Coredy R580"
• "Alexa, turn off Coredy R580"
-
If you add two or more Robot devices to Coredy Robot App, you can edit name for each Coredy robot on Coredy App or Alexa, they're Synchronous. After named, giving a command by using your robot name. Examples, named "Robot 1":
-
"Alexa, turn on Robot 1"
- "Alexa, turn off Robot 1"
Troubleshooting
What do I do if Alexa fails to discover my devices?
Check if there are any Internet connection problems.
Try to reboot the smart device and re-discover the device on Alexa.
Why does the device's status Show "Offline" on Alexa?
Your wireless connection might have been lost. Reboot the smart device and re-discover on Alexa.
Internet access on your router could be unavailable. Check if your router is connected to the Internet and try again.
Why can't I control Coredy devices with Amazon Alexa?
Check if there are any Internet connection problems.
Check if you are using the proper commands when talking to Alexa. You must say the wake word "Alexa" first when making your request.
Repeat your question. Speak naturally and clearly to Alexa.
Make sure your Coredy device is at least eight inches away from walls or other objects that may cause interference (such as microwave ovens).
8 Using Google Assistant
These instructions will help enable you to control your Coredy devices with Google Assistant.
Before you start, please make sure that:
Your Coredy Devices are connected with the Coredy Robot app. You have a Google Assistant enabled device (i.e. Google Home). The Google Home app is already installed on your smart device, and you have created an account.
To control Coredy devices with Google Assistant:
For Robot only, do the following steps:
-
Open the Google Home app.
-
Say "OK Google, talk to Robot" to the Google Assistant-enabled device (i.e. Google Home) to initiate the Google action for Robot.
- Follow the instructions in the Google Home app to authorize Google Assistant with your Coredy Robot account.
- To control Robot with your voice, say simple commands to Google Assistant:
• "OK Google, turn on Coredy R580"
• "OK Google, turn off Coredy R580"
• "OK Google, find Coredy R580"
• "OK Google, go home Coredy R580"
-
If you add two or more Robot devices to Coredy Robot App, you can edit name for each Coredy robot on Coredy App or Alexa, they're Synchronous. After named, giving a command by using your robot name. Examples, named "Robot 2":
-
"OK Google, turn on Robot 2"
• "OK Google, turn off Robot 2" - "OK Google, find Robot 2"
• "OK Google, go home Robot 2"
3.4 How Coredy R580 Clean Your Home
Coredy R580 continues this process until it has cleaned an entire level of your home. If its battery gets low before finishing a cleaning cycle, Coredy R580 returns to the Charging Dock to recharge.
1. Auto Cleaning
- Working in random pattern for seamlessly and thoroughly clean.
- At various times throughout the cleaning cycle, Coredy R580 touches up around the edges of the room, as well as chair legs and other furniture.
- Coredy R580 continues this process until it has cleaned an entire level of your home. If its battery gets low before finishing a cleaning cycle, Coredy R580 returns to the Charging Dock to recharge.
- Once Coredy R580 finishes its cleaning cycle, Coredy R580 returns to the Charging Dock to recharge.
text_image
Diagram showing a hand pressing a button on a circular device and a remote control with 'AUTO' button, both labeled in English.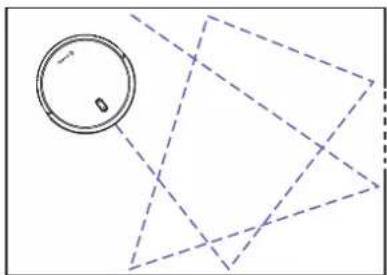
natural_image
Simple line drawing of a circular object with dashed lines extending outward (no text or symbols)Cleaning Preferences
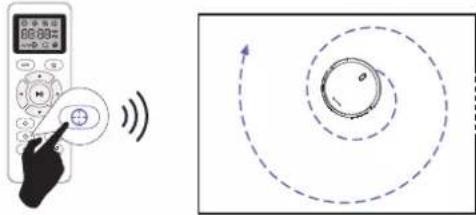
2. Spot Cleaning
When you select Spot Cleaning, robot intensely cleans a localized area by spiraling outward about 3 feet (1 meter) in diameter and then spiraling inward to where it started. When Spot Cleaning, robot boosts its vacuum power to provide the best cleaning possible where you need it. To use Spot Cleaning, place robot on top of the localized debris and press ⊕ (Spot) on the Remote Control.
text_image
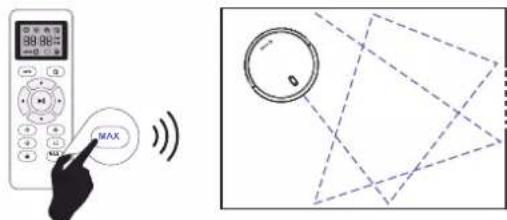
Diagram showing a remote control with signal waves and a circular motion diagram illustrating rotational motion.3. Changing Cleaning Suction Button
Change the cleaning suction by pressing the MAX button on Remote Control to reach 2000Pa. Vacuuming cleaning suction is 1000Pa by default.
text_image
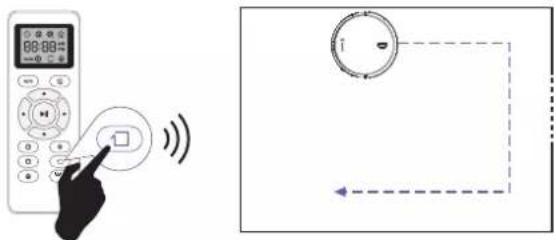
Diagram showing a remote control with MAX signal and a circular dial with dashed lines, alongside a separate schematic of a camera setup.4. Edge Cleaning
After robot finishes cleaning the open areas of your floor, it uses Edge Clean to ensure that it has cleaned along walls and around furniture legs. If you prefer a quicker edge cleaning, press the button on Remote Control.
text_image
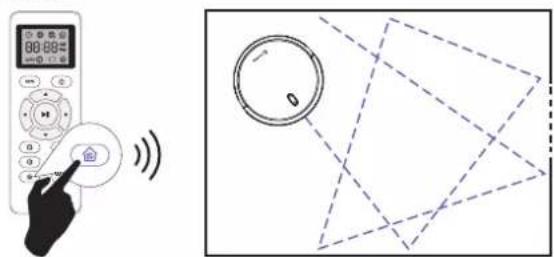
Diagram showing a hand interacting with an electronic device and a circular dial with directional arrows, likely illustrating a digital interface or control system.5. Single Room Cleaning
Coredy R580 intensively cleans one single room and stops after 30 minutes. Select this mode only when one specific room needs to be cleaned. Make sure to confine Coredy R580 to the room by closing the door.
Press 🏠 on the remote control to start cleaning in Single Room Mode.
text_image
Diagram showing a remote control with a hand pointing to a circular dial and connected to a magnified view of the dial's screen.6. Manual Cleaning
You can direct Coredy R580 to clean a particular area by using the directional buttons on the remote control.
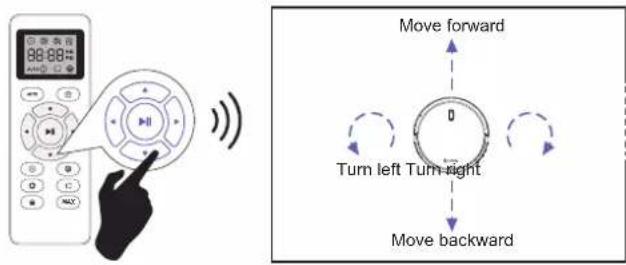
text_image
88:88 Move forward Turn left Turn-right Move backward7. Use the Boundary Strip (Sold Separately)
With the Boundary Strip, you can keep Coredy R580 away from any area or item you do not want Coredy R580 to clean. Coredy R580 will recognize the Boundary Strip and will not cross into the blocked-off area.
- Identify the area or item you do not want Coredy R580 to get close to.
- If necessary, use scissors to cut the Boundary Strip to a shorter length. Be sure to correctly measure the length before cutting.
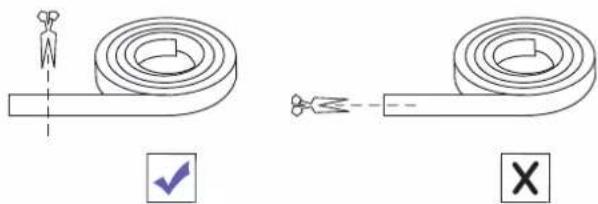
natural_image
Two schematic diagrams showing a coiled tube with a handle and a cross symbol, no text or labels present.- Apply adhesive tape to lay the Boundary Strip flat on the floor. Make sure the strip is placed FLAT on the floor.
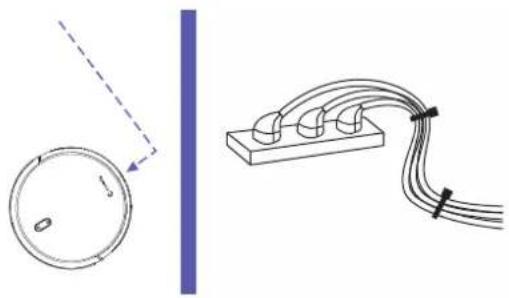
natural_image
Diagram showing a circular component with a dashed line and a separate electrical connector with three terminals (no text or symbols)Note: If the Boundary Strip is rolled up, remove and then re-apply on the floor with adhesive tape. Otherwise the Boundary Strip may not work well.
Make sure the Boundary Strip is placed on the same surface plane Coredy R580 is used on.
Be careful not to damage the floor when using adhesive tape. It is not recommended for use on carpets.
Keep the Boundary Strip away from objects that emit excessive heat.
3.5 Floor Mopping Cleaning
Coredy R580 support wet mopping function (Required a water tank and mopping cloth, you can shop on http://shop.coredy.com) the robot can floor mops cleaning for your home.
Note: Water tank and mopping cloth sold separately.
- Attach the mop cloth to the water tank and fill the water tank with water.
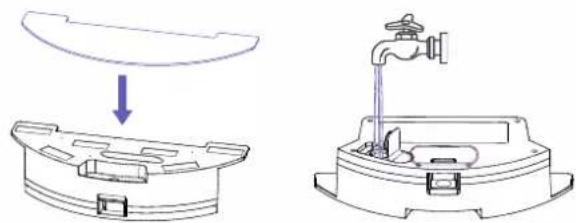
natural_image
Technical line drawing showing a mechanical component with a downward arrow and a faucet inserted into a housing (no text or symbols)- Remove the dust bin from the robot.
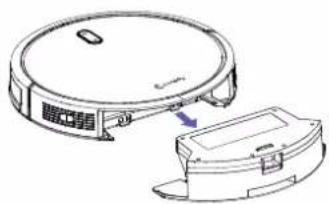
natural_image
Diagram of a robotic vacuum cleaner with a close-up view of its internal components (no text or symbols)Put back the water tank to robot.
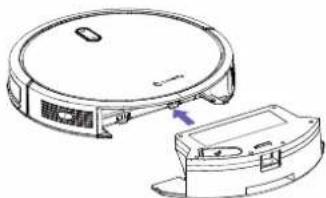
natural_image
Technical line drawing of a circular device with a separate housing (no text or symbols)Note: If you are using a dry sweeping cleaning, skip to fill water in water tank.
4. Start Mopping Cleaning
Press the ⏻ power button to start mopping cleaning (or AUTO)
button on Remote Control, or Coredy Robot app).
button on
* Robot will automatically stop the water flow when it stops mopping cleaning.
* Robot cannot auto detects and avoids the carpet, please manually carry it down from carpet if the robot climbs to carpet.
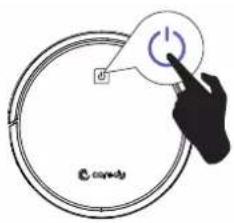
text_image
d @coventy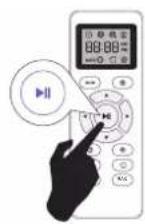
text_image
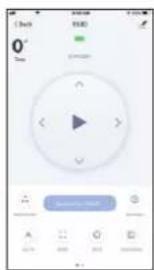
0° TimeSelect a Cleaning Mode
The robot has 4 cleaning modes for your choice under mopping cleaning function: Auto, Random, Spot and Edge, use remote control or Coredy Robot app to select the desired cleaning modes to achieve optimal cleaning for your home.
Default cleaning mode: Auto
text_image
88:88 AM AUTO AUTO MAX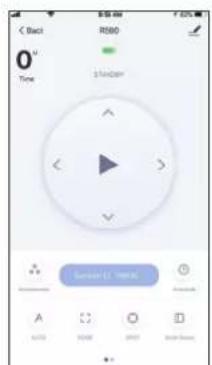
text_image
Black R580 0" Time Random Sawndar (1) Time (2)3.6 Cleaning Schedule
Coredy R580 has cleaning schedule settings which allow you to customize when robot cleans your home.
1. Schedule Cleaning from Coredy Robot App
With the Coredy Robot app, you can schedule R580 to start cleaning at any particular time from Sunday to Saturday (or certain days of the week).
Note: 1. You can set the time and customize the cleaning schedules from Sunday to Saturday on the Coredy Robot App.
2. Schedule accuracy is -/+ 30 seconds.
3. This function is available in the app only.
Schedule Cleaning from Remote Control
With the remote control, you can schedule R580 to start cleaning at a specified time.
Note: 1. Make sure the time is set correctly to your local time before setting a cleaning schedule.
2. Make sure AM/PM is set correctly.
3. Schedule accuracy is every 15 minutes.
4. Make sure the remote control near by the robot while setting the clock or schedule.
2.1 Set the Remote Control's Clock
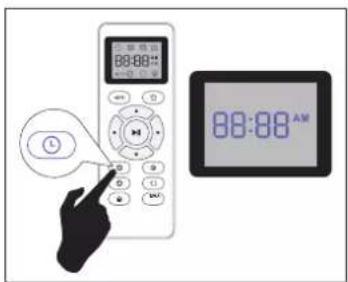
text_image
88:88 AM 88:88 AMPress Ⓞ button on Remote Control, and then the hour section begins to flash in the clock display setting window.
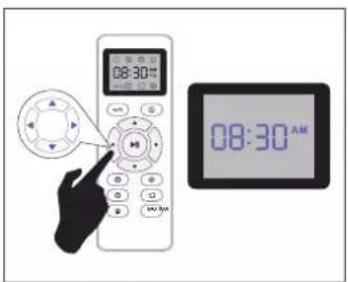
text_image
08:30 08:30 AMPress ▲ or ▼ button to select the desired figures. Press the ◀ or ▶ button to select the minute or hour section.
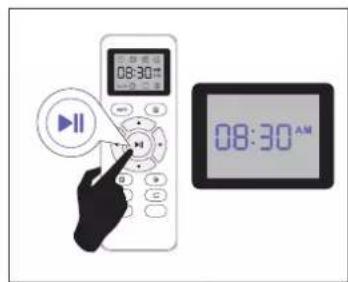
text_image
08:30 AM 08:30 AMAnd then press the ▶ button, the Robot will "BEEP" when the clock setting completed.
2.2 Setting Cleaning Schedule
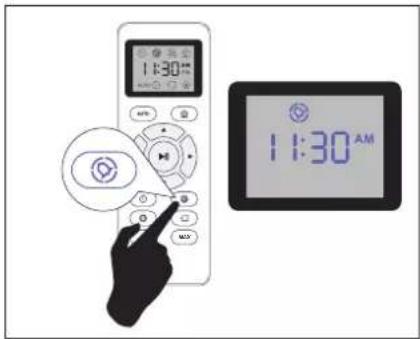
text_image
1:30 11:30 AMPress Ⓧ button on Remote Control, and then the hour section begins to flash in the Cleaning Schedule display setting window.
text_image
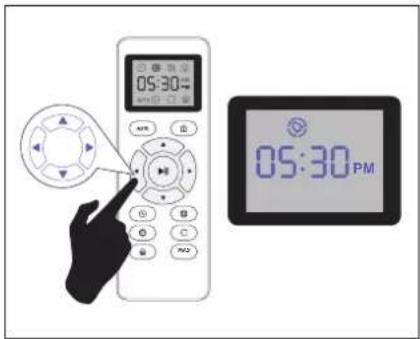
05:30 05:30 PMPress ▲ or ▼ button to select the desired figures. Press the ◀ or ▶ button to select the minute or hour section.
text_image
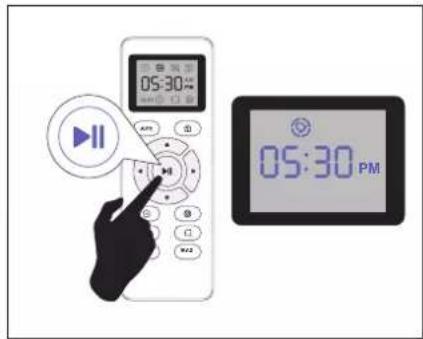
05:30 05:30 PMAnd then press the ▶ button, the Robot will "BEEP" when the Cleaning Schedule setting completed.
2.3 Cancel the Cleaning Schedule
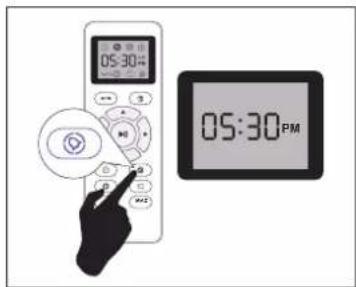
Press and hold Ⓑ button approximately 4 seconds on Remote Control, the Robot will "BEEP" when the Cleaning Schedule process cancel completely.
text_image
05:30 05:30PM4 Regular Robot Care
To keep robot running at peak performance, perform the following care procedures. If you notice robot picks up less debris from your floor, then empty the bin, clean the filter and clean the rolling brush.
| Robot Part Care Frequency Replacement Frequency | ||
| Filter | Once per week (twice per week in homes with pets) | Every 2-3 Months |
| Side Brush | Once per week (twice per week in homes with pets) | Every 2-3 months (or when visibly worn) |
| Rolling Brush | Once per week (twice per week in homes with pets) | Every 3-6 months |
| Brush Guard Once per month | Every 3-6 months | |
| Mopping Cloth (sold separately) After each use | Every 3-6 months (or when visibly worn) | |
| Every 12 monthsDust Bin After each use | ||
| Water Tank (sold separately) | After each use | Every 12 months |
| Cliff SensorsCharging ContactsFloor Tracking SensorFront Driving WheelUniversal Wheel | Once per month | — |
Note: Coredy manufactures various replacement parts and assemblies. If you think you need a replacement part, please contact Coredy Customer Care for more information.
4.1 Emptying Robot's Bin and Cleaning Robot's Filter
- Press dust bin release button to remove it.

natural_image
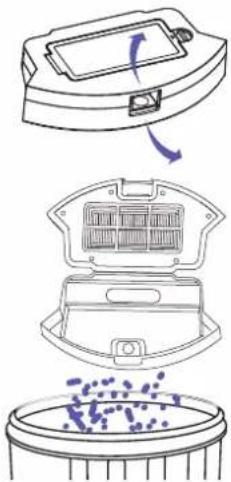
Diagram of a robotic vacuum cleaner with a circular top and attached device (no text or symbols)- Open dust bin door to empty it.
text_image
Diagram illustrating the process of cleaning a small appliance with labeled parts and directional arrows indicating rotation.- Remove filter by grasping the white tab.
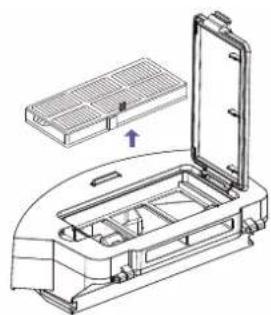
natural_image
Technical line drawing of a mechanical device with an open lid and internal compartments (no text or symbols)- Shake off debris by tapping the filter against your trash container.
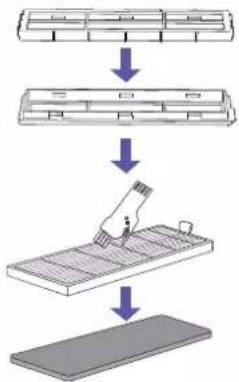
flowchart
graph TD
    A["Assembly Setup"] --> B["Product Assembly"]
    B --> C["Tool Inserting Component"]
    C --> D["Product Final Product"]
4.2 Cleaning Robot's Water Tank and Mop Cloth (Sold Separately)
- Press water tank release button to remove it.
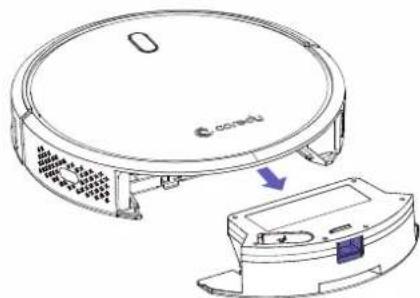
natural_image
Diagram of a circular device with a labeled component and an open base showing internal components (no text or symbols present)- Remove the cleaning mop cloth from water tank, wash and lay flat to dry.
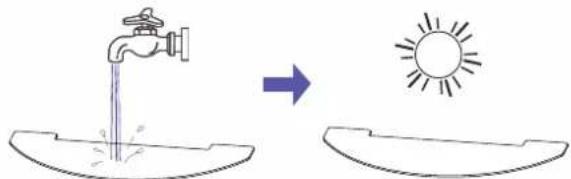
text_image
Diagram illustrating the water cycle from a faucet to sunlight, showing water flow and sunlight generation.- Empty the remaining water from the water tank.
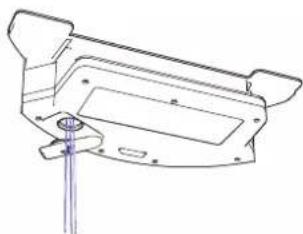
natural_image
Technical line drawing of a mechanical bracket or housing component (no text or symbols)- Use soft and dry cloth to wipe the outside of water tank, lay flat to dry. Avoid direct sunlight.
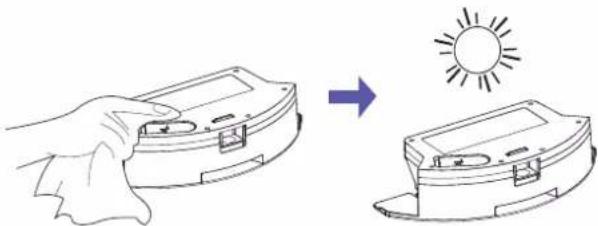
natural_image
Illustration showing a hand holding a device next to a sun, with no text or symbols present.4.3 Cleaning Robot's Side Brush
Remove the brush
Clean the brush and the brush stand, and reinstall the brush.
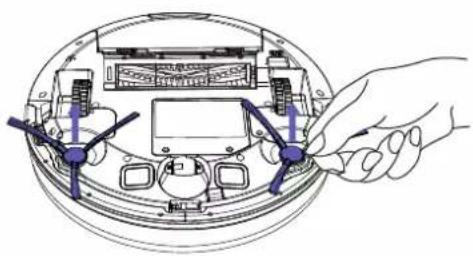
natural_image
Illustration of a hand adjusting a device on a circular base (no text or symbols visible)4.4 Cleaning Robot's Cliff Sensors and Charging Contacts
Wipe Robot's Cliff Sensors with a clean, dry cloth.
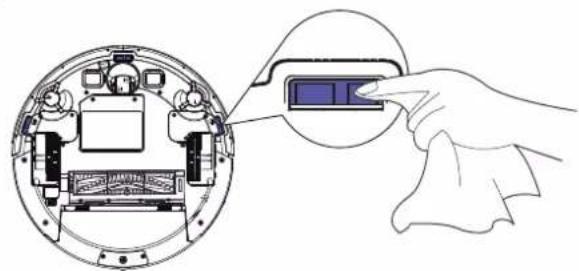
natural_image
Diagram showing a hand interacting with a device inside an open circular housing, highlighting a blue internal component (no text or symbols present)- Wipe the charging contacts on Robot and the Charging Base with a clean, dry cloth.
natural_image
Diagram showing a hand inserting a component into a circular device with internal components (no text or symbols)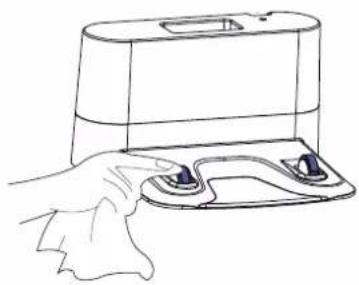
natural_image
Line drawing of a hand holding a device with a handle and buttons (no text or symbols)4.5 Cleaning Robot's Floor Tracking Sensor
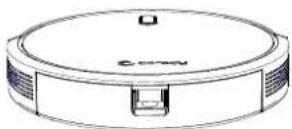
Use a clean, dry microfiber or soft cotton cloth to wipe any debris that has accumulated in the round sensor opening on the right side of the bottom surface.
Do not spray cleaning solution directly into the sensor entrance.
4.6 Cleaning Robot's Rolling Brush
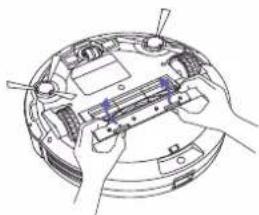
- Pull on the release tabs to unlock the brush guard as shown.
natural_image
Line drawing of hands assembling a circular electronic device with internal components (no text or symbols)- Lift the rolling brush to remove.
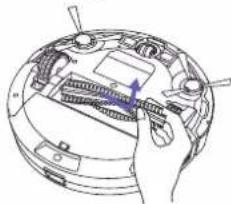
natural_image
Technical line drawing of a mechanical device with internal components and a hand operating the base (no text or symbols)- Clean the rolling brush with the provided cleaning tool or a vacuum cleaner.
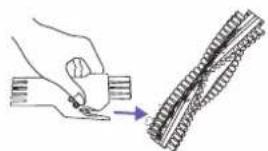
natural_image
Illustration of a hand holding a tool next to a coiled spring or cable (no text or symbols)- Reinstall the rolling brush by inserting the fixed protruding end first and then clicking into place.
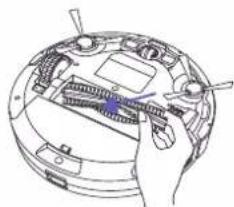
natural_image
Technical line drawing of a mechanical device with internal components and a hand adjusting parts (no text or symbols)- Press down to snap the brush guard into place.
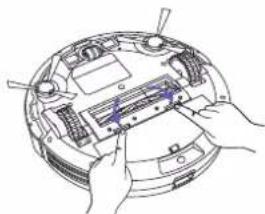
natural_image
Line drawing of hands installing or adjusting a mechanical component on a circular device (no text or symbols visible)4.7 Battery and Charging Information
Lithium Ion Battery
Important: Lithium ion batteries and products that contain lithium ion batteries are subject to stringent transportation regulations. If you need to ship this product (with the battery included) for service, travel or any other reason, you MUST comply with the following shipping instructions:
- Remove the lithium ion battery from the product
- Place a piece of tape over the battery's metal charging contacts
- Reinstall the battery (with the tape on it) in the product and secure the battery door
• Package the product in its original packaging or in your own packaging that prevents any movement during transportation - Ship via ground transportation only (no air shipping)
Battery Charging
To extend battery life, always keep robot charged on the Home Base when not in use.
Battery Storage
If storing robot off of the Charging Dock, remove the battery first. Then store robot and the battery in a cool, dry place.
Battery Disposal
Contact your local waste management authority for battery recycling and disposal regulations in your area.
Battery Replacement
You can visit Coredy's website http://shop.coredy.com to purchase the battery or other accessories for the robot.
Battery Removal
Follow these instructions to remove and reinstall robot's battery:
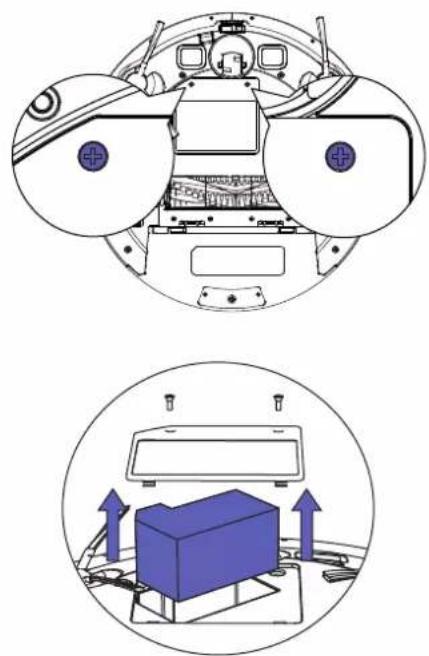
- Unscrew the door and the two screws on the battery door, then remove.
natural_image
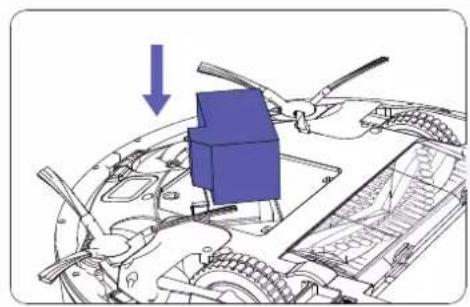
Technical diagram showing two views of a spacecraft's cockpit and its internal components, with no visible text or symbols.- Reinstall the battery with the battery label and tabs facing up.
natural_image
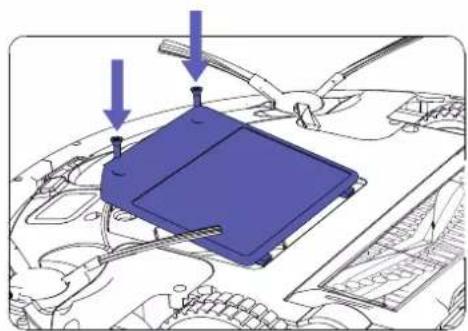
Mechanical assembly diagram showing a blue component being inserted into a motor (no text or symbols visible)- Reinstall the battery door and the two screws. Take care not to pinch the side brush in the battery door when re-installing the battery.
natural_image
Diagram of a blue plastic component mounted on an engine, with arrows indicating assembly or inspection points (no text or symbols present)5 Troubleshooting
Robot will tell you something is wrong with a two-tone distress sound followed by message. The indicator 📄 will also blink or light red. Refer to the chart as below to resolve Robot's problem. If the problem is not resolved, please contact our COST FREE customer service team for more assistance.
Rebooting Instructions
For some errors, rebooting Robot may resolve the problem. To reboot Robot, press the power button on the bottom on Robot, you will hear an audible tone signifying a successful reboot.
Indicator Lighting Red
| Robot Blinks and Says Likely Cause What to Do | |||
| Indicator Lighting Red | One beep | • Robot's front driving wheel is stuck. | • Clean the front driving wheel, then press the power button to restart the robot. |
| Two beeps | • Robot's side brush is stuck. | • Clean the side brush, then press the power button to restart the robot. | |
| Three beeps | • Robot's vacuum fan is stuck or its filter is clogged. | • Remove and empty robot's dust bin.• Clean robot's filter, then briskly tap the bin to loosen any remaining trapped debris.• Make sure the vacuum inlet is not blocked by any hair or debris. | |
| Four beeps | • Robot's main rolling brush is stuck. | • Remove and clean the main rolling brush and brush guard, then press the power button to restart the robot. | |
Indicator Flashing Red
| Robot Blinks and Says Likely Cause What to Do | |||
| Indicator Flashing Red | Two beeps | • Robot's bumper is stuck. | • Tap robot's bumper several times to dislodge any debris that might be trapped underneath.• Press robot's bumper 5-10 times to ensure bumper contracts freely. |
| Three beeps | • Robot's cliff sensors are dirty.• Robot is hanging over a drop, or it is stuck on a dark surface. | • Clean robot's cliff sensors gently with a dry cloth.• Start cleaning in a new location if robot is hanging over a drop, or on a dark surface.• Use boundary strip or a physical barrier to block off the problem area. | |
| Four beeps | • Robot's battery power level is too low.• Robot cannot return to its charging dock. | • Manually take the robot on the charging dock to charge.• Ensure there are no obstacles in front of the charging dock or starting position, wipe the charging contacts on both of the charging dock and robot with a clean, dry cloth. | |
Frequently asked questions
| Problems Solutions | |
| Coredy R580 cannot be activated. | Make sure the main power switch is in the ON position.Make sure the battery is fully charged.Replace the batteries (2 AAA) in the remote control.Make sure the remote control is within range (16 ft/5 m) of Coredy R580.If you still have trouble, turn off the main power switch and then turn it back on. |
| The remote control does not work. | Replace the batteries in the remote control.Make sure Coredy R580 is turned on and fully charged.Note: Limited workable range distance is 5m/16.5ft. |
| Coredy R580 stops working suddenly. | Check if Coredy R580 is trapped or stuck on an obstacle.Check if the battery level is too low.If you still have trouble, turn off the main power switch, wait for 2 seconds, and then turn it back on. |
| You cannot schedule cleanings. | Make sure the main power switch on the bottom of Coredy R580 is turned on.Make sure the time, time of day (AM/PM), and the scheduled time have been set correctly.Check if Coredy R580's power is too low to start cleaning. |
| Suction power is weak. | Check if any obstructions are blocking the suction inlet.Empty the dust collector.Clean the filters with a vacuum cleaner or a cleaning brush.Check if the filters are wet due to water or other liquid on the floor. Air-dry the filters completely before use. |
| Coredy R580 cannot be charged. | Check if the indicator on the Charging Base lights up. If not, contact the Coredy service center to repair or replace the Charging Base.Dust off the charging contact pins with a dry cloth.Check if you can hear a beep when Coredy R580 is docked onto the Charging Base. If not, contact the Coredy service center to repair or replace the Charging Base. |
| Coredy R580 cannot return to the Charging Base. | Remove objects within 3 ft/1 m to the left and right side and within 6 ft/2 m of the front of the Charging Base.When Coredy R580 is in the vicinity of the Charging Base (distance within 26ft/8M), it returns more quickly.However, if the Charging Base is located far away (distance over 26ft/8M), Coredy R580 needs more time to return. Please be patient as it walks back.Clean the charging contact pins. |
| The rolling brush does not rotate. | Clean the rolling brush.Check if the rolling brush and brush guard have been installed properly. |
| Coredy R580's movements or travel path are abnormal. | Clean the sensors carefully with a dry cloth.Restart Coredy R580 by turning the power switch off and on. |
6 Specifications
 | Product Model R580 | |
| Input | 19 V —— 0.6 A | |
| Battery Voltage DC 14.4 V | ||
| Power Consumption 28 W | ||
| Battery Type | DC 14.4 VLi-ion 2600 mAh | |
| Dust Collector Capacity 0.5 L | ||
| Cleaning Time Max. 120 mins | ||
| Charging Time 300 - 360 mins |
 | Input | 19 V 0.6 A |
| Output | 19 V 0.6 A |
7 Customer Service
US COST FREE Tech Support:
+1 (800) 999 8470
UK COST FREE Tech Support:
+44 (808) 134 9909
E-mail: support@coredytech.com
Website: http://shop.coredy.com


@coredytech @CoredyOfficial @coredy_robotvacuum @Coredy Official

text_image
© coredyUS COST FREE Tech Support:
UK COST FREE Tech Support:
+1 (800) 999 8470
+44 (808) 134 9909
(PST Mon-Sun 06:00-24:00) (GMT Mon-Sun 14:00-08:00)
MODEL: R580
E-mail: support@coredytech.com
Website: http://shop.coredy.com