Type R - Scooter Root Industries - Free user manual and instructions
Find the device manual for free Type R Root Industries in PDF.


User questions about Type R Root Industries
0 question about this device. Answer the ones you know or ask your own.
Ask a new question about this device
Download the instructions for your Scooter in PDF format for free! Find your manual Type R - Root Industries and take your electronic device back in hand. On this page are published all the documents necessary for the use of your device. Type R by Root Industries.
USER MANUAL Type R Root Industries
natural_image
Abstract black geometric shape on white background (no text or symbols)ROOT INDUSTRIES

text_image
TYPE RCOMPLETE SCOOTER
OWNERS MANUAL
Before using this product, please make sure you read and understand the entire manual.
For any further assistance, contact Root Industries by visiting our website:
www.rootindustries.com
CONTENTS
2/ Safety Warnings
2/ Getting started
3/ Safety information
4/ Assembly Instructions
5/ General Maintenance
5/ Warranty
SAFETY WARNING
This manual contains information for the safety of the user. It is in your best interests to review this information. Children should also be accompanied by an adult who can explain and help with fully understanding all the warnings, cautions, instructions and safety topics following.
Riding scooters can be a hazardous activity Scooters are a moving vehicle and therefore it is possible for the user to get into dangerous situations and/or lose control and/or fall. If such things occur, the user and/or other persons can be seriously injured or killed.

LIKE ANY OTHER VEHICLE, USING A SCOOTER CAN BE A DANGEROUS ACTIVITY AND MAY RESULT IN INIURY OR DEATH EVEN WHEN USED WITH PROPER SAFETY PRECAUTIONS. USE AT YOUR OWN RISK AND USE COMMON SENSE.
GETTING STARTED
- Safety equipment to be worn always such as knee pads and elbow pads.
- Do not operate this scooter without a helmet.
• Always ride on smooth and paved surfaces away from motor vehicles. - Scooter could stop if it comes into contact with sharp bumps, rocks/sticks or sudden surface changes.
- Do not ride on surfaces where there is water, sand, gravel, dirt or other debris. Use while raining will impact traction and will affect braking.
- Do not ride at night.
- Brakes do get hot from continuous use. Do not touch the brake after braking.
- Avoid excessive speeds associated with downhill rides.
- Adults must assist children in assembling this scooter.
• Always obey all local traffic laws and regulations.
- Respect pedestrians when riding on footpaths.
Replace worn or broken parts immediately.
- Do not exceed 220 pounds (100kg).
- Children under the age of eight years old should not use this scooter. Adult guidance is advised for all children using this product.
- It's the parent's decision to allow his or her child to ride this product. It's also their responsibility to judge if the child's maturity, skill and ability is suitable and safe to use this product.
- This scooter was manufactured for performance and durability, however it is not impervious to damage. Stunt riding can over stress or damage any product, including this scooter and the rider assumes all risks associated with high-stress activities.
SAFETY INFORMATION
Parental supervision is required. Only use the scooter in a controlled environment that is free of potential traffic hazards and not on public streets. Avoid use in any areas where there are other vehicles operating. Have two hands on the handlebars always. Never allow more than one child at a time to ride the scooter. Never use near steps, slopes, driveways, hills, roadways, alleyways, or swimming pool areas.
Do not ride a scooter in wet weather. Scooters are intended and made to be used
on concreted or smooth paved areas that are flat, clean and dry, free from any loose debris such as rocks, sticks or gravel. Wet, slick or uneven and rough surfaces may impair traction and contribute to possible accidents. Avoid riding this scooter in mud, ice, puddles or water. Avoid excessive speeds that can be associated with downhill rides. Do not ride at night or when visibility is impaired.
ALWAYS USE SAFETY EQUIPMENT
Ensure your child is wearing proper protective equipment such as a certified safety helmet.
A helmet may be legally required by local law, we advise you to check with your local law enforcement. User should always wear shoes that are fully enclosed with flat soles.

WARNING! ALWAYS INSPECT YOUR SCOOTER BEFORE RIDING!

FAILURE TO USE COMMON SENSE AND HEED THE ABOVE WARNINGS FURTHER INCREASES THE RISK OF SERIOUS INJURY. USE AT YOUR OWN RISK AND WITH APPROPRIATE AND SERIOUS ATTENTION TO SAFE OPERATION. USE CAUTION.
Proper inspection and maintenance of your scooter can reduce the risk of injury. Always inspect your scooter before riding and regularly maintain it.
GENERAL MAINTENANCE
Tightening your compression
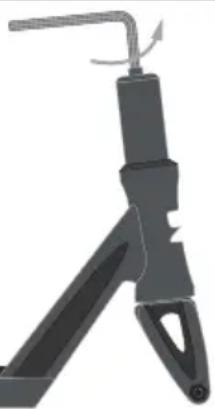
If your bars start to shake or move side to side, this means your compression needs to be tightened. Do so by removing your handlebars and with your 6mm Allen Key and insert it into the top of your fork as demonstrated. Turning it in a clockwise direction, tighten until some pressure is felt in the Allen Key. You want to be able to still spin your forks freely, however, if over tightened you can restrict the movement and damage your compression or headset. This should be done by an adult or a professional mechanic.
Tightening HIC/IHC compression
natural_image
3D rendered mechanical tool with a handle and bracket (no text or symbols visible)GENERAL MAINTENANCE (CONT.)
Tightening your SCS Compression
Slide the clamp onto the fork, tighten the compression bolt into the fork and the top cap compresses your front end together. Once your front end is tightened, you install your bars into the top of the clamp and align your bars. Your bars are now sitting on top of the compression top cap inside the SCS Clamp. You then tighten all four bolts to lock both your compression and bars in place.
Lubricating your bearings
You will need to take off your wheels to lubricate your wheel bearings. This is done by taking 6m Allen Key, and turning them anti clock-wise. The wheels may need some encouragement to slide out. Using a damp cloth wipe off any dirt or grime on your wheels and bearings. Using bicycle bearing oil, place 3 to 4 drops directly on the bearing covers and allow the oil to sink in. If the wheels do not spin freely after this you may need to replace the bearings.
SCOOTER ASSEMBLY INSTRUCTIONS
(Ensure all wrapping and packing materials are taken off your scooter before you start)
With the 6mm allen key (provided), ensure the bolt at the top of the forks is tightly fitted by turning it clockwise. Although this is pre-tightened at factory level, it is important to check it has not come loose during transit. Be sure not to over-tighten this bolt.
Slide the Handlebars onto the fork tube, ensuring the fork and bars are lined up correctly.
Avoid twisting/turning the bars as you slide it down. Doing so may loosen the compression.
Ensure both bars and the clamp are touching the top of the headset.
When you are satisfied that your front wheel and your handle bars are inline using your 6mm Allen Key, start tightening the bolts from the bottom up. Do this by turning the Allen Key in a clockwise rotation.
Repeat this action until all 2 bolts are tightened securely.
text_image
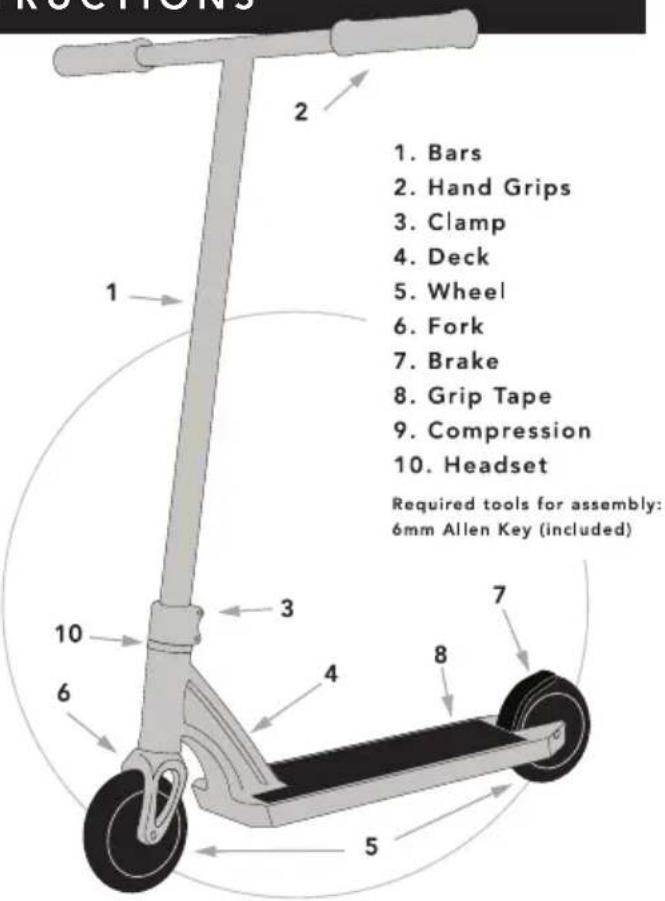
1. Bars 2. Hand Grips 3. Clamp 4. Deck 5. Wheel 6. Fork 7. Brake 8. Grip Tape 9. Compression 10. Headset Required tools for assembly: 6mm Allen Key (included)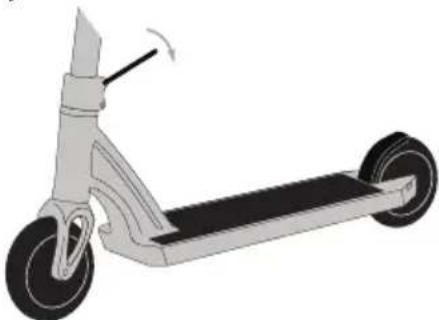
natural_image
Illustration of a scooter with wheels and a curved handle (no text or symbols)
FAILURE TO TIGHTEN OR INSTALL PROPERLY MAY RESULT IN LOSS OF CONTROL AND INJURY. IF YOU HAVE TROUBLE UNDERSTANDING THESE INSTRUCTIONS SEEK ASSISTANCE OF A QUALIFIED MECHANIC.
This product is covered under a limited 3 month warranty. To activate your warranty you must complete the warranty form which is found here:
rootindustries.com/warranty
Warranty claims are limited to the following:
DECKS
Covered
Cracks or breakages caused by manufacturing fault or defect for a period of up to 3 months from date of purchase.
Exclusions
Damage caused by external forces (e.g. damage caused to the deck through impact on concrete, excessive grinding, or other damage caused to the deck).
Brake, inserts, axles, spacers and finishes (e.g. paint, anodizing, decals etc) are NOT COVERED under warranty.
BARS
Covered
Bending or breaking of the bar for a period of up to 3 months from date of purchase. (1 month for aluminum bars).
Exclusions
Damage caused by external forces (e.g. damage caused to the bars through impact on concrete, or other damage caused to the bars).
Finishes (e.g. paint, anodizing, decals, etc) are NOT COVERED under warranty.
FORKS
Covered
Bending or breaking of the forks for a period of up to 3 months from date of purchase.
Exclusions
Damage caused by external forces (e.g. damage caused to the forks through impact on concrete, or other damage caused to the bars).
Axles, shims, internal threads, spacers, finishes (e.g. paint, anodizing, decals, etc) are NOT COVERED under warranty.
WHEELS:
Covered
Cracks or breakages to the core caused by manufacturing fault or defect for a period of up to 3 months from date of purchase.
Dehubbing of the wheel (must be a clean dehub where the PU has come completely away from the hub) for a period of up to 3 months from date of purchase.
Core ovalising for a period of up to 3 months from date of purchase.
Exclusions
Damage caused by external forces (e.g. damage caused to the wheels through impact on concrete, or any other damage caused to the wheels).
Factory-fitted bearings, spacers, and finishes (e.g. paint, anodizing, decals etc) are NOT COVERED under warranty.
CLAMPS
Covered
Cracking or breaking of the clamps for a period of up to 30 days from date of purchase.
Exclusions
Damage caused by external forces (e.g. damage caused to the forks through impact on concrete, or other damage caused to the bars) Shims, internal threads, finishes (e.g. paint, anodizing, decals, etc) are NOT COVERED under warranty.
The following parts are not covered under any warranty:
GRIPS HEADSETS
GRIPTAPE BRAKES
BEARINGS
All the above parts are not covered under a warranty, but have a standard statutory life expectancy of a minimum 14 days. If any of the above products "fail" within 14 days, the manufacturer will agree to replace the product.