IP50 - Uncategorized Funkwerk - Free user manual and instructions
Find the device manual for free IP50 Funkwerk in PDF.


User questions about IP50 Funkwerk
0 question about this device. Answer the ones you know or ask your own.
Ask a new question about this device
Download the instructions for your Uncategorized in PDF format for free! Find your manual IP50 - Funkwerk and take your electronic device back in hand. On this page are published all the documents necessary for the use of your device. IP50 by Funkwerk.
USER MANUAL IP50 Funkwerk
text_image
1.Phone book 2.Call history funkwerkOperating instructions
funkwerk IP 50
English
Declaration of conformity and CE mark
This device meets the requirements of the following EC directive R&TTE 1999/5/EG:

»Directive 1999/5/EC of the European Parliament and of the Council of 9 March 1999 on radio equipment and telecommunications terminal equipment and the mutual recognition of their conformity«.
You can also request this EC declaration of conformity at the following Internet URL: http://www.funkwerk-ec.com.

The waste container symbol with the "X" through it on the device indicates that the device must be disposed of separately from normal domestic waste at an appropriate waste disposal facility at the end of its useful service life.
© 2007 Funkwerk Enterprise Communications gmbH - All rights reserved.
Reprinting of this document, even excerpts, is permitted only with the express consent of the publisher and with precise source information, regardless of the media used (mechanical or electronic).
Function descriptions included in this documentation which refer to software products of other manufacturers are based on the software used and valid at the date the documentation was prepared or published. The product and company names used in this documentation may be protected by trademarks.
Table of contents
Telephone description....3
Safety notes 3
User interface....1
Keypad features. 2
Connecting the IP phone 3
Installing the IP Phone 4
Configuring the telephone using the keypad. 5
Features 5
Operation 10
Symbols. 10
Telephone display 11
Simple Log-in of a »funkwerk IP 50« to a PABX.... 12
Telephony 13
Settings....15
Configuration using the telephone....16
Call history 18
Phone settings 19
Setting the date / time 20
Volume & Gain. 22
Network. 25
SIP Settings 28
Administrator settings 30
Configuring the phone using the Web browser. 33
Login 33
Telephone system data....33
Phone Book, Speed Dial (Speed Dial Settings) 34
Telephone Settings (Phone Setting) 35
Volume Setting 37
Melody Setting 38
Dial Plan feature 39
Call waiting setting 40
Softkey Setting 40
Automatic dialing (Hot Line Setting) 41
Appointment reminder calls (Alarm setting). 41
Network. 42
PPTP-Settings 46
SIP Settings 46
NAT Trans.... 50
Other features....50
Automatic Configuration Setup (Auto Config) 50
System Authority 53
Save Changes....53
Update 54
Reboot 57
Configuring the phone via Telnet (only under Windows XP) 58
Configuration 58
Login to phone 58
Configuration using the command line interpreter (CLI) 59
Appendix. 69
Technical specifications 70
Hardware Overview 70
Software Overview....70
Operating requirements: 70
Electric requirements: 71
Size: 71
Telephone description
IP is the abbreviation for Internet Protocol. An IP phone is a telephone transporting voice by grouping data package of IP protocol.
An IP phone transports voice message over data communication network at extremely low price but of excellent sound quality just like ordinary fixed telephone lines do. With our »funkwerk IP 50« Internet phone, you're going to save dramatically on international calls.
»funkwerk IP 50« Internet phone functions much like an ordinary telephone switching between inner and out line, it brings great convenience to the users. In the internal mode, calls between your »funkwerk IP 50« and any other »funkwerk IP 50« are free of charge. When IP 50 series IP net phone is in generalized out line mode, it can place calls to every ordinary telephones in the world at an extremely low price. With its stability, sound quality, compatibility and rich functionalities, »funkwerk IP 50« leverages your wealth with high quality communications!
Safety notes
- Mind the storage and operation temperatures for the device listed in the technical specifications. Only connect the device when the permissible ambient operating temperature has been reached.
- Please note that condensation on or in the unit must be prevented when moving from cold to warm surroundings. Only remove the unit from the package when the permissible ambient operating temperature has been reached.
- You should not make calls or connect or disconnect any lines during thunderstorms.
PUNKT 5 = Be sure to connect all cords and cables only to their designated ports.
PUNKT 5 = Be sure to route cords and cables so nobody can trip over them.
- Avoid the following:
Direct sunlight
Sources of heat (for example radiators)
Electronic devices (for example stereo components, office equipment or microwave devices)
Ingress of moisture or liquids
Aggressive fluids or vapors
Dusty environment
PUNKT 5 = Do not use the unit in moist areas or where there is a risk of explosion.
PUNKT 5 = Do not expose any internal parts of the unit unless you are instructed to do so by the installation and operating manual.
PUNKT 5 = Do not touch any connector pins with sharp metallic items or damp objects.
PUNKT 5 = If the unit is not fixed to a surface, place it and its accessories on an anti-skid mat or equivalent.
PUNKT 5 = Clean the unit using only a slightly dampened piece of cloth.
- Only use approved accessories.
- Only terminals with SELV and/or which comply with ETS 300047 may be connected to the unit. This regulation is fulfilled when approved terminal devices are used as intended.
Plug-in power supply
- Use only approved power plug-in units.
- Do not use power plug-in units with visible defects or damage (fissures, cracks, etc.)
Elektrostatic charges (protection against electrostatic charges)
- The telephone is supplied with enhanced ESD protection against the effects of electrostatic discharge that exceeds the protection level cited in the approval specification. Elevated ESD levels should nevertheless be avoided to the greatest possible extent. In some cases, electrostatic discharge levels can far exceed the approval limits or the resistance levels already implemented in your telephones. Eliminate the causes or conditions that promote these elevated ESD levels, such as insufficient humidity or carpeting. The telephone manufacturer does not assume any liability for damage caused under such circumstances.
Unpacking and placing the telephone
- funkwerk IP50
- Handset with handset connecting cord
• Cat.5 Connection cable, approx. 2 m - Brief description of functions
• CD-ROM with User Manual
User interface
text_image
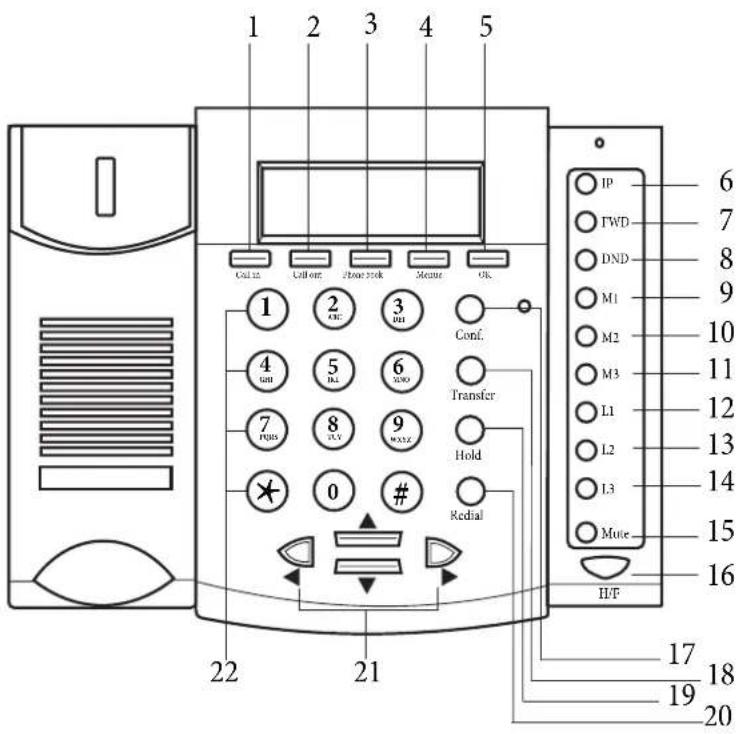
1 2 3 4 5 Call 12 Call out Phone lock Measure Ok. 1 2 3 DU Conf. 4 5 6 X800 Transfer 7 8 9 Hold × 0 # Redial H/F IP FWD DND M1 M2 M3 L1 L2 L3 Mune 6 7 8 9 10 11 12 13 14 15 16 22 21 17 18 19 201 Callin Completionofcallwithlast caller
2 CallOut Completionofcallwithlast called party
3 PhoneBook Accesstothetelephone directory
4 Menu Accessforpolling/configuration
5 OK Confirmation of an entry
6 IP Retrievingthetelephones IP-address
7 FWD »Callforwarding«on or off
8 DND »Silentsignalling«onoroff
9 M1 1stspeeddialbutton
10 M2 2ndspeeddialbutton
11 M3 3rd Speeddialbutton
12 L1 Communicationusingprovider1
13 L2 Communicationusingprovider2
14 L3 Communicationusingprovider3
15 Mute Activatingordeactivatingthe microphone (room inquiry)
16 H/F Handsfree calling on or off
17 Conf. Conferenceon
18 Transfer Transferring a call put on hold to another party
19 Hold Room inquiry / Broker's callbutton
20 Redial Redialing
21 Selectionbuttons
22 Dialbuttons
Keypad features
The assignments for the keypad for entering letters, digits and special characters are as follows:
| Button | Number of actuations | ||||||||
| 1 | 2 | 3 | 4 | 5 | 6 | 7 | 8 | ||
| 1 | 1 | - | , | ! | ? | ||||
| 2 ABC | 2 | a | b | c | A | B | C | ||
| 3 DEF | 3 | d | e | f | D | E | F | ||
| 4 OHI | 4 | g | h | i | G | H | I | ||
| 5 JKL | 5 | j | k | l | J | K | L | ||
| 6 MNO | 6 | m | n | o | M | N | O | ||
| 7 PQBS | 7 | P | q | r | s | P | Q | R | |
| 8 TUN | 8 | t | u | v | T | U | V | ||
| 9 WXTS | 9 | w | x | y | z | W | X | Y | |
| 0 | 05 | pace | |||||||
| * | * | . | : | @ | |||||
| # | Dial initiation | ||||||||

Severalspecialcharactersareassigned to the button »1«.
For ex.: «-«,», «, »!«, »?«
When you press the 1 button the first time a »1« is inserted. When you press this key a second time several special characters are shown in the display. Press the appropriate key to select the corresponding special characters 1 ... 9.
Connecting the IP phone
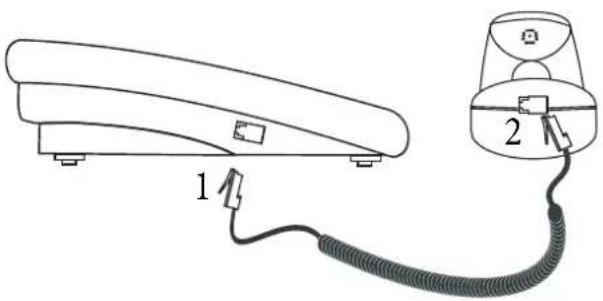
Connecting the handset cord
Connectingthehandsettothebasert handset cord into handset jack at the left side of the base.
natural_image
Line drawing of a landline telephone handset with cord and connector, labeled 1 and 2 (no text or symbols on device body)Telephone rear view
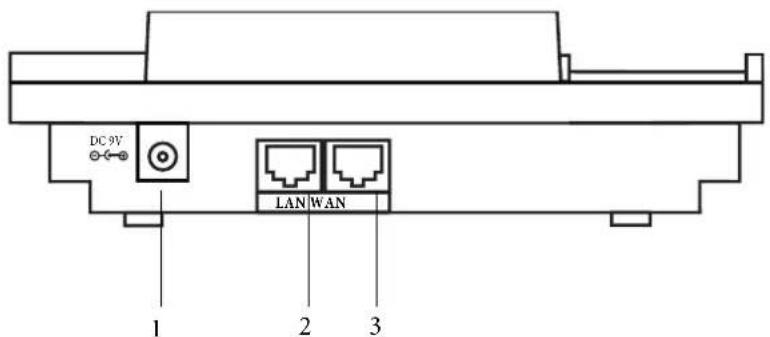
thetelephonewiththeInternetPlug the RJ-45 Ethernet cable into the Ethernet jacknamed »WAN« of the phone. Plug the other end connecting: of the cable into an appropriate LAN or DSL/Cable router port or a HUB.
ConnectIPhone to a computer if necessary. Plug the RJ-45 Ethernet cable into the Ethernet jack named »LAN« of the phone. Plug the other end of the cable to a computer.
Activating the telephone: Plug the power adapter into the power jack of the phone. Then plug the other end of the power adapter into the appropriate 230 VAC wall outlet.
text_image
DC9V LAN/WAN 1 2 31 - To the power adaptor
2 - PC-port
3 - To the LAN- or DSL/router port or hub
Installing the IP Phone
Before installing your IP phone, it is useful to know what kind of IP addressing your LAN or router is using.
Most networks, including the Internet, use identification codes IP (Internet Protocol) addresses to identify and locate the devices that share their services.
DHCP-addressing
- With this system, your LAN or router automatically assigns all the required IP parameters to any device connected to it when the device logs on. (Some ISPs who use DHCP require a host name, which must be entered manually.)
Your phone is shipped from the factory with DHCP on, or enabled. So, if your LAN or router is configured to use DHCP addressing, your IP Phone's LAN parameters will automatically be configured as soon as it is connected to the LAN or router and powered up.
Press the »IP« button if you wish to view the IP address.
Static addressing
- If your LAN does not use DHCP addressing, each device concurrently connected to it must be assigned its own unique IP address. In this case, your LAN's configuration information must be manually entered into the phone. You will need to know the following parameters:
- IP address
- Subnet mask
- Gateway address
• Primary DNS address
• Secondary DNS address (required by some systems)
If your network uses static addressing, ask your network administrator for the parameters needed for configuring your IP Phone.
Configuring the telephone using the keypad
Features
Telephone directory
Search: EINR50 = Search Phone Book.
Addinganentry: Add new phone number to phone book
Speeddial: Add speed dial phone number to speed dial list.
Deleteall: Deleting all numbers stored in the phone book.
Call history
Incomingcalls: Displaying all inbound calls.
Dialednumbers: Displaying all stored numbers.
Deleting data records / deleting call history.
All: Deleting all stored numbers.
Incoming: Deleting all inbound calls.
Selected: Deleting all previously dialed numbers.
Phone setting
Call forward
Forwarding all calls
Activate: To Enabled/Disabled this function.
Telephonenumber: Forward to a speed dial number.
Busy Forward
Activate: To Enable/Disable this function.
Telephonenumber: Forward to a speed dial number.
Forwarding calls at no answer
Activate: To Enable/Disable this function.
Telephonenumber: Forward to a speed dial number.
Ring Timeout
Timeintervalbefore forwardingacall
atnoanswer:
For example, if 20 is set for this, the call will be rerouted to the specified target number after 20 seconds.
Do Not Disturb
Always: Block all the incoming calls
pertime: Block all the incoming calls within a period of time.
Timeinterval: Enter start and end time for inhibition.
Appointments
Activate: To Enable/Disable this function.
Time: Setting the time for an appointment. It is in 24 hours format.
Date/Time setting
Date&Time: Set the IP Phone Date and Time.
SNTP setting
SNTP: Enable / Disable SNTP.
PrimarySNTP-server: Set Primary SNTP server IP address.
SecondarySNTPserver: Set Secondary SNTP server IP address.
Timezone: Set Time zone.
Synchronisationtime: Set adjustment time period.
Volume & Gain
Handsetvolume: Set Handset volume from 0...15 (max.).
Speaker Set Speaker phone volume from 0...15 (max.).
volume:
Handsetvolume: Set Handset gain from 0...15 (max.).
Speakergain: Set Speaker gain from 0...15 (max.).
Ringer
Dialtonegain: Ringer volume setting from 0...15.
Tone: Selecting the ringer tone 1...4.
AutoDial: Set Auto Dial time from 3...9 seconds.
Network
WLAN Setup
IPtype Client with fixed IP
DHCP-Client
PPPoE-Client
FixedIPsetting IP-address
Subnet mask
Default Gateway
MAC-address
PPPoE setting User name
Password
LAN Setup
Bridge
NAT
DNS
PrimaryDNS
SecondaryDNS
VLAN
Activate
VID: Select VID Priority (VID 2-4094).
CFI: Canonical Format Indicator(0...1).
Status: Show WAN and LAN IP addresses.
SIP Settings
Service domain
Firstrealm Activate
User Name
Display name
Register name
Register password
Proxy-Server
Domain Server
Outbound proxy
SecondRealm Activate
User name
Displayed name
Login-Name
Login password
Proxy-Server Proxy
Domain-Server
Outbound proxy
Thirdrealm Activate
User name
Displayed name
Login-Name
Login password
Proxy-Server Proxy
Domain-Server
Outbound proxy
Codec
CodecType
G.711uLaw
G.711aLaw
G.723
G.729
G.726-16
G.726-24
G.726-32
G.726-40
VAD: To Enable/Disable the Voice Active Detection function.
RTP setting
OutbandDTMF
Duplicate RTP No duplicate.
One duplicate.
Two duplicate.
RPortSetting RPort Enabled/Disabled.
HoldbyRFC: Enable/ disable the hold feature (RCF:3261).
Status First Realm: First SIP server register status.
Second Realm: Second SIP server register status.
Dritter Realm: Third realm register status.
NAT Transversal
STUNsettings STUN: To Enable/Disable this function.
STUN server
Administrator
Auto Config
Configurationmode Deactivate
TFTP
FTP
TFTP-Server: Setting the TFTP server IP address.
FTP-server: Setting the FTP server IP address.
FTPLoginname: Setting the FTP login name.
FTP-password: EINR50 = Setting the FTP password.
Upgrade system
Immediate upgrade: Immediate device upgrade.
Status: The time for next checking of updated firmware.
Timerreset: Reset the update time.
Default setting
System Authentication:
Inorder to set the SIP using the keypadyouneed to input the password first. Default is »24234880«.
Version
Watch dog
Restart
Operation
Symbols
Symbol Reference
Thissymbolpromptsyouto lift up the handset ofyourtelephone.
Thissymbolindicatesthecallstatus. You have lifted the handset of your telephone.
This symbol prompts you to replace the handset of your phone in the carriage, or the telephone is idle.
This symbol indicates some kind of signaling activity at your terminal, for example, that your phone is ringing.
Thissymbolpromptsyouto dial a number.
1 9 Oneofthese symbols indicates that youshoulddialthedigitshown, or a certain character.



Phone book


Thissymbolpromptsyouto press the »Hold«button.
Usethisbutton to dial the last numberonceagain(redialbutton).
Use this button to initiate a three-party conference call.
Usethisbutton to transfer acalltoanother party.
Thisysymbolpromptsyouto press the OKbutton(Enter).
Usethisbutton to enter the phone's configurationmenu.
Usethisbutton to access the telephone directory.
Usethisbutton to access the called party list.
Usethisbutton to access the caller list forcalls.
Thissymbolindicates that an acknowledgement signal can be heard in the handset.
※Thissymbolindicates that a conference call is active.
Telephone display
Telephone display when not enrolled.
| When the telephone is idle (not yet enrolled) the display shows the following:Date (MM-TT) and time (hh:mm) in the upper line, as for example 01.12 8:26 a.m.»No service« signifies that none of the performance features such as call transfer or »Do not disturb« has been activated.The green LED will be lit after enrolling the telephone with a SIP-provider or with a pabx. | 12-01 08:26No service |
Display for an enrolled telephone
| When the telephone is idle, the display shows the following: Daten and time on the first line.The entered name (»Display Name«) on the second line.The green LED is lit. The telephone has been enrolled with a SIP-provider or with a pabx. | 12-01 08:26< IP-50> |
Lifting up the handset without dialing
| If you lift up the handset but do not start dialing, the dial mode will be switched off after approximately 20 seconds. The text shown here is then displayed for around 10 seconds and you will hear the busy tone. The display then returns to idle state. However, you will not hear any tone from the handset. Replace the handset. | Time out... |
Call
| With an incoming call, the numer of the caller is displayed on the upper and the lower line. | 12 |
| 12 |
Whether or not the name of the caller is displayed depends on the provider. The number may be displayed on both lines.
| The display will be as shown here, if a caller terminates the call without establishing a connection. In this example here two calls were not accepted.The caller list contains more information on these calls (»2.Call history«). | 12-01 08:262 Missed Call |
Making a call
| After lifting up the handset or activating the hands-free mode you can start dialing. To have the entered number dialed immediately, press the # button. The user is called. | IP Dialing 1212345 |
| Ringback1234 |
Call connection
| You are connected with the other party. Description of the display:L1:10 = Connected with call number 10.Timer = Connected for 1 hour, 2 minutes and 3 seconds. | - | L 1 : 10Timer = 01 : 02 : 03 |
Room inquiry
| You are connected with the other party. IP Dialing | Timer=01:02:03 |
Simple Log-in of a »funkwerk IP 50« to a PABX.
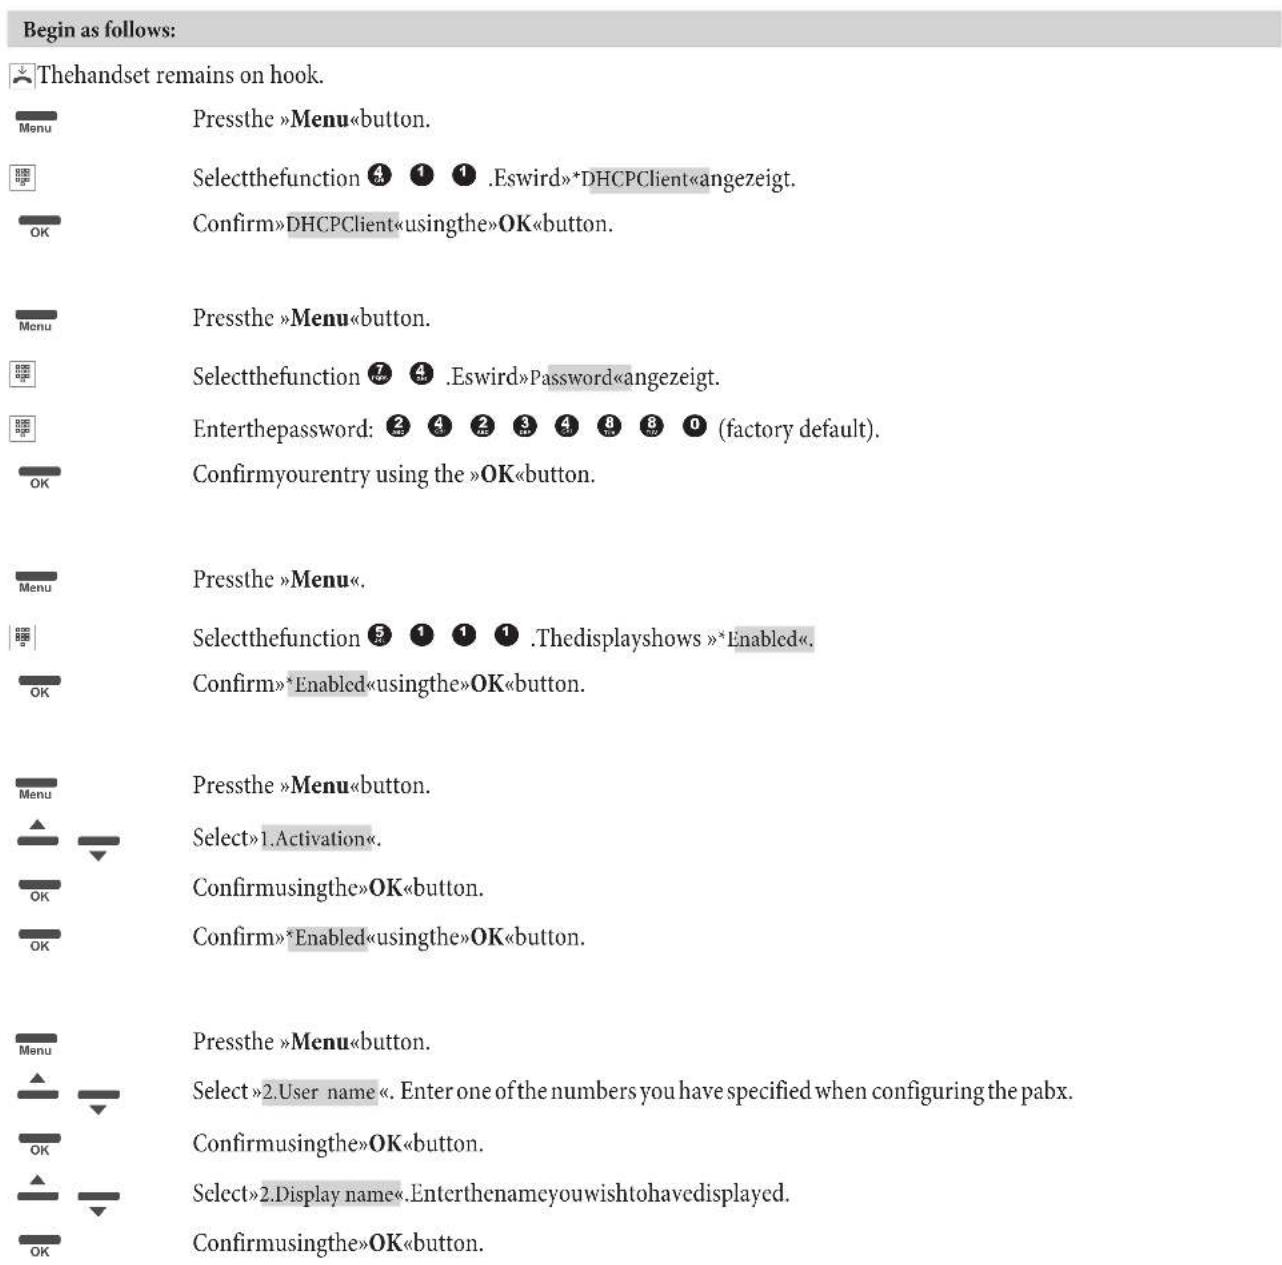
Enroll your telephone at the pabx and specify a number for the SIP-phone (e.g. 13); save the changes made. If required enter all other information according to the pabx description.
Connect the pabx and the »funkwerk IP 50« through Ethernet. Connect the power supply for the »funkwerk IP 50«.
text_image
Begin as follows: Thehandset remains on hook. Menu Selectthefunction 4 1 1 .Eswird»*DHCPClient«angezeigt. OK Confirm»DHCPClient«usingthe»OK«button. Menu Selectthefunction 7 4 .Eswird»Password«angezeigt. Enterthepassword: 2 4 2 3 4 8 8 0 (factory default). OK Confirmyouentry using the »OK«button. Menu Selectthefunction 5 1 1 1 .Thedisplayshows »*Enabled«. OK Confirm»*Enabled«usingthe»OK«button. Menu Select the »Menu«button. Select»1.Activation«. OK Confirmusingthe»OK«button. OK Confirm»*Enabled«usingthe»OK«button. Menu Select »2.User name«. Enter one of the numbers you have specified when configuring the pabx. OK Confirmusingthe»OK«button. Select»2.Display name«.Enterthenameyouwishtohavedisplayed. OK Confirmusingthe»OK«button.After a restart your »funkwerk IP 50« will be ready for operation.
If required, enter all other information as described in the pabx manual.
Telephony
When subscribers are put on hold they hear waiting music, depending on the provider.
Note! When you press any of the numerical buttons, the phone will start dialing, even with the handset on hook or hands-free mode switched off.
The following procedures often begin with »Lift up handset« and end with »Replace handset«. Activating or deactivating the hands-free mode has exactly the same effect.
Starting a call
| Lift up handset Dial call number Terminate dialing by pressing the # key. | Conduct your call Terminate your call |
Dialing from the phone book
You can store up to 140 names and numbers in the telephone directory. To select a name, you can page through the directory using the arrow buttons, or enter the specific first letter(s) of the name using the push-button set.
| Handset on hook | Phone book | Enter first letter | OK | Select subscriber Lift up handset |
Accepting calls
| Telephone rings Lift up handset Conversation Terminate your call | |||
Speed dial using the M1..M3 buttons
| orLift up handset or handset on hook | M1...M3 | Conduct your call Terminate your call |
Room inquiry
| You are conducting a call.You would like to call another party. | Mute button»Mute«The other party can no longer hear you. | Mute button»Mute«The other party can hear you again. |
Inquiry Call
You can call another party at any time during an ongoing call.
| You are conducting a call.You would like to call another party. | Press the System-parked inquiry button»Hold«.You hear the dial tone from the earpiece. | Dial the number of the party you wish to call. Speak to the desired party. | Press the System-parked inquiry button»Hold« once again to return to the first caller. |
Accepting a waiting call (room inquiry with waiting caller)

You are conducting a call. A second party calls you. You hear the call waiting signal.

Press the System-parked inquiry button»Hold«. You hear the dial tone from the earpiece.

You will be connected with the waiting party. Your first call is put on hold (see »Inquiry call«). For further procedures refer also to »Broker's call« or »Three-party conference call«.
Broker's Call

You are in a call but wish to speak to a third party.

Press the System-parked inquiry button»Hold«. You hear the dial tone from the earpiece.

Dial the number of the party you wish to call. Speak to the desired party.

You are conducting the call. The first call is put on hold.


Press the System-parked inquiry button »Hold«, to return to the first caller, the second caller will be put on hold. Press »Hold« to switch backandforth between the two callers.
If you switch back and forth between two external parties (broker's call) and then hang up your handset, the current call is terminated and the caller on hold will call you by way of the »Recall«.
Call switching

You are conducting a call and wish to transfer the call to another party.

Press »Transfer«. You hear the dial tone from the earpiece.

Dial the number of the party you wish to call.

or

Replace the handset. The two parties are then connected.
If the called party does not answer, press »Transfer« once again to return to the first party.
Three-Party Conferencing

You are conducting a call with one party and wish to include a further party in the call.

Press the System-parked inquiry button»Hold«. You hear the dial tone from the ear-piece.

Dial the number of the party you wish to call.

You would like to include this party in the first call.


PresstheSystem-parkedinquiry button»Hold«. Conductyourthree-party conferencecall.
The conference is ended when you hang up your handset. A party included in the conference call can hang up at any time and the party which initiated the call can then continue the conference with the remaining callers.
If you are in a conference call and you hang up, your call is terminated and the two parties from your conference remain connected with each other!
Settings
Temporary handset volume setting (Volume)
The telephone is idle, or you wish to change the handset or speaker volume during an ongoing call.

Use the arrow keys to adjust the handset or speaker volume. The display shows volume control values from »Volume=0« tos »Volume=15«.
12-01 08:26 Volume= 10
Viewing the IP address

IP
Press the »IP« function button. The display then shows the IP address currently assigned to your phone.
12-01 08:26 192.168.001.053
Do not disturb Settings (DND)

DND
Press »DND« (Do not Disturb). The feature is active when »DND« shows on the display.
12-01 08:26
DND #
Activate call forwarding (FWD)
Use this key to activate call forwarding. Call forwarding must have been configured previously in the phone for this.

FWD
Press the function key »FWD«. Call forwarding is active when »Empty FWD Number« shows on the display.
12-01 08:26 AF10
When you replace the handset, the following appears in the display, for example »AF 10«. This indicates that you have configured call forwarding to subscriber 10. When you replace the handset after completing a call, the text in the display »#Forward#« notifies you of an existing call forwarding setting.
12-01 08:26 Empty FWD Number
Forward
Speed dial
You can save a speed dialing number at keys M1 to M3; the number is then dialed when you press one of these keys. These three keys assign the locations »Phone 1« - »Phone 3« for the »Speed Dial Phone List« in the Web configuration for the phone. You can configure these three locations either with Web configuration, or using the phone. You can overwrite this number using your phone.
Configuring speed dialing destinations for a function key
| The handset remains on hook. Dial the number you wish to call. | IP Dialing.. 1234567 | |
| M1 | Press »M1«, »M2« or »M3«. In this example »M1«. | 1234567 Save to M1 <ENT> |
| OK | Press »OK« to save the entry. | Speed Dial M1 : 1234567 |
Configuration using the telephone
Configuration at the phone is performed using corresponding menus that can be selected with the arrow keys after pressing »Menu«.
Each entry is numbered. After pressing »Menu« you can also reach the required menu by pressing the corresponding number for a specific menu. Example: Pressing »Menu«, key »3«, key »1« will move you to the menu for call forwarding (»1.All Forward«.
| During configuration the handset remains in the cradle and hands-free calling (key »H/F«) is de-activated. | ||
 | Press the »Menu« button.The first display shows the settingsPhone book) for the phone book andCall history) for the call history | 1.Phone book2.Call history |
 | Press the arrow button to have the following menu items displayed. | 3.Phone setting4.Network |
| The corresponding number will flash when the cursor is located above the selected menu. | 5.SIP setting6.NAT transversa | |
| 7.Administrator1.Phone book | ||
 | You can also use the numbers to select a specific menu. Press the key »Menu« and then enter a number from 1 to 7. The menu is then selected and you can see the first submenu directly, such as for entering »1«: 1.Search und 2. Add entry. | 1.Search2.Add entry |
 [23SW] [23SW] | ||
Telephone directory setup
 | ||
 | Select »2.Add entry«. | 1. Serch2. Add entry |
| [006D] | Confirm your entry using the »OK« button. | |
| Enter the desired name. For ex.: »Carlos«. Name : | Carlos | |
 | Confirm your entry using the »OK« button.Enter the telephone number. | Number :123456 |
 | Confirm your entry using the »OK« button>«. Imput further entries as needed. | 2. Add entry3. Speed dial |
Searching phone book entries (Search)
| Begin as follows: | |||
| [X=DX] |  | [SDCW] | [Y22] |
| »Menu« button | 1.Phone book | ||

Select »1.Search«.
- Search
- Add entry

Confirm your entry using the »OK« button.

The display shows the number of telephone directory entries (in this example: 4 entries).
Enter the first letter of the name of the party you wish to talk to.
Confirm your entry using the »OK« button.
Search [4]
Activate speed dial
| Begin as follows: | ||
| Menu »Menu« button | 1.Phone book | |
| Select »3.Speed dial«. | 3.Speed dial4.Erase all | |
| Confirm your entry using the »OK« button. | ||
| Enter the telephone number you wish to assign to any one of the buttons M1 ... M3 and confirm your entry using the »OK« button. | Number : 1234 | |
| Press »M1«, »M2« or »M3« or use the keypad buttons 1 through 0. The desired number is now stored under this button. | Press M1..Mx to store number | |
| 3.Speed dial4.Erase all | ||
| Press »M1«, »M2« or »M3« or use the keypad buttons 1 through. | ||
Delete phone book (speed dial)
| Begin as follows: | ||
| Menu | 1.Phone book | |
| »Menu« button | ||
| Select »4.Erase all«. | 3.Speed dial4.Erase all | |
| Confirm your entry using the »OK« button. | ||
| Select »1.Yes« in order to delete. | 1.Yes2*No | |
| Confirm your entry using the »OK« button. | 3.Speed dial4.Erase all | |
Call history
Begin as follows:

text_image
Menu »Menu« button 2.Call historyDisplaying the call history
text_image
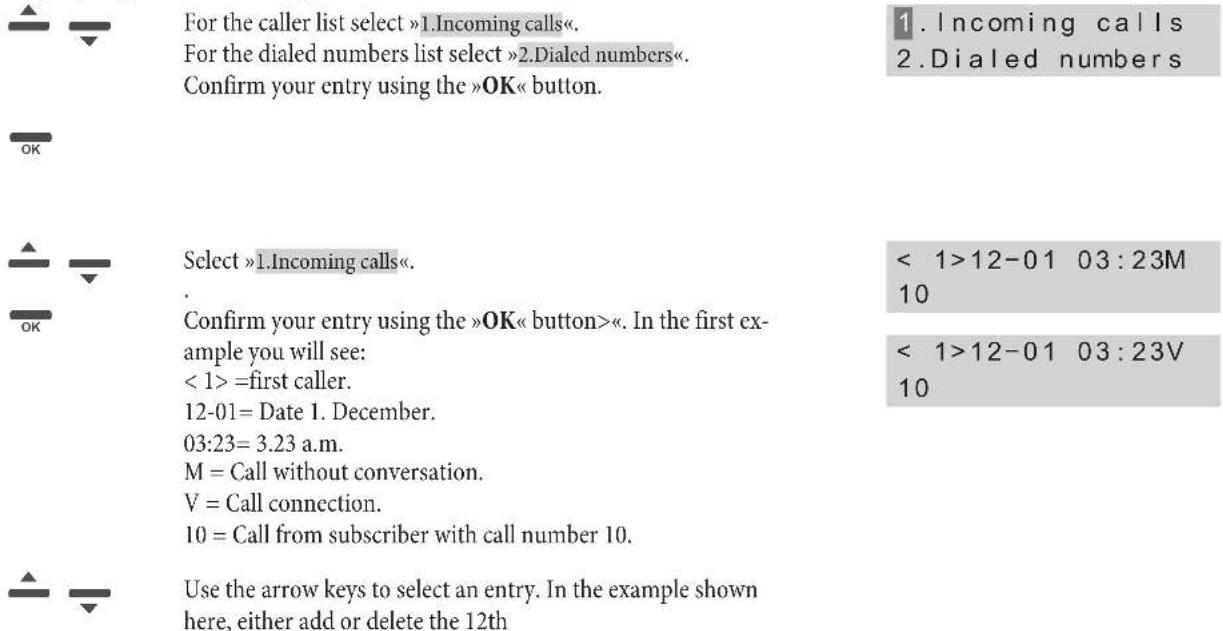
For the caller list select »1.Incoming calls«. For the dialed numbers list select »2.Dialed numbers«. Confirm your entry using the »OK« button. Select »1.Incoming calls«. Confirm your entry using the »OK« button>«. In the first example you will see: < 1> =first caller. 12-01= Date 1. December. 03:23= 3.23 a.m. M = Call without conversation. V = Call connection. 10 = Call from subscriber with call number 10. Use the arrow keys to select an entry. In the example shown here, either add or delete the 12th= subscriber in the call list to/from the phone book
You have selected a subscriber from the caller or call history list and now wish to add that subscriber to your phone book.
text_image
Use the arrow keys to select an entry. In this example call number 12 with subscriber 15. Confirm your entry using the »OK« button. Select »2.Erase« to delete the entry. Or select »1*Save« to the entry from the list. Confirm your entry using the »OK« button. Here you can enter the party's name. Confirm your entry using the »OK« button. Enter here the number of the caller. Confirm your entry using the »OK« button. <12>12 01 04:23M 15 1*Save 2.Erase Name: 10 Carlo Phone: 10Deleting the call history
You can also delete the entire contents of the lists simultaneously.
For the caller list select »3.Erase record«. Confirm your entry using the »OK« button.
- Dialed numbers
- Erase record

Select »1*All« if you wish to remove all entries from the list. Or select »2.Incomming« to remove the callers from the list. Or select »3.Dialed« to remove all outgoing calls from the list. Confirm your entry using the »OK« button.
- Incoming 3. Dialed

Phone settings
Call forwarding (Call Forward)
The following call forwarding options are available:
Selectthecallforwarding type:
- Callforwarding continuous (All forwards)
- Callforwarding on busy (Busy forward)
- Callforwarding on no answer (Noanswer fwd.).

Confirm your entry using the »OK« button.
- All forwards
- Busy forward

Select either »1.Activation« to activate call forwarding, or »2.Number» to input the destination number for call forwarding.
- Busy forward
- No answer fwd.
- Activation
- Number

Confirm your entry using the »OK« button.

»1.Enabled«. This activates call forwarding. In the example shown here, »*« indicates that this function has been configured.
1*Enabled 2. Disabled
Confirm your entry using the »OK« button.
»2. Disabled«. This de-activates call forwarding, but the destination number remains configured.
- Enabled 2*Disabled
Confirm your entry using the »OK« button.
- No answer fwd.
- Ring Timeout
If you have selected »3.No answer fwd.«, under »4.Ring Timeout« you can set the number of calls (2...8) after which call forwarding is to be carried out.

Confirm your entry using the »OK« button.
Silent signalling (Do not Disturb)
Begin as follows:

»Menu« button


- Phone setting 2. Do not Disturb
To enter the time, move the arrow (cursor) to the proper position and input the correct digits.
| Select either »1.Allways« for permanent Idle, or »2.By Period» to define a time period in which no acoustic signals will be issued at your phone. Confirm your entry using the »OK« button. | 1. All ways2. By Period | |
| If you have selected »3.By Period«, under »4.Period Time« you can set the time at which no acoustic signal is to be issued by your phone. Confirm your entry using the »OK« button. | 2. By Period3. Period Time | |
| Here, enter the time period in which station guarding is to be activated at your phone (in the example shown here from 12:30 to 13:00). Confirm your entry using the »OK« button. | 1. Period Time:12:30 13:00 | |
Appointment reminder calls (Alarm setting)
Your phone can also activate an appointment reminder call at a time which you can define.
Begin as follows:


»Menu« button
3.Phone setting
- Alarm setting
OK ▲ Select »1.Activation«. 1. Activation
Confirm your entry using the »OK« button>«.
»1.Enabled«. This activates the appointment reminder call. 1*Enabled
»2. Disabled«. This de-activates the appointment reminder call. 1. Enabled
Select »2.Alarm time«. 1. Activation
OK Confirm your entry using the »OK« button>«.
Here, enter the time at which the reminder call is to be placed (in the room, but one 12:30) 1. Alarm Time :
OK Confirm your entry using the »OK« button.
Setting the date / time
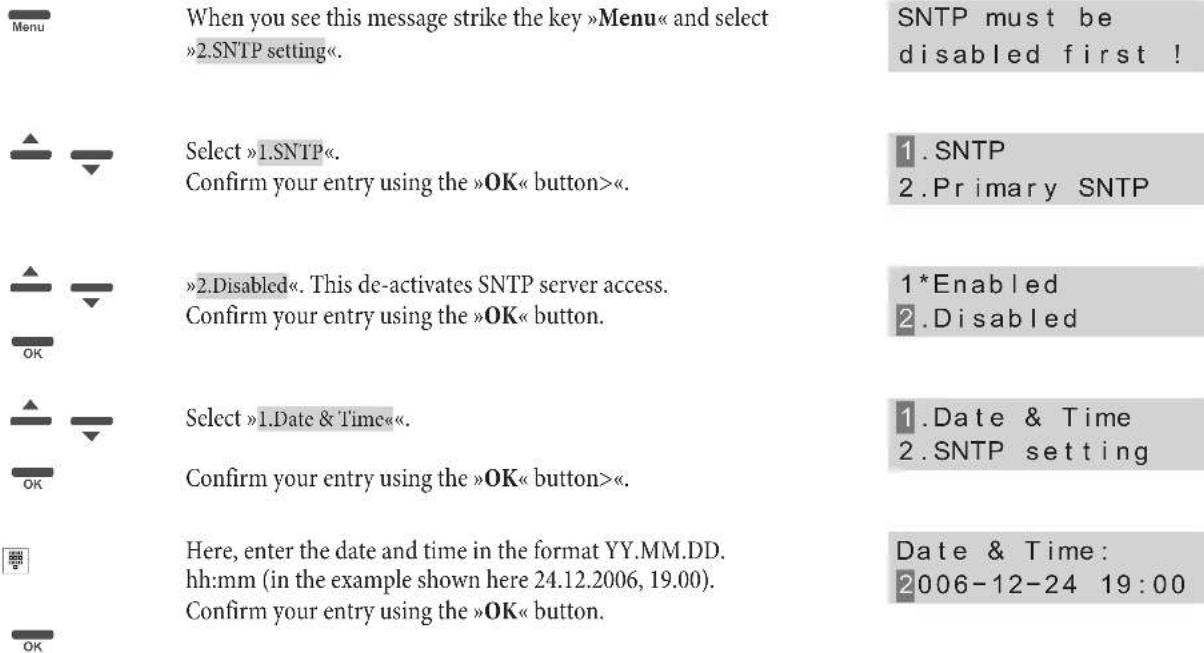
It is useful to configure a timer server in your phone so that your Telephone remains synchronized within the network. This server can be installed at an external location in the Internet as a so-called Public Time Server or in your own network. SNTP server access must be de-activated for this. This setting must be made when you do not receive the time automatically via an SNTP server.
Begin as follows:

text_image
Menu »Menu« button 3.Phone setting 4.Date/Time sett 1.Date & Time OK OKTo enter the time, move the arrow (cursor) to the proper position and input the correct digits.
If your SNTP server is still configured you will be requested to de-activate it.
text_image
Menu When you see this message strike the key »Menu« and select »2.SNTP setting«. SNTP must be disabled first ! Select »1.SNTP«. Confirm your entry using the »OK« button>«. 1.SNTP 2.Primary SNTP »2.Disabled«. This de-activates SNTP server access. Confirm your entry using the »OK« button. 1*Enabled 2.Disabled Select »1.Date & Time««. Confirm your entry using the »OK« button>«. 1.Date & Time 2.SNTP setting Here, enter the date and time in the format YY.MM.DD. hh:mm (in the example shown here 24.12.2006, 19.00). Confirm your entry using the »OK« button. Date & Time: 2006-12-24 19:00Activating / De-activating the SNTP server (SNTP settings)
Begin as follows:

text_image
Menu »Menu« button 3.Phone setting 4.Date/Time set 2.SNTP setting OK OK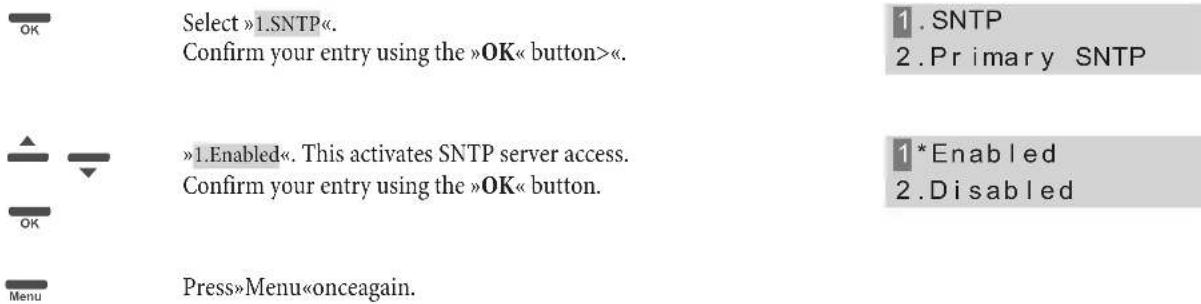
text_image
OK Select »1.SNTP«. Confirm your entry using the »OK« button>«. 1. SNTP 2. Primary SNTP »1.Enabled«. This activates SNTP server access. Confirm your entry using the »OK« button. 1* Enabled 2. Disabled Menu Press»Menu«onceagain.Under the »Primary SNTP« and »Secondary SNTP« setup items, enter the IP addresses of the »time synchronization sources«. Here, you can enter two different addresses. This allows the time to be accepted via a second server in the event of loss of the first server. Any time server that has already been entered is displayed.

text_image
Select »2.Primary SNTP«. Or, select a further SNTP server »3.Secondary SNTP«. Confirm your entry using the »OK« button>
text_image
Enter the IP address for the SNTP-server. Confirm your entry using the »OK« button. If required, you can then select a second time server; enter the address as described above. SNTP Server IP: time.windows.com 2. Primary SNTP 3. Secondary SNTPTime Zone
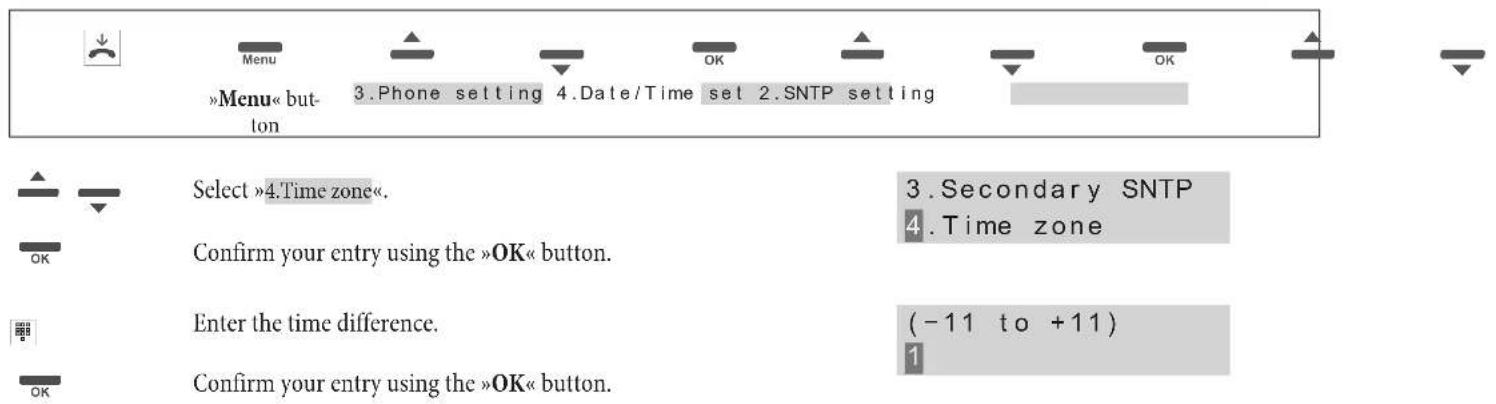
Here, enter the time difference between the standard time »Greenwich (Mean) Time« and your own location. For Central Europe the time zone needs to be set to + one hour (1). Also observe the difference between standard and daylight savings time.
Begin as follows:
text_image
Menu »Menu« button 3.Phone setting 4.Date/Time set 2.SNTP setting OK OK Select »4.Time zone«. OK Confirm your entry using the »OK« button. Enter the time difference. OK Confirm your entry using the »OK« button. 3.Secondary SNTP 4.Time zone (-11 to +11) 1Adjustment Time
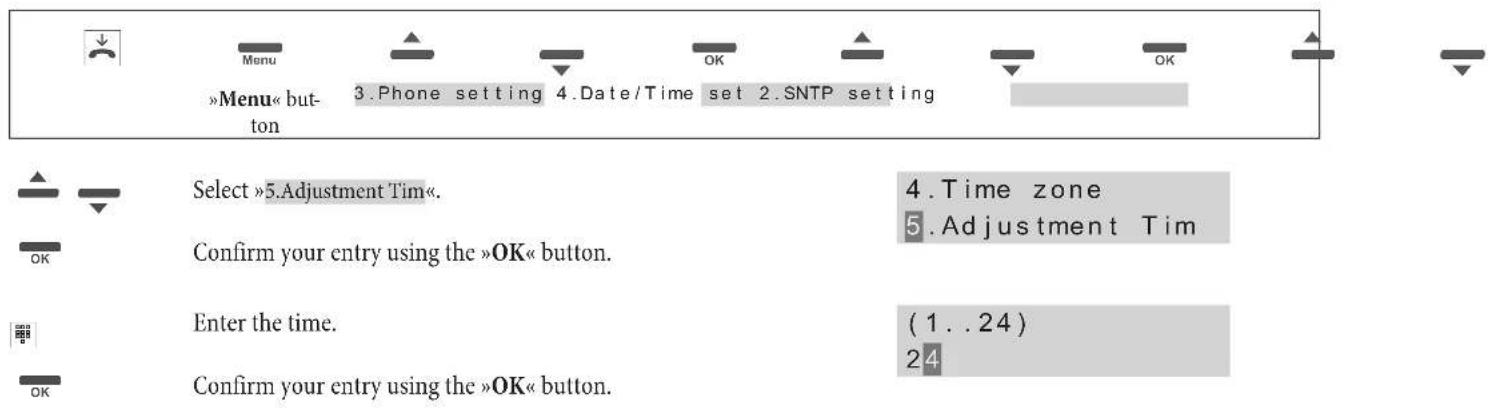
This option lets you specify the »Time zone« for resynchronizing the time setting.
Begin as follows:
text_image
Menu »Menu« button 3.Phone setting 4.Date/Time set 2.SNTP setting OK OK Select »5 Adjustment Tim«. OK Confirm your entry using the »OK« button. Enter the time. OK Confirm your entry using the »OK« button. 4.Time zone 5.Adjustment Tim (1..24) 24Volume & Gain
This option lets you set the volumes for voice communication. What you set here are the signal levels delivered to and received from the phone.
Handset Volume Setting
Begin as follows:


»Menu« button
3.Phone setting 5.Volume & Gain

Select »1.Handset volume«.
- Handset volume

Confirm your entry using the »OK« button.
2.Speaker volume

You can set the volume in 15 steps. Select the desired value.
Handset volume:
Confirm your entry using the »OK« button>«.
1 (15=Max)
Speaker volume
Begin as follows:


»Menu« button
- Phone setting 5. Volume & Gain

Select »2.Speaker volume«.
- Handset volume

Confirm your entry using the »OK« button.
- Speaker volume

You can set the volume in 15 steps. Select the desired value.
Speaker volume:

Confirm your entry using the »OK« button>«.
8 (15=Max)
Microphone gain (handset gain)
Use this setting to define the level of amplification to be applied to the voice signal from your microphone before the signal is transmitted to the other party.
Begin as follows:


»Menu« button
3.Phone setting 5.Volume & Gain

Select »3.Handset gain«.
- Speaker volume

Confirm your entry using the »OK« button.
- Handset gain

15 levels (steps) are provided for the amplification setting. Select the desired value.
Handset gain:

Confirm your entry using the »OK« button>«.
8 (15=Max)
Speaker gain
Use this setting to define the level of amplification to be applied to the incoming voice signal.
Begin as follows:


Menu button
-
Phone setting
-
Volume
& Gain

Select »4.Speaker gain«.
-
Handset gain
-
speaker gain

Confirm your entry using the »OK« button.

15 levels (steps) are provided for the amplification setting. Select the desired value.
Speaker gain: 8 (15=Max)

Confirm your entry using the »OK« button>«.
Ringer setting
Use this setting to define the ringing melody you wish to use and its volume.
Begin as follows:


»Menu« button
- Phone setting
6.Ringer
Ringer volume

Select »1.Ringer volume«.
- Ringer volume
2.Ringer type

Confirm your entry using the »OK« button.

You can set the volume in 10 steps. Select the desired value.
Ringer volume:
6 (10=Max)

Confirm your entry using the »OK« button.
Tone setting

Select »1.Ringer type«.
- Ringer volume
2.Ringer type

Confirm your entry using the »OK« button.

You can set 4 different ringing melodies. Select the desired melody.
Ringer type:
3 (4=Max)

Confirm your entry using the »OK« button.
Auto Dial Time
If you enter digits for composing a subscriber number, the phone must have some means of recognizing when dialing ends. During manual dialing, you mark out the end of a dialed number by pressing the number (#) key. If the number key (#) is not pressed after dialing a phone number, dialing will assume to be completed only when the defined time period starting after which the last number was entered expires (»Auto dial«) You can adjust the length of that period of time between 3 and 9.
Begin as follows:


»Menu« button
-
Phone setting
-
Auto dial
The time between dialing can be set in steps of 3...9 seconds. Select the desired value. Confirm your entry using the »OK« button.
Auto dial: 3 (3-9 seconds)
Network
Remember that some settings may not be effective until the phone is restarted.
Your phone is equipped with two Ethernet ports: LAN and WAN. The WAN port is linked to the router or modem. The LAN port represents a dedicated network and must be configured as such.
Here, you can configure the network ports for WAN and LAN.
Begin as follows:

text_image
Menu »Menu« button 4 . Network OKWAN Settings
text_image
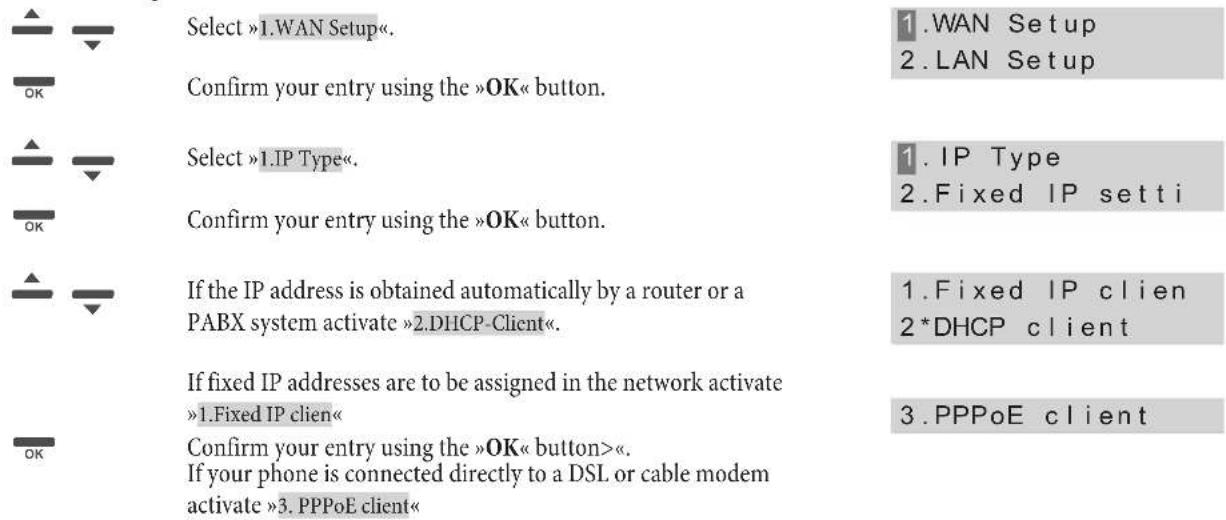
Select »1.WAN Setup«. OK Confirm your entry using the »OK« button. Select »1.IP Type«. OK Confirm your entry using the »OK« button. If the IP address is obtained automatically by a router or a PABX system activate »2.DHCP-Client«. If fixed IP addresses are to be assigned in the network activate »1.Fixed IP clien«. OK Confirm your entry using the »OK« button>«. If your phone is connected directly to a DSL or cable modem activate »3.PPPoE client« 1.WAN Setup 2.LAN Setup 1.IP Type 2.Fixed IP setti 1.Fixed IP clien 2*DHCP client 3.PPPoE clientConfiguring a fixed IP-address
Begin as follows:

text_image
Menu »Menu« button 4.Network 1.WAN Setup 2.fixed IP setti OK OK
Select 1.IP Adress«. Confirm your entry using the »OK« button.
- IP Adress
- Subnet mask

Enter an IP-address from your network (in this example 192.168.1.45 Confirm your entry using the »OK« button.
IP adress: 192.168.001.045
| OK | Select »2.Subnet mask«. | 1.IP Adress2.Subnet mask |
| Confirm your entry using the »OK« button. | ||
| Enter the subnet address of your network (in this example 255.255.255.0) | Subnet mask: 255.255.255.000 | |
| OK | Confirm your entry using the »OK« button. | |
| OK | Select »3.Default Gateway«. | 2.Subnet mask3.Default Gateway |
| Confirm your entry using the »OK« button. | ||
| Enter the gateway address of your network (in this example: 255.255.255.0) | Gateway IP: 192.168.001.250 | |
| OK | Confirm your entry using the »OK« button. |
DSL- or cable modem access (PPPoE)
| Begin as follows: | ||
| MenuOKOKOKMenu« button4.Network1.WAN Setup | ||
| Select 3.PPPoE«. Confirm your entry using the »OK« button. | 2.Fixed IP setti3.PPPoE setting | |
| Under »1.User Name « and »2.Password« enter the user name and password assigned to you by your provider. Confirm your entry using the »OK« button. | 1.User Name2.Password | |
| If the user name or password contains special characters that are not supported by the phone, these entries must be made using the »Web Configurator«. | ||
LAN Settings
- If the LAN setting is at «Bridge», the two Ethernet ports are linked transparently with one another. You need this option if the phone is interconnected with an external NAT router.
- If the LAN setting is at »NAT«, the integrated NAT is activated. This setting is useful for ADSL users who don't have access to a NAT router.
Begin as follows:
| [2CKS] |  |  | [52SH] |  |  |  | [H30Z] |
| »Menu« button | 4.Network 2.LAN Setup | ||||||
(DNS Settings
The DNS, or Domain Name System entry is a service on the Internet that can provide a fixed host name for a dynamic IP address. This services allows a PC to be addressed using an invariable domain name.
Begin as follows:
text_image
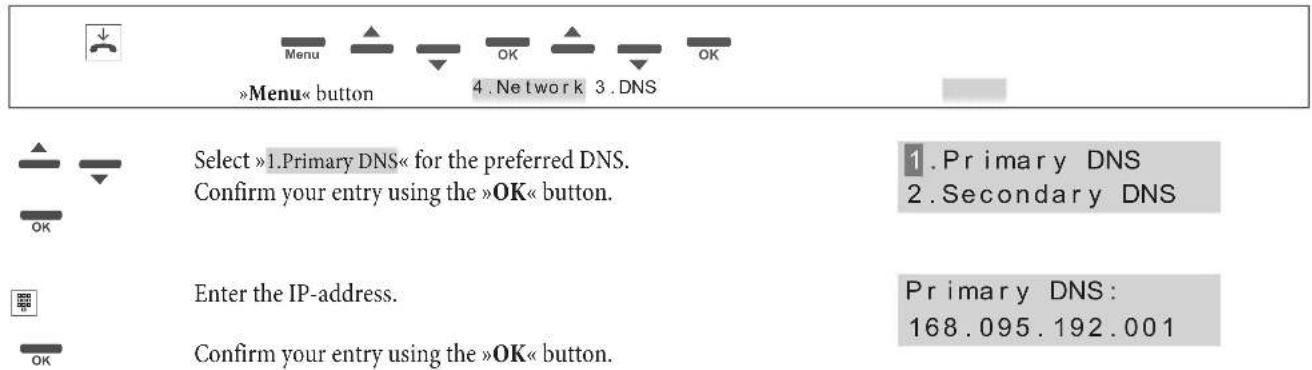
Menu »Menu« button OK 4. Network 3. DNS Select »1.Primary DNS« for the preferred DNS. Confirm your entry using the »OK« button. Primary DNS 2. Secondary DNS Enter the IP-address. Primary DNS: 168.095.192.001 Confirm your entry using the »OK« button.The »Secondary DNS« is configured in the same manner as the »Primary DNS«.
VLAN Settings
A Virtual Local Area Network (VLAN) is a local virtual network that resides in a physical network. It most widely used implementation is specified in the IEEE 8021Q standard.
VLAN activation
When you activate the VLAN option, all incoming packets are checked on the basis of their IP address and VID, provided you have defined the settings for VID, User Priority and CFI.
Begin as follows:

text_image
Menu »Menu« button OK 4. Network 4. VLAN
Select »1.Activation« in order to activate.
Confirm your entry using the »OK« button.
- Activation
2.VID
VID setup
Set the VID as specified in the information from your service provider.
Select »2.VID« in order to set up VID.
Confirm your entry using the »OK« button.
- Activation
2.VID

Here, enter the value specified by your provider.
Confirm your entry using the »OK« button.
VID (2-4094):
136

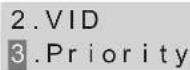
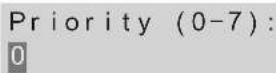
Priority
defines a user priority using eight different priority levels (2^3). IEEE 802.1P specifies the use of the three user priority bits. Normally, this value is defined by your Service Provider.
Select »2.VID« in order to set up priority. Confirm your entry using the »OK« button.

Here, enter the value specified by your provider. Confirm your entry using the »OK« button.
CFI
The Canonical Format Indicator is always set to zero by Ethernet Switches. CFI is used to ensure the compatibility of Ethernet and Token Ring networks. When an Ethernet interface receives a frame with a CFI value of "One", that frame should not be forwarded to an unmarked interface without any processing.
If you activate the VLAN option and enter values for VID, User Priority and CFI, all incoming packets that bear the IP address of the phone and the same VID will be accepted. Packets that have the IP address of the phone but a different VID are rejected by the phone.
defines a user priority using eight different priority levels (2^3). IEEE 802.1P specifies the use of the three user priority bits. Normally, this value is defined by your Service Provider.
Status
Here, you can view the IP address and MAC address of your phone.
Begin as follows:

text_image
Menu »Menu« button OK 4.Network 5.StatusThe IP address and MAC address are shown here. A »W« is placed in front of the WLAN address, an »L« in front of the LAN address.
L192.123.123.001
W192.168.001.052
MAC:00094551ee08
SIP Settings
This menu item lets you set the Service Domain, make Codec settings, Codec ID settings and miscellaneous other settings. Follow your provider's instructions for these settings, as they are specific for each different provider. Configuration can only be completed via the »Web Configurator«.
Administrator (Authentication)
You must log in with your password (factory default setting »24234880«) before you can make any SIP settings. Only after you have successfully logged in can you make the following settings.
Begin as follows:

text_image
Menu »Menu« button 7.Administrator 4.System AuthentEnter the password »Password«. Password :
24234880

Confirm your entry using the »OK« button>«. »Correct!« will appear in the display when your password is accepted.
Correct!
You can now make any entries that require previous authentication.
Entering provider data.
Your phone can utilize services from three different providers. Three function keys (L1....L3) are provided for this on the telephone. You can permanently select a provider using these function keys. Enter the data for each provider under »First realm«, »Second realm« and »Third realm«.
Begin as follows:
| Menu»Menu« button | 5.SIP setting | OK |
The »First realm« is set when the phone is restarted.
| OK | Select »1.Service domain« in order to activate. Confirm your entry using the »OK« button. | 1. Service domain2. Codec |
| OK | Select the realm in which you wish to enter the provider. Confirm your entry using the »OK« button. | 1. First realm2. Second realm3. Third realm |
| OK | Select »1.Activation« in order to activate. Confirm your entry using the »OK« button. | 1. Activation2. User name |
| OK | »1.Enabled«. This activates the provider. »2. Disabled«. This de-activates the provider. Confirm your entry using the »OK« button. | 1* Enabled2. Disabled |
| OK | Select one of the entries 2...8 « and enter the data of your provider. Confirm your entry using the »OK« button. | 1. Activation2. User name |
| OK |
PABX connection: Under »2.User name« enter one of the numbers you have specified when configuring the pabx.
| Enter the name that you wish to have displayed. 3 . Display name | |
| Enter the register name specified by your provider. | 4. Register name |
| Enter the register password specified by your provider. | 5. Register passw |
| Enter the Proxy Server specified by your provider. | 6. Proxy Server |
| Enter the Domain Server specified by your provider. | 7. Domain Server |
| Enter the Outbound Proxy address used by your provider. If unknown, you may skip his option. The same steps are required when registering with a different provider. | 8. Outband proxy |
| Confirm your entry using the »OK« button. | |
Port settings (RTP setting)
RTP = Real-Time Transport - a network protocol for transmitting continuous data (streams).
Under »Port Setting« you can specify the SIP and the RTP port numbers. Providers can use different SIP/RTP port settings; ask your provider about this so that you can enter the correct port number.
Begin as follows:

text_image
Menu »Menu« button OK 5.SIP setting 3.RTP setting Select the entry that you wish to activate or de-activate. Confirm your entry using the »OK« button. 1. Outband DTMF 2. Duplicate RTPDisplaying the status
You can use this item to view registration at the given provider.
Begin as follows:

text_image
Menu »Menu« button OK 5.SIP setting 6.Status Select the entry that you wish to view. In the example given here the phone has not been registered with the provider, or the phone is not logged on to a PABX system. First realm UnregisterSTUN Setting
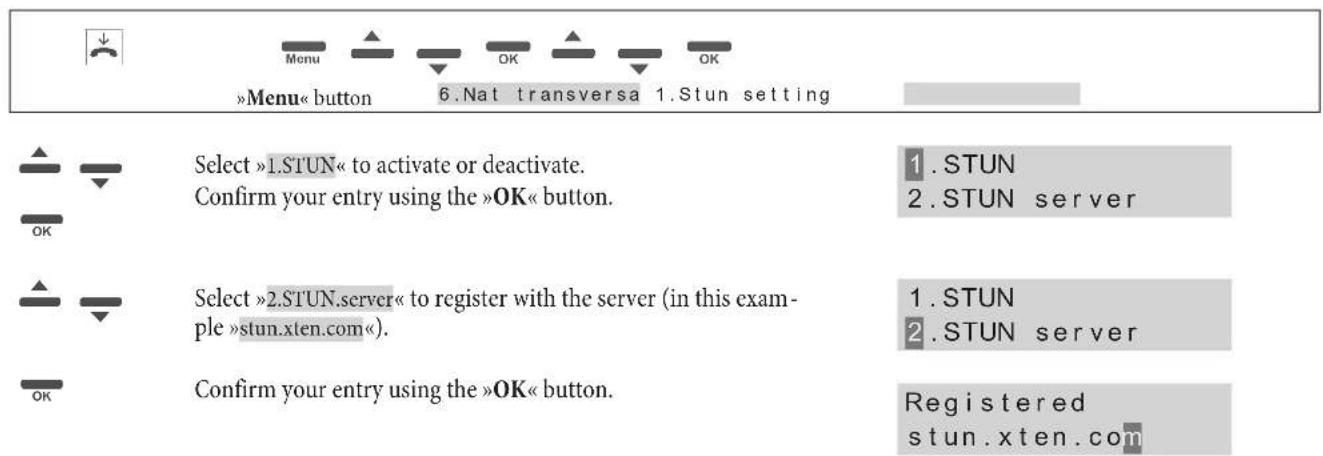
Under »STUN Setting« you can set up the STUN server for the SIP service. The STUN function must be activated in order for a telephone registered with the SIP server to work correctly downstream from a SIP server.
Begin as follows:
text_image
Menu OK OK »Menu« button 6.Nat transversa 1.Stun setting Select »1.STUN« to activate or deactivate. Confirm your entry using the »OK« button. OK Select »2.STUN.server« to register with the server (in this example »stun.xten.com«). OK Confirm your entry using the »OK« button. 1. STUN 2. STUN server 1. STUN 2. STUN server Registered stun.xten.comAdministrator settings
You can have your phone configured using a preset or stored configuration file. You will need to specify the location for the configuration data.
Selecting the configuration data server
Begin as follows:


»Menu« button
7.Administrator 1.Auto config

Select »1.Auto config« to specify the server on which the configuration data are stored.
-
Auto config
-
Upgrade System

Confirm your entry using the »OK« button.

Select »1.Config mode« to activate the server. The following servers are available:
-
*Disabled
-
TFTP
»1.Disable« (deactivating server access)
»2.TFTP«
»3.FTP«
»4.HTTP«

Confirm your entry using the »OK« button.

Select the activated server type and enter the IP address, user name (»Login Name«) and the password (»Password«) for the FTP server.
2.TFTP
3.FTP

Confirm your entry using the »OK« button.
- HTTP
(Upgrading the telephone software
Begin as follows:


»Menu« button
- Administrator 2. Upgrade system
The corresponding entries must be made for the following settings using the Web Configurator. These procedures are then carried out in the functions that are described.

Select »3.Status« to view the current software and the preset time for the next automatic upgrade.
-
Status
-
Reset Time

Confirm your entry using the »OK« button.

Click »2. Upgrade via« to select the server on which the file to upgrade is located.
-
Upgrade via
-
Status

»1.Disable« (deactivating server access)
»2.TFTP«
»3.FTP«
»4.HTTP.
Confirm your entry using the »OK« button>«

Select »1. Upgrade Now« to view the current software.
-
Upgrade Now
-
Upgrade via

Confirm your entry using the »OK« button.

Select whether you wish to continue »Yes« or whether you wish to quit the upgrade »No«.
- Yes
2*No

Confirm your entry using the »OK« button.
Select »4.Reset Time« to have the upgrade done at the time specified in the Web configurator.
Confirm your entry using the »OK« button.
Select whether you wish to continue »Yes« or whether you wish to quit the upgrade »No«.
Confirm your entry using the »OK« button.
-
Reset Time 1. Upgrade Now
-
Yes 2*No
Configuring the phone using the Web browser
You phone is also equipped with an integrated Web interface that you can use to configure the phone. First, enter the IP address at the Web site. Example: http://192.168.1.100. This IP address is obtained automatically from the connected PC via DHCP. You can view the IP address when you press the »IP« key on your phone.
Login
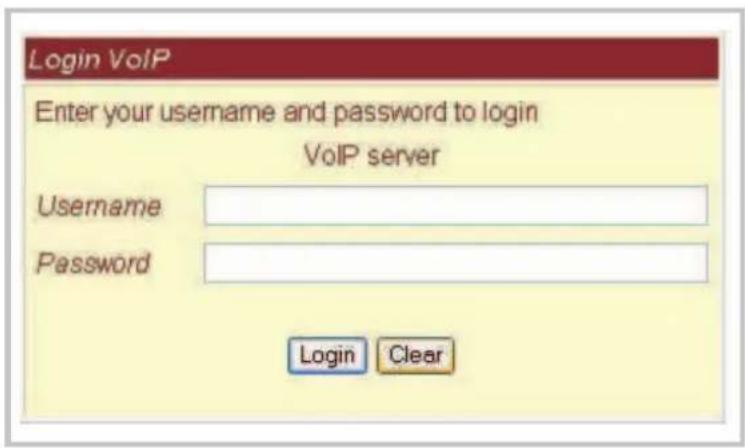
Enter the User Name and Password in the empty text boxes provided for that purpose.
Default settings:
- The user name for the adminis »admin« and the password is: »24234880«. As an Administrator, you are authorized to make any configuration settings you require.
- The user name for generic users is: »user« and the password is: »user«. As a standard User you are not authorized to perform SIP configuration, for example.
- When you click the »Login« button the Web-based information management menu is loaded to your phone.
- You must confirm any changes you make to this menu by clicking the button »Submit«. When you are finished making changes to the menu click the button »Save« in the menu »Save Change« to save all your changes. The modified settings will only be activated after you restart your system. To do this, click the button »Reboot« located at the left. The system is then restarted with the new configuration parameters.
text_image
Login VoIP Enter your username and password to login VoIP server Username Password Login ClearTelephone system data
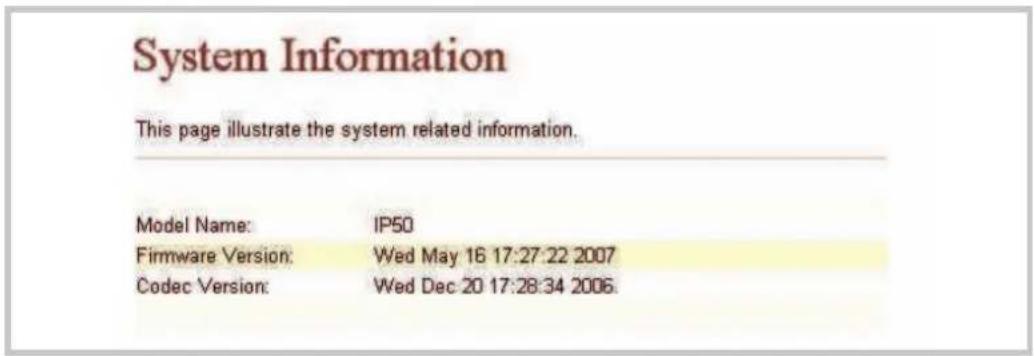
When you have successfully logged on to the Web site, the current system data for your phone is displayed, such as firmware version, model name, etc.
A list of the functions is shown on the left side. Select the function you wish to set by clicking it with the mouse key.
text_image
System Information This page illustrate the system related information. Model Name: IP50 Firmware Version: Wed May 16 17:27:22 2007 Codec Version: Wed Dec 20 17:28:34 2006.Phone Book, Speed Dial (Speed Dial Settings)
Phone Book/
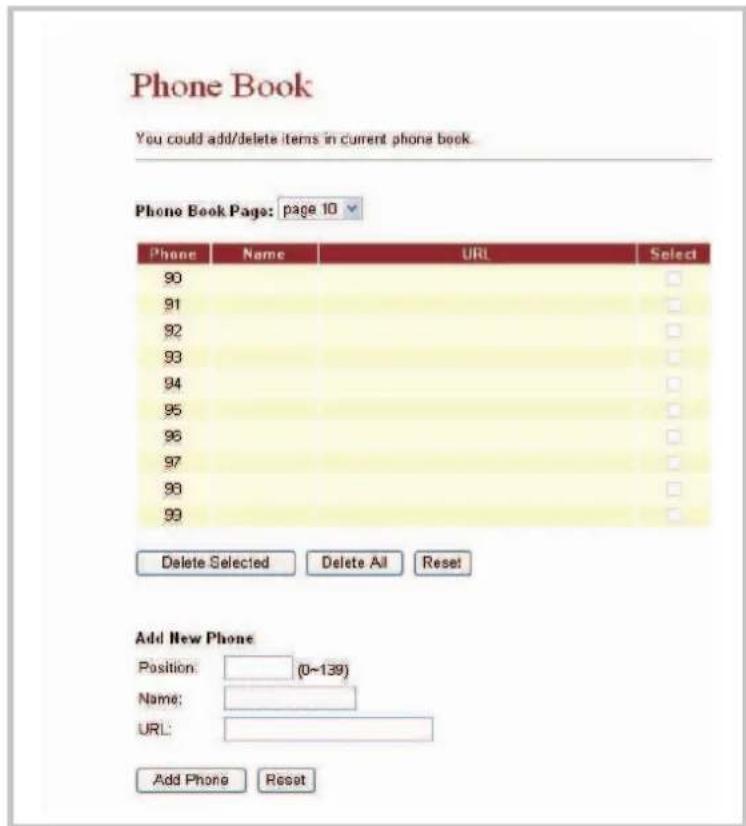
Use the menu item »Phone Book« to configure the phone book. You can add, change or delete speed dial numbers in the speed dial list ( »Speed Dial Phone List«).
Phone book entries
You can add new phone book entries using »Add New Phone«.
- Under »Position« you may choose one out of 140 speed dial destinations (000...139). Use »Name« to enter a name for the entry.
- For »URL« enter either the phone number, the URL, or the IP address of the subscriber.
- When you are done, click the »Add Phone« button.
- By clicking the »Reset« button youcandelete the entries made under »Add New Phone«.
- Once an entry has been added to the »Speed Dial Phone List« you cannot edit it anymore, only delete or overwrite.
Entry Delete
- Go to the »Select« column, choose the entries you want to remove, and click the »Delete Selected« button.
- If you wish to remove all subscriber numbers in one go, you need not choose all entries in the »Select« column. Simply click the »Delete All« button instead.
text_image
Phone Book You could add/delete items in current phone book. Phone Book Page: page 10 Phone Name URL Select 90 91 92 93 94 95 96 97 98 99 Delete Selected Delete All Reset Add New Phone Position: (0~139) Name: URL: Add Phone ResetSpeed dial(Speed Dial Phone List)
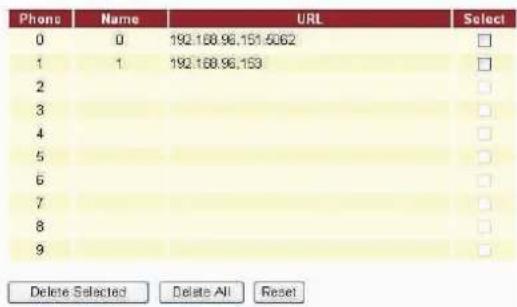
Use the menu option »Speed Dial Phone List« in order to configure the speed dial feature. You can add, change or delete speed dial numbers in the speed dial list ( »Speed Dial Phone List«).
Entering a Speed Dial Destination
Under »Add New Phone« you can enter a new speed dial destination.
- Under »Position« you may choose one out of 10 speed dial destinations (0...9). The digits 0 through 9 each represent a subscriber number. The phone dials these destination numbers automatically whenever you enter the appropriate digit for the desired subscriber.
- Under »Name« you can enter a name for each speed dial destination.
- Under »URL« you enter either the phone number, the URL, or the IP address of the subscriber you wish to store under this speed dial destination.
- When you are done, click the »Add Phone« button.
- By clicking the »Reset« button you can delete the entries made under »Add New Phone«.
Once an entry has been added to the »Speed Dial Phone List« you cannot edit it anymore.
Entry Delete
- Go to the »Select« column, choose the entries you want to remove, and click the »Delete Selected« button.
- If you wish to remove all subscriber numbers in one go, you need not choose all entries in the »Select« column. Simply click the »Delete All« button instead.
Speed Dial Phone List
You could set the speed dial phones in this page
text_image
Phone Name URL Select 0 0 192.168.96.151-5062 1 1 192.168.96.153 2 3 4 5 6 7 8 9 Delete Selected Delete All Reset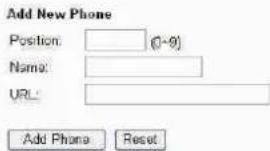
text_image
Add New Phone Position: (0-9) Name: URL: Add Phone ResetTelephone Settings (Phone Setting)
Here you can define the settings for the telephony functions.
Call Forward
This feature lets you redirect your phone calls and incoming telefax messages to a location of your choice.
Please note that not all providers support call forwarding. Before setting up this feature, you should therefore ask your provider for advice.
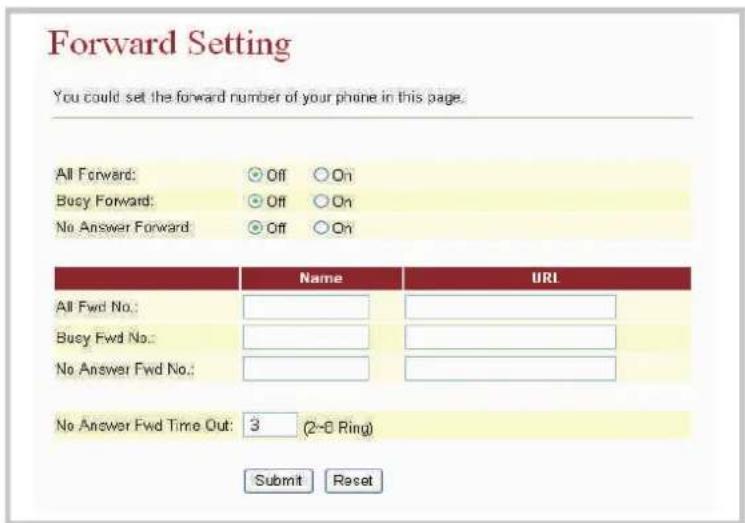
On the page »Forward Setting« you can select the forwarding mode, then enter the destination URL (phone number, phone number in URL format or IP address) to which incoming calls should be forwarded, as well as a name. The following call forwarding options are available:
UnconditionalCall Forwarding (All Forward): CallForwardon Busy(Busy Forward):
All incoming calls will be forwarded to the specified phone number, URL or IP address.
An incoming call will be forwarded to the specified phone number, URL or IP address only if the call led subscriber is busy.
Callforwarding on (NoAnswer Forward):
An incomingcall will be forwarded to thespecifiedphone number, phone numberinURL format, or IP address if the called subscriber does not pick up the handset within a specified time (as entered in »Time Out.
text_image
Forward Setting You could set the forward number of your phone in this page. All Forward: ○ Off ○ On Busy Forward: ○ Off ○ On No Answer Forward: ○ Off ○ On Name URL All Fwd No.: Busy Fwd No.: No Answer Fwd No.: No Answer Fwd Time Out: 3 (2-6 Ring) Submit ResetSet Up Call Forwarding
You may enable all three call forwarding modes at the same time. In this case the TA will only use »Call Forward Unconditional« (All Forward). This call forwarding mode has the highest priority. The two remaining call forwarding modes may be active concurrently.
• To enable the desired call forwarding mode, choose »On«.
- Under »All Fwd No.:«, »Busy Fwd No.:« or »No Answer Fwd No.:« you can use the »Name« text box to enter a name for the forwarding destination.
- Under »URL« you enter either the phone number, the phone number in URL format or the IP address of the subscriber to whom calls should be forwarded.
- Under »No Answer Fwd Time Out« you specify the number of calls after which Call Forwarding on No Answer should kick in and redirect calls to the specified destination. You can choose any number between 2 and 8 ringing tones (»2\~8 Ring«).
- Confirm your entries by clicking the »Submit« button.
Time Synchronization Setup (SNTP Settings)
It is useful to configure a timer server in your network so that your Telephone remains synchronized within the network. This server can be installed at an external location in the Internet as a so-called Public Time Server or in your own network. If you have configured a computer within your network as the Time Server, enter the IP address of that computer here.
SNTP
• Here, you can activate time acceptance. Select »On«.
Time Synchronization
(Time Server)
- Under the »Primary Server« and »Secondary Server« setup items, enter the IP addresses of the »time synchronization sources«. Here, you can enter two different addresses. This allows the time to be accepted via a second server in the event of loss of the first server.
Time Zone
(Time Zone)
- Here, enter the time difference between the standard time »Greenwich (Mean) Time« and your own location. For Central Europe the time zone needs to be set to + one hour (+ 01:00). Please note that Daylight Saving Time may be in force when setting the time zone.
Synchronization Time
(Sync. Time)
- Here, enter the time (»Sync. Time«) after which a new time synchronization attempt is to be made.
- Confirm your entries by clicking the »Submit«button.
SNTP Settings
You could set the SNTP servers in this page.
SHTP:
On
○Off
Primary Server
time.windows.com
Secondary Server
208.184 49 9
Time Zone:
GMT + 08 00 (hh:mm)
Sync. Time:
1 0 0
Submit
Reset
Volume Setting
You can set the handset volume, the dial tone gain and the handset gain. Click »Submit« to confirm.
- Under » »Handset Volume« you can set the handset volume.
- Under » »Speaker Volume« you can set the speaker volume.
- Under » »Ringer Volume« you can set the dial tone gain.
- Under » »Handset Gain« you can set handset gain.
• Under »Speaker Gain« you can set the microphone gain.
Volume Setting
You could set the volume of your phone in this page.
Handset Volume:
Speaker Volume:
Ringer Volume:
10 (0\~15)
10 (0\~15)
6 (0\~10)
Handset Gain:
Speaker Gain:
10 (0\~15)
9 (0\~15)
Submit
Reset
Melody Setting
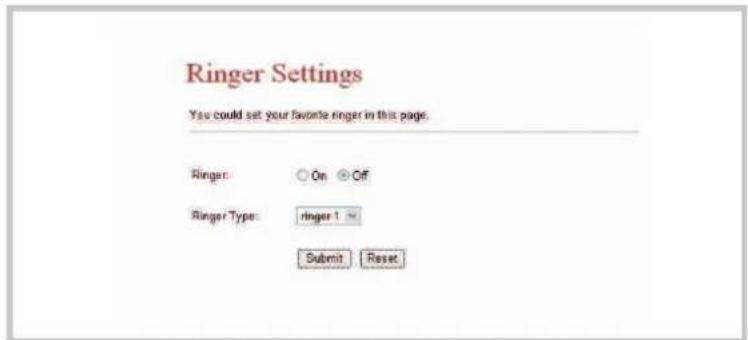
You can choose between 4 different ringing melodies.
text_image
Ringer Settings You could set your favorite ringer in this page. Ringer: On Off Ringer Type: ringer 1 Submit ResetConfirm your entries using the »Submit« button.
Block Settings (Do Not Disturb)
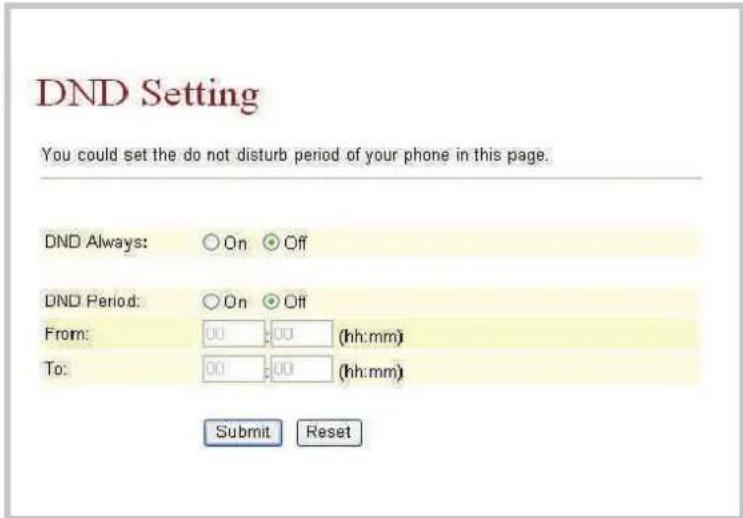
On this page you can set up the »Blocking« feature. Select whether calls are not to be signaled at any time, or only for a defined period at this phone (»DND Always « set to »On«), or whether the phone is to be set to »Idle« for a defined period (»DNDPeriod«).
No Ringing (DND Always)
Incoming calls will not ring your phone until you deactivate this function.
• To enable »Blocking«(DND Always) choose »On«.
No Call Signaling by time (DND Period)
• Here, you can activate »Idle« (DND Period) for a defined period. Select »On«.
- In the »From« and »To« text boxes enter the start and end times of the period during which ringing should be suppressed. If the time of day specified for »From« occurs later than the one specified for »To«, ringing will be suppressed until that time on the following day.
- Confirm your entries by clicking the »Submit« button.
text_image
DND Setting You could set the do not disturb period of your phone in this page. DND Always: ○ On ○ Off DND Period: ○ On ○ Off From: 00 00 (hh:mm) To: 00 00 (hh:mm) Submit ResetDial Plan feature
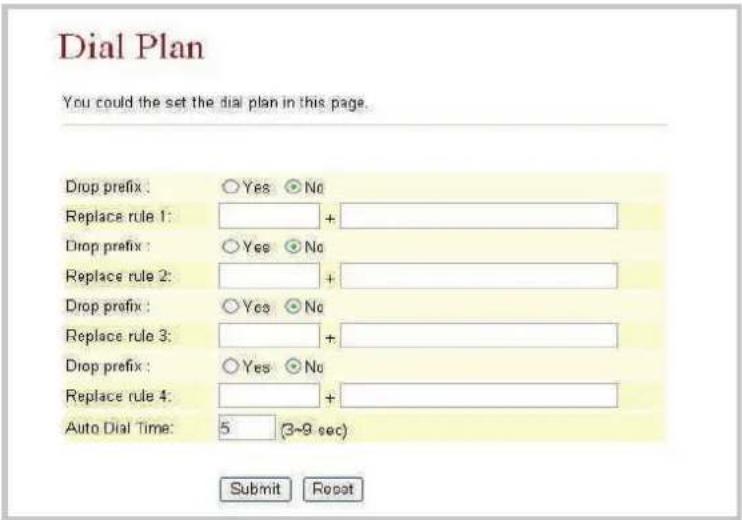
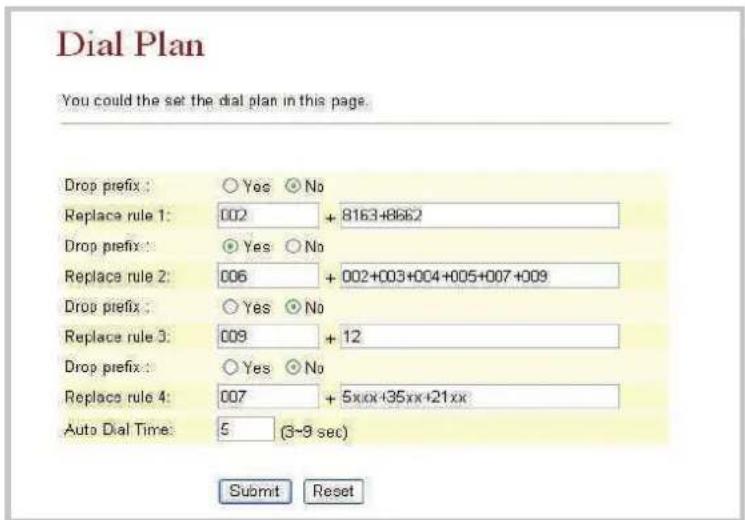
You phone can complete and dial numbers automatically when the first few numbers that you dial match the programmed "Replacement rules". When you have made your settings click the button »Submit« to confirm them.
text_image
Dial Plan You could the set the dial plan in this page. Drop prefix: Yes No Replace rule 1: + Drop prefix: Yes No Replace rule 2: + Drop prefix: Yes No Replace rule 3: + Drop prefix: Yes No Replace rule 4: + Auto Dial Time: 5 (3~9 sec) Submit ResetDescription of Symbols
| x 0,1,2,3,4,5,6 | 7,8,9 |
| + | or |
- Drop Prefix: When set to »No«, the number present in the front field is placed in front of the phone number, as defined by the replacement rule. When set to »Yes«, the number in the front field is used in place of the number in the rear field, as defined by the replacement rule.
- Replace rule: Defining the Replacement Rule.
- Auto Dial Time: Time period prior to the beginning of automatic dialing after inputting the last digit of the phone number. The default setting is 5 seconds.
Example:
text_image
Dial Plan You could the set the dial plan in this page. Drop prefix: Yes No Replace rule 1: 002 + 8163+8662 Drop prefix: Yes No Replace rule 2: 006 + 002+003+004+005+007+009 Drop prefix: Yes No Replace rule 3: 009 + 12 Drop prefix: Yes No Replace rule 4: 007 + 5xx+35xx+21xx Auto Dial Time: 5 (3~9 sec) Submit ResetExample: After entering the first four digits 8163 (or 8662), the digit sequence »002« is placed in front of the phone number.
The number »002+8163+xxxxx...« is then dialed (or »002+8662+xxxxx...«).
Replace rule 2:
The digit sequences 002, 003, 004, 005, 007 and 009 are replaced by the digit string 006. In the example shown here, the number »006+xxxxx...« is dialed.
Replace rule 3:
If 12 is input as the first digit string, the digit string »009« will be placed in front of it for dialing. The number that will then be dialed is »009+12+xxxxx...«.
Replace rule 4:
- After inputting the digit 5 and three other digits, 007 will be placed in front of the number. In the example shown here, the number »007+5xxx« is then dialed.
- After inputting the digit 5 and four other digits, 007 is not placed in front of the number. In the example shown here, the number »5xxxx« is then dialed.
- After inputting the digit string 35 (or 21) and two other digits, 007 is placed in front of the number. In the example shown here, the number »007+35xx« (or »007+21xx«) is then dialed.
Call waiting setting
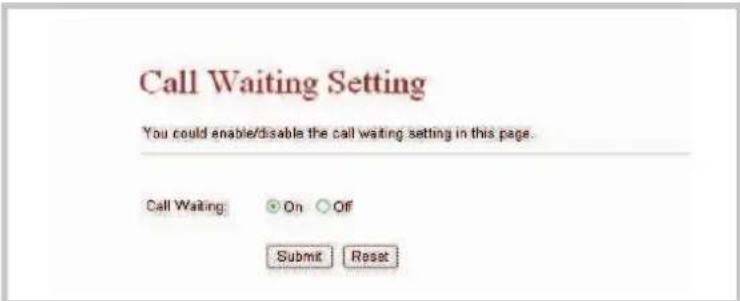
Where required, the Call waiting function can be de-activated so that no further incoming call is signaled.
text_image
Call Waiting Setting You could enable/disable the call waiting setting in this page. Call Waiting: On Off Submit ResetSoftkey Setting
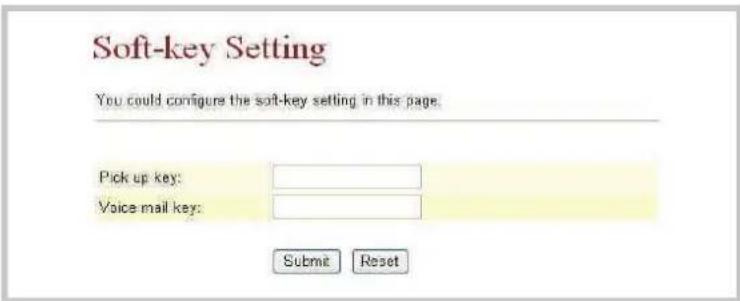
You can also configure corresponding keys for »Pick-up« and »Voice Mail«. These keys must be present on the phone before the function can work properly however.
- Pick up key: Enter the key that is to be used for accepting incoming calls.
• Voice mail key: Enter the key for Voice Mail.
text_image
Soft-key Setting You could configure the soft-key setting in this page. Pick up key: Voice mail key: Submit ResetAutomatic dialing (Hot Line Setting)
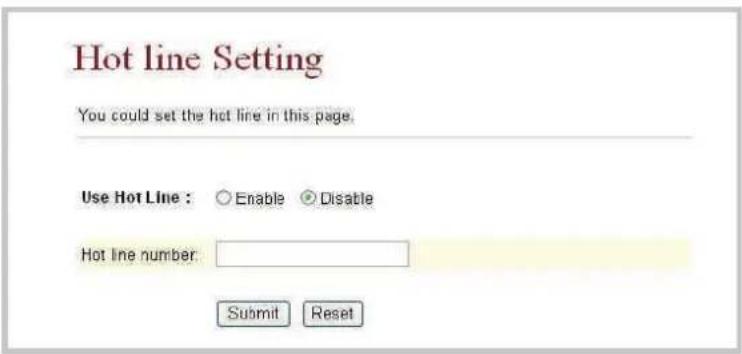
When you lift the handset the number you have configured is dialed automatically.
text_image
Hot line Setting You could set the hot line in this page. Use Hot Line : Enable Disable Hot line number: Submit ResetProgramming a direct dial-in
- Under »Use Hotline« check »Enable« to activate the hotline function.
- Under »Hotline number« enter the hotline number as the IP address, or the registered user name.
Confirm your entries by clicking the »Submit« button.
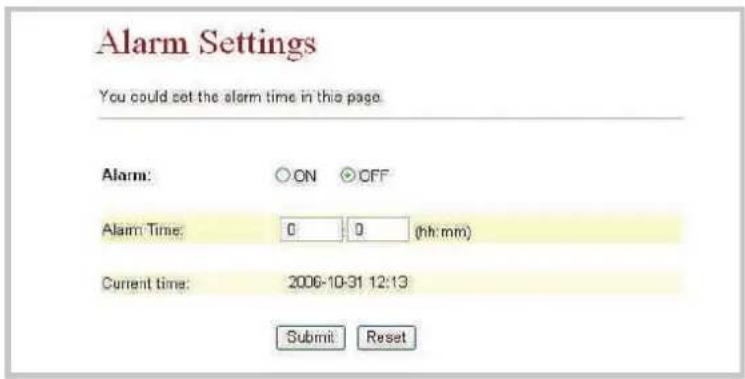
Appointment reminder calls (Alarm setting)
Your phone will then issue a signal each day at the programmed time.
- Alarm: Activate/De-activate the appointment function using »On« / »Off«.
- Alarm Time: Input the appointment time in the 24-hour format.
text_image
Alarm Settings You could set the alarm time in this page. Alarm: ON OFF Alarm Time: 0 0 (hh:mm) Current time: 2006-10-31 12:13 Submit ResetNetwork
Network Status
By using the »Network Status« menu item you can check the current status of the WAN and LAN settings.
Network Status
This page shows current status of network interfaces of the system.
Interface 0
| Type: | DHCP Client |
| IP: | 192.168.1.51 |
| Mask: | 255.255.255.0 |
| Gateway: | 192.168.1.250 |
| DNS Server 1: | 168.95.192.1 |
| DNS Server 2: | 168.95.1.1 |
Interface 1
| Type: | DHCP Server |
| IP: | 192.168.123.1 |
| Mask: | 255.255.255.0 |
| Gateway: | 192.168.123.1 |
| DNS Server 1: | 168.95.192.1 |
| DNS Server 2: | 168.95.1.1 |
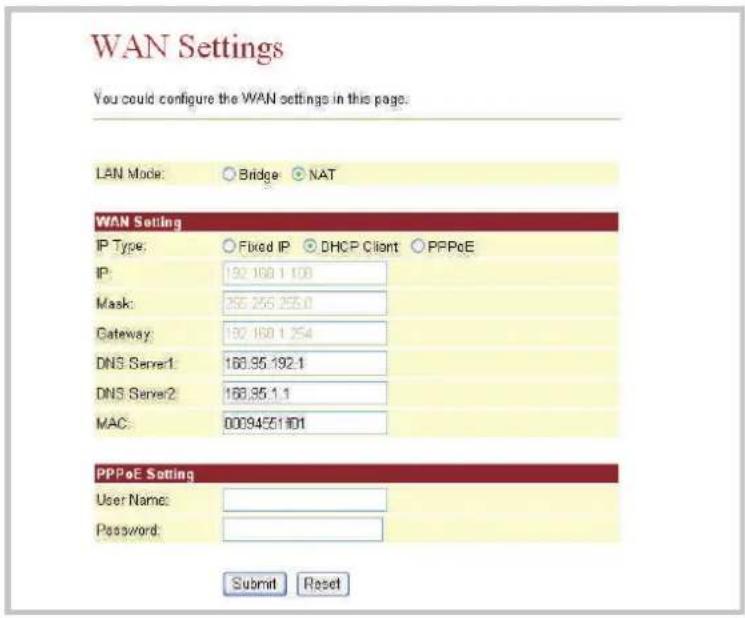
WAN Settings
This page lets you configure the network setup of the WAN port on the phone.
LAN Mode
- If LAN Mode is set to »Bridge« both Ethernet ports are physically interconnected in a fully transparent fashion. You need this option if the phone is interconnected with an external NAT router.
- If LAN Mode is set to »NAT«, the integrated NAT is activated. This setting is useful for ADSL users who don't have access to a NAT router.
IP Type
- Fixed IP: Sets a fixed IP address for the WAN port.
- DHCP Client: The IP address the phone has obtained from an upstream router or cable modem is shown.
PPPoE
- Under «PPPoE Setting« you enter the »User Name« and »Password« given to you by your provider. In this mode the phone gets the IP address and the appropriate subnet mask from the DHCP server of your provider. Entries for the DNS server must be made manually. You may also enter a virtual MAC address if you have obtained one from your provider.
- Confirm your entries by clicking the »Submit« button.
text_image
WAN Settings You could configure the WAN settings in this page. LAN Mode: Bridge NAT WAN Setting IP Type: Fixed IP DHCP Client PPPoE IP: 192.168.1.108 Mask: 255.255.255.0 Gateway: 192.168.1.254 DNS Server1: 168.35.192.1 DNS Server2: 168.35.1.1 MAC: 00094551101 PPPoE Setting User Name: Password: Submit ResetLAN Settings
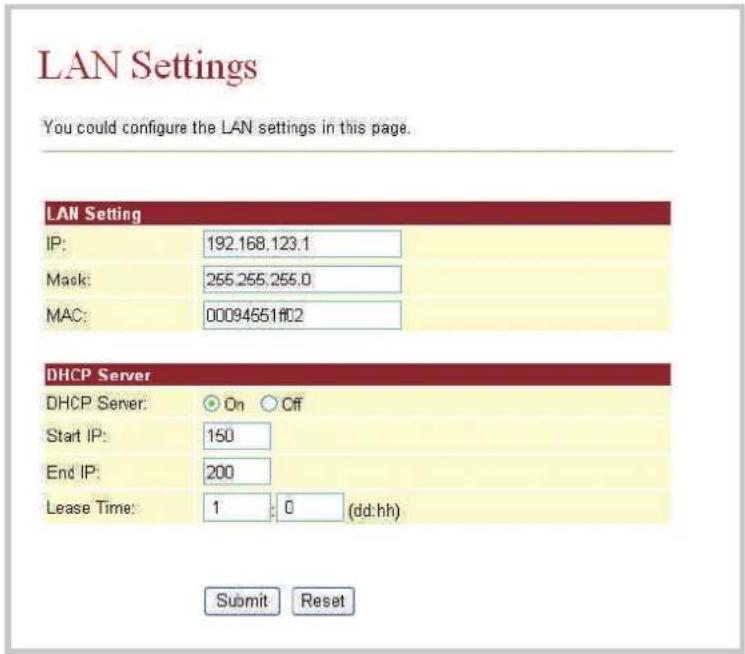
If you wish to set up the phone's integrated NAT on this page, you must deactivate Bridge mode beforehand.
LAN Settings
- The «LAN Settings» page lets you set up address translation for the network. Also featured on this page are options for setting the local IP address (IP), the subnet mask (Mask), and the MAC address (MAC).
DHCP Server
• These options enable (On) and disable (Off) the DHCP Server.
- Settings under »LAN Settings« are »Start IP«, »End IP«, the lifetime in days and hours of a dynamic IP address allocated by the DHCP server (»Lease Time«), as well as the activation status of the DHCP servers.
text_image
LAN Settings You could configure the LAN settings in this page. LAN Setting IP: 192.168.123.1 Mask: 255.255.255.0 MAC: 00094551ff02 DHCP Server DHCP Server: On Off Start IP: 150 End IP: 200 Lease Time: 1 : 0 (dd:hh) Submit ResetDynDNS Settings
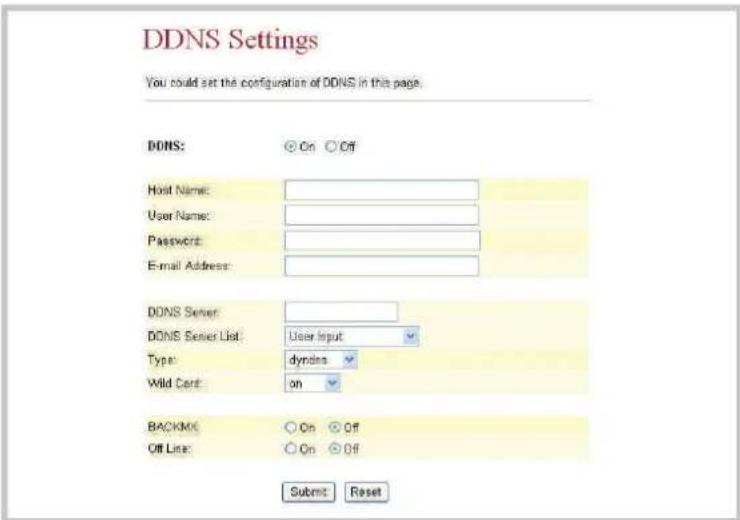
DynDNS or Dynamic Domain Name System is a service on the Internet that maintains a fixed host name allocation for devices with a dynamically changing IP address. This services allows a PC to be addressed using an invariable domain name.
The »DDNS Settings« page lets you configure the DynDNS setup. Prior to entering the necessary information you need a DDNS account. Confirm your entries by clicking the »Submit« button.
text_image
DDNS Settings You could set the configuration of DDNS in this page. DDNS: ○ On ○ Off Host Name: User Name: Password: E-mail Address: DDNS Server: DDNS Server List: User Input Type: dyndns Wild Card: on BACKM: ○ On ○ Off Off Line: ○ On ○ Off Submit ResetVLAN Settings
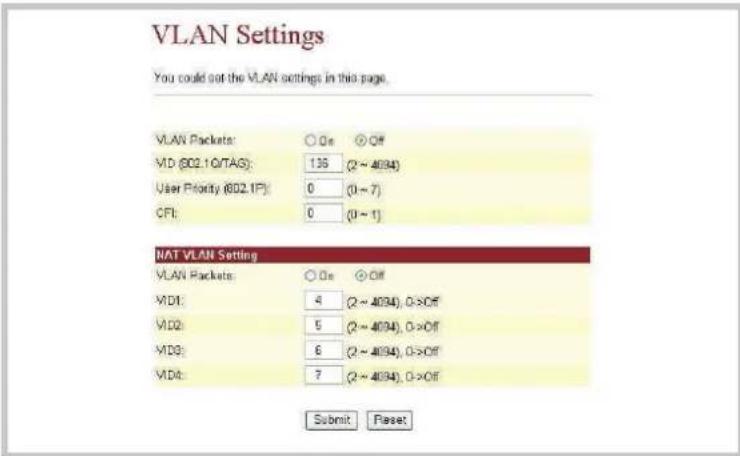
A Virtual Local Area Network (VLAN) is a local virtual network that resides in a physical network. It most widely used implementation is specified in the IEEE 8021Q standard.
text_image
VLAN Settings You could set the VLAN settings in this page. VLAN Packets: ○ On ○ Off MD (802.10/TAG): 136 (2 ~ 4094) User Priority (802.1P): 0 (0 ~ 7) CFI: 0 (0 ~ 1) NAT VLAN Setting VLAN Packets: ○ On ○ Off MD1: 4 (2 ~ 4094), 0 >Off MD2: 5 (2 ~ 4094), 0 >Off MD3: 6 (2 ~ 4094), 0 >Off MD4: 7 (2 ~ 4094), 0 >Off Submit ResetThere are two sections for configuring VLAN settings:
• one for VoIP packets that get through to the telephone,
• one for VLAN settings in NAT mode
Two kinds of packets may be received:
- VoIP packets
- Packets routed to the PC via the LAN port.
VLAN packets:
- If you activate the »VLAN packets« option, all incoming packets are verified for a correct IP address and VID, provided that you have made the appropriate settings for VID, User Priority and CFI.
VID:
- Please set the VID as specified by your Service Provider.
User Priority:
- defines a user priority using eight different priority levels (2^3). IEEE 802.1Pspecifies the use of the three user priority bits. Normally, this value is defined by your Service Provider.
CFI:
- The Canonical Format Indicator is always set to zero by Ethernet Switches. CFI is used to ensure the compatibility of Ethernet and Token Ring networks. When an Ethernet interface receives a frame with a CFI value of "One", that frame should not be forwarded to an unmarked interface without any processing.
- If you activate the VLAN Packets option and enter values for VID, User Priority and CFI, all incoming packets that bear the IP address of the phone and the same VID will be accepted. Packets that have the phone IP address, but a different VID are rejected by the phone. Packets with a different IP address are routed to the PC via the LAN interface.
DMZ-Setting
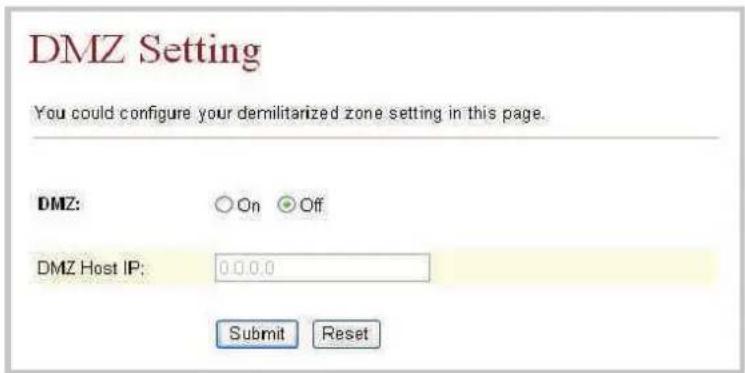
- DMZ: When set to »On«, all packets (except for SIP-specific ones) will be forwarded to the IP address that has been entered under »DMZ Host IP«.
- DMZ Host IP: Input the IP address that isto be used for the DMZ.
text_image
DMZ Setting You could configure your demilitarized zone setting in this page. DMZ: On Off DMZ Host IP: 0.0.0.0 Submit ResetConfiguring a virtual server (Virtual Server Settings)
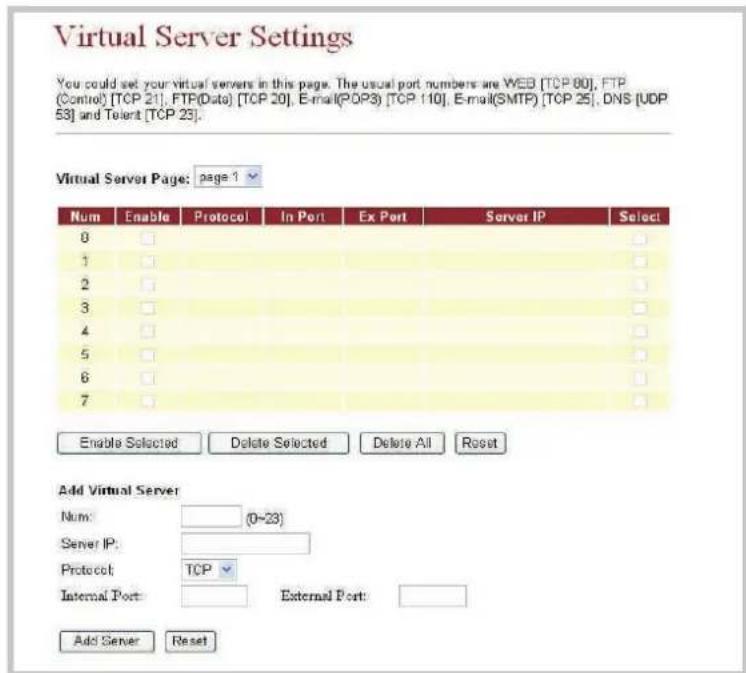
You can configure the virtual server on this page.
• Virtual Server Page: You can configure up to 24 »Virtual Servers«.
- Enable: Activating the specific server.
- Protocol: Defining the TCP or UDP protocol.
• In Port: Defining the internal port.
• Ex Port: Defining the external port.
• Server IP: Setup of Server IP Address.
- Select: Selecting the configuration
- Enable Selected: Activating the selected server.
- Delete Selected: Delete the selected server.
- Delete All: Delete all entries.
- Reset: Resetting all entries.
- Add Server: Adding a configuration.
text_image
Virtual Server Settings You could set your virtual servers in this page. The usual port numbers are WEB [TCP 80], FTP (Control) [TCP 21], FTP(Data) [TCP 20], E-mail(POP3) [TCP 110], E-mail(SMTP) [TCP 25], DNS [UDP 53] and Telent [TCP 25]. Virtual Server Page: page 1 Num Enable Protocol In Port Ex Port Server IP Select 0 1 2 3 4 5 6 7 Enable Selected Delete Selected Delete All Reset Add Virtual Server Num: (0-23) Server IP: Protocol TCP Internal Port: External Port: Add Server ResetPPTP-Settings
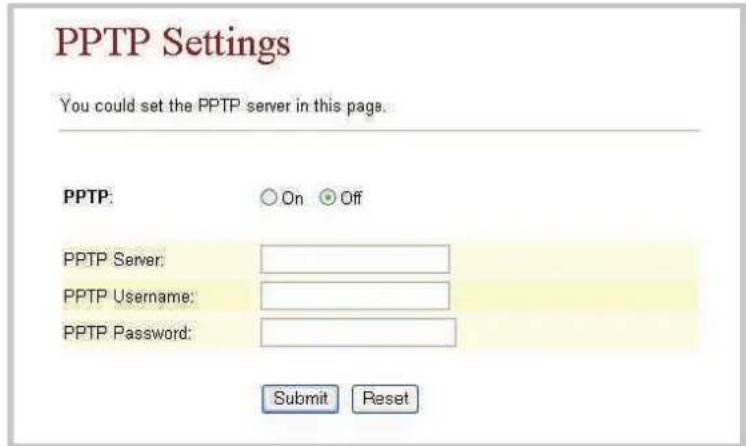
The Point-to-Point Tunneling Protocol (PPTP) is a protocol used to set up a Virtual Private Network (VPN). This permits tunneling of the point-to-point protocol through an IP network, with the individual PPP packets in turn being grouped into GREPackets.
text_image
PPTP Settings You could set the PPTP server in this page. PPTP: On Off PPTP Server: PPTP Username: PPTP Password: Submit ResetSIP Settings
This menu item lets you set the Service Domain, make Codec settings, Codec ID settings and miscellaneous other settings.
You can make calls to and receive calls from other parties through the SIP account.
Active: Click«ON«to set theService Domain to«Active«status, then enter the following data youhave receivedfromyour servi ceprovider:
DisplayName: Enterthe namethat you wishto havedisplayed.
UserName: Enterthe username.
RegisterName: Enterthe registrationname.
RegisterPassword: Entertheregistrationpassword.
DomainServer: EntertheDomainServer.
ProxyServer: EntertheProxyServer.
OutboundProxy: EntertheOutboundProxy.Ifunknown,youmayskip his option.
- If the »Status« row reads »Registered«, this indicates successful registration with the provider. The »PHONE« LED starts flashing in that case. The phone is now ready for VoIP calls.
- If you have more than one SIP account, please carry out all of the steps described above in order to register with the alternative providers.
- Confirm your entries using the »Submit« button.
- If you have more than one SIP account you can log on to other service providers in only a few easy steps.
• To conclude the configuration click »Submit«.
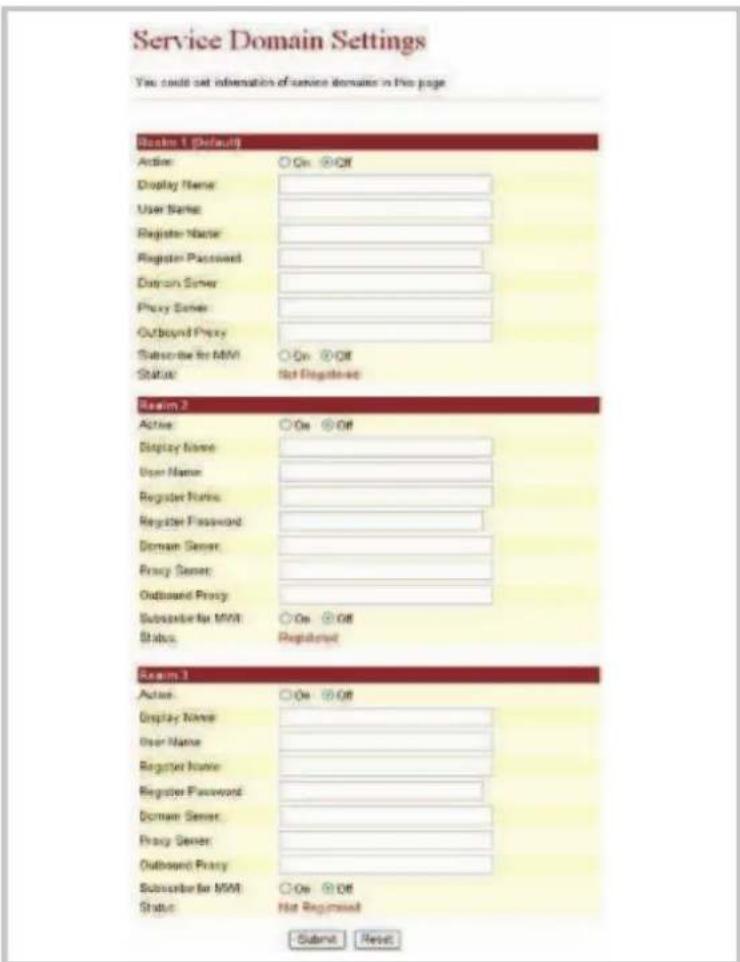
text_image
Service Domain Settings You could set information of service domains in the page Section 1 (Default) Action: ○ On ⊕ Off Display Name: User Name: Register Name: Register Password: Datran Server: Proxy Server: Outbound Proxy: Subscribe for MVI: ○ On ⊕ Off Status: Not Registered Section 2 Active: ○ On ⊕ Off Display Name: User Name: Register Name: Register Password: Domain Server: Proxy Server: Outbound Proxy: Subscribe for MVI: ○ On ⊕ Off Status: Registered Section 3 Active: ○ On ⊕ Off Display Name: User Name: Register Name: Register Password: Domain Server: Proxy Server: Outbound Proxy: Subscribe for MVI: ○ On ⊕ Off Status: Not Registered Submit ResetPort Setting
Under »Port Setting« you can specify the SIP and the RTP port numbers. Providers may use different SIP/RTP port settings. Please consult with your provider in order to learn about the correct port numbers to be entered here. Confirm your entries by clicking the »Submit« button.
FactoryDefault Setting:
SIP-Port 5060, RTP-Port 60000.
Port Settings
You could set the port number in this page.
| SIP Port: | 5060 | (10~65533) |
| RTP Port: | 60000 | (10~65533) |
Submit Reset
Codec Settings
The »Codec Settings« page lets you set »Codec Priority«, »RTP packet length« and configure the VAD function. Be sure to enter this data exactly as specified by your provider.
Codec Settings
You could set the coded settings in this page.
| Codec Priority | |
| Codec Priority 1: | 0.711 a-law |
| Codec Priority 2: | 0.711 a-law |
| Codec Priority 3: | 0.729 |
| Codec Priority 4: | 0.723 |
| Codec Priority 5: | 0.726 - 16 |
| Codec Priority 6: | 0.726 - 24 |
| Codec Priority 7: | 0.726 - 32 |
| Codec Priority 8: | 0.726 - 40 |
| RTP Packet Length | |
| 0.711 & 0.729 | 20 ms |
| 0.729 | 30 ms |
On the »Codec ID Setting« page, you can specify the Codec ID. Be sure to enter this data exactly as specified by your provider.
Codec ID Setting
You could set the value of Codec ID in this page.
| Codec Type | ID | Default Value | |
| G726-15 ID: | 23 | (95~255) | ☑ 23 |
| G726-24 ID: | 22 | (95~255) | ☑ 22 |
| G726-32 ID: | 2 | (95~255) | ☑ 2 |
| G726-40 ID: | 21 | (95~255) | ☑ 21 |
| RFC 2833 ID: | 101 | (95~255) | ☑ 101 |
Submit Reset
DTMF Setting
Under »DTMF Setting«, you can specify options for DTMF dialing. The options include RFC 2833 (Outband DTMF), Inband DTMF, and DTMF SIP Info. The factory setting is Inband-DTMF. To use DTMF in-call dialing (for example 2833), you may have to select the Inband DTMF option. You may need DTMF in-call dialing when you call, for example, a public agency and your calls are handled by an automated interactive voice recognition system. Once you are connected the voice recognition system may prompt you to enter a certain sequence of digits. By doing so, you may be automatically put through to a department that can answer your inquiry.
DTMF Setting
You could set the DTMF setting in this page.
RFC 2003
○ Inband DTMF
Send DTMF SIP Info
Submit Reset
RPort function
You can activate/de-activate the »RPort« on this page. You can obtain helpful information about this from your provider.
RPort Setting
You could enable/disable the RPort setting in this page.
RPort:


Submit
Recet
Other Settings
On the »Other Settings« page you can configure Hold mode through RFC and QoS (Quality of Service). Please follow the instructions given by your providers when changing these settings.
Confirm your entries by clicking the »Submit« button.
The QoS value allows for prioritizing voice packets. Higher values mean higher priority for voice packets on the Internet. It should be noted that any intervening systems on the Internet must support the QoS function.
Other Settings
You could set other settings in this page.
Hold by RFC:


Voice QoS (Diff-Serv):


SIP QoS (Diff-Serv):


SIP Expire Time:


Use DNS SRV:


Submit
Reset
NAT Trans.
Under » »NAT Trans.« you can set up the STUN server for the SIP service.
STUN Setting
The STUN function must be activated in order for a telephone registered with the SIP server to work correctly downstream from a SIP server. You can enter the IP address of the STUN server and the STUN port number.
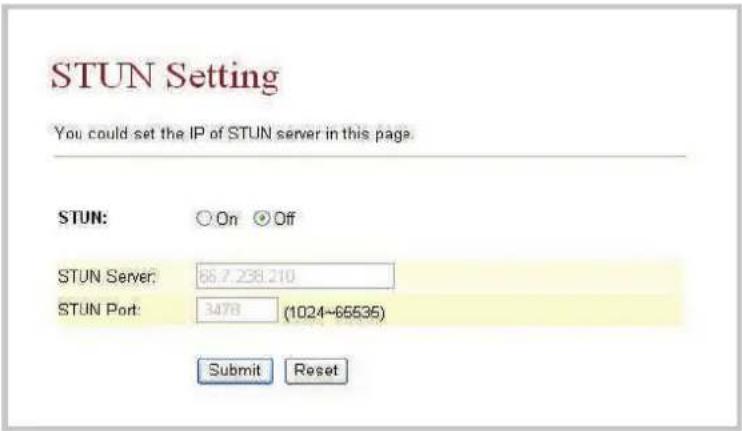
text_image
STUN Setting You could set the IP of STUN server in this page. STUN: On Off STUN Server: 66.7.238.210 STUN Port: 3478 (1024~65535) Submit ResetOther features
You can use the Auto Configuration Setting function to have the phone configured automatically.
Automatic Configuration Setup (Auto Config)
The »Auto Config« menu item takes you to the »Auto Configuration Setting« page. This page allows you to download configurations stored on a TFTP or FTP server using the auto configuration function. This setup approach may come in handy for new users, allowing them to get started right away by automatically downloading a ready-for-use configuration setup. Before you can activate Auto Configuration, you must go to the »Network« setup page and select the »Bridge« and »Fixed IP« modes. After activating that function by clicking »On«, click the »Submit« button. Do not forget to click the »Save« button in the »Save Change« window. The telephone reboots now, then downloads the predefined setup automatically from the TFTP or FTP server.
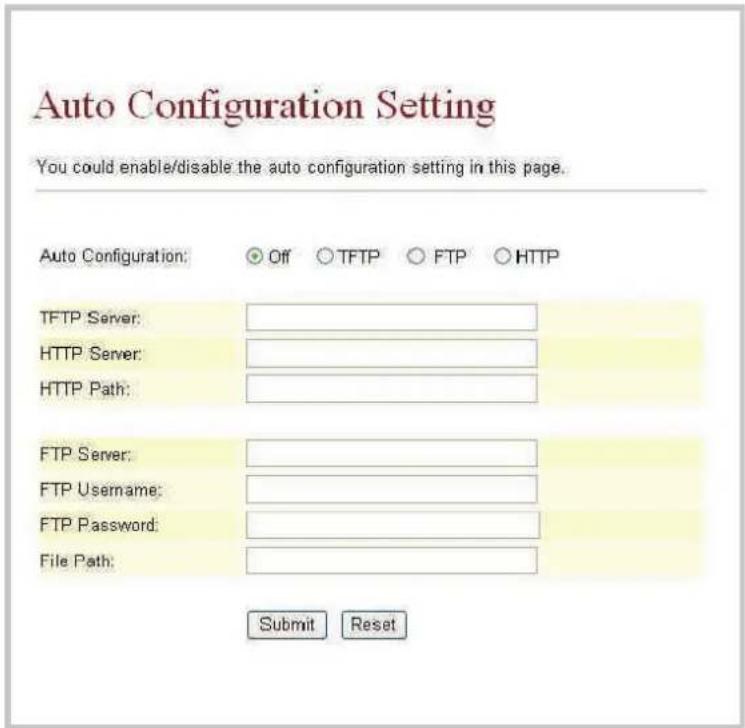
text_image
Auto Configuration Setting You could enable/disable the auto configuration setting in this page. Auto Configuration: Off TFTP FTP HTTP TFTP Server: HTTP Server: HTTP Path: FTP Server: FTP Username: FTP Password: File Path: Submit ResetCopying the MAC address (MAC Clone Setting)
Copying the MAC address for the PC connected to the phone LAN port to the phone's WAN port. To conclude configuration click »Submit«.
MAC Clone Setting
You could enable/disable the MAC clone setting in this page.
MAC Clone:


Submit
Reset
Tone Settings
You can set the acoustic signals and their speeds on this page.
DialTone Dial tone
RingBackTone Call waiting tone
BusyTone Busy tone
ErrorTone Negative acknowledgement signal
RingTone Ringing signal
InsertTone Positive acknowledgement signal
Tones Settings
You could configure your tones settings in this page.
| Dial Tone | Ring Back Tone | Busy Tone | Error Tone | Ring Tone | Insert Tone | |
| Cadence On: | ||||||
| Hi-Tone Freq: | 440 | 480 | 620 | 620 | 480 | 440 |
| Lo-Tone Freq: | 350 | 440 | 480 | 480 | 440 | 350 |
| Hi-Tone Gain: | 4522 | 2261 | 2261 | 2261 | 15360 | 2261 |
| Lo-Tone Gain: | 2261 | 2261 | 2261 | 2261 | 15360 | 1130 |
| On Time 1: | 0 | 200 | 50 | 30 | 200 | 30 |
| Off Time 1: | 0 | 400 | 50 | 20 | 400 | 20 |
| On Time 2: | 0 | 0 | 0 | 0 | 0 | 30 |
| Off Time 2: | 0 | 0 | 0 | 0 | 0 | 400 |
| On Time 3: | 0 | 0 | 0 | 0 | 0 | 0 |
| Off Time 3: | 0 | 0 | 0 | 0 | 0 | 0 |
Submit
Reset
Example for calling cycles and acoustic signals of pabx systems in DE, AT, BE, HU, PL, SL, GR
| Acoustic signals | Frequency (Hz). Attenuation (dB) | Cycle rate for sound / pauses in milliseconds |
| Dial tone 420 / -8 | 200, 300, 200, 300 | 200, 200, 800 ... |
| Busy tone 420 / -8 | 200, 400 ... | |
| Ringing signal 420 / -8 | 1000, 4000 ... | |
| Call waiting tone | -8 200, 300, 420 / -8 700 | 200, 1300 ... |
| Ack. signal 320+ | -8 700 | |
| Neg. ac-knowledgement | -8 300, 320+420/ -8 700 | 300, 300,300, 300 |
Setup example
| #2 | Dial Tone | Ring Back Tone | Busy Tone | Error Tone | Ring Tone | Insert Tone |
| Cadence On: | ||||||
| Hi-Tone Freq.: | 425 | 425 | 425 | 425 | 425 | 435 |
| Lo-Tone Freq.: | 0 | 0 | 0 | 0 | 0 | 0 |
| Hi-Tone Gain: | 4522 | 4522 | 4522 | 4522 | 4522 | 4522 |
| Lo-Tone Gain: | 0 | 0 | 0 | 0 | 0 | 0 |
| On Time 1: | 30 | 100 | 20 | 30 | 100 | 70 |
| Off Time 1: | 20 | 400 | 40 | 30 | 400 | 0 |
| On Time 2: | 30 | 0 | 0 | 0 | 0 | 0 |
| Off Time 2: | 20 | 0 | 0 | 0 | 0 | 0 |
| On Time 3: | 20 | 0 | 0 | 0 | 0 | 0 |
| Off Time 3: | 80 | 0 | 0 | 0 | 0 | 0 |
Advanced Setting
ICMP Not Echo
- Activating reply barring for a »Ping signal.
Send Anonymous CID
- Activating number suppression.
Send Flash Event
- Activating flash signaling as DTMF EVENT or as SIP INFO.
SIP Encrypt
- Encrypting SIP packets using INFINET, AVS, WALKERSUN1 or WALKERSUN2.
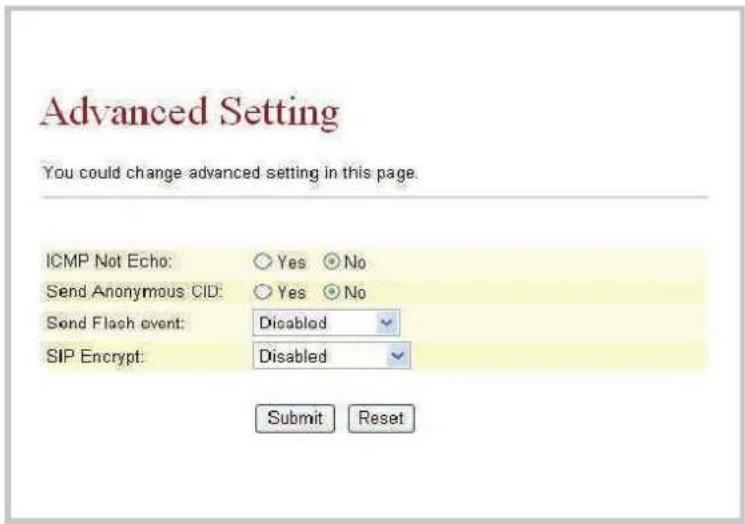
text_image
Advanced Setting You could change advanced setting in this page. ICMP Not Echo: Yes No Send Anonymous CID: Yes No Send Flash event: Disabled SIP Encrypt: Disabled Submit ResetSystem Authority
User Password
The »User Password« menu item takes you to the »User Password« page. On this page, you can change your »Username« and »Password«.
New username
- Use this text box to enter your new User Name.
New password
- Use this text box to enter a new password.
Confirmed password
- Use this text box to enter your new password one more time.
Confirm your entries by clicking the »Submit« button.
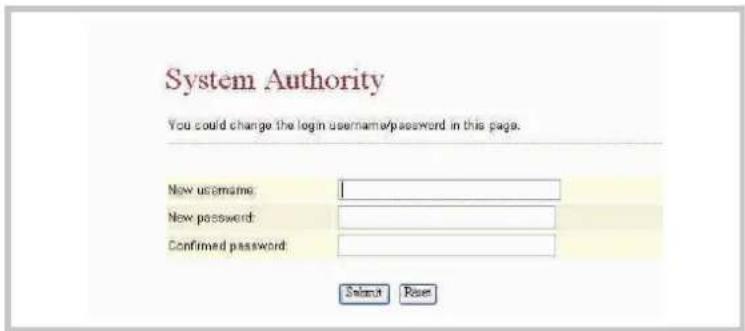
text_image
System Authority You could change the login username/password in this page. New username: New password: Confirmed password: Select ResetSave Changes
On the »Save Changes« page you can permanently save the changes you made to the phone setup.
- Click the »Save« button.
Save Changes
You have to save charges to effect them.
Save Changes: Save
Update
With the »Update« menu item and the »New Firmware« submenu item the phone offers two methods for loading the latest firmware in a Local PC or TFTP session.
- Select the desired type of server, HTTP or TFTP.
Local PC
- Now select the type of firmware code (»Code Type«): Risc or DSP code (Risc code is the preferable option).
- Code Type:
Click the »Browse« button in order to select the storage location for Local PC.
- When you are done, click the »Update« button.
TFTP
- Enter the IP address of the TFTP server from which you wish to download firmware.
- When you are done, click the »Update« button.
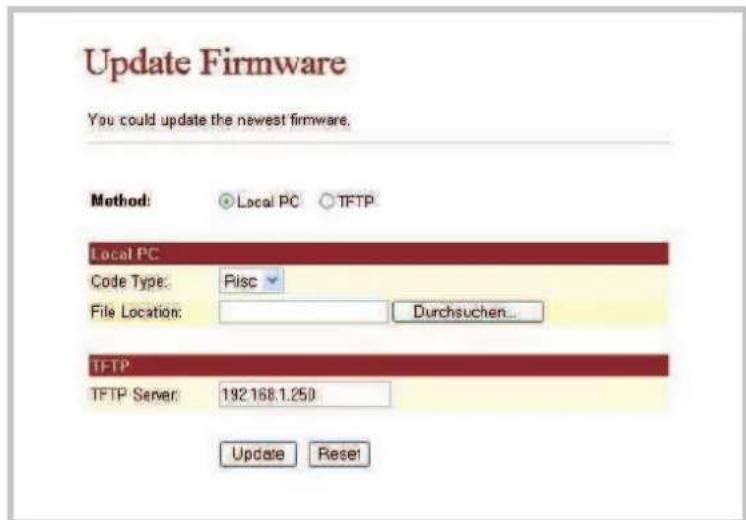
text_image
Update Firmware You could update the newest firmware. Method: Local PC TFTP Local PC Code Type: Pisc File Location: Durchsuchen... TFTP TFTP Server: 192.168.1.250 Update ResetAutomatic Update Auto Update
Simple update
You should use this version when updating your phone. Use of the functions described below requires a great deal of expertise in this field. This is why only the various setting options are indicated there.
First, enter the IP address to be used for the update on the Web page. Example: http://192.168.1.100:9999/update.htm. In the example shown here, 192.168.1.100 is the IP address for your phone.
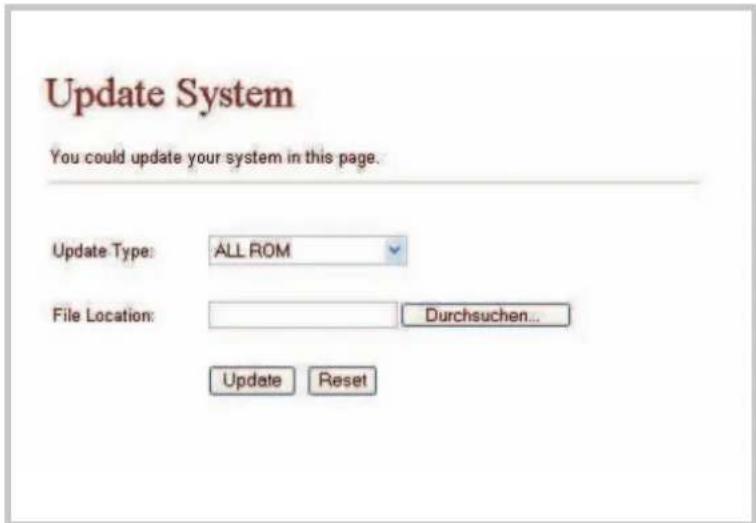
text_image
Update System You could update your system in this page. Update Type: ALL ROM File Location: Durchsuchen... Update Reset- Use »Search« to search for, and then load the required »ROM« file. Then click the button »Update«.
- While the update is running, ensure that there is no interruption of power supply, or any disruption of the connection to your PC.
Advanced update
Automatic firmware update. The settings on this page must match those on the page Auto Configuration Setting.
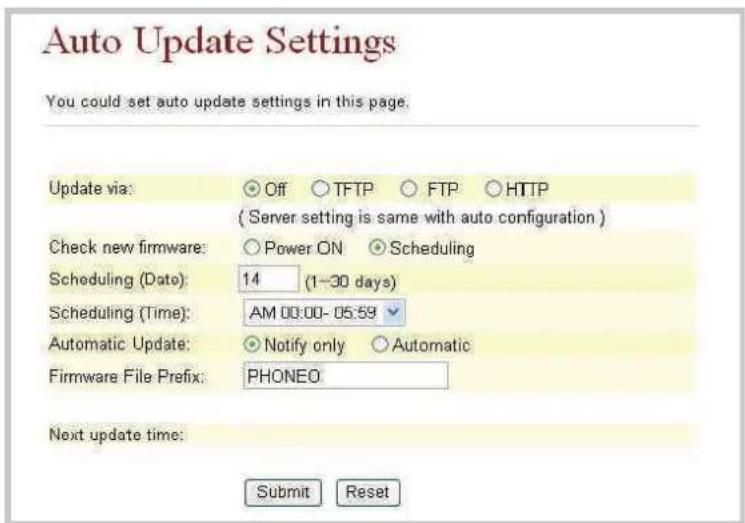
text_image
Auto Update Settings You could set auto update settings in this page. Update via: ○ Off ○ TFTP ○ FTP ○ HTTP ( Server setting is same with auto configuration ) Check new firmware: ○ Power ON ○ Scheduling Scheduling (Date): 14 (1-30 days) Scheduling (Time): AM 00:00- 05:59 Automatic Update: ○ Notify only ○ Automatic Firmware File Prefix: PHONEO Next update time: Submit ResetUpdate via
Selecting the automatic update process.
Check new firmware
- At the »Power ON« setting, a search is conducted for new firmware when the phone is switched on. At the setting »Scheduling«, a search is conducted for new firmware based on the programmed time schedule.
Scheduling (Date)
- Inputting the duration (number of days) during which a search is conducted for new firmware.
Scheduling (Time)
- Inputting the period during which a search is conducted for new firmware. The search will then be performed at any time during this period.
Automatic Update
- At the »Notify only« setting, the user is notified of available new firmware by a message on screen. No automatic-up date is conducted however. At the »Automatic« setting, the firmware will be updated fully automatically.
Firmware File Prefix
- Normally, this is also the product name. A specific search is made for firmware with a similar product name.
Next update time
- The time for the next search for firmware and updating.
Programming an auto update file:
- The file name must consist of the »Firmware File Prefix« + _ver.dat; here in our example PHONE_ver.dat
- The following information must be contained in the file (example):
• Version: 0609100, Name: PHONE_ - '0609100« is the designation for the updated firmware; »PHONE_« is the product designation (Firmware File Prefix).
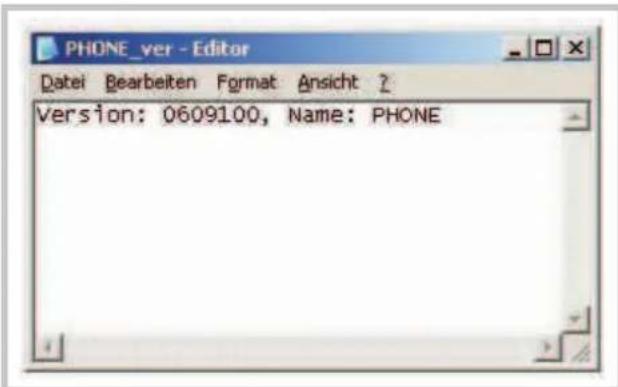
The system reads the PHONE_ver.dat file and then checks the version number. If the version number is more recent, updating is then performed fully automatically. It must also be noted that the designation + the version should also be contained in the file name; in the example shown here PHONE_0609100.gz. Ensure that the file name is spelled correctly.
Copy the file PHONE_ver.dat, together with the updated firmware to the http, FTP or TFTP server that you have specified in the path for automatic updates.
Standard Configuration (Default Setting)
You can restore the standard factory settings for your phone with Default Setting. To do this, just click the button Restore. Your phone will then carry out a restart using the standard factory settings.
You could click the restore button to restore the factory settings.
You can restart your phone using the Reboot function. You only need to click the button Reboot for this. The phone takes care of everything else automatically.
Reboot System
You could press the reboot button to restart the system.
Reboot system: Reboot
Configuring the phone via Telnet (only under Windows XP)
Configuration
On the PC click »Start« and select the option »Run«. An input dialog window is then displayed in which you can enter the telnet address 192.168.1.100. Start the procedure by clicking »OK«. As an alternative to this, you can open a DOS window and enter the telnet address 192.168.1.100 there. The following display is then shown on the screen:
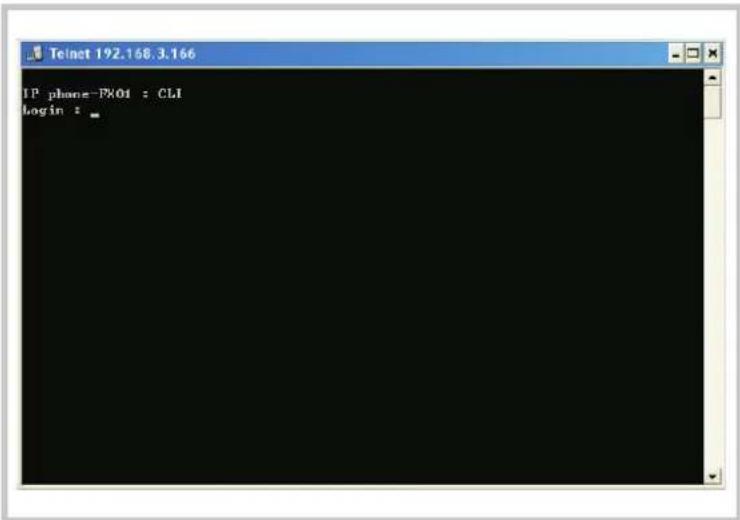
text_image
Telnet 192.168.3.166 IP phone-PR04 : CLI Login : _Login to phone
When you press »Enter« at the hyperterminal, the »Login: » line is displayed. Enter »admin« and confirm your input by pressing »Enter«. The »Password:« line then appears. ». Enter »24234880« and confirm your input by pressing »Enter«. You are now logged on to your phone.
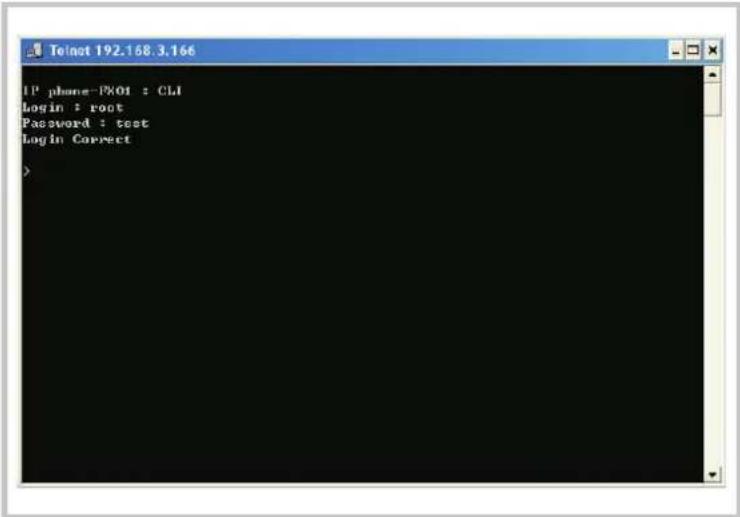
text_image
IP phone-PRO1 : CLI Login : root Password : test Log In CorrectConfiguration using the command line interpreter (CLI)
CLI Command line:
| Itno Command Description | |
| 1 ? Show CLI Command | |
| 2 arp ARP Configuration | |
| 3 ipconfig Interface Configuration | |
| 4 save Save to flash | |
| 5 reboot Reboot | |
| 6 exit Exit | |
| 7 debugmode Enter Debug Mode | |
| 8 update Update Flash Code/RAM | |
| 9 auth Change User Name and Password | |
| 10 nat NAT Configuration | |
| 11 dns DNS Configuration | |
| 12 ping ping [-|N] [IP-addr|host-name] | |
| 13 sip SIP Configuration | |
| 14 ddns DDNS Configuration | |
| 15 sntp SNTP Configuration | |
| 16 vlan VLAN Configuration | |
| 17 time Get System Time | |
| 18 mactab Show MAC Learning Table | |
| 19 dump Read/Write Memory | |
| 20 book Edit phone book | |
| 21 reload Reload Factory Setting | |
| 22 watchdog WatchDog Function | |
| 23 phone Phone Setting | |
| 24 weblogo Change Web's logo | |
| 25 dsp Show dsp type | |
| 26 addport Add Nat Port Mapping | |
| 27 cid Select slic Cid | |
| 28 slic read or write slic registers | |
| 29 ver Firmware Version |
arp-function
| Itno Command Description | |
| 1 ? Show ‘arp’ Option | |
| 2 -a Show ARP Table | |
| 3 -d Delete ARP Table | |
| 4 -s Set Static ARP Table | |
| 5 (null) Show ARP Table |
ipconfig-function
| Itno Command Description | |
| 1 ? Show ‘ipconfig’ Option | |
| 2 -if0 Interface 0 | |
| 3 -if1 Interface 1 | |
| 4 -if2 Interface 2 | |
| 5 -h Set Host Name | |
| 6 -a Set ARP Cache Expire | |
| 7 -r Restore Current Setting | |
| 8 (null) Show IP Setting |
ipconfig -ifN-function N is 0, 1, 2
| Itno Command Description | ||
| 1 ? Show 'ipconfig -ifN' Option | ||
| 2 -t Set Host Type | ||
| 3 -m Set MAC Address | ||
| 4 -i Set IP Address | ||
| 5 -nm Set Net Mask | ||
| 6 -g Set Gateway | ||
| 7 -dns0 Set Primary DNS server | ||
| 8 -dns1 Set Secondary DNS server | ||
| 9 -dr Set Default Route | ||
| 10 -nat Set NAT | ||
| 11 on Enable Interface | ||
| 12 off Disable Interface | ||
| 13 -dhops DHCP Server Setting | ||
| 14 -ddns Set DDNS | ||
| 15 -bridge Set Bridge | ||
| 16 -dev0 Set Device 0 Setting | ||
| 17 -dev1 Set Device 1 Setting | ||
| 18 -dev2 Set Device 2 Setting | ||
| 19 (null) Show Interface Setting | ||
save function
| Itno Command Description | |
| 1 ? Show ‘save’ Option | |
| 2 -book Save phone book | |
| 3 -sys Save system setting |
reboot function
Rebooting the telephone.
exit function
Terminating entry through CLI.
debugmode
Launching the debug mode.
updat-function
| Itno Command Description | ||
| 1 ? Show 'update' Option | ||
| 2 -os Update OSImage(IP filename) | ||
| 3 -dsp Update DSP Image(IP filename) | ||
| 4 -all Update All Image(IP filename) | ||
| 5 -server Update Server (IP filename length) | ||
| 6 -pcm PCM(IP filename) | ||
| -alaw alaw (IP filename) | ||
| -ulaw ulaw (IP filename) | ||
| -g729 g729 (IP filename) | ||
| -g723 g723 (IP filename) | ||
| -g726.16 g726.16 (IP filename) | ||
| -g726.24 g726.24 (IP filename) | ||
| -g726.32 g726.32 (IP filename) | ||
| -g726.40 g726.40 (IP filename) | ||
IP is the IP-address for the TFTP-server, the filename for downloading into the system.
»IP« is the IP-address for the TFTP-server, the »filename« for downloading into the system.
auth-function
| Itno Command Description | ||
| 1 ? Show ‘auth’ Option | ||
| 2 -admin Change Administrator user name/password | ||
| 3 -sys0 Change System user0 user name/password | ||
| 4 -sys1 Change System user1 user name/password | ||
| 5 -sys2 Change System user2 user name/password | ||
| 6 -sys3 Change System user3 user name/password | ||
| 7 -sys4 Change System user4 user name/password | ||
| 8 -norm0 Change Normal user0 user name/password | ||
| 9 -norm1 Change Normal user1 user name/password | ||
| 10 -norm2 Change Normal user2 user name/password | ||
| 11 -norm3 Change Normal user3 user name/password | ||
| 12 -norm4 Change Normal user4 user name/password | ||
| 13 -ppp Change PPP user name/password | ||
| 14 (null) Show auth Setting | ||
Always possible as an addendum
| Itno Command Description | |
| 1 ? Show ‘auth’ Option | |
| 2 -user Change User Name.’auth -sys3 -user xxx‘ | |
| 3 -pass Change Password. ‘auth -sys3 -pass xxx xxx’ | |
| 4 (null) Show auth’s System/PPP Setting |
You will have to enter the new password twice on the command line if you wish to change the old password.
nat-function
| Itno Command Description | |
| 1 ? Show ‘nat’ Option | |
| 2 -vs Set ‘nat -vs’ Option | |
| 3 -dmz Set ‘nat -dmz’ Option | |
| 4 (null) Show NAT Setting |
DMZ-input only
| Itno Command Description | |
| 1 ? Show ‘nat -dmz’ Option | |
| 2 on EnableDMZ | |
| 3 off EnableDMZ | |
| 4 -ip Set DMZ IP address | |
| 5 (null) Show DMZ Setting |
dns -function
| Itno Command Description | |
| 1 ? Show ‘dns’ Option | |
| 2 -q DNS query. dns -q domain-name | |
| 3 (null) Show DNS Table |
ping-function
| Itno Command Description | |
| 1 ? Show ‘ping’ Option | |
| 2 -l ping [-l N] [IP-addr|host-name] | |
| 3 (null) ping [IP-addr|host-name] |
sip-function
| Itno Command Description | |
| 1 ? Show 'sip' Option | |
| 2 -proxy0 sip -proxy0 | |
| 3 -proxy1 sip -proxy1 | |
| 4 -proxy2 sip -proxy2 | |
| 5 -upnp sip -upnp on/off/show | |
| 6 -exts sip -exts sip upnp external-port | |
| 7 -extr sip -extr rtp upnp external-port | |
| 8 -sipp sip udp port | |
| 9 -rtpp sip rtp port | |
| 10 -stun sip -stun on/off | |
| 11 -rport sip -rport on/off | |
| 12 -sserver sip -sserver stun-server | |
| 13 -out sip -out outbound-proxy | |
| 14 -dump sip -dump | |
| 15 -log sip -log on/off | |
| 16 -drtp sip -drtp 0/1/2 | |
| 17 -rtpnc sip -rtpnc on/off | |
| 18 -wanip sip -wanip | |
| 19 -nattype sip -nattype | |
| 20 -hbyrfc sip -hbyrfc | |
| 21 -dereg sip -dereg | |
| 22 -restart sip -restart | |
| 23 -jbt sip -jitter buffer Threshold | |
| 24 (null) Show SIP Setting |
ddns -function
| Itno Command Description | |
| 1 ? Show ‘ddns’ Option | |
| 2 -type Set DDNS Type | |
| 3 -host Set Host Name | |
| 4 -wild Set Wild Card Mode | |
| 5 -mx Set Mail Exchanger | |
| 6 -backmx Set Mail Exchanger Mode | |
| 7 -offline Set Offline Mode | |
| 8 -user Set Login User Name | |
| 9 -pass Set Login Password | |
| 10 (null) Show DDNS Setting |
sntp -function
| Itno Command Description | |
| 1 ? Show ‘sntp’ Option | |
| 2 -on Enable SNTP Client | |
| 3 -off Disable SNTP Client | |
| 4 -ip1 Set SNTP Server1 IP | |
| 5 -ip2 Set SNTP Server2 IP | |
| 6 -mode Set SNTP Client Mode | |
| 7 -zone Set GMT Time Zone: [+|-][hour]:[min] | |
| 8 -adjust Set Adjustment Time: [second] | |
| 9 (null) Show SNTP Setting |
vlan -function
| Itno Command Description | |
| 1 ? Show ‘vlan’ Option | |
| 2 -tx Tx Vlan setting | |
| 3 -rx Rx Vlan setting | |
| 4 (null) Show Vlan Setting |
time-function
| Itno Command Description | |
| 1 ? Show ‘Time’ Option | |
| 2 -t Modify Time: hour:min:sec | |
| 3 -d Modify date: year:mon:date | |
| 4 (null) Show Data & Time |
mactab -function
MAClearningtable.
dump-function
| Itno Command Description | |
| 1 ? Show ‘dump’ Option | |
| 2 -r dump -r XXXXxxxx | |
| 3 -w dump -w XXXXxxxx XX |
book-function
| Itno Command Description | |
| 1 ? Show ‘book’ Option | |
| 2 -a Show answer list | |
| 3 -c Show call list | |
| 4 -s speed dial | |
| 5 -p phone book |
Reload function
Reloadingthe factory defaults.
watchdog -function
| Itno Command Description | |
| 1 ? Show ‘WatchDog’ Option | |
| 2 on Enable WatchDog | |
| 3 off Disable WatchDog | |
| 4 (null) Show WatchDog Setting |
phone -Funktion
| Itno Command Description | |
| 1 ? Show ‘phone’ Option | |
| 2 -autoanswer phone auto answer | |
| 3 -vol Volume setting | |
| 4 -block Block Incoming call | |
| 5 -ring Set Melody Ringer | |
| 6 -forward Auto-forward Incall to Phone[0-9] in Book | |
| 7 (null) Show Phone Setting |
weblogo -function
| Itno Command Description | |
| 1 ? Show ‘weblogo’ Option | |
| 2 -on Vender Logo | |
| 3 -off Crystal media Logo | |
| 4 (null) Show weblogo Setting |
dsp function
ShowstheDSP-codetype.
addport -function
cid -functions
| Itno Command Description | ||
| 1 ? Show ‘cid’ Option | ||
| 2 -off Disable Slic Cid signal | ||
| 3 -1 Tx | FSK after 1st Ring | |
| 4 -2 Tx | FSK before 1st Ring | |
| 5 -3 Tx | DTMF before 1st Ring | |
| 6 -4 Tx | FSK with Line reversal before 1st Ring | |
| 7 -5 Tx | DTMF with Line reversal before 1st Ring | |
| 8 -time | FSK cid with time message | |
| 9 -single | Single type FSK CID | |
| 10 | (null) Show Cid Option | |
slic -function
| Itno Command Description | |
| 1 ? Show ‘slic’ Option | |
| 2 -ring Issue Ring signal | |
| 3 -r read slic addr | |
| 4 -w write slic addr | |
| 5 -a read all slic reg | |
| 6 (null) Show slic register |
ver function
Displaying the current firmware version.
Appendix
Setting up an FWD account
- You can set up an account for VoIP communication at the Web site (www.freeworlddialup.com;0;;:0;www.freeworlddialup.com). After you have entered all the required data you will receive an e-mail from the FWD mail system containing your registration data.
- You can make the required settings in your phone after you have successfully set up your account.
- You can use a Web browser, Telnet or the hyperterminal and CLI commands to do this. You must enter the proxy name, the domain name, your user name and a password here. You can also specify the name that is to be displayed to other subscribers (nickname).
- After successfully logging on to the SIP server you can call other subscribers who are also logged on to that server. For this you only need to enter the subscriber's user name (login name) and then press »#«.
- To make calls to other subscribers over the Internet you first have to log on to a proxy server (with SIP server IP, do main IP, user name and password); be sure to activate the stun function first before your first attempt at placing calls.
Technical specifications
Hardware Overview
- Chip set - CM5000
- Data memory - 16M
• Program memory - 64M - Ethernet ports: - 2 x 10/100M
Software Overview
Network Protocols
• SIP V1 (RFC2543), V2 (RFC3261)
• IP/TCP/UDP/RTP/RTCP
- ICMP/ARP/RARP/SNTP
• TFTP-Client/DHCP-Client/ PPPoE-Client, Static IP
- Telnet/HTTP server
- DNS-Client
Codec
G.711
G.723
G.726
G.729A
•G.729B
IP Assignment
- Static IP
- DHCP
- PPPoE
Voice Quality
• VAD (Voice Activity Detection)
• CNG (Comfortable Noise Generator)
- _LEC (Line Echo Canceller)
- Packet Loss Compensation
- Adaptive Jitter Buffer
Security
- HTTP 1.1 Basic/Digest Authentication for web-based applications
- _MD5 for SIP authentication (RFC2069/ RFC 2617)
Configuration
- Internet Browser
- Telnet
- Keypad configuration
Firmware Upgrade
- TFTP
- HTTP
Operating requirements:
• Operating temperature: 0 to 50 °C
• Storage temperature: -10 to 60°C
• relative humidity: 10 to 90% no dew
Electric requirements:
- Operating voltage: 9V DC
• Power supply: Input: 230 AC, Output: 9 VDC, 1,000mA
• Network interface: 2 X RJ-45 Ethernet connectors
Size:
- 198 x 176 x 60 mm (L x W x H)
Index
A
Accepting a waiting call. 14
Accepting calls. 13
Activate call forwarding....15
Activating the SNTP server. 21
addport function is to add Nat Port Mapping .....67
Administrator....8,28,30
Administrator settings....30
Advanced Setting....52
Advanced Settings. 52
Alarm setting. . . . . . . . . 20,41,42,43,44,45,46,47,48,49
All Forward....5
Always Block. 38
Appendix....69
Appointment reminder calls. 20,41,42,43,44,45,46,47,48,49
Appointments....5
arp function....60
auth function. 62
Authentication. 28
Auto Config....8,50
Auto Dial Time....24
Auto Update....55
Automatic Configuration Setup ..... 50
Automatic Dial Time....24
Automatic dialing....41
Automatic Updating....55
B
Block Period....38
Block Settings 38
book function....66
Bridge....6
Busy Forward....5,36
C
Call forward....5
Call Forward....35
Call forwarding forwarding on no answer . . . . . . . . . 36
Call Forwarding on Busy....36
Call Forwarding on No Answer 36
Call history....5,18
Call list....18
Call number....12
Call switching....14
Call waiting. 40
Call Waiting Setting. 40
Caller list....18
CFI....7,28
cid function....67
CLI Command line....59
Codec....7,48
Codec....70
Codec ID....48
Codec ID Setting. 48
Codec Settings 48
Codec type....7
Command line interpreter....59
Command line interpreter CLI....59
Configuration....70
Configuration mode....8
Configuration using the telephone . . . . . 16,17,18,19,20,21,22,23,24,25,26,27,28,29,30,31,32
Configuring a virtual server....45
Configuring speed dialing destinations for a function key 15
Configuring the phone using the Web browser .....33
Confirmed password....53
Connecting the IP phone. 3
Copying the MAC address ..... 51
D
Date/Time setting....6,20
DDNS....44
ddns function....65
DDNS Settings 44
Debugmode function is to enter the debugmode....61
Default setting. 9
Default Setting. 56
Delete phone directory / speed dial ..... 17
Deleting data records. 5
Description of symbols....39
DHCP Server. 43
Dial plan....39
Dialing from the phone book....13
Display name....7
Display Name 46
DMZ-input....63
DMZ-Setting....45
DND....15
DNS. 6
dns function....63
DNS Settings....27
DNS-Setting....27
Do not Disturb....15,19,38
Do Not Disturb....5
Do not disturb settings....15
Domain Server. 7,47
dsp function is to show dsp code type....67
DSP-Code Type 67
DTMF. 49
DTMF Setting....49
dump function. 66
Duplicate RTP. 8
E
Electric requirements....71
Electrostatic charges....3
Empty FWD Number....15
exit function is to exit the CLI....61
F
Factory Default Setting....47
Firmware Upgrade....70
First realm....7
Fixed IP setting....6
Forward....15
Forwarding calls at no answer .....5
FTP 8
FWD....15
G
Gain 22
Gateway address....4
H
Handset gain....23
Handset volume 23
Hardware Overview....70
Hot Line Setting....41
I
Inquiry Call....13
Installing the IP Phone....4
IP address....4
IP Assignment....70
IP Type....42
ipconfig \endash ifN function N is 0, 1, 2. . . . . . . . . . . . . . . . . . . . . . . . . . . . . . . . . . . . . . . . . . . . . . . . .
ipconfig function....60
IP-Type. 6
K
Keypad features....2
L
LAN 43
LAN Mode....42
LAN Setting....43
LAN Settings 26,43
LAN Setup....6
Launching the Debug mode .....61
List of calls....18
Listed calls....18
Loading factory defaults....66
Local PC....54
Login....33
Log-in. 12
Login to phone. 58
M
MAC Clone Setting....51
MAC learning table....66
mactab function is to show MAC learning table....66
Making telephone calls
accepting calls....13
broker\rquote s call....14
inquiry call....13
room Inquiry....13
three-party conferencing....14
Making Telephone Calls
Speed Dialing from the Phone Book. . . . . . 13
Melody Setting. 38
Microphone volume. 23
N
NAT....6
nat function....63
NAT Trans....50
NAT Transversal....8
Net 42
Network. 6,25,42
Network Protocols....70
Network Status....42
New password....53
New username....53
No Answer Forward. 36
No Call Signaling by time. 38
No Ringing....38
0
Open listening volume....23
Operating requirements....70
Other features. 50,51,52
Other Settings....49
Outband DTMF....8
Outbound proxy....7
Outbound Proxy. 47
P
PABX....12
pabx connection....29
Phone book. 34
Phone Book....34
phone function 67
Phone setting....5
Phone Setting. 35,36
Phone settings....19
Phone setup....19
ping function. 64
Port....47
Port Setting. 47
Port settings....30
PPPoE....26,42
PPPoE setting....6
Primary DNS....6
Primary DNS address....4
Priority....27
Programming an auto update file ..... 56
Protection against electrostatic charges ..... 3
Proxy Server....47
Proxy-Server. 7
R
Reboot....57
reboot function is to restart the system. . . . . . . . . . . . 61
Register name....7
Register Name....46
Register password....7
Register Password....47
reload -function....66
Restart 9
Ring Timeout....5
Ringer. 6,24
Room inquiry....13
Room inquiry with waiting caller ..... 14
RPort Function....49
RPort Setting....8
RTP setting. 8,30
S
Save Changes. 53
save function. 61
Saving Changes. 53
Search. 16
Searching phone book entries ..... 16
Second realm. 7
Secondary DNS 6
Security....70
Service domain. 7
Set Up Call Forwarding....36
Setting signaling tones....51
Setting the time and the date. 20
Setting the volume. 37
Setting up an FWD account....69
Settings....15,49
Silent signalling....19
SIP 28,46
sip -Funktion. 64
SIP Settings....7,28,46
Size....71
slic function....68
SNTP 36
sntp function. 65
SNTP setting. 6
SNTP settings....21
Softkey setting....40
Software Overview....70
Software update....31
Speaker gain 23
Speaker volume....23
Speed dial....15,17,34,35
Speed Dial....34
Speed dial activation....17
Speed Dial Phone List. 35
Speed Dial Settings 34
Standard Configuration....56
Starting a call....13
Status....7,28,42
STUN Setting. 30,50
STUN settings 8,30,50
STUN-Server....8
Subnet mask. 4
Symbol Reference....10
Sync.Time....22,37
Synchronisation time....22
Synchronization Time....37
System Authority....53,54,55,56
System management....53,54,55,56
T
technical specifications....70
Telephone description....3
Telephone directory. 5,34
Telephone directory setup....16
Telephone display....11
Telephone number....12
Telephone reboot....61
Telephone settings. 35,36
Telephone system data....33,34
Telnet....58,59,60,61,62,63,64,65,66,67,68
Temporary handset volume setting ..... 15
TFTP....8,54
Third realm....7
time function. 66
Time Server....36
Time Synchronization....36
Time Synchronization Setup (SNTP Settings) ..... 36
Time zone....22
Time Zone....37
Time Zone....37
Tone setting....24
Tone settings. 38
Tone Settings....51
U
Unconditional Call Forwarding....36
Unpacking and placing the telephone....3
Update....54
update function....62
Update via....56
Upgrade system....8,31
User interface....1
User Name....7,46
User Password....53
V
VAD....8
ver function is to show Firmware Version....68
Version. 9
VID....7
Viewing the IP-address....15
Virtual Server Settings....45
VLAN. 7,27,44
vlan function. 65
VLAN Settings....27,44
Voice Quality. 70
Volume....15,22
Volume & Gain....6
Volume and gain....22
Volume setting....23
Volume Setting 37
Volume& Gain. 22
W
WAN settings....25
WAN Settings 25,42
Watch dog. 9
watchdog function....66
Web Interface....33
weblogo function....67
WLAN Setup....6
For support and service information visit the Service / Support section of our Website at
www.funkwerk-ec.com
Phone: 0911 9673 0
Subject to changes
010707