Dominion SX II - Server Raritan - Free user manual and instructions
Find the device manual for free Dominion SX II Raritan in PDF.


| Product Type | Serial Console Server (Terminal Server) |
| Model Variants | DSX2-4, DSX2-8, DSX2-16, DSX2-32, DSX2-48 (with optional internal modem: add M suffix) |
| Form Factor | 1U, 19-inch rackmount |
| Dimensions (approx.) | 1.75 x 19 x 12 inches (4.4 x 48.3 x 30.5 cm) |
| Weight | Approximately 10 to 15 lbs (4.5 to 6.8 kg) depending on model |
| Power Supply | Dual AC 100-240 V, auto-switching, with automatic failover; dual DC models also available |
| Power Consumption | Typical 30W (varies by model) |
| Network Interfaces | Dual Gigabit Ethernet LAN ports (10/100/1000), configurable for failover or simultaneous operation |
| Serial Ports | 4, 8, 16, 32, or 48 RJ-45 serial ports with auto-sensing DTE/DCE |
| Serial Baud Rates | 1200 to 230400 bps |
| Terminal Emulation | VT100, VT220, VT320, ANSI; code-sets including US-ASCII, ISO 8859-1, UTF-8, etc. |
| Security | 256-bit AES encryption, FIPS 140-2 validated cryptographic module, SSHv2, SSL, iptables firewall, external authentication (LDAP, RADIUS, TACACS+, Active Directory), SSH key authentication |
| Management | Web GUI (Remote Console), CLI via SSH/Telnet, local console (serial, USB, DVI+USB), Raritan Serial Console (RSC), CommandCenter integration |
| Access Methods | SSH/Telnet client, web browser, direct port access (IP/port, URL), modem (internal analog or external 3G/4G USB), local at-rack |
| Logging & Monitoring | Port logging to Syslog, NFS, local file; keyword monitoring with SNMP/email alerts; audit log |
| Concurrent Sessions | Up to 10 users per port, up to 200 total sessions per SX II |
| Package Contents | SX II appliance, rackmount kit, 2 AC power cords, 4 rubber feet, warranty card, Quick Setup Guide |
| Operating Temperature | 32 to 122 °F (0 to 50 °C) |
| Humidity | 20% to 80% non-condensing |
| Regulatory Compliance | FCC Class A, CE, cULus, VCCI, IC CS03 |
Frequently Asked Questions - Dominion SX II Raritan
User questions about Dominion SX II Raritan
0 question about this device. Answer the ones you know or ask your own.
Ask a new question about this device
Download the instructions for your Server in PDF format for free! Find your manual Dominion SX II - Raritan and take your electronic device back in hand. On this page are published all the documents necessary for the use of your device. Dominion SX II by Raritan.
USER MANUAL Dominion SX II Raritan
Copyright © 2015 Raritan, Inc.
DSX2-v2.0.0.-0A-E
August 2015
255-62-0001-00
This document contains proprietary information that is protected by copyright. All rights reserved. No part of this document may be photocopied, reproduced, or translated into another language without express prior written consent of Raritan, Inc.
© Copyright 2015 Raritan, Inc. All third-party software and hardware mentioned in this document are registered trademarks or trademarks of and are the property of their respective holders.
FCC Information
This equipment has been tested and found to comply with the limits for a Class A digital device, pursuant to Part 15 of the FCC Rules. These limits are designed to provide reasonable protection against harmful interference in a commercial installation. This equipment generates, uses, and can radiate radio frequency energy and if not installed and used in accordance with the instructions, may cause harmful interference to radio communications. Operation of this equipment in a residential environment may cause harmful interference.
VCCI Information (Japan)
Raritan is not responsible for damage to this product resulting from accident, disaster, misuse, abuse, non-Raritan modification of the product, or other events outside of Raritan's reasonable control or not arising under normal operating conditions.
If a power cable is included with this product, it must be used exclusively for this product.

text_image
CE cUL us 1F61 LISTED I.T.E.Contents
CS03 Certification - DSX2-16 and DSX2-48
vi
Chapter 1 Features and Benefits 1
Package Contents......8
SX II Models....9
SX II Appliance Diagram....9
Supported Serial Devices 10
SX II Access Clients....11
Chapter 2 Access and Use Remote Console Features 12
Allow Pop-Ups 13
Security Warnings and Validation Messages 13
Java Validation and Access Warning 14
Additional Security Warnings....15
Initial SX II Configuration from the Remote Console 15
Connect a Laptop to SX II Using a Cross-Over Cable (Optional) 16
Installing a Certificate....16
Example 1: Import the Certificate into the Browser 17
Example 2: Add the SX II to Trusted Sites and Import the Certificate 19
Converting a Binary Certificate to a Base64-Encoded DER Certificate (Optional) ...... 21
Log In to SX II 23
Change Your Password from the Remote Console....23
SX II Port Access Page 24
SX II Left Panel 25
Enable Favorites 28
Change How Favorites are Displayed 28
Discover Devices Product Subnet 29
Chapter 3 Access Targets 31
Port Action Menu Options - Connect, Disconnect, Power On, Power Off and Power Cycle
Targets....31
Connect to a Target 33
Disconnect from a Target or Power Strip 34
Power On a Target or Power Strip 35
Power Off a Target or Power Strip 36
Contents
Power Cycle a Target or Power Strip 37
Connect to Targets Using CLI - Connect, Disconnect, Power On, Power Off and Power Cycle
Targets 37
Command Line Interface Protocols 40
Command Line Interface Partial Searches....41
Command Line Interface Tips 41
Command Line Interface Shortcuts 41
Command Line Interface High-Level Commands 42
Chapter 4 Raritan Serial Console (RSC) Help 43
Standalone Raritan Serial Console Requirements 44
Set Windows OS Variables and Install Standalone Raritan Serial Console (RSC) ...... 44
Set Linux OS Variables and Install Standalone Raritan Serial Console (RSC) for Linux .47
Setting UNIX OS Variables....48
Launching RSC on Windows Systems 49
Raritan Serial Console (RSC) Functions 49
Emulator 49
Edit....56
Start and Stop Logging....57
Send a Text File....59
Toggle Power....60
Power On a Target 61
Power Off a Target 62
Power Cycle a Target 63
Chat 65
Help and About....66
Chapter 5 Connect a Rack PDU to SX II and Configure Power Control Options 67
Connecting the SX II to the PX2 Serial Port 67
Connecting the SX II to the PX2 FEATURE Port 68
Appendix A Specifications 70
SX II Dimensions and Physical Specifications ....70
Supported Remote Connections....70
Supported Number of Ports and Remote Users per SX II Model....71
Maximum Number of Users Session 71
Maximum Number of Support Users Per Port 71
Port Access Protocol Requirements 71
SX II Port Pins....74
SX2 Port Ranges 75
Network Speed Settings 75
Default User Session Timeouts 76
SX II Supported Local Port DVI Resolutions 77
SX II Appliance LED Status Indicators 77
Target Cable Connection Distances and Rates 78
Appendix B FAQs 79
Appendix C SX II Support 91
SX II Release Notes and Help....91
Contact the Documentation Team with Feedback....92
CS03 Certification - DSX2-16 and DSX2-48
To avoid potentially fatal shock hazard and possible damage to Raritan equipment:
- Do not use a 2-wire power cord in any product configuration.
- Test AC outlets at your computer and monitor for proper polarity and grounding.
- Use only with grounded outlets at both the computer and monitor.
- When using a backup UPS, power the computer, monitor and appliance off the supply.
NOTICE: This equipment meets the applicable Industry Canada Terminal Equipment Technical Specifications. This is confirmed by the registration number. The abbreviation IC, before the registration number, signifies that registration was performed based on a Declaration of Conformity, indicating that Industry Canada technical specifications were met. It does not imply that Industry Canada approved the equipment.
NOTICE: The Ringer Equivalence Number (REN) for this terminal equipment is 01. The REN assigned to each terminal equipment provides an indication of the maximum number of terminals allowed to be connected to a telephone interface. The termination on an interface may consist of any combination of devices subject only to the requirement that the sum of the Ringer Equivalence Numbers of all the devices does not exceed five.
Features and Benefits

natural_image
Front view of a black Sony 32 network interface (no visible text or symbols on the device body)
natural_image
Front view of a network switch device showing multiple Ethernet ports and indicator lights (no readable text or labels)Next-Generation Console Server
Raritan's Next-Generation Serial Console Server
The Dominion SX II is Raritan's next-generation Serial Console Server (also known as Terminal Server) that provides IT and network administrators secure IP access and control of serial devices, anytime, anywhere. The new SX II is the most powerful, secure, reliable, easy-to-use and manageable serial-over-IP console server on the market. SX II provides convenient and productive access to networking devices, servers, PDUs, telecommunications and other serial devices.
Ten Years of Serial Console Experience
For over ten years, thousands of customers have relied on the first generation Dominion SX for access and control of hundreds of thousands of serial devices, representing over 500 million hours of total operation. The SX II builds upon that experience with a wide range of advancements and innovations.
Dominion Platform, User Interface and Management
Starting with a powerful, Dominion hardware platform providing performance, reliability and security, the SX II includes virtua lly all the Serial-over-IP features of its predecessor, Dominion compatible user interfaces and management features, plus exciting new capabilities.
Full CLI-based Configuration and Auto-Configuration
The SX II offers complete CLI access and management via SSH, Telnet and web-based user interface, with convenient direct port access. Two script-based automatic configuration methods are available for a fast installation and for subsequent configuration changes.
Exciting New Features and Innovations
The SX II new features include: military grade security features with 256-bit AES encryption and FIPS encryption mode, automatic DTE/DCE serial port detection, innovative at-the-rack access options, wireless modem support, IPv6 networking, script based auto-configuration and Dominion compatible user interfaces and management.
CommandCenter Management & Scalability
With Raritan's CommandCenter, organizations can manage hundreds or even thousands of serial devices, spread across multiple locations, including branch offices.
| Powerful Hardware Platform | |
| Powerful New Hardware Platform | Powerful new hardware platform with 1GHz CPU engine, with an 8-fold increase in RAM. Increased flash memory, up to 8 GB, for storage and logging. Front panel LED's show port connection status. |
| Wide Variety of 1U Models | Rackable, 1U models available in 4, 8, 16, 32 and 48 ports. All have dual power supplies and dual Gigabit Ethernet LAN ports. Models are available with an optional built-in modem. At-the-rack access includes RJ-45/serial, USB and KVM console. |
| Powerful Serial Processing Engine | The Dominion SX II with its powerful hardware platform provides high-powered serial processing for the most extreme use cases. Up to 10 users can simultaneously connect to a serial device connected to a SX II port. Up to 200 simultaneous user sessions are supported by a given SX II console server. Port configuration time is up to 23 times faster than the original SX. Connection times are over 50 times faster. |
| Dual AC Power Supplies | All models have dual, 100-240 volt AC, auto-switching power supplies with automatic failover for increased reliability. |
| Dual DC Powered Models | Dual power and dual LAN, 8, 32 and 48 port DC powered models are available. These models provide the same features, serial access and performance as the AC powered models. |
| Dual Gigabit Ethernet LAN on all Models | Dual gigabit Ethernet LAN ports, which can be configured for simultaneous operation or automatic failover. Dual stack IPv4 and IPv6 networking. |
| Five USB Ports | The Dominion SX II has four USB 2.0 ports, three on the back panel and one on the front panel. These are available for local keyboard/mouse, 3G/4G cellular modem and for automatic configuration via USB drive. A USB 2.0 mini-B port is available for local laptop connection. |
| Optional Telephone Modem | All models have the option for an internal, 56K telephone modem with RJ11 connection for emergency access and disaster recovery. |
| Innovative Local Console | The Dominion SX II's local console provides multiple ways for at-the-rack access. The console includes a traditional RJ45 serial port, USB mini-B port, and even a DVI/USB KVM console. |
Productive Serial-over-IP Access
| Productive Serial-over-IP Access | |
| Widest Variety of Serial-over-IP Access | The Dominion SX II supports the widest variety of serial-over-IP connections via SSH/Telnet Clients, web-browser, CommandCenter, telephony modem, cellular modem and at-the-rack access. This includes CLI, GUI and multiple Direct Port Access methods. |
| SSH/Telnet Client Access | SSH/Telnet client access from a desktop, laptop, or handheld device. Direct Port Access via SSH Client using a username/port string syntax. Customer can upload, view and delete SSH keys for greater security. |
| Web Browser Access | Web browser access via Dominion SX II or CommandCenter user interfaces and the Raritan Serial Client (RSC). |
| Convenient Direct Port Access | Convenient Direct Port Access methods via SSH, Telnet & HTTP. IP address and TCP port-based access for Telnet and SSHv2 clients. Independent IP addresses or TCP port numbers can be assigned to access each SX II port. HTTPS-based direct access via URL. Com Port Redirection can be supported for third-party software redirectors. |
| Cellular and Telephone Modem Access | Optional external Cellular (3G/4G) modem and internal Telephone modem access for emergency access, business continuity and disaster recovery. |
| Innovative At-the-Rack Access | With the Dominion SX II, you get multiple types of local access at-the-rack. This includes: (1) Traditional RJ45 serial port, (2) Mini-USB port for laptop connection, and (3) DVI & USB-based KVM console for connection to a rackmount keyboard tray or even a KVM switch. |
| Port Keyword Monitoring and Alerting | Users can define up to 14 keywords per port. The SX II will scan the data coming from the port, and if one of the keywords is detected, it will send an alert via SNMP or e-mail. Serial devices are monitored, even when no user is connected! This results in faster notification that reduces Mean Time to Repair (MTTR). |
| Port Logging to Syslog, NFS and Local File | Port activity to and from serial devices can be logged to a Syslog server, Network File System (NFS) server or locally to the SX II device with up to 8 Gb of storage. |
| NFS Logging Features | Allows logging of all user keystrokes and server/device responses to NFS server(s). Can even be stored on the NFS server with user-defined encryption keys for greater security. Keep-alive messages in the NFS log allow easy monitoring if the managed server/device goes down. |
| SecureChat Instant Messaging | Allows for secure, instant messaging among SX II users. Enables collaboration of distributed users to increase their productivity, troubleshoot, reduce the time to resolve problems and for training purposes. |
| Automatic Serial Device Logoff | Once a user is timed out for inactivity, a user defined "logoff" command can be sent to the target. Improved security of user sessions results as serial sessions are automatically closed upon |
Productive Serial-over-IP Access
time out and not left open for possible un-authorized access.
| Comprehensive Serial Device Access | |
| Over Ten Years of Serial Device Management | The first generation Dominion SX has been serving customers for over ten years, with over 500,000 ports sold. This represents hundreds of millions of hours of operation across a wide variety of serial devices. |
| Automatic DTE/DCE Serial Port Detection | This feature allows for a straight Cat5 connections to Cisco equipment (and other compatible devices), without rollover cables. It also means that a SX II can replace the first generation SX with its existing serial device connections. |
| Support for the Widest Variety of Serial Devices | Supports the widest variety of serial equipment including: networking routers, Ethernet switches, firewalls, UNIX/LINUX servers, Windows Servers, virtual hosts, rack PDU's, UPS systems, telecom/wireless gear. Supports multiple operating systems including SUN® Solaris, HP-UX, AIX, Linux®, Windows® Server 2012, and UNIX®. |
| Up to 230,400 Baud Serial Connections | Supports operating speeds of 1,200 to 230,400 bits-per-second for serial connections. |
| Flexible Serial Port Options | Flexible per-port serial options, including BPS, emulation, encoding, parity, flow control, stop bits, character and line delays, always-active connections and more. Multiple users can optionally write to a port simultaneously. Can define an exit command when the user times out, as well as enable an in-line menu for port commands and power control. |
| VT100/220/320/ANSI support | Increased choice of terminal emulation options, allows support of a broader range of devices. SX II supports the following code-sets: US-ASCII (ISO 646); ISO 8859-1 (Latin-1); ISO 8859-15 (Latin-9); UTF-8 and others. |
| Remote Power Control of Raritan PDU's (With Power Control Menu) | Raritan rack PDU's (PX, PX2, PX3, RPC) can be connected to the Dominion SX II for remote power control of the equipment connected to the PDU. Remote power control can be done via the SX II GUI, SSH/Telnet Client or CommandCenter. Outlet associations can be created for serial devices with multiple power supplies, such that these outlets can be controlled with a single power command. The SX II has "Control P" style menu commands for power control available during a serial session. |
| Security - Encryption | |
Chapter 1: Features and Benefits
| Strong 256 Bit AES Encryption | The SX II utilizes the Advanced Encryption Standard (AES) encryption for added security. 128- and 256-bit AES encryption is available. AES is a U.S. government-approved cryptographic algorithm that is recommended by the National Institute of Standards and Technology (NIST) in the FIPS Standard 197. |
| Validated FIPS 140-2 Cryptographic Module | For government, military and other high security applications, the Dominion SX II utilizes a validated FIPS 140-2 Cryptographic Module for enhanced encryption. Modules tested and validated as conforming to FIPS 140-2 are accepted by federal agencies of the U.S. and Canada for the protection of sensitive information. |
| Enhanced Encryption Options | Support more encryption options: web-browser security through 256 and 128-bit SSL encryption; for SSHv2 connections, AES and 3DES are supported (client-dependent). |
| Security - Authentication | |
| External authentication with LDAP, Radius, TACACS & Active Directory | Dominion SX II integrates with industry-standard directory servers, such as Microsoft Active Directory, using the LDAP, RADIUS and TACACS protocols. This allows Dominion SX II to use pre-existing username/password databases for security and convenience. SecureID is supported via RADIUS for added security. |
| Upload Customer-Provided SSL Certificates | Customers can upload to the Dominion SX II digital certificates (self-signed or certificate authority provided) for enhanced authentication and secure communication. |
| Configurable Strong Password Checking | The Dominion SX II has administrator-configurable, strong password checking to ensure that user-created passwords meet corporate and/or government standards and are resistant to brute force hacking. |
| Configurable Security Banner | For government, military and other security-conscious customers requiring a security message before user login, the SX II can display a user-configurable banner message and require acceptance before user login. |
| SSH Client Certificate Authentication | In addition to authentication via login/password, on the SSH interface users can be authenticated via SSH certificates. Each local user can be assigned up to 10 SSH keys. The key authentication takes the place of the login/password |
| Local Authentication with Users, Groups and Permissions | In addition to external authentication, the Dominion SX II supports local authentication. Administrators can define users and groups with customizable administration and port access permissions. |
| Login and Password Security | The SX II includes multiple login and password security features including password aging, idle timeout, user blocking and login limitations. Failed login attempts can be result in lockouts and user deactivation. |
| SHA-2 Certificate Support | Support for the more secure SHA-2 certificates. |
Security - Networking
| Dual Stack IP Networking – IPv4 and IPv6 | The Dominion SX II provides dual-stack IP networking with simultaneous support of IPv4 and IPv6. |
| IPTables Firewall support | Fully configurable "iptables" firewall support. User selectable and customizable system security levels catering to wide range of security needs. |
| Selective Static Routing Support | Supports connections between modem and LAN 1, modem and LAN 2 or LAN 1 and LAN 2. This allows users to utilize two different networks (Public and Private) and modem access to KVM or Ethernet controlled devices. When used with the firewall function, secure access can be enabled. |
| TCP/IP Port Management | Can disable TELNET and SSH access if desired. Ability to change these ports in addition to HTTP, HTTPS and discovery ports |
| Prevent Man In The Middle Attacks | Enhanced security of communication channels by using client and server SSL certificates. |
| Modem Dial-Back Security | For enhanced security, Dominion SX supports modem dial-back. |
| Rejects SSHv1 Requests | Due to the many known security vulnerabilities of the SSHv1 protocol, the Dominion SX will automatically reject SSHv1 connections. |
| End User Experience | |
| Multiple User Interfaces | The SX II supports multiple user interfaces giving the user the freedom to use the interface best suited for the job at hand. This includes remote access via Raritan or third party serial client via CLI, Raritan graphical user interface (GUI), at-the-rack access or via CommandCenter. Convenient direct port access methods available. |
| Full Modern CLI – GUI Equivalence | Full CLI management and configuration, thereby allowing scripting of any command. |
| Broad Range of Supported Browsers | Offers broad range of browsers Firefox, Internet Explorer and Chrome. |
| International Language Support | The web-based user interface supports English, Japanese and Chinese languages. The Raritan Serial Console can support four languages: English, Japanese, Korean and Chinese |
| PC Share Mode | Up to ten users can connect and remotely access each connected serial device up to a maximum of 200 serial sessions. Sharing feature is very useful for collaboration, troubleshooting and training. |
Easy to Install and Manage
| Full CLI-based Configuration and Management | The SX II offers complete CLI administration and management via SSH, Telnet and web-based user interface. Two script-based automatic configuration methods are available for a fast installation and for subsequent configuration changes. |
| Automatic Configuration via USB Drive | The SX II can be optionally configured via a CLI script on a USB drive connected to one of its USB ports. This can be used for initial configuration or subsequent updates. |
| Automatic Configuration via TFTP Server | The SX II can be optionally configured via a second method, i.e. via a CLI script contained in a TFTP server. This can be used for initial configuration or subsequent updates. The TFTP server address can be retrieved via DHCP or set by the administrator. |
| Dominion-Compatible Management | Dominion-compatible management features are available via a web-based user interface or CLI. This includes Dominion-style User Management, Device Settings, Security, Maintenance, Diagnostic and Help features. Firmware update via web browser without the use of an FTP server. |
| Easy to Install | Installation in minutes, with just a web browser, CLI or automatic configuration. Some competitive products require burdensome editing of multiple files to complete a basic installation. |
| Configurable Event Management and Logging | The SX II generates a large variety of device and user events including: device operation, device management changes, security, user activity and user administration. These can be selectively delivered to: SNMP, Syslog, email (SMTP) as well as stored on the SX II in the audit log. Support for SNMP v2 and v3, |
Raritan CommandCenter® Management and Scalability
Chapter 1: Features and Benefits
| Raritan’s CommandCenter Centralized Management | Like the rest of the Dominion series, Dominion SX II features complete CommandCenter Secure Gateway integration, allowing users to consolidate all Dominion SX II and other Raritan devices into a single logical system, accessible from a single IP address, and under a single remote management interface. |
| Manage Hundreds of Serial Devices | When deployed with CommandCenter Secure Gateway, hundreds of Dominion SX II devices (and thousands of serial devices) can be centrally accessed and managed. |
| Single IP Address for Administration and Device Connection | Administrators and users can connect to a single IP address via CommandCenter Secure Gateway to manage the SX II or access the attached serial devices. This connection can be via web browser or through SSH. Option for SX II at-the-rack access while under CC-SG management. |
| Bulk Firmware Upgrades | Administrators can schedule firmware upgrades (and other operations) for multiple SX II devices from CommandCenter. |
| Remote Power Control via CommandCenter Secure Gateway | CommandCenter supports remote power control of Raritan PX rack PDU’s connected to serial ports on the Dominion SX II. For equipment with multiple power feeds, multiple power outlets can be associated together to switch equipment on or off with a single click of the mouse. |
Package Contents
Each SX II ships as a fully-configured stand-alone product in a standard 1U 19" rackmount chassis.
The SX II package includes -
• 1 - SX II appliance
• 1 - Rackmount kit
• 2 - AC power cords
• 1 - Set of 4 rubber feet (for desktop use)
• 1 - Warranty card
• 1 - SX II Quick Setup Guide
SX II Models
The following SX II models are available.
Models with an M include an internal modem in addition to the standard features that are provided on all SX II models. For a list of standard features, see Introduction (see "Features and Benefits" on page 1).
• DSX2-4 and DSX-4M - 4-port serial console server
• DSX2-8 and DSX-8M - 8-port serial console server
• DSX2-16 and DSX-16M - 16-port serial console server
• DSX2-32 and DSX-32M - 32-port serial console server
• DSX2-48 and DSX-48M - 48-port serial console server
Model size, weight, temperature and other specifications are found in SX II Dimensions and Physical Specifications (on page 70).
SX II Appliance Diagram
Note the image shown here is an example, so it may be different from your model.
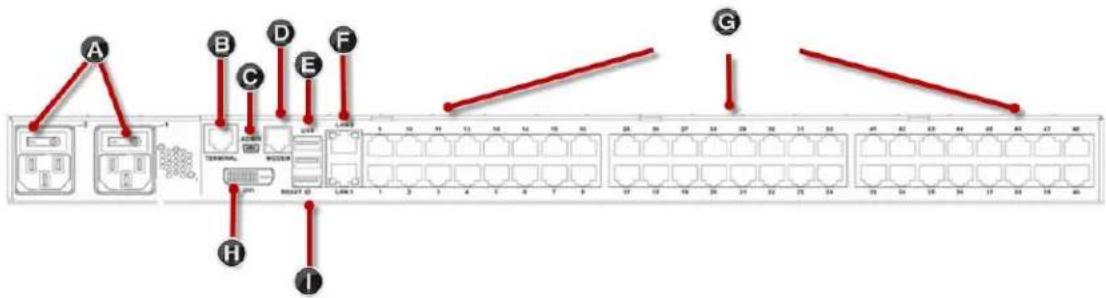
text_image
A B C D E F G H IAppliance diagram key
| A | AC power outlet(s) 1 and 2 with independent power on/off switches |
| B | Terminal port/console port |
| C | Admin Mini-USB port |
| D | Modem port (based on model) |
| E | 3 USB ports |
| F | LAN1 and LAN2 ports |
| G | Server ports |
| H | DVI-D port |
| I | Reset button |
Chapter 1: Features and Benefits

text_image
J Riton K L Dominion BCE IIAppliance diagram key
| J | USB port |
| K | LED port indicators |
| L | Power status(Note SX II 48 port models have their power status located above the front-panel USB port.) |
Supported Serial Devices
- Routers
• LAN switches - Rack PDUs
- Wireless modems
- Telecom modems
- Windows servers
- UNIX servers
- Linux servers
- Virtual hosts
- Firewalls
SX II Access Clients
Raritan Serial Console (RSC) (RSC)
Access RSC by connecting from the Remote Console or use standalone RSC to access targets directly.
See Raritan Serial Console (RSC) Help (on page 43)
Direct Port Access
Direct Port Access allows users to bypass having to use the SX II's Login dialog and Port Access page.
This feature also provides the ability to enter a username and password directly to proceed to the target, if the username and password is not contained in the URL.
command line interface (CLI)
Connect using CLI via SSH or Telnet.
See Command Line Interface SX2
Chapter 2
Access and Use Remote Console Features
The Remote Console is a browser-based interface accessed when you log in to SX II via a network connection.
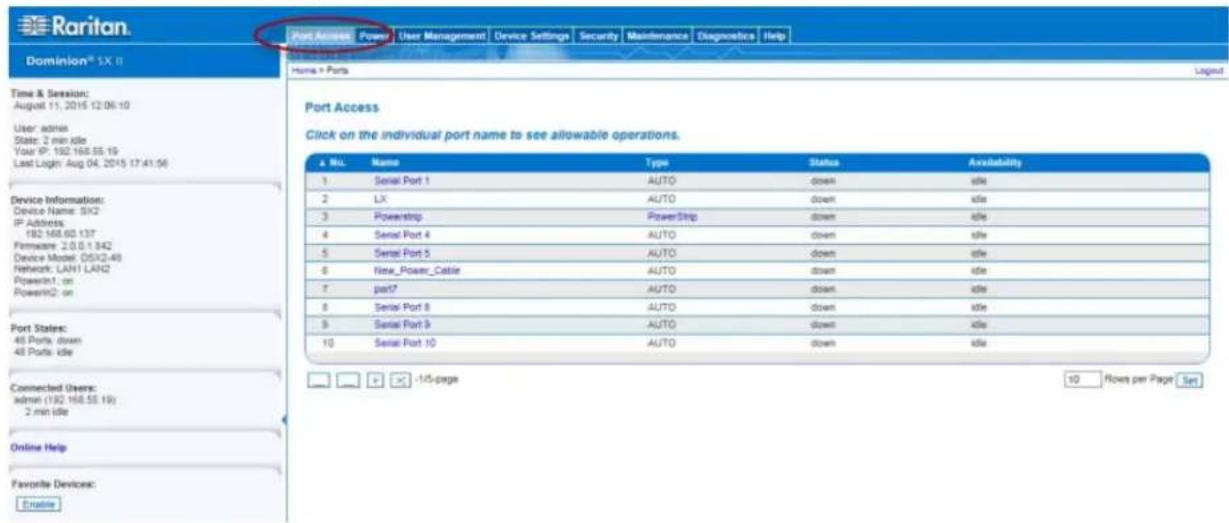
text_image
Raritan Port Access Power User Management Device Settings Security Maintenance Diagnostics Help Dominion® 1X II Home + Ports Time & Session: August 11, 2015 12:06:10 User admin State: 2 min idle Your IP: 192.168.55.19 Last Light: Aug 04, 2015 17:41:56 Device Information: Device Name: SK2 IP Address: 182.168.60.137 Firmware: 2.0.0.1.342 Device Model: OSX2-48 Network: LAN1 LAN2 Power1 on Power2 on Port States: 45 Porta down 45 Porta idle Connected Users: admin (192.168.55.19) 2 min idle Online Help Favorite Devices: Enable Port Access Click on the individual port name to see allowable operations. a No. Name Type Status Availability 1 Serial Port 1 AUTO down idle 2 LX AUTO down idle 3 Powerstrip PowerStrip down idle 4 Serial Port 4 AUTO down idle 5 Serial Port 5 AUTO down idle 6 New_Power_Cable AUTO down idle 7 port? AUTO down idle 8 Serial Port 8 AUTO down idle 9 Serial Port 9 AUTO down idle 10 Serial Port 10 AUTO down idle -1/5-page 10 Rows per Page SetAdministrator Functions in the Remote Console
Administrators perform SX II configuration and maintenance functions from the Remote Console, such as configuring network access, adding and managing users, managing device IP addresses and so on.
End User Functions in the Remote
From the Remote Console, end users access targets, manage favorites, change passwords and so on.
Note that these functions can also be performed via command line interface.
In This Chapter
Allow Pop-Ups 13
Security Warnings and Validation Messages 13
Initial SX II Configuration from the Remote Console.... 15
Installing a Certificate 16
Log In to SX II 23
Change Your Password from the Remote Console 23
SX II Port Access Page 24
SX II Left Panel 25
Enable Favorites....28
Allow Pop-Ups
Regardless of the browser you are using, you must allow pop-ups in order to launch the SX II Remote Console.
Security Warnings and Validation Messages
When logging in to SX II, security warnings and application validation message may appear.
These include -
- Java ^™ security warnings and requests to validate SX II See Java Validation and Access Warning (on page 14) and Installing a Certificate (on page 16)
- Additional security warnings based on your browser and security settings See Additional Security Warnings (on page 15)
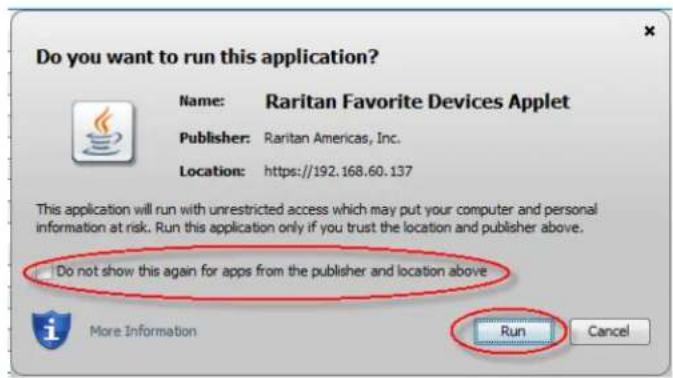
Java Validation and Access Warning
When logging in to SX II, Java™ prompts you to validate SX II, and to allow access to the application.
Raritan recommends installing an SSL certificate in each SX II device in order to reduce Java warnings, and enhance security.
See SSL Certificates
text_image
Do you want to run this application? Name: Raritan Favorite Devices Applet Publisher: Raritan Americas, Inc. Location: https://192.168.60.137 This application will run with unrestricted access which may put your computer and personal information at risk. Run this application only if you trust the location and publisher above. Do not show this again for apps from the publisher and location above More Information Run Cancel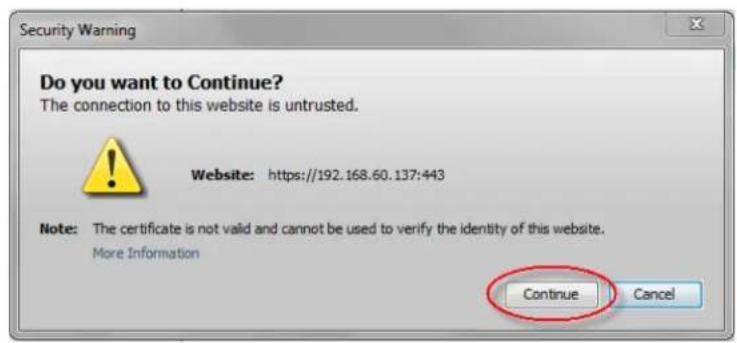
text_image
Security Warning Do you want to Continue? The connection to this website is untrusted. Website: https://192.168.60.137:443 Note: The certificate is not valid and cannot be used to verify the identity of this website. More Information Continue CancelAdditional Security Warnings
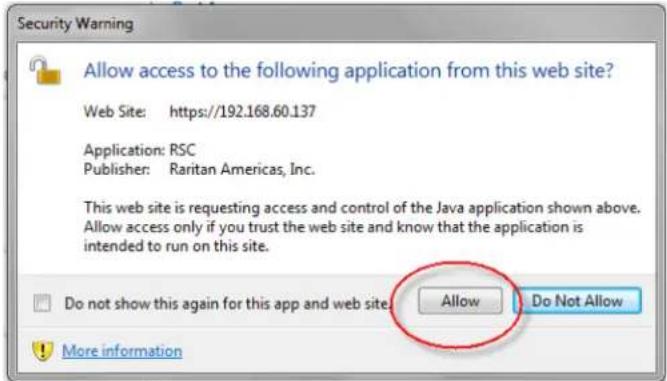
Even after an SSL certificate is installed in the SX II, depending on your browser and security settings, additional security warnings may be displayed when you log in to SX II.
It is necessary to accept these warnings to launch the SX II Remote Console.
text_image
Security Warning Allow access to the following application from this web site? Web Site: https://192.168.60.137 Application: RSC Publisher: Raritan Americas, Inc. This web site is requesting access and control of the Java application shown above. Allow access only if you trust the web site and know that the application is intended to run on this site. Do not show this again for this app and web site Allow Do Not Allow More informationReduce the number of warning messages during subsequent log ins by checking the following options on the security and certificate warning messages:
• In the future, do not show this warning
• Always trust content from this publisher
Initial SX II Configuration from the Remote Console
- After you have installed the SX II at the rack, connect the power cord(s) between the power connector on the SX II and an external, AC or DC power source (depending on your model).
- You can connect the second power connector to a backup power source.
Use the power cords that came with SX II.

- Connect an external modem (optional). See Connect and Enable Global Access to an External ModelOnline Help
- Connect your target devices or other serially managed devices to the server ports on the SX II.

Use a standard Cat5 cable to connect your target device to an available port on the back of SX II.
Note: Check the pin definition of the RJ45 port on the target. It should match the pin definition on SX II.
Or
If needed, connect a Raritan Nulling Serial Adapter to the serial port on your target, then plug a standard Cat5 cable into the adapter. Connect the other end of the cable to an available port on the back of SX II.
- Flip the power switch(s) to turn SX II on.

Next, connect SX II to your network and configure your network settings for the first time.
See Initial SX II Configuration Using Command Line Interface (Optional) or Configure SX II Network Settings from the Remote Console.
Connect a Laptop to SX II Using a Cross-Over Cable (Optional)
The first time you configure SX II, if you are connecting from the LAN port on laptop to the LAN1 port on SX II using a crossover cable, do the following -
- Use cross-over cable to connect between SX II LAN1 and the laptop LAN port.
- Set the Static IP of the LAN port that is connected to SX II to 192.168.0.191 and Network Mask to 255.255.255.0.
- Launch your browser and access SX II via 192.168.0.192.
Installing a Certificate
You may be prompted by the browser to accept and validate the SX II's SSL certificate.
Depending on your browser and security settings, additional security warnings may be displayed when you log in to SX II.
It is necessary to accept these warnings to launch the SX II Remote Console. For more information, see Security Warnings and Validation Messages (on page 13).
Two sample methods on how to install an SSL Certificate in the browser are provided here, both using Microsoft Internet Explorer 8 ^® and Windows 7 ^® .
Specific methods and steps depend on your browser and operating system. See your browser and operating system help for details.
Example 1: Import the Certificate into the Browser
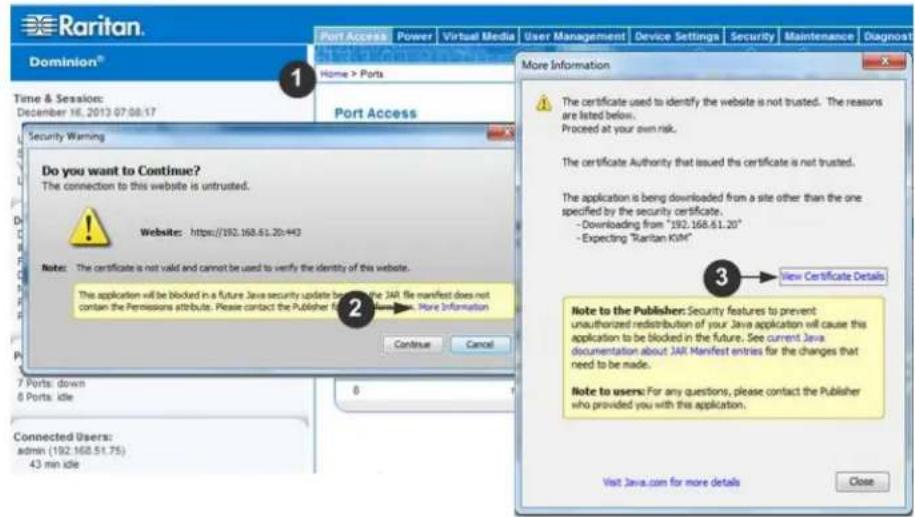
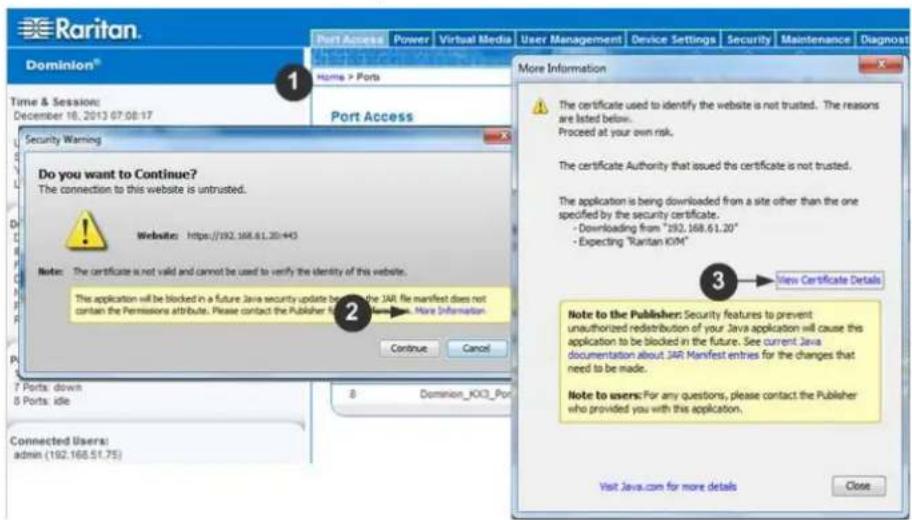
In this example, you import the Certificate into the browser.
text_image
Raritan. Port Access Power Virtual Media User Management Device Settings Security Maintenance Diagnosis Dominion® Home > Ports Port Access 1 2 3 More Information The certificate used to identify the website is not trusted. The reasons are listed below. Proceed at your own risk. The certificate Authority that issued this certificate is not trusted. The application is being downloaded from a site other than the one specified by the security certificate. - Downloading from "192.168.61.20" - Expecting "Raritan KIM" Note to the Publisher: Security features to prevent unauthorized redistribution of your Java application will cause this application to be blocked in the future. See current Java documentation about JAR Manifest entries for the changes that need to be made. Note to users: For any questions, please contact the Publisher who provided you with this application. Visit Java.com for more details Close Time & Session: December 16, 2013 07:08:17 Security Warning Do you want to Continue? The connection to this website is untrusted. Website: https://192.168.61.20/443 Note: The certificate is not valid and cannot be used to verify the identity of this website. This application will be blocked in a future Java security update between the JAR file manifest does not contain the Permissions attribute. Please contact the Publisher for more information. Continue Cancel 7 Ports: down 8 Ports: idle Connected Users: admin (192.168.51.75) 43 min idle More Information New Certificate Details- Open an IE browser, then log in to SX II.
- Click More Information on the first Java ^™ security warning.
- Click View Certificate Details on the More Information dialog. You are prompted to install the certificate. Follow the wizard steps.
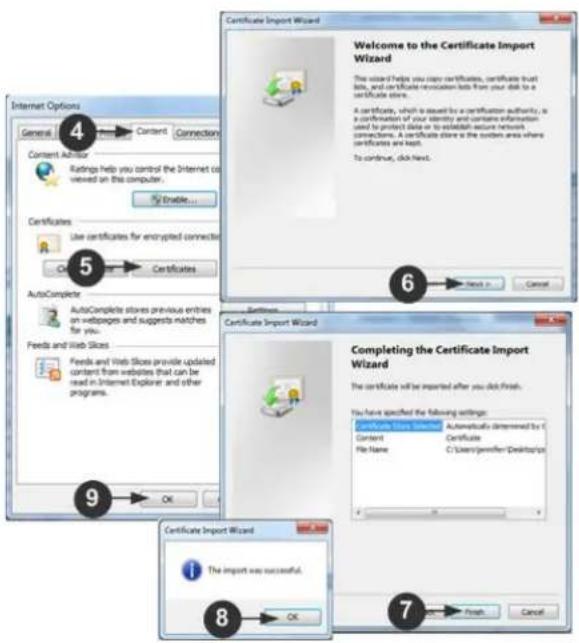
Note: If you are not prompted by the browser, manually select Tools > Internet Options to open the Internet Options dialog.
text_image
Internet Options General Content Connection 4 Content Author Ratings help you control the Internet or viewed on this computer. 5 Certificates Use certificates for encrypted connections. 6 AutoComplete AutoComplete stores previous entries on webpages and suggests matches for you. 7 Feeds and Web Slices Feeds and Web Slices provide updated content from websites that can be read in Internet Explorer and other programs. 8 Certificate Import Wizard Welcome to the Certificate Import Wizard The certificate helps you copy certificates, certificate that lists, and certificate revocation lists from your disk to a certificate store. A certificate, which is issued by a certification authority, is a confirmation of your identity and contains information used to protect data or to establish secure network connections. A certificate store is the system area where certificates are kept. To continue, click next. 9 OK 10 Certificate Import Wizard Next 2 Cancel 6 Certificate Import Wizard Completing the Certificate Import Wizard The certificate will be imported after you click finish. You have specified the following settings: Certificate Store Internet Automatically determined by C Content Certificate C:\Users\pwifter\Desktop\# File Name C:\Users\pwifter\Desktop\# 7 Certificate Import Wizard The import was successful. OK 8 OK Cancel- Click the Content tab.
- Click Certificates.
The Certificate Import Wizard opens and walks you through each step.
■ File to Import - Browse to locate the Certificate
- Certificate Store - Select the location to store the Certificate
- Click Finish on the last step of the Wizard.
The Certificate is imported. Close the success message.
- Click OK on the Internet Options dialog to apply the changes, then close and reopen the browser.
Example 2: Add the SX II to Trusted Sites and Import the Certificate
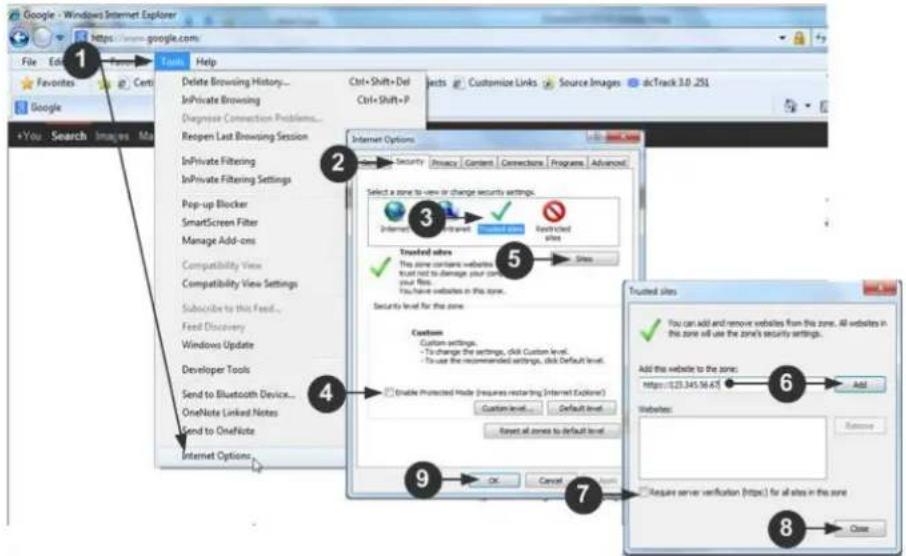
In this example, the SX II's URL is added as a Trusted Site, and the Self Signed Certificate is added as part of the process.
text_image
Google - Windows Internet Explorer https://www.google.com File Edit Favorites Tools Help Delete Browsing History... InPrivate Browsing Diagnose Connection Problems... Reopen Last Browsing Session InPrivate Filtering InPrivate Filtering Settings Pop-up Blocker SmartScreen Filter Manage Add-ons Compatibility View Compatibility View Settings Subscribe to this Feed... Feed Discovery Windows Update Developer Tools Send to Bluetooth Device... OneNote Linked Notes Send to OneNote Internet Options Ctrl+Shift+Def Ctrl+Shift+P Select a zone to view or change security settings. Internet Options Security Privacy Content Connections Programs Advanced Trusted sites This zone contains websites that trust not to damage your own your file. You have websites in this zone. Security level for the zone. Customs Custom settings. - To change the settings, click Custom level. - To use the recommended settings, click Default level. Enable Protected Mode (requires replacing Internet Explorer) Custom level... Default level Reset all zones to default level. OK Cancel OK 8 Use server verification (https.) for all sites in the zone Close- Open an IE browser, then select Tools > Internet Options to open the Internet Options dialog
- Click the Security tab.
- Click on Trusted Sites.
- Disable Protected Mode, and accept any warnings.
- Click Sites to open the Trusted Sites dialog.
- Enter the SX II URL, then click Add.
- Deselect server verification for the zone (if applicable).
- Click Close.
- Click OK on the Internet Options dialog to apply the changes, then close and reopen the browser.
Next, import the Certificate.
text_image
Raritan. Port Access Power Virtual Media User Management Device Settings Security Maintenance Diagnosis Dominion® Home > Ports Port Access 1 Time & Session: December 18, 2013 07:08:17 Port Access Security Warning Do you want to Continue? The connection to this website is untrusted. Website: https://992.168.61.20=443 Note: The certificate is not valid and cannot be used to verify the identity of this website. This application will be blocked in a future Java security update before the JAR file manifest does not contain the Permissions attribute. Please contact the Publisher Who Available. More Information Continue Cancel 7 Ports: down 8 Ports: idle 8 Dominion_KCO Port Connected Users: admin (192.168.51.75) More Information The certificate used to identify the website is not trusted. The reasons are listed below. Proceed at your own risk. The certificate Authority that issued the certificate is not trusted. The application is being downloaded from a site other than the one specified by the security certificate. - Downloading from "292.168.61.20" - Expecting "Raritan KOM" 3 New Certificate Details Note to the Publisher: Security features to prevent unauthorized redistribution of your Java application will cause this application to be blocked in the future. See current Java documentation about JAR Manifest entries for the changes that need to be made. Note to users: For any questions, please contact the Publisher who provided you with this application. Visit Java.com for more details Close- Open an IE browser, then log in to SX II.
- Click More Information on the first Java ^™ security warning.
- Click View Certificate Details on the More Information dialog. You are prompted to install the certificate. Follow the wizard steps.
For details see, Example 1: Import the Certificate into the Browser (on page 17).
Converting a Binary Certificate to a Base64-Encoded DER Certificate (Optional)
SX II requires an SSL certificate in either Base64-Encoded DER format or PEM format.
If you are using an SSL certificate in binary format, you cannot install it.
However, you can convert your binary SSL certificate.
text_image
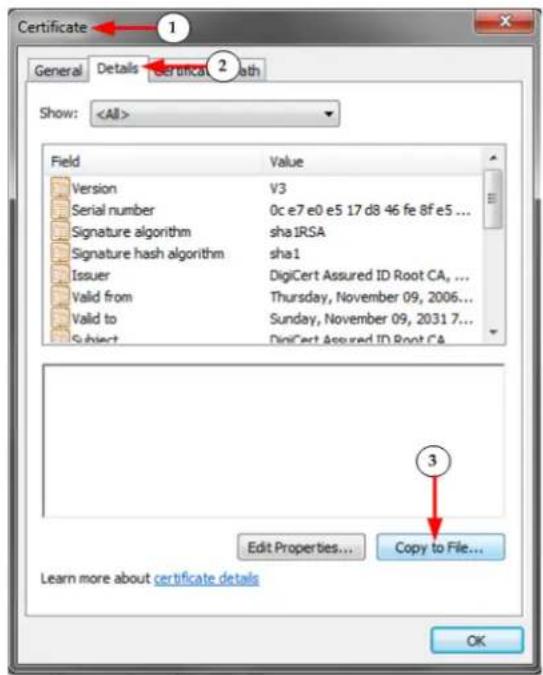
Certificate General Details Certificate Path Show:- Locate the DEGHKVM0001.cer binary file on your Windows machine.
Double-click on the DEGHKVM0001.cer file to open its Certificate dialog.
- Click the Detail tab.
3. Click "Copy to File...".
text_image
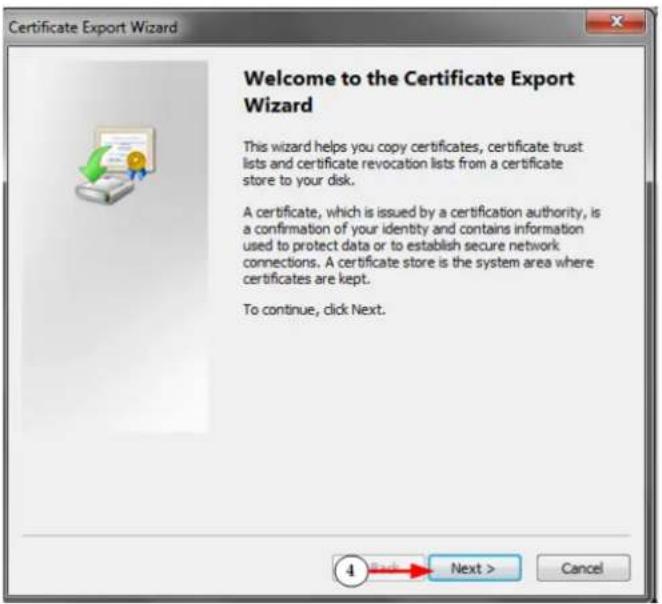
Welcome to the Certificate Export Wizard This wizard helps you copy certificates, certificate trust lists and certificate revocation lists from a certificate store to your disk. A certificate, which is issued by a certification authority, is a confirmation of your identity and contains information used to protect data or to establish secure network connections. A certificate store is the system area where certificates are kept. To continue, click Next.4. The Certificate Export Wizard opens. Click Next to start the Wizard.
text_image
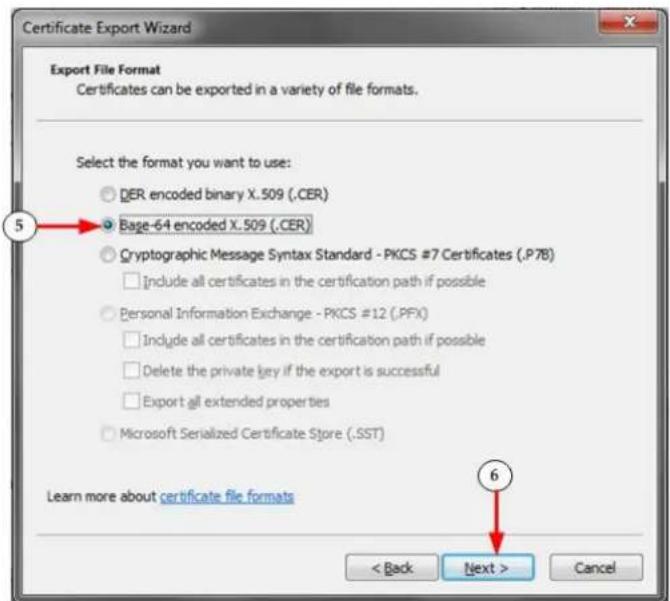
Certificate Export Wizard Export File Format Certificates can be exported in a variety of file formats. Select the format you want to use: ○ QER encoded binary X.509 (.CER) ○ Base-64 encoded X.509 (.CER) ○ Cryptographic Message Syntax Standard - PKCS #7 Certificates (.P7B) □ Include all certificates in the certification path if possible ○ Personal Information Exchange - PKCS #12 (.PFX) □ Include all certificates in the certification path if possible □ Delete the private key if the export is successful □ Export all extended properties ○ Microsoft Serialized Certificate Store (.SST) Learn more about certificate file formats < Back Next > Cancel- Select "Base-64 encoded X.509" in the second Wizard dialog.
- Click Next to save the file as a Base-64 encoded X.509.
You can now install the certificate on your SX II.
Log In to SX II
- Launch a supported web browser.
- Enter the SX II HTTP, HTTPS or DNS address provided to you by your Administrator.
Note: You are always redirected to the IP address from HTTP to HTTPS.
-
Enter your username and password, then click Login.
-
Accept the user agreement (if applicable).
-
If security warnings appear, accept and/or allow access.
Change Your Password from the Remote Console
Note: You can also update passwords using command line interface. See Change Your Password Using CLI.
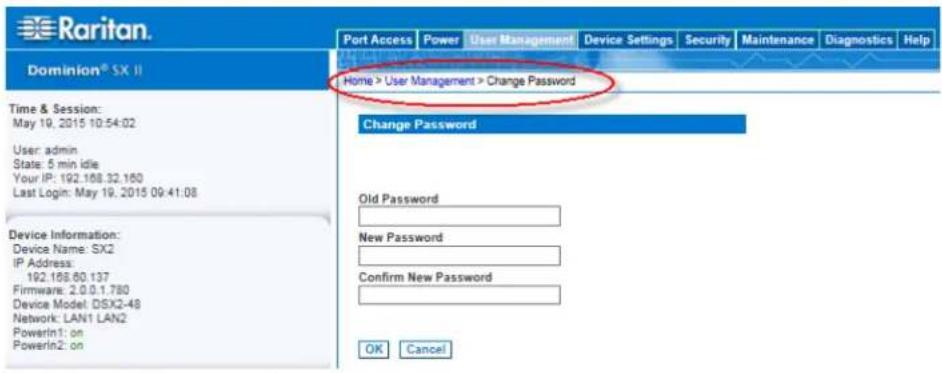
- To change your password, open the Change Password page by selecting User Management > Change Password.
A confirmation that the password was successfully changed is displayed after you change it.
If strong passwords are in use, this page displays information about the format required for the passwords.
For more information, see Strong Passwords.
text_image
Raritan. Port Access Power User Management Device Settings Security Maintenance Diagnostics Help Dominion® SX II Home > User Management > Change Password Time & Session: May 19, 2015 10:54:02 User: admin State: 5 min idle Your IP: 192.168.32.160 Last Login: May 19, 2015 09:41:08 Device Information: Device Name: SX2 IP Address: 192.168.60.137 Firmware: 2.0.0.1.780 Device Model: DSX2-48 Network: LAN1 LAN2 PowerIn1: on PowerIn2: on Change Password Old Password New Password Confirm New Password OK CancelImportant: If the administrator password is forgotten, SX II must be reset to the factory default from the Reset button on the rear panel and the initial configuration tasks must be performed again.
SX II Port Access Page
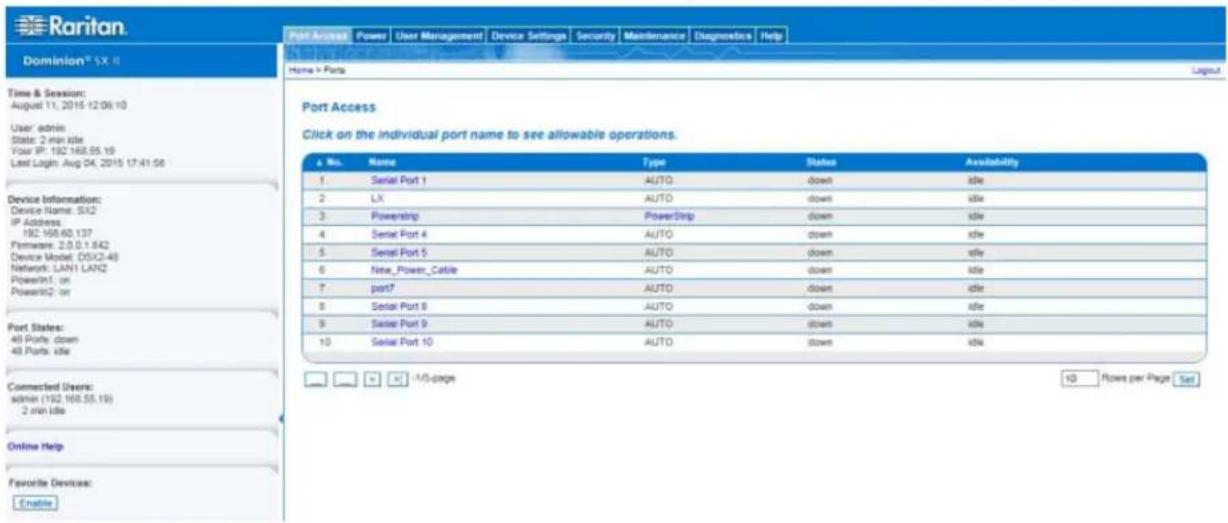
After a successful login, the Port Access page opens listing all ports along with their status and availability.
text_image
Raritan Port Access Power User Management Device Settings Security Maintenance Diagnostics Help Dominion® S.X II Home > Ports Time & Session: August 11, 2015 12:06:10 User: admin State: 2 min idle Your IP: 192 168.95.19 Last Login: Aug 04, 2015 17:41:58 Device Information: Device Name: S42 IP Address: 192 168.60.137 Firmware: 2.0.0.1.642 Device Model: OSX2-48 Network: LAN1 LAN2 PowerIn1: on PowerIn2: on Port States: 48 Ports: down 48 Ports: idle Connected Users: admin (192 168.55.19) 2 min idle Online Help Favorite Devices: Enable Port Access Click on the individual port name to see allowable operations.No. Name Type Status Availability
1 Serial Port 1 AUTO down idle 2 LX AUTO down idle 3 Powerstrip PowerStrip down idle 4 Serial Port 4 AUTO down idle 5 Serial Port 5 AUTO down idle 6 New_Power_Cable AUTO down idle 7 port7 AUTO down idle 8 Serial Port 8 AUTO down idle 9 Serial Port 9 AUTO down idle 10 Serial Port 10 AUTO down idle -/-/5-page 10 Rows per Page SetPorts are numbered from 1 up to the total number of ports available for the SX II. For example, Port_1 - Port_64, Port_1 - Port_32.
"SerialPort"_"Port #" are what make up the default name the physical port until a name is configured for the port. Once a name is designated for a port, the name stays with the port until the name is edited or SX II is factory reset.
Port type includes:
• Auto - No target connected
- DTE - DCE target is connected or this port is forced to be configured as DTE.
- DCE - DTE target is connected or this port is forced to be configured as DCE.
Sort by Port Number, Port Name, Status (Up and Down), and Availability (Idle, Connected, Busy, Unavailable, and Connecting) by clicking on the column heading.
Click on any port that listed and marked as Available to open its Port Action menu so you can then manage the target. For more information, see Port Action Menu Options - Connect, Disconnect, Power On, Power Off and Power Cycle Targets (on page 31).
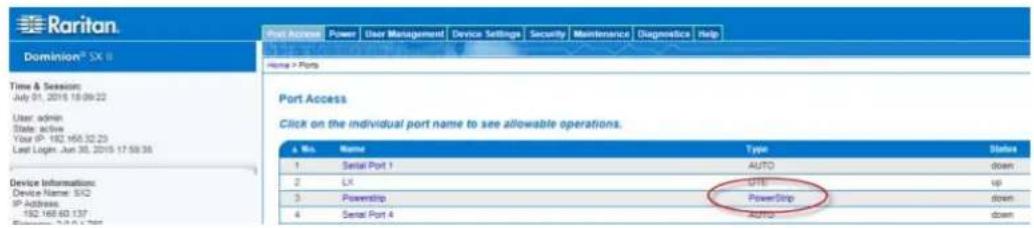
Note that in the Remote Console, you can also quickly access a powerstrip's page from the Port Access page by clicking on the Powerstrip link in the Type column.
text_image
Raritan. Dominion® SX Time & Session: July 01, 2015 18:09:22 User admin State active Your IP: 192.168.32.23 Last Login Jun 30, 2015 17:58:36 Port Access Click on the individual port name to see allowable operations. a. No. Name Type Status 1 Serial Port 1 AUTO down 2 LX QTE up 3 PowerStrip down 4 Serial Port 4 AUTO downSX II Left Panel
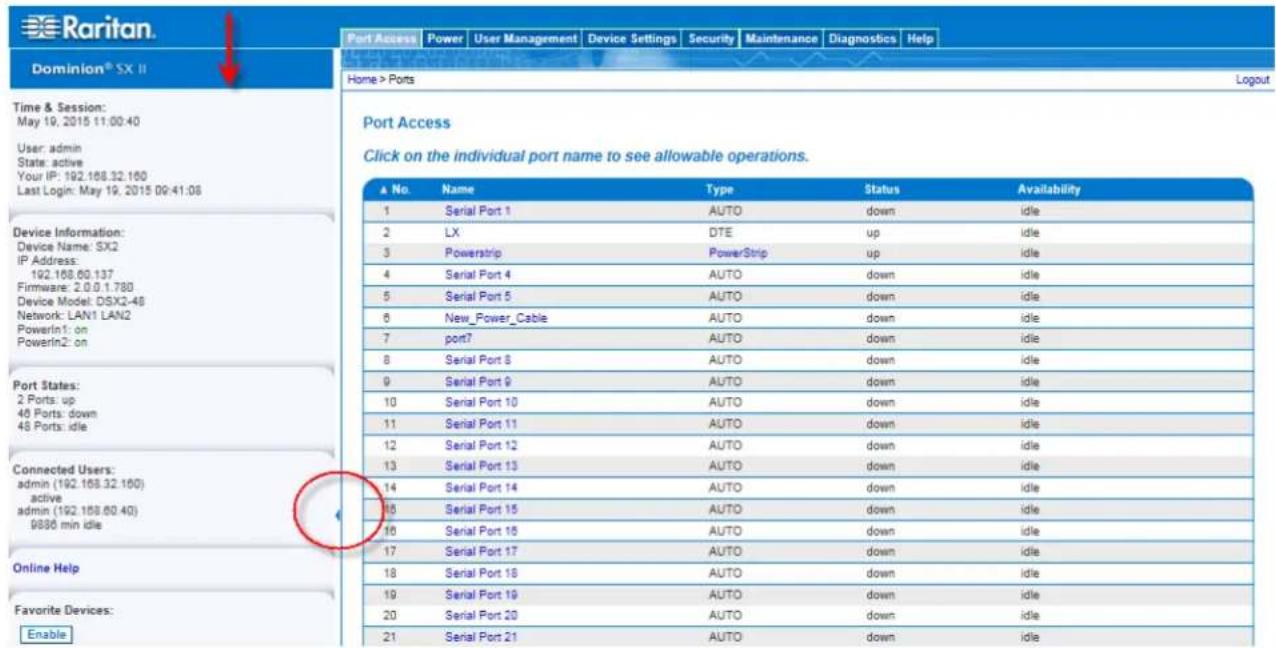
The left panel contains the following information.
Note that some information is conditional - meaning it is displayed based on your role, features being used and so on. Conditional information is noted here.
| Information | Description | Displayed when? |
| Time & Session | The date and time the current session started | Always |
| User Username Always |
Chapter 2: Access and Use Remote Console Features
| Information | Description | Displayed when? |
| State | The current state of the application, either idle or active.If idle, the application tracks and displays the amount time the session has been idle. | Always |
| Your IP | The IP address used to access SX II. | Always |
| Last Login | The last login date and time. | Always |
| Under CC-SG Management | The IP address of the CC-SG device managing the SX II. | When SX II is being managed by CC-SG. |
| Device Information | Information specific to the SX II you are using. | Always |
| Device Name | Name assigned to the SX II you are accessing. | Always |
| IP Address | The IP address of the SX II you are accessing. | Always |
| Firmware Current version | of firmware installing on the SX II. | Always |
| Device Model | The model of the SX II you are accessing. | Always |
| Network | LAN1, or LAN1 and LAN2 if you are in dual LAN mode. | Always |
| PowerIn1 | Status of the power 1 outlet connection. Either on or off, or Auto-detect off | Always |
| PowerIn2 | Status of the power 2 outlet connection. Either on or off, or Auto-detect off | Always |
| Port States | The statuses of the ports being used by SX II - up, down, idle. | Always |
| Connected Users | The users, identified by their username and IP address, who are currently connected to SX II. | Always |
| Online Help | Links to online help. | Always |
| FIPS Mode | FIPS Mode: EnabledSSL Certificate: FIPS Mode Compliant | When FIPS is enabled |
Collapse the left panel and then expand it again by clicking on the blue arrow located along the right edge of the panel.
text_image
Raritan Port Access Power User Management Device Settings Security Maintenance Diagnostics Help Dominion® SX II Home > Ports Logout Time & Session: May 19, 2015 11:00:40 User: admin State: active Your IP: 192.168.32.160 Last Login: May 19, 2015 09:41:08 Device Information: Device Name: SX2 IP Address: 192.168.60.137 Firmware: 2.0.0.1.780 Device Model: DSX2-48 Network: LAN1 LAN2 PowerIn1: on PowerIn2: on Port States: 2 Ports: up 48 Ports: down 48 Ports: idle Connected Users: admin (192.168.32.160) active admin (192.168.60.40) 9886 min idle Online Help Favorite Devices: Enable Port Access Click on the individual port name to see allowable operations. No. Name Type Status Availability 1 Serial Port 1 AUTO down idle 2 LX DTE up idle 3 Powerstrip PowerStrip up idle 4 Serial Port 4 AUTO down idle 5 Serial Port 5 AUTO down idle 6 New_Power_Cable AUTO down idle 7 port7 AUTO down idle 8 Serial Port 8 AUTO down idle 9 Serial Port 9 AUTO down idle 10 Serial Port 10 AUTO down idle 11 Serial Port 11 AUTO down idle 12 Serial Port 12 AUTO down idle 13 Serial Port 13 AUTO down idle 14 Serial Port 14 AUTO down idle 15 Serial Port 15 AUTO down idle 16 Serial Port 16 AUTO down idle 17 Serial Port 17 AUTO down idle 18 Serial Port 18 AUTO down idle 19 Serial Port 19 AUTO down idle 20 Serial Port 20 AUTO down idle 21 Serial Port 21 AUTO down idleEnable Favorites
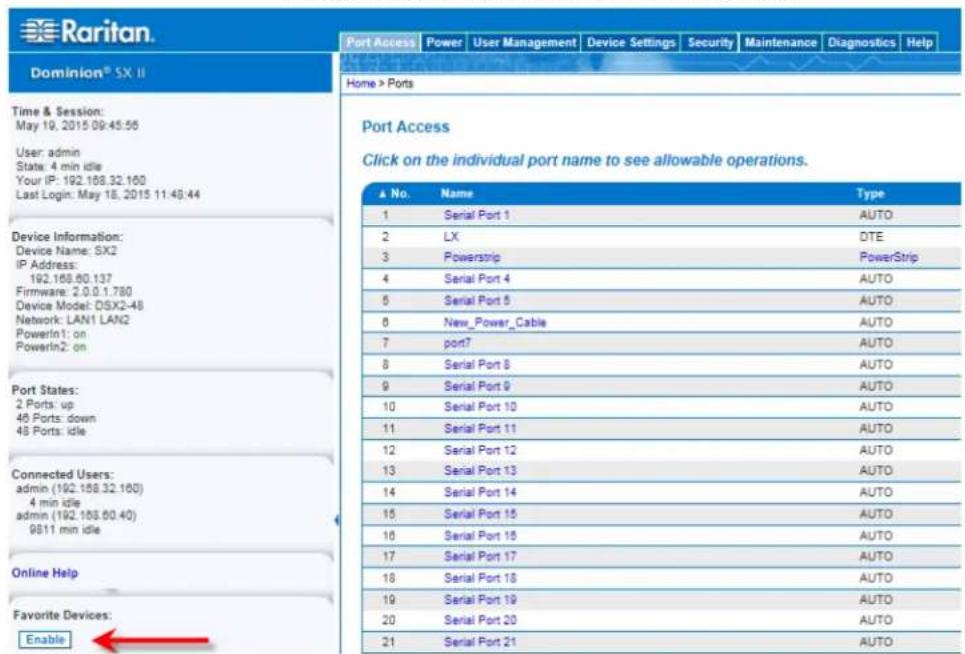
Enable the Favorites feature and display a list of favorite, frequently accessed SX II devices by clicking Enable in the Favorite Devices section of the left panel of the SX II interface.
Accept security warnings if they are displayed.
text_image
Raritan. Port Access Power User Management Device Settings Security Maintenance Diagnostics Help Dominion® SX II Home > Ports Time & Session: May 19, 2015 09:45:56 User: admin State: 4 min idle Your IP: 192.168.32.160 Last Login: May 18, 2015 11:45:44 Device Information: Device Name: SX2 IP Address: 192.168.60.137 Firmware: 2.0.0.1.780 Device Model: DSX2-48 Network: LAN1 LAN2 PowerIn1: on PowerIn2: on Port States: 2 Ports: up 48 Ports: down 48 Ports: idle Connected Users: admin (192.168.32.160) 4 min idle admin (192.168.60.40) 9811 min idle Online Help Favorite Devices: Enable Port Access Click on the individual port name to see allowable operations. a No. Name Type 1 Serial Port 1 AUTO 2 LX DTE 3 Powerstrip PowerStrip 4 Serial Port 4 AUTO 5 Serial Port 5 AUTO 6 New_Power_Cable AUTO 7 port7 AUTO 8 Serial Port 8 AUTO 9 Serial Port 9 AUTO 10 Serial Port 10 AUTO 11 Serial Port 11 AUTO 12 Serial Port 12 AUTO 13 Serial Port 13 AUTO 14 Serial Port 14 AUTO 15 Serial Port 15 AUTO 16 Serial Port 16 AUTO 17 Serial Port 17 AUTO 18 Serial Port 18 AUTO 19 Serial Port 19 AUTO 20 Serial Port 20 AUTO 21 Serial Port 21 AUTOChange How Favorites are Displayed
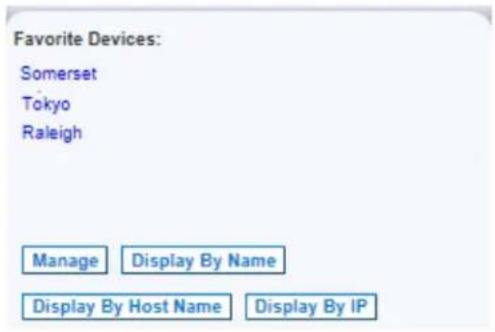
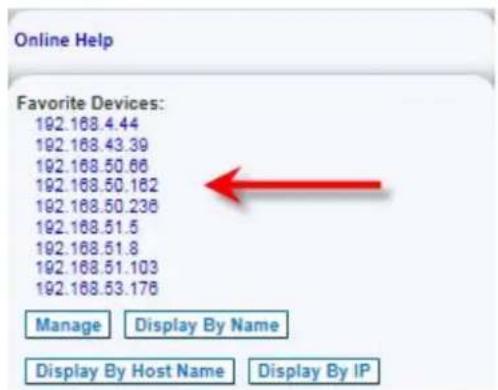
Change how your SX II favorite devices are displayed by clicking on one of the corresponding buttons -
- By name (default display)
text_image
Favorite Devices: Somerset Tokyo Raleigh Manage Display By Name Display By Host Name Display By IP- By IP address
text_image
Online Help Favorite Devices: 192.168.4.44 192.168.43.39 192.168.50.66 192.168.50.182 192.168.50.238 192.168.51.5 192.168.51.8 192.168.51.103 192.168.53.178 Manage Display By Name Display By Host Name Display By IP- By host name (if applicable)
Discover Devices Product Subnet
This option discovers SX II devices on the device subnet. This is the subnet of the SX II device's IP address.
You can access these devices directly from the Subnet page or add them to your list of favorites.
This feature allows multiple SX II devices to interoperate and scale automatically.
The SX II Remote Console automatically discovers the SX II devices, and any other Raritan device, in the subnet of the SX II.
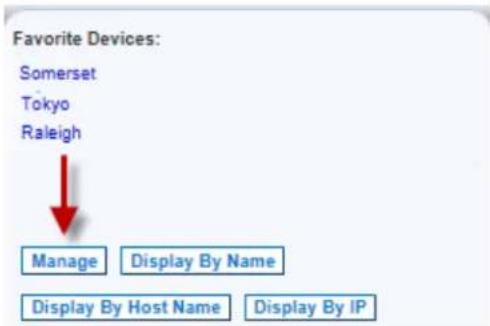
To discover devices on the device subnet:
- Choose Manage > Discover Devices - SX II Subnet.
text_image
Favorite Devices: Somerset Tokyo Raleigh Manage Display By Name Display By Host Name Display By IPThe Discover Devices - SX II Subnet page appears.
- Click Refresh. The list of devices on the local subnet is refreshed.
To add devices to your Favorites List:
-
Select the checkbox next to the device name/IP address.
-
Click Add.
To access a discovered device:
- Click the device name or IP address for that device. A new browser opens to that device.
Chapter 3
Access Targets
Target devices can be accessed from the Remote Console's Port Access page using Raritan Serial Console (RSC) (RSC), and at-the-rack via command line interface (CLI).
Targets can also be accessed via Direct Port Access, in which case you are connected directly to the target via SX II and no intermediate steps are needed.
This section describes connecting from the Remote Console and CLI.
In This Chapter
Port Action Menu Options - Connect, Disconnect, Power On, Power Off and Power Cycle Targets ....31 Connect to Targets Using CLI - Connect, Disconnect, Power On, Power Off and Power Cycle Targets ....37
Port Action Menu Options - Connect, Disconnect, Power On, Power Off and Power Cycle Targets
Once you log in to SX II via a web browser, the SX II Port Access page displays. For more information on the Port page, see SX II Port Access Page (on page 24).
From the Port Access page, use the Port Action menu to connect, disconnect, or control power of targets and power strips that are connected to SX II.
Once connected, you can manage a target with the Raritan Serial Console (RSC). See Raritan Serial Console (RSC) Help (on page 43).
Note that you must have permissions to a target or power strip in order to access it.
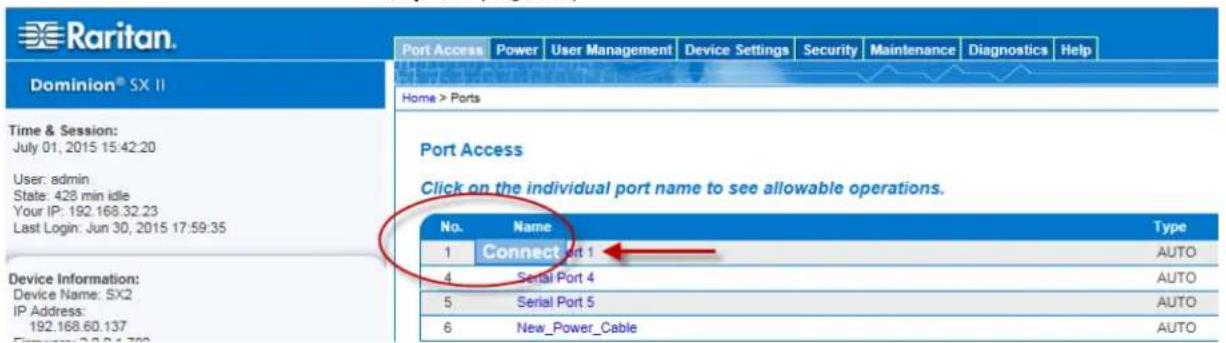
To access the Port Action menu for a target or power strip:
- Hover your mouse over a target's port name in the list and click on your mouse.
The Port Action menu appears.
Note that only currently available options, depending on the port's status and availability, are listed in the Port Action menu.
-
Choose the desired menu option for that port to execute it.
-
Connect to a Target or Power Strip (see "Connect to a Target" on page 33)
■ Disconnect from a Target or Power Strip (on page 34)
Chapter 3: Access Targets
■ Power On a Target (see "Power On a Target or Power Strip" on page 35)
■ Power Off a Target (see "Power Off a Target or Power Strip" on page 36)
Power Cycle a Target (see "Power Cycle a Target or Power Strip" on page 37)
text_image
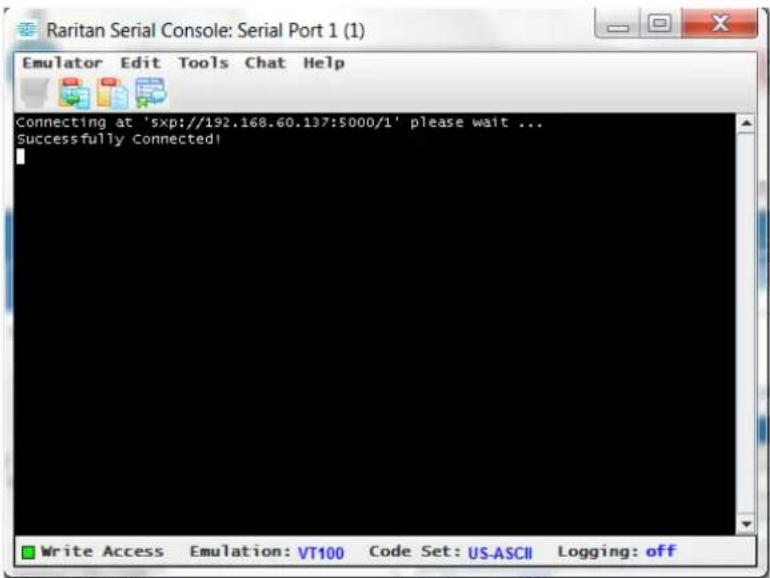
Raritan. Port Access Power User Management Device Settings Security Maintenance Diagnostics Help Dominion® SX II Home > Ports Time & Session: July 01, 2015 15:42:20 User: admin State: 428 min idle Your IP: 192.168.32.23 Last Login: Jun 30, 2015 17:59:35 Port Access Click on the individual port name to see allowable operations. No. Name Type 1 Connectort 1 AUTO 4 Serial Port 4 AUTO 5 Serial Port 5 AUTO 6 New_Power_Cable AUTOYou can then connect via Raritan Serial Console (RSC). When you connect to a target, the RSC opens in a new window. See Raritan Serial Console (RSC) Help.
text_image
Raritan Serial Console: Serial Port 1 (1) Emulator Edit Tools Chat Help Connecting at 'sxp://192.168.60.137:$000/1' please wait ... Successfully Connected!Alternatively, you can connect via Direct Port Access, if SX II is configured for Direct Port Access.
Note that you can also connect to targets via command line interface. See Connect to Targets Using CLI - Connect, Disconnect, Power On, Power Off and Power Cycle Targets (on page 37).
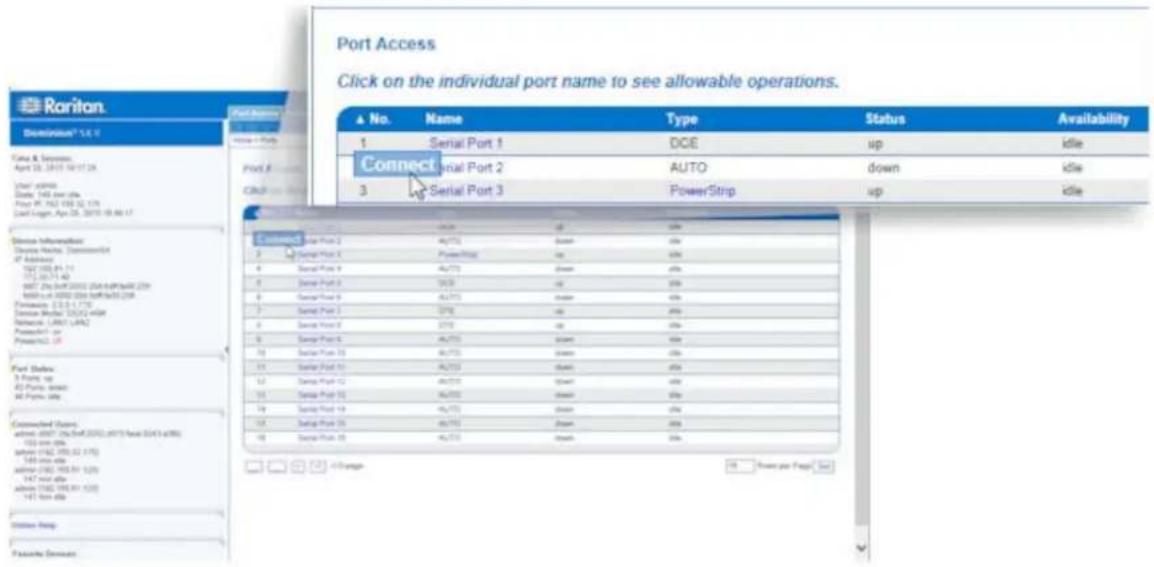
Connect to a Target
Creates a new connection to the target device.
From the SX II Remote Console, Raritan Serial Console (RSC) opens in a new window and you manage the target from there.
If you are connected to the target from the Local Console port, you access the target via command line interface. See Raritan Serial Console (RSC) Help (on page 43) and Connect to Targets Using CLI - Connect, Disconnect, Power On, Power Off and Power Cycle Targets (on page 37).
text_image
Port Access Click on the individual port name to see allowable operations. No. Name Type Status Availability 1 Serial Port 1 DCE up idle Connect Serial Port 2 AUTO down idle 3 Serial Port 3 Power/Strip up idle Connect Serial Port 2 AU/TSU down idle 0 Serial Port 3 Power/Strip up idle 0 Serial Port 4 AU/TSU down idle 0 Serial Port 5 AU/TSU down idle 0 Serial Port 6 AU/TSU down idle 0 Serial Port 7 AU/TSU down idle 0 Serial Port 8 AU/TSU down idle 0 Serial Port 9 AU/TSU down idle 0 Serial Port 10 AU/TSU down idle 0 Serial Port 11 AU/TSU down idle 0 Serial Port 12 AU/TSU down idle 0 Serial Port 13 AU/TSU down idle 0 Serial Port 14 AU/TSU down idle 0 Serial Port 15 AU/TSU down idle 0 Serial Port 16 AU/TSU down idle 0 Serial Port 17 AU/TSU down idle 0 Serial Port 18 AU/TSU down idle 0 Serial Port 19 AU/TSU down idle 0 Serial Port 20 AU/TSU down idle 0 Serial Port 21 AU/TSU down idle 0 Serial Port 22 AU/TSU down idle 0 Serial Port 23 AU/TSU down idle 0 Serial Port 24 AU/TSU down idle 0 Serial Port 25 AU/TSU down idle 0 Serial Port 26 AU/TSU down idle 0 Serial Port 27 AU/TSU down idle 0 Serial Port 28 AU/TSU down idle 0 Serial Port 29 AU/TSU down idle 0 Serial Port 30 AU/TSU down idle 0 Serial Port 31 AU/TSU down idle 0 Serial Port 32 AU/TSU down idle 0 Serial Port 33 AU/TSU down idle 0 Serial Port 34 AU/TSU down idle 0 Serial Port 35 AU/TSU down idle 0 Serial Port 36 AU/TSU down idle 0 Serial Port 37 AU/TSU down idle 0 Serial Port 38 AU/TSU down idle 0 Serial Port 39 AU/TSU down idle 0 Serial Port 40 AU/TSU down idle 0 Serial Port 41 AU/TSU down idle 0 Serial Port 42 AU/TSU down idle 0 Serial Port 43 AU/TSU down idle 0 Serial Port 44 AU/TSU down idle 0 Serial Port 45 AU/TSU down idle 0 Serial Port 46 AU/TSU down idle 0 Serial Port 47 AU/TSU down idle 0 Serial Port 48 AU/TSU down idle 0 Serial Port 49 AU/TSU down idle 0 Serial Port 50 AU/TSU down idle 0 Serial Port 51 AU/TSU down idle 0 Serial Port 52 AU/TSU down idle 0 Serial Port 53 AU/TSU down idle 0 Serial Port 54 AU/TSU down idle 0 Serial Port 55 AU/TSU down idle 0 Serial Port 56 AU/TSU down idle 0 Serial Port 57 AU/TSU down idle 0 Serial Port 58 AU/TSU down idle 0 Serial Port 59 AU/TSU down idle 0 Serial Port 60 AU/TSU down idle 0 Serial Port 61 AU/TSU down idle 0 Serial Port 62 AU/TSU down idle 0 Serial Port 63 AU/TSU down idle 0 Serial Port 64 AU/TSU down idle 0 Serial Port 65 AU/TSU down idle 0 Serial Port 66 AU/TSU down idle 0 Serial Port 67 AU/TSU down idle 0 Serial Port 68 AU/TSU down idle 0 Serial Port 69 AU/TSU down idle 0 Serial Port 70 AU/TSU down idle 0 Serial Port 71 AU/TSU down idle 0 Serial Port 72 AU/TSU down idle 0 Serial Port 73 AU/TSU down idle 0 Serial Port 74 AU/TSU down idle 0 Serial Port 75 AU/TSU down idle 0 Serial Port 76 AU/TSU down idle 0 Serial Port 77 AU/TSU down idle 0 Serial Port 78 AU/TSU down idle 0 Serial Port 79 AU/TSU down idle 0 Serial Port 80 AU/TSU down idle 0 Serial Port 81 AU/TSU down idle 0 Serial Port 82 AU/TSU down idle 0 Serial Port 83 AU/TSU down idle 0 Serial Port 84 AU/TSU down idle 0 Serial Port 85 AU/TSU down idle 0 Serial Port 86 AU/TSU down idle 0 Serial Port 87 AU/TSU down idle 0 Serial Port 88 AU/TSU down idle 0 Serial Port 89 AU/TSU down idle 0 Serial Port 90 AU/TSU down idle 0 Serial Port 91 AU/TSU down idle 0 Serial Port 92 AU/TSU down idle 0 Serial Port 93 AU/TSU down idle 0 Serial Port 94 AU/TSU down idle 0 Serial Port 95 AU/TSU down idle 0 Serial Port 96 AU/TSU down idle 0 Serial Port 97 AU/TSU down idle 0 Serial Port 98 AU/TSU down idle 0 Serial Port 99 AU/TSU down idleDisconnect from a Target or Power Strip
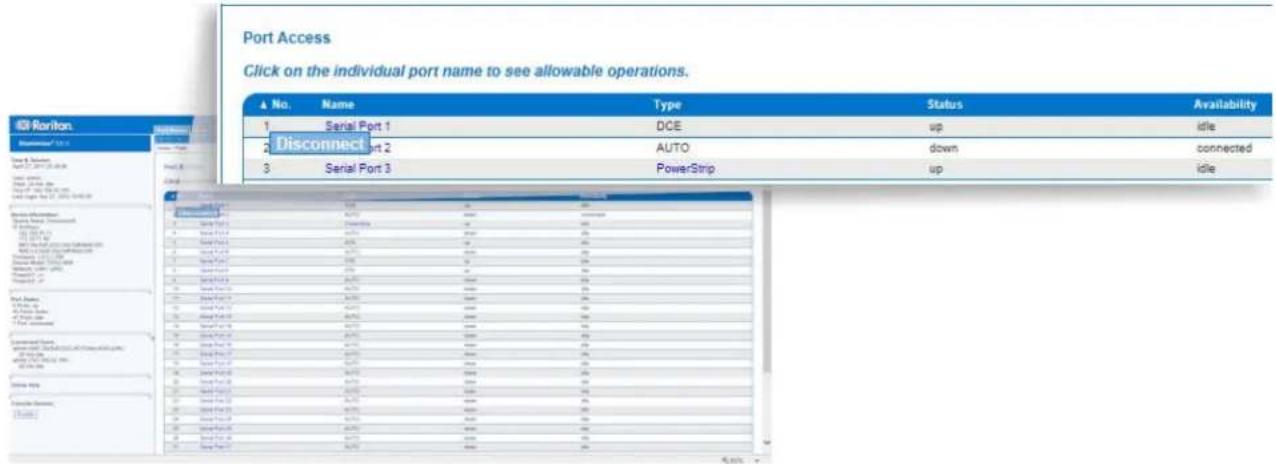
Once connected to a target or power strip, and the port status is Up, the Disconnect menu option is available in the Port Action menu.
Clicking on the Disconnect option disconnects from a target or power strip, and closes the Raritan Serial Console (RSC) window. You can also click the X icon on the window or use the Exit menu option.
See Raritan Serial Console (RSC) Help (on page 43) and Connect to Targets Using CLI - Connect, Disconnect, Power On, Power Off and Power Cycle Targets (on page 37).
text_image
Port Access Click on the individual port name to see allowable operations.No. Name Type Status Availability
1 Serial Port 1 DCE up idle 2 Disconnect Port 2 AUTO down connected 3 Serial Port 3 PowerStrip up idleDisconnect Port 1
Serial Port 1
Auto
PowerStrip
Disconnect Port 2
Auto
PowerStrip
Disconnect Port 3
PowerStrip
Disconnect Port 4
Auto
PowerStrip
Disconnect Port 5
Auto
PowerStrip
Disconnect Port 6
Auto
PowerStrip
Disconnect Port 7
Auto
PowerStrip
Disconnect Port 8
Auto
PowerStrip
Disconnect Port 9
Auto
PowerStrip
Disconnect Port 10
Auto
PowerStrip
Disconnect Port 11
Auto
PowerStrip
Disconnect Port 12
Auto
PowerStrip
Disconnect Port 13
Auto
PowerStrip
Disconnect Port 14
Auto
PowerStrip
Disconnect Port 15
Auto
PowerStrip
Disconnect Port 16
Auto
PowerStrip
Disconnect Port 17
Auto
PowerStrip
Disconnect Port 18
Auto
PowerStrip
Disconnect Port 19
Auto
PowerStrip
Disconnect Port 20
Auto
PowerStrip
Disconnect Port 21
Auto
PowerStrip
Disconnect Port 22
Auto
PowerStrip
Disconnect Port 23
Auto
PowerStrip
Disconnect Port 24
Auto
PowerStrip
Disconnect Port 25
Auto
PowerStrip
Disconnect Port 26
Auto
PowerStrip
Disconnect Port 27
Auto
PowerStrip
Disconnect Port 28
Auto
PowerStrip
Disconnect Port 29
Auto
PowerStrip
Disconnect Port 30
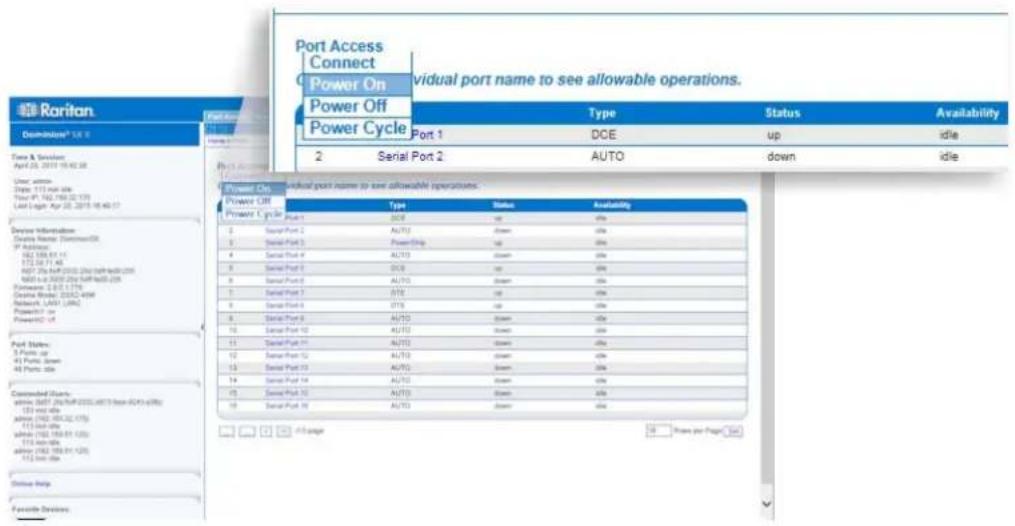
Power On a Target or Power Strip
Power on the target from the Remote Console through the associated outlet.
This option is visible only when there are one or more power associations to the target, and when you have permission to manage the target's power.
You can also perform these actions through Raritan Serial Console (RSC) and command line interface. See Raritan Serial Console (RSC) Help (on page 43) and Connect to Targets Using CLI - Connect, Disconnect, Power On, Power Off and Power Cycle Targets (on page 37).
text_image
Port Access Connect Power On Power Off Power Cycle Port 1 DCE up idie 2 Serial Port 2 AUTO down idie Power On Power Off Type Status Availability Power Cycle Port 1 DCB up idie Serial Port 2 AU/TO down idie Serial Port 3 PowerUp up idie Serial Port 4 AU/TO down idie Serial Port 5 DCB up idie Serial Port 6 AU/TO down idie Serial Port 7 DTB up idie Serial Port 8 DTB up idie Serial Port 9 AU/TO down idie Serial Port 10 AU/TO down idie Serial Port 11 AU/TO down idie Serial Port 12 AU/TO down idie Serial Port 13 AU/TO down idie Serial Port 14 AU/TO down idie Serial Port 15 AU/TO down idie Serial Port 16 AU/TO down idiePower Off a Target or Power Strip
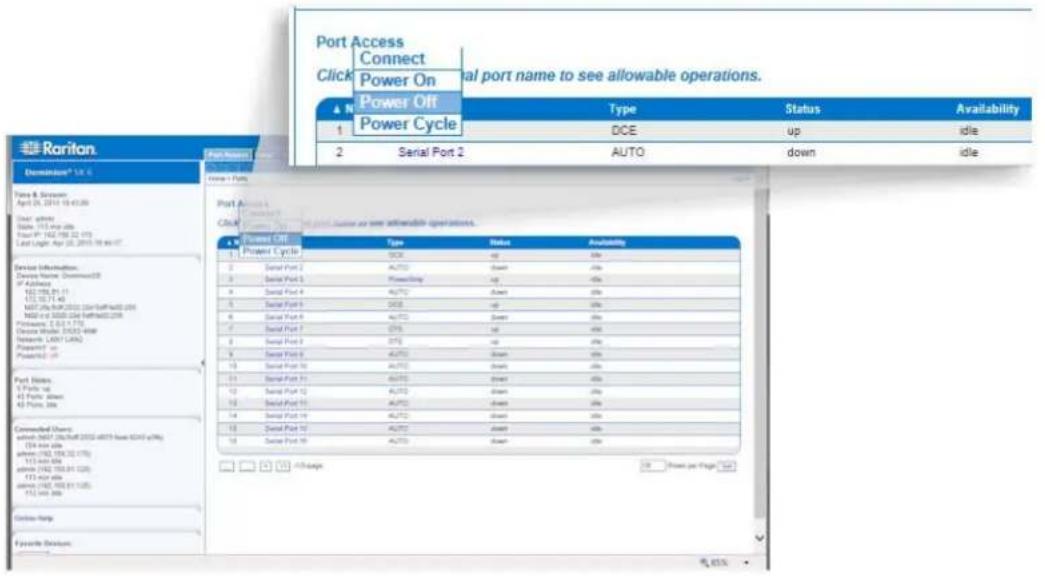
Power off the target or power strip through the associated outlet.
This option is visible only when -
• there are one or more power associations to the target or power strip
• you have permission to manage the power
You can also perform these actions through Raritan Serial Console (RSC) and command line interface. See Raritan Serial Console (RSC) Help (on page 43) and Connect to Targets Using CLI - Connect, Disconnect, Power On, Power Off and Power Cycle Targets (on page 37).
text_image
Port Access Connect Click Power On Power Off Type Status Availability 1 Power Cycle DCE up idle 2 Serial Port 2 Auto down idle Device Information: Device Name: Dritten20 IP Accounts 162.78.81 (1) 152.78.71 (4) MST Jia HOP 2013 (000+half-000) (00) NIO + 6 3000 (000+half-000) (00) Primers: 2.6.1.4.7(6) Device IDs: 3000-498 Network L&T (L&T) Property or Property (P) Port Names: 1 Pairs up 4 Pairs absent 4 Pairs Site Converted Owners: admin: MST Jia HOP 2013 (000+half-000) (00) (54 non site) actions: 192.176.32.17(6) 113 non site actions: 192.176.31.12(6) 173 non site actions: 192.176.31.12(6) FIL: 549.988 Connection Help Favorite Options Port Address Connect Click Power Off Type Status Availability 1 Power Cycle DCX up idle 2 Serial Port 2 AUTO down idle 3 Serial Port 3 Powering up idle 4 Serial Port 4 AUTO down idle 5 Serial Port 5 DCX up idle 6 Serial Port 6 AUTO down idle 7 Serial Port 7 CPU up idle 8 Serial Port 8 CPU up idle 9 Serial Port 9 AUTO down idle 10 Serial Port 10 AUTO down idle 11 Serial Port 11 AUTO down idle 12 Serial Port 12 AUTO down idle 13 Serial Port 13 AUTO down idle 14 Serial Port 14 AUTO down idle 15 Serial Port 15 AUTO downPower Cycle a Target or Power Strip
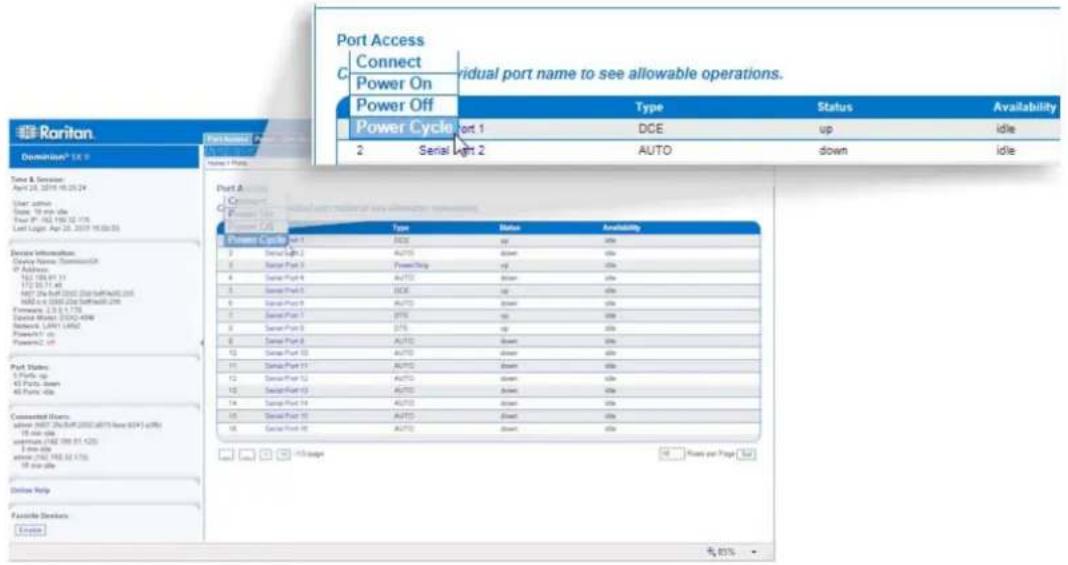
Power cycling allows you to turn a target or power strip off and then back on through the outlet it is plugged into.
This option is visible only when -
• there are one or more power associations to the target or power strip
• you have permission to manage the power
You can also perform these actions through Raritan Serial Console (RSC) and command line interface. See Raritan Serial Console (RSC) Help (on page 43) and Connect to Targets Using CLI - Connect, Disconnect, Power On, Power Off and Power Cycle Targets (on page 37).
text_image
Port Access Connect Power On Power Off Type Status Availability Power Cycle 1 DCE up idle 2 Serial Light 2 AUTO down idle Port A Connect Power Off Type Status Availability Power Cycle1 Auto up idle 0 Serial Light 2 AUTO down idle 0 Serial Port 3 PowerChip up idle 4 Serial Port 4 AUTO down idle 0 Serial Port 5 DCE up idle 6 Serial Port 6 AUTO down idle 0 Serial Port 7 DTE up idle 0 Serial Port 8 DTE up idle 0 Serial Port 9 AUTO down idle 12 Serial Port 10 AUTO down idle 11 Serial Port 11 AUTO down idle 12 Serial Port 12 AUTO down idle 12 Serial Port 13 AUTO down idle 14 Serial Port 14 AUTO down idle 15 Serial Port 15 AUTO down idle 16 Serial Port 16 AUTO downConnect to Targets Using CLI - Connect, Disconnect, Power On, Power Off and Power Cycle Targets
Before connecting to a target, the terminal emulation and escape sequence must be configured. See Set Terminal Emulation on a Target and Set the CLI Escape Sequence.
Connect the SX II While at the Rack
While at the rack, do one of the following depending on your needs -
- Connect a computer to the Terminal port.

Chapter 3: Access Targets
- Connect a keyboard tray or KVM console to the DVI-D and USB ports.

■ Connect a laptop to the Mini-USB Admin port.

Note that connecting to the SX II Local Console via the Local port is an independent access path to each connected target device.
Video Resolution
The default, Local Console port video resolution is 1024x768@60.
By default, monitors are typically set to the highest resolution they support.
Once a monitor is connected to the SX II Local Port DVI, SX II EDID information from the monitor, including its native, preferred resolution. SX II uses the monitor's preferred, native resolution as long as it is a resolution that SX II supports. If it is not, SX II switches to a resolution it supports and that most closely matches the monitor's resolution.
For example, if a monitor with a native resolution of 2048x1600@60Hz is connected to SX II, SX II detects that it is not an SX II supported resolution and selects a resolution it does support, such as 1280x1024@60Hz.
Note that you can connect to targets using the Remote Console and manage them using Raritan Serial Console (RSC). See Raritan Serial Console (RSC) Help (on page 43) and Port Action Menu Options - Connect, Disconnect, Power On, Power Off and Power Cycle Targets (on page 31).
Connect Commands
Connect to a port.
admin > connect <port number>
Port Sub-Menu Commands
The port sub-menu can be reached using the escape key sequence.
Clear history buffer for this port.
admin > [portname] > clearhistory
Close this target connection. When a target is disconnected, the appropriate disconnect message appears.
admin > [portname] > close, quit, q
Display the history buffer for this port.
admin > [portname] > gethistory
Get write access for the port.
admin > [portname] > getwrite
Return to the target session.
admin > [portname] > return
Send a break to the connected target.
admin > [portname] > sendbreak
Lock write access to this port.
admin > [portname] > writelock
Unlock write access to this port.
admin > [portname] > writeunlock
Query Power status of this port.
admin > [portname] > powerstatus
Toggle Power On/Off of this port.
admin > [portname] > powertoggle
Power on the target.
admin > [portname] > poweron
Power off the target.
admin > [portname] > poweroff
Power cycle the target.
admin > [portname] > powercycle
Command Line Interface Protocols
• SSH (Secure Shell) via IP connection
- Telnet via IP connection
- Local Console via the Local Port and Mini-USB port
- Terminal port
If SX II has an internal modem and console mode is enabled, the modem interface can also be accessed from CLI.
Many SSH/TELNET applications are available such as PuTTY, SSH Client and OpenSSH Client. These can be located and downloaded from the Internet.
Command Line Interface Partial Searches
Enter the first few characters of command and press the Tab key on your keyboard in order to locate a specific command.
The command line interface (CLI) completes the entry if the characters form an exact match.
For example entering
admin > Config > us
and then pressing the Tab key, returns the result users.
If an exact match is not found, all of the commands at the same level the CLI hierarchy that are potential matches are listed.
For example, entering
admin > Config > User > add
and then pressing the Tab key, returns results for addgroup and adduser.
If needed, enter additional text to make the entry unique and press the Tab key to complete the entry. Alternatively, use a command from the list.
Command Line Interface Tips
- When commands are displayed as a list, they are in alphabetical order.
- Commands are not case sensitive.
- Commands without arguments default to show current settings for the command.
- A command's parameters are usually parameter-value pairs in which the parameter name is followed by a space and the value.
- Typing a question mark ( ? ) after a command displays help specific to the command.
Command Line Interface Shortcuts
- Press the Up arrow key to display the last entry.
- Press Backspace to delete the last character typed.
- Press Ctrl + C to terminate a command or cancel a command if you typed the wrong parameters.
- Press Enter on your keyboard to execute the command.
- Press Tab on your keyboard to complete a command. Tab also completes parameters and values (if the value is part of an enumerated set).
Command Line Interface High-Level Commands
The CLI is menu based. Some commands move to a menu with a different command set.
The following common commands can be used at all levels of the command line interface (CLI):
- top - Return to the top level of the CLI hierarchy, or the username prompt.
- history - Displays the last 200 commands the user entered into the SX II CLI.
- logout - Logs the user out of the current session.
- quit - Moves the user back one level in the CLI hierarchy.
• help - Displays an overview of the CLI syntax.
Chapter 4
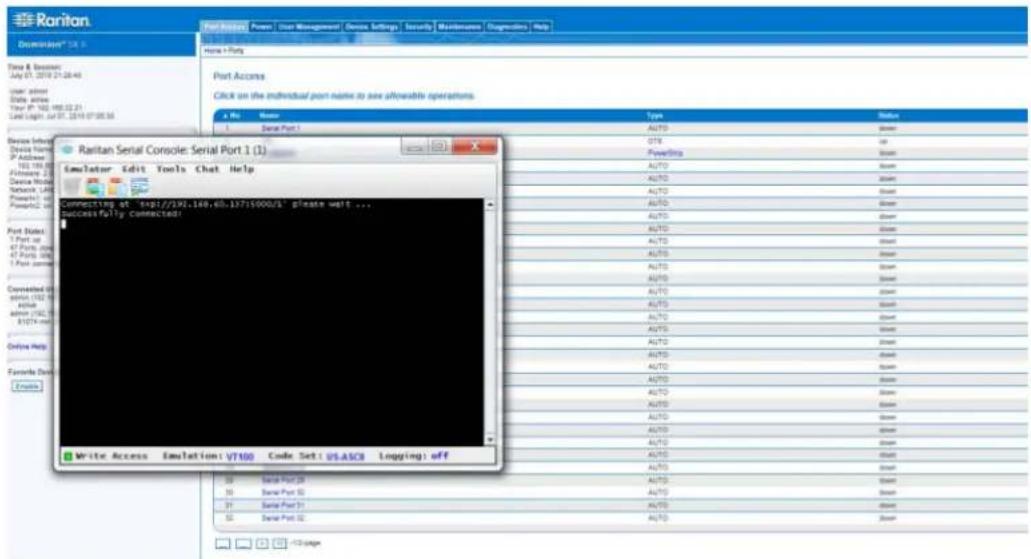
Raritan Serial Console (RSC) Help
Use Raritan Serial Console (RSC) to connect to serial targets from the SX II Remote Console.
Alternatively, install RSC as a standalone-client.
The RSC stand-alone client uses the SX II IP address and the target's port number to connect directly to the target, so you do not have to connect to the Remote Console and then connect to the target. For details, see Standalone Raritan Serial Console Installation.
Download the standalone RSC from the Raritan support web site at http://www.raritan.com/support http://www.raritan.com/support.
Note: You can also access targets via Direct Port Access and command line interface (CLI).
text_image
Raritan Description* 10.7 Time & Session: July 01, 2019 21:28:46 user: admin Data: admin Your IP: 102.105.22.21 Last Log: 2019 07:08:36 Home + Port Port Access Click on the individual port name to save allowable operations. A Win Name Type Status 1 Serial Port 1 OTX PowerInfo Auto Auto Auto Auto Auto Auto Auto Auto Auto Auto Auto Auto Auto Auto Auto Auto Auto Auto Auto Auto Auto Auto Auto Auto Auto Auto Auto Auto Auto Auto Auto Auto Auto Auto Auto Auto Auto Auto Auto Auto Auto Auto Auto Auto Auto Auto Auto Auto Auto Auto AUTO Serial Port 20 Auto Serial Port 50 Auto Serial Port 21 Auto Serial Port 52 AutoIn This Chapter
Standalone Raritan Serial Console Requirements.... 44
Raritan Serial Console (RSC) Functions 49
Standalone Raritan Serial Console Requirements
The following requirements must be met to support the Raritan Serial Console (RSC):
• Minimum 1 GHz PC with 512 MB RAM.
- Java ^TM
See SX II release notes for the required version.
If you do not have a compatible version of the JRE, go to http://www.java.com (http://www.java.com) and click the Download Now button.
Your system may require configuration adjustments depending on the operating system and browser. The JRE provides configuration instructions with the JRE download. See
http://www.java.com/en/download/help/testvm.xml (http://www.java.com/en/download/help/testvm.xml \o http://www.java.com/en/download/help/testvm.xml) to determine the JRE version currently installed on your system.
Ensure that Java can be started from the command line.
To do this, you must configure environment variables. Make a note of the exact path where Java was installed (the path information is used later).
Set Windows OS Variables and Install Standalone Raritan Serial Console (RSC)
- Choose Start > Control Panel > System.
-
Click the Advanced tab and then click Environment Variables.
-
In the System variables section, click New.
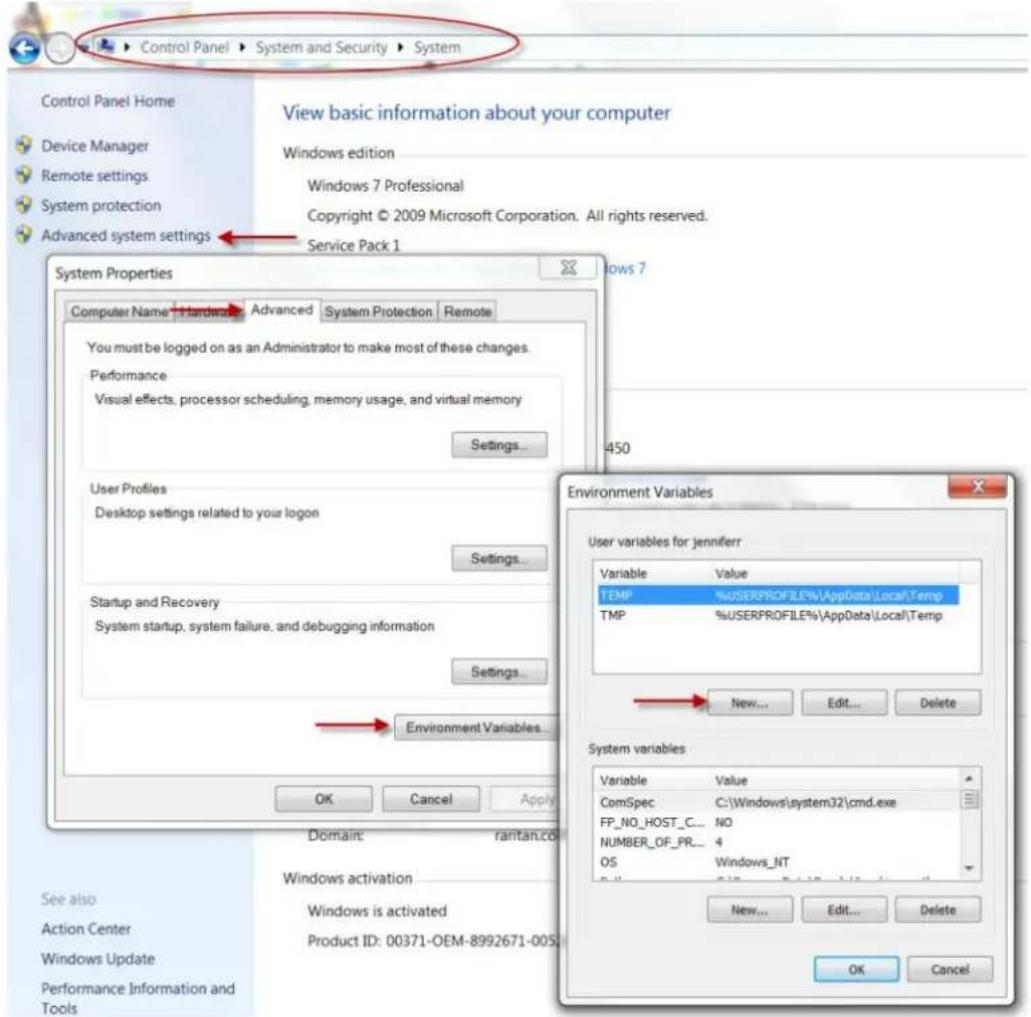
text_image
Control Panel System and Security System Control Panel Home Device Manager Remote settings System protection Advanced system settings View basic information about your computer Windows edition Windows 7 Professional Copyright © 2009 Microsoft Corporation. All rights reserved. Service Pack 1 System Properties Computer Name Hardware Advanced System Protection Remote You must be logged on as an Administrator to make most of these changes. Performance Visual effects, processor scheduling, memory usage, and virtual memory Settings... User Profiles Desktop settings related to your logon Settings... Startup and Recovery System startup, system failure, and debugging information Settings... Environment Variables... OK Cancel Apply Environment Variables User variables for jenniferr Variable Value TEMP %USERPSOFILE%\\AppData\Local\Temp TMP %USERPROFILE%\\AppData\Local\Temp New... Edit... Delete System variables Variable Value ComSpec C:\Windows\system32\cmd.exe FP_NO_HOST_C... NO NUMBER_OF_PR... 4 OS Windows_NT New... Edit... Delete OK Cancel See also Action Center Windows Update Performance Information and Tools- Write down the installed Java path.
- In the Variable value block field of the New System Variable dialog, add JAVA_HOME to the Variable name block and the Java path you wrote down earlier.
- Click OK.
- Select the PATH variable and click Edit.
- Add %JAVA_HOME%\bin to the end of the current Variable value. Ensure a semicolon (;) separates the new value from the last value in the string.
9. Click OK.
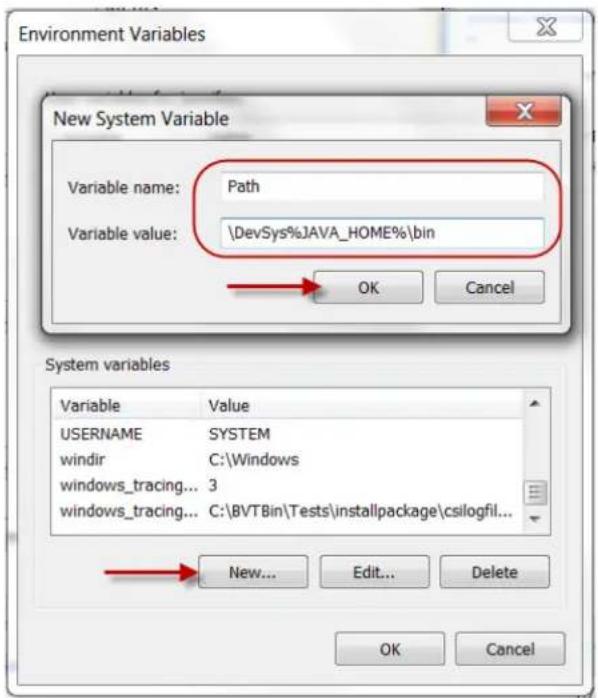
text_image
Environment Variables New System Variable Variable name: Path Variable value: \DevSys%JAVA_HOME%\bin OK Cancel System variables Variable Value USERNAME SYSTEM windir C:\Windows windows_tracing... 3 windows_tracing... C:\BVTBin\Tests\installpackage\csilogfil... New... Edit... Delete OK Cancel- Select the CLASSPATH variable and click Edit.
- Ensure the CLASSPATH Variable value is configured properly; that is, its value must have a period (.) in it. If, for any reason, there is no CLASSPATH variable defined, create one.
Next, install Raritan Serial Console (RSC) on your Windows OS.
You must have administrative privileges to install RSC.
- Log in to a Windows ^® machine.
- Download, or copy from a known location, the RSC-installer.jar installation file.
- Double-click on the executable file to start the installer program. The splash page opens.
- Click Next. The installation path page opens.
- Change the path, if desired.
- Click Next. The installation progress page opens.
Note: The standalone version of RSC is available from the Raritan Support website:
http://www.raritan.com/support/sup_upgrades.aspx
(http://www.raritan.com/support/sup_upgrades.aspx)
- Click Next. The Windows shortcut page opens.
- Select the Program Group for the Shortcut.
- Click Next. The installation finished page opens.
- Click Done.
Set Linux OS Variables and Install Standalone Raritan Serial Console (RSC) for Linux
To set Java ^™ for a specific user, open and edit the .profile file located in the /home/Username folder.
To set Java for all users, open the .profile file in your /etc folder:
- Find the line where you set your path:
export
PATH=$PATH:/home/username/somefolder
- Before that line you must set your JAVA_HOME and then modify your PATH to include it by adding the following lines:
export
JAVA_HOME=/home/username/j2sdk1.6/
export PATH=PATH:JAVA_HOME/bin
- Save the file.
You must have administrative privileges to install Raritan Serial Console (RSC).
- Log in to your Linux ^™ machine.
- Download, or copy from a known location, the RSC-installer.jar installation file.
- Open a terminal window and change to the directory where the installer is saved.
-
Type java -jar RSC-installer.jar and press Enter to run the installer.
-
Click Next after the initial page loads. The Set Installation Path page opens.
a. Select the directory where you want to install RSC and click Next.
b. Click Browse to navigate to a non-default directory.
c. Click Next when the installation is complete.
d. Click Next again. The installation is complete. The final page indicates where you can find an uninstaller program and provides the option to generate an automatic installation script.
- Click Done to close the Installation dialog.
Setting UNIX OS Variables
To check the latest JRE ^™ version on Sun Solaris ^™ :
- Launch a terminal window on the Sun Solaris desktop.
-
Type java-version in the command line and press Enter. The currently-installed version of Java™ Runtime Environment (JRE) appears.
-
If your path variable is not set to where the Java binaries have been installed, you may not be able to see the JRE version.
■ Assuming JRE is installed in /usr/local/java: you must set your PATH variable.
■ To set a path for the bash shell:
export
PATH=$PATH:/usr/local/java/j2re1.6/bin
■ To set path for tcsh or csh:
set
PATH = ($PATH /usr/local/java/j2re1.6/bin)
- These commands can either be typed at the terminal each time you log in, or add them to your .bashrc for bash shell or .cshrc for csh and tcsh so that each time you log in, the path is already set. See your shell documentation if you encounter problems.
- If the JRE is installed, proceed with the RSC installation; download JRE if it is not, and then install RSC.
Launching RSC on Windows Systems
- Double-click the shortcut or use Start Programs to launch the standalone Raritan Serial Console (RSC). The RSC Login connection properties dialog appears.
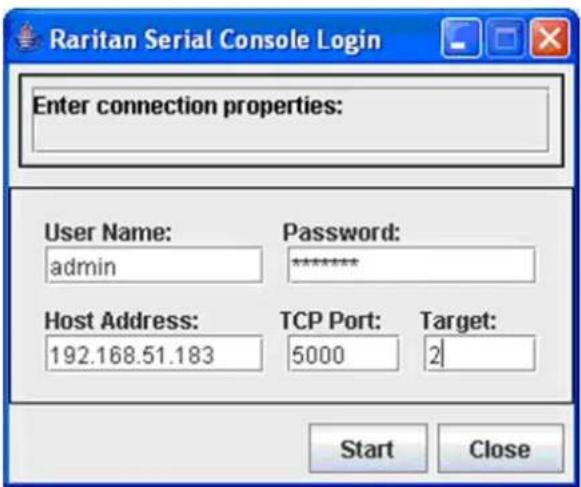
text_image
Raritan Serial Console Login Enter connection properties: User Name: admin Password: ****** Host Address: 192.168.51.183 TCP Port: 5000 Target: 2 Start Close- Enter the Dominion SX II IP address, account information, and the desired target (port).
- Click Start. RSC opens with a connection to the port.
Note: In case of unrecognized characters or blurry screens in RSC window due to localization support, try changing the font to Courier New. Choose Emulator > Settings > Display, and select Courier New for Terminal Font Properties or GUI Font Properties.
Raritan Serial Console (RSC) Functions
The following functions are available when accessing targets via Raritan Serial Console (RSC) from the SX II Remote Console and when accessing targets via standalone RSC.
Emulator
IMPORTANT: Raritan Serial Console (RSC) sessions are affected by the SX II Idle Timeout.
If you have not changed the SX II Idle Timeout setting from the default, your RSC session could be closed automatically if it exceeds the Idle Timeout period.
Change the default Idle Timeout setting and then launch the RSC. See Login Limitations for details on changing the Idle Timeout setting.
Access Emulator Options
- Select the Emulator drop-down menu to display a list of options.
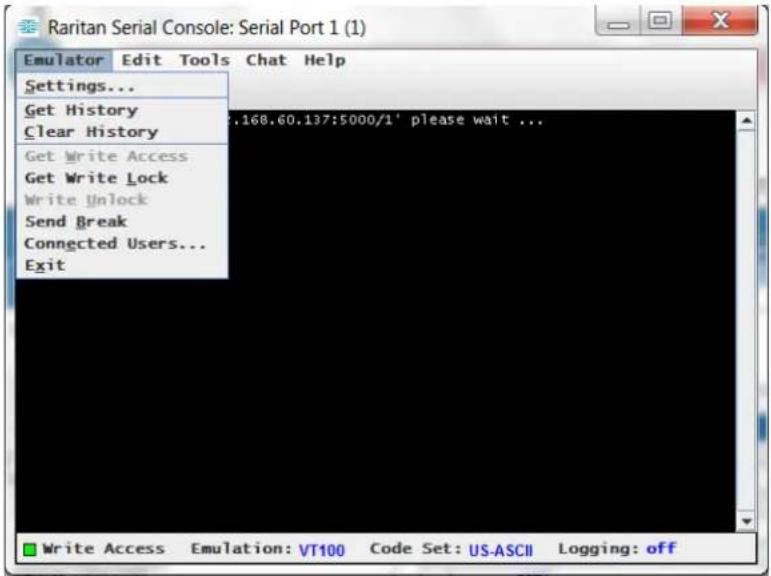
text_image
Raritan Serial Console: Serial Port 1 (1) Emulator Edit Tools Chat Help Settings... Get History Clear History Get Write Access Get Write Lock Write Unlock Send Break Connected Users... Exit .168.60.137:5000/1' please wait ...Settings
Note: An Administrator can set Terminal emulation settings using Setup > Port Configuration.
- Choose Emulator > Settings. The Settings screen displays the General tab with the default settings.
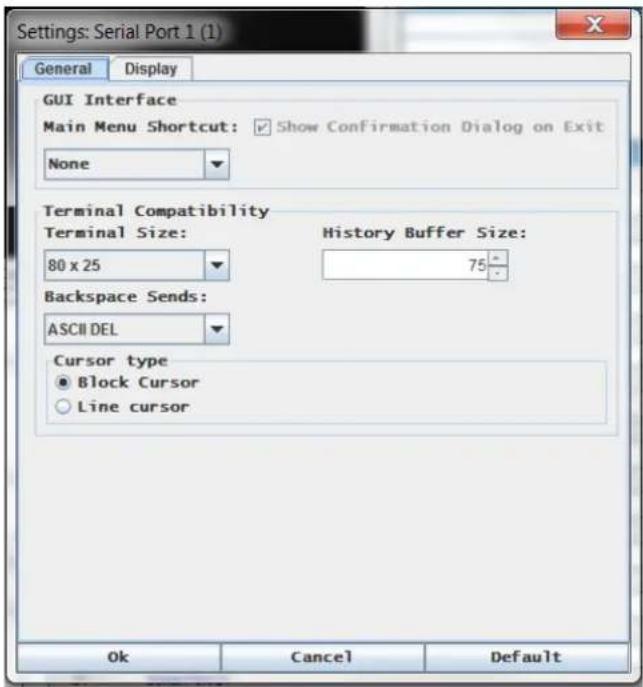
text_image
Settings: Serial Port 1 (1) General Display GUI Interface Main Menu Shortcut: ✓ Show Confirmation Dialog on Exit None Terminal Compatibility Terminal Size: History Buffer Size: 80 x 25 75 Backspace Sends: ASCII DEL Cursor type ● Block Cursor ○ Line cursor Ok Cancel Default- The Main Menu Shortcut default is None; accept this, or choose one of the following from the Main Menu Shortcut drop-down menu:
F10
- Alt
- The Show Confirmation Dialog on Exit checkbox is selected by default, but you can deselect it based on preference.
- The Terminal Size default is selected, or you can choose a different size from the drop-down menu.
- The Backspace Sends default is ASCII DEL, or you can choose Control-H from the Backspace Sends drop-down menu.
- The History Buffer Size default is 75. Type a value or use the arrows to change the buffer size.
- The Cursor type default is Block Cursor, or you can select the Line Cursor radio button.
- Click OK.
Display Settings
- Choose Emulator > Settings and click the Display tab.

text_image
Settings: Serial Port 1 (1) General Display Font Directories + - Terminal Font Properties GUI Font Properties Lucida Console Lucida Console Lucida Sans Typewriter MS Gothic MS Mincho MS Outlook Font size: 11 Colors Foreground: Background: Locale Encoding: US-ASCII Language: English Preview Font Preview Ok Cancel Default- Click Default to accept the Default settings, and then click Ok to close the Display Settings window. To change the settings, follow these steps:
a. The Terminal Font Properties default is Arial, or you can choose a font from the Terminal Font Properties scrolling list.
b. Click the GUI Font Properties tab.
c. The default font property is Monospace, or you can choose a font from the GUI Font Properties scrolling list.
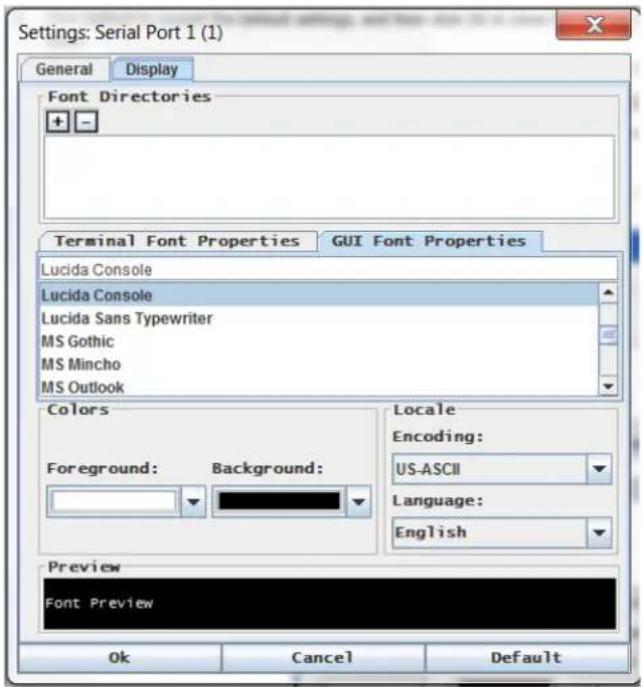
text_image
Settings: Serial Port 1 (1) General Display Font Directories + - Terminal Font Properties GUI Font Properties Lucida Console Lucida Console Lucida Sans Typewriter MS Gothic MS Mincho MS Outlook Colors Foreground: Background: Locale Encoding: US-ASCII Language: English Preview Font Preview Ok Cancel DefaultNote: For Simplified Chinese characters, RSC supports EUC-CN encoding system.
- Choose the following from their respective drop-down menus:
■ Foreground Color
■ Background Color
- Choose one of the following from the Encoding drop-down menu:
US-ASCII
ISO-8859-1
ISO-8859-15
■ UTF-8
Shift-JIS
■ EUC-CN
■ EUC-JP
■ EUC-KR
-
Choose one of the following from the Language drop-down menu:
-
English
-
Japanese
-
Korean
Chinese -
Bulgarian
-
Click Ok to close the Display Settings window. If you changed the Language setting, the RSC changes to that language when the Display Settings window is closed.
Note: In case of unrecognized characters or blurry screens that might appear when RSC is launched, due to localization support, try changing the font to Courier New.
Get History
History information can be useful when debugging, troubleshooting, or administering a target device. The Get History feature:
- Allows you to view the recent history of console sessions by displaying the console messages to and from the target device.
- Displays up to 512KB of recent console message history. This allows a user to see target device events over time.
When the size limit is reached, the text wraps, overwriting the oldest data with the newest.
Notes: History data is displayed only to the user who requested the history.
To view the Session History, choose Emulator > Get History.
Clear History
- To clear the history, choose Emulator > Clear History.
Get Write Access
Only users with permissions to the port get Write Access. The user with Write Access can send commands to the target device. Write Access can be transferred among users working in the RSC via the Get Write Access command.
To enable Write Access, choose Emulator > Click Get Write Access.
• You now have Write Access to the target device.
- When another user assumes Write Access from you:
- The RSC displays a red block icon before Write Access in the status bar.
- A message appears to the user who currently has Write Access, alerting that user that another user has taken over access to the console.
Get Write Lock
Write lock prevents other users from taking the write access while you are using it.
- To get write lock, choose Emulator > Get Write Lock.
- If Get Write Lock is not available, a request rejected message appears.
Write Unlock
To get Write Unlock, choose Emulator > Write Unlock.
Send Break
Some target systems such as Sun Solaris servers require the transmission of a null character (Break) to generate the OK prompt. This is equivalent to issuing a STOP-A from the Sun keyboard.
Only users with Write Access privileges can send a break.
To send an intentional "break" to a Sun Solaris server:
- Verify that you have Write Access. If not, follow the instructions in the previous section to obtain write access.
- Choose Emulator > Send Break. A Send Break Ack (Acknowledgement) message appears.
- Click OK.
Connected Users
The Connected Users command allows you to view a list of other users who are currently connected on the same port.
- Choose Emulator > Connected Users.
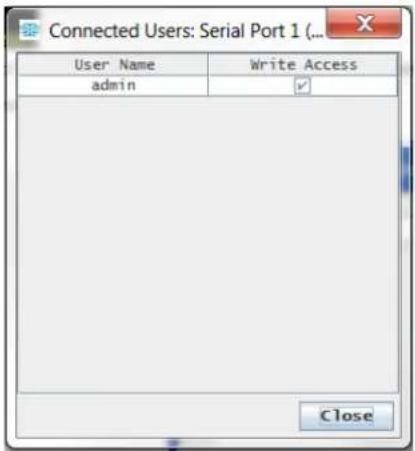
text_image
Connected Users: Serial Port 1 (...) User Name Write Access admin ✓ Close- A check mark appears in the Write Access column after the name of the User who has Write Access to the console.
- Click Close to close the Connected Users window.
Exit
- Choose Emulator > Exit to close the RSC. The Exit Confirmation dialog appears.
- Click Yes.
Edit
Use the Copy, Paste, and Select All text commands to relocate and/or re-use important text.
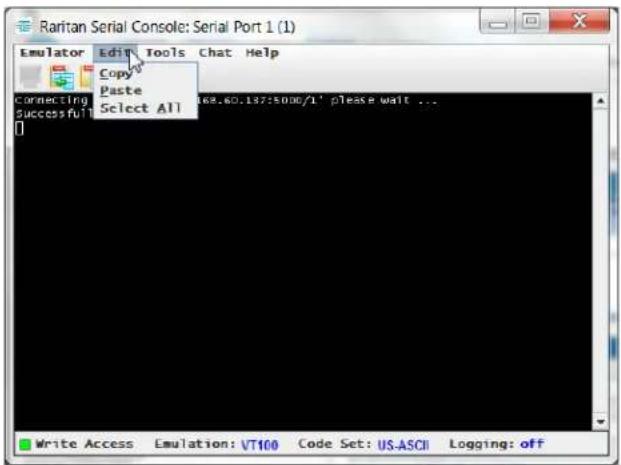
text_image
Raritan Serial Console: Serial Port 1 (1) Emulator Edit Tools Chat Help Copy Paste Connecting Select All 68.60.137:5000/1' please wait ... Successful Write Access Emulation: VT100 Code Set: US-ASCII Logging: off▶ To copy and paste all text:
- Choose Edit > Select All.
- Choose Edit > Copy.
- Position the cursor at the location where you want to paste the text.
- Click once to make that location active.
- Choose Edit > Paste.
Note: The copy-paste limit of text in RSC is 9999 lines.
Keyboard shortcuts to highlight, copy, and paste all or partial lines of text:
- Click and drag your mouse over the text you wish to copy.
- Use Ctrl+C to copy text.
- Position the cursor where you want to paste the text and click in that location to make it active.
- Use Ctrl+V to paste text.
Start and Stop Logging
When you start Raritan Serial Console (RSC), the Logging indicator on the status bar indicates whether logging is on or off.
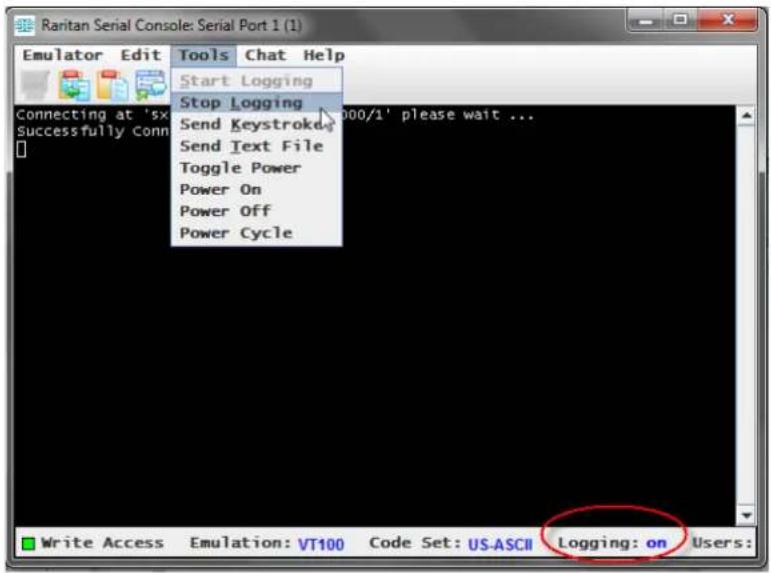
text_image
Raritan Serial Console: Serial Port 1 (1) Emulator Edit Tools Chat Help Start Logging Stop Logging Send Keystroke Send Text File Toggle Power Power On Power Off Power Cycle Connecting at 'sx Successfully Conn 000/1' please wait ... Write Access Emulation: VT100 Code Set: US-ASCII Logging: on Users:Start Logging
The Start Logging function allows you to collect raw console data from the target device and save it to a file on your computer.
- Choose Tools > Start Logging.
- Choose an existing file or provide a new file name in the Save RSC Log dialog.
When an existing file is selected for logging, you can overwrite it, append it or create a new file by giving it a new name.
3. Click Save after selecting or creating a file.
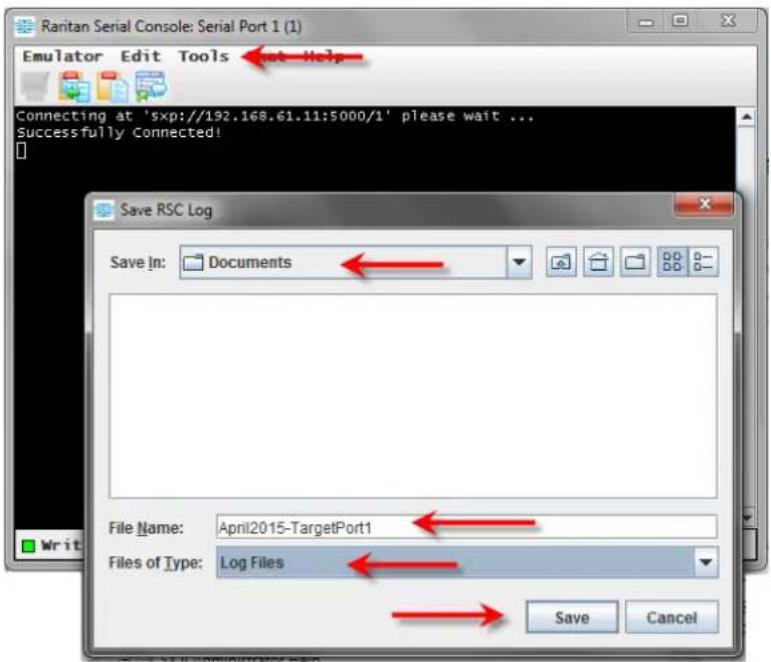
text_image
Raritan Serial Console: Serial Port 1 (1) Emulator Edit Tools Not Help Connecting at 'sxp://192.168.61.11:5000/1' please wait ... Successfully Connected! Save RSC Log Save In: Documents File Name: April2015-TargetPort1 Files of Type: Log Files Save CancelStop Logging
- Choose Tools > Stop Logging.
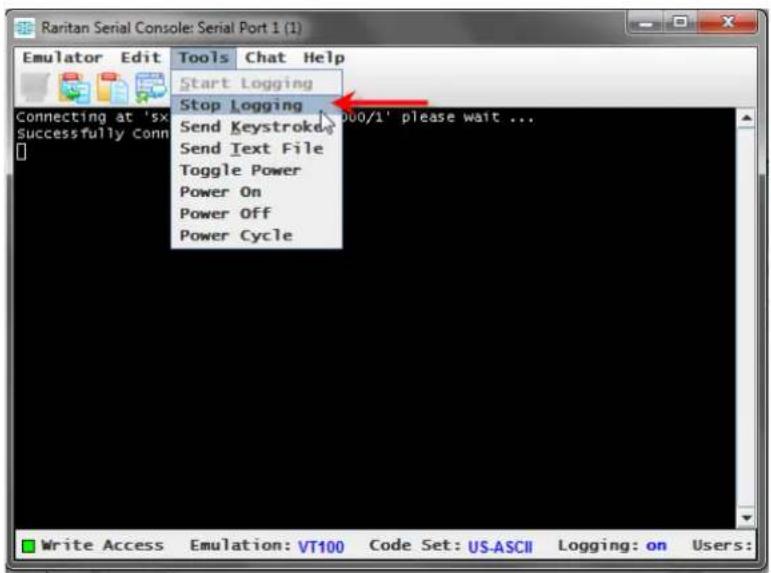
text_image
Raritan Serial Console: Serial Port 1 (1) Emulator Edit Tools Chat Help Start Logging Stop Logging 000/1' please wait ... Connecting at 'sx Successfully conn Send Keystroke Send Text File Toggle Power Power On Power Off Power Cycle Write Access Emulation: VT100 Code Set: US-ASCII Logging: on Users:The logging stops.
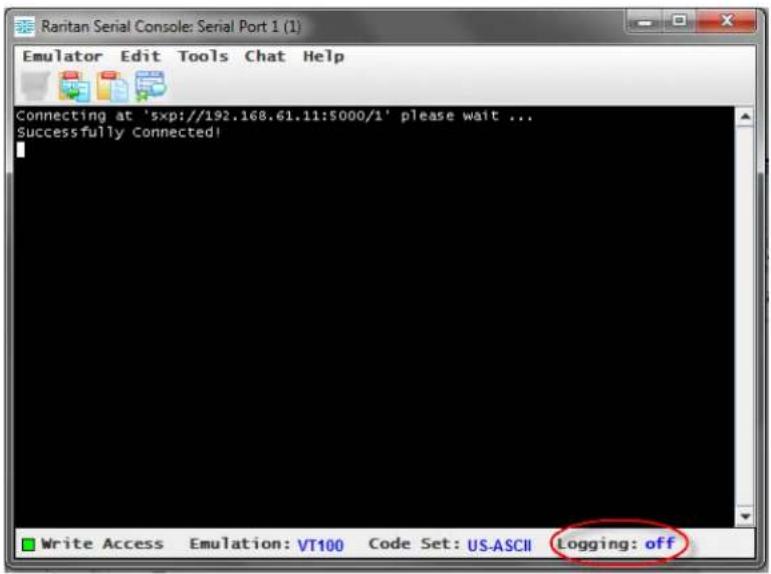
text_image
Raritan Serial Console: Serial Port 1 (1) Emulator Edit Tools Chat Help Connecting at 'xp://192.168.61.11:000/1' please wait ... Successfully Connected! Write Access Emulation: VT100 Code Set: US-ASCII Logging: offSend a Text File
- Select Tools > Send Text File. A Send Text File screen appears.
- Open the directory of the Text file.
- Click on or enter the file name of the text file.
- Click Open.
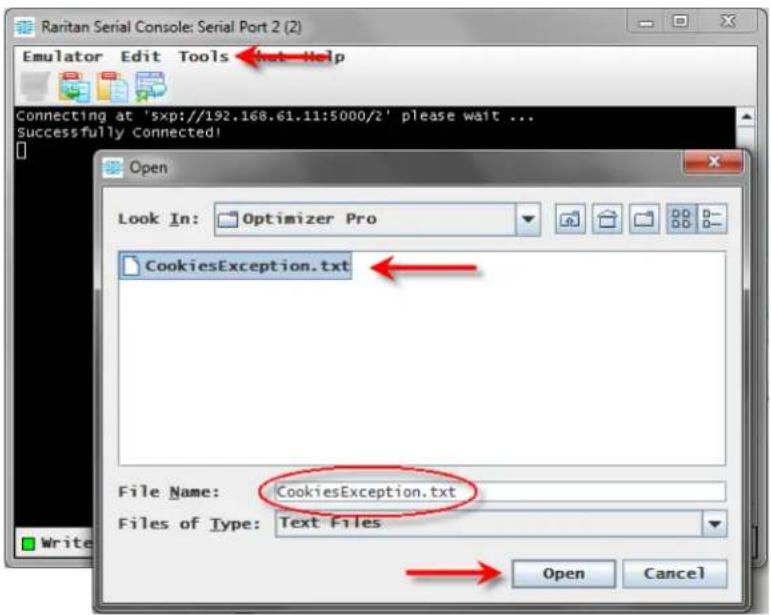
text_image
Raritan Serial Console: Serial Port 2 (2) Emulator Edit Tools Help Connecting at '5xp://192.168.61.11:5000/2' please wait ... Successfully connected! Open Look In: Optimizer Pro CookiesException.txt File Name: CookiesException.txt Files of Type: Text Files Open Cancel- When you click Open, Raritan Serial Console (RSC) sends whatever file you selected directly to the port.
- If there is currently no target connected, nothing is visible on the screen.
Note, if you are using a Mac ^® and/or Safari ^® , do the following in order to use this feature:
- In Safari, select Preferences.
- Under the Security tab, select "Manage Website Settings"
- Click on the SX II website.
- Select "Run in unsafe mode" from the drop-down box.
- Restart Safari.
Toggle Power
The Toggle Power function lets you power on or off the device that is connected to the associated outlet on a Power Distribution Unit (PDU). For example, if a router is connected to one of the outlets on the PDU, you can toggle the router's power on or off.
You must configure the association of outlets to the target port of the device before you can use the Toggle Power feature. Assign a power port to the serial target from the Device Settings > Port Configuration tab of the device. If you have not done this, the system displays a message stating that the target is not associated with a power outlet.
You must have power control permissions to the port to perform these functions.
- Select Toggle Power to turn the device (router) on or off. A prompt appears displaying the current status of the outlet(s). You can turn the device on or off depending on its current status.
-
If you select No, the system returns you to the RSC screen.
-
If you select Yes, the system sends the power command to either turn on or off the outlets associated to the target port of the device.
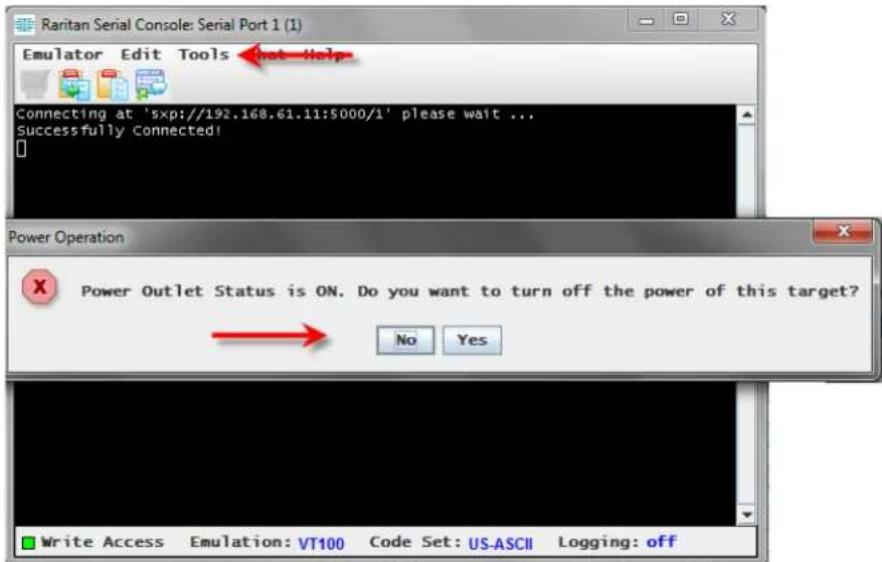
text_image
Raritan Serial Console: Serial Port 1 (1) Emulator Edit Tools Not Help Connecting at 'sxp://192.168.61.11:$000/1' please wait ... Successfully Connected! Power Operation Power Outlet Status is ON. Do you want to turn off the power of this target? No Yes Write Access Emulation: VT100 Code Set: US-ASCII Logging: offIf you receive a hardware error message, this means the PDU command failed.
If you receive a software error message, this means another user is controlling the power outlet and the power control command cannot be sent.
Power On a Target
Use this option to power on a target from Raritan Serial Console (RSC).
This option is visible only when there are one or more power associations to the target, and when you have permission to manage the target's power.
- Select Tools > Power On.
2. Click Yes when prompted to confirm.
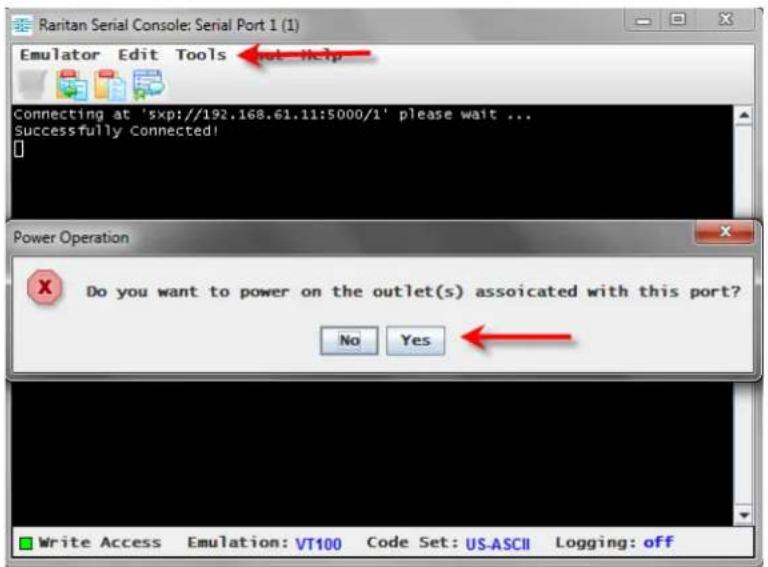
text_image
Raritan Serial Console: Serial Port 1 (1) Emulator Edit Tools not Help Connecting at 'sxp://192.168.61.11:5000/1' please wait ... Successfully Connected! Power Operation Do you want to power on the outlet(s) associated with this port? No Yes Write Access Emulation: VT100 Code Set: US-ASCII Logging: offPower Off a Target
Use this option to power off a target from Raritan Serial Console (RSC).
This option is visible only when there are one or more power associations to the target, and when you have permission to manage the target's power.
- Select Tools > Power Off.
2. Click Yes when prompted to confirm.
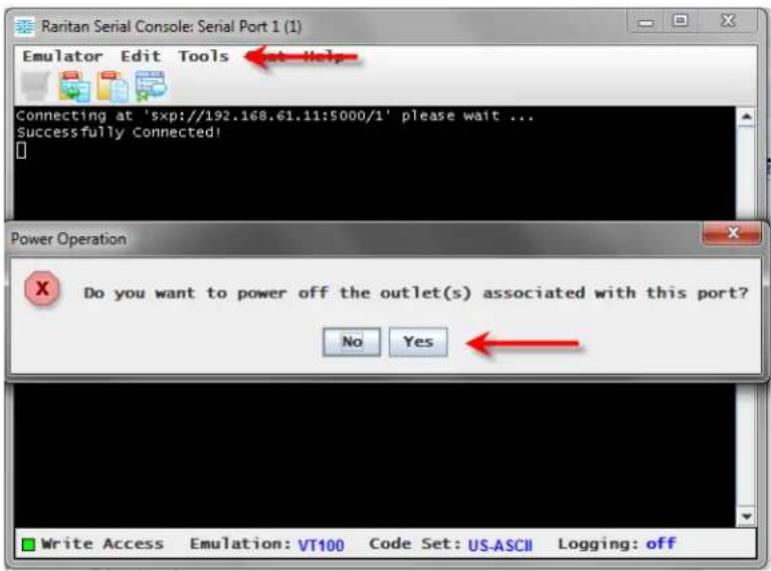
text_image
Raritan Serial Console: Serial Port 1 (1) Emulator Edit Tools at Help Connecting at 'sxp://192.168.61.11:$000/1' please wait ... Successfully Connected! Power Operation Do you want to power off the outlet(s) associated with this port? No Yes Write Access Emulation: VT100 Code Set: US-ASCII Logging: offPower Cycle a Target
Power cycling allows you to turn a target off and then back on through the outlet it is plugged into.
This option is visible only when -
• there are one or more power associations to the target
• the target is already powered on (the port status us Up)
• you have permission to manage the target's power
- Select Tools > Power Cycle.
2. Click Yes when prompted to confirm.
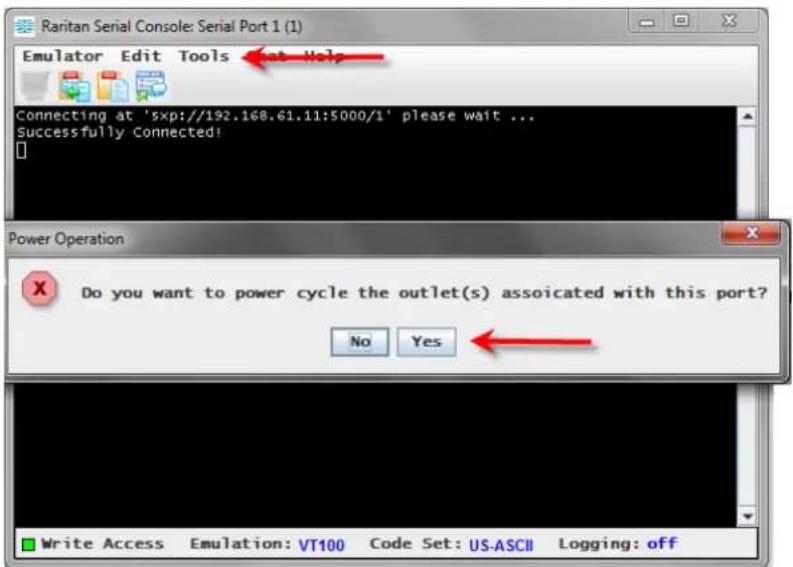
text_image
Raritan Serial Console: Serial Port 1 (1) Emulator Edit Tools Help Connecting at 'sxp://192.168.61.11:5000/1' please wait ... Successfully Connected! Power Operation Do you want to power cycle the outlet(s) associated with this port? No Yes Write Access Emulation: VT100 Code Set: US-ASCII Logging: offChat
When using browser access over SSL, an interactive chat feature called Chat allows you and other users on the same port to communicate. The maximum length of a chat message is 300 characters.
Note: When a chat is initiated, a chat window appears on the monitors of all SSL users logged on to the port. If a user is logged into a port multiple times, multiple chat messages do not appear to that user.
To open chat:
- Choose Chat > Chat.
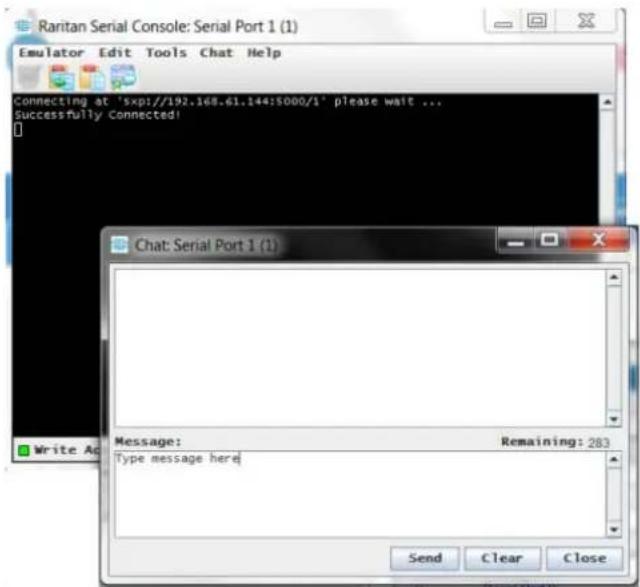
text_image
Raritan Serial Console: Serial Port 1 (1) Emulator Edit Tools Chat Help Connecting at '5xp1//192.168.61.144!5000/1' please wait ... Successfully Connected: Chat: Serial Port 1 (1) Message: Remaining: 283 Type message here Send Clear CloseTo clear text in a chat text box:
- Click Clear to delete the typed text.
Help and About
Help Topics include online assistance for operating the Raritan Serial Console (RSC) and release information about RSC.
Help Topics
- Choose Help > Help Topics. Help is displayed in a secondary window.
About Raritan Serial Console
- Choose Help > About Raritan Serial Console. An About Raritan Serial Console message appears.
Chapter 5
Connect a Rack PDU to SX II and Configure Power Control Options
SX II provides the following options when connecting a PX2 to a SX II:
- Connect SX II to the PX2 Serial port.
In this configuration, access to the PX2 is done through the PX2 command line interface (CLI). - Connect the SX II to the Feature port on the PX2.
In this configuration, the PX2 is managed from the SX II interface like any other power strip.
See the PX2 Help for information on using the PX2 appliance.
In This Chapter
Connecting the SX II to the PX2 Serial Port....67
Connecting the SX II to the PX2 FEATURE Port 68
Connecting the SX II to the PX2 Serial Port
In this configuration, after the PX is connected to the SX II, access the PX using the PX CLI.
Note that the appliances used in the diagram may not match your specific models. However, the connections and ports used are the same across models.
To connect the SX II to the PX:
- Connect an ASCSDB9F adapter to the PX2 DB9 console/modem port.
Note: The adapter is purchased from Raritan. It does not come with PX or SX II appliances.
-
Plug a Cat5 cable into the ASCSDB9F adapter, then plug the other end of the cable in to the port on the SX II.
-
Power on the PX2 (if it is not already). The command line interface (CLI) interface appears.
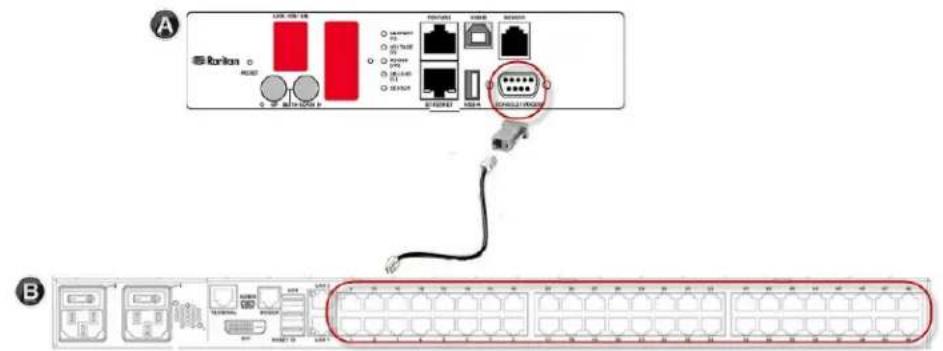
text_image
A Ranlon c H3007 128-056-18 128-056-18 128-056-18 128-056-18 128-056-18 128-056-18 128-056-18 128-056-18 128-056-18 128-056-18| A | PX appliance |
| B | SX II |
Connecting the SX II to the PX2 FEATURE Port
In this configuration, the PX is managed from the SX II interface like any other powerstrip. See Power Control.
Note that the appliances used in the diagram may not match your specific models. However, the connections and ports used are the same across models.
To connect the SX II to the Feature port on the PX:
- Connect the red end of the CSCSPCS crossover Cat5 cable into the Feature port on the PX.
- Connect the yellow end of the CSCSPCS crossover Cat5 cable into a port on the SX II.
- Power on the PX (if it is not already).
Chapter 5: Connect a Rack PDU to SX II and Configure Power Control Options
You can now add the PX as a managed power strip to the SX II. See Configure Power Strips from the Remote Console or Configure Power Strips Using CLI.

text_image
A S-Linker 12V 750 V8 300 1000 V8 300 1000 V8 300 1000 V8 300 1000 V8 300 1000 V8 300 1000 V8 300 1000 V8 300 1000 V8 300 1000 V8 300 100V8 300 100V8 300 100V8 300 100V8 300 100V8 300 100V8 300 100V8 300 100V8 300 100V8 300 100V8 300 100W8 300 100W8 300 100W8 300 100W8 300 100W8 300 100W8 300 100W8 300 100W8 300 100W8 300 100W8 300 100V8 300 100V8 300 100V8 300 100V8 300 100V8 300 100V8 300 100V8 300 100V8 300 100V8 300 100N8 300 100N8 300 100N8 300 100N8 300 100N8 300 12V6 3.4V6 3.4V6 3.4V6 3.4V6 3.4V6 3.4V6 3.4V6 3.4V6 3.4V6 3.4V6 3.4V6 3.4V6 3.4V6 3.4V6 3.4V6 3.4V6 3.4V6 B| A | PX appliance |
| B | SX II |
Appendix A Specifications
In This Chapter
SX II Dimensions and Physical Specifications ....70
Supported Remote Connections 70
Supported Number of Ports and Remote Users per SX II Model....71
Maximum Number of Users Session....71
Maximum Number of Support Users Per Port....71
Port Access Protocol Requirements....71
SX II Port Pins 74
SX2 Port Ranges....75
Network Speed Settings....75
Default User Session Timeouts....76
SX II Supported Local Port DVI Resolutions....77
SX II Appliance LED Status Indicators 77
Target Cable Connection Distances and Rates 78
SX II Dimensions and Physical Specifications
| Form factor | 1U, rack mountable |
| Power | 100/240VAC auto-switching: 50-60 Hz, .35A, 36-72VDC auto-switching |
| Max power consumption | 4-Port SX: 21W | 8-port SX: 21W | 16-port SX: 22W | 32-port SX: 23W | 48-port SX: 25W |
| Temperatures | Operating: 0°C – 50°C. Non-Operating: 0°C – 55°C |
| Humidity | Operating: 20% – 85%. Non-Operating: 10% – 90% |
| Altitude | Operates properly at any altitude from 0 to 2,000 meters |
Supported Remote Connections
Network
- 10BASE-T
- 100BASE-T
• 1000BASE-T (Gigabit) Ethernet
Protocols
Appendix A: Specifications
- TCP/IP
- HTTP
- HTTPS
- RADIUS
- LDAP/LDAPS
- SSH
- Telnet
- TACACS+
- UDP
• SNTP
Supported Number of Ports and Remote Users per SX II Model
| Model | Number of ports |
| SX2-04 and SX2-04M 4 | |
| SX2-08 and SX2-08M 8 | |
| SX2-16 and SX2-16M | 16 |
| SX2-32 and SX2-32M | 32 |
| SX2-48 and SX2-48M | 48 |
Maximum Number of Users Session
A maximum of 200 users can access a single SX II at the same time.
This applies to the Remote Console access, Direct Port Access and command line interface access via SSH/Telnet.
Maximum Number of Support Users Per Port
A maximum of 10 users can access the same port and the same time.
This applies to the Remote Console access, Direct Port Access and command line interface access via SSH/Telnet.
Port Access Protocol Requirements
| Protocol Port Communication | direction | |
| HTTP | Ports 80, 443 and 5000 must be open in the firewall for theappliance to operate. | Both |
| Port 80This port can be configured as needed. See HTTP and HTTPS Port Settings.By default, all requests received by the SX II via HTTP (port 80) are automatically forwarded to HTTPS for complete security.The SX II responds to Port 80 for user convenience, relieving users from having to explicitly type in the URL field to access the SX II, while still preserving complete security. | ||
| Port 443This port can be configured as needed. See HTTP and HTTPS Port Settings.By default, this port is used for multiple purposes, including the web server for the HTML client, the download of client software onto the client's host, and the transfer of data streams to the client. | ||
| Port 5000This port is used to discover other Dominion devices and for communication between Raritan devices and systems, including CC-SG for devices that CC-SG management is available.By default, this is set to Port 5000, but you may configure it to use any TCP port not currently in use. For details on how to configure this setting, see Network Settings. | ||
| HTTPS SSL only | Port 443TCP port 443 must be open. Port 80 can be closed. | Both |
| SSH | Port 22TCP port 22 must be open. Port 22 is used for the SX II command line interface (CLI). | Both |
| Telnet | Port 23TCP port 23 must be open. | Both |
| TACACS+ | Port 49Port 49 must be open. | Outgoing |
| RADIUS | Port 1812If SX II is configured to remotely authenticate user logins via the RADIUS protocol, port 1812 is used and must be open.However, but the system can also be configured to use any port of your designation.OptionalPort 1813If the SX II is configured to remotely authenticate user logins via the RADIUS protocol, and it also employs RADIUS accounting for event logging, port 1813 or an additional port of your designation is used to transfer log notifications. | Outgoing |
| LDAP | Ports 389 and 636Port 389 or 636 must be open.If the SX II is configured to remotely authenticate user logins via the LDAP/LDAPS protocol, ports 389 or 636 will be used, but the system can also be configured to use any port of your designation.Optional | Outgoing |
| SNMP | Ports 161 and 162Port 161 is used for inbound/outbound read/write SNMP access.Port 162 must be open. Port 162 is used for outbound traffic for SNMP traps. | Both (Port 161)Outgoing (Port 162) |
| For FTP upgrades | Port 21Port 21 must be open. | Outgoing |
| SYSLOG on Configurable UDP Port | Port 514UDP port 514 must be open.If SX II is configured to send messages to a Syslog server, UDP Port 514 is used for communication. | Outgoing |
| SNTP (Time Server) on Configurable UDP | Port 123The SX II offers the optional capability to synchronize its internal clock to a central time server.This function requires the use of UDP Port 123 (the standard for SNTP), but can also be configured to use any port of your designation.Optional | Both |
You may have to open additional ports when NFS logging, using LDAP servers, and so forth.
These ports may vary from installation-to-installation depending on network topologies, virtual Local Area Networks (VLANs), and firewall configurations.
Contact your network administrator for site-specific information and settings.
SX II Port Pins
Local Terminal Port
| pin Definition Direction | ||
| pin 1 | RTS | Output |
| pin 2 N/A | ||
| pin 3 | TXD | Output |
| pin 4 Ground | ||
| pin 5 Ground | ||
| pin 6 | RXD | Input |
| pin 7 N/A | ||
| pin 8 | CTS | Input |
DTE Mode on Serve Port
| pin Definition Direction | ||
| pin 1 | RTS | Output |
| pin 2 | DTR | Output |
| pin 3 | TXD | Output |
| pin 4 Ground | ||
| pin 5 Ground | ||
| pin 6 | RXD | Input |
| pin 7 | DSR | Input |
| pin 8 | CTS | Input |
DCE Mode on Serve Port
| pin Definition Direction | ||
| pin 1 | CTS | Input |
Appendix A: Specifications
| DCE Mode on Serve Port | ||
| pin 2 | DSR | Input |
| pin 3 | RXD | Input |
| pin 4 Ground | ||
| pin 5 Ground | ||
| pin 6 | TXD | Output |
| pin 7 | DTR | Output |
| pin 8 | RTS | Output |
SX2 Port Ranges
The port range for internal port configuration - CSC, HTTP, HTTPS, SSH, Telnet, DPA SSH, DPA Telnet - is 1 to 64510. The configurable port range for socket creation is limited to 1024 to 64510.
External port configuration - LDAP, RADIUS, TACACS+ and SNMP - is not affected by a port range limitation.
Network Speed Settings
SX II network speed setting
| Network switch port setting | Auto | 1000/Full | 100/Full | 100/Half | 10/Full | 10/Half | |
| Highest Available Speed | 1000/Full SX II: 100/Full Switch: 100/Half | 100/Half SX II: 10/Full Switch: 10/Half | 10/Full | 10/Half | |||
| 1000/Full | 1000/Full | 1000/Full No | Communication | No Communication | No Communication | No Communication | |
| 100/Full | SX II: 100/Half Switch: 100/Full | SX II: 100/Half Switch: 100/Full | 100/Full SX II: 100/Half Switch: 100/Full | 100/Half Switch: 100/Full | No Communication | No Communication | |
| 100/Half | 100/Half | 100/Half SX II: | 100/Full Switch: 100/Half | 100/Half No | Communication | No Communication | |
SX II network speed setting
| 10/Full | SX II: 10/HalfSwitch: 10/Full | No Communication | No Communication | No Communication | 10/Full SX II: | 10/HalfSwitch: 10/Full |
| 10/Half | 10/Half No | Communication | No Communication | No Communication | SX II: 10/FullSwitch: 10/Half | 10/Half |
Legend:
Does not function as expected

Supported

Functions; not recommended

NOT supported by Ethernet specification; product will communicate, but collisions will occur
Per Ethernet specification, these should be "no communication," however, note that the SX II behavior deviates from expected behavior
Note: For reliable network communication, configure the SX II and the LAN switch to the same LAN Interface Speed and Duplex. For example, configure the SX II and LAN Switch to Autodetect (recommended), or set both to a fixed speed/duplex such as 100MB/s/Full.
Default User Session Timeouts
- SX II interface - 5 minutes (to change this, select Security > Settings and update the "Idle Timeout (minutes)" field)
- SSH - 16 minutes
- Telnet - 2 hours
SX II Supported Local Port DVI Resolutions
Following are the resolutions supported when connecting to a DVI monitor from the SX II local port.
- 1920x1080@60Hz
- 1280x720@60Hz
• 1024x768@60Hz (default)
• 1024x768@75Hz
• 1280x1024@60Hz - 1280x1024@75Hz
- 1600x1200@60Hz
- 800x480@60Hz
- 1280x768@60Hz
- 1366x768@60Hz
- 1360x768@60Hz
- 1680x1050@60Hz
- 1440x900@60Hz
SX II Appliance LED Status Indicators
LEDs are used to indicate power status, appliance status and target connection status.
There are LEDs located on the front panel and rear panel of the SX II. Front Panel LED Status Indicators
- When SX II boots up, only the Power LED turns on. The power LED turns both red and blue.
• Port Channel LEDs are off the whole time SX II boots up. - Once SX II is fully powered on, the Power LED remains on.
■ If a single power supply is plugged in, the Power LED is Red.
- If both power supplies are plugged in, the Power LED is Blue.
- When you physically connect a powered-on target to a port on SX II via a CAT5 cable, the Port channel's LED turns on.
The LED remains on until the target is disconnected.
Note: The target must be powered on in order for the SX II Port channel LED to turn on and the SX II to detect the target.
- When you physically disconnect a target from a port on an SX II, the port channel's LED turns off.
- When you log in to SX II and connect to a target via either Raritan Serial Console (RSC), SSH or the Local Console, the port channel's LED blinks.
The LED blinks until you end the your connection to the target.
If you are connected to more than one target at the same time, all LEDs blink in unison.
- When you press the SX II's Reset button to reset the appliance or when you perform a reboot from the SX II GUI, the Power LED(s) blinks as the appliance powers down and turns off.
While the appliance powers back up, the Power LED(s) continue to blink.
Once the appliance is powered on, the Power LED(s) stop blinking and the LED remains on.
Target Cable Connection Distances and Rates
SX II supports the following connection distances using a CAT5 cable between its Serial port and a target.
| Distance | Bits per second |
| 300ft/91m 1,200 | |
| 300ft/91m 1,800 | |
| 300ft/91m 2,400 | |
| 200ft/60m 4,800 | |
| 100ft/30m 9,600 | |
| 50ft/15m 19,200 | |
| 25ft/7.5m 28,800 | |
| 25ft/7.5m 38,400 | |
| 16ft/5m 57,600 | |
| 8ft/2.5m 115,200 | |
| 4ft/1.2m 230,400 |
Appendix B FAQs
Dominion SX II Overview
Dominion SX II Overview
| What is the Dominion SX II? | The Dominion SX II is Raritan's next-generation Serial Console Server that provides IP access and control of serial devices, anytime, anywhere. The new SX II is the most powerful, secure, reliable, easy-to-use and manageable serial-over-IP console server on the market. SX II provides convenient and productive access to networking devices, servers, PDUs, telecommunications and other serial devices. |
| How is SX II different from the current SX? | The SX II is the next-generation version of the current SX. SX II has an entirely new hardware and software design that is substantially more powerful and capable than the current SX. The SX II provides virtually all of the features of the SX, plus exciting new capabilities. Unlike the current SX, all SX models come with dual power supplies, dual LAN connections and multiple local connection options. The SX II comes in 4, 8, 16, 32 and 48 models, available with and without an internal telephone modem. Many of the management features are the same as those on the Dominion KX III. |
| What are the SX II's new features? | New features include: Gigabit Ethernet, IPv6 networking, direct connection to Cisco devices with no rollover cables, FIPS 140-2 encryption, automatic configuration via USB stick or TFTP, 3G/4G cellular modem support, up to 8 gigabytes of flash space, multiple at the rack access options and Dominion compatible user interfaces and management. |
| Does the SX II have all of the current SX's features? | Virtually all of the current SX's features are included in the SX II. Several features (firmware update, fixed user groups have been replaced by more powerful Dominion style features and a few infrequently used features have been removed. |
| What is the pricing for SX II? | While you might expect a significant price increase for the SX II, it is priced similarly to the current SX. The exact price difference varies model by model. Some SX II models are even less expensive than the current |
| Dominion SX II Overview | |
| What are the end-of-life plans (lifecycle) for the current SX? | SX models!The Dominion SX II will replace the current Dominion SX. In the 4th quarter of 2015, Raritan will announce the end-of-sales for the current SX models, with opportunities for last-time-buys for a few months. Raritan will continue software support for the current SX for two years from the end-of-sales announcement date; after that there will be no more firmware releases for the current SX. CommandCenter support will likely continue past the end-of-support date. Existing hardware warranties will be honored. |
| Is there a trade-in program for the SX II? | Yes, you will have the opportunity to trade in the current SX and/or competitor serial console servers. |
| Dominion SX II Hardware Platform | |
Dominion SX II Hardware Platform
| What are some of the hardware improvements? | There are many: more powerful CPU, memory and flash space, dual power supplies (AC & DC), dual gigabit LAN ports, port status LED's, 4 USB ports, autosensing DTE/DCE ports, USB laptop access, DVI/USB access, and modem option for all models. |
| How does the SX II's performance compared to the current SX? | The SX II hardware platform is substantially more powerful with a 1GHz CPU, an 8-fold increase RAM, and up to 8 Gb of flash space. SX II supports up to 10 sessions per port and up to 200 total serial sessions. Port configuration is 15 to 23 times faster, with order of magnitude improvements in simultaneous connections, connection speed and serial processing. |
| What type of network connections does the SX II have? | The SX II has two Gigabit Ethernet LAN ports that are auto-sensing to support 10/100/1000 Megabit connections. These LAN ports can be configured for (1) single LAN connection, or (2) dual LAN connections; the latter with (a) failover or (b) simultaneous operation. Both IPv4 and IPv6 are supported. |
| Are all SX II models 1U? Even the 48 port model? | Yes, all models are 1U and include a rackmount kit. Like, the current SX, the 48 port model has 48 ports on the back panel; to make room for this, the dual power outlets are on the front panel. |
| How much flash space is available for logs? | More than you could ever possibly use!! Four and eight port SX II's have 2 Gigabits of flash space. The other models have 8 Gigabits of flash space. |
| Does the SX II support remote power control? | Yes, the SX II supports remote power control for serial devices via connection to Raritan PX intelligent rack PDU's. |
| What is the pin definition for the SX II's local admin port? | The SX II local admin port is an RJ-45 port with the following DTE pinout (Pin/ Signal): 1/RTS, 3/TXD, 4/GND, 5/GND, 6/RXD, 8/CTS. You can connect to a DB9 port on a laptop using the Raritan ASCSDB9F RJ-45(female) to DB9 (female) adapter with a Cat5 cable. |
Appendix B: FAQs
Dominion SX II Hardware Platform
Does Dominion SX include a 19" rack mount kit?
Yes. Dominion SX II comes standard with a complete ready-to-install 19" rack mount kit.
Serial-over-IP Sessions and Access
Serial-over-IP Sessions and Access
| What types of serial access are available? | The SX II has the widest variety of serial access. This includes: SSH, Telnet and web browser serial connections. Web browser access is available via the Raritan Serial Client and through Raritan CommandCenter. Convenient Direct Port Access (DPA) methods are available. At-the-rack access is available via serial cable, USB and via a KVM console. Emergency modem access is available via optional internal modem or external 3G/4G cellular modem. |
| What is Direct Port Access ? | Direct Port Access provides direct and convenient access to a specific serial device connected to the SX II. Multiple Direct Port Access (DPA) methods are available via SSH, Telnet and HTTP/URL. |
| Does the SX II support TELNET? | TELNET is supported, but is disabled by default for security reasons as TELNET does not support encrypted sessions. We recommend that SSH is used instead of TELNET. |
| What about emergency access via modem? | There are two types of modem access supported. First, an internal telephone modem is optional for each SX II model (DSX2-...M models). Second, for 3G/4G cellular modem access, you can connect the Sierra Wireless Airlink GX440 wireless modem to the SX II's USB port and access the SX II via the modem's IP address. |
| How can I secure the Sierra Wireless modem? | You can use the SX II's Firewall feature to create Linux-style "iptable" rules to secure the connection to the wireless modem. In addition the modem itself has a firewall capability. |
| How can I access the SX II when I am in the data center? | The Dominion SX II provides multiple types of at-the-rack access. To connect to a laptop or PC you can connect to its RJ45 serial port or USB mini-B port. You can connect a crash cart or rackmount keyboard tray to the SX II's DVI and USB KVM ports. To access the SX II's web-based user interface, connect a crossover Ethernet cable to the SX II's LAN port. |
| How can I get consolidated | There are two ways to do this. First you can connect the serial admin ports of |
| Serial-over-IP Sessions and Access | |
| access to the local ports of multiple SX II's? | multiple SX II's to another SX II with straight Cat5 cables. Second you can connect the DVI/USB local ports of the SX II's to a KVM switch like the Dominion KX III. This can give you access to multiple SX II's in and around the data center. |
| What baud rates are supported? | Multiple baud rates are supported: 1200, 1800, 2400, 4800, 9600 (default), 19200, 28800, 38400, 57600, 115200, and 230400 bits per second. Can set this on a per port basis from the Port Configuration page or CLI. |
| What code-sets does the terminal emulator in Dominion SX II support? | Dominion SX release 3.0 or higher supports VT100/VT220/VT320 and ANSI with the following code-sets: default, US-ASCII, ISO-8859-1, ISO-8859-15, UTF-8, Shift-JIS, EUC-JP, EUC-CN, and EUC-KR. |
| How many serial devices can be simultaneously accessed through a given SX II? | A group of users can simultaneously access all the serial devices connected to a SX II. For example, with a 48 port SX II, users can simultaneously connect to and access all 48 serial devices connected to it! |
| How many users can simultaneously access a single serial device connected to a SX II | Up to ten users can access a single serial device at the same time, up to a limit of two hundred simultaneous accesses per SX II. For example, on a 32 port SX II, six users could each simultaneous access each of the 32 serial devices connected to it for a total of 192 user sessions. This would not be a typical user scenario, but illustrates the powerful serial processing capacity of the SX II. |
| Is the Dominion SX unit SUN® "break-safe" | All Dominion SX units are SUN "break-safe" for use with SUN Solaris. |
| Connecting to Serial Devices | |
| What type of devices can the SX II connect to? | The SX II can connect to a wide variety of serial devices including network routers, Ethernet switches, firewalls, UNIX/LINUX servers, Windows Servers, virtual hosts, rack PDU's, UPS systems and telecom/wireless gear. The SX II connects via Cat5 cable to these device's RJ-45, DB9 or DB25 serial console ports. |
| Are rollover cables required? | No. SX II serial connections are auto-sensing, so that they can connect to both DTE (data terminal equipment) and DCE (data communications equipment) console ports without rollover cables. The SX II can connect to Cisco and other compatible devices with RJ-45 console ports without rollover cables. |
| What is DTE/DCE and why is it important? | An RS-232 serial port is either DTE or DCE. DTE ports are typically used on a computer or terminal, i.e. male DB9 COM port. And DCE is used on a modem, CSU/DSU, multiplexer or peripheral. A DTE port is typically cabled to a DCE port. Connections between like ports must be connected by a specific rollover cable. Since SX II is auto-sensing, it can connect to either DTE or DCE ports. |
| Are adapters required? | To connect to RJ45 console ports, a regular Cat5 cable can be used with no adapter. Raritan also sells male and female DB9 and DB25 adapters for devices with these types of serial ports. Adapters are also available to connect to Raritan PX intelligent Rack PDU's. See the SX II User Guide or online help for more information on adapters and pinouts. |
| What is the maximum distance from the SX II to a serial device? | The distance varies according to the baud rate that is used. This can range from 4 feet for 230K baud to over 300 feet for 2.4K baud. |
| What are some sample connections to serial devices? | The below table shows how to connect the SX II to standard networking and computer equipment. This is based on the type of serial port (RJ45, DB9 & DB25) and its gender (male or female). The required Raritan adapter is shown. |
Connecting to Serial Devices
| Vendor | Models | Serial Port | How to Connect |
| Cisco | Catalyst | RJ45 | Cat5 cable |
| Cisco | Catalyst | DB25F | ASCSDB25M adapter and CAT5 cable |
| Cisco | Router | RJ45 | Cat5 cable |
| Cisco | Router | DB25F | ASCSDB25M adapter and CAT5 cable |
| Cisco | UCS | RJ45 | Cat5 cable |
| Cisco | PIX Firewall | DB9M | ASCSDB9F adapter and CAT5 cable |
| HP | Servers | DB9M | ASCSDB9F adapter and CAT5 cable |
| Dell | Servers | DB9M | ASCSDB9F adapter and CAT5 cable |
| IBM | Servers | RJ45 | Cat5 cable |
| Checkpoint | Firewall | DB9M | ASCSDB9F adapter and CAT5 cable |
| Silicon Graphics | Origin | DB9M | ASCSDB9F adapter and CAT5 cable |
| Sun | SPARCStation | DB25F | ASCSDB25M adapter and CAT5 cable |
| Sun | Netra T1 | RJ45 | Cat5 cable |
| Sun | Cobalt | DB9M | ASCSDB9F adapter and CAT5 cable |
| Various | Windows | DB9M | ASCSDB9F adapter and CAT5 cable |
| Raritan | PX | RJ45 | CSCSPCS-1 or CSCSPCS-10 cable |
Installation, Management & Configuration
| Installation, Management & Configuration | |
| How do I initially configure the SX II? | Initial configuration can be done manually from the SX II local console or automatically via USB stick or TFTP server. Manual configuration can be done via CLI by connecting your laptop via (1) USB , (2) serial cable, or (3) by connecting a KVM console. You can also (4) use the web GUI connecting a laptop via a crossover cable. A Quick Setup Guide (QSG) is included. |
| Can the SX II be completely managed by CLI? Where is the CLI defined? | Yes, the SX II can be completely managed via CLI commands. The CLI is defined in the on-line help, user guide and available from the CLI itself. |
| Tell me more about the automatic configuration options. | There are two ways to automatically configure the SX II. First, it can be configured by a script of CLI commands, plugged into a USB port on the SX II. Second, a script of CLI commands can be stored on a TFTP server available via DHCP Server or configured into the SX. For security, both of these automatic configuration methods must be enabled by the administrator. |
| Does the SX II require a FTP Server for firmware upgrades like the current SX? | No, the SX II firmware upgrade process is like that of the KX III. No FTP server is required. The user browses to an encrypted firmware file downloaded from the Raritan website. Many of the management functions are the same as with the KX III. Note that the FTP option still exists via CLI to upgrade the device in this manner. |
| Can I copy my current SX configuration to the new SX II?" | With the extensive software and hardware changes, the configuration backups of the current SX are unfortunately not compatible with the new SX II. |
| Where can I get a copy of the SNMP MIB for Dominion SX? | The SX II SNMP MIB is available from the Dominion SX II Support Page on raritan.com. It is also available from the Event Management - Settings page on the web GUI. |
| Does the SX II work with Raritan's Command Center? | Yes. The Dominion SX II requires CommandCenter Secure Gateway Release 6.1 and above, available in September 2015. Using CommandCenter, users can connect to thousand ds of serial (and KVM) devices, connected to the Dominion SX, SX II, KX III and other Raritan devices. |
| Security | |
| Security | |
| Is the Dominion SX II secure? | Yes, the Dominion SX II has rock-solid security with military grade security features such as 256 bit AES encryption with a FIPS 140-2 mode and encryption module. The SX II has a long list of security features and each release is tested with a vulnerability scanner. Security patches will be made available from the Raritan website. |
| Is the Dominion SX II FIPS 140-2 certified? | The Dominion SX II uses an embedded FIPS 140-2 validated cryptographic module running on a Linux platform per FIPS 140-2 implementation guidelines. This cryptographic module is used for encryption of serial sessions when using the Raritan Serial Client (RSC). |
| Is ActiveDirectory authentication supported? | Yes, ActiveDirectory, LDAP, Radius and TACACS authentication are supported. In addition the SX II administrator can create local users with their passwords. |
| Which ports need to be open for SX II connections? | Port 443 (for https); optionally port 80 (http) for user sessions. When using SSH, port 22 needs to be open. The TCP ports for HTTP, HTTPS, Telnet, SSH are all user configurable. These user configured ports will need to be open for access. Also, TCP port 5000. |
| What type of logging is available? | The SX II supports many types of events generated for user access, security events as well as administrative actions. Multiple logging methods are available including SNMP, Syslog, Email, NFS and internal log file. |
| Is the serial port data logged? | Yes, data from the serial devices can be logged to a local file on the SX II, Syslog or NFS server. |
| What is the default login and default password? | The default login is "admin" and the default password is "raritan". You are forced to change the password when you first log in to the SX II. We recommend that you also change the default "admin" name for security reasons. Also recommended is strong passwords for your local accounts, which can be enabled on the Security Settings panel. |
| I have lost the Admin password to the Dominion SX. What can I do? | You can restore the unit to its factory default settings. A factory reset function to restore the unit to factory default settings is provided. This reset function has several configurable options. |
| User Interface & Documentation | |
User Interface & Documentation
What type of web-based user interface does the Dominion SX II have?
The Dominion SX II Graphical User Interface is similar to the other Dominion products, providing a common look-and-feel across the Dominion SX II, KX, KSX and KX2-101-V2. In addition, similar management features are available including firmware update, backup and restore, security options and diagnostics.
Does the SX II require Java?
For web browser access by the Raritan Serial Console software, Java is required. Java is not required for CLI access to the SX II via SSH, Telnet or an at-the-rack connection.
Where can I get documentation (user guide, etc.) for the Dominion SX II?
The Data Sheet, available on the SX II Product Page, provides a good overview of the SX showing the available models, adapters and features. The Features and Benefits document, also available on the SX II Product Page, provides a list of the SX II features. The SX II Support Page provides detailed technical information including the Release Notes, User Manual, On-line Help, SX II MIB and firmware releases.
Appendix C
SX II Support
In addition to Raritan Technical Support and Customer Support, the following resources are available.
In This Chapter
SX II Release Notes and Help....91
Contact the Documentation Team with Feedback 92
SX II Release Notes and Help
SX II Release Notes
Release notes come with the SX II appliance and are available on the Support page of Raritan's website
(http://www.raritan.com/support/firmware-and-documentation).
Review the release notes for important information before you begin using the appliance.
SX II Quick Setup Guide
Online help is accompanied by the SX II Quick Setup Guide, which is included with your SX II and can be found on the Support page of
Raritan's website (http://www.raritan.com/support/firmware-and-documentation).
SX II Online Help
SX II online help is considered your primary help resource.
Raritan Serial Console (RSC) help is provided as part of SX II online help.
To use online help, Active Content must be enabled in your browser.
SX II Users Guide and Administrators Guide
A PDF version of help topics specific to end users is contained in the SX II User Guide and topics specific to SX II administrators are contained in the SX Administrators Guide.
Both PDFs are available on the Support page of Raritan's website (http://www.raritan.com/support/firmware-and-documentation).
Contact the Documentation Team with Feedback
Contact the Documentation directly with any questions or feedback related to the online help or user guides.
Email us at documentation@raritan.com, or directly from online help by doing one of the following -
Use the "Send Feedback" feature in online help:
- Open online help and click the "Send Feedback" icon in the toolbar. An email addressed to the team opens in your default email client.

text_image
Dominion SX II Online Help Contents Welcome Search Match partial words Send feedback Welcome Dominion® SX II Online Help▶ Email the Documentation Team a specific topic from the online help:
- Open to the topic in online help, then click on the "Email this Page" icon in the toolbar in online help.
An email addressed to the team opens in your default email client.

text_image
Dominion SX II Online Help Contents Welcome Search Match partial words Email this page Welcome Dominion® SX II Online HelpNote: Feedback via this method is for online help content only and not for technical support, sales, website or product information. See the Contact Us page on Raritan's website for additional contact information.
Raritan.
U.S./Canada/Latin America
Monday - Friday
8 a.m. - 6 p.m. ET
Phone: 800-724-8090 or 732-764-8886
For CommandCenter NOC: Press 6, then Press 1
For CommandCenter Secure Gateway: Press 6, then Press 2
Fax: 732-764-8887
Email for CommandCenter NOC: tech-ccnoc@rarltan.com
Email for all other products: tech@raritan.com
China
Beijing
Monday - Friday
9 a.m. - 6 p.m. local time
Phone: +86-10-88091890
Shanghai
Monday - Friday
9 a.m. - 6 p.m. local time
Phone: +86-21-5425-2499
GuangZhou
Monday - Friday
9 a.m. - 6 p.m. local time
Phone: +86-20-8755-5561
India
Monday - Friday
9 a.m. - 6 p.m. local time
Phone: +91-124-410-7881
Japan
Monday - Friday
9:30 a.m. - 5:30 p.m. local time
Phone: +81-3-5795-3170
Email: support.japan@raritan.com
Europe
Europe
Monday - Friday
8:30 a.m. - 5 p.m. GMT+1 CET
Phone: +31-10-2844040
Email: tech.europe@raritan.com
United Kingdom
Monday - Friday
8:30 a.m. to 5 p.m. GMT
Phone +44(0)20-7090-1390
France
Monday - Friday
8:30 a.m. - 5 p.m. GMT+1 CET
Phone: +33-1-47-56-20-39
Germany
Monday - Friday
8:30 a.m. - 5:30 p.m. GMT+1 CET
Phone: +49-20-17-47-98-0
Email: rg-support@raritan.com
Melbourne, Australia
Monday - Friday
9:00 a.m. - 6 p.m. local time
Phone: +61-3-9866-6887
Taiwan
Monday - Friday
9 a.m. - 6 p.m. GMT -5 Standard -4 Daylight
Phone: +886-2-8919-1333
Email: support.apac@raritan.com