Onyx DYLTO32D - TV Soyo - Free user manual and instructions
Find the device manual for free Onyx DYLTO32D Soyo in PDF.


User questions about Onyx DYLTO32D Soyo
0 question about this device. Answer the ones you know or ask your own.
Ask a new question about this device
Download the instructions for your TV in PDF format for free! Find your manual Onyx DYLTO32D - Soyo and take your electronic device back in hand. On this page are published all the documents necessary for the use of your device. Onyx DYLTO32D by Soyo.
USER MANUAL Onyx DYLTO32D Soyo
The serial number of this product may be found on the back of the unit. You should record the number and other vital information here and retain this manual as a permanent record of your purchase to aid identification in case of theft. Serial numbers are not kept on file.
Model No:DYLT032D
Serial No:
IMPORTANT INFORMATION
WARNING: TO REDUCE THE RISK OF FIRE OR ELECTRIC SHOCK, DO NOT EXPOSE THIS PRODUCT TO RAIN OR MOISTURE.

CAUTION
RISK OF ELECTRIC SHOCK DO NOT OPEN

CAUTION: TO REDUCE THE RISK OF ELECTRIC SHOCK, DO NOT REMOVE COVER NO USER-SERVICEABLE PARTS INSIDE. REFER SERVICING TO QUALIFIED SERVICE PERSONNEL

The lightning flash with arrowhead symbol, within an equilateral trangle, is intended to alert the user to the presence of uninsulated "dangerous voltage within the product's enclosure that may be of sufficient magnitude to constitute a risk of electric shock to persons.

The exclamation point within a triangle is intended to alert the user to the presence of important operating and maintenance(servicing)instruction accompanying the product.
WARNING: FCC Regulations state that any unauthorized changes or modifications to this equipment not expressly approved by the manufacturer could void the user's authority to operate this equipment.
CAUTION : TO PREVENT ELECTRIC SHOCK, MATCH WIDE BLAND OF PLUG TO WIDE SLOT, FULLY INSERT.
SERVICE INSTRUCTIONS:
No user-serviceable parts inside, refer servicing to qualified service personnel. Call 1-800-287-4871 to find the nearest service center.
"Note to CATV SYSTEM installer, This reminder is provided to call CATV system installer's attention to Article 820-40 of the National Electrical Code that provides guidelines for proper grounding and, in particular, specifies that the cable ground has; be connected to the grounding system of the building, as close to the point of cable entry as practical."
This product utilizes tin-lead solder, and fluorescent lamp containing a small amount of mercury. Disposal of these materials may be regulated due to environmental considerations, For disposal or recycling information, please contact your local authorities.
Electricity is used to perform many useful functions, but it can also cause personal injuries and property damage if improperly handled. This product has been engineered and manufactured with safety being the highest priority. However, improper use can result in personal injury and / or property damage.
- Read instructions - All operating instructions must be read and understood before the product is operated.
- Keep this manual in a safe place - These safety and operating instructions must be kept in a safe place for future reference.
- Observe warnings - All warnings on the product and in the instructions must be observed closely.
■ Follow instructions - All operating instructions must be followed.
■ Attachments - Do not use attachments not recommended by the manufacturer. Use of inadequate attachments can result in accidents.
Power source - This product must be operated on a power source specified on the specification label. If you are not sure of the type of power supply used in your home, consult your dealer or local power company. For units designed to operate on batteries or another power source, refer to the operating instructions.
Power cord protection - The power cords must be routed properly to prevent people from stepping on them or objects from resting on them.
If the AC adapter is misplaced or needs to be replaced, obtain the same type of adapter from our service center or your dealer.
■ Overloading - Do not overload AC outlets or extension cords, overloading can cause fire or electric shock.
■ Entering of objects and liquids - Never insert an object into the product through vents or openings. High voltage flows through the product. Inserting objects can cause electric shock and/or short circuit internal parts. Also, do not spill water, or any other Liquid on the product.
Servicing - Do not attempt to service the product yourself. Removing covers can expose you to high voltage and other dangerous conditions. Request a qualified service person to perform servicing.
■ Repair - If any of the following conditions occurs, unplug the power cord from the AC outlet, and request a qualified service person to perform repairs.
a. When the power cord or plug is damaged.
b. When a liquid was spilled on the product or when objects have fallen into the product.
c. When the product has been exposed to rain or water.
d. When the product does not operate properly as described in the operating instructions.
Do not touch the controls other than those described in the operating instructions. Improper adjustment of controls not described in the instructions can cause damage, which often requires extensive adjustment work by a qualified technician.
e. When the product has been dropped or damaged.
f. When the product displays an abnormal picture.
g. Any noticeable abnormality in the product.
■ Replacement parts - In case the product needs replacement parts, make sure that the service person uses replacement parts specified by the manufacturer.
Safety check - Upon completion of service or repairwork, request the service technician to perform safety check to ensure that the product is in proper operating condition.
■ Wall or ceiling mounting - When mounting the product on a wall or ceiling, be sure to install the product according to the method recommended by the manufacturer.
Polarization - ThisAC adapter may be equipped with a polarized alternating current line plug (a plug having one blade wider than the other). This plug will fit into the power outlet only one way.
This is asafety feature, If you are unable to insert the plug fully into the outlet, try reversing the plug, If the plug still doesn't fit, contact your electrician to replace your obsolete outlet.
Do not defeat the safety purpose of the polarized plug.
IMPORTANT SAFETY PRECAUTIONS(Continued)
■ Cleaning - Unplug the power cord from the AC outlet before cleaning the product. Use a damp cloth to clean the product. Do not use liquid cleaners or aerosol Cleaners.
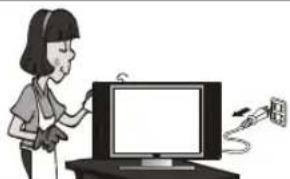
natural_image
Illustration of a person using a computer to interact with a cable (no text or symbols present)■ Water and moisture - Do not use the product near water, such as bathtub, washbasin, kitchen sink and laundry tub, swimming pool and in a wet basement.
natural_image
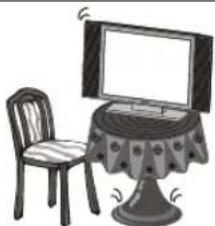
Illustration of two vintage office computers with different devices (no text or symbols visible)Stand - Do not place the product on an unstable cart, stand, tripod or table. Placing the product on an unstable base can cause the product to fall, resulting in serious personal injuries as well as damage to the product. Use only a cart, stand, tripod, bracket or table recommended by the manufacturer's instruction. Use only the mounting hardware recommended by the manufacturer.
natural_image
Illustration of a vintage-style office desk with a monitor and chair (no text or symbols)When relocating the product, place it on a cart. It must be moved with utmost care. Sudden stops, excessive force and uneven floor surface can cause the product to fall from the cart.

natural_image
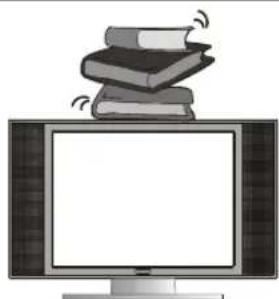
Simple line drawing of a person pushing a large box with a 'X' symbol above, no text or labels present.■ Ventilation - The vents and other openings in the cabinet are designed for ventilation. Do not cover or block these vents and openings since insufficient ventilation can cause overheatings and/or shorten the life of the product. Do not place the product on a bed, sofa, rug or other similar surface, since they can block ventilation openings. This product is not designed for built-in installations; do not place the product in an enclosed place such as a bookcase or rack, unless proper ventilation is provided or the manufacturer's instruction are followed.
natural_image
Illustration of a computer monitor with stacked books on top (no text or symbols)The Liquid Crystal panel used in this product is made of glass, Therefore, it can break when the product is dropped or when pressure is applied. Be careful not to injure yourself from broken glass in case the Liquid Crystal Panel breaks.
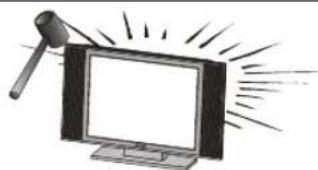
natural_image
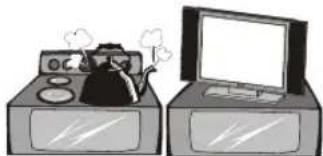
Illustration of a hammer striking a flat-screen monitor with radiating lines (no text or symbols)■ Heat sources - Keep the product away from heat sources such as radiators, heaters, stoves and other heat-generating products (including amplifiers).
natural_image
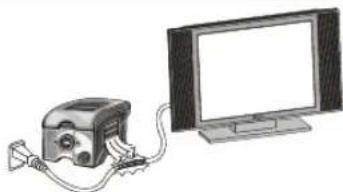
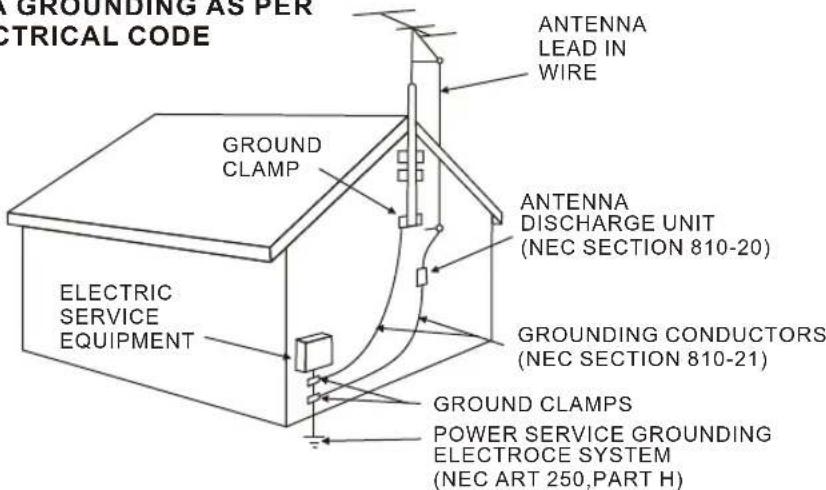
Illustration of a portable electronic device connected to a flat-screen monitor (no text or symbols visible)If an outside antenna is connected to the television equipment, be sure the antenna system is grounded so as to provide some protection against voltage surges and built-up static charges. Section 810 of the Nation Electrical Code provides information with respect to proper grounding of the mast and supporting structure, grounding of the lead-in wire to an antenna discharge unit, size of grounding conductors, location of antenna-discharge unit, connection to grounding electrode, and requirement for the grounding electrode.
EXAMPLE OF ANTENNA GROUNDING AS PER NATIONAL ELECTRICAL CODE
text_image
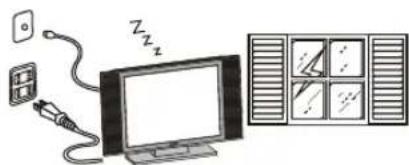
GROUNDING AS PER ELECTRICAL CODE ANTENNA LEAD IN WIRE GROUND CLAMP ANTENNA DISCHARGE UNIT (NEC SECTION 810-20) ELECTRIC SERVICE EQUIPMENT GROUNDING CONDUCTORS (NEC SECTION 810-21) GROUND CLAMPS POWER SERVICE GROUNDING ELECTROCE SYSTEM (NEC ART 250, PART H)Lightning - For added protection for this television equipment during a lightning storm, or when it is left unattended and unused for long period of time, unplug it from the wall outlet and disconnect the antenna. This will prevent damage to the equipment due to lightning and power-line surge.
natural_image
Illustration of a TV connected to a wall-mounted device with a cable, next to a grid display (no text or symbols)■ Power Lines - An outside antenna system should not be located in the vicinity of overhead power lines or other electric light or power circuits, or where it can fall into such power lines or circuits. When installing an outside antenna system, extreme care should be taken to keep from touching such power lines or circuits as contact with them might be fatal.
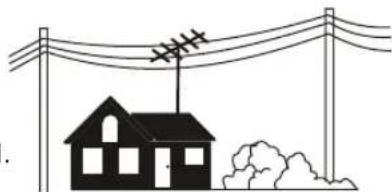
natural_image
Simple line drawing of a house under power lines with an antenna (no text or symbols)■ To prevent fire, never place any type of candle or naked flames on the top or near the TV set.
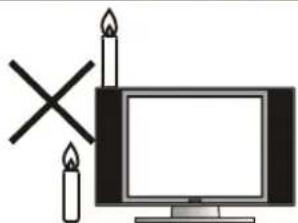
natural_image
Illustration of a computer monitor with candle and cross symbols (no text or labels)■ To prevent fire or shock hazard, do not expose this products to dripping or splashing. No objects filled with liquids, such as vases, should be placed on the products.
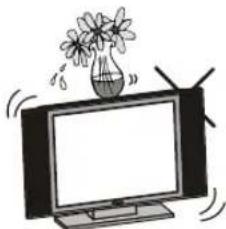
natural_image
Illustration of a flat-screen TV with a vase and explosion effect (no text or symbols)CONTENTS
Page
IMPORTANT INFORMATION.... 1-2
IMPORTANT SAFETY PRECAUTIONS.... 3-5
CONTENTS....6
SUPPLIED ACCESSORIES....7
PREPARATION.... 8-11
REMOTE CONTROL OVERVIEW....12-13
PDPTV CONTROLS OVERVIEW.... 14
CONNECTORS OVERVIEW.... 15
BASIC OPERATION....16-17
SELECTING MENU ITEMS.... 18
ADJUSTMENTS 19-27
CONNECTING EXTERNAL DEVICES.... 35
TROUBLESHOOTING.... 36-38
SPECIFICATIONS.... 39
Make sure the following accessories are included in the product packaging.
| Remote Control | Instruction Manual |
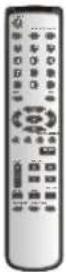 |  |
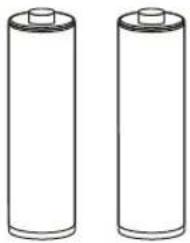
| AC cord | 2 X"AAA" Size Batteries |
 |  |
Using the Remote Control
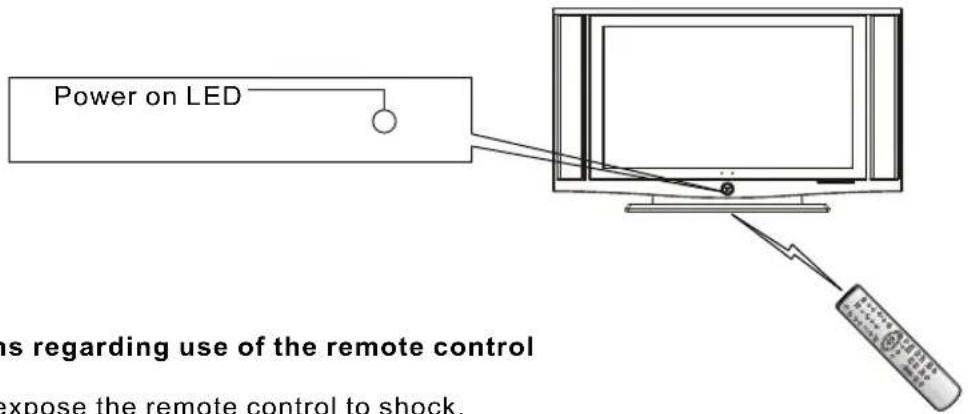
Use the remote control by pointing it towards the remote control sensor window on the main unit. Objects between the remote control and sensor window may prevent proper operation.
text_image
Power on LED as regarding use of the remote control expose the remote control to shock.Cautions regarding use of the remote control
- Do not expose the remote control to shock.
In addition, do not expose the remote control to liquid, and do not place in an area with high humidity. - Do not install or place the remote control under direct sunlight. The heat may cause deformation of the unit.
- The remote control may not work properly if the remote control sensor window of the main unit is under direct sunlight or strong lighting. In such case, change the angle of the lighting or PDP TV set, or operate the remote control closer to the remote control sensor window.
Installing the Batteries
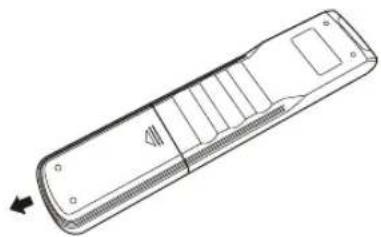
Before using the PDP TV set for the first time, insert 2 "AAA" size batteries into the remote control (supplied). When the batteries become depleted and the remote control fails to operate, replace the batteries with new (AAA size) batteries.
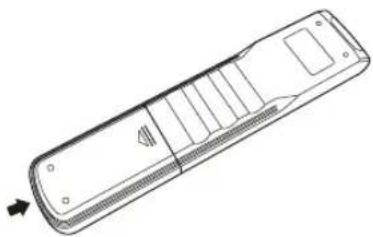
- Press cover edge & pull it to open the battery cover.
natural_image
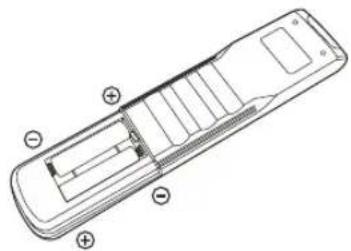
Line drawing of a remote control device with no text or symbols- Insert both batteries noting the polarity markings.
natural_image
Technical line drawing of a remote control casing with labeled components (no text or symbols)- Press the battery cover down.
natural_image
Line drawing of a remote control device with no text or symbolsCaution!
Cautions regarding batteries
Improper use of batteries can result in chemical leakage and/or explosion. Be sure to follow the instructions below:
- Insert batteries with their terminals corresponding to the (+) and (-) as indicated in the compartment. Different types of batteries have different characteristics. Do not mix batteries of different types.
- Do not mix old and new batteries. Mixing old and new batteries can shorten the life of new batteries and/or cause the old battery to leak.
- Remove batteries when they become weak. Chemicals that leak from batteries can cause a rash. If chemical leakage is found, wipe clean with cloth.
- The batteries supplied with the product may have a shorter life expectancy due to storage conditions.
- If the remote control will not be used for an extended period of time, remove the batteries from the remote control.
Antenna Connection
ANTENNA
The antenna requirements for good color television reception are more important than those for black & white television reception. For this reason, a good quality outdoor antenna is strongly recommended.
The following is a brief explanation of the type of connections that are provided with the various antenna systems.
F-type connector
- A 75-ohm system is generally a round cable with F-type Connector that can easily be attached to a terminal without tools (not supplied).
- A 300-ohm system is a flat "twin-lead" cable that can be attached to a 75-ohm terminal through a 300-75-ohm adapter (not supplied)
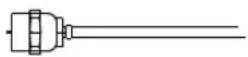
75-ohm coaxical cable (round)

300-ohm twin lead cable (flat)
OUTDOOR ANTENNA CONNECTION
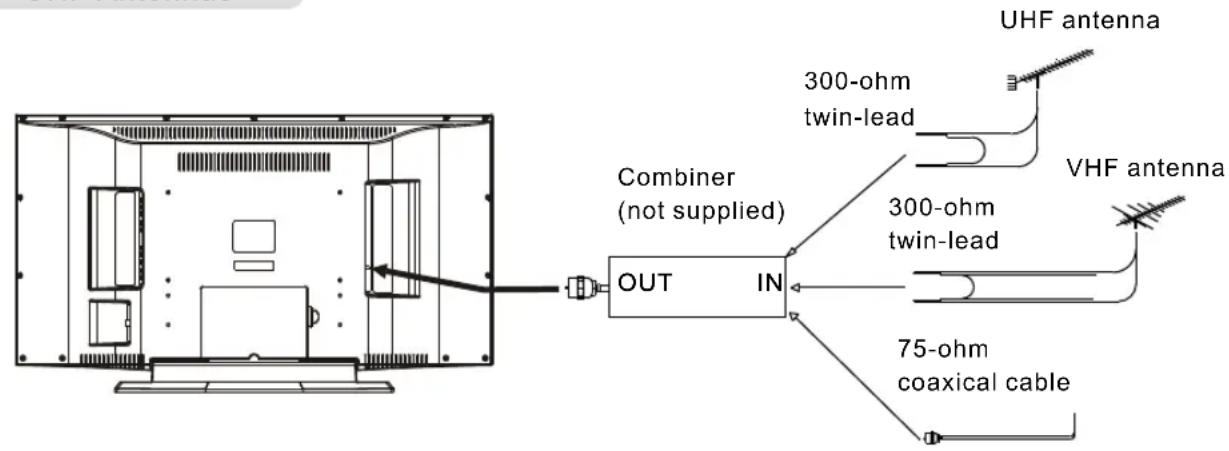
- Use one of the following two diagrams if you connect to an outdoor antenna
A: Using a VHF/UHF combination outdoor antenna
B: Using separate VHF and/or UHF outdoor antennas
- Connect the outdoor antenna cable lead-in to ANT. (Antenna terminal) on the rear of the TV set.
Separate VHF AND/OR UHF Antennas
text_image
UHF antenna 300-ohm twin-lead VHF antenna 300-ohm twin-lead 75-ohm coaxical cable Combiner (not supplied) OUT INAntenna Connection (Continued)
CABLE TV (CATV) CONNECTION
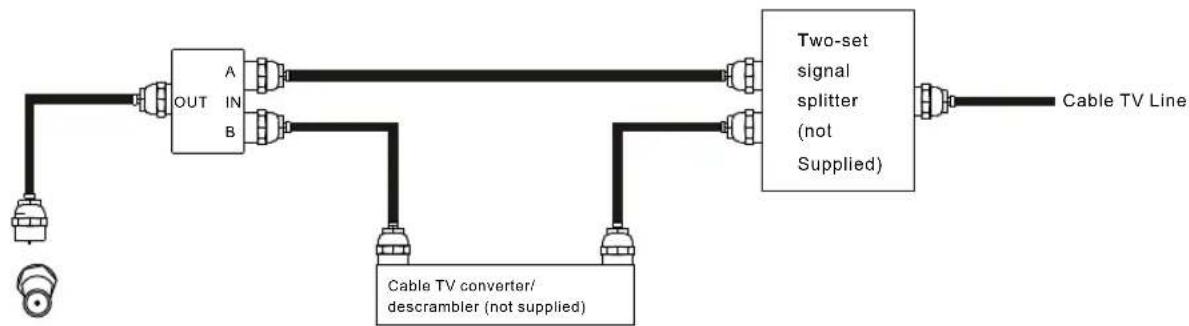
A 75-ohm coaxial cable connector is built into the back of the PDP TV for easy hookup. When connecting the 75-ohm coaxial cable to the set, screw the 75-ohm cable to the ANT. Terminal.
Some cable TV companies offer "premium pay channels" Since some of these premium pay channels are scrambled, a cable TV converter/descrambler is generally provided to the subscriber by the cable TV company. This converter/descrambler is necessary for normal viewing of the scrambled channels. (Set your TV to channel 3 or 4, typically one of these channels is used. If this is unknown, consult your cable TV company.) For more specific instructions on installing cable TV, consult your cable TV company. One possible method of utilizing the converter /descrambler provided by your cable TV company is explained below:
Please note: An RF switch provided with two inputs (A and B) is required (not supplied).
"A"position on the RF switch (not supplied): You can view all unscrambled channels by using the TVs channel keys.
"B"position on the RF switch (not supplied):the converter/descrambler by using the converters channel keys.
flowchart
graph LR
    A["Input"] --> B["OUT"]
    B --> C["A"]
    B --> D["B"]
    C --> E["Two-set signal splitter (not Supplied)"]
    D --> E
    E --> F["Cable TV Line"]
    G["Cable TV converter/descrambler (not supplied)"] --> E
NOTE
- Consult your Dealer or Service Center for the type of splitter, RF switch or combiner that might be required.
Power Connection
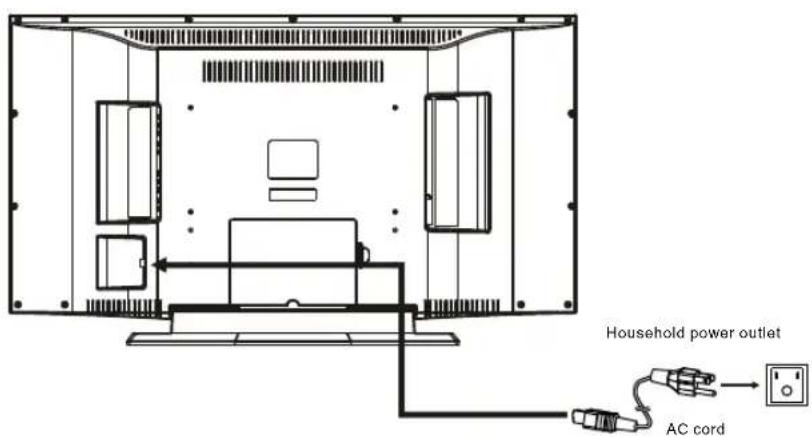
- Turn on power switch.
- Plug AC cord(supplied) to product and wall outlet.
text_image
Household power outlet AC cordNOTE
- Use only a recommended AC plug code, if necessary, depending on the design of the wall outlet.
- Unplug the AC cord from the product and power outlet when not using the TV for a long period of time.
Button Descriptions
text_image
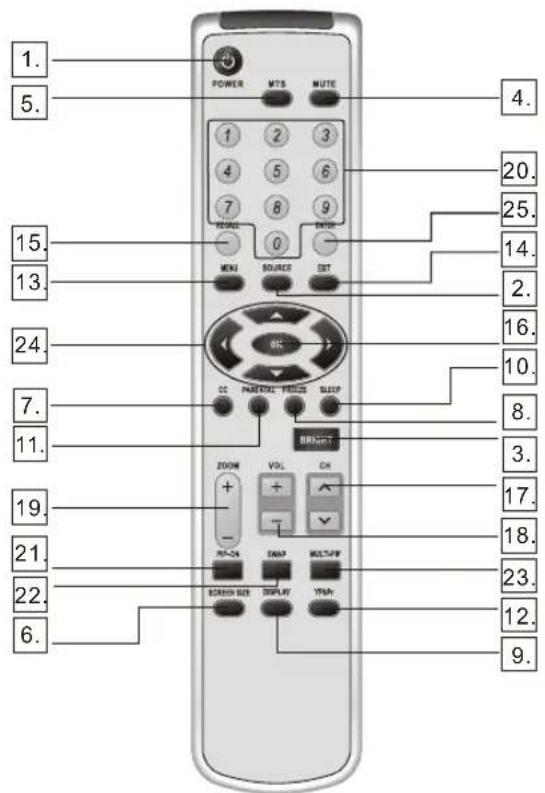
1. 5. 15. 13. 24. 7. 11. 19. 21. 22. 6. POWER MTS MUTE 1 2 3 4 5 6 7 8 9 MENU 0 SOURCE EST CC PARENTAL FOCUS SLIPP BRINCH ZOOM + - + - VOL CK - - DMAP MULTIPF SCREEN SIZE DISPLAY TRAP 4. 20. 25. 14. 2. 16. 10. 8. 3. 17. 18. 23. 12. 9.- POWER Press to turn on and off the TV.
- SOURCE Press to select the applicable input source.
- BRIGHT Press to select picture brightness.
- MUTE Press to mute the sound. Press again to restore the sound.
- MTS Press repeatedly to cycle through the Multi-channel TV sound (MTS) options: MONO, STEREO. and SAP.
- SCREEN SIZE Press repeatedly to scroll through the screen size options:4:3, ZOOM, Full screen.
- CC Press to select the Closed Caption Function, see page 27 for further details.
- FREEZE Press to freeze the picture. Press again to restore the picture.
- DISPLAY Press once to display the current channel number, available main and PIP connections.
- SLEEP Press repeatedly to step through the 30MIN, 60MIN, 90MIN, 120MIN, and OFF
Button Descriptions
| 11. | PARENTAL | Press to select PARENTAL CONTROLS, see page 25. |
| 12. | YPbPr | Press to select HDTV picture if you connect a DVD player or digital set-top-box to YPbPr jacks. Note that the DVD player or the digital set-top box needs to have a built-in HDTV tuner, and you need to be tuned into an HDTV channel to receive HDTV quality broadcasts. |
| 13. | MENU | Press to display the menu screen. |
| 14. | EXIT | Press EXIT to exit from the menu screen. |
| 15. | RECALL | Press to jump back and forth between two channels. The TV alternates between the current channel and the last channel that was selected. |
| 16. | OK | Press to enter and to set the function you choose in the menu screen. |
| 17. | CH ▲/▼ | Press to scan through channels. To scan quickly through channels, press and hold down either CH▲/▼ |
| 18. | VOL +/- | Press to adjust the volume. |
| 19. | ZOOM +/- | Press ZOOM + to enlarge picture, press ZOOM - to shrink picture. |
| 20. | 0-9 | Press 0-9 to select a channel; the channel changes after 3 seconds. |
| 21. | PIP-ON | Press repeatedly to cycle through the PIP size, PBP and POP picture. See page 22 for further details. |
| 22. | SWAP | Press to exchange main and sub picture in PIP, PBPand POP mode. |
| 23. | MULTI-PIP | Press to let you operate Multi-PIP function, see page 23. |
| 24. | ▲▼▶◀ | Press ▲▼▶◀ the cursor on screen. To select an item please press the "OK" button. |
| 25. | ENTER | Press to enter and to set the function you choose in the menu screen. |
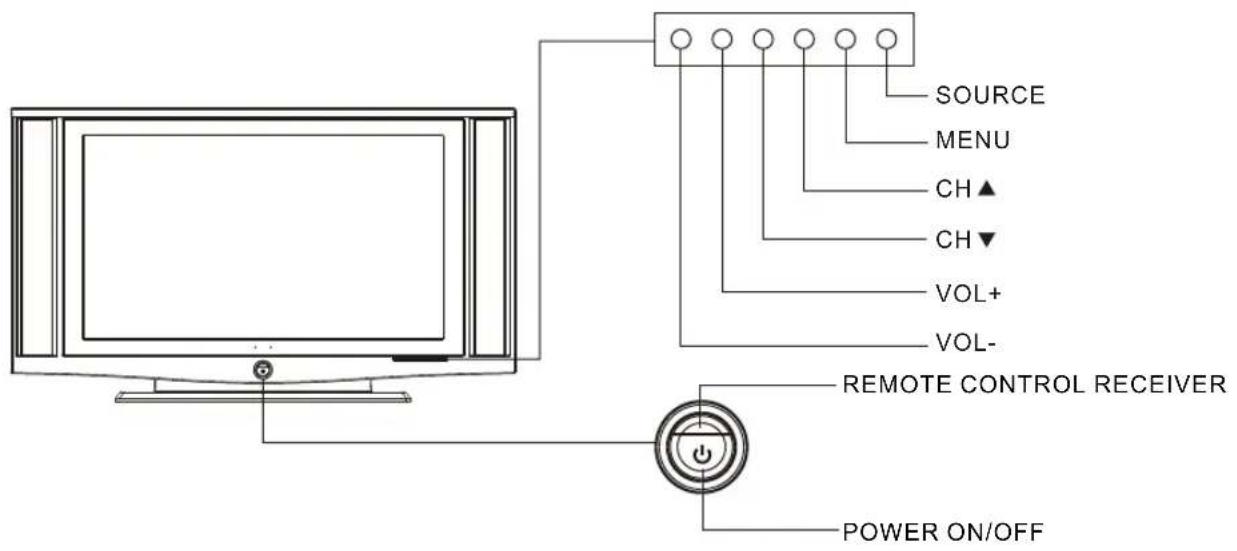
text_image
SOURCE MENU CH▲ CH▼ VOL+ VOL- REMOTE CONTROL RECEIVER POWER ON/OFFNOTE
- SOURCE, CH▲, ▼OL +/-, and MENU button on the main unit have the same functions as the same buttons on the remote control. Basically, this operation manual provides a description based on operation with the remote control.
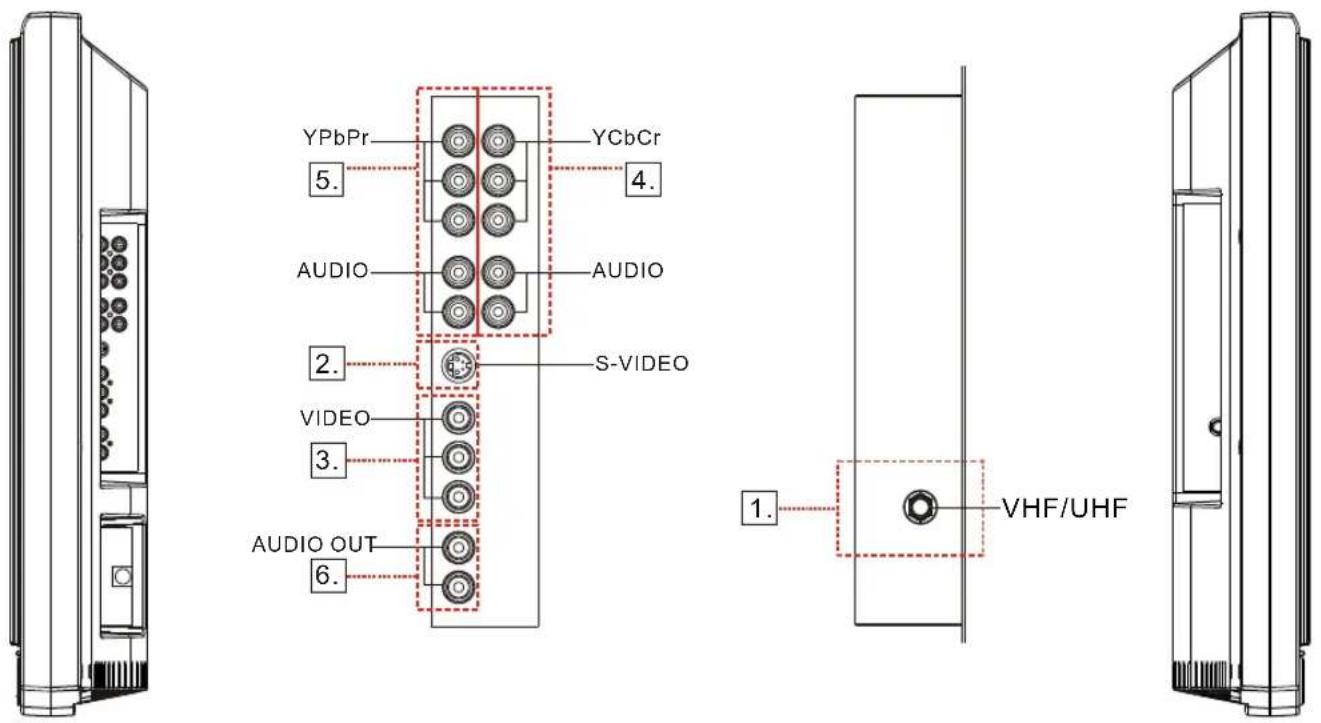
- VHF/UHF Primary RF input connects through RF/HLF antenna or cable.
- S-VIDEO Connect to the S-VIDEO OUT jack of your VCR or other video equipment that has S-VIDEO output jack S-VIDEO provides better picture quality than either composite video 3. or VHF/UHF 1. connections.
- VIDEO Connect to the composite A/V output jacks on your VCR or other video component.
- YCbCr Video equipment connected to the YCbCr inopobeminals. ) from 480s enterpriseinput equipment is available. Please read equipment's user manual to make sure that it's capable of 480i output.
- YPbPr Connect to your DVD player's ordigital set-top box's component video(Y, Pb,Pr) and audio (L/R) jacks. Component video provide better picture quality than 1., 2. σ 3. Playback from 480i,480p-1080i output equipment is available. This is only available 480i,480p-1080i output signal is provided by your equipment. Please read equipment's user manual to make sure that it's capable of 480i,480p-1080i output.
- AUDIO Connect to the left and right audio input jacks of your audio amplifier. You can LINE OUT R/L use these outputs to listen to your TV's audio through your stereo system.

natural_image
Top-down schematic of a device rear panel with ventilation slots and buttons (no text or labels)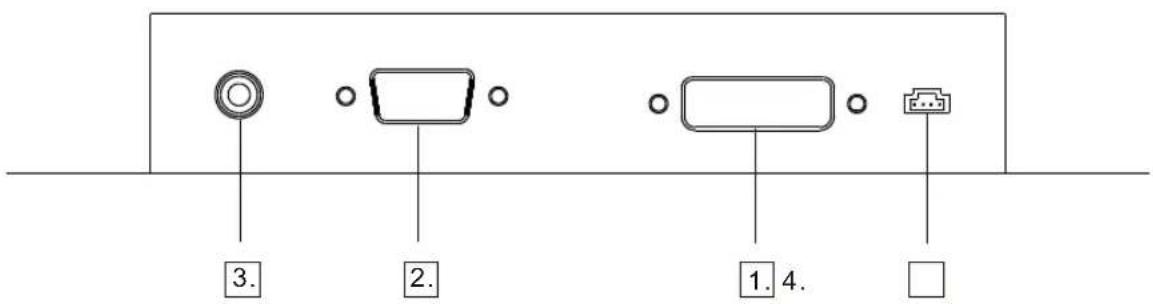
text_image
3. 2. 1. 4. □- DVI INPUT JACK
Receives the digital video/audio signals from PC. The DVI input is including HDCP.
- PC(RGB) INPUT JACK(15pin)
Connect to the video/audio output jack on your PC.
- AUDIO LINE-IN
PC "SOUND CARD" input 3.5mm jacket terminal.
- SERVICE PACK
For service only.
SELECTING AN INPUT SOURCE
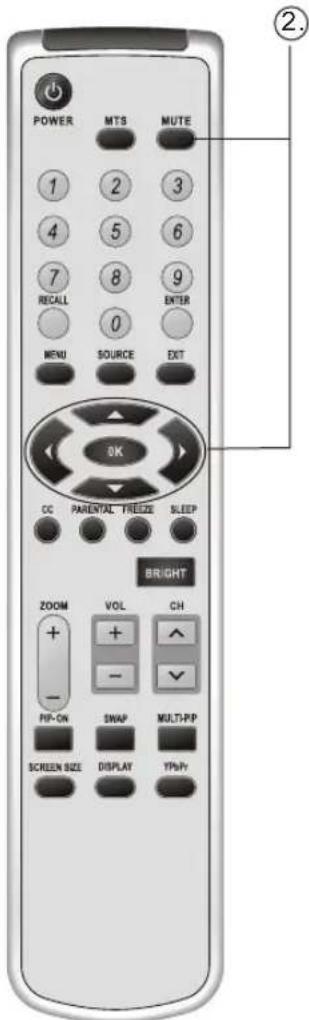
text_image
POWER MTS MUTE 1 2 3 4 5 6 7 8 9 RECALL 0 MENU SOURCE EXIT 5K CC PARENTAL TBEEZE SLEEP BRIGHT ZOOM VOL CH + + - - - - PIP-ON SWAP MULTI-PP SCREEN SIZE DISPLAY YF/HY-
Turn on the power of the connected Video equipment.
-
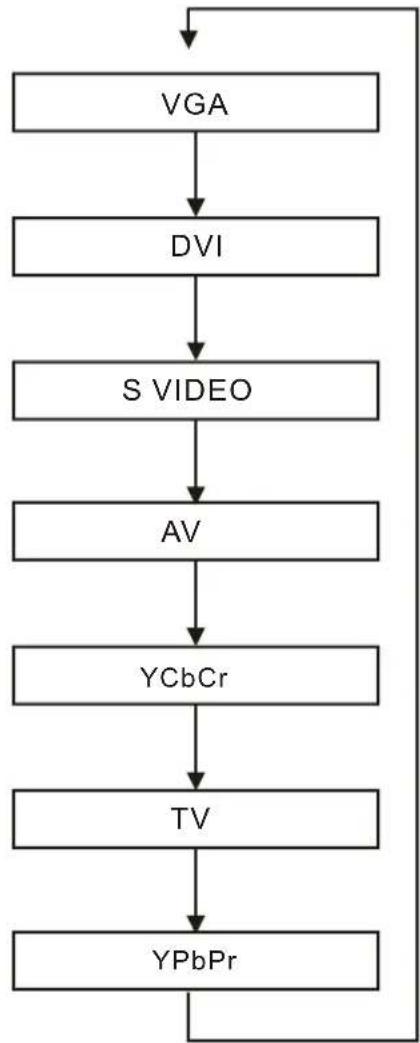
Press SOURCE and ▲ to select the main input source you want to view.
NOTE
- The AV input mode indication remains for 10 seconds.
- VGA and DVI: Connects to the VGA&DVI jack of your Personal computer (PC). Note that a DVI port is not a very common jack on a PC as it requires a PC which has a digital video card.
- S VIDEO: Connects to the S VIDEO out jack of your VCR on other video equipment that has S VIDEO.
- AV: Connects to the composite AV output jacks on your VCR or other video component.
- YCbCr: Video equipment connected to the YCbCr input terminals.
- TV: VHF/UHF/CABLE connect to the ANTENNA TERMINAL.
- YPbPr: Video equipment (such as HDTV) connected to the YPbPr input terminals. Playback from 480p480p-1080i equipment is available.
MAIN SOURCE
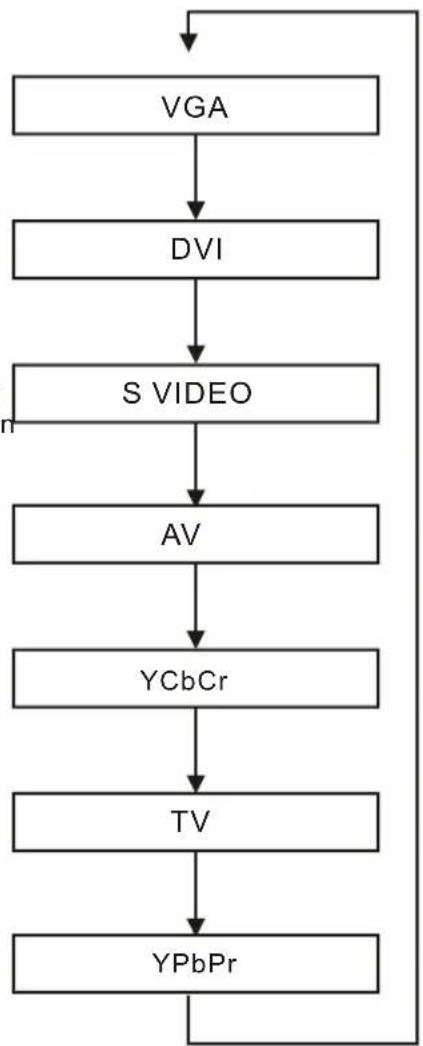
flowchart
graph TD
    A["VGA"] --> B["DVI"]
    B --> C["S VIDEO"]
    C --> D["AV"]
    D --> E["YCbCr"]
    E --> F["TV"]
    F --> G["YPbPr"]
    G --> A
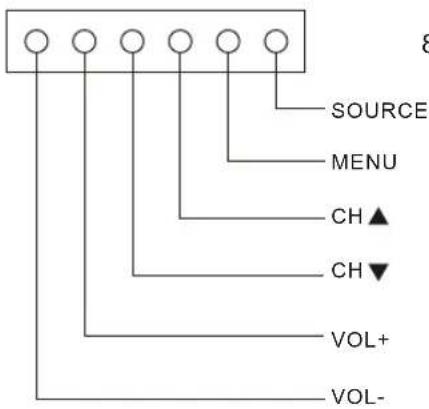
text_image
SOURCE MENU CH▲ CH▼ VOL+ VOL-SELECTING VIDEO PIP SOURCE
If you want to use the PIP function you will have to connect a PIP source(see page 33,34,35)
text_image
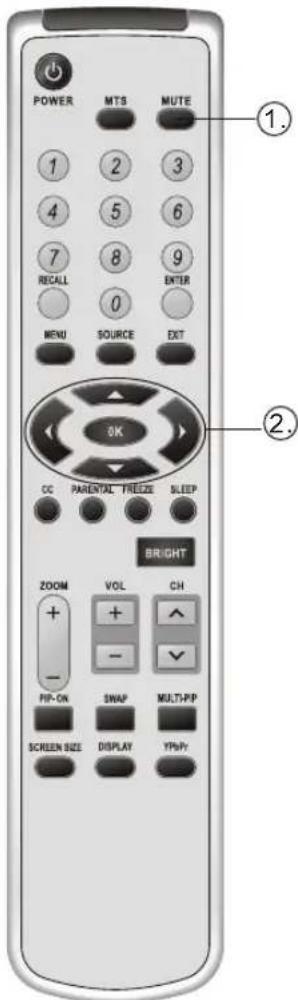
POWER MTS MUTE 1 2 3 4 5 6 7 8 9 RECALL 0 ENTER MENU SOURCE EXT OK CC PARENTAL FRIEZE SLEEP BRIGHT ZOOM VOL CH + - - - - - - - - - - - - - - - - - - - - - - - - - - - - - - - - - - - - - - - - - - - - - - - - - - - - - - - - - - - - - - - - - - - - - - - - - - - - - - - - - - - - - - - -- Press SOURCE twice to show the available PIP sources. The available PIP sources will show up in black letters and are available for selection. The disabled PIP sources will show up in grey letters and will not be available for selection.
- Press ▲ to select the PIP source you want to use and then press the OK button to confirm your choice
PIP SOURCE
flowchart
graph TD
    A["VGA"] --> B["DVI"]
    B --> C["S VIDEO"]
    C --> D["AV"]
    D --> E["YCbCr"]
    E --> F["TV"]
    F --> G["YPbPr"]
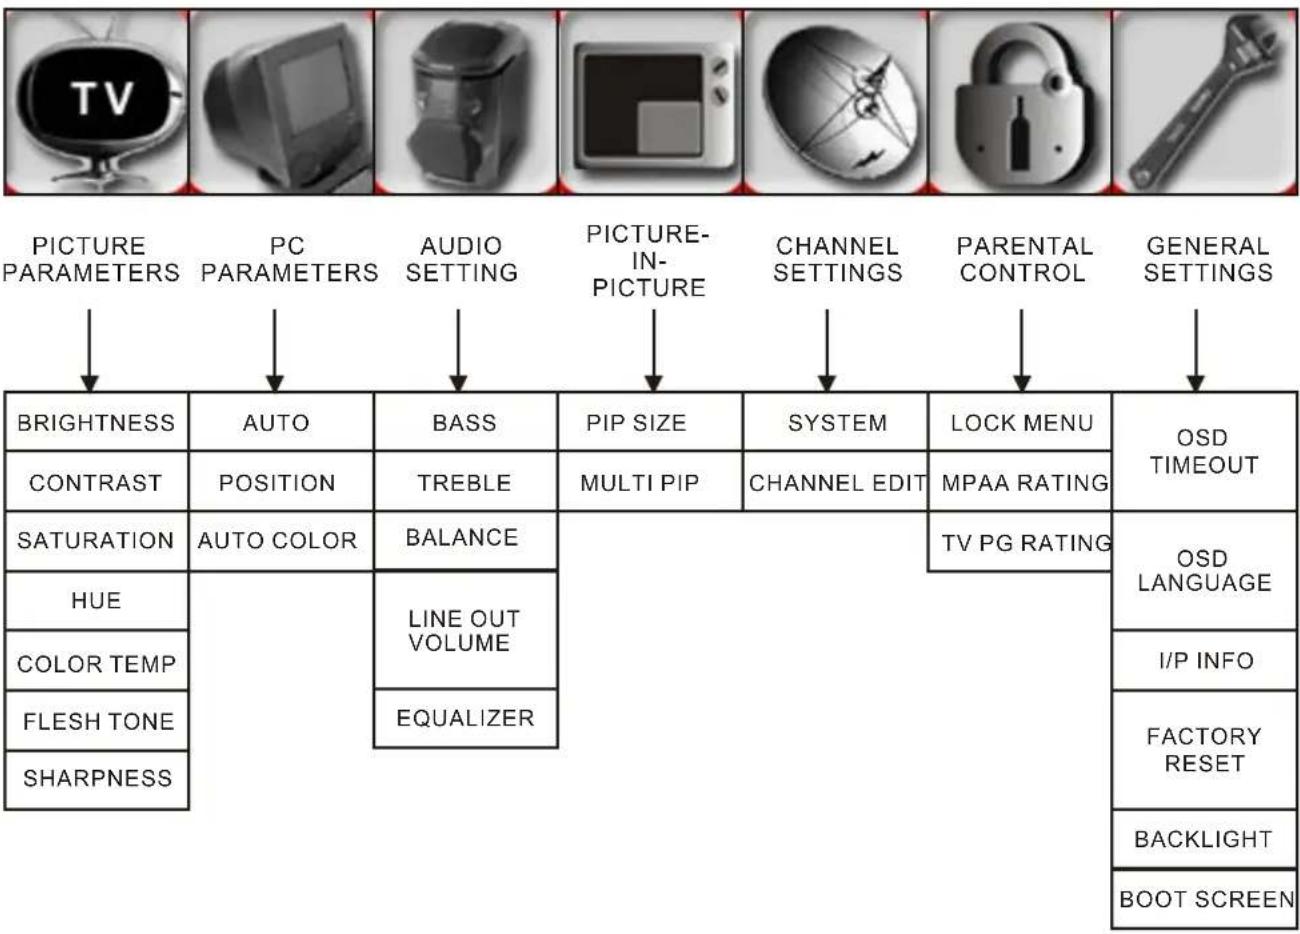
This LCD TV set allows you to adjust the various setting using the menu screen. Select the desired menu item by following the steps and then refer to the indicated page for details.
- Press MENU to display the MENU screen.
- Press either the VOLUME +/- buttons on the remote control or TV to select the sub-menu (The desired menu & sub-menu item will change to yellow when it is selected.)
flowchart
graph TD
    A["TV"] --> B["PICTURE PARAMETERS"]
    C["PC"] --> D["PC PARAMETERS"]
    E["AUDIO SETTING"] --> F["AUDIO SETTING"]
    G["PICTURE-IN-PICTURE"] --> H["PICTURE-IN-PICTURE"]
    I["CHANNEL SETTINGS"] --> J["CHANNEL SETTINGS"]
    K["PARENTAL CONTROL"] --> L["PARENTAL CONTROL"]
    M["GENERAL SETTINGS"] --> N["GENERAL SETTINGS"]
    O["BRIGHTNESS"] --> P["AUTO"]
    Q["CONTRAST"] --> R["POSITION"]
    S["SATURATION"] --> T["AUTO COLOR"]
    U["HUE"] --> V["LINE OUT VOLUME"]
    W["COLOR TEMP"] --> X["EQUALIZER"]
    Y["FLESH TONE"] --> Z["EQUALIZER"]
    AA["SHARPNESS"] --> AB["EQUALIZER"]
    AC["AUTO"] --> AD["BASS"]
    AE["MULTI PIP"] --> AF["PIP SIZE"]
    AG["CHANNEL EDIT"] --> AH["SYSTEM"]
    AI["MPAA RATING"] --> AJ["LOCK MENU"]
    AK["OSD TIMEOUT"] --> AL["OSD OUTPUT"]
    AM["TV PG RATING"] --> AN["TV PG RATING"]
    AO["OSD LANGUAGE"] --> AP["I/P INFO"]
    AQ["FACTORY RESET"] --> AR["FACTORY RESET"]
    AS["BACKLIGHT"] --> AT["BACKLIGHT"]
    AU["BOOT SCREEN"] --> AV["BOOT SCREEN"]
NOTE
- The displayed items depend on the setting conditions.
- To return to the previous screen, press either remote controller's EXIT or TV's MENU/EXIT button.
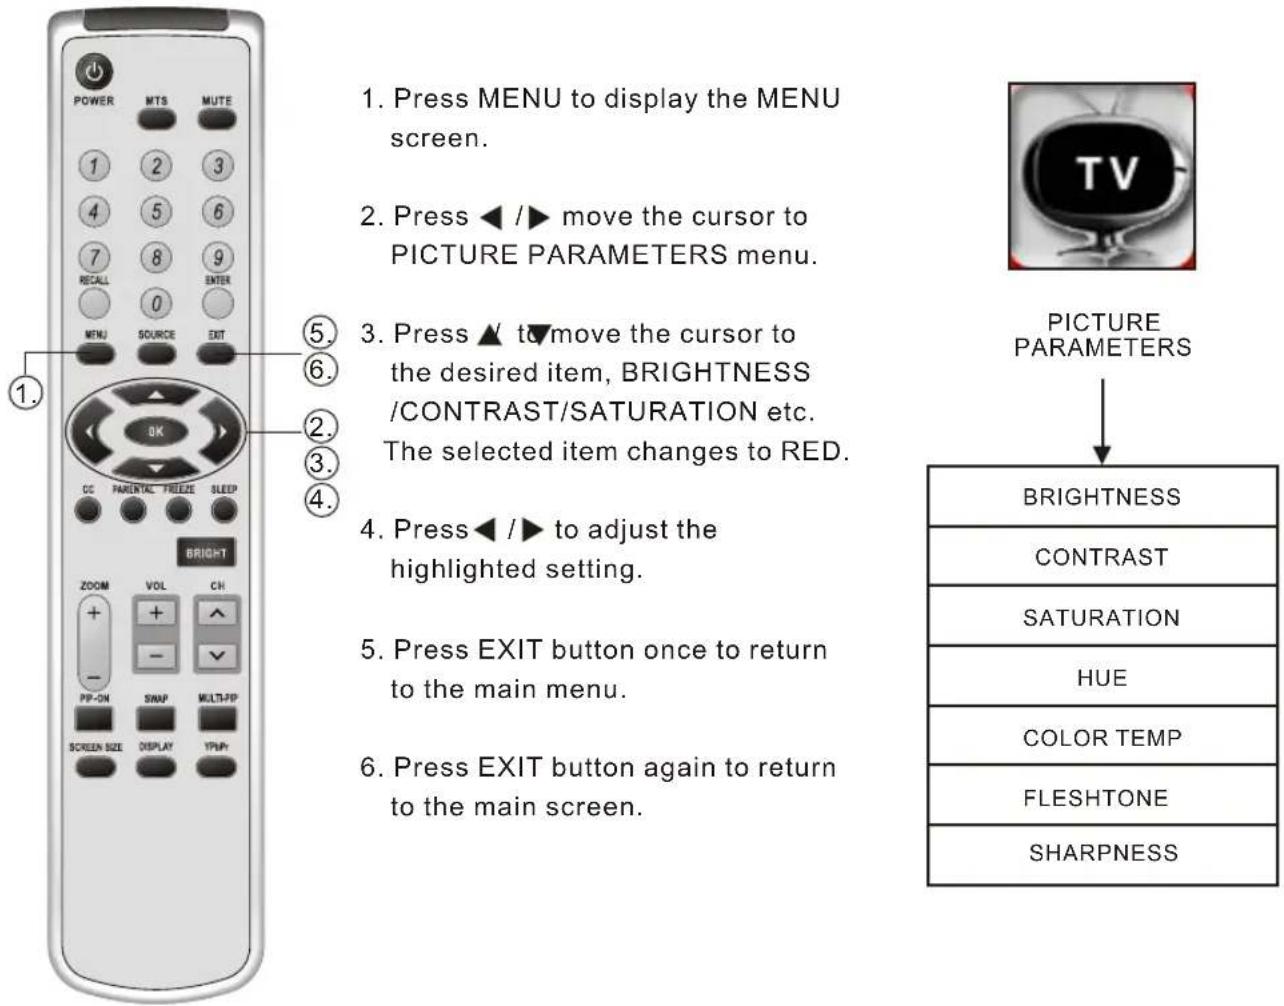
ADJUSTING PICTURE PARAMETERS SETTINGS
Video adjustments have different selection items depending on AV mode (signal from external device).
text_image
1. Press MENU to display the MENU screen. 2. Press ◀ /► move the cursor to PICTURE PARAMETERS menu. 3. Press ▲ t▼move the cursor to the desired item, BRIGHTNESS /CONTRAST/SATURATION etc. The selected item changes to RED. 4. Press ◀ /► to adjust the highlighted setting. 5. Press EXIT button once to return to the main menu. 6. Press EXIT button again to return to the main screen. 1. 2. 3. 4. 5. 6. 7. 8 9 10 11 12 13 14 15 16 17 18 19 20 21 22 23 24 25 26 27 28 29 30 31 32 33 34 35 36 37 38 39 40 41 42 43 44 45 46 47 48 49 50 51 52 53 54 55 56 57 58 59 60 61 62 63 64 65 66 67 68 69 70 71 72 73 74 75 76 77 78 79 80 81 82 83 84 85 86 87 88 89 90 91 92 93 94 95 96 97 98 99 100ADJUSTING PC PARAMETER SETTINGS
PC adjustments have different selection items depending on VGA/DVI mode (signal from PC). This setting is only available when a PC is connected via a VGA/DVI cable to the TV.
text_image
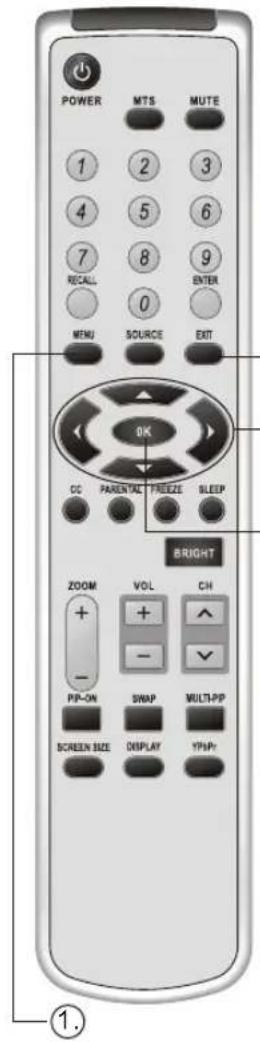
POWER MTS MUTE 1 2 3 4 5 6 7 8 9 RECALL 0 ENTER MENU SOURCE EXIT OK CC PARENTAL FREEZE SLEEP BRIGHT ZOOM VOL CH + - PP-ON SWAP MULTI-PP SCREEN SIZE DISPLAY YPS-PP ①- Press MENU to display the MENU screen.
- Press ◀ / ▶ to move the cursor to PC PARAMETERS menu.
- Press ▲ to move the cursor to the desired item, AUTO/POSITION/AUTO COLOR etc. The selected item changes to GREEN.
- Press OK to enter the setting you have highlighted.
- Press ▲▼ ◀c adjust display position.
- Press EXIT to return to the main menu.
- Press EXIT button again to return to the main screen.
PC PARAMETERS
flowchart
graph TD
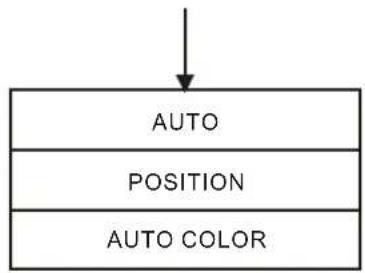
    A["AUTO"] --> B["POSITION"]
    B --> C["AUTO COLOR"]
NOTE
- AUTO: PC configuration is set automatically.
- POSITION: To set video signal from PC for best viewing position.
- AUTO COLOR: Configures the video signal from the PC to provide best picture.
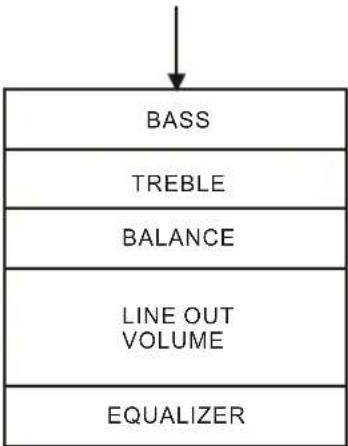
ADJUSTING AUDIO SETTINGS
text_image
POWER MTS MUTE 1 2 3 4 5 6 7 8 9 RECALL 0 MENU SOURCE EXIT OK CC PARENTAL FREEZE SLEEP BRIGHT ZOOM VOL CH + - PP-ON SWAP MULTI-PP SCREEN SIZE DISPLAY YMPR ①.- Press MENU to display the MENU screen.
- Press ◀ /▶ to move the cursor to AUDIO SETTINGS menu.
- Press ▲ move the cursor to the desired item, BASS/TREBLE/BALANCE etc. The selected item changes to RED.
- Press ◀ /▶ to adjust the highlighted setting.
- Press EXIT botten to return to the main menu.
- Press EXIT button again to return to the main screen.
AUDIO
SETTING
flowchart
graph TD
    A[" "] --> B["BASS"]
    A --> C["TREBLE"]
    A --> D["BALANCE"]
    A --> E["LINE OUT VOLUME"]
    A --> F["EQUALIZER"]
NOTE
• LINE OUT VOLUME: You can use this volume control to adjust audio output through your stereo amplifier system.
- EQUALIZER: There are ROCK, CLASSIC, POP, NORMAL and USER's types. Depend on customer like to select.
ADJUSTING PICTURE-IN-PICTURE SETTINGS
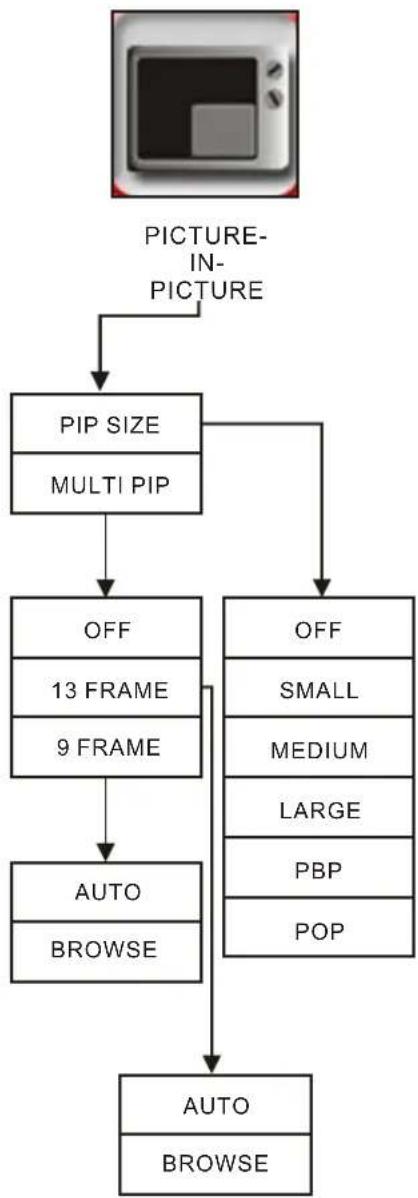
PIP adjustment lets you see two pictures or multiple pictures from different sources (from an antenna, VCR, DVD, etc.) on the same display at the same time.
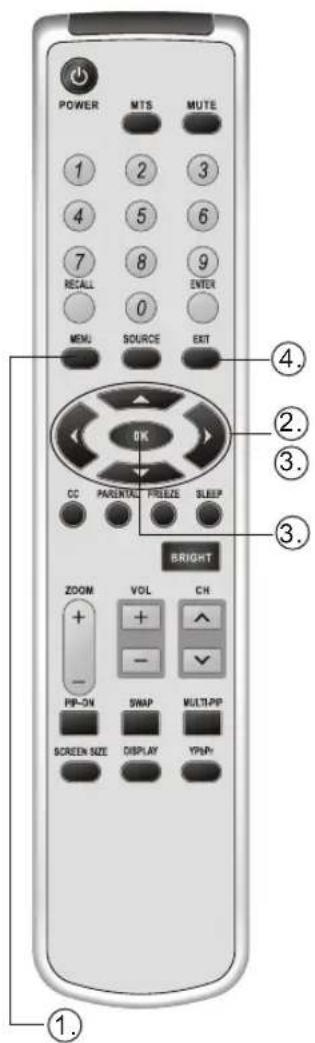
SET PIP SIZE
- Press MENU to display the MENU screen.
- Press ◀ / ▶ to move the cursor to PICTURE-IN-PICTURE menu.
- Press ▲ to move the cursor to PIP SIZE, press OK to show all available options, press ▲ to choose preferred size, press OK to confirm your selection.
- Press EXIT twice to return to the main screen.
text_image
POWER MTS MUTE 1 2 3 4 5 6 7 8 9 RECALL 0 ENTER MENU SOURCE EXIT OK CC PARENTAL FREESE SLINK BRIGHT ZOOM VOL CH + - - - PIP-ON SWAP MULTIPP SCREEN SIZE DISPLAY YMP+ ① ② ③ ④NOTE
- There is a hot key "PIP-ON" to let you set PIP SIZE easily on remote controller.
flowchart
graph TD
    A["PICTURE-IN-PICTURE"] --> B["PIP SIZE"]
    B --> C["MULTI PIP"]
    C --> D["OFF"]
    C --> E["OFF"]
    D --> F["13 FRAME"]
    D --> G["9 FRAME"]
    E --> H["SMALL"]
    E --> I["MEDIUM"]
    E --> J["LARGE"]
    E --> K["PBP"]
    E --> L["POP"]
    F --> M["AUTO"]
    G --> N["AUTO"]
    H --> O["BROWSE"]
    I --> P["BROWSE"]
    J --> Q["BROWSE"]
    K --> R["BROWSE"]
    L --> S["BROWSE"]
ADJUSTING PICTURE-IN-PICTURE SETTINGS
text_image
POWER MTS MUTE 1 2 3 4 5 6 7 8 9 RECALL 0 ENTER MENU SOURCE EXIT OK CC PARENTAL FRIEZE SLEEP BRIGHT ZOOM VOL CH - - - - PP-ON SWAP MULTI-PP SCREEN SIZE DISPLAY TP-PP- ②SET MULTI PIP
This function can only be performed when the PIP SIZE has been chosen, except for "OFF" setting.
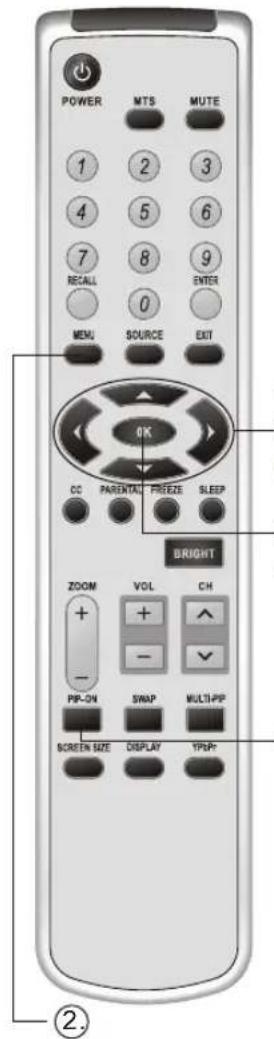
- Press PIP-ON button repeatedly to select the desired PIP window size.
- Press MENU to display menu screen.
-
Press ◀ /▶ to move the cursor to the "PICTURE-IN-PICTURE" menu.
-
Press ▲ to move the cursor to MULTI PIP, Press OK to display sub settings menu, Press ▲ to choose 1'3 FRAME or 9 FRAME The selected item changes to GREEN.
-
Press OK and / ▲to choose AUTO or " BROWSE". Enter pass word 1111 "to display MULTI PIP.
-
Press ◀/▶ to choose TV programs if you choose BROWSE " .
-
Press MULTI-PIP to return to main menu. Press "OK" to select OFF twice and then press EXIT twice to return to the main screen.
natural_image
Simple icon of a camera with no text or symbols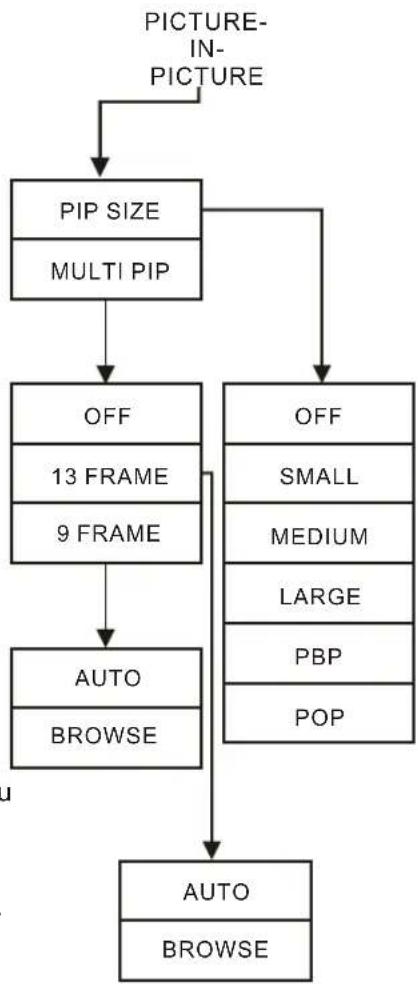
flowchart
graph TD
    A["PICTURE-IN-PICTURE"] --> B["PIP SIZE"]
    B --> C["MULTI PIP"]
    C --> D["OFF"]
    C --> E["13 FRAME"]
    C --> F["9 FRAME"]
    D --> G["AUTO BROWSE"]
    E --> H["OFF"]
    H --> I["SMALL"]
    H --> J["MEDIUM"]
    H --> K["LARGE"]
    H --> L["PBP"]
    H --> M["POP"]
    G --> N["AUTO BROWSE"]
    I --> N
    J --> N
    K --> N
    L --> N
    M --> N
NOTE
• 13 FRAME allows you to display 13 programs.
- 9 FRAME allows you to display 9 programs.
• AUTO performs program scanning automatically.
• BROWSE lets you to choose programs manually.
- There is a MULTI-PIP button on the remote to let you access this function easily.
• The pass word can not be changed by user.
Adjusting CHANNEL Settings
text_image
POWER MTS MUTE 1 2 3 4 5 6 7 8 9 RECALL 0 MENU SOURCE EXIT OK CC PARENTAGE FREEZEE SLEEP BRIGHT ZOOM VOL CH + + - PIP-ON SWAP MULTI-PP SCREEN SIZE DISPLAY YPS++ ①CHANNEL SETTINGS let you memorize TV stations provided by VHF/UHF or CABLE signal.
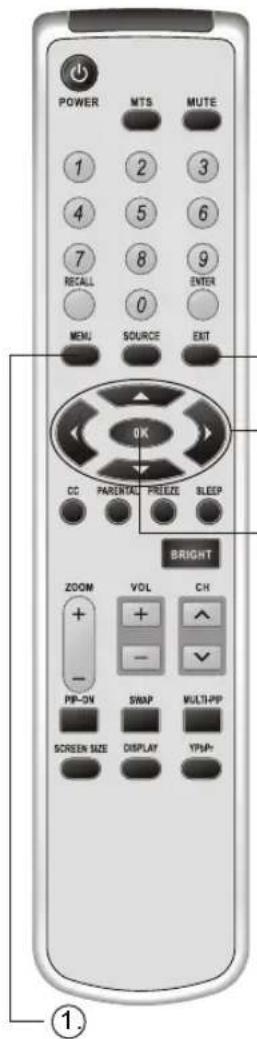
- Press MENU to display the MENU screen.
- Press ◀ / ▶ to move the cursor to" CHANNEL SETTINGS "menu.
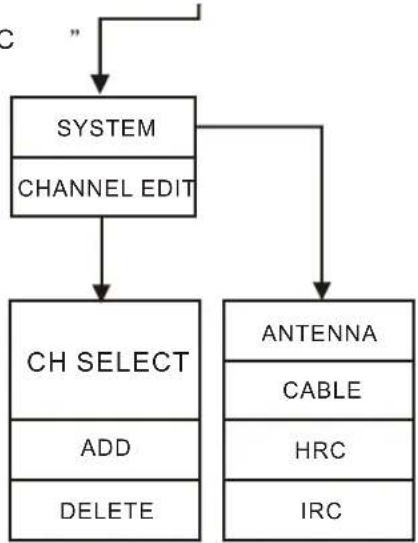
- Press ▲ to move the cursor to SYSTEM or CHANNEL EDIT to display sub settings menu, press OK and then press
▲ to choose ANTENNA/CABLE/HRC/IRC
or CH SELECT/ADD/DELETE to select
available TV channels from VHE/UHE or
CABLE signal.
- Press EXIT twice to return to the main screen.
CHANNEL SETTINGS
flowchart
graph TD
    A[""] --> B["SYSTEM"]
    A --> C["CHANNEL EDIT"]
    B --> D["CH SELECT"]
    B --> E["ANTENNA"]
    D --> F["ADD"]
    D --> G["DELETE"]
    E --> H["CABLE"]
    E --> I["HRC"]
    E --> J["IRC"]
©NOTE
- ANTENNA/CABLE/HRC/IRC will scan available TV signals automatically.
- CH SELECT saves all available TV channels automatically.
- ADD/DELETE allows you to ADD or DELETE TV channels.
Adjusting the PARENTAL CONTROLS
The PARENTAL CONTROLS allows you to set up the TV to block programs according to their content and rating levels. This function prevents children from watching violent or sexual scenes that may be harmful.
- Press MENU to display the MENU screen.
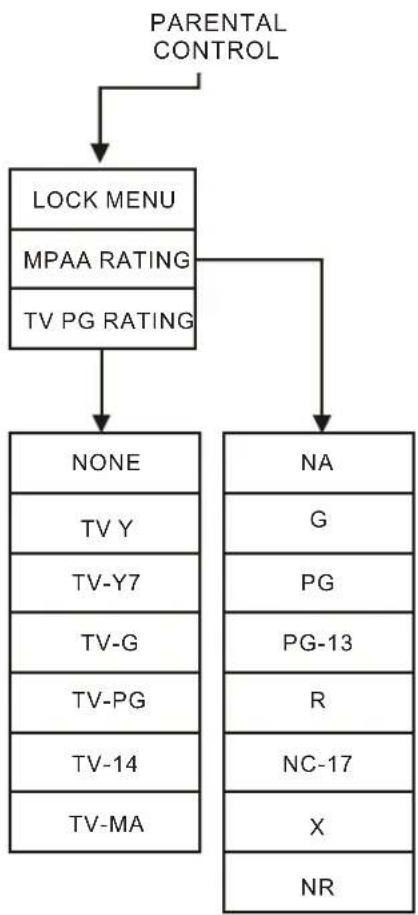
- Press ◀ / ▶ to move the cursor to PARENTAL CONTROLS menu Press ▲ / ▼ to display sub settings menu, Press "OK" and then ▲ to choose rating level, press OK" " again to confirm the rating level you have selected.
- Press EXIT to escape from the MENU.
NOTE
- LOCK MENU : Press "OK" when "LOCK MENU" is highlighted in green to lock the PARENTAL CONTROLS MENU, the dot on the right side of the menu bar turns GREEN. Enter password "1111" (default) to turn off PARENTAL CONTROLS function.
The Custom Rating Menu includes the following options:
| MPAA RATING | G | All children and general audience |
| PG | Parental guidance suggested | |
| PG-13 | Parental guidance children under 13 | |
| R | Restricted viewing parental guidance is suggested for children under 17 | |
| NC-17 and X | No one 17 or under allowed | |
| NR | Not rating limit | |
| TV PG RATING | TV-Y | All children |
| TV-Y7 | Directed to children age 7 and older | |
| TV-G | General audience | |
| TV-PG | Parental guidance suggested | |
| TV-14 | Parents strongly cautioned | |
| TV-MA | Mature audience only |

flowchart
graph TD
    A["PARENTAL CONTROL"] --> B["LOCK MENU"]
    B --> C["MPAA RATING"]
    B --> D["TV PG RATING"]
    C --> E["NONE"]
    D --> F["NA"]
    E --> G["TV Y"]
    E --> H["TV-Y7"]
    E --> I["TV-G"]
    E --> J["TV-PG"]
    E --> K["TV-14"]
    E --> L["TV-MA"]
    F --> M["G"]
    F --> N["PG"]
    F --> O["PG-13"]
    F --> P["R"]
    F --> Q["NC-17"]
    F --> R["X"]
    F --> S["NR"]
Adjusting the GENERAL SETTINGS
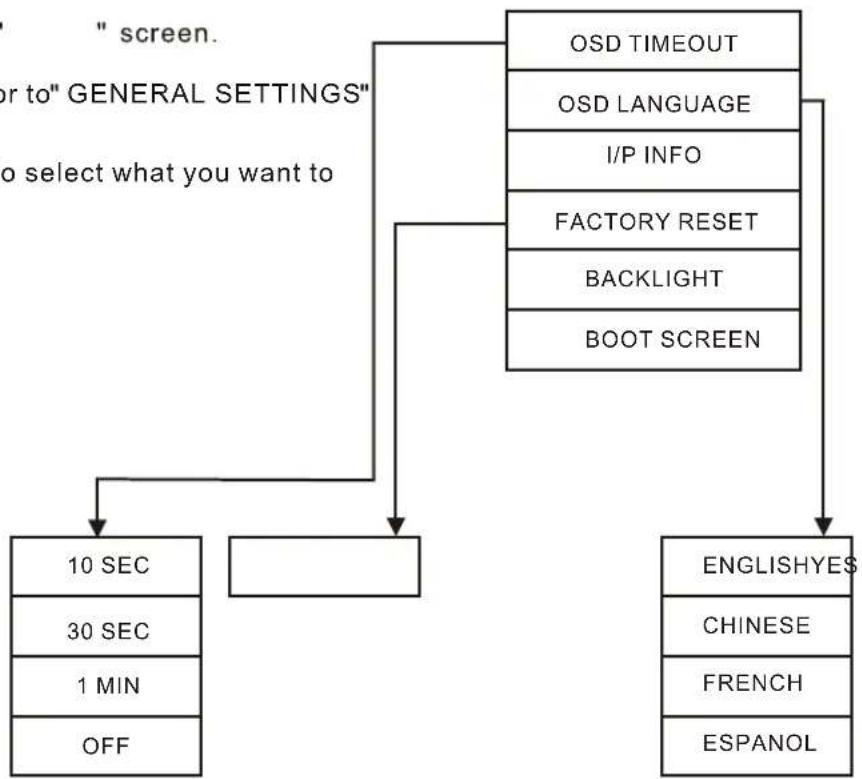
This menu provides you with options that make operating this TV more convenient.
- OSD TIMEOUT: To adjust OSD (menu) display time.
- OSD LANGUAGE: To choose OSD display language.
- I/P INFO: To show you information on current input source.
- FACTORY RESET: To let you set TV system back to the factory default settings.
- BACKLIGHT: To adjust backlight brightness level of TFT LCD panel.
-
BOOT SCREEN: Choose to ON/OFF boot up screen logo.
-
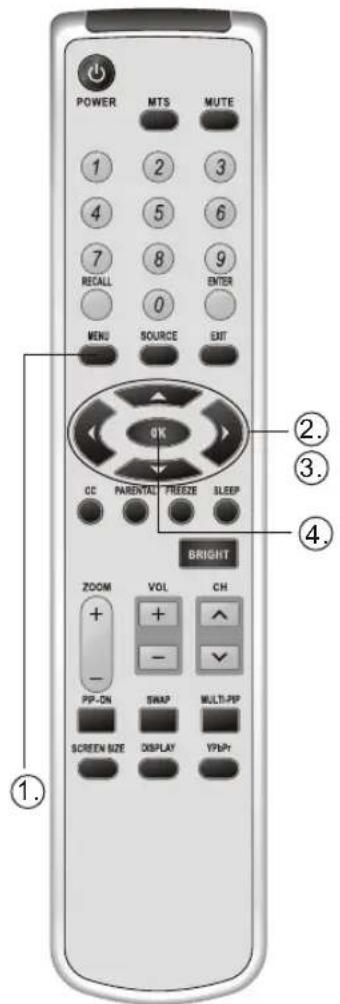
Press "MENU MEN display the " screen.
- Press ◀ /▶ to move the cursor to" GENERAL SETTINGS" menu.
- Press ▲ to move the cursor to select what you want to adjust.
- Press "OK" to set.
text_image
POWER MTS MUTE 1 2 3 4 5 6 7 8 9 RECALL 0 MENU SOURCE EXIT OK CC PARENTAL FREEZE SLEEP BRIGHT ZOOM VOL CH + + - - PPP-DN SWAP MULTI-PF SCREEN SIZE DISPLAY YR/Pt ①. ②. ③. ④.
GENERAL SETTINGS
flowchart
graph TD
    A[" screen."] --> B["" general SETTINGS" "]
    B --> C["10 SEC"]
    B --> D[" 30 SEC"]
    B --> E[" 1 MIN"]
    B --> F["" OFF "]
    A --> G[" OSD TIMEOUT"]
    A --> H[" OSD LANGUAGE"]
    A --> I[" I/P INFO"]
    A --> J[" FACTORY RESET"]
    A --> K[" BACKLIGHT"]
    A --> L[" BOOT SCREEN"]
    G --> M["" ENGLISH YES" "]
    H --> M
    I --> M
    J --> M
    K --> M
    L --> M
Adjusting CLOSED CAPTIONING SETTINGS
■ SETTING CLOSED CAPTIONING
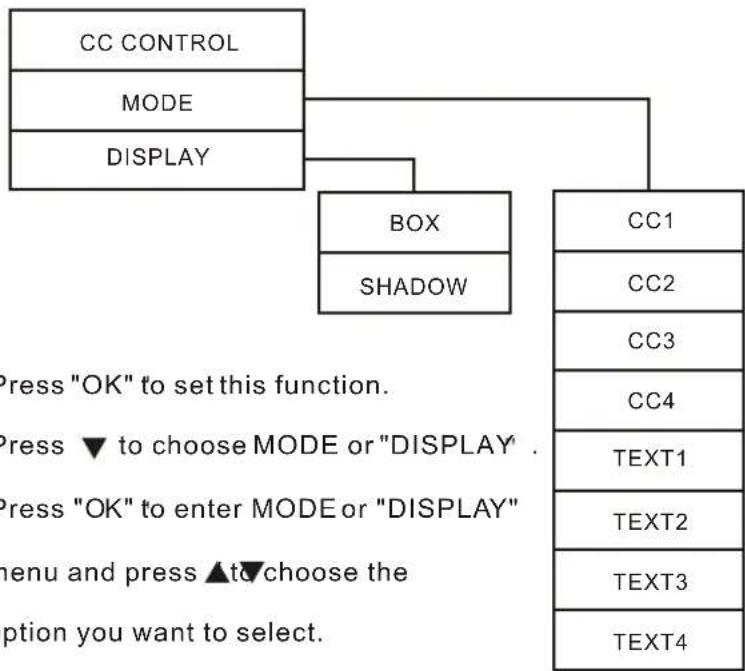
- "Closed Caption" is a system which allows conversations, narration, and sound effects in TV programs and home videos to be viewed as captions on the TV screen.
- Not all programs and videos will offer closed captioning. Please look for the "CC" symbol to ensure that captions are available.
- Closed Caption broadcasts can be viewed in two modes." CAPTION" and TEXT. For each mode, four selections are available. The CAPTION mode shows subscripts of dialogs and commentaries of TV dramas and news programs while allowing a clear view of the picture.
- The TEXT mode displays various information over the picture(such as TV program schedules and weather forecasts, etc)that is independent of the TV programs.
text_image
POWER MTS MUTE 1 2 3 4 5 6 7 8 9 RECALL 0 ENTER MENU SOURCE EXT OK CC PARENTAL FREEE SLEEP BRIGHT ZOOM VOL CH + - - PIP-ON SNAP MULTI-PIP SCREEN SIZE DISPLAY YPGPY ①. ②. ③. ④.Setting the CLOSED CAPTION option from the MENU screen
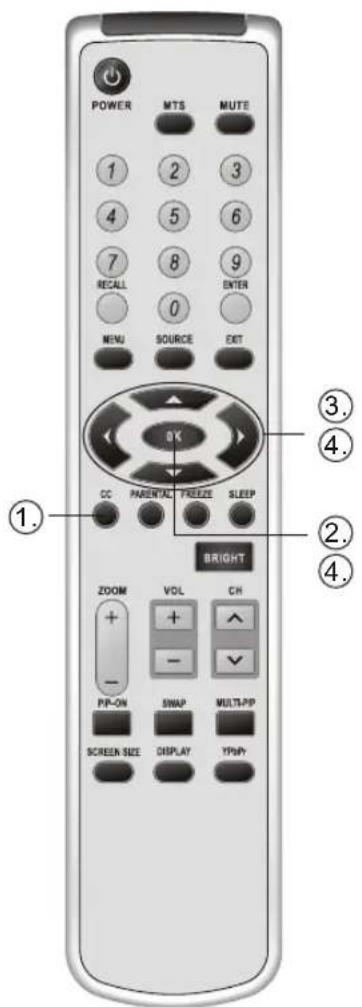
- Press "CC" to display the OSD MENU.
flowchart
graph TD
    A["CC CONTROL"] --> B["MODE"]
    A --> C["DISPLAY"]
    C --> D["BOX"]
    C --> E["SHADOW"]
    D --> F["CC1"]
    E --> G["CC2"]
    E --> H["CC3"]
    E --> I["CC4"]
    I --> J["TEXT1"]
    I --> K["TEXT2"]
    I --> L["TEXT3"]
    I --> M["TEXT4"]
NOTE
- Closed Caption may malfunction (white blocks, strange characters, etc.) if signal conditions are poor or if there are problems at the broadcast source. This does not necessarily indicate a problem with your set.
- If any button is pressed to call up the menu screen while viewing a Closed Caption broadcast, the closed captions will disappear momentarily.
- BOX:To show the content of closed caption in a block.
- SHADOW: To show the content of closed caption in SHADOW style.
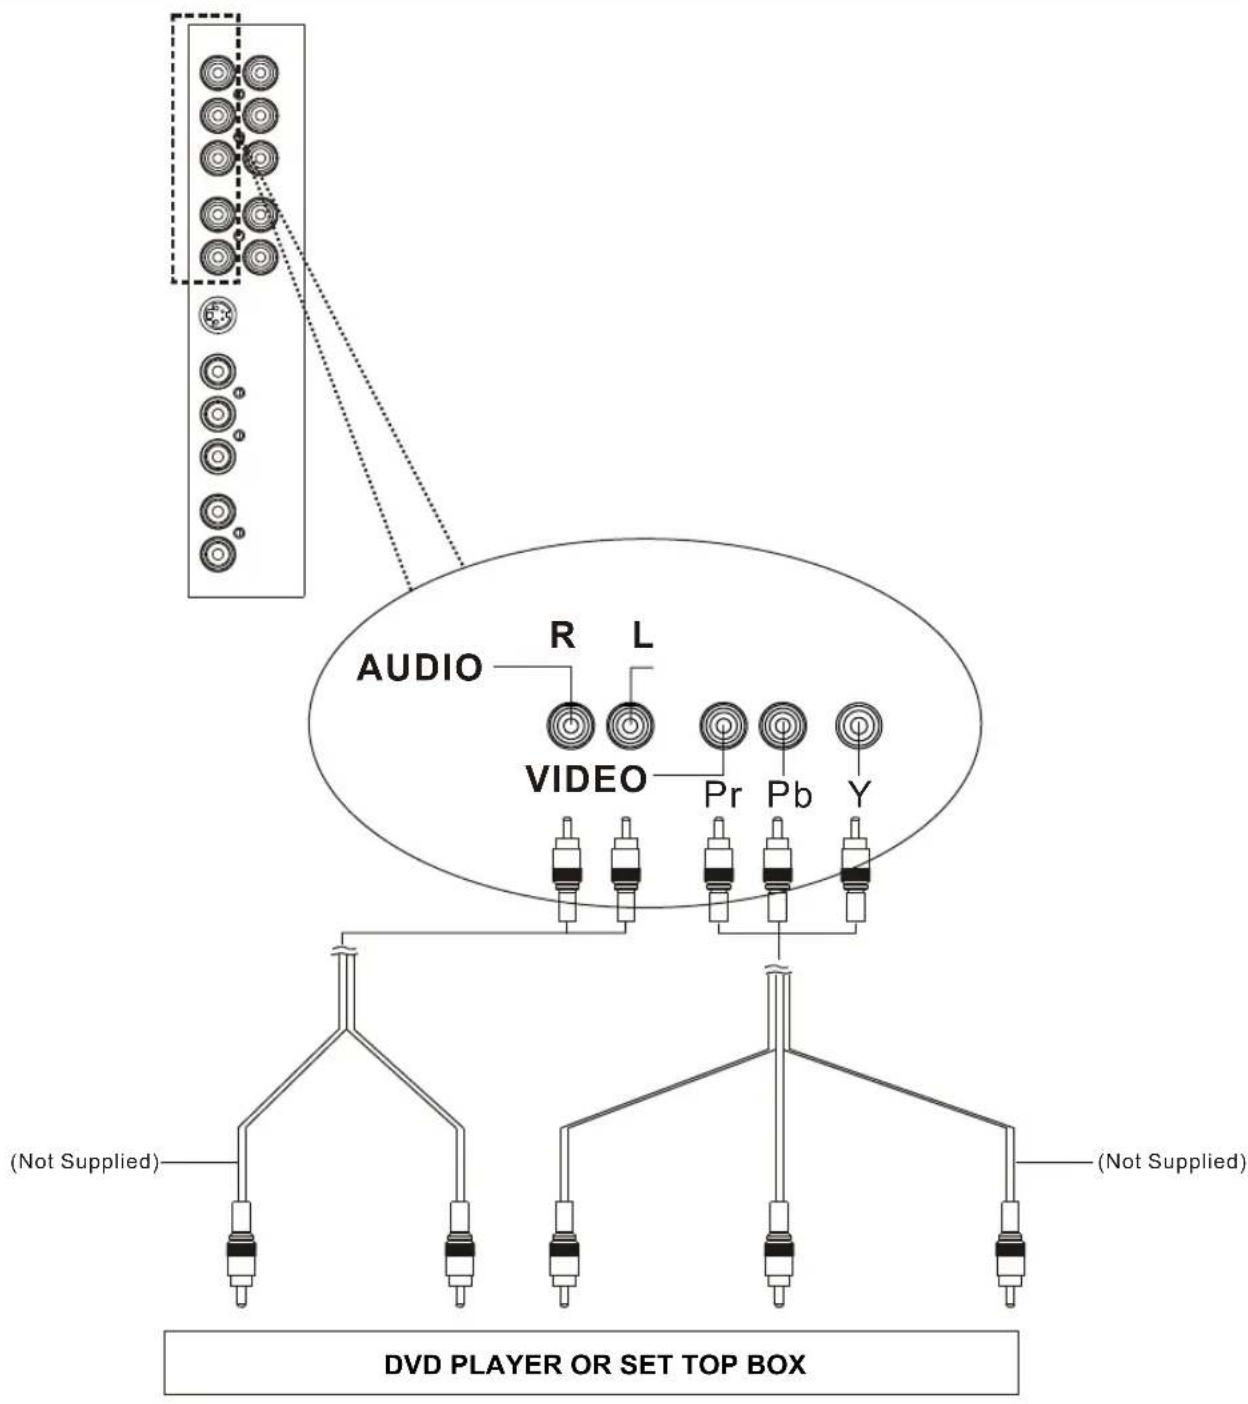
For best video quality, use this connection if your DVD player or digital set-top box has component video (Y, Pb, Pr) jacks.
Connecting a DVD or Digital Set-Top Box
flowchart
graph TD
    A["Top Box"] --> B["Audio"]
    B --> C["Video Port 1"]
    B --> D["Video Port 2"]
    B --> E["Video Port 3"]
    B --> F["Video Port 4"]
    B --> G["Video Port 5"]
    B --> H["Video Port 6"]
    B --> I["Video Port 7"]
    B --> J["Video Port 8"]
    B --> K["Video Port 9"]
    B --> L["Video Port 10"]
    style A fill:#f9f,stroke:#333
    style B fill:#ccf,stroke:#333
    style C fill:#cfc,stroke:#333
    style D fill:#fcc,stroke:#333
    style E fill:#cff,stroke:#333
    style F fill:#ffc,stroke:#333
    style G fill:#cfc,stroke:#333
    style H fill:#fcc,stroke:#333
    style I fill:#cfc,stroke:#333
    style J fill:#fcc,stroke:#333
    style K fill:#cfc,stroke:#333
    style L fill:#fcc,stroke:#333
    note right of A: DVD PLAYER OR SET TOP BOX
    note left of A: Not Supplied
    note right of L: Not Supplied
To watch a DVD or a broadcast, using the connection configuration shown above, press the YPbPr button or press the SOURCE button on the remote control repeatedly to select YPbPr as the input source.
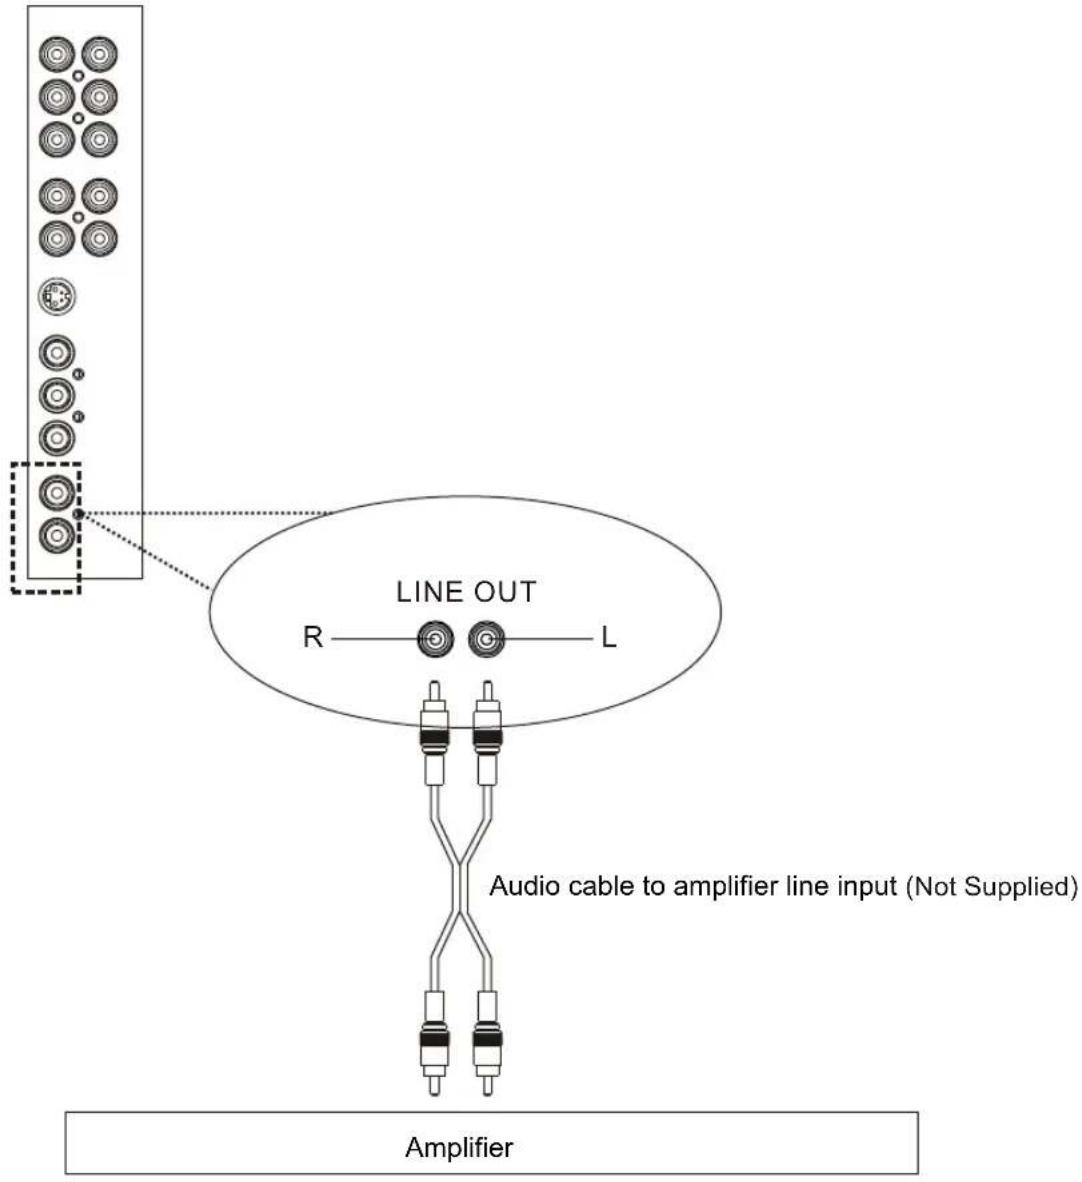
For improve sound quality, you may want to play the TV studio through your stereo system.
To connect an audio system
- Use an audio cable to connect the TV's audio output jacks to the audio amplifier's linen put jacks.
- Using the "AUDIO SETTING" menu to adjust line out volume.
-Press MENU to display the MENU screen.
-Press◀ to move the cursor to AUDIO SETTING mode.
-Press CH ▲ ▼o move the cursor to LINE OUT VOLUME mode.
-Press VOLUME +/- to adjust the LINE OUT volume setting.
- Turn on the amplifier; and then set the amplifier line input to the jack into which you connected the TV.
text_image
LINE OUT R —— L Audio cable to amplifier line input (Not Supplied) AmplifierConnecting a Game console or camcorder
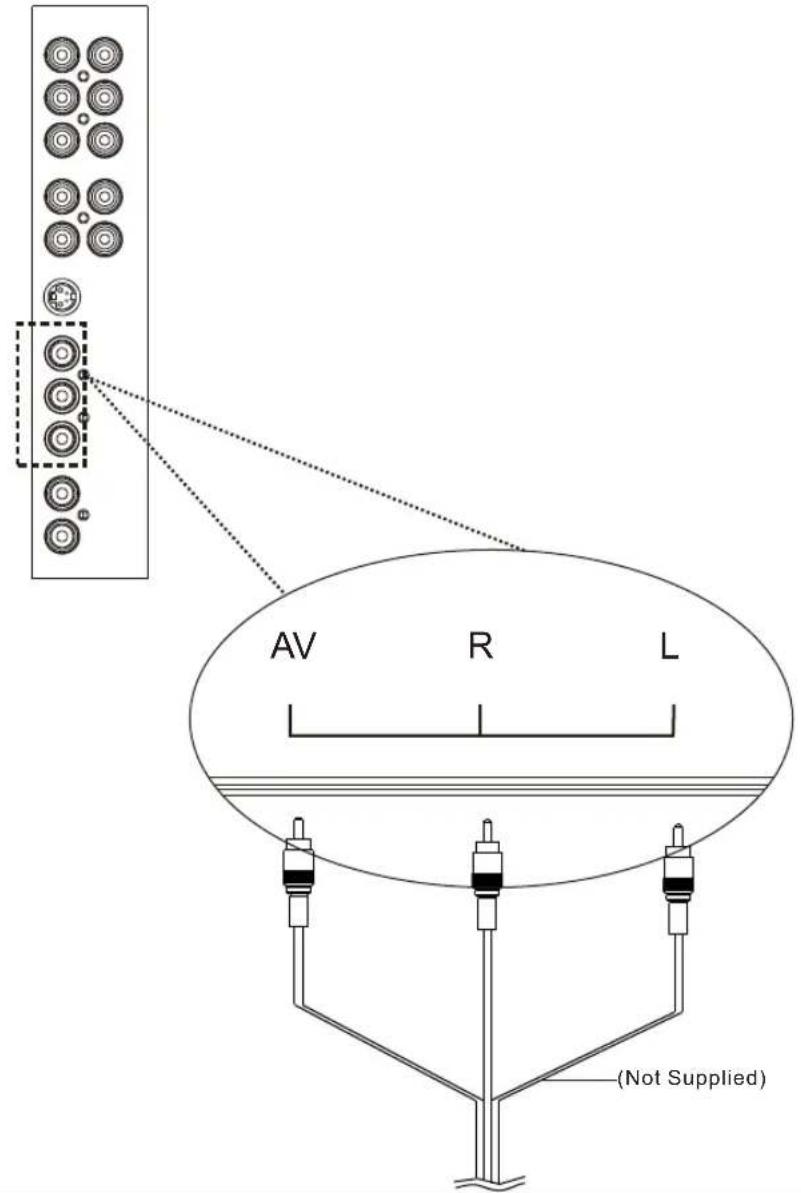
You can use the Video terminals when connecting a game console or camcorder and other audio visual equipment.
text_image
AV R L (Not Supplied)Game console or VCR or Camcorder or VCR
Displaying an image of the game console or camcorder
To connect a game console or view a camcorder, select "AV" from the INPUT SOURCE"menu using SOURCE button on the remote control unit or on the Display.
Connecting a VCR
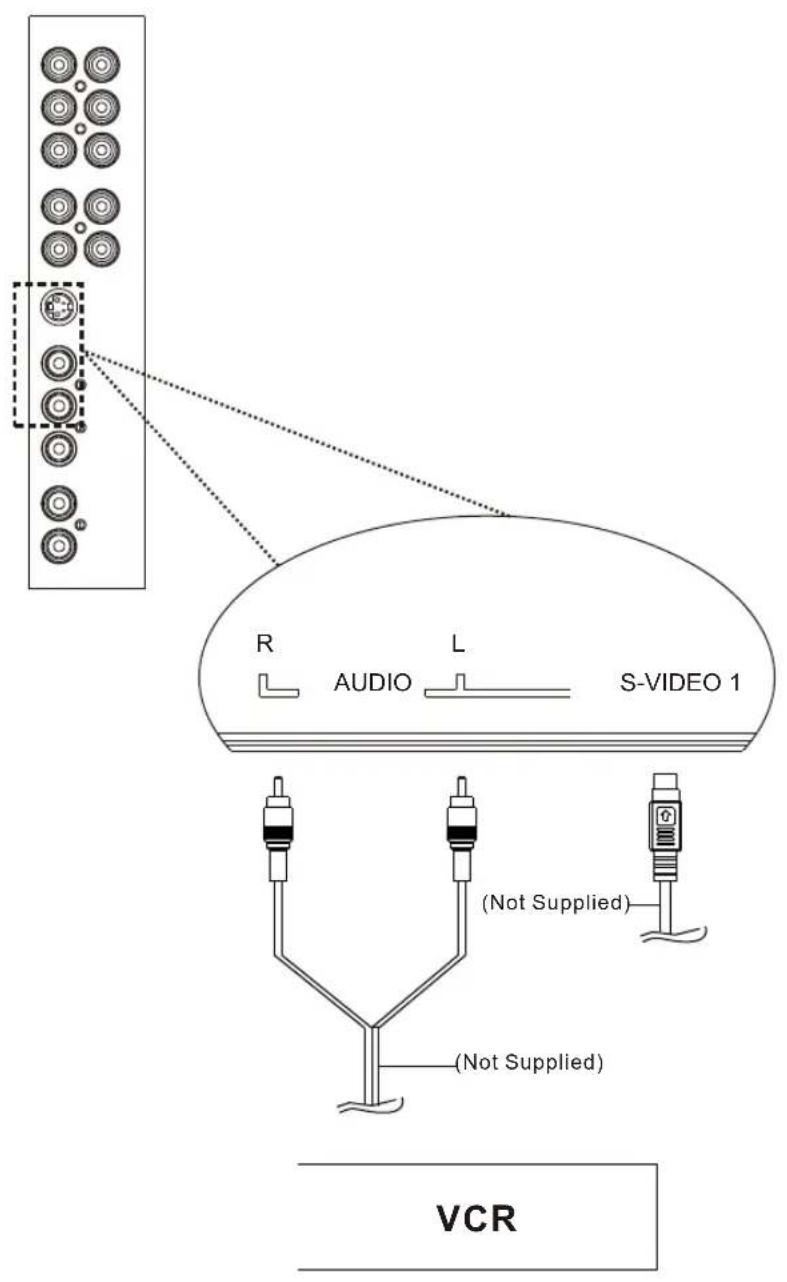
You can use the S-Video terminal when connecting a VCR and other audio visual equipment (if there is an S-VIDEO output on the VCR. If there isn't, use the VIDEO (AV) terminals).
text_image
R AUDIO L S-VIDEO 1 (Not Supplied) (Not Supplied) VCRDisplaying a VCR image
To watch a VCR image, select "S-Video from the "INPUT SOURCE" menu using SOURCE on the remote control unit or on the Display.
NOTE
• Each time SOURCE is pressed, the input source toggles.
• Refer to your VCR operation manual for the signal type.
CONNECTING EXTERNAL DEVICES (Continued)
You can connect many types of external equipment to your system, like a DVD player, VCR, game console and camcorder. To view external source images, select the input source by pressing the SOURCE button on the remote control unit or on the display.
Connecting a DVD player
You can use the YCbCr terminal when connecting to a DVD player...etc to get 480P progressive video quality.
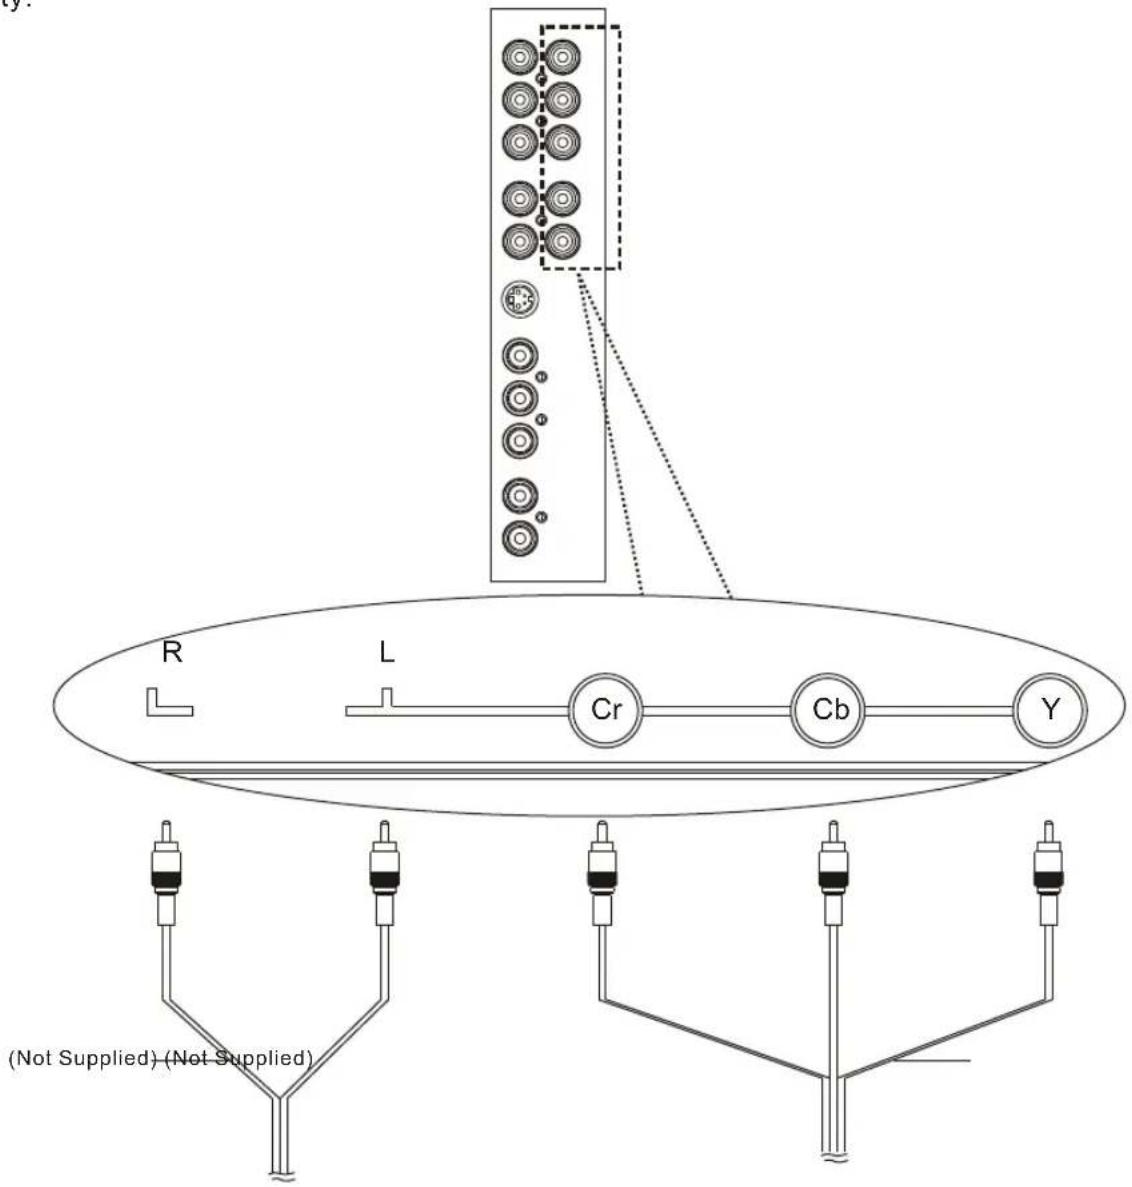
text_image
R L Cr Cb Y (Not Supplied) (Not Supplied)DVD PLAYER OR SET TOP BOX
Displaying a DVD image
To watch a DVD image, select "YCbCr" from "INPUT SOURCE" menu using SOURCE button on the remote control unit or on the Display.

natural_image
Technical line drawing of a rear panel with ventilation slots and buttons (no text or symbols)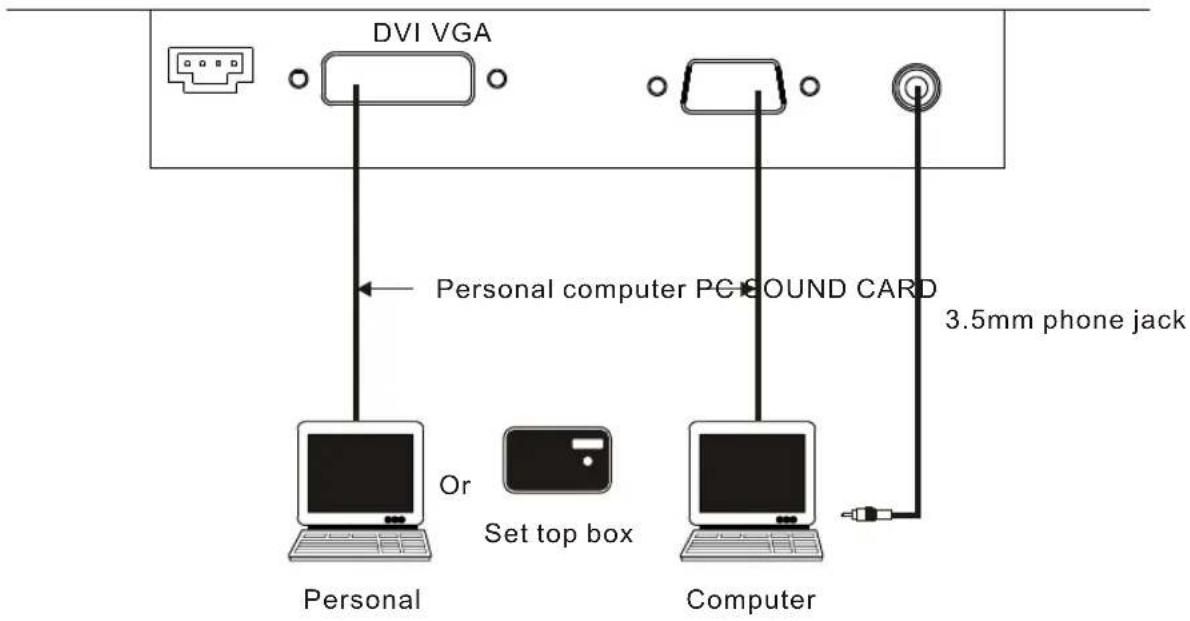
text_image
DVI VGA Personal computer PC SOUND CARD Or Set top box 3.5mm phone jack Personal ComputerConnecting a personal computer
- One of following connection can make you play back video from either "DVI" or "VGA". Choose one connection to meet your computer properly.
- DVI terminal use to available to connect "SET Top Box" and computer, check your equipment provided terminal.
- Connect computer sound card to 3.5mm phone jack.
©NOTE
•The DVI, VGA and 3.5mm phone jack cables are not supplied.
SELECTING MAIN AND PIP SOURCE
After you have connected the MAIN and PIP sources.
- Press" SOURCE "threcnaindsourve.
- Press" SOURCE "twedel ansource.
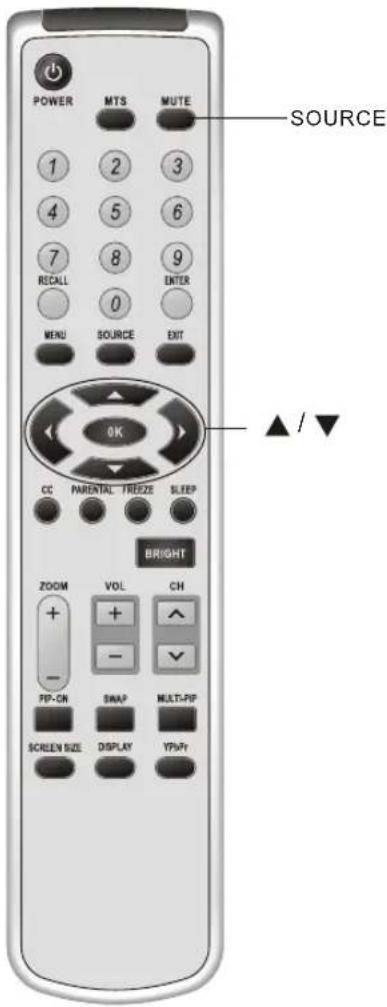
text_image
POWER MTS MUTE SOURCE 1 2 3 4 5 6 7 8 9 RECALL ENTER 0 MENU SOURCE EXIT OK CC PARENTAL TRYZZE SLEEP BRIGHT ZOOM VOL CH + + - - PIP-CN SWAP MULTIPIP SCREEN SIZE DISPLAY YPsPyQuick reference of PIP & Multi-PIP Connection list
| PIP Source | ||||||||
| Analog Tuner | CVBS | S-Video | YCbCr | YPbPr | VGA | DVI | ||
| Main Source | Analog Tuner | XXXX | OO | O | ||||
| CVBS | XXXX | OO | O | |||||
| S-Video | XXXX | OO | O | |||||
| YCbCr | XXXX | OO | O | |||||
| YPbPr | OOOO | X | X | O | ||||
| VGA | O | O | O | O | X | X | O | |
| DVI | O | O | OOOO | X | ||||
NOTE
The Means that the combination of connections can be used for PIP and Multi-PIP.
The Xmeans that the combination of connections can not be used for PIP and Multi-PIP.
PIP VIEW
| Problem | Possible Remedies |
| I cannot get PIP view to work | Be sure MAIN source and PIP source have been connected to TV properly. (See page 33, 34, 35)Be sure you have selected correct MAIN and PIP sources by pressing "SOURCE" button and selecting input sources which are active. |
| There is no PIP window, or the PIP window just shows static | Be sure the PIP view window is set to a video input or channel that has a signal airing.You might be tuned to a video input with nothing connected to it. Check cycling through the video inputs by pressing "SOURCE" to make sure a correct input source is selected |
| PIP view cannot display anything but TV channels | Press SOURCE button twice and press the▲/▼button to select a different PIP input source. |
REMOTE CONTROL
| Problem | Possible Remedies |
| Remote control does not operate | The batteries could be weak. Replace the batteries.Check the orientation of the batteries.Make sure this units power cord is connected securely to the wall outlet.Locate the unit at least 3-4 feet away from fluorescent lights. |
| Cannot change channels with the remote control | Be sure the main source has been selected to" TV".If you are using another device to change channels, be sure to select correct source for that device. For example, if you are using your cable box or set top box or HDTV receiver, please use remote controller which was supplied with that device. |
VIDEO
| Problem | Possible Remedies |
| No picture(screen not lit),No sound | Make sure the power cord is plugged in.Press" POWER top of the TV unit.Press "SOURCE to check the correct video source has been selected.Try another channel; it could be station trouble.Make sure the display signal is connected to the TV unit. |
| Dark, poor or no picture (screen lit),good sound | Adjust the" PICTURE PARAMETERS" in the MENUAdjust the" BRIGHTNESS in the MENU BRIGHT the remote controller.Check the antenna/cable connections. |
| Only snow and noise appear on the screen | Check the antenna/cable connections.Try another channel; it could be station trouble.Press "SOLED THE "source. |
| Lines or Stripes appear on the screen | Adjust the antenna.Move the TV away from noise sources. Such as cars, neon signs, or hair-dryers, microwave ovens, speakers. |
| Double images or ghosts | Using a highly sensitive and directional outdoor antenna or cable may solve the problem. |
| Black box on screen | You have selected a text option in the setup MENU and no text is available. To turn off this feature, set the "CtoSED CAPTIONYou have selected a "PIP No PIP source is available. To turn off this feature, press"PIP-ON repeatedly until black box disappears.You have selected a "PIP No PIP source is connection. Please connect a PIP source. |
| Black bars appear at the top and bottom of the screen | Some wide-screen programs are filmed in aspect rations that are greater than 16:9(this is especially common with theatrical releases).Your TV will show these programs with black bars at the top and bottom of the screen. For more details, check the documentation that came with your DVD (or contact your program provider). |
| Certain programs on DVD or other digital sources display a fast-motion or dark scenes. | The compression used by certain digital broadcasts and DVDs may cause your TV's screen to display less detail than usual, or cause artifacts(small blocks or dots, pixelations) to appear on you screen. This is due to you TV's large screen and ability to show very fine detail, and is normal for certain digitally recorded programs. Adjust the reality/clarity in the "SCREEN MODE" from remote control to optimize the picture while viewing these sources. |
AUDIO
| Problem | Possible Remedies |
| Good picture, no sound | Press "MEN" that MENU disappears from the screen.Make sure the speaker sound source is set to main source Please press"SW/ARchange main and PIP source or press "PIP"CNedly until PIP picture disappears. |
| Audio noise | Please use head phones other than infrared cordless head phones.Move away the infrared transceiver from the TV until the noise is eliminated. |
| Cannot gain enough volume when using a cable box | Increase the volume of the cable box using the cable boxes remote control. |
| Sound seems weak or insufficient | The TV's audio might be set to" SAP"or"MONO it might be better set to" STEREO".If already set to "STEREO", switch to" MONO"(which may reduce background noise during weak stereo broadcasts) by pressing the MTS button on the remote control. |
CHANNELS
| Problem | Possible Remedies |
| Cannot receive any channels when using cable TV | Use "CHINE TO SETTNGS MENU" SYSTEMGABLE receivable channels.Make sure cable is connected to TV properly and choose TV as the main source. |
GENERAL
| Problem | Possible Remedies |
| How to restore factory settings | • Press" MenUgo to the "GENERAL SETTINGS" menu. Highlight "FACTORY PRESET" and press the "SELECT" button. |
| Cannot operate MENU | • If a menu option appears in grey letters, this indicates that the menu option is not available. |
| ITEM | DESCRIPTION | REMARK |
| Screen Size 32 | ||
| Aspect Ration | 16:9 | |
| Contrast Ratio | 1000:1 | |
| Brightness | 550 nits | |
| High color saturation | NTSC 75% | |
| Resolution | 1366x768 | |
| Pixel Pitch | 0.173(H)X0.519(V) | |
| Display color | 16.7M | |
| Response Time(Tr/Tf) | 8 ms | |
| Viewing Angles | 176 Horizontal/176 Vertical | |
| Video Compatible | NTSC 181 CH | |
| Built in Speaker | 10Wx2 Stereo | |
| Special Features | Stereo reception | |
| Sleep Timer | ||
| PIP/POP | ||
| 2D comb filter, 3D comb filter, 4H filter | ||
| 3:2 and 2:2 pull down | ||
| Full function V-chip parental control | ||
| Closed Caption | ||
| Full function remote control | ||
| Input Terminals: | ||
| Antenna | VHF/UHF | |
| VIDEO Input | Composite x 1 | |
| S-VIDEO Input | S-Videox1(Mini DIN 4Pin) | |
| YCbCr Input | Component x 1 | |
| YPbPr Input | Component x 1 | |
| PC input | VGAx 1 , DVIx 1 | DVI with HDCP |
| Output Terminals: | ||
| Line-Out | Stereo L/R | |
| General: | ||
| Power on LED | Blue | |
| Safety & EMI | CUL, FCC-B pending | |
| Keypad | POWER,VOL(+),VOL(-),CH(▲,CH( )SOURCE,MENU | |
| Dimension | 980mm(W)x570mm(H)x300mm(D)(with stand) | |
| Weight | 15 kgs | |
| Power Consumption | Under 200W | |
| Power Supply | AC:100V~240V | |
| Operation Temperature | 0°C ~ 55°C | |
| Storage Temperature | -5°C ~ 55°C | |