Method - 3D Printer MakerBot - Free user manual and instructions
Find the device manual for free Method MakerBot in PDF.


User questions about Method MakerBot
0 question about this device. Answer the ones you know or ask your own.
Ask a new question about this device
Download the instructions for your 3D Printer in PDF format for free! Find your manual Method - MakerBot and take your electronic device back in hand. On this page are published all the documents necessary for the use of your device. Method by MakerBot.
USER MANUAL Method MakerBot
text_image
MakerBot. METHOD MakerBot. USER MANUAL FOR METHOD AND METHOD XCHAPTER 1
WELCOME
Welcome to the User Manual for the MakerBot® Method™ Series 3D Printers.
LEGAL NOTICES
LIMITED WARRANTY
The MakerBot Limited Warranty (available at makerbot.com/legal) applies to the MakerBot Method 3D Printer.
OVERALL PROVISIONS
All information in this user manual (“Manual”) is subject to change at any time without notice and is provided for convenience purposes only. MakerBot Industries, LLC and our respective affiliates and suppliers (“MakerBot”) reserves the right to modify or revise this Manual in its sole discretion and at any time and makes no commitment to provide any such changes, updates, enhancements, or other additions to this Manual in a timely manner or at all. Contact the MakerBot Support Team for up-to-date information. In order to protect MakerBot proprietary and confidential information and/or trade secrets, this manual may describe some aspects of MakerBot technology in generalized terms.
DISCLAIMERS
MakerBot does not warrant the accuracy or completeness of the information, products, or services provided by or through this Manual and assumes no responsibility for any typographical, technical, or other inaccuracies in this Manual, which is provided "as is" and without any express or implied warranties of any kind, including warranties of merchantability, fitness for a particular purpose, or non-infringement of intellectual property. In connection with your use of this Manual, MakerBot shall not be liable to you for any damages whatsoever, be they direct, economic, commercial, special, consequential, incidental, exemplary, or indirect damages, even if MakerBot has been advised of the possibility of such damages, including without limitation, loss of business revenue or earnings, lost data, or lost profits. MakerBot assumes no responsibility, nor will be liable, for any damages to, or any viruses or malware that may infect, your computer, telecommunication equipment, or other property caused by or arising from your downloading of any information or materials related to this Manual. The foregoing exclusions do not apply to the extent prohibited by law; please refer to your local laws for any such prohibitions. MakerBot makes no warranties to those defined as "consumers" in the Magnuson-Moss Warranty-Federal Trade Commission Improvement Act.
INTELLECTUAL PROPERTY
Certain trademarks, trade names, service marks, and logos (the "Marks") used in this Manual are registered and unregistered trademarks, trade names, and service marks of MakerBot and its affiliates. Nothing contained in this Manual grants or should be construed as granting, by implication, estoppel, or otherwise, any license or right to use any Marks without the written permission of MakerBot. Any unauthorized use of any information, materials, or Marks may violate copyright laws, trademark laws, laws of privacy and publicity, and/or other laws and regulations. Other company and/or product names mentioned herein may be trademarks of their respective companies.
© 2009-2019 MakerBot Industries, LLC. All rights reserved.
SAFETY AND COMPLIANCE
MANUFACTURER:
MakerBot Industries, LLC
One MetroTech Center, 2 ^ft Floor
Brooklyn, NY 11201
347.334.6800
PRODUCT: 3D Desktop Printer
MODEL: METHOD
MAKERBOT METHOD CAT NO.: PACT56
RATINGS: 100-240VAC\~ 50/60 Hz, 3.9 - 1.6 A
MAKERBOT METHOD X CAT NO.: PADJ56
RATINGS: 100-240VAC\~ 50/60 Hz, 8.1 - 3.4 A
Regulatorycompliance@makerbot.com



N1605-19

ANATEL
03983-19-09891


NYCE
MakerBot declares that the radio equipment type 802.11 a/b/g/n dual band complies with Directive 2014/53/EU.
CMIIT ID: 2019AJ2744
內含發射器模組

CCAF19LP0490T2

CCAJ19LP6330T1

應避免影響附近雷達系統之操作。The use of equipment near radar systems should be avoided.
第十二條
The module supports router channels 1-14. Not all RF channels are available in all countries.
Taiwan:
a. 低功率電波輻射性電機管理辦法
(This telecommunication equipment is in compliance with NBTC requirements)
NIGERIA
Connection and use of this communications equipment is permitted by the Nigerian Communication Commission.
ISRAEL
The module supports router channels 1-14.
RADIO AND TELEVISION INTERFERENCE
This equipment has been tested and found to comply with the limits for a Class A digital device, pursuant to part 15 of the FCC Rules. These limits are designed to provide reasonable protection against harmful interference when the equipment is operated in a commercial environment. This equipment generates, uses, and can radiate radio frequency energy and, if not installed and used in accordance with the instruction manual, may cause harmful interference to radio communications. Operation of this equipment in a residential area is likely to cause harmful interference in which case the user will be required to correct the interference at his own expense.
Any changes or modifications made to this equipment voids your authority to operate this equipment under FCC Rules.
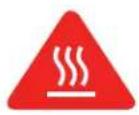
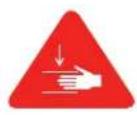
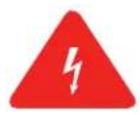

Safety alert symbols precede each safety message in this manual. These symbols indicate potential safety hazards that could harm you or others or cause product or property damage.

Warning: The MakerBot Method includes moving parts that may cause injury. Never reach inside the MakerBot Method while it is in operation.

Warning: The MakerBot Method generates high temperatures. Always allow the MakerBot Method Performance Extruders to cool down before you reach inside.

Warning: There is a risk of shock. The electronics of the MakerBot Method are not user serviceable.

Caution: The socket outlet must be located near the printer and must be easily accessible.

Caution: In case of emergency, disconnect the MakerBot Method from the socket outlet.

Caution: The MakerBot Method melts plastic during printing. Plastic odors and particles may be emitted during this operation. Make sure to set up the MakerBot Method in a well-ventilated area.

Caution: Always allow the Performance Extruders to cool to 50°C before reaching inside the MakerBot Method or removing the Performance Extruders.

Caution: Children under 12 should be supervised by an adult.

Caution: Dust generation and accumulation should be minimized. Some dust and dry powders can build static electricity charges when subjected to friction and create an ignition hazard.
Note: For users in Japan, the power cord is only for use with this printer model, the MakerBot Method Performance 3D Printer.
ABOUT THE MAKERBOT METHOD
HOW THE MAKERBOT METHOD WORKS
The MakerBot Method makes three-dimensional objects out of different types of melted materials. First, download a model from the internet or design a part, then use MakerBot Print to translate 3D design files into a .makerbot file, which creates instructions for the MakerBot printer. Then, transfer the .makerbot file to the MakerBot printer via your local network, USB drive, or USB cable.
The MakerBot Method will melt materials and extrude it out onto the build plate in thin lines to build your object layer by layer. The heated build chamber allows the extruded material to cool slowly, minimizing warping and curling. This 3D printing technology is called fused deposition modeling (FDM).
SPECIFICATIONS
| PRINTING | |
| Print Technology | Fused deposition modeling (FDM) |
| Build Volume | 19 L x 19 W x 19.6 H cm / 7.5 x 7.5 x 7.75 in single extrusion15.2 L x 19 W x 19.6 H cm / 6.0 x 7.5 x 7.75 in dual extrusion |
| Maximum Layer Resolution | 20 – 400 microns |
| Nozzle Diameter | 0.4 mm |
| Print File Type | .makerbot |
| SOFTWARE | |
| Software Bundle | MakerBot Print, MakerBot Mobile |
| Supported File Types | MakerBot (.makerbot), STL (.stl), SolidWorks (.sldprt, .sldasm), InventorOBJ (.ipt, .iam), IGES (.iges, .igs), STEP AP203/214 (.step, .stp), CATIA (.CATPart, .CATProduct), Wavefront Object (.obj), Unigraphics/NX (.prt), Solid Edge (.par, .asm), ProE/Creo (.prt, .asm), VRML (.wrl), Parasolid (.x_t, .x_b) |
| PHYSICAL DIMENSIONS | |
| Printer | 64.9 H x 41.3 W x 43.7 D centimeters [25.6 H x 16.3 W x 17.2 D inches] |
| Shipping Box | 76.5 H x 50.0 W x 55.5 D centimeters [30.1 H x 19.7 W x 21.9 D inches] |
| Printer Weight | 65 lbs |
| Shipping Weight | 81.7 lbs |
| TEMPERATURE | |
| Ambient Operating Temperature | 15 - 26° C / 59 - 78° F, 10 - 70% RH non-condensing |
| Storage Temperature | 0 - 38° C / 32 - 100° F |
| ELECTRICAL | |
| POWER REQUIREMENTS :MAKERBOT METHOD (PACT56)MAKERBOT METHOD X (PADJ56) | 100 - 240 VAC, 50/ 60 HZ, 400 W MAX 3.9A -1.6A100 - 240 VAC, 50/ 60 HZ, 800 W MAX 8.1A- 3.4A |
| Connectivity | USB 2.0, Unshielded Ethernet: 10/100Base -T, WiFi 802.11 a/b/g/n 2.5GHz, 5GHz |
| CAMERA | |
| Camera Resolution | 640 by 480 pixels |
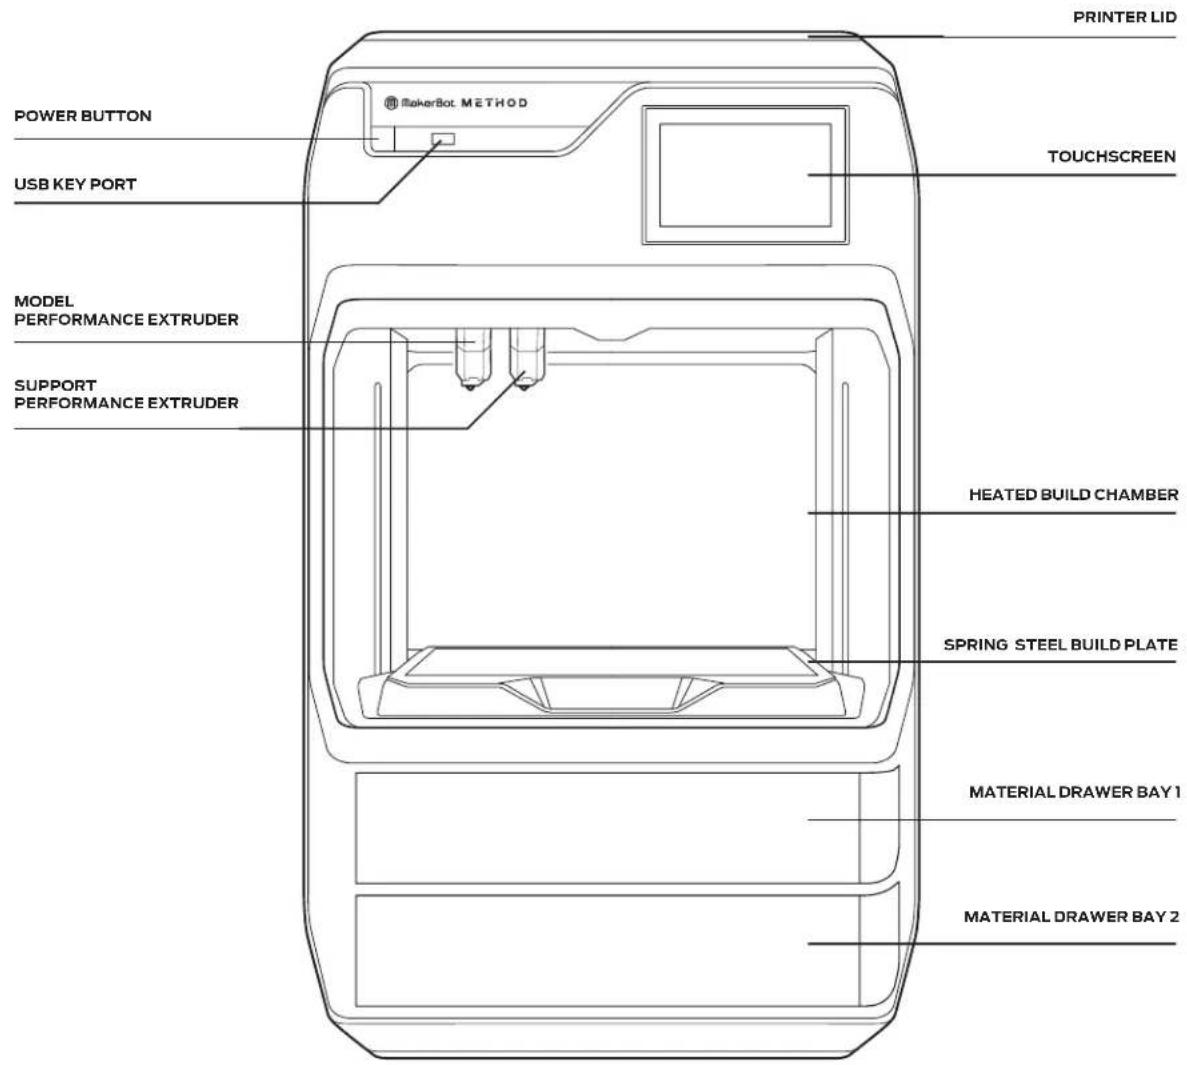
MAKERBOT METHOD DIAGRAM
text_image
PRINTER LID POWER BUTTON USB KEY PORT MODEL PERFORMANCE EXTRUDER SUPPORT PERFORMANCE EXTRUDER MakerBot. METHOD TOUCHSCREEN HEATED BUILD CHAMBER SPRING STEEL BUILD PLATE MATERIAL DRAWER BAY 1 MATERIAL DRAWER BAY 2CHAPTER 2
GETTING STARTED
When you set up your MakerBot® Method™ Performance 3D Printer, remember that it was built and packaged very carefully. We hope you will take your time and be just as careful unpacking it and getting it set up.
UNPACKING THE METHOD
natural_image
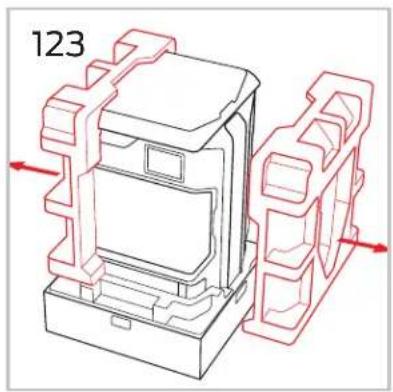
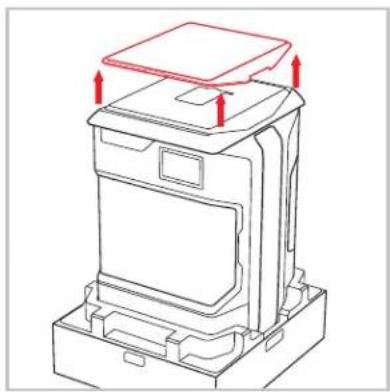
Technical line drawing of a mechanical component with red arrows indicating force or movement (no text or symbols)Carefully remove the foam from the sides of the printer.
natural_image
Technical line drawing of a mechanical device with red arrows indicating assembly or force direction (no text or symbols)Lift the lid off and store nearby.
natural_image
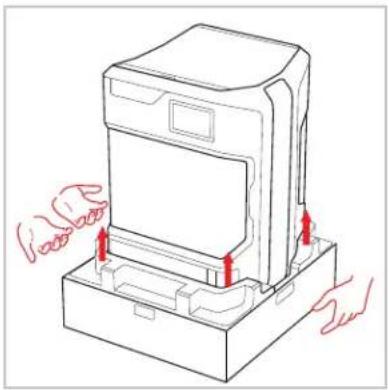
Line drawing of a printer with red arrows indicating force or movement, no text or symbols presentWith two people lift from the side handles of the printer and put it on a stable flat surface.
natural_image
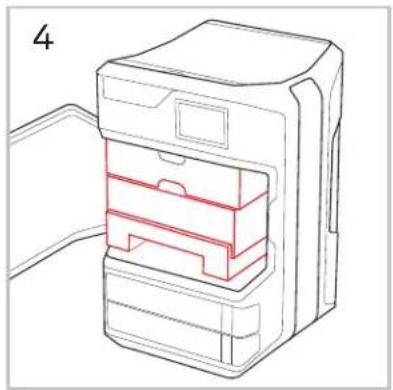
Line drawing of a refrigerator with open door and red internal compartments (no text or symbols)Remove the bag, remaining packaging tape, and open the door to remove the starter kit.
natural_image
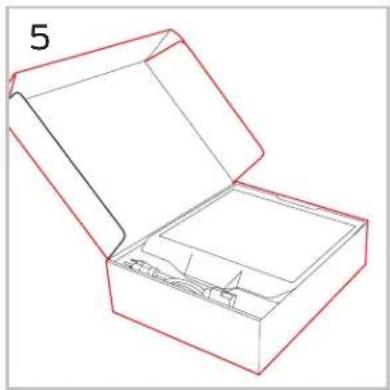
Line drawing of an open box with a lid and internal compartments, no text or symbols presentOpen the starter kit on a flat surface.
natural_image
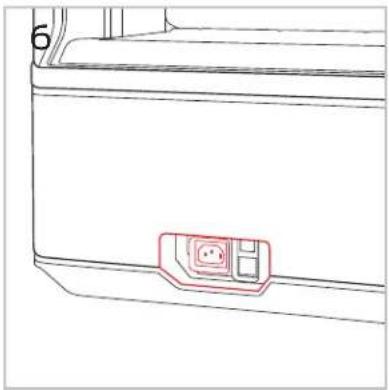
Line drawing of a car front panel with a small electronic device on the side panel (no text or symbols)Locate the power input on the lower back of the printer.
text_image
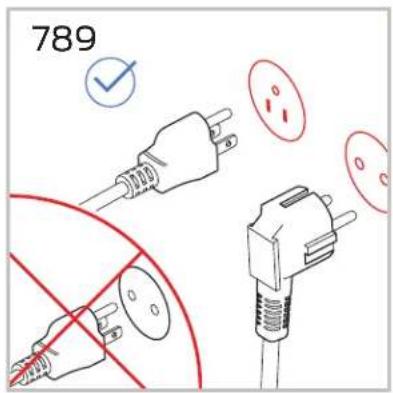
789Use the correct power cord to connect the printer to an accessible outlet.
natural_image
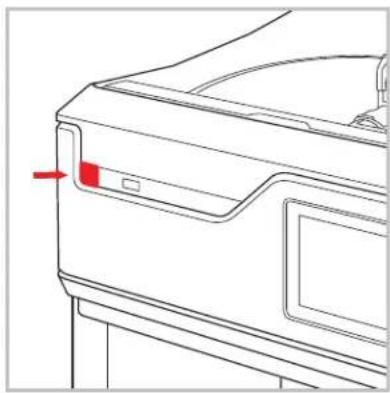
Line drawing of a car rear bumper with a red arrow pointing to the side panel (no text or symbols)Press the power button on the front of the printer.
natural_image
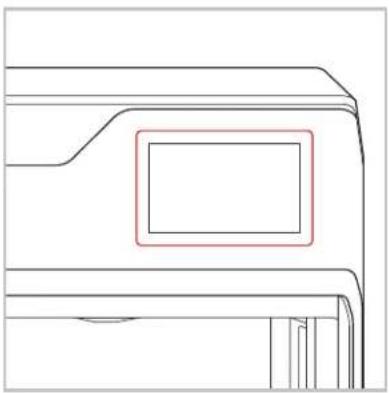
Pure technical line drawing of a mechanical component with no text, numbers, or symbolsAfter the printer powers on, follow the on screen instructions to finish setting up your printer.
STARTER KIT
Inside the box of your MakerBot Method, you will find almost everything you need to get started, including both a Model Performance Extruder and Support Performance Extruder, a spring steel build plate, a leveling hex key, a nozzle cleaning brush, and two power cords (North America and EU). To order material, visit store.makerbot.com.
| (Z647) | (Z471) | (Z4201) | (Z344) | 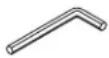 | 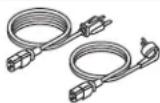 |
| SPRING STEELBUILD PLATE | MODELPERFORMANCEEXTRUDER | SUPPORTPERFORMANCEEXTRUDER | CLEANINGBRUSH | LEVELINGHEX KEY | NORTH AMERICA ANDEU POWER CORD |
SETTING UP THE METHOD
In case of conflicting information between this Manual and the on-screen instructions, FOLLOW THE ON-SCREEN information, since it is updated more frequently.

Caution: Never remove a Performance Extruder from your MakerBot Method 3D printer during or immediately after printing. Always allow a Performance Extruder to cool below 50°C.
TURN ON YOUR MAKERBOT METHOD
The power button for the MakerBot Method is located on the top front panel, to the left of the USB port. Push this button to turn on your MakerBot Method.
To reset your MakerBot Method, depress the power button for at least 8 seconds. To turn off your MakerBot Method, go to Settings --> Shutdown on the touch screen.
THE GUIDED SETUP
The first time you turn on your MakerBot Method, you will be guided through the initial setup process using the MakerBot Method user interface. This Guided Setup will walk you through connecting the printer to an internet connection, authorizing your printer, attaching Performance extruders, running calibration, loading material, and running your test print.
Please see Chapter 3: Guided Setup for more information.
Prepare Your Model to Print
The 3D model must be formatted, or "sliced" for the MakerBot Method using the MakerBot Print software. MakerBot Print can import an STL or other supported 3D file type, and export a MakerBot (.makerbot) file type.
Please see Chapter 5: MakerBot Print for more information about MakerBot Print.
SUPPORTED FILE TYPES:
Mac: MakerBot (.makerbot), STL (.stl)
Windows: MakerBot (.makerbot), STL (.stl), SolidWorks (.sldprt, .sldasm), InventorOBJ (.ipt, .iam), IGES (.iges, .igs), STEP AP203/214 (.step, .stp), CATIA (.CATPart, .CATProduct), Wavefront Object(.obj), Unigraphics/NX (.prt), Solid Edge (.par, .asm), ProE/Creo (.prt, .prt., .asm, .asm.), VRML(.wrl), Parasolid (.x_t, .x_b)
CHAPTER 3
GUIDED SETUP
The first time you turn on your MakerBot® Method™ Performance 3D Printer, you will be guided through the setup process via the onboard touchscreen. From there, you will learn everything you need to know to start your first 3D print.
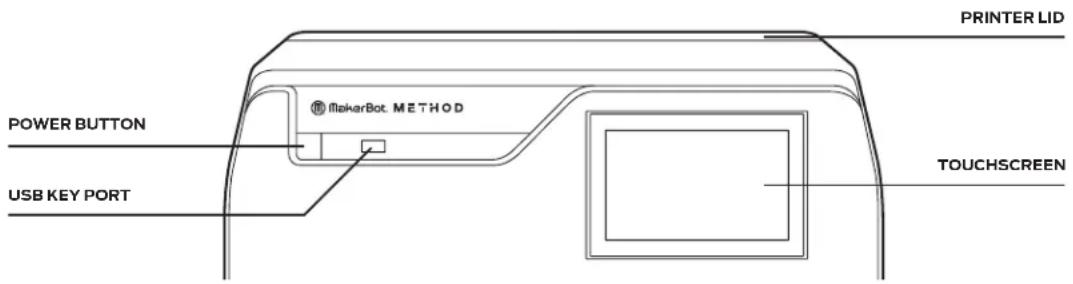
The touchscreen located at the upper right of the machine operates the MakerBot Method. See Chapter 4 The User Interface for more related information.
text_image
PRINTER LID POWER BUTTON USB KEY PORT MikarBot. METHOD TOUCHSCREENTHE GUIDED SETUP
The first time you turn on your MakerBot Method, you will be guided through the initial setup process using the MakerBot Method user interface. This Guided Setup will walk you through connecting the printer to an internet connection, authorizing your printer, attaching Performance extruders, running calibration, loading material, and running your test print.
RE-RUN THE GUIDED SETUP
To re-run the Guided Setup, select SETTINGS > RESET TO FACTORY. Restoring factory settings will allow you to rerun the Guided Setup.
NEW FIRMWARE UPDATE REQUIRED
Having up to date firmware is one of the most important factors in getting the most out of your MakerBot Method. The first step in the setup process will make sure that your MakerBot Method is running the most up to date firmware. You will not be able to proceed without updating firmware. Use the touch screen on your MakerBot Method to select the option that works best for you. Once selected your MakerBot Method will walk you through the firmware update process via on screen prompts.
UPDATING VIA ETHERNET
Please make sure your MakerBot Method is plugged into your local network via the Ethernet port in the back of the printer. Once your MakerBot Method has established an Ethernet Connection, it will download the latest firmware. Once the firmware has been downloaded and installed, press "Continue Setup".
UPDATING VIA WI-FI
Once you select "Update via Wi-Fi" from the startup screen, your MakerBot Method 3D Printer will automatically scan for nearby Wi-Fi networks. Select your preferred wireless network from the available list. You will then be prompted for the password for this network, please enter it using the touch screen. Once complete your MakerBot Method will connect to the network and automatically download the newest firmware version. Once you have successfully entered the password for the selected Wi-Fi network, your MakerBot Method will automatically connect and begin searching for the latest firmware version. Once the latest firmware has been found, it will automatically begin downloading and installing. Once all three steps have been completed, your MakerBot Method will restart running the latest firmware version. Once the firmware has been downloaded and installed, press "Continue Setup".
UPDATING VIA USB STICK
For the MakerBot Method, visit MakerBot.com/MethodFW to download the latest firmware. For the MakerBot Method X, visit MakerBot.com/MethodXFW to download the latest firmware.
Once you have downloaded the newest firmware version, transfer it to a USB drive. Please ensure that the firmware file is not embedded inside another folder on your USB stick, or else the Method printer will not be able
to select it.
Insert your USB drive into the USB port to the right of the power button. Use the touch screen to click "Update Now" to proceed to the next step. Select the file for the firmware that you downloaded and installed on your USB drive. Your MakerBot Method should begin downloading and installing the selected firmware. Once the firmware has been successfully updated, you will be all set to continue the setup process for your MakerBot Method. Select "Continue Setup", followed by "Begin Setup" on the next screen.
NAMING YOUR PRINTER
Once you have updated to the latest firmware you will be prompted to change the name of your MakerBot Method as the next step in the setup process. On the next page, you can use the touchscreen keyboard to enter a name for your MakerBot Method. This is a helpful feature to help differentiate multiple printers. If you would like to skip this step of the setup process, you can press the "X" in the top left corner of the screen.
SIGNING INTO YOUR MAKERBOT ACCOUNT
Logging into your MakerBot account on your MakerBot Method will ensure the best experience within the MakerBot ecosystem and will automatically register your MakerBot Method. Your MakerBot Account is the account that you use to log into MakerBot.com and MakerBot Print. If you do not have an account, visit https://accounts.makerbot.com to create one.
INSTALLING THE PERFORMANCE EXTRUDERS
It is strongly recommended you install the Performance Extruders as part of the guided setup. If you skip this step, you will need to attach the extruders through the interface later in order to calibrate, load material, and print. If you would like to skip this step, press the "X" in the top left corner of the touch screen. Clicking "Skip Printer Setup" on the pop up will skip this step and end the Startup Process.
LEVEL BUILD PLATFORM
After installing the Performance Extruders the next step in setting up your MakerBot Method is to ensure that the build platform is level. The spring steel should not be in place for the leveling check. If you have installed it from your customer kit already, please remove it. Your MakerBot Method will now check to ensure that the build platform is level. To do this, the printer will move the extruders around the build area and have the built in sensor check the build platform height at 3 locations. This may take a few minutes. If your build plate is not level (most likely shifted during shipment) you will be taken through the assisted leveling procedure.
CALIBRATION
Once your you have ensured that the build platform on your MakerBot Method is level you will need to calibrate the extruders. When printing with Method's two Performance Extruders, it is crucial to ensure the distance between both extruders is set correctly. If the extruders are not calibrated, a part may not print successfully. The first step of the calibration process involves the extruder nozzles locating their X, Y and Z positions by probing the holes in the build platform. In order for them to be able to access the build platform, the build plate can not be installed. If the build plate has been installed, open the door, remove it and close the door before proceeding.
CLEANING THE EXTRUDERS
It is very important for the calibration process that the extruder nozzles are clear of any material. New extruders should be clean, but may have some filament left on or in them from the testing process. Inspect the nozzles on your extruders for any material. If you see any filament click "Clean Extruders" to go through the extruder cleaning process. Ensure there is no debris in the square indents in the build platform as this can also interfere with the calibration process. If there is debris, use canned air or another method to blow it out. If there is no material on the extruders and the indents are clear, click "Skip" to begin the calibration process.
BUILD PLATE CALIBRATION
Once the calibration of the build platform has been completed. The MakerBot Method will need to determine the height of the build plate. Remove the Spring Steel Build Plate from your Starter Kit, open the door of your MakerBot Method and insert the build plate fully into the build platform. The easiest way to insert the build plate properly is to angle it at 45 degrees, seat the back of the build plate into the back notches on the build platform and then to lower the rest of the build plate into place. Double check that the build plate is fully seated on the build platform (no space in the back) and click "Done" to continue. The screen will update once the final calibration phase is complete.
LOADING THE MATERIALS
Follow the onscreen instructions to load the spool and material into your MakerBot Method.
MATERIAL BEST PRACTICES
LOADING TIPS
Before loading your materials it is important to remove about 2 feet from the spool before inserting it into the slot in the drawer. Any materials that may be bent or crimped may get stuck or break along the way to the extruder.
If you are using material you had previously printed with, it is important that you remove any material that may have already been routed from the drawer to the extruder.
If the material feels brittle or breaks easily do not load this into the printer. Remove at least 2 feet of the material and continue with loading.
As the filament travels from the bay up to the extruders it must pass through a Y splitter at the top left of the gantry.
Occasionally the material can get caught on the lip of the guide tube leading to the extruder.
You can reseat the guide tube by removing the panel on the top left outside of the printer, pinching the small metal clasp to release the tube, and reseat into the splitter making sure it is firmly in place.
To determine if your Material has become brittle, you'll want to bend a piece of it back onto itself a few times. If you can bend it at least 3 times before breaking it is not brittle.
PVA SUPPORT MATERIAL BEST PRACTICES
Once the PVA Support Material is loaded, you'll want to leave the material in the drawer for as long as possible unless the printer is not going to be used for an extended amount of time. When not in use always store the support material in the sealed metalized polyester bag to avoid moisture uptake and environmental damage
If you notice excessive stringiness during a print this is often caused by moisture uptake of the material. At this point, we recommend using a new unopened spool. You can always salvage your PVA spool by putting it in a bag with 20 grams of desiccant and sealing it up to absorb moisture.
TEST PRINT
Once you have loaded material into both of your Performance Extruders, it is time to run a test print to ensure your MakerBot Method. The purpose of the test print is to ensure that your MakerBot Method is setup to provide the best dimensional accuracy.
Note: If you have already performed the guided setup and would like to print the calibration test again, you can access it from MakerBot Print. Simply navigate to File > Insert Example Print > Method > Calibration Check Print
START TEST PRINT
You will need both the model and support material for the test print. Once you have ensured they are both loaded, click "Start Test Print" to start the print. The extruders will then begin heating up for the test print.
Once the Performance Extruders have heated, the test print will begin. It is recommended that you watch at least the first few layers to ensure the print is adhering to the build surface.
The test print will take around 30 minutes. The display screen will show a progress bar.
The MakerBot Method utilizes a "Purge Tower" to periodically remove material residue from the nozzles of each extruder and to make sure the quality of the material is uniform across each layer line.
When first setting up your MakerBot Method, you may notice that the "Calibration Test Print" has a second small model next to it. What you are seeing is a small version of a Purge Tower.
During the course of a print, you will notice the extruders will move back and forth from your model to the Purge Tower, in order to purge material. When the print is complete, you can remove the purge tower along with your model.
The purge tower is necessary for ideal print quality, and removing it may reduce print quality or cause print failures. We recommend printing with the purge tower to achieve optimal print quality. See Chapter 5 to learn how to interact with the purge tower in MakerBot Print.
CHAPTER 4
TOUCHSCREEN USER INTERFACE
The touchscreen interface gives you options for managing your printer and the printing process. You can use these options to print objects from a USB flash drive on your MakerBot® Method™ Performance 3D Printer or start prints initiated via MakerBot Print™ software. You can also change printer settings and monitor a print's progress.
HOME SCREEN
The touchscreen gives you six options for managing your printer and the printing process:
PRINT >EXTRUDERS >SETTINGS
INFO > MATERIAL > ADVANCED
MY 3D PRINTER


EXTRUDERS

SETTINGS

INFO

MATERIAL

ADVANCED
START A PRINT
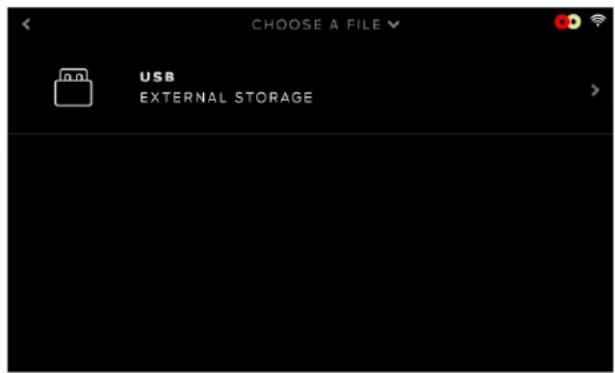
1 SELECT A FILE
text_image
CHOOSE A FILE USB EXTERNAL STORAGESelect [PRINT] on the touchscreen to initiate a print stored on a USB flash drive.
Push the icon to select the location of the file you want to print. Select [USB STORAGE] to print a file stored on a USB drive inserted into the USB port.
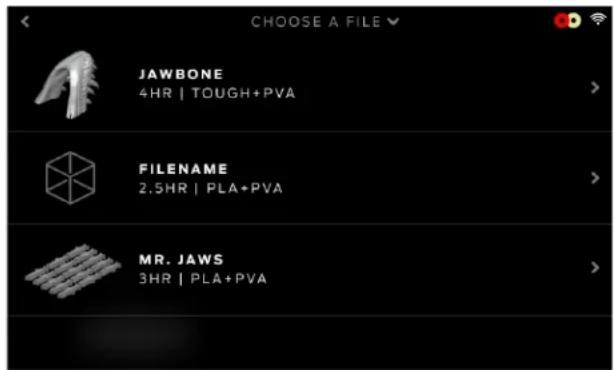
text_image
CHOOSE A FILE JAWBONE 4HR | TOUGH+PVA FILENAME 2.5HR | PLA+PVA MR. JAWS 3HR | PLA+PVAUse the touchscreen to scroll through the list of available files and press it again to select the file you would like to print.
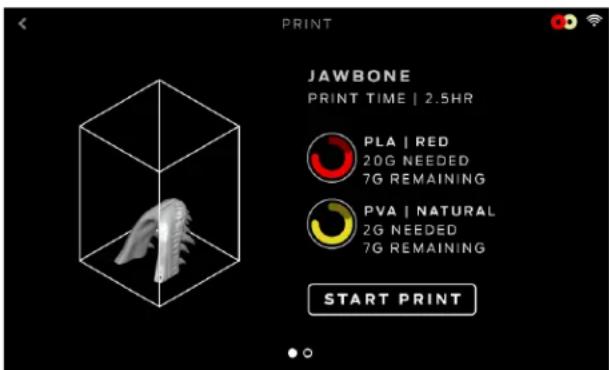
2 START PRINT
text_image
PRINT JAWBONE PRINT TIME | 2.5HR PLA | RED 20G NEEDED 7G REMAINING PVA | NATURAL 2G NEEDED 7G REMAINING START PRINTChoose a .MakerBot file that has been exported from MakerBot Print to begin printing. Note that the file needs to be formatted from within MakerBot Print for MakerBot Method before being exported.
Select [START PRINT] to begin printing the file.
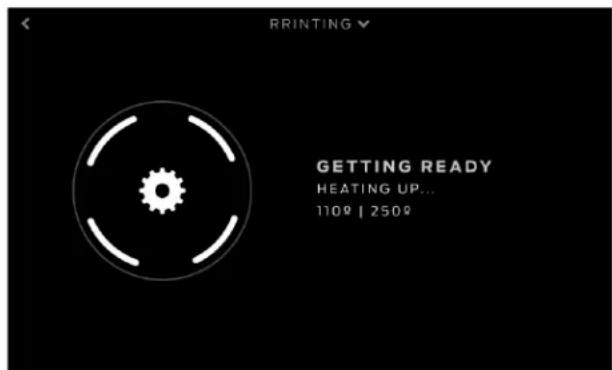
3 PRINTING
text_image
PRINTING GETTING READY HEATING UP... 110° | 250°During the printing process you will be able to view print progress information and other printer details.
- Percentage of the print completed.
- Time elapsed and estimated time remaining in the print. While the Heated Chamber and Performance Extruders are heating, the screen will display the current and target temperatures.
-
While actively printing, swipe the touch screen between the following screens:
-
Print progress
- Rendering of your model or layout
-
File information
• Print options information
• Extruder temperatures -
The Print menu contains the following options:
-
PAUSE - Press the pause button on the screen to temporarily pause your print.
- CHANGE MATERIAL - Select this option to load or unload material.
- CANCEL - Select this option to cancel your print.
4 PRINT COMPLETE
After the print is complete, the screen will indicate its completion. Push the screen to continue to the next menu. You will then be asked if you would like to print the object again, or return to the storage menu screen. Select your choice by touching the screen accordingly.
If you wish to print the object again, make sure to clear the build plate.
MATERIAL
Select the [Material] icon to load or unload material.
For material best practices, see Chapter 3, Guided Setup.
TO LOAD MATERIAL
- Cut the end of your material to create a clean edge
- Use the touch screen to select [LOAD FOR MATERIAL BAY 1] or [LOAD FOR MATERIAL BAY 2]
- Follow the instructions on the screen
TO UNLOAD MATERIAL
- Use the touch screen to select [UNLOAD MATERIAL] for either Material Bay 1 or 2
- Follow the instructions on the screen
- When the Performance Extruder has stopped pushing the material out and the screen states that the material is ready to be removed, gently pull the material and rewind it onto the spool
If you are changing material spools, make sure to keep the spool tightly wound as you pull the material free of the guide tube. If you do not, the material could unravel or tangle on the spool.
NOTE: When you are not using a material spool, make sure the free end of the material is inserted into one of the storage slots of the spool. This allows you to find the insertion end of the material much faster and will prevent the spool from tangling. Spools not in use should be stored in the original bag they came in. This prevents moisture uptake, which is important for maintaining print quality.
SETTINGS
Select the [SETTINGS] icon to personalize your MakerBot Method, edit network or sharing settings, update firmware, access automated XYZ calibration, and other tools.
FIRMWARE UPDATE
Select [FIRMWARE UPDATE] to see if you have the most up-to-date firmware. If the MakerBot Method is already connected to a network, then it will automatically check for an update. If there is an update, push the screen to begin the download. If the MakerBot Method already has the most current firmware, a message will display on the touchscreen stating that your firmware is already up-to-date. If the printer can not be connected to the internet, firmware can be updated via MakerBot Print.
CONFIGURE WIFI
Select [CONNECT TO WIFI] to begin the setup process of connecting your MakerBot Method to a WiFi connection. When you select [CONNECT TO WIFI], the MakerBot Method will show the available WiFi networks. Select the WiFi network that you would like to connect to and enter a password if required.
CALIBRATION
Select [CALIBRATE TOOLHEADS] to run an automated XYZ calibration after inserting the performance extruders to the extruder assembly. For more information on calibrating toolheads, see Chapter 6 Maintenance.
DIAGNOSTICS AND LOGS
Select [DIAGNOSTICS AND LOGS] to run a system diagnostic scan of the MakerBot Method and save the resulting logs. These logs can be sent to MakerBot should you ever need support.
COPY SYSTEM LOGS TO USB
Allows you to copy system logs of the MakerBot Method to a USB drive.
RESET TO FACTORY SETTINGS
Select [RESET TO FACTORY SETTINGS] to restore the MakerBot Method to its original factory settings and wipe any information stored on the internal storage drive.
POWER OFF
Select [POWER OFF] on the touchscreen to turn off the MakerBot Method.
EXTRUDER
Select the [EXTRUDER] Icon for assistance in attaching a Performance Extruder. If the Performance Extruder is attached, the screen will show the Performance Extruder information such as temperature and print statistics.
If the Performance Extruder is not attached, the Extruder icon will not be highlighted or display the MakerBot logo.
When attaching the Performance Extruder, position the extruder so that the connectors lock into place with the Extruder Assembly and close the latch onto the extruder. If the Performance Extruder is successfully attached, you will see the extruder icon highlighted.
NOTE: Only the Performance Extruder is supported for the MakerBot Method. Both extruders are required to start a print.
INFO
Select the [INFO] icon to view firmware information, network information, and print statistics from your MakerBot Method.
CHAPTER 5
MAKERBOT PRINT™
The MakerBot® Method™ Performance 3D Printer streamlines 3D print preparation and file management using MakerBot Print™ software. MakerBot Print is a free desktop application that allows you to discover prepare, manage, and share 3D prints.
DOWNLOADING AND INSTALLING MAKERBOT PRINT™ (WEBSITE)
- Go to MAKERBOT.COM/PRINT. Click the Download button.
- Select your operating system from the drop-down menu on the download pack and click Download.
- Double-click the MakerBot Print installer to run the installation wizard. Follow the installation instructions.
HOW IT WORKS
MakerBot Print streamlines 3D print preparation and file management. PC users can also import and manipulate native CAD files. MakerBot Print allows you to Arrange, Orient, Scale, and View your 3D models and prepare them for print. You can also access print settings to modify your print.
USING MAKERBOT PRINT
Please visit our MakerBot Print Learning Page to get our most up-to-date instructions and guides on how to use the MakerBot Print application.
Note: The default print settings have been tuned to give you the best overall print quality. It is recommended you keep the default settings.
CONNECTING TO YOUR MAKERBOT METHOD VIA USB
If you have not already, you will need to download MakerBot Print. Once installed, open MakerBot Print and use the included USB A to USB B cable to connect your MakerBot Method to your computer. The USB B port on the MakerBot Method is located on the back of the printer. Once connected, your MakerBot Method will appear under the printers menu in the bottom right corner of MakerBot Print.
INTERACTING WITH THE PURGE TOWER IN MAKERBOT PRINT
When you open MakerBot Print and the MakerBot Method is selected as your printer, you will notice that the Purge Tower appears as a square model on the virtual build plate, along with your model.
The Purge Tower can be moved around the build plate to accommodate the size and shape of your model. You can do this by clicking and dragging the Purge Tower around the virtual build plate. The Purge Tower can be removed by right clicking on the tower in Makerbot Print and selecting "Delete". The purge tower is necessary for ideal print quality, and removing it may reduce print quality or cause print failures. We recommend keeping the purge tower, to achieve optimal print quality.
STARTING A PRINT WITH THE MAKERBOT METHOD
There are two ways to begin printing an object. You can use the touchscreen on the MakerBot Method or MakerBot Print.
When you are ready to print your model, click PRINT in MakerBot Print to slice the model using the current settings and send a .makerbot print file to your MakerBot Method. You will be reminded to clear the build plate and asked to initiate the print on the touchscreen. You can also select [BEGIN PRINTING] on the touch screen after starting the file transfer.
If MakerBot Print is connected to your MakerBot Method, the print file will be sent directly to your 3D printer. If MakerBot Print is not connected to your MakerBot Method, this button will open a dialog allowing you to export and save a .makerbot print file. You can transfer the print file to your MakerBot Method using a USB drive.
HOW TO PAUSE OR CANCEL A PRINT
To pause a print, push the pause icon on the print progress screen. You can also select the printer in MakerBot Print and select PAUSE.
To cancel a print, tap the top of the screen that says printing or paused. A drop down will appear with the option to cancel the print.
TO ADD AN OFFLINE PRINTER
- Open the printer panel and click [ADD A PRINTER]
- Select [ADD AN UNCONNECTED PRINTER]
- Select a printer, and the build plate will update to the appropriate size
AFTER YOU PRINT
REMOVING THE PRINT FROM THE BUILD PLATE
When your print finishes, remove the flexible build plate from the MakerBot Method. Remove the print from the build plate by simply bending the flexible build plate. The print will peel off the smooth grip surface. After the model has been removed, soaking it in warm water will cause the support material to dissolve. Warm water with agitation will increase the speed at which the support material dissolves. For PVA, do not heat higher than 40C. For SR-30, heat between 70 and 75C.
NOTE: When you bend the flexible build plate, some pieces of the raft may remain on the plate. Simply bend the flex build plate again or use a flat, non-sharp tool such as a putty knife to remove the raft pieces. Never use a knife to remove pieces of the raft—doing so can damage the build plate.
CHAPTER 6
PRINTER MAINTENANCE
As soon as you take your MakerBot® Method™ Performance 3D Printer out of the box, it is ready to print high-quality models. However, like any precision machine, routine maintenance is needed. Here are some ways you can keep your MakerBot Method printing smoothly.
EXTRUDER CALIBRATION
When printing with Method's two Performance Extruders, it is crucial to ensure the distance between both extruders is set correctly. If the extruders are not calibrated, a part may not print successfully.
Calibration should be run if you are noticing any print quality issues, or if the extruders are changed.
You can access the calibration script on the MakerBot Method by going to Settings > Calibrate Extruders on the printer's touch screen.
MAINTAINING THE BUILD PLATE
The surface of the MakerBot Method build plate, known as the Grip Surface, allows for better print adhesion and print quality compared to other types of build surfaces. However, over time the grip surface can become cracked and damaged. If these cracks or tears begin to affect print quality, it is time to replace the grip surface.
Visit HTTPS://SUPPORT.MAKERBOT.COM to learn how to replace the grip surface.
Go to HTTPS://STORE.MAKERBOT.COM/ to order more Grip Surfaces and build plates.
OTHER ISSUES
For help with issues not covered in this chapter, please go to HTTPS://SUPPORT.MAKERBOT.COM.
CHAPTER 7
REFERENCE
GLOSSARY
BUILD PLATFORM: The support for the build plate. The build platform's underside contains adjustable hex bolts for use during assisted-leveling.
ETHERNET CABLE: The cable used to connect your MakerBot Method to a local area network.
EXTRUDER ASSEMBLY: The swappable Performance Extruders which contain the sensors, drive gears, hot end, and nozzle.
EXTRUDER CARRIAGE: Holds the extruders firmly in place on the rail of the x-y gantry while allowing for quick and easy extruder swapping.
EXTRUDER NOZZLE: The opening on the end of the Performance Extruder from which heated MakerBot material emerges to be spread onto the build plate.
FIRMWARE: The software that runs on your MakerBot Method.
GANTRY: The apparatus that allows the carriage and extruder assemblies to move along the x and y axis.
GRIP SURFACE: The surface on which the extruder prints on. Prints adhere better to the Grip Surface resulting in reduced warping and curling.
GUIDED SETUP: The set of tasks that runs when you turn on the MakerBot Method for the first time. The setup assistant helps you level the build plate, load material and start a test print.
INTERNAL STORAGE: The part of the MakerBot Method onboard storage that you can use to store print files.
LAYOUT: An arrangement of 3D models on the build plate. Multiple layouts can be saved as part of any .Thing in your Library.
LEVELING SCREWS: The two screws underneath the build platform that allow you to pivot the build plate around its center point during the leveling process.
.MAKERBOT: The format of print files for your MakerBot Method Print files contain instructions for your MakerBot Method.
MAKERBOT ACCOUNT: The username and password you will use to sign in to MakerBot Print, and log on to Thingiverse and other MakerBot sites.
MAKERBOT PRINT SOFTWARE: Free software for use with your MakerBot Method. MakerBot Print will help you discover, manage, share and print 3D models.
MATERIAL DRAWER BAYS: The two drawers located at the base of the MakerBot Method, where both the model and support material spools are stored during the printing process.
MATERIAL GUIDE TUBE: The plastic tube that guides the MakerBot material from the material spool to the Performance Extruders.
.OBJ: A file format used for 3D models.
PERFORMANCE EXTRUDER: The Performance Extruder draws the material from the spool, melts it, and pushes it through a nozzle onto the Spring Steel Build Plate.
PROFILE: The settings used to slice your 3D model and create a print file. MakerBot Print Software comes with preset profiles for Balanced and High-resolution prints.
RAFT: A plastic base printed on the build plate and used as a printing surface for your printed object.
SLICING: The process of turning a 3D model into a print file containing instructions for your MakerBot Method. The MakerBot Method uses print files with the extension .makerbot.
SPRING STEEL BUILD PLATE: The flat plate on which the MakerBot Method 3D Printer builds an object. This plate is removable and bending the plate allows you to remove objects.
.STL: A widely used file format for 3D models.
SUPPORTS: Automatically generated support structures used to prop up any sections of a print that will not stand alone.
.THING: A file format used by MakerBot Print that stores additional information about your 3D model files.
THING: A file or group of files saved to Thingiverse or to your MakerBot Cloud Library.
THINGIVERSE: An online community for sharing 3D design files.
TOUCHSCREEN: The touchscreen at the upper right corner of the MakerBot Method. The touchscreen allows you to start prints, change settings and view status information.
USB CABLE: A cable that allows your computer to communicate with the MakerBot Method.
USB DRIVE: A USB flash drive. You can use a USB drive to transfer print files to and from the MakerBot Method. Make sure that the USB drive is formatted to FAT32. USB drives that are formatted to NTFS will not be visible.
CONTACT
SUPPORT
support.makerbot.com
Our website has extensive documentation and troubleshooting information about your MakerBot Method. It's a great resource when you want to try to solve issues quickly on your own.
my.makerbot.com/support
At MakerBot, we take pride in offering expert, responsive, friendly customer support to our customers around the world. If you need help resolving an issue with your MakerBot Method, open a case with the MakerBot Support Team at the web address above.
SALES
sales@makerbot.com
To learn about other MakerBot products, including MakerBot material, please email the address above, or call our Sales Team at +1347.334.6800