W1488 - Sewing machine White - Free user manual and instructions
Find the device manual for free W1488 White in PDF.


| Product Type | Sewing Machine |
| Brand | White |
| Model | W1488 |
| Power Supply | 240V AC, 50Hz (UK plug with 3A fuse) |
| Sewing Lamp | 15W max, 120V or 240V (depending on model) |
| Speed Control | Foot pedal with variable speed |
| Stitch Selection | Pattern selector dial with multiple stitch patterns |
| Stitch Length | Adjustable, 0-4 mm |
| Reverse Sewing | Yes, push-button reverse |
| Needle System | Standard household needles (e.g., 11, 14) |
| Bobbin Type | Drop-in bobbin, horizontal |
| Presser Foot System | One-touch lever, interchangeable feet |
| Presser Foot Pressure | Adjustable (0-3) |
| Feed Dog Drop | Yes, for darning and freehand embroidery |
| Free Arm Capability | Yes, removable extension table |
| Weight | Approximately 7-8 kg (estimated) |
| Dimensions (L x W x H) | Approximately 40 x 18 x 30 cm (estimated) |
| Safety Features | Automatic unplugging before cleaning/maintenance; do not use with damaged cord |
| Included Accessories | Zigzag foot, buttonhole foot, button foot, zipper foot, bobbins, needles, screwdriver, oil, seam ripper |
| Maintenance | Clean race and shuttle hook regularly; oil at indicated points; use only sewing machine oil |
| Repairability | User-serviceable: needle change, cleaning, oiling; professional service for complex issues |
| Country of Manufacture | Not specified; likely China or Taiwan |
Frequently Asked Questions - W1488 White
User questions about W1488 White
0 question about this device. Answer the ones you know or ask your own.
Ask a new question about this device
Download the instructions for your Sewing machine in PDF format for free! Find your manual W1488 - White and take your electronic device back in hand. On this page are published all the documents necessary for the use of your device. W1488 by White.
USER MANUAL W1488 White
natural_image
Line drawing of a sewing machine with no visible text or symbols1477/1488/1499
WHITE
WHITE SEWING MACHINE COMPANY
Record in space provided below the Serial No. and Model No. of this appliance.
The Serial No. is located on Bed Plate. The Model No. is located on Rating Plate.
Serial No. ____.
Model No. ____.
Retain these numbers for future reference.
IMPORTANT SAFETY INSTRUCTIONS
When using an electrical appliance, basic safety precautions should always be followed, including the following:
Read all instructions before using (this appliance)
DANGER To reduce the risk of electric shock:
An appliance should never be left unattended when plugged in. Always unplug this appliance from the electric outlet immediately after using and before cleaning.
WARNING To reduce the risk of burns. fire, electric shock, or injury to persons:
- Do not allow to be used as a toy. Close attention is necessary when this appliance is used by or near children.
- Use this appliance only for its intended use as described in this manual. Use only attachments recommended by the manufacturer as contained in this manual.
- Never operate this appliance if it has a damaged cord or plug, if it is not working properly, if it has been dropped or damaged, or dropped into water, Return the appliance to the nearest authorized dealer or service center for examination, repair, electrical or mechanical adjustment.
- Never operate the appliance with any air openings blocked, Keep ventilation openings of the sewing machine and foot controller free from the accumulation of lint, dust, and loose cloth.
- Never drop or insert any object into any opening.
- Do not use outdoors.
- Do not operate where aerosol (spray) products are being used or where oxygen is being administered.
- To disconnect, turn all controls to the off ("0") position, then remove plug from outlet.
- Do not unplug by pulling on cord. To unplug, grasp the plug, not the cord.
DANGER
- Always unplug before relamping, Replace bulb with same type rated 15 watts.
- Do not reach for an appliance that has fallen into water, Unplug immediately.
- Do not place or store appliance where it can fall or be pulled into a tub or sink. Do not place in or drop into water or other liquid.
SAVE THESE INSTRUCTIONS
WARNING
- Keep fingers away from all moving parts. Special care is required around the sewing machine needle.
- Always use the proper needle plate. The wrong plate can cause the needle to break.
- Do not use bent needles.
- Do not pull or push fabric while stitching. It may deflect the needle causing it to break.
- Unplug the sewing machine when making any adjustments in the needle area, such as threading needle, changing needle, threading bobbin, or changing presser foot, etc.
- Always unplug sewing machine from the electrical outlet when removing covers, lubricating, or when making any other user servicing adjustments mentioned in the instruction manual.
- Never operate on a soft surface such as a bed or couch where the air openings may be blocked.
CONTENTS
Name of Parts....1
Accessories. 2
Removing the extension table 3
Before sewing (Power supply and Sewing lamp)....4
Fitting shank and quilting seam guide. Fitting of presser feet . . . . . . . . . . . . . . . . . . . . . . . . . 5
Winding the bobbin....6
Removing bobbin case and bobbin 7
Inserting bobbin into bobbin case. 7
Inserting bobbin case into shuttle race....8
Changing needle 8
Threading upper thread & Twin needle threading. 9
Drawing up bobbin thread....10
Changing sewing directions 10
Adjusting.thread tensions 11
Regulating the presser foot pressure .....12
Darning plate 12
Fabric. Thread, Needle guide....13
Sewing (pattern selector) and operation table 14
To start sewing to finish a seam 15
Straight stitch zig zag stitch....16
Blind hemming....17
Three step zig-zag 18
Overcasting edges-binding 19
Straight stretch stitch....20
Sewing on buttons 21
Sewing in zips. 22
Button hole sewing 23
Hemming....24
Twin needle-freehand embroidery....25
Cleaning of race.and shuttle hook....26
Cleaning and oiling 27
Trouble shooting guide....28
NAME OF PARTS (FRONT SIDE)
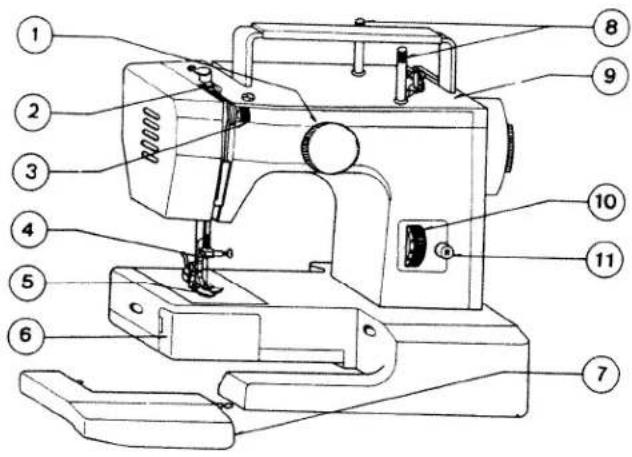
(REAR VIEW)
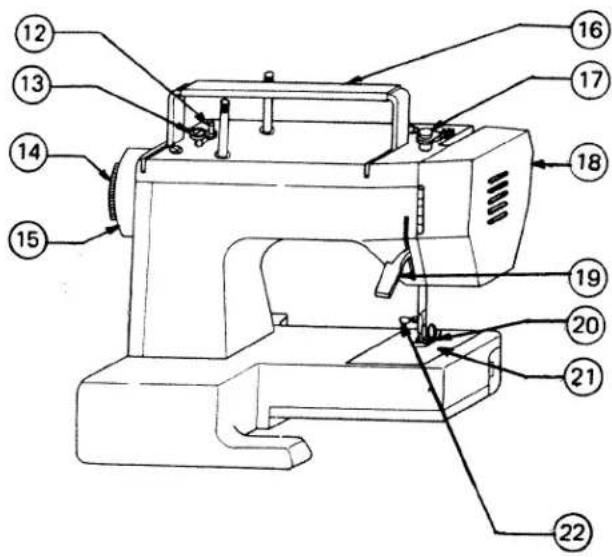
1 Pattern selector dial
2 Take up lever
3 Tread tension dial
4 Tread guide for upper threading
5 Presser foot
6 Shuttle cover
7 Extension table
8 Spool pin
9 Top cover
10 Stitch length dial
11 Reverse button
12 Bobbin winder spindle
13 Bobbin winder stopper
14 Stop motion knob
15 Hand wheel
16 Handle
17 Upper thread guide
18 Face cover
19 Presser foot lever
20 Thumb screw
21 Needle plate
22 Needle clamp screw
ACCESSORIES
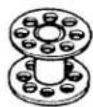
Bobbin
10030

05734
Felt
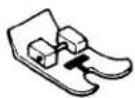
Zigzag foot
(On machine)
4911
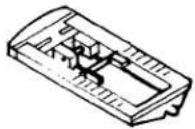
Button hole foot
4918
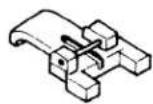
Button foot
4917
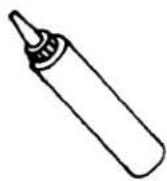
Machine Oil
7093
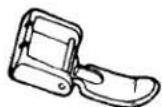
3589
Zipper foot
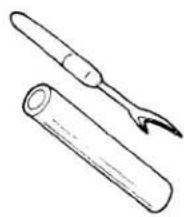
natural_image
Line drawing of a pen and inkwell (no text or symbols)Button hole cutter
20185-
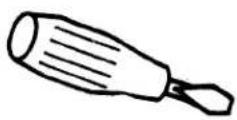
Screw driver
1627
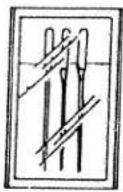
Needle
11 #14
11901
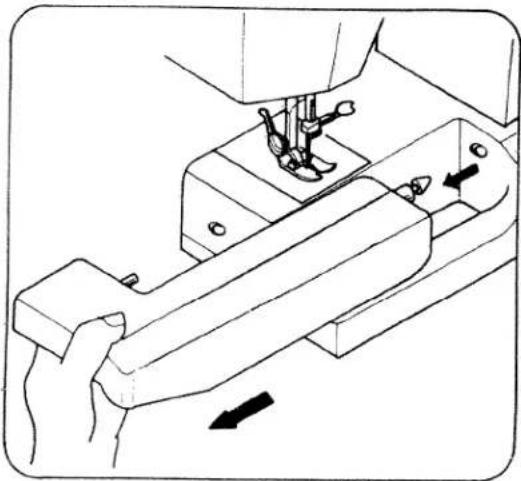
REMOVING EXTENSION TABLE
natural_image
Line drawing of a sewing machine needle stitching a wooden handle, with no text or symbols present.To convert the machine from flat-bed to free-arm use simply remove the tension table as shown.
THIS IS ONLY APPLICABLE TO MACHINES MANUFACTURED FOR THE UNITED KINGDOM IMPORTANT
The wires in this mains lead are coloured in accordance with the following code:
BLUE - NEUTRAL
BROWN - LIVE
NOTE. As the colours of the mains lead of this appliance may not correspond with the coloured markings identifying the terminals in your plug, proceed as follows:
Connect BROWN wire to terminal marked L or coloured RED.
Connect BLUE wire to terminal marked N or coloured BLACK.
FIT CORRECT PLUG TO POWER CORD
WHEN USING A B.S. 1363 FUSED PLUG, A 3 AMP. FUSE MUST BE FITTED.
If the terminals of the plug are unmarked consult a qualified electrician before use.
When leaving the sewing machine unattended, the plug must be removed from the socket outlet. When servicing the sewing machine, or when removing covers or changing lamps, the machine or the electrical set must be disconnected from the supply by removing the plug from the socket outlet.
THE MAXIMUM INPUT OF LAMP: 240 V 15 W.
THIS APPLIANCE CONFORMS TO THE STATUTORY RADIO INTERFERENCE SUPPRESSION REGULATIONS.
BEFORE SEWING
natural_image
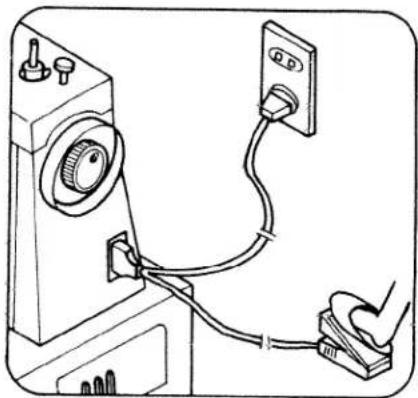
Line drawing of a hand connecting a power outlet to a device with cable (no text or symbols)- Fit the machine plug into the machine.
- Plug the machine to the power supply.
- Sewing speed can be varied by the speed controller.
(BE SURE TO FIT A CORRECT PLUG TO SUPPLY CORD)
natural_image
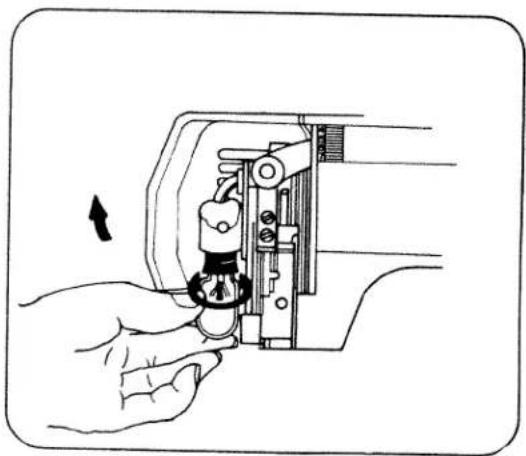
Illustration of a hand operating a sewing machine with a key inserted, showing mechanical components and a rotation arrow (no text or symbols)- Remove or install lamp from inside of face cover.
- Open face cover in direction of arrow.
- Remove lamp by unscrewing it counter clockwise.
- Install a new bulb by screwing it in clockwise.
- Use only a 120V, 15W (Max) "Hi-Light" brand replacement sewing machine lamp. Available from your Riccar stockist.
Important: When leaving the machine unattended, servicing, changing lamps or removing covers, disconnect from the supply by removing plug from the socket outlet.
FITTING SHANK
AND
QUILTING SEAM GUIDE
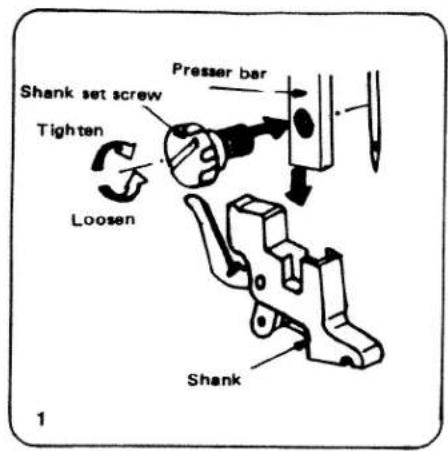
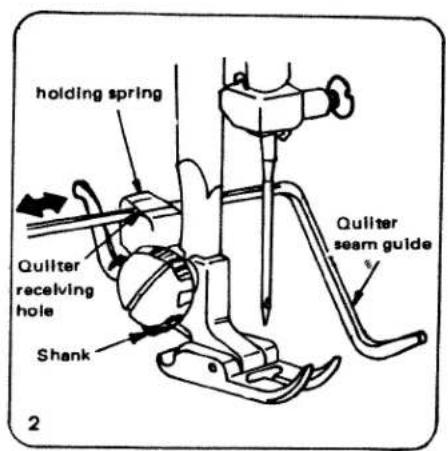
Raise the presser bar and fit shank as shown. (1) Insert quilting/seam guide carefully so as not to damage the holding spring. (2)
FITTING OF PRESSER FEET
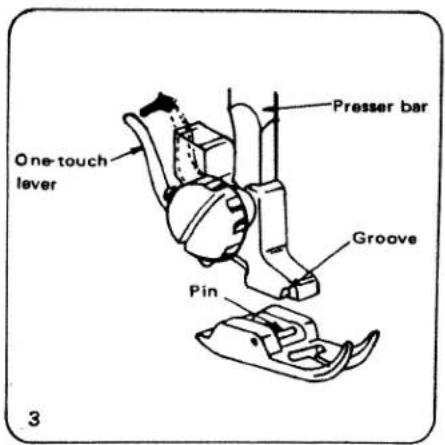
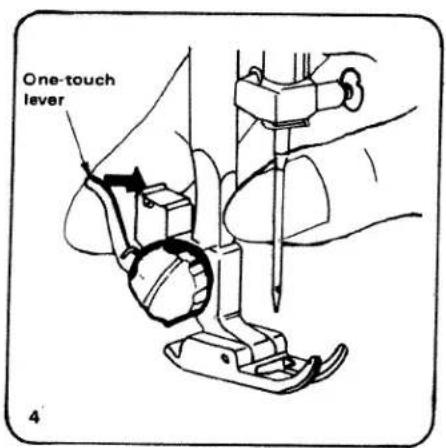
Raise the presser foot. Pull the one-touch lever towards you and the foot will be released. Centre new foot under shank.
Lower shank until groove is directly above and touching the pin. Pull one-touch lever towards you and the foot will become engaged. (3, 4)
WINDING THE BOBBIN
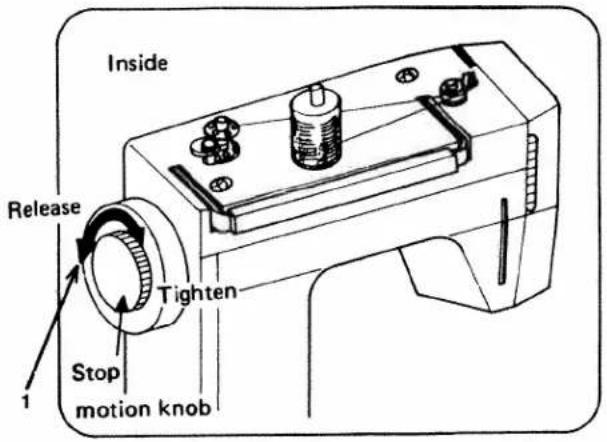
- Release stop motion knob.
- Thread as shown.
- Place bobbin onto spindle and hand-wind thread onto bobbin in an anti-clockwise direction for 5 or 6 turns. (When bobbin is filled re-tighten stop motion knob)
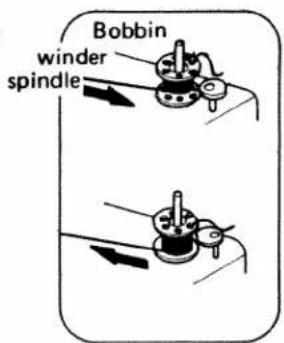
- Push bobbin winder spindle against stopper, in direction of arrow, and depress foot pedal.
- When bobbin winding is completed return spindle to its original position.
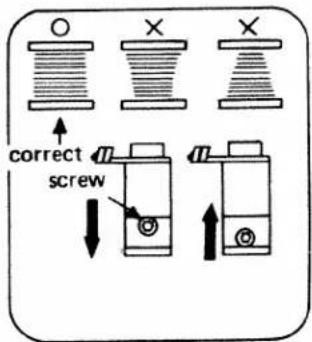
Note:
If the bobbin winding should be uneven (it is factory set) the thread guide can be raised or lowered to achieve the correct winding.
Remove the top cover and adjust with a suitable tool.
REMOVING BOBBIN CASE AND BOBBIN
natural_image
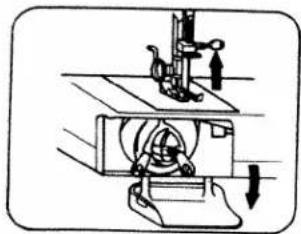
Mechanical assembly diagram showing a rotating device with directional arrows indicating motion (no text or labels)- Raise needle to its highest position and open the shuttle race cover.
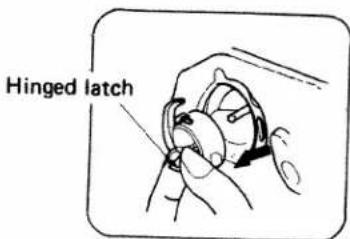
- Open hinged latch of bobbin case and pull bobbin case out of machine.
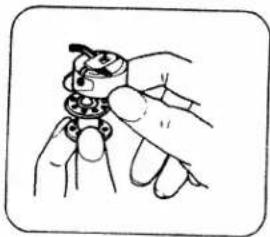
natural_image
Illustration of hands holding a small object with a ring, no text or symbols present- Release the latch and bobbin will fall out easily.
INSERTING BOBBIN INTO BOBBIN CASE
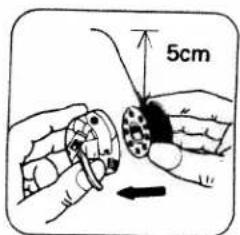
- Pull off 5cm of thread from bobbin and insert it into bobbin case as shown.
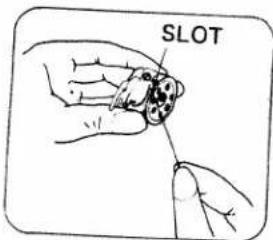
- Guide the end of thread into slot.
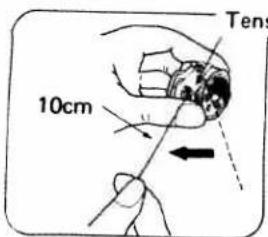
ion spring
3. Pull into slot and under tension spring and draw out about 10 cm of thread.
INSERTING BOBBIN CASE INTO SHUTTLE RACE
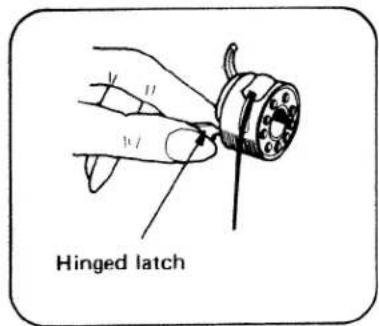
- Ensure needle is at its highest position. Pulling thread to the front, open the latch of bobbin case and hold it.
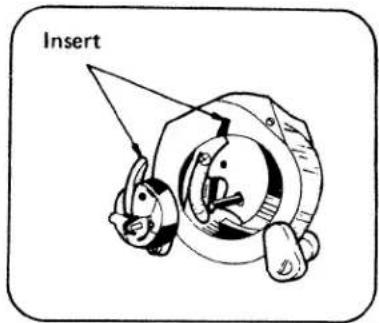
- Holding latch open, place bobbin case onto centre pin in shuttle and release latch.
CHANGING NEEDLE
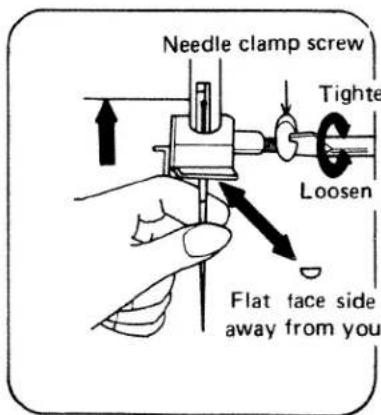
-
Raise needle to its highest position.
-
Loosen needle clamp screw and remove old needle.
-
With the flat side of the needle facing away from you, insert needle as far up as it will go.
-
Tighten the needle clamp screw securely.
Note:
At the first sign of any stitching irregularity always change the needle for a new good quality one.
THREADING UPPER THREAD
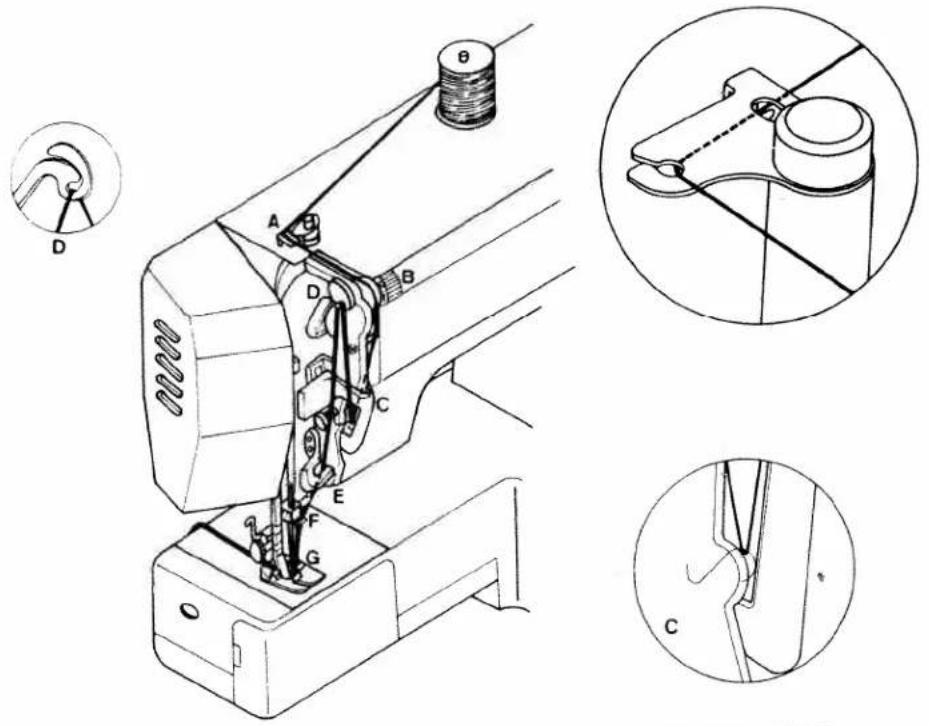
Thread the machine from A to G as illustrated.
A. Through the thread guide.
B. Between the tension discs.
C. Up and into the tension spring.
D. Into the thread take-up lever from right to left.
E. Down behind the thread guide.
F. Behind the needle clamp thread guide.
G. Through the needle from front to back, Fig. 1 & 2 also illustrates threading for twin needle sewing (see page 25)

DRAWING UP BOBBIN THREAD
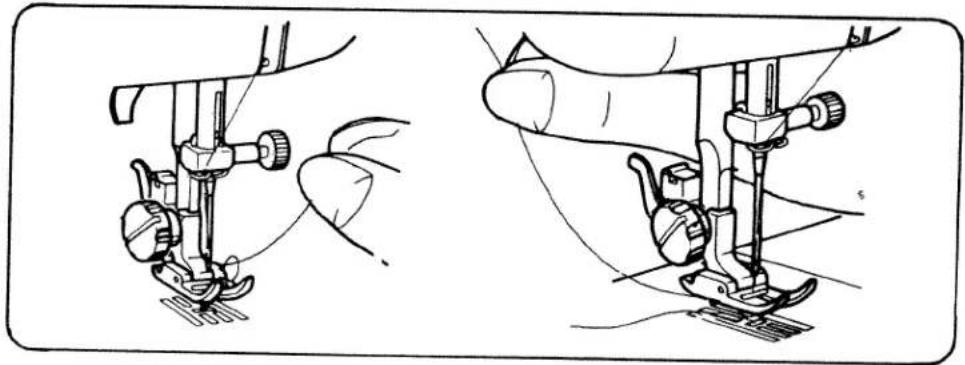
Hold the top thread with a slight tension in your left hand and rotate the hand wheel towards you so that the needle goes down and up again, then gently pull your thread out towards the rear and under your sewing foot and you are ready to start sewing.
natural_image
Technical line drawing of a sewing machine needle and foot, showing two different positioning techniques (no text or symbols present)CHANGING SEWING DIRECTIONS
natural_image
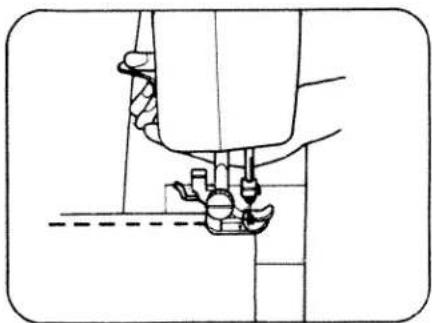
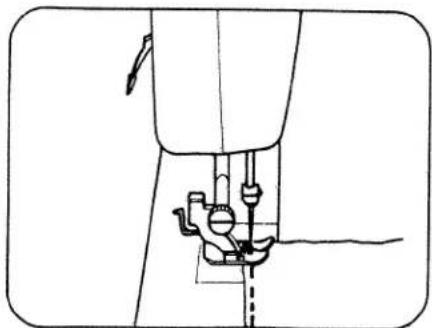
Line drawing of a sewing machine needle and foot (no text or symbols)- Lower needle down into fabric and raise presser foot, pivot the fabric around the needle to change direction as desired.
natural_image
Line drawing of a sewing machine needle and foot (no text or symbols)- Put down presser foot and start to sew.
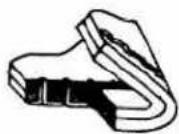
ADJUSTING UPPER THREAD TENSION
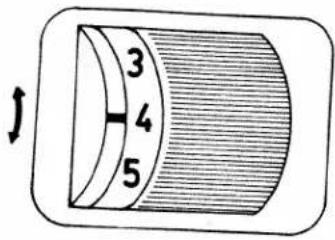
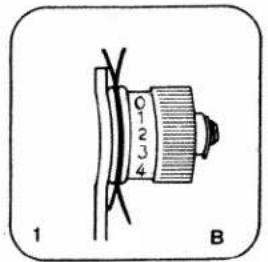
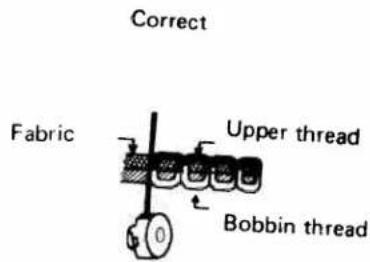
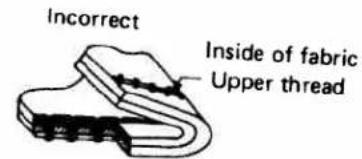
It is only normally necessary to adjust the upper thread tension to achieve the correct balance between the upper and lower threads.
The higher the number on the dial the greater the tension.
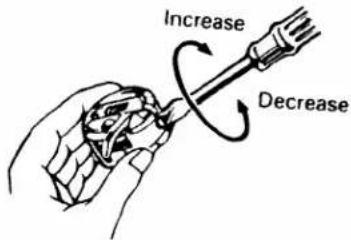
ADJUSTING LOWER THREAD TENSION
Lower thread tension can be adjusted by turning the screw on the bobbin case slightly to the right (clock-wise) to increase tension, (Anti-clockwise) to the left to decrease tension.
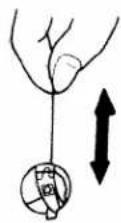
As a general guide only, the user can achieve the correct tension for normal sewing, by carefully suspending the wound bobbin in its case by the thread. If the bobbin and case immediately fall to the ground, the tension is too loose and should be increased. The correct tension is obtained when a slight jerk of the thread causes the bobbin to drop a short distance only. If this action does not move the bobbin the tension is too tight and should be loosened until the desired effect is achieved.
REGULATING THE PRESSER FOOT PRESSURE
natural_image
Technical line drawing of two mechanical clamp components (no text or symbols)-
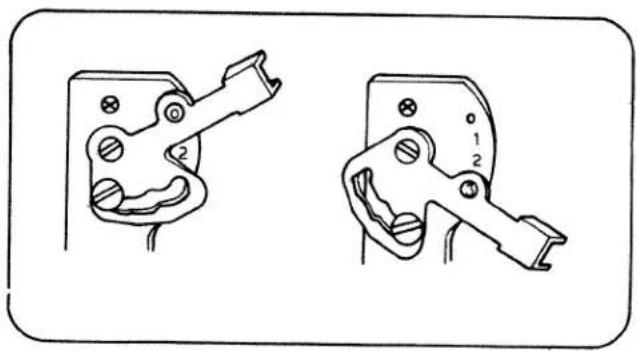
Adjust lever to desired pressure. For light fabrics use 0-1, for medium fabrics use 1-2, for heavy fabrics use 3.
-
Insufficient pressure may cause poor feeding, skipped stitches, or difficulty in guiding the fabric.
-
No. pressure adjustment is required when darning or sewing freehand embroidery.
DROP FEED
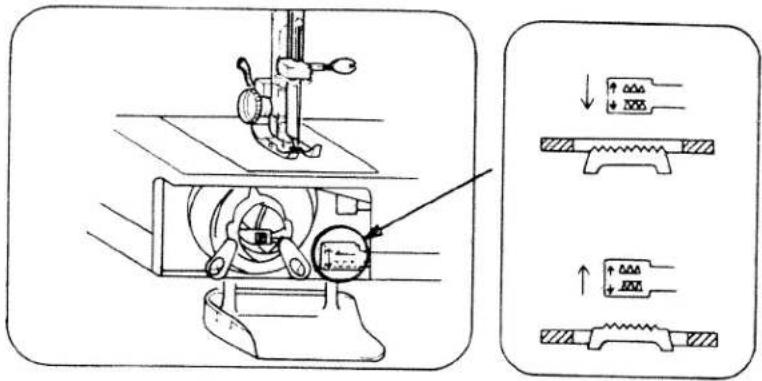
Lower feed dog by pushing lever, down in direction of arrow. (No feeding of fabric)
Used when sewing on buttons, free hand embroidery, etc.
For general sewing, raise height of feed dog by lifting lever in direction of arrow.
| Fabric Thread Needle | Pressure of presser foot | Length of stitches | Indication of tension | ||||
| ST. | ZZ. | ||||||
 |  | Pressure regulation 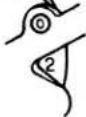 | Stitch length dial  |  | |||
| Light | Nylon | 80 Cotton | 11 | 0.5-3 | 0.5-3 | ||
| Tricot | 60 S. Fiber | ||||||
| Silk | 50 silk | ||||||
| Wool silk | 50 S. Fiber Silk | 11 | |||||
Medium 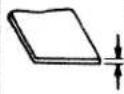 | Ging ham | 60-80 Cotton | 11 or 14 | 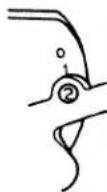 | 0.5-4 | 0.5-4 |  |
| Thin Jersey | 60 S. Fiber | ||||||
| Gabardine | 50 Silk | ||||||
Heavy 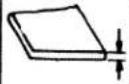 | Denim | 50 cotton | 14 |  | 1-4 | 0.5-5 |  |
| Jersey | 50 S. Fiber | 14 | |||||
| Tweed | 50 Silk | 14 | |||||
As a general rule use shorter stitch lengths on finer fabrics and longer stitch lengths with heavier fabrics, finer thread and needles with finer fabrics and heavier thread and needles with heavier fabrics. Use special 'ball point' or 'stretch' needles on difficult stretchy fabrics.
SEWING (PATTERN SELECTOR) AND OPERATION TABLE
| Stitch No. | Stitch Patterns | Stitch Length | Presser Foot | Drop feed | |
| 1 | Straight Stitch | 04 |  | ↑↓ | |
| 2 | Zig-Zag | 04 |  | ||
| 3 | Blind Hem | 13 | 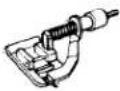 | ||
| Thread step-Zigzag Stitch | 0.53 | ||||
| 4 | Slant Overedge | 4 |  | ||
| Straight Stretch Stitch | |||||
| 5 | Button Hole | 0251 | 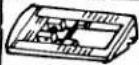 | ||
| 6 | Twin Needle | except button hole | 14 |  | |
| 7 | Freehand Embroidery | 0 | Not Necessary | ↓↓ | |
SEWING (PATTERN SELECTOR) AND OPERATION TABLE
| Stitch No. | Stitch Patterns | Stitch Length | Presser Foot | Drop feed | |||
| 1 | Straight Stitch | ● |  |  | ↑▲▲▲ | ||
| 2-5 | Zig-Zag | 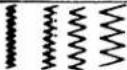 | ● |  |  | ||
| 6 | Blind Hem | [T3SZ] | ● |  | 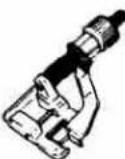 | ||
| 7 | Thread step-Zigzag Stitch |  | ● |  | |||
| 8 | Reverse Blind Hem | [KHBX] | ● |  | |||
| 9-11 | Button Hole | 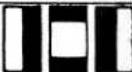 | ● | [8HZT] | [6HKS] | ||
| 12 | Smocking Stitch |  | ● |  | ### | ||
| 13 | Slant Overedge |  | |||||
| 14 | Pullover Stitch | [BODO] | |||||
| 15 | Ric-Rack Stretch Stitch |  |  | ||||
| 16 | Straight Stretch Stitch | [ZD06] |  | ||||
| Twin Needle | Stitc 1, 2,  | os. only | ● |  | [5BST] | ||
| Freehand Embroidery | Stitc 1, 2, 3, [HHCG] | os. only | ● |  | Not Necessary | m××× | |
TO START SEWING
Important Hints.
- Raise the take-up lever to its highest position when starting and stopping sewing.
- Hold both threads about 10 cms to the rear of machine for the first two or three stitches.
- Sufficient fabric should be placed under needle before lowering presser foot.
- Depress foot/Speed control and start to sew.
- Test the machine stitches on a scrap of fabric you plan to use, adjusting the machine for the length of stitch and tension suitable to your fabric.
Attention.
- When turning the hand wheel manually, always turn it toward you.
- Guide the cloth gently with your hand.
- To prevent breaking needle always stop with the needle out of the fabric.
TO FINISH SEAM
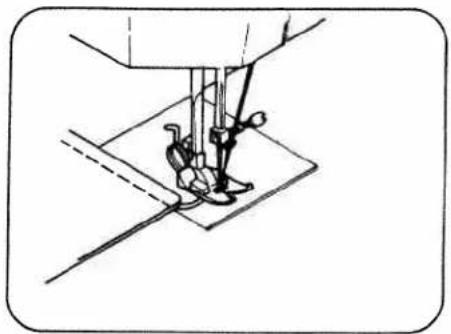
natural_image
Line drawing of a sewing machine needle stitching fabric (no text or symbols)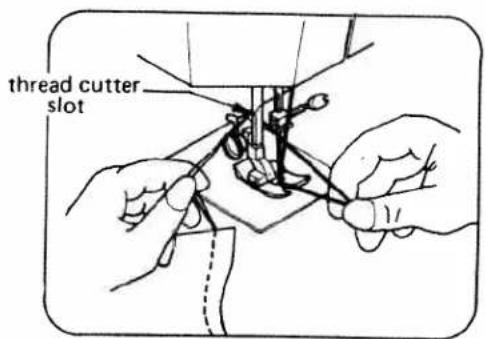
- Sew to the edge of seam.
- Push the reverse button and sew in reverse for about 2-3 cms.
- Raise needle to its highest position.
- Lift presser foot and pull out the fabric to rear of machine.
- Cut threads, as shown, on the thread cutter.
STRAIGHT STITCH
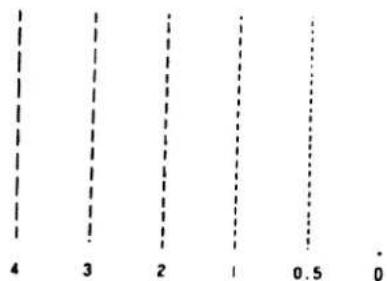
While "2" or "3" on the dial gives a suitable stitch length for ordinary purposes, the stitch length varies with the weight of fabric, thickness of thread and purposes, the stitch length varies with the weight of fabric, thickness of thread and purpose of sewing. Generally speaking, the finer the fabric, the finer the thread and shorter the stitch length; the heavier the fabric, the thicker the thread and longer the stitch length.
bar
| Category | Value | |---|---| | 4 | 4 | | 3 | 3 | | 2 | 2 | | 1 | 1 | | 0.5 | 0.5 | | 0 | 0 |At "0" the fabric will not move ahead, and the needle will keep piercing the same point.
ZIG-ZAG STITCH
The zig-zag stitch can be set at various stitch widths and lengths according to the application required. Set the pattern selector as desired.
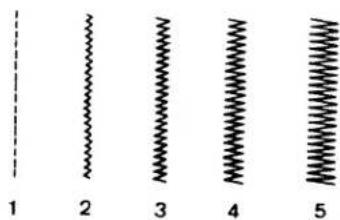
Satin stitching is a "closed up", very short stitch length, stitch and can be used for sewing initials, patterns, applique, etc.
BLIND HEMMING
Fold the fabric as illustrated with the "wrong" side facing upwards.(1).
Place the folded fabric under the foot as shown.
Turn the hand wheel towards you by hand, until the needle swings over to the far left. It should then just pierce the fold of the fabric. (2) If it does not, then adjust the position of the fabric.
Once the correct position of the fabric has been set, position the "guide" of the foot (3) up against the fold (2) by turning the nut (4).
Proceed to sew carefully feeding the fabric to ensure it retains the correct position against the guide. (3) Note: Some practice will be needed to obtain the best results. Always test the stitch first on a spare piece of fabric.

THREE STEP ZIG-ZAG
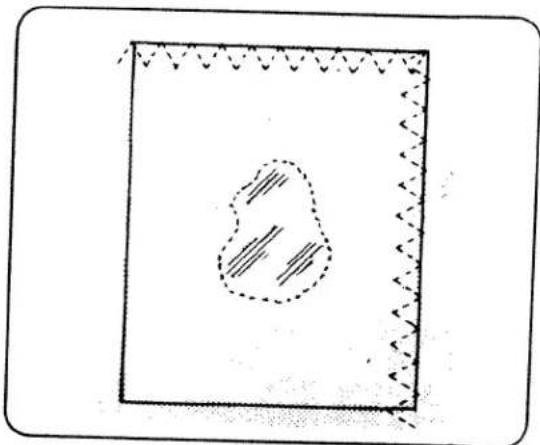
The three step zig-zag stitch has a wide range of sewing applications, such as patching, darning, repairing tears, mending, sewing on elastic and lace, oversewing edges etc. on a wide range of fabrics.
The illustration shows patching, where the stitches are to the edge of the patch and a tear, where the stitches go firstly over the centre of the tear and then to either side but overlapping slightly on the first row.
The stitch length can be reduced until the stitches are very close together. This will give a stronger finish for most repairing operations.
natural_image
Simple line drawing of a rectangular frame with a dashed oval and diagonal hatching, no text or symbols present.OVERCASTING EDGES
For thicker fabrics

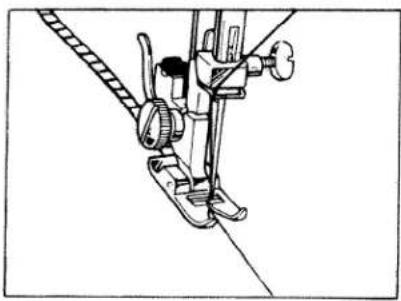
Both these stitches are designed to overlock the edge of a fabric.
When the needle is at its extreme right position, allow it to just pass over or just pierce the edge of the fabric according to the effect you require.
Using the overcasting foot will prevent puckering of thin fabrics.
natural_image
Technical line drawing of a mechanical assembly with no visible text or symbolsBINDING
natural_image
Simple line drawing of a rectangular container with internal zigzag lines and a dotted top section (no text or symbols)STRAIGHT STRETCH STITCH
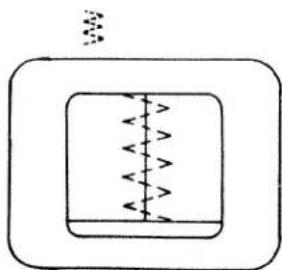
The straight stretch sews two stitches forward and one stitch backwards, thereby giving "triple" strength. Use it for stretch fabrics and for areas of "stress" where a strong stitch is required.
natural_image
Pure geometric line drawing of a garment pattern piece with no text or symbolsSEWING ON BUTTONS
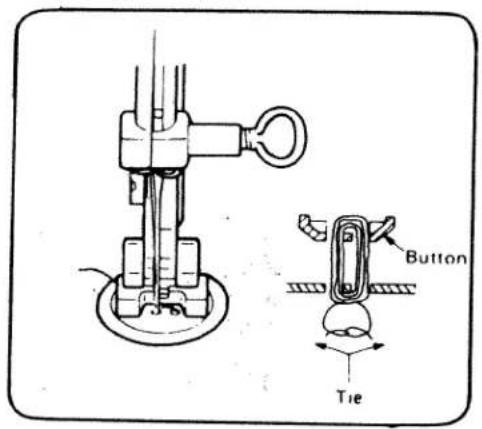
- Fit darning plate as described on page 12.
- Use button presser foot and attach firmly.
- Place button between presser foot and fabric and lower presser foot.
- Manually turn hand wheel towards you ensuring that the needle enters into both holes of button without obstruction. (Increase or decrease width setting).
- Sew about 7 stitches.
- Pull both threads to the underside and tie together.
SEWING IN ZIPS
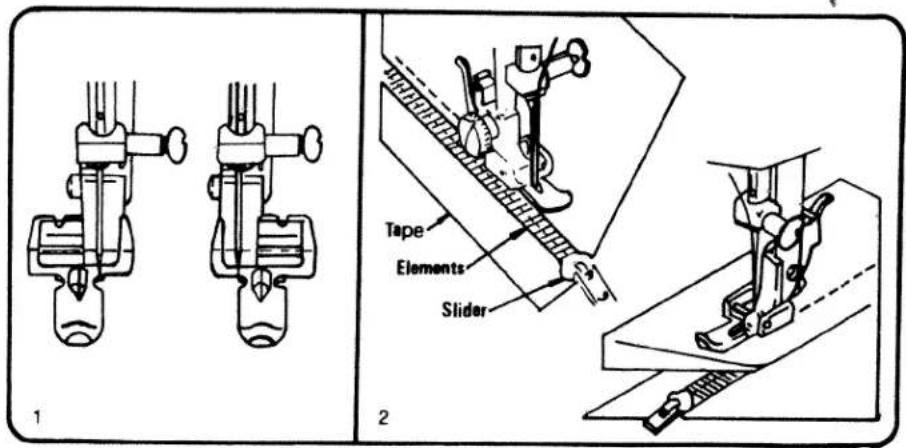
Fit the Zipper foot. The Zipper foot can be moved to the left or right. (2) To sew on the right hand side of the zipper, move foot over to the right as illustrated and reverse the procedure to sew the left hand side of the zipper. (3)
To move the "zip slider" out of the way, leave needle in the fabric, raise foot and slide it behind the foot. Lower the foot and continue.
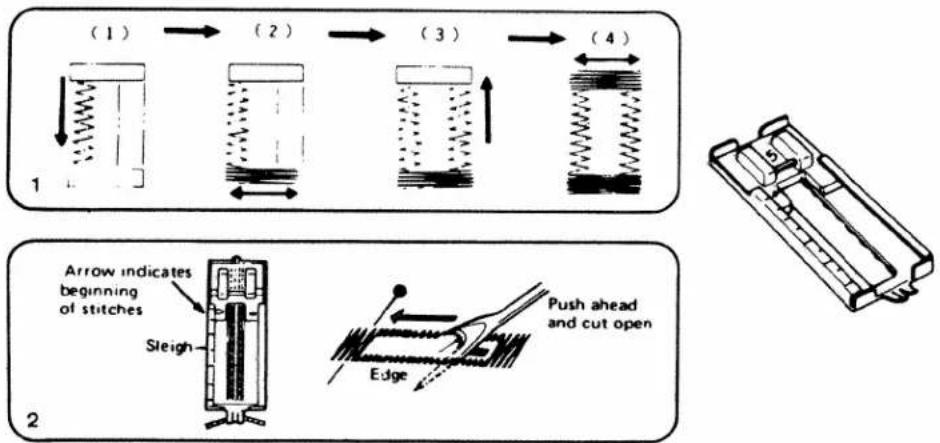
BUTTON HOLE SEWING
Fit the button hole foot.
Set the stitch length dial within the green marking to achieve the correct density (closeness) of satin stitch. (1) Sew in the sequence illustrated (1) selecting patterns 18, 19, 20 and 19 again.
USER TIPS
Always sew a sample buttonhole on some spare fabric as settings will change according to the fabric used. For very thin, stretchy or other difficult fabrics, try using interfacing (vilene) or tissue or other paper underneath the fabric to aid machine feeding.
Always use the Buttonhole foot using its calibrated markings to measure the buttonhole length. On suitable fabric, a corded buttonhole can be sewn taking care that the zig-zag stitches of the buttonhole oversew the cord. (2)
Carefully cut between the sides (beads) of the buttonhole with the seam ripper using a pin through the end bar tack (2) to prevent the seam ripper going too far. The top tension may be reduced to achieve a better looking buttonhole.
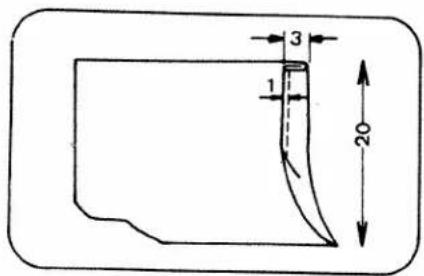
HEMMING
-
Raise the foot and the needle to its highest position. Replace the foot with the hemmer foot.
-
Fold over the fabric edge by about 3mm and place it under the foot. Secure the folded edge with a few stitches. Take out the workpiece and draw the hem into the hemmer foot by pulling the threads.
natural_image
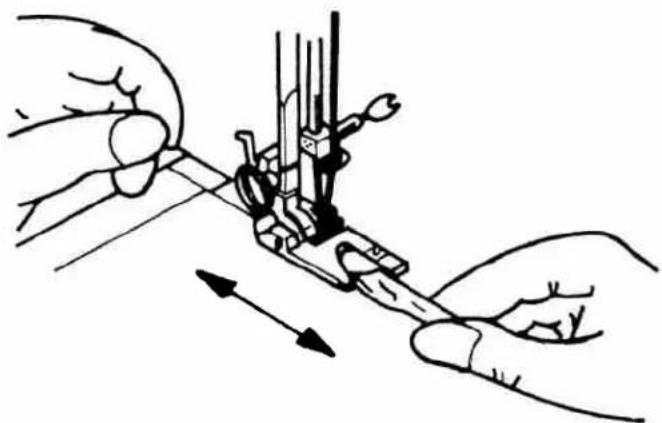
Illustration of a sewing machine needle stitching with two hands, showing thread positioning and cutting tool (no text or symbols)- Lower the foot and sew the hem.
- During sewing, fold the fabric to the left a little and allow it to run into the hemmer foot.
- Make sure that the fabric does not move under the right half of the foot. The fabric must be fed into the scroll of the hemmer sufficiently so that the workpiece edge runs freely through the groove under the foot.
Only suitable materials can be used and some practice may be necessary to achieve best results.
TWIN NEEDLE
natural_image
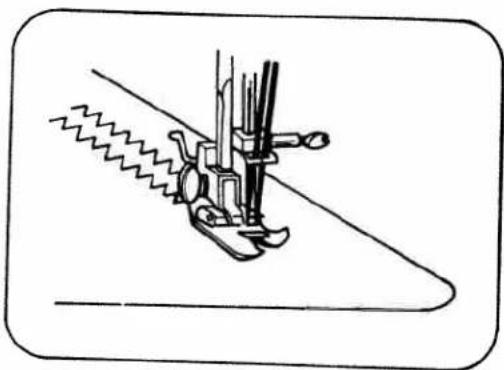
Technical line drawing of a sewing machine needle with zigzag thread (no text or symbols)Thread machine as for normal sewing using both spool pins and pass the threads through the same procedure but through the eye of each needle.
NB. Sewing width should not exceed the third widest stitch width, exceeding this will result in breaking of needles.
Suitable for stitch numbers 1, 2, 3 and 13 only.
FREEHAND EMBROIDERY
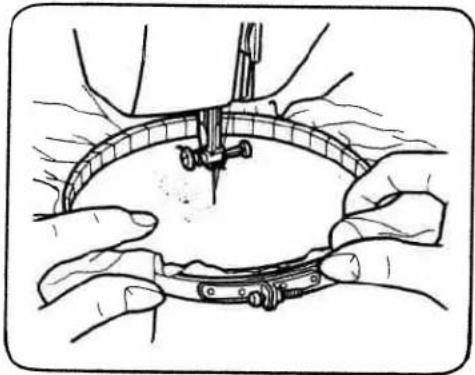
In freehand embroidery, unlike mechanically controlled stitching, feeding of the fabric is done by hand without assistance from feed dogs.
Fit darning plate as described on page 12 and set stitch patterns from 1-5 as desired.
A round embroidery hoop is generally used. Use wooden or plastic hoops with an adjusting screw.
Stretch the fabric tight across the hoop and sew whilst moving the hoop to create the desired effect.
natural_image
Illustration of hands performing a manual tool on a curved mechanical component (no text or symbols visible)CLEANING OF RACE AND SHUTTLE HOOK
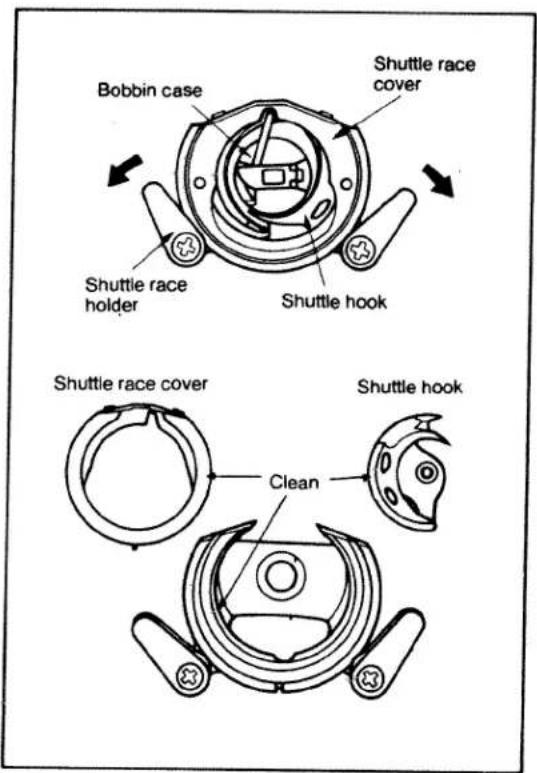
Raise the needle bar to its highest point by turning the hand wheel toward you. Open shuttle cover.
1) Take out the bobbin case.
2) Unlock the shuttle race holder.
3) Release the shuttle race cover.
4) Take out the shuttle hook
Clean dust and gummed oil off each part with an oiled cloth. When finished cleaning, reassemble reversing the above procedure.
CLEANING AND OILING
natural_image
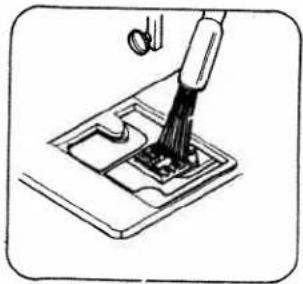
Line drawing of a mechanical device with a tool inserted into a tray (no text or symbols)Cleaning feed dog
natural_image
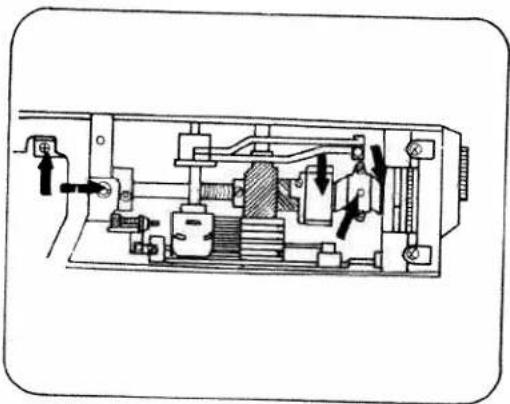
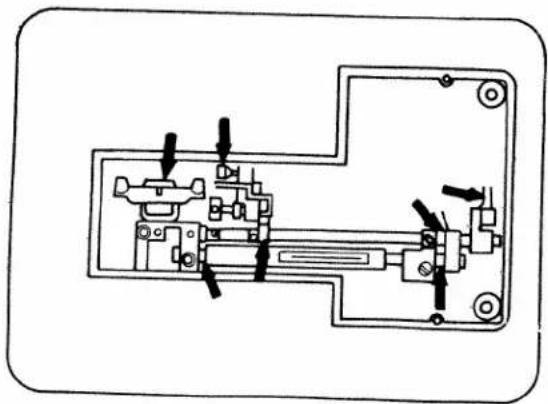
Technical diagram of an internal mechanical assembly with no visible text or symbolsOpen top cover and oil points indicated.
natural_image
Technical line drawing of a mechanical assembly with no visible text or symbolsOil points indicated on underside of bed base.
| CONDITION | CAUSE | REMEDY |
| Top Inread Breaks | 1. Machine is theoedecincorrectly. | 1. Rehreodmochine and needle. |
| 2. Tension is 1too highy. | 2. Reduce lension on top (smoller numbers). | |
| Lower Inread Breaks | 1. Bobbin case is not inserteede correctly. | 1. Reposition Bobbin Check by pulling Inreed. If it pulls smoothly ill is correct. |
| Skipped stitches | 1. Needle is not inserteede correctly. | 1. Reisen needele (IloI side toword bock). |
| Needle breakage | 2. Needle is domaged. | 2. Inser new needle. |
| Slitching forms Loops | 2. Needle is not inserted correctly. | 2. Reisenan needle correctly (IloI side toword bock). |
| Seems shrink or putcher | 1. Needle is not inserded correctly. | 3. Match needle size to thread & fabric weight. |
| Irregular stirring/feeding | 3. Bobbin is shicbing ratio is incorrect. | 4. Incorrect lenisions. |
| Mocchine is noisy and rough | 1. Mocchine needs oil. | 1. Oll according to instructions. |
| 2. Lint and oil residue have collected in hook or on needle bor oil-3-in-1 oil. | 3. Clean face and hook according to instructions. | |
| 4. Needle is domaged. | 4. Replace needle. | |
| 5. Mocchine requires servicing. | Consult your specifications dealer. |
TOUBLE-SHOOTING GUIDE
- WHITE SEWING MACHINE COMPANY
- IMPORTANT SAFETY INSTRUCTIONS
- Read all instructions before using (this appliance)
- DANGER To reduce the risk of electric shock:
- WARNING To reduce the risk of burns. fire, electric shock, or injury to persons:
- DANGER
- SAVE THESE INSTRUCTIONS
- WARNING
- CONTENTS
- NAME OF PARTS (FRONT SIDE)
- ACCESSORIES
- #14
- THIS IS ONLY APPLICABLE TO MACHINES MANUFACTURED FOR THE UNITED KINGDOM IMPORTANT
- BEFORE SEWING
- FITTING SHANK
- AND
- QUILTING SEAM GUIDE
- FITTING OF PRESSER FEET
- Note:
- INSERTING BOBBIN CASE INTO SHUTTLE RACE
- CHANGING NEEDLE
- DRAWING UP BOBBIN THREAD
- ADJUSTING UPPER THREAD TENSION
- ADJUSTING LOWER THREAD TENSION
- TO START SEWING
- Important Hints.
- Attention.
- STRAIGHT STITCH
- ZIG-ZAG STITCH
- BLIND HEMMING
- THREE STEP ZIG-ZAG
- OVERCASTING EDGES
- STRAIGHT STRETCH STITCH
- SEWING ON BUTTONS
- SEWING IN ZIPS
- BUTTON HOLE SEWING
- Fit the button hole foot.
- USER TIPS
- HEMMING
- TWIN NEEDLE
- FREEHAND EMBROIDERY
- CLEANING OF RACE AND SHUTTLE HOOK
Brand : White
Model : W1488
Category : Sewing machine