B1000 - Uncategorized C-Ducer - Free user manual and instructions
Find the device manual for free B1000 C-Ducer in PDF.


User questions about B1000 C-Ducer
0 question about this device. Answer the ones you know or ask your own.
Ask a new question about this device
Download the instructions for your Uncategorized in PDF format for free! Find your manual B1000 - C-Ducer and take your electronic device back in hand. On this page are published all the documents necessary for the use of your device. B1000 by C-Ducer.
USER MANUAL B1000 C-Ducer
natural_image
Two identical cylindrical devices with textured surfaces and connectors, no visible text or symbols.Instructions
AMG Electronics
2 High Street, Haslemere, Surrey, GU27 2LY.
Tel: 01428 658775 Fax 01428 658438
Email: sales@c-ducer.com
http://www.c-ducer.com
Dealers stamp
natural_image
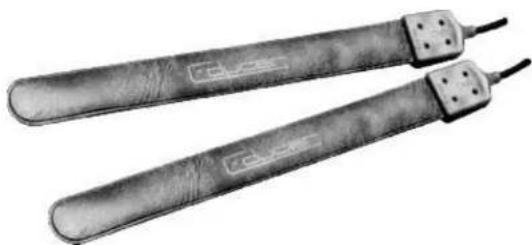
Two elongated mechanical tools with textured surfaces and connectors, no visible text or symbolsTHE C-DUCERTAPE
The C-ducer [Capacitive-trans-ducer] is a contact condenser microphone. It is light in weight so as to minimise interference with the vibration of the instrument to which is attached, and it has a phenomenal dynamic range [the transducer itself has a dynamic capability of >155dB] and can handle the amplitudes within a bass drum without distortion. The frequency response of the transducer is an incredible 0.11 Hz to 1MHz, although this is deliberately restricted within the preamplifier to minimise noise and interference.
Two lengths of C-ducer tape are available, 3" [7.5cm] and 8" [20cm]. The shorter length is suitable for smaller instruments [violin, folk harp, banjo etc], and the longer tape is designed for other acoustic stringed instruments [double-bass, cello, acoustic guitar etc], drums and piano.
The B2000 C-ducer piano system uses two 8" tapes.
THE C-DUCER PREAMPLIFIER The C-ducer B2000 uses a low-noise preamplifier which has been integrated into the extended jack connector. The output from this connector is suited to any standard jack input amplifier, combo, or recording desk.
The B1000 is powered by a built-in lithium battery which has a minimum life of 1000 hours continuous use. When a replacement battery is required, the new battery must be one of the C-ducer type CR1 and should be fitted with care.
CARE OF YOUR C-DUCER
C-ducer is a rugged instrument; however, certain precautions should be taken to ensure the many years of trouble-free use it has been designed to give:
• The C-ducer should never be punctured or cut.
- Although the C-ducer is designed to be splashproof, it should not be deliberately immersed.
- The C-ducer should only be powered by the batteries as supplied by the manufacturer.
- The C-ducer should only be attached to the instrument using adhesives outlined on Page 3.
- If it is necessary to reduce the cable length of the C-ducer, the instructions in the section should be noted:
CHANGING THE BATTERY
Only use Battery Type 3V lithium CR113N
The B1000 has a minimum life of 1000 hours {typically 1800} therefore the battery will not need changing that often. The battery should only be changed by someone experienced in soldering. The following steps should be taken:-
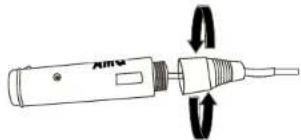
- Unscrew cable restraints clockwise.
natural_image
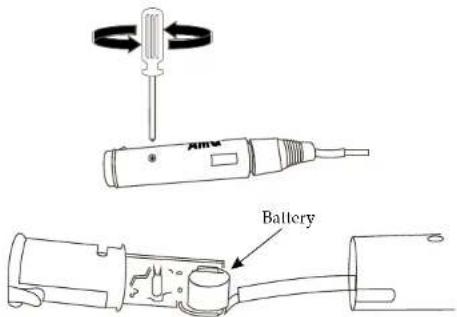
Diagram of a soldering iron with directional arrows indicating rotation (no text or symbols)- Remove crosshead screw and slide out circuit board, by pulling gently on the red jack locking switch.
text_image
IMM Battery- The battery is located at the cable end of the circuit board. To remove the battery unfold the metal tags either side of the battery and pull the old battery gently from the circuit board. Push the tags from the new battery through the slots on the circuit board (checking polarity) and fold the tags flat to the circuit board. The battery should sit centrally within the circuit board cut out.
4 To reassemble reverse points 1 to 3.
A battery kit is available from your C-ducer dealer.
DRUMS AND PERCUSSION
LATIN PERCUSSION:
The C-ducer produces excellent results when used on Latin drums such as Bongos and Congas.
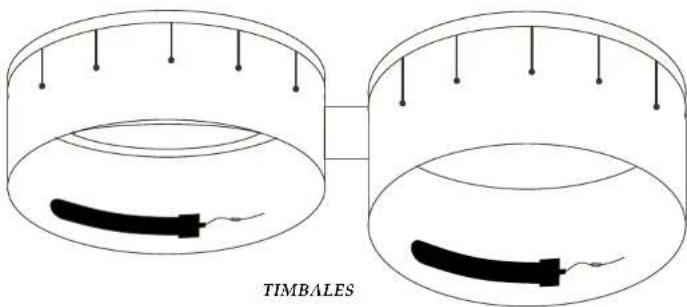
Two tape positions are suitable: wrapped inside the lower rim of the drum [particularly suited to Congas and Timbales] or wrapped around the outer, upper rim [particularly recommended for use on Bongos]. Experimentation is recommended for optimum performance.
natural_image
Diagram of two cylindrical containers with black bands and wire connections, labeled TIMBALES (no text or symbols on the objects themselves)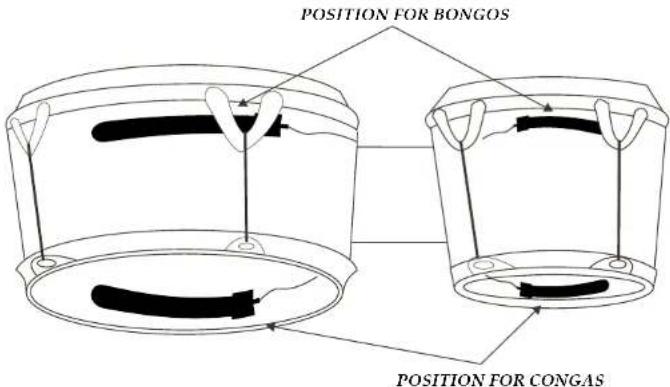
text_image
POSITION FOR BONGOS POSITION FOR CONGASREDUCING THE CABLE LENGTH
The length of the C-ducer cable is suitable for virtually all applications. However, it is permissible to reduce this cable length [for instance, to insert an inline connector] if the following precautions are taken.
The C-ducer cable has been designed for low-noise and low-interference and includes an additional ground shield. This takes the form of a black, conductive-plastic layer between the outer ground braid and the clear inner insulator. IF TIIE CABLE IS SHORTENED THIS BLACK LAYER MUST BE STRIPPED RIGHT BACK TO THE GROUND BRAID [SO IT IS AT LEAST [6MM] BACK FROM THE SIGNAL CONDUCTOR].
If you wish to insert a miniature inline connector in the cable it is important to use fully shielded [metal] connectors for this purpose, since hum and noise may result from not doing so [talk to your dealer/distributor if you are in doubt].
ATTACHING YOURC-DUCER
Your C-ducer B1000 system contains a spare reel of C-ducer double-sided adhesive tape. When adhesive on the surface of your C-ducer no longer has adequate adhesion to stick to the instrument gently remove the old adhesive layer and replace with a new piece. It may also be necessary to replace the adhesive foam pad that is originally supplied to prevent the small plastic joining block between the C-ducer tape and the cable from falling off the instrument. If this happens, distortion and noise may result. Further supplies of adhesive tape and pads are available from your C-ducer dealer.
NOTE: IT IS THE USER'S RESPONSIBILITY TO ENSURE THAT THE SURFACE OF THE INSTRUMENT WILL NOT BE DAMAGED BY THE C-DUCER ADHESIVE. WHILE EVERY CARE HAS BEEN TAKEN TO DESIGN THIS ADHESIVE SO AS NOT CAUSE DAMAGE TO THE SURFACE OF AN INSTRUMENT AUDIO MARKETING GROUP AND ITS DISTRIBUTORS ACCEPT NO RESPONSIBILITY FOR SUCH DAMAGE AND STRONGLY RECOMMEND THAT YOU GENTLY TEST THE ADHESIVE ON A SMALL AREA OF THE INSTRUMENT THAT IS NOT NORMALLY VISIBLE PRIOR TO MOUNTING THE C-DUCER IN ITS FINAL POSITION.
Delicate surfaces can sometimes be protected by first applying a piece of clingwrap or clingfilm-type material to the surface of the instrument before attaching the C-ducer tape. There are also various types of low-adhesive plastic films available from most book stores and hardware stores that may be suitable. In all cases gently apply the material to a discreet part of the instrument before applying it in the final position.
In some cases [when attached to the underside of a piano, for example] the weight of the cable may tend to pull the C-ducer tape off the instrument despite the adhesive foam pad. The use of adhesive-backed cable clips as a strain-relief solves this problem.
NOTE: THE C-DUCER SHOULD NOT BE COVERED WITH DUCT TAPE, GAFFERS TAPE OR SIMILAR. THE SURFACE OF THE C-DUCER THAT IT IS NOT STUCK TO THE INSTRUMENT SHOULD, BE ALLOWED TO BREATHE.
TAPE TUNER
The C-ducer "Tape Tuner" is designed to enable you to vary the bass responses of the C-ducer at the "front end". Your B1000 is supplied with the tuner in mid position. When a good sound location is found on the instrument, adjust the tuner to increase or decrease the bass response. This is particularly useful on acoustic guitar if you get unwanted bass resonance. A small flat headed screwdriver is ideal for this adjustment. Care must be taken not to damage the control. Once set, the tuner should be left and further equalisation done at the desk or amplifier.
APPLICATION NOTES
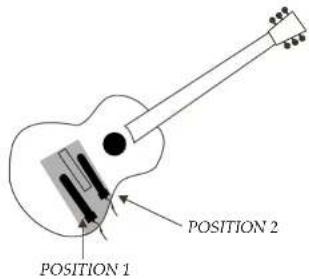
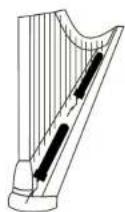
Remove the protective backing from the C-ducer tape and carefully attach it to your instrument in the position shown. Attach the C-ducer lightly at first, this will enable you to experiment with the exact position that best suits your instrument, ear and sound equipment. EXPERIMENTATION AROUND THE APPROXIMATE POSITION SHOWN IS THE KEY TO GETTING THE PERFECT SOUND FOR YOU.
text_image
POSITION 1 POSITION 2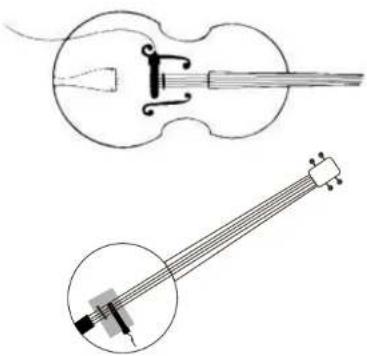
natural_image
Line drawings of a violin and string instrument (no text or symbols)STRINGED
INSTRUMENTS GUITAR:
Two positions are shown, position 1 has been found suitable for larger, more resonant instruments or when enhanced bass is desired. Position 2 provides a natural balance on Classical and Spanish-style instruments. In both cases the tape should be mounted close and parallel to the bridge
VIOLIN, CELLO AND BASS:
Position the tape over the sound post initially and move it in small Increments until the desired sound is found. On Bass and Cello [particularly those instruments of heavier construction] success can sometimes also be found with the C-ducer mounted near the f-holes.
STRINGED
INSTRUMENTS BANJO:
Depending on the type of instrument and the style of play, the C-ducer can either be mounted close to the bridge [as shown] or it can be mounted with the adhesive foam pad stuck to the rim and just the tape portion attached to the skin. When percussive effects are used [ie tapping the skin] the position of the tape will alter the level of the effect.
HARP:
Two tapes are used on harp, B2000. Two 3" [8cm] tapes should be used on smaller harps and two 8" [20cm] tapes on concert harp. Attach tapes in positions shown, parallel and close to the strings.
ACOUSTIC KEYBOARDS
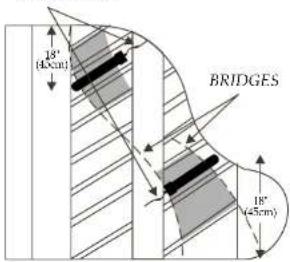
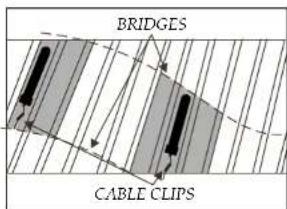
require two C-ducer tapes for maximum performance. The smaller members of the family [Celeste, Clavicord etc] require two 3" [8cm] tapes and others use two 8" [20cm] tapes. Tapes should be attached in the positions shown in the diagrams; experimentation is recommended for optimum results, however, it has been found that best results are generally obtained mounting the tapes directly under the bridges and between the ribs. In all cases mount the tapes between the soundboard struts and start experimentation from a position of around 18" [45cm] in from the edge of the soundboard. If an unnatural degree of treble 'bite' is required interesting effects can be obtained by mounting one of the tapes directly onto the metal harp on the inside of the piano.
Adhesive cable clips should be used if problems are found attaching the tapes securely, since the plastic moulding at the cable end of the tape must not be allowed to rattle or move and should be flat against the soundboard. Under no circumstances should any kind of tape be applied to the outer [brown] surface of the C-ducer tape.
ADHESIVE CABLE CLIPS
text_image
18" (40cm) BRIDGES 18" (45cm)VIEW FROM UNDERNEATH
text_image
BRIDGES CABLE CLIPSVIEW FROM THE BACK