MegaPix DWC-MB75WI4T - Security Camera Digital Watchdog - Free user manual and instructions
Find the device manual for free MegaPix DWC-MB75WI4T Digital Watchdog in PDF.


| Product Type | 5MP Bullet IP Camera |
| Brand | Digital Watchdog |
| Model | MegaPix DWC-MB75WI4T |
| Image Sensor | 1/2.8" 5MP CMOS |
| Total Pixels | 2592 x 1944 |
| Lens | 4.0mm, F2.0 |
| Field of View | Diagonal 106.6°, Horizontal 82.3°, Vertical 58.8° |
| Minimum Illumination | 0.16 lux (color), 0 lux with IR |
| IR Range | Up to 100 ft (30.5 m) |
| Video Compression | H.265, H.264, MJPEG |
| Max Resolution | 2592x1944 at 30 fps |
| WDR | Yes (DOL) |
| Day/Night | True Day/Night (TDN) |
| Privacy Mask | 16 programmable zones |
| Motion Detection | Yes |
| Storage | Micro SD card slot (SD/SDHC/SDXC, up to 128GB) |
| Network | 10/100 Ethernet, PoE (IEEE 802.3af Class3) |
| Power | DC12V max 6.5W, PoE max 8.3W |
| Operating Temperature | -4°F to 122°F (-20°C to 50°C) |
| Dimensions | 6.41 x 2.65 in (163 x 67.5 mm) |
| Weight | 1.1 lbs (0.5 kg) |
| Material | Aluminum die-casting |
| Certifications | FCC, CE, ROHS, IP67 |
| Warranty | 5 years labor, 2 years parts |
Frequently Asked Questions - MegaPix DWC-MB75WI4T Digital Watchdog
User questions about MegaPix DWC-MB75WI4T Digital Watchdog
0 question about this device. Answer the ones you know or ask your own.
Ask a new question about this device
Download the instructions for your Security Camera in PDF format for free! Find your manual MegaPix DWC-MB75WI4T - Digital Watchdog and take your electronic device back in hand. On this page are published all the documents necessary for the use of your device. MegaPix DWC-MB75WI4T by Digital Watchdog.
USER MANUAL MegaPix DWC-MB75WI4T Digital Watchdog
MEGApix® 5MP bullet IP camera
DWC-MB75Wi4T / DWC-MPB75Wi4T
natural_image
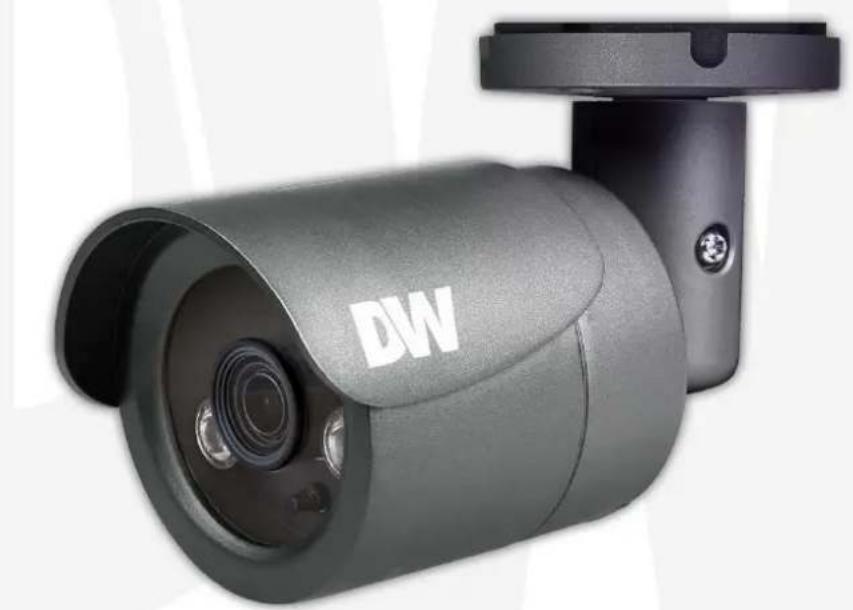
Exterior view of a black DW surveillance camera (no text or symbols visible on body)User's Manual Ver. 12/20
Before installing and using the camera, please read this manual carefully. Be sure to keep it handy for future reference.
CAUTION
RISK OF ELECTRIC SHOCK. DO NOT OPEN.

CAUTION :
TO REDUCE THE RISK OF ELECTRIC SHOCK, DO NOT REMOVE COVER (OR BACK) NO USER SERVICEABLE PARTS INSIDE. REFER SERVICING TO QUALIFIED SERVICE PERSONNEL.
Warning
This symbol indicates that dangerous voltage consisting of a risk of electric shock is present within this unit.
WARNING
To prevent damage which may result in fire or electric shock hazard, do not expose this appliance to rain or moisture.
WARNING
- Be sure to use only the standard adapter that is specified in the specification sheet. Using any other adapter could cause fire, electrical shock, or damage to the product.
- Incorrectly connecting the power supply or replacing the battery may cause an explosion, fire, electric shock, or damage to the product.
- Do not connect multiple cameras to a single adapter. Exceeding the capacity may cause excessive heat generation or fire.
- Securely plug the power cord into the power receptacle. An insecure connection may cause fire.
- When installing the camera, fasten it securely and firmly. A falling camera may cause personal injury.
- Do not place conductive objects (e.g. screwdrivers, coins, metal items, etc.) or containers filled with water on top of the camera. Doing so may cause personal injury due to fire, electric shock, or falling objects.
- Do not install the unit in humid, dusty, or sooty locations. Doing so may cause fire or electric shock.
- If any unusual smells or smoke come from the unit, stop using the product. Immediately disconnect the power source and contact the service center. Continued use in such a condition may cause fire or electric shock.
- If this product fails to operate normally, contact the nearest service center. Never disassemble or modify this product in any way.
- When cleaning, do not spray water directly onto parts of the product. Doing so may cause fire or electric shock.

Precaution
This exclamation point symbol is intended to alert the user to the presence of important operating and maintenance (servicing) instructions in the literature accompanying the appliance.
Precaution
Operating
- Before using, make sure the power supply and all other parts are properly connected.
- While operating, if any abnormal condition or malfunction is observed, stop using the camera immediately and contact your dealer.
Handling
- Do not disassemble or tamper with parts inside the camera.
- Do not drop the camera or subject it to shock or vibration as this can damage the camera.
- Clean the clear dome cover with extra care. Scratches and dust can ruin the quality of the camera image.
Installation and Storage
- Do not install the camera in areas of extreme temperature, exceeding the allowed range.
- Avoid installing in humid or dusty environments.
- Avoid installing in places where radiation is present.
- Avoid installing in places where there are strong magnetic fields and electric signals.
- Avoid installing in places where the camera would be subject to strong vibrations.
-
Never expose the camera to rain or water.
-
Read these Instructions. - All these safety and operating instructions should be read before the product is installed or operated.
-
Keep these Instructions. - The safety, operating and use instructions should be retained for future reference.
-
Heed all warnings. - All warnings on the product and in the operating instructions should be adhered to.
-
Follow all instructions. - All operating and use instructions should be followed.
-
Do not use this device near water. - For example: near a bathtub, washbowl, kitchen sink, laundry tub, in a wet basement; near a swimming pool; etc.
-
Clean only with a dry cloth. - Unplug this product from the wall outlet before cleaning. Do not use liquid cleaners.
-
Do not block any ventilation openings. Install following the manufacturer's instructions. - Slots and openings in the cabinet are provided for ventilation, to ensure reliable operation of the product, and to protect it from overheating. The openings should never be blocked by placing the product on a bed, sofa, rug, or other similar surfaces. This product should not be placed in a built-in installation such as a bookcase or rack unless proper ventilation is provided and the manufacturer's instructions have been adhered to.
-
Do not install near any heat sources such as radiators, heat registers, or other apparatus (including amplifiers) that produce heat.
-
Do not defeat the safety purpose of the polarized or grounding-type plug. A polarized plug has two blades with one wider than the other. A grounding type plug has two blades and a third grounding prong. The wide blade or the third prong are provided for your safety. If the provided plug does not fit into your outlet, consult an electrician for replacement of the obsolete outlet.
-
Protect the power cord from being walked on or pinched particularly at plugs, convenience receptacles, and the point where they exit from the apparatus.
-
Only use attachments/accessories specified by the manufacturer.
-
Use only with cart, stand, tripod, bracket, or table specified by the manufacturer, or sold with the apparatus. When a cart is used, use caution when moving the cart/apparatus combination to avoid injury from tip-over.
-
Unplug this apparatus during lightning storms or when unused for long periods.
-
Refer all servicing to qualified service personnel. Servicing is required when the apparatus has been damaged in any way, such as power supply cord or plug is damaged, liquid has been spilled or objects have fallen into the apparatus, the apparatus has been exposed to rain or moisture, does not operate normally, or has been dropped.


natural_image
Symbol of a trash bin crossed with a diagonal line, representing no waste or discharge (no text or labels)Disposal of Old Appliances
-
When this crossed-out wheel bin symbol is attached to a product it means the product is covered by the European Directive 2002/96/EC.
-
All electrical and electronic products should be disposed of separately from the municipal waste stream per laws designated by the government or the local authorities.
-
The correct disposal of your old appliance will help prevent potential negative consequences for the environment and human health.
-
For more detailed information about disposal of your old appliance, please contact your city office, waste disposal service or the shop where you purchased the product.
FCC
This equipment has been tested and found to comply with the limits for a Class A digital device, pursuant to part 15 of the FCC Rules. These limits are designed to provide reasonable protection against harmful interference when the equipment is operated in a commercial environment.
This equipment generates, uses, and can radiate radio frequency energy and, if not installed and used in accordance with the instruction manual, may cause harmful interference to radio communications. Operation of this equipment in a residential area is likely to cause harmful interference in which case the user will be required to correct the interference at his own expense.
Table of Contents
Introduction
Product and Accessories....5
Parts Notifications....6
Installation
Disassemble the Camera....7
Factory Reset....7
Installation....7
Cabling....8
Managing the SD Card....9
Network Setup
DW IP Finder....10
Web Viewer
Login to the Camera....11
GUI Overview....12
Camera Settings
Settings > Video and Audio Setup....13
Settings > Camera Setup > Image Enhancement....21
Settings > Camera Setup > Exposure Settings....22
Settings > Camera Setup > Day and Night Settings....23
Settings > Camera Setup > Backlight Settings....24
Settings > Camera Setup > White Balance Settings....25
Settings > Camera Setup > Image Enhancement Settings....26
Settings > Network Setup....27
Settings > Trigger Action Setup....37
Settings > Event Setup....41
Settings > Record Setup....46
Settings > Security Setup....52
Settings > System Setup > System Information....59
Settings > System Setup > Firmware....61
Settings > System Setup > Date and Time....62
Settings > System Setup > DST....63
Settings > System Setup > Users....64
Settings > System Setup > System Log....65
Settings > System Setup > Factory Reset....66
Settings > System Setup > Restart....67
Settings > System Setup > System Open Source License....68
Appendix....69
FAQs....76
Dimensions....77
Specifications....78
Warranty....79
Limits and Exclusions....80
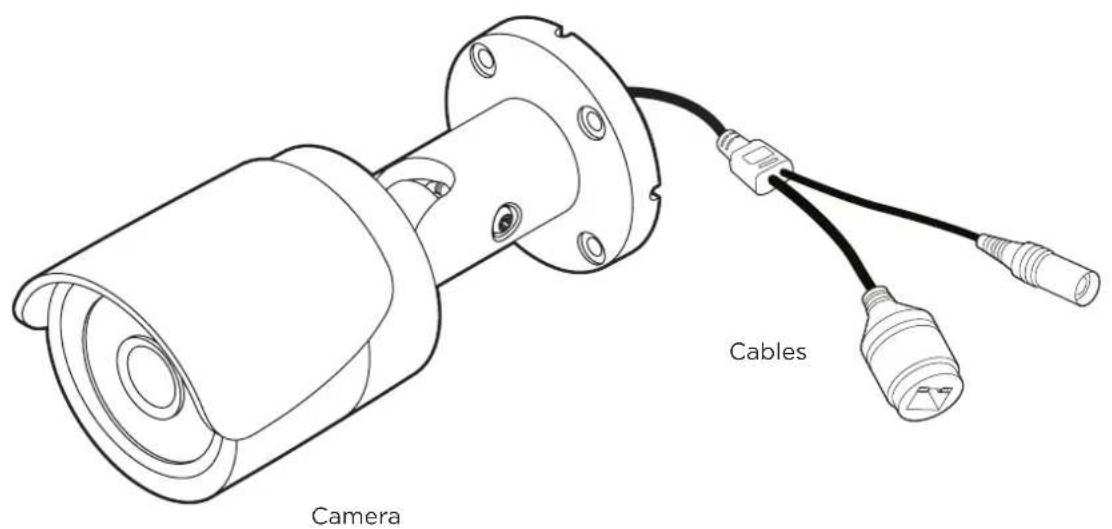
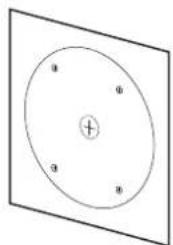
Please check that the camera and all accessories are included in the package.
text_image
Cables Camera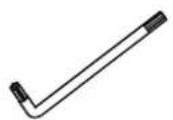
Star Wrench
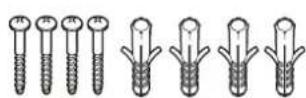
Screws and Plastic Anchors - 4pcs
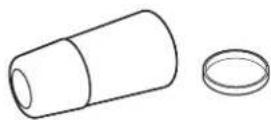
Waterproof Cap and Gasket

Quick Setup Manual
text_image
a b c dMounting Template
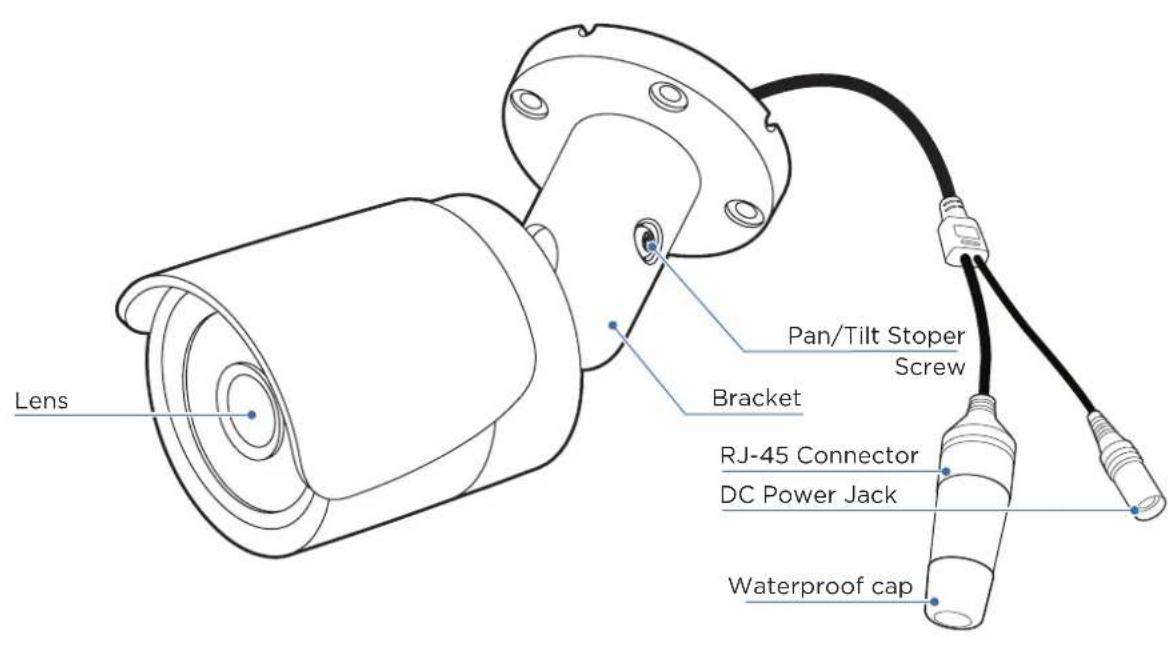
text_image
Lens Pan/Tilt Stoper Screw Bracket RJ-45 Connector DC Power Jack Waterproof cap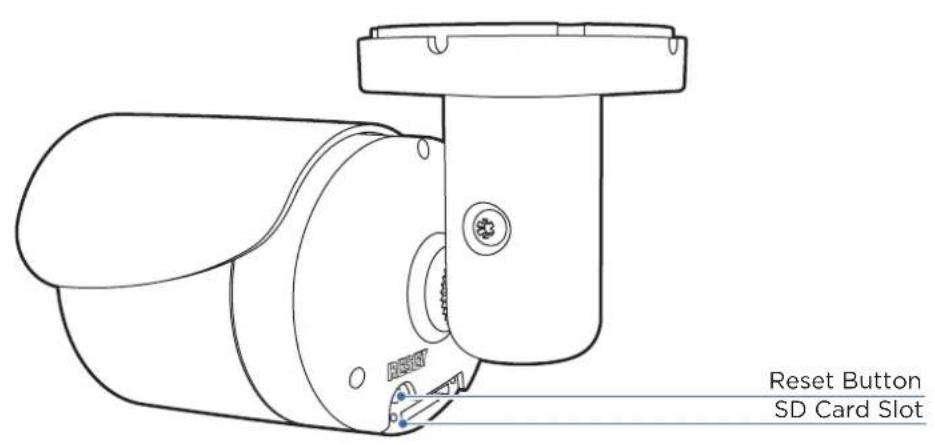
text_image
Reset Button SD Card SlotBefore installing your camera, you have to read the following cautions.
- The mounting surface must withstand five times the camera weight.
- Do not let the cables get caught in improper places or the electric line cover can be damaged. This may cause a short or fire.
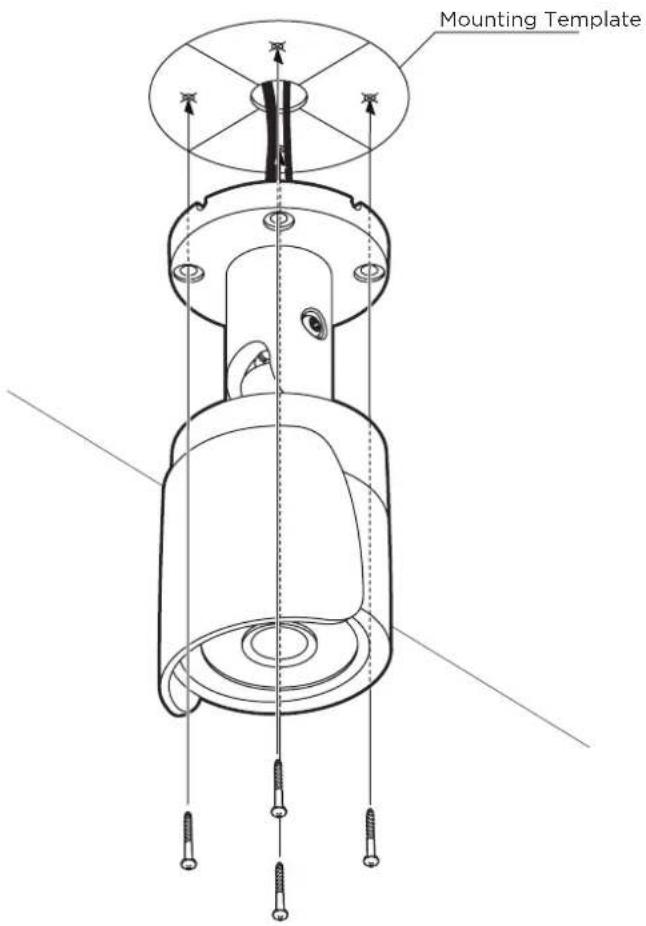
text_image
Mounting Template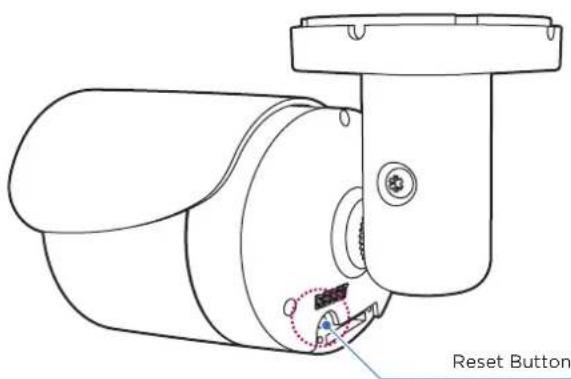
text_image
Reset Button- Using the mounting template sheet or the camera itself, mark and drill the necessary holes in the wall or ceiling.
- Pass the wires through the mount bracket and make all necessary connections. See page 12 for more information.
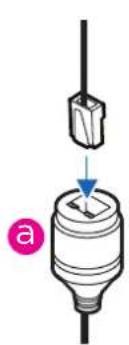
- To use the camera's waterproof wiring:
a. Install the LAN cable into (a).
b. (b) will be assembled to (a) with a 1/4 turn.
c. Thread (c) tightly to (b).
text_image
a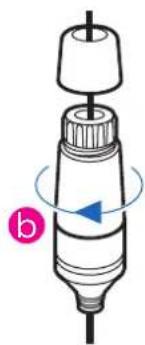
natural_image
Illustration of a mechanical component with a blue arrow indicating rotation (no text or symbols)
natural_image
Diagram of a cylindrical device with a circular label marked 'C' and a blue arrow indicating rotation (no text or symbols present)NOTE: to ensure a proper moisture seal, make sure the o-ring is in place between (a) and (b). In extreme environments, use an outdoor-rated sealer.
NOTE: When using the waterproof cap, crimp the RJ-45 connected after passing the camera through the waterproof cap.
-
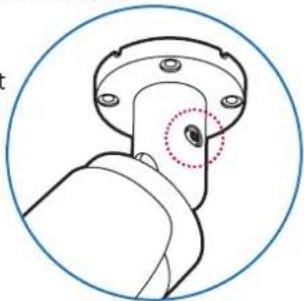
Fix the camera's bracket to the mounting surface using the screws provided.
-
If needed, adjust the camera's tilt by loosening the pan/tilt stopper screw.
- Once the camera's tilt and panning are adjusted, secure the stopper screw back.
natural_image
Technical line drawing of a mechanical component with a highlighted circular feature (no text or symbols)Reset to the Factory Default
Press the reset button for 5 seconds to return the setup to the factory default.
Warning:
If you press the 'Reset' button, you will lose all setting data. If needed, please, make a note for further installation.
Two Options
Use a PoE-enabled switch to connect data and power through a single cable and begin viewing and recording images instantly.
A non-PoE switch will require an adaptor for power transmission.
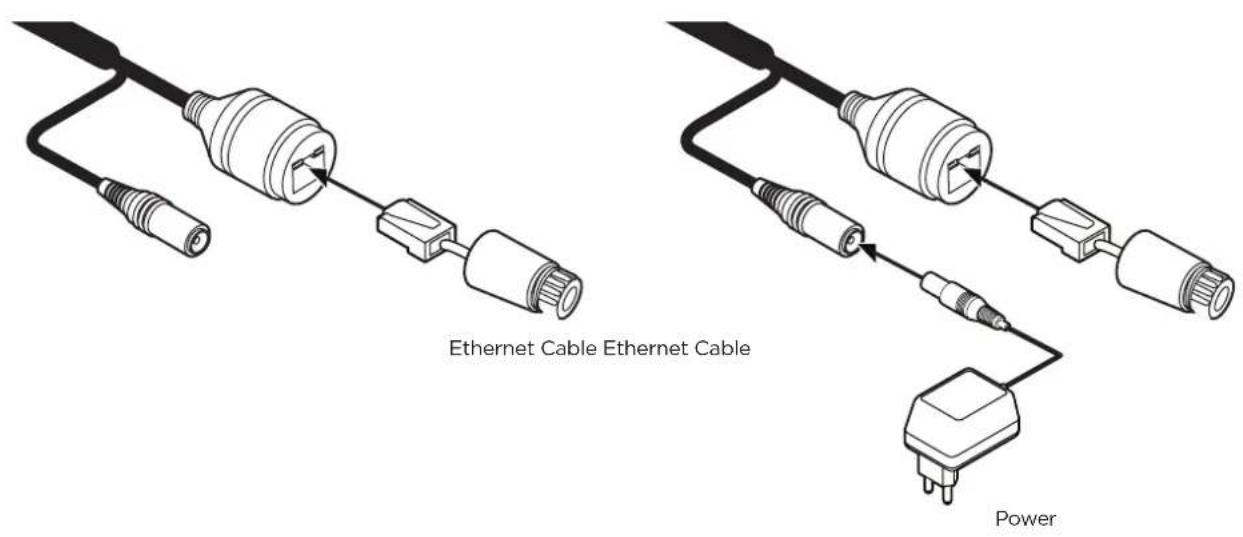
1. Using a PoE-Enabled Switch
The Camera is PoE-compliant, allowing transmission of power and data via a single Ethernet cable. PoE eliminates the need for the different cables used to power, record, or control the camera. Follow the illustration below to connect the camera to a PoE-enabled switch using an Ethernet cable.
2. Using a Non-PoE Switch
If a PoE-enabled switch is not used, use a power adaptor for power transmission and non-PoE switch for data transmission.
Follow the illustrations below to connect the camera without a PoE-enabled Switch.
text_image
Ethernet Cable Ethernet Cable PowerInstallation - Inserting/Removing an SD Memory Card
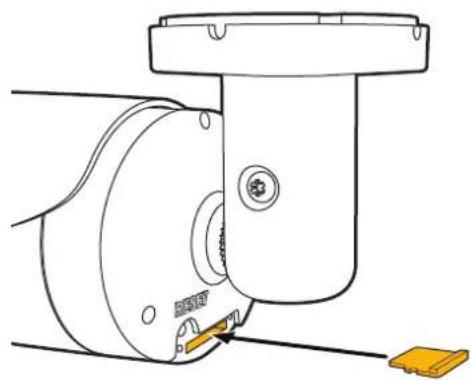
natural_image
Technical line drawing of a mechanical assembly with no visible text or symbolsThe memory card is an external data storage device that has been developed to offer an entirely new way to record and share video, audio, and text data using digital devices.
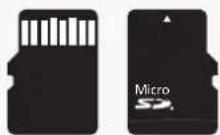
Recommended SD card specification (not included)
- Type: Micro SD (SD/SDHC/SDXC)
- Manufacturer: SanDisk, Samsung, Transcend, Micron
- Capacity: 4GB\~128GB
- Class: UHS-I U3 Class 10
New micro SD card over 64GB must be formatted on the first use.

natural_image
Technical line drawing of a mechanical assembly with a pulley and mounting bracket (no text or symbols)1 Inserting an SD Memory Card
Insert the SD card in the arrow direction. The SD card slot is located on the back of the camera, under the mounting bracket.
Do not insert the SD memory card while it's upside down by force. Otherwise, it may damage the SD memory card.
② Removing an SD Memory Card
Gently press down on the exposed end of the memory card as shown in the diagram to eject the memory card from the slot.
Pressing too hard on the SD memory card can cause the card to shoot out uncontrollably from the slot when released.
If you have saved data in the SD memory card, removing the SD memory card before setting the record to OFF will cause damage to the data stored in the card.
Network Setup - DW IP Finder™
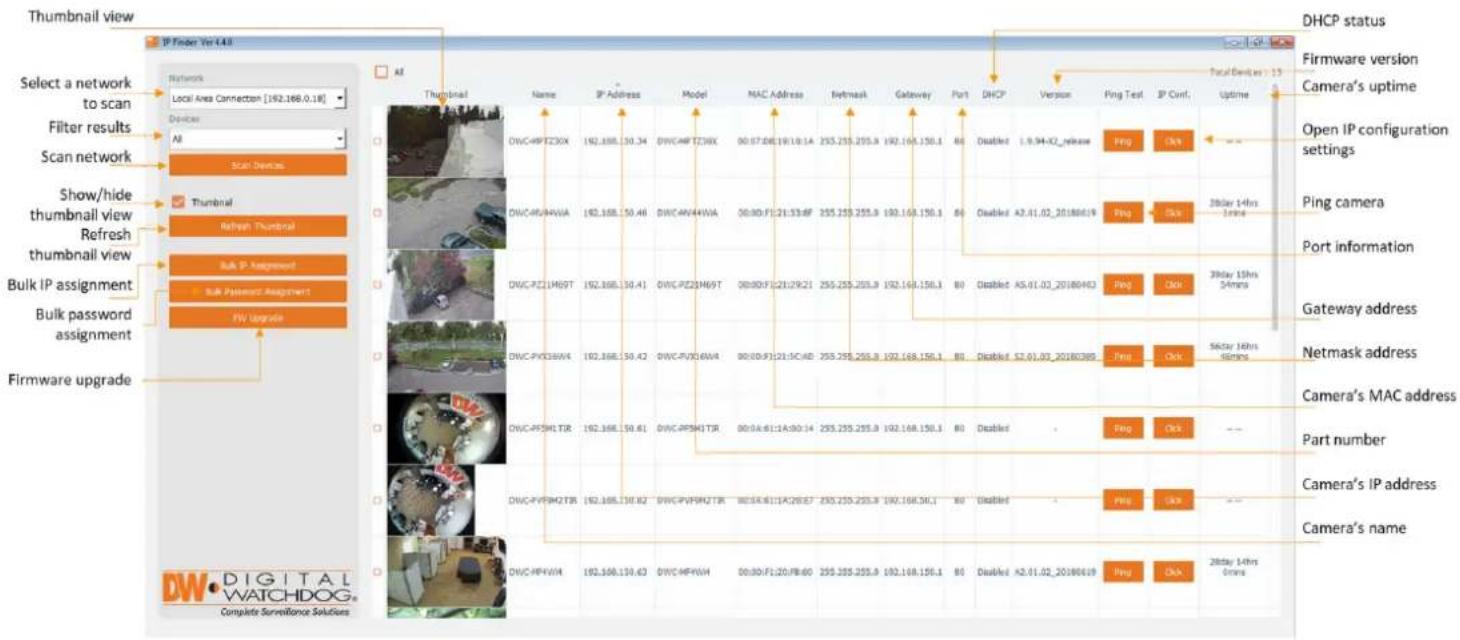
text_image
Thumbnail view IP Finder Ver 14.4.1 Select a network to scan Filter results Scan network Show/hide thumbnail view Refresh thumbnail view Bulk IP assignment Bulk Password Assignment1 FIV Upgrade Firmware upgrade Select a network to scan Device All Scan Devices Zoom Devices Thumbnail Refresh Thumbnail Bulk IP Assignment Bulk Password Assignment1 FIV Upgrade All Thumbnail Name IP Address Model MAC Address Network Gateway Port DHCP Version Ping Test IP Conf Uptime DWVC49PZ36X 192.168..50.34 DWVC49PZ36X 00:07:06:19:10:14 255.255.255.9 192.168.150.1 B0 Disabled 1.9.94-X2_release Ping Click Open IP configuration Settings Ping Click 280ar 14hrs 34mins Ping Click 380ar 15hrs 34mins Ping Click 56star 18hrs Simings Ping Click Camera's MAC address Part number Camera's IP address Camera's name DWVCHF4VW 192.168.130.63 DWVC4FYPWH 00:30:F1:20:FB:60 255.255.255.9 192.168.150.1 B0 Disabled A2.01.02.20180419 Ping Click 280ar 14hrs 34mins Ping Click 380ar 15hrs 34mins Ping Click 56star 18hrs Simings Ping Click 280ar 14hrs 34mins Ping Click 56star 18hrsGo to http://www.digital-watchdog.com and search for 'IP Finder' on the quick-search bar at the top of the page.
2 The latest IP Finder software will appear in the search results. Click on the link to download the file to your computer.
3 The software will scan your network for all supported cameras and display the results in the table. Allow up to 5 seconds for the IP Installer to find the camera on the network.
4 You can press the 'Refresh List' to search the network again, or filter the search results by entering a value in the filter box.
5 Check the box next to 'Display Camera Thumbnail' to view a JPEG image of the camera's view next to the camera name on supported models.
The default network type of camera is DHCP mode.
If you have a DHCP server, it will automatically set the Camera IP.
Contact your network administrator for more information.
To save the changes made to the camera's settings, input the username and password of the camera for authentication.
7 If the camera needs to be rebooted after the settings were changed, press the 'Reboot' button. The camera will power cycle and will appear back in the search results once the reboot is complete.
Default username and password: admin/admin.
For security purposes, it is highly recommended to change your password after the initial setup.
⑧ Click 'Save' to save changed values.
To update the camera's firmware from the DW IP Finder™, click on the firmware tab, upload the firmware file and select the camera to update. You can update multiple cameras at the same time.
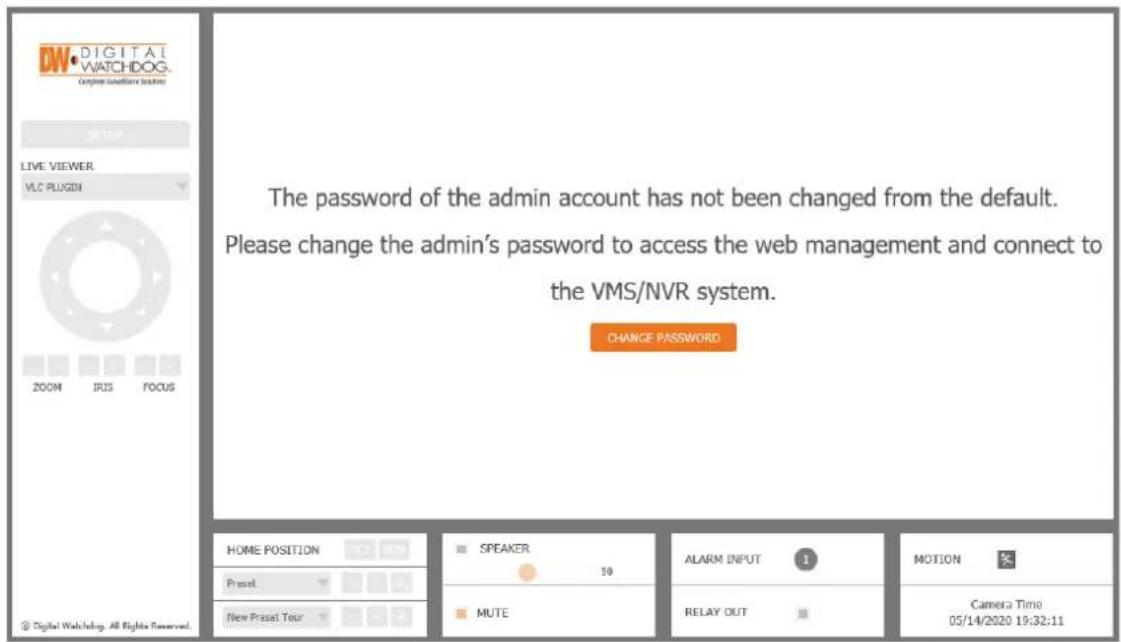
text_image
DN DIGITAL WATCHDOG. Organise dashboard operators LIVE VIEWER VLC PLUGIN ZOOM IRUS FOCUS The password of the admin account has not been changed from the default. Please change the admin's password to access the web management and connect to the VMS/NVR system. CHANGE PASSWORD HOME POSITION SPEAKER ALARM INPUT MOTION Preset 50 MUTE RELAY OUT Camera Time New Preset Tour 05/14/2020 19:32:11 Digital Watchdog. All Rights Reserved.Password change is required at the initial connection in a factory reset state. The web client cannot be fully utilized until a new password has been assigned.
You cannot see the image, and the setup button is disabled.
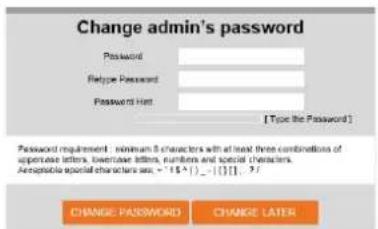
② Change the password with the CHANGE PASSWORD button.
text_image
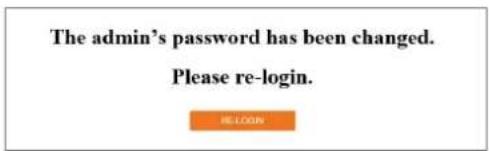
Change admin's password Password Heltype Password Password Hint [Type the Password] Password requirement - minimum 5 characters with at least three combinations of uppercase letters, lowercase letters, numbers and special characters. Aeroglassical special character use: <15^4( )-1[1] -3/ CHANGE PASSWORD CHANGE LATER3 After changing the password, login again by pressing the RE-LOGIN button.
- Internet Explorer: After three failed attempts or the cancel button is clicked, you will experience a login fail.
- Other Browsers: After the Cancel button is clicked, you will experience a login fail.
text_image
The admin's password has been changed. Please re-login.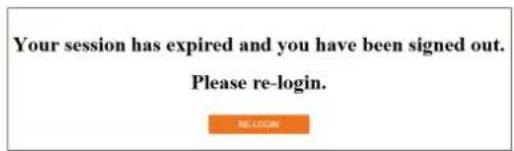
text_image
Your session has expired and you have been signed out. Please re-login.Password Hint Page
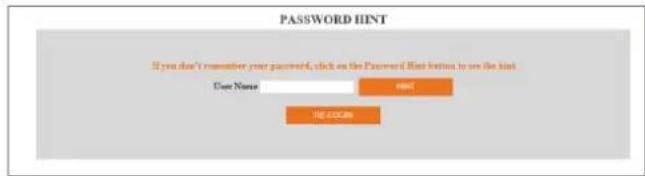
- If you need help remembering the password for your user, input the username in the username field and press the hint button. If you added a hint for your password when setting it up, it will appear then.
text_image
PASSWORD HINT If you don't remember your password, click on the Password Hint listen to use the hint. User Name mail the .comWeb Viewer Screen -
Basic Screen
text_image
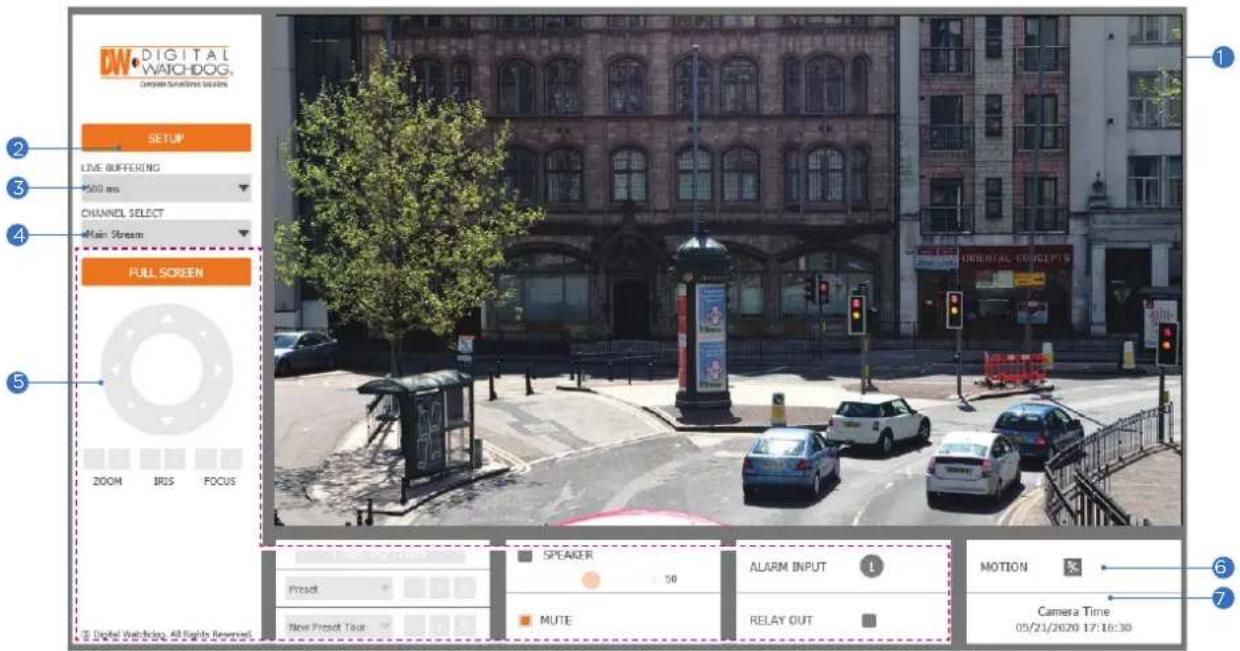
DW DIGITAL WATCHDOG Deep surveillance system 1 2 3 4 5 SETUP LIVE BUFFERING 500 ms CHANNEL SELECT Main Stream FULL SCREEN ZOOM IRIS FOCUS S Digital Watchdog, All Rights Reserved. SPEAKER 50 MUTE ALARM INPUT 1 RELAY OUT MOTION Camera Time 05/21/2020 17:16:30The web viewer is optimized with Internet Explorer 10 (or above) and Mozilla Firefox.
If VLC is not installed or the VLC plugin is not supported (Chrome), 'Live Buffering' and 'Channel Select' (subjects 3 and 4 in the diagram) will display as 'Live Viewer'. If so, select HTML5 (MJPEG) from the Live Viewer menu to view the video.
① Live video display. This is the region for the live video stream from the camera.
② Setup a popup button. Click it to open the Setup page to setup details of IP camera like Video, Network, Events, System, etc. See the section 'Setup'.
③ When the image is distorted due to a bad network connection, the stored image frames will display live images, depending on the set buffer time.
Users will see the delayed images based on the set delay time.
④ Channel Select button. Select a stream produced from the camera between Stream 1 \~ 3 to display it in the live view screen.
Refer the 'Setup > Video & Audio > Video' to setup the Video Stream.
⑤ Below "Menu" is supported per models.
PTZ Control - This camera model does not support the zoom and focus.
Preset - Not supported.
Speaker Control - Enable/disable the audio stream from the camera and adjust the volume accordingly.
Alarm Input - If an alarm is triggered, the corresponding input number will be changed from dark gray to red.
Relay Out - Using this checkbox, read the relay output status and set or reset it manually.
⑥ Motion - Shows the motion event status.
Event Alert Icon ( 📋 appears if 'Motion Detection' is activated.
7 Camera Time - Display the camera time.
Setup - Video & Audio Setup
Video Configuration
text_image
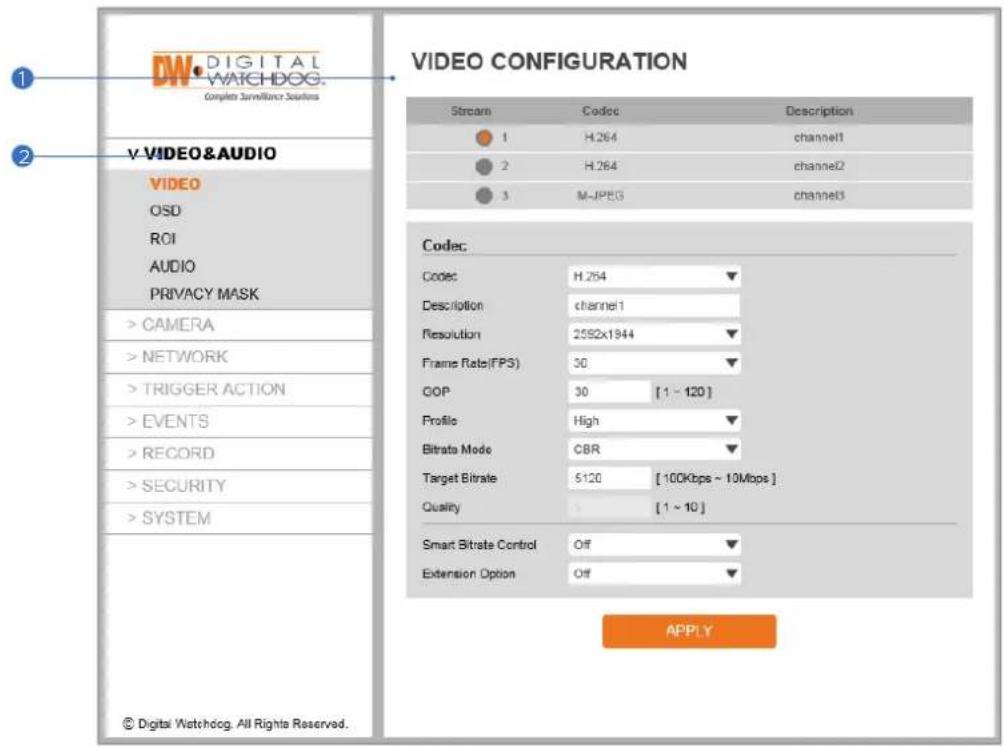
Digital Watchdog. Complete Surveillance Solutions v-VIDEO&AUDIO VIDEO OSD ROI AUDIO PRIVACY MASK >CAMERA >NETWORK >TRIGGER ACTION >EVENTS >RECORD >SECURITY >SYSTEM VIDEO CONFIGURATION Stream Codec Description 1 H.264 channel1 2 H.264 channel2 3 M-JPEG channel3 Codec: Codec H.264 Description channel1 Resolution 2592x1944 Frame Rate(FPS) 30 GOP 30 [1 ~ 120] Profile High Bitrate Mode CBR Target Bitrate 5120 [100Kbps ~ 10Mbps] Quality [1 ~ 10] Smart Bitrate Control Off Extension Option Off APPLY © Digital Watchdog. All Rights Reserved.1 Detail Page - When you select an item from the menu, you can set the details for the selected item.
② Setup Constitution
Video & Audio
[VIDEO, OSD, ROI, AUDIO, PRIVACY MASK]
Camera
[IMAGE ADJUSTMENT, EXPOSURE, DAY&NIGHT, BACKLIGHT, WHITE BALANCE, IMAGE, VIDEO]
Network
[ STATUS, NETWORK SETTING, AUTO IP, ONVIF, UPNP, DDNS, FTP, SMTP, SNMP, RTSP INFORMATION ]
Trigger Action
[ ACTION RULES, IMAGE TRANSFER, RELAY OUT ]
Events
[ EVENT RULES, MOTION, TEMPERATURE, ALARM ]
Record
[ MANAGEMENT, RECORD LIST, STORAGE ]
Security
[ IP ADDRESS FILTER, RTSP AUTHENTICATION, IEEE 802.1x, HTTPS, CERTIFICATES, SERVICE ]
System
[ INFORMATION, DIAGNOSTICS, FIRMWARE UPDATE, DATE&TIME, DST, USER MANAGEMENT, LOG, LANGUAGE, FACTORY RESET, RESTART, OPEN SOURCE ]
NOTE: See MEGApix IVA Rules manual for more information on the IVA and IVA+ rules, setup and configuration.
Setup - Video & Audio Setup
Video Configuration
text_image
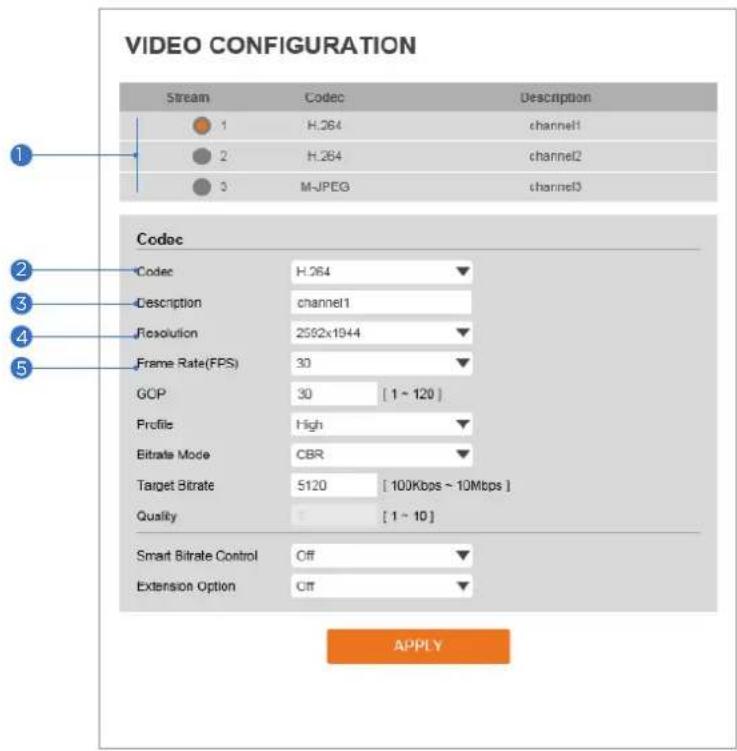
VIDEO CONFIGURATION Stream Codec Description 1 H.264 channel1 2 H.264 channel2 3 M-JPEG channel3 Codec Codec H.264 Description channel1 Resolution 2582x1944 Frame Rate(FPS) 30 GCP 30 [ 1 ~ 120 ] Profile High Bitrate Mode CBR Target Bitrate 5120 [ 100Kbps ~ 10Mbps ] Quality [ 1 ~ 10 ] Smart Bitrate Control Off Extension Option Off APPLYLive Video Channel Setup - The video can be configured to various settings with a combination of codec and resolution. The camera performance should be considered when setting multiple channels, as the performance of the camera will be affected.
H.265 (HEVC) codec with a higher bitrate may cause unstable live streaming or reload the webpage.
② Codec - Choose the video codec. Depending on the selected codec, the subcategories may be changed accordingly.
3 Description - Input the additional description of the selected channel. Max. 30 alphanumeric characters may be used, including spaces.
4 Resolution - Select video resolution.
Available Frame Rate may differ even if the same codecs are in use.
| 5MP(QSXGA) | 4MP | 2.1MP/1080p | 720p/i SVGA | 768x432(0.3M) | 4CIF DI VGA | 640x360(0.2M) | CIF SIF / 240P | ||||
| 2592x1944 | 2560x1440 | 1920x1080 | 1280x720 | 800x600 | 768x432 | 704x576 | 704x480 | 640x480 | 640x360 | 352x288 | 352x240 |
⑤ Frame Rate - Select the maximum Frame Rate.
Available Frame Rate can be different although the same codecs were set up.
Setup - Video & Audio Setup
Video Configuration
text_image
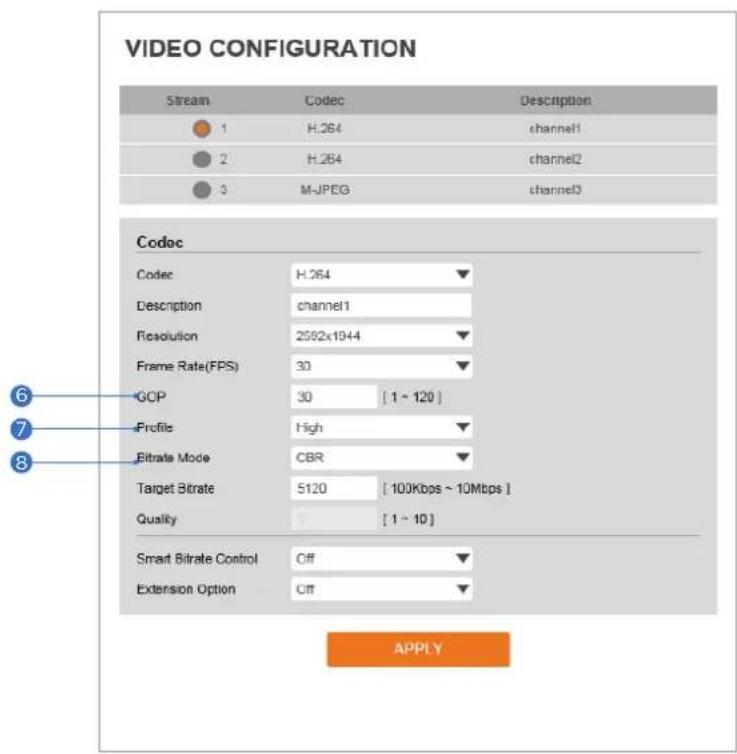
VIDEO CONFIGURATION Stream Codec Description 1 H.264 channel1 2 H.264 channel2 3 M-JPEG channel3 Codec Codec H.264 Description channel1 Resolution 2592x1944 Frame Rate(FPS) 30 GCP 30 [ 1 ~ 120 ] Profile High Bitrate Mode CBR Target Bitrate 5120 [ 100Kbps ~ 10Mbps ] Quality [ 1 ~ 10 ] Smart Bitrate Control Off Extension Option Off 6 7 8 APPLY⑥ GOP(Group of Pictures) Size - Set up the number of frames (P-frame) which contain only changed information based on the basic frame (I-frame). Regarding videos with lots of movement, if you set GOP size bigger, only the number of P-frames is bigger.
As a result, the video resolution will be low but 'File size' and 'Bit-rate can be decreased.
GOP(Group of Pictures) Size -
I-frame and P-frame creation for MPEG4, H.264, and H.265 (HEVC) video compression. 'I-frame', also known as 'key-frame', refers to the complete image data for a specific video frame. 'P-frame' refers to the changes in the image in comparison to the previous video frame. As a result, the GOP consists of one I-frame and several P-frames. For improved video quality, use a lower number of P-frames for this setting.
7 Profile - The profile defines the subset of bitstream features in H.264, H.265 (HEVC) stream, including color reproduction and additional video compression.
H.264: Main, High / H.265 (HEVC): Main
Main - An intermediate profile with a medium compression ratio. Supports I-frames, P-frames, and B-frames.
High - A complex profile with a high compression ratio. Supports I-frames, P-frames, and B-frames.
Bitrate Mode - Select the bit rate control scheme of video compression from CBR (Constant Bit Rate) or VBR (Variable Bit Rate).
CBR - To guarantee the designated constant bit rate, the quality of the video is controlled in this mode. Therefore, the quality of the video is likely to be varying when network traffic is changing.
VBR - To guarantee the designated quality, the bit rate of the video stream is changed in this mode. Therefore, the frame rate of the video is likely to be varying when network traffic is changing.
This category will not appear if you select the codec.
Setup - Video & Audio Setup
Video Configuration
VIDEO CONFIGURATION
| Stream | Codec | Description |
| 1 | H.264 | channel1 |
| 2 | H.264 | channel2 |
| 3 | M-JPEG | channel3 |
Codec
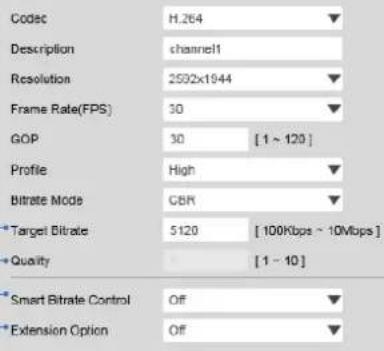
text_image
Codec H.264 Description channel1 Resolution 2592x1944 Frame Rate(FPS) 30 GOP 30 [1 ~ 120] Profile High Bitrate Mode CBR *Target Bitrate 5120 [100Kbps ~ 10Mbps] *Quality [1 ~ 10] *Smart Bitrate Control Off *Extension Option OffAPPLY
9 Target Bitrate - If Bitrate Control is set to be CBR, you can set the Target Bitrate.
10 Quality - For VBR control mode, The Target Quality of video can be setup.
11 Smart Core - Off / Smart.RC
12 Extension Option
Off - You cannot use the Extension Option.
SVC-T On - The H.264, H.265 (HEVC) SVC (Scalable Video Coding) is a video compression algorithm that enables effective and efficient transmission of video files over low bandwidth networks.
13 Click 'Apply' to save all settings.
Setup - Video & Audio Setup
OSD Configuration
text_image
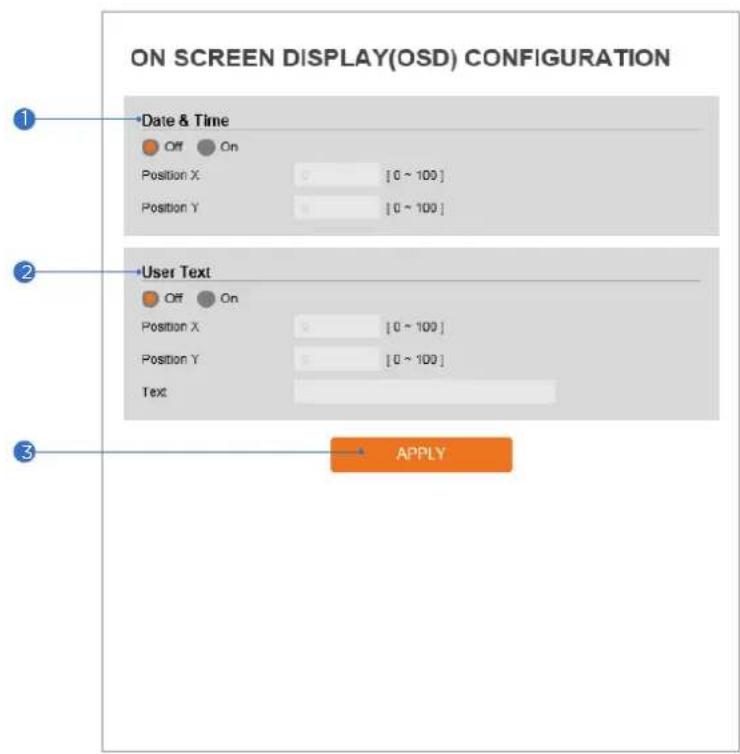
ON SCREEN DISPLAY(OSD) CONFIGURATION 1 Date & Time Off On Position X 0 [0 ~ 100] Position Y 0 [0 ~ 100] 2 User Text Off On Position X 0 [0 ~ 100] Position Y 0 [0 ~ 100] Text 3 APPLY① Date / Time - Display the current time.
② User Text - Output the TEXT entered by the user. Support a maximum of 30 characters.
3 Click 'Apply' to save all settings.
Setup - Video & Audio Setup
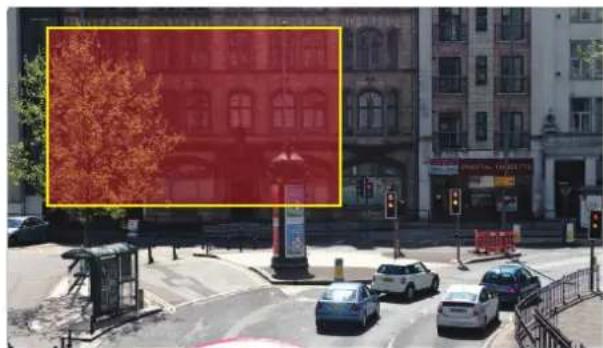
Region of Interest Configuration
REGION OF INTEREST CONFIGURATION
text_image
Street photo with visible store signboards and a large red billboard overlay in the backgroundThe function is not supported in MJPEG codec.
text_image
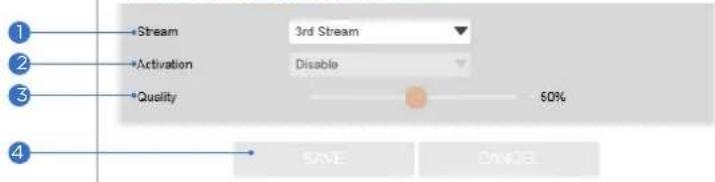
Stream 3rd Stream Activation Disable Quality 50% SAVE CANDERThe region of interest function gives a more efficient picture quality for the indicated area to improve the qualities of movement in the scene without compromising the bandwidth.
1 Stream - Select the Stream.
Currently supports only H.264, H.265 (HEVC).
The function is not supported in the MJPEG codec.
The function is not supported in MJPEG codec.
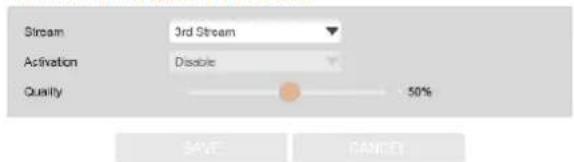
text_image
Stream 3rd Stream Activation Disable Quality 50% SAVE CANCEL2 Activation - Enable or disable the region of interest function.
3 Quality - Set the quality of the set area.
4 Click 'Save' to save all settings.
Click 'Cancel' to return to the previous setting.
Setup - Video & Audio Setup
Audio Configuration
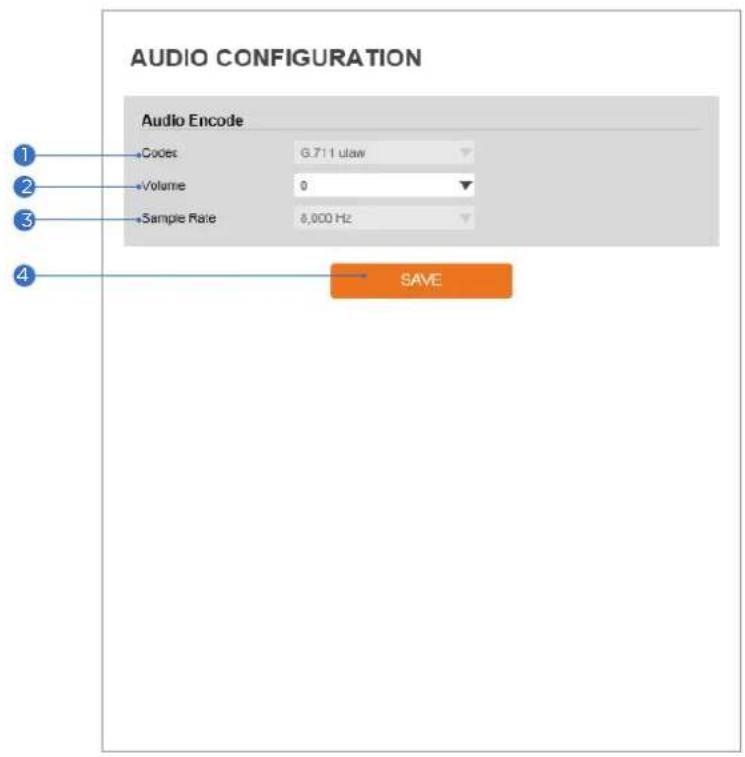
text_image
AUDIO CONFIGURATION Audio Encode Codes G.711 ulaw Volume 0 Sample Rate 8,000 Hz SAVE1 Codec - Select the Audio Codec.
Currently, the camera supports codec G.711.
② Volume - Select the Audio Volume from 0 to 10.
3 Sample Rate - Select the Audio Sample Rate.
Currently, the camera supports 8000 Hz.
4 Click 'Save' to save all changes.
Setup - Video & Audio Setup Privacy Mask Configuration

text_image
PRIVACY MASK CONFIGURATION 1 2 3 Activation On Off Area Area1 CLEAR AREA SAVE CANCELUse this function to mask areas that you want to hide on-screen to protect privacy.
1 Activation - Enable or disable the privacy mask function.
② Area - Select Area1 \~ Area16, then draw the privacy mask in the video display.
3 Click 'Save' to save all settings.
Click 'Cancel' to return to the previous setting.
Click 'Clear Area' to delete the selected Area1-Area16.
Setup - Camera Setup
Camera Image Adjustment
IMAGE ADJUSTMENT
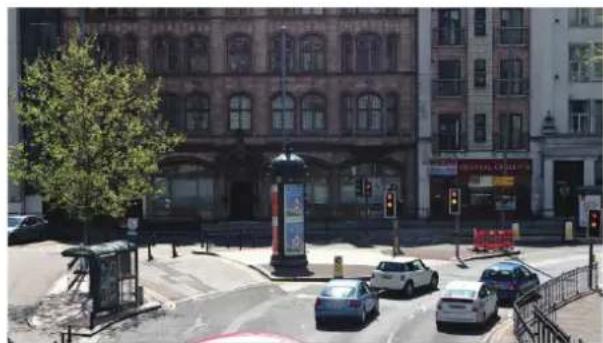
natural_image
Street scene with parked cars, a pedestrian bridge, and surrounding buildings (no visible text or signage)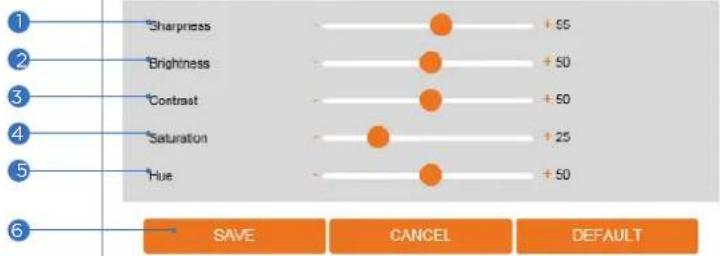
text_image
1 Sharpness 2 Brightness 3 Contrast 4 Saturation 5 Hue 6 + 55 + 50 + 50 + 25 + 50 SAVE CANCEL DEFAULT1 Sharpness - The higher the number, the sharper the lines in the image will appear.
② Brightness - The higher the number, the brighter the image will appear.
3 Contrast - The higher the number, the stronger the contrast between colors in the image will appear.
4 Saturation - The higher the number, the more saturated the colors in the image will appear.
⑤ Hue - The higher the number, the stronger the hue in the image will appear.
⑥ Click 'Save' to save all settings.
Click 'Cancel' to return to the previous setting.
Click 'Default' to settings to the factory defaults.
Setup - Camera Setup
Camera Exposure Settings
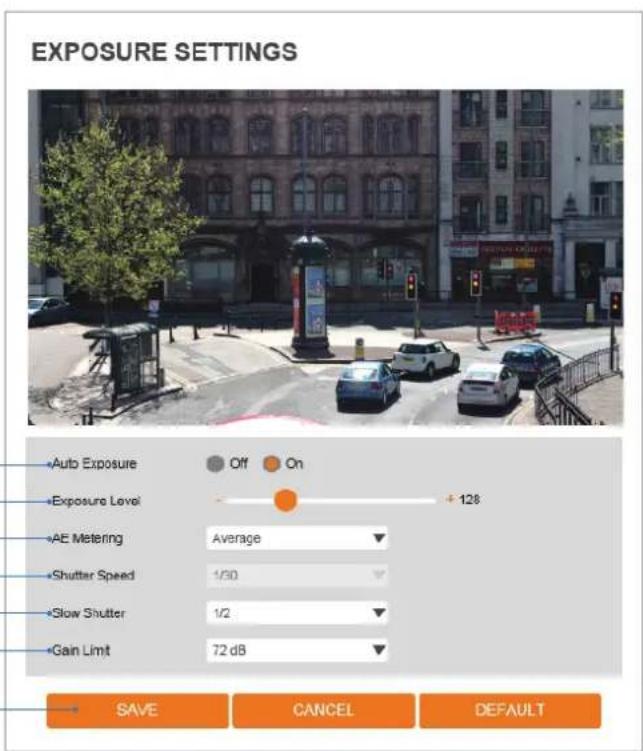
text_image
EXPOSURE SETTINGS Auto Exposure Off On Exposure Level + 128 AE Metering Average Shutter Speed 1/30 Slow Shutter 1/2 Gain Limit 72 dB SAVE CANCEL DEFAULT1 Auto Exposure - Automatic exposure (AE) automatically sets the aperture or shutter speed, based on the external lighting conditions for the photo.
② Exposure Level - The higher the number, the brighter the image will appear.
3 AE metering - AE metering mode refers to how a camera determines the exposure.
4 Shutter Speed - If this speed is faster, the moving object can be photographed without the ghost effect. However, the picture can be dark if the lighting is insufficient.
5 Slow Shutter Level - Slow shutter Level lets you adjust the amount of light striking the sensor and essentially determines when the video sensor sends out its batch of data for processing.
⑥ Gain Limit - Adjusts image gain. The lower the value, the darker the image will appear.
7 Click 'Save' to save all settings.
Click 'Cancel' to return to the previous setting.
Click 'Default' to settings to the factory defaults.
Setup - Camera Setup
Camera Day & Night Settings
DAY&NIGHT SETTINGS
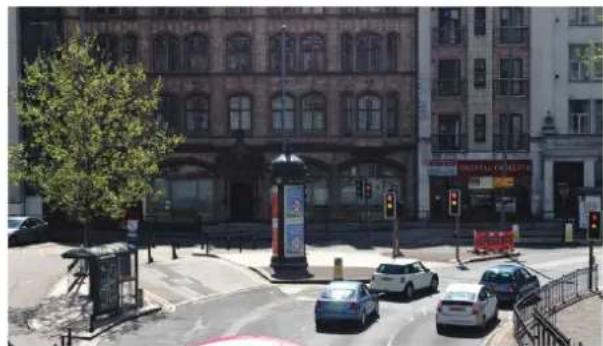
natural_image
Street scene with parked cars and a pedestrian monument in front of a historic building (no visible text or signage)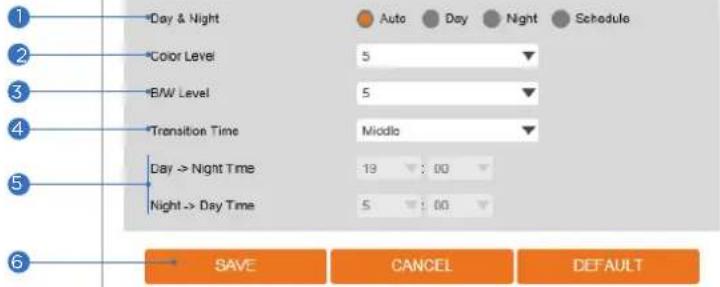
text_image
1 2 3 4 5 6 Day & Night Color Level B/W Level Transition Time Day -> Night Time Night -> Day Time Auto Day Night Schedule Mode 19 : 00 5 : 00 SAVE CANCEL DEFAULT1 Day & Night
- Auto: In this mode, the IR cut filter is removed automatically depending on the light condition around.
- Day: In this mode, the IR cut filter is applied to the image sensor all the time. Thus, the sensitivity will be reduced in the dark light condition, but the better color reproduction performance is obtained.
- Night: In this mode, the IR cut filter on the image sensor is removed all the time. The sensitivity will be enhanced in the dark light condition, but the image is black and white.
- Schedule: In this mode, Day / Night mode is converted accordance with the scheduled time.
2 Color Level - It is a level to change Night mode into Day mode when Day & Night mode is Auto.
3 B / W Level - It is a level to change Day mode into Night mode when Day & Night mode is Auto.
4 Transition Time - If it is set to Auto, to determine the rate at which Day / Night is converted.
5 If it is set to schedule mode, Set the time that Day / Night is converted.
6 Click 'Save' to save all settings.
Click 'Cancel' to return to the previous setting.
Click 'Default' to settings to the factory defaults.
Setup - Camera Setup
Camera Backlight Settings
BACKLIGHT SETTINGS
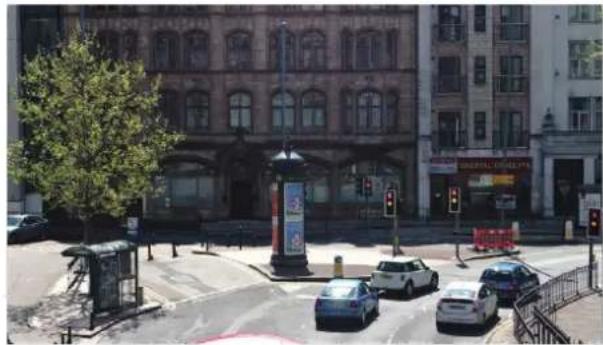
natural_image
Street scene with parked cars, a pedestrian bridge, and a large brick building in the background (no visible text or signage)WDR(Wide Dynamic Range)
Off
SAVE
CANCEL
DEFAULT
This feature is used when lighting conditions may cause detail loss in the camera's view due to high contrast.
① WDR (Wide Dynamic Range) - Enable or disable the feature.
② Click 'Save' to save all changes.
Click 'Cancel' to return to the previous setting.
Click 'Default' to change the settings back to their factory defaults.
Setup - Camera Setup
Camera White Balance
WHITE BALANCE
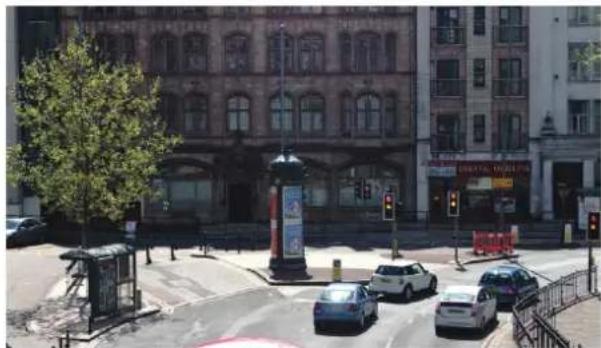
natural_image
Street intersection with parked cars and a prominent street lamp in front of a historic building (no visible text or signage)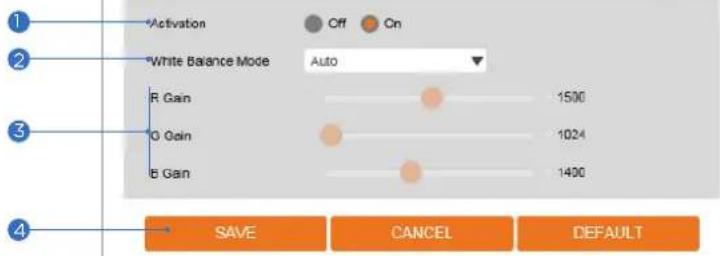
text_image
Activation White Balance Mode Auto R Gain O Gain E Gain 1500 1024 1400 SAVE CANCEL DEFAULT1 Activation - Enable or disable the White Balance function
② White Balance Mode - Select White Balance depending on the lighting conditions.
RGB Gain - The R/G/B gain can be set only when the White Balance Mode is set to Manual.
4 Click 'Save' to save all settings.
Click 'Cancel' to return to the previous setting.
Click 'Default' to settings to the factory defaults.
Setup - Camera Setup
Camera Image Enhancement
text_image
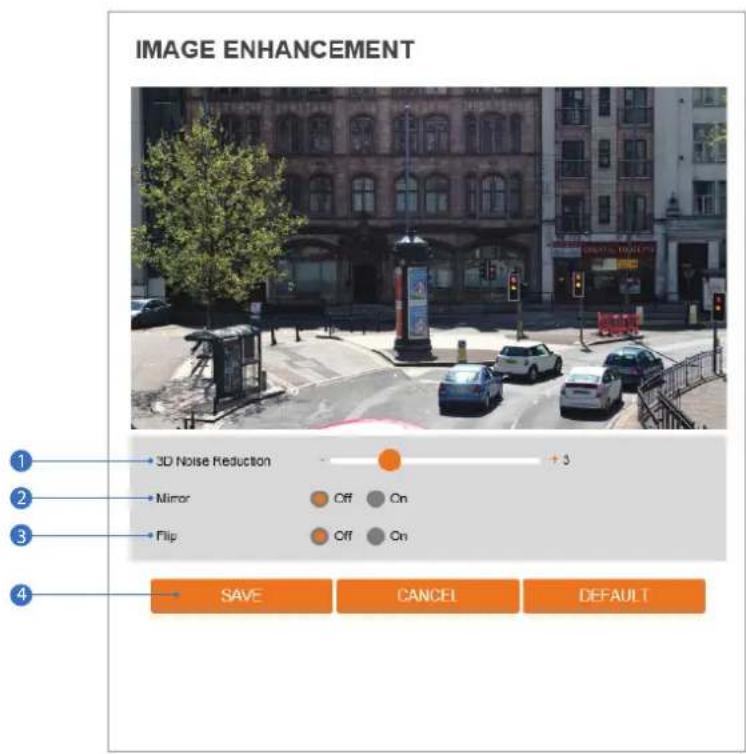
IMAGE ENHANCEMENT 1 2 3 4 3D Noise Reduction + 3 Mirror Off On Flip Off On SAVE CANCEL DEFAULT1 3D Noise Reduction - Reduce digital noise in low-light conditions, improving video quality.
2 Mirror - Reverse the video horizontally.
③ Flip - Reverse the video vertically.
4 Click 'Save' to save all settings.
Click 'Cancel' to return to the previous setting.
Click 'Default' to settings to the factory defaults.
NETWORK STATUS
| MAC Address | 00.00.F1.21.A2:11 |
| IP Address | 192.168.1.34 |
| Subnet Mask | 255.255.0.0 |
| Default Gateway | 192.168.1.1 |
| Preferred DNS Server | 192.168.1.1 |
| Alternate DNS Server | |
| HTTP Port | 60 |
| HTTPS Port | 443 |
| RTSP Port | 554 |
This menu displays the camera's current network settings. To make any changes to the settings, you must go to the appropriate network settings tab.
Setup - Network Setup
Network Settings
text_image
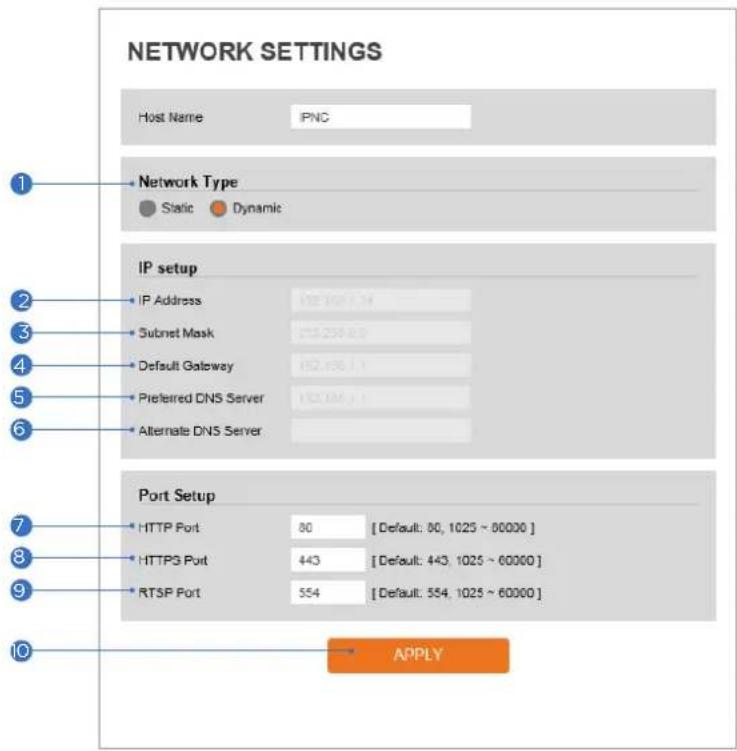
NETWORK SETTINGS Host Name IPNG Network Type Static Dynamic IP setup IP Address 152.806.04 Subnet Mask 153.236.69 Default Gateway 152.836.11 Preferred DNS Server 152.836.11 Alternate DNS Server Port Setup HTTP Port 80 [ Default: 80, 1025 ~ 80000 ] HTTP3 Port 443 [ Default: 443, 1025 ~ 60000 ] RTSP Port 554 [ Default: 554, 1025 ~ 60000 ] APPLY1 Network Type - Define the network IP address type. Select Static Mode for a fixed IP or Dynamic Mode for a dynamic IP address.
If you select Static Mode, enter the camera's IP Address, Subnet Mask, Gateway, DNS Server, and all ports. If you select Dynamic Mode, the IP address will be assigned automatically by the DHCP network requirements. If you click 'Apply', the system will reboot and you will have to reconnect the camera using the new IP address.
② IP Address - A unique string of numbers, divided into four octets (ranging from 0-255), used to identify the device over a network.
3 Subnet Mask - Determines the range of IP address options within the network.
4 Default Gateway - IP address of the forwarding host within the network; the IP address of the router that is most commonly used.
5 Preferred DNS Server - Address of the decentralized system used to translate alphabetic names into IP addresses.
⑥ Alternate DNS Server - Secondary address of the decentralized system used to translate alphabetic names into IP addresses.
7 HTTP Port - The HTTP port can be set to the default 80 port or any value in between 1025 to 60000.
8 HTTPS Port - The HTTPS port can be set to the default 443 port or any value in between 1025 to 60000.
9 RTSP Port - The RTSP port can be set to the default 554 port or any value in between 1025 to 60000.
10 Click 'Apply' to save all settings.
If the network type is dynamic, the IP address is changed in the following cases. In these cases, the IP address needs to be searched again, and the camera needs to be reconnected:
- When the camera's power is switched off and on.
• After firmware update, or when the camera is reset to its default settings and reboot.
Setup - Network Setup
Auto IP Settings
text_image
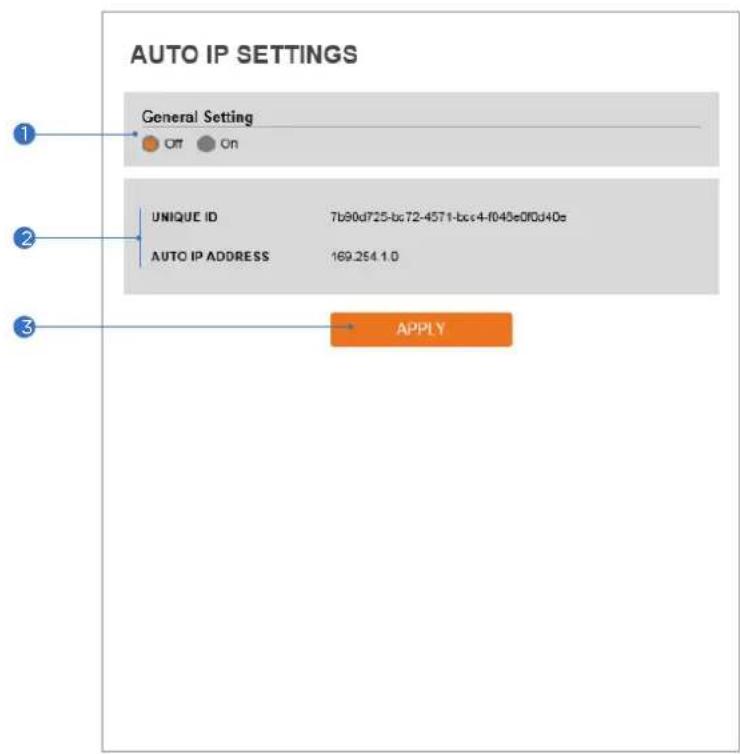
AUTO IP SETTINGS General Setting Off On UNIQUE ID 7b80d725-bc72-4571-bcc4-f045e0f0d40e AUTO IP ADDRESS 169.254.1.0 APPLY1 General Setting - Enable or disable the Auto IP Settings.
2 Auto IP Settings Information - Display the camera's Unique ID and Auto IP address.
3 Click 'Apply' to save all settings.
Setup - Network Setup
ONVIF Settings
text_image
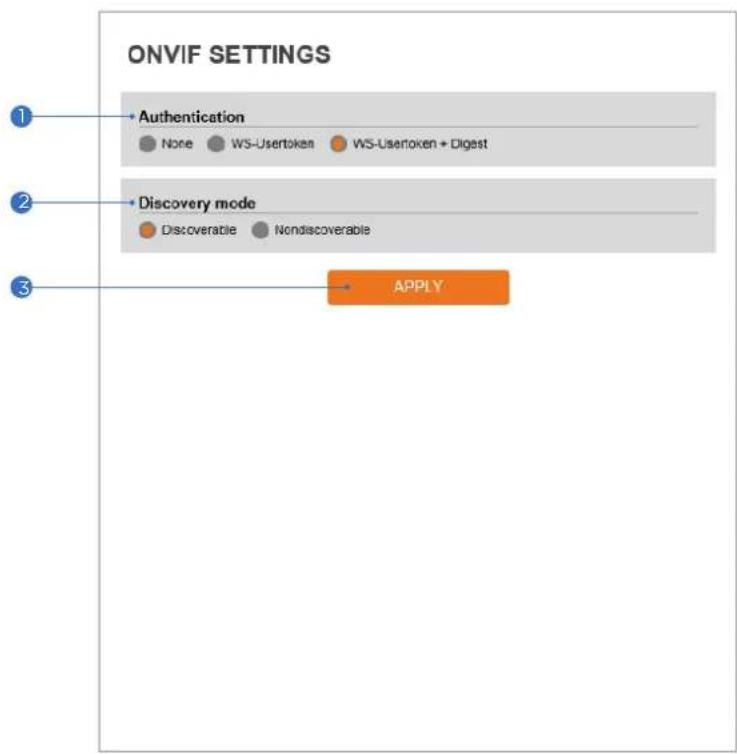
ONVIF SETTINGS 1 Authentication None WS-Usertoken WS-Usertoken + Digest 2 Discovery mode Discoverable Nondiscoverable 3 APPLY1 Authentication
None: Allow access to the camera without ONVIF authentication.
WS - Usertoken: Allow access to the camera with WS-User Token of ONVIF authentication.
WS - Usertoken + Digest: Allow access to the camera with WS-User Token and Digest of ONVIF authentication.
2 Discovery Mode - Enable or disable discovery mode.
3 Click 'Apply' to save all settings.
Setup - Network Setup
UPNP Settings
text_image
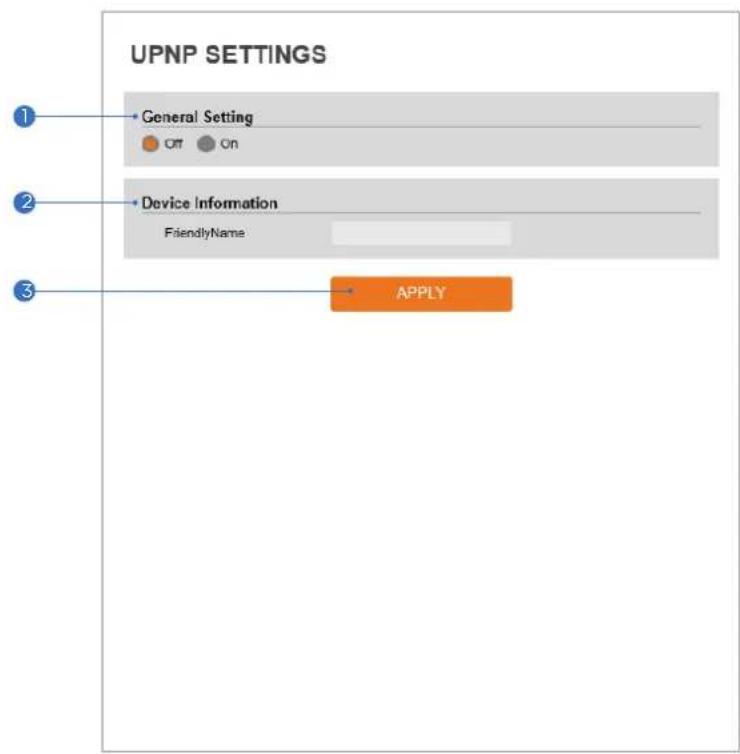
UPNP SETTINGS 1 General Setting 2 Off On Device Information FriendlyName 3 APPLY1 General Setting - Enable or disable the UPNP function.
2 Friendly Name - Define the friendly name. Support a maximum of 30 characters and special characters.
- Do not use: / \~ ! \$ ( ) { } [ ] ; ,
- Acceptable special characters include; @ . _ -
3 Click 'Apply' to save all settings.
Setup - Network Setup
DDNS Settings
text_image
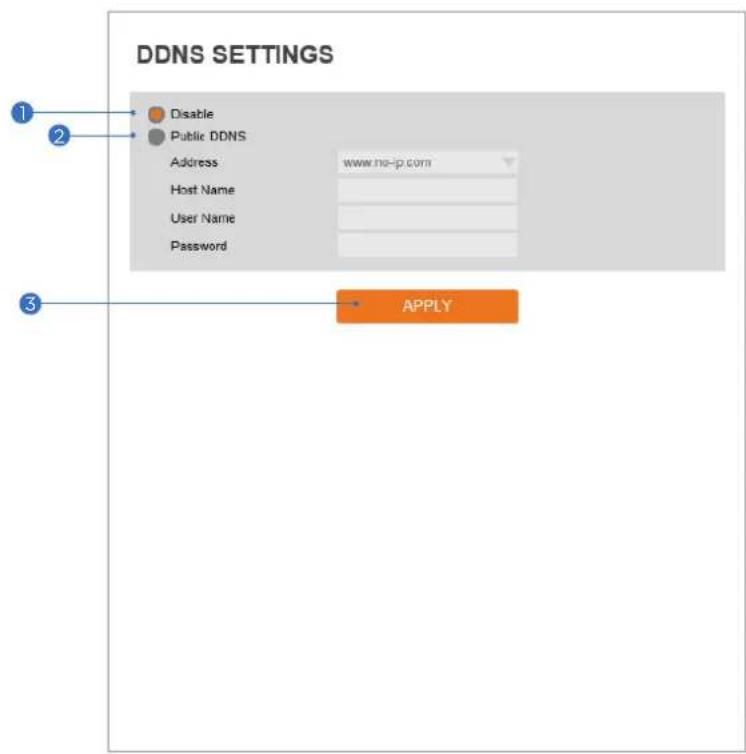
DDNS SETTINGS 1 2 Disable Public DDNS Address www.no-jp.com Host Name User Name Password 3 APPLY1 DDNS Disable - If it is selected, DDNS service does not work.
② Public DDNS - To use public DDNS service, select a site address listed on the list. After filling out the Host Name of the site the setup is completed by entering the username and password registered in that DDNS site.
| DDNS Provider |
| DynDNS |
| No-IP |
If you setup DDNS properly, the IP address of your camera will be updated automatically whenever the IP address is changed or the system is rebooted.
If P updating to the DDNS site is failed, the camera will keep retrying in 1min. interval.
3 Click 'Apply' to save all settings.
Setup - Network Setup
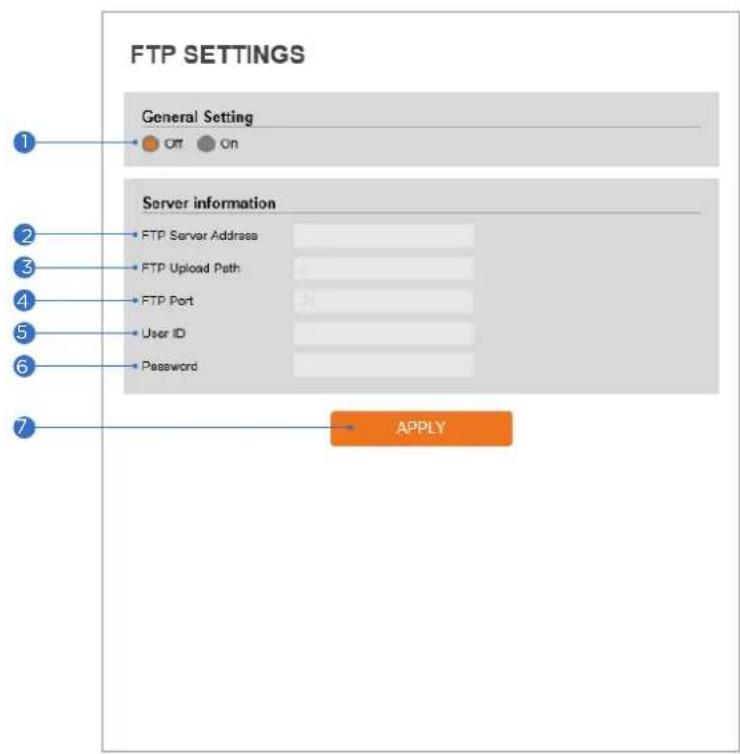
FTP Settings
text_image
FTP SETTINGS General Setting Off On Server information FTP Server Address FTP Upload Path FTP Port User ID Password APPLYTo transfer/save the image to the relevant sites through FTP, then FTP needs to be setup.
1 General Setting - Enable or disable the FTP function.
② FTP Server Address - Define FTP Server IP Address. If the IP Address form is incorrect, a message box will be shown to try again.
FTP Upload Path - Define a path in FTP server to store video. For the path name, English Alphabets, numbers and special characters (/ - !@ \$ ^ () _ - {} [ ]; ) can be used.
4 FTP Port - Define the FTP Server Port. If the port is not appropriate, it is impossible to access to FTP Server.
5 User ID - Define User ID to access to the FTP Server. Fill out the correct User ID registered in the FTP Server.
6 Password - Define Password to access to the FTP Server. Fill out the correct Password registered in the FTP Server.
7 Click 'Apply' to save all settings.
Refer to the above image for example.
text_image
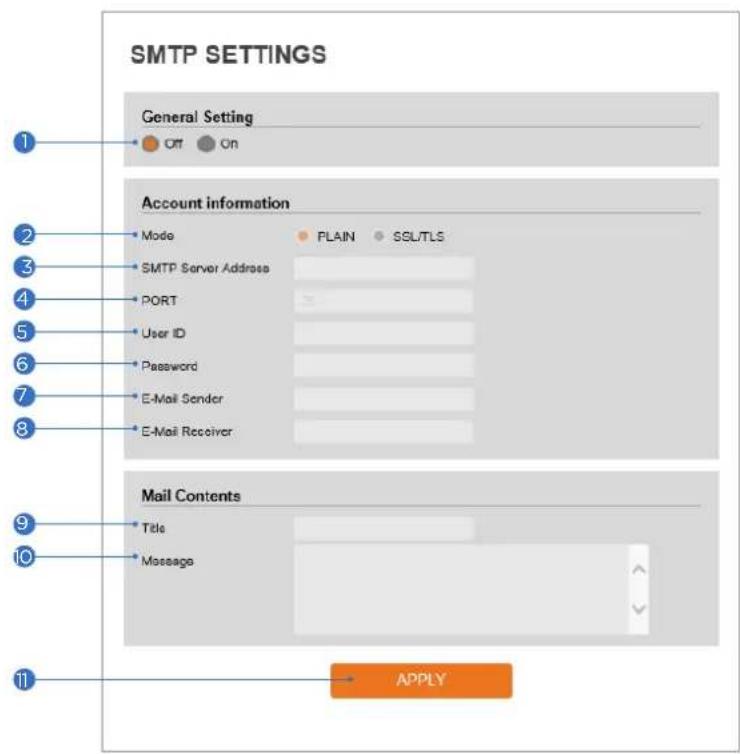
SMTP SETTINGS General Setting Off On Account information Mode SMTP Server Address PORT User ID Password E-Mail Sender E-Mail Receiver Mail Contents Title Message APPLYTo send/save the image to the relevant sites by Email, SMTP needs to be setup.
1 General Setting - Enable or disable the SMTP function.
② Mode - Select the security mode of SMTP from Plain or SSL / TLS. After checking the account setup of your SMTP Server, you may select one.
3 SMTP Server Address - Define the SMTP Server Address. If the IP Address form is incorrect, a message box will be shown to try again.
4 Port - Define the Port used in the Plain or SSL / TLS security mode in the above.
5 User ID - Define the User ID to access the SMTP Server. Fill out the correct User ID registered in the SMTP Server.
6 Password - Define the Password to access the SMTP Server. Fill out the correct Password registered in the SMTP Server.
7 E-Mail Sender - Define the e-mail address of the E-Mail Sender. It will be displayed as the sender when the camera sends an E-mail.
⑧ E-Mail Receiver - Define the e-mail address of E-Mail Receiver. It will be displayed as the Receiver when the camera sends an E-mail.
9 Title - Define the title of the E-Mail when the camera sends an E-mail.
The title of the Email is limited to 40 characters including the spaces.
Message - Define the contents of E-Mail when the camera sends an E-mail. The message of the E-mail is limited to 40 characters including the spaces.
11 Click 'Apply' to save all settings.
text_image
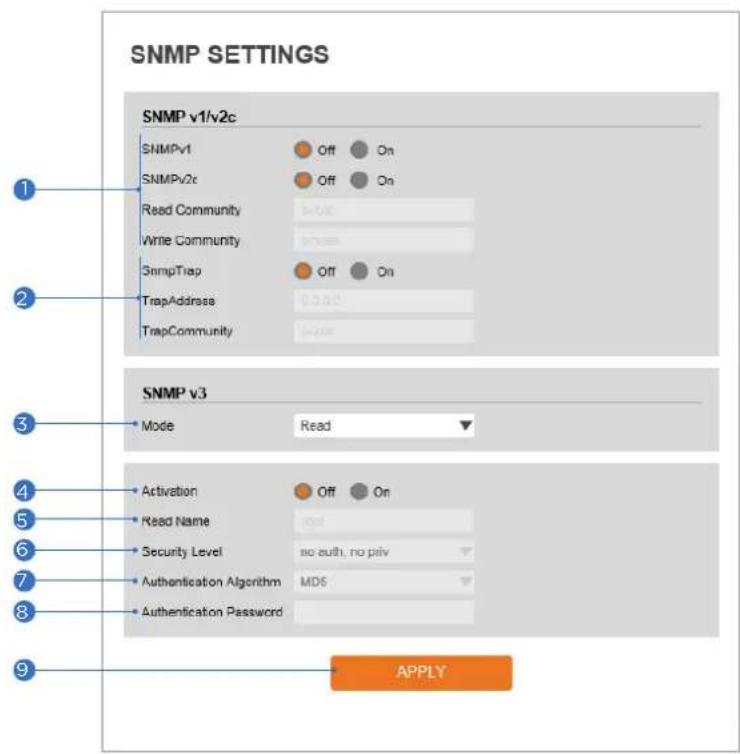
SNMP SETTINGS SNMP v1/v2c SNMPv1 Off On SNMPv2c Off On Read Community Write Community SnmpTrap Off On TrapAddress TrapCommunity SNMP v3 Mode Read Activation Off On Read Name Security Level no auth, no priv Authentication Algorithm MDS Authentication Password APPLY1 SNMPv1/SNMPv2 - Select the SNMPv1/SNMPv2 option and type the names of Read and Write communities.
SNMP trap can be used to check periodically for operational thresholds or failures that are defined in the MIB.
② SNMP Trap - Enable or disable the SNMP trap.
SNMPv3 contains cryptographic security, a higher security level, which allows you to set the Authentication password and the Encryption password.
3 Mode - Select the either Read or Read/Write mode.
4 Activation - Select mode to enable or disable.
⑤ Read/Write name - Define Read name and Write name.
6 Security Level - Select one of no auth, no priv/auth, priv.
⑦ Authentication Algorithm - Select MD5 or SHA as the authentication method.
⑧ Authentication Password - The Authentication Password is encryption for authentication and is between 8 to 30 digits long.
9 Click 'Apply' to save all settings.
text_image
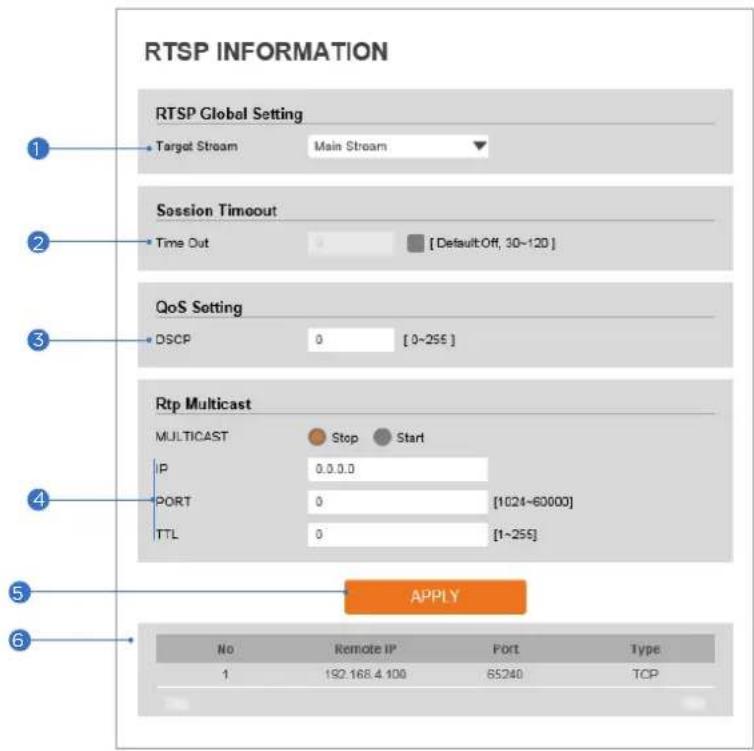
RTSP INFORMATION 1 RTSP Global Setting Target Stream Main Stream 2 Session Timeout Time Out [Default:Off, 30~120] 3 QoS Setting DSCP 0 [0~255] 4 Rtp Multicast MULTICAST Stop Start IP 0.0.0.0 PORT 0 [1024~60000] TTL 0 [1~255] 5 APPLY 6 No Remote IP Port Type 1 192.168.4.100 65240 TCP1 Target Stream - Select the stream you want to set.
2 Time out - Set the RTSP time out.
The session is disconnected after the specified time out.
3 QoS Setting - Set the quality of service to ensure data transfer performance.
4 RTP Multicast - Check RTP Multicast Start/Stop. To activate RTP Multicast.
- Click the "On" button.
- Enter accessible RTP Multicast IP, the port for video stream control, RTP packet TTL.
- Click the "Apply" button.
It is possible to set each RTP Multicast for CH1\~3.
⑤ Click 'Apply' to save all settings.
Click this button when completed setup each channel.
⑥ It shows RTSP Connection information.
Setup - Trigger Action Setup Action Rules Configuration
ACTION RULES CONFIGURATION
| Action Rules | ||
| Name | Reserve Action | Action |
| SMTP | 1/5 | SMTP |
| FTP | 1/5 | FTP |
| RECORD | 1/5 | RECORD |

1 Action rules List - It indicates the custom action rule information added to the Action rules list.
② Click 'Add' to add custom action rules.
Click 'Modify' to modify selected items from the action rules list.
Click 'Delete' to delete selected items from the action rules list.
Setup - Trigger Action Setup Action Rules Add / Modify

text_image
ACTION RULES CONFIGURATION General Setting Name NewAction Action1 NONE Action2 NONE Action3 NONE Action4 NONE Action5 NONE SAVE CANCEL1 Name - Define the name of the action rules.
Input text cannot exceed the limit (3\~15 characters).
② Action1 - Action5 - Select the action to take If the event occurs.
3 Click 'Save' to save all settings.
Click 'Cancel' to return to the previous menu.
Setup - Trigger Action Setup Image Transfer Configuration
IMAGE TRANSFER CONFIGURATION
- Add the FTP/SMTP action in the event rules menu.
- When an event occurs, the images will be sent to ftp/smtp address.
- Determine the image transfer speed and the duration of image transfer after/before an event.
Pre/Post Alarm Image
Number Of Image 2 Image Per Seconds(s) [1 \~ 5]
Pre-Alarm Duration 3 Second(s) [1\~5]
Post-Alarm Duration 3 Second(s) [1\~30]

1 Pre / Post Alarm Image - Image Transfer due to event is configured by setting the image transfer rate and Pre / Post alarm duration.
| Descriptions | |
| Number of Images | Define the number of images transferred per second. |
| Pre-alarm Duration | Define the duration of the image transfer before an event. |
| Post-alarm Duration | Define the duration of the image transfer after an event. |
② Click 'Apply' to save all settings.
Setup - Trigger Action Setup Relay Out Configuration
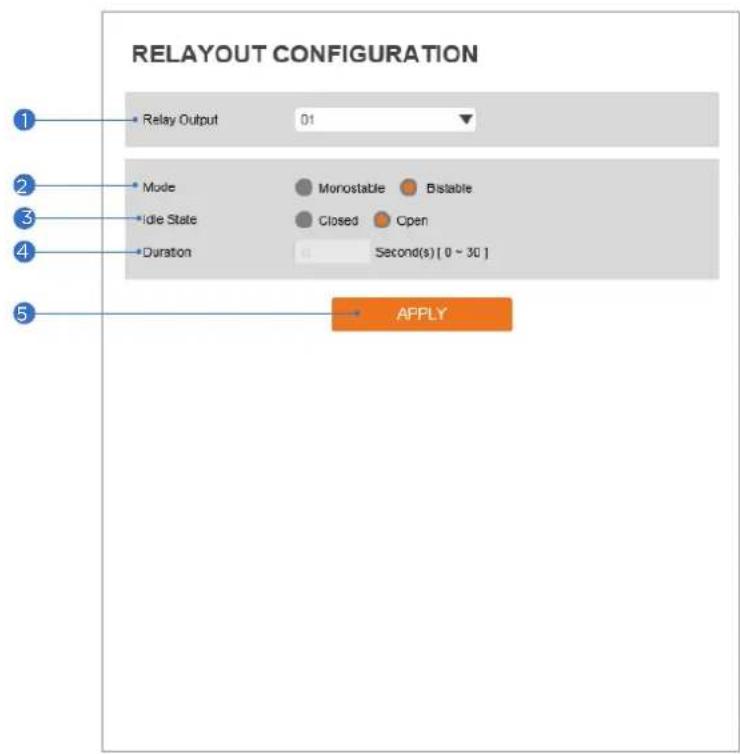
text_image
RELAYOUT CONFIGURATION 1 Relay Output 01 2 Mode Morostable Bistable 3 Idle State Closed Open 4 Duration Second(s) [ 0 ~ 30 ] 5 APPLY1 Relay Output - Select the Relay output.
The number of relay outputs available depends on the camera model.
② Mode - Select the monostable/bistable for relay mode.
3 Idle State - Select whether the contact is normally opened or is closed.
4 Duration - Relay out is operated during the setting time.
In monostable mode, this function must be set up.
⑤ Click 'Apply' to save all changes.
Setup - Event Setup
Event Rules Configuration
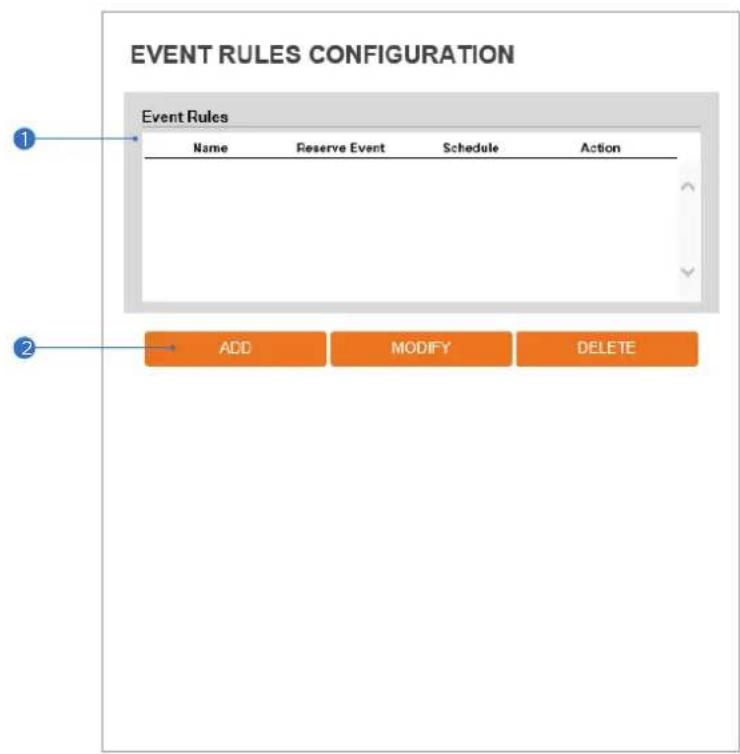
text_image
EVENT RULES CONFIGURATION Event Rules Name Reserve Event Schedule Action ADD MODIFY DELETE① Event Rules List - It indicates the custom Event Rule information added to the Event Rules list.
② Click 'Add' to add custom event rules.
Click 'Modify' to modify selected items from the event rules list.
Click 'Delete' to delete selected items from the event rules list.
Setup - Event Setup
Event Rules Configuration
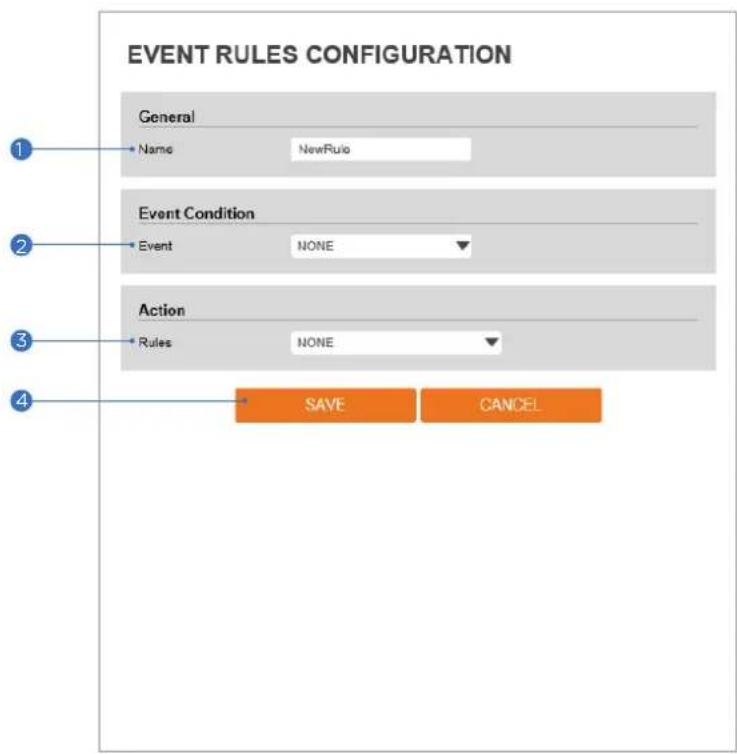
text_image
EVENT RULES CONFIGURATION General Name NewRule Event Condition Event NONE Action Rules NONE SAVE CANCEL1 Name - Define the Event rule name.
② Event - Select the event among motion detection, network disconnection, illegal login detected, temperature critical, schedule, sensor detection.
Click 'Cancel' to return to the previous setting.
You need at least one event.
3 Rules - Select the action rule defined in the Trigger Action-Action rule menu.
4 Click 'Save' to save the current settings.
Click 'Cancel' to return to the previous setting.
Setup - Event Setup
Motion Detection Configuration
natural_image
Street scene with parked cars and a tall building in the background, no visible text or signage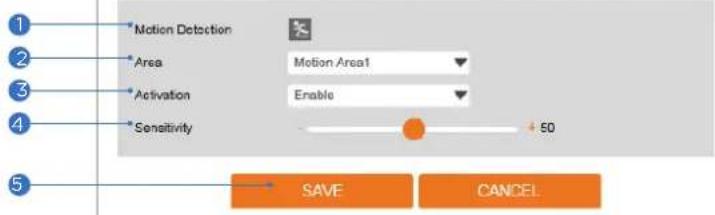
text_image
1 2 3 4 5 Motion Detection Area Motion Area1 Activation Enable Sensitivity 50 SAVE CANCEL1 Motion Detection - It shows the Motion event status.
Event Alert Icon( ) appears if 'Motion Detection' is activated.
② Area - Set the motion detected area. Click in the display window to draw the motion area.
You can set up to four areas.
3 Activation - Enable or Disable motion detection function.
4 Sensitivity - Define the sensitivity of motion detection.
If a high value is selected, it will detect very small motion while it becomes relatively insensitive when a low value is selected.
5 Click 'Save' to save all settings.
Click 'Cancel' to return to the previous setting.
Setup - Event Setup
Temperature
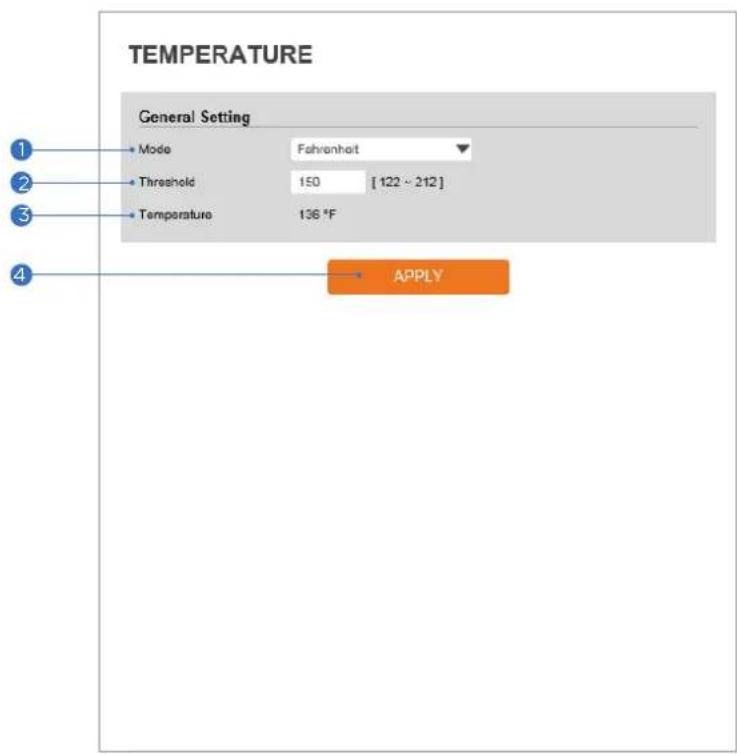
text_image
TEMPERATURE General Setting Mode Fahrenheit Threshold 150 [ 122 ~ 212 ] Temperature 136 °F APPLY1 Mode - Select Fahrenheit or Celsius.
2 Threshold - Define the temperature at which the event trigger occurs.
3 Temperature - It indicates the current temperature of the IP camera.
4 Click 'Apply' to save all settings.
Setup - Event Setup
Alarm Configuration
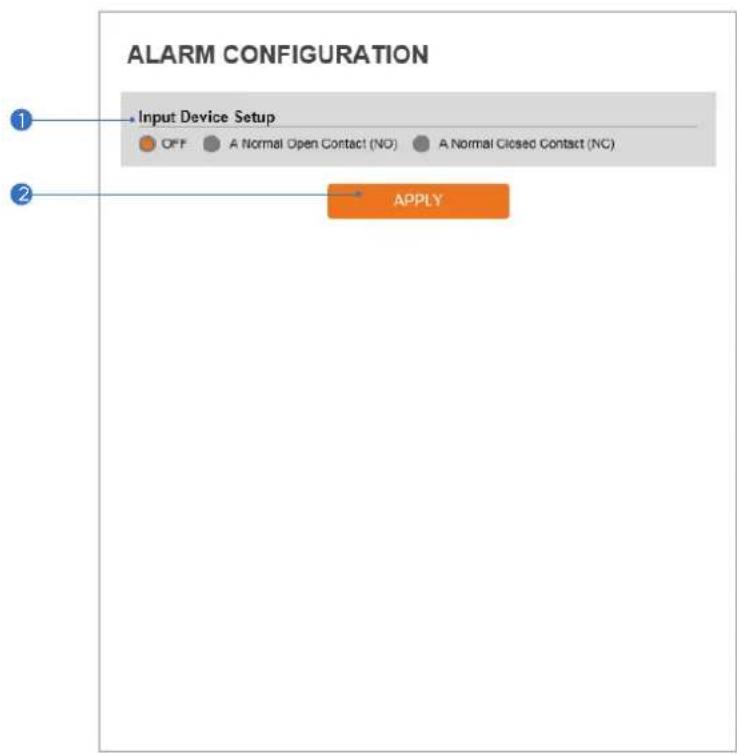
text_image
ALARM CONFIGURATION Input Device Setup OFF A Normal Open Contact (NO) A Normal Closed Contact (NC) APPLY① Input Device Setup - Select input device type from OFF / N.O. / N.C.
| Operation | |
| OFF | Ignore this input sensor. |
| NO | The contact is normally open and closed when activated. |
| NC | The contact is normally closed and open when activated. |
② Click 'Apply' to save all changes.
Setup - Record Setup
Record Management
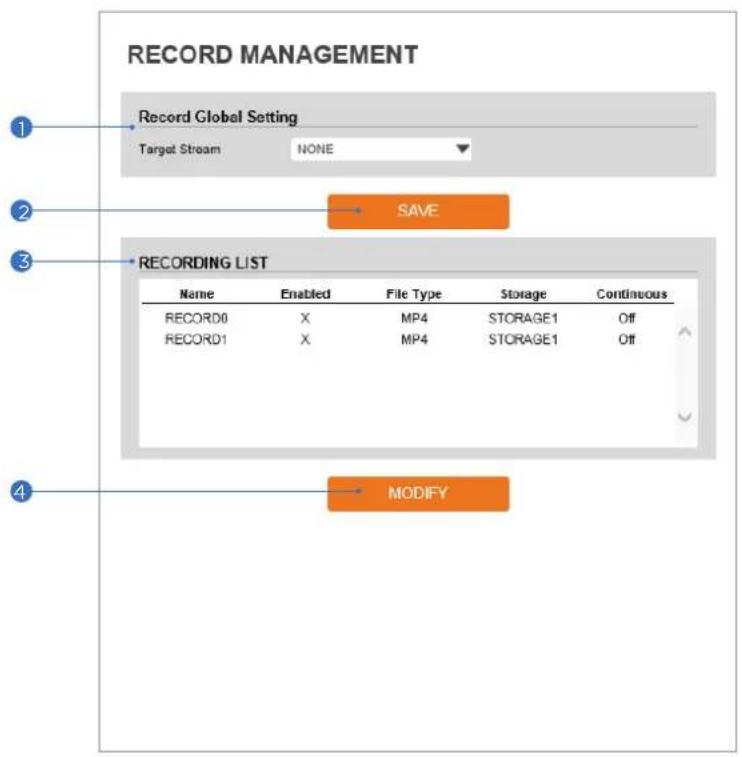
text_image
RECORD MANAGEMENT Record Global Setting Target Stream NONE SAVE RECORDING LIST Name Enabled File Type Storage Continuous RECORD0 X MP4 STORAGE1 Off RECORD1 X MP4 STORAGE1 Off MODIFY① Target Stream - Select the channel you want to record video.
② Click 'Save' to save the current settings.
3 Recording List - Display the information about the recording settings.
④ Click 'Modify' to modify the selected item in the recording list.
Setup - Record Setup
Record Configuration
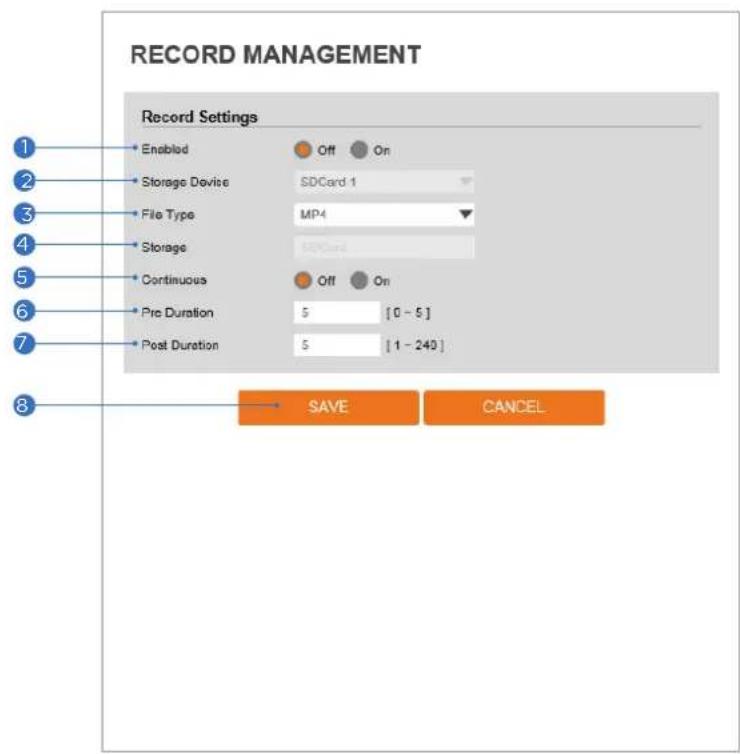
text_image
RECORD MANAGEMENT Record Settings Enabled Off On Storage Device SDCard 1 File Type MP4 Storage SDCard Continuous Off On Pre Duration 5 [0 - 5] Post Duration 5 [1 - 240] SAVE CANCEL1 Enabled - Enable or disable this function.
② Storage Device - This option shows the SD card currently mounted on the camera.
3 File Type - Select the recording file type.
Currently, the camera supports MP4 file type.
4 Storage - Select the storage type. SD Card (Disabled) selection is not allowed.
5 Continuous - If continuous mode is enabled, the camera will start recording automatically.
⑤ Pre Duration - Define the duration of recording before an event.
7 Post Duration - Define the duration of image transfer after an event.
8 Click 'Save' to save the current settings.
Click 'Cancel' to return to the previous setting.
Setup - Record Setup
Recording List
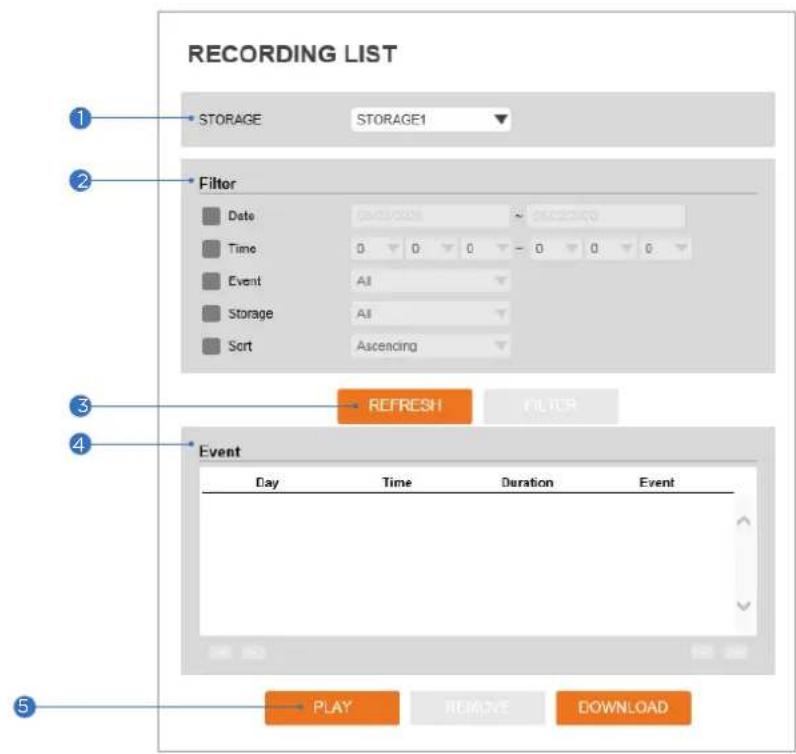
text_image
RECORDING LIST 1 STORAGE STORAGE1 2 Filter Date 000000 ~ 000000 Time 0 0 0 - 0 0 0 Event AI Storage AI Sort Ascending 3 REFRESH FILTER 4 Event Day Time Duration Event PLAY REMOVE DOWNLOAD① Storage - Select the Storage from the available options.
② Filter - Select the date/time, event, sort or storage format to filter the recorded video results.
3 Click the 'Refresh' button to refresh the search results as needed. Click 'Filter' to view the filtered recorded video.
4 Recording List - Display the information of the recorded video.
⑤ Click 'Play' to view the selected item in the list of the recorded video results.
Click 'Download' to download the selected item.
- When you click Download, the following window appears.
- When downloading, please fill-up the purpose of the file download. The field is limited to 30 characters. (This information will be shown on the Log page with the download time).
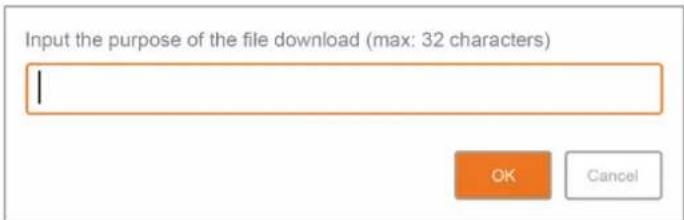
text_image
Input the purpose of the file download (max: 32 characters) OK CancelWhen playing back recorded MP4 files with H.265 (HEVC) codec, the video may not play due to a performance issue of VLC plug-in.
RECORDING LIST
1
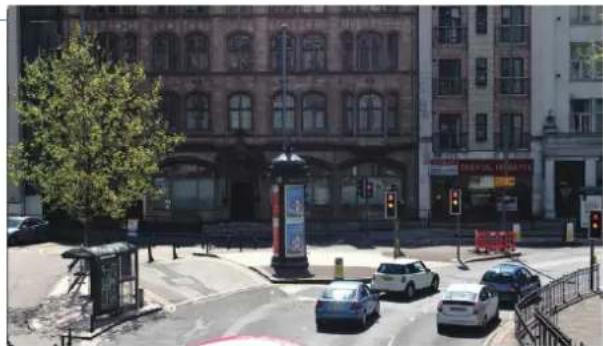
natural_image
Street scene with parked cars and a tall monument in front of a historic building (no visible text or signage)2
Recording Video
| Token | 0001a26/bac714c6 |
| Status | Completed |
| Start Time | 05/22/2020 09:25:44 |
| End Time | 05/22/2020 09:25:54 |
| Recording Time | 00:10 |
3

1 Recording Video Viewer - Play the recorded video.
2 Recording Video Information - Display information about the recorded video.
3 Click 'Replay' to view the recorded video again. Click 'Back' to return to the previous menu.
- If SD Card does not automatically mount, you must format for mounting SD card.
Storage List
| Name | Mounted | Size | Used(%) | Available |
| SDCard1 | 0 | 29.8GB | 0% | 29.8GB |
Display the SD card information mounted on the device.
* Select an item from the Storage List to configure its related functions.
Setup - Record Setup
Storage Configuration
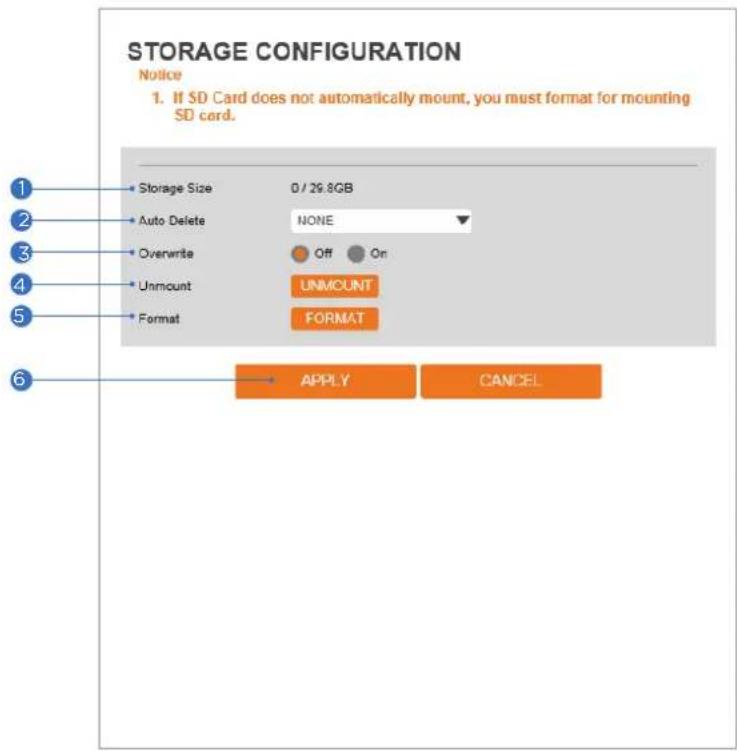
text_image
STORAGE CONFIGURATION Notice 1. If SD Card does not automatically mount, you must format for mounting SD card. Storage Size 0 / 29.8GB Auto Delete NONE Overwrite Off On Unmount UNMOUNT Format FORMAT APPLY CANCEL① Storage Size - Total capacity of SD card and the remainder of it are displayed.
2 Auto Delete - Select the period for auto delete. The data stored before the set period will be deleted automatically.
Delete all stored images older than selected time.
3 Overwrite - If ON is selected, once the SD card has less than 8MB storage available, new data will start to overwrite the oldest data. If OFF is selected, once the SD card has less then 8MB available, the camera will stop recording to the SD card.
4 Unmount - Remove the SD card from the device.
5 Format - Delete all contents stored in the SD card.
6 Click 'Apply' to save all settings.
Click 'Cancel' to return to the previous setting.
Setup - Security Setup
IP Address Filter Configuration
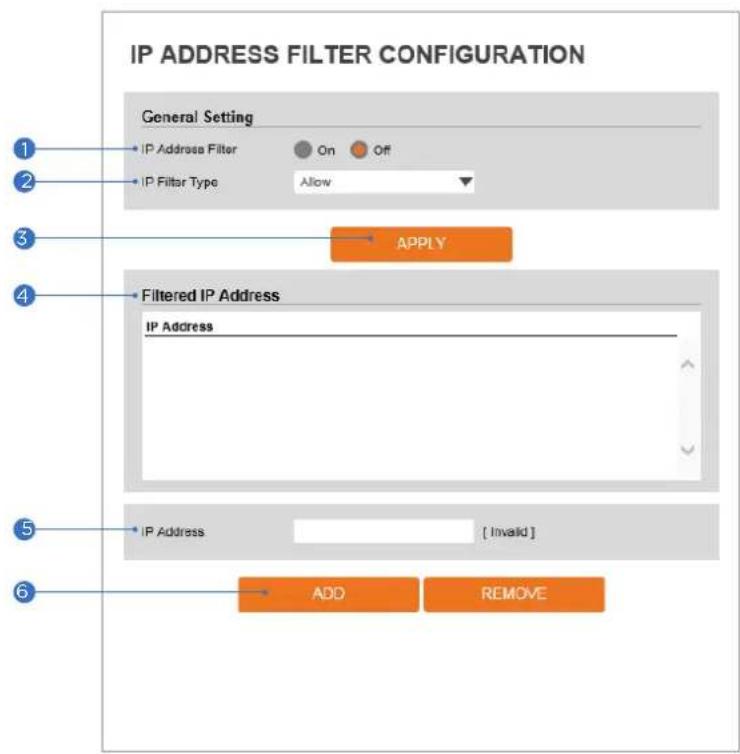
text_image
IP ADDRESS FILTER CONFIGURATION General Setting IP Address Filter On Off IP Filter Type Allow 3 APPLY 4 Filtered IP Address IP Address 5 IP Address [ Invalid ] 6 ADD REMOVE① IP Address Filter - Enable or disable this function.
② IP Filter Type - Select the recording IP filter type.
3 Click 'Apply' to save all settings.
4 Filter IP Address - Display the filtered IP address.
⑤ IP Address - Define the IP address you want to apply the IP filter.
⑥ Click 'Add' to add the IP address to the list.
Click 'Remove' to remove the IP address selected in the list.
Setup - Security Setup
RTSP Authentication Configuration
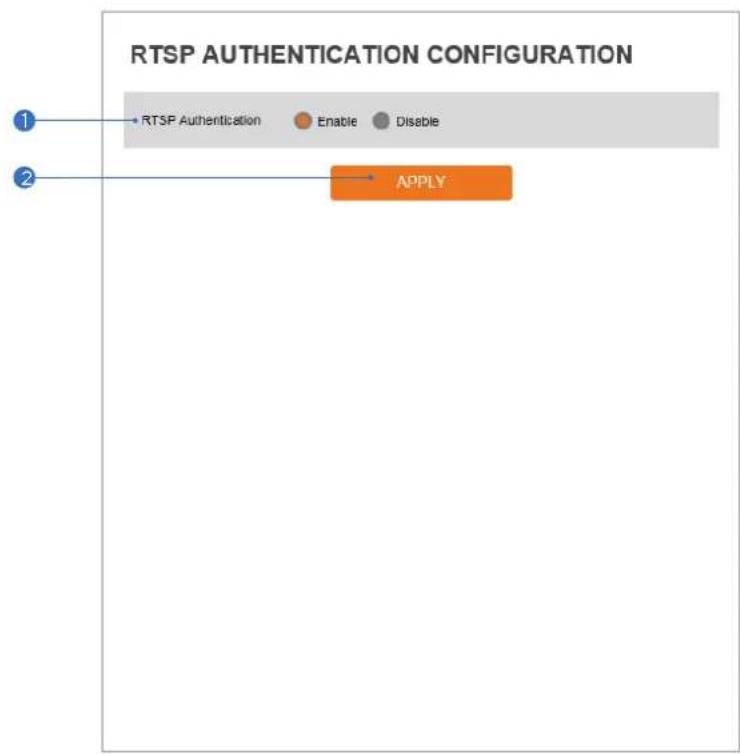
text_image
RTSP AUTHENTICATION CONFIGURATION 1 • RTSP Authentication Enable Disable 2 APPLY1 RTSP Authentication - Enable or disable the RTSP authentication.
② Click 'Apply' to save all settings.
IEEE 802.1X CONFIGURATION
text_image
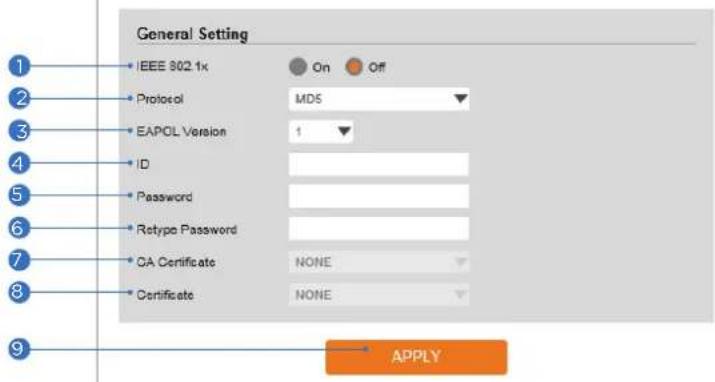
General Setting IEEE 802.1x On Off Protocol MD5 EAPOL Version 1 ID Password Retype Password OA Certificate NONE Certificate NONE APPLYThe feature is needed when connecting the camera to the network protected by the IEEE 802.1X.
IEEE 802.1x - Enable or disable the IEEE 802.1x feature.
2 Protocol
- MD5: It provides one-way password-based network authentication of the client.
- PEAP: It is similar to TTLS in that it does not require a certificate on the client-side.
- TTLS/MD5: It does not require a certificate on the client-side.
- TLS: It relies on client-side and server-side certificates to perform authentication.
3 EAPOL Version - Select the EAPOL Version.
4 ID - Type the ID to identify the client in the IEEE 802.1X authentication server.
5 Password - Type the Password to identify the client in the IEEE 802.1X authentication server.
⑥ Verify - Verify Password.
7 CA Certificate - Select the CA certificate required for TLS, TTLS, and PEAP authentication.
8 Certificate - Select the client certificate required for TLS authentication
9 Click 'Apply' to save all settings.
Setup - Security Setup HTTPS Configuration
text_image
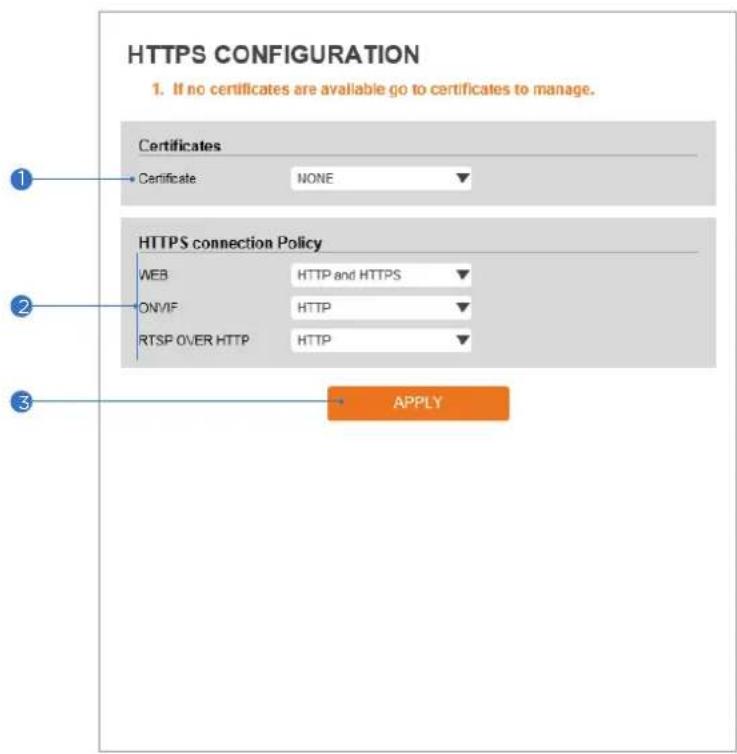
HTTPS CONFIGURATION 1. If no certificates are available go to certificates to manage. Certificates Certificate NONE HTTPS connection Policy WEB HTTP and HTTPS ONIF HTTP RTSP OVER HTTP HTTP APPLYHTTPS encrypts session data over SSL or TLS protocols instead of using plain text in socket communications.
1 Certificate - Select an installed certificate.
If you cannot select a certificate, please install the certificate from the Security->Certificates menu.
2 HTTPS connection Policy - Select one of "HTTP", "HTTPS", "HTTP and HTTPS" depending on the connected web, ONVIF, RTSP over HTTP.
• WEB: "HTTP" "HTTPS" "HTTP and HTTPS"
- ONVIF, RTSP OVER HTTP: "HTTP" "HTTPS" "HTTP and HTTPS"
3 Click 'Apply' to save all settings.
When HTTPS mode is chosen, input https://
Setup - Security Setup
Certificates Configuration
text_image
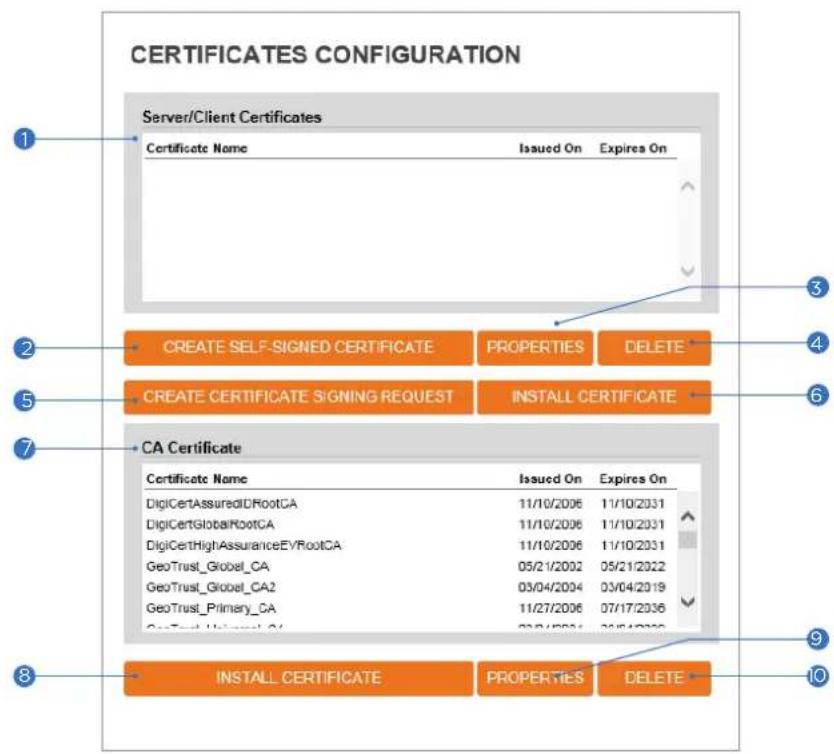
CERTIFICATES CONFIGURATION Server/Client Certificates Certificate Name Issued On Expires On CREATE SELF-SIGNED CERTIFICATE PROPERTIES DELETE CREATE CERTIFICATE SIGNING REQUEST INSTALL CERTIFICATE CA Certificate Certificate Name Issued On Expires On DigiCertAssuredIDRootCA 11/10/2006 11/10/2031 DigiCertGlobalRootCA 11/10/2006 11/10/2031 DigiCertHighAssuranceEYRootCA 11/10/2006 11/10/2031 GeoTrust_Globel_CA 05/21/2002 05/21/2022 GeoTrust_Globel_CA2 03/04/2004 03/04/2019 GeoTrust_Primary_CA 11/27/2006 07/17/2036 GeoTrust_University_C 23/14/2014 24/14/2039 INSTALL CERTIFICATE PROPERTIES DELETE ① ② ③ ④ ⑤ ⑥ ⑦ ⑧ ⑨ ⑩1 Server/Client Certificates - Shows the installed certificates.
② Create Self-Signed Certificate - A self-signed SSL certificate is an identity certificate signed by its creator. But they are considered to be less trustworthy.
3 Properties - Shows information about the selected certificate.
④ Delete - Delete the selected certificate.
⑤ Create a Certificate signing request - This is the encoded data that contains the necessary information for issuing the certificate.
They must be filled in when creating the CSR (Certificate Signing Request).
⑥ Install Certificate - Install Certification
7 CA Certificate - Shows the installed CA certificates.
8 Install CA Certificate - Install Certification, see the detail page.
9 Properties - Shows information about the selected certificate.
10 Delete - Delete the selected CA certificate.
Setup - Security Setup
Certificates Configuration
text_image
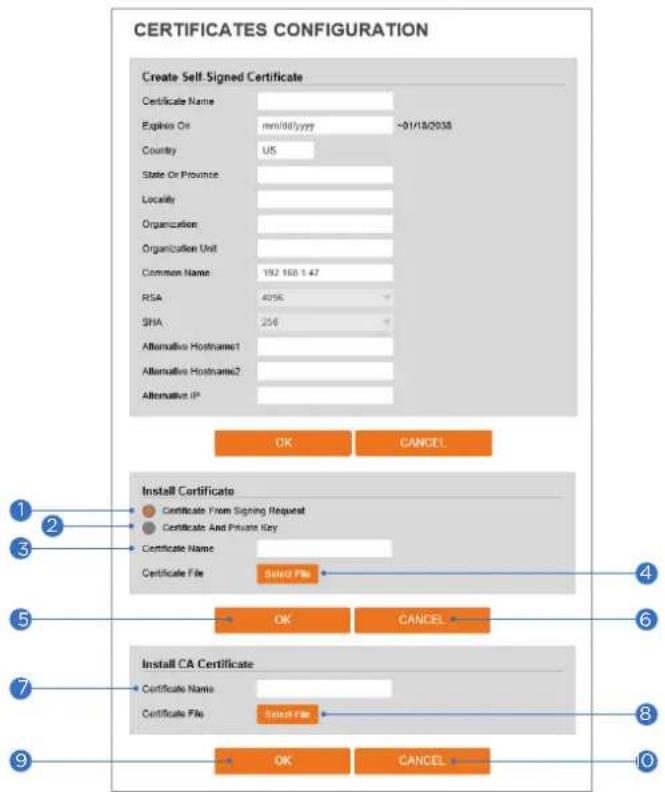
CERTIFICATES CONFIGURATION Create Self Signed Certificate Certificate Name Expires On: mm/dd/yyyy ~01/18/2038 Country: US State Or Province Locality Organization Organization Unit Common Name: 192 168.147 RSA: 4096 SHA: 256 Alternative Hostname1 Alternative Hostname2 Alternative IP* OK CANCEL Install Certificate Certificate From Signing Request Certificate And Private Key Certificate Name Certificate File Select File OK CANCEL Install CA Certificate Certificate Name Certificate File Select File OK CANCEL ①②③④⑤⑥⑦⑧⑨Detail for Install Certification.
1 Certificate From Signing Request - Select to install a signed certificate returned from the CA.
2 Certificate And Private Key - Select to install Certificate And Private Key to install a certificate and private key.
3 Certificate Name - Enter a unique name to identify a certificate.
4 Select File - Choose the certification file.
⑤ OK - Request installing a certificate.
⑥ Cancel - Cancel install certificate and then back to certificates configuration.
Detail for Install CA Certification.
7 Certificate Name - Enter a unique name to identify CA certificate.
8 Select File - Choose a CA certification file
⑨ OK - Request installing a CA certificate.
10 Cancel - Cancel installing a CA certificate and then back to certificates configuration.
Setup - Security Setup Service Configuration
text_image
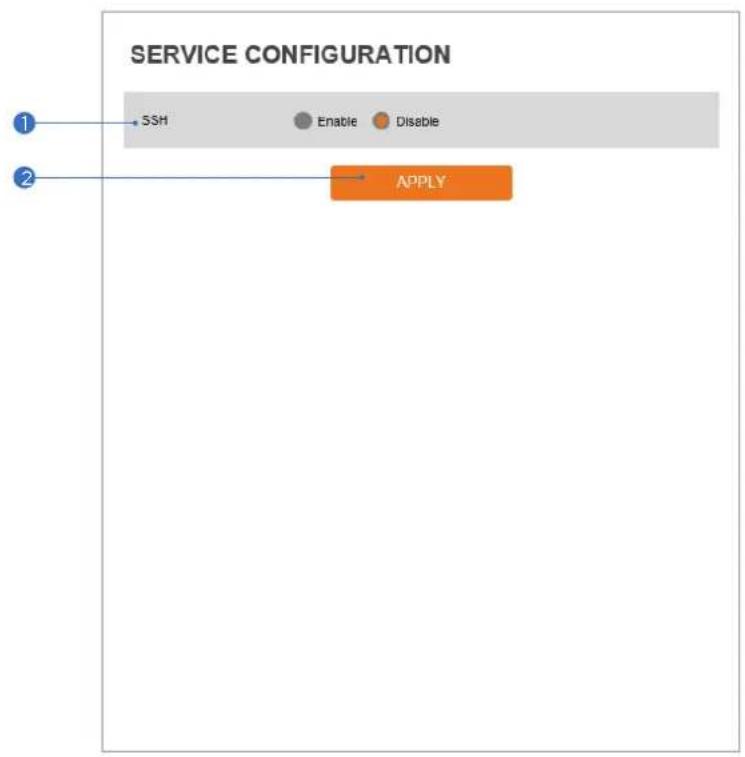
SERVICE CONFIGURATION 1 SSH Enable Disable 2 APPLY① SSH - Enable or disable the SSH function.
② Click 'Apply' to save all settings.
Setup - System Setup System Information
text_image
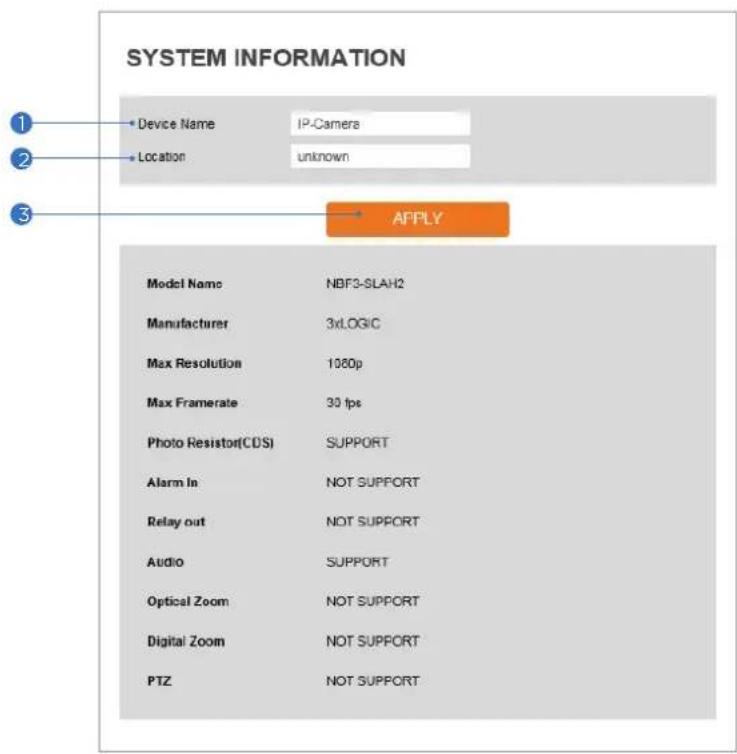
SYSTEM INFORMATION Device Name IP-Camera Location unknown APPLY Model Name NBF3-SLAH2 Manufacturer 3xLOGIC Max Resolution 1000p Max Framerate 30 fps Photo Resistor(CDS) SUPPORT Alarm In NOT SUPPORT Relay out NOT SUPPORT Audio SUPPORT Optical Zoom NOT SUPPORT Digital Zoom NOT SUPPORT PTZ NOT SUPPORTSystem Capability information.
1 Device Name - You can define the device name.
② Location - You can define the device's location.
3 Click 'Apply' to save all settings.
Setup - System Setup System Diagnostics
SYSTEM DIAGNOSTICS
Uptime
0day 6hrs 28mins
SD Card
SD card is not inserted
NAND
NAND read/write OK
EEPROM
EEPROM read OK
Audio
Audio ACK OK
System Files
File system OK
NTP Status
NTP: On
Connect Success
Last NTP Connected Date&Time: 2020-5-21 21:24:25
Shows basic hardware functions after inspection.
1 Shows Uptime, SD card, NAND, EEPROM, Audio chip, Important file system, and NTP Status.
Warning:
If the camera is abnormally terminated, a download button will appear on the diagnostics page to download a file that allows you to check the error information you can.
If you want to download the core dump file, press the Download button
DOWNLOAD
text_image
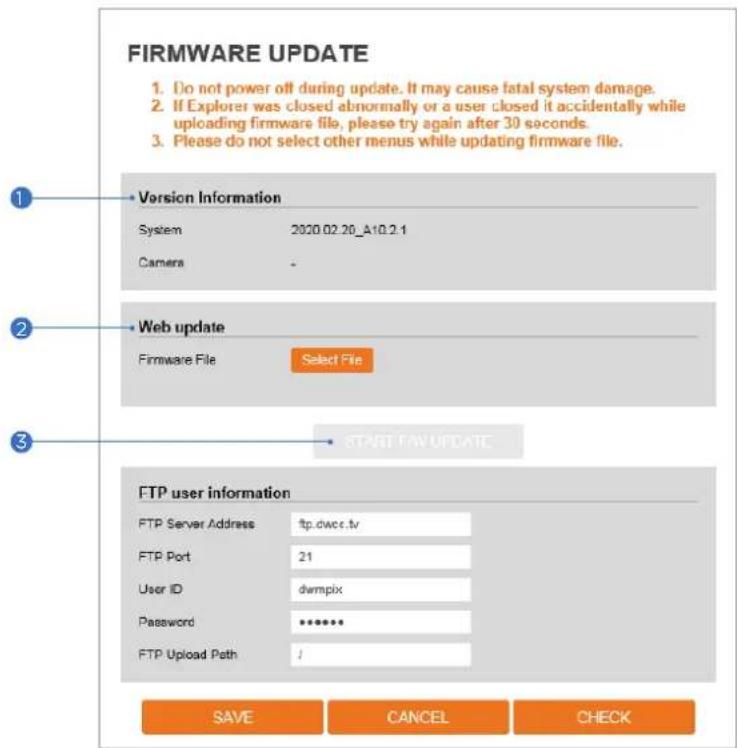
FIRMWARE UPDATE 1. Do not power off during update. It may cause fatal system damage. 2. If Explorer was closed abnormally or a user closed it accidentally while uploading firmware file, please try again after 30 seconds. 3. Please do not select other menus while updating firmware file. 1 • Version Information System 2020.02.20_A10.2.1 Camera - 2 • Web update Firmware File Select File 3 • START FAN UPDATE FTP user information FTP Server Address ftp.dwc.c.tv FTP Port 21 User ID dwmpix Password ••••••• FTP Upload Path / SAVE CANCEL CHECK① Version Information - It shows the current Firmware Version in the system.
② Web Update - Select the Firmware file in your computer by clicking the [Select file] button.
3 Start F / W Update - Click this button to start the update. Progress of uploading will be displayed using Progress Bar. If you assign the wrong file name, an error message will be shown.
Warning:
-
Do not turn off the power to the camera during the firmware update. Interrupting the update may cause the system to become unstable. Once the update is completed, the system will reboot automatically.
-
Make sure to check the 'Notice' shown on screen. If the firmware update is completed successfully, the camera will reboot and show the login window.
Setup - System Setup Date & Time Settings
text_image
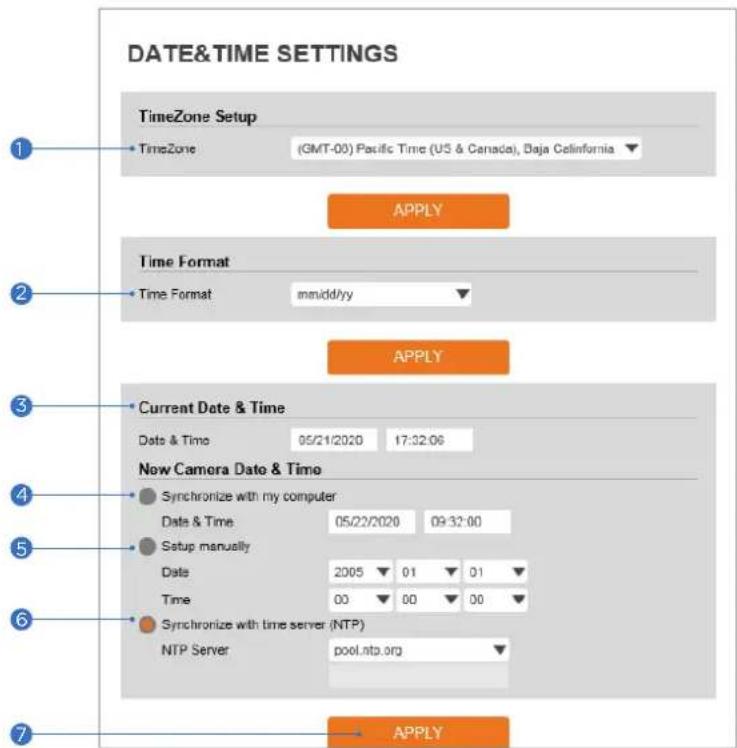
DATE&TIME SETTINGS 1 TimeZone Setup • TimeZone (GMT-00) Pacific Time (US & Canada), Daja Celiniformia ▼ APPLY 2 Time Format • Time Format mnidd/yy ▼ APPLY 3 Current Date & Time Date & Time 05/21/2020 17:32:06 Now Camera Date & Time 4 • Synchronize with my computer Date & Time 05/22/2020 09:32:00 • Setup manually Date 2005 ▼ 01 ▼ 01 ▼ Time 00 ▼ 00 ▼ 00 ▼ 6 • Synchronize with time server (NTP) NTP Server pool.ntp.org ▼ 7 APPLY1 TimeZone Setup - Choose the time zone for the camera. It will be activated after clicking the 'Apply' button.
Before setting below 'New Camera Date and Time', set the correct time zone first.
2 Time Format - Select the time format yy-mm-dd or mm/dd/yy.
3 Current Date and Time - Shows the current date and time setting in the Camera.
4 Synchronize with my computer - Set the date/time using those of PC currently connected.
5 Setup manually - Set the date/time by typing manually.
⑥ Synchronize with time server Time Zone (NTP) - Choose time server available to connect to the current camera. Date and Time will be updated automatically every hour when connected.
7 Click 'Apply' to save all settings.
text_image
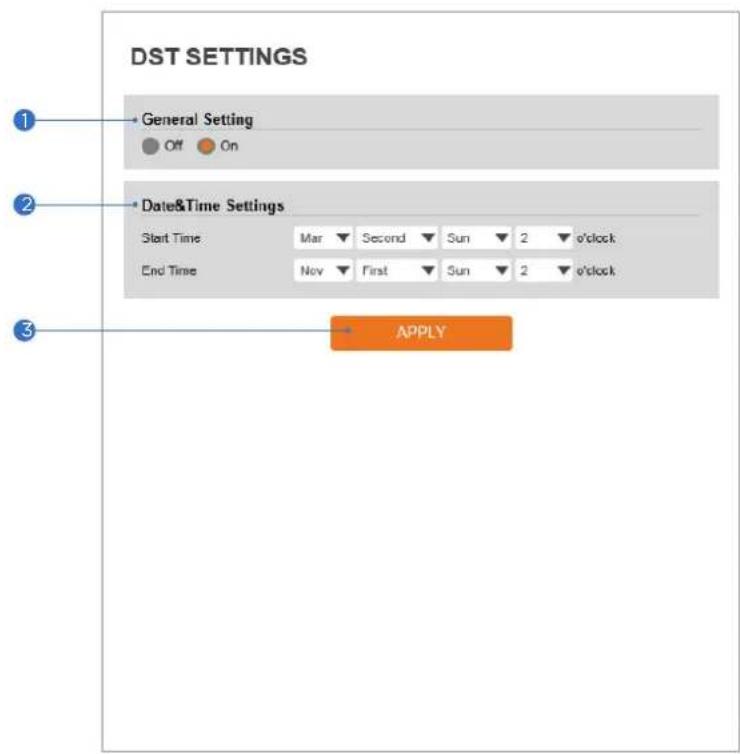
DST SETTINGS General Setting Off On Date&Time Settings Start Time Mar Second Sun 2 o'clock End Time Nov First Sun 2 o'clock APPLYDaylight Saving Time (DST) is the practice of setting the clocks forward one hour from standard time during the summer months, and back again in the fall, to make better use of natural daylight.
1 General Setting - Enable or disable the DST function.
② Date and Time Settings - Set the start time and end time that the DST applies.
3 Click 'Apply' to save all settings.
Setup - System Setup
Users Management
text_image
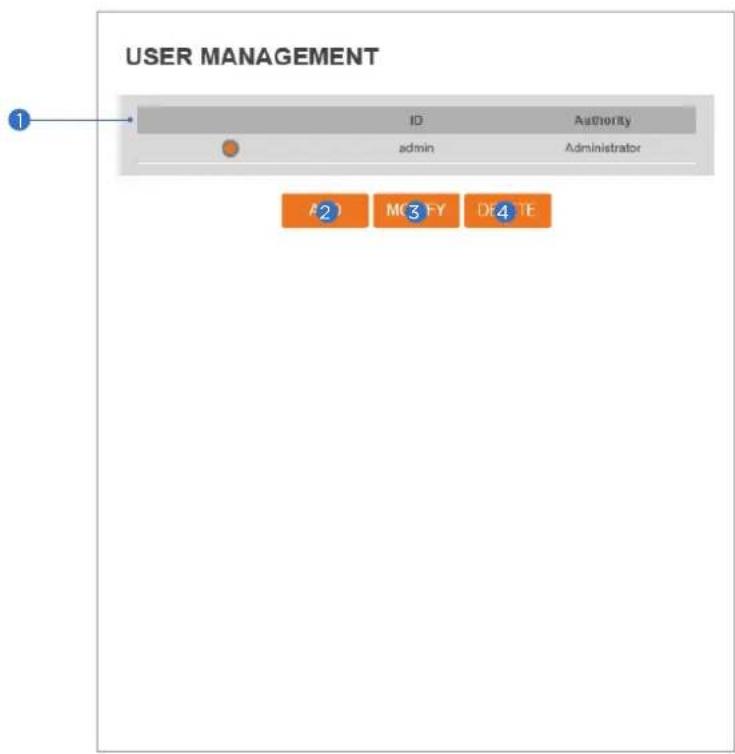
USER MANAGEMENT ID Authority admin Administrator A2 MC3-FY DE4E1 Users - List all the user accounts for authentication.
② Add - Register a new user.
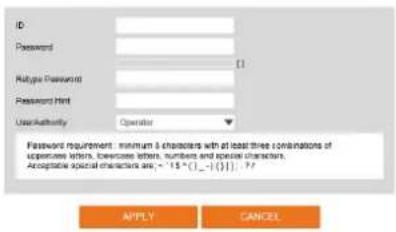
| ID | Enter a new user ID. Admin already exists. |
| Password | Enter the user password. (Check the password) |
| Retype Password | Enter the user password again for verification. |
| Password Hint | Enter the password hint. |
| User Authority | Select Operator or Viewer.Viewer: Only monitoring is allowed.Operator: Most of the functions are allowed except 'Setup'. |
text_image
ID Password Password Password Name User-Authority Operator Password requirement: minimum 3 characters with at least three combinations of up-to-date letters, lower-to-date letters, numbers and special characters. Acceptable special characters are: ~15°(—)–(•): ?/ APPLY CANCELThe ID and Password are limited to 8 characters with at least two combinations of uppercase letters, lowercase letters, numbers and special characters.
Acceptable special characters are: \~'! \$ ^ () _ - {} [ ]; ? /
Click 'Save' to save all settings.
Click 'Cancel' to return to the previous menu.
3 Modify - Modify the information of the user accounts registered. For the admin account, only the password can be modified.
4 Delete - Delete the selected user account. The admin account cannot be deleted.
Setup - System Setup
System Log
text_image
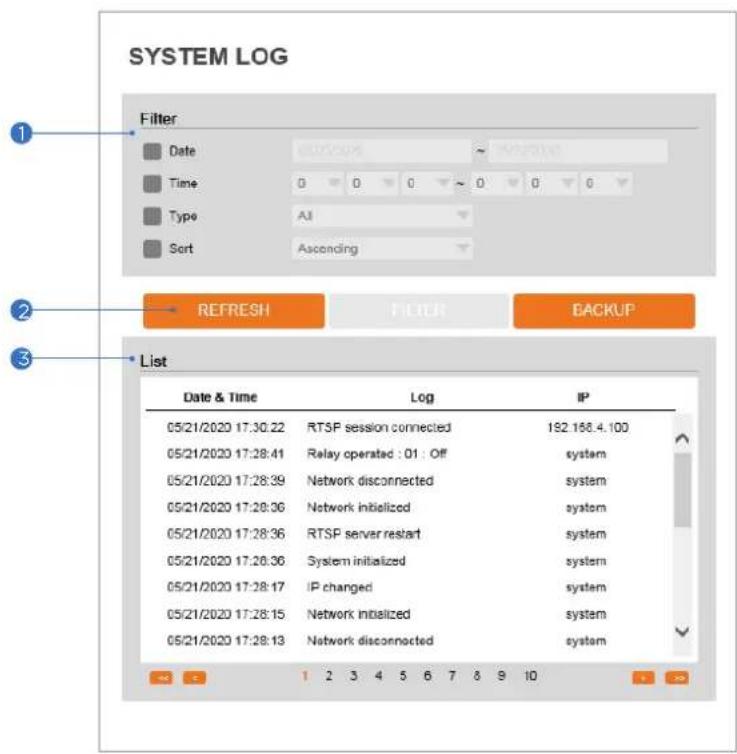
SYSTEM LOG Filter Date Time Type Sort 0 0 0 0 0 0 AI Ascending REFRESH FILTER BACKUP List Date & Time Log IP 05/21/2020 17:30:22 RTSP session connected 182.168.4.100 05/21/2020 17:28:41 Relay operated : 01 : Off system 05/21/2020 17:28:39 Network disconnected system 05/21/2020 17:28:36 Network initialized system 05/21/2020 17:28:36 RTSP server restart system 05/21/2020 17:28:36 System initialized system 05/21/2020 17:28:17 IP changed system 05/21/2020 17:28:15 Network initialized system 05/21/2020 17:28:13 Network disconnected system1 Filter - Select a date, time, sort, or type of log to filter the log.
② Click the 'Refresh' button to refresh the log list.
Click 'Filter' to view the filtered log.
Click 'Backup' to back up the filtered log.
3 System Log List - The filtered log is displayed.
Setup - System Setup
Factory Reset
text_image
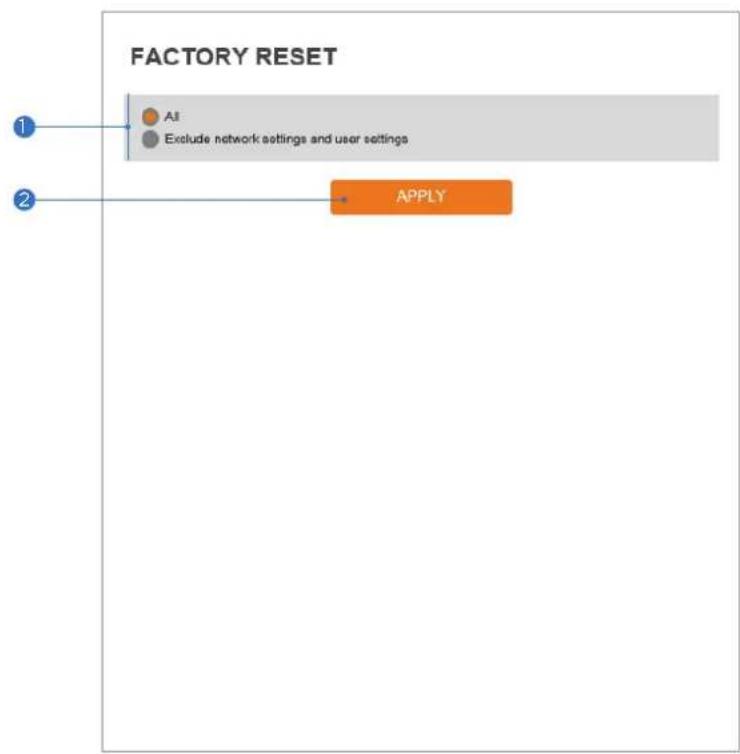
FACTORY RESET 1 All Exclude network settings and user settings 2 APPLY1 Reset to the factory defaults - Return the setup to the factory default.
All - Reset all Settings to the factory defaults.
Except Network Settings and User Settings - Reset all camera settings to factory default except for the network settings.
② Click 'Apply' to save all settings.
text_image
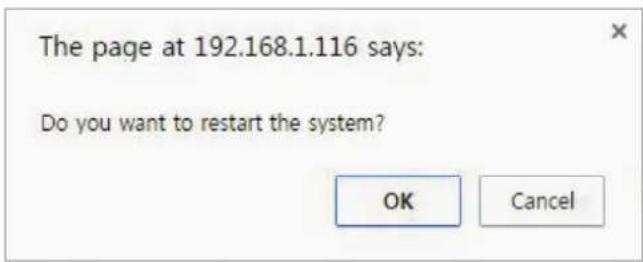
The page at 192.168.1.116 says: Do you want to restart the system? OK CancelIf you click the 'RESTART' menu, a message box will be shown to confirm. Click the 'OK' button to restart.
SYSTEM OPEN SOURCE LICENSE
| Open Source Name | Version | License |
| busybocx | 1.24.1 | GPLv2 |
| alao-ib | 1.1.2 | GPLv2.1 |
| libqlib2 | 2.47.1 | LGPLv2 |
| libgnutis | 3.4.11 | LGPLv2.1 |
| libjson-c | 0.11-20140402 | JSON License |
| libcurl | 7.50.1 | MIT/X derivate License |
| libfl | 3.1 | MIT License |
| libgcrypt | 1.6.1 | LGPLv2.1 |
| libnl | 3.2.24 | LGPLv2.1 |
| libogg | 1.3.1 | BSD-style License |
| libsamplerata | 0.1.8 | GPLv2 |
| libselinux | 2.3 | Public domain |
| libsndtle | 1.0.25 | LGPLv2.1 |
| libssh2 | 1.6.0 | BSD |
| libtasn1 | 4.8 | GPLv3 |
This menu will show you all the list of System Open Source License in the camera.
Open Source Name / Version / License.
Follow the steps below to complete the initial network setup.
Do not power on the IP camera until instructed.
i Temporarily disable any proxy servers configured in Internet Explorer.
If connecting the IP camera directly to a modem, power down and reset the modem. Leave the modem powered down until the camera's configuration is complete and the IP Camera has been connected to the modem.
1 Connect the IP camera to the configured network.
2 Open the DW IP Finder on a PC on the same network as the camera and search for the camera.
If you have a DHCP server, it will automatically set the camera's IP address and network settings.
i If you do not have a DHCP server, the camera's IP address is set by default to 192.168.1.80 after one minute In this case, the PC's IP address must be changed to match the camera's IP address settings to be able to access the camera.
3 If multiple cameras are added at the same time, each camera can be identified by its mac address.
4 Click on the camera's IP address and connect to the web page.
⑤ Default ID/password are both: admin.
⑥ Familiarize yourself with the viewer interface.
⑦ Install VLC to display live video.
8 The camera's IP address settings can be set to 'STATIC' from the DW IP Finder or the camera's web viewer by going to Setup -> Network -> Network Settings.
9 If the IP camera is connected to a network with a router, you must have port forwarding configured on your router to access the camera from outside the network.
After configuring port forwarding on your router (if necessary), access your IP camera by opening Internet Explorer and typing the IP address and web port assigned to the IP camera.
Example: http://192.168.0.200:8888
If your web port is 80, you do not need to specify the port in the address bar to access to your IP camera.
Access your IP Camera via the Internet (from a different network from the one your camera is):
If you use a static IP address assigned by your ISP:
- Open Internet Explorer.
- Type the address of the IP camera.
- If you use a router, enter the routers' static IP and the web port number of the IP camera.
If you have a dynamic address provided by your ISP
- Open Internet Explorer and go to your DDNS website.
- Register the IP camera.
- Reboot the IP camera.
- Give the DDNS server 10 minutes to locate your IP camera's IP information.
- Click the refresh button in Internet Explorer.
- After your camera is connected, select your camera.
If you have a DYNAMIC IP service from your Internet Service Provider (ISP), you cannot tell the current IP address of the IP Camera.
To solve this problem, you must register with our DDNS service.
First, you must check if you are using dynamic addressing. If so, register your IP Video Server on our DDNS website before you configure, setup, or install the IP Camera.
Even though your IP is not dynamic, you will benefit by registering your device with a DDNS service. In this case, just remember 'hostname.dyndns.com/gate1' instead of a complicated series of numbers like http://201.23.4.76:8078.
For more details, contact our Support Center.
To use a public DDNS called 'DynDNS' or 'no-IP', refer to the detailed information on how to use the service. (Visit: http://www.dyndns.com or http://www.no-ip.com)
Network Setup -
Guide to the Network Environment
Please configure the IP Camera at the installation site. You must determine your network scenario to configure the IP Camera with the proper TCP/IP settings.
This tutorial will guide you through the process. Before actually configuring the IP Camera, determine settings to be applied. Record those settings to be used to configure your IP Camera for reference.
When configuring your IP Camera, treat the IP Camera as another PC on your network. You will assign it to several addresses and other TCP/IP properties to match your current network.
This step-by-step tutorial will teach what IP addresses and network configurations should be assigned based on the network scenario.
Before you begin, locate any information and settings received from your Internet Service Provider (ISP). You may need to refer to these IP addresses at a later time during the configuration.
| Current TCP/IP Settings | |
| IP Address | |
| Subnet Mask | |
| Default Gateway | |
| Primary DNS Server | |
| Secondary DNS Server (Option) | |
Static □ Dynamic □
If you were not given any IP addresses or the ISP was responsible for the setup and installation of your Internet connection, go to step 2.
If you are not using a router on your network, your 'Current TCP/IP Settings' (from the previous section) and 'Assigned IP Addresses from My ISP' will be exactly the same.
② You must determine whether the IP address is STATIC or DYNAMIC. Contact your ISP to get a STATIC IP address for the camera.
3 Configure your IP Camera's TCP/IP settings for network connectivity by selecting Setup from the main interface and selecting TCP/IP located on the left of the setup screen.
4 If prompted for ID and password, use 'admin' for both entries. The default web port number is 80. If port 80 is blocked by the ISP, use a value between 1025 \~ 60000. If TCP port 80 is blocked, contact your ISP.
5 The following descriptions are several basic network scenarios. Determine which scenario describes your network. If your network does not match one of the scenarios below and you are unsure how to setup your IP camera, contact your network administrator.
You cannot control the rectangular gray areas and only the ISP has access to the devices.
Case A: Dynamic IP + Personal Router [Most SOHO]
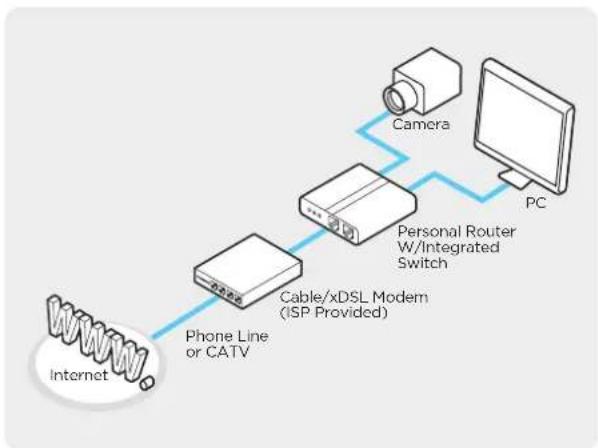
flowchart
graph LR
    A["Internet"] --> B["Phone Line or CATV"]
    B --> C["Cable/xDSL Modem (ISP Provided)"]
    C --> D["Personal Router W/Integrated Switch"]
    D --> E["PC"]
    E --> F["Camera"]
Case B: Static(Fixed) IP + Personal Router [Efficient]
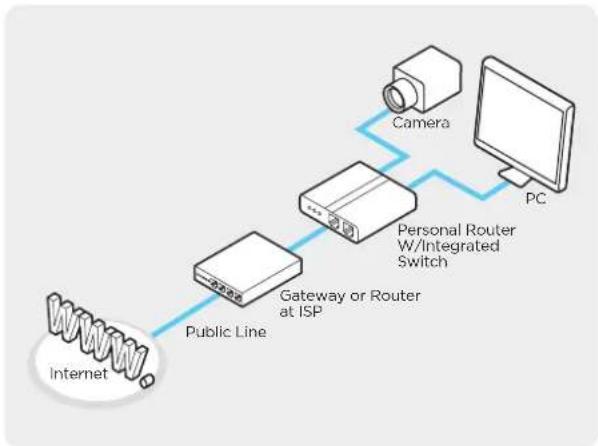
flowchart
graph LR
    A["Internet"] --> B["Public Line"]
    B --> C["Gateway or Router at ISP"]
    C --> D["Personal Router W/Integrated Switch"]
    D --> E["PC"]
    E --> F["Camera"]
Configure your IP Camera's TCP/IP properties:
1 Network Type: STATIC (even though you have Dynamic IP from your ISP, use STATIC on the IP camera).
② Internet Address: A private IP address such as 192.168.0.200 (example)
You need to assign an IP address to the IP Camera just as you do with PC.
The IP address you assign must be unique to your network and match your network as well.
For information on how to choose a unique IP and match your network, read the FAQ.
The IP address you assign must be a private IP. For information on how to choose a private IP please, read the FAQ.
3 Subnet Mask: 255.255.255.0 (example)
i You must use the same subnet mask as the one you noted under 'Current TCP/IP Settings'.
4 Default Gateway: 192.168.0.1 (example)
This IP address must be the IP address of your router. (private or LAN side)
Use the same Default Gateway you noted under 'Current TCP/IP Settings'.
5 Preferred DNS Server: Use the 1st DNS Server from 'Assigned IP Address from My ISP'.
If you did not receive any IP addresses from your ISP, contact the ISP and acquire the IP address of their DNS server.
6 DDNS Server: Use the DDNS server.
This is the same site you will register later to accommodate dynamic IP from your ISP.
7 Web Port: 8888
Do not use the default port 80 as this number must be changed.
1 Select a number between 1025 - 60000.
Case C:
Static(Fixed) IP
[Dedicated line directly to the IP Camera]
![Digital Watchdog MegaPix DWC-MB75WI4T - [Dedicated line directly to the IP Camera] - 1](/content/2026/05/819965/images/e11c070ae39299203e1be0bde08fd2ecfe91dec11e4f05f4cb5b79ce3ae365e7.jpg)
flowchart
graph LR
    A["Internet"] -->|Phone Line or CATV| B["Cable/xDSL Modem (ISP Provided)"]
    B --> C["Camera"]
Configure your IP Camera's TCP/IP properties:
1 Network Type: STATIC
2 Internet Address: A static IP address received from your ISP such as 24.107.88.125 (example)
You need to assign an IP address to the IP Camera just as you do with PC.
3 Subnet Mask: Subnet mask assigned from your ISP such as 255.255.255.240 (example)
4 Default Gateway: 24.107.88.113 (example)
Use the assigned default gateway from your ISP.
⑤ Preferred DNS Server: Use the 1st DNS Server from 'Assigned IP Address from My ISP'
If you have not received any IP addresses from your ISP, contact them to acquire the IP address of their DNS server.
6 DDNS Server: Use the DDNS server
This is the same site you will register later to utilize our DDNS service.
7 Web Port: 80
i Select a number between 1025 - 60000.
Case D:
Dynamic IP + DSL/Cable Modem [Connected directly to the IP Camera]
![Digital Watchdog MegaPix DWC-MB75WI4T - Dynamic IP + DSL/Cable Modem [Connected directly to the IP Camera] - 1](/content/2026/05/819965/images/2da202fd1b6e769eafb9751f7d1df6fae516dfe215e6512b292ab8973e6a1a1e.jpg)
flowchart
graph LR
    A["Internet"] -->|Public Line| B["Gateway or Router at ISP"]
    B --> C["Camera"]
To connect the IP Camera directly to a modem, power down and reset the modem. Leave the modem powered down until the IP camera's setup is completed and the IP camera has been connected to the modem. Then power on the modem, followed by the IP camera.
Configure your IP Camera's TCP/IP properties:
1 Network Type: DYNAMIC
2 DDNS Server: Use the DDNS server
This is the same site you will register later to accommodate dynamic IP from your ISP.
3 Web Port: 80
i Select a number between 1025 - 60000.
Network Setup - Port Forwarding
After entering the correct TCP/IP settings, you are ready for 'Port Forwarding' (Cases A, B).
1 Use the table below to note your camera's TCP/IP settings for future reference. You may need this information to access your IP Camera and to configure 'port forwarding'.
| IP camera TCP/IP settings | |
| IP address | |
| Subnet mask | |
| Default gateway | |
| Preferred DNS server | |
| DDNS server | |
| Web port | |
2 After clicking 'Apply', the system will prompt for a reboot. Please allow the system 50 seconds to reboot and accept the changes. After 50 seconds, close the configuration screen. The view will display 'Trying to Reconnect'. If the ACTIVE light on the IP Camera has gone off and is now back on again flashing, the IP Camera has rebooted. After the system reboots completely, remove the power supply from the unit and close Internet Explorer.
3 Return your PC/Laptop TCP/IP properties to their original settings.
4 Before installing the IP camera, you must perform port forwarding on your router (Cases A, B). You will need to forward 1 port:
- Web Port: All the ports will be forwarded to the IP address you assigned to the IP Camera. In the example above, you would forward:
· 8888 > 192.168.0.200
After forwarding correctly the Web Port, through your router (if applicable), install the IP Camera in a proper location.
1 Locate the serial number located on the label attached to the bottom of the IP camera, you will need this for DDNS registration.
2 Connect the IP Camera to your router or cable/DSL modem (per your network scenario) via a Cat5/5e UTP Ethernet network cable.
3 Supply power to the IP camera.
4 After 1 minute, verify the IP camera indicators: · LINK: Flickering/Solid
5 After configuring port forwarding on your computer (if necessary), access your IP camera on your local network by opening Internet Explorer and specifying the IP address and web port assigned to the IP camera.
Examples: http://192.168.0.200:8888 or http://24.106.88.123
If you left your web port as 80, you do not need to specify the port in the address bar to access the IP camera.
6 Access your IP camera via the Internet :
If you use cases B, C:
- Open Internet Explorer.
- Type the address of the IP camera.
- If you use a router, enter the routers' static IP and the web port number of the IP camera.
If you use cases A, D:
- Open Internet Explorer and go to your DDNS website.
- Register the IP camera.
- Reboot the IP camera.
- Give the DDNS server 10 minutes to locate your IP camera's IP information.
- Click the refresh button in Internet Explorer.
- After your camera is connected, select your camera.
The difference between B and C is that B needs to set the port forwarding.
① Since the type of DDNS differs from the service type, refer to the related service site.
1. My POWER light is not on?
Power is not being supplied to the unit. Please use the power supply shipped with the unit and verify that a power source is active from the attached power outlet used to connect the adapter. You can test this by plugging in any other electrical device and verify its operation. After using the power supply shipped with the product, check the power source, and reinserting the power connector into the IP Camera, please call our Support Center. The power supply may be defective.
2. My ACTIVE light is not flashing?
Verify the power supply to the unit. Power off the unit and back on again, wait 1 minute, if the ACTIVE light still does not begin to flash, you will have to set the unit to its factory default (THIS WILL DELETE ANY CONFIGURATION AND SET THE UNIT TO THE FACTORY DEFAULTS). Power on the unit and insert the end of a paper clip into the small recessed opening on the back of the unit. Use the clip to press the button located within that opening.
3. My LINK light is not flashing or solid?
Verify the cable connection. 99% of the time the cable's connection to the unit is causing this problem. Try using a different network cable or crossover cable (for PC connection only). Try reinserting the cable, if this still doesn't solve the problem call our Support Center.
4. I can access the video server on my LAN, but not from the Internet.
Verify that your router (if applicable) has port forwarding properly configured. If accessing from our DDNS service, verify the correct serial number. Firewall issues may prevent user access.
5. How do I open an MS-DOS or Command Prompt?
Start > (All) Programs > Accessories > Command Prompt
6. How do I find out my IP address information if my settings were automatically detected?
1) Open a Command Prompt
2) At the prompt type - "ipconfig / all" (without the quotes)
3) Near the end of the information supplied, should be your current IP address, subnet mask, default gateway and DNS servers
7. I can't connect!!
In the case of a connection failure.
Modem Reboot > Modem Reboot Finished > Router
Reboot > Router Reboot Finished > IP Camera Reboot
IP Camera Reboot Finish > Verify DDNS and IP Camera connection, if applicable.
8. How do I "PING" an IP address?
1) Open an MS-DOS (or Command) prompt
2) At the prompt type - "ping xxx.xxx.xxx.xxx" (without the quotes and replace the "x" s with an IP address)
3) Press Enter
9. I'm accessing my video server remotely over the Internet and the video stream is choppy, is this normal?
Yes. The frames per second received remotely are determined by your bandwidth capabilities both at your site where the IP Camera is installed and your remote location. The lower of the two sites will determine how fast your video stream is received. It is recommended to have at least a 256Kb/sec upstream connection from the site where the IP Camera is installed. Lower speeds will operate properly but provide poor remote performance. The Faster the Internet connection at both ends, the faster the video stream.
10. How do I enable or check VLC on my browser
Internet Explorer
Open Internet Explorer > Tools on the menu bar > Internet Options > Security Tab > Custom Level > Scroll down and verify that you are prompted or have enabled plug-ins to be downloaded and executed. > click OK > restart browser.
Chrome
Open Chrome > Chrome menu settings > Advanced settings > Individual information - content settings > Run automatically
11. How do I reset the unit to factory defaults?
Refer to the previous functions page and find the reset button. Power ON the unit and use a paper clip to push the reset button within that opening. You should then see the ACTIVE light turn off and after a few seconds, the ACTIVE light will begin to flash, signifying a successful reboot. If the ACTIVE light does not turn off after depressing the reset button, please try holding the button in for a few seconds and releasing it. YOU WILL LOSE ALL DATA THAT HAD BEEN ENTERED PREVIOUSLY AND THE IP CAMERA WILL BE SET TO ITS FACTORY RESETS.
Unit: inches (mm)
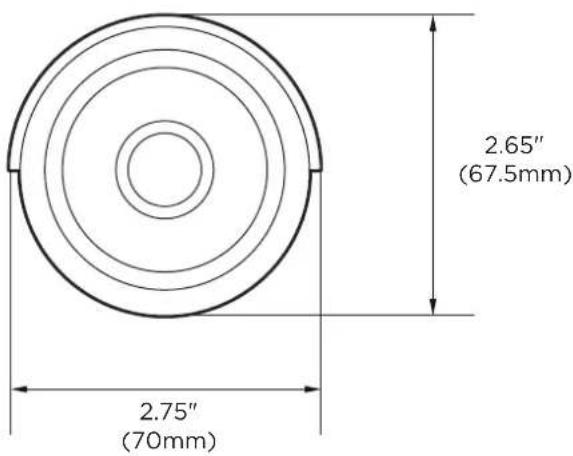
text_image
2.65" (67.5mm) 2.75" (70mm)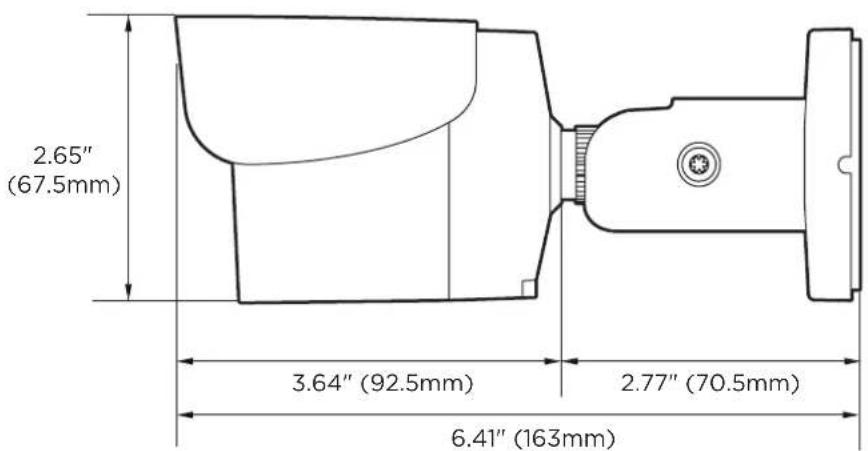
text_image
2.65" (67.5mm) 3.64" (92.5mm) 2.77" (70.5mm) 6.41" (163mm)Specification - Spec.
| CAMERA | |
| Image Sensor 1/2.8" | 5MP CMOS |
| Total Pixels 2592(H) X 1944(V) | |
| Focal Length 4.0mm, F2.0 | |
| Field Angle D: 106.6°, H: 82.3°, V: 58.8° | |
| Shutter Speed | Auto / manual (1/15 ~ 1/32000), anti-flicker, slow shutter(off, 2X, 3X, 5X, 6X, 7.5X, 10X) |
| MIN. Illumination 0.16 lux, 0 lux with IR (F2.0) | |
| IR H2IR, 100ft | |
| Day and Night TDN | (True day and night) |
| WDR WDR (DOL) | |
| DNR 3D-DNR | |
| Privacy Zone 16 programmable zones | |
| AGC Auto | |
| Other Image Processing | Configurable exposure, white balance, sharpness |
| ENCODER (VIDEO AND AUDIO) | |
| Video Compression | H.265, H.264, MJPEG |
| H.264 Profile MP / | HP |
| H.265 Profile MP | |
| Multiple Profile Streaming Performance | H.265: 2592x1944, 2304x1296, 2.1MP/1080p, 720p, VGA, D1, CIF H.264: 2592x1944, 2304x1296, 2.1MP/1080p, 720p, VGA, D1, CIF MJPEG: 2.1MP/1080p, 720p, 800x600, VGA, 768x432, D1, CIF |
| Video Bitrate | 100kbps ~ 10Mbps, multi-rate for preview and recording |
| Bitrate Control | Multi-streaming CBR/VBR at H.264, H.265 (controllable frame rate and bandwidth) |
| Edge Storage Micro | SD card (SD/SDHC/SDXC) |
| I/O AND EVENT | |
| Audio In/Out N/A | |
| Alarm In/Out N/A | |
| Video Output(2nd Video Out) | N/A |
| Event Notification | FTP, E-mail, SD card |
| SECURITY AND NETWORK | |
| Network Protocol | IPv4: TCP/IP / UDP / AutoIP / RTP(UDP/TCP) / RTSP / NTP / HTTP / HTTPS / SSL / DNS / DDNS / DHCP / FTP / SMTP / ICMP / SNMPv1/v2/v3(MIB-2) / ONVIF |
| Security | HTTPS (TLS), IP filtering, 802.1x, digest authentication (ID/PW) |
| Plugin | CGI API, ONVIF |
| GENERAL | |
| Support Languages | English, Korean, Japanese |
| Power | (Adaptor is not Included)DC12V: max 6.5WPOE IEEE 802.3af Class3: max 8.3W |
| Temperature | -4°F ~ 122°F (-20°C ~ 50°C) |
| Material | Aluminum die-casting |
| Densions (WXDXH) | 6.41" x 2.65" (163 x 67.5 mm) |
| Weight | 1.1 lbs (0.5kg) |
| Certification | FCC, CE, ROHS, IP67 |
Digital Watchdog (referred to as “the Warrantor”) warrants the Camera against defects in materials or workmanship as follows:
Labor: For the initial five (5) years from the date of the original purchase if the camera is determined to be defective, the Warrantor will repair or replace the unit a with new or refurbished product at its option, at no charge.
Parts: In addition, the Warrantor will supply replacement parts for the initial two (2) years.
To obtain warranty or out of warranty service, please contact a technical support representative at 1+ (866) 446-3595, Monday through Friday from 9:00 AM to 8:00 PM EST.
A purchase receipt or other proof of the date of the original purchase is required before warranty service is rendered. This warranty only covers failures due to defects in materials and workmanship which arise during normal use. This warranty does not cover damages which occurs in shipment or failures which are caused by products not supplied by the Warrantor or failures which result from accident, misuse, abuse, neglect, mishandling, misapplication, alteration, modification, faulty installation, setup adjustments, improper antenna, inadequate signal pickup, maladjustments of consumer controls, improper operation, power line surge, improper voltage supply, lightning damage, rental use of the product or service by anyone other than an authorized repair facility or damage that is attributable to acts of God.
There are no express warranties except as listed above. The Warrantor will not be liable for incidental or consequential damages (including without limitation, damage to recording media) resulting from the use of these products, or arising out of any breach of the warranty. All express and implied warranties, including the warranties of merchantability and fitness for a particular purpose, are limited to the applicable warranty period set forth above.
Some states do not allow the exclusion or limitation of incidental or consequential damages or limitations on how long an implied warranty lasts, so the above exclusions or limitations may not apply to you. This warranty gives you specific legal rights, and you may also have other rights from vary from state to state.
If the problem is not handled to your satisfaction, then write to the following address:
Digital Watchdog, Inc.
ATTN: RMA Department
16220 Bloomfield Ave
Cerritos, CA 90703
Service calls which do not involve defective materials or workmanship as determined by the Warrantor, in its sole discretion, are not covered. Cost of such service calls are the responsibility of the purchaser.
DW
DIGITAL WATCHDOG®
Complete Surveillance Solutions
DW® East Coast office and warehouse: 5436 W Crenshaw St, Tampa, FL USA 33634 DW® West Coast office and warehouse: 16220 Bloomfield Ave, Cerritos, CA USA 90703
PH: 866-446-3595 | FAX: 813-888-9262
www.Digital-Watchdog.com
technicalsupport@dwcc.tv
Technical Support PH:
USA & Canada 1+ 866-446-3595
International 1+813-888-9555
French Canadian: + 1-904-999-1309
Technical Support Hours: Monday-Friday 9 a.m. to 8 p.m. Eastern Time