
FLE 1416 W - Washing machine ZANUSSI - Free user manual and instructions
Find the device manual for free FLE 1416 W ZANUSSI in PDF.


User questions about FLE 1416 W ZANUSSI
0 question about this device. Answer the ones you know or ask your own.
Ask a new question about this device
Download the instructions for your Washing machine in PDF format for free! Find your manual FLE 1416 W - ZANUSSI and take your electronic device back in hand. On this page are published all the documents necessary for the use of your device. FLE 1416 W by ZANUSSI.
USER MANUAL FLE 1416 W ZANUSSI
natural_image
Line drawing of a white front-loading washing machine with a circular vent and control panel (no text or symbols)
Important Safety Information
It is most important that this instruction book should be retained with the appliance for future reference. Should the appliance be sold or transferred to another owner, or should you move house and leave the appliance, always ensure that the book is supplied with the appliance in order that the new owner can get to know the functioning of the appliance and the relevant warnings.
These warnings have been provided in the interest of safety. You MUST read them carefully before installing or using the appliance.
Installation
- This appliance is heavy. Care should be taken when moving it.
- It is dangerous to alter the specifications or attempt to modify this product in any way.
- All packing and transit bolts must be removed before use. Serious damage can occur to the product and to property if this is not adhered to. See relevant section in instructions.
- Any plumbing work required to install this appliance should be carried out by a qualified plumber or competent person.
- Any electrical work required to install this appliance should be carried out by a qualified electrician or competent person.
- Care must be taken to ensure that the appliance does not stand on the electrical supply cable.
- If the machine is situated on a carpeted floor, please adjust the feet in order to allow air to circulate freely.
Child Safety
- This appliance is designed to be operated by adults. Children should not be allowed to tamper with the controls or play with the product.
- Pets and children have been known to climb into washing machines. Please check your drum before use.
- The glass door becomes very hot during the washing cycle. Keep children away from the vicinity of the appliance whilst it is in operation.
- Keep all packaging well away from children.
- Keep all detergents in a safe place out of children's reach.
Use
- Always unplug the appliance and turn off the water supply after use.
- Do not overload the appliance. See relevant section in the instruction book.
- Only wash fabrics which are designed to be machine washed. If in doubt, consult the care label on the clothes.
- Before washing, ensure that all pockets are empty and buttons and zips are fastened. Avoid washing frayed or torn articles and treat stains such as paint, ink, rust, and grass before washing. Underwired bras must NOT be machine washed.
- Any objects such as coins, safety pins, nails, screws, stones or any other hard, sharp material can cause extensive damage and must not be placed into the machine.
- Garments which have been in contact with volatile petroleum products should not be machine washed. If volatile cleaning fluids are used, care should be taken to ensure that the fluid is removed from the garment before placing in the machine.
- Wash small items such as socks, laces, washable belts etc in a washing bag or pillow case as it is possible for such items to slip down between the tub and the inner drum.
- Only use the advised quantities of fabric softener. Damage to the fabric can ensue if you over-fill. Refer to the manufacturer's recommendations of quantities.
- As some duvets and eiderdowns should be washed in large commercial machines because of their bulk, please check with the manufacturer of the item before washing in a domestic machine.
- Leave the porthole door slightly ajar between washes to preserve the door seal.
- Under no circumstances should you attempt to repair the machine yourself. Repairs carried out by inexperienced persons may cause injury or serious malfunctioning. Contact your local Zanussi Service Force Centre. Always insist on genuine Zanussi spare parts.
Contents
For the User
Important Safety Information 2
Your New Washing Machine 4
Description of the Appliance 5
Door locked light 5
Detergent dispenser drawer 5
Child safety feature 5
The Control Panel 6-8
Operating sequence 9-11
Load the laundry 9
Measure out the detergent 9
Measure out the fabric softener 9
Switch the machine on 9
Select the required programme/fabric 9
Select the temperature 9
Select the spin speed or the RINSE HOLD option 10
Select the desired options 10
Start the programme 10
How to change a programme during its cycle 10
How to cancel a programme during its cycle 11
How to open the door during the cycle of
a programme 11
End of programme 11
Washing Hints 12-13
Which detergent?.... 13
And in which form? 13
Wash Care Symbols 14
Washing Programmes 15
Maintenance and Cleaning 16-17
Descaling 16
After each wash 16
Maintenance Wash 16
External cleaning 16
Cleaning the dispenser drawer 16
Cleaning the drawer recess 16
Cleaning the filter 16
The dangers of freezing 17
Something Not Working 18-19
Service and Spare Parts 19
Guarantee Conditions 20
Zanussi Service Force 21-22
For the Installer
Installation Instructions 23
Technical Specifications 23
Unpacking 24
Positioning 24
Water inlet 24
Water drainage 25
Levelling 26
Special conditions 26
In the interest of the environment 26
Electrical connection 27
Guide to use the Instruction Book
The following symbols will be found in the text to guide you throughout the instructions:
⚠️ Safety instructions
i Hints and tips
Environmental information
i Your New Washing Machine
Your new washing machine meets all modern requirements for effective treatment of laundry with low water, energy and detergent consumption.
- Automatic cooling of the wash water to 60^ C before draining, with the 90^ C programme. This reduces thermal shock to fabrics, helping to prevent creasing.
- The special wool programme with its new delicate wash system treats your woollens with extreme care.
- The anti-unbalance device ensures that the washing machine remains stable when spinning.

Ecological hints
To save water and energy and help protect the environment, we recommend that you follow these hints:
- Normally soiled laundry may be washed without prewashing in order to save detergent, water and time (the environment is protected too!).
- The machine works more economically if it is fully loaded.
- With adequate pre-treatment, stains and limited soiling can be removed; the laundry can then be washed at a lower temperature.
- Measure out detergent according to the water hardness, the degree of soiling and the quantity of laundry being washed.

In the interest of the environment
● Materials marked with the symbol recyclable.
- Check with your local Council or Environmental Health Office to see if there are facilities in your area for re-cycling this appliance.
- When the appliance is to be scrapped, cut off the power supply cable and make the door lock device unusable to prevent young children from being trapped inside.
- Help to keep your country tidy - use authorised disposal sites for your old appliance.

How do we help to protect the environment? We use recycled paper!
Important
Your machine is fitted with a balance control device, which ensures the machine is stable during the spin.
If the wash load appears not to have been spun sufficiently at the end of the wash cycle, because it is not evenly distributed in the drum, the balance control device may have operated. It will therefore be necessary to redistribute the wash load manually and select a spin programme. For more detailed information see the section headed “Something Not Working”.
Description of the Appliance
1 Detergent dispenser drawer
2 Control panel
3 Door locked light
4 Door opening handle
5 Filter
6 Adjustable feet
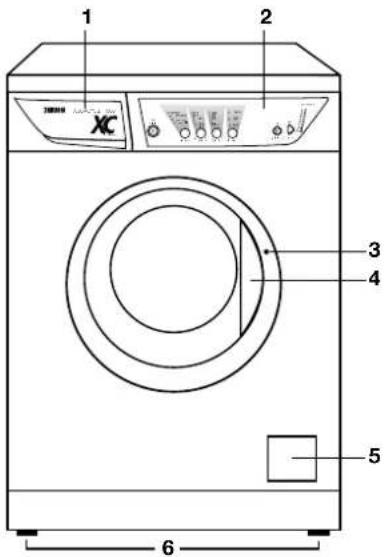
text_image
1 2 3 4 5 6Door locked light
It stays on during the whole programme indicating that the door is locked.
When the light goes out, the door can be opened (see page 11).
Detergent dispenser drawer

Prewash

Main wash

Fabric softener
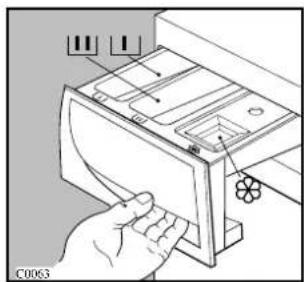
natural_image
Illustration of a hand inserting a device into a drawer with a flower symbol (no text or symbols present)The Control Panel
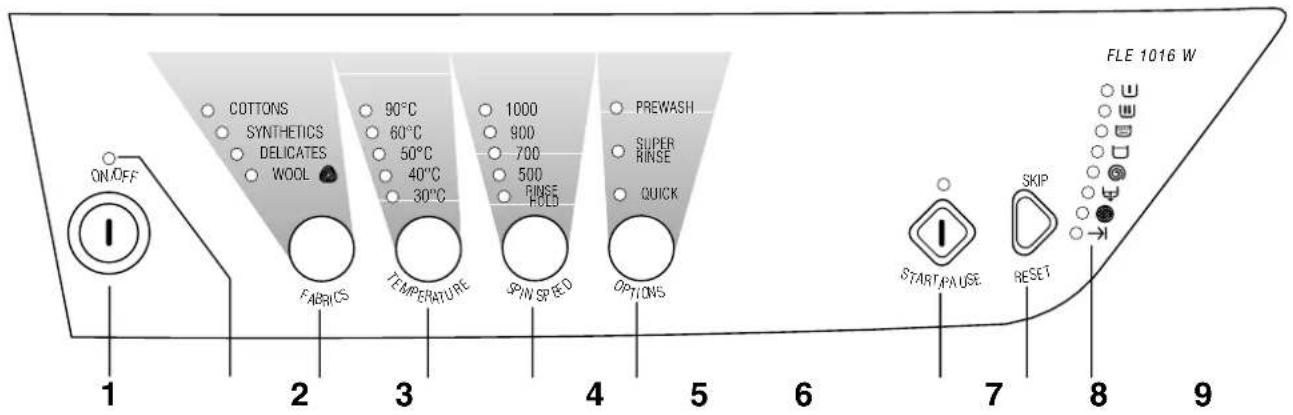
text_image
COTTONS SYNTHETICS DELICATES WOOL 90°C 60°C 50°C 40°C 30°C 1000 900 700 500 RINSE HOLD PREWASH SUPER RINSE QUICK FABRICS TEMPERATURE SPW SPEED OPTIONS 1 2 3 4 5 6 7 8 9 FLE 1016 W START/PAUSE SKIP RESETI ON/OFF button
Press this button to switch the washing machine on. Press the ON/OFF button again to switch the machine off.
2 MAINS-ON light
This light is connected to the ON/OFF button. It lights up when you press the button, and goes out when you press it again.
3 FABRICS button
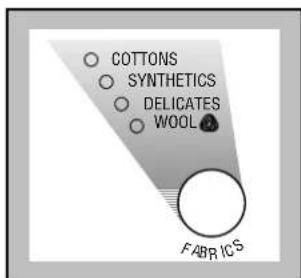
Press this button repeatedly to select the programme on the basis of the type of laundry to be washed. The light relevant to the selected programme will light up. The washing machine will propose a temperature and automatically select the maximum spin value provided for the programme you have chosen. You can change these values by operating buttons 4 and 5.
4 TEMPERATURE button
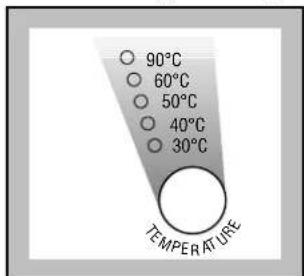
Press this button repeatedly to increase or decrease the temperature, if you want your laundry to be washed at a temperature different from the one proposed by the washing machine. The relevant light will light up. Maximum temperatures are 90°C for cotton, 60°C for synthetic fabrics, 40°C for delicate fabrics and wool.
i Important!
By pressing the TEMPERATURE and SPIN SPEED buttons simultaneously, the acoustic signal at the end of the cycle is deactivated.
By pressing these 2 buttons again the acoustic signal is reactivated.
5 SPIN SPEED button
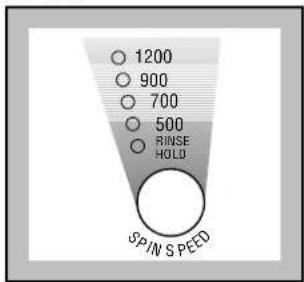
Press this button repeatedly to change the spin speed, if you want your laundry to be spun at a speed different from the one proposed by the washing machine. The relevant light will light up.
Maximum speeds are:
• for cotton: 1,400, 1,200, 1,100 or 1,000 rpm depending on the model;
• for synthetic fabrics and wool: 900 rpm;
• for delicate fabrics: 700 rpm.
RINSE HOLD position : when you choose this option, the machine will not drain the water of the last rinse, so as not to wrinkle the laundry.
At the end of the cycle, the START/PAUSE button light will flash and the light ☐ the programme phase indicator remains lit, to indicate that the water must be drained.
To complete the cycle, choose one of the following options:
- Draining and spin:
- Press the START/PAUSE button. The machine will drain the water, then spin the laundry at the maximum speed provided for the selected programme.
- Select spin speed by means of button 5, and press the START/PAUSE button.
- Drain only
- Press the SKIP/RESET button once, so as to cause the DRAIN light to light up, then press the START/PAUSE button.
Important! If you accidentally press the SKIP/RESET button more than once, the memory will be cleared. To cause the washing machine to drain the water, select any washing programme by means of the FABRIC button, then press SKIP/RESET three times in order to select the DRAIN position (only the DRAIN light will remain lit).
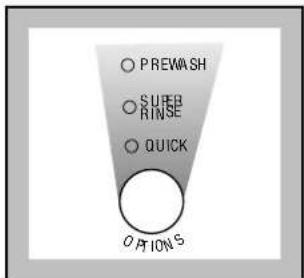
6 OPTIONS button
Press this button to select the following options:
- PREWASH: select this option if you wish your laundry to be prewashed before the main wash (not available for wool).
The prewash ends with a short spin at 650 rpm in programmes for cotton and synthetic fabrics, whereas in the programme for delicate fabrics the water is only drained.
- SUPER RINSE: this option can be selected with all programmes except the wool programme.
The machine performs 4 rinses instead of 3. This option is recommended for people who are allergic to detergents, and in areas where the water is very soft.
- QUICK WASH: for laundry that is only slightly soiled (not for wool).
The washing time will be reduced according to the type of fabric and the selected temperature.
The PREWASH and QUICK WASH options cannot be selected together.
7 START/PAUSE button
This button has three functions:
- Start: after you have selected the desired programme and options, press this button to start the washing machine. The light above the button will stop flashing and remain lit.
- Pause: when you press this button again, the programme in progress is interrupted. The light above the button will start flashing. To restart the programme, press the button again.
When you PAUSE the cycle, the DOOR LOCKED light goes out, and it becomes possible to open the door, provided
- the washing machine is not in the heating phase beyond 40^ ;
• the level of the water is not high;
• the drum is not turning.
Important! You must set the washing machine to PAUSE before you make any change in the programme in progress.
- Draining of water and spinning after the execution of programmes with the RINSE HOLD option.
8 SKIP/RESET button
This button performs two functions:
- Clears the memory
- Selects special programmes
At the end of every programme the RESET button must be pressed once or repeatedly to clear the programme memory. All the programme phase indicator lights must be off.
If the previous programme is not cleared, an audible signal will sound, when you switch the machine on.
Selecting a special programme:
A wash programme must be selected in the normal way. (START button not pressed)
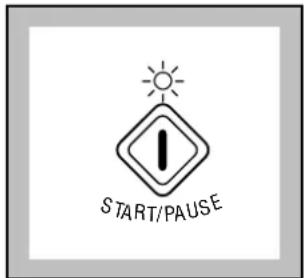
text_image
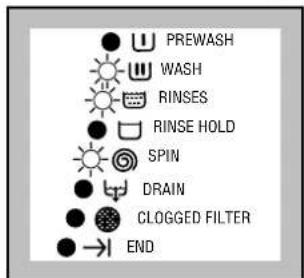
START/PAUSEA normal wash cycle consists of the following phases, Wash - Rinses - Spin and is confirmed by the illumination of the corresponding LED,s.
text_image
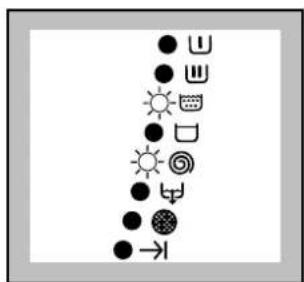
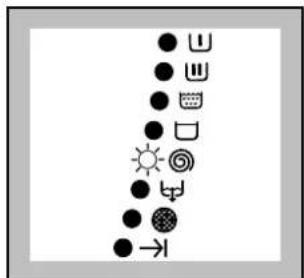
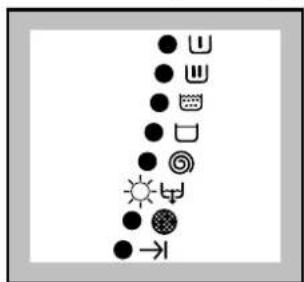
PREWASH WASH RINSES RINSE HOLD SPIN DRAIN CLOGGED FILTER ENDTo select rinse & spin, press the SKIP button once, the wash LED goes out.
natural_image
Collection of black-and-white icons representing weather, sunlight, and climate symbols (no text or labels)To select spin only, press the SKIP button twice. The wash & rinse LED, s go out.
natural_image
Collection of black-and-white icons including sun, moon, gear, and directional arrows, arranged in a diagonal pattern (no text or symbols)To select Drain, press the SKIP button three times, the wash - rinse - spin LED, s go out.
natural_image
Collection of abstract geometric and symbolic icons arranged in a vertical column (no text or labels)If you wish to cancel or advance the running programme to the required phase, PAUSE the cycle and then press the SKIP button as previously described.
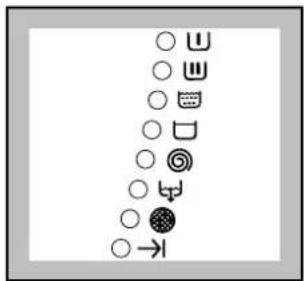
9 Programme phase indicator lights
When you select a programme, the lights relevant to the phases that form the programme light up.
flowchart
graph TD
    A[" "] --> B[" "]
    C[" "] --> D[" "]
    E[" "] --> F[" "]
    G[" "] --> H[" "]
    I[" "] --> J[" "]
    K[" "] --> L[" "]
    M[" "] --> N[" "]
    O[" "] --> P[" "]
    Q[" "] --> R[" "]
    S[" "] --> T[" "]
    U[" "] --> V[" "]
    W[" "] --> X[" "]
    Y[" "] --> Z[" "]
After you have started the programme, only the light relevant to the phase that is currently being carried out will remain lit.
At the end of the cycle the light will illuminate. If at the end of the programme the light comes on, this means that the drain filter must be cleaned (see page 17).
The END light flashes if there are operating problems. At the same time one of the following lights comes on indicating the type of problem:
☐: problem with the water supply
: problem with water draining
: door open
See paragraph "Something Not Working".
i Operating Sequence
Before the first wash, we recommend that you run a cotton cycle at 60^ C, without any laundry in the machine, to remove any manufacturing residue from the drum and tub.
Pour 1/2 a measure of detergent into the main wash compartment of the dispenser drawer and start the machine.
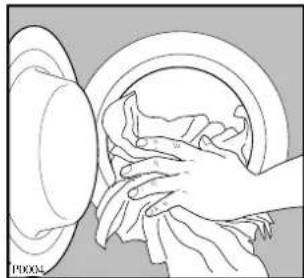
I.Load the laundry
Open the door.
Place the laundry in the drum, one item at a time, shaking them out as much as possible.
Close the door.
natural_image
Illustration of hands washing clothes from a circular basin (no text or symbols)2.Measure out the detergent
Pull out the dispenser drawer until it stops. Measure out the amount of detergent required and pour it into the main wash compartment [..]
If you wish to carry out the prewash, pour detergent into the appropriate compartment marked ⚠.
3.Measure out the fabric softener
If required, pour fabric softener into the compartment marked ⚙, without exceeding the «MAX» mark.

natural_image
Illustration of a hand placing a component into a drawer with a handle (no text or symbols visible)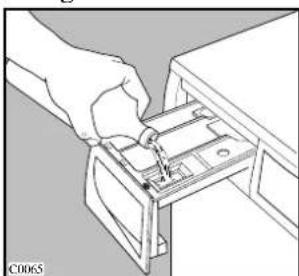
natural_image
Illustration of a hand inserting a component into a drawer (no text or symbols visible)Close the drawer gently.
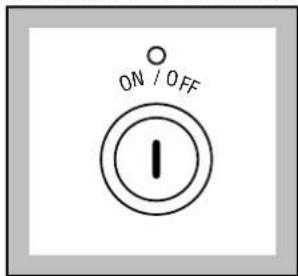
4. Switch the machine on
Press the ON/OFF button to switch the machine on. The light above the button will light up.
text_image
ON / OFF5. Select the desired programme/fabric
Press the FABRICS button repeatedly, in order to select the desired programme/fabric. The relevant light will light up.
The lights relevant to the phases that form the programme will light up.
The START/PAUSE button light will start flashing.
text_image
COTTONS SYNTHETICS DELICATES WOOL FABRICS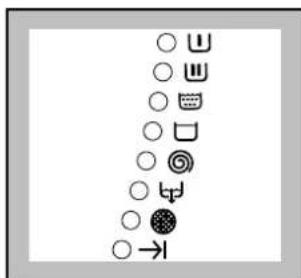
flowchart
graph TD
    A[" "] --> B[" "]
    C[" "] --> D[" "]
    E[" "] --> F[" "]
    G[" "] --> H[" "]
    I[" "] --> J[" "]
    K[" "] --> L[" "]
    M[" "] --> N[" "]
    O[" "] --> P[" "]
    Q[" "] --> R[" "]
    S[" "] --> T[" "]
    U[" "] --> V[" "]
    W[" "] --> X[" "]
    Y[" "] --> Z[" "]
6. Select the temperature
Press the TEMPERATURE button if you wish to select a temperature value different from the one proposed by the washing machine.
The relevant light will light up.
text_image
90°C 60°C 50°C 40°C 30°C TEMPERATURE7. Select the spin speed or the RINSE HOLD option
Press the SPIN SPEED button repeatedly, in order to select the desired spin speed or the RINSE HOLD option. The relevant light will light up.
If you select the RINSE HOLD option, the machine will stop at the end of the programme with the water still in the tub.
pie
| Category | Value | |---|---| | 1200 | 1200 | | 900 | 900 | | 700 | 700 | | 500 | 500 | | RINSE HOLD | (implied by label) | | SPIN S SPEED | (unknown value) |8. Select the desired options
If your laundry is very dirty, it may be advisable to select the PREWASH option.
If you wish the laundry to undergo an extra rinse, select the SUPER RINSE option.
If your laundry is only slightly soiled, select the QUICK WASH option.
Press the OPTIONS button so as to cause one or two lights to light up.
text_image
PREWASH SUPER RINSE QUICK OPTIONS9. Start the programme
Press the START/PAUSE button. The relevant light will stop flashing, the DOOR LOCKED light will light up, and only the light relevant to the phase that is in progress will remain lit.
text_image
START/PAU SE10. How to change a programme during its cycle
Before you make any change, you must pause the washing machine by pressing the START/PAUSE button.
It is possible to change any phase before the programme carries it out.
Changing the type of fabric or temperature is possible, obviously, only during the washing phase. When you make a change in these two parameters, the washing machine will resume the cycle from the beginning.
If it is necessary to drain the water in order to change the programme in progress, proceed as follows:
- PAUSE the machine by pressing the START/PAUSE button;
- press the SKIP/RESET button repeatedly, until only the DRAIN light remains lit;
- press the START/PAUSE button again.
When the water has been drained, a new programme can be selected. Press the START/PAUSE button to start it.
II. How to cancel a programme during its cycle
To cancel a programme that is being carried out, first pause the washing machine by pressing the START/PAUSE button, then press the SKIP/RESET button repeatedly, until all lights go out.
12. How to open the door during the cycle of a programme
You can open the door, after having set the washing machine to PAUSE, provided the following conditions exist:
- the washing machine is not in the heating phase beyond 40^ ;
• the level of the water is not high;
• the drum is not turning.
If these requirements are met, when you pause the washing machine, the DOOR LOCKED light goes out and the door can be opened.
Should it not be possible to open the door, and should it be absolutely necessary to do so, switch the machine off by pressing the ON/OFF button.
After approximately 3 minutes, you can open the door.
Pay attention to the level and temperature of the water in the washing machine!
When you close the door and press the ON/OFF button again, the washing machine will resume the programme from the point where it had been interrupted.
13. End of programme
At the end of the programme, the washing machine stops automatically and gives an audible signal.
If you had selected the RINSE HOLD option, the START/PAUSE button light flashes and the light☐ remains lit to indicate that the water must be drained.
When the programme has been completed, the light remains lit and the audible signal is given.
The DOOR LOCKED light goes out at once.
Press the SKIP/RESET button repeatedly to erase the programme that has just been carried out. If you omit to do this, the next time you switch the washing machine on, you will hear the audible signal.
Note: when you switch the machine on, if you must erase the previously performed programme, it is also sufficient to press the FABRIC button and select a new programme.
Press the ON/OFF button to switch the machine off. The relevant light will go out.
Remove the laundry from the washing machine.
Check whether the drum is completely empty, by rotating it with your hand. The purpose of this is to prevent any items of laundry from remaining accidentally in the drum, where they might get damaged in a subsequent wash (e.g. by shrinking) or bleed colour into another load of laundry.
We advise you to close the water supply tap and disconnect the plug from the socket.
Leave the door ajar in order to air the washing machine.
i Washing Hints
Do NOT overload the machine. Weigh the laundry the first few times you use the appliance.
The average weights of the most common items are listed below as a guide:
1000g = 1 kg
| Sheet | 700-1000 |
| Pillow case 100-200 g | |
| Tablecloth | 400-500 |
| Serviette | 50-100 |
| Tea towel 70-120 g | |
| Linen hand towel 100-150 g | |
| Towelling hand towel 150-250 g | |
| Towelling bath towel 700-1000 g | |
| Bath robe 1000-1500 g | |
| Man's shirt 200-300 g | |
| Apron | 150-200 |
- Load the laundry loosely alternating large items with small ones.
- Sort the laundry according to the type of fabric, colour-fastness and how dirty it is.
- Avoid washing unhemmed or torn items as they may unravel.
- Before washing, empty all pockets of small objects which may have been left inside (coins, keys, screws etc). as these could damage the drain pump.
- When washing curtains, remove the hooks.
- Close poppers and zips and fasten loose buttons.
- It is essential to wash new coloured items separately when washing for the first time.
- When washing fabrics requiring different wash temperatures together, always select the lowest temperature.
- White items should not be washed with coloured items.
- Very small items (handkerchiefs, ribbons, socks etc) should be washed in a washing bag or a pillow case.
- Use a good quality detergent suitable for automatic washing machines.
-
Use the correct quantities of detergent.
-
For wool, use gentle detergent only in small quantities.
- Bleach is very corrosive; it should be used with care and kept out of reach of children.
- Some stains such as fruit, wine, grass, rust etc. are difficult to remove and should be treated before washing with specific products, which can be found in most household shops. In some cases it may help to soak the stain before washing with a special pre-soak product or biological detergent.
- Only wool marked “Pure New Wool - washable, preshrunk” can be washed in the machine using the wool programme; other types of wool should be washed by hand or dry cleaned.
- If you have used the machine to wash, rinse or spin only non-colour fast garments, there may be dye left in the sump. To ensure any subsequent wash is not contaminated with the dye, select and carry out a rinse and spin programme, without any garments, to ensure that any dye is removed from the sump.
- Once you have finished using the machine, you are advised to unplug it and turn off the water tap.
Which detergent?....
To ensure you obtain the best wash results from your appliance, it is important to use the right detergent in your everyday wash, and only detergents recommended for use in automatic machines.
To maintain the appearance of your clothes and household textiles and to make them last longer you should use different types of detergent for different washes, whether for whites, colours or delicates.
WHITES
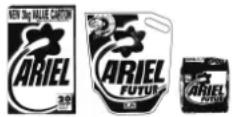
We recommend the Ariel product range which is biological and designed to provide excellent cleaning and stain removal even at low temperatures.
NON BIOLOGICAL
If you prefer to use a non biological detergent, which does not contain enzymes we recommend Fairy. Fairy provides good cleaning and stain removal.

COLOUREDS
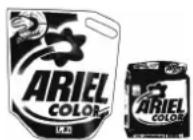
For coloured items you should use a detergent which is designed to clean while maintaining the original colour. Ariel Color does not contain bleach and therefore helps to preserve colours.
DELICATE ITEMS
When washing delicates such as woollens, you should use a product which is specially designed to care for fine fabrics.
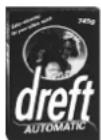
Dreft Automatic is suitable for woollens and other delicates.
LAUNDRY BLEACH
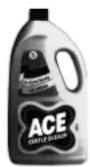
For additional stain removal you may wish to use a product such as Ace Gentle Bleach which is used in addition to your chosen detergent. Ace is suitable for all washable fabrics including silks, woollens and coloureds.
And in which form?
Not only are there different types of detergent, but they are also available in different forms. Whether you chose a powder or liquid in traditional or compact form is your own personal choice.
TRADITIONAL POWDERS
Pour the powder directly into the dispenser drawer. Do not sprinkle powder onto clothes in the machine drum.
TRADITIONAL LIQUIDS
Liquid can be placed in the main wash compartment of the detergent drawer marked with the symbol L.lstart the machine immediately upon placing the detergent in the dispenser drawer.
Alternatively the detergent is measured into the specially designed dosing device* which should be placed on top of the laundry, and at the back of the machine drum.
COMPACT POWDERS AND LIQUIDS
Compact detergents (or concentrates as they are also known) are available in liquid or powder form, and generally require a smaller dosage. Follow the manufacturer's instructions to ensure the most economical usage. Pour the detergent directly into the dispenser drawer, or alternatively measure the detergent into the specially designed dosing device* which should be placed on top of the laundry, and at the back of the machine drum.
* If you use a dosing device in a washer dryer, please ensure the dosing device/ball is removed before carrying out a drying programme.
FABRIC CONDITIONERS
These are ideal for improving ‘softness’, and also reduce static cling on synthetics and make ironing easier. They are available in two types:
For example Lenor liquid fabric softener, for use in the washing machine/washer dryer. The liquid fabric softener should be poured into the compartment marked with the symbol 🌿 Follow the manufacturer's dosage instructions and never exceed the MAX level.

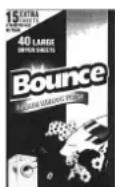
Bounce conditioning sheets for use in a tumble dryer. We recommend the conditioning sheets are pinned (using a safety pin) to an article of laundry and placed in the tumble dryer.
Wash Care Symbols
Wash care labels inside garments recommend how to launder your clothes with the best results. The care labelling code is in line with care labelling used in the rest of Europe. The symbols used make it easy to select the correct programme on your washing machine.
WASHING SYMBOL
WASH ACTION FABRIC
 | Normal (Maximum) | White Cotton or Linen without Special Finishes |
 | Normal (Maximum) | Cotton, Linen or Viscose without Special Finishes Colourfast at 60°C. |
 | Reduced (Medium) | Nylon, Polyester/Cotton, Viscose with Special Finishes, Cotton/Acrylic Mix. |
 | Normal (Maximum) | Cotton, Linen or Viscose Colourfast at 40°C but not 60°C. |
 | Reduced (Medium) | Acrylics, Acetate, Triacetate, Wool mixes, Polyester/wool blends. |
 | Much Reduced (Minimum) | Wool, wool mixtures, Silks |
 | Hand wash only | Do not machine wash |
| BLEACHING | ||
| cl | Chlorine bleach may be used | |
| IRONING | ||
| Hot iron | Cotton, Linen, Viscose | |
| Warm iron | Polyester mixtures, Wool | |
| Cool iron | Acrylic, Nylon, Polyester | |
| DRY CLEANING | ||
| P | May be dry cleaned. Other letters and/or a bar beneath the circle will indicate the required process to the dry cleaner. | |
| TUMBLE DRYING | ||
| with high heat setting | ||
| with low heat setting | ||
| May be tumble dried | ||
| X | A cross through any symbol means «DO NOT» | |
Important Notes
For best results, always use the dispenser drawer for dispensing detergents and liquid additives.
Once the dispenser has been filled, close it by pushing it in gently. This is particularly important if you are using
fabric conditioner to avoid the conditioner entering the machine prematurely.
When using liquid detergent and a prewash programme, place the detergent into the correct compartment in the dispenser drawer, after the prewash has finished.
Washing programmes
| Type of laundry and symbols on labels | Load | Programme/temperature | Description of programme | Available options | Consumption* | ||
| Energy kWh | Water litres | Time h/min. | |||||
| 60 95White cotton:e.g. sheets, tablecloths, household linen | 5 kg | Cottons60°-90°C | Main wash at 60°-90°C3 rinsesLong spin | SPIN SPEED RINSE HOLD PREWASH SUPER RINSE QUICK | 2.1 | 58 | 2.28 |
| 60 40 30Coloured cotton: e.g. shirts, blouses, underwear, towels, house-hold linen | 5 kg | Cottons60°-40°-30°C | Main wash at 60°-40°-30°C3 rinsesLong spin | SPIN SPEED RINSE HOLD PREWASH SUPER RINSE QUICK | 0.95 | 55 | 2.10 |
| 60 50 40 30Synthetic fabrics and blends: e.g. shirts, blouses, underwear | 2.5 kg | Synthetics60°-50°-40°-30°C | Main wash at 60°-50°-40°-30°C3 rinsesShort spin | SPIN SPEED RINSE HOLD PREWASH SUPER RINSE QUICK | 1.0 | 52 | 1.30 |
| 40 30Delicate fabrics: e.g. acrylic fabrics, viscose, polyester, synthetic blends | 2.5 kg | Delicates40°-30°C | Main wash at 40°-30°C3 rinsesShort spin | SPIN SPEED RINSE HOLD PREWASH SUPER RINSE QUICK | 0.55 | 55 | 56 |
| 40 30Wool | 2 kg | Wool40°-30°C | Main wash at 40°-30°C3 rinsesShort spin | SPIN SPEED RINSE HOLD | 0.4 | 52 | 55 |
The “coloured cotton programme” at 60^ C with a wash load of 5 kg is the reference programme for the data entered in the energy label, in compliance with EEC 92/75 standards.
* This data is given purely as an indication: the consumption values may vary in relation to the quantity and type of laundry, the temperature of the water supply and the ambient temperature. The data refers to the highest temperature provided for each programme.
The machine is capable of washing up to 6 kg, however, to achieve optimum wash results it is recommended that the above wash load are adhered to.
Maintenance and Cleaning
Before any maintenance or cleaning is carried out you must DISCONNECT the appliance from the electricity supply.
Descaling
The water we use normally contains lime. It is a good idea to periodically use a water softening powder in the machine. Do this separately from any laundry washing, and according to the softening powder manufacturer's instructions. This will help to prevent the formation of lime deposits.
After each wash
Leave the door open for a while. This helps to prevent mould and stagnant smells forming inside the appliance. Keeping the door open after a wash will also help to preserve the door seal.
Maintenance Wash
With the use of low temperature washes it is possible to get a build up of residues inside the drum.
We recommend that a maintenance wash be performed on a regular basis.
To run a maintenance wash:
• The drum should be empty of laundry.
- Select the hottest cotton wash programme.
- Use a normal measure of detergent, must be a powder (such as Ariel Futur).
External cleaning
Clean the exterior cabinet of the appliance with soap and water only, and then dry thoroughly.
Cleaning the dispenser drawer
From time to time the washing powder and additive dispenser drawer should be cleaned.
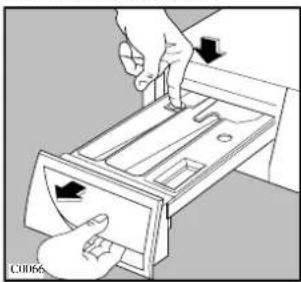
Remove the drawer by pressing the catch downwards and by pulling it out. Flush it out under a tap, to remove any traces of accumulated powder.
To aid cleaning, the top part of the additive compartment should be removed.
natural_image
Illustration of hands using a device to press or install a tray (no text or symbols visible)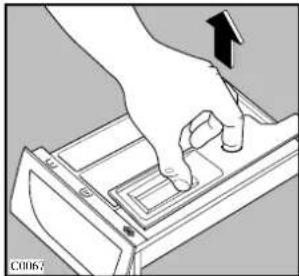
natural_image
Hand pressing a button on a device tray (no text or symbols visible)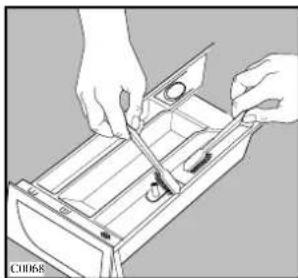
natural_image
Illustration of hands using a tool to adjust or install a mechanical component (no text or symbols visible)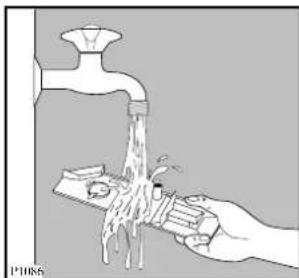
natural_image
Illustration of a hand using a tool to clean or disinfect the water of a faucet (no text or symbols present)Cleaning the drawer recess
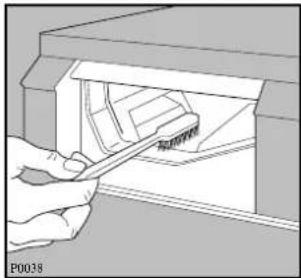
Having removed the drawer, use a small brush to clean the recess, ensuring that all washing powder residue is removed from the upper and lower part of the recess. Replace the drawer and run the rinse programme without any clothes in the drum.
natural_image
Illustration of a hand using a tool to cut or remove a component, no text or symbols visibleCleaning the filter
The water drain filter
A clean filter is important for the correct operating of the machine, and should therefore be cleaned after every washing programme.
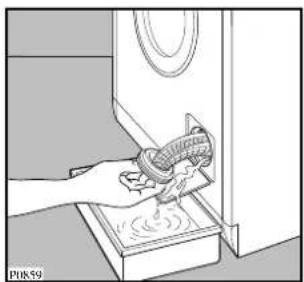
Open the filter door and place a container underneath to catch any spillage. If the filter is blocked and the machine is unable to drain you will need to drain the water manually from the machine at this stage. To do this, unhook the drain hose from the standpipe or sink and hold the end of the hose over a bowl on the floor. The water should drain by gravity into the bowl. When the bowl is full, hook the hose back up and empty the bowl. Repeat the procedure until water stops flowing out.
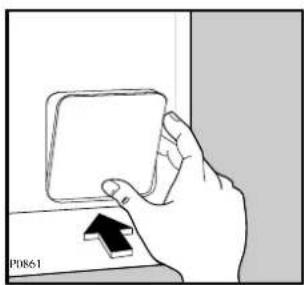
natural_image
Hand holding a small rectangular object with an arrow pointing to it, next to a box labeled 'PD861' (no other text or symbols visible)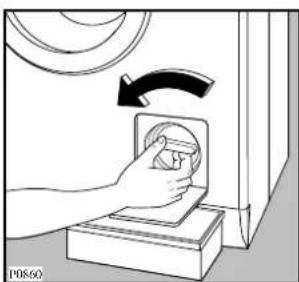
natural_image
Illustration of a hand using a device to clean or adjust a component, with no visible text or symbols.Unscrew and remove the filter.
Clean carefully under a fast running tap.
natural_image
Illustration of a hand cleaning a microwave oven with a cloth (no text or symbols)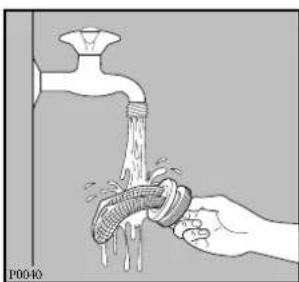
natural_image
Illustration of a hand washing a pipe with water flowing from a faucet (no text or symbols)Warning
When the appliance is in use and depending on the programme selected there can be hot water in the filter. Never remove the filter during a wash cycle, always wait until the appliance has finished the cycle, and is empty. When replacing the filter, ensure it is securely retightened so as to stop leaks and young children being able to remove it.
The water inlet filter
If your water is very hard or contains traces of lime deposit, the water inlet filter may become clogged.
It is therefore a good idea to clean it from time to time.
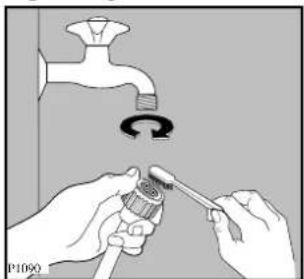
Turn off the water tap. Unscrew the water inlet hose. Clean the filter using a hard bristle brush.
Tighten up the inlet hose.
natural_image
Illustration of hands using a tool to adjust or install a pipe inside a faucet (no text or symbols visible)The dangers of freezing
If the machine is exposed to temperatures below 0^ C, certain precautions should be taken.
- Turn off the water tap.
- Unscrew the inlet hose.
- Unhook the drain hose from the rear support and position the end of this hose and that of the inlet hoses in a bowl. Run the draining programme.
To do this:
- Switch the machine on
- Select a washing programme
- Press the SKIP/RESET button three times
-
Press START/PAUSE button
-
Disconnect the appliance.
● Screw the inlet hose and reposition the drain hose. - When you intend to start the machine up again, make sure that the room temperature is above 0^ C.
Something Not Working
Certain problems are due to lack of simple maintenance or oversights, which can be solved easily without calling out an engineer. Before contacting your local Service Force Centre, please carry out the checks listed below.
IMPORTANT: if you call out an engineer to a fault listed below, or to repair a fault caused by incorrect use or installation, a charge will be made even if the appliance is under guarantee.
During machine operation it is possible that one of the following lights on programme phase indicator comes on and the START/PAUSE light and the END light—flash indicating a fault in machine operation:
- : problem with the water supply
- : problem with water draining
- : door open
Once the problem has been eliminated, press the START/PAUSE button to restart the programme. If after all checks, the problem persists, contact your local Service Force Centre.
| Symptom | Possible causes |
| The machine does not start | The door has not been closed.The plug is not properly inserted in the power socket.There is no supply at the socket.The main fuse or the fuse in the plug has blown.The START/PAUSE button has not been depressed. |
| The machine does not fill | The water tap is closed.The filter in the inlet hose is blocked.The inlet hose may be squashed or kinked.The door has not been closed. |
| The machine fills then empties immediately | The end of the drain hose is too low.The end of the drain hose is submerged in water.There is no vent in the end of the drain hose. |
| The machine does not empty and/or does not spin | The drain hose may be squashed or kinked.The RINSE HOLD option has been selected.The drain filter may be blocked.The drain hose extension, if fitted, is not correct. Follow the instructions for connecting to the waste.The drainage system pipes are blocked.The wash load is unbalanced: redistribute the clothes inside the drum to allow the machine to spin. |
| There is water on the floor | Too much detergent or unsuitable detergent has been used (creates too much foam).Check whether there are any leaks from the inlet hose fittings. It is not always easy to see this as the water runs down the hose; check to see if it is damp.The drain hose may be damaged or not securely positioned.The detergent dispenser drawer or recess is clogged.The drainage system pipes are blocked. |
| Unsatisfactory washing results | Too little detergent or unsuitable detergent has been used. An insufficient amount of detergent leaves the laundry looking grey and causes lime scale to form Stubborn stains have not been treated prior to washingThe correct wash programme/temperature has not been selected.Too much laundry has been placed in the drum. |
| The machine vibrates when spinning | ● The internal packing has not been removed.● The machine is in contact with the wall or furniture.● The machine is not level and stable (check diagonally).● The washing load is badly distributed in the drum.● Maybe there is very little laundry in the drum. |
| The door will not open | ● The water level is above the bottom edge of the door.● The machine is heating the water.● The drum is turning.The door can only be opened when the relevant light has gone out. |
| Spinning starts late or the machine does not spin | ● The electronic unbalance detection device has cut in because the laundry is not evenly distributed in the drum. The laundry is redistributed by reverse rotation of the drum. This may happen several times before the unbalance disappears and normal spinning can resume. If, after 15 minutes, the laundry is still not evenly distributed in the drum, the machine will not spin. In this case, redistribute the load manually and select the spin programme. |
| The machine makes an unusual noise | ● The machine is fitted with a type of motor which makes an unusual noise compared with other traditional motors. This new motor ensures a softer start and more even distribution of the laundry in the drum when spinning, as well as increased stability of the machine. |
| No water is visible in the drum | ● Machines based on modern technology operate very economically using very little water without affecting performance. |
Service & Spare Parts
In the event of your appliance requiring service, or if you wish to purchase spare parts, please contact your local Zanussi Service Force Centre by telephoning:
0870 5 929929
Your telephone call will be automatically routed to the Service Force Centre covering your post code area.
The addresses are listed on the following pages.
Before calling out an engineer, please ensure you have read the details under the heading “Something Not Working”.
When you contact the Service Force Centre you will need to give the following details:
- Your name, address and post code
- Your telephone number
- Clear and concise details of fault
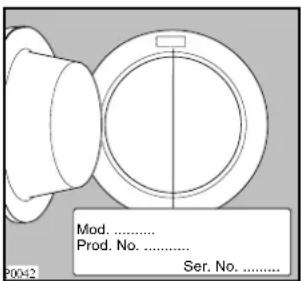
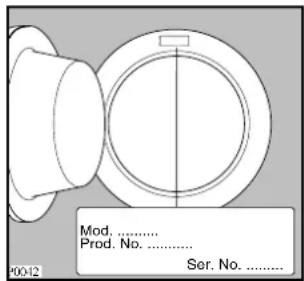
- The model and serial number of the appliance (found on the rating plate - see picture).
- The purchase date
text_image
Mod. ...... Prod. No. ...... Ser. No. ...... P0042Customer Care
For general enquiries concerning your Zanussi appliance or for further information on Zanussi products, please contact our Customer Care Department by letter or telephone as follows:
Customer Care Department
Zanussi
55-77 High Street
Slough
Berkshire
SL1 1DZ
Tel 08705 727727*
or visit our website at www.zanussi.co.uk
* calls to this number may be recorded for training purposes.
Guarantee Conditions
Standard guarantee conditions
We, Zanussi undertake that if, within 12 months of the date of the purchase, this Zanussi appliance or any part thereof is proved to be defective by reason only of faulty workmanship or materials, we will, at our option, repair or replace the same FREE OF ANY CHARGE for labour, materials or carriage on condition that:
- The appliance has been correctly installed and used only on the electricity supply stated on the rating plate.
- The appliance has been used for normal domestic purposes only, and in accordance with the manufacturer's instructions.
- The appliance has not been serviced, maintained, repaired, taken apart or tampered with, by any person not authorised by us.
All service work under this guarantee must be undertaken by a Zanussi Service Force Centre.
Any appliance or defective part replaced shall become the Company's property.
This guarantee is in addition to your statutory and other legal rights.
Home visits are made between 8.30am and 5.30pm Monday to Friday. Visits may be available outside these hours in which case a premium will be charged.
Exclusions
This guarantee does not cover:
- Damage or calls resulting from transportation, improper use or neglect, the replacement of any light bulbs or removable parts of glass or plastic.
- Costs incurred for calls to put right an appliance which is improperly installed or calls to appliances outside the United Kingdom.
- Appliances found to be in use within a commercial environment, plus those which are subject to rental agreements.
- Products of Zanussi manufacture which are NOT marketed by Zanussi.
European guarantee
If you should move to another country within Europe then your guarantee moves with you to your new home subject to the following qualifications:
- The guarantee starts from the date you first purchased your product.
- The guarantee is for the same period and to the same extent for labour and parts as exists in the new country of use for this brand or range of products.
- The guarantee relates to you and cannot be transferred to another user.
- Your new home is within the European Community (EC) or European Free Trade Area.
- The product is installed and used in accordance with our instructions and is only used domestically, i.e. a normal household.
- The product is installed taking into account regulations in your new country.
Before you move please contact your nearest Customer Care Centre, listed below, to give them details of your new home. They will then ensure that the local Service Organisation is aware of your move and able to look after you and your appliances.
France Senlis +33 (0)344 62 22 22
Germany Nurnberg +49 (0)911 323 2600
Italy Pordenone +39 (0)1678 47053
Sweden Stockholm +46 (0)8 738 79 50
UK Slough +44 (0)1753 219897
SERVICEFORCE
To contact your local Service Force Centre telephone 08705 929 929
| CHANNEL ISLANDS | ISLE OF LEWIS | ND Macleod16 James StreetStornowayIsle of Lewis PA87 2QW | NORTH EAST | ||
| GUERNSEY | Guernsey ElectricityPO Box 4Vale, GuernseyChannel Islands GY1 3AD | GATESHEAD | Unit 356aDukesway CourtDukeswayGateshead NE11 0BH | ||
| KELSO | 2, 6 & 8 WoodmarketKelsoBordersTD5 7AX | ||||
| JERSEY | Jersey Electricity CompanyHaut De L'ormeRue De Haut De L'ormeTrinityJerseyChannel Islands JE3 5FG | GRIMSBY | 15 Hainton AvenueGrimsbyN. E. LincsDN32 9AS | ||
| ORKNEY | 7 King StreetKirkwallOrkneyKW15 1JF | ||||
| SCOTLAND | PERTH(OWN SALES) | Scottish Hydro ElectricCentral WarehouseInveralmondPerth PH1 3AF | Unit 1Boulevard Industrial EstateHullHU3 4AY | ||
| ABERDEEN | 54 Claremont StreetAberdeen AB10 6RA | LEEDS | 64-66 Cross Gates RoadCross GatesLeedsLS15 7YS | ||
| AUCHTERMUCHTY | 33a BurnsideAuchtermuchtyFife KY14 7AJ | SHETLAND(OWN SALES) | 3-4 Carlton PlaceLerwickShetlandZE1 0PW | ||
| BLANTYRE | Unit 5Block 2Auchenraith Ind. EstateRosendale WayBlantyre G72 0NJ | SHETLAND(OWN SALES) | Bolts Shetland26 North RoadLerwickShetland ZE1 0PE | Unit 23Northfield WayAycliffe Industrial ParkNewton AycliffeDL5 6EJ | |
| DUMFRIES | 93 Irish StreetDumfriesDG1 2 PQ | WHALSAY(OWN SALES) | Leask ElectricalHarisdaleSymbister, WhalsayShetland ZE2 9AA | Pennine HouseRoman Ridge RoadSheffieldS9 1GB | |
| DUNOON | 7 Hill StreetDunoonArgyllPA23 7AL | NORTHERN IRELAND | NORTH WEST | ||
| BELFAST | Owenmore HouseKilwee Business ParkDunmurryBelfastBT17 0HD | ||||
| EDINBURGH | Unit 12Dumbryden Ind. Estate2 Dumbryden RoadEdinburghEH14 2AB | BIRKENHEAD | 1 Kelvin ParkDock RoadBirkenheadCH41 1LT | ||
| CARLISLE | Unit 7James Street WorkshopsJames StreetCarlisleCumbria CA2 5AH | ||||
| GLASGOW | Unit 4Wellington RoadBishopriggsGlasgow G64 2SA | CARDIFF | WALESUnit 4Guardian Industrial EstateClydesmuir RoadCardiffCF2 2QS | ||
| INVERNESS | Unit 3BISmithton Ind. EstateSmithtonInverness IV2 7WL | ISLE OF MAN | South Quay Ind. EstateDouglasIsle of ManIM1 5AT | ||
| CLYWD | Unit 6-7 Coed ParcAbergele RoadRhuddlanClwydLL18 5UG | ||||
| ISLE OF ARRAN | R HaggertyBruachBlackwaterfootIsle of Arran | BOLTON | Unit BCentral Industrial EstateSt Marks StreetBoltonBL3 6NR | ||
| DYFED | Unit 9St. Clears Business ParkTenby RoadSt. ClearsCarmarthenSA33 4JW | ||||
| ISLE OF BARRA | J Zerfah244 BruernishIsle of BarraWestern Islands HS9 5QY | PRESTON | Unit 250Dawson PlaceBamber BridgePrestonLancashire PR5 8AL | ||
| ISLES OF BUTE | Walker EngineeringGlenmhorUpper Serpentine RoadRothesayIsle of Bute PA20 9EH | OSWESTRY | Plas Fynnnon WarehouseMiddleton RoadOswestrySY11 2PP | ||
SERVICEFORCE
To contact your local Service Force Centre telephone 08705 929 929
| MIDLANDS | LONDON & EAST ANGLIA | SOUTH EAST | |||
| BIRMINGHAM | 66 Birch Road EastWyrley Trading EstateWittonBirminghamB6 7DB | BECKENHAM | 11a Gardner Ind. EstateKent House LaneBeckenhamKent BR3 1QZ | ASHFORD | Unit 2Bridge Road Business CentreBridge RoadAshfordKent TN23 1BB |
| BOURNE | Pinfold RoadBournePE10 9HT | CHELMSFORD | Hanbury RoadWidford Ind. EstateCheimsfordEssexCM12 3AE | FLEET | Unit 1Redfields Ind. EstateChurch CrookhamFleetHampshire GU13 0RD |
| BRIDGNORTH | 68 St. Mary's StreetBridgnorthShropshireWV16 4DR | COLINDALE | Unit 14Capitol ParkCapitol WayColindaleLondon NW9 0EQ | HAYWARDSHEATH | 21-25 Bridge RoadHaywards HeathSussex RH16 1UA |
| GLOUCESTER | 101 Rycroft StreetGloucesterGL1 4NB | ELTHAM | 194 Court RoadMottinghamElthamLondon SE9 4EW | TONBRIDGE | Unit 30Deacon Trading EstateMorley RoadTonbridgeTN9 1RA |
| HEREFORD | Units 3 & 4Bank BuildingsCattle marketHarefordHE4 9HX | ENFIELD | 284 Alma RoadEnfieldLondonEN3 7BB | ||
| HIGHAM FERRERS | 30 High StreetHigham FerrersNorthantsNN10 8PL | GRAVESEND | Unit B4Imperial Business EstateWest MillGravesendKentDA11 0DL | SOUTH WEST | |
| ILKESTON | Unit 2Furnace RoadIlkeston DE7 5EP | BARNSTAPLE | Main RoadFremingtonBarnstapleNorth Devon EX31 2NT | ||
| LEICESTER | Unit 7Oaks Industrial EstateCoventry RoadNarboroughLeicestershireLE9 5GF | IPSWICH | Unit 6CELton Park Business CentreHadleigh RoadIpswichIP2 0DD | BOURNEMOUTH | 63-65 Curzon RoadBournemouthDorsetBH1 4PW |
| LINCOLN | Unit 8Clifton StreetStone Field ParkLincolnLN5 8LQ | LETCHWORTH | 16-17 Woodside Ind. ParkWorks RoadLetchworthHertsSG6 1LA | BRIDGEWATER | 6 Herswell Business ParkSalmon ParadeBridgwaterSomerset TA6 5PY |
| NEWCASTLEUNDER LYME | 18-21 Croft RoadBrampton Ind. EstateNewcastle under LymeStaffordshireST5 0TW | LONDON | 2 - 4 Royal LaneYiewsleyWest DraytonMiddlesexUB7 8DL | BRISTOL | 11 Eldon WayEldonwall Trading EstateBristolBS4 3QQ |
| REDDITCH | 13 Thornhill RoadNorth Moons MoatRedditchWorcestershireB98 9ND | MAIDENHEAD | Reform RoadMaidenheadBerkshireSL6 8BY | EMSWORTH | 266 Main RoadSouthbourneEmsworthPO10 8JL |
| MOLESEY | 10 Island Farm AvenueWest MoleseySurreyKT8 2UZ | ISLE OF WIGHT | Unit 8Enterprise CourtRyde Business ParkRydeIsle of Wight PO33 1DB | ||
| TAMWORTH | Unit 3Sterling ParkClaymoreTamworthB77 5DQ | NEWBURY | 9 Pipers CourtBerkshire DriveThatchamBerkshireRG19 4ER | NEWTON ABBOT | Unit 2Zealey Ind. EstateKingsteigntonNewton AbbotTQ12 3TD |
| WORCESTER | Units 1 & 2Northbrooks CloseGregorys Mill Ind. EstateWorcesterWR3 8BP | NORWICH | 2b Trafalgar StreetNorwichNR1 3HN | REDRUTH | Unit 7DPool Ind. EstateDruids RoadRedruthCornwall TR15 3RH |
| SUNBURY | Unit 1aThe SummitHanworth RoadSunbury on ThamesTW16 5DB | ||||
Installation Instructions
⚠ It is dangerous to alter the specifications or attempt to modify this product in any way.
⚠️ Care must be taken to ensure that the appliance does not stand on the electrical supply cable.
⚠️ Any electrical work required to install this appliance should be carried out by a qualified electrician or competent person.
⚠️ Any plumbing work required to install this appliance should be carried out by a qualified plumber or competent person.
Should the appliance power supply cable need to be replaced, this should be carried out by our Service Force Centre.
Technical Specifications
| DIMENSIONS | HeightWidthDepth | 6060 |
| POWER SUPPLY VOLTAGE 230-240 V/50 HzTOTAL POWER ABSORBED 2050 W (10A) | ||
| WATER PRESSURE Minimum 50 kPa (0.5 bar) | Maximum 800 kPa (8 bar) | |
| SPIN SPEED Maximum 1000 rpm (FLE 1016 W) | 1100 rpm (FLE 1116 W)1200 rpm (FLE 1216 W)1400 rpm (FLE 1416 W) | |
| LOAD CAPACITY Cotton, linen 5 kg (max. 6 kg) | SyntheticsDelicate fabricsWool | 2.5 kg2.5 kg2 kg |
| CONSUMPTION DATA CALCULATEDON 5 KG NORMALLY SOILED COTTONITEMS AT 60°C | EnergyWater | 0.95 kWh55 litres |

This appliance complies with the following E.E.C. Directives:
- 73/23 EEC of 19.2.73 (Low Voltage Directive) and subsequent modifications;
- 89/336 EEC of 3.5.89 (Electromagnetic Compatibility Directive) and subsequent modifications.
Unpacking

All transit bolts and packing must be removed before using the appliance.
You are advised to keep all the packaging for re-use in case the machine is to be transported again.
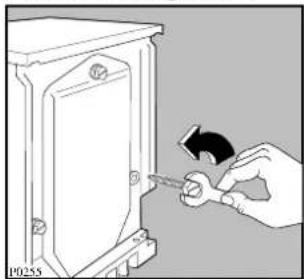
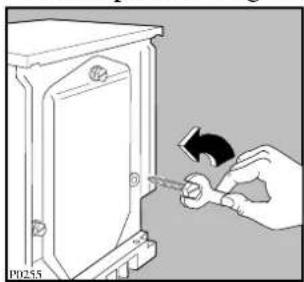
Using a spanner unscrew and remove the rear right bolt. Lay the machine gently on its back, making sure that the hoses are not squashed.
natural_image
Hand using a screwdriver to adjust or install a component on a box (no text or symbols visible)Remove the polystyrene block from the bottom of the machine and release the two plastic bags.
Carefully slide out the right polythene bag (1).
Repeat the operation for the left polythene bag (2).

natural_image
Technical diagram of an electronic device with a clamped component and a base plate (no text or symbols)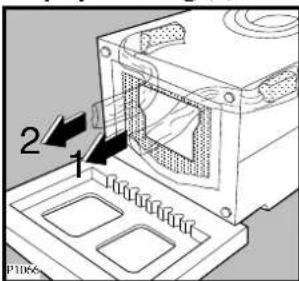
text_image
2 1 P3066Remove the polystyrene base.
Set the machine upright and remove the two remaining bolts from the back.
Pull out the three plastic spacers from the holes into which the bolts were fitted.
Plug all the holes with the plugs which you can find in the envelope containing the instruction booklet.
natural_image
Hand using a screwdriver to adjust or install a component on a cabinet (no text or symbols visible)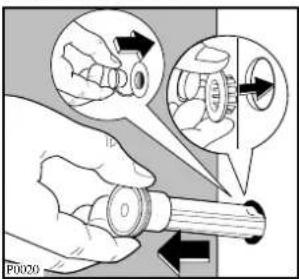
text_image
P0020Positioning
Install the machine on a flat hard floor.
Make sure that air circulation around the machine is not impeded by carpets, rugs etc. Check that the machine does not touch the wall or other kitchen units.
Never place cardboard, wood or similar materials under the machine to compensate for any unevenness in the floor.
Your new washing machine has been designed to be permanently plumbed in to your home's water supply and drainage system. However, if this is not possible, it may be connected to a suitable existing tap with the drain hose discharging into a sink.
The appliance has an inlet hose, with female 3/4” BSP thread connector. If this connection is not compatible with the plumbing of the existing installation, a variety of connectors are available from good hardware stores and plumbers merchants to suit most domestic plumbing. Any alteration to your existing plumbing must be carried out by a competent person, or qualified plumber.
Installation on a Suspended Floor
Suspended wooden floors are particularly susceptible to vibration. To help prevent vibration we recommend you place a waterproof wood panel, at least 15 mm thick under the appliance, secured to at least 2 floor beams with screws. If possible install the appliance in one of the corners of the room, where the floor is more stable.
Water inlet
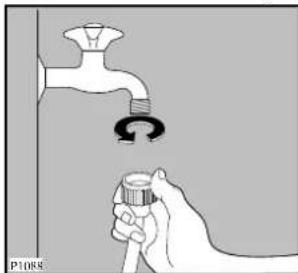
Connect the hose to a tap with a 3/4" thread.
natural_image
Illustration of a hand holding a tool near a faucet, with no visible text or symbolsInstallation should comply with local water authority and building regulations' requirements.
The appliance must be connected to a cold water supply.
A minimum water pressure of 50 kPa (0.5 bar) is required for safe operation of the appliance.
If you cannot make the cold water connection direct from the rising mains, you may be able to operate the appliance from your cold water storage system.
There should be a minimum distance of 5.02m (161/2 ft) between the appliance's inlet and the bottom of the water storage tank.
Set the hose correctly by loosening the ring nut. After positioning the inlet hose, be sure to tighten the ring nut again to prevent leaks.

natural_image
Diagram of a pipe joint with a curved arrow indicating direction (no text or symbols)Water drainage
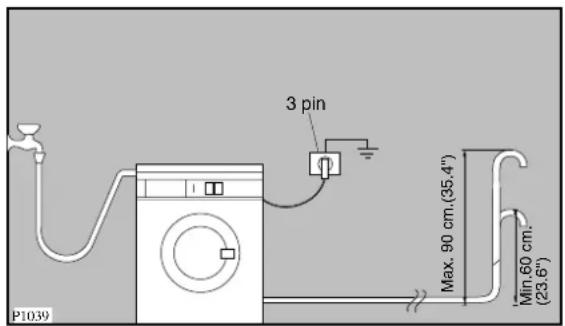
This appliance is designed to be permanently plumbed into your home's water supply and drainage system.
text_image
3 pin P1039 Max. 90 cm.(35.4") Min.60 cm. (23.6')The appliance drain hose should hook into a standpipe, the hook in the drain hose is formed using the plastic “U-Piece” supplied.
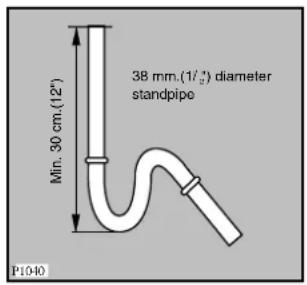
The standpipe should have an internal diameter of approximately 38mm (see diagram) thus ensuring there is an air break between the drain hose and standpipe.
text_image
38 mm.(1½") diameter standpipe Min. 30 cm.(12") P1040When discharging into a standpipe ensure that the top of the curve in the hose end is no more than 90cm (35.4") and no less than 60cm (23.6") above floor level. The upright standpipe should have a minimum length of 30cm (12") from the bottom of the elbow to the top of the pipe (see diagram).
Make sure that it is designed in such a way, that the end of the drain hose cannot be covered with water. The drain hose may be extended to a maximum of 4 metres.
An additional drain hose and joining piece is available from your local Service Force Centre. The joining piece must have an internal diameter of 18mm.
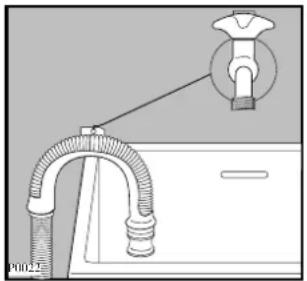
If you intend the drain hose to empty into a sink, make sure that the sink is empty and the plug hole is not blocked. Use the plastic “U-Piece” supplied.
natural_image
Diagram showing a pipe fitting attached to a door with a faucet inserted, no text or symbols presentImportant
Before connecting up the machine to new pipework or to pipework that has not been used for some time, run off a reasonable amount of water to flush out any debris that may have collected in the pipes.
Levelling
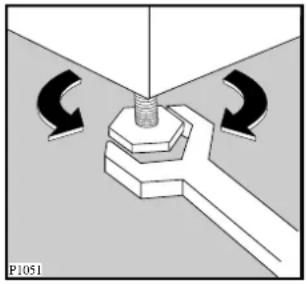
Level the washing machine by raising or lowering the feet. The feet may be tight to adjust as they incorporate a self locking nut, but the machine MUST be level and stable (check diagonally).
natural_image
Diagram of a mechanical assembly with directional arrows indicating motion (no text or symbols)Any necessary adjustment can be made with a spanner. Accurate levelling prevents vibration, noise and displacement of the machine during operation.
Some vibration is inevitable, especially if mounted on a wooden floor.
Sprung wooden floors are particularly susceptible to vibration. For advice, consult a builder. If possible, always place the machine on a solid floor.
Special conditions
If the floor is carpeted or covered with crumbly or soft material, insert a rigid support base under the feet to prevent noise, vibration or displacement. The base should protrude a few centimetres beyond the edges of the machine.

Warning
The machine should NOT be placed on deep pile carpeting.
Note
Please ensure that when the appliance is installed it is easily accessible for the engineer in the event of a breakdown.
In the interest of the environment
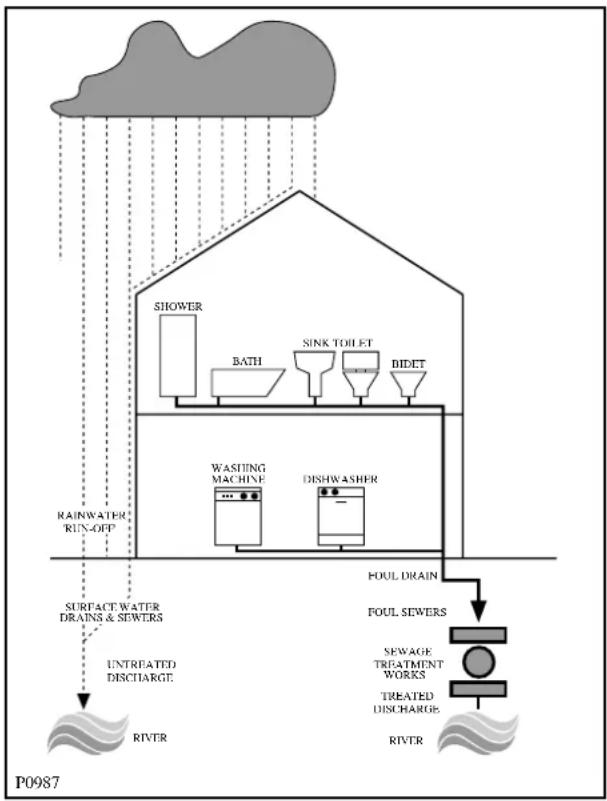
Washing machines and dishwashers should be connected to the FOUL drainage system, the water will then be taken to a sewage works for treatment before being discharged safely into a river.
It is essential that these appliances are not connected to the surface water drainage system as this water is discharged directly into a river or stream and may cause pollution.
If you require any further advice please contact your local water authority.
flowchart
graph TD
    A["RAINWATER 'RUN-OFF'"] --> B["SHOWER"]
    B --> C["BATH"]
    C --> D["SINK TOILET"]
    D --> E["DIDET"]
    E --> F["WASHING MACHINE"]
    E --> G["DISHWASHER"]
    F --> H["FOUL DRAIN"]
    G --> I["FOUL SEWERS"]
    H --> J["SEVAGE TREATMENT WORKS"]
    I --> K["TREATED DISCHARGE"]
    J --> L["RIVER"]
    K --> M["RIVER"]
    N["SURFACE WATER DRAINS & SEWERS"] --> O["UNTRATED DISCHARGE"]
    P["P0987"] --> Q["RIVER"]
Electrical connection
Any electrical work required to install this appliance should be carried out by a qualified electrician or competent person.

WARNING: THIS APPLIANCE MUST BE EARTHED.
The manufacturer declines any liability should this safety measure not be observed.
Before switching on, make sure the electricity supply voltage is the same as that indicated on the appliance's rating plate. The rating plate is located at the top of the rim of the open door.
text_image
Mod. ...... Prod. No. ...... Ser. No. ...... P00-12The appliance is supplied with a 13amp plug fitted. In the event of having to change the fuse in the plug supplied, a 13amp ASTA approved (BS1363A) fuse must be used.
Should the plug need to be replaced for any reason, proceed as described below.
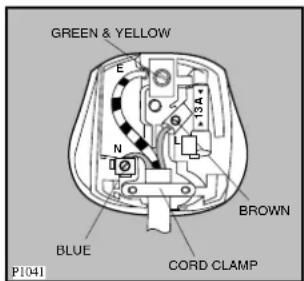
The wires in the mains lead are coloured in accordance with the following code:
Green and Yellow - Earth
Blue - Neutral
Brown - Live
text_image
GREEN & YELLOW E N L BROWN BLUE CORD CLAMP P[04]The wire coloured green and yellow must be connected to the terminal marked with the letter «E» or by the earth symbol ♣ coloured green and yellow.
The wire coloured blue must be connected to the terminal marked «N» or coloured black.
The wire coloured brown must be connected to the terminal marked «L» or coloured red.
Upon completion there must be no cut, or stray strands of wire present and the cord clamp must be secure over the outer sheath.

WARNING:
A cut off plug inserted into a 13 amp socket is a serious safety (shock) hazard.
Ensure that the cut off plug is disposed of safely.
Should the appliance power supply cable need to be replaced, this should be carried out by our Service Force Centre.
Note
When the appliance is installed the power supply cable must be accessible.
Permanent connection
In the case of permanent connection it is necessary that you install a double pole switch between the appliance and the electricity supply (mains), with a minimum gap of 3mm between the switch contacts and of a type suitable for the required load in compliance with the current electrical regulations.
The switch must not break the yellow and green earth cable at any point.
From the Electrolux Group. The world's No. 1 choice.
The Electrolux Group is the world's largest producer of powered appliances for kitchen, cleaning and outdoor use. More than 55 million Electrolux Group products (such as refrigerators, cookers, washing machines, vacuum cleaners, chain saws and lawn mowers) are sold each year to a value of approx. USD 14 billion in more than 150 countries around the world.