ZWF 580E - Washing machine ZANUSSI - Free user manual and instructions
Find the device manual for free ZWF 580E ZANUSSI in PDF.


User questions about ZWF 580E ZANUSSI
0 question about this device. Answer the ones you know or ask your own.
Ask a new question about this device
Download the instructions for your Washing machine in PDF format for free! Find your manual ZWF 580E - ZANUSSI and take your electronic device back in hand. On this page are published all the documents necessary for the use of your device. ZWF 580E by ZANUSSI.
USER MANUAL ZWF 580E ZANUSSI
natural_image
Abstract graphic with geometric shapes and lines, no text or symbols presentUser Manual
GETTING STARTED? EASY.
natural_image
Simple line drawing of a washing machine on a dark background (no text or symbols)ZWG580E ZWG580SE
EN User Manual Washing Machine
ZANUSSI
Before the installation and use of the appliance, carefully read the supplied instructions. The manufacturer is not responsible if an incorrect installation and use causes injuries and damages.
Always keep the instructions with the appliance for future reference.
CHILDREN AND VULNERABLE PEOPLE SAFETY
- This appliance can be used by children aged from 8 years and above and persons with reduced physical, sensory or mental capabilities or lack of experience and knowledge if they have been given supervision or instruction concerning use of the appliance in a safe way and understand the hazards involved.
- Do not let children play with the appliance.
- Children of less than 3 years should be kept away unless continuously supervised.
- Keep all packaging away from children.
- Keep all detergents away from children.
- Keep children and pets away from the appliance door when it is open.
- If the appliance has a child safety device, we recommend you activate it.
- Cleaning and user maintenance shall not be made by children without supervision.
GENERAL SAFETY
- Do not change the specification of this appliance.
- Obey the maximum load volume of 6 kg (refer to the “Programme chart” chapter).
- The operating water pressure (minimum and maximum) must be between 0,5 bar (0,05 MPa) and 8 bar (0,8 MPa).
- The ventilation openings in the base (if applicable) must not be obstructed by a carpet.
-
The appliance is to be connected to the water mains using the new supplied hose-sets. Old hose sets must not be reused.
-
If the supply cord is damaged, it must be replaced by the manufacturer, its Authorised Service Centre or similarly qualified persons in order to avoid a hazard.
- Before maintenance, deactivate the appliance and disconnect the mains plug from the mains socket.
- Do not use water spray and steam to clean the appliance.
- Clean the appliance with a moist soft cloth. Only use neutral detergents. Do not use abrasive products, abrasive cleaning pads, solvents or metal objects.
SAFETY INSTRUCTIONS
INSTALLATION
- Remove all the packaging and the transit bolts.
- Keep the transit bolts. When you move the appliance again you must block the drum.
- Always be careful when you move the appliance because it is heavy. Always wear safety gloves.
- Do not install or use a damaged appliance.
- Obey the installation instruction supplied with the appliance.
- Do not install or use the appliance where the temperature is less than 0^ or where it is exposed to the weather.
- Make sure that the floor where you install the appliance is flat, stable, heat resistant and clean.
- Make sure that there is air circulation between the appliance and the floor.
- Adjust the feet to have the necessary space between the appliance and the carpet.
- Do not install the appliance where the appliance door can not be fully opened.
ELECTRICAL CONNECTION
- The appliance must be earthed.
- Always use a correctly installed shockproof socket.
- Make sure that the electrical information on the rating plate agrees with the power supply. If not, contact an electrician.
- Do not use multi-plug adapters and extension cables.
- Make sure not to cause damage to the mains plug and to the mains cable. Should the mains cable need to be replaced, this must be carried out by our Authorised Service Centre.
-
Connect the mains plug to the mains socket only at the end of the installation. Make sure that there is access to the mains plug after the installation.
-
Do not touch the mains cable or the mains plug with wet hands.
- Do not pull the mains cable to disconnect the appliance. Always pull the mains plug.
- Only for UK and Ireland: The appliance has a 13 amp mains plug. If it is necessary to change the fuse in the mains plug, use a 13 amp ASTA (BS 1362) fuse.
- This appliance complies with the E.E.C. Directives.
WATER CONNECTION
- Make sure not to cause damage to the water hoses.
- Before you connect the appliance to new pipes or pipes not used for a long time, let the water flow until it is clean.
- The first time you use the appliance, make sure that there is no leakage.
USE

WARNING! Risk of injury, electrical shock, fire, burns or damage to the appliance.
- Use this appliance in a household only.
- Obey the safety instructions on the detergent packaging.
- Do not put flammable products or items that are wet with flammable products in, near or on the appliance.
- Make sure that you remove all metal objects from the laundry.
- Do not put a container to collect possible water leakage under the appliance. Contact the Authorised Service Centre to ensure which accessories can be used.
- Do not touch the glass of the door while a programme operates. The glass can be hot.
SERVICE
- To repair the appliance contact an Authorised Service Centre.
- Use original spare parts only.
DISPOSAL

WARNING! Risk of injury or suffocation.
PRODUCT DESCRIPTION
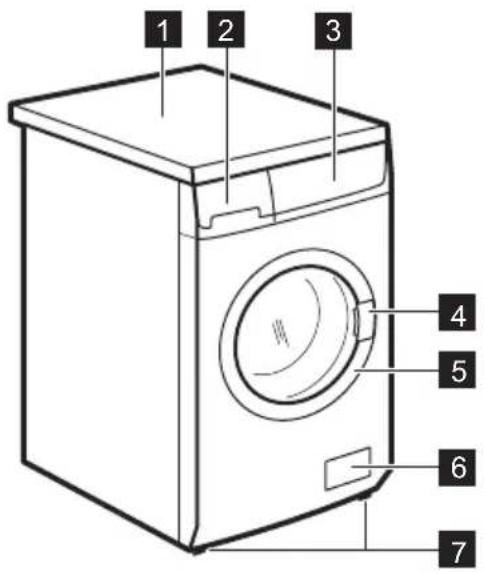
APPLIANCE OVERVIEW
text_image
1 2 3 4 5 6 71 Worktop
2 Detergent dispenser
3 Control panel
4 Door handle
- Disconnect the appliance from the mains supply.
- Cut off the mains cable and discard it.
- Remove the door catch to prevent children and pets to get closed in the appliance.
- Disconnect the appliance from the mains supply.
CHILD SAFETY DEVICE
natural_image
Illustration of a hand holding a small object inside a circular frame, with an arrow indicating rotation (no text or symbols)5 Rating plate
6 Drain pump filter
7 Feet for the appliance level
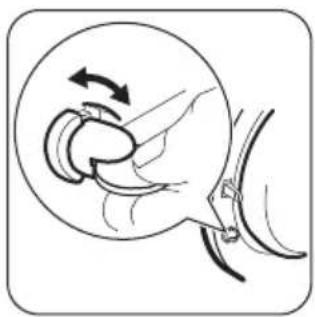
This device prevents children or pets to be closed in the drum.
Turn the device clockwise, until the groove is horizontal. You cannot close the door.
To close the door, turn the device anticlockwise until the groove is vertical.
CONTROL PANEL DESCRIPTION
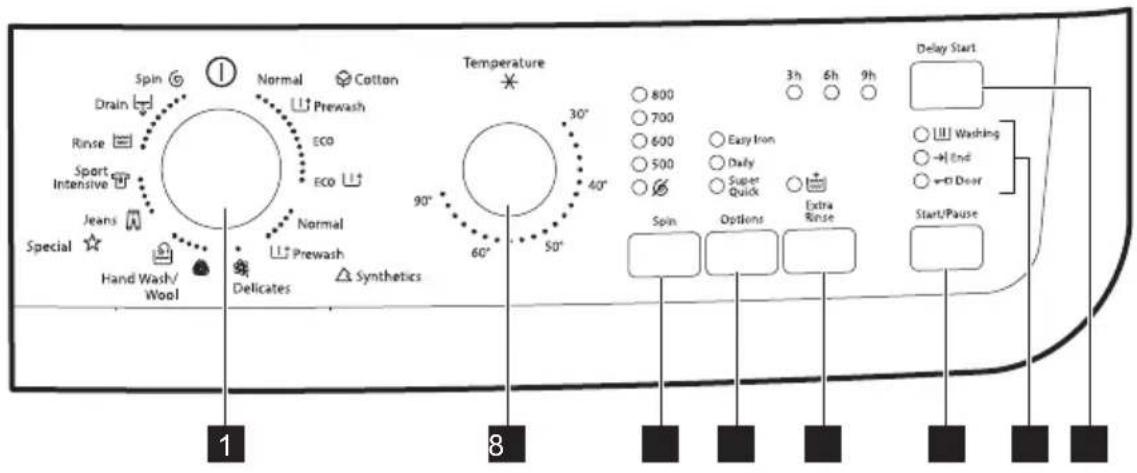
text_image
Spin Drain Rinse Sport Intensive Jeans Special Hand Wash/ Wool Normal Prewash Normal Prewash Delicates Synthetics Temperature 90° 60° 50° 30° 40° 8 1 8 Delay Start 7h 6h 9h 800 700 600 500 Super Quick Easy Iron Daily Extra Rinse Spin Options Start/Pause Washing End Door1 Programme knob
2 Temperature Selector dial (Temperature)
3 Spin reduction button (Spin)
- : No Spin
4 Options button (Options)
- Easy Iron (Easy Iron)
- Daily (Daily)
- Super Quick (Super Quick)
5 Extra rinse button (Extra Rinse)
6 Start/Pause button (Start/Pause)
7 Pilot Lights:
- washing (Washing)
- End (End)
- Door (Door)
8 Delay start button (Delay Start)
PROGRAMMES
PROGRAMME CHART
| Programme Temperature range | Maximum load Maximum spin speed | Programme description (Type of load and soil level) |
Cottons (Cotton)
| Normal90°C - ✗C | 6 kg800 rpm | White cotton and coloured cotton. Normal soil and light soil. |
| PrewashCottons + Pre-wash90°C - ✗C | 6 kg800 rpm | White cotton and coloured cotton. Heavy soil and normal soil. |
| Programme Temperature range | Maximum load Maximum spin speed | Programme description (Type of load and soil level) |
| Eco^1) Cottons Economy90°C - 40°C | 6 kg800 rpm | White cotton and colour-fast cotton. Normal soil. The energy consumption decreases and the time of the washing programme is extended. |
| Eco Cottons Economy+ Prewash90°C - 40°C | 6 kg800 rpm | White cotton and colour-fast cotton. Normal soil with stains. The energy consumption decreases and the time of the washing programme is extended. |
 Synthetics (Synthetics) Synthetics (Synthetics) | ||
| Normal60°C - ✗ | 3 kg800 rpm | Synthetic items or mixed fabric items. Normal soil. |
| PrewashSynthetics + Pre-wash60°C - ✗ | 3 kg800 rpm | Synthetic items or mixed fabric items. Heavy soil and normal soil. |
 Delicates (Delicates) Delicates (Delicates) | ||
| Delicates40°C - ✗ | 3 kg700 rpm | Delicate fabrics as acrylics, viscose, polyester items. Normal soil with stains. |
| Hand wash/Wool (Hand Wash/Wool) | ||
 Wool40°C - ✗ Wool40°C - ✗ | 2 kg800 rpm | Machine washable wool and hand washable wool.2) |
 Hand wash40°C - ✗ Hand wash40°C - ✗ | 2 kg800 rpm | Delicate fabrics with «hand washing» care symbol.2) |
 Special programmes (Special) Special programmes (Special) | ||
| Jeans[TAKS] C - ✗ | 4 kg800 rpm | Items in denim and jersey. Also for dark coloured items. |
| Sport Intensive(624T)40°C - ✗ | 2 kg800 rpm | Synthetic items. A cycle for outdoor sport clothes - normal and heavily soil. The prewash phase is activated automatically to remove soil.3) |
| Other programmes | ||
| Rinse | 6 kg800 rpm | To rinse and spin the laundry. All fabrics. |
| Drain | 6 kg To drain the water in the drum. All fabrics. | |
| Spin | 6 kg800 rpm | To spin the laundry and to drain the water in the drum. All fabrics.4) |
| On/Off | To switch the appliance on or off and for cancelling the programme which is running. | |
1) Standard programmes for the Energy Label consumption values. According to regulation 1061/2010, these programmes are respectively the «Standard 60°C cotton programme» and the «Standard 40°C cotton programme». They are the most efficient programmes in terms of combined energy and water consumption for washing normally soiled cotton laundry.

The water temperature of the washing phase may differ from the temperature declared for the selected programme.
2) During this cycle the drum rotates slowly to ensure a gentle washing. It can seem that the drum doesn't rotate or doesn't rotate properly. Consider this as a normal functioning of the appliance.
3) Do not use any detergent for prewash phase to rinse only with water.
4) The default phase of the spin speed is related to cotton items. Set the spin speed. Make sure that it agrees with the laundry.
Programme options compatibility
| Programme Spin |  | Super Quick | Daily | Easy Iron | Extra Rinse | Delay Start | |
| Normal Cotton ■■■■■■■ | |||||||
  |  | ||||||
 ■■ ■■ |  | ||||||
 |  | ||||||
| Normal Synthetics ■■■■■■■ | |||||||
 [ZZ80] [ZZ80] |  | ||||||
| [2TH5] | ■■■■ ■ ■■ | ||||||
| [WKA0] | ■■ | ■ | |||||
| Programme Spin | 6 | Super Quick | Daily | Easy Iron | Extra Rinse | Delay Start | |
| ■■ | ■ | ||||||
| ■■ | ■■■ | ||||||
| ■■ | ■■ | ||||||
| ■■ | ■■■ | ||||||
| ■ | ■ | ||||||
CONSUMPTION VALUES

The data of this table are approximate. Different causes can change the data: the quantity and type of laundry, the water and ambient temperature.
| Programmes Load (kg) | Energy consumption (kWh) | Water consumption (litre) | Approximate programme duration (minutes) | Remaining moisture (%)1) | |
| Cotton 60 °C 6 1,30 | 58 125 66 | ||||
| Cotton 40 °C 6 0,70 | 58 120 66 | ||||
| Synthetics 40 °C 3 0,50 | 45 95 37 | ||||
| Delicates 40 °C 3 0,55 | 60 65 37 | ||||
| Hand Wash/Wool 30 °C2) | 2 0,25 | 53 55 37 | |||
| Standard cotton programmes | |||||
| Standard 60 °C cotton | 6 1,01 | 49 175 66 | |||
| Standard 60 °C cotton | 3 0,77 | 32 150 66 | |||
| Standard 40 °C cotton | 3 0,65 | 32 141 66 | |||
1) At the end of spin phase.
2) Not available for some models.
| Off Mode (W) Left On Mode (W) | |
| 0,10 0,98 | |
| The information given in the chart above are in compliance with the EU Commission regulation 1015/2010 implementing directive 2009/125/EC. | |
OPTIONS
TEMPERATURE
This knob allows you to select the temperature more suitable to the laundry to be washed.
If you set ✕ position (Cold), the machine will wash with cold water.
SPIN
With this option you can decrease the default spin speed.
The indicator of the set speed comes on.
Additional spin option:
No Spin
- Set this option to remove all spin phases.
- Set it for very delicate fabrics.
- The rinse phase uses more water for some washing programmes.
- The indicator Ⓤ comes on.
SUPER QUICK
With this option you can decrease the programme duration. Set this option for items with light soil or items to refresh.
The related indicator comes on.

We recommend to reduce the laundry loading.
DAILY
Use this option for daily soiled cotton, synthetic or delicate items in order to obtain good washing performance in a short time.
When the option is set, the related indicator comes on.
EASY IRON
The appliance carefully washes and spins the laundry to prevent the creases.
The appliance decreases the spin speed, uses more water and adapts the programme duration to the type of laundry.
The related indicator comes on.
EXTRA RINSE
With this option you can add some rinses to a washing programme.
Use this option for persons allergic to detergents and in areas where the water is soft.
The related indicator comes on.
DELAY START
With this option you can delay the start of a programme by 9, 6 or 3 hours.
The indicator of the set delay time comes on.
BEFORE FIRST USE
- Make sure that the electrical and water connections comply with the installation instructions.
- Remove the polystyrene block and any material from the drum.
-
Put a small quantity of detergent in the compartment for washing phase.
-
Set and start a programme for cotton at the highest temperature without laundry.
This removes all possible dirt from the drum and the tub.

WARNING! Refer to Safety chapters.
LOADING THE LAUNDRY
Open the water tap. Connect the mains plug to the mains socket.
- Pull the door handle to open the appliance door.
- Put the laundry in the drum, one item at a time.
- Shake the items before you put them in the appliance.
Make sure not to put too much laundry in the drum. Refer to maximum loads indicated in "Programme chart".
- Close the door.
text_image
Safety warning symbol with warning sign, circular diagram, and cross mark indicating no need for ventilation or disinfection
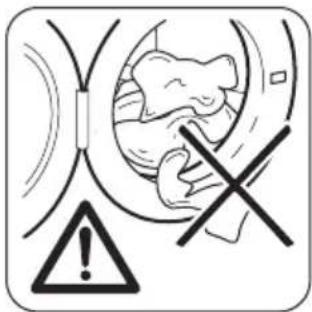
CAUTION! Make sure that no laundry stays between the seal and the door. There is a risk of water leakage or damage to the laundry.
DETERGENT COMPARTMENTS

CAUTION! Use only specified deter- gents for washing machine.

Always obey the instructions that you find on the packaging of the detergent products.
text_image
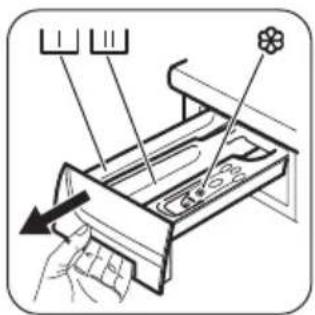
Diagram showing a hand inserting a device into a rack with labeled parts and directional arrowDetergent compartment for prewash or soak phase.
The prewash and soak detergent must be added at the beginning of the wash programme.
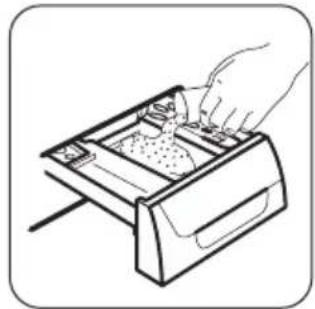
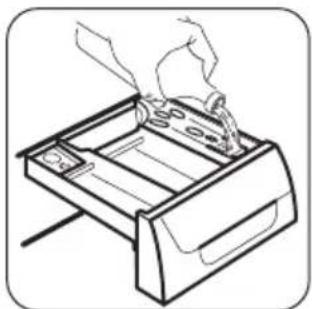
Compartment for powder or liquid detergent used for main wash. If using liquid detergent, pour it just before starting the programme.
Compartment for liquid additives (fabric conditioner, starch).
Follow the product manufacturer's recommendations on quantities to use and do not exceed the maximum mark in the detergent dispenser drawer.
USING DETERGENT AND ADDITIVES
natural_image
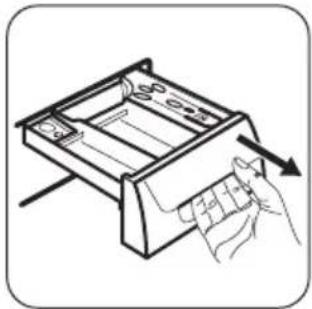
Line drawing of a hand inserting a component into a tray (no text or symbols)Open the detergent drawer.
natural_image
Line drawing of a hand placing food into a tray with a tool (no text or symbols)Measure out the deter- gent.
natural_image
Line drawing of a hand using a tool to clean or inspect the internal components of a mechanical device (no text or symbols)Measure out the fabric conditioner.
natural_image
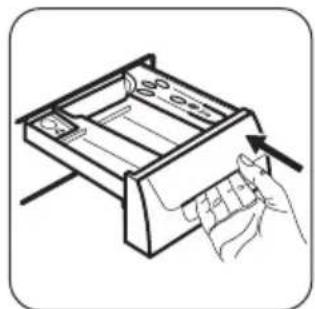
Line drawing of a hand inserting a card into a tray (no text or symbols)Carefully close the deter- gent drawer.
SETTING A PROGRAMME
- Turn the programme knob to switch the appliance on and set the programme.
- The green indicator of the button flashes.

- If necessary, change the temperature and the spin speed or add available options. When you activate an option, the indicator of the set option comes on.
If you set something incorrect, the red indicator of the button flashes.
STARTING A PROGRAMME WITHOUT THE DELAY START
Press the button ▷.||
- The indicator of the button ▷II stops to flash and stays on.
- The programme starts, the door locks, the indicator is on.

The drain pump can operate for a short time at the beginning of the washing cycle.
STARTING A PROGRAMME WITH THE DELAY START
The start of the programme can be delayed by 9, 6 or 3 hours.
- Press the button Delay Start to choose the delay you want to set.
The indicator of the selected delay comes on.
-
Press the button : ▷||
-
The appliance starts the countdown.
- When the countdown is completed, the programme starts automatically.

You can cancel or change the set of the delay start before you press the button. After pressing the button you can only cancel the delay.
To cancel the delay start:
- Press the button to set the appliance to pause.
- Press the button Delay Start until the indicator of the set delay goes off.
Press the button ▷ again to start the programme immediately.
INTERRUPTING A PROGRAMME AND CHANGING THE OPTIONS
You can change only some options before they operate.
- Press ▷II.
The indicator flashes.
-
Change the options.
-
Press again.
The programme continues.
CANCELLING A RUNNING PROGRAMME
-
Turn the programme knob to position to cancel the programme and to deactivate the appliance.
-
Turn the programme knob again to activate the appliance. Now, you can set a new washing programme.

Before starting the new programme the appliance could drain the water. in this case, make sure that the detergent is still in the detergent compartment, if not fill the detergent again.
OPENING THE DOOR WHEN THE DELAY START OPERATES
While the delay start operates, the appliance door is locked and the indicator - is on.
- Press to pause the appliance.
- Wait until the door lock indicator goes off.
- Open the door.
- Close the door.
- Press again.
The delay start continues to operate.
OPENING THE DOOR WHEN THE PROGRAMME OPERATES
While the programme operates, the appliance door is locked and the indicator - is on.

CAUTION! If the temperature and level of the water in the drum are too high, you cannot open the door.
- Turn the programme knob to position deactivate the appliance.
- Wait some minutes until the indicator goes off and then open carefully the appliance door.
- Close the appliance door.
- Set the programme again.

AT THE END OF THE PROGRAMME
- The appliance stops automatically.
- The indicator of the goes off.
- The door lock indicator and the indicator go off. The indicator goes on.
- You can open the door.
- Remove the laundry from the appliance. Make sure that the drum is empty.
- Close the water tap.
- Turn the programme knob to the position to deactivate the appliance.
- Keep the door ajar, to prevent the mildew and odours.
The washing programme is completed, but there is water in the drum:
- The drum turns regularly to prevent the creases in the laundry.
- The door lock indicator is on. The door stays locked.
- You must drain the water to open the door.
To drain the water:
-
Turn the programme knob to spinning or draining programme.
-
Press the button ▷ ||. If necessary, decrease the spin speed.
The appliance spins and drains or only drains.
- When the programme is completed and the door lock indicator goes off, you can open the door.
HINTS AND TIPS
THE LAUNDRY LOAD
- Divide the laundry in: white, coloured, synthetics, delicates and wool.
- Obey the washing instructions that are on the laundry care labels.
- Do not wash together white and coloured items.
- Some coloured items can discolour with the first wash. We recommend that you wash them separately for the first times.
- Button up pillowcases, close zippers, hooks and poppers. Tie up belts.
- Empty the pockets and unfold the items.
- Turn inside out multilayered fabrics, wool and items with painted illustrations.
- Remove hard stains.
- Wash with a special detergent heavy soil stains.
- Be careful with the curtains. Remove the hooks or put the curtains in a washing bag or pillowcase.
- Do not wash in the appliance laundry without hems or with cuts. Use a washing bag to wash small and/or delicate items (e.g. underwired bras, belts, tights, etc.).
- A very small load can cause balance problems with the spin phase. If this occurs, adjust manually the items in the tub and start the spin phase again.
STUBBORN STAINS
For some stains, water and detergent is not sufficient.
We recommend that you remove these stains before you put the items in the appliance.
Special stain removers are available. Use the special stain remover that is applicable to the type of stain and fabric.
- Turn the programme knob to the position deactivate the appliance.


The appliance drains and spins automatically after approximately 18 hours (except for Wool programme).
STAND-BY
Once the programme has finished, after a few minutes the energy saving system will be enabled. The indicator lights switch off.
By pressing any button the appliance will come out of the energy saving status.
DETERGENTS AND ADDITIVES
- Only use detergents and additives specially made for washing machines:
– powder detergents for all types of fabric, - powder detergents for delicate fabrics (40 °C max) and woollens,
– liquid detergents, preferably for low temperature wash programmes (60 °C max) for all types of fabric, or special for woollens only. - Do not mix different types of detergents.
- To help the environment, do not use more than the correct quantity of detergent.
- Obey the instructions that you find on the on packaging of these products.
- Use the correct products for the type and colour of the fabric, the programme temperature and the level of soil.
- If your appliance has not the detergent dispenser with the flap device, add the liquid detergents with a dosing ball (supplied by the detergent's manufacturer).
ECOLOGICAL HINTS
- Set a programme without the prewash phase to wash laundry with normal soil.
- Always start a washing programme with the maximum load of laundry.
- If necessary, use a stain remover when you set a programme with a low temperature.
- To use the correct quantity of the detergent, check the water hardness of your domestic system
WATER HARDNESS
If the water hardness in your area is high or moderate, we recommend that you use a water softener for washing machines. In areas where the
water hardness is soft it is not necessary to use a water softener.
To know the water hardness in your area, contact your local water authority.
CARE AND CLEANING

WARNING! Refer to Safety chapters.
EXTERNAL CLEANING
Clean the appliance only with soap and warm water. Fully dry all the surfaces.

CAUTION! Do not use alcohol, solvents or chemical products.
DESCALING
If the water hardness in your area is high or moderate, we recommend that you use a water descaling product for washing machines.
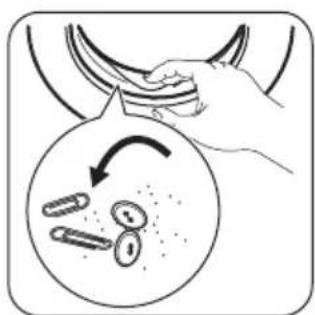
Regularly examine the drum to prevent limescale and rust particles.
To remove rust particles use only special products for washing machine. Do this separately from the laundry wash.

Always obey the instructions that you find on the packaging of the product.
MAINTENANCE WASH
With the low temperature programmes it is possible that some detergent stays in the drum. Make regularly a maintenance wash. To do this:
- Remove the laundry from the drum.
- Set the cotton programme with the highest temperature with a small quantity of detergent.
DOOR SEAL
natural_image
Illustration of a hand holding a curved object with an arrow pointing to three oval objects inside a circle (no text or symbols)Regularly examine the seal and remove all objects from the inner part.
CLEANING THE DETERGENT DISPENSER
Clean regularly the washing powder and additive dispenser drawer.
Use the correct quantity of the water softener. Obey the instructions that you find on the packaging of the product.
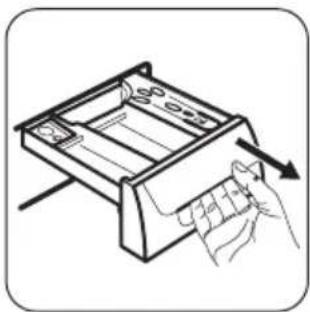
To clean the detergent drawer it is necessary to remove it from its site.
natural_image
Line drawing of a hand holding a tray with arrows indicating direction (no text or symbols)Open the drawer.
natural_image
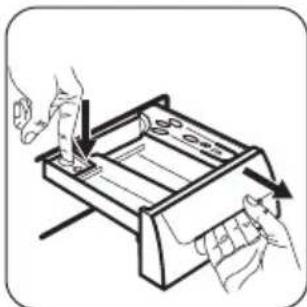
Line drawing of two hands operating a mechanical device with a tool, no text or symbols presentPress the catch downwards as described in the graphic and pull it out.
natural_image
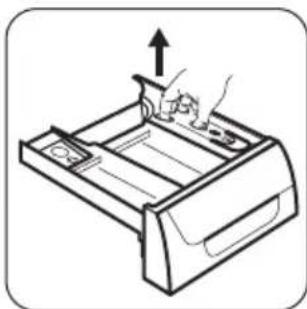
Line drawing of a mechanical device with an upward arrow indicating motion or force (no text or symbols)Remove the top part of the additive compartment to aid cleaning.
Flush it out under a tap, to remove any traces of accumulated powder.
natural_image
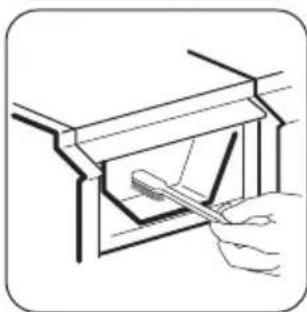
Line drawing of a hand using a tool to cut or inspect a mechanical component (no text or symbols)Make sure that all washing powder residue is removed from the upper and lower part of the recess.
Use a small brush to clean the recess.
natural_image
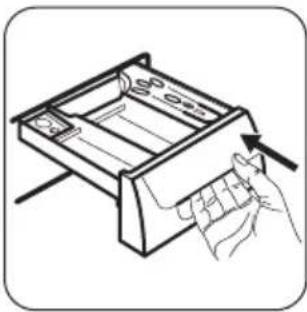
Line drawing of a hand inserting a tray into a container with an arrow indicating direction (no text or symbols)Close the drawer and run the rinse programme without any clothes in the drum.
CLEANING THE DRAIN FILTER
The pump should be inspected regularly and particularly if:
- the appliance does not empty and/or spin;
- the appliance makes an unusual noise during draining phase due to objects such as safety pins, coins and so on blocking the pump;
- a problem with water draining is detected (see chapter 'Troubleshooting' for more details).

CAUTION! Switch the appliance off and remove the mains plug from the socket.
Proceed as follows:
- Unplug the appliance.
- If it is necessary, wait until the water has cooled down.
natural_image
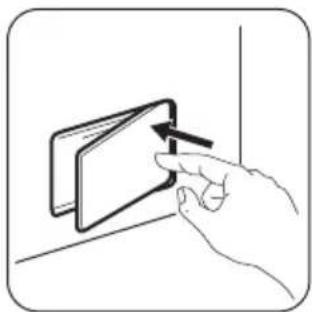
Hand inserting a card into a folder, showing the arrow (no text or symbols)Open the pump door. Place a container close to the pump to collect any spillage.
text_image
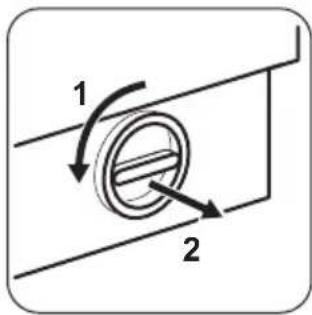
1 2Unscrew carefully the drain filter to drain out the water.
When no more water comes out, remove the filter. If necessary, use pliers.

Always keep a rag nearby to dry up any water spillage.
natural_image
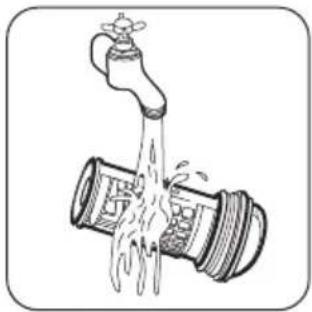
Illustration of a faucet with water flowing out, no text or symbols presentClean the filter under a tap, to remove any traces of fluff.
natural_image
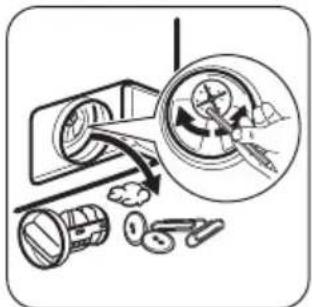
Diagram showing a car wheel with a magnified view of the wheel and surrounding components (no text or symbols)Remove foreign bodes and fluff from the filter seat and from the pump impeller.
Check carefully whether the pump impeller rotates (it rotates jerkily).
text_image
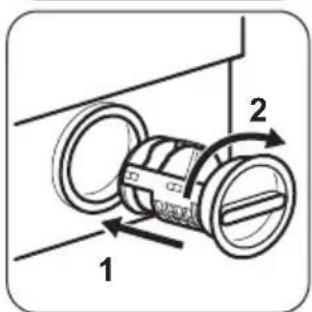
1 2Replace the filter into the pump by inserting it correctly into the special guides.
Screw firmly the filter.
natural_image
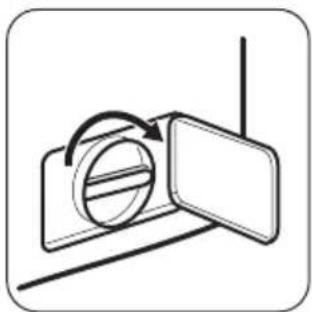
Diagram of a camera with an open lens and rotating arrow, no text or symbols presentClose the pump door.

CAUTION! Never remove the filter during a washing cycle, always wait until the appliance has finished the cycle, and is empty.

CAUTION! When refitting the filter, ensure it is securely re-tightened so as to stop leaks and young children being able to remove it.
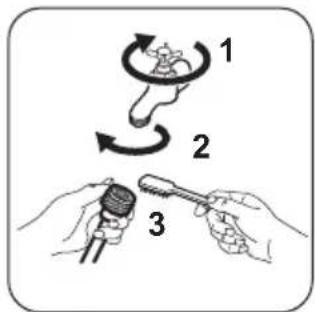
CLEANING THE INLET HOSE AND THE VALVE FILTER
text_image
Diagram illustrating three-step robotic manipulation: hand rotation, tool use, and tool path with labeled steps 1, 2, and 3.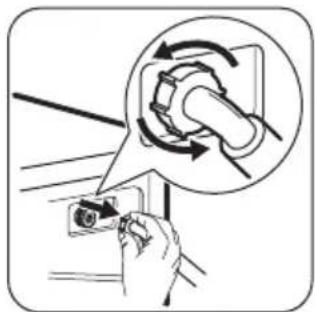
natural_image
Illustration of a hand holding a small electronic component with a magnified inset showing rotational motion (no text or symbols)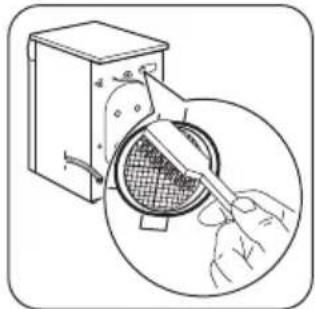
natural_image
Illustration of a hand using a tool to clean or store contents inside a machine (no text or symbols visible)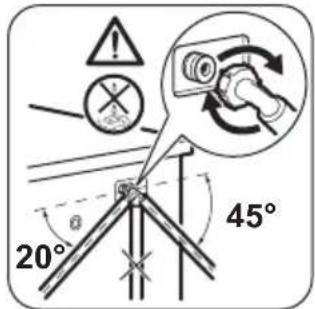
text_image
20° 45°EMERGENCY DRAIN
Because of a malfunction, the appliance cannot drain the water.
If this occurs, do steps (1) through (9) of 'Cleaning the drain filter'. If necessary, clean the pump.
When you drain the water with the emergency drain procedure, you must activate again the drain system:
-
When you drain the water with the emergency drain procedure, you must activate again the drain system: Put 2 litres of water in the main wash compartment of the detergent dispenser.
-
Start the programme to drain the water
FROST PRECAUTIONS
If the appliance is installed in an area where the temperature can be less than 0^ C, remove the remaining water from the inlet hose and the drain pump.
- Disconnect the mains plug from the mains socket.
- Close the water tap.
- Put the two ends of the inlet hose in a container and let the water flow out of the hose.
- Empty the drain pump. Refer to the emergency drain procedure.
- When the drain pump is empty, install the inlet hose again.

WARNING! Make sure that the temperature is more than 0 °C before you use the appliance again.
The manufacturer is not responsible for damages caused by low temperatures.
TROUBLESHOOTING

WARNING! Refer to Safety chapters.
INTRODUCTION
During the appliance operation it is possible that the red indicator ▷‖ flashes to indicate that the appliance is not working.
First try to find a solution to the problem (refer to the "Possible failures" table). If not, contact the Authorised Service Centre.

WARNING! Deactivate the appliance before you do the checks.
Once the problem has been eliminated, press the button to restart the programme. If after all checks, the problem persists, contact your Authorised Service Centre.
POSSIBLE FAILURES
| Problem Possible solution | |
| The programme does not start. | Make sure that the mains plug is connected to the mains socket. |
| Make sure that the appliance door is closed. | |
| Make sure that there is not a damaged fuse in the fuse box. | |
| Make sure that the Start/Pause has been pressed. | |
| If the delay start is set, cancel the setting or wait for the end of count-down. | |
| The appliance does not fill with water properly. | Make sure that the water tap is open. |
| Make sure that the pressure of the water supply is not too low. For this information, contact your local water authority. | |
| Make sure that the water tap is not clogged. | |
| Make sure that the filters of the inlet hoses and the filters of the valves are not clogged. Refer to “Care and cleaning”. | |
| Make sure that the inlet hoses have no kinks or bends. | |
| Make sure that the connections of the water inlet hoses are correct. | |
| The appliance does not fill with water and drain immediately. | Make sure that the drain hose is in the correct position. The hose may be too low. |
| The appliance does not drain the water. | Make sure that the sink spigot is not clogged. |
| Make sure that the drain hose has no kinks or bends. | |
| Make sure that the drain filter is not clogged. Clean the filter, if necessary. Refer to 'Care and cleaning'. | |
| Make sure that the connection of the drain hose is correct. | |
| Set the drain programme if you set a programme without drain phase. | |
| Set the drain programme if you set an option which ends with water in the tub. | |
| The spin phase does not operate or the washing cycle lasts longer than usually. | Set the spin programme. |
| Make sure that the drain filter is not clogged. Clean the filter, if necessary. Refer to 'Care and cleaning'. | |
| Adjust manually the items in the tub and start the spin phase again.This problem may be caused by balance problems. | |
| There is water on the floor. Make sure that the couplings of the water hoses are tight and there is not water leakages. | |
| Make sure that the drain hose have no damages. | |
| Make sure you use the correct detergent and the correct quantity of it. | |
| You cannot open the appli-ance door. | Make sure that the washing programme is finished. |
| Set the drain or the spin programme if there is water in the drum. | |
| The appliance makes an unusual noise. | Make sure the levelling of the appliance is correct. Refer to 'Installation'. |
| Make sure that the packaging and/or the transit bolts are removed. Refer to 'Installation'. | |
| Add more laundry in the drum. The load may be too small. | |
| The washing results are not satisfactory. | Increase the detergent quantity or use a different detergent. |
| Use special products to remove the stubborn stains before you wash the laundry. | |
| Make sure that you set the correct temperature. | |
| Decrease the laundry load. | |
| You cannot set an option. Make sure that you press only the wanted button(s). | |
After the check, activate the appliance. The programme continues from the point of interruption. If the problem occurs again, contact the Authorised Service Centre.
TECHNICAL DATA
| Dimension Width/ Height/ | Depth/ Total depth | 552 mm/ 850 mm/ 600 mm/ 642 mm |
| Electrical connection Voltage | Overall powerFuseFrequency | 220-230 V2200 W10 A50 Hz |
| Level of protection against ingress of solid particles and moisture ensured by the protective cover, except where the low voltage equipment has no protection against moisture | IPX4 | |
| Water supply pressure MinimumMaximum | 0,5 bar (0,05 MPa)8 bar (0,8 MPa) | |
| Water supply 1) Cold water | ||
| Maximum Load Cotton 6 kg | ||
| Energy Efficiency Class A+ | ||
| Spin Speed Maximum 800 rpm | ||
1) Connect the water inlet hose to a water tap with a 3/4" thread.
Recycle the materials with the symbol .Put the packaging in applicable containers to recycle it. Help protect the environment and human health and to recycle waste of electrical and electronic appliances. Do not dispose appliances marked with
the symbol with the household waste. Return the product to your local recycling facility or contact your municipal office.
WWW.ZANUSSI.COM/SHOP