Captain Cook Automatic R32505153 - Watch Rado - Free user manual and instructions
Find the device manual for free Captain Cook Automatic R32505153 Rado in PDF.


User questions about Captain Cook Automatic R32505153 Rado
0 question about this device. Answer the ones you know or ask your own.
Ask a new question about this device
Download the instructions for your Watch in PDF format for free! Find your manual Captain Cook Automatic R32505153 - Rado and take your electronic device back in hand. On this page are published all the documents necessary for the use of your device. Captain Cook Automatic R32505153 by Rado.
USER MANUAL Captain Cook Automatic R32505153 Rado
Innovative, durable and skin-friendly: introduced by Rado in 1986, high-tech ceramic has become our signature. In metallic or non-metallic colors, with a glossy, matt, satin-brushed or decorated finish, it is the most versatile of our materials.
HIGH-TECH HARDMETAL
Pure, simple and tough: we pioneered the use of this material by introducing the scratch-resistant watch, Diastar 1 (The Original), in 1962.
CERAMOS
Ceramos™ combines high-tech ceramic - specifically titanium carbide – with a metallic alloy. Light and adaptable to skin temperature, it has the same qualities and benefits as high-tech ceramic, enhanced by a metallic luster.
CARBON DIFFUSED STEEL
Through the diffusion of a high quantity of carbon at a low temperature, this treatment makes it possible to harden the surface of steel parts.
SAPPHIRE CRYSTAL
High-tech sapphire crystal is used throughout our collection. The application of edge-to-edge crystal and metallization are standard features of Rado.
NOTE: In order to reduce reflection, the sapphire crystal of some Rado collections has an anti-reflective coating on both sides. With time scratches may appear on the anti-reflective coating, this is normal wear and tear.
HOW HARD IS HARD?
The hardness of Rado high-tech materials guarantees durability and brilliance. The Vickers scale is used to indicate hardness: the higher a value, the greater the resistance.
The value of 10,000 is attributed only to natural diamonds and to the Rado high-tech diamond surface.
NOTE: Rado watches are hard but not indestructible. Although our high-tech materials are resistant, Rado watches must be treated with care. They should not be dropped, and sharp knocks should be avoided. If hit hard enough, the materials may break.
PRECIOUS STONES
The name “Jubilé” refers to all the Rado products with diamonds or other precious
stones. Depending on the model, the name "Jubilé" may or may not figure on the dial. Details regarding the precious stones used on Jubilé watches may be found on the accompanying Precious Stone Certificate.
The quality of a diamond is defined by 4C's: Carat, Clarity, Color and Cut.
CARAT
The weight of a diamond is measured in carats. 1 carat is the equivalent of 0.2 grams.
Stones of various weight classes and sizes are used in Rado “Jubilé” models.
CLARITY
The diamond clarity rating of stones used by Rado is generally VVS (Very Very Small Inclusions) on the case and VS-SI (Very Small - Small Inclusions) on the dial.
COLOR
The color spectrum ranges from colorless to yellow.
Rado uses Top Wesselton (superior quality) diamonds.
CUT
The cut determines the fire, brilliance and the luster of the diamond. Nearly all Rado diamonds are classed as 8/8 or full cut(brilliant).
There is no uniform nomenclature for describing the purity and color of other precious stones. Rado uses only precious stones of high quality.
QUARTZ WATCHES
Rado quartz watches are equipped with top-quality Swiss button-type zinc-silver oxide or lithium batteries. Under
normal conditions, a battery should last at least 30 months. The battery must be changed when the seconds hand starts to move in 4-second intervals (or when, on a multifunction watch, the digital display begins to blink). Battery exhaustion in a watch without a seconds hand becomes apparent only when the hands stop moving altogether. Battery changes should only be performed by an authorized Rado dealer or Service Center to ensure that only original parts are used and that your watch is properly tested for water resistance. A worn-out battery should be replaced immediately in order to reduce the risk of leakage and consequent damage to the movement.
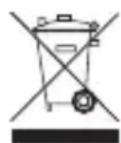
Collection and treatment of end of life quartz watches*: This symbol indicates that this product should not be disposed with household waste. It has to be returned to a local authorized collection system. By following this procedure
you will contribute to the protection of the environment and human health. The recycling of the materials will help to conserve natural resources.

* Valid in the EU member states and in any countries with corresponding legislation.
AUTOMATIC WATCHES
Automatic watches are precision instruments powered by the wearer's movement.
Before using your automatic watch, we strongly advise winding the watch by turning the crown 15-20 times. A fully wound Rado automatic watch has a running reserve of at least 36 hours. If the watch stops (e.g. if it has not been worn for some time or during periods of low activity), it should be wound manually. To wind an automatic watch manually: place the crown in position 1. Turn the crown forwards several times.
IMPORTANT: Magnetic fields can affect the accuracy of the watch.
NOTE: Date setting is not recommended between 8 pm and 2 am.
SWISS PRECISION
The name Rado guarantees a Swiss quality watch movement of great precision. Every movement undergoes numerous controls before being installed in a Rado watch. The average deviation of a Rado quartz watch should not exceed 15 seconds per month. The average deviation of a Rado automatic watch should not exceed -5 to +20 seconds per day.
WATER RESISTANCE
All Rado watches are water-resistant. They can withstand a water pressure of at least 3 bar (depth of 30 meters). Water resistance is not a permanent condition. To ensure permanent water resistance, the watch should be checked once a year.
To ensure conformance with the warranty regulations, these operations must be performed by an authorized Rado dealer or authorized Rado Service Center.
NOTE: Water resistance information in “meters” or “bar” refers to theoretical pressure and temperature test norms and does not indicate actual diving depths.
IMPORTANT: To ensure optimal water resistance, the following must be observed: after every operation involving the crown, return it to position 1 or screw it back in by
pressing and turning it forwards simultaneously. Avoid shocks to the crown. Do not use either the crown or chronograph pushers underwater.
TEMPERATURE
Avoid exposing your Rado watch to extreme temperatures (higher than 60^ C/140°F or lower than 0^ C/32°F), extreme changes in temperature, or high humidity.
MAINTENANCE
Please note that having your Rado watch serviced every 5 to 7 years will not only prolong its life but also maintain its value. For perfect maintenance, please visit only your official Rado dealer or Service Center (a list of Rado Service Centers can be found at the end of this manual or on the Internet). Your Rado watch will also benefit from being cleaned from time to time with lukewarm,
slightly soapy water and the help of a toothbrush. This cleaning is especially recommended if the watch has been in contact with salt water or cosmetics.
To preserve the condition of your leather strap for as long as possible please avoid contact with water, dampness, prolonged exposure to sunlight or with greasy substances and cosmetic products.
SKIN-FRIENDLINESS
For Rado, luxury means not only beauty and exquisite materials, but also personal comfort. Apart from ensuring durability, our high-tech materials ensure that Rado watches are gentle to the skin and smooth on the wrist.
OPERATING INSTRUCTIONS
HOW TO FIND THE RELEVANT SECTION FOR YOUR WATCH
Engraved on the back of your watch is an 8-digit reference number. The first three digits refer to the movement. In the reference number 115.0653.3, for example, 115 is the caliber used in the watch. Please review the following caliber list and refer to the relevant section.
Calibers:
073 ____ page 21
080 page 23
084 ____ page 22
111, 113 ____ page 21
114 ____ page 22
115, 129 ____ page 21
140, 150 ____ page 23
152 ____ page 21
153 page 23
156, 157, 160, 161 ____ page 21
193,210 ____ page 41
212, 218, 219, 239, 256, 271 ____ page 21
277 ____ page 24
278 ____ page 21
289 page 34
290 page 46
291 ____ page 21
312 page 37
318, 322 ____ page 23
370 page 39
420 ____ page 23
510 page 57
538 page 37
541 page 39
542 page 37
550, 557, 561, 580 ____ page 48
603 ____ page 54
604 ____ page 53
609, 629 ____ page 48
636 page 50
642 page 55
648, 650, 652, 653 ____ page 50
656, 657, 658, 661 ____ page 48
663 ____ page 51
674 ____ page 54
734, 763 ____ page 48
764 page 50
765 ____ page 27
766 page 48
770 page 50
771 page 56
772,773 ____ page 48
963 page 23
964 ____ page 24
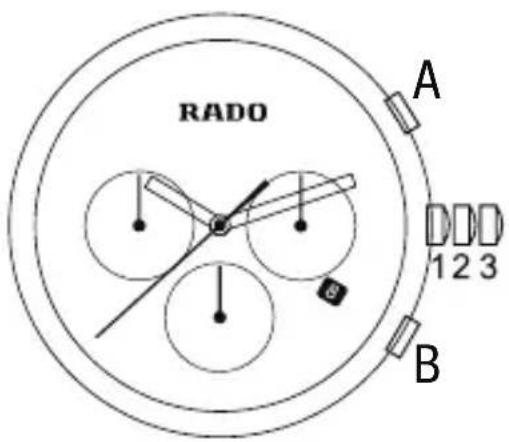
text_image
RADO A 1 2 3 BQUARTZ WATCHES
WITH DATE DISPLAY
CALIBERS: 073, 111, 113, 115*, 129*, 152, 156, 157*, 160, 161*, 212, 218, 219, 239, 256, 271, 278*, 291
* On certain models these movements have no date display (jewelry version) and only the positions 1 and 3 are functional.
THE CROWN HAS 3 POSITIONS
1. Normal position
When pressed in against the case (position 1), the crown ensures that the watch is water-resistant (if not damaged).
2. To set the date
Pull the crown out to position 2, turn it forwards or backwards (depending on the movement) to the desired date.
Push the crown back to position 1.
3. To set the time
Pull the crown out to position 3 and turn it forwards or backwards to the desired time. If the watch is equipped with a seconds hand, accept by pushing the crown back to position 1 to coincide with a given time signal.
QUARTZ WATCHES WITH DATE DISPLAY AND MOON PHASE CALIBER: 084
THE CROWN HAS 3 POSITIONS
1. Normal position
When pressed in against the case (position 1), the crown ensures that the watch is water-resistant (if not damaged).
2. Set the date and moon phase
To set the moon phase, pull the crown out to position 2 and turn it backwards until the full moon appears in the centre of the moon phase dial. Use a calendar that lists the moon's phases to find out the date of the last full moon. Turn the crown backwards again until the moon is in the position indicated on the calendar. Turn the crown forwards until the desired date is displayed. Press the crown back into position 1.
3. To set the time
Pull the crown out to position 3 and turn it forwards or backwards to set the desired time. If the watch is equipped with a seconds hand, accept by pushing the crown back to position 1 to coincide with a given time signal.
QUARTZ WATCHES WITH DAY/DATE DISPLAY CALIBER: 114
THE CROWN HAS 3 POSITIONS
1. Normal position
When pressed in against the case (position 1), the crown ensures that the watch is water-resistant (if not damaged).
2. To set the date and day
Pull the crown out to position 2, turn it forwards to set the desired date. Turn it backwards to set the desired day of the week. Push the crown back to position 1.
3. To set the time
Pull the crown out to position 3 and turn it forwards or backwards to set the desired time. Accept by pushing the crown back to position 1 to coincide with a given time signal.
QUARTZ WATCHES
WITHOUT DATE DISPLAY
CALIBERS: 080, 140, 150, 153, 318, 322, 420, 963
THE CROWN HAS 2 POSITIONS
1. Normal position
When pressed in against the case (position 1), the crown ensures that the watch is water-resistant (if not damaged).
2. To set the time
Pull the crown out to position 2 and turn it forwards or backwards to set the desired time. If the watch is equipped with a seconds hand, accept by pushing the crown back to position 1 to coincide with a given time signal.
QUARTZ WATCHES WITHOUT CROWN CALIBER: 964
To set the time on crownless watches, use the magnetic pin or the enclosed magnet accessory to press the respective contacts on the caseback forwards (+) or backwards (−) to set the desired time.
To adjust the time forwards or back one minute at a time, maintain contact for 1 second; for 30-minute adjustments, maintain contact for around 3 seconds; to adjust by several hours, maintain contact for around 4 seconds.
QUARTZ CERAMIC TOUCH WATCHES WITHOUT DATE DISPLAY CALIBER: 277
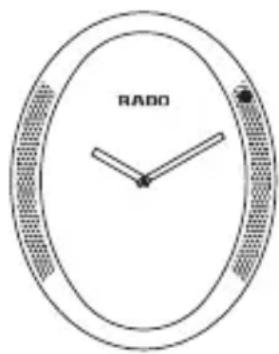
This watch has no crown. It is activated and the time is set by touch only.
text_image
RADO1. Activating setting mode
Activation is always a two-step process to avoid any unwanted changes in time setting.
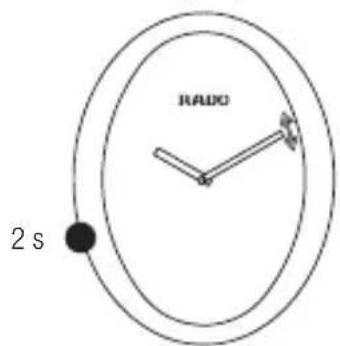
1a. Touch the case at 8 o'clock for approximately 2 seconds. The minute hand will move slightly.
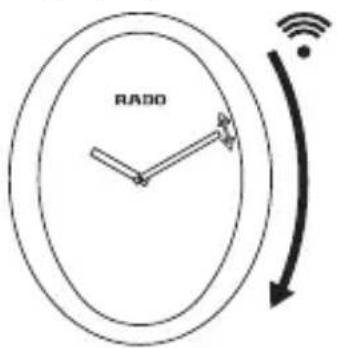
text_image
RADIO 2 s1b. Immediately slide your index finger down the right hand side of the watch case from top to bottom. The watch will emit a short 'beep' and the minute hand will move slightly again.
text_image
RADO2. Setting the time
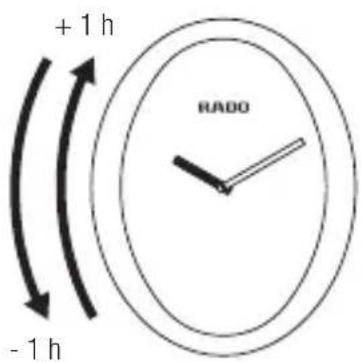
2a. Setting the hours / Changing time zone
Slide your finger along the left hand side of the case clockwise = +1 hour, or anti-clockwise = -1 hour.
text_image
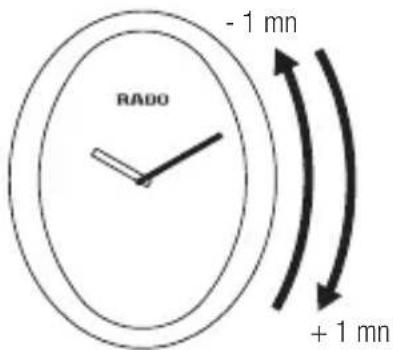
+ 1 h - 1 h RADO2b. Setting the minutes
Slide your finger along the right hand side of the case clockwise = + 1 minute or anti-clockwise = - 1 minute.
text_image
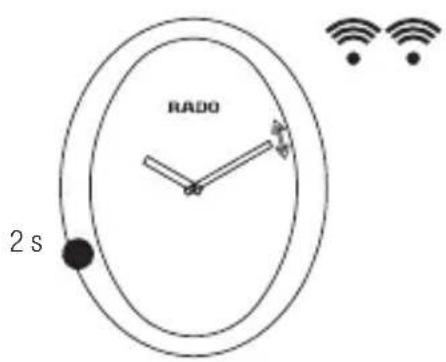
RADO - 1 mn + 1 mn3. Confirmation / Exit setting mode
Touch the case at 8 o'clock for approximately 2 seconds to confirm the changes made to the time setting in step 2. The minute hand will move slightly and the watch will emit two 'beeps'. Setting mode is now deactivated.
text_image
RADO 2 sWithout this confirmation, the watch will automatically exit setting mode after 10 seconds and will not retain the changes made in Step 2. The watch will return to the previous time setting.
QUARTZ CERAMIC TOUCH WATCHES WITH A SECOND TIME ZONE WITHOUT DATE DISPLAY CALIBER: 765
This watch has no crown. It is activated and the time is set by touch only. This watch has a 2nd Time Zone function, which is synchronised with the main one.
TO SET THE MAIN TIME ZONE (MAIN DIAL)
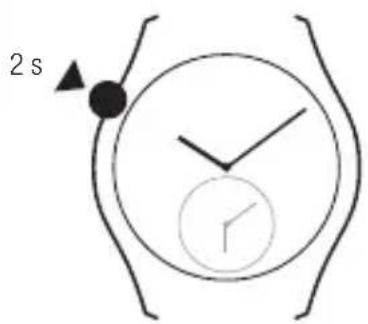
1. Activating setting mode
Activation is always a two-step process to avoid any unwanted changes in time setting.
1a. Touch the case at 10 o'clock until the minute hand on the main dial moves slightly.
text_image
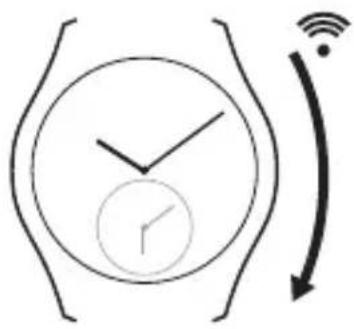
2 s1b. Immediately slide your finger along the right hand side of the case from top to bottom. The minute hand moves slightly again and the watch emits a small beep.
text_image
Diagram showing a clock with hour and minute hands, accompanied by a Wi-Fi signal icon indicating wireless communication.2. Setting the time
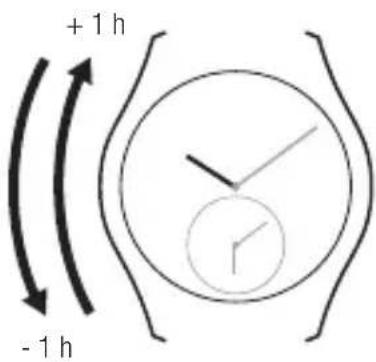
2a. Setting the hours
Slide your finger along the left hand side of the case clockwise = + 1 hour or anti-clockwise = - 1 hour.
text_image
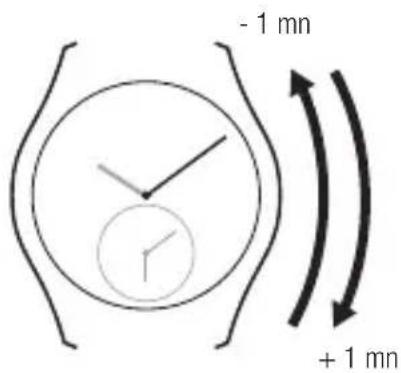
+ 1 h - 1 h2b. Setting the minutes
Slide your finger along the right hand side of the case clockwise = + 1 minute or anti-clockwise = - 1 minute.
text_image
- 1 mn + 1 mn3. Confirmation / Exit setting mode
Touch the case at 10 o'clock or at 8 o'clock for 2 seconds. The watch emits two small beeps. Setting mode is now deactivated and the time cannot be changed accidentally.
text_image
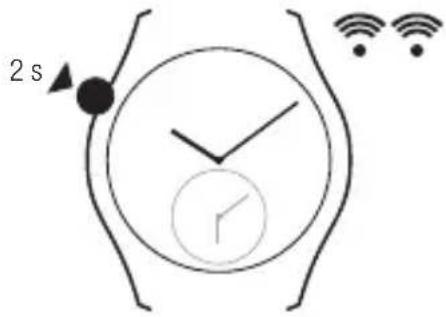
2 sTO SET THE SECOND TIME ZONE (SMALL DIAL)
1. Activating setting mode
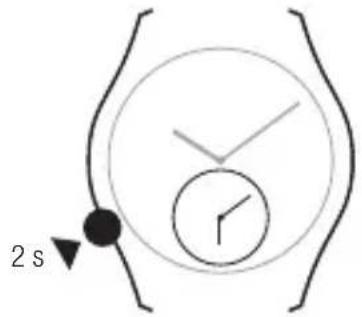
1a. Touch the case at 8 o'clock, the minute hand on the small dial moves slightly.
text_image
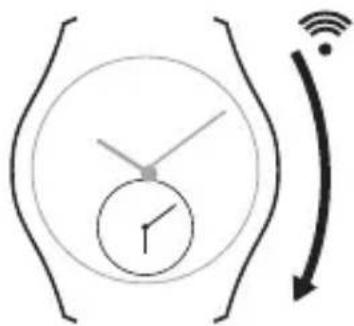
2 s1b. Immediately slide your finger along the right hand side of the case from top to bottom. The minute hand moves slightly again and the watch emits a small beep.
text_image
Diagram showing a clock with time and signal icon, indicating wireless communication or data transfer.2. Setting the time
2a. Setting the hours
Slide your finger along the left hand side of the case clockwise = +1 hour or anti-clockwise = -1 hour.
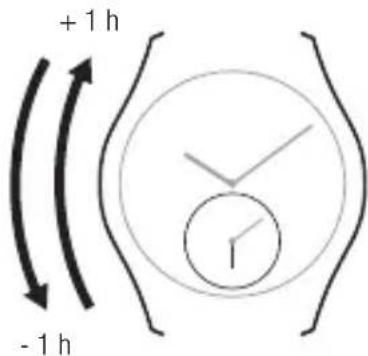
text_image
+ 1 h - 1 h2b. Setting the quarter hours (minimum possible time zone difference)
Slide your finger along the right hand side of the case clockwise = + 14 hour or anti-clockwise = - 14 hour.

text_image
- 1/4 h + 1/4 h3. Confirmation / Exit setting mode
Touch the case at 8 o'clock or at 10 o'clock for 2 seconds. The watch will emit two small beeps. Setting mode is now deactivated and the time cannot be changed accidentally.
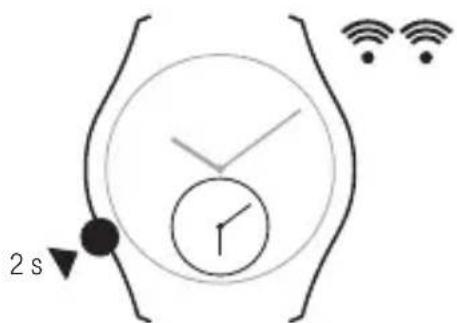
text_image
2 sTIME ZONE SWAP
1. Activating setting mode
1a. Touch the case either at 8 o'clock (or 10 o'clock), the minute hand on the small (or main) dial moves slightly.
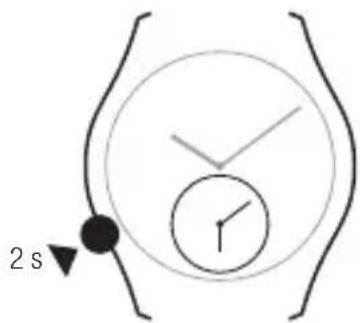
text_image
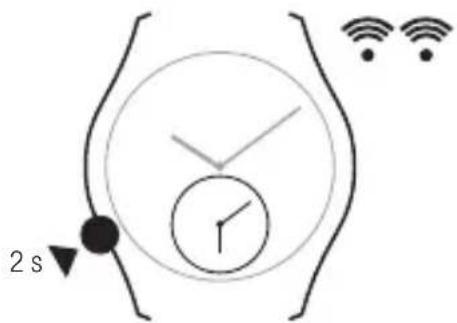
2 s1b. Immediately slide your finger along the right hand side of the case from top to bottom. The same minute hand moves slightly again and the watch emits a small beep.
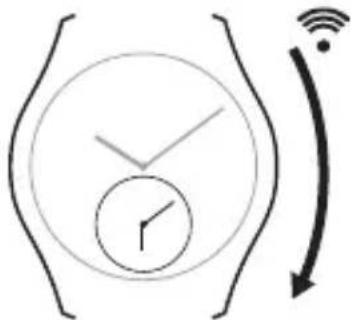
text_image
Diagram showing a clock with hour and minute hands, accompanied by a Wi-Fi signal icon and directional arrow.2. Swapping time zones
Touch the case simultaneously at 9 o'clock and 3 o'clock for 2 seconds. The hands on both dials will move quickly and the time set on each dial will move to the other one.
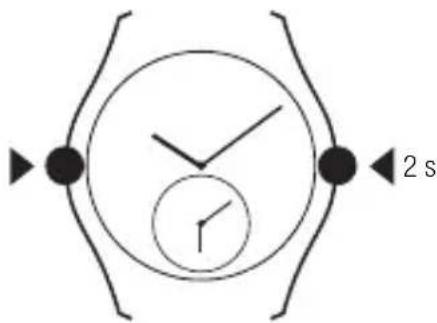
text_image
2 s3. Confirmation / Exit setting mode
Touch the case either at 8 o'clock (or 10 o'clock) for 2 seconds. The watch will emit two small beeps. Setting mode is now deactivated and the time cannot be changed accidentally.
text_image
2 sRESYNCHRONISING THE MINUTE HANDS
If the minute hands on the small and big dials are no longer aligned you can activate a special mode to resynchronise them.
1. Activating setting mode
1a. Touch the case at 8 o'clock, until the minute hand on the small dial moves slightly from right to left.
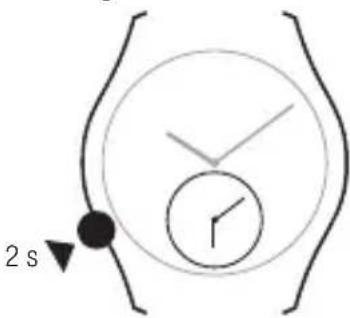
text_image
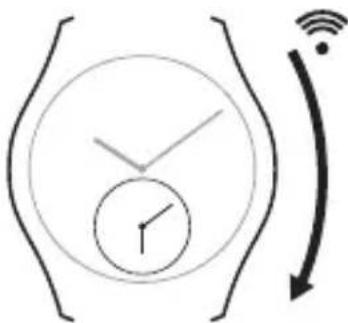
2 s1b. Immediately slide your finger along the right hand side of the case from top to bottom. The minute hand moves slightly from right to left and the watch emits a small beep.
text_image
Diagram showing a clock with hour and minute hands, accompanied by a Wi-Fi signal icon indicating wireless communication.2. Set the position of the minute hand on the small dial
In order to proceed with the resynchronisation make sure the minute hands of both dials are at almost a full hour time difference. To do so follow the setting instructions.
3. Resynchronising the minute hand
Use option a. or b. depending on the direction you wish the minute hand of the small dial to move, in order to align it with the position of the minute hand of the main dial.
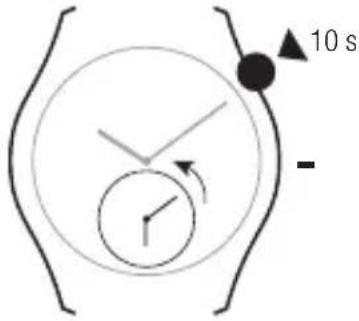
3a. Resynchronising the minute hand anti-clockwise
Touch the case at 2 o'clock, wait 10 seconds for hand to begin moving, hold until it has reached the same position as the minute hand on the main dial. The hand moves at 1/3 minute intervals for accuracy and the maximum correction possible is 5 minutes.
text_image
10 s -b. Resynchronising the minute hand clockwise
Touch the case at 4 o'clock, wait 10 seconds for hand to begin moving, hold until it has reached the same position as the minute hand on the main dial. The hand moves at 1/3 minute intervals for accuracy and the maximum correction possible is 5 minutes.
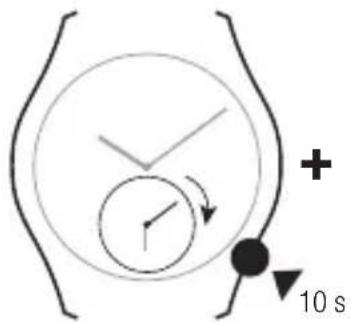
text_image
Diagram showing a clock with a plus sign and 10 seconds time indicator, likely illustrating a scientific or technical concept.4. Confirmation / Exit setting mode
Touch the case at 8 o'clock for two seconds. The watch emits two small beeps. Setting mode is now deactivated.
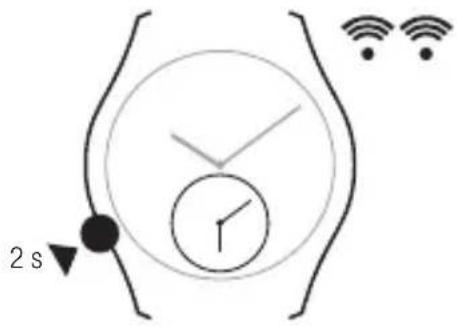
text_image
2 sQUARTZ SPLIT- AND ADD-SECONDS CHRONOGRAPH WATCHES CALIBER: 289
THE WATCH IS DELIVERED IN 'ENERGY-SAVING' MODE
The crown is extended, the hands are at twelve o'clock. Once the crown has been pushed in from position 2, the watch automatically changes to the Swiss time and date. It must then be set to the local time. If the user pulls the crown to position 2, the hands return to twelve o'clock and the watch goes back into ‘energy-saving’ mode after about 1 minute. Once the crown has been pushed in, the watch automatically changes to the local time.
PRECIDRIVE OF ± 10 SECONDS PER YEAR
The watch ensures the display of hours, minutes and seconds to an accuracy of ± 10 sec / year. This extreme accuracy is
achieved through an ultra-precise quartz combined with time display correction in the event of a disturbance.
GPD SYSTEM
The GPD system (Gear Position Detection) is the watch's key device. It allows to automatically reset the hands after a shock, either immediately or at 3am if the problem isn't resolved right away. The GPD system also includes automatic correction at 3am every three days to ensure the precision.
PERPETUAL CALENDAR
The watch is equipped with a perpetual calendar that no longer requires correcting the date. The caliber does not allow one to move the time forward or backward more than one day, in order to avoid disrupting the perpetual calendar.
SMART CROWN
The smart crown allows to set the time minute by minute or hour by hour (quick setting), by turning the crown either slowly or quickly. When changing the time in summer/winter, the movement automatically repositions the second and minute hands to the exact position of the previous time, therefore ensuring extra precision.
BATTERY
The watch signals the end of battery life when the second hand is jumping every five seconds. If the battery is not replaced during the E.O.L. (end of life) phase, the system goes into E.O.E (end of energy) mode by setting the watch hands to 12 o'clock. You have then about 6 months to change the battery.
RESYNCHRONISATION
If the battery is empty (or removed from the movement more than one day), the watch needs to be totally resynchronised (reprogrammed). All the functions are affected. If the battery is removed from the movement less than one day, only the hour needs to be resynchronised.
THE CROWN HAS 2 POSITIONS
1. Normal position
When pressed in against the case (position 1), the crown ensures that the watch is water-resistant (if not damaged).
2. To set the time
Pull the crown out to position 2. Adjust the hands by turning the crown in either direction. The time can be set minute by minute or hour by hour (quick setting), by turning the crown either slowly or quickly. Push the crown back in to position 1. The perpetual calendar no longer requires correcting the date.
Chronograph functions
Make sure the chronograph hands are at zero (Pusher B).
NOTE: this movements has no 1/10th of a second counter. In this case the timekeeping is precise to 1 second.
CHR SP: Stopwatch with Intermediate times (SPLIT)
Start: Press pusher A.
Stop: Press pusher B, read off first Intermediate (split) time.
Start again: Press pusher B to show elapsed time. Repeat for further intermediate (split) times.
Stop: Press pusher A, read off total elapsed time.
Reset to zero: Press pusher B again.
NOTE: The split time should be read immediately, as it continues after 10 seconds and since the chronograph
totalizers for hours, minutes and seconds continue to measure the elapsed time. While the chronograph is running, do not leave the split-second hand stopped any longer than is necessary to read the split time, otherwise the functioning of the split-seconds mechanism may be affected.
CHR Ad: Stopwatch with ADD timing mode.
Start: Press pusher A.
Stop: Press pusher A again and read off time.
Start again: Press pusher A again.
Stop again: Press pusher A again and read off time.
Reset to zero: Press pusher B.
QUARTZ CHRONOGRAPH WATCHES CALIBERS: 312, 538\*, 542
* On certain models these movements have no 1/10th of a second counter. In this case the timekeeping is precise to 1 second.
THE CROWN HAS 3 POSITIONS
1. Normal position
When pressed in against the case (position 1), the crown ensures that the watch is water-resistant (if not damaged).
2. To set the date
Pull the crown out to position 2 and set the date by moving the hour hand forwards or backwards. To adjust by one day, the hour hand must be moved by 24 hours. Push the crown back to position 1.
To change time zones, summer/winter time Pull the crown out to position 2 and turn
it forwards or backwards to set the desired hour. The minutes and seconds remain the same. Push the crown back to position 1.
3. To set the time
Pull the crown out to position 3. The small seconds hand will stop. Set the correct time by turning the crown forwards or backwards. Accept by pushing the crown back to position 1 to coincide with a given time signal.
Chronograph functions
Timing to within 1/10th of a second for up to 30 minutes.
Addition function
Pusher A: Start
Pusher A: Stop to read time
Pusher A: Restart
Pusher A: Stop
At the end of the last step, the chronograph indicates the total time.
Pusher B: Reset
Split time function
Pusher A: Start
Pusher B: Stop to read the split time.
The chronograph continues to operate.
Pusher B: Restart
The chronograph hands catch up with the elapsed time.
Pusher A: For the last stop and to display the total time.
Pusher B: Reset
Readjusting the chronograph hands
After a battery change it may be necessary to reset the hands to their original position.
312:
Resetting the hands:
Pull out the crown into position 2 and press pusher A to select the hand to be repositioned. The selected hand moves.
Press pusher B to correct the position of the hand.
Short push: Forward movement by one unit Long push: Rapid forward movement of the hand
538*, 542:
Initialization of the 30-minute totalizer hand: Pusher B and crown in position 2
Initialization of the 60-second totalizer hand: Pusher A and crown in position 3
Initialization of the 1/10th of a second hand: Pusher B and crown in position 3
Short push: Forward movement by one unit Long push: Rapid forward movement of the hand
QUARTZ CHRONOGRAPH WATCHES CALIBER: 370, 541
SCREW-IN CROWN
Certain models are fitted with a screw-in crown. With these models, the crown must be unscrewed before using it to adjust any settings. Following any adjustments, the crown must be returned to position 1 and screwed back in. Position 1 is the starting point for all manipulations of the crown on all models.
THE CROWN HAS 3 POSITIONS
1. Normal position
When pressed in against the case (position 1) or screwed in, the crown ensures that the watch is water-resistant (if not damaged).
2. To set the date
Pull the crown out to position 2 and set the date by moving the hour hand forwards or backwards. To adjust by one day, the hour hand must be moved by 24 hours. Push the crown back to position 1.
To change time zones, summer/winter time Pull the crown out to position 2 and turn it forwards or backwards to set the desired hour. The minutes and seconds remain the same. Push the crown back to position 1.
3. To set the time
Pull the crown out to position 3. The small seconds hand will stop. Set the correct time by turning the crown forwards or backwards. Accept by pushing the crown back to position 1 to coincide with a given time signal.
Chronograph functions
Timing to within 1/10th of a second for up to 12 hours.
Addition function
Pusher A: Start
Pusher A: Stop to read time
Pusher A: Restart
Pusher A: Stop
At the end of the last step, the chronograph indicates the total time.
Pusher B: Reset
Split time function
Pusher A: Start
Pusher B: Stop to read the split time.
The chronograph continues to operate.
Pusher B: Restart
The chronograph hands catch up with the elapsed time.
Pusher A: For the last stop and to display the total time.
Pusher B: Reset
Readjusting the chronograph hands
After a battery change it may be necessary to reset the hands to their original position.
370:
Resetting the hands:
Pull out the crown into position 2 and press pusher A to select the hand to be repositioned. The selected hand moves.
Press pusher B to correct the position of the hand.
Short push: Forward movement by one unit Long push: Rapid forward movement of the hand
541:
Initialization of the 12-hour totalizer hand:
Pusher A and crown in position 2
Initialization of the 60-minute totalizer hand:
Pusher B and crown in position 2
Initialization of the 60-second totalizer hand:
Pusher A and crown in position 3
Initialization of the 1/10th of a second hand:
Pusher B and crown in position 3
Short push: Forward movement by one unit
Long push: Rapid forward movement of the hand
MULTIFUNCTION WATCHES
CALIBERS: 193, 210
THE CROWN HAS 2 POSITIONS AND MULTIPLE FUNCTIONS
Select function: Leave crown in position 1 and turn. Scroll through the 9 functions.
Adjust function: Pull crown out to position 2 and turn.
Turn function on/off: Press crown briefly.
Set to zero: Press crown and hold for 3 seconds.
1. To adjust the time
Select function 1
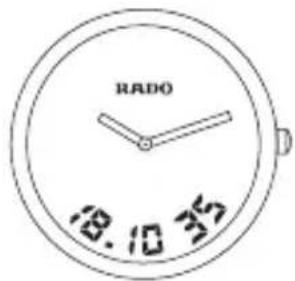
text_image
RADO 18.10:52Pull crown out to position 2.
a) Hours: Turn crown quickly.
b) Minutes: Turn crown slowly.
c) Seconds: Push the crown back to position 1. The seconds display blinks for 1 minute, during which a brief press of the crown will reset the seconds to zero.
2. To synchronize digital and analog displays
Set digital display to 24-hour mode (Function 6: T2), then select function 2.
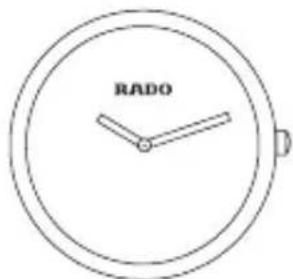
text_image
RADOPull crown out to position 2.
Turn crown until both time displays are synchronized.
a) Hours: Turn crown quickly.
b) Minutes: Turn crown slowly.
Push the crown back to position 1.
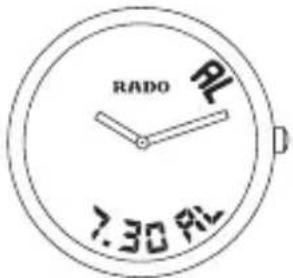
3. AL: Alarm
Select function 3
text_image
RADO 7.30 P/LTo set the alarm:
Pull crown out to position 2.
a) Hours: Turn crown quickly.
b) Minutes: Turn crown slowly.
Push the crown back to position 1.
To switch alarm tone on/off
Press crown briefly.
AL = alarm tone on. OF = alarm tone off
NOTE: The alarm can be set in 12-hour (AM/PM) or 24-hour mode.
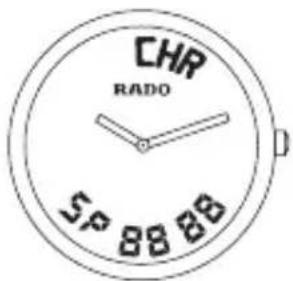
4. CHR SP: Stopwatch with intermediate times (SPLIT)
Select function 4
text_image
CHR RADO SP 88 88Start: Press crown.
Stop: Press crown again, read off first intermediate (split) time. Chronograph continues to operate
Start again: Press crown again
to show elapsed time. Repeat for further intermediate (split) times.
Stop: Press crown, read off total elapsed time.
Reset to zero: Press crown and hold for at least 3 seconds.
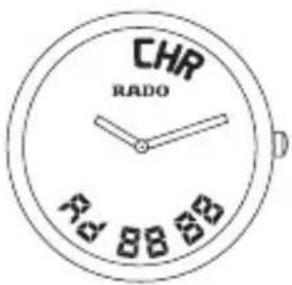
5. CHR Ad: Stopwatch with ADD timing mode.
Select function 5
text_image
CHR RADO RD 88 88Start: Press crown.
Stop: Press crown again and read off time.
Start again: Press crown again – and so on.
Reset to zero: Press crown and hold for at least 3 seconds.
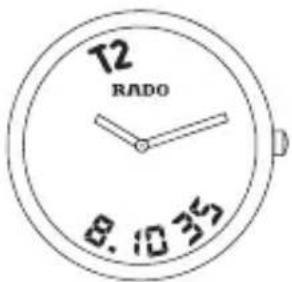
6. T2: Additional time zone adjustment.
Select function 6
text_image
T2 RADO 8.10 35Pull crown out to position 2.
To adjust by hours: Turn the crown quickly.
To adjust by 1/2 hours: Turn the crown slowly.
Push the crown back to position 1.
To select 24-hour display or AM/PM display.
The watch can display the time in 12-hour (AM/PM) or 24-hour mode.
Select Function 6. To check the display mode, briefly press the crown once: if A or P appears, the time display is in 12-hour mode.
If no letter appears, the time display is in 24-hour mode. To change mode, press crown briefly a second time.
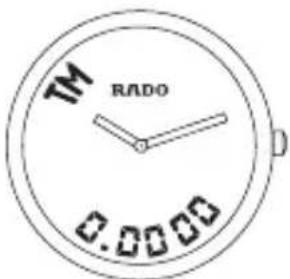
7. TM: Timer
Select function 7
text_image
TM RADO 0.0000To set countdown start time
Pull crown out to position 2.
a) Hours: Turn crown quickly.
b) Minutes: Turn crown slowly.
To start countdown
Push the crown back to position 1.
When the countdown reaches zero,
the watch emits an audible signal. To switch the signal off, press crown briefly.
Timer memory function.
Pressing the crown automatically resets the preprogrammed starting time for the count-down, and the countdown begins again.
To reset countdown to zero (at any time)
Press crown for at least 3 seconds.
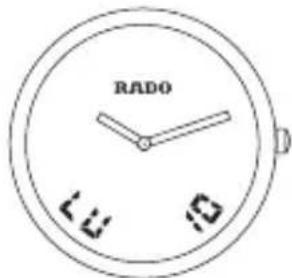
8. To change language and year
Select function 8
text_image
RADO 12:00 14:00Pull crown out to position 2.
Language: Turn crown quickly.
E = English D = German
F = French S = Spanish
Year: Turn crown slowly.
Push the crown back to position 1.
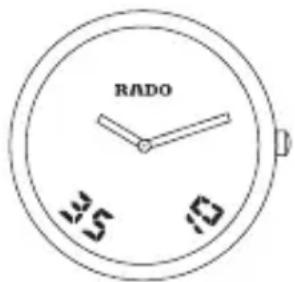
9. To adjust the date
Select function 9
text_image
RADO 15 10Pull crown out to position 2.
Month: Turn crown quickly.
Date: Turn crown slowly.
Push the crown back to position 1.
NOTE: The month number is stored in the memory but is not continuously displayed; it must be set correctly in order for the calendar to function properly.
DIGITAL WATCHES
WITH SELF-WINDING MECHANISM
CALIBER: 290
THE CROWN HAS 2 POSITIONS AND MULTIPLE FUNCTIONS
1. Normal position
Time display: hours and minutes.
To display the date, turn the crown: the date appears for 2 seconds.
2. To set the time
Pull the crown out to position 2.
Display blinks.
a) Hours: Turn crown quickly.
b) Minutes: Turn crown slowly.
Push the crown back to position 1.
This will also reset the seconds to zero.
NOTE: The seconds are not displayed.
To set the date
Turn the crown. The date is displayed. Immediately pull the crown out to position 2. Display blinks.
a) Month: Turn crown quickly.
b) Date: Turn crown slowly.
Push the crown back to position 1.
NOTE: The month number is stored in memory but is not continuously displayed; it must be set correctly in order for the calendar to function properly.
To select 12/24 h display
Pull the crown out to position 2.
Push the crown back to position 1 and immediately pull it out again to position 2.
Turn the crown to select the mode: 12 h or 24 h.
Push the crown back to position 1.
POWER RESERVE/WINDING
The running time depends on how long the watch has been worn. With a fully loaded power reserve, the watch will run for 120 days. It takes 4 to 9 months of wearing the watch for it to reach the full power reserve.
When there is only a little energy left, the corresponding symbol (the small bar at the center of the dial, directly beneath the time display) starts to blink. The watch can be wound manually at any time by turning the crown forwards.
If the movement is completely stopped, you can restart it by winding it for at least 15 seconds before setting the time.
If you wish to store the watch for a long time, you may pull out the crown to position 2. This will reduce its power consumption considerably and increase the power reserve up to 10 years, but the time of day will be lost.
SELF-WINDING WATCHES WITH DATE DISPLAY CALIBERS: 550, 557*, 561, 580, 609, 629, 656*, 657*, 658**, 661, 734*, 763***, 766, 772***, 773***
* On certain models this movement has no date display (jewelry or skeleton versions) and only the positions 1 and 3 are functional.
*** This movement has a power reserve up to 80 hours.
SCREW-IN CROWN
Certain models are fitted with a screw-in crown. With these models, the crown must be unscrewed before using it to adjust any settings. It must then be returned to position 1 and screwed back in. With all models, position 1 is the starting point for all manipulations of the crown.
THE CROWN HAS 3 POSITIONS
1. Normal position
The crown is in its normal position if it is pressed up against the case (position 1) or screwed in. In this position, the crown ensures that the watch is water-resistant (if not damaged).
2. To set the date
Pull the crown out to position 2, turn it forwards or backwards (depending on the movement, Caliber 657* forwards only) to set the desired date. Push the crown back to position 1.
NOTE: Date setting is not recommended between 8 pm and 2 am.
3. To set the time
Pull the crown out to position 3 and turn it forwards or backwards (Caliber 657* forwards only) to the desired time. Accept by pushing the crown back to position 1 to coincide with a given time signal.
\*\*Rotating bezel
On certain models the rotating bezel is located under the protective covering of the sapphire crystal and can be manipulated with the crown.
Short time measurement
Unscrew the crown. Turn the crown to move the 60-minute marker to the position of the minute hand. Screw the crown back in place. The elapsed time can subsequently be read off on the inner rotating bezel.
POWER RESERVE INDICATOR
Caliber 772*** features a power reserve indicator. When the watch is fully wound (by wearing or manual winding) it provides a power reserve of up to 80 hours. If the watch is not worn for a while, or worn only infrequently, the power reserve indicator moves counter-clockwise. When the indicator reaches the lower red area of the display, the watch should be worn or wound manually (place the crown in position 1 and turn it forwards several times) to ensure it does not stop. During winding, the power reserve indicator moves clockwise and stops once the watch has been fully wound.
SELF-WINDING WATCHES WITH DAY/DATE DISPLAY CALIBERS: 636, 648, 764***, 770***
*** This movement has a power reserve up to 80 hours.
THE CROWN HAS 3 POSITIONS
1. Normal position
When pressed in against the case (position 1), the crown ensures that the watch is water-resistant (if not damaged).
2. To set the date
Pull the crown out to position 2, turn it forwards to set the desired date. Turn it backwards to set the desired day of the week. Push the crown back to position 1.
NOTE: Date setting is not recommended between 8 pm and 2 am.
3. To set the time
Pull the crown out to position 3 and turn it forwards or backwards to the desired time. Accept by pushing the crown back to position 1 to coincide with a given time signal.
SELF-WINDING CHRONOGRAPH WITH DATE CALIBERS: 650, 652, 653
THE CROWN HAS 3 POSITIONS
1. Normal position
When pressed in against the case (position 1), the crown ensures that the watch is water-resistant (if not damaged).
2. To set the date
Pull the crown out to position 2 and rotate it backwards (Caliber 650 forwards only) to the desired date, then push the crown back to position 1.
NOTE: Date setting is not recommended between 8 pm and 2 am.
3. To set the time
Pull the crown out to position 3. The small seconds hand will stop. Set the correct time by turning the crown forwards or backwards (Caliber 650 forwards only). Accept by pushing the crown back to position 1 to coincide with a given time signal.
Chronograph functions
Timing to within 1/4th of a second for up to 12 hours.
Make sure the chronograph hands are at zero (Pusher B).
Pusher A: Start – stop, start – stop etc.
Pusher B: Reset (after a stop).
SELF-WINDING SPLIT-SECONDS CHRONOGRAPH
CALIBER: 663
SCREW-IN CROWN
This model is fitted with a screw-in crown. The crown must be unscrewed before using it to adjust any settings. It must then be returned to position 1 and screwed back in. Position 1 is the starting point for all manipulations of the crown.
THE CROWN HAS 3 POSITIONS
Only positions 1 and 3 are functional.
1. Normal position
When pressed in against the case and screwed in, the crown ensures that the watch is water-resistant.
3. To set the time
Pull the crown out to position 3. The small seconds hand will stop. Set the correct time by turning the crown forwards or backwards. Accept by pushing the crown back to position 1 to coincide with a given time signal.
Chronograph functions
Timing to within 1/4th of a second for up to 12 hours.
Make sure the chronograph hands are at zero (Pusher B). Pusher A: Start – stop, start – stop etc. Pusher B: Reset (after a stop).
Chronograph functions with split-seconds
The split-seconds function allows split times to be recorded while the chronograph is running.
- Start the chronograph by pressing pusher A.
- To record a split time, press pusher C.
The split-seconds hand stops, indicating the split time, while the chronograph continues running.
NOTE: The split time should be read immediately, since the chronograph totalizers for hours, minutes and seconds continue to measure the elapsed time.
While the chronograph is running, do not leave the split-seconds hand stopped any longer than is necessary to read the split time, otherwise the functioning of the split-seconds mechanism may be affected.
- Press pusher C for the split-seconds hand to catch up with the chronograph seconds hand.
- To record a new split time, start from step 2 above.
- Press pusher A to stop the chronograph.
- Press pusher B to reset.
IMPORTANT: The split-seconds hand must have caught up with the chronograph seconds hand, as explained in step 3 above, before the chronograph is reset.
SELF-WINDING CHRONOGRAPH WITH DATE CALIBER: 604
THE CROWN HAS 2 POSITIONS
1. Normal position
When pressed in against the case (position 1), the crown ensures that the watch is water-resistant (if not damaged).
2. To set the date
Set the date by pressing on push-button C. The date changes at each press. Date correction is not possible between 8.30 pm and 11 pm.
To set the time
Pull the crown out to position 2. The small seconds hand will stop. Set the correct time by turning the crown forwards or backwards.
Accept by pushing the crown back to position 1 to coincide with a given time signal.
Chronograph functions
Timing to within 1/4th of a second for up to 30 minutes.
Make sure the chronograph hands are at zero (Pusher B).
Pusher A: Start – stop, start – stop etc.
Pusher B: Reset (after a stop).
SELF-WINDING CHRONOGRAPH WITH DATE CALIBERS: 603, 674\*
* On certain models this movement has no display of the date.
THE CROWN HAS 3 POSITIONS
1. Normal position
When pressed in against the case (position 1), the crown ensures that the watch is water-resistant (if not damaged).
2. To set the date
Pull the crown out to position 2, turn it forwards to set the desired date. Push the crown back to position 1.
NOTE: Date setting is not recommended between 8 pm and 2 am.
3. To set the time
Pull the crown out to position 3 and turn it forwards or backwards to the desired time. Accept by pushing the crown back to position 1 to coincide with a given time signal.
Chronograph functions
Timing to within 1/4th of a second for up to 12 hours.
Make sure the chronograph hands are at zero (Pusher B). Pusher A: Start – stop, start – stop etc. Pusher B: Reset (after a stop).
SELF-WINDING WATCHES WITH A SECOND TIME ZONE AND DATE DISPLAY (GMT/UTC) CALIBER: 642
THE CROWN HAS 3 POSITIONS
1. Normal position
When pressed in against the case (position 1), the crown ensures that the watch is water-resistant (if not damaged).
2. To set the date and the second time zone
Pull the crown out to position 2, and turn it backwards until you obtain the desired date. Turn the crown forwards until you obtain the desired time for the second time zone (24-h hand). Push the crown back to position 1.
NOTE: Date setting is not recommended between 8 pm and 2 am.
3. To set the time
Pull the crown out to position 3, and turn it forwards or backwards to the desired time. Accept by pushing the crown back to position 1 to coincide with a given time signal.
AUTOMATIC WATCHES WITH SECOND TIME ZONE AND DATE DISPLAY (GMT / UTC) CALIBER: 771***
*** This movement has a power reserve of up to 80 hours.
THE CROWN HAS 3 POSITIONS
1. Normal position
When pressed in against the case (position 1), the crown ensures that the watch is water-resistant (if not damaged).
2. To set the time and the second time zone
Pull the crown out to position 3 and turn it forwards or backwards until the desired time is set.
The 24-hour hand also moves to set the desired time in the second time zone.
Accept by pushing the crown back to position 1 to coincide with a given time signal.
3. Setting the hour (changing the time zone or from summer to winter time) and the date
Pull the crown out to position 2 and turn it forwards or backwards until the desired date appears.
The hour hand moves in one-hour jumps. Push the crown back to position 1.
NOTE: Date setting is not recommended between 8 pm and 2 am.
HAND-WOUND MECHANICAL WATCHES WITHOUT DATE DISPLAY CALIBER: 510
THE CROWN HAS 2 POSITIONS
1. Normal position
When pressed in against the case (position 1), the crown ensures that the watch is water-resistant (if not damaged).
Winding
This mechanical calibre is hand-wound. In order to ensure continuous operation of the watch, it must be fully wound once a day by turning the crown forwards in position 1.
2. To set the time
Pull the crown out to position 2, and turn it forwards or backwards to the desired time.