GoXtreme Discovery - Camcorder EASYPIX - Free user manual and instructions
Find the device manual for free GoXtreme Discovery EASYPIX in PDF.


| Product Type | Action Camera / Camcorder |
| Brand | Easypix |
| Model | GoXtreme Discovery |
| Video Resolution | Full HD 1080p at 30fps |
| Lens | Wide Angle Lens |
| Waterproof | Up to 30m (with included underwater housing) |
| Battery Life | Up to 90 minutes (depending on settings) |
| Charging Time | 5 hours via USB |
| Storage | microSD, microSDHC, microSDXC up to 32GB (Class 10 or above) |
| Connectivity | Wi-Fi, Micro HDMI, Micro USB |
| App Support | Ez iCam App (iOS and Android) |
| Remote Control | 2.4G Wireless Remote (splashproof) |
| Shooting Modes | Video, Photo, Burst Photo (3 photos in 1.5s), Time Lapse (2s-60s intervals) |
| Display | Built-in LCD screen |
| Microphone & Speaker | Built-in microphone and speaker |
| Power Supply | Rechargeable battery, charges via laptop/computer USB |
| Compatible Memory Cards | 16GB and 32GB microSD cards (Class 10 or higher) |
| Waterproof Housing | Included, with latch and seal |
| Maintenance | Clean housing after salt/chlorine water; keep open after underwater use |
| Safety Warnings | Do not expose to high temperatures; keep away from magnetic interference |
| File System Limitation | FAT32 4GB file size limit; 1080p/30fps max 29 minutes per clip |
Frequently Asked Questions - GoXtreme Discovery EASYPIX
User questions about GoXtreme Discovery EASYPIX
0 question about this device. Answer the ones you know or ask your own.
Ask a new question about this device
Download the instructions for your Camcorder in PDF format for free! Find your manual GoXtreme Discovery - EASYPIX and take your electronic device back in hand. On this page are published all the documents necessary for the use of your device. GoXtreme Discovery by EASYPIX.
USER MANUAL GoXtreme Discovery EASYPIX
text_image
GO TREME ACTION CAM8GoXTREME®
DISCOVERY

Wide Angle Lens

HDMI

Full HD

Waterproof to 30m

Long-lasting battery
USER'S MANUAL

WARNINGS
- Always take the appropriate steps to protect your camera from falls, shock or impact.
- Ensure a suitable distance is kept from any objects with strong magnetic interference such as electrical machinery in order to avoid strong radio waves that may be damaging to the product and affect the sound or image quality.
- Never expose the product directly to high temperatures and prolonged strong sunlight.
- We recommend using high quality, class 10 or above Micro SD Card for the best results.
- To avoid potential data error, avoid placing your Micro SD card near strong magnetic objects.
- In the unlikely event of overheating, unwanted smoke or unpleasant smell from the device, unplug it immediately from the power outlet to prevent hazardous fire.
- Keep the device out of reach of children while charging.
- The device should be stored in a dry and dust free location at normal room temperature and out of direct sunlight.
- The product should only be charged via laptop or computer USB port.
- Before using your camera in the water please verify that all lids and locks are tightly closed and sealed on the camera and the underwater case.
- After use, clean the housing of salt and chlorine water and then let it dry.
- The camera should not be exposed to large temperature and humidity differences to avoid condensation inside the housing or behind the lens.
- After underwater use, the case must be kept open to avoid condensation or rust.
- Recording times are dependant on resolution and frame rate settings.
After reaching a max. video recording time (or file size*) the camera will automatically stop. It can only be restarted manually.
*FAT32 file system has a maximum single file size limit of 4GB: 1080p/30fps: 29min. max. - Battery life time - depending on settings and outdoor temperature - up to 90 min. under optimal conditions.
THE BASICS
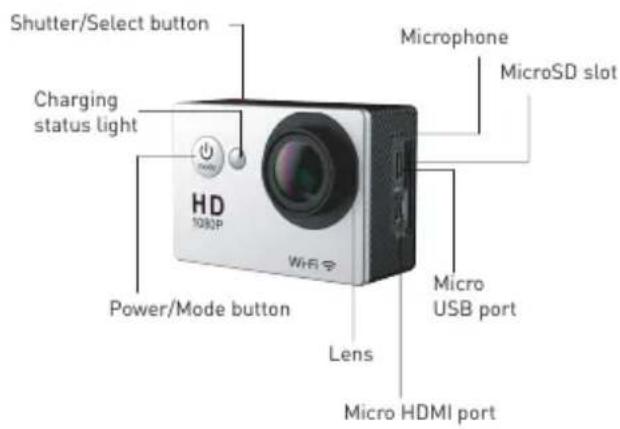
text_image
Shutter/Select button Charging status light Microphone MicroSD slot Power/Mode button Wi-Fi Lens Micro USB port Micro HDMI port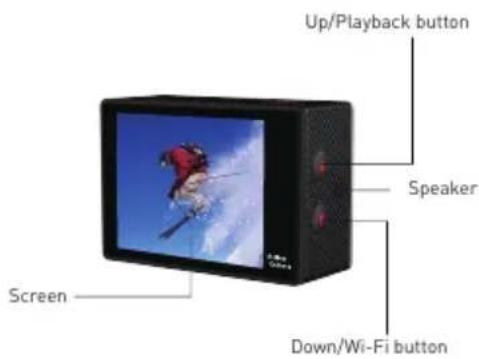
text_image
Up/Playback button Speaker Screen Down/Wi-Fi button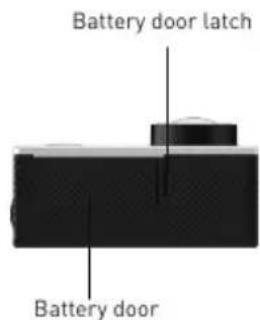
text_image
Battery door latch Battery doorWATERPROOF HOUSING
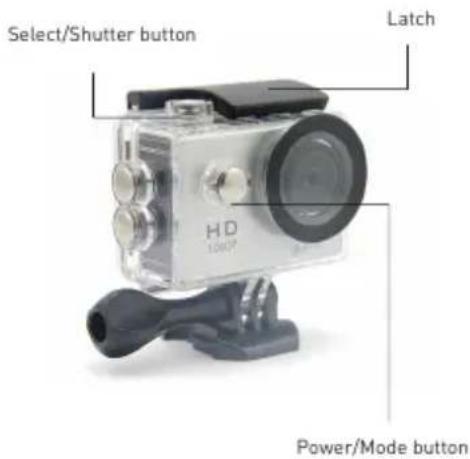
text_image
Select/Shutter button Latch HD 10kV Power/Mode buttonMOUNTING YOUR CAMERA
Attach your camera to helmets, gear and equipment.
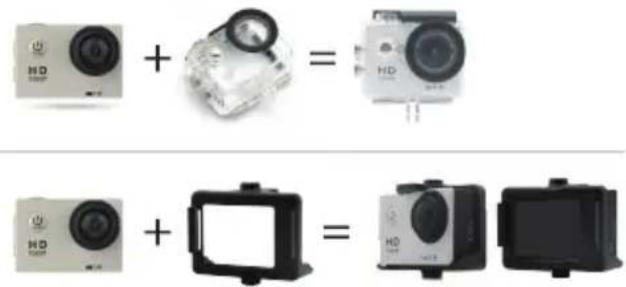
text_image
HD + = HD HD + = HD +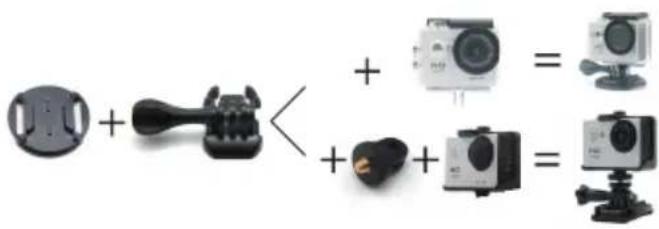
text_image
Diagram showing camera module components with plus and minus signs indicating different configurations or states.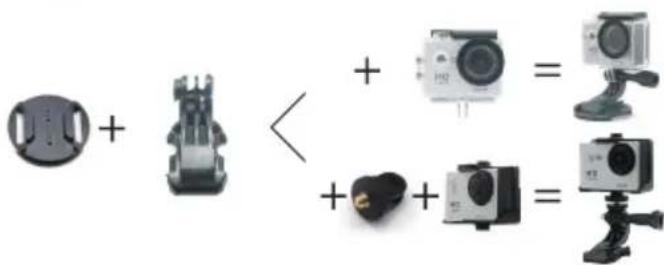
text_image
Diagram showing mechanical components with plus and minus signs, including a device with a circular head and a camera module.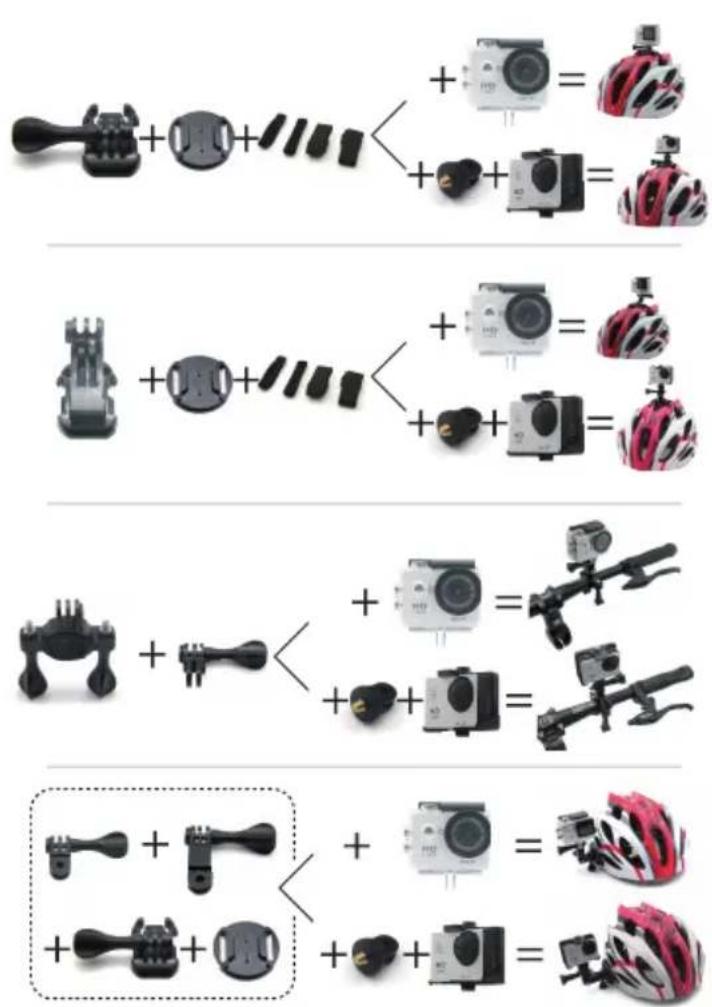
GETTING STARTED
To power ON:
Press the Power/Mode Button.
To power OFF:
Press and hold the Power/Mode Button.
OVERVIEW
Turn the camera ON and repeatedly press the
Power/Mode Button to cycle through camera modes and settings. The modes will appear in following order:
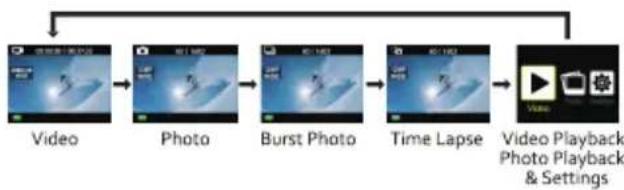
flowchart
graph LR
    A["Video"] --> B["Photo"]
    B --> C["Burst Photo"]
    C --> D["Time Lapse"]
    D --> E["Video Playback Photo Playback & Settings"]

Video
Record Video

Photo
Capture a single photo

Burst Photo
Capture photo bursts

Time Lapse
Shoot a series of photos at set time intervals

Video & Photo Playback

Adjust camera settings, resolution and more

flowchart
graph LR
    A["NETNESS"] --> B["NetNESS"]
    B --> C["NETNESS"]
    C --> D["NETNESS"]
    D --> E["NETNESS"]
    E --> F["NETNESS"]
Press the Shutter/Select Button to enter the settings menu. Repeatedly press the Power/Mode Button to cycle through options and press the Shutter/Select Button to select desired option. Or use the Up/Playback or Down/Wi-Fi Button to cycle through the various options.
Time Stamp: Off/Date/Date & Time
Exposure: +-2.0/+-1.7/+-1.3/+-1.0/+-0.7/+-0.3/0
Photo Resolution: 12M, 8M, 5M, 2M
Burst Photo: 3 Photos
Time Lapse: 2s/3s/5s/10s/20s/30s/60s
Continuous Lapse: Off/On
Power Frequency: 50Hz/60Hz/Auto
Language: English/Traditional
Chinese/Italian/Spanish/Portuguese/German/Dutch/
France/Czech/Polish/Turkish/Russian/Japanese/Korean/Thai
Date & Time: MM/DD/YY, DD/MM/YY, or YY/MM/DD
Sound Indicator: Shutter On/Off, Start Up 1/2/3/, None, Beep On/Off, Volume 0/1/2/3
Rotate Display: On/Off (For use when camera is mounted upside down)
Screen Saver: Off/1 min/3 min/5 min
Power Saver: Off/1 min/3 min/5 min
Format: No/Yes
Reset: No/Yes
Version: Displays current firmware version
VIDEO MODE

Video
To record Video, verify the camera is in Video mode.
If the Video icon on your camera's LCD screen is not showing, press the Power/Mode Button repeatedly until it appears.
To start recording:
Press the Shutter/Select Button. The camera will emit one beep and the Camera Status Lights will flash while recording.
To stop recording:
Press the Shutter/Select Button. The Camera Status Lights stop flashing and the camera emits one beep to indicate recording has stopped.
This camera automatically stops recording when the battery is out of power. Your Video will be saved before the camera powers OFF.
Recording times are dependant on resolution and frame rate settings.
After reaching a max. video recording time (or file size*) the camera will automatically stop. It can only be restarted manually.
*FAT32 file system has a maximum single file size limit of 4GB:1080p/30fps:29min.max.
PHOTO MODE

Photo
To capture a Photo, verify the camera is in Photo mode. If the Photo icon on your camera's LCD screen is not showing, press the Power/Mode Button repeatedly until it appears.
To take a photo:
Press the Shutter/Select Button. The camera will emit the camera shutter sound.
BURST PHOTO MODE

Burst Photo
To capture a Burst Photo series, verify the camera is in Burst Photo mode. If the Burst Photo icon on your camera's LCD screen is not showing, press the Power/Mode Button repeatedly until it appears. In Burst Photo mode, your camera takes 3 photos in 1.5 seconds.
To take a Burst Photo series:
Press the Shutter/Select Button. The camera will emit camera shutter sounds.
TIME LAPSE MODE

Time Lapse
To capture a Time Lapse series, verify the Continuous Lapse is ON and camera is in Time Lapse mode. If the Time Lapse icon on your camera's LCD screen is not showing, press the Power/Mode Button repeatedly until it appears. In Time Lapse mode, your camera captures a series of photos at 2, 3, 5, 10, 20, 30 or 60 second intervals.
The intervals at which the camera will operate in Time Lapse mode must first be set using the settings screen before recording in Time Lapse mode.
To take Time Lapse:
Press the Shutter/Select Button. The camera initiates countdown and emits the camera shutter sound each time a Photo is taken.
PLAYBACK
Playing Back Videos and Photo
To enter the Playback menu:
- Verify the camera is in Camera mode.
- Press the Up/Playback Button to enter the Playback menu.
- Repeatedly press the Power/Mode Button to cycle through Video and Photo.
- Press the Shutter/Select Button to select desired option.
- Use Up/Playback Button or Down/Wi-Fi Button to cycle through the various options.
- Press the Shutter/Select Button.
- To return to the Playback menu, press the Power/Mode Button.
- To exit, hold down the Up/Playback Button for two seconds.
STORAGE/MICRO SD CARDS
This camera is compatible with 16GB and 32GB capacity microSD, microSDHC, and microSDXC
memory cards. You must use a microSD card with at least a Class 10 speed rating. We recommend using brand name memory cards for maximum reliability in high-vibration activities.
BATTERY
Charging The Battery
- Connect the camera to a computer or USB power supply.
- The Charging Status Light remains ON while the battery is charging.
- The Charging Status Light will turn OFF when the battery is fully charged.
Charging Time: 5 hours
COMPATIBILITY
Compatibility varies by device. Content playback, sharing and access to the camera's memory card might be not available on some devices.
CAMERA APP
Connecting to the Ez iCam App
The Ez iCam App lets you control your camera remotely using a smartphone or tablet. Features include full camera control, live preview, photo playback and sharing of select content and more.
- Download the Ez iCam App to your smartphone or tablet at the Google Play or Apple App Store.
- Press the Power/Mode Button to power camera ON.
- Make sure the camera is in Camera mode.
- Press the Down/Wi-Fi Button to turn on Wi-Fi*.
- In your smartphone or tablet's Wi-Fi settings, connect to the network called "Discovery" followed by a series of numbers.
- Enter the password "1234567890".
- Open the Ez iCam App on your smartphone or tablet.
* Press and hold the Down/Wi-Fi Button for three seconds to turn OFF Wi-Fi.
The Ez iCam App is compatible with smartphones and tablets listed below:
For Apple iOS
* iPhone5, 5s, 6 (Plus), & 6s (Plus) (iOS9)
* iPad Air & Mini (iOS9)
For Android
* Android 4X Quad-core devices

iOS / Android
App Download
2.4G Remote
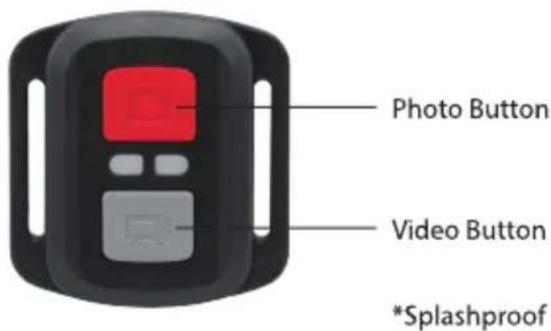
text_image
Photo Button Video Button *SplashproofVideo
To record Video, verify the camera is in Video mode.
To start recording:
Press the Grey Video Button. The camera will emit three beeps and the Camera Light will flash while recording.
To stop recording:
Press the Grey Video Button again. The Camera Light will stop flashing while recording.

Photo
To capture a Photo, verify the camera is in Photo or Video mode.
To take a photo:
Press the Red Photo Button. The camera will emit a camera shutter sound.

Burst Photo
To capture a Burst Photo series, verify the camera is in Burst Photo mode.
To take a Burst Photo series:
Press the Red Photo Button. The camera will emit camera shutter sounds.

Time Lapse
To capture a Time Lapse series, verify the Continuous Lapse is ON and camera is in Time Lapse mode.
To take Time Lapse:
Press the Red Photo Button. The camera initiates countdown and emits a camera shutter sound each time a Photo is taken.
*To power OFF camera:
Press and hold the Red Photo Button.
NOTE
Before using your camera in the water please verify that all lids and locks are tightly closed and sealed on the camera and the underwater case.
After use, clean the housing of salt and chlorine water and then let it dry.
The camera should not be exposed to large temperature and humidity differences to avoid condensation inside the housing or behind the lens.
After underwater use, the case must be kept open to avoid condensation or rust.
DECLARATION OF CONFORMITY
easypix hereby declares that the product GoXtreme Discovery is in conformity to all the essential requirements of Directive 1999/5/EC. The declaration of conformity can be downloaded here:
http://www.easypix.info/download/pdf/doc_goxtreme_discovery.pdf For technical help please visit our support area on www.easypix.eu.

Only EU

LIFESTYLE ELECTRONICS