
PowerBackup 1 - Software CYBERLINK - Free user manual and instructions
Find the device manual for free PowerBackup 1 CYBERLINK in PDF.


| Product Type | Backup and Restore Software |
| Version | PowerBackup 1 |
| Developer | CyberLink Corporation |
| Category | Software |
| Supported Operating Systems | Windows XP / 2000 / ME |
| Minimum Memory | 64 MB |
| Minimum CPU | Pentium II 300 MHz or higher |
| Minimum Hard Disk Space | 10 MB |
| Supported Backup Destinations | Hard disk, USB drive, Jazz, ZIP, MO, CD-R/RW, DVD-R/RW, DVD+R/RW, DVD-RAM |
| Backup Methods | Full, Incremental, Differential |
| Compression Options | No compression, Quick compression, Maximum compression |
| Password Protection | Yes (case-sensitive) |
| Exclusion List | Yes (hidden files, system files, custom file types) |
| Scheduling | Once, Daily, Weekly, Monthly |
| Disc Erasing | Quick erase, Full erase |
| Reports | Backup, Restoration, Comparison |
| File Search | Yes (within backup files) |
| Multi-volume Backup | Yes (auto, custom sizes) |
| Verify Backup | Yes |
| Fit-to-disc | Yes |
| Update | Via internet (Tools > Update PowerBackup) |
Frequently Asked Questions - PowerBackup 1 CYBERLINK
User questions about PowerBackup 1 CYBERLINK
0 question about this device. Answer the ones you know or ask your own.
Ask a new question about this device
Download the instructions for your Software in PDF format for free! Find your manual PowerBackup 1 - CYBERLINK and take your electronic device back in hand. On this page are published all the documents necessary for the use of your device. PowerBackup 1 by CYBERLINK.
USER MANUAL PowerBackup 1 CYBERLINK
Copyright and Disclaimer
All rights reserved. No part of this publication may be reproduced, stored in a retrieval system, or transmitted in any form or by any means electronic, mechanical, photocopying, recording, or otherwise without the prior written permission of CyberLink Corporation.
To the extent allowed by law, PowerBackup IS PROVIDED "AS IS", WITHOUT WARRANTY OF ANY KIND, EITHER EXPRESS OR IMPLIED, INCLUDING WITHOUT LIMITATION ANY WARRANTY FOR INFORMATION, SERVICES, OR PRODUCTS PROVIDED THROUGH OR IN CONNECTION WITH POWERBACKUP AND ANY IMPLIED WARRANTIES OF MERCHANTABILITY, FITNESS FOR A PARTICULAR PURPOSE, EXPECTATION OF PRIVACY, OR NON-INFRINGEMENT.
BY USING THIS SOFTWARE, YOU AGREE THAT CYBERLINK WILL NOT BE LIABLE FOR ANY DIRECT, INDIRECT, OR CONSEQUENTIAL LOSS ARISING FROM THE USE OF THIS SOFTWARE OR MATERIALS CONTAINED EITHER IN THIS PACKAGE.
The terms and conditions here under shall be governed and construed in accordance with the laws of Taiwan.
PowerBackup is a registered trademark along with other company and product names mentioned in this publication, used for identification purposes and remain the exclusive property of their respective owners.
International Headquarters
Mailing Address CyberLink Corporation
15F, #100, Min Chuan Road, Hsin Tian City
Taipei County, Taiwan, R.O.C.
Web Site www.gocyberlink.com
Telephone 886-2-8667-1298
Fax 886-2-8667-1300
Copyright © 2004 CyberLink Corporation. All rights reserved.
Contents
Introduction 1
Welcome 2
System Requirements 3
Updating PowerBackup 3
Backup Methods 4
Sample Scenarios 5
The PowerBackup Program 8
Function Buttons 9
Procedure Pane 10
Backup Options 11
General Tab 11
Disc Tab 12
Exclude Tab 13
Password Tab 14
Working with PowerBackup...... 15
Backing Up Data 16
Restoring Data 18
Comparing Data 20
Using the Scheduler 21
Finding Files 23
Erasing a Disc 24
Viewing Reports 25
Appendix.... 27
Technical Support 28
Web Support 28
Fax Support 28
Telephone Support 29
CD vs. DVD 30
CD Types 31
DVD Types 32
Index.... 33
CyberLink PowerBackup
Chapter 1:
Introduction
This chapter introduces CyberLink PowerBackup and the data backup process. It discusses the minimum system requirements for using the program and the method for upgrading to the latest version of the software. After this is a description of the different backup methods, then an introduction to the program itself and the various options you may select while using the program.
This chapter contains the following sections:
- Welcome on p.2
• System Requirements on p.3 - Updating PowerBackup on p.3
- Backup Methods on p.4
• The PowerBackup Program on p.8 - Backup Options on p.11
Welcome
Welcome to the CyberLink family of software programs! CyberLink PowerBackup is a backup program that allows you to back up folders and files, including those on a network, to hard disk, a removable drive, or to disc.
Backing up data is an important security procedure that can save large amounts of time and money in case of disaster, disk failure, attack by a hacker or virus, etc. By keeping a backup copy of your important data on another medium, you can quickly and reliably restore your data to its original state.
PowerBackup's main features include the following:
- Backup, restoration, and comparison functions
• Full, Incremental, and Differential backups - Scheduled intervals (once, daily, weekly, monthly)
- Multi-volume backups
- Support for CD-R/-RW, DVD-R/-RW, DVD+R/+RW, and DVD-RAM disc types
• Fit-to-disc, even on discs that already contain files - Support for hard disk/USB/Jazz/ZIP/MO drives
- Data compression
- Password protection
- Exclusion list to filter files with specific extensions
- File searching within the backed-up file
- Reports available for backups, restorations, and comparisons
- Backup records stored in My Catalog available for use in restorations
System Requirements
The system requirements listed below are recommended as minimums for running PowerBackup.
Minimum System Requirements
OS Windows XP/2K/ME
Memory 64 MB
CPU PII-300 or higher
HDD Space 10 MB
Burning Drive CyberLink certified recording device
Updating PowerBackup
If PowerBackup exists in a newer version than the version you are running, you can update to the latest version in order to take advantage of the latest features.
To update PowerBackup, click Tools, then select Update PowerBackup. The CyberLink website opens in your web browser, allowing you to follow a link to upgrade your software.
Note: You must be connected to the Internet to use this function.
Backup Methods
PowerBackup offers three backup methods: Full, Differential, and Incremental. These backup methods are explained below:
• Full backup: backs up all of the selected folders and files.
- Differential backup: backs up only those files that have been added or modified since the last Full backup. These backups are larger, but when you restore from a Differential backup, you need only the original Full backup and the latest Differential backup for a complete set of data.
- Incremental backup: backs up only those files that have been added or modified since the last Incremental backup. These backups are smaller, but when you restore from an Incremental backup, you need the original Full backup as well as each of the successive Incremental backups for a complete set of data.
Note: Though all three backup methods are available the first time you back up your data, it is strongly recommended that you use the Full backup option for your first backup.
On a technical note... The difference between a Differential backup and an Incremental backup lies in how the program handles the Archive attribute of the files that are backed up. (To view this attribute, right-click on a file in File Explorer, then select Properties. The Archive attribute appears at the bottom of the General tab. On a remote drive, you must further click Advanced....) During a Differential backup, PowerBackup keeps the Archive attribute checked - meaning that PowerBackup will again back up the file the next time the program encounters it. During an Incremental backup (as well as a Full backup), however, PowerBackup unchecks the Archive attribute, meaning that the program will not back up the file the next time the program encounters it.
The following section contains a number of sample scenarios that illustrate how PowerBackup handles different backup situations using the different backup methods over a period of four days.
Sample Scenarios
The section below offers some sample scenarios using the different backup methods over a four-day period. Scenarios 1-4 are simpler, as they start from a Full backup. Scenarios 5-8 are more complicated, as they start from a Differential or Incremental backup. (In Scenarios 5 & 6, the data was previously backed up either in a different job or using a different backup software.)
The table below shows the state of files A, B, and C on days 1-4:
Day Action
Day 1 Files A, B, C exist on drive
Day 2 A modified
Day 3 B modified
Day 4 No files modified
Scenario 1
This scenario shows the effect of using Differential backups after a Full backup on the first day.
Day Backup Method Files Backed Up
Day 1 Full backup A, B, C
Day 2 Differential backup A
Day 3 Differential backup A, B
Day 4 Differential backup A, B
Scenario 2
This scenario shows the effect of using Incremental backups after a Full backup on the first day.
Day Backup Method Files Backed Up
Day 1 Full backup A, B, C
Day 2 Incremental backup A
Day 3 Incremental backup B
Day 4 Incremental backup --
Scenario 3
This scenario shows the effect of using both Differential and Incremental backups after a Full backup on the first day.
Day Backup Method Files Backed Up
Day 1 Full backup A, B, C
Day 2 Differential backup A
Day 3 Incremental backup A, B
Day 4 Incremental backup --
Scenario 4
This scenario shows the effect of using both Differential and Incremental backups after a Full backup on the first day.
Day Backup Method Files Backed Up
Day 1 Full backup A, B, C
Day 2 Incremental backup A
Day 3 Differential backup B
Day 4 Incremental backup B
Scenario 5
This scenario shows the effect of using Differential backups starting from a previous backup of A, B, C (on Day 0).
Day Backup Method Files Backed Up
Day 1 Differential backup --
Day 2 Differential backup A
Day 3 Differential backup A, B
Day 4 Differential backup A, B
Scenario 6
This scenario shows the effect of using Incremental backups starting from a previous backup of A, B, C (on Day 0).
Day Backup Method Files Backed Up
Day 1 Incremental backup --
Day 2 Incremental backup A
Day 3 Incremental backup B
Day 4 Incremental backup --
Scenario 7
This scenario shows the effect of using Differential backups, even on the first day.
Note: Although the first backup was not a Full backup, the resulting backup on Day 1 is the equivalent of a Full backup.
Day Backup Method Files Backed Up
Day 1 Differential backup A, B, C
Day 2 Differential backup A, B, C
Day 3 Differential backup A, B, C
Day 4 Differential backup A, B, C
Scenario 8
This scenario shows the effect of using Incremental backups, even on the first day.
Note: Although the first backup was not a Full backup, the resulting backup on Day 1 is the equivalent of a Full backup.
Day Backup Method Files Backed Up
Day 1 Incremental backup A, B, C
Day 2 Incremental backup A
Day 3 Incremental backup B
Day 4 Incremental backup --
The PowerBackup Program
When you first open PowerBackup, the program appears as follows:

The program changes appearance according to the procedure you are running. However, there are a few common elements that remain available, including the function buttons along the top and the procedure box on the left. These are described below.
Function Buttons
The function buttons allow you to access many of PowerBackup's functions. These buttons are described below.
| Button Function | |
 | Displays the program's backup function, which allows you to back up your data. See Backing Up Data on p.16. |
 | Displays the program's restoration function, which allows you to restore previously backed-up data. See Restoring Data on p.18. |
 | Displays the program's comparison function, which allows you to compare backed-up data against the original data. See Comparing Data on p.20. |
 | Displays the program's Scheduler function, which allows you to schedule jobs for a later time. See Using the Scheduler on p.21. |
 | Creates a new backup job. |
 | Opens an existing backup job. |
 | Saves a backup job. (Click the down arrow to display the Save As option.) |
 | Erases a rewritable disc that contains files. See Erasing a Disc on p.24. |
 | Displays backup options. See Backup Options on p.11. |
 | Opens the help system. |
| PowerBackup | Displays copyright and program version information. |
Note: Not all buttons are available in all procedures.
Procedure Pane
To the left of the file directory panes is a pane containing each of the steps in the backup, restoration, and comparison procedures.
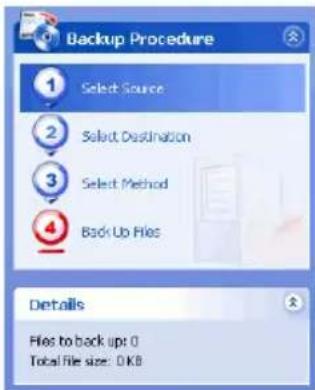
Click each step in order to display the options relevant to that point in the procedure. You can show or hide the entire procedure box by clicking the arrow in the right-hand corner. The Details pane displays the number of files to back up and the total file size. You can likewise show or hide this pane by clicking the arrow in the right-hand corner.
Backup Options
Open the backup procedure, then click the button to display backup options. The Backup Options dialog box opens, displaying four tabs. These tabs and the options they contain are described below.
General Tab
Click the General tab to display PowerBackup's general backup options.

- Compression: No compression saves backup and restoration time, but creates a larger backup file. Quick compression is a compromise between file size and backup/restoration time. Maximum compression creates a smaller backup file, but requires more backup and restoration time.
- Verify: Check this option to compare the backed-up data to the original data immediately after the backup process has completed.
Disc Tab
Click the Disc tab to display PowerBackup's options for writing to disc. These options control how PowerBackup handles discs intended as a backup destination that already contain files.
![Backup Options General Disc Exclude Password If the disc already contains data ○ Append this backup file to the disc. ○ Overwrite the data on the disc with this backup file. [Data is erased on ewritable CDs/DVDs.] ● Prompt me each time. The backup file will always append to disc while performing scheduled backups. OK Cancel](/content/2026/05/819798/images/340559601728778f2c632cce709221183ff4c5ce7f8f22c470a65e9025f12239.jpg)
- Append this backup file to the disc: Adds the backup data after the existing files on the selected disc.
• Overwrite the data on the disc with this backup file: Replaces the existing files on the selected disc with the backup data. (This option applies only to rewritable discs.)
- Prompt me each time: Displays a message asking how you would like to add the backup data to the backup disc.
Exclude Tab
Click the Exclude tab to display PowerBackup's exclusion options. By adding specific file types to the exclusion list, you prevent those type of file from being backed up during any subsequent backups.

To add a file type to the exclusion list, click Add. In the dialog box that opens, a list of registered file types appears. Locate and check the file type you want to exclude, or enter a custom file type in the entry box, then click OK. The file type is added to the exclusion list and is not backed up during subsequent backups.
To remove a file type from the exclusion list, highlight it, then click Remove. The file type is removed immediately from the exclusion list.
Note: By default, hidden files and folders and protected operation system files are excluded from backups.
Password Tab
Click the Password tab to display PowerBackup's password options. Using a password allows you to prohibit unauthorized persons from accessing (and thus using) the data you have backed up.

To use password protection, first check the Enable password protection option, then enter and confirm your password. Click OK to set password protection. Remember of course to take precautions to ensure the confidentiality of your password! You will need to enter your password any time you access your backed-up data.
Chapter 2:
Working with PowerBackup
This chapter describes how to use the CyberLink PowerBackup program to back up your data, restore data from a backup file, compare files that have been backed up against the original versions, and how to schedule backup jobs to run at a specific interval. There are also instructions for finding backed-up files, erasing rewritable discs, and viewing the reports that PowerBackup generates when a job is run.
This chapter contains the following sections:
- Backing Up Data on p.16
- Restoring Data on p.18
• Comparing Data on p.20
• Using the Scheduler on p.21
• Finding Files on p.23 - Erasing a Disc on p.24
• Viewing Reports on p.25
Backing Up Data
To ensure that a safe copy of your important data is always available, you can back up specific files or folders. You can back up your data to hard drive, to disc, or to a removable medium (such as a USB drive). If you need to save your backup file across several discs, you can even split the backup file into volumes of a specific size to fit your backup media.
To back up your data, do this:
- Click 📋 or use the View > Backup command to open the backup procedure. The Select Source option opens by default.
-
Locate and check the files and folders that you want to back up in the two file directory panes. (These panes resemble Windows Explorer in functionality.)
-
An empty box indicates that the folder has not been selected for backing up.
- A green check mark indicates that all of the folder's contents are selected for backing up.
-
A yellow check mark indicates that only some of the folder's contents are selected for backing up.
-
Click Select Destination, then set your backup destination.
-
Backup destination: Select your backup destination from the drop-down box. Backup destinations may include hard disk or a disc burner (depending on your available hardware).
- Backup filename: Give each backup file a unique name. To save the backup file to a different directory, click Browse, then locate and select the folder you want to use.
- Split into volumes: Divide your backup files into volumes (portions) of the size you specify. The Auto option automatically detects the size of the destination hard drive's file system. (To verify the file system on your computer, open My Computer, right-click on your hard drive, then select Properties.) The DVD option divides your backup files into volumes that fit the capacity of a DVD. The CD option divides your backup files into volumes that fit the capacity of a CD. To set a custom volume size, select Custom size..., then enter a size in megabytes.
-
Click Select Method, then choose the backup method (and advanced options, if desired) that you want to use.
-
Backup methods include Full, Differential, and Incremental. For complete information on these backup methods, see Backup Methods on p.4.
-
For more options, click Options.... For more information, see Backup Options on p.11.
-
Click Back Up Files. Verify that the settings are correct, then click one of the buttons to begin your backup.
-
Click Backup Now to begin backing up immediately. To make the same backup configuration available later (as a "job"), click Yes when you are prompted to save changes to your backup file. After you save the file, the backup begins immediately. (To begin the backup immediately without saving the backup file, click No.)
- Click Add to Scheduler to schedule the backup for a later time.
After the backup is completed, you can view the backup report by clicking Report....
Note: For more information on reports, see Viewing Reports on p.25.
Restoring Data
The second half of the backup equation consists of restoring your data to a usable state. The data restoration process uses the file created during the backup process (i.e.: the “backup file”) to put all of your backed up data back into a specified location for your use.
To restore your data after a backup, do this:
- Click 📋 or use the View >Restore command to open the restoration procedure. The Select Source option opens by default.
-
Select the restoration source from the Restore from drop-down box.
-
Backup file: Restore from an existing backup file. To open a backup file, click Browse, then locate and open the file you want to use.
- My Catalog: Restore from existing records of previous backup jobs. (To delete records from My Catalog, use the Edit > Delete Catalog Record or Delete All Catalog Records command.)
-
Disc drive: Restore from a disc.
-
Click Select Destination, then set your restoration destination.
-
Original location: Restore to the original location from which the files were backed up.
- Alternative location: Restore to a new location. To set a new directory, click Browse, then locate and select the folder you want to use.
- Single directory: Restore all of the backed up files to a single new directory. To set a new directory, click Browse, then locate and select the folder you want to use.
Note: Your data's original directory structure will be lost if you restore to a single directory.
- Click Select Method, then choose the restoration method you want to use.
- Do not overwrite: Restores only files that are not found on your hard drive, and does not overwrite existing files.
- Overwrite older files: Overwrites existing files on your hard drive if the backed-up copy is newer.
- Always overwrite the files on my computer: Overwrites existing files on your hard drive with the backed-up copy in every case.
-
Ask before overwriting: Prompts you to decide which copy you want to keep.
-
Verify that the settings are correct, then click Restore Now to begin restoring files immediately.
After the restoration is completed, you can view the restoration report by clicking Report....
Note: For more information on reports, see Viewing Reports on p.25.
Comparing Data
You can compare files that have been backed up against the original versions to ensure that the backup file contains the versions of the data that you require.
To compare backed-up data against the original data, do this:
- Click 📋 or use the View > Compare command to open the comparison procedure. The Select Source option opens by default.
-
Select the source of the backed-up data from the Compare from drop-down box.
-
Backup file: Compare data in a backup file against the original data. To open a backup file, click Browse, then locate and open the file you want to use.
- My Catalog: Compare data in the record of a previous backup job against the original data. (To delete records from My Catalog, use the Edit > Delete Catalog Record or Delete All Catalog Records command.)
-
Disc drive: Compare data on a disc against the original data.
-
Click Select Location of Data, then select the location of the original data to be used in the comparison.
-
Original location: Selects the original location of the data.
-
Alternative location: Selects a new location of the data. (You may need to use this option if you have moved the folder or restructured your hard drive). To set a new directory, click Browse, then locate and select the folder you want to use.
-
Verify that the settings are correct, then click Compare Now to begin the comparison immediately.
After the comparison is completed, you can view the comparison report by clicking Report....
Note: For more information on reports, see Viewing Reports on p.25.
Using the Scheduler
Use the Scheduler to schedule backup jobs to run at a future time and date. You can select to run jobs at a regular interval or to run once only.
Click 📁 or use the View > Scheduler command to open the Scheduler function. The large central pane displays a catalog of existing backup jobs at the top and details of each record at the bottom.

On the left-hand side is a list of tasks that can be run from the Scheduler.

The Scheduler offers the following tasks:

Edit Backup: Opens the backup procedure, allowing you to modify the backup source, destination, or options. (This is the same as clicking 📄 or using the View > Backup command.)

Back up Now: Begins the backup process immediately.

Reschedule: Opens a dialog box in which you can select a job interval (Once, Daily, Weekly, or Monthly) and a time and date to run the backup process. The Postpone option allows you to cancel the job, but to keep it in the Scheduler indefinitely.


Add Job: Opens a dialog box in which you can select an existing backup job to add to the Scheduler.

Remove Job: Displays a message asking if you want to remove the selected job from the Scheduler. Click Yes to delete the job, or No to close the message without deleting the job.
Finding Files
You can search in both the restoration or comparison functions to ensure that specific files have been backed up or restored. When you find a file, you can use the displayed file information (name, size, backup time, date modified, and location) to compare with other existing versions of the file found in other locations.
To find files in the restoration or comparison functions, do this:
-
Click 📋 or use the View >Restore command to open the restoration process, or click 📋 or use the View >Compare command to open the comparison process.
-
Right-click on a catalog record, then select Find Files. The Find Files dialog box opens.

- Enter a file name or a file extension (or portion thereof), select a catalog record from the drop-down box, then click Find. All files that match your search criteria appear in the box.
Erasing a Disc
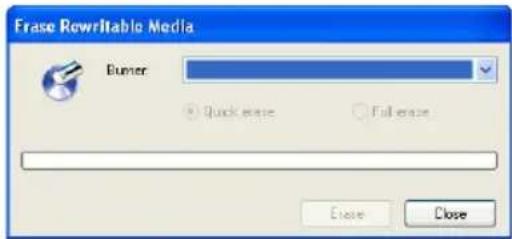
If you are using a rewritable disc (in CD-RW, DVD-RW, DVD+RW, or DVD-RAM format), you can erase content that has been previously recorded onto it. This allows you to reuse the same discs over and over without the need to continually buy new discs. Most manufacturers suggest that discs in DVD-RW or DVD+RW format can be written to about 1,000 times. Discs in DVD-RAM format can be written to about 100,000 times.
- Click Erase Disc. The Erase Rewritable Disc dialog box opens.
-
Insert your disc and select your burning drive.
-
Select an erasing method.
-
Quick erase: Erases the disc index, but does not physically erase the content on the disc.
-
Full erase: Erases all of the content on the disc. (This option takes more time to complete.)
-
Click Erase. PowerBackup displays the real-time progress of the task.
When the task is completed, a message appears, informing you of the status. Click OK to close the message.
Viewing Reports
PowerBackup creates a report each time you perform a job. There are three kinds of reports available in PowerBackup:
- Backup reports
- Restoration reports
• Comparison reports
To view a report, do this:
-
Use the View Reports function to display the type of report you want to view.
-
Click Tools > View Reports > Backup Reports to view a backup report.
- Click Tools > View Reports > Restoration Reports to view a restoration report.
- Click Tools > View Reports > Comparison Reports to view a comparison report.

-
When you have finished reading the report, close it by clicking one of the available buttons.
-
Delete: deletes the report.
- Close: closes the report.
CyberLink PowerBackup
Appendix
This chapter contains technical support information as well as a reference section to help answer questions you may have about the different disc technologies available in CyberLink PowerBackup.
This chapter contains the following sections:
• Technical Support on p.28
- CD vs. DVD on p.30
Technical Support
Before asking CyberLink for technical support, please refer to this user's guide or online help for information. It contains all the information you generally need to use the program. You may also find answers quickly by contacting your local distributor/dealer.
If your problem is not resolved using the above methods, please feel free to contact CyberLink for technical support.
Web Support
Solutions to your problems are available 24 hours a day and at no cost on our Web sites:
support.gocyberlink.com
www.gocyberlink.com
In addition to frequently asked questions, we also provide troubleshooting techniques, the latest in product news, and other relevant information.
Fax Support
Use our fax support number to get technical support quickly without spending time on the phone:
(886) 2-8667-1300
Note: Technical support is only offered to registered users, so please make sure to include your CD-key (located on your CD case) when faxing.
Telephone Support
You are welcome to call the CyberLink's Technical Support Hotline at the phone number listed below during hours of availability:
| CyberLink Technical Support Information | |
| Support Phone Number | (886) 2-8667-1298 |
| Support Hours | 9:00 a.m. -5:00 p.m. Taiwan time (GMT +8:00)Monday to Friday, excluding holidays |
Note: Technical support is only offered to registered users. Please be sure to have your CD-key (located on your CD case) on hand when calling.
When calling for support, please have your computer ready and provide us with the following information:
- your registered CD-key
- the product version
- the version of Windows installed on your system
- the hardware devices on your system and their specifications
- the wording of any warning messages that were displayed (You may want to write this down or make a screen capture.)
- a detailed description of the problem and under what circumstances it occurred
CD vs. DVD
CDs and DVDs look the same and do pretty much the same thing: store data. Both can be used to record data, music, or video files. However, CDs and DVDs are incompatible, bringing different advantages and disadvantages. Therefore, the decision of which to use is left up to you. You can avoid any confusion over which disc type to use by asking yourself two simple questions:
• What disc type is supported by my disc burner?
- What disc type is supported by my disc player?
Knowing the answers to these questions goes a long way towards deciding on a disc type: after all, you want to be able to play your disc after burning it, and of course, your burner must support the disc type you want to create.
In broad terms, discs are divided into CD (which, being the earlier technology, is more widely supported) and DVD (which holds seven times the amount of content, but requires a special drive). Following is a brief description of the different disc types supported by CyberLink PowerBackup.
CD Types
CDs contain up to 74/80 minutes of high quality video or 650/700 MB of data.
CD-R CD-R is a write once format. CD-RW burners and most new DVD burners can write in CD-R, and most DVD players can also read this format. The CD-R format is commonly used for storage of computer data, music, and video.
CD-RW CD-RW is a rewritable CD format. CD-RW burners and most new DVD burners can write in CD-RW, and most DVD players can also read this format. The CD-RW format is best suited for temporary storage.
DVD Types
DVD is a high capacity disc that holds anywhere from 1.4 to 17 GB of data, or from roughly 2-8 hours of video (depending on the type of DVD). Using the High Quality setting, you can expect to be able to record 1-2 hours of video.)
DVDs can be played on DVD players and computers equipped with DVD drives. For more detailed information on DVD-R/RW formats, see www.dvdrhelp.com/dvd or other web sources. For more detailed information on DVD+R/RW formats, see www.dvdrw.com or other web sources.
DVD-R DVD-R is a write once DVD format. It is a competitor product to DVD+R, and is therefore not compatible with that format. Some new DVD burners can write in both DVD-R and DVD+R, and most DVD players can read both formats.
DVD-RW DVD-RW is a DVD format that can be written to about 1,000 times. It is a competitor product to DVD+RW, and is therefore not compatible with that format. Some new DVD burners can write in both DVD-RW and DVD+RW, and most DVD players can read both formats.
DVD+R DVD+R is a write once DVD format. It is a competitor product to DVD-R, and is therefore not compatible with that format. Some new DVD burners can write in both DVD-R and DVD+R, and most DVD players can read both formats.
DVD+RW DVD+RW is a rewritable DVD format that can be written to about 1,000 times. It is a competitor product to DVD-RW, and is therefore not compatible with that format. Some new DVD burners can write in both DVD-RW and DVD+RW, and most DVD players can read both formats.
DVD-RAM DVD-RAM is a DVD format that can be written/rewritten to about 100,000 times. While DVD-RAM's boasts technological advances, it is incompatible with many DVD burners and players.
Index
A
About button 8, 9
add a file type to the exclusion list 13
Add Job option 22
Alternative location option 18, 20
Always overwrite the files on my computer option 19
Append option 12
Archive attribute 4
Ask before overwriting option 19
B
Back up Now 22
backup
methods 4
options 11
procedure 16
reports 25
Backup button 9
backup file, saving 17
buttons 9
C
CD
key, location of 29
types 31
vs. DVD 30
Compare button 9
comparison
procedure 20
reports 25
Custom size... option 17
D
Delete All Catalog Records 18
Delete Catalog Record 18
Details pane 10
Differential backup 4
disc options 12
discs, erasing 24
Do not overwrite option 18
DVD
types 32
vs. CD 30
E
Edit Backup 22
Erase Disc button 9
erasing a disc 24
exclusion options 13
F
fax support 28
file directory panes 8, 16
finding files 23
Full backup 4
full erase 24
function buttons 8, 9
G
general backup options 11
green check mark 16
H
Help button 9
|
Incremental backup 4
M
main features 2
Maximum compression option 11
methods for backing up data 4
My Catalog 18, 20
N
New button 9
No compression option 11
0
Open button 9
Options button 9
Original location option 18, 20
Overwrite older files option 19
Overwrite option 12
P
password options 14
phone number, tech support 29
Postpone option 22
Procedure pane 10
procedure pane 8
Prompt option 12
Q
Quick compression option 11
quick erase 24
R
remove file types from exclusion list 13
Remove Job option 22
reports, viewing 25
Reschedule 22
restoration
procedure 18
reports 25
Restore button 9
rewritable discs, erasing 24
S
Save button 9
saving a backup file 17
Scheduler 21
Scheduler button 9
scheduling a backup for later 17
searching for files 23
Single directory option 18
Split into volumes 17
system requirements 3
T
technical support 28
U
updating PowerBackup 3
using the Scheduler 21
V
Verify 11
viewing reports 25
W
Web sites for technical support 28
Y
yellow check mark 16
- Copyright and Disclaimer
- International Headquarters
- Contents
- Introduction 1
- Working with PowerBackup...... 15
- Appendix.... 27
- Index.... 33
- Chapter 1:
- Introduction
- Welcome
- System Requirements
- Minimum System Requirements
- Updating PowerBackup
- Backup Methods
- Sample Scenarios
- Day Action
- Scenario 1
- Day Backup Method Files Backed Up
- Scenario 2
- Scenario 3
- Scenario 4
- Scenario 5
- Scenario 6
- Scenario 7
- Scenario 8
- The PowerBackup Program
- Function Buttons
- Procedure Pane
- Backup Options
- General Tab
- Disc Tab
- Exclude Tab
- Password Tab
- Chapter 2:
- Working with PowerBackup
- Backing Up Data
- Restoring Data
- Comparing Data
- Using the Scheduler
- Finding Files
- Erasing a Disc
- Viewing Reports
- Appendix
- Technical Support
- Web Support
- Fax Support
- Telephone Support
- CD vs. DVD
- CD Types
- DVD Types
- Index
- A
- B
- C
- D
- E
- F
- G
- H
- |
- M
- N
- 0
- P
- Q
- R
- S
- T
- U
- V
- W
- Y
Brand : CYBERLINK
Model : PowerBackup 1
Category : Software