
ActionDirector 3 - Software CYBERLINK - Free user manual and instructions
Find the device manual for free ActionDirector 3 CYBERLINK in PDF.


| Product Type | Video Editing Software |
| Version | ActionDirector 3 |
| Developer | CyberLink Corporation |
| Supported Operating Systems | Microsoft Windows 10, 8/8.1, 7 |
| Minimum Processor | Intel Core i3 or AMD A6 |
| Minimum Graphics Processor | ATI/AMD Radeon HD 7000 series, NVIDIA GeForce GTX 600 series, Intel HD Graphics |
| Minimum Memory | 2 GB |
| Screen Resolution | 1024 x 768, 16-bit color |
| Hard Disk Space | 2 GB for installation |
| Internet Connection | Required for program activation, online services, and some import/export formats |
| Main Editing Modes | Storyboard, Theme Designer, 360° Editor |
| Supported Import Formats | Image: Animated-GIF, BMP, GIF, JPEG, PNG, TIFF plus RAW camera formats. Video: 3GPP2, AVCHD, AVI, DAT, DivX, DV-AVI, DVR-MS, FLV, MKV, MP4, MOD, MOV, MPEG-1, MPEG-2, MPEG-4 AVC, MVC, TOD, VOB, VRO, WMV, WMV-HD, WTV. Also PowerPoint PPT/PPTX. |
| Project File Extension | .acs |
| Key Features | Action Camera Center (time shift, freeze frame, speed effects), View Designer (direction of view, little planet), Intelligent SVRT, 360° video editing and production, Theme Designer, Title Designer, transitions, background music, video effects |
| Production Output Formats | H.264 AVC (.MP4), Windows Media (.WMV) – up to 4K resolution (Ultra HD) |
| Online Sharing | Facebook, YouTube, Dailymotion, Vimeo, Niconico Douga, Youku |
| Language Support | Multilingual (user manual available in multiple languages) |
| Technical Support | Knowledge base, video tutorials, community forum, email/phone support |
Frequently Asked Questions - ActionDirector 3 CYBERLINK
User questions about ActionDirector 3 CYBERLINK
0 question about this device. Answer the ones you know or ask your own.
Ask a new question about this device
Download the instructions for your Software in PDF format for free! Find your manual ActionDirector 3 - CYBERLINK and take your electronic device back in hand. On this page are published all the documents necessary for the use of your device. ActionDirector 3 by CYBERLINK.
USER MANUAL ActionDirector 3 CYBERLINK
Copyright and Disclaimer
All rights reserved.
To the extent allowed by law, ActionDirector IS PROVIDED "AS IS", WITHOUT WARRANTY OF ANY KIND, EITHER EXPRESS OR IMPLIED, INCLUDING WITHOUT LIMITATION ANY WARRANTY FOR INFORMATION, SERVICES, OR PRODUCTS PROVIDED THROUGH OR IN CONNECTION WITH ActionDirector AND ANY IMPLIED WARRANTIES OF MERCHANTABILITY, FITNESS FOR A PARTICULAR PURPOSE, EXPECTATION OF PRIVACY, OR NON-INFRINGEMENT. BY USING THIS SOFTWARE, YOU AGREE THAT CYBERLINK WILL NOT BE LIABLE FOR ANY DIRECT, INDIRECT, OR CONSEQUENTIAL LOSS ARISING FROM THE USE OF THIS SOFTWARE OR MATERIALS CONTAINED EITHER IN THIS PACKAGE.
The terms and conditions here under shall be governed and construed in accordance with the laws of Taiwan.
ActionDirector is a registered trademark along with other company and product names mentioned in this publication, used for identification purposes and remain the exclusive property of their respective owners.
Manufactured under license from Dolby Laboratories. Dolby and the double-D symbol are registered trademarks of Dolby Laboratories. Confidential unpublished works. Copyright 1995-2005 Dolby Laboratories. All rights reserved.
For DTS patents, see http://patents.dts.com. Manufactured under license from DTS Licensing Limited. DTS, the Symbol, & DTS and the Symbol together are registered trademarks, and DTS 5.1 Producer is a trademark of DTS, Inc. © DTS, Inc. All Rights Reserved.
International Headquarters
Mailing Address CyberLink Corporation
15F., No. 100, Minquan Rd., Xindian Dist.
New Taipei City 231, Taiwan (R.O.C.)
Web Site http://www.cyberlink.com
Telephone 886-2-8667-1298
Fax 886-2-8667-1385
Copyright © 2017 CyberLink Corporation. All rights reserved.
Contents
Introduction......1
Welcome....1
DirectorZone....2
ActionDirector Versions ....2
System Requirements....3
ActionDirector Projects......4
Setting Project Aspect Ratio......4
Opening Saved Projects....5
Exporting Projects....5
Storyboard Window......7
7Rooms
Library Window....8
Searching the Library....9
Filtering Media in the Library 10
Library Menu....12
Preview Window....13
Preview Player Controls....13
Playing 360° Media Files ....14
Taking a Screen Snapshot....15
Preview/Display Options 15
Zoom In/Out 16
Undocking the Preview Window ....16
Expanding the Library/Preview Window....17
Function Buttons....17
Importing Media 19
Importing Media Files....19
Importing 360° Media Files ....20
Importing ActionDirector Projects 21
Downloading Effects and Templates from DirectorZone 21
Adding Video Clips and Images to the Storyboard 22
Editing Media on the Storyboard......28
Splitting a Clip....28
Trimming Video Clips....29
Cropping Images....31
Rotating Media Clips....32
Fixing and Enhancing Media Clips....32
Fixing Video Clips....34
Setting a Media Clip's Duration....36
Changing the Shape of Media....37
Editing 360° Videos....39
Adding Intro/Outro Effects......40
Modifying Titles in the Title Designer....40
Adding Text, Images, and Backgrounds....41
Modifying Intro/Outro Effect Position....43
Modifying Title Text Properties....43
Applying Animation Effects to Title Text....45
Adding Action Effects in the Action Camera Center 46
Creating Action Effects on Video Clips....47
Action Camera Center Settings....53
Changing the Action Camera Center Content....54
View Designer....56
Customizing Direction of View in 360° Video Clips....57
Creating Little Planet Videos....61
Adding Video Effects......69
Using Transitions....70
Adding Transitions to a Single Clip....70
Adding Transitions Between Two Clips....71
Adding Background Music....72
Producing Your Project....74
Utilizing Intelligent SVRT....74
Producing and Saving to a Video File....75
Producing Regular HD Video 75
Producing a 360° Video ....76
Uploading Video to Online Media Sites....77
Uploading Regular HD Video 77
Uploading a 360° Video ....83
Using the Theme Designer......85
Overview....86
What are Theme Templates? 86
Importing Media Files into the Theme Designer......87
Adding Theme Templates/Sequences....89
Adding Media Clips....91
Importing More Media Files....94
Taking Snapshots from Videos....94
Editing Media Clips....95
Editing Background Music....96
Editing Title Text....98
Replacing Background Images....98
Adding Transitions Between Sequences....99
Previewing and Saving....99
ActionDirector Preferences......101
General Preferences....101
DirectorZone Preferences....102
Editing Preferences....102
File Preferences....103
Hardware Acceleration Preferences....103
Project Preferences....104
Produce Preferences....104
Improvement Program Preferences....105
ActionDirector Hotkeys......106
Appendix....109
Intelligent SVRT: When Is Used?......109
Licensing and Copyright Information....110
Licenses and Copyrights......111
Technical Support......123
Before Contacting Technical Support....123
Web Support....124
Help Resources....124
Chapter 1:
Introduction
This chapter introduces CyberLink ActionDirector, outlines its key features, and reviews the minimum system requirements for the program.

Note: this document is for reference and informational use only. Its content and the corresponding program are subject to change without notice.
Welcome
Welcome to the CyberLink family of digital media tools. CyberLink ActionDirector is a digital video editing program designed specifically for action camera enthusiasts like you, as it helps you quickly create high-impact, pro-looking videos that showcase the action.
When you launch the program from the start menu, or the CyberLink ActionDirector shortcut on the desktop, you are prompted to choose one of the following editing modes:
- Storyboard: select this option to edit your video on the storyboard.
Storyboard editing is a flexible and very intuitive way to quickly create your video. See Storyboard Window for an overview of the storyboard and the editing features it includes. - Theme Designer: in the Theme Designer you can use theme templates to create impressive, professional looking videos with style, almost instantly. See Using the Theme Designer for more information and detailed steps on using this feature.
- 360° Editor: select this option to perform 360° video editing. See Importing 360° Media Files for information on importing these types of media files, or Editing 360° Videos for information on how to edit them.

Note: you can also quickly access your saved ActionDirector projects in the Welcome window. See Opening Saved Projects for more information.
DirectorZone
DirectorZone is a free web service that lets you search for and download theme templates, title templates, and transitions created by CyberLink and other users of CyberLink software.
To access the benefits of DirectorZone, you can sign in by:
- clicking the Sign in to DirectorZone link in the top right corner of the CyberLink ActionDirector window.
- clicking the 📄 button at the top of the window to open the ActionDirector preferences, and then on the DirectorZone tab. See DirectorZone Preferences for more information.
Also, be sure to periodically click the button to check out the latest DirectorZone Bulletin and view the Popular templates on DirectorZone. Just click in either of these sections in the Notifications window to view the bulletin or download these templates. Or go to https://directorzone.cyberlink.com to find out more information on the features and benefits of the DirectorZone web service.
ActionDirector Versions
The features that are available to you within CyberLink ActionDirector are completely dependent on the version you have installed on your computer.
To determine your version of CyberLink ActionDirector, click on the CyberLink ActionDirector logo in the top left corner or select ? > About CyberLink ActionDirector.
Updating ActionDirector
Software upgrades and updates (patches) are periodically available from CyberLink. CyberLink ActionDirector automatically prompts you when either is available.

Note: you can prevent CyberLink ActionDirector from auto checking for updates/upgrades in General Preferences.
To update your software, do this:
-
Click the button to open the Notifications window.
-
Check the New Updates and Upgrade Info sections.
- Select an item in these sections to open your web browser, where you can purchase product upgrades or download the latest patch update.

Note: you must connect to the Internet to use this feature.
System Requirements
The system requirements listed below are recommended as minimums for general digital video production work.
| System Requirements | |
| Operating System | • Microsoft Windows 10, 8/8.1, 7 |
| Processor (CPU) | • Intel Core i3 or AMD A6 |
| Graphics Processor (GPU) | • ATI/AMD: Radeon HD 7000 series• NVIDIA: GeForce GTX 600 series• Intel: HD Graphics |
| Memory | • 2 GB |
| Screen Resolution | • 1024 x 768, 16-bit color |
| Hard Disk Space | • 2 GB for installation |
| Internet Connection | • Required for program activation, online services and activation of some import/export formats |

Note: please consult the CyberLink web site (https://www.cyberlink.com) for the most recent system requirements information.
Chapter 2:
ActionDirector Projects
When working on a new video production, click the button to save it as a .acs file, a project file format that is used exclusively by CyberLink ActionDirector. These project files can be imported directly into the storyboard, if required. See Importing ActionDirector Projects for more information.

Note: a CyberLink ActionDirector project (.acs) file essentially contains a list of the media clips and effects used in your project, and a log of all the edits you want to make to your media. Project files do not include the media clips in them. If you want to save all your video production files in one place, use the Pack Project Materials function. To do this select, File > Pack Project Materials from the menu.
Use the options in the File menu to save, create new, or open existing projects in CyberLink ActionDirector. When you create a new project, CyberLink ActionDirector resets your media library. If you want to create a new video production using the same media that's currently in your library, select File > New Workspace.
The changes you make to your media in CyberLink ActionDirector do not affect the original media you imported into the program. Since your edits are all saved in the project file, you can trim, edit, or remove clips, but still keep your original files on your hard drive, untouched. So let yourself get creative. If you end up changing things too drastically, you can always start over.
Setting Project Aspect Ratio
To set the aspect ratio for your project, and your outputted video, select 4:3 or 16:9 from the aspect ratio drop-down at the top of the window. The preview window changes according to the aspect ratio you select.

When you select 360, your project will actually have an aspect ratio of 2:1 and is for users wanting to create and produce 360 virtual reality videos. See Editing 360°
Videos for information on how to edit 360 projects, and Playing 360° Media Files for more information on the extra preview window controls available in these types of projects.
Opening Saved Projects
You can open previously saved projects at any time when in the storyboard window by selecting Open Project from the File menu. You can also open projects directly on the ActionDirector launch window.

The most recent projects you were working on display at the bottom of launch window. Just click the project thumbnail to open it, or click See more to find another saved project.
Exporting Projects
You can export your CyberLink ActionDirector projects by packing all the materials in a folder on your computer's hard drive. Exported projects can then be imported into another computer running CyberLink ActionDirector.
CyberLink ActionDirector
To export your project to a folder select File > Pack Project Materials.
Chapter 3:
Storyboard Window
In the storyboard window is where you edit together your video production. The storyboard is a large graphical display of all the video clips and images in your video production. When you select Storyboard on the CyberLink ActionDirector launch window, the program displays as follows.

A - Import Media, B - Media Room, C - Library Window, D - Intro/Outro Effects Room, E - Transitions Rooms, F - ActionDirector Preferences, G - Preview Window, H - Undock Preview Window, I - Zoom In/Out, J - Add Background Music, K - Produce Video, L - Preview Quality/Display Options, M - Take Snapshot, N - Preview Player Controls, O - Storyboard Workspace, P - Function Buttons
Rooms
There are three rooms in the storyboard window of CyberLink ActionDirector:
- Media room: this room contains all the video files and images that you import into CyberLink ActionDirector. See Importing Media for information on importing media into this window, or Adding Video Clips and Images to the Storyboard to learn how to add media files to the storyboard workspace.
- Title room: this room contains a library of title effects that when applied to your project, add credits or comments to your production. For more information, see Adding Title Effects.
- Transition room: this room contains transitions that you can use on or between clips in your project. Transitions let you control how media appears and disappears in your project, and changes from one clip to the next. For more information, see Using Transitions.
Library Window
The library window contains all of the media you in CyberLink ActionDirector, including your video files and images. When you are in other rooms (Title Room, Transition Room, etc.) it contains the effects, titles, and transitions you apply to your media.

The media content and available buttons that display in the library window depend on the room you are currently in.

Note: if you cannot see all of the media or content in a specific room, you can resize the library window to display it. See Expanding the Library/Preview Window for more information.
Searching the Library
If you are looking for specific media files, effects, or templates in a library window, use the search function to find them.
To search in the library, do this:
- Enter in a keyword in the search field located on top of the library window.

- CyberLink ActionDirector filters the content in the library window based on the keywords entered.


Note: click on to clear the search results.
Filtering Media in the Library
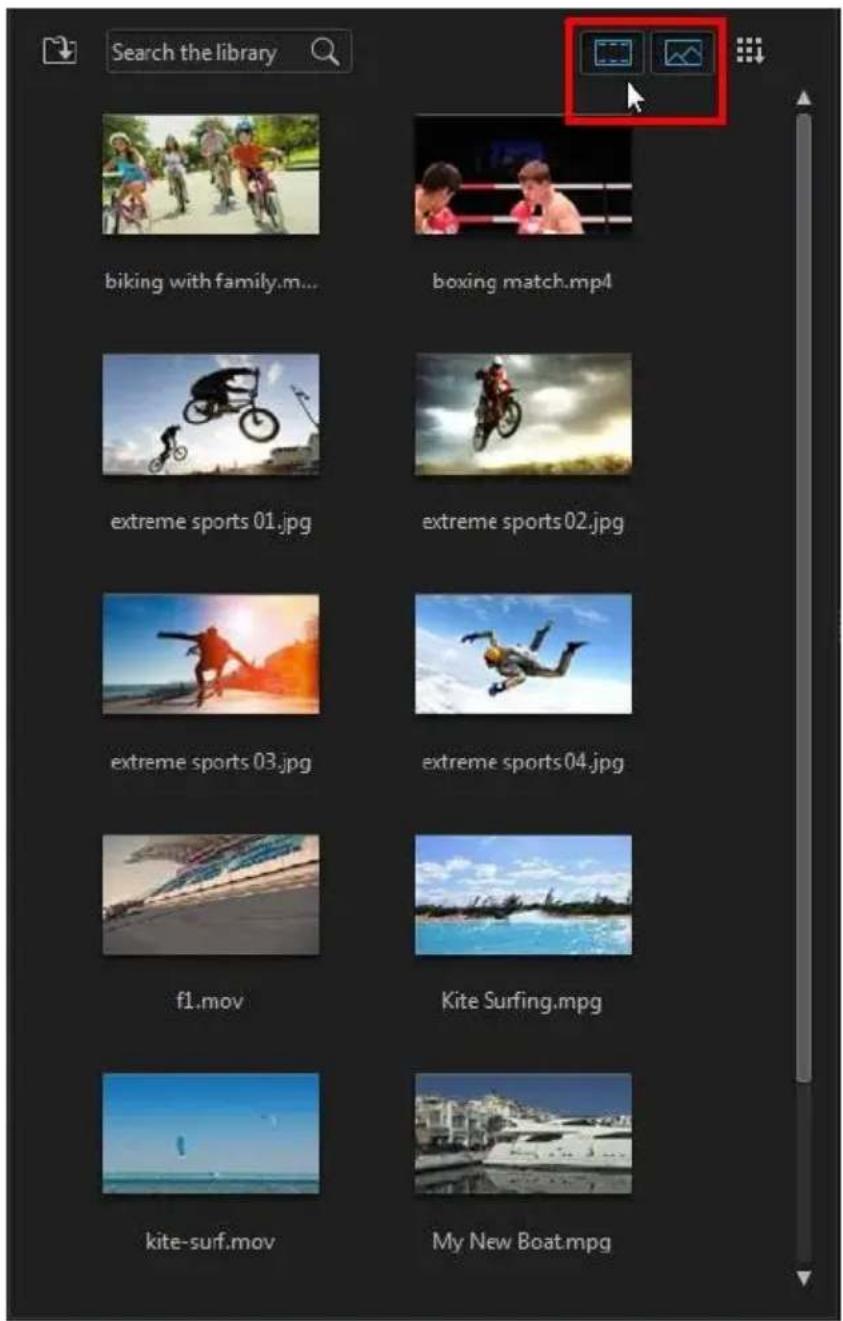
You can filter the media files that are in the library by file type, using the two buttons above the library window. Click these buttons to hide media so you can more easily find what you are looking for.

Library Menu
Click on 📄 to access the library menu. In the library menu you can sort the content in a room by name, date created, file size, and more. You can also select all the content in the room or change the media/effect thumbnail display size. Other
options that are available in the library menu, but are dependent on the specific room you are in.
Preview Window
While creating your video production, you can preview it in the preview window using the available player controls.

natural_image
Motorcyclist mid-air during a jump against a cloudy sky, no visible text or symbols
Note: you can resize the preview window to fit your personal preference. See Expanding the Library/Preview Window for more information.
Preview Player Controls
With the player controls you can preview your production as you edit, including playing your project from the current storyboard position, or pausing and stopping playback.
Use the button to select a seek by method (frame, second, minute, segment) and then use the buttons on either side of it for a more precise step through of your
current video production. You can also click and drag the playback slider, or enter in a specific timecode in the time field, and then press the enter key on your keyboard to quickly find a specific scene.
Playing 360° Media Files
After 360° video and image files are imported into the media library, they can be played back. To play back a 360° media file, do this:
- First, ensure your project's aspect ratio is set to 360. See Setting Project Aspect Ratio for more information.
- Select the 360° media file in the media library or on the project timeline.
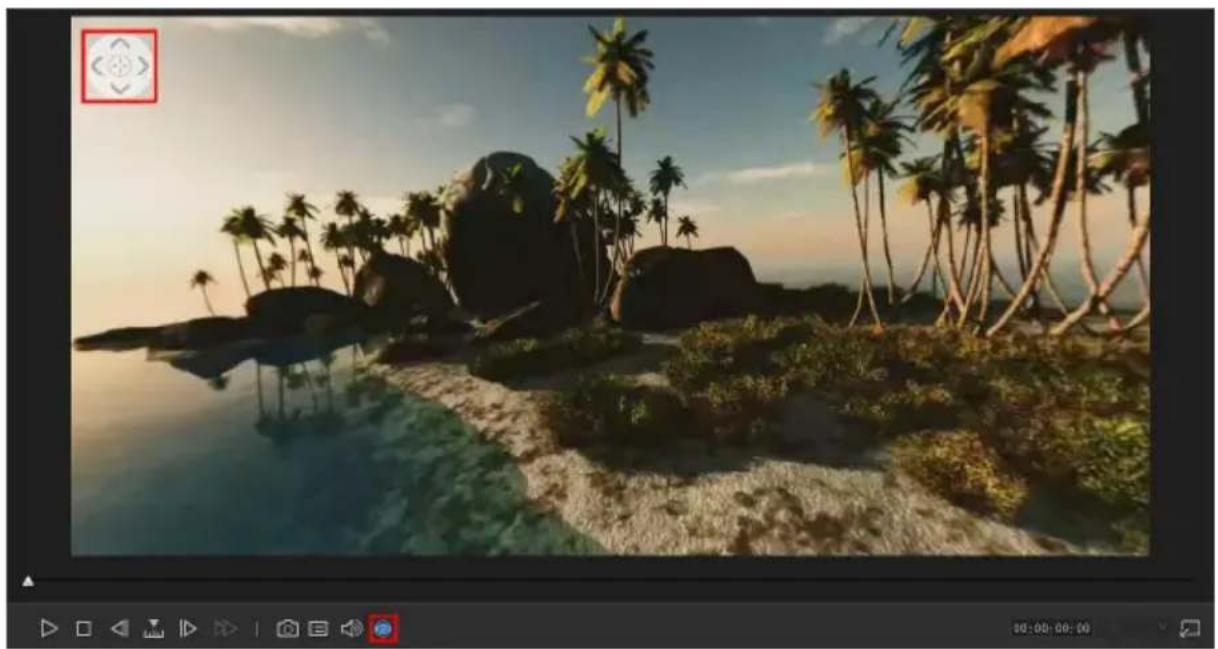
- Click to enable the 360^ viewer mode.
- If it is a video file, click the play button to start playing it back.
- Use the 360 controls to view and explore the 360^ environment.

Note: you can also click and drag your mouse in the preview window to explore the 360^ environment.
360 Controls
When you play 360° media files, there are extra 360 controls available in the preview window.
natural_image
Scenic tropical beach scene with palm trees, rocks, and water reflecting on shore (no text or symbols)When viewing or playing a 360° media file, you can click and drag on the preview
window to pan around the 360^ environment or use the controls to pan left, right, up, or down. Note that you can click the in the middle of the controls at any time to reset to the default viewing position.

Note: you can also use your mouse's scroll wheel to zoom in and out within the 360° view.
Taking a Screen Snapshot
While previewing your project, you can take a still screen snapshot and save it as a JPG image file. To do this click the button on the player controls.
Preview/Display Options
CyberLink ActionDirector includes some preview and display options that help make your editing experience easier. Click on to set the preview quality or display grid lines on the preview window.
Preview Quality
Click ☐ select Preview Quality, and then a preview quality from the list (Full HD*, HD*, high, normal, low) to set the resolution/quality of the video used when previewing your video in the preview window. The higher the quality you select, the more resources that are required to preview your video project.

Note: Full HD and HD preview resolution are only available when CyberLink ActionDirector is installed on a 64-bit operating system.
Grid Lines
When you place media on the storyboard, use the grid lines to help with the precise placement on your video project's image. Click the button, select Grid Lines, and then select the number of lines you want to display in a grid over the video image. Use this grid to more precisely place the title text or PiP media on the video image.
Once enabled, media and title effects will snap to the grid lines on the preview window.
Zoom In/Out
When you place media on the storyboard, use the Fit drop-down underneath the preview window to zoom in or out on the video. Zooming in is useful for precise placement of media on the preview window.
Undocking the Preview Window
Click the button to undock the preview window. Once undocked, you can preview your production at full screen or move it to an extended desktop. You can also resize the timeline and library window to your liking.
Once undocked, you can:
- click ☐ to view your production at full screen, or ☐ to maximize the preview window.
- click to minimize the preview window, and hide it so you can edit more freely. Click on next to the button to show the minimized preview window.
- click on to-re-dock the preview window.
Expanding the Library/Preview Window
You can expand the size of the library and the preview window to fit your personal preference.
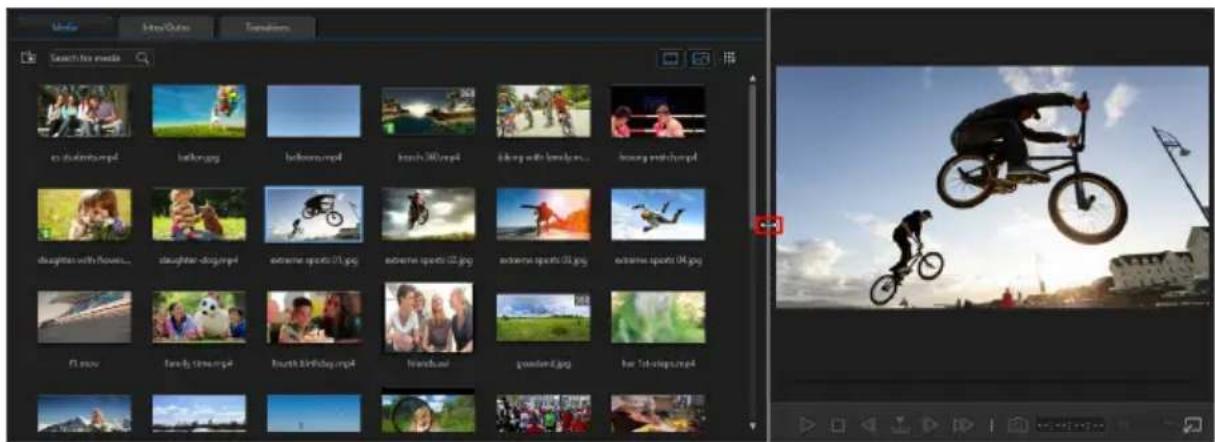
Simply drag the border between the library window and the preview window to resize them to your liking. This allows you to get the most out of your display device space by customizing the size of the preview window, or increasing the amount of content you can view in the media, title, or transition room.
Function Buttons
When you select media that is on the storyboard, whether it's a video clip, image, effect, title effect, etc., several function buttons display above the storyboard. These buttons let you perform a variety of tasks or gain access to some important features of CyberLink ActionDirector.
The function buttons that are available depend on the type of media content you
select. However, whenever you select media, the is always displayed. Click
to remove the selected media content from the storyboard.
Chapter 4:
Importing Media
The first step when using CyberLink ActionDirector is to import your video clips and photos into the media room library. You can import videos and images one by one, or import the entire contents of a folder into the program.

Note: media you import is saved in the current CyberLink ActionDirector project you are working on. You can also select File > New Workspace to create a new project, while maintaining the current media in the library.
Importing Media Files
If you already have video and image files that you want to use in your production on your computer's hard drive, you can import the files directly into CyberLink Action Director's media library in the Media Room. You can also import media files that are on a removable device.

Note: if you import media files that are on a removable device into the media library, they will be removed if the removable device is disconnected. For best results, it is recommended that you copy the media to your computer's hard drive before importing.
CyberLink ActionDirector supports the following file formats:
Image: Animated-GIF, BMP, GIF, JPEG, PNG, TIFF
CyberLink ActionDirector also supports the import of the following camera RAW image formats, which are then converted to JPEG once imported: ARW (SONY), CR2 (Canon), DNG (Ricoh), ERF (Epson), KDC (Kodak), MRW (Konica Minolta), NEF (Nikon), NRW (Nikon), ORF (OLYMPUS), PEF (Pentax), RAF (Fujifilm), RW2 (Panasonic), SR2 (SONY), SRF (SONY)
Video: 3GPP2, AVCHD (M2T, MTS), AVI, DAT, DivX**, DV-AVI, DVR-MS, DSLR video clip in H.264 format with LPCM/AAC, FLV (H.264), MKV, MP4 (XAVC S), MOD, MOV, MOV (H.264), MPEG-1, MPEG-2, MPEG-4 AVC (H.264), MVC (MTS), TOD, VOB, VRO, WMV, WMV-HD, WTV in H.264/MPEG2 (multiple video and audio streams).

Note: ** to enable, you must download the DivX codec online. Available on Windows 32bit only.
PowerPoint files: CyberLink ActionDirector supports the import of PowerPoint files in the PPT and PPTX formats. During import, each of the PowerPoint slides are converted to PNG image files, which are then added to the media library.
To import media into CyberLink ActionDirector, click and then select one of the following options:
- Import Media Files: import media files individually.
- Import a Media Folder: import the entire contents of a folder that contains the media files you want to use in your current project.
Note: you can also drag and drop media onto the CyberLink ActionDirector window to import it into the program.
Importing 360° Media Files
You can import and edit video and image files that were captured with a 360 camera. Once imported, the 360° media files are automatically detected and indicated by a 360° logo in the top right of the thumbnail. For 360° images, CyberLink ActionDirector will auto level out the horizon if the image is tilted/not level.

Note: if an imported 360° media file is not displaying correctly (no 360° logo), it usually means the file is not using the 360 equirectangular projection video format required for editing. See the documentation for your 360 camera manufacturer for information on producing the video file in this format.
See Playing 360° Media Files for information on the additional preview controls available in the preview window for these types of media files.
Setting 360 Projection Format
If CyberLink ActionDirector did not detect your 360° media file and you are sure it has been produced for playback and editing, you can manually set the 360 projection format. You can also disable 360° mode for a file that was mistakenly detected as a 360° media file.
To set the 360 projection format, do this:
-
Right-click on a 360° media file in the media library and then select Set360 Projection Format.
-
Select the 360 projection format by selecting one of the following:
- Equirectangular (360°): equirectangular video is the standard projection used in 360° media files. Equirectangular projection displays the 360° environment, which is a sphere, onto a rectangular video screen.
- 2D Format (Not 360°): select this option if the selected media file is actually 2D content.
Importing ActionDirector Projects
CyberLink ActionDirector projects (.acs files) you worked on and saved previously can be imported and then directly inserted into your video production's storyboard.
To do this, select File>Insert Project from the menu. All of the media in the original project will be imported into the current project's media library, and also inserted at the current position of the storyboard slider.
Downloading Effects and Templates from DirectorZone
If you are looking for additional title effects or transitions for your library, you can click Download Templates to download them directly from the DirectorZone web site in to the Title Room or Transition Room.
Visit the DirectorZone web site for more information: www.directorzone.com.
Chapter 5:
Adding Video Clips and Images to the Storyboard
To start creating your video production, begin adding video clips and images to the storyboard. To add a media clip to the storyboard, just select it in the media room and then drag and drop it on the storyboard.

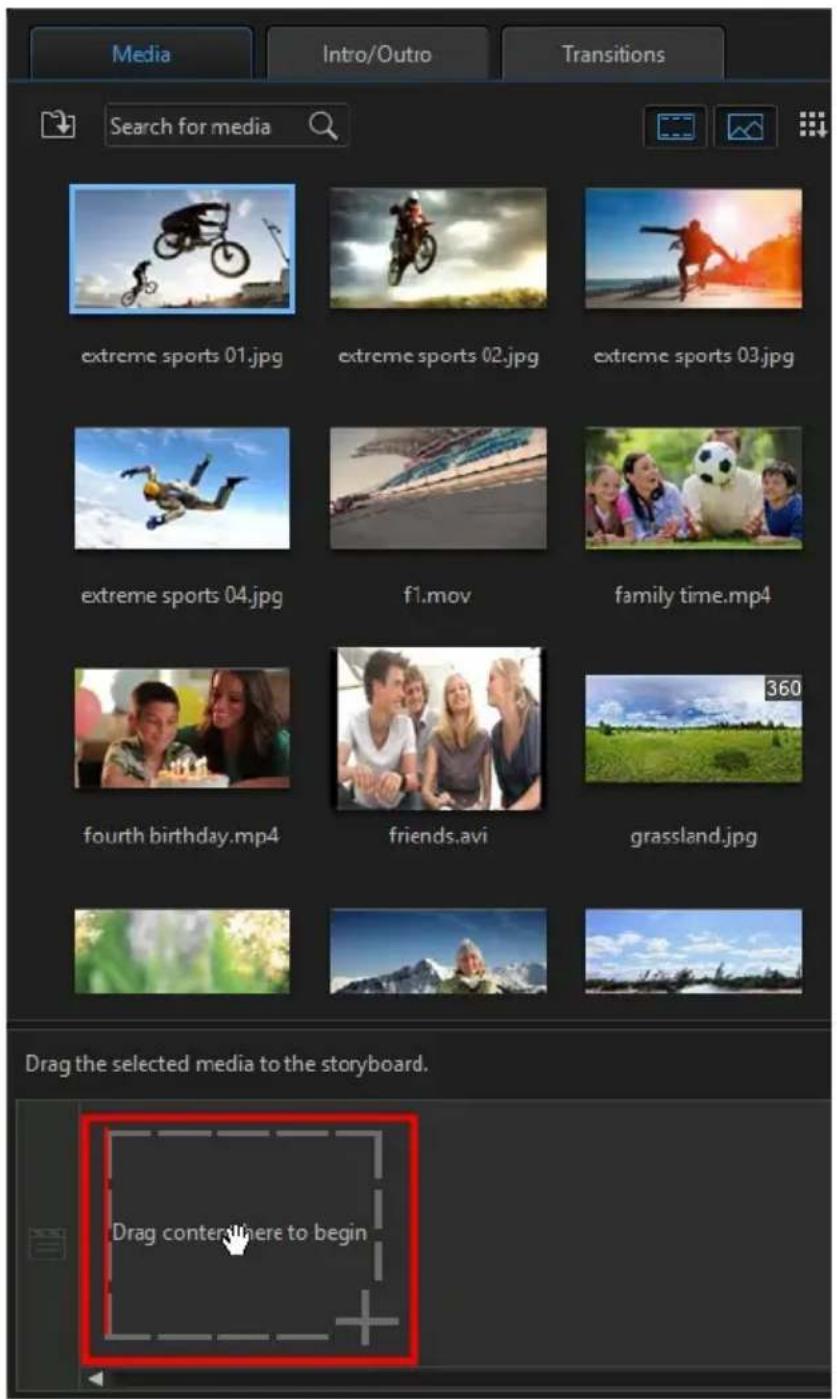
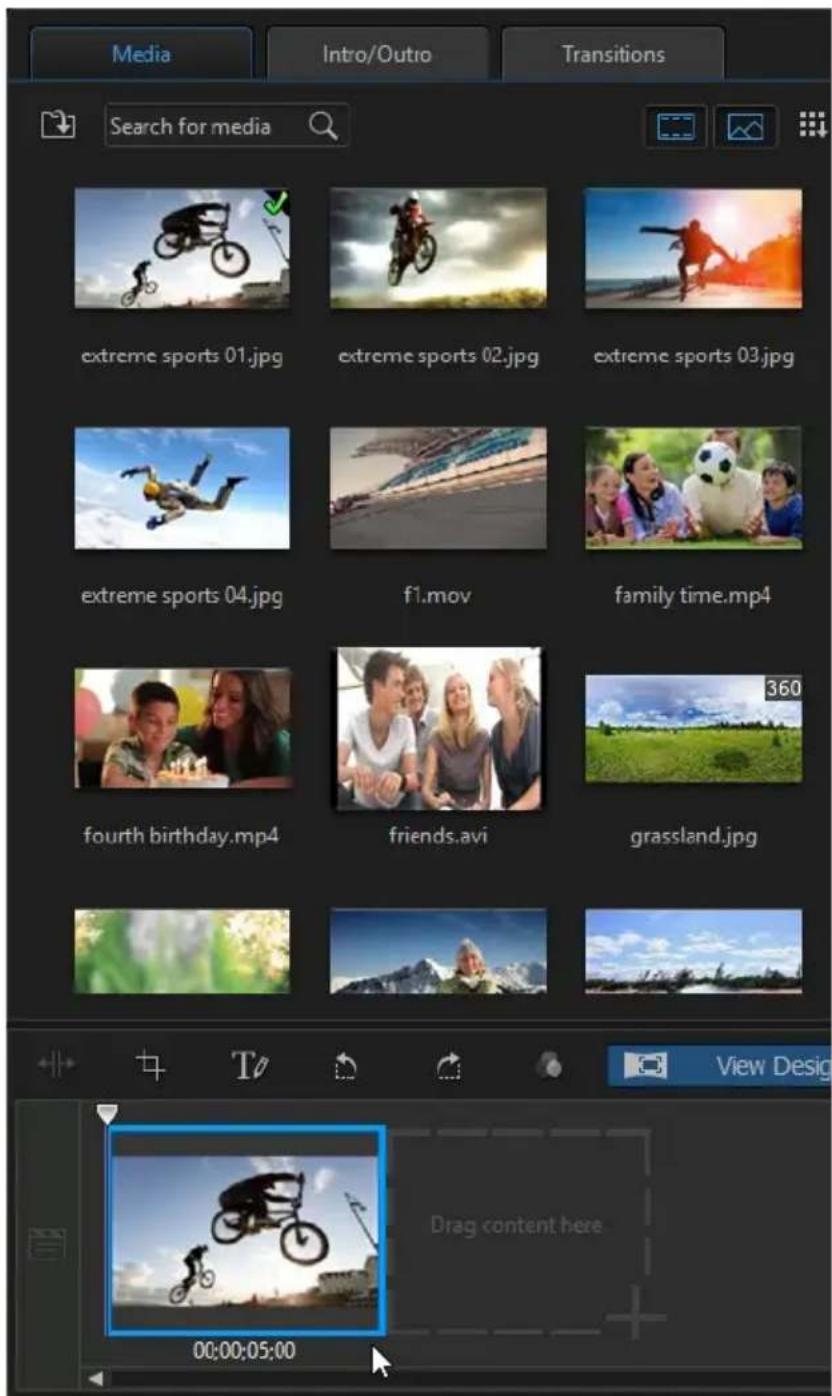
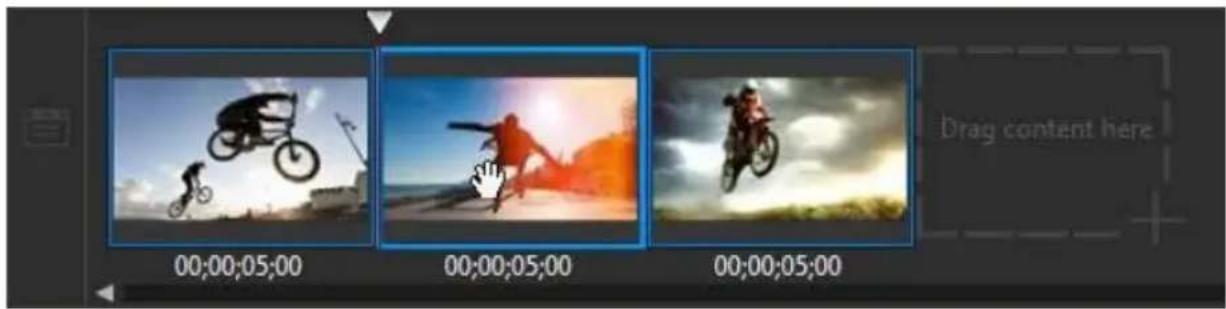
Repeat this process to continue adding your media clips to the storyboard. You add the media clips in the order that tells the story you want to tell.

You do not have to add the media clips after the last clip on the storyboard. They can also be dragged and dropped between two existing clips.
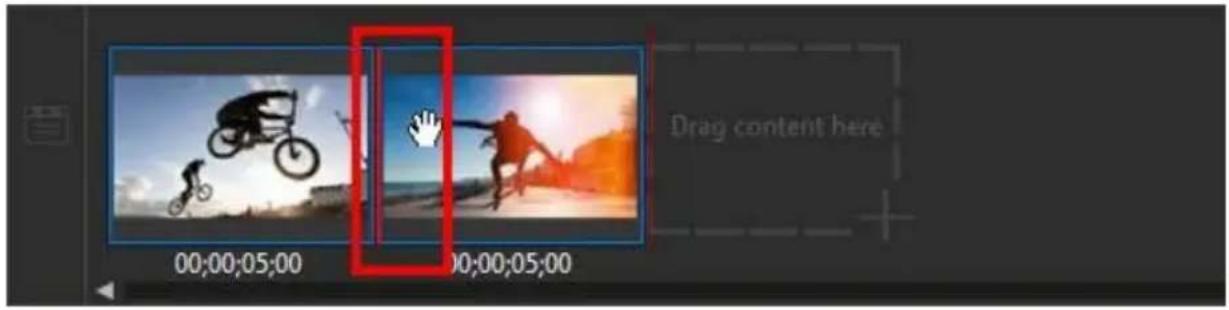

If the media clips are not in the correct sequence on the storyboard, you can click and drag them to different positions.


Chapter 6:
Editing Media on the Storyboard
Once you have your video clips and images on the storyboard you can start editing them. Editing is a broad term that encompasses a number of different functions, including splitting, trimming, applying fixes, and much more.
This section describes all of the editing processes you can perform on your media clips.
Splitting a Clip
You can quickly split a media clip that is on the storyboard into two separate clips. To do this, move the playback slider (or use the player controls) to the position in
the clip where you want to split it. Next, click the button above the storyboard to separate it into two clips.

You can also use it to quickly remove unwanted portions of a media clip, or if you want to insert other media between the two portions.
Trimming Video Clips
Use the trim functions to remove unwanted portions from the beginning and/or ends of a video clip.

Note: when you trim video clips, the program does not delete any of the original source media's content. It just marks the requested edits on the clips and then applies the edits when it renders the final video during production.
To trim a video clip, select it on the storyboard and then click the button above the storyboard.
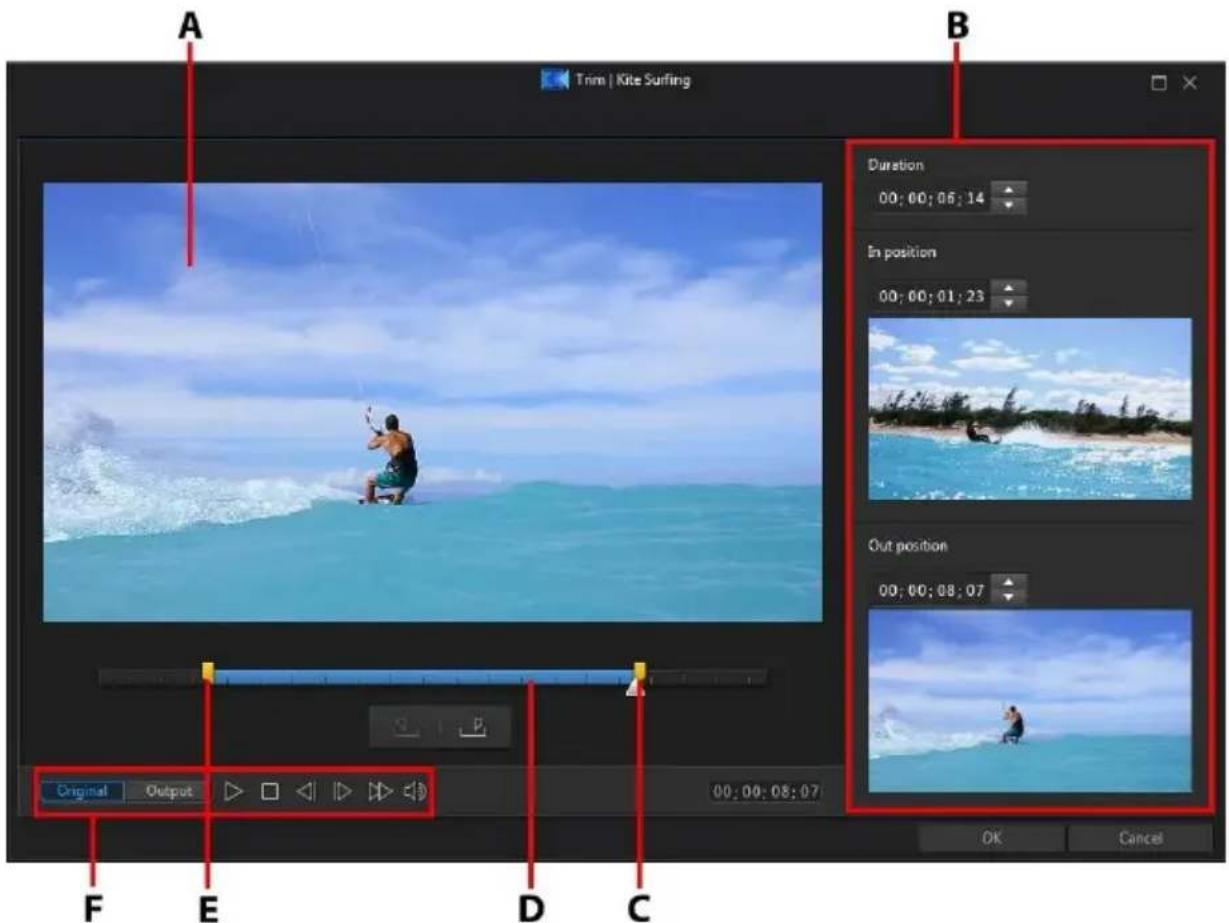
A - Preview Area, B - Marked Positions in Clip, C - Mark Out Position Slider, D - Selected Content, E - Mark In Position Slider, F - Player Controls
To trim a video clip, do this.
- Select the video clip on the storyboard you want to trim, and then click on the

button above the storyboard.
- Use the player controls to find where you want the trimmed clip to begin, and
then click to set the mark in position or drag the mark in position slider to this position.

natural_image
Blue horizontal bar with directional arrows and a small yellow icon at the end (no text or symbols)- Use the player controls to find where you want the trimmed clip to end, and
then click to set the mark out position or drag the mark out position slider to this position.

natural_image
Pure horizontal bar with directional arrows, no text or symbols present- If required, you can preview what the trimmed clip will look like by clicking Output and then clicking the play button on the player controls. Click Original if you want to play the original video.
- Click OK to set your changes and trim the clip.

Note: you can reenter the trim window to refine the trimmed clip at any time.
Cropping Images
You can completely customize the aspect ratio of the images in your video production or crop out unwanted portions of a photo, using the crop image function.
To crop an image, do this:
- Select the image on the storyboard and then click the button above the storyboard. You can also right-click on the image and then select Crop Image.
- Set the aspect ratio or size of the crop area by selecting one of the following:
• 4:3: gives the crop area, and the resulting cropped image, a 4:3 aspect ratio.
• 16:9: gives the crop area, and the resulting cropped image, a 16:9 aspect ratio.
- Freeform: select if you want to manually resize the crop area on the image and give the resulting cropped image a custom aspect ratio.
- Custom: select if you want to set a custom aspect ratio for the cropped image using the Width and Height fields.
- Crop size: similar to custom, you can manually enter the image size you want in the Width and Height fields.
- If required, drag the crop area to the position on the photo you want to keep.
All areas outside the crop area will be removed from the image. - Click OK to set your changes and crop the image.
Rotating Media Clips
If the orientation of a media clip is incorrect, you can quickly rotate it in the Storyboard. To rotate a media clip, select it on the storyboard and then click rotate it 90 degrees counterclockwise. Click 📄 to rotate it 90 degrees clockwise.

Fixing and Enhancing Media Clips
Select a video clip or image on the storyboard and then click the apply fixes and make enhancements to these clips.

Note: enable the Compare adjustments in split preview option for a before and after comparison in the preview window.
Video Denoise
This tool removes video noise from a video clip, including High-ISO and TV signal noise. Once enabled, drag the slider to increase or decrease the level of denoise on the video.
Audio Denoise
Use audio denoise on video clips that were recorded outdoors, in a room with poor acoustics, in a car, or other noisy locations. The audio denoise tool uses CLNR (CyberLink Noise Reduction) technology to improve your video's audio quality and reduce background noise. Select the Noise type from the drop-down menu and then use the Degree slider to adjust the amount of denoise applied.
Color Adjustment
Lets you manually adjust the color attributes (exposure, brightness, contrast, hue, etc.) of the video image or a photo. Once enabled, you cannot use other fixes or enhancements. Use the sliders to adjust the attributes as follows:
- Exposure: use on media clips that are over or underexposed. A lower value darkens all the colors in the clip, while a higher value lightens them.
- Brightness: use to increase or decrease the brightness of the media clip's image.
- Contrast: use to adjust contrast, or the difference between light and dark areas of the media clip.
- Hue: use to fine tune the shade or purity of the colors in the media clip.
- Saturation: use to adjust the saturation of the colors in a media clip. A smaller value moves the colors towards black and white, while a higher value increases the overall intensity of color in the clip.
- Vibrancy: use to make the colors in a media clip brighter and more vivid, by enhancing the duller colors.
- Highlight healing: is applied to areas of media clips that are overexposed to recover detail in the highlights and brighter areas.
- Shadow: use to enhance detail in dark sections of the media clip by lightening shadows and underexposed areas.
- Sharpness: use the slider to adjust the amount of sharpness applied to the media clip.
Color Enhancement
Color Enhancement dynamically adjusts the color saturation ratio in video. Use the available slider to make the colors in the video more vivid, without affecting skin tones.
Fixing Video Clips
Select a video clip on the storyboard and then click the Fix function button to open the Action Camera Center to stabilize shaky video, adjust video white balance, or add color presets. You can also use lens correction to remove fisheye distortions and vignettes.
Lens Correction
Select the Lens Correction option to import lens profiles to auto correct distorted videos, or use the controls to manually correct them if they have a fisheye distortion or vignette effect.

Note: lens correction is not available in 360 projects.
When you enter the Action Camera Center, manually select the lens profile, using the Maker and Model drop-downs, that matches the camera your video was shot with. Once selected, CyberLink ActionDirector will auto correct the video.

Note: if none of the lens profiles match your camera, you can download more from DirectorZone or manually fix the distorted video using the controls in this window. See more details below.
Downloading Lens Profiles from DirectorZone
If your video camera's lens and profile are not available in CyberLink ActionDirector you can click the button to download more lens profiles from DirectorZone.
Once downloaded, click the button to import it. CyberLink ActionDirector should auto detect the imported profile and then correct the selected video.
Fisheye Distortion
The fisheye distortion section helps correct videos that appear distorted. Dragging the slider to the right straightens lines that bend away from the center, correcting barrel distortions. Dragging it to the left straightens lines that bend towards the center, fixing pincushion distortions in videos.
Vignette Removal
Use the following sliders to remove an unwanted vignette effect on videos that was caused by a camera lens or the lighting environment:
- Vignette amount: use this slider to adjust the level of vignette removal on the video.
- Vignette midpoint: drag the midpoint slider to the left to increase the size of the area (towards the center of the video) where the vignette removal is applied. Drag it right to decrease the size, towards the corners.
Video Stabilizer
Select the Video Stabilizer option to employ motion compensation technology to correct shaking videos. This tool is ideal for use with videos taken without a tripod or recorded while moving.

Note: video stabilizer is not available in 360 projects.
Once enabled, drag the Strength slider to increase or decrease the level of correction.
Select the Fix rotational camera shake option if the clip has segments where the camera rotates from side to side. Select the Use enhanced stabilizer option to improve the output quality of some video clips. Using this feature requires more computing power, so it is recommended that you switch to non-real time preview or render a preview for the applied range.
White Balance
Select the White Balance option and then Color temperature to adjust the video's color temperature or create a specific atmosphere. Once enabled, use the slider to adjust the color of the video image. A lower value applies a colder temperature, while a higher value creates an atmosphere that is warmer. Use the Tint slider to adjust the color level of the clip.
Select the White calibration option and then click 📄 to color correct the video image. By indicating which portion of the video image should be white, CyberLink ActionDirector automatically adjusts the other colors accordingly to be more vivid and true.
Color Presets
Select the Color Presets option to instantly transform the color and look of your video clips. To apply a color preset, just select it.
Setting a Media Clip's Duration
When you add images and title effect templates to the storyboard, you can set how long they are displayed in your video production. Unlike video clips which have a maximum length, these media clips can have any duration you want.

Note: to set the duration of a video, see Trimming Video Clips.
To set a media clip's duration, do this:
-
Select the clip on the storyboard.
-
Click the the button above the storyboard (or right-click on the clip, select Set Clip Attributes, and then select Set Duration).
-
In the Duration Settings window, enter in the how long you want it to display in your video production. You can set the duration down to the number of frames.
-
Click on OK.
Changing the Shape of Media
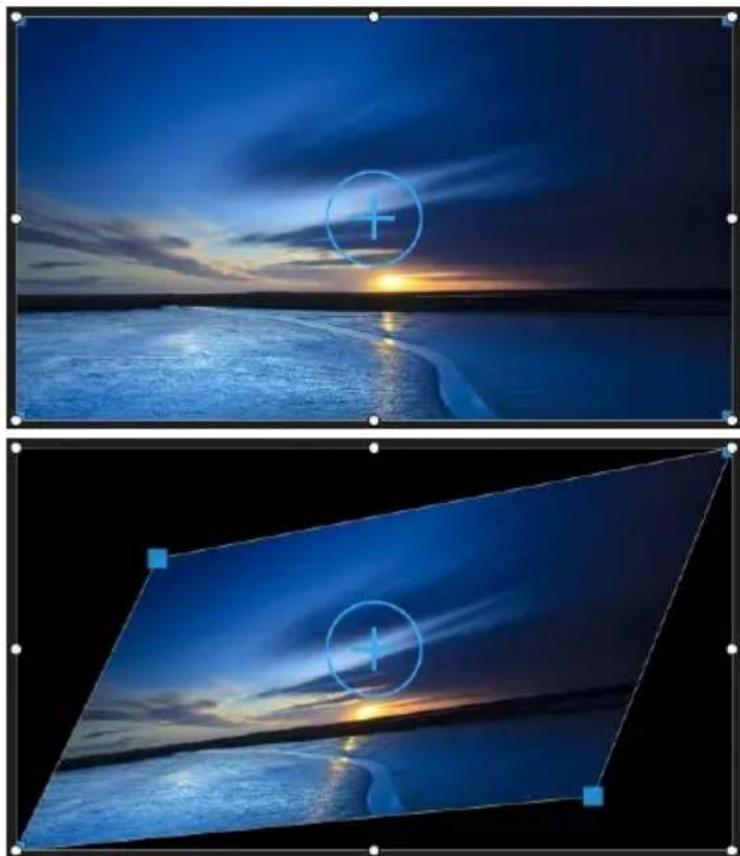
CyberLink ActionDirector lets you change the shape of the media in your video production. Both videos and images added to the storyboard have freeform properties, so you can easily change their shape to create media that is different from the usual rectangle or square shape.
natural_image
Two-panel image showing a beach at sunset with a blue sky and a white sun, each with a circular overlay of a plus sign (no text or symbols in the main image area)To change the shape of a media clip, do this:
- Select a media clip on the storyboard. The media crosshairs will be displayed.
- Use your mouse to click and drag the blue nodes in the corners of the media clip, changing it to the desired freeform shape.

Chapter 7:
Editing 360° Videos
If you want to render (produce) or upload your imported 360° media files, you first need to add them to the storyboard. See Adding Video Clips and Images to the Storyboard for detailed information.
Once added to the storyboard you can produce it right away, or make some edits to the media file. When editing 360° videos, please note the following:
- you can add more than one 360° media file on the storyboard. In the produced 360° video, the media files will play in the order they are arranged on the storyboard. You can use transitions between the media files if required, add stylish video effects, or include title effects created in the Title Designer.
- the adding of non-360° media files or effects is not recommended, as the content will appear distorted in the produced 360° video file.
- see the Editing Your Media on the Storyboard section for information on some of the editing you can perform on your 360° media files. You can split, trim, or make color adjustments on 360° video clips that are on the storyboard, and more.
- in the Action Camera Center you can speed up portions of the 360° video and more.
- you can add background music to your 360° video.
Once you are done editing your 360° video, click the Produce button to produce it, which renders it as a 360° video file. See Producing a 360° Video for more information. You can also upload it directly to YouTube or Facebook. See Uploading a 360° Video for more information.
Chapter 8:
Adding Intro/Outro Effects
Intro/Outro effects let you add text to your video production, such as open and closing credits. You add intro/outro effect templates to the storyboard the same way you add media clips, and they can be customized in the Title Designer.
To add a intro/outro effect template to the storyboard, do this:
- Click on the To button above the storyboard, or click the Intro/Outro tab to open the Title room.
- Browse through the available intro/outro effect templates. You can click one to view a preview in the preview window.
- When you find the intro/outro effect template you like, drag and drop it on the storyboard. See Adding Video Clips and Images to the Storyboard for more detailed instructions, since the process is the same.

Note: the text in the intro/outro effect template cannot be added or modified in the storyboard or in the preview window. Click the Title Designer button to edit the text in the template.
Once added to the storyboard, select the intro/outro effect template and then click the Title Designer button to edit it in the Title Designer. See Modifying Titles in the Title Designer for more information. For information on setting the amount of time the intro/outro effect appears in your video production, see Setting a Media Clip's Duration.
Modifying Titles in the Title Designer
In the Title Designer you can customize the intro/outro effects in your project. Intro/Outro effects contain character presets, animation, and background options that you can modify to fit your video project.
To open the Title Designer, select a intro/outro effect on the storyboard and then click the Title Designer button.
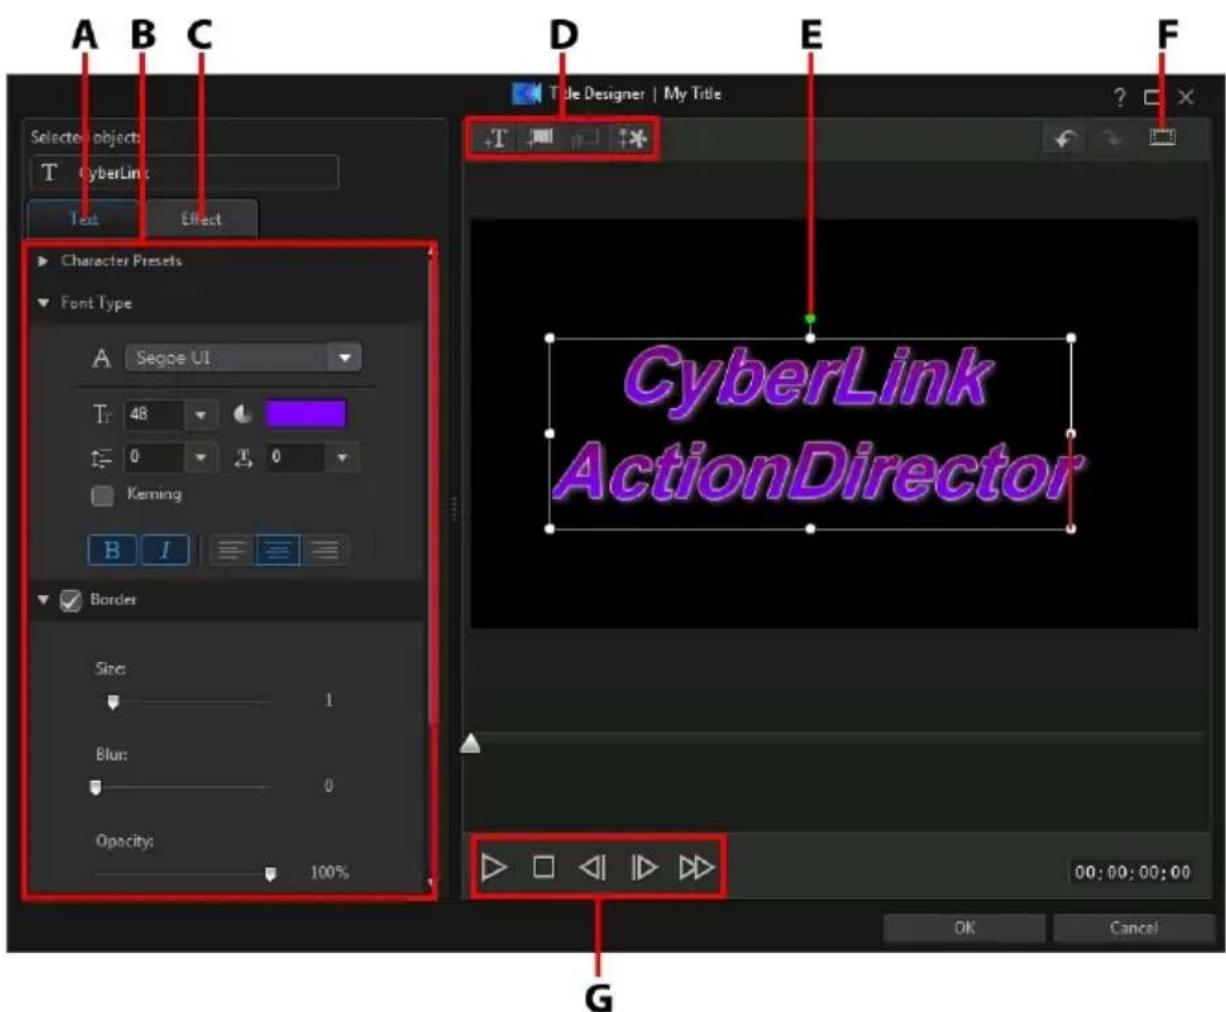
A - Text Properties Tab, B - Title Properties, C - Title Animation Effect Tab, D - Insert Text/Backgrounds, E - Title Text, F - TV Safe Zone/Grid Lines, G - Player Controls
Once you are done modifying the intro/outro effect in the Title Designer, click the OK button to close the window and set your changes in your video production.

Note: if you'd like to perform additional editing after closing the Title Designer, just select the title again in the storyboard and then click the Title Designer button.
Adding Text, Images, and Backgrounds
Each intro/outro effect template can contain one or more title text boxes. It can also contain images and a background that the text displays over.
Adding Title Text
By default there is one title text box in the Title Designer when it's opened. To edit the text in the title text, just click in the box, ensure the default text is selected, and then type in your text.
You can also add additional title text boxes. To add new title text, click on the button and then click in the preview window to add the title text box to the desired position. Type in the required text in the new title text box.
See Modifying Title Text Properties for more information on customizing the default title text properties to fit the intro/outro effect you are trying to create.

Inserting Backgrounds
Your intro/outro effect can consist of a background that the title text displays over.
To set a background, do this:
- Click on the bu
- Browse to and then select the image on your computer you want to use as the background, and then click Open.
- When prompted, select the adjustment setting for the background that best fits your requirements.


Note: to remove the imported background image, just click the button.

Adding Images
You can insert your own images into your intro/outro effect template.
To add a image, do this:
- Click on the bu

- Browse to and then select the image on your computer you want to add, and then click Open.
- Once added, resize and reposition the image in the Title Designer as required, just like a title.
Modifying Intro/Outro Effect Position
You can change the position and orientation of the title text in a intro/outro effect, quickly and easily.

Note: click on 📄 to use the TV safe zone and grid lines to help with the precise placement of the intro/outro effect on the master video. Select Snap to Reference Lines to have the intro/outro effect snap to the grid lines, TV safe zone, and boundary of the video area.
To modify title text or orientation:
- click on the title text, and then drag it to a new position.
- click on □ above the title text or image, and drag it right or left to change its orientation.
- click and drag a corner or side to resize the title text.
Modifying Title Text Properties
Click on the Text tab to change the properties of the selected title text.
Modifying Text Properties
Click on the Text properties tab to modify everything from the text size, style, color, as well as adding borders, and much more.
Applying Character Presets to Title Text
Select the Character Presets option to apply a defined character preset to title text. After you have applied a defined character preset you can refine it using the other properties on the tab, if required.
To apply a character preset to title text, ensure the text box is selected in the preview window and then click on a character preset in the list.

Note: once you are done customizing all of the text properties on the tab, click on to save the character preset to your favorites. To find and use saved character presets, select My Favorites in the Character types drop-down.
Customizing Font Type
Select the FontType option to set the font type and size of the selected title text. You can also select the font face color, bold or italicize text, change the line and text spacing, and set the text alignment in the text box.
If the font type you are using supports it, you can select the Kerning check box to reduce the space between the letters in the title text.
Applying a Border
Select the Border option to add a border around the title text. Available options allow you to change the border's size, and add an opacity or blur effect.
You can customize the border color using the following options in the Fill type drop-down:
- Uniform color: select this option if you want the border to be one solid color. Click the colored square to open the color palette and select the desired border color.
- 2 color gradient: select this option if you want the border color to change from one color to another using a gradient. Click the colored squares to set the beginning and ending colors, and then drag the Gradient direction control to set which way the color flows.
- 4 color gradient: select this option if you want the border to consist of four colors. Click the colored squares to set the colors in each of the four corners of the border.
Opacity
Select this option to use the Opacity slider to set the level of transparency of the selected title text.
Applying Animation Effects to Title Text
Click on the Effect tab to apply animations to title text, such as text fades, text motion, or wipes.
To apply animation to text, do this:
- Select the title text you wish to animate in the preview window.
- Select the Starting Effect option and then select an animation from the available list.
- Select the Ending Effect option and then select an animation from the available list.
Chapter 9:
Adding Action Effects in the Action Camera Center
In the Action Camera Center you can add effects that highlight the action sequences in the video.
To open the Action Camera Center, select a video clip on the storyboard and then click the Action Effect button.

A - Fix Video Clips, B - Add Action Effects, C - Preview Window, D - Action Camera Center Settings, E - Zoom on Timeline, F - Action Camera Center Timeline
Once in the Action Camera Center, you can:
• Fix Video Clips
• Create Action Effects
When you are done editing the video clip, click the OK button to save your changes. Your changes are applied to the video clip and updated on the storyboard.

Note: to edit content created with the Action Camera Center, click on it on the storyboard and then click on the Action Effect function button above the storyboard.
Creating Action Effects on Video Clips
Click on the Effect tab in the Action Camera Center to highlight action sequences in your videos clips with time shifts and freeze frames. Time shifts let you replay, reverse, or alter the speed of key moments in your videos, while freeze frames pause and zoom in on the action.

Note: before you finish creating your action effects, configure the Action Camera Center Settings to ensure the best output results.
Creating Time Shifts
Time shifts let you highlight action in video clips by adding slow motion or replays on key moments. To create a time shift, do this:
- On the Effect tab, use the player controls or drag the Action Camera Center timeline slider to the position in your video clip where you want the time shift to start.

Note: use the zoom controls above the Action Camera Center timeline to zoom in on the video clip's timeline to more precisely add the time shift.

- Click on the Create time shift button. CyberLink ActionDirector will create the time shift, which is indicated in orange on the timeline.

- If required, drag each end of the time shift so that it covers the segment of the video you want to add the effect to.


Note: the length of the original time shift is dependent on how much you have zoomed in on the Action Camera Center timeline.
- Apply the effect as required (see below) to the time shift segment.

Note: you can create more than one time shift on a video clip. Just repeat the above steps to add another.
Replay
In the Replay section, select the Apply replay and reverse option if you want to loop the selected segment of video in the time shift. Once selected, indicate how many times you want the segment to play by setting it in the Play times field. Select the Add reverse effect option if you want the video to reverse forward and backward as it loops playback.
Speed
In the Speed section, select the Apply speed effect option to speed up or slow down just the selected segment of video in the time shift. Once selected, you can enter a new Duration for the segment in the field provided, or use the Speed multiplier slider. Drag it left to slow down the segment, or right to speed it up.
When you apply a speed effect to a segment of video, by default the change in the speed in the video is instantaneous once the timeline slider enters the time shift. If you want it to be more gradual and look smoother, you can use the Ease in/out options. Select Ease in if you want the change of speed at the beginning of the time
shift to gradually speed up/slow down to the specified speed. Select Easeout if you want the video to gradually return to the original video speed at the end of the time shift.

Note: if you also selected the Apply replay and reverse option, in the Apply effect to drop down select whether to apply the speed effect to the first or last play of the time shift segment.
Stop Motion
Select the Stop Motion tab and then the Applystop motion option to add a stop motion effect on the selected segment of video in the time shift. This effect pauses on a frame of video for a specified number of frames, before jumping to the current frame of video. Drag the slider right to increase the number of frames the video will pause for, or drag it left to reduce the number of frames.
Zoom and Pan
In the Zoom and Pan section you can add zooms and pans on the selected segment of video in the time shift.
To add a zoom and pan in a time shift segment:
- Drag the timeline slider to the moment in the segment where you want to be zoomed in/out on a portion of the video frame, and then click to add a keyframe marker.

- Resize and move the focus area box as required. Make it smaller to zoom in on a portion of the video, or make it larger to zoom out. Moving the focus area box will add a pan as the camera moves to the location of the box by the time the timeline slider reaches the keyframe.


Note: in the above example, the zoom in will begin at the beginning of the time shift. Once the keyframe is reached, the camera will start zooming back out.
- If required, you can add more keyframes to customize the effect. For example, you can add another keyframe to hold the zoom, which is done by keeping the focus area box the same size and following the subject (moving the focus area box).

Adding Freeze Frames
Add a freeze frame to pause a frame of video for a specified duration. To add a freeze frame, do this:
- On the Effect tab, use the player controls or drag the Action Camera Center timeline slider to the position in your video clip where you want the freeze frame.

Note: use the zoom controls above the Action Camera Center timeline to zoom in on the video clip's timeline to more precisely find the frame.

- Click on the Add freeze frame button. CyberLink ActionDirector will add a freeze frame, which is indicated by the blue indicator.

- In the Duration field, enter how long you want the video to pause on this frame of video.

Note: you can add more than one freeze frame to a video clip. Just repeat the above steps to add another.
Applying Zoom Effect
Select the Apply zoom effect option if you want to zoom in and out on the paused frame of video. Once selected, resize and align the focus box to the part of the video frame where you want the zoom to occur.

Note: if you also selected the Apply replay and reverse option, in the Apply effect to drop down select whether to apply the freeze frame to the first or last play of the time shift segment.
Action Camera Center Settings
Click the 📄 button in the Action Camera Center window to open the settings window. The available options are as follows:
Audio setting:
- Remove audio: select this option if you want to mute the audio in the entire video clip.
- Keep audio: select this option if you want to keep the audio in the edited video clip. Select the Keep audio pitch (0.5X to 2X only) if you are changing the speed of the video. Selecting this will stretch the audio to match the new video's length, minimizing the warping of the sound as the video speed changes.
Interpolation setting:
- Apply interpolated technology for smoother result (when available): select this option when reducing the speed of the video. CyberLink ActionDirector uses frame interpolated technology* to create a more advanced and smooth slow motion effect.

Note: * optional feature in CyberLink ActionDirector. Check the version table on our web site for detailed versioning information.
Changing the Action Camera Center Content
Once you have created your action effects in the Action Camera Center and imported the resulting video clip into the storyboard, you can edit it like any other video clip on the storyboard. However, if you find that you want to edit or refine the effects more, you can do this by re-entering the Action Camera Center.

Note: if you would like to view the individual clips created by the Action Camera Center so you can edit them directly on the storyboard, just right-click on the file and then select Show Individual Clips.
To edit content created with the Action Camera Center, click on it on the storyboard and then click on the Action Camera Center function button above the storyboard.
Editing Content
When you re-enter in the Action Camera Center, you can refine any of the fixes you made on the Fix tab. Click on the Effect tab to edit any action effects you created, or add new ones. To edit a created time shift, just select it on the video timeline,

and then adjust its parameters as required.
For freeze frames, select the freeze frame indicator,


and then adjust the freeze frame settings as required.

Note: if you want to remove a time shift or freeze frame from a video clip,
just select it on the Action Camera Center timeline and then click the button.

When you are done, click OK to save your changes and import the updated content into the storyboard.
Chapter 10:
View Designer
In non 360 projects, the View Designer lets you customize the direction of view in 360^ video clips for use in conventional/standard 2D video productions. You can also use it to create new unique videos with your 360^ video clips that look like little planets.
To do this, select a 360° video clip on the storyboard and then select View Designer.

A - Direction of View/Little Planet Properties, B - Select Projection Mode, C - Preview Window, D - Display/Hide Keyframe Timeline, E - Keyframe Timeline
See Customizing Direction of View in 360° Video Clips and Creating Little Planet Videos for more information about these View Designer features.
When you are done customizing the video, click the OK button to save your changes and create the conventional video. Your changes are applied to the video clip and updated on the storyboard.
Customizing Direction of View in 360° Video Clips
360° videos allow the viewer to choose where they look during playback. When creating a standard 2D/conventional video (non 360 project) using 360° footage, you can customize this direction of view in 360° video clips using keyframes.
To customize the direction of view in a 360° video clip, do this:
- Select a 360° video clip on the storyboard and then select View Designer.
- In the Projection mode drop-down, ensure that Standard 2D is selected.
- Click to add a keyframe at the beginning of the video.
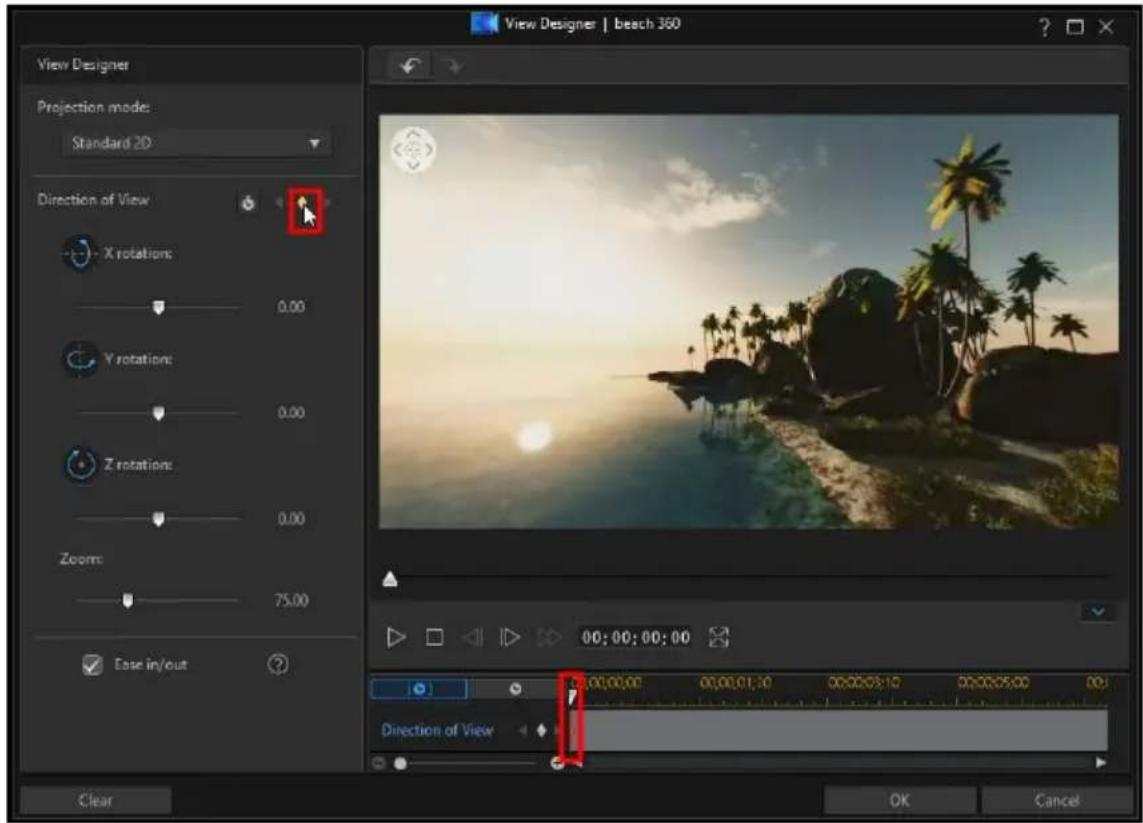
- If required, set the direction you want the camera (audience's view) to be pointing at the beginning of the video. You can do this by clicking and dragging your mouse in the preview window, or using the navigation controls in the top left corner of the preview window.
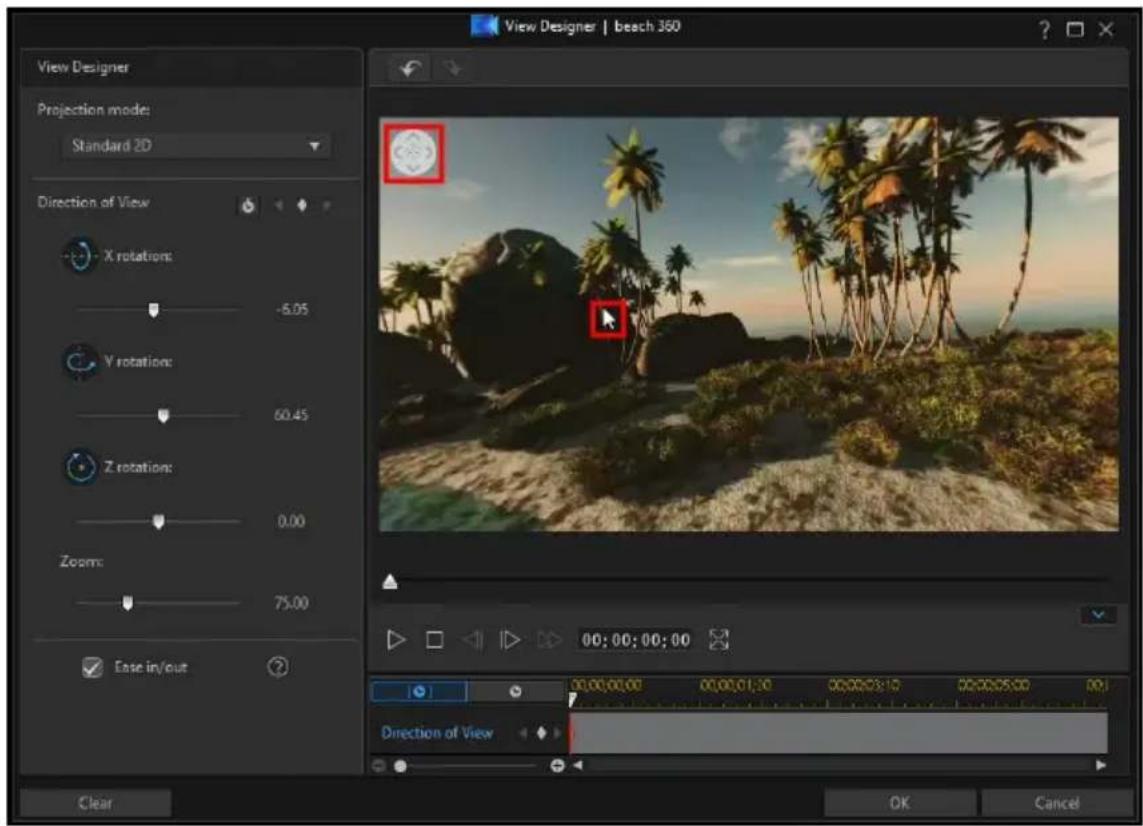
-
Use the playback controls, or drag the timeline slider to a point in the video where you want the camera to have a different direction of view, and then pause the video.
-
Once again, set the direction of view by clicking and dragging on the preview window, using the navigation controls, and/or the Zoom in/out slider. This will add another keyframe to the Direction of view keyframe timeline, and the audience will have this view at this point in the video's playback.
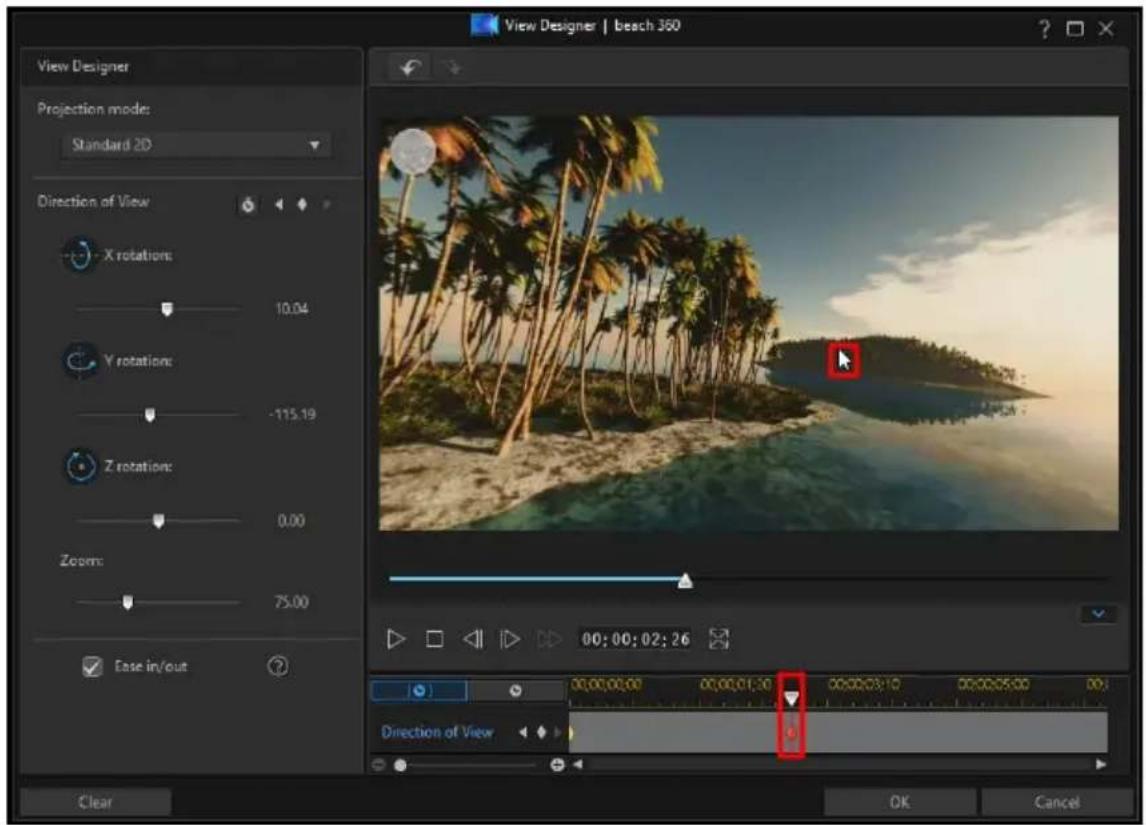
Note: if required, you can also use the X, Y, Z rotation and Zoom (or use your mouse's scroll wheel) sliders to customize the view at the first or any keyframe.
- Repeat steps 5 and 6, changing the direction of view as many times as required (or setting all the points (keyframes) where you want the camera to be facing at specific times in the video clip).

- When you are done, use the playback controls to preview the video. Click OK to save your changes and add the updated video to the storyboard.

Note: if you want to edit the video after closing the View Designer, just select it again on the storyboard and then View Designer to reenter the window.
Ease In/Out
Adjusting the direction of view and X, Y, and Z rotation sliders lets you manually create camera movements in your video. To change the direction of view/camera movement, you indicate when in the video you want the camera to be facing a specific direction by adding keyframes. To create the camera movement, CyberLink ActionDirector will ensure the camera is facing in the selected direction at the specified time in the video. However, this may cause the camera movements to appear jerky. To make the sudden camera movements look smoother, be sure to enable the Ease in/out option.
Modifying Direction of View Keyframes
At any time you can modify the keyframes added, by selecting them and changing the direction of view/zoom, or by dragging the keyframe to another position on the keyframe timeline.

Note: if you cannot find the keyframe timeline in the View Designer, just click the button under the preview window to display it.
To remove a keyframe, select it on the keyframe timeline and then click .
Creating Little Planet Videos
In the View Designer you can use 360° video clips to create little planet videos. To create a little planet video, do this:
- Select a 360° video clip on the storyboard and then select View Designer.
- In the Projection mode drop-down, select the Little Planet option to transform the video.

Customizing the Look of Your Little Planet Video
When creating a little planet video, use the direction of view sliders, fly in/out, and keyframes to customize the look of your final video.
Direction of View
Use the X, Y, Z rotation sliders and keyframes to customize the look of your little planet video. See Customizing Direction of View in 360° Video Clips for more details on how to use these to customize the direction of view to your liking.
Fly Out
Select the Flyout option if you want the video to begin as a regular video, and then fly out to reveal the little planet.

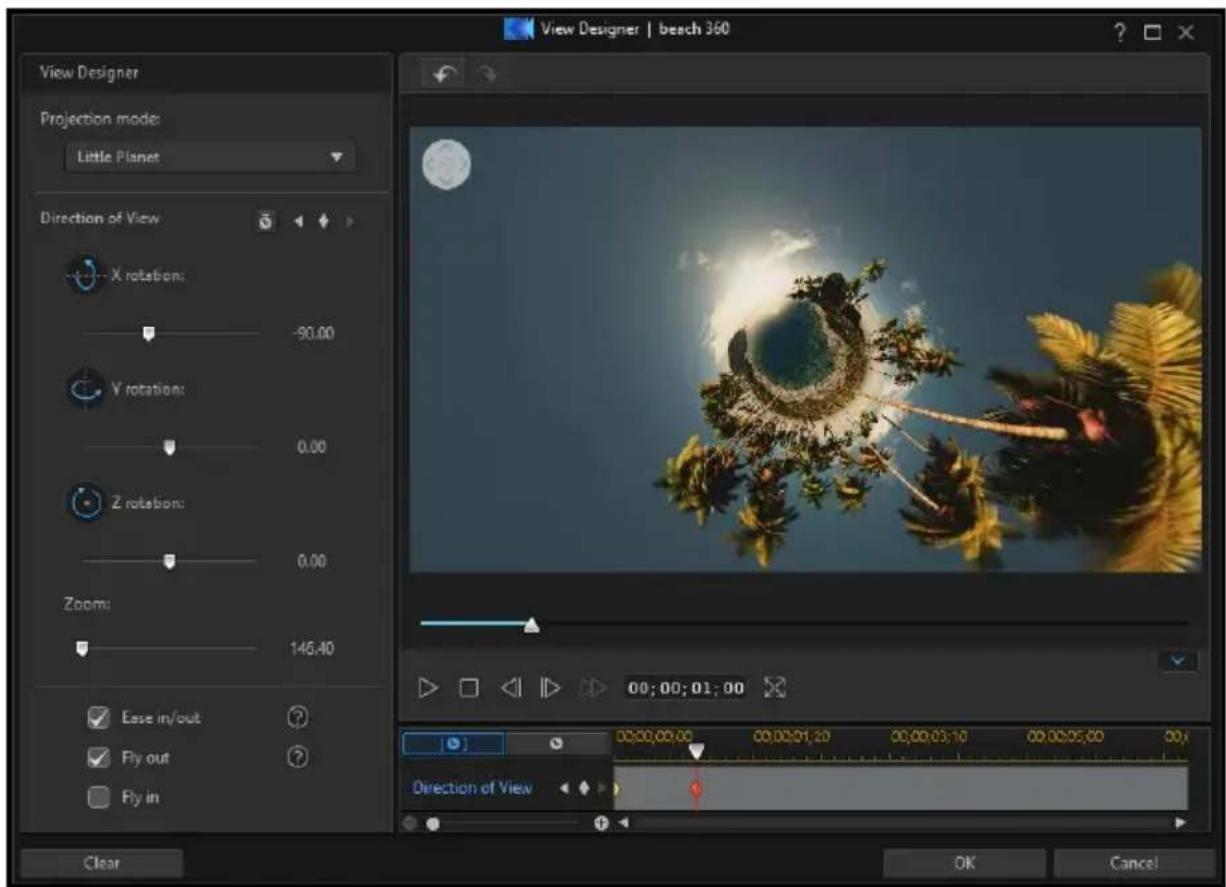
You can modify the look and timing of the fly out by adjusting the added keyframes.

Fly In
Select the Flyin option if you want the video to end as a regular video, by flying in on the little planet.


You can modify the look and timing of the fly out by adjusting the added keyframes.

Ease In/Out
Adjusting the direction of view, and adding a fly out and in, may cause movements in your video to appear jerky. To make them look smoother, be sure to enable the Ease in/out option.
Chapter 11:
Adding Video Effects
You can add stylish video effects to your video production to make it unique. Video effects can be applied to both video clips and images on the storyboard, even when editing 360° video projects.
To add a video effect on a media clip in the storyboard, do this:
- Select a video file or image on the storyboard.
- Click the button above the storyboard to open the Effects panel.
- Find a video effect you like and then click it to instantly apply it to the selected clip.

Note: the effect is applied for the entire duration of the selected clip. If you only want it applied to a portion of it, you can split the clip and then apply the effect to the portion you want. See Splitting a Clip for more information.
- Once applied, you can preview it in the preview window.

Note: media clips on the storyboard that have an effect applied have an i icon in the bottom left corner of its storyboard thumbnail.

natural_image
Scenic landscape with blue water, scattered trees, and cloudy sky (no text or symbols)- To apply a different effect to this clip, ensure it is still selected and then click on the new effect.

Note: only one video effect at can be applied to each media clip on the storyboard.
- When you are done adding the video effect, click ✗ to close the Effects panel.
Note: to remove an applied effect from a media clip, reenter the Effects panel, make sure the clip is selected, and then click on No Effect in the top left.
Chapter 12:
Using Transitions
Click the Transition tab to open the Transition Room and access a library of transitions that you can use on or between image and video clips in your video production. Transitions let you control how media appears and disappears in your project, and changes, or transitions, from one clip to the next.
Adding Transitions to a Single Clip
By adding a transition to a single clip, you can control how the clip appears and/or disappears in your production.
To add a transition to a single clip, do this:
- Click on Transitions tab to open the Transition Room.
- Select a transition effect and then drag it to the beginning (prefix transition) of the first clip on the storyboard.


Note: if you only want a transition to be at the beginning of a clip, this can only be done by adding it to the first clip on the storyboard. Once added, you can then move the clip to another position on the storyboard.
- Select a transition effect and then drag it to the end (postfix transition) of the last clip on the storyboard.


Note: if you only want a transition at the end of a clip, this can only be done by adding it to the last clip on the storyboard. Once added, you can then add more clips after it on the storyboard.
To change the duration of the transition, click on the Duration button above the storyboard. If you want to remove the transition from the clip, just click on it in the thumbnail and then press the Delete key on your keyboard.
Adding Transitions Between Two Clips
You can also add a transition between two image and video clips on the storyboard.
To add a transition between two clips, do this:
- Click on Transition tab to open the Transition Room.
- Select a transition effect and then drag it between the two clips on the storyboard.
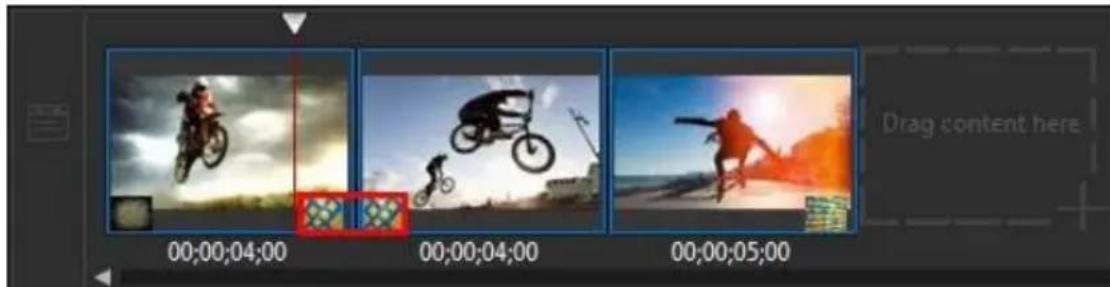
To change the duration of the transition, click on the Duration button above the storyboard. If you want to remove the transition from between the clips, just click on it in the first thumbnail and then press the Delete key on your keyboard.
Chapter 13:
Adding Background Music
You can easily add background music to your video production. To add background music, do this
- Click on the Music button to the right of the storyboard. The Add Background Music window opens.
- Click on the button.
- Browse to the music you want to add, select it, and then click Open. You can repeat this step multiple times, or select more than one music file to add more music.
-
In the Trim audio section you can trim the length of the music files you added as background music as follows:
-
use the player controls to find the desired start point for the music, and then click
- use the player controls to find the desired end point for the music, and then click
- drag the markers on the music timeline to set the desired start and end times manually.

natural_image
Pure diagram of a horizontal beam with directional arrows indicating length and width (no text or symbols)-
In the mix audio section:
-
drag the slider left (towards Background music) to increase the volume of the music in your video. Doing this will also reduce the volume of the audio in the video clip's on the storyboard.
-
drag the slider right (towards Video's audio) to increase the volume of the audio in the video clip's on the storyboard. Doing this will reduce the volume of the background music you added.
-
Select the Loop playback option if you want the music to play continuously during the entire duration of the video. When the music ends, it will loop back to the beginning.
-
Select the Auto fade in/out option to have the background music gradually fade in and out during the production.
- Click OK to save your changes and add the background music to the video.

Note: if you'd like to edit the background music after closing the Add Background Music window, just click on the Music button again.
Chapter 14:
Producing Your Project
When you are done creating your video production, and you are satisfied with the results after viewing it in the preview window, it's time to produce it. Producing simply means compiling (or rendering) the separate elements your project contains into a playable video file.
To begin producing your project, click the Produce button in the bottom right corner. In the Produce dialog you have two options:
- Produce & Save: select this option if you want to create a video file on your computer's hard drive. See Producing and Saving to a Video File for detailed information.
- Produce & Share: select this option if you want to render your video production and then have it uploaded to a social media web site such as Facebook, YouTube, or Vimeo. See Producing and Sharing to Online Media Sites for detailed information.

Note: before you produce your project, you can also click Go to Theme Designer to use theme templates to add style to your video production. CyberLink ActionDirector will create a render preview of your finished video production and then import it into the Theme Designer. See Using the Theme Designer for more detailed information.
Utilizing Intelligent SVRT
Intelligent SVRT (Smart Video Rendering Technology) is a proprietary rendering technology from CyberLink that assists in the output of your video productions by suggesting which video profile you should use.
Based on the format of original video clips in your project, what portions of the clips were modified (and therefore require rendering during production), and which portions of them were not changed (and thus can be skipped over during the rendering process), Intelligent SVRT suggests the video profile that will result in the best output quality possible, and save you the most time during production.
To utilize Intelligent SVRT, click the Intelligent SVRT button on the File tab.
In the Intelligent SVRT dialog that displays, CyberLink ActionDirector auto selects the video profile it suggests you use to output your video production, and some other video profiles you can utilize.
To select a video profile, just select it in the Intelligent SVRT dialog and then click Apply. The selected video profile is auto highlighted and selected as you proceed to produce. The video profile you used is also saved in the dialog, and will always be available when utilizing Intelligent SVRT.
Producing and Saving to a Video File
You can produce your video and save it as a video file that you can watch on a computer, mobile device, and more.
Producing Regular HD Video
You can output your video production as a video file, which you can watch on a computer, burn to disc, or output to a portable device.

Note: if you're not sure which video file format you should output your production in, click the Intelligent SVRT button for assistance. See Utilizing Intelligent SVRT for more information on using this feature.
You can output your project to one of the following formats:
• H.264 AVC (.MP4)
- Windows Media
To output your video production, do this:
- Select a video file format by clicking it (H.264 AVC (.MP4) or Windows Media).
- Select the Profile name/Quality you want to use to create the file. This selection determines the video resolution, file size, and overall quality of the outputted file.

Note: H.264 AVC and WMV video file formats support up to 4K resolution (Ultra HD). Before production, be sure to select the desired video resolution in the Profile name/Quality drop-down.
- Check the production details and that the file will be outputted to the folder
on your computer where you want it. Click folder.

another output
- If required, select Enable preview during production to preview your video during production. Selecting this option will increase the time required to produce your file.
- Click the Start button to begin producing your file.
Producing a 360° Video
You can output your 360° video file in either of the following formats:
• H.264 AVC (.MP4)
To output your video production, do this:
- Select a video file format by clicking it (H.264 AVC (.MP4)).
- Select the Profile name/Quality you want to use to create the file. This selection determines the video resolution, file size, and overall quality of the outputted file.

Note: H.264 AVC video file format supports up to 4K resolution (Ultra HD). Before production, be sure to select the desired video resolution in the Profile name/Quality drop-down.
- Check the production details and that the file will be outputted to the folder
on your computer where you want it. Click folder.

another output
- If required, select Enable preview during production to preview your video during production. Selecting this option will increase the time required to produce your file.
Note: a 360 video preview is not available during production.
- Click the Start button to begin producing your file.
Playing Your 360° Video
Once the production is complete, the 360° video file is automatically imported into your media library. To play it back, just select it in the media library and then use the playback and 360 controls. See Playing 360° Media Files for more information.
360° video files can also be played on your compatible Samsung device, or you can upload and then play it on YouTube and Facebook. See Uploading a 360° Video for more information.
Uploading Video to Online Media Sites
On the Online tab you can upload your video production to online media web sites.
Uploading Regular HD Video
On the Online tab you can upload your video production to one of the following online media web sites:
- YouTube
- Dailymotion
- Vimeo
• Niconico Douga - Youku

Note: in some versions of ActionDirector, you can produce and upload up to 4K resolution (Ultra HD) video to social web sites. Before production, be sure to select the desired video resolution in the Profile name/Quality drop-down.
Uploading Video to Facebook
To upload your video to Facebook ^® , do this:
- Click the Facebook button.
- Select the desired quality of your video from the Profile type drop-down list.
- Enter a Title and Description for your video in the fields provided. The text you enter is included on Facebook once uploaded.
- If required, select Enable preview during production to preview your video during production. Selecting this option will increase the time required to produce the file before upload.
- Click Start to begin.
- Click Authorize and then grant ActionDirector permission to upload videos to your Facebook account by following the steps in the Facebook Authorization windows.
- ActionDirector proceeds to produce and upload the video file. Click Close when done to return to the program.
Uploading Video to YouTube
To upload your video to YouTube, do this:
Note: if the size/length of the your video exceeds the maximum allowed, ActionDirector will separate the video into smaller/shorter videos, upload these videos, and then create a playlist for you on YouTube.
-
Click the YouTube Videos button.
-
Select the desired quality of your video from the Profile type drop-down. The quality you select will result in the corresponding quality option being available after the video is fully processed on YouTube.

Note: the quality option available on YouTube is also dependent on the original captured video quality and the bandwidth of the user who is watching the video.
-
Enter a Title and Description for your video in the fields provided. The text you enter is included on YouTube once uploaded. Also select one of the Video categories and enter in some keyword Tags that users can search for to find your video.
-
Set whether you want the video to be Public or Private once it is uploaded to YouTube.

Note: sign in to DirectorZone and then select Share video on
DirectorZone if you want to show others how you adjusted the clips in your video production. When selected, your uploaded video also displays on DirectorZone.
- If required, select Enable preview during production to preview your video during production. Selecting this option will increase the time required to produce the file before upload.
- Click Start to begin.
- Click Authorize and then grant ActionDirector permission to upload videos to your YouTube account by following the steps in the YouTube Authorization windows.
- ActionDirector proceeds to produce and upload the video file. Click Close when done to return to the program.
Uploading Video to Dailymotion
To upload your video to Dailymotion, do this:

Note: if the size/length of the your video exceeds the maximum allowed, ActionDirector will separate the video into smaller/shorter videos, upload these videos, and then create a playlist for you on Dailymotion.
-
Click the Dailymotion button.
-
Select the desired quality of your video from the Profile type drop-down. The quality you select will result in the corresponding quality option being available after the video is fully processed on Dailymotion.

Note: the quality option available on Dailymotion is also dependent on the original captured video quality and the bandwidth of the user who is watching the video.
-
Enter a Title and Description for your video in the fields provided. The text you enter is included on Dailymotion once uploaded. Also select one of the Video categories and enter in some keyword Tags that users can search for to find your video.
-
Set whether you want the video to be Public or Private once it is uploaded to Dailymotion.

Note: sign in to DirectorZone and then select Share video on
DirectorZone if you want to show others how you adjusted the clips in your video production. When selected, your uploaded video also displays on DirectorZone.
-
If required, select Enable preview during production to preview your video during production. Selecting this option will increase the time required to produce the file before upload.
-
Click Start to begin.
-
Click Authorize and then grant ActionDirector permission to upload videos to your Dailymotion account by following the steps in the Dailymotion Authorization windows.
-
ActionDirector proceeds to produce and upload the video file. Click Close when done to return to the program.
Uploading Video to Vimeo
To upload your video to Vimeo, do this:

Note: if the size/length of the your video exceeds the maximum allowed, ActionDirector will separate the video into smaller/shorter videos, upload these videos, and then create a playlist for you on Vimeo.
-
Click the Vimeo button.
-
Select the desired quality of your video from the Profile type drop-down. The quality you select will result in the corresponding quality option being available after the video is fully processed on Vimeo.

Note: the quality option available on Vimeo is also dependent on the original captured video quality and the bandwidth of the user who is watching the video.
-
Enter a Title and Description for your video in the fields provided. The text you enter is included on Vimeo once uploaded. Also enter in some keyword Tags that users can search for to find your video.
-
Set whether you want the video to be Public or Private once it is uploaded to Vimeo.

Note: sign in to DirectorZone you can select Share video on
DirectorZone if you want to show others how you adjusted the clips in your video production. When selected, your uploaded video also displays on DirectorZone.
- If required, select Enable preview during production to preview your video during production. Selecting this option will increase the time required to produce the file before upload.
- Click Start to begin.
- Click Authorize and then grant ActionDirector permission to upload videos to your Vimeo account by following the steps in the Vimeo Authorization windows.
- ActionDirector proceeds to produce and upload the video file. Click Close when done to return to the program.
Uploading Video to Niconico Douga
To upload your video to Niconico Douga, do this:

Note: if the size/length of the your video exceeds the maximum allowed, ActionDirector will separate the video into smaller/shorter videos, upload these videos, and then create a playlist for you on Niconico Douga.
- Click the Niconico Douga button.
- Enter your Niconico Douga Username and Password. If you don't have an account, click the Sign Up to Niconico link to get one.
- Select the desired quality of your video from the Profile type drop-down. The quality you select will result in the corresponding quality option being available after the video is fully processed on Niconico Douga.

Note: the quality option available on Niconico Douga is also dependent on the original captured video quality and the bandwidth of the user who is watching the video.
- Enter a Title and Description for your video in the fields provided. The text you enter is included on Niconico Douga once uploaded. Also enter in some keyword Tags that users can search for to find your video.
- Set whether you want the video to be Public or Private once it is uploaded to Niconico Douga.

Note: sign in to DirectorZone you can select Share video on DirectorZone if you want to show others how you adjusted the clips in your video production. When selected, your uploaded video also displays on DirectorZone.
- If required, select Enable preview during production to preview your video during production. Selecting this option will increase the time required to produce the file before upload.
- Use the player controls in the preview window to find the frame of video in your production you want to use as the video's thumbnail on the Niconico Douga web site, and then click the Set Thumbnail button.
- Click Start to begin.
- Click Authorize and then grant ActionDirector permission to upload videos to your Niconico Douga account by following the steps in the Niconico Douga Authorization windows.
- ActionDirector proceeds to produce and upload the video file. Click Close when done to return to the program.
Uploading Video to Youku
To upload your video to Youku, do this:

Note: if the size/length of the your video exceeds the maximum allowed, ActionDirector will separate the video into smaller/shorter videos, upload these videos, and then create a playlist for you on Youku.
- Click the Youku button.
- Select the desired quality of your video from the Profile type drop-down. The quality you select will result in the corresponding quality option being available after the video is fully processed on Youku.

Note: the quality option available on Youku is also dependent on the original captured video quality and the bandwidth of the user who is watching the video.
- Enter a Title and Description for your video in the fields provided. The text you enter is included on Youku once uploaded. Also select one of the Video categories and enter in some keyword Tags that users can search for to find your video.
- Set whether you want the video to be Public or Private once it is uploaded to Dailymotion.
Note: sign in to DirectorZone you can select Share video on DirectorZone if you want to show others how you adjusted the clips in your video production. When selected, your uploaded video also displays on DirectorZone.
- If required, select Enable preview during production to preview your video during production. Selecting this option will increase the time required to produce the file before upload.
- Click Start to begin.
- Click Authorize and then grant ActionDirector permission to upload videos to your Youku account by following the steps in the Youku Authorization windows.
- ActionDirector proceeds to produce and upload the video file. Click Close when done to return to the program.
Uploading a 360° Video
On the Online tab you can upload your 360° video to either Facebook or YouTube. Once uploaded, you can click and drag on the Facebook/YouTube player window, or use any available 360 controls, to rotate and view the entire 360° video.

Note: in some versions of ActionDirector, you can produce and upload up to 4K resolution (Ultra HD) video to social web sites. Before production, be sure to select the desired video resolution in the Profile name/Quality drop-down.
Uploading 360° Video to Facebook
To upload your 360° video to Facebook®, do this:
- Click the Facebook button.
- Select the desired quality of your video from the Profile type drop-down list.
- Enter a Title and Description for your video in the fields provided. The text you enter is included on Facebook once uploaded.
-
If required, select Enable preview during production to preview your video during production. Selecting this option will increase the time required to produce the file before upload.
-
Click Start to begin.
-
Click Authorize and then grant ActionDirector permission to upload videos to your Facebook account by following the steps in the Facebook Authorization windows.
-
ActionDirector proceeds to produce and upload the video file. Click Close when done to return to the program.
Uploading 360° Video to YouTube
To upload your 360° video to YouTube, do this:

Note: if the size/length of the your video exceeds the maximum allowed, ActionDirector will separate the video into smaller/shorter videos, upload these videos, and then create a playlist for you on YouTube.


- Click the YouTube Videos button.
- Select the desired quality of your video from the Profile type drop-down. The quality you select will result in the corresponding quality option being available after the video is fully processed on YouTube.
Note: the quality option available on YouTube is also dependent on the original captured video quality and the bandwidth of the user who is watching the video. - Enter a Title and Description for your video in the fields provided. The text you enter is included on YouTube once uploaded. Also select one of the Video categories and enter in some keyword Tags that users can search for to find your video.
- Set whether you want the video to be Public or Private once it is uploaded to YouTube.
Note: sign in to DirectorZone and then select Share video on DirectorZone if you want to show others how you adjusted the clips in your video production. When selected, your uploaded video also displays on DirectorZone. - If required, select Enable preview during production to preview your video during production. Selecting this option will increase the time required to produce the file before upload.
- Click Start to begin.
- Click Authorize and then grant ActionDirector permission to upload videos to your YouTube account by following the steps in the YouTube Authorization windows.
- ActionDirector proceeds to produce and upload the video file. Click Close when done to return to the program.
Chapter 15:
Using the Theme Designer
The Theme Designer lets you add style and a professional video look to your video production, with fully customizable theme templates. A theme may consist of one or more theme templates, or individual sequences from different theme templates.

Note: this feature is not available when editing a 360° video project.
As you customize the theme template, you can also fully customize how your media is displayed, giving you more creative control over your outputted movie.
To open the Theme Designer click ThemeDesigner on the ActionDirector launch window, or Go to Theme Designer in the Produce dialog.
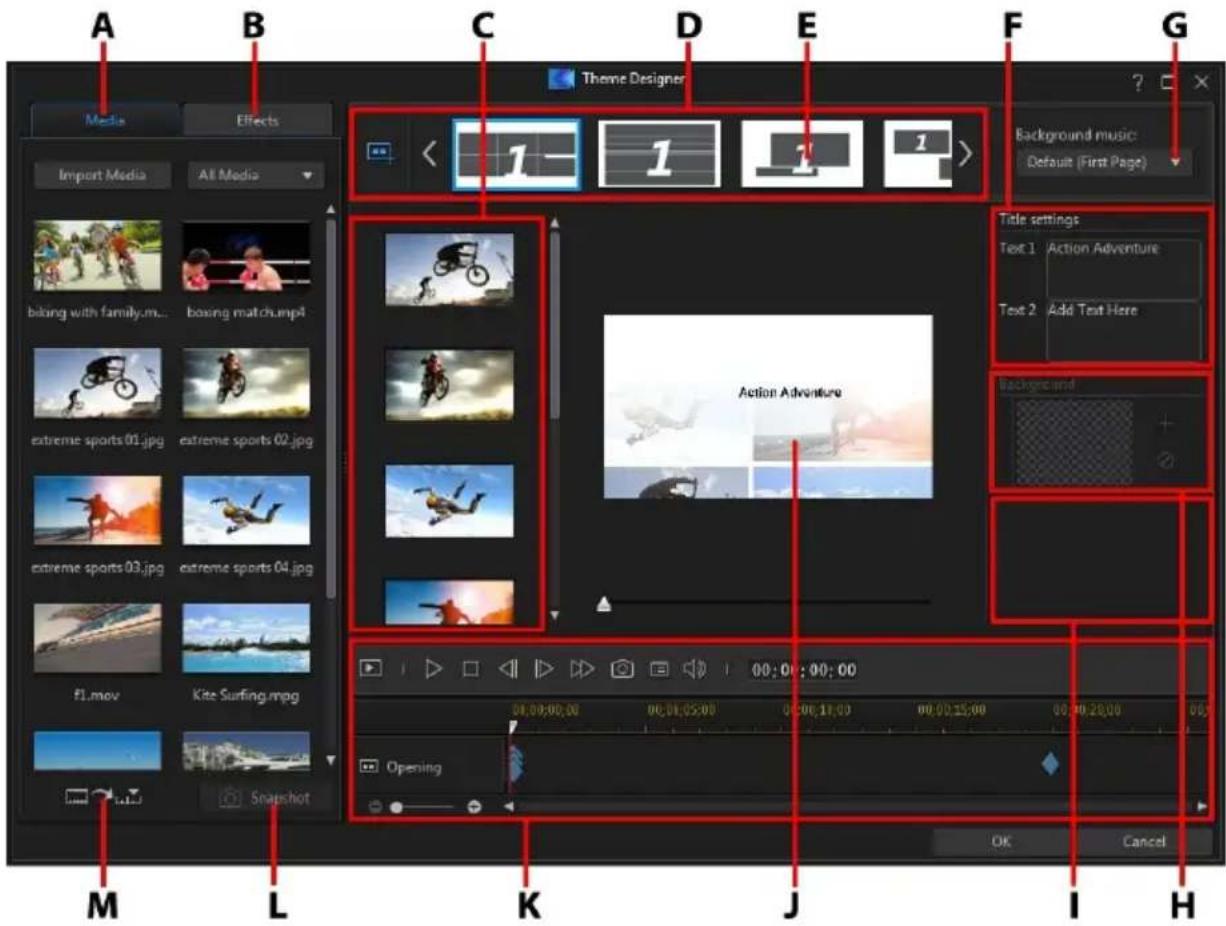
A - Media Tab, B - Effects Tab, C - Sequence Content Area, D - Added Sequences Area, E - Selected Sequence, F - Title Settings, G - Theme Background Music, H - Sequence Background Image, I - Transition Settings, J - Preview Window, K - Preview Controls, L - Take Snapshot from Video, M - Auto Fill Media Slots
Overview
Themes that you edit in the Theme Designer consist of theme templates and your media files. Your media files may consist of:
- images and video clips you import into the Theme Designer.
- a render preview of the video production created in the storyboard window.
- all the images and video clips you had in the media room in the storyboard window.
- snapshot images you create in the Theme Designer. See Taking Snapshots from Videos for more information.
What are Theme Templates?
Theme templates are used to create a video production, with a specific type of theme or style, and can be downloaded from DirectorZone. Theme templates consist of a number of sequences. Each of these sequences contain elements, some of which are customizable and some of which are not.
The customizable elements include the text and media (images, videos, and background music) you add to each sequence. You can add effects on this media and set how and when it is displayed. You can also set the background image on some sequences, and select the transition between each sequence in templates named "with transitions". Non-customizable elements include any animation included in the sequences.
When selecting a theme template to use in the Theme Designer, you can choose to add one or more theme templates, creating a more original production. You can even just select some of the sequences in a theme template, or mix and match the sequences used.
There are three types of sequences: opening, middle, and closing sequences. Opening and closing sequences usually contain text, while the elements in middle sequences are much more random.
Importing Media Files into the Theme Designer
There are two ways you can enter the Theme Designer in CyberLink ActionDirector, so the process for the initial import of media files depends on the path you take. If you entered the Theme Designer from the storyboard window, CyberLink ActionDirector will:
- create a render preview of your video production and then import it into the Theme Designer.
- import all of the video files and images you have in the media room, whether they were used in your production or not, into the Theme Designer.

Note: once the render preview and media files are imported into the Theme Designer, the Add Theme Templates/Sequences window displays. See Adding Theme Templates/Sequences for more information on the next steps.
If you enter the Theme Designer from the launch window, you will see an import window that helps you import your media files.

Note: if you want to import additional media files into the Theme Designer after you have entered it, see Importing More Media Files.
Importing Media Files
When you select Theme Designer on the ActionDirector launch window, you import your media files as below.
- After selecting Theme Designer, the import media window displays.
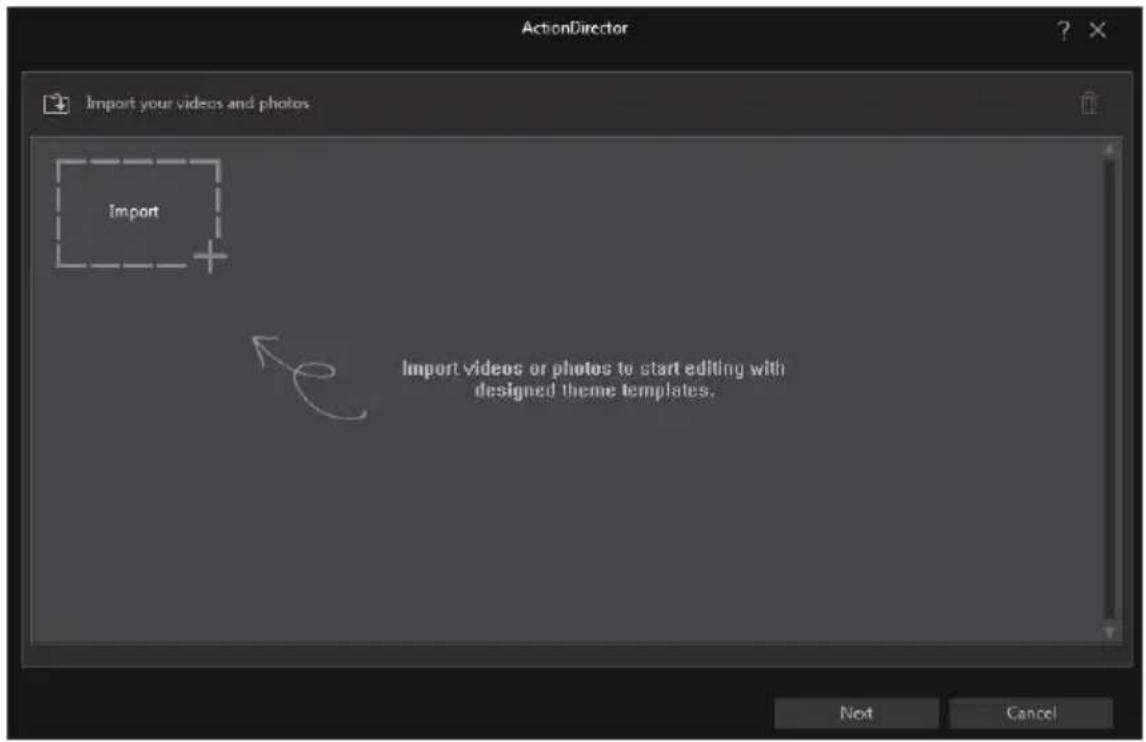
- Click on 📄 and then select one of the following options:

Note: you can also click on the Import icon if you just want to import media files individually.
- Import Media Files: import media files individually.
-
Import a Media Folder: import the entire contents of a folder that contains the media files you want to use.
-
Browse to and select the media files you want to import and then click Open.
-
Click on Next to import the media files into the Theme Designer and display the Add Theme Templates/Sequences window. See Adding Theme Templates/Sequences for more information on the next steps.
Adding Theme Templates/Sequences
In the Theme Designer you can use one or more theme templates, or just certain selected sequences, to create your video.
When you first enter the Theme Designer, you are prompted to select a theme template.
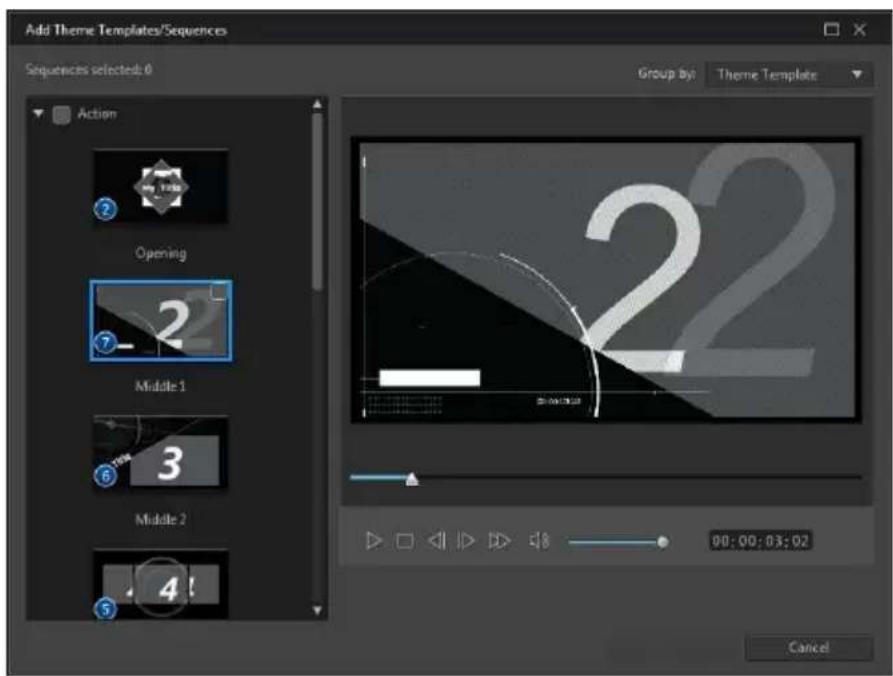
To add a theme template, just select it in the window and all of its sequences will be added.
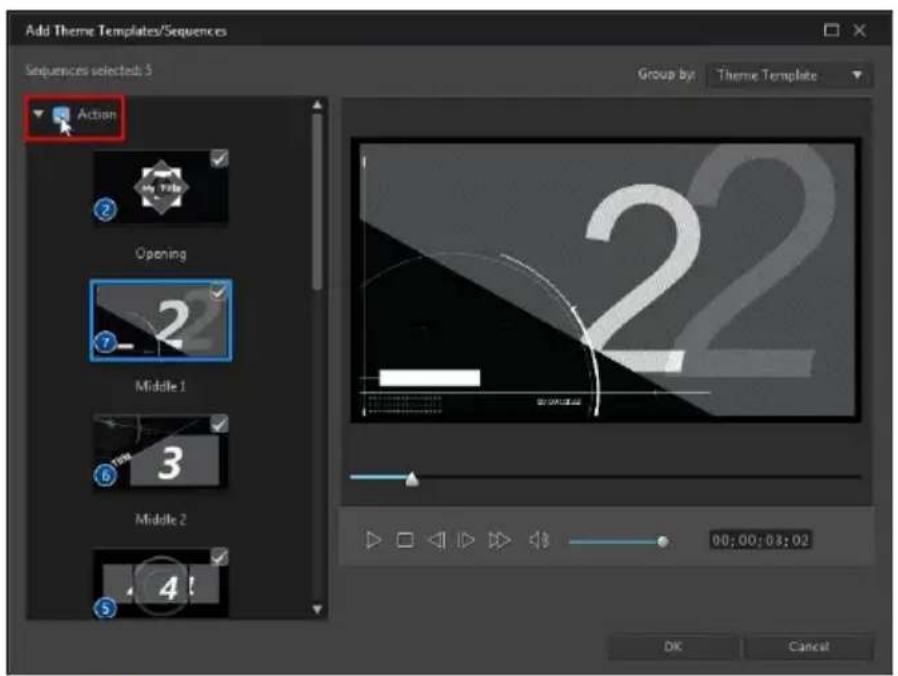

Note: you can preview a theme template in the preview window by selecting it and then using the available playback controls.
If you don't want to use all the theme template's sequences, just deselect the ones you don't want to use.
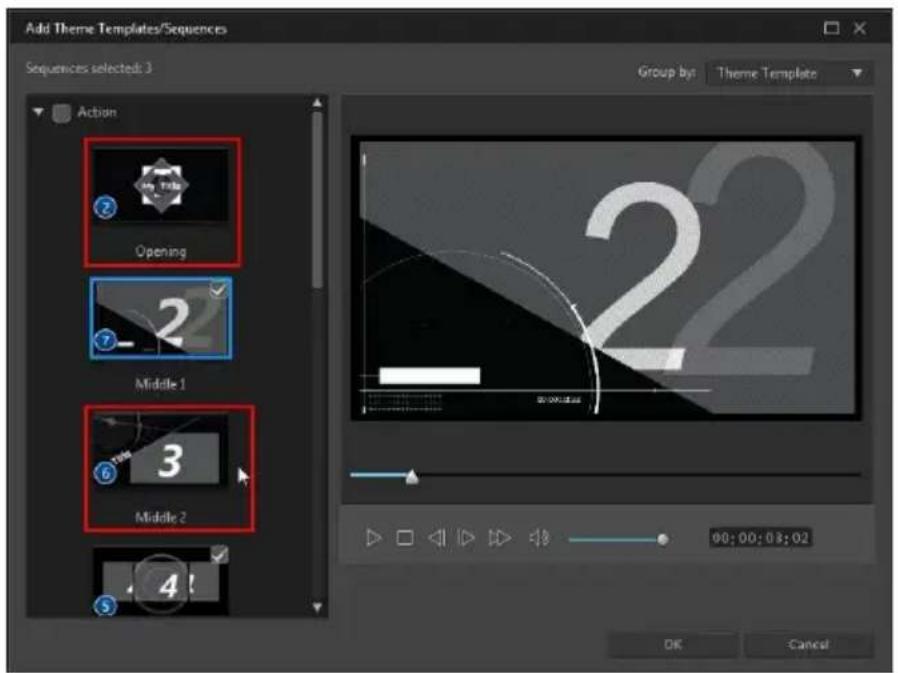
You can also select sequences from other theme templates and include them in your video. The Theme Designer will remember the order of your selections.

Click OK once you have selected all the sequences. They will be loaded into the added sequences area of the Theme Designer.

If you'd like to add more sequences, just click the button. You can drag and drop the sequences to reorder them, or right click to remove the selected one.
Adding Media Clips
Once you have selected the theme templates (and their sequences) that you want to use, you can start adding your images and video files to them.

Note: the number of media files you can add to a sequence is dependent on its design.
To add media into the selected sequences, do this:
- In the added sequences area, select the individual sequence you want to add media to. Note the number of media slots that are available in the sequence content area. The number of available slots varies from sequence to sequence.

Note: some of the media slots in sequences allow you to add both images and videos into them, while others only allow one type of media.
- Click on the Media tab and then drag and drop the media that you want in the sequence to the desired slot.

Note: the media that is available on the Media tab are the videos and images you imported into the Media Room library. Click Import Media to import media from your computer's hard drive.
- Continue this process until all the media slots have been used.

- Select the next sequence, and then repeat steps 2 and 3 until all the media slots have been filled.
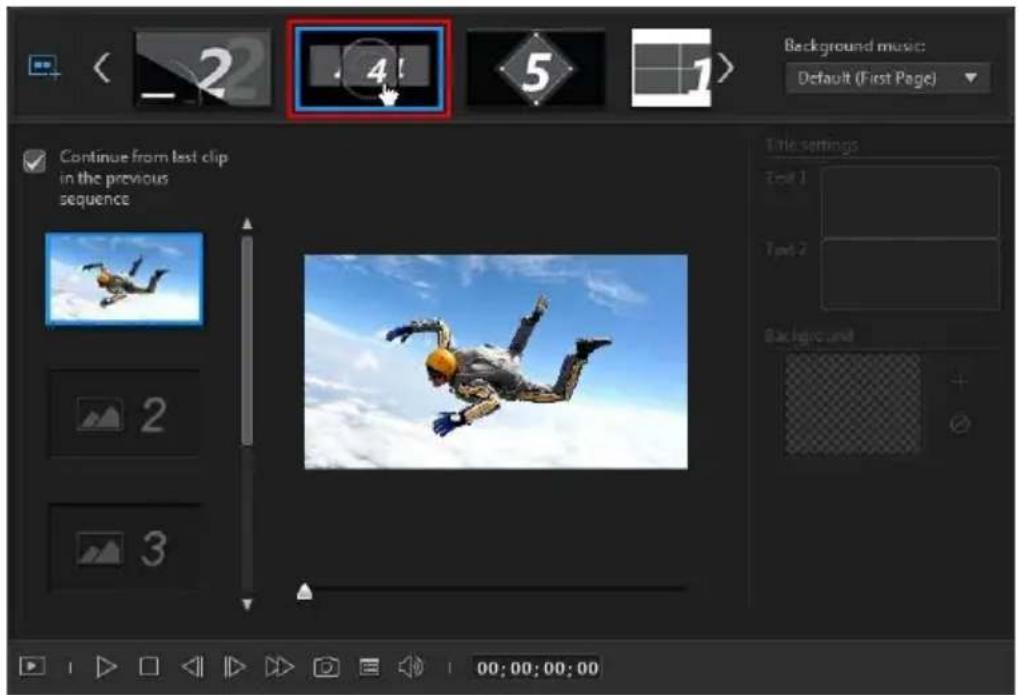

Note: if you want a media file to continue playing from one sequence to the next, ensure the Continue from last clip in the previous sequence is selected. The first media slot will be auto populated with the content from the last media slot on the previous sequence. Deselect this option if you want new media displayed in the next sequence.
- Continue selecting all the sequences in your video until all of the media slots and sequences contain media.

Note: when adding media you can also click the button to auto fill all the empty media slots in the sequences. Select Auto Fill by Library Order to fill by the created date, as displayed in the Media Room library. Select Auto Fill Using Videos First if you want to add the video clips first.

Importing More Media Files
Once you are in the Theme Designer, there are two ways you can import more media files into the window.
- To import more video files and images located on your hard drive, click the ImportMedia button.
- To take still snapshots from videos in the Theme Designer, click the Snapshot button. See Taking Snapshots from Videos for more information.
Taking Snapshots from Videos
You can take a snapshot from a paused video and then import the image into the Theme Designer to use in your video production.
To take a snapshot, do this:
- In the main Theme Designer window, select the video file you want to use and then click the Snapshot button.
- In the Snapshot window, use the playback controls to find the video frame
you want to take a snapshot of. Pause the video and use the buttons to find the precise frame you want to capture.


-
Click the 📄. The snapshot image is captured.
-
Repeat the steps to take as many snapshots from the video as you wish.
-
Click OK to close the Snapshot window and import the captured images into the Theme Designer.
Editing Media Clips
There are several editing options available for the media clips you want to use in the Theme Designer.

Note: the editing options in the Theme Designer are limited to video trimming, image duration, and adding effects. If you need to perform more complex editing on your media clips, it is recommended that you do this before importing the clips into the Theme Designer. See for Editing Your Media for more advanced editing options.
Trimming Video Clips
You can perform trims on the video clips used in the Theme Designer. To trim a video clip, right-click on it in the Theme Designer and then select Trim. Or hover your mouse over the video clip and click on 📋 in its thumbnail. See Trimming Video Clips for detailed information on trimming video clips.
Muting Video Clips
Some theme templates and sequences contain background music that will be used in your video. Because of this, you may want to mute the audio in the imported video clips, so that it doesn't conflict with the background music.
To mute the audio in a video clip, hover your mouse over the video clip and then click on 🎨s thumbnail.
Modifying Image Duration
To modify the duration that an image clip is displayed in your outputted video, do this:
-
Right-click on it in the Theme Designer and then select Set Duration. Or hover your mouse over the image clip and then click on its thumbnail.
-
In the Duration Settings window, enter in the how long you want it to display in your video production. You can set the duration down to the number of frames.
- Click on OK.
Applying Zoom In on Media Clips
Some media slots in sequences allow you to zoom in on the media clip that was added to it. If a zoom is available, then the icon is displayed in the top right corner.
To apply a zoom in on the media clip, click on the icon. Click to remove it if required.
Adding Video Effects to Clips
In the Theme Designer you can add special effects to your images and video clips. Each special effect has unique attributes that you can customize to help achieve the impression you want in your video production.
To add a video effect to a clip, do this:
- Click on the Effects tab.
- Select an effect and then drag and drop it on the clip.
- If required, right-click on the clip and then select Modify Effect Settings. Use the available sliders and options to customize the video effect to your preference. Click on OK to save your changes.
See Adding Video Effects for more information on video effects.
Editing Background Music
You can customize the music that is used in your video. To edit the background music, select one of the following options in the Background music drop-down:
- Default (First Page): select this option to use the background music that is included by default in theme templates.

Note: if you select sequences from more than one theme template, the Theme Designer uses the background music that is applied to the first sequence in the video.
- Imported: select this option if you want to import your own custom background music from your computer's hard drive. Select the music you want to use and then click OK to set it as the music used.
- No Music: select this option if you don't want to have any background music in your video.
Background Music Preferences
You can trim the music used in your video or add fades. To do this, select Preferences in the Background music drop-down. Modify the music preferences as follows:
- if required, trim the background music using the player controls and the mark-in/mark-out indicators.

- if required, adjust the volume of the music using the available volume control.

- if required, use the slider to mix the audio level, by deciding whether to have more background music or the original video's audio in the production.
Click OK to save your changes.
Editing Title Text
Some sequences contain title text that you can edit. If a sequence allows you to edit title text, the text fields in Title settings will become active when the sequence is selected.

To edit the title text, just enter the text you want to use in the fields provided. If you don't want any text displayed in the selected sequences, just make sure the text field blank.
Replacing Background Images
Some sequences let you replace their background image. A thumbnail of the background image is displayed in the Background area if the sequence has a replaceable background image.

Click to replace the background with an image from your computer's hard drive. Click if you want to remove the background image from the sequence.
Adding Transitions Between Sequences
When viewing a video created with the Theme Designer, you will notice that there are transitions between the sequences in a theme template. These transitions are editable in theme templates named "with transitions". Transitions can also be added between sequences if you are using sequences from different theme templates.

Note: in theme templates not named "with transitions", the transitions between sequences are not editable. These theme templates use your media to make the transitions between the sequences.
If adding a transition is available for a sequence, the Transition settings area displays when the sequence is selected.

Click ☐ to add a transition before the selected sequence. Click ☑ if you want to remove a selected transition from the sequence. See Using Transitions for more information on transitions.
Previewing and Saving
As you are creating your video in the Theme Designer, you can preview your creation using the available preview controls.
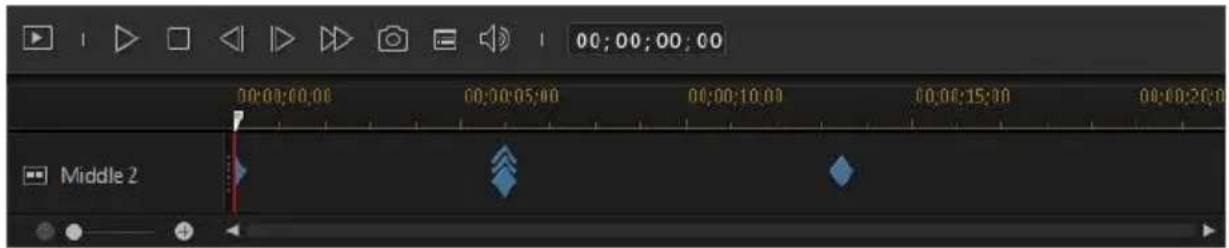
Click ▶ to preview the entire movie, or ▶ to preview just the selected sequence. Click ▶ to change the preview resolution, or ▶ to take a photo snapshot of your movie.
The keyframe indicators on the preview timeline indicate where the media files in the sequence are in the movie. Hover your mouse over a keyframe to view the clip information.
Once you are done previewing your movie and you are satisfied with the results, click on OK. The Theme Designer will close, and you will be brought to produce window where you can do either of the following:
- On the File tab, you can render your production and create a video file on your computer's hard drive. See Producing and Saving to a Video File for detailed information.
- On the Online tab, you can to render your video production and then have it uploaded to a social media web site such as Facebook, YouTube, or Vimeo. See Producing and Sharing to Online Media Sites for detailed information.
Chapter 16:
ActionDirector Preferences
To set your preferences in CyberLink ActionDirector, just click the button.
General Preferences
In the Preferences window, select the General tab. The available options are as follows:
Application:
- Maximum undo levels: enter the number (between 0 and 100) of undos (Ctrl+Z) you would like to make available while you work on your video production. Setting a higher number consumes more CPU resources.
- Always prompt me when aspect ratios conflict: select this option to enable a warning message when you add a video clip to the storyboard whose aspect conflicts with that of the project.
- Enable shadow files (proxy files) on high res videos: select this option to speed up the editing of high definition and 4K video by allowing CyberLink ActionDirector to create smaller and lower resolution proxy files that will be used during the editing process. Once enabled, select the resolution of the shadow file from the Shadow file resolution drop-down.

Note: enabling shadow files is recommended when editing large, high resolution videos on some computers. Please note that enabling shadow files won't affect the resolution of your final produced video, but will consume some computer resources while the file is being created.
Internet:
- Automatically check for software updates: select to periodically check for updates or new versions of ActionDirector automatically.
Language:
- Use system default language (if supported): select this option for the language display to be the same as the language of your operating system. This feature is only available if your operating system's language is one of the supported user defined languages.
- User defined: select this option and then select the language from the dropdown list that you want to use.
DirectorZone Preferences
In the Preferences window, select the DirectorZone tab. The available options are as follows:
Auto sign in:
- Auto sign in to DirectorZone: select this option and then enter in your e-mail address and password to automatically sign in to DirectorZone when the program is opened. If you do not have a DirectorZone account, click on the Get an Account button.
Retrieve templates from DirectorZone:
- Templates Downloaded from DirectorZone: click this button when you have signed in to your DirectorZone account if you want to download and import all of the templates you previously downloaded from DirectorZone.
Privacy rules:
- Allow DirectorZone to gather editing information: select this option to allow DirectorZone to collect all of the names of the templates used in a finished project you upload to YouTube.
Editing Preferences
In the Preferences window, select the Editing tab. The available options are as follows:
Durations:
- set the default durations (in seconds) for image files, transitions, and titles when placed on the storyboard.
File Preferences
In the Preferences window, select the File tab. The available options are as follows:
Default locations:
- Import folder: indicates the last folder that media was imported from. To change this folder, click Browse and then select a new folder.
- Export folder: set the folder where captured media is saved. To change this folder, click Browse and then select a new folder.
Hardware Acceleration Preferences
In the Preferences window, select the Hardware Acceleration tab. The available options are as follows:
Hardware acceleration:
Note: ensure you download and install the latest drivers, and any related hardware acceleration software, for your computer's graphics card to enable this feature in CyberLink ActionDirector.
- Enable OpenCL technology to speed up video effect preview/render: if your computer supports GPU hardware acceleration, select this option to speed up the rendering of some video effects by tapping into the multi-core parallel processing power of your computer.
- Enable hardware decoding: if your computer supports NVIDIA CUDA/AMD Accelerated Parallel Processing/Intel Core Processor Family technology, select this option to use hardware acceleration to decode the video during the editing process and when producing video.
- Enable hardware encoding: if your computer supports NVIDIA CUDA/AMD Accelerated Parallel Processing/Intel Core Processor Family technology, select this option to use hardware acceleration to encode the video when producing video.
Project Preferences
In the Preferences window, select the Project tab. The available options are as follows:
Project:
- Number of recently used projects: enter the number (between 0 and 20) of recently used projects that you would like to make available in the File menu when you open CyberLink ActionDirector.
- Automatically load the last project when ActionDirector opens: select this option to automatically load the last project you were working on.
- Automatically load sample clips when ActionDirector opens: select this option to automatically load the sample image and video clips into your media library when the program opens.
- Auto save project every: select this to automatically save your project every specified number of minutes, so you don't lose your changes by accident. If you want to set a specific location for the auto save files, click the Browse button and select a folder location on your computer.
Produce Preferences
In the Preferences window, select the Produce tab. The available options are as follows:
Produce:
- Reduce video blocky artifacts (Intel SSE4 optimized): select this option to improve the production overall quality of produced video, if your computer supports Intel SSE4 optimization.
- Reduce video noise when using H.264 software encoders: select this option if you want CyberLink ActionDirector to auto apply video denoise when encoding H.264 video during production.
H.264 AVC:
- Allow SVRT on single IDR H.264 video: select this option if you want CyberLink ActionDirector to use SVRT to render a movie project when you only have one H.264 AVC clip on the storyboard. See Utilizing Intelligent SVRT for more information on SVRT.
WMV:
- Produce WMV video with Speed Mode: select this option if you want CyberLink ActionDirector to use Speed Mode to render WMV videos more quickly.
Improvement Program Preferences
In the Preferences window, select the Improvement Program tab. The available options are as follows:
CyberLink Product Improvement Program
- I want to participate: select this item if you would like to participate in the CyberLink Product Improvement Program for ActionDirector. Once enabled, CyberLink ActionDirector will collect information about the hardware and software configuration of your computer system, as well as your usage behavior and statistics related to the software. Click the Read more information about the improvement program online link to view more detailed information about the content collected.

Note: the CyberLink Product Improvement Program for ActionDirector will not collect any personal information for purposes of identifying you.
Chapter 17:
ActionDirector Hotkeys
CyberLink ActionDirector includes a number of keyboard hotkeys that can make the whole video editing process go more quickly and smoothly.
| Hotkeys | Command |
| File | |
| Ctrl + N | Create new project |
| Ctrl + Shift + W | New workspace |
| Ctrl + O | Open existing project |
| Ctrl + S | Save project |
| Ctrl + Shift + S | Save project as |
| Ctrl + Q | Import media files |
| Ctrl + W | Import a media folder |
| Alt + P | Display project properties |
| Alt + F4 | Exit CyberLink ActionDirector |
| Alt + C | Open user preferences window |
| Edit | |
| Ctrl + Z | Undo |
| Ctrl + Y | Redo |
| Ctrl + X | Cut |
| Ctrl + C | Copy |
| Ctrl + V | Paste |
| F2 | Modify (selected title effect in Title Designer) |
| Ctrl + Alt + T | Open Trim window |
| Delete | Delete/Remove selected items |
| Ctrl + A | Select all media in media room |
| Ctrl + T | Split clip at current storyboard slider position |
| Ctrl + P | Take a snapshot of content in the preview window |
| [ | Mark in Trim window |
| ] | Mark out Trim window |
| Title Designer | |
| Ctrl + B | Make text bold |
| Ctrl + I | Make text italic |
| Ctrl + L | Left-align text |
| Ctrl + R | Right-align text |
| Ctrl + E | Center-align text |
| Up arrow key | Move object up |
| Down arrow key | Move object down |
| Left arrow key | Move object left |
| Right arrow key | Move object right |
| View | |
| F3 | Switch to Media Room |
| F7 | Switch to Title Room |
| F8 | Switch to Transition Room |
| Playback | |
| Space | Play/Pause |
| Ctrl + / | Stop |
| , | Previous unit (seek by frame, second, etc.) |
| . | Next unit (seek by frame, second, etc.) |
| Home | Go to the beginning of clip/project |
| End | Go to the end of clip/project |
| Ctrl + left arrow key | Go to previous clip in storyboard |
| Ctrl + right arrow key | Go to next clip in storyboard |
| Alt + up arrow key | Next second |
| Alt + down arrow key | Previous second |
| Ctrl + G | Go to timecode |
| Ctrl + F | Fast forward |
| Ctrl + U | Adjust system volume |
| Ctrl + Backspace | Mute/Mute off |
| F | Full screen |
| System Hotkeys | |
| F1 | Open help file |
| Delete | Delete/Remove selected items |
| Shift + F12 | View hotkey list |
Chapter 18:
Appendix
This chapter contains reference information to help answer questions you may have about the digital movie production process or about using CyberLink ActionDirector.
Intelligent SVRT: When Is Used?
Intelligent SVRT can be applied to video clips in the H.264 format. In the following conditions, clips (or portions of clips) do not require rendering during production, and SVRT can therefore be applied:
- The frame rate, frame size, and file format are the same as those of the destination production profile.
• The bitrate is similar to that of the destination production profile.
• The TV format is the same as that of the destination production profile.
If all of the above conditions are met, SVRT can be used. Any clips that do not meet the above criteria are fully rendered without SVRT.
In the following conditions, clips (or portions of clips) must be rendered during production, and SVRT can therefore not be applied:
- Adding a title or transition effect.
- Modifying the color of a video clip.
- Merging two video clips (clips within 2 seconds before or after the merged clips will be rendered).
- Splitting a video clip (clips within 2 seconds before or after the split will be rendered).
- Trimming a video clip (clips within 2 seconds before or after the trimmed clip will be rendered).
- If the total duration of the production is less than one minute and any portion of the video requires rendering, the entire production will be rendered for efficiency reasons.
Licensing and Copyright Information
This section contains the ActionDirector licensing and copyright information, including a copy of the Intel License Agreement for Open Source Computer Library and the GNU Lesser General Public License. There is also a list of the third-party components used in ActionDirector.
License Disclaimer
This product includes certain copyrighted third-party software components license under the terms of the GNU Lesser General Public License and other similar license agreements offering free distribution of these software components offered by other organizations, if applicable. Copies of these agreements can be found by clicking the link associated with each of the component provided in the table below. You may also visit http://www.gnu.org/copyleft/lesser.html for a copy of GNU Lesser General Public License Agreement.
LGPL components and other components listed below are licensed without warranties of any kind, either express or implied warranties, including without limitation the implied warranties of merchantability and fitness for a particular purpose. The entire risk as the quality and performance of these components is with you. Please check the respective license agreement for more details.
Copyright Holders under LGPL and/or other license agreements mentioned herein shall not be responsible for any damages, general, special, incidental or consequential, arising out of the use or inability to use these components/software. Please check the respective license agreement for more details.
For a list of components of such nature, and to acquire the full source code of these licensed components, including any scripts to control compilation and installation of the object code, please see "List of Components" below.
Downloading Source Code
You can download the machine-readable source code of the corresponding licensed component from https://www.cyberlink.com/. Please read the copyright notice, the warranty disclaimer, and the license agreement accompanying these source codes.
List of Components
| Component | License Information |
| cv.dll | Intel License Agreement for Open Source Computer Library |
| cvaux.dll | Intel License Agreement for Open Source Computer Library |
| highgui.dll | Intel License Agreement for Open Source Computer Library |
| OptCVa6.dll | Intel License Agreement for Open Source Computer Library |
| OptCVm6.dll | Intel License Agreement for Open Source Computer Library |
| OptCVw7.dll | Intel License Agreement for Open Source Computer Library |
| PThreadVC2.dll | GNU Lesser General Public License |
Licenses and Copyrights
Below are the applicable licenses and copyright information that pertain to the components listed in the List of Components.
MPEG-2 Packaged Media Notice
ANY USE OF THIS PRODUCT IN ANY MANNER OTHER THAN PERSONAL USE THAT COMPLIES WITH THE MPEG-2 STANDARD FOR ENCODING VIDEO INFORMATION FOR PACKAGED MEDIA IS EXPRESSLY PROHIBITED WITHOUT A LICENSE UNDER APPLICABLE PATENTS IN THE MPEG-2 PATENT PORTFOLOP, WHICH LICENSE IS AVAILABLE FROM MPEG LA, LLC, 6312 S. Fiddlers Green Circle, Suite 400E, Greenwood Village, Colorado 80111 U.S.A.
Intel License Agreement For Open Source Computer Vision Library
Copyright © 2000, Intel Corporation, all rights reserved. Third party copyrights are property of their respective owners.
Redistribution and use in source and binary forms, with or without modification, are permitted provided that the following conditions are met:
Redistribution's of source code must retain the above copyright notice, this list of conditions and the following disclaimer.
Redistribution's in binary form must reproduce the above copyright notice, this list of conditions and the following disclaimer in the documentation and/or other materials provided with the distribution.
The name of Intel Corporation may not be used to endorse or promote products derived from this software without specific prior written permission.
This software is provided by the copyright holders and contributors "as is" and any express or implied warranties, including, but not limited to, the implied warranties of merchantability and fitness for a particular purpose are disclaimed. In no event shall Intel or contributors be liable for any direct, indirect, incidental, special, exemplary, or consequential damages (including, but not limited to, procurement of substitute goods or services; loss of use, data, or profits; or business interruption) however caused and on any theory of liability, whether in contract, strict liability, or tort (including negligence or otherwise) arising in any way out of the use of this software, even if advised of the possibility of such damage.
GNU Lesser General Public License
Version 2.1, February 1999
Copyright (C) 1991, 1999 Free Software Foundation, Inc.
51 Franklin St, Fifth Floor, Boston, MA 02110-1301 USA
Everyone is permitted to copy and distribute verbatim copies of this license document, but changing it is not allowed.
[This is the first released version of the Lesser GPL. It also counts as the successor of the GNU Library Public License, version 2, hence the version number 2.1.]
Preamble
The licenses for most software are designed to take away your freedom to share and change it. By contrast, the GNU General Public Licenses are intended to guarantee your freedom to share and change free software--to make sure the software is free for all its users.
This license, the Lesser General Public License, applies to some specially designated software packages--typically libraries--of the Free Software Foundation and other authors who decide to use it. You can use it too, but we suggest you first think carefully about whether this license or the ordinary General Public License is the better strategy to use in any particular case, based on the explanations below.
When we speak of free software, we are referring to freedom of use, not price. Our General Public Licenses are designed to make sure that you have the freedom to distribute copies of free software (and charge for this service if you wish); that you receive source code or can get it if you want it; that you can change the software and use pieces of it in new free programs; and that you are informed that you can do these things.
To protect your rights, we need to make restrictions that forbid distributors to deny you these rights or to ask you to surrender these rights. These restrictions translate to certain responsibilities for you if you distribute copies of the library or if you modify it.
For example, if you distribute copies of the library, whether gratis or for a fee, you must give the recipients all the rights that we gave you. You must make sure that they, too, receive or can get the source code. If you link other code with the library, you must provide complete object files to the recipients, so that they can relink them with the library after making changes to the library and recompiling it. And you must show them these terms so they know their rights.
We protect your rights with a two-step method: (1) we copyright the library, and (2) we offer you this license, which gives you legal permission to copy, distribute and/or modify the library.
To protect each distributor, we want to make it very clear that there is no warranty for the free library. Also, if the library is modified by someone else and passed on, the recipients should know that what they have is not the original version, so that the original author's reputation will not be affected by problems that might be introduced by others.
Finally, software patents pose a constant threat to the existence of any free program. We wish to make sure that a company cannot effectively restrict the users of a free program by obtaining a restrictive license from a patent holder. Therefore, we insist that any patent license obtained for a version of the library must be consistent with the full freedom of use specified in this license.
Most GNU software, including some libraries, is covered by the ordinary GNU General Public License. This license, the GNU Lesser General Public License, applies to certain designated libraries, and is quite different from the ordinary General Public License. We use this license for certain libraries in order to permit linking those libraries into non-free programs.
When a program is linked with a library, whether statically or using a shared library, the combination of the two is legally speaking a combined work, a derivative of the original library. The ordinary General Public License therefore permits such linking only if the entire combination fits its criteria of freedom. The Lesser General Public License permits more lax criteria for linking other code with the library.
We call this license the "Lesser" General Public License because it does Less to protect the user's freedom than the ordinary General Public License. It also provides other free software developers Less of an advantage over competing non-free programs. These disadvantages are the reason we use the ordinary General Public License for many libraries. However, the Lesser license provides advantages in certain special circumstances.
For example, on rare occasions, there may be a special need to encourage the widest possible use of a certain library, so that it becomes a de-facto standard. To achieve this, non-free programs must be allowed to use the library. A more frequent case is that a free library does the same job as widely used non-free libraries. In this case, there is little to gain by limiting the free library to free software only, so we use the Lesser General Public License.
In other cases, permission to use a particular library in non-free programs enables a greater number of people to use a large body of free software. For example, permission to use the GNU C Library in non-free programs enables many more people to use the whole GNU operating system, as well as its variant, the GNU/Linux operating system.
Although the Lesser General Public License is Less protective of the users' freedom, it does ensure that the user of a program that is linked with the Library has the freedom and the wherewithal to run that program using a modified version of the Library.
The precise terms and conditions for copying, distribution and modification follow. Pay close attention to the difference between a "work based on the library" and a "work that uses the library". The former contains code derived from the library, whereas the latter must be combined with the library in order to run.
TERMS AND CONDITIONS FOR COPYING, DISTRIBUTION AND MODIFICATION
- This License Agreement applies to any software library or other program which contains a notice placed by the copyright holder or other authorized party saying it may be distributed under the terms of this Lesser General Public License (also called "this License"). Each licensee is addressed as "you".
A "library" means a collection of software functions and/or data prepared so as to be conveniently linked with application programs (which use some of those functions and data) to form executables.
The "Library", below, refers to any such software library or work which has been distributed under these terms. A "work based on the Library" means either the Library or any derivative work under copyright law: that is to say, a work containing the Library or a portion of it, either verbatim or with modifications and/or translated straightforwardly into another language. (Hereinafter, translation is included without limitation in the term "modification".)
"Source code" for a work means the preferred form of the work for making modifications to it. For a library, complete source code means all the source code for all modules it contains, plus any associated interface definition files, plus the scripts used to control compilation and installation of the library.
Activities other than copying, distribution and modification are not covered by this License; they are outside its scope. The act of running a program using the Library is not restricted, and output from such a program is covered only if its contents constitute a work based on the Library (independent of the use of the Library in a tool for writing it). Whether that is true depends on what the Library does and what the program that uses the Library does.
- You may copy and distribute verbatim copies of the Library's complete source code as you receive it, in any medium, provided that you conspicuously and appropriately publish on each copy an appropriate copyright notice and disclaimer of warranty; keep intact all the notices that refer to this License and to the absence of any warranty; and distribute a copy of this License along with the Library.
You may charge a fee for the physical act of transferring a copy, and you may at your option offer warranty protection in exchange for a fee.
- You may modify your copy or copies of the Library or any portion of it, thus forming a work based on the Library, and copy and distribute such modifications or work under the terms of Section 1 above, provided that you also meet all of these conditions:
a) The modified work must itself be a software library.
b) You must cause the files modified to carry prominent notices stating that you changed the files and the date of any change.
c) You must cause the whole of the work to be licensed at no charge to all third parties under the terms of this License.
d) If a facility in the modified Library refers to a function or a table of data to be supplied by an application program that uses the facility, other than as an argument passed when the facility is invoked, then you must make a good faith effort to ensure that, in the event an application does not supply such function or table, the facility still operates, and performs whatever part of its purpose remains meaningful.
(For example, a function in a library to compute square roots has a purpose that is entirely well-defined independent of the application. Therefore, Subsection 2d requires that any application-supplied function or table used by this function must be optional: if the application does not supply it, the square root function must still compute square roots.)
These requirements apply to the modified work as a whole. If identifiable sections of that work are not derived from the Library, and can be reasonably considered independent and separate works in themselves, then this License, and its terms, do not apply to those sections when you distribute them as separate works. But when you distribute the same sections as part of a whole which is a work based on the Library, the distribution of the whole must be on the terms of this License, whose permissions for other licensees extend to the entire whole, and thus to each and every part regardless of who wrote it.
Thus, it is not the intent of this section to claim rights or contest your rights to work written entirely by you; rather, the intent is to exercise the right to control the distribution of derivative or collective works based on the Library.
In addition, mere aggregation of another work not based on the Library with the Library (or with a work based on the Library) on a volume of a storage or distribution medium does not bring the other work under the scope of this License.
- You may opt to apply the terms of the ordinary GNU General Public License instead of this License to a given copy of the Library. To do this, you must alter all the notices that refer to this License, so that they refer to the ordinary GNU General Public License, version 2, instead of to this License. (If a newer version than version 2 of the ordinary GNU General Public License has appeared, then you can specify that version instead if you wish.) Do not make any other change in these notices.
Once this change is made in a given copy, it is irreversible for that copy, so the ordinary GNU General Public License applies to all subsequent copies and derivative works made from that copy.
This option is useful when you wish to copy part of the code of the Library into a program that is not a library.
- You may copy and distribute the Library (or a portion or derivative of it, under Section 2) in object code or executable form under the terms of Sections 1 and 2 above provided that you accompany it with the complete corresponding machine-readable source code, which must be distributed under the terms of Sections 1 and 2 above on a medium customarily used for software interchange.
If distribution of object code is made by offering access to copy from a designated place, then offering equivalent access to copy the source code from the same place satisfies the requirement to distribute the source code, even though third parties are not compelled to copy the source along with the object code.
- A program that contains no derivative of any portion of the Library, but is designed to work with the Library by being compiled or linked with it, is called a "work that uses the Library". Such a work, in isolation, is not a derivative work of the Library, and therefore falls outside the scope of this License.
However, linking a "work that uses the Library" with the Library creates an executable that is a derivative of the Library (because it contains portions of the Library), rather than a "work that uses the library". The executable is therefore covered by this License. Section 6 states terms for distribution of such executables.
When a "work that uses the Library" uses material from a header file that is part of the Library, the object code for the work may be a derivative work of the Library even though the source code is not. Whether this is true is especially significant if the work can be linked without the Library, or if the work is itself a library. The threshold for this to be true is not precisely defined by law.
If such an object file uses only numerical parameters, data structure layouts and accessors, and small macros and small inline functions (ten lines or less in length), then the use of the object file is unrestricted, regardless of whether it is legally a derivative work. (Executables containing this object code plus portions of the Library will still fall under Section 6.)
Otherwise, if the work is a derivative of the Library, you may distribute the object code for the work under the terms of Section 6. Any executables containing that work also fall under Section 6, whether or not they are linked directly with the Library itself.
- As an exception to the Sections above, you may also combine or link a "work that uses the Library" with the Library to produce a work containing portions of the Library, and distribute that work under terms of your choice, provided that the terms permit modification of the work for the customer's own use and reverse engineering for debugging such modifications.
You must give prominent notice with each copy of the work that the Library is used in it and that the Library and its use are covered by this License. You must supply a copy of this License. If the work during execution displays copyright notices, you must include the copyright notice for the Library among them, as well as a reference directing the user to the copy of this License.
Also, you must do one of these things:
a) Accompany the work with the complete corresponding machine-readable source code for the Library including whatever changes were used in the work (which must be distributed under Sections 1 and 2 above); and, if the work is an executable linked with the Library, with the complete machine-readable "work that uses the Library", as object code and/or source code, so that the user can modify the Library and then relink to produce a modified executable containing the modified Library. (It is understood that the user who changes the contents of definitions files in the Library will not necessarily be able to recompile the application to use the modified definitions.)
b) Use a suitable shared library mechanism for linking with the Library. A suitable mechanism is one that (1) uses at run time a copy of the library already present on the user's computer system, rather than copying library functions into the executable, and (2) will operate properly with a modified version of the library, if the user installs one, as long as the modified version is interface-compatible with the version that the work was made with.
c) Accompany the work with a written offer, valid for at least three years, to give the same user the materials specified in Subsection 6a, above, for a charge no more than the cost of performing this distribution.
d) If distribution of the work is made by offering access to copy from a designated place, offer equivalent access to copy the above specified materials from the same place.
e) Verify that the user has already received a copy of these materials or that you have already sent this user a copy.
For an executable, the required form of the "work that uses the Library" must include any data and utility programs needed for reproducing the executable from it. However, as a special exception, the materials to be distributed need not include anything that is normally distributed (in either source or binary form) with the major components (compiler, kernel, and so on) of the operating system on which the executable runs, unless that component itself accompanies the executable.
It may happen that this requirement contradicts the license restrictions of other proprietary libraries that do not normally accompany the operating system. Such a contradiction means you cannot use both them and the Library together in an executable that you distribute.
- You may place library facilities that are a work based on the Library side-by-side in a single library together with other library facilities not covered by this License, and distribute such a combined library, provided that the separate distribution of the work based on the Library and of the other library facilities is otherwise permitted, and provided that you do these two things:
a) Accompany the combined library with a copy of the same work based on the Library, uncombined with any other library facilities. This must be distributed under the terms of the Sections above.
b) Give prominent notice with the combined library of the fact that part of it is a work based on the Library, and explaining where to find the accompanying uncombined form of the same work.
-
You may not copy, modify, sublicense, link with, or distribute the Library except as expressly provided under this License. Any attempt otherwise to copy, modify, sublicense, link with, or distribute the Library is void, and will automatically terminate your rights under this License. However, parties who have received copies, or rights, from you under this License will not have their licenses terminated so long as such parties remain in full compliance.
-
You are not required to accept this License, since you have not signed it. However, nothing else grants you permission to modify or distribute the Library or its derivative works. These actions are prohibited by law if you do not accept this License. Therefore, by modifying or distributing the Library (or any work based on the Library), you indicate your acceptance of this License to do so, and all its terms and conditions for copying, distributing or modifying the Library or works based on it.
-
Each time you redistribute the Library (or any work based on the Library), the recipient automatically receives a license from the original licensor to copy, distribute, link with or modify the Library subject to these terms and conditions. You may not impose any further restrictions on the recipients' exercise of the rights granted herein. You are not responsible for enforcing compliance by third parties with this License.
-
If, as a consequence of a court judgment or allegation of patent infringement or for any other reason (not limited to patent issues), conditions are imposed on you (whether by court order, agreement or otherwise) that contradict the conditions of this License, they do not excuse you from the conditions of this License. If you cannot distribute so as to satisfy simultaneously your obligations under this License and any other pertinent obligations, then as a consequence you may not distribute the Library at all. For example, if a patent license would not permit royalty-free redistribution of the Library by all those who receive copies directly or indirectly through you, then the only way you could satisfy both it and this License would be to refrain entirely from distribution of the Library.
If any portion of this section is held invalid or unenforceable under any particular circumstance, the balance of the section is intended to apply, and the section as a whole is intended to apply in other circumstances.
It is not the purpose of this section to induce you to infringe any patents or other property right claims or to contest validity of any such claims; this section has the sole purpose of protecting the integrity of the free software distribution system which is implemented by public license practices. Many people have made generous contributions to the wide range of software distributed through that system in reliance on consistent application of that system; it is up to the author/donor to decide if he or she is willing to distribute software through any other system and a licensee cannot impose that choice.
This section is intended to make thoroughly clear what is believed to be a consequence of the rest of this License.
- If the distribution and/or use of the Library is restricted in certain countries either by patents or by copyrighted interfaces, the original copyright holder who places the Library under this License may add an explicit geographical distribution limitation excluding those countries, so that distribution is permitted only in or among countries not thus excluded. In such case, this License incorporates the limitation as if written in the body of this License.
- The Free Software Foundation may publish revised and/or new versions of the Lesser General Public License from time to time. Such new versions will be similar in spirit to the present version, but may differ in detail to address new problems or concerns.
Each version is given a distinguishing version number. If the Library specifies a version number of this License which applies to it and "any later version", you have the option of following the terms and conditions either of that version or of any later version published by the Free Software Foundation. If the Library does not specify a license version number, you may choose any version ever published by the Free Software Foundation.
- If you wish to incorporate parts of the Library into other free programs whose distribution conditions are incompatible with these, write to the author to ask for permission. For software which is copyrighted by the Free Software Foundation, write to the Free Software Foundation; we sometimes make exceptions for this. Our decision will be guided by the two goals of preserving the free status of all derivatives of our free software and of promoting the sharing and reuse of software generally.
NO WARRANTY
-
BECAUSE THE LIBRARY IS LICENSED FREE OF CHARGE, THERE IS NO WARRANTY FOR THE LIBRARY, TO THE EXTENT PERMITTED BY APPLICABLE LAW. EXCEPT WHEN OTHERWISE STATED IN WRITING THE COPYRIGHT HOLDERS AND/OR OTHER PARTIES PROVIDE THE LIBRARY "AS IS" WITHOUT WARRANTY OF ANY KIND, EITHER EXPRESSED OR IMPLIED, INCLUDING, BUT NOT LIMITED TO, THE IMPLIED WARRANTIES OF MERCHANTABILITY AND FITNESS FOR A PARTICULAR PURPOSE. THE ENTIRE RISK AS TO THE QUALITY AND PERFORMANCE OF THE LIBRARY IS WITH YOU. SHOULD THE LIBRARY PROVE DEFECTIVE, YOU ASSUME THE COST OF ALL NECESSARY SERVICING, REPAIR OR CORRECTION.
-
IN NO EVENT UNLESS REQUIRED BY APPLICABLE LAW OR AGREED TO IN WRITING WILL ANY COPYRIGHT HOLDER, OR ANY OTHER PARTY WHO MAY MODIFY AND/OR REDISTRIBUTE THE LIBRARY AS PERMITTED ABOVE, BE LIABLE TO YOU FOR
DAMAGES, INCLUDING ANY GENERAL, SPECIAL, INCIDENTAL OR CONSEQUENTIAL DAMAGES ARISING OUT OF THE USE OR INABILITY TO USE THE LIBRARY (INCLUDING BUT NOT LIMITED TO LOSS OF DATA OR DATA BEING RENDERED INACCURATE OR LOSSES SUSTAINED BY YOU OR THIRD PARTIES OR A FAILURE OF THE LIBRARY TO OPERATE WITH ANY OTHER SOFTWARE), EVEN IF SUCH HOLDER OR OTHER PARTY HAS BEEN ADVISED OF THE POSSIBILITY OF SUCH DAMAGES.
CLAPACK Copyright Notice
Anderson, E. and Bai, Z. and Bischof, C. and Blackford, S. and Demmel, J. and Dongarra, J. and Du Croz, J. and Greenbaum, A. and Hammarling, S. and McKenney, A. and Sorensen, D. LAPACK User's Guide. Third Edition. Philadelphia, PA: Society for Industrial and Applied Mathematics, 1999. ISBN: 0-89871-447-8 (paperback)
Chapter 19:
Technical Support
If you require technical support, then this chapter can help. It includes all the information you need to find the answers you are looking for. You may also find answers quickly by contacting your local distributor/dealer.
Before Contacting Technical Support
Before contacting CyberLink technical support, please take advantage of one or more of the following free support options:
- consult the user's guide or the online help installed with your program.
• refer to the Knowledge Base at the following link on the CyberLink web site: https://www.cyberlink.com/support/search-product-result.do - check the Help Resources page in this document.
When contacting technical support by e-mail or phone, please have the following information ready:
- registered product key (your product key can be found on the software disc envelope, the box cover, or in the e-mail received after you purchased CyberLink products on the CyberLink store).
- the product name, version and build number, which generally can be found by clicking on the product name image on the user interface.
• the version of Windows installed on your system. - list of hardware devices on your system (capture card, sound card, VGA card) and their specifications. For fastest results, please generate and attach your system info using the DxDiag.txt.

Note: here are the steps to generate the system info DxDiag.txt file: Click Windows (start) button, and then search for "dxdiag". Click Save All Information button to save the DxDiag.txt file.
- the wording of any warning messages that were displayed (you may want to write this down or take a screen capture).
- a detailed description of the problem and under what circumstances it occurred.
Web Support
Solutions to your problems are available 24 hours a day at no cost on the CyberLink web site:
Note: you must first register as a member before using CyberLink web support.
CyberLink provides a wide range of web support options, including FAQs, in the following languages:
| Language | Web Support URL |
| English | https://www.cyberlink.com/cs-help |
| Traditional Chinese | https://tw.cyberlink.com/cs-help |
| Japanese | https://jp.cyberlink.com/cs-help |
| Spanish | https://es.cyberlink.com/cs-help |
| Korean | https://kr.cyberlink.com/cs-help |
| Simplified Chinese | https://cn.cyberlink.com/cs-help |
| German | https://de.cyberlink.com/cs-help |
| French | https://fr.cyberlink.com/cs-help |
| Italian | https://it.cyberlink.com/cs-help |
Help Resources
The following is a list of help resources that may assist you when using any of CyberLink's products.
- Access CyberLink's Knowledge base and FAQ (frequently asked questions): https://www.cyberlink.com/cs-resource
• View video tutorials for your software: https://directorzone.cyberlink.com/tutorial/
- Ask questions and get answers from our users on the CyberLink Community Forum: https://forum.cyberlink.com/forum/forums/list/ENU.page

Note: CyberLink's user community forum is only available in English and German.
CyberLink ActionDirector
Index
2
2K resolution 75
uploading 77
3
360° video
editing 39
importing 20
playing 14
producing 76
rendering 76
sharing 83
stabilizer 35
uploading 83
4
4 color gradient
title text 43
4K resolution 75
uploading 77
A
ActionDirector
versions 2
Aspect ratio
setting project 4
Audio
adding 72
denoise 32
B
Background music
themes 96
video 72
Backgrounds
title effects 42
C
Color adjustment 33
Color enhancement 33
Color presets 34
Crop images 31
CyberLink Product Improvement Program 105
D
Dailymotion 77
Default language 101
Direction of view 57
DirectorZone
bulletin 2
downloading from 21
downloading lens profiles 35
overview 2
popular templates 2
preferences 102
Dolby
copyright 111
Duration 36
E
Edit
media 28
Effects
action 47
adding 69
downloading 21
speed 47
titles 40
video 69
Enhanced stabilizer 35
Equirectangular projection 20
Export
projects 5
F
Facebook 77
360° video 83
Fisheye 34
Formats
supported, import 19
Freeform
media 37
G
Grid lines 15
H
H.264 AVC 75
Hardware acceleration
preferences 103
Help 124
Hotkeys 106
|
Images
adding 22
cropping 31
effects 69
enhancing 32
fixing 32
importing 19
rotating 32
shaping 37
transitions 70
Import
media 19
projects 21
Intelligent SVRT
overview 109
utilizing 74
Intro/outro effects 40
adding text 41
animation 45
position 43
properties 43
L
Language 101
Lens flare 69
Lens profiles 34
downloading 35
Library
expanding 17
search 9
window 8
Little planet 61
M
Magnifier 69
Media
editing 28
flitering 10
importing 19
searching for 9
shaping 37
Music
adding to themes 96
adding to video 72
N
Niconico Douga 81
O
OpenCL 103
P
Pack project materials 5
Photos
adding 22
cropping 31
editing 28
effects 69
enhancing 32
fixing 32
importing 19
rotating 32
shaping 37
transitions 70
PowerPoint 19
Preferences 101
Preview
expanding 17
quality 15
undocking window 16
window 13
Produce
preferences 104
video 74
Projects
aspect ratio 4
exporting 5
inserting 21
opening 5
overview 4
preferences 104
producing 74
saving 4
R
Recent projects 5
Rendering 74
Replay 47
Reverse 47
Rooms 7
Rotating 32
S
Screen snapshots 15
Search
library 9
Shadow files 101
Shape 37
Snap to reference line 15
Speed
effects 47
Split 28
Stabilizer 35
Stop motion 49
Storyboard 7
Supported formats 19
SVRT
overview 109
utilizing 74
System requirements 3
T
Technical support 123
Theme Designer 85
Tilt shift 69
Time shift 47
Title Designer 40
Title effects 40
Transitions 70
adding 70, 71
removing 71
Trim 29
TV
safe zone 15
U
Ultra HD 75
Undock 16
V
Vibrancy 32
Videos
adding 22
aspect ratio 4
background music 72
denoise 32
editing 28
effects 69
enhancing 32
fixing 32, 34
importing 19
importing 360 20
producing 74
rendering 74
rotating 32
Videos
shaping 37
stabilizer 35
transitions 70
trimming 29
virtual reality 20
View designer 56
Vignette 34
Vimeo 77
Virtual reality
importing video 20
W
Water reflection 69
Web support 124
White balance 34
Workspace
creating new 4
Y
Youku 82
YouTube 77
360° video 83
Z
Zoom 16
- Copyright and Disclaimer
- International Headquarters
- Contents
- Introduction......1
- ActionDirector Projects......4
- Storyboard Window......7
- Importing Media 19
- Adding Video Clips and Images to the Storyboard 22
- Editing Media on the Storyboard......28
- Editing 360° Videos....39
- Adding Intro/Outro Effects......40
- Adding Action Effects in the Action Camera Center 46
- View Designer....56
- Adding Video Effects......69
- Using Transitions....70
- Adding Background Music....72
- Producing Your Project....74
- Using the Theme Designer......85
- ActionDirector Preferences......101
- ActionDirector Hotkeys......106
- Appendix....109
- Technical Support......123
- Chapter 1:
- Introduction
- Welcome
- DirectorZone
- ActionDirector Versions
- Updating ActionDirector
- System Requirements
- Chapter 2:
- ActionDirector Projects
- Setting Project Aspect Ratio
- Opening Saved Projects
- Exporting Projects
- Chapter 3:
- Storyboard Window
- Rooms
- Library Window
- Searching the Library
- Filtering Media in the Library
- Library Menu
- Preview Window
- Preview Player Controls
- Playing 360° Media Files
- Controls
- Taking a Screen Snapshot
- Preview/Display Options
- Preview Quality
- Grid Lines
- Zoom In/Out
- Undocking the Preview Window
- Expanding the Library/Preview Window
- Function Buttons
- Chapter 4:
- Importing Media
- Importing Media Files
- Importing 360° Media Files
- Setting 360 Projection Format
- Importing ActionDirector Projects
- Downloading Effects and Templates from DirectorZone
- Chapter 5:
- Adding Video Clips and Images to the Storyboard
- Chapter 6:
- Editing Media on the Storyboard
- Splitting a Clip
- Trimming Video Clips
- Cropping Images
- Rotating Media Clips
- Fixing and Enhancing Media Clips
- Video Denoise
- Audio Denoise
- Color Adjustment
- Color Enhancement
- Fixing Video Clips
- Lens Correction
- Downloading Lens Profiles from DirectorZone
- Fisheye Distortion
- Vignette Removal
- Video Stabilizer
- White Balance
- Color Presets
- Setting a Media Clip's Duration
- Changing the Shape of Media
- Chapter 7:
- Editing 360° Videos
- Chapter 8:
- Adding Intro/Outro Effects
- Modifying Titles in the Title Designer
- Adding Text, Images, and Backgrounds
- Adding Title Text
- Inserting Backgrounds
- Adding Images
- Modifying Intro/Outro Effect Position
- Modifying Title Text Properties
- Modifying Text Properties
- Applying Character Presets to Title Text
- Customizing Font Type
- Applying a Border
- Opacity
- Applying Animation Effects to Title Text
- Chapter 9:
- Adding Action Effects in the Action Camera Center
- • Create Action Effects
- Creating Action Effects on Video Clips
- Creating Time Shifts
- Replay
- Speed
- Stop Motion
- Zoom and Pan
- Adding Freeze Frames
- Applying Zoom Effect
- Action Camera Center Settings
- Audio setting:
- Interpolation setting:
- Changing the Action Camera Center Content
- Editing Content
- Chapter 10:
- View Designer
- Customizing Direction of View in 360° Video Clips
- Ease In/Out
- Modifying Direction of View Keyframes
- Creating Little Planet Videos
- Customizing the Look of Your Little Planet Video
- Direction of View
- Fly Out
- Fly In
- Chapter 11:
- Adding Video Effects
- Chapter 12:
- Using Transitions
- Adding Transitions to a Single Clip
- Adding Transitions Between Two Clips
- Chapter 13:
- Adding Background Music
- Chapter 14:
- Producing Your Project
- Utilizing Intelligent SVRT
- Producing and Saving to a Video File
- Producing Regular HD Video
- Producing a 360° Video
- Playing Your 360° Video
- Uploading Video to Online Media Sites
- Uploading Regular HD Video
- Uploading Video to Facebook
- Uploading Video to YouTube
- Uploading Video to Dailymotion
- Uploading Video to Vimeo
- Uploading Video to Niconico Douga
- Uploading Video to Youku
- Uploading a 360° Video
- Uploading 360° Video to Facebook
- Uploading 360° Video to YouTube
- Chapter 15:
- Using the Theme Designer
- Overview
- What are Theme Templates?
- Importing Media Files into the Theme Designer
- Adding Theme Templates/Sequences
- Adding Media Clips
- Importing More Media Files
- Taking Snapshots from Videos
- Editing Media Clips
- Muting Video Clips
- Modifying Image Duration
- Applying Zoom In on Media Clips
- Adding Video Effects to Clips
- Editing Background Music
- Background Music Preferences
- Editing Title Text
- Replacing Background Images
- Adding Transitions Between Sequences
- Previewing and Saving
- Chapter 16:
- ActionDirector Preferences
- General Preferences
- Application:
- Internet:
- Language:
- DirectorZone Preferences
- Auto sign in:
- Retrieve templates from DirectorZone:
- Privacy rules:
- Editing Preferences
- Durations:
- File Preferences
- Default locations:
- Hardware Acceleration Preferences
- Hardware acceleration:
- Project Preferences
- Project:
- Produce Preferences
- Produce:
- H.264 AVC:
- WMV:
- Improvement Program Preferences
- CyberLink Product Improvement Program
- Chapter 17:
- ActionDirector Hotkeys
- Chapter 18:
- Appendix
- Intelligent SVRT: When Is Used?
- Licensing and Copyright Information
- License Disclaimer
- Downloading Source Code
- Licenses and Copyrights
- MPEG-2 Packaged Media Notice
- Intel License Agreement For Open Source Computer Vision Library
- GNU Lesser General Public License
- Preamble
- TERMS AND CONDITIONS FOR COPYING, DISTRIBUTION AND MODIFICATION
- NO WARRANTY
- CLAPACK Copyright Notice
- Chapter 19:
- Technical Support
- Before Contacting Technical Support
- Web Support
- Help Resources
- Index
- 2
- 3
- 4
- A
- B
- C
- D
- E
- F
- G
- H
- |
- L
- M
- N
- O
- P
- R
- S
- T
- U
- V
- W
- Y
- Z
Brand : CYBERLINK
Model : ActionDirector 3
Category : Software