
Screen Recorder 3 - Software CYBERLINK - Free user manual and instructions
Find the device manual for free Screen Recorder 3 CYBERLINK in PDF.


| Product Type | Screen Recording Software |
| Version | 3.0 |
| Platform | Windows (7/8/10/11), macOS |
| Key Features | Record screen, webcam, audio; edit videos; add annotations; export to MP4, AVI, etc. |
| Maximum Recording Resolution | 4K UHD (3840x2160) |
| Frame Rate | Up to 60 fps |
| Audio Input | System audio, microphone |
| Editing Tools | Trim, cut, merge, add text, arrows, highlights |
| Export Formats | MP4, AVI, MOV, WMV, GIF |
| Hardware Acceleration | Intel Quick Sync, NVIDIA NVENC |
| System Requirements (Minimum) | Intel Core i3, 4GB RAM, 1GB free disk, Windows 7 or macOS 10.12 |
| System Requirements (Recommended) | Intel Core i5, 8GB RAM, SSD, Windows 10 or macOS 10.14 |
| Language Support | English, French, German, Spanish, Chinese, Japanese, and more |
| Updates | Free updates for version 3.x |
| Technical Support | Online knowledge base, email support |
| License Type | One-time purchase, lifetime license |
| Activation | Requires internet for activation |
Frequently Asked Questions - Screen Recorder 3 CYBERLINK
User questions about Screen Recorder 3 CYBERLINK
0 question about this device. Answer the ones you know or ask your own.
Ask a new question about this device
Download the instructions for your Software in PDF format for free! Find your manual Screen Recorder 3 - CYBERLINK and take your electronic device back in hand. On this page are published all the documents necessary for the use of your device. Screen Recorder 3 by CYBERLINK.
USER MANUAL Screen Recorder 3 CYBERLINK
Copyright and Disclaimer
All rights reserved.
To the extent allowed by law, Screen Recorder IS PROVIDED "AS IS", WITHOUT WARRANTY OF ANY KIND, EITHER EXPRESS OR IMPLIED, INCLUDING WITHOUT LIMITATION ANY WARRANTY FOR INFORMATION, SERVICES, OR PRODUCTS PROVIDED THROUGH OR IN CONNECTION WITH Screen Recorder AND ANY IMPLIED WARRANTIES OF MERCHANTABILITY, FITNESS FOR A PARTICULAR PURPOSE, EXPECTATION OF PRIVACY, OR NON-INFRINGEMENT. BY USING THIS SOFTWARE, YOU AGREE THAT CYBERLINK WILL NOT BE LIABLE FOR ANY DIRECT, INDIRECT, OR CONSEQUENTIAL LOSS ARISING FROM THE USE OF THIS SOFTWARE OR MATERIALS CONTAINED EITHER IN THIS PACKAGE.
The terms and conditions here under shall be governed and construed in accordance with the laws of Taiwan.
Screen Recorder is a registered trademark along with other company and product names mentioned in this publication, used for identification purposes and remain the exclusive property of their respective owners.
International Headquarters
Mailing Address CyberLink Corporation
15F., No. 100, Minquan Rd., Xindian Dist.
New Taipei City 231, Taiwan (R.O.C.)
Web Site https://www.cyberlink.com
Telephone 886-2-8667-1298
Fax 886-2-8667-1385
Copyright © 2018 CyberLink Corporation. All rights reserved.
Contents
1 IntroductionChapter 1:
1 Welcome
2 Minimum System Requirements
3 Recording VideoChapter 2:
3 Record at Full Screen
5 Record a Custom Sized Area of Your Desktop
7 Record by Locking to a Desktop App
9 Record a Game
10 Record from a Connected Device
12 Streaming VideoChapter 3:
12 Streaming Video to Twitch
13 Streaming Video to YouTube
14 Streaming Video to Facebook
16 Library WindowChapter 4:
17 Sharing Media
25 Editing Recorded Video ClipsChapter 5:
25 Splitting a Clip
26 Trimming Video Clips
27 Changing the Shape of Media
28 Adding Title Effects
34 Using Transitions
35 Adding Background Music
36 Producing Your Edited Video
37 Editing Preferences
40 Screen Recorder Preferences Chapter 6:
40 General Preferences
41 File Preferences
41 Video Preferences
44 Audio Preferences
45 Webcam Preferences
45 Hotkeys Preferences
46 Improvement Program Preferences
47 Technical Support Chapter 7:
47 Before Contacting Technical Support
48 Web Support
48 Help Resources
Chapter 1:
Introduction
This chapter introduces CyberLink Screen Recorder and reviews the minimum system requirements for the program.
Note: this document is for reference and informational use only. Its content and the corresponding program are subject to change without notice.
Welcome
Welcome to the CyberLink family of digital media tools. CyberLink Screen Recorder lets you capture everything on your desktop, including screencasts, streaming videos, Skype calls, and more. You can also use CyberLink Screen Recorder to stream video from your desktop and webcam directly to Twitch, YouTube, and Facebook.
Screen Recorder Editions
The features that are available in Screen Recorder are completely dependent on the edition you have installed on your computer. Click the Screen Recorder logo in the top left to determine the version, edition, and build number for your copy of Screen Recorder.
Updating Your Software
Software upgrades and updates (patches) are periodically available from CyberLink.
Note: you must connect to the Internet to use this feature.
To update your software, do this:
- Open the Notification Center by doing one of the following:
- click the button when it's enabled.
- click the Screen Recorder logo in the top left of the window, and then click the Upgrade button in the About Screen Recorder window.
- Click the feature you would like to upgrade to, or the patch you want to update to.
- A web browser window opens, where you can purchase product upgrades or download the latest patch update.
Minimum System Requirements
The system requirements listed below are recommended as minimums for general digital video production work.
| Minimum System Requirements | |
| Operating System | • Microsoft Windows 10, 8/8.1, 7 (Windows 10 64bit recommended) |
| Processor (CPU) | • Intel CoreTM i-series or AMD Phenom® II |
| Graphics Processor (GPU) | • Desktop recording: 1 GB VGA VRAM• Game recording: 3 GB VGA VRAM |
| Memory | • 2 GB (6 GB or above recommended) |
| Hard Disk Space | • 600 MB for product installation |
| Capture Device | • Webcam (built-in or external USB) |
| Sound Card | • Windows compatible sound card |
| Internet Connection | • Required for program activation, streaming, and online services |
| Screen Resolution | • 1024 x 768, 16-bit color (up to 2560 x 1440) |
Note: please consult the CyberLink web site (https://www.cyberlink.com) for the most recent system requirements information.
Chapter 2:
Recording Video
Screen Recorder lets you capture a video of your mouse movements and computer usage, allowing you to create instruction videos, and record webcasts/screencasts, streaming videos, Skype calls, and much more.
Note: while recording you can click the button on the UI, or use the hotkey specified in preferences, to take a photo screenshot at any time. The screenshot feature is only available during recording and streaming.
With the Screen Recorder, you can:
• Record at Full Screen
• Record a Custom Sized Area of Your Desktop
• Record by Locking to a Desktop App
- Record a Game
• Record from a Connected Device
To launch the Screen Recorder, double-click on its desktop icon or select CyberLink Screen Recorder 3 from the Windows start menu. The Screen Recorder window displays.
Record at Full Screen
The Full screen option in Screen Recorder lets you record your entire computer's desktop. To record at full screen, do this:
- Launch the Screen Recorder.
- On the Record tab, click the Full Screen option.
Note: this option records the entire desktop of your computer. If you try and adjust the capture area, Screen Recorder will switch to the record a custom area option.
-
Set the recording options as follows:
-
Video resolution: select the resolution of the recorded video from the dropdown. Select the Original Resolution option to match your current Windows display resolution.
- Video framerate: select the framerate of the recorded video from the drop-down.
- Mouse clicks: choose whether you want to include a colored animation used to illustrate that a mouse click was performed in your recording. If you select Yes, click ☐ (or the colored dot) to set the color of the animation. Select the option, or No, if you don't want the animation to appear in your video.
- Webcam*: choose whether you want to include the video feed from a connected webcam in your recording. After selecting Yes, go to Webcam Preferences to set the size and position of your webcam video in the recording area.
Note: * this feature is only available in the Deluxe edition of Screen Recorder 3.
- Microphone: choose whether you want to include the audio from a connected microphone in your recording. After selecting Yes, go to Audio Preferences to select and set the input volume of the connected microphone, if required.
-
If you'd like it to be a timed recording, select the Time limit option, and then enter how long you want Screen Recorder to record in the field provided.
-
When ready, click REC to begin recording.
-
When you are done recording, click the Stop button, or press the hotkey specified in preferences, to stop the recording and save the file in the folder selected in File Preferences.
Note: if required, you can trim out unwanted recorded video and perform other edits after the recording is complete.
Record a Custom Sized Area of Your Desktop
The Custom option in Screen Recorder lets you manually customize the size of the area on your computer's desktop that you record. To record a custom sized area on your desktop, do this:
-
Launch the Screen Recorder.
-
On the Record tab, click the Custom option.
-
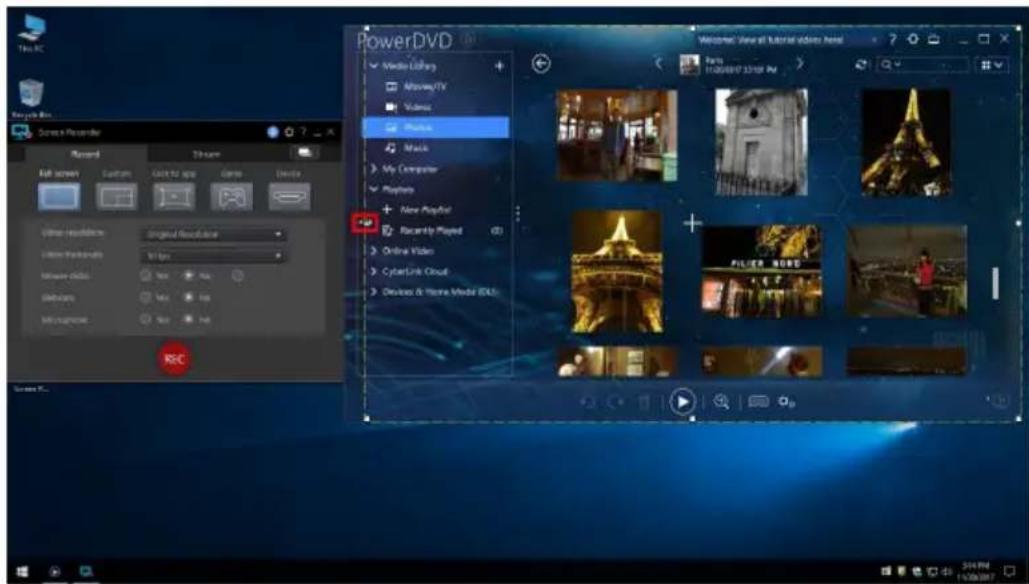
Use your mouse to manually set the size of the capture area by clicking and dragging your mouse.
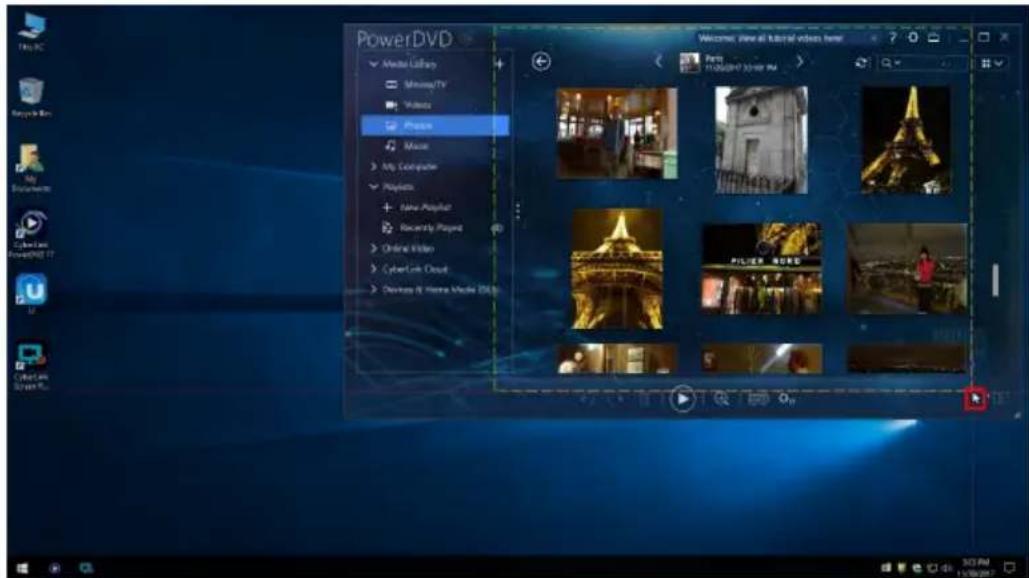
You can resize the selected capture area at any time before you start recording.
-
Set the recording options as follows:
-
Video resolution: select the resolution of the recorded video from the dropdown. Select the Original Resolution option to match your current Windows display resolution.
- Video framerate: select the framerate of the recorded video from the drop-down.
- Mouse clicks: choose whether you want to include a colored animation used to illustrate that a mouse click was performed in your recording. If you select Yes, click ☐ (or the colored dot) to set the color of the animation. Select the option, or No, if you don't want the animation to appear in your video.
- Webcam*: choose whether you want to include the video feed from a connected webcam in your recording. After selecting Yes, go to Webcam Preferences to set the size and position of your webcam video in the recording area.
Note: * this feature is only available in the Deluxe edition of Screen Recorder 3.
- Microphone: choose whether you want to include the audio from a connected microphone in your recording. After selecting Yes, go to Audio Preferences to select and set the input volume of the connected microphone, if required.
- If you'd like it to be a timed recording, select the Timelimit option, and then enter how long you want Screen Recorder to record in the field provided.
- When ready, click REC to begin recording.
- When you are done recording, click the Stop button, or press the hotkey specified in preferences, to stop the recording and save the file in the folder selected in File Preferences.
Note: if required, you can trim out unwanted recorded video and perform other edits after the recording is complete.
Record by Locking to a Desktop App
The Lock to app option in Screen Recorder lets you select and record within a running desktop app on your computer. To record by locking to a desktop app, do this:
- Launch the Screen Recorder.
- On the Record tab, click the Lock to app option.
- Hover your mouse over the desktop app you want to record within and then click in its window to set the capture area. Note that a yellow dotted line is drawn around the program.
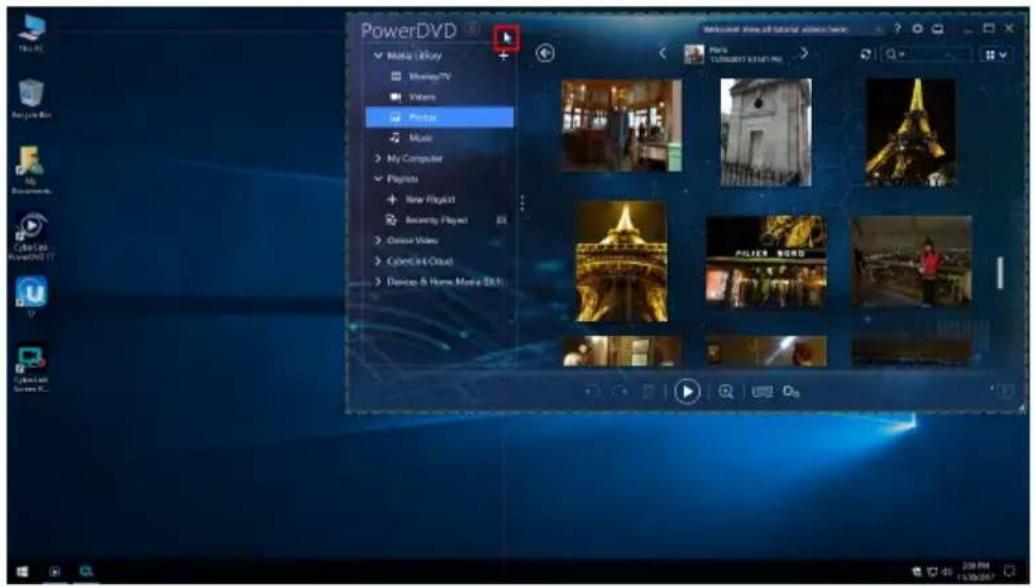
This indicates the screen area that will be captured during the recording. If you move the desktop app, the Screen Recorder will follow the window.
-
Set the recording options as follows:
-
Video resolution: select the resolution of the recorded video from the dropdown. Select the Original Resolution option to match your current Windows display resolution.
- Video framerate: select the framerate of the recorded video from the drop-down.
- Mouse clicks: choose whether you want to include a colored animation used to illustrate that a mouse click was performed in your recording. If you select Yes, click ☐ (or the colored dot) to set the color of the animation. Select the option, or No, if you don't want the animation to appear in your video.
- Webcam*: choose whether you want to include the video feed from a connected webcam in your recording. After selecting Yes, go to Webcam Preferences to set the size and position of your webcam video in the recording area.
Note: * this feature is only available in the Deluxe edition of Screen Recorder 3.
- Microphone: choose whether you want to include the audio from a connected microphone in your recording. After selecting Yes, go to Audio Preferences to select and set the input volume of the connected microphone, if required.
- If you'd like it to be a timed recording, select the Time limit option, and then enter how long you want Screen Recorder to record in the field provided.
- When ready, click REC to begin recording.
- When you are done recording, click the Stop button, or press the hotkey specified in preferences, to stop the recording and save the file in the folder selected in File Preferences.
Note: if required, you can trim out unwanted recorded video and perform other edits after the recording is complete.
Record a Game
The Game* option in Screen Recorder lets you record a video game or other program running in exclusive or Windows mode on your computer. To record a game, do this:
Note: * this feature is only available in the Deluxe edition of Screen Recorder 3.
- Launch the Screen Recorder.
- On the Record tab, click the Game option.
-
Set the recording options as follows:
-
Video resolution: select the resolution of the recorded video from the dropdown. Select the Original Resolution option to match your current Windows display resolution.
- Video framerate: select the framerate of the recorded video from the drop-down.
- Application: choose the game or program in the drop-down you want to record.
Note: if you want to record a video game that runs in exclusive mode (i.e. running in DirectX or OpenCL), you do not have to select anything from this drop-down. Once you launch the video game/program in exclusive mode, Screen Recorder will configure itself to record the exclusive mode content. If the game is running in Window mode, then you need to select it here.
- Webcam*: choose whether you want to include the video feed from a connected webcam in your recording. After selecting Yes, go to Webcam Preferences to set the size and position of your webcam video in the recording area.
Note: * this feature is only available in the Deluxe edition of Screen Recorder 3.
- Microphone: choose whether you want to include the audio from a connected microphone in your recording. After selecting Yes, go to Audio Preferences to select and set the input volume of the connected microphone, if required.
- If you'd like it to be a timed recording, select the Time limit option, and then enter how long you want Screen Recorder to record in the field provided.
- When ready, click REC to begin recording.
- When you are done recording, click the Stop button, or press the hotkey specified in preferences, to stop the recording and save the file in the folder selected in File Preferences.
Note: if required, you can trim out unwanted recorded video and perform other edits after the recording is complete.
Record from a Connected Device
The Device option in Screen Recorder lets you record from an external device that is connected to your computer via HDMI, USB, etc. To record from a connected device, do this:
- Launch the Screen Recorder.
-
On the Record tab, click the Device option.
-
Set the recording options as follows:
- Input device: select the device in the drop-down that you want to record from.
Note: make sure the device is firmly connected and powered on (if required) before launching Screen Recorder.
- Video resolution: select the resolution of the recorded video from the drop-down. Select the Original Resolution option to match your current Windows display resolution.
- Video framerate: select the framerate of the recorded video from the drop-down.
- Webcam*: choose whether you want to include the video feed from a connected webcam in your recording. After selecting Yes, go to Webcam Preferences to set the size and position of your webcam video in the recording area.
Note: * this feature is only available in the Deluxe edition of Screen Recorder 3.
- Microphone: choose whether you want to include the audio from a connected microphone in your recording. After selecting Yes, go to Audio Preferences to select and set the input volume of the connected microphone, if required.
- If you'd like it to be a timed recording, select the Timelimit option, and then enter how long you want Screen Recorder to record in the field provided.
- When ready, click REC to begin recording.
- When you are done recording, click the Stop button, or press the hotkey specified in preferences, to stop the recording and save the file in the folder selected in File Preferences.
Note: if required, you can trim out unwanted recorded video and perform other edits after the recording is complete.
Chapter 3:
Streaming Video
Screen Recorder can stream video from your computer directly to Twitch, YouTube, or Facebook.
Note: while streaming you can click the 📷 button on the UI, or use the hotkey specified in preferences, to take a photo screenshot at any time. The screenshot feature is only available during recording and streaming.
Streaming Video to Twitch
Screen Recorder can stream video from your desktop, computer game, connected device, etc. directly to Twitch. To stream video to Twitch, do this:
- Launch the Screen Recorder.
- On the Record tab, first select and set up what you want to stream. See Recording Video for detailed information.
- Click on the Stream tab and then on Twitch.
- Click the Login button and then follow the instructions to sign in to your Twitch account and authorize Screen Recorder to stream video to it.
Note: once you sign in and authorize your account, Screen Recorder will automatically get the stream key needed to broadcast your video stream on Twitch.
-
Once you're signed in, click the ⚙ button to set the following stream options:
-
Server: select the server you want to use for streaming.
• Title: enter a title for your streamed video. -
Set the recording options as follows:
-
Video resolution: select the resolution of the streamed video from the dropdown. Select the Original Resolution option to match your current Windows display resolution.
- Video framerate: select the framerate of the streamed video from the dropdown.
-
LiveURL: displays the URL for your live stream. Click the Copy button to copy it for sharing.
-
Select the Save streamed video to disk option if you want to save a copy of the streamed video on your computer's hard drive. The file is saved in the export folder selected in File Preferences.
- When ready, click Live to begin streaming.
- When you are done streaming, click the Stop button, or press the hotkey specified in preferences, to stop the streaming.
Streaming Video to YouTube
The Screen Recorder can stream video from your desktop, computer game, connected device, etc. directly to YouTube. To stream video to YouTube, do this:
- Launch the Screen Recorder.
- On the Record tab, first select and set up what you want to stream. See Recording Video for detailed information.
- Click on the Stream tab and then on YouTube.
- Click the Login button and then follow the instructions to log in to your YouTube account and authorize Screen Recorder to stream video to it.
Note: once you sign in and authorize your account, Screen Recorder will automatically get the stream key needed to broadcast your video stream on YouTube.
- Once you're signed in, click the ⚙ button to set the following stream options:
• Title: enter a title for your streamed video.
- Privacy: select whether you want the stream to be public, unlisted, or private.
-
Set the recording options as follows:
-
Video resolution: select the resolution of the streamed video from the dropdown. Select the Original Resolution option to match your current Windows display resolution.
- Video framerate: select the framerate of the streamed video from the dropdown.
-
LiveURL: displays the URL for your live stream. Click the Copy button to copy it for sharing.
-
Select the Save streamed video to disk option if you want to save a copy of the streamed video on your computer's hard drive. The file is saved in the export folder selected in File Preferences.
- When ready, click Live to begin streaming.
- When you are done streaming, click the Stop button, or press the hotkey specified in preferences, to stop the streaming.
Streaming Video to Facebook
The Screen Recorder can stream video from your desktop, computer game, connected device, etc. directly to Facebook. To stream video to Facebook, do this:
- Launch the Screen Recorder.
- On the Record tab, first select and set up what you want to stream. See Recording Video for detailed information.
- Click on the Stream tab and then on Facebook.
- Click the Login button and then follow the instructions to log in to your Facebook account and authorize Screen Recorder to stream video to it.
Note: once you sign in and authorize your account, Screen Recorder will automatically get the stream key needed to broadcast your video stream on Facebook.
-
Once you're signed in, click the 🎨 button to set the following stream options:
-
Choose where to post: select where you want the steaming video to be posted on Facebook.
• Title: enter a title for your streamed video. -
Privacy: select whether you want the stream to be public, private, or only viewable by certain friends.
-
Set the recording options as follows:
-
Video resolution: select the resolution of the streamed video from the dropdown. Select the Original Resolution option to match your current Windows display resolution.
- Video framerate: select the framerate of the streamed video from the dropdown.
-
LiveURL: displays the URL for your live stream. Click the Copy button to copy it for sharing.
-
Select the Save streamed video to disk option if you want to save a copy of the streamed video on your computer's hard drive. The file is saved in the export folder selected in File Preferences.
-
When ready, click Live to begin streaming.
-
When you are done streaming, click the Stop button, or press the hotkey specified in preferences, to stop the streaming.
Chapter 4:
Library Window
All of your recorded videos and captured photo screenshots are saved in the library.
To access the library window, just click in the Screen Recorder window.
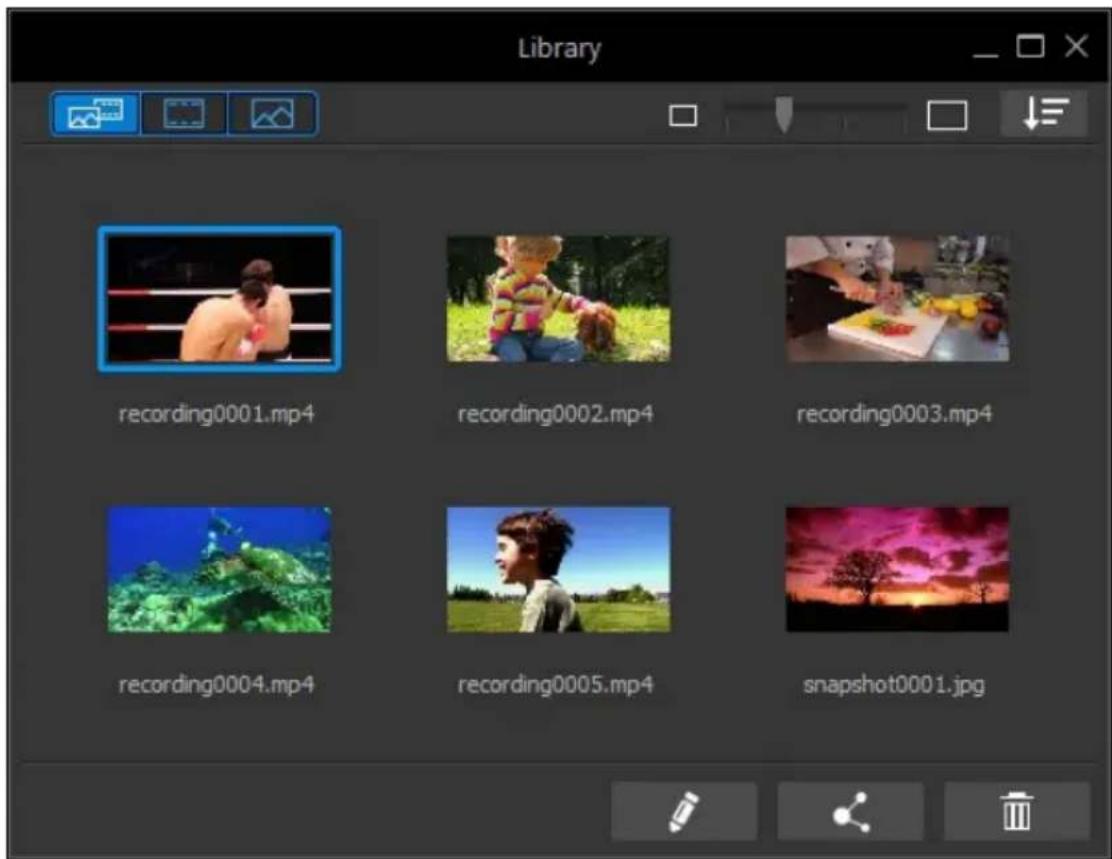
The media in the library window is organized by capture date, but you can click
to sort it by name, file size, capture date, and more, in ascending or descending order. Use the slider near the top right of the window to adjust the size of the media thumbnails in the library.
You can also filter the media in the library using the buttons in the top left corner as follows:
- click to view all the captured media in the library window.
- click to view only the recorded videos in the library window.
- click to view only the captured photo screenshots in the library window.
Select a video file in the library, click 📄, and then select Edit with Screen
Recorder's video editor to perform some edits on the video file. Click on to share the video on social media web sites, including YouTube and Facebook.
If you'd like to delete media from the library window, just select it and then click the
button in the bottom right corner of the window. Click the X in the top
right of the window or in the Screen Recorder window to hide the library window.
Sharing Media
The video files you recorded with Screen Recorder can be shared on social media
web sites. Select a video file in the library and then click on to share it to the following online media web sites.
Note: the recorded video clips are rendered before they are uploaded to online media web sites. You can produce and upload in up to 4K resolution (Ultra HD). Before production, be sure to select the desired video resolution in the Profile name/Quality drop-down.
In Screen Recorder, you can:
▼ Upload Your Media to Facebook
To upload a video to Facebook ^® , do this:
-
In the Screen Recorder window, click to open the library.
-
Select the video file in the library you want to upload and then click
- Click the Facebook button.
- Select the desired quality of your video from the Profile type drop-down list.
- Enter a Title and Description for your video in the fields provided. The text you enter is included on Facebook once uploaded.
- If required, select Enable preview during production to preview your video during production. Selecting this option will increase the time required to produce the file before upload.
- Click Start to begin.
- Click Authorize and then grant Screen Recorder permission to upload videos to your Facebook account by following the steps in the Facebook Authorization windows.
- Screen Recorder proceeds to produce and upload the video file. Click Close when done to return to the program.
▼ Upload Your Media to YouTube
To upload a video to YouTube, do this:
Note: if the size/length of the your video exceeds the maximum allowed, Screen Recorder will separate the video into smaller/shorter videos, upload these videos, and then create a playlist for you on YouTube.
- In the Screen Recorder window, click to open the library.
- Select the video file in the library you want to upload and then click
-
Click the YouTube Videos button.
-
Select the desired quality of your video from the Profile type drop-down. The quality you select will result in the corresponding quality option being available after the video is fully processed on YouTube.
Note: the quality option available on YouTube is also dependent on the original captured video quality and the bandwidth of the user who is watching the video.
- Enter a Title and Description for your video in the fields provided. The text you enter is included on YouTube once uploaded. Also select one of the Video categories and enter in some keyword Tags that users can search for to find your video.
- Set whether you want the video to be Public or Private once it is uploaded to YouTube.
- If required, select Enable preview during production to preview your video during production. Selecting this option will increase the time required to produce the file before upload.
- Click Start to begin.
- Click Authorize and then grant Screen Recorder permission to upload videos to your YouTube account by following the steps in the YouTube Authorization windows.
- Screen Recorder proceeds to produce and upload the video file. Click Close when done to return to the program.
▼ Upload Your Media to Dailymotion
To upload your video to Dailymotion, do this:
Note: if the size/length of the your video exceeds the maximum allowed, Screen Recorder will separate the video into smaller/shorter videos, upload these videos, and then create a playlist for you on Dailymotion.
- In the Screen Recorder window, click to open the library.
- Select the video file in the library you want to upload and then click

- Click the Dailymotion button.
- Select the desired quality of your video from the Profile type drop-down. The quality you select will result in the corresponding quality option being available after the video is fully processed on Dailymotion.
Note: the quality option available on Dailymotion is also dependent on the original captured video quality and the bandwidth of the user who is watching the video.
- Enter a Title and Description for your video in the fields provided. The text you enter is included on Dailymotion once uploaded. Also select one of the Video categories and enter in some keyword Tags that users can search for to find your video.
- Set whether you want the video to be Public or Private once it is uploaded to Dailymotion.
- If required, select Enable preview during production to preview your video during production. Selecting this option will increase the time required to produce the file before upload.
- Click Start to begin.
- Click Authorize and then grant Screen Recorder permission to upload videos to your Dailymotion account by following the steps in the Dailymotion Authorization windows.
- Screen Recorder proceeds to produce and upload the video file. Click Close when done to return to the program.
▼ Upload Your Media to Vimeo
To upload your video to Vimeo, do this:
Note: if the size/length of the your video exceeds the maximum allowed, Screen Recorder will separate the video into smaller/shorter videos, upload these videos, and then create a playlist for you on Vimeo.
- In the Screen Recorder window, click to open the library.
- Select the video file in the library you want to upload and then click

- Click the Vimeo button.
- Select the desired quality of your video from the Profile type drop-down. The quality you select will result in the corresponding quality option being available after the video is fully processed on Vimeo.
Note: the quality option available on Vimeo is also dependent on the original captured video quality and the bandwidth of the user who is watching the video.
- Enter a Title and Description for your video in the fields provided. The text you enter is included on Vimeo once uploaded. Also enter in some keyword Tags that users can search for to find your video.
- Set whether you want the video to be Public or Private once it is uploaded to Vimeo.
- If required, select Enable preview during production to preview your video during production. Selecting this option will increase the time required to produce the file before upload.
-
Click Start to begin.
-
Click Authorize and then grant Screen Recorder permission to upload videos to your Vimeo account by following the steps in the Vimeo Authorization windows.
- Screen Recorder proceeds to produce and upload the video file. Click Close when done to return to the program.
▼ Upload Your Media to Niconico Douga
To upload your video to Niconico Douga, do this:
Note: if the size/length of the your video exceeds the maximum allowed, Screen Recorder will separate the video into smaller/shorter videos, upload these videos, and then create a playlist for you on Niconico Douga.
- In the Screen Recorder window, click to open the library.
- Select the video file in the library you want to upload and then click
- Click the Niconico Douga button.
- Enter your Niconico Douga Username and Password. If you don't have an account, click the Sign Up to Niconico link to get one.
- Select the desired quality of your video from the Profile type drop-down. The quality you select will result in the corresponding quality option being available after the video is fully processed on Niconico Douga.
Note: the quality option available on Niconico Douga is also dependent on the original captured video quality and the bandwidth of the user who is watching the video.
- Enter a Title and Description for your video in the fields provided. The text you enter is included on Niconico Douga once uploaded. Also enter in some keyword Tags that users can search for to find your video.
- Set whether you want the video to be Public or Private once it is uploaded to Niconico Douga.
- If required, select Enable preview during production to preview your video during production. Selecting this option will increase the time required to produce the file before upload.
- Use the player controls in the preview window to find the frame of video in your production you want to use as the video's thumbnail on the Niconico Douga web site, and then click the Set Thumbnail button.
- Click Start to begin.
- Click Authorize and then grant Screen Recorder permission to upload videos to your Niconico Douga account by following the steps in the Niconico Douga Authorization windows.
- Screen Recorder proceeds to produce and upload the video file. Click Close when done to return to the program.
▼ Upload Your Media to Youku
To upload your video to Youku, do this:
Note: if the size/length of the your video exceeds the maximum allowed, Screen Recorder will separate the video into smaller/shorter videos, upload these videos, and then create a playlist for you on Youku.
- In the Screen Recorder window, click to open the library.
- Select the video file in the library you want to upload and then click
-
Click the Youku button.
-
Select the desired quality of your video from the Profile type drop-down. The quality you select will result in the corresponding quality option being available after the video is fully processed on Youku.
Note: the quality option available on Youku is also dependent on the original captured video quality and the bandwidth of the user who is watching the video.
- Enter a Title and Description for your video in the fields provided. The text you enter is included on Youku once uploaded. Also select one of the Video categories and enter in some keyword Tags that users can search for to find your video.
- Set whether you want the video to be Public or Private once it is uploaded to Dailymotion.
- If required, select Enable preview during production to preview your video during production. Selecting this option will increase the time required to produce the file before upload.
- Click Start to begin.
- Click Authorize and then grant Screen Recorder permission to upload videos to your Youku account by following the steps in the Youku Authorization windows.
- Screen Recorder proceeds to produce and upload the video file. Click Close when done to return to the program.
Chapter 5:
Editing Recorded Video Clips
The Screen Recorder comes with a video editor*, which lets you perform trims, add titles and transitions, and more.
Note: * this feature is only available in the Deluxe edition of Screen Recorder 3.
To enter the editing window, select a video file in the library, click , and then select Edit with Screen Recorder's video editor.
Note: if you have CyberLink PowerDirector installed and you want to edit with it instead, click 📄 and then select Edit with PowerDirector.
Splitting a Clip
You can quickly split a video clip that is on the storyboard into two separate clips. To do this, move the playback slider (or use the player controls) to the position in
the clip where you want to split it. Next, click the button above the storyboard to separate it into two clips.
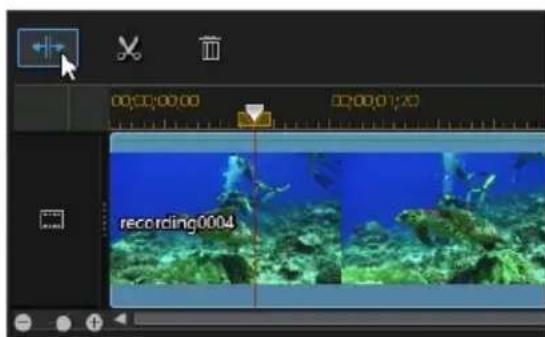
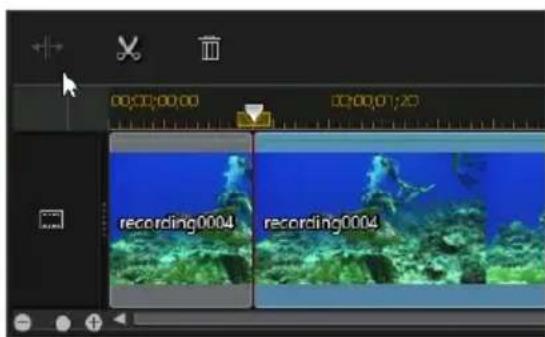
You can also use it to quickly remove unwanted portions of a video clip, or if you want to insert other videos between the two portions.
Trimming Video Clips
Use the trim functions to remove unwanted portions from the beginning and/or ends of a video clip.
Note: when you trim video clips, the program does not delete any of the original source media's content. It just marks the requested edits on the clips and then applies the edits when it renders the final video during production.
To trim a video clip, select it on the storyboard and then click the above the storyboard.

button
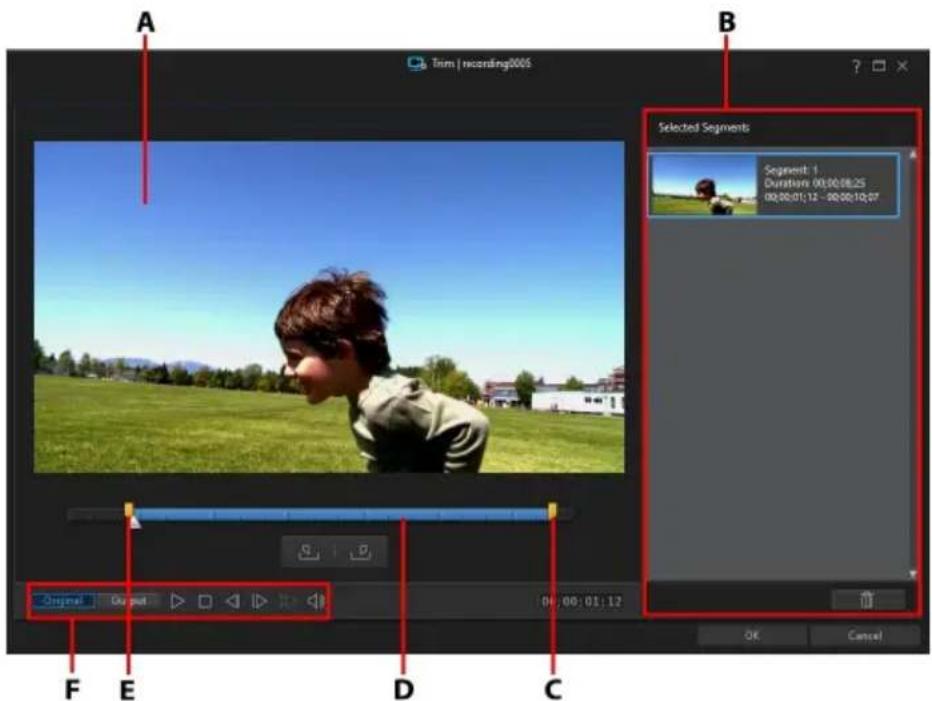
A - Preview Area, B - Marked Positions in Clip, C - Mark Out Position Slider, D - Selected Content, E - Mark In Position Slider, F - Player Controls
To trim* a video clip, do this.
Note: * this feature is only available in the Deluxe edition of Screen Recorder 3.
- Select the video clip on the storyboard you want to trim, and then click on the
button above the storyboard.
- Use the player controls to find where you want the trimmed clip to begin, and
then click to set the mark in position or drag the mark in position slider to this position.

natural_image
Blue horizontal bar with directional arrows and a small icon on the left (no text or symbols)- Use the player controls to find where you want the trimmed clip to end, and
then click to set the mark out position or drag the mark out position slider to this position.

natural_image
Pure diagram of a horizontal bar with directional arrows, no text or symbols present-
If required, you can preview what the trimmed clip will look like by clicking Output and then clicking the play button on the player controls. Click Original if you want to play the original video.
-
Click OK to set your changes and trim the clip.
Note: you can reenter the trim window to refine the trimmed clip at any time.
Changing the Shape of Media
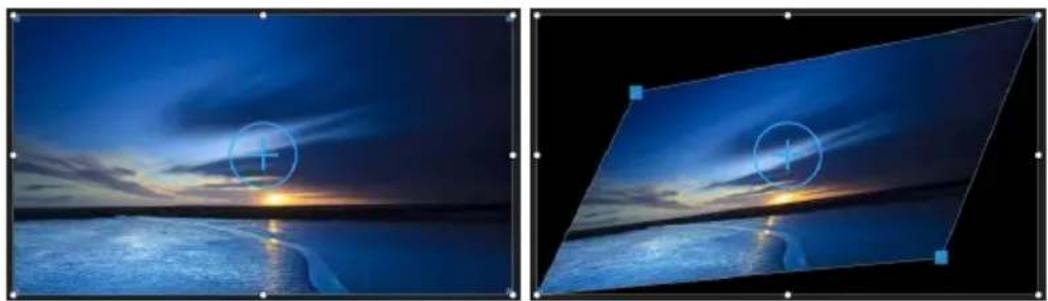
Screen Recorder lets you change the shape of the video clips. Videos on the storyboard have freeform properties, so you can easily change their shape to create media that is different from the usual rectangle or square shape.
natural_image
Two-panel image showing a beach at sunset with illuminated waves and reflections, no text or symbols present.To change the shape of a video clip, do this:
- Select a video clip on the storyboard. The media crosshairs will be displayed.
- Use your mouse to click and drag the blue nodes in the corners of the video clip, changing it to the desired freeform shape.
Adding Title Effects
Title effects let you add text to your videos, such as captions, or open and closing credits. You add title effect templates to the storyboard, and they can be customized in the Title Designer.
To add a title effect template to the storyboard, do this:
- Click on the Titles tab to open the Title room.
- Browse through the available title effect templates. You can click one to view a preview in the preview window.
- When you find the title effect template you like, drag and drop it on top of the video on the storyboard.
- Adjust the length of the title effect on the storyboard by dragging both its ends. Doing this sets the duration the title is displayed in your video.
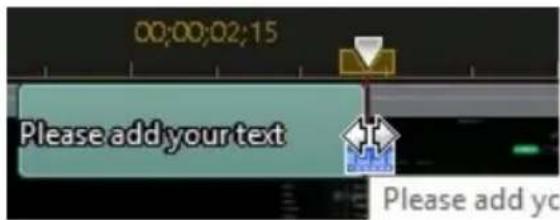
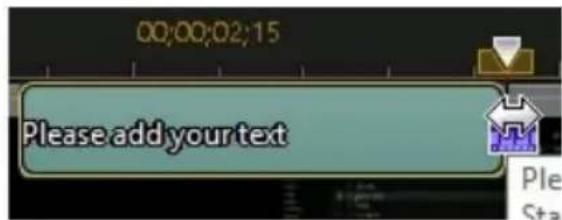
Once added to the storyboard, select the title effect template and then click the
To button to edit the text it in the Title Designer. See Modifying Titles in the Title Designer for more information.
Modifying Titles in the Title Designer
In the Title Designer* you can customize the title effects in your project. Title effects contain character presets, animation, and background options that you can modify to fit your video project.
To open the Title Designer, select a title effect on the storyboard and then click the

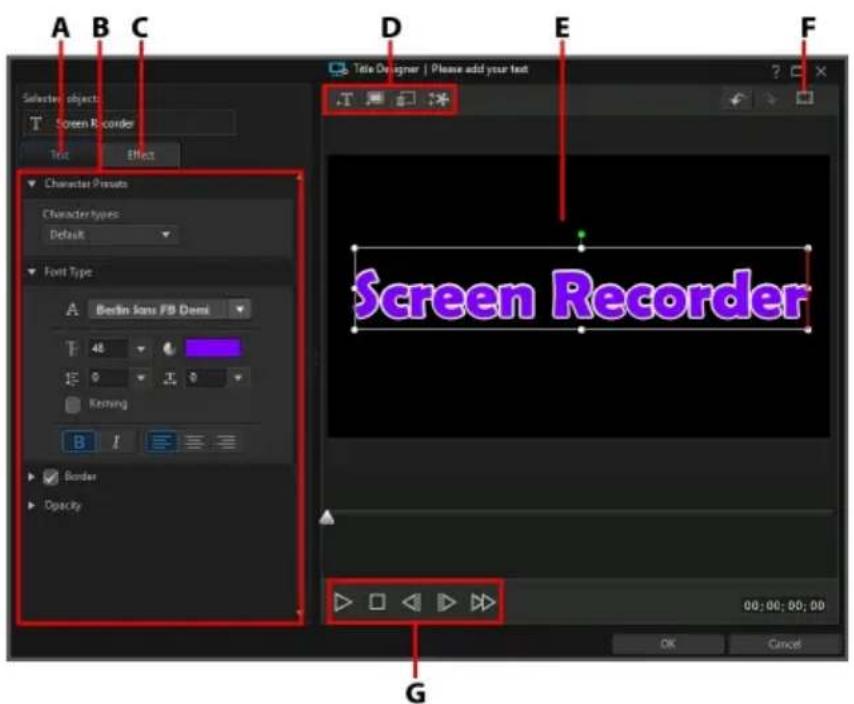
A - Text Properties Tab, B - Title Properties, C - Title Animation Effect Tab, D - Insert Text/Backgrounds, E - Title Text, F - TV Safe Zone/Grid Lines, G - Player Control
In the Title Designer you can perform the following functions:
- Add Text, Images, and Backgrounds
Each title effect template can contain one or more title text boxes. It can also contain images and a background that the text displays over.
Adding Title Text
By default there is one title text box in the Title Designer when it's opened. To edit the text in the title text, just click in the box, ensure the default text is selected, and then type in your text.
You can also add additional title text boxes. To add new title text, click on the

button and then click in the preview window to add the title text box to desired position. Type in the required text in the new title text box.
See Modifying Title Text Properties for more information on customizing the default title text properties to fit the title effect you are trying to create.
Inserting Backgrounds
Your title effect can consist of a background that the title text displays over.
To set a background, do this:
- Click on the bu

- Browse to and then select the image on your computer you want to use as the background, and then click Open.
- When prompted, select the adjustment setting for the background that best fits your requirements.
Note: to remove the imported background image, just click the button.

Adding Images
You can insert your own images into your title effect template.
To add a image, do this:
- Click on the bu

-
Browse to and then select the image on your computer you want to add, and then click Open.
-
Once added, resize and reposition the image in the Title Designer as required, just like a title.
▼ Modify Title Effect Position
You can change the position and orientation of the title text in a title effect, quickly and easily.
Note: click on 📄 to use the TV safe zone and grid lines to help with the precise placement of the title effect on the master video. Select Snap to Reference Lines to have the title effect snap to the grid lines, TV safe zone, and boundary of the video area.
To modify title text or orientation:
- click on the title text, and then drag it to a new position.
- click on ▲ove the title text or image, and drag it right or left to change its orientation.
- click and drag a corner or side to resize the title text.
▼ Modify Title Text Properties
Click on the Text properties tab to modify everything from the text size, style, color, as well as adding borders, and much more.
Applying Character Presets to Title Text
Select the Character Presets option to apply a defined character preset to title text. After you have applied a defined character preset you can refine it using the other properties on the tab, if required.
To apply a character preset to title text, ensure the text box is selected in the preview window and then click on a character preset in the list.
Note: once you are done customizing all of the text properties on the tab, click on to save the character preset to your favorites. To find and use saved character presets, select MyFavorites in the Character types drop-down.
Customizing Font Type
Select the Font Type option to set the font type and size of the selected title text. You can also select the font face color, bold or italicize text, change the line and text spacing, and set the text alignment in the text box.
If the font type you are using supports it, you can select the Kerning check box to reduce the space between the letters in the title text.
Applying a Border
Select the Border option to add a border around the title text. Available options allow you to change the border's size, and add an opacity or blur effect.
You can customize the border color using the following options in the Fill type drop-down:
- Uniform color: select this option if you want the border to be one solid color. Click the colored square to open the color palette and select the desired border color.
- 2 color gradient: select this option if you want the border color to change from one color to another using a gradient. Click the colored squares to
set the beginning and ending colors, and then drag the Gradient direction control to set which way the color flows.
- 4 color gradient: select this option if you want the border to consist of four colors. Click the colored squares to set the colors in each of the four corners of the border.
Opacity
Select this option to use the Opacity slider to set the level of transparency of the selected title text.
- Applying Animation Effects to Title Text
Click on the Effect tab to apply animations to title text, such as text fades, text motion, or wipes.
To apply animation to text, do this:
- Select the title text you wish to animate in the preview window.
- Select the Starting Effect option and then select an animation from the available list.
- Select the Ending Effect option and then select an animation from the available list.
Once you are done modifying the title effect in the Title Designer, click the OK button to close the window and set your changes in your video.
Note: if you'd like to perform additional editing after closing the Title Designer, just select the title again in the storyboard and then click the

button.
Using Transitions
Click the Transition tab to open the Transition Room and access a library of transitions that you can use on video clips. Transitions let you control how clips appear and disappear in your final video.
Adding Transitions to a Video Clip
By adding a transition to a video clip, you can control how the clip appears and/or disappears in your video.
To add a transition* to a video clip, do this:
Note: * this feature is only available in the Deluxe edition of Screen Recorder 3.
- Click on Transitions tab to open the Transition Room.
- Select a transition effect and then drag it to the beginning (prefix transition) of the clip on the storyboard.

- Select a transition effect and then drag it to the end (postfix transition) of the last clip on the storyboard.

To change the duration of the transition, select it and then click on the button above the storyboard. If you want to remove the transition from the clip,
just click on it in the thumbnail and then press the key on your keyboard.
Adding Background Music
You can easily add background music* to your video. To add background music, do this
Note: * this feature is only available in the Deluxe edition of Screen Recorder 3.
- Click on the Music button to the right of the storyboard. The Add Background Music window opens.
- Click on the button.
- Browse to the music you want to add, select it, and then click Open. You can repeat this step multiple times, or select more than one music file to add more music.
-
In the Trim section you can trim the length of the music files you added as background music as follows:
-
use the player controls to find the desired start point for the music, and then click
- use the player controls to find the desired end point for the music, and then click
- drag the markers on the music timeline to set the desired start and end times manually.

natural_image
Pure diagram of a horizontal beam with two directional arrows indicating left and right motion (no text or symbols)-
In the mix audio section:
-
drag the slider left (towards Background music) to increase the volume of the music in your video. Doing this will also reduce the volume of the audio in the video clip on the storyboard.
-
drag the slider right (towards Video's audio) to increase the volume of the audio in the video clip on the storyboard. Doing this will reduce the volume of the background music you added.
-
Select the Loop playback option if you want the music to play continuously during the entire duration of the video. When the music ends, it will loop back to the beginning.
- Select the Auto fade in/out option to have the background music gradually fade in and out during the production.
- Click OK to save your changes and add the background music to the video.
Note: if you'd like to edit the background music after closing the Add Background Music window, just click on the Music button again.
Producing Your Edited Video
When you are done editing your video, and you are satisfied with the results after viewing it in the preview window, it's time to produce it.
To begin producing your edited video, click the Produce button in the bottom right corner. In the Produce dialog you have two options:
- Produce & Save: select this option if you want to create a video file on your computer's hard drive. See Producing and Saving to a Video File for detailed information.
- Produce & Share: select this option if you want to render your edited video and then have it uploaded to a social media web site such as Facebook, YouTube, or Vimeo. See Sharing Media for detailed information.
Producing and Saving to a Video File
You can produce your video in the H.264 AVC (.MP4) format and save it as a video file that you can watch on a computer, mobile device, and more.
To output your video production, do this:
- Select the Profile name/Quality you want to use to create the file. This selection determines the video resolution, file size, and overall quality of the outputted file.
Note: H.264 AVC video file formats support up to 4K resolution (Ultra HD). Before production, be sure to select the desired video resolution in the Profilename/Quality drop-down.
- If required, select the country where the video file will be played from the Country/video format of disc drop-down.
- If required, set the Export folder where the produced file will be saved. Click to choose a different export folder.
- If required, select Enable preview during production to preview your video during production. Selecting this option will increase the time required to produce your file.
- Click the Start button to begin producing your file.
Editing Preferences
To set your editing preferences in the editing window of the Screen Recorder, just click the button.
Editing Preferences
Click the ⚙ button to open the Preferences window, and then select the Editing tab. The available options are as follows:
Durations:
- set the default durations (in seconds) for transitions and titles when placed on the storyboard.
File Preferences
Click the 📄 button to open the Preferences window, and then select the File tab. The available options are as follows:
Default locations:
- Import folder: indicates the last folder that media was imported from. To change this folder, click Browse and then select a new folder.
- Export folder: set the folder where produced videos are saved. To change this folder, click Browse and then select a new folder.
Hardware Acceleration Preferences
Click the 📄 button to open the Preferences window, and then select the Hardware Acceleration tab. The available options are as follows:
Hardware acceleration:
Note: ensure you download and install the latest drivers, and any related hardware acceleration software, for your computer's graphics card to enable this feature in Screen Recorder.
- Enable OpenCL technology to speed up video effect preview/render: if your computer supports GPU hardware acceleration, select this option to speed up the rendering of some video effects by tapping into the multi-core parallel processing power of your computer.
- Enable hardware decoding: if your computer supports NVIDIA CUDA/AMD Accelerated Parallel Processing/Intel Core Processor Family technology, select this option to use hardware acceleration to decode the video during the editing process and when producing video.
- Enable hardware encoding: if your computer supports NVIDIA CUDA/AMD Accelerated Parallel Processing/Intel Core Processor Family technology, select this option to use hardware acceleration to encode the video when producing video.
Produce Preferences
Click the 📄 button to open the Preferences window, and then select the Produce tab. The available options are as follows:
Produce:
- Reduce video blocky artifacts (Intel SSE4 optimized): select this option to improve the production overall quality of produced video, if your computer supports Intel SSE4 optimization.
- Reduce video noise when using H.264 software encoders: select this option if you want CyberLink ActionDirector to auto apply video denoise when encoding H.264 video during production.
Chapter 6:
Screen Recorder Preferences
To set your preferences in CyberLink Screen Recorder, just click the 📄 button.
General Preferences
Click the ⚙️ button to open the Preferences window, and then select the General tab. The available options are as follows:
Application:
- Always on top: select this option to have Screen Recorder appear on top of all your other Windows apps.
- Minimize after launch: select this option if you want Screen Recorder to be minimized when it is launched.
- Minimize when recording/streaming starts: select this option if you want Screen Recorder to be minimized once recording or streaming starts.
- Show when recording/streaming is complete: select this option if you want Screen Recorder to display once the recording or streaming is complete.
Software update:
- Automatically check for software updates: select to periodically check for updates or new versions of Screen Recorder automatically.
Language:
- Use system default language (if supported): select this option for the language display to be the same as the language of your operating system. This feature is only available if your operating system's language is one of the supported user defined languages.
- User defined: select this option and then select the language from the dropdown list that you want to use.
File Preferences
Click the 📄 button to open the Preferences window, and then select the File tab. The available options are as follows:
Default locations:
- Export folder: set the folder where captured media (videos and photos) is saved. To change this folder, click Browse and then select a new folder.
File name:
- Captured video prefix: enter a default name for captured video files.
- Screenshot file name: enter a default name for captured photo screenshots. Select a preferred file format from the drop-down list for your screenshots (JPG or PNG format).
Video Preferences
Click the 📄 button to open the Preferences window, and then select the Video tab. The available options are as follows:
Monitor setup:
- if you have more than one monitor connected to your computer and you have extended your desktop, select whether you want to capture on the Primary, Secondary, or Third monitor.
Note: Screen Recorder can only record one monitor at a time. It cannot record across extended desktops.
Performance:
Note: ensure you download and install the latest drivers, and any related hardware acceleration software, for your computer's graphics card to enable this feature in Screen Recorder.
- Enable hardware encoding: if your computer supports NVIDIA CUDA/AMD Accelerated Parallel Processing/Intel Core Processor Family technology, select this option to improve recording performance using hardware encoding.
Editing:
- Create.mrk file when recording: select this option if you want to create a log file that tracks the mouse clicks when you record video. This will be helpful if you plan to edit the recorded video in PowerDirector, as these mouse clicks will be indicated on PowerDirector's clip marker track when the recorded file is added to the timeline.
Lock to application:
- Record only selected window: select this option when using the "Lock to app" recording option to ensure only the content in the selected window is what is recorded.
Bitrate:
- use the slider to set the bitrate level of the recorded video file and quality of the streamed video. See Expected Video Bitrates for a detailed list of the expected bitrates for the selected bitrate level.
Note: higher bitrate levels require a faster and more stable Internet connection for optimal streaming.
Expected Video Bitrates
Below are the expected video bitrates based on the bitrate level selected in Video Preferences, when capturing/streaming with Screen Recorder.
Local Recording
| Low | Mid | High | |
| 1080 (15 fps) | 3960 Kbps | 5940 Kbps | 7920 Kbps |
| 1080 (24/25/30 fps) | 6000 Kbps | 9000 Kbps | 12000 Kbps |
| 1080 (50/60 fps) | 9000 Kbps | 13500 Kbps | 18000 Kbps |
| 1080 (120 fps) | 13500 Kbps | 20250 Kbps | 27000 Kbps |
| 720 (15 fps) | 198 Kbps | 363 Kbps | 528 Kbps |
| 720 (24/25/30 fps) | 3000 Kbps | 5500 Kbps | 8000 Kbps |
| 720 (50/60 fps) | 4500 Kbps | 8250 Kbps | 12000 Kbps |
| 720 (120 fps) | 6750 Kbps | 12375 Kbps | 18000 Kbps |
| 480 (15 fps) | 660 Kbps | 1650 Kbps | 2640 Kbps |
| 480 (24/25/30 fps) | 1000 Kbps | 2500 Kbps | 4000 Kbps |
| 480 (50/60fps) | 1500 Kbps | 3750 Kbps | 6000 Kbps |
| 480 (120 fps) | 2250 Kbps | 5625 Kbps | 9000 Kbps |
| 360 (15 fps) | 528 Kbps | 924 Kbps | 1320 Kbps |
| 360 (24/25/30 fps) | 800 Kbps | 1400 Kbps | 2000 Kbps |
| 360 (50/60 fps) | 1200 Kbps | 2100 Kbps | 3000 Kbps |
| 360 (120 fps) | 1800 Kbps | 3150 Kbps | 4500 Kbps |
| 240 (15 fps) | 396 Kbps | 660 Kbps | 924 Kbps |
| 240 (24/25/30 fps) | 600 Kbps | 1000 Kbps | 1400 Kbps |
| 240 (50/60 fps) | 900 Kbps | 1500 Kbps | 2100 Kbps |
| 240 (120 fps) | 1350 Kbps | 2250 Kbps | 3150 Kbps |
Streaming to YouTube
| Low | Mid | High | |
| 1080 (24/25/30 fps) | 3000 Kbps | 4500 Kbps | 6000 Kbps |
| 1080 (50/60 fps) | 4500 Kbps | 6750 Kbps | 9000 Kbps |
| 720 (24/25/30 fps) | 1500 Kbps | 2750 Kbps | 4000 Kbps |
| 720 (50/60 fps) | 2250 Kbps | 4125 Kbps | 6000 Kbps |
| 480 (24/25/30 fps) | 500 Kbps | 1250 Kbps | 2000 Kbps |
| 480 (50/60fps) | 750 Kbps | 1875 Kbps | 3000 Kbps |
| 360 (24/25/30 fps) | 400 Kbps | 700 Kbps | 1000 Kbps |
| 360 (50/60 fps) | 600 Kbps | 1050 Kbps | 1500 Kbps |
Streaming to Twitch
| Low | Mid | High | |
| 1080 (24/25/30 fps) | 2500 Kbps | 3500 Kbps | 4000 Kbps |
| 1080 (50/60 fps) | 3750 Kbps | 5250 Kbps | 6000 Kbps |
| 720 (24/25/30 fps) | 2000 Kbps | 2500 Kbps | 3000 Kbps |
| 720 (50/60 fps) | 3000 Kbps | 3750 Kbps | 4500 Kbps |
| 480 (24/25/30 fps) | 1000 Kbps | 1500 Kbps | 2000 Kbps |
| 480 (50/60fps) | 1500 Kbps | 2250 Kbps | 3000 Kbps |
| 360 (24/25/30 fps) | 500 Kbps | 800 Kbps | 1200 Kbps |
| 360 (50/60 fps) | 750 Kbps | 1200 Kbps | 1800 Kbps |
Streaming to Facebook
| Low | Mid | High | |
| 720 (24/25/30 fps) | 2000 Kbps | 2500 Kbps | 3000 Kbps |
| 720 (50/60 fps) | 3000 Kbps | 3750 Kbps | 4500 Kbps |
| 480 (24/25/30 fps) | 1000 Kbps | 1500 Kbps | 2000 Kbps |
| 480 (50/60fps) | 1500 Kbps | 2250 Kbps | 3000 Kbps |
| 360 (24/25/30 fps) | 500 Kbps | 800 Kbps | 1200 Kbps |
| 360 (50/60 fps) | 750 Kbps | 1200 Kbps | 1800 Kbps |
Audio Preferences
Click the 📄 button to open the Preferences window, and then select the Audio tab. The available options are as follows:
Audio setup:
- Microphone: turn your connected microphone On/Off.
• System audio: turn your system's audio On/Off.
- Mix: use the slider to set the mix between your microphone and your system's audio. Dragging it left will increase the volume of your microphone, while dragging it right will increase the volume of the system audio.
Hardware setup:
- Microphone: select the microphone connected to your computer that you want to use to record audio.
- Micvolume: set the input level for the microphone audio.
- Input device: select the audio input device for the system audio you want to use to record audio.
- Input volume: set the input level for the input device audio.
Webcam Preferences
Click the ⚙️ button to open the Preferences window, and then select the Webcam tab. The available options are as follows:
Webcam setup:
- Webcam: select the connected webcam you want to use. Click the 📄 button to adjust the specific settings for your selected webcam. Consult your webcam's user manual for a detailed description of the available controls.
- Size: use the slider to set the size of the webcam window that will display in the recorded video. You can also manually set the size of the webcam window in the preview area by clicking and dragging its borders.
- Position: in the preview area, drag the webcam window to the position on your desktop that you want it during the recording.
Hotkeys Preferences
Click the ⚙️ button to open the Preferences window, and then select the Hotkeys tab. The available options are as follows:
Customize keyboard hotkeys:
- Start/Stop: set the hotkey for starting and stopping recording or streaming.
- Pause/Resume: set the hotkey for pausing recording or streaming. This hotkey is also used to resume the paused recording/streaming.
- Microphone on/off: set the hotkey for turning your microphone on and off.
- Webcam on/off: set the hotkey for turning your webcam video on and off.
- Take a screenshot: set the hotkey for taking a photo screenshot during recording/streaming. The screenshots are saved in the format set in File Preferences.
Improvement Program Preferences
Click the 📄 button to open the Preferences window, and then select the Improvement Program tab. The available options are as follows:
CyberLink Product Improvement Program
- I want to participate: select this item if you would like to participate in the CyberLink Product Improvement Program for Screen Recorder. Once enabled, CyberLink Screen Recorder will collect information about the hardware and software configuration of your computer system, as well as your usage behavior and statistics related to the software. Click the Read more information about the improvement program online link to view more detailed information about the content collected.
Note: the CyberLink Product Improvement Program for Screen Recorder will not collect any personal information for purposes of identifying you.
Chapter 7:
Technical Support
If you require technical support, then this chapter can help. It includes all the information you need to find the answers you are looking for. You may also find answers quickly by contacting your local distributor/dealer.
Before Contacting Technical Support
Before contacting CyberLink technical support, please take advantage of one or more of the following free support options:
- consult the user's guide or the online help installed with your program.
- refer to the Knowledge Base at the following link on the CyberLink web site: http://www.cyberlink.com/support/search-product-result.do
- check the Help Resources page in this document.
When contacting technical support by e-mail or phone, please have the following information ready:
- registered product key (your product key can be found on the software disc envelope, the box cover, or in the e-mail received after you purchased CyberLink products on the CyberLink store).
- the product name, version and build number, which generally can be found by clicking on the product name image on the user interface.
• the version of Windows installed on your system. - list of hardware devices on your system (capture card, sound card, VGA card) and their specifications. For fastest results, please generate and attach your system info using the DxDiag.txt.
Note: here are the steps to generate the system info DxDiag.txt file: Click Windows (start) button, and then search for "dxdiag". Click Save All Information button to save the DxDiag.txt file.
- the wording of any warning messages that were displayed (you may want to write this down or take a screen capture).
- a detailed description of the problem and under what circumstances it occurred.
Web Support
Solutions to your problems are available 24 hours a day at no cost on the CyberLink web site:
Note: you must first register as a member before using CyberLink web support.
CyberLink provides a wide range of web support options, including FAQs, in the following languages:
| Language | Web Support URL |
| English | https://www.cyberlink.com/cs-help |
| Traditional Chinese | https://tw.cyberlink.com/cs-help |
| Japanese | https://jp.cyberlink.com/cs-help |
| Spanish | https://es.cyberlink.com/cs-help |
| Korean | https://kr.cyberlink.com/cs-help |
| Simplified Chinese | https://cn.cyberlink.com/cs-help |
| German | https://de.cyberlink.com/cs-help |
| French | https://fr.cyberlink.com/cs-help |
| Italian | https://it.cyberlink.com/cs-help |
Help Resources
The following is a list of help resources that may assist you when using any of CyberLink's products.
- Access CyberLink's Knowledge base and FAQ (frequently asked questions): https://www.cyberlink.com/cs-resource
• View video tutorials for your software: https://directorzone.cyberlink.com/tutorial/
- Ask questions and get answers from our users on the CyberLink Community Forum: https://forum.cyberlink.com/forum/forums/list/ENU.page
Note: CyberLink's user community forum is only available in English and German.
CyberLink Screen Recorder Help
Index
transitions 34
A
Audio
adding background 35
preferences 44
recording level 44
F
sharing to 17
streaming to 14
Freeform
media 27
B
Background music
video 35
Backgrounds
title effects 30
Bitrate
setting 41
table 42
H
H.264 AVC 36
Hardware acceleration
enabling 38
Help 48
Hotkeys
setting 45
C
CyberLink Product Improvement
Program 46
L
Language 40
Library 16
D
Default language 40
Display 41
M
Microphone
muting 45
recording level 44
Monitor 41
Music
adding to video 35
Mute
hotkey 45
E
Editing
recorded video 25
Effects
titles 28
O
OpenCL 38
P
Performance 41
Photos
viewing 16
PowerDirector 25
Preferences
editing 37
hardware acceleration 38
Screen Recorder 40
Produce
video 36
R
Recording 3
expected bitrate 42
file location 41
hotkeys 45
Rendering 36
S
Screenshots
file format 41
hotkey 45
while recording 3
while streaming 12
Shape 27
Share
videos 17
Skew 27
Split 25
Streaming 12
expected bitrate 42
hotkeys 45
quality 41
System requirements 2
T
Technical support 47
Title Designer 29
Title effects 28
Transitions 34
adding 34
Trim 26
Twitch 12
U
Updates 1
V
Video
expected bitrate 42
quality 41
Videos
background music 35
editing 25
producing 36
recording 3
rendering 36
shaping 27
sharing 17
Videos
skewing 27
streaming 12
transitions 34
trimming 26
viewing 16
W
Web support 48
Webcam
preferences 45
Y
YouTube
sharing to 17
streaming to 13
- Copyright and Disclaimer
- International Headquarters
- Contents
- IntroductionChapter 1:
- Recording VideoChapter 2:
- Streaming VideoChapter 3:
- Library WindowChapter 4:
- Editing Recorded Video ClipsChapter 5:
- Screen Recorder Preferences Chapter 6:
- Technical Support Chapter 7:
- Chapter 1:
- Introduction
- Welcome
- Screen Recorder Editions
- Updating Your Software
- Minimum System Requirements
- Chapter 2:
- Recording Video
- Record at Full Screen
- Record a Custom Sized Area of Your Desktop
- Record by Locking to a Desktop App
- Record a Game
- Record from a Connected Device
- Chapter 3:
- Streaming Video
- Streaming Video to Twitch
- Streaming Video to YouTube
- Streaming Video to Facebook
- Chapter 4:
- Library Window
- Sharing Media
- ▼ Upload Your Media to Facebook
- ▼ Upload Your Media to YouTube
- ▼ Upload Your Media to Dailymotion
- ▼ Upload Your Media to Vimeo
- ▼ Upload Your Media to Niconico Douga
- ▼ Upload Your Media to Youku
- Chapter 5:
- Editing Recorded Video Clips
- Splitting a Clip
- Trimming Video Clips
- Changing the Shape of Media
- Adding Title Effects
- Modifying Titles in the Title Designer
- - Add Text, Images, and Backgrounds
- Adding Title Text
- Inserting Backgrounds
- Adding Images
- ▼ Modify Title Effect Position
- ▼ Modify Title Text Properties
- Applying Character Presets to Title Text
- Customizing Font Type
- Applying a Border
- Opacity
- - Applying Animation Effects to Title Text
- Using Transitions
- Adding Transitions to a Video Clip
- Adding Background Music
- Producing Your Edited Video
- Producing and Saving to a Video File
- Editing Preferences
- Durations:
- File Preferences
- Default locations:
- Hardware Acceleration Preferences
- Hardware acceleration:
- Produce Preferences
- Produce:
- Chapter 6:
- Screen Recorder Preferences
- General Preferences
- Application:
- Software update:
- Language:
- File name:
- Video Preferences
- Monitor setup:
- Performance:
- Editing:
- Lock to application:
- Bitrate:
- Expected Video Bitrates
- Audio Preferences
- Audio setup:
- Hardware setup:
- Webcam Preferences
- Webcam setup:
- Hotkeys Preferences
- Customize keyboard hotkeys:
- Improvement Program Preferences
- CyberLink Product Improvement Program
- Chapter 7:
- Technical Support
- Before Contacting Technical Support
- Web Support
- Help Resources
- Index
- A
- F
- B
- H
- C
- L
- D
- M
- E
- O
- P
- R
- S
- T
- U
- V
- W
- Y
Brand : CYBERLINK
Model : Screen Recorder 3
Category : Software