IP2M-842EB - Security Camera Amcrest - Free user manual and instructions
Find the device manual for free IP2M-842EB Amcrest in PDF.


User questions about IP2M-842EB Amcrest
0 question about this device. Answer the ones you know or ask your own.
Ask a new question about this device
Download the instructions for your Security Camera in PDF format for free! Find your manual IP2M-842EB - Amcrest and take your electronic device back in hand. On this page are published all the documents necessary for the use of your device. IP2M-842EB by Amcrest.
USER MANUAL IP2M-842EB Amcrest
Amcrest PT Network Camera User Manual
Version 1.1.3
Revised July 22, 2015
Welcome....5
Important Security Warning 5
Important Safeguards and Warnings....6
1 Features and Specicaons....7
1.1 Overview....7
1.2 Features....7
2 Device Overview 8
3 Connecon & Installaon....10
3.1 Connecon Guide .... 10
3.2 Installaon Guide....10
4 Camera Access Setup....11
4.1 Default Username and Password ....11
4.2 Amcrest View App Setup ....11
4.3 Amcrest Cloud Setup ....16
4.4 Local Web Access Setup....16
4.5 Remote Web Access Setup ....17
4.5.1 UPnP/DDNS Remote Web Access Setup....17
4.5.2 Port Forwarding Remote Web Access Setup 17
4.6 AmcrestView.com Access Setup....19
4.7 NVR Access ....19
5 Operaon and Interface ....20
5.1 Live....20
5.2 PTZ....22
5.3 Playback....23
5.4 Setup....25
5.4.1 Camera....26
5.4.1.1 Conguraon....26
5.4.1.2 Video....29
5.4.1.3 Audio....32
5.4.2 Network....33
5.4.2.1 TCP/IP 33
5.4.2.2 Connecon....35
5.4.2.3 PPPoE....36
5.4.2.4 DDNS....37
5.4.2.5 IP Filter 38
5.4.2.6 SMTP (Email)....39
5.4.2.7 UPnP 40
5.4.2.8 SNMP 41
5.4.2.9 Bonjour 41
5.4.2.10 Mulcast 42
5.4.2.11 WiFi....42
5.4.2.12 802.1x 43
5.4.2.13 QoS....44
5.4.3 Event....45
5.4.3.1 Video Detecon 45
5.4.3.2 Audio Detecon....48
5.4.3.3 Alarm ....49
5.4.3.4 Abnormality ....51
5.4.4 Storage....54
5.4.4.1 Schedule ....54
5.4.4.2 Desnaon ....57
5.4.4.3 Record Control....59
5.4.5 System 60
5.4.5.1 General 60
5.4.5.2 Manage Users....62
5.4.5.3 Restore Factory Sengs....63
5.4.5.4 Import/Export....63
5.4.5.5 Auto Maintain....64
5.4.5.6 Upgrade ......64
5.4.6 Informaon....65
5.4.6.1 Version....65
5.4.6.2 Log 65
5.4.6.3 Online Users....66
5.5 Alarm ....66
5.6 Logout....66
- FAQs/Troubleshoong....67
Glossary of Terms ....71
Appendix A: Toxic or Hazardous Materials or Elements....73
Welcome
Thank you for purchasing our Amcrest PT Network Camera!
This user manual is designed to be a reference tool for the installaon and operaon of your PT camera.
Here you can nd informaon about the camera's features and funcons, as well as informaon to aid in troublesomeong.
Many of the setup and installaon seconds below have corresponding videos on YouTube
To access the setup videos, please go to hp://amcrest.com/videos

For access to the quick start guide and other support informaon, go to hp://amcrest.com/support
To contact Amcrest support, please do one of the following:
- Visit hp://amcrest.com/contacts and use the email form
- Call Amcrest Support using one of the following numbers
Toll Free: (888) 212-7538
Internaonal Callers (Outside of US): +1-713-893-8956
USA: 713-893-8956
Canada: 437-888-0177
UK: 203-769-2757
• Email Amcrest Customer Support support@amcrest.com
Important Security Warning
In order to keep your Amcrest camera secure and prevent unauthorized access, please make sure to follow the steps below:

text_image
Yellow triangular warning sign with black exclamation mark symbol• Always make sure that your camera has the latest rmware as listed on www.amcrest.com/rmware
- Never use the default password for your camera. Always ensure that your password is at least 8-10 characters long and contains a combinaon of lowercase characters, uppercase characters as well as numbers.
Important Safeguards and Warnings
1. Electrical Safety
All installaon and operaon should conform to your local electrical safety codes.
The product must be grounded to reduce the risk of electric shock.
We assume no liability or responsibility for any res or electrical shock caused by improper handling or installaon.
2. Transportaon Security
Heavy stress, violent vibraons, and excess moisture should not occur during transportaon, storage, and installaon of the device.
3. Installaon
Handle the device with care. Keep the device right side up.
Do not apply power to the camera before compleng installaon.
Do not place objects on top of the camera.
4. Repair Professionals
All the examinaon and repair work should be done by qualified service engineers.
We are not liable for any problems caused by unauthorized modicaons or user-aempted repair.
5. Environment
The camera should be kept in a cool, dry place away from direct sunlight, ammable materials, explosive substances, etc.
This product should be transported, stored, and used only in the specied environments as stated above.
Do not aim the camera at a strong light source, as it may cause overexposure of the picture, and may act the longevity of the camera's sensors.
Ensure that the camera is in a well venlated area to prevent overheang.
6. Operaon and Maintenance
Do not touch the camera sensor or lens directly.
To clean dust or dirt o of the lens, use an air blower or a microber cloth.
7. Accessories
Be sure to use only the accessories recommended by manufacturer.
Before installaon, please open the package and check to ensure that all of the components are present.
Contact the retailer that you purchased from, or Amcrest directly if anything is broken or missing in the package.
1 Features and Specicaons
1.1 Overview
The Amcrest PT Network Camera is an excellent digital surveillance product that can be useful to a wide variety of users. The camera connects to any router, and uses an internet conneccon to allow the user to access all of its funconality from many internet connected devices. It's easy to use and can be set up in a relatively small amount of me. It has various funcons such as recording, playback, and monitoring funconality and it synchronizes audio and video by default.
This PT Network Camera adopts a high-quality design in order to achieve high levels of reliability and security. It can be congured to work locally, as well as on a network. The PT Network Camera also has a built-in WiFi adapter that allows for the camera to be used on a wireless network, without needing a physical conncon to a router or PC.
1.2 Features
The Amcrest PT Network Camera has the following features:
- Network Access
The PT Network Camera connects to a wide variety of routers in order to connect to the internet, both through a wired conncon and wirelessly. Once setup, the camera can be accessed remotely from a wide variety of internet connected devices, including PCs, iPhones, iPads, Android tablets, and Android phones.
• Cloud Storage Funconality
The PT Network Camera is able to record video and audio streams to the Amcrest Cloud service in order to enable long-term storage for recordings. Amcrest Cloud also allows the user to easily nd and download recorded video for playback from any internet connected PC or Mac computer.
• Advanced Playback Funcon
This device supports real-me recording and can support search, fast forwarded playback, recorded searches, and downloading of videos and screenshots. The PT Network Camera can also playback in slow moon, backwards, and frame by frame as needed. When recording, the PT Network Camera shows a date/me overlay to ensure accurate viewing of events when they occurred. Lastly, the PT Network Camera can support video enlargement of certain zones within a stream.
• Advanced Network Protocol Support
The PT Network Camera is UPnP compatible, and also includes funconality for use with PPPoE, DDNS, and other protocols in order to allow remote and local conncon with a large variety of network hardware.
Note: There may be slight dierences in funconality due to the existence of dierent product series.
2 Device Overview
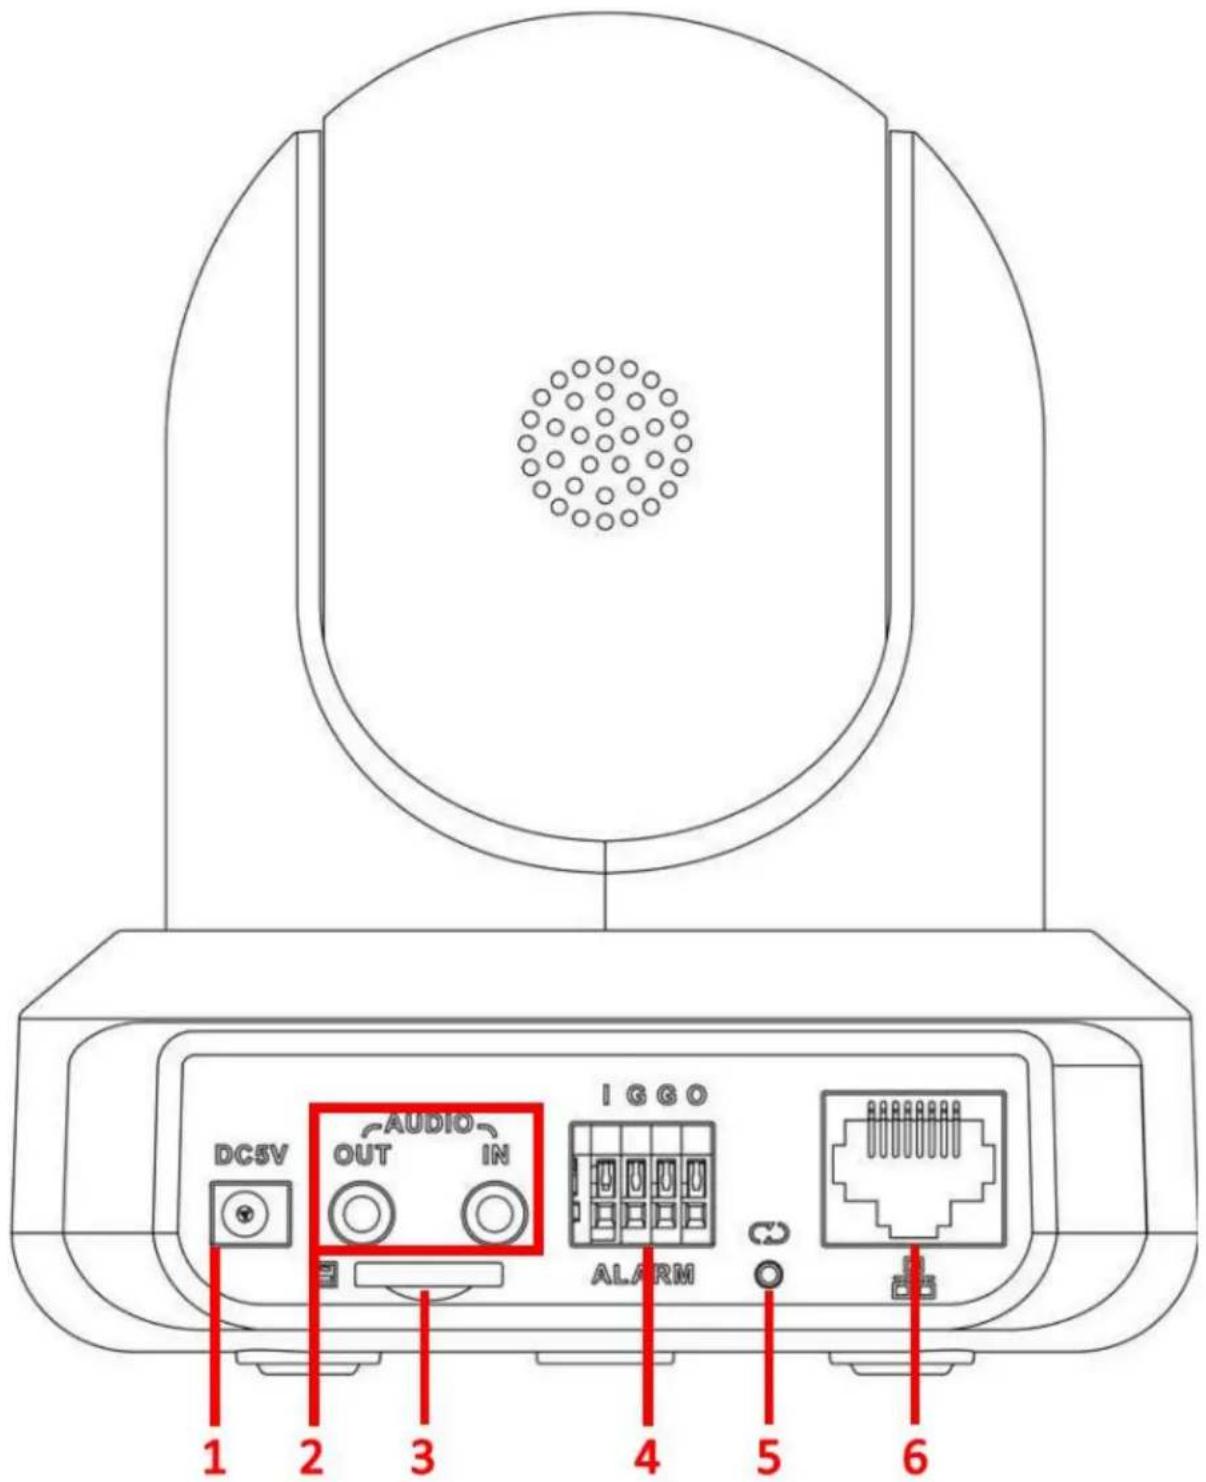
The diagram below shows the camera's prole and rear panel.
text_image
DC5V AUDIO OUT IN I G GO ALARM 1 2 3 4 5 6Please refer to the following chart for informaon about the camera and its ports.
| Number | Name |
| 1 | Power port |
| 2 | Audio Input/Output ports |
| 3 | SD Card slot |
| 4 | Alarm Input/Output ports |
| 5 | Reset/WPS buon/Indicator Light (For reset, long press for 10 seconds; for WPS, one quick press) |
| 6 | Network port |
Please refer to the chart below for informaon about the camera's indicator light:
| Indicator Light Status | Device Status |
| Red Light is blinking quickly. | The device is acvang. |
| Green Light is blinking. | The device is connecng to the network. |
| Red light is solid and steady. | The device failed to connect to the network. |
| Green Light is solid and steady. | The device is connected to the network and is funconing normally. |
| Red Light is blinking slowly. | The device is upgrading itself. |
The images below show the dimensions for the camera. The measurements are in millimeters (mm):
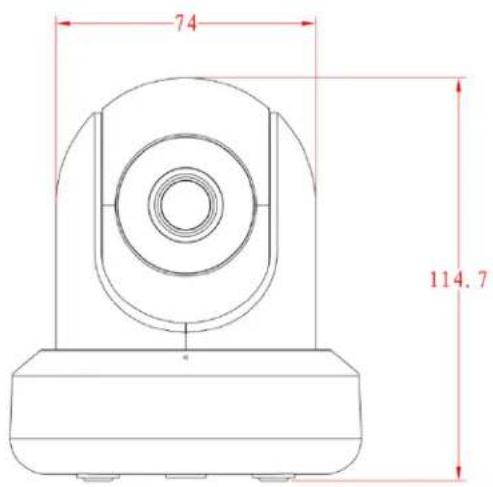
text_image
74 114.7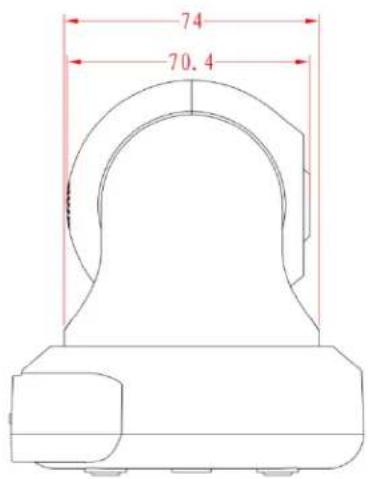
text_image
74 70.43 Connecon & Installaon
This secon provides informaon about the connecan and installaon of the Amcrest PT Network Camera.
3.1 Connecon Guide
The camera initially should be connected via the following method:
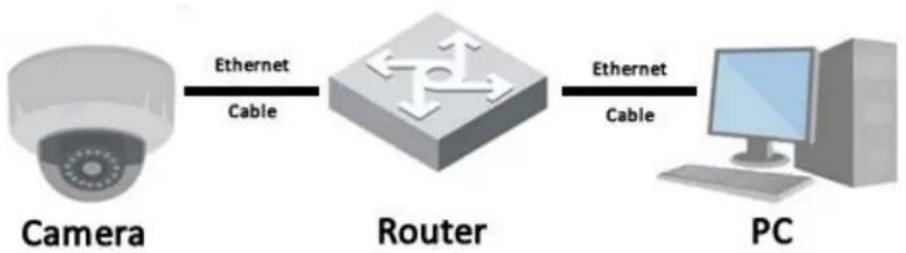
flowchart
graph LR
    A["Camera"] -->|Ethernet Cable| B["Router"]
    B -->|Ethernet Cable| C["PC"]
In addition to connecng the camera to a computer, the camera should also be connected to a power source, by connecng the included power cable to both a power outlet, and the camera.
3.2 Installaon Guide
The camera has a standard camera tripod screw hole (1/4-20 UNC thread) for use in mounng the camera onto a stable surface.
Note: Prior to installaon ensure that the installaon environment can support at least 3 mes the weight of the camera.
4 Camera Access Setup
This secon of the guide will provide the user with informaon on how to setup access to the camera through any of the following methods.
4.1 Default Username and Password
To login to the system for the rst me, use one of the following default username/password combinaons. Once you've successfully logged in, it is highly recommended to change the password for security reasons.
Username: admin
Password: admin
Note: Logging in for the rst me will prompt the user to change the password to the admin account.
4.2 Amcrest View App Setup
The Amcrest PT Network Camera enables access through the use of the Amcrest View app on either iOS or Android mobile operang systems. There are two versions of the app, Amcrest View Lite, and Amcrest View Pro. The Pro version contains some features that the Lite version does not.
For purposes of this guide, we will use iOS, though both apps have the same interface.
Note: The App Interface may dier slightly from the screenshots below.
- Connect your smartphone/tablet to your WiFi network.
- Download and Install either the Amcrest View Lite or Amcrest View Pro app from the app store.
- Open the app, and tap the icon in the top right hand corner to view connected devices.
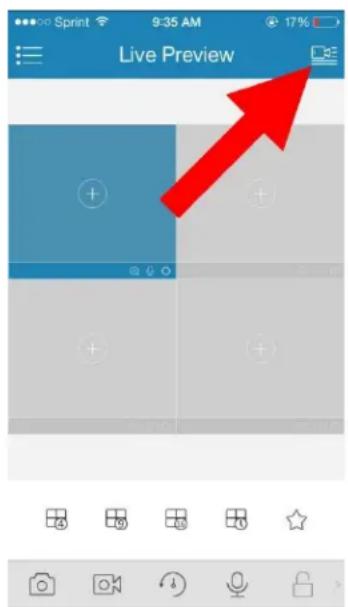
text_image
Live Preview- On the app, tap the plus sign in the top right hand corner.
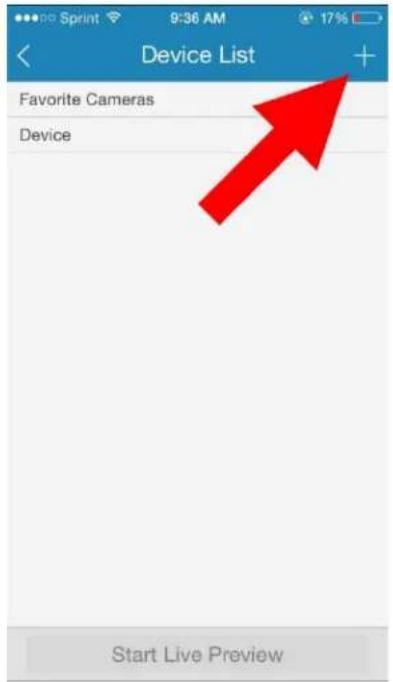
text_image
Device List Favorite Cameras Device Start Live Preview- Tap WiFi Conguraon
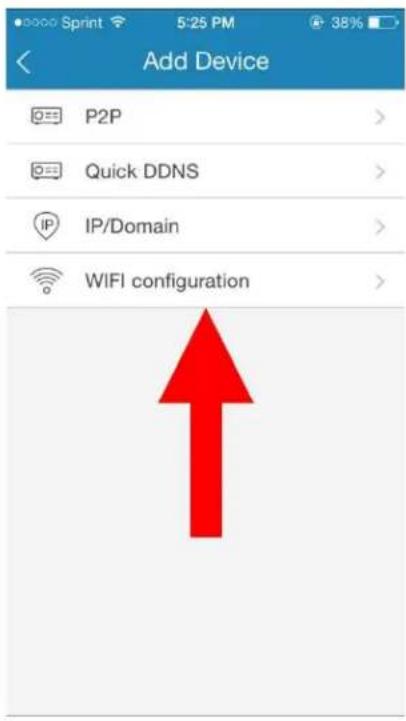
text_image
Add Device P2P Quick DDNS IP/Domain WIFI configuration- Click the buon that says "Scan QR Code". Alternatively, in some versions of the app, tap the QR code icon that shows in the right part of the SN eld.
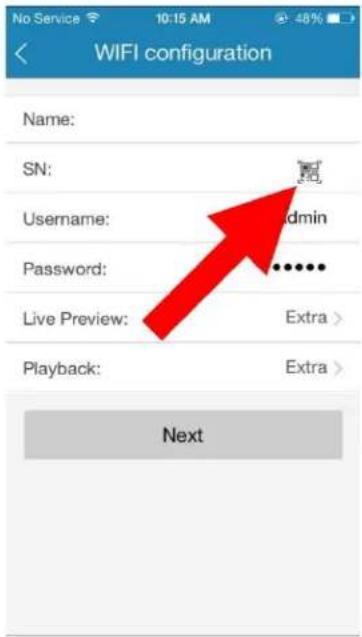
text_image
No Service 10:15 AM 48% WIFI configuration Name: SN: Username: Password: Live Preview: Playback: Next- Point the phone's camera at the QR code on the boom of the PT Network camera. Make sure the QR code ts inside of the clear box in the center of the phone screen. Your phone will vibrate and take you back to the previous page when the scan is successful.
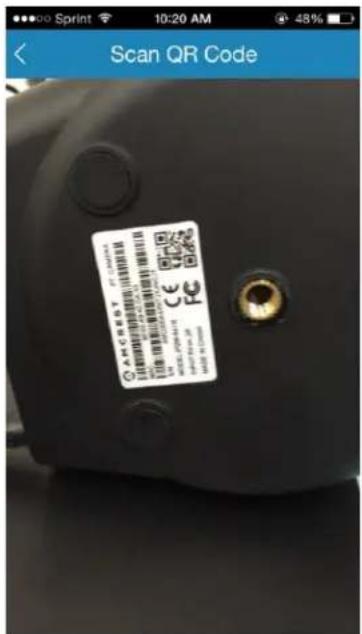
text_image
Scan QR Code APCB801 96200000 CE FC SIN: 000-000-000 SIN: 000-000-000- Enter a name for the camera, then enter the Username and Password used to login to the camera. By default, the username is "admin" and the password is "admin", then tap Next.
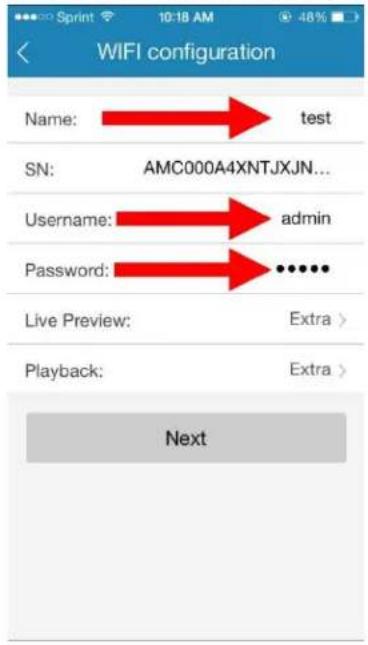
text_image
WIFI configuration Name: test SN: AMC000A4XNTJXJN... Username: admin Password: ••••• Live Preview: Extra > Playback: Extra > Next- If the WiFi network is protected with a password, enter it in the eld on this screen, then tap Next.
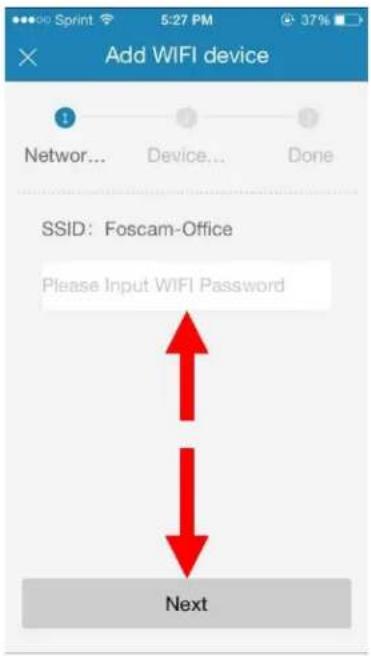
text_image
Add WIFI device 1 Network... Device... Done SSID: Foscam-Office Please Input WIFI Password Next- Wait for the camera to connect to the WiFi Network, and when the camera is done connecng to the network, the Added Successfully screen will display.
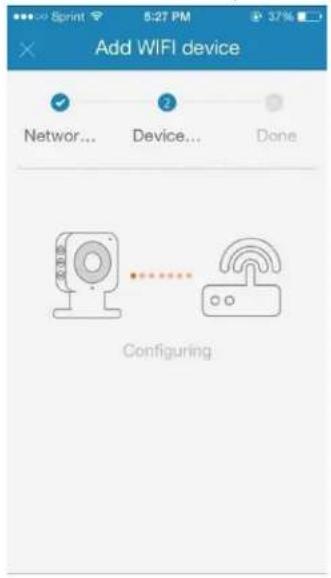
text_image
Add WIFI device Network... Device... Done Configuring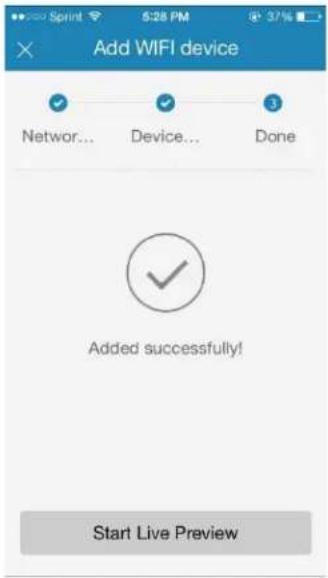
text_image
Add WIFI device Network... Device... Done Added successfully! Start Live Preview- Enter in a new password for the camera in order to secure it. Once the new password has been entered and conrmed, tap OK.
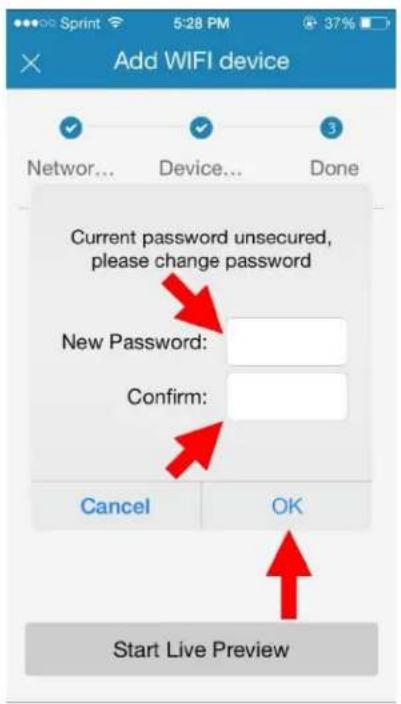
text_image
Add WIFI device Network... Device... Done Current password unsecured, please change password New Password: Confirm: Cancel OK Start Live Preview- The device is now successfully setup for live viewing! Click Start Live Preview to show the camera's feed.
4.3 Amcrest Cloud Setup
The Amcrest PT Network Camera is able to sync with Amcrest Cloud; a service that stores recorded video and audio streams in order to enable long-term storage. Amcrest Cloud also allows the user to easily nd and download recorded video for playback from any internet connected PC or Mac computer.
- Connect the camera to a power supply using the included power adapter.
- Connect the camera to the internet, either through a wired conncon (see secon 3.1), or through WiFi (see secon 4.2)
- Using a web browser on your PC or Mac, visit www.amcrest.com/cloud and register for a free account. Once registered, click the "Add Camera" buon. Select "Amcrest", give the camera a name, and enter the camera's SN (located on the boom of the camera), then click "Next".
- On the sengs page, you can adjust oponal preferences for your camera. Once sengs have been adjusted, click "Finish". Your camera is now successfully set up for cloud access and storage.
- View your camera live or watch recorded clips using the menu buon on the top of the page. You can also use the Amcrest Cloud app on iOS and Android to add more cameras, play recordings, and view your camera live, from anywhere.
4.4 Local Web Access Setup
The Amcrest PT Network Camera can be accessed via a web browser on a PC or Mac. Using the Local Web Access interface, the camera's advanced sengs can be congured.
- Connect the camera to a power supply using the included power adapter.
- Connect the camera to the internet, either through a wired conncon or through WiFi (see Amcrest View App secon).
- Using a PC or Mac, insert the included CD and install the IP Cong soware. Alternatively, you can download the IP Cong soware from www.amcrest.com/support
- Open the IP Cong soware and hit the refresh buon. The camera will appear in the device list. Click the E icon to open the camera in your web browser. Ensure that you are using the Internet Explorer or Safari.
- Log in to the camera using the default login credentials (use admin for both the username and password). If this is your rst me logging into the device, you will be prompted to change your password.
- Download and install the Amcrest browser plugin to enable live viewing.
- The camera is now successfully set up for live viewing and playback! To set up WiFi (oponal), navigate to Setup -> Network -> WiFi. Click the Help Center icon on the top right to follow the on-screen instrucons.
Note: This sequence is required in order to set up the camera for remote web access.
4.5 Remote Web Access Setup
There are two main methods for seng up remote access: UPnP/DDNS, and Port Forwarding.
4.5.1 UPnP/DDNS Remote Web Access Setup
Using Universal Plug and Play (UPnP) and Dynamic Domain Name Server (DDNS) funconality is the easiest way to setup stable remote access. For this method, your router should support the uPnP networking protocol and the protocol should be enabled. Please refer to your router manufacturer's documentaon to learn how to enable uPnP on your router.
Below is a step-by-step walkthrough that details how to setup the Amcrest PT Network Camera for Remote Web Access using UPnP and DDNS:
- Login to your camera's web interface, open the main menu then go to Setup -> Network.
- Using the le hand menu, go to the Connecon menu, and write down the HTTP port. It is recommended to ensure the port number is at least 5 digits long to prevent any port conicts. If need be, change the port to a 5 digit number that is less than 65535, note the number down, and click save before proceeding to the next step.
- The system will prompt you to reset the camera. Click OK and wait for the camera to restart.
- Restarng the camera may cause the device to use another IP address. Use the included IP Cong tool to find the IP address as detailed in secon 3.2.1.
- Login to your camera, open the main menu then go to Setup -> Network.
- Click the Connecons menu item on the le hand menu, and ensure that the HTTP port has changed.
- Click the DDNS menu item on the le hand menu, pick QUICK DDNS from the drop down box, click the checkbox next to Server Type, and then click the Save buon on the boom right.
- To set a custom DDNS name, ll out the Domain Name eld and click Save.
- Write down the enre Domain Name eld, including the white text that says .quickddns.com
- Click the UPnP menu item on the le hand menu, and click the enable checkbox at the top.
- While in the UPnP menu, double click the HTTP port, and change both the internal and external HTTP ports to match the number that was used in step 2.
- Uncheck the last 4 checkboxes in the PAT table on the UPnP menu.
- Click apply, then exit this menu to go back to the main menu, then re-enter the UPnP menu, and ensure the UPnP status says "Mapping Successful".
- Open a web browser and enter in the DDNS domain name address from step 9, enter in a colon, then type the port number from step 4 on to the end.
a. For example, if the DDNS domain name is hp://abc123456789.quickddns.com and your HTTP Port is 33333, the URL would be hp://abc123456789.quickddns.com:33333 - The browser may prompt you to install a plugin. Click install to download the plugin, and then click on the plugin installaon le to install the plugin.
- If the browser prompts you to allow the plugin to work on the computer, hit Allow to ensure the plugin can run successfully.
- Enter in login details into the username and password elds and click login.
For more informaon on UPnP, see secon 5.4.2.6. For more informaon on DDNS, see secon 5.4.2.4.
4.5.2 Port Forwarding Remote Web Access Setup
Port Forwarding is an alternate method to seng up remote access for the Amcrest PT Network Camera. This method should only be used if the UPnP/DDNS Remote Access method did not work.
Below is a step-by-step walkthrough that details how to setup the camera for Remote Web Access using Port Forwarding:
- Login to your camera, open the main menu then go to Setup -> Network.
- Open the TCP/IP sengs screen.
- By default, the camera has the mode set to DHCP. Ensure that DHCP is selected. The IP Address, Subnet Mask, Default Gateway, Preferred DNS, and Alternate DNS should all be 0s if DHCP is selected.
- Click Save to save these sengs. This should now open the main menu.
- From the main menu, go to Setup -> Network.
- On the TCP/IP sengs screen, the IP Address, Subnet Mask, Default Gateway, Preferred DNS, and Alternate DNS should all be populated.
- Click the radio buon next to Stac, to change the mode to Stac.
- Write down the IP Address that is currently in the IP address eld.
- Click the Save buon.
- Using the le hand menu, go to the Connecon menu, and write down the TCP, UDP, and HTTP port number. It is recommended to ensure that these port numbers are at least 5 digits long to prevent any port conicts. If need be, change each of these port numbers to a 5 digit number that is less than 65535, note the numbers down, and click save before proceeding to the next step.
- Go to hp://www.canyouseeme.org/ and check to ensure each of the port numbers specified in step 10 is open.
- Write down the manufacturer name, brand, and model name for the router that the camera is connected to, and then proceed to http://www.poroward.com on your web browser.
- Open the port forwarding guide secon on the le hand side menu.
- Find the router brand name in the list, and click it.
- Find the router model number, and click it.
- Click the Default Guide link near the middle of the page.
- This guide will help you take the step necessary to port forward on the router. Follow these steps, and then return to the camera.
- Login to your camera, open the main menu then go to Setup -> Network.
- Click the DDNS menu item on the le hand menu, pick QUICK DDNS from the drop down box, click the checkbox next to Server Type, and then click the Save buon on the boom right.
- To set a custom DDNS name, fill out the Domain Name eld and click Save.
- Write down the enre Domain Name eld, including the white text that says .quickddns.com
- Open a web browser and enter in the DDNS domain name address from step 21, enter in a colon, then type the HTTP port number from step 10 on to the end.
a. For example, if the DDNS domain name is hp://abc123456789.quickddns.com and your HTTP Port is 33333, the URL would be hp://abc123456789.quickddns.com:33333 - Enter in login details into the username and password elds and click login.
If either of the processes above are not working, please contact Amcrest Support via one of the following opons:
- Visit hp://amcrest.com/contacts and use the email form
- Call Amcrest Support using one of the following numbers
Toll Free: (888) 212-7538
Internaonal Callers (Outside of US): +1-713-893-8956
USA: 713-893-8956
Canada: 437-888-0177
UK: 203-769-2757
• Email Amcrest Customer Support support@amcrest.com
4.6 AmcrestView.com Access Setup
- Connect the camera to a power supply using the included power adapter.
- Connect the camera to the internet, either through a wired conncon (see secon 3.1), or through WiFi (see secon 4.2)
- Using Internet Explorer or Safari, go to www.AmcrestView.com and register an account. You will be required to acvate your account by e-mail (double-check your spam folder).
- Once avvated, download and install the plugin for your web browser. The installaon of the plugin will require all web browsers to close.
- Log in to your account. To add a camera, click the "Add Device" buon. Give the camera a name, enter the UID (found on the boom of your camera), then enter the login details for the camera. The default username and password for the camera is admin.
- Once added, the camera should appear in the device list. Click the icon next to the camera's UID to open the live viewing and playback interface.
- The device is now successfully setup for live viewing and playback!
4.7 NVR Access
The camera supports connecng to any NVR that uses the ONVIF standard. This allows the camera to view live playback and to save recorded data to a network storage device. To connect to an NVR, use an Ethernet cable to link the camera to the NVR.
5 Operaon and Interface
This secon of the manual details the camera's interface, as well as all of the operaons the camera can perform.
The main interface of the camera contains 6 major tabs on the top of the screen. By default, the interface opens on the Live tab.
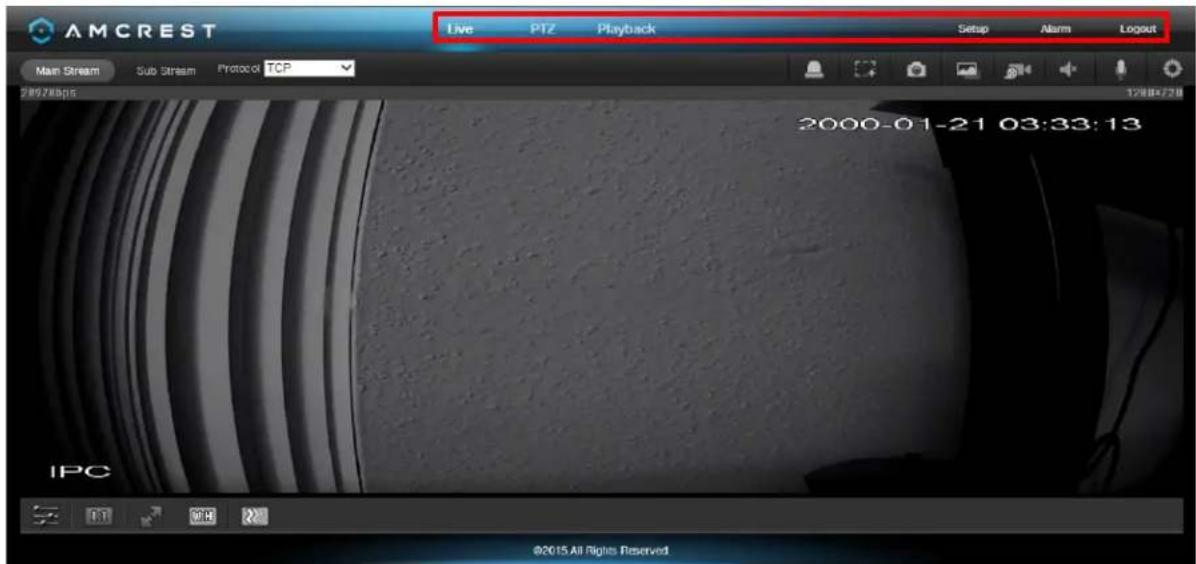
text_image
AMCREST Live PTZ Playback Setup Alarm Logout Main Stream Sub Stream Protocol TCP 2000 ZMbps 12/08/28 2000-01-21 03:33:13 IPC ©2015 All Rights Reserved.5.1 Live
The Live tab allows the user to see a live video feed from the camera. The live tab has 4 main seconds:
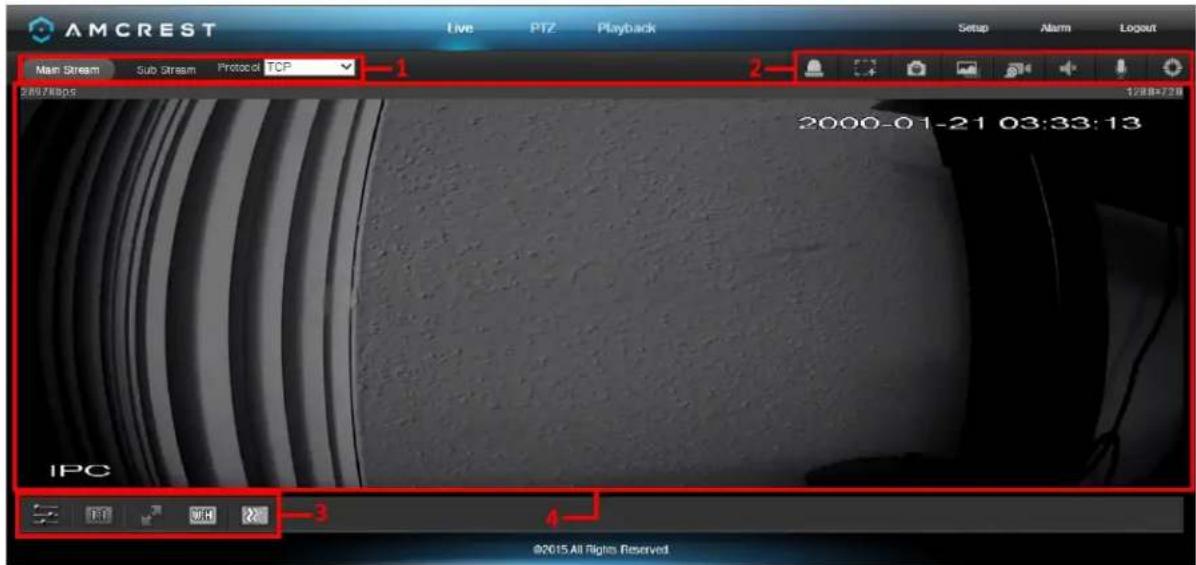
text_image
AMCREST Live PTZ Playback Setup Alarm Logout Main Stream Sub Stream Protocol TCP 1 2 2000-01-21 03:33:13 IPC 3 4 ©2015 All Rights ReservedSecon 1: This bar allows the user to select which stream type and which protocol they want to choose. For more informaon on stream types, see secon 5.4.1.2.1. For more informaon on protocols, see secon 5.4.2.2.1.
Secon 2: The funcons bar allows the user to perform dierent camera funcons while in live mode. See the table below for an explanaon of the dierent funcons available:
| Buon | Funcon Name | Funcon Descripon |
 | Alarm Output | Click this buon to generate an alarm output signal. This buon becomes red/grey depending on alarm output acvaon or cancellaon. |
 | Digital Zoom | Click this buon to acvate the zone selecon funcon. This allows the user to use the mouse to select a zone to zoom in on. |
 | Snapshot | Click this buon to take a screenshot of the live feed. The picture is saved at the path specied in Setup -> Camera -> Video -> Path. |
 | Triple Snapshot | Click this buon to take 1 screenshot per second for 3 seconds. The pictures are saved at the path specied in Setup -> Camera -> Video -> Path. |
 | Manual Record | Click this buon to manually record video. The video is saved at the path specied in Setup -> Camera -> Video -> Path. |
 | Audio | Click this buon to enable or disable audio output from the camera. This feature allows the user to listen in on the audio the camera's microphone is picking up. |
 | Bidireconal Talk | Click and hold this buon to enable bidireconal talk. This feature allows the user to broadcast audio from their computer to the camera. While this is acve, the camera's speaker is shut o in order to keep audio quality high. |
 | Help | Click this buon to open a window that details the buons and funcons shown on this screen. |
Secon 3: This bar allows the user to change video sengs for the live playback screen. See the below table for an explanaon of the video sengs:
| Buon | Funcon Name | Funcon Descripon |
 | Image Adjustment | This buon opens the image adjustment toolbar, which allows the user to adjust brightness, contrast, saturaon, and hue for the live feed's picture. |
 | Adapt/Original Size | This buon allows the user to switch between displaying the original size of the stream in its set resoluon, or to adapt to the size of the monitor display the feed is being viewed on. |
 | Full Screen | This buon allows the user to make the live feed go into full screen mode. Double click the mouse or click the ESC buon to exit full screen mode. |
 | Width/Height Rao | This buon allows the user to change the width/height rao for the live feed. The opons are Original and Adapve. Original uses the aspect rao of the stream's set resoluon, and adapve ts the feed to the aspect rao of the monitor display the feed is being viewed on. |
 | Stream Fluency | This buon allows the user to change the stream uency. There are 3 opons. Realme reduces delay and decreases uency, and Fluency has a larger delay but the video stream becomes more uid. |
Secon 4: This secon of the Live tab shows the picture that the camera is broadcasting. The bitrate is shown in the top le corner, the nave resoluon is shown in the top right corner, the me stamp is shown below the nave resoluon, and the camera type is shown in the boom le corner.
5.2 PTZ
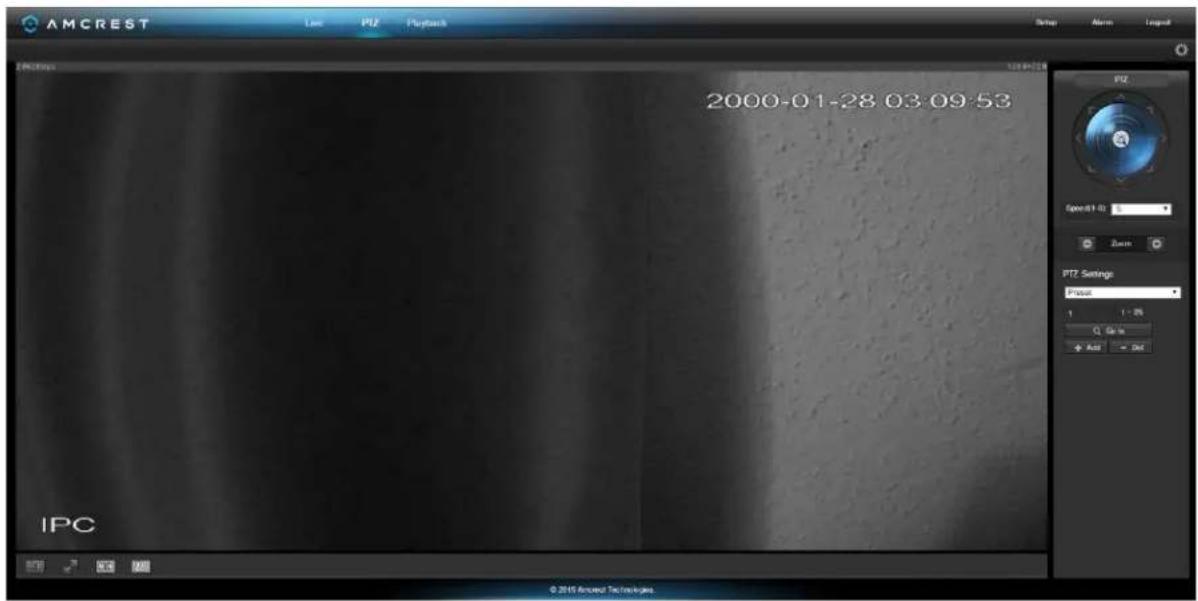
The PTZ tab allows the user to change the posion of the camera. Below is a screenshot of the PTZ tab:
text_image
AMCREST Live PMI Playback 2000-01-28 03:09:53 IPC Speed: 1.0 Zoom PTZ Settings: Preset 1 1:25 Q 5m + Add - Det © 2015 Amcored Tech/ncs/plusThe PTZ control panel allows the user to posion the camera in dierent ways. Below is a screenshot of the PTZ control panel:
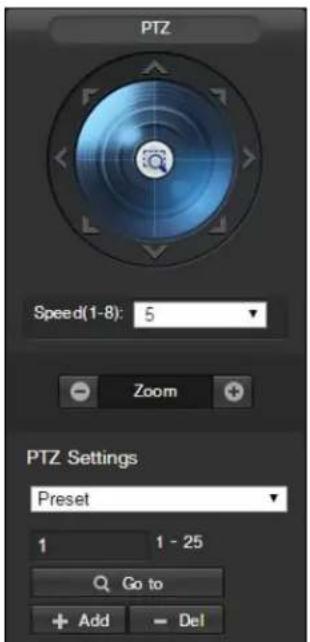
text_image
PTZ Speed(1-8): 5 Zoom PTZ Settings Preset 1 1 - 25 Q Go to + Add - DelThe arrows on the PTZ control panel allow the user to move the camera's posion in a specific direcon. The buon in the middle of the direcon arrow allows the user to select an area in the live view to zoom in on.
The speed dropdown box allows the user to control the speed at which the camera moves. The values range from 1 to 8, 8 being the fastest.
The zoom buons allow the user to digitally zoom in and out on the live preview picture.
The dropdown box under PTZ sengs allows the user to conjure Presets and Tours. Preset allows the user to designate specic PTZ posions for the camera. To create and manage presets, follow the steps below:
- Congure the camera posioning as needed.
- Input the preset number, and then click the + Add buon
- Click - Del to delete the current preset.
- Click Go To to access a preset.
Tour allows the user to string mulple presets together. To create and manage tours, follow the steps below:
- Ensure you have more than 1 preset congured already.
- Input the tour value and click Start.
- Input the preset value and then click the Add Preset buon to add a preset.
- Connue adding presets as needed.
- Click Del Preset to remove a preset from the tour.
- Click - Del to delete the enre tour.
5.3 Playback
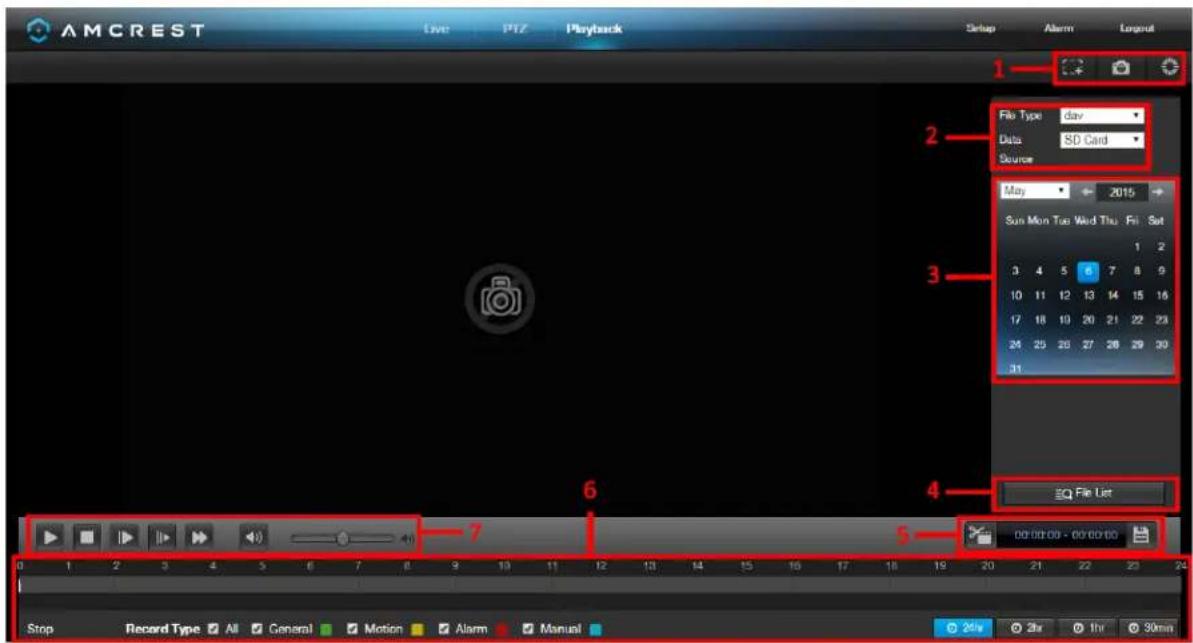
The Playback tab allows the user to playback the camera's recorded video. Below is a screenshot of the Playback tab:
text_image
AMCREST Live PTZ Playback Setup Alarm Logout 1 2 File Type: day Data: SD Card Source May 2015 Sun Mon Tue Wed Thu Fri Sat 3 4 5 6 7 8 9 10 11 12 13 14 15 16 17 18 19 20 21 22 23 24 25 26 27 28 29 30 31 4 EQ File List 5 Stop Record Type All General Motion Alarm Manual 00:00:00 - 00:00:00This is the interface for the playback menu. There are 7 main seconds:
- Quick Acons: This panel allows the user to zoom in on playback footage, take a snapshot of the playback footage, or open the help menu.
- File Menu: This panel allows the user to select a file type and data source.
- Calendar: This panel allows the user to pick a date that they would like to playback video from. When a date has recorded footage available, it's green. The current date is blue, unless it has recorded footage, then it's a lighter green.
- File List: This buon opens a le list of all recorded video for a speci date range. From here, the user can download these videos to their PC.
- Trim Panel: This panel allows the user to trim playback video for download. By specifying me stamps, the user can trim down.
- Recorded Video Panel: This panel allows the user to specify what type of video they would like to playback and it also allows the user to select where to start playback from. The buons on the boom right allow the user to select a zoom level.
- Playback Bar: This panel allows the user to control playback. It also allows the user to control playback speed, and playback volume.
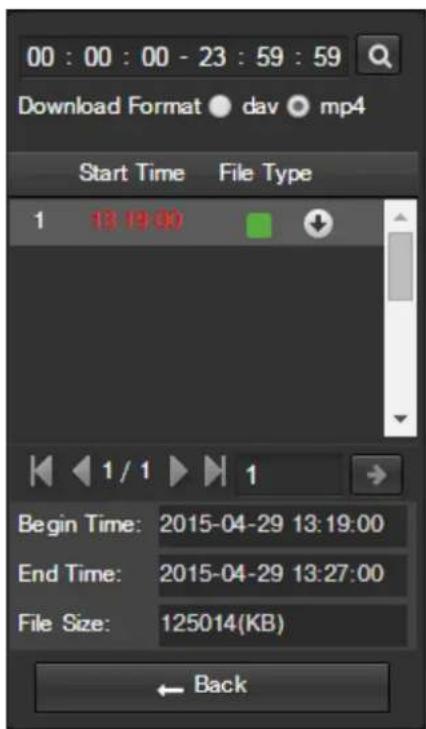
Clicking the File List opens the following screen on the sidebar:
This allows the user to select les for download. Select the files by clicking the checkbox next to each le, and then
click to download the les to the PC.
text_image
00 : 00 : 00 - 23 : 59 : 59 Download Format dav mp4 Start Time File Type 1 13:19:00 1 / 1 1 Begin Time: 2015-04-29 13:19:00 End Time: 2015-04-29 13:27:00 File Size: 125014(KB) ← Back5.4 Setup
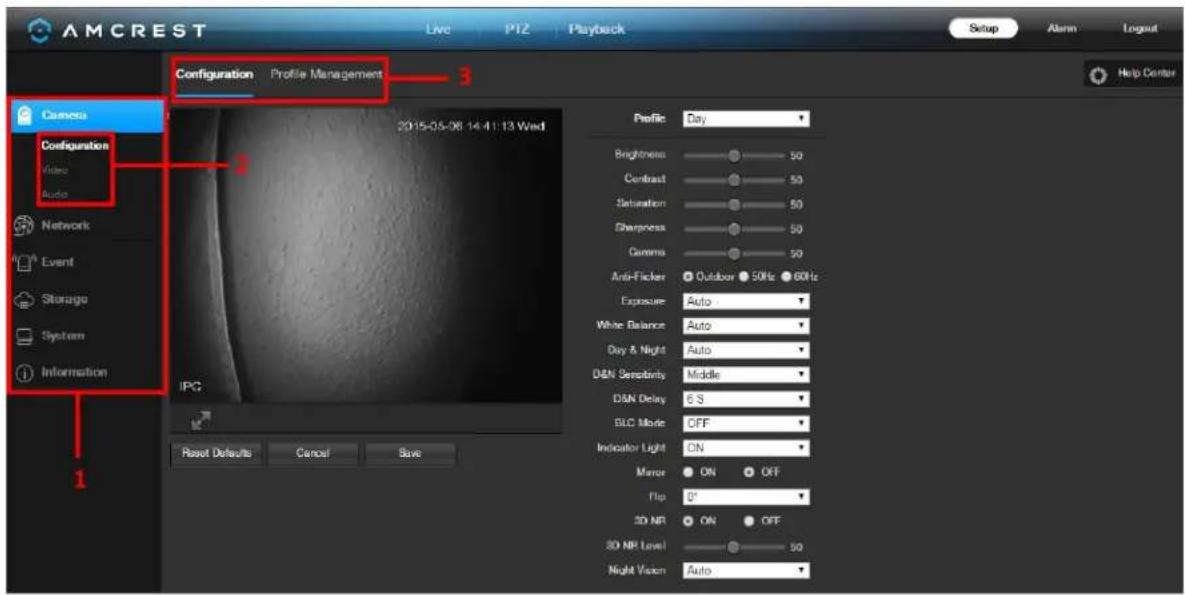
The Setup tab allows the user to change dierent camera sengs. Below is a screenshot of the setup tab:
text_image
AMCREST Live PTZ Playback Setup Alarm Logout Configuration Profile Management 3 Camera Configuration Video Audio Network Event Storage System Information 2015-05-08 14:41:13 Wed Profile Day Brightness 50 Contrast 50 Saturation 50 Sharpness 50 Gamma 50 Anti-Ficker Outdoor 50Hz 60Hz Exposure Auto White Balance Auto Day & Night Auto D&N Sensitivity Middle DSN Delay 6 S BLC Mode CFF Indicator Light ON Mirror ON OFF Flip 0° 3D NR ON OFF 3D NP Level 50 Night Vision Auto Reset Defaults Cancel SaveThere are 3 main seconds to note in the Setup tab:
- Menu Bar: The menu bar is composed of menu seconds, which when clicked display any menu items that fall under their category.
- Menu Items: These menu items each open up a dierent menu that allows the user to change specific sengs for the camera.
- Menu Tab: These tabs open up menu opons for certain menu items.
Note: To view additional informaon about any of the informaon in the menu, click the bud the top right corner.

In the rest of secon 5.4, we will be exploring all of the dierent menus that are available through web access.
5.4.1 Camera
This menu secon allows the user to change dierent camera sengs for video, audio, and to manage image proles.
5.4.1.1 Conguraon
This menu allows the user to congregate image proles for normal, day, and night usage.
5.4.1.1.1 Conguraon
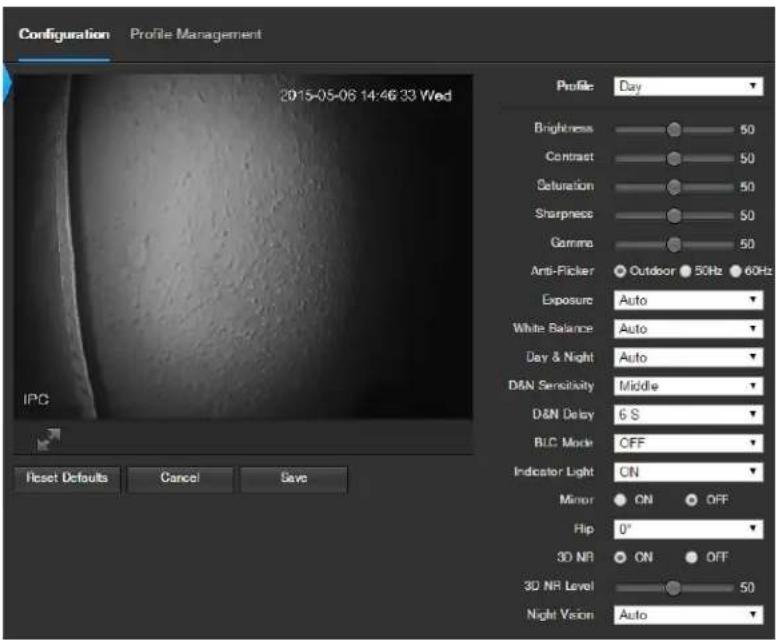
Below is a screenshot that shows the Conguraon tab in the Conguraon menu item:
text_image
Configuration Profile Management 2015-05-06 14:46:33 Wed IPC Reset Defaults Cancel Save Profile Day Brightness 50 Contract 50 Saturation 50 Sharpness 50 Gamma 50 Anti-Plicker Outdoor 50Hz 60Hz Exposure Auto White Balance Auto Day & Night Auto D&N Sensitivity Middle D&N Delay 6 S BLC Mode OFF Indicator Light ON Minor ON OFF Hip 0° 3D NR ON OFF 3D NR Level 50 Night Vision AutoBelow is an explanaon for each of the elds on the Conguraon tab in the Conguraon menu item:
- Prole: This dropdown box allows the user to select which prole to modify. The 3 opons are Day, Night, and Normal.
- Brightness: This slider is used to adjust playback and recorded video window brightness. The value ranges from 0 to 100. The default value is 50. The larger the number, the brighter the video is. When you input the value here, the bright secon and the dark secon of the video will be adjusted accordingly. You can use this funcon when the whole video is too dark or too bright. Please note the video may become hazy if the value is too high. The recommended value ranges from 40 to 60.
- Contrast: This slider is used to adjust playback and recorded video window contrast. The value ranges from 0 to 100. The default value is 50. The larger the number is, the higher the contrast is. You can use this funcon when the whole video brightness is OK but the contrast is not correct. Please note the video may become hazy if the value is too low. If this value is too high, the dark secon may lack brightness while the bright secon may over expose. The recommended value ranges from 40 to 60.
- Saturaon: This slider is used to adjust playback and recorded video window saturaon. The value ranges from 0 to 100. The default value is 50. The larger the number, the stronger the color is. This value has no
eect on the general brightness of the whole video. The video color may become too strong if the value is too high. For the grey part of the video, distoron may occur if the white balance is not accurate. Please note the video may not be clear if the value is too low. The recommended value ranges from 40 to 60.
- Sharpness: This slider is used to adjust the sharpness of the video. The value ranges from 0 to 100. The larger the value is, the clearer the edges are and vice versa. Note: The higher the value, the higher likelihood of picture noise occurring. The default value is 50 and the recommended value ranges from 40 to 60.
- Gamma: This slider is used to adjust the gamma of the video. The larger the number, the brighter the video is. The default value is 50 and the recommended value ranges from 40 to 60.
- An-Flicker: These radio buons allow the user to select what type of an-icker technology should be used for the video feed. The three opons are 50 Hz, 60 Hz, and Outdoor. The desired opon should oset any ickering eect caused by the electrical current used in the specific area.
- Exposure: This dropdown box allows the user to select the exposure type for the video feed. The opons are Auto, Low Noise, Low Moon Blur, and Manual. When low noise is selected, an additional opon to specify a gain range appears below this box. When low noise is selected, an additional opon to specify shuer speed appears below this box. When manual is selected, additional opons to specify a shuer speed and a gain range appear below this box.
- White Balance: This dropdown box allows the user to select the white balance for the video feed. The dierent opons are Auto, Sunny, Night, Outdoor, and Customized. Selecng customized opens a menu that allows the user to set specic red or blue values.
- Day & Night: This dropdown box allows the user to select which type of picture is displayed. The opons are Color, Auto, and Black & White.
- D&N Sensitivity: This opon allows the user to change the Day/Night Sensitivity of the camera. The three opons are Low, Middle, and High. The higher the sensitivity, the quicker the camera will change into another mode depending on the light levels.
- D&N Delay: This dropdown box allows the user to set a delay in seconds for how long it takes to switch between Day and Night modes. The values range from 2 seconds to 10 seconds.
- BLC Mode: This dropdown box allows the user to select Black Light Compensaon. The values are O, BLC (Auto), WDR, and HLC. This feature should only be used in black lit environments.
- Indicator Light: This dropdown box allows the user to select whether the indicator light on the back of the camera is on or o for the selected prole.
- Mirror: This radio buon allows the user to turn the mirroring feature on or o. Turning mirroring on will mirror the picture.
- Flip: This dropdown box allows the user to ip the video feed picture. Flipping the picture is recommended only if the camera is mounted upside down.
• 3D NR: This radio buon allows the user to turn the 3D Noise Reducon feature on or o.
• 3D NR Level: This slider allows the user to specify the 3D Noise Reducon level. The value ranges from 1-100. - Night Vision: This dropdown box allows the user to select whether the camera turns on night vision automatically or if night vision remains o.
To reset to default sengs, click the Reset Defaults buon. To cancel any modicaons, click the Cancel buon. To save the sengs, click the Save buon.
5.4.1.1.2 Prole Management
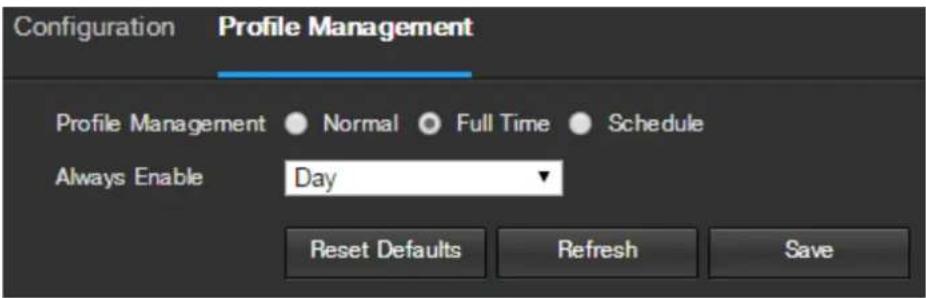
Below is a screenshot that shows the Prole Management tab in the Conguraon menu item:
text_image
Configuration Profile Management Profile Management ● Normal ● Full Time ● Schedule Always Enable Day Reset Defaults Refresh SaveBelow is an explanaon for each of the elds on the Prole Management tab in the Conguraon menu item:
- Prole Management: This set of radio buons allow the user to set what basis the prole management sengs run on. There are 3 opons: Normal, Full Time, and Schedule. Normal means that the system can automacally alternate between night and day based on the proles for each. Full Time means that the system scks to one prole the enre me it is running. Schedule allows the user to dictate which mes of the day are designated for the day prole and the night prole.
To reset to default sengs, click the Reset Defaults buon. To refresh the page, click the Refresh buon. To save the sengs, click the Save buon.
5.4.1.2 Video
This secon allows the user to change video sengs for the camera's video feed. There are 4 tabs in this menu item: Video, Snapshot, Overlay, and Path.
5.4.1.2.1 Video
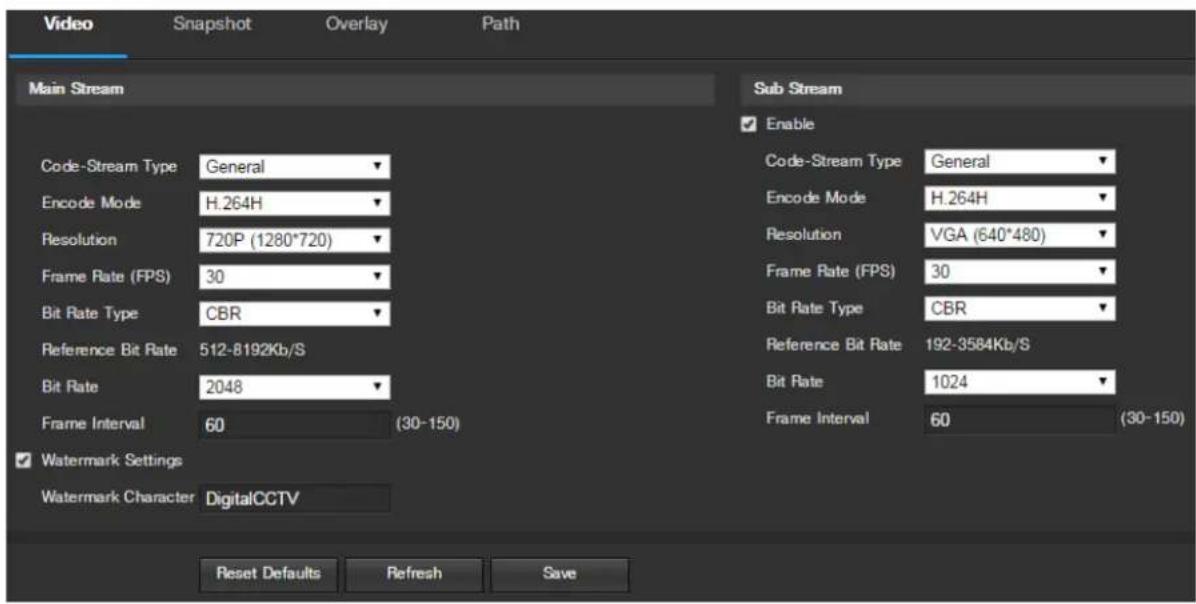
Below is a screenshot that shows the Video tab in the Video menu item:
text_image
Video Snapshot Overlay Path Main Stream Sub Stream Enable Code-Stream Type General Encode Mode H.264H Resolution 720P (1280*720) Frame Rate (FPS) 30 Bit Rate Type CBR Reference Bit Rate 512-8192Kb/S Bit Rate 2048 Frame Interval 60 (30-150) Watermark Settings Watermark Character DigitalCCTV Reset Defaults Refresh Save Code-Stream Type General Encode Mode H.264H Resolution VGA (640*480) Frame Rate (FPS) 30 Bit Rate Type CBR Reference Bit Rate 192-3584Kb/S Bit Rate 1024 Frame Interval 60 (30-150)Below is an explanaon for each of the elds on the Video tab in the Video menu item:
- Code-Stream Type: This dropdown box allows the user to select dierent encode frame rates for dierent recorded events. This includes the main stream, moon stream, and alarm stream. The camera supports acve control frame funcon (ACF). It allows the user to record in dierent frame rates. For example, a high frame rate can be used to record important events, and a low frame rate can be used to record scheduled events. The camera also allows for the open to set dierent frame rates for moon detecon recordings and alarm recordings.
- Encode Mode: This dropdown box allows the user to select a compression protocol. The system supports H.264 and MJPEG video compression protocols.
- Resoluon: This dropdown box allows the user to set the resoluon. The system supports various resoluons and they can be selected from this dropdown list.
- Frame Rate (FPS): This dropdown box allows the user to select a frame rate. Frame rate sengs are measured in frames per second (FPS), and can range from 1f/s to 25f/s in PAL mode and 1f/s to 30f/s in NTSC mode.
- Bit Rate Type: This dropdown box allows the user to select a bit rate type. The system supports two bit rate types: CBR and VBR. In VBR mode, video quality can be set.
- Reference Bit Rate: This is the recommended bit rate value according to the resolution and frame rate selected.
- Bit Rate Type: This dropdown box allows the user to select a bit rate.
- Frame Interval: This eld allows the user to set the P frame amount between two I frames. The value ranges from 1 to 150 seconds. Default value is 50. Recommended value is frame rate *2.
• Watermark Sengs: This funcon allows the user to verify if the video has been tampered with.
- Watermark Character: This eld allows the user to set the watermark's text. The default string is DigitalCCTV. The maximum length is 85 characters. This string can only include numbers, characters, and underscores.
Sub Stream is a lower quality stream that allows the feed to take up less resources and bandwidth when streaming. The Main Stream and the Sub Stream have the same elds. Sub Stream can be enabled by checking the box next to Enable.
To reset to default sengs, click the Reset Defaults buon. To refresh the page, click the Refresh buon. To save the sengs, click the Save buon.
5.4.1.2.2 Snapshot
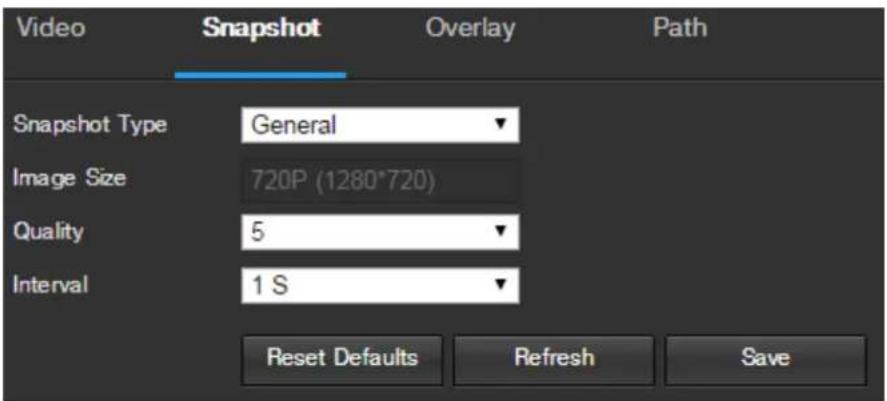
Below is a screenshot that shows the Snapshot tab in the Video menu item:
text_image
Video Snapshot Overlay Path Snapshot Type General Image Size 720P (1280*720) Quality 5 Interval 1 S Reset Defaults Refresh SaveBelow is an explanaon for each of the elds on the Snapshot tab in the Video menu item:
- Snapshot Type: This dropdown box allows the user to select a snapshot mode. There are two snapshot modes: general and event. General snapshots are taken as scheduled. Event snapshots occur when a moon detecon alarm or a tampering alarm is triggered.
- Image Size: This dropdown box shows the image size. By default the screenshot size is the same size as the video feed's resolution.
• Image Quality: This dropdown box allows the user to select image quality. Quality is adjusted on a scale of 1-6. - Snapshot Frequency: This is to set snapshot frequency. The value ranges from 1 to 7 seconds. The maximum seng for a customized interval is 3600s/picture.
To reset to default sengs, click the Reset Defaults buon. To refresh the page, click the Refresh buon. To save the sengs, click the Save buon.
5.4.1.2.3 Overlay
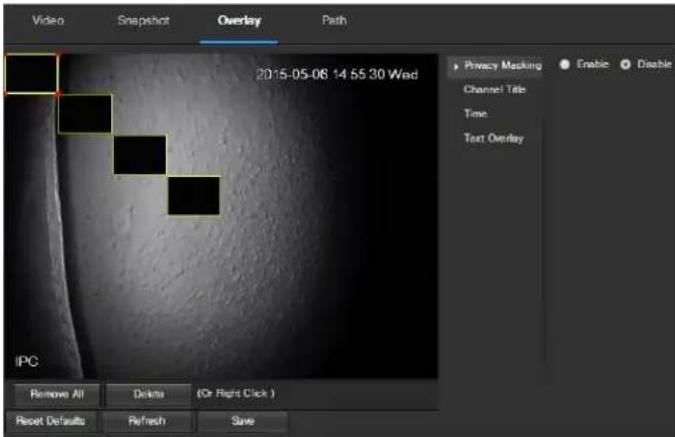
Below is a screenshot that shows the Overlay tab in the Video menu item:
text_image
Video Snapshot Overlay Path 2015-05-06 14:55:30 Wed IPC Remove All Drinks (Or Right Click ) Reset Defaults Refresh Save Privacy Masking Enable Disable Channel Title Time Text OverlayThe menu on the le allows the user to select which overlay to modify. Privacy Masking, Channel Title, Time, and Text Overlay can all be modified in this menu.
For Privacy Masking, the radio buon enables or disables the feature. To set a privacy mask, click one of the boxes in the live view window, and posion or resize it as needed. To remove a box, click on it, then click the delete buon. To remove all privacy Iter boxes, click the remove all buon.
For Channel Title, the radio buon enables or disables the feature. The Input Channel Title eld allows the channel tle to be modified.
For Time, the radio buon enables or disables the feature. Clicking the Display Weekdays checkbox will show the weekday at the end of the mestamp.
For Text Overlay, the radio buon enables or disables the feature. The Input Text box allows the user to enter multiple lines of text as needed, and the Text Alignment dropdown box allows the user to align the text either right or left.
To reset to default sengs, click the Reset Defaults buon. To refresh the page, click the Refresh buon. To save the sengs, click the Save buon.
5.4.1.2.4 Path
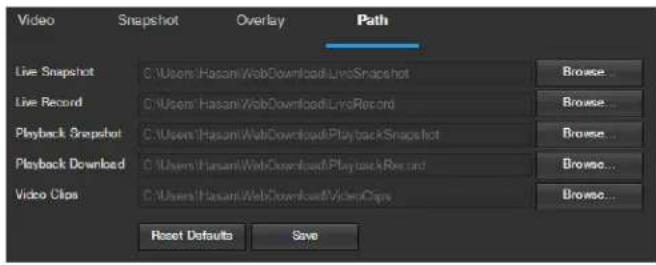
Below is a screenshot that shows the Path tab in the Video menu item:
text_image
Video Snapshot Overlay Path Live Snapshot C:\Users\Hasani\WebDownload\LiveSnapshot Browse... Live Record C:\Users\Hasani\WebDownload\LiveRecord Browse... Playback Snapshot C:\Users\Hasani\WebDownload\PlaybackSnapshot Browse... Playback Download C:\Users\Hasani\WebDownload\PlaybackRecord Browse... Video Clips C:\Users\Hasani\WebDownload\Video Clips Browse... Reset Defaults SaveBelow is an explanaon for each of the elds on the Path tab in the Video menu item:
- The Live Snapshot eld allows the user to select where to save live snapshots to. Click the Browse buon to select a dierent desnaon folder.
- The Live Record eld allows the user to select where to save live recordings to. Click the Browse buon to select a dierent desnaon folder.
- The Playback Snapshot eld allows the user to select where to save playback snapshots to. Click the Browse buon to select a dierent desnaon folder.
- The Playback Download eld allows the user to select where to save playback video downloads to. Click the Browse buon to select a dierent desnaon folder.
- The Video Clips eld allows the user to select where to save video clips to. Click the Browse buon to select a dierent desnaon folder.
To reset to default sengs, click the Reset Defaults buon. To save the sengs, click the Save buon.
5.4.1.3 Audio
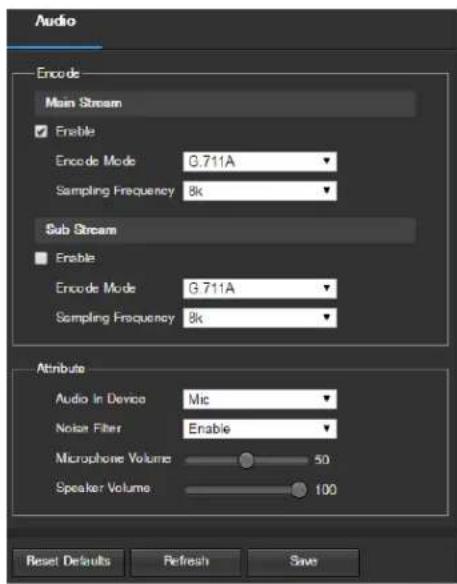
This menu allows the user to modify audio sengs for the camera. Below is a screenshot that shows the Audio menu item under the Camera menu secon:
text_image
Audio Encode Main Stream Enable Encode Mode 0.711A Sampling Frequency 8k Sub Stream Enable Encode Mode G 711A Sampling Frequency 8k Attribute Audio in Device Mic Noise Filter Enable Microphone Volume 50 Speaker Volume 100 Reset Defaults Refresh SaveBelow is an explanaon for each of the elds on the Audio menu:
- Enable: This checkbox allows the user to enable audio recording.
- Encode Mode: This dropdown box allows the user to select what audio format the audio should be recorded in.
- Sampling Frequency: This dropdown box allows the user to select a sampling frequency for the audio. The opons are 8k and 16k. 16k audio sampling allows for higher sound quality.
- Audio In Device: This eld allows the user to select what source to get audio from. The default is the camera's built-in mic. Alternatively, the line in mic can be selected.
- Noise Filter: This dropdown box allows the user to enable or disable the audio noise Iter funcon. This funcon provides cleaner audio quality when enabled.
- Microphone Volume: This slider allows the user to select the microphone volume. The value ranges from 0 to 100. The default value is 50.
- Speaker Volume: This slider allows the user to select the speaker volume. The value ranges from 0 to 100. The default value is 50.
To reset to default sengs, click the Reset Defaults buon. To refresh the page, click the Refresh buon. To save the sengs, click the Save buon.
5.4.2 Network
This menu secon allows the user to change network sengs for the camera.
5.4.2.1 TCP/IP
The TCP/IP menu item has two tabs: TCP/IP and P2P.
5.4.2.1.1 TCP/IP
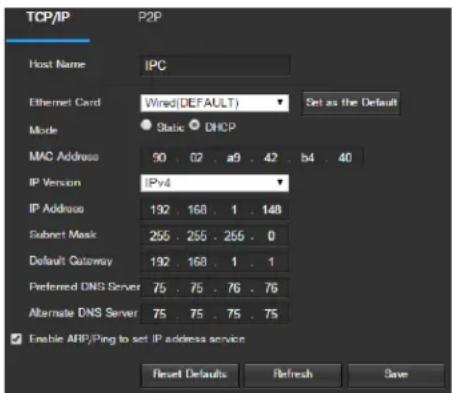
TCP/IP stands for Transmission Control Protocol/Internet Protocol and it is the language/protocol that allows communicaon between internet connected devices, whether on a local network, or a on the Internet at large. This screen allows for TCP/IP sengs to be modified in order for the camera to establish a conneccon to the network. Below is a screenshot of the TCP/IP sengs tab:
text_image
TCP/IP P2P Host Name IPC Ethernet Card Wired(DEFAULT) Set as the Default Mode Static DHCP MAC Address 90 . 02 . a9 . 42 . b4 . 40 IP Version IPv4 IP Address 192 . 168 . 1 . 148 Subset Mask 255 . 255 . 256 . 0 Default Gateway 192 . 168 . 1 . 1 Preferred DNS Server 75 . 75 . 76 . 76 Alternate DNS Server 75 . 75 . 75 . 75 Enable ARP/Ping to set IP address service Reset Defaults Refresh SaveBelow is an explanaon of the elds on the TCP/IP sengs tab:
- Host Name: This text eld allows the user to change the host device name for the camera. This eld supports a maximum of 15 characters.
- Ethernet Card: This dropdown box allows the user to select which internet access device to use. If the device is connected to a wired conncon and a wireless one at the same me, then this box will have opons to pick either of the conncons. The Set as Default buon allows the user to select one of the conncon methods as the default one.
- Mode: Stac vs DHCP: This radio buon allows the user to choose between a stac IP address, and a dynamic IP address. DHCP stands for Dynamic Host Conguraon Protocol, and this enables the camera to automatically obtain an IP address from another network device such as a server or more commonly, a router. When the DHCP funcon is enabled, the user cannot modify the IP address, Subnet Mask, or Default Gateway, as these values are obtained from the DHCP funcon. To view the current IP address, DHCP needs to be disabled. Note: When PPPoE is enabled, modicaon of the IP Address, Subnet Mask, and Gateway becomes prohibited.
- MAC Address: This eld shows the camera's MAC address, which is unique to this device. This number is read-only and is used to access a local area network (LAN).
• IP Version: This dropdown allows the user to select the IP version. The two opons are IPV4 and IPV6.
• IP Address: This eld allows the user to enter a custom IP address. - Subnet Mask: This eld allows the user to enter a custom subnet mask.
- Default Gateway: This eld allows the user to enter a custom default gateway.
• Preferred DNS Server: This eld allows the user to enter the preferred DNS server IP address.
• Alternate DNS Server: This eld allows the user to enter the alternate DNS server IP address. - Enable ARP/Ping to set IP Address Service: This checkbox allows the user to enable the ARP/Ping service to change the IP address service. For more informaon on this feature, click the help buon while on the TCP/IP sengs tab.
To reset to default sengs, click the Reset Defaults buon. To refresh the page, click the Refresh buon. To save the sengs, click the Save buon.
5.4.2.1.1 P2P
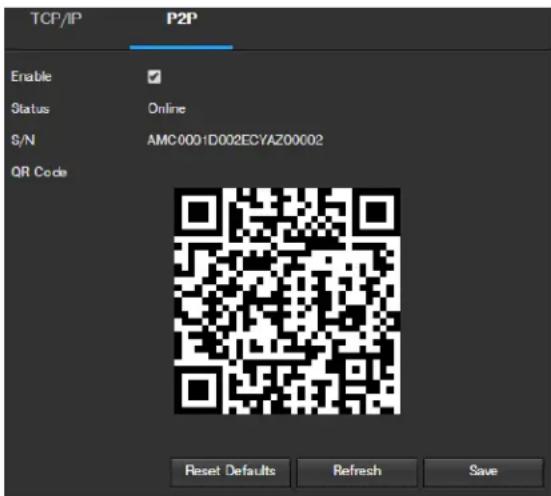
The P2P sengs screen is where users can use a QR code to connect their smartphone or tablet to the camera. This feature needs to be enabled for use with the Amcrest View app, Amcrest Cloud, or AmcrestView.com. Below is a screenshot of the P2P sengs tab:
text_image
TCP/IP P2P Enable ✓ Status Online S/N AMC0001D002ECYAZ00002 QR Code Reset Defaults Refresh SaveBelow is an explanaon of the elds on the P2P sengs tab:
- Enable: This checkbox allows the user to enable the P2P feature for the camera. This feature must be enabled for the camera to connect to a smartphone or tablet via the Amcrest View app. It is enabled by default.
- Status: This eld displays the status of the P2P conncon. Once the camera is connected to a device, this eld should display the word Online.
- UID: This eld displays the Token ID for the camera. The Token ID can be used to manually enter the camera's informaon on a mobile or tablet device in case the QR code scanning feature cannot be used.
- QR Code: This image is a Quick Response (QR) code. By scanning this image using the Amcrest View app, this camera can establish a conneccon with the app.
To reset to default sengs, click the Reset Defaults buon. To refresh the page, click the Refresh buon. To save the sengs, click the Save buon.
5.4.2.2 Connecon
The Connecon menu item has two tabs: Connecon and ONVIF.
5.4.2.2.1 Connecon
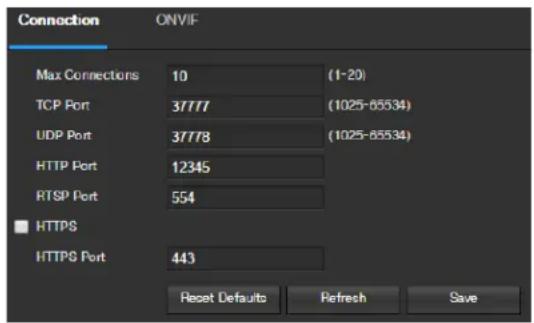
The Connecon tab is where users can congregate port conncons. Below is a screenshot of the Connecon sengs tab:
text_image
Connection ONVIF Max Connections 10 (1-20) TCP Port 3777 (1025-85534) UDP Port 3778 (1025-85534) HTTP Port 12345 RTSP Port 554 HTTPS HTTPS Port 443 Reset Defaults Refresh SaveBelow is an explanaon of the elds on the Connecon sengs tab:
- Max Connecons: This eld allows the user to specify the maximum amount of users that can be connected to the camera at the same me. The maximum number of users the camera can support at one me is 20.
- TCP Port: This eld designates the Transmission Control Protocol (TCP) port number. The default value is 37777.
• UDP Port: This eld designates the User Datagram Protocol (UDP) port number. The default value is 37778. - HTTP Port: This eld designates the Hypertext Transfer Protocol (HTTP) port number. The default value is 80.
- RTSP Port: This eld designates the Real Time Streaming Protocol (RTSP) port number. The default value is 554.
- HTTPS: This checkbox enables the use of the HTTPS protocol for accessing the camera.
- HTTPS Port: This eld designates the Hypertext Transfer Protocol Secure (HTTPS) port number. The default value is 443.
To reset to default sengs, click the Reset Defaults buon. To refresh the page, click the Refresh buon. To save the sengs, click the Save buon.
5.4.2.2.2 ONVIF
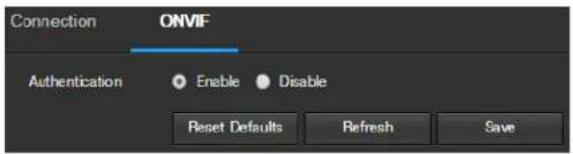
The ONVIF tab is where users can congure authencaon via the ONVIF standard. Below is a screenshot of the ONVIF sengs tab:
text_image
Connection ONVIF Authentication Enable Disable Reset Defaults Refresh SaveTo enable ONVIF, click the radio buon next to Enable, and then click the save buon.
To reset to default sengs, click the Reset Defaults buon. To refresh the page, click the Refresh buon. To save the sengs, click the Save buon.
5.4.2.3 PPPoE
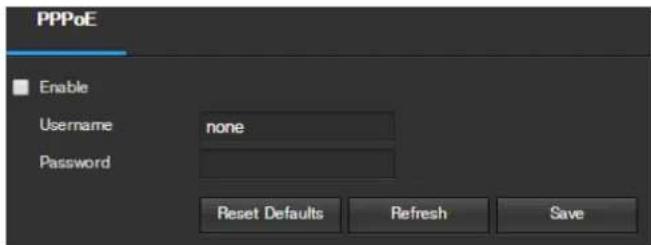
PPPoE stands for Point-to-Point Protocol over Ethernet. This screen allows users to congregate PPPoE conneccons. Below is a screenshot of the PPPoE screen:
text_image
PPPoE Enable Username none Password Reset Defaults Refresh SaveTo enable PPPoE, click the enable checkbox, and ll in the username and password elds, then click Save.
To reset to default sengs, click the Reset Defaults buon. To refresh the page, click the Refresh buon. To save the sengs, click the Save buon.
5.4.2.4 DDNS
DDNS stands for Dynamic Domain Name Server. This technology is used to automacally update name servers in real me in order to help the camera maintain a persistent address despite changes in locaon or conguraon. What this means is that even when the camera is restarted, moved, or recongured, it can keep the same IP address, thus allowing remote users uninterrupted access to the camera, rather than having to request a new IP address to use for remote access anymore a change is made.
To use this feature, users will need to setup an account with a DDNS service. The camera supports a variety of DDNS services such as Quick DDNS, NO-IP DDNS, CN99 DDNS, and Dyndns DDNS. Based on which service is selected, dierent opons may show on this screen. For purposes of this guide, QuickDDNS will be used. QuickDDNS is a free DDNS service provided by Amcrest, and it must be renewed every year. A renewal reminder email will be sent to the email entered in the username eld below.
To congure the camera for DDNS access using QuickDDNS, see secon 4.5.1. Below is a screenshot of the DDNS sengs screen, congured to QuickDDNS:

text_image
DDNS ✓ DDNS Provider QUICK DDNS Server Address www.quickddns.com Mode Auto Manual Domain Name ezptz .quickddns.com test Username (Optional)Please input an email address Reset Defaults Refresh SaveTo reset to default sengs, click the Reset Defaults buon. To refresh the page, click the Refresh buon. To save the sengs, click the Save buon.
5.4.2.5 IP Filter
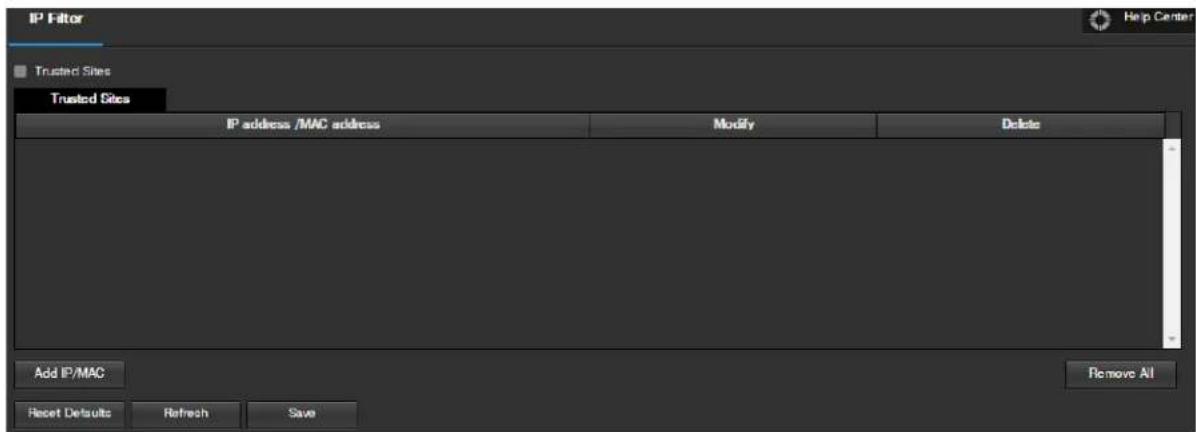
This screen allows for the ltering of IP addresses, either blocking them, or granng them access to the camera. This feature helps make the camera more secure by liming remote access only to approved users. Below is a screenshot of the IP Filter screen:
text_image
IP Filter Trusted Sites Trusted Sites IP address /MAC address Modify Delete Add IP/MAC Remove All Reset Defaults Refresh SaveBelow is an explanaon of elds on the IP Filter sengs screen:
• Trusted Sites: This checkbox allows the user to enable the IP Filter feature for trusted sites.
- Add IP/MAC: This buon opens a popup that allows the user to add IP or MAC addresses to the trusted site list. Note: When accessing the camera externally, please add the MAC address of the router on the PC end.
- Remove All: This buon allows the user to remove all sites from the trusted IP/MAC list.
To reset to default sengs, click the Reset Defaults buon. To refresh the page, click the Refresh buon. To save the sengs, click the Save buon.
5.4.2.6 SMTP (Email)
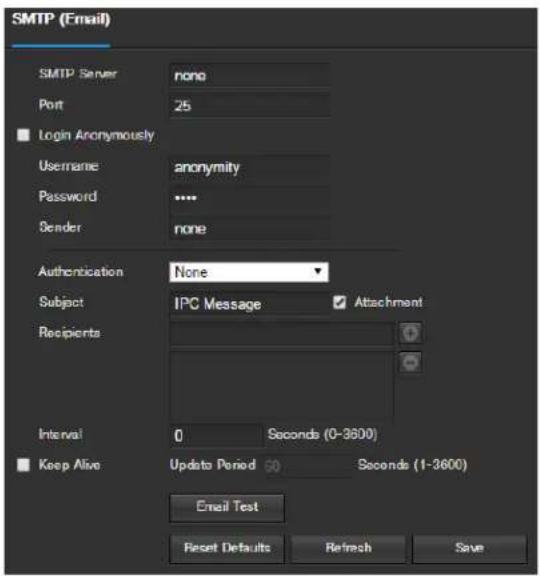
This screen allows for the conging of email sengs in order to permit the camera to send emails when an alarm is triggered. Below is a screenshot of the email sengs screen:
text_image
SMTP (Email) SMTP Server none Port 25 ■ Login Anonymously Username anonymity Password **** Sender none Authentication None Subject IPC Message Attachment Recipients Interval 0 Seconds (0-3600) ■ Keep Alive Update Period 50 Seconds (1-3600) Email Test Reset Defaults Refresh SaveBelow is an explanaon of elds on the SMTP (Email) sengs screen:
- SMTP Server: SMTP stands for Simple Mail Transfer Protocol. This eld allows the user to enter the SMTP server used by the email service.
• Port: This eld allows the user to enter the port that corresponds to the selected SMTP server. - Login Anonymously: This checkbox allows the user to anonymously login to the server.
- Username: This checkbox allows the user to anonymously login to the server.
- Password: This eld allows the user to enter the password associated with the SMTP username.
- Sender: This eld allows the user to enter the sender email address. This email address will be the one that sends out all emails pertaining to the alerts and alarm emails sent by the camera.
- Authencaon: This dropdown box allows the user to select an encrypon type. There are two types of email encrypon protocols that are available.
- SSL: Secure Socket Layer
- TLS: Transport Layer Security
- Subject: This eld allows the user to dene the subject line of the email that is sent to the receivers.
- Recipients: This eld allows the user to enter the receiver email address. These email addresses are the ones that will receive any emails pertaining to alert and alarm emails sent by the camera. Up to 3 email addresses can be entered in this eld.
- Interval: This eld allows the user to dene, in seconds, how long the system should wait between sending emails. This prevents mulple emails from being sent out.
- Keep Alive: This checkbox allows the user to enable a funcon to periodically check in with the SMTP server to ensure it can connect correctly.
- Email Test: This buon causes the system to automatically send out an email to test the conneccon is OK or not. Prior to the email test, please save the email setup informaon.
To reset to default sengs, click the Reset Defaults buon. To refresh the page, click the Refresh buon. To save the sengs, click the Save buon.
5.4.2.7 UPnP
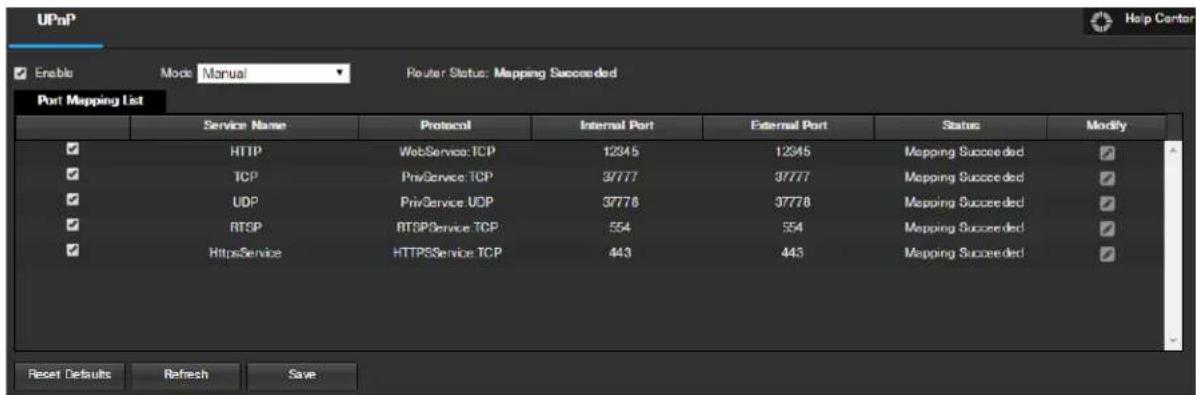
UPnP stands for Universal Plug and Play, and it is a protocol used to easily connect devices to the internet. In the case of this camera, it allows the camera to connect to the router in an easy manner to quickly allow for remote access. Below is a screenshot of the UPnP sengs screen:
text_image
UPnP Enable Mode Manual Router Status: Mapping Succeeded Port Mapping List Service Name Protocol Internal Port External Port Status Modify HTTP WebService TCP 12345 12345 Mapping Succeeded TCP PrivService TCP 37777 37777 Mapping Succeeded UDP PrivService UDP 37778 37778 Mapping Succeeded RTSP RTSPService TCP 554 554 Mapping Succeeded HttpsService HTTPSService TCP 443 443 Mapping Succeeded Reset Defaults Refresh SaveBelow is an explanaon of elds on the UPnP sengs screen:
- Enable: This checkbox allows the user to enable the UPnP funcon.
-
Router State: This eld shows the UPnP status and has two opons:
-
Unknown: This means that UPnP mapping has failed.
- Successful: This means that UPnP mapping has succeeded.
- Port Mapping Lis: This table is used to show how the ports for each protocol listed below have been remapped by the UPnP protocol.
- The rst column shows the checkboxes to enable the corresponding service on the table.
- The second column shows the name of the services. To edit this, double click on the service line item.
The third column shows the name of the protocol used by that service. To edit this, click the pencil buon in the modify column for that line item.
The fourth column shows the Internal Port used by that service to establish communicaon from the router to the camera. To edit this, click the pencil buon in the modify column for that line item.
The h column shows the External Port used by that service to establish communicaon from the router to the internet. To edit this, click the pencil buon in the modify column for that line item.
The sixth column shows the status of the protocol. If the protocol was mapped successfully, this eld will say "Mapping Succeeded". - The seventh column allows the user to open a dialog box and edit the service's informaon.
To see how to setup the camera for remote access, see secon 4.5.
To reset to default sengs, click the Reset Defaults buon. To refresh the page, click the Refresh buon. To save the sengs, click the Save buon.
5.4.2.8 SNMP
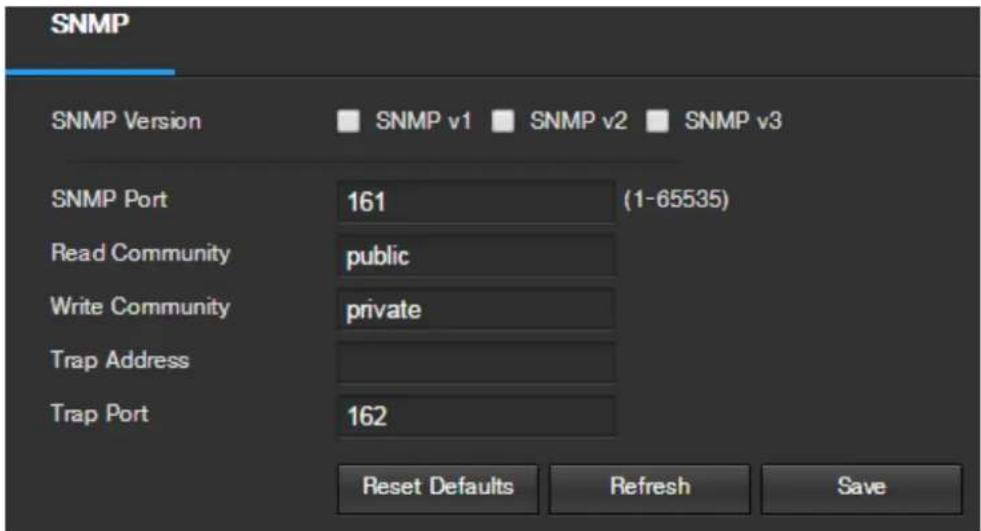
SNMP stands for Simple Network Management Protocol. This protocol is used to provide a basic framework in order to allow conneccon between various network devices. Below is a screenshot of the SNMP sengs screen:
text_image
SNMP SNMP Version SNMP v1 SNMP v2 SNMP v3 SNMP Port 161 (1-65535) Read Community public Write Community private Trap Address Trap Port 162 Reset Defaults Refresh SaveBelow is an explanaon of elds on the SNMP sengs screen:
• SNMP Version: These checkboxes allow the user to select the SNMP version to use.
- SNMP Port: This eld allows the user to write in a port for SNMP to use. The port can range from anywhere from 1 to 65535.
- Read Community: This eld shows which SNMP community has read access.
• Write Community: This eld shows which SNMP community has write access.
- Trap Address: This eld allows the user to write in a trap address.
- Trap Port: This eld allows the user to write in a trap port number. The trap port number should not be the same as the SNMP port.
To reset to default sengs, click the Reset Defaults buon. To refresh the page, click the Refresh buon. To save the sengs, click the Save buon.
5.4.2.9 Bonjour
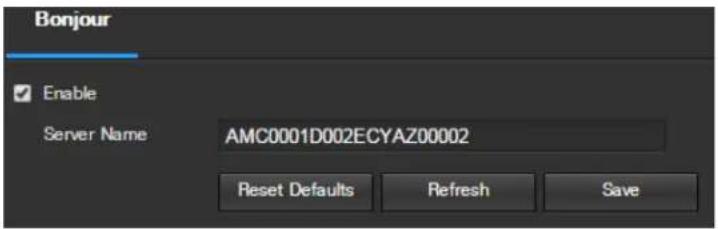
Bonjour is Apple's implementation of Zero-conguraon networking (Zeroconf), a group of technologies that includes service discovery, address assignment, and hostname resolution. Below is a screenshot of the Bonjour sengs screen:
text_image
Bonjour Enable Server Name AMC0001D002ECYAZ00002 Reset Defaults Refresh SaveClick the checkbox next to Enable to the Bonjour funconality. The Server Name eld allows the user specify what name to use in order to connect devices via the Bonjour protocol.
To reset to default sengs, click the Reset Defaults buon. To refresh the page, click the Refresh buon. To save the sengs, click the Save buon.
5.4.2.10 Mulcast
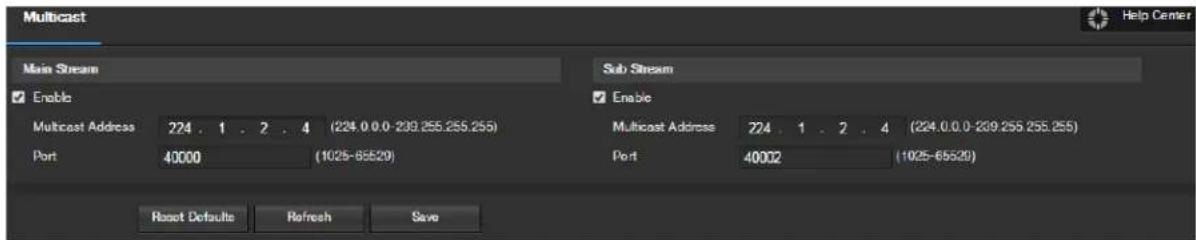
Mulcast is a feature that enables the camera to broadcast its live view to mulple computers on the same network. Below is a screenshot of the mulcast screen:
text_image
Multicast Main Stream Sub Stream Enable Multicast Address 224 . 1 . 2 . 4 (224.0.0.0-239.255.255.255) Port 40000 (1025-65529) Sub Stream Enable Multicast Address 224 . 1 . 2 . 4 (224.0.0.0-239.255.255.255) Port 40002 (1025-65529) Reset Defaults Refresh Save Help CenterBelow is an explanaon of the elds in the Mulcast sengs screen:
- Enable: This checkbox allows the user to enable Mulcast funconality.
- Mulcast Address: This eld allows the user to enter a mulcast address.
• Port: This eld allows the user to enter a mulcast port.
To reset to default sengs, click the Reset Defaults buon. To refresh the page, click the Refresh buon. To save the sengs, click the Save buon.
5.4.2.11 WiFi
The WiFi menu item has two tabs: WiFi and WPS.
5.4.2.11.1 WiFi
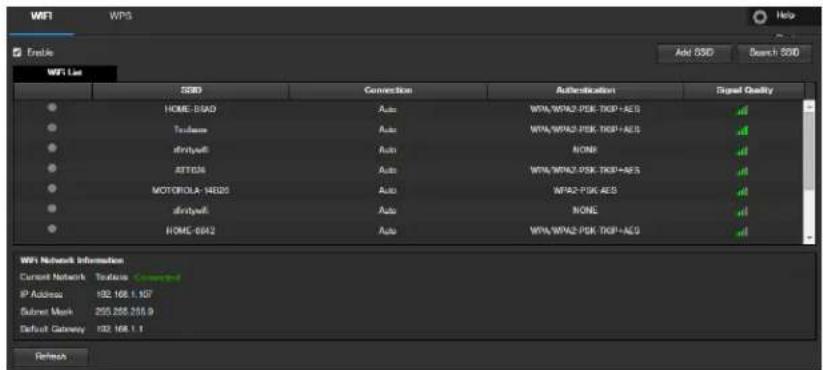
The WiFi feature on this camera allows it to connect to a network wirelessly. Below is a screenshot of the WiFi tab on the WiFi menu:
text_image
WiFi WPG Enable Add SSD Search SDD WiFi List SDD Connection Authentication Signal Quality HOME-SBAD Auto WPA/WPA2-PSK-TKDP+AES Todoma Auto WPA/WPA2-PSK-TKDP+AES dirtbywell Auto NONE ATTOM Auto WPA/WPA2-PSK-TKDP+AES MOTOROLA-14025 Auto WPA2-PSK AES dirtbywell Auto NONE HOME-SBAS Auto WPA/WPA2-PSK-TKDP+AES WiFi Network Information Current Network Options Connected IP Address 192.168.1.107 Submit Mask 255.255.256.9 Default Gateway 192.168.1.1 RefreshBelow is an explanaon of the elds on the WiFi tab of the WiFi menu:
- Enable: This checkbox allows the user to enable WiFi funconality.
- Add SSID: This buon allows the user to manually enter in an SSID.
• Search SSID: This buon allows the user to search for more SSIDs.
• Refresh: This buon obtains the most recent WiFi network informaon.
To connect to a WiFi network, click the line item for a specific network, and enter in the password if needed.
5.4.2.11.2 WPS
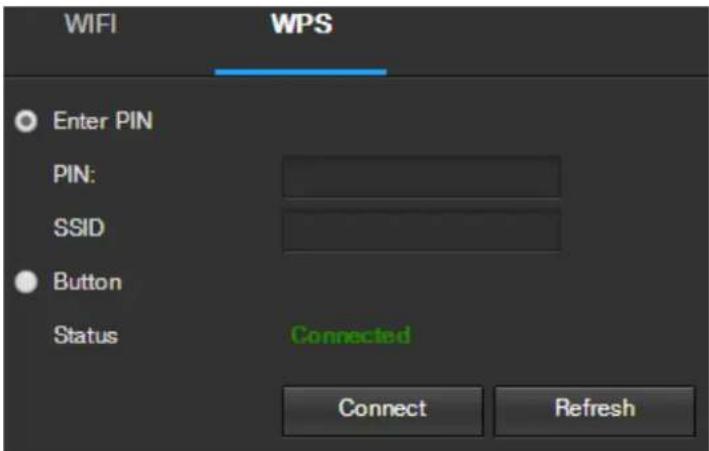
The WPS tab of the WiFi menu is used to connect to a wireless network through the WPS conneccon method.
text_image
WIFI WPS Enter PIN PIN: SSID Button Status Connected Connect RefreshBelow is an explanaon of the elds on the WPS tab of the WiFi menu:
• Enter PIN: This radio buon allows the user to select the Enter PIN opon for WPS
To enter a PIN, enter the PIN in the PIN eld, and enter an SSID in the SSID eld
- Buon: This radio buon allows the user to select the WPS buon conneccon method for connecng to WiFi.
To connect to a network, click the Connect buon. To refresh the page, click the Refresh buon.
5.4.2.12 802.1x
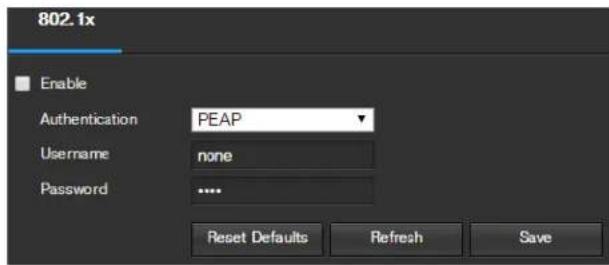
802.1x is an authencaon method for connecng to a network. Below is a screenshot of the 802.1x screen:
text_image
802.1x Enable Authentication PEAP Username none Password **** Reset Defaults Refresh SaveTo enable 802.1x, click the checkbox next to Enable. An authencaon method can be chosen from the dropdown box, and a username and password can be entered in their respective elds.
To reset to default sengs, click the Reset Defaults buon. To refresh the page, click the Refresh buon. To save the sengs, click the Save buon.
5.4.2.13 QoS
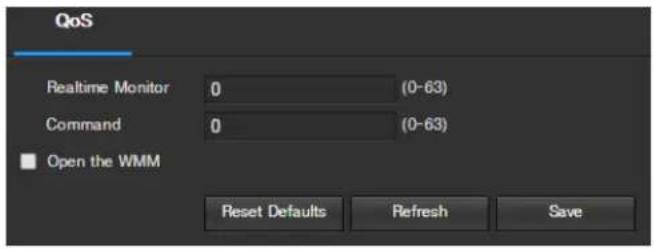
QoS stands for Quality of Service and it refers to the overall performance of a computer network, particularly the performance seen by the users of the network. Below is a screenshot of the QoS screen:
text_image
QoS Realtime Monitor 0 (0-63) Command 0 (0-63) Open the WMM Reset Defaults Refresh SaveBelow is an explanaon of the elds on the QoS screen:
- Realme Monitor: This eld allows the user to enter in a priority value for realme monitoring packets. The range is between 0-63.
- Command: This eld allows the user to enter in a priority value for command packets. The range is between 0-63.
- Open the WMM: This checkbox allows the user to open the WiFi MulMedia (WMM) opons.
To reset to default sengs, click the Reset Defaults buon. To refresh the page, click the Refresh buon. To save the sengs, click the Save buon.
5.4.3 Event
This menu secon allows the user to change dierent sengs for triggering events.
5.4.3.1 Video Detecon
The video detecon menu has two tabs: Moon Detect and Video Tamper.
5.4.3.1.1 Moon Detect
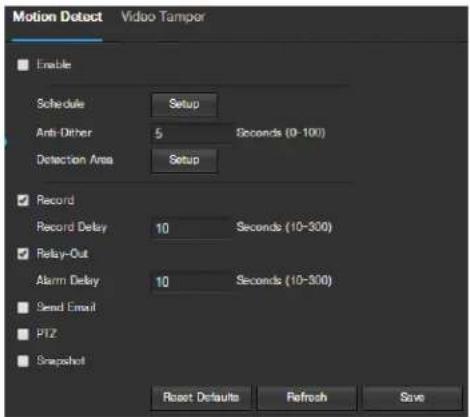
This tab allows the user to modify moon detecon sengs. Below is a screenshot of the Moon Detect tab:
text_image
Motion Detect Video Tamper Enable Schedule Setup Anti-Dither 5 Seconds (0-100) Detection Area Setup Record Record Delay 10 Seconds (10-300) Relay-Out Alarm Delay 10 Seconds (10-300) Send Email PTZ Snapshot Reset Defaults Refresh SaveBelow is an explanaon of the elds on the Moon Detect tab:
- Enable: This checkbox enables moon detecon for the camera.
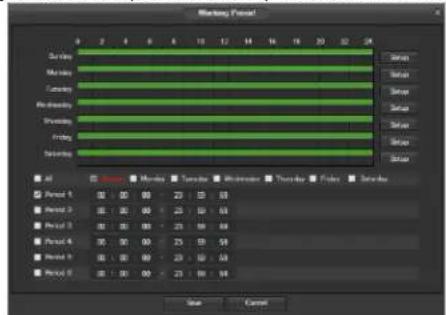
• Working Period: Clicking this buon opens a weekly schedule that can be used to set mes.
text_image
Morning Focus! Sunday Monday Tuesday Wednesday Thursday Friday Saturday Sunday Sunday Sunday Sunday Sunday Sunday Sunday Sunday Sunday Sunday Sunday Sunday Sunday Sunday Sunday Sunday Sunday Sunday Sunday Sunday Sunday Sunday Sunday Sunday Sunday Sunday Sunday Sunday Sunday Sunday Sunday Sunday Sunday Sunday Sunday Sunday Sunday Sunday Sunday Sunday Sunday Sunday Sunday Sunday Sunday Sunday Sunday Sunday Sunday Sunday Slate Send Send Send Send Send Send Send Send Send Send Send Send Send Send Send Send Send Send Send Send Send- Click and drag to set moon detecon for certain days of the week. Also, periods of moon detecon can be set for each day and enabled using the period sengs on the boom half of the screen. There are a total of 6 periods that can be set.
- An-Dither: This eld allows the user to set the an-dither me. The values in this eld can range from 5 to 600 seconds. This me value controls how long the alarm signal lasts. Based on moon detecon, a buzzer can go o, a tour can begin, PTZ can be acvated, a snapshot can be taken, or the camera can begin recording.
For example, if the an-dither me is set to 10 seconds, each alarm may last 10 seconds if the local alarm is acvated. During the process, if the system detects another local alarm signal at the h second, the buzzer, tour, PTZ acvaon, snapshot, record channel funcons will begin another 10 seconds while the screen prompt, alarm upload, email will not be acvated again. Aer 10 seconds, if
system detects another alarm signal, it can generate a new alarm since the an-dither me has expired.
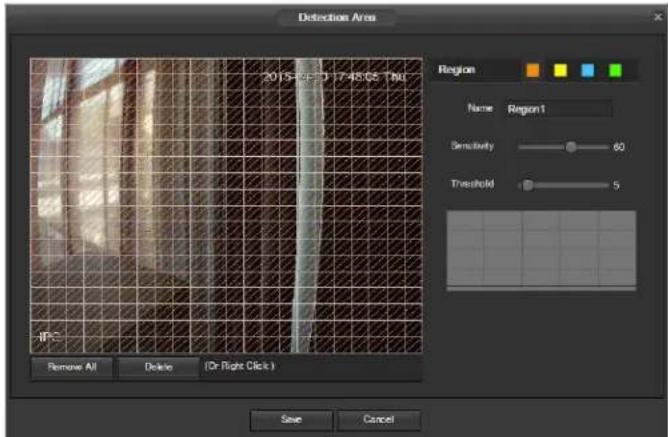
• Detecon Area: Clicking this buon opens a pop up screen that can be used to set detecon areas.
text_image
Detection Area 2015-2017-48-C5-MU Region Name Region1 Sensitivity 60 Threshold 5 IF Remove All Delete (Or Right Click) Save CancelWhen the setup buon is clicked, a live stream of the video is shown. The user can then set up to 4 regions, each with their own region name, sensitivity (1-100), and threshold (1-100). Each region has a specific color, and the region selector tool is displayed when the mouse is moved to the top of the screen.
■ Sensitivity is the amount of change required to increase the moon detected by a percentage. The lower the sensitivity, the more movement is required to trigger an alarm.
- Threshold is the level that the moon detecon needs to reach in order to trigger an alarm. The lower the threshold, the more likely that moon will trigger an alarm.
To designate a zone, click and drag the mouse over the area desired. When a colored box is displayed over the live feed, that area is now enabled for moon detecon.
Aer the moon detecon zone is set, click the enter buon to exit the moon detecon screen. Remember to click the save buon on the moon detecon sengs screen, otherwise the moon detecon zones will not go into eect. Clicking the cancel buon to leave the moon detecon zone and will not save the zone setup.
- Record: This checkbox allows the user to enable the camera to record video when a moon detecon alarm is triggered.
- Record Delay: This eld species in seconds how long the delay between alarm acvaon and recording should be.
- Relay Out: This checkbox allows the user to enable the camera to trigger a connected alarm (connected to the alarm port on the back of the camera) when a moon detecon alarm is triggered.
- Alarm Delay: This eld species in seconds how long the delay between alarm acvaon and Relay alarm acvaon should be.
- Send Email: This checkbox allows the user to enable the camera to send an email when a moon detecon alarm is triggered.
- PTZ: This checkbox allows the user to enable the camera to acvate a PTZ tour when a moon detecon alarm is triggered.
- Snapshot: This checkbox allows the user to enable the camera to take a snapshot when a moon detecon alarm is triggered.
To reset to default sengs, click the Reset Defaults buon. To refresh the page, click the Refresh buon. To save the sengs, click the Save buon.
5.4.3.1.2 Video Tamper
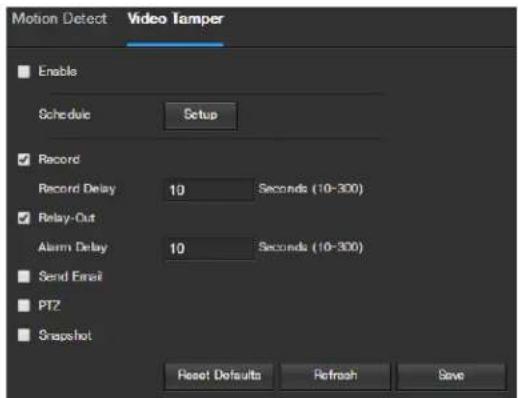
This tab allows the user to modify video tamper sengs. Below is a screenshot of the Video Tamper tab:
text_image
Motion Detect: Video Tamper Enable Schedule Setup Record Record Delay 10 Seconds (10-300) Relay-Out Alarm Delay 10 Seconds (10-300) Send Email PT2 Snapshot Reset Defaults Refresh SaveBelow is an explanaon of the elds on the Video Tamper tab:
- Enable: This checkbox enables a video tamper alarm for the camera.
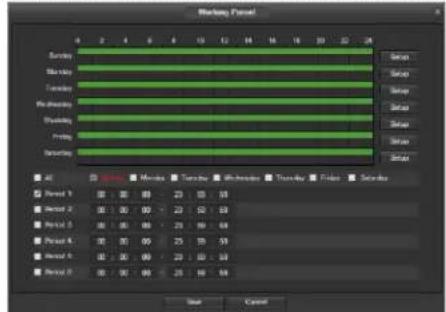
• Working Period: Clicking this buon opens a weekly schedule that can be used to set mes.
text_image
Timeline Panel Sunday Monday Tuesday Wednesday Thursday Friday Saturday Sunday Saturn Monday Tuesday Wednesday Thursday Friday Saturday Saturn Saturn Saturn Saturn Saturn Saturn Saturn Saturn Saturn Saturn Saturn Saturn Saturn Saturn Saturn Saturn Saturn Saturn Saturn Saturn Saturn Saturn Saturn Saturn Saturn Saturn Saturn Saturn Saturn Saturn Saturn Saturn Saturn Saturn- Click and drag to set video tampering for certain days of the week. Also, periods of video tampering can be set for each day and enabled using the period sengs on the boom half of the screen. There are a total of 6 periods that can be set.
- Record: This checkbox allows the user to enable the camera to record video when a video tampering alarm is triggered.
- Record Delay: his eld species in seconds how long the delay between alarm acvaon and recording should be.
- Relay Out: This checkbox allows the user to enable the camera to trigger a connected alarm (connected to the alarm port on the back of the camera) when a moon detecon alarm is triggered.
- Alarm Delay: This eld species in seconds how long the delay between alarm acvaon and Relay alarm acvaon should be.
- Send Email: This checkbox allows the user to enable the camera to send an email when a video tampering alarm is triggered.
- PTZ: This checkbox allows the user to enable the camera to acvate a PTZ tour when a video tampering alarm is triggered.
- Snapshot: This checkbox allows the user to enable the camera to take a snapshot when a video tampering alarm is triggered.
To reset to default sengs, click the Reset Defaults buon. To refresh the page, click the Refresh buon. To save the sengs, click the Save buon.
5.4.3.2 Audio Detecon
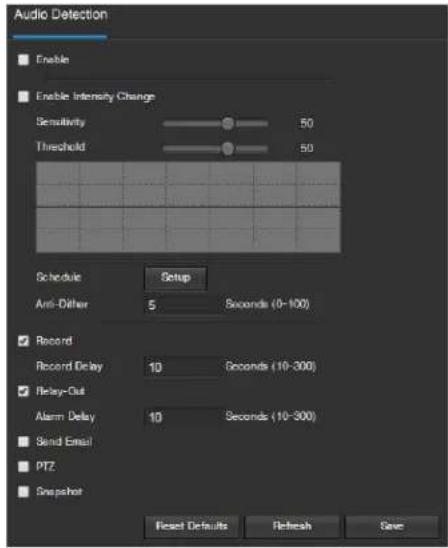
This menu allows the user to modify audio detecon sengs. Below is a screenshot of the Audio Detect screen:
text_image
Audio Detection Enable Enable Intensity Change Sensitivity 50 Threshold 50 Schedule Setup Anti-Dither 5 Seconds (0-100) Record Record Delay 10 Seconds (10-300) Relay-Out Alarm Delay 10 Seconds (10-300) Send Email PTZ Snapshot Reset Defaults Refresh SaveBelow is an explanaon of the elds on the Audio Detect tab:
- Enable: This checkbox enables an audio detecon alarm for the camera.
- Enable Intensity Change: This checkbox enables intensity change for the camera audio.
Sensitivity is the amount of change required to increase the audio detected by a percentage. The lower the sensitivity, the more audio variance is required to trigger an alarm.
○ Threshold is the level that the detected audio needs to reach in order to trigger an alarm. The lower the threshold, the more likely that audio will trigger an alarm.
• Working Period: Clicking this buon opens a weekly schedule that can be used to set mes.

text_image
Weekend Period Sunday Monday Tuesday Wednesday Thursday Friday Saturday Sunday Sunday Sunday Sunday Sunday Sunday Sunday Sunday Sunday Sunday Sunday Sunday Sunday Sunday Sunday Sunday Sunday Sunday Sunday Sunday Sunday Sunday Sunday Sunday Sunday Sunday Sunday Sunday Sunday Sunday Sunday Sunday Sunday Sunday Sunday Sunday Sunday Sunday Sunday Sunday Sunday Sunday Sunday Sunday Sunday Sunday Sunday Sunday Sunday Sunday Slate Cable- Click and drag to set audio tampering for certain days of the week. Also, periods of audio detecon can be set for each day and enabled using the period sengs on the boom half of the screen. There are a total of 6 periods that can be set.
- An-Dither: This eld allows the user to set the an-dither time. The values in this eld can range from 5 to 600 seconds. This me value controls how long the alarm signal lasts. Based on audio detecon, a buzzer can go o, a tour can begin, PTZ can be acvated, a snapshot can be taken, or the camera can begin recording.
For example, if the an-dither me is set to 10 seconds, each alarm may last 10 seconds if the local alarm is acvated. During the process, if the system detects another local alarm signal at the h second, the buzzer, tour, PTZ acvaon, snapshot, record channel funcons will begin another 10 seconds while the screen prompt, alarm upload, email will not be acvated again. Aer 10 seconds, if system detects another alarm signal, it can generate a new alarm since the an-dither me has expired.
- Record: This checkbox allows the user to enable the camera to record video when an audio detecon alarm is triggered.
- Record Delay: his eld species in seconds how long the delay between alarm acvaon and recording should be.
- Relay Out: This checkbox allows the user to enable the camera to trigger a connected alarm (connected to the alarm port on the back of the camera) when a moon detecon alarm is triggered.
- Alarm Delay: This eld species in seconds how long the delay between alarm acvaon and Relay alarm acvaon should be.
- Send Email: This checkbox allows the user to enable the camera to send an email when an audio detector alarm is triggered.
- PTZ: This checkbox allows the user to enable the camera to acvate a PTZ tour when an audio detecon alarm is triggered.
- Snapshot: This checkbox allows the user to enable the camera to take a snapshot when an audio detector alarm is triggered.
To reset to default sengs, click the Reset Defaults buon. To refresh the page, click the Refresh buon. To save the sengs, click the Save buon.
5.4.3.3 Alarm
This screen is used to set external alarm sengs for the camera and any devices aached to the camera's relay. Below is a screenshot of the Alarm sengs screen:
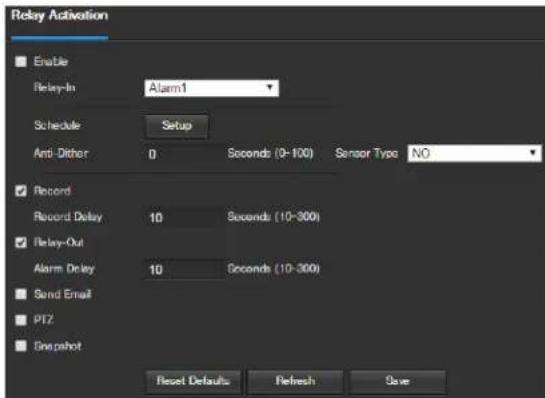
text_image
Relay Activation Enable Relay-In Alarm1 Schedule Setup Anti-Dither 0 Seconds (0-100) Sensor Type NO Record Record Delay 10 Seconds (10-300) Relay-Out Alarm Delay 10 Seconds (10-300) Send Email PTZ Snapshot Reset Defaults Refresh SaveBelow is an explanaon of the elds on the Alarm sengs screen:
- Enable: This checkbox enables external alarm acvaon for the camera.
- Relay In: This dropdown box allows the user to select which relay input's sengs are modified.
• Working Period: Clicking this buon opens a weekly schedule that can be used to set mes.
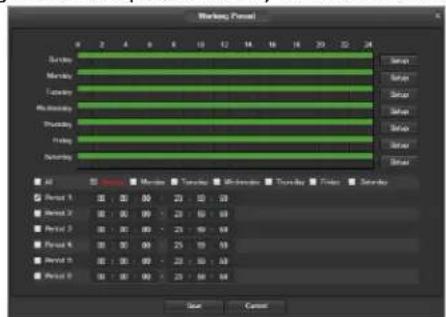
text_image
Timeline (Panel) Sunday Monday Tuesday Wednesday Thursday Friday Saturday Sunday Saturn Saturn Saturn Saturn Saturn Saturn Saturn Saturn Saturn Saturn Saturn Saturn Saturn Saturn Saturn Saturn Saturn Saturn Saturn Saturn Saturn Saturn Saturn Saturn Saturn Saturn Saturn Saturn Saturn Saturn Saturn Saturn Saturn Saturn- Click and drag to set alarm acvaon for certain days of the week. Also, periods of moon detecon can be set for each day and enabled using the period sengs on the boom half of the screen. There are a total of 6 periods that can be set.
- An-Dither: This eld allows the user to set the an-dither time. The values in this eld can range from 5 to 600 seconds. This me value controls how long the alarm signal lasts. Based on moon detecon, a buzzer can go o, a tour can begin, PTZ can be acvated, a snapshot can be taken, or the camera can begin recording.
For example, if the an-dither me is set to 10 seconds, each alarm may last 10 seconds if the local alarm is acvated. During the process, if the system detects another local alarm signal at the h second, the buzzer, tour, PTZ acvaon, snapshot, record channel funcons will begin another 10 seconds while the screen prompt, alarm upload, email will not be acvated again. Aer 10 seconds, if system detects another alarm signal, it can generate a new alarm since the an-dither me has expired.
- Sensor Type: This dropdown box allows the user to select which sensor type to use. The opons are Normally Open (NO) and Normally Closed (NC).
• Record: This checkbox allows the user to enable the camera to record video when an alarm is acvated. - Record Delay: his eld species in seconds how long the delay between alarm acvaon and recording should be.
- Relay Out: This checkbox allows the user to enable the camera to trigger a connected alarm (connected to the alarm port on the back of the camera) when a moon detecon alarm is triggered.
- Alarm Delay: This eld species in seconds how long the delay between alarm acvaon and Relay alarm acvaon should be.
- Send Email: This checkbox allows the user to enable the camera to send an email when an alarm is acvated.
• PTZ: This checkbox allows the user to enable the camera to acvate a PTZ tour when an alarm is acvated. - Snapshot: This checkbox allows the user to enable the camera to take a snapshot when an alarm is acvated.
To reset to default sengs, click the Reset Defaults buon. To refresh the page, click the Refresh buon. To save the sengs, click the Save buon.
5.4.3.4 Abnormality
This menu has 3 tabs: SD Card, Network, and Illegal Access
5.4.3.4.1 SD Card
This tab allows the user to set the camera's response to an SD card related abnormality. Below is a screenshot of the SD card tab screen:
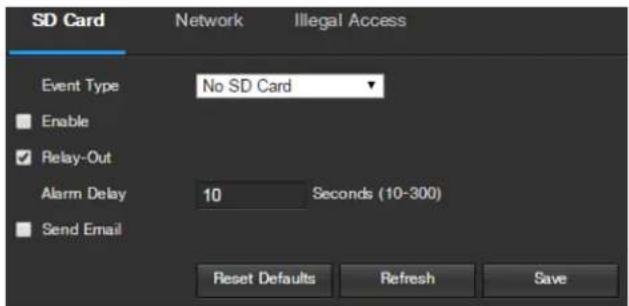
text_image
SD Card Network Illegal Access Event Type No SD Card Enable Relay-Out Alarm Delay 10 Seconds (10-300) Send Email Reset Defaults Refresh SaveBelow is an explanaon of the elds on the SD Card sengs tab:
- Event Type: This dropdown box allows the user to select which SD card abnormality to set event triggers for. The 3 opons are No SD Card, SD Card Error, and Capacity Warning.
- Enable: This checkbox enables the SD Card abnormality trigger for the camera.
- Relay Out: This checkbox allows the user to enable the camera to trigger an alarm when an SD Card abnormality is detected.
- Alarm Delay: This eld species in seconds how long the delay between alarm acvaon and relay alarm acvaon should be.
- Send Email: This checkbox allows the user to enable the camera to send an email when an SD Card abnormality is detected.
To reset to default sengs, click the Reset Defaults buon. To refresh the page, click the Refresh buon. To save the sengs, click the Save buon.
5.4.3.4.2 Network
This tab allows the user to set the camera's response to a Network related abnormality. Below is a screenshot of the Network tab screen:
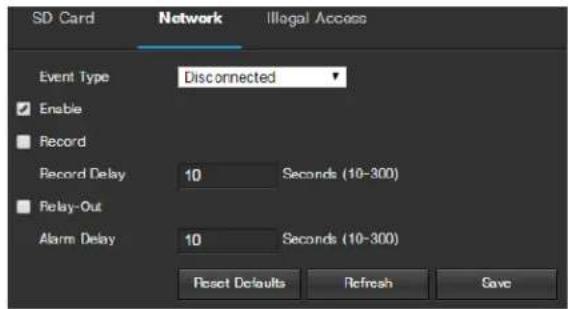
text_image
SD Card Network Illegal Access Event Type Disconnected Enable Record Record Delay 10 Seconds (10-300) Delay-Out Alarm Delay 10 Seconds (10-300) Reset Defaults Refresh SaveBelow is an explanaon of the elds on the Network sengs tab:
- Event Type: This dropdown box allows the user to select which Network abnormality to set event triggers for. The 2 opons are Disconnecon and IP Conict.
- Enable: This checkbox enables the Network abnormality trigger for the camera.
- Record: This checkbox allows the user to enable the camera to record video when a network abnormality is detected.
- Record Delay: This eld species in seconds how long the delay between alarm acvaon and recording should be.
- Relay Out: This checkbox allows the user to enable the camera to trigger an alarm when a network abnormality is detected.
- Alarm Delay: This eld species in seconds how long the delay between alarm acvaon and relay alarm acvaon should be.
To reset to default sengs, click the Reset Defaults buon. To refresh the page, click the Refresh buon. To save the sengs, click the Save buon.
5.4.3.4.3 Illegal Access
This tab allows the user to set the camera's response to an Illegal Access related abnormality. Below is a screenshot of the Illegal Access tab screen:
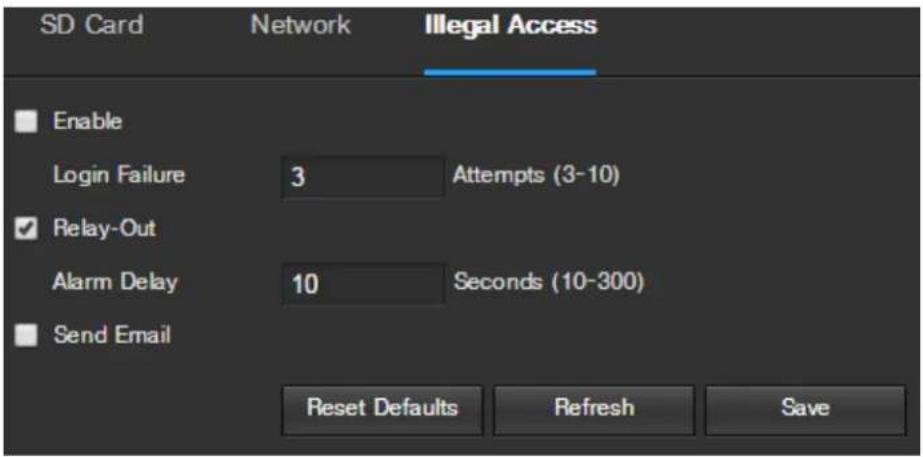
text_image
SD Card Network Illegal Access Enable Login Failure 3 Attempts (3-10) Relay-Out Alarm Delay 10 Seconds (10-300) Send Email Reset Defaults Refresh SaveBelow is an explanaon of the elds on the Illegal Access sengs tab:
- Enable: This checkbox enables the Illegal Access abnormality trigger for the camera.
- Login Failure: This eld allows the user to specify how many failed login aempts must be aempted in order to trigger an illegal Access abnormality event.
- Relay Out: This checkbox allows the user to enable the camera to trigger an alarm when illegal access is detected.
- Alarm Delay: This eld species in seconds how long the delay between alarm acvaon and relay alarm acvaon should be.
- Send Email: This checkbox allows the user to enable the camera to send an email when illegal access is aempted.
To reset to default sengs, click the Reset Defaults buon. To refresh the page, click the Refresh buon. To save the sengs, click the Save buon.
5.4.4 Storage
This menu secon allows the user to change storage sengs for the camera.
5.4.4.1 Schedule
The schedule menu manages the recording schedule for the camera. This menu has 3 tabs: Record Schedule, Snapshot Schedule, and Holiday Schedule.
5.4.4.1.1 Record Schedule
This tab is where video recording sengs are congured. Below is a screenshot of the Record Schedule sengs screen:
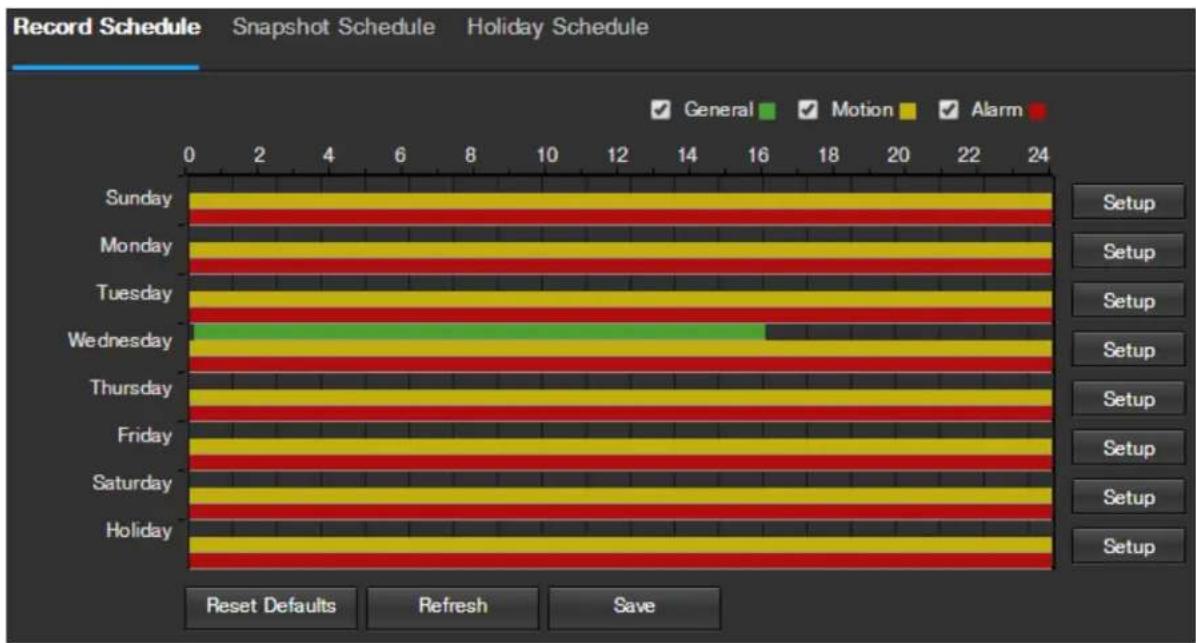
bar
| Day | General | Motion | Alarm | | --------- | ------- | ------ | ----- | | Sunday | 24 | 24 | 24 | | Monday | 24 | 24 | 24 | | Tuesday | 24 | 24 | 24 | | Wednesday | 16 | 16 | 16 | | Thursday | 24 | 24 | 24 | | Friday | 24 | 24 | 24 | | Saturday | 24 | 24 | 24 | | Holiday | 24 | 24 | 24 |Below is an explanaon of the elds on the Record Schedule sengs tab:
- Record Type: These checkboxes allow the user to select which recording type they want to conjure on the schedule. There are 3 types of recordings:
- Regular: Regular recording means that the camera captures all footage for the specied me period. Regular recording is represented by the color green.
Moon: Moon Detecon recording means that the camera captures only footage when the moon detecon alarm is acvated. Moon recording is represented by the color yellow.
○ Alarm: Alarm recording means that the camera captures only footage when an alarm is acvated. Alarm recording is represented by the color red.
- Video Recording Schedule: To specify a video recording range, rst select the type of recording desired, then click and drag on me bar for the desired date. To edit mulple days at once, drag the cursor further up or down to cover the other days.
Setup: Clicking this buon opens a screen that allows for recording periods to be set for each day and for each recording type. There are a total of 6 periods that can be set.
To reset to default sengs, click the Reset Defaults buon. To refresh the page, click the Refresh buon. To save the sengs, click the Save buon.
5.4.4.1.2 Snapshot Schedule
This tab is where snapshot recording sengs are congured. Below is a screenshot of the Snapshot Schedule sengs screen:
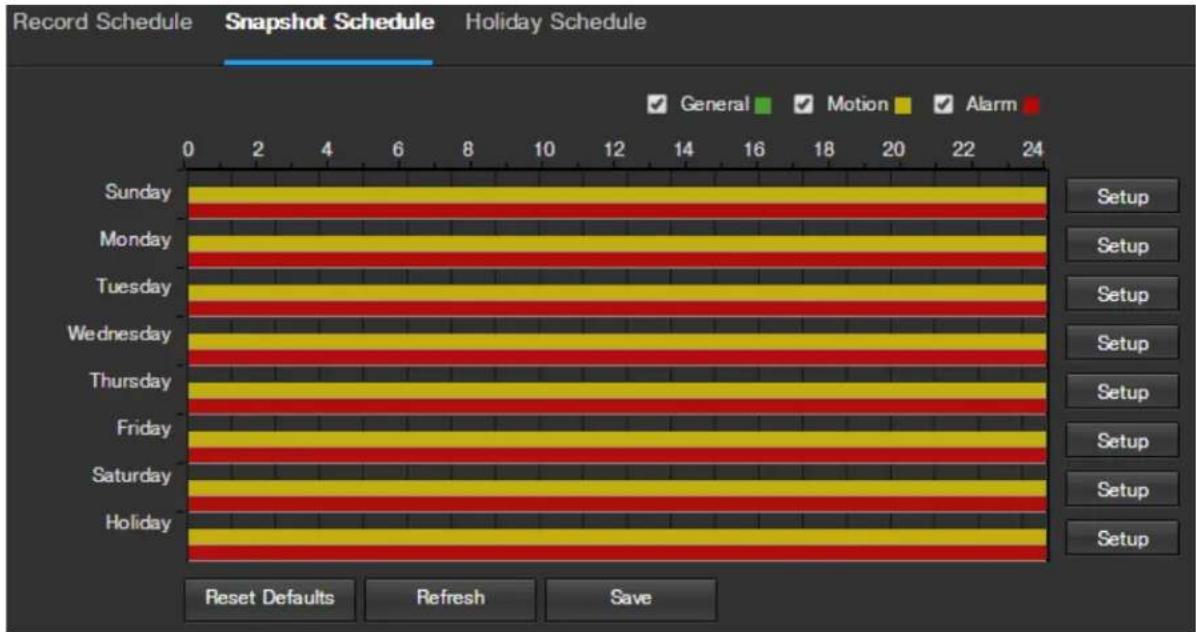
bar
| Day | General | Motion | Alarm | | --------- | ------- | ------ | ----- | | Sunday | 24 | 24 | 24 | | Monday | 24 | 24 | 24 | | Tuesday | 24 | 24 | 24 | | Wednesday | 24 | 24 | 24 | | Thursday | 24 | 24 | 24 | | Friday | 24 | 24 | 24 | | Saturday | 24 | 24 | 24 | | Holiday | 24 | 24 | 24 |Below is an explanaon of the elds on the Snapshot Schedule sengs tab:
- Record Type: These checkboxes allow the user to select which snapshot type they want to conjure on the schedule. There are 3 types of snapshots:
- Regular: Regular means that the camera will take snapshots during the specied me period. Regular recording is represented by the color green.
Moon: Moon Detecon means that the camera only takes snapshots when the moon detecon alarm is acvated. Moon recording is represented by the color yellow.
Alarm: Alarm means that the camera only takes snapshots when an alarm is acvated. Alarm recording is represented by the color red.
- Snapshot Recording Schedule: To specify a snapshot range, rst select the type of snapshot desired, then click and drag on me bar for the desired date. To edit mulple days at once, drag the cursor further up or down to cover the other days.
Setup: Clicking this buon opens a screen that allows for snapshot periods to be set for each day and for each snapshot type. There are a total of 6 periods that can be set.
To reset to default sengs, click the Reset Defaults buon. To refresh the page, click the Refresh buon. To save the sengs, click the Save buon.
5.4.4.1.3 Holiday Schedule
This tab is where holiday sengs are congured. Below is a screenshot of the Holiday Schedule sengs screen:
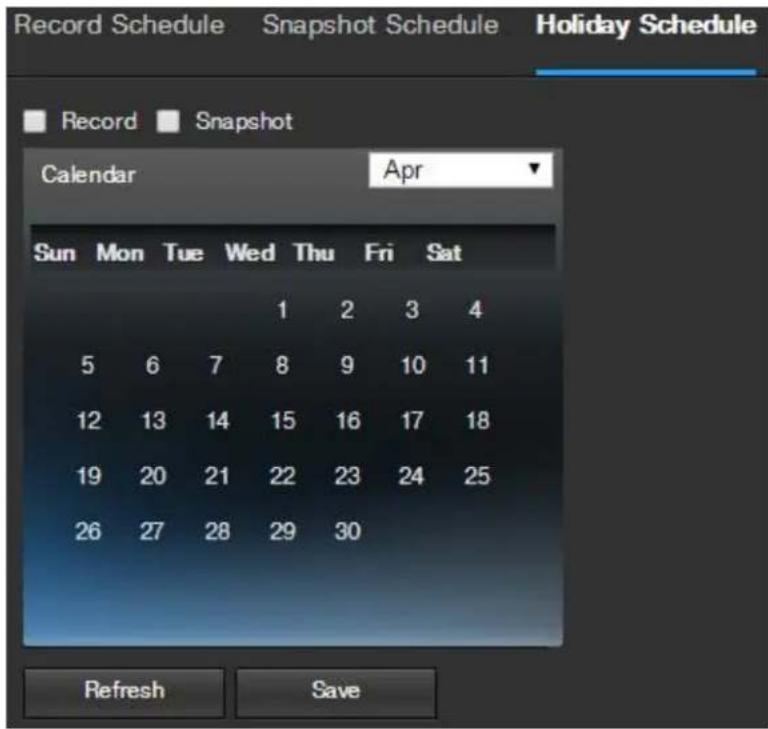
text_image
Record Schedule Snapshot Schedule Holiday Schedule Record Snapshot Calendar Apr Sun Mon Tue Wed Thu Fri Sat 1 2 3 4 5 6 7 8 9 10 11 12 13 14 15 16 17 18 19 20 21 22 23 24 25 26 27 28 29 30 Refresh SaveBelow is an explanaon of the elds on the Holiday Schedule sengs tab:
- Record Type: These checkboxes allow the user to select which recording type they want to conjure on the schedule. There are 2 types of recordings:
- Record: This checkbox is referring to video recording.
- Snapshot: This checkbox is referring to snapshot recording.
- Calendar: This calendar allows the user to select days to designate as holidays. Once a day is designated, it can be customized to stop recording or snapshots for that day by using the Record and Snapshot checkboxes.
To refresh the page, click the Refresh buon. To save the sengs, click the Save buon.
5.4.4.2 Desnaon
This menu controls where recorded media is stored. There are 4 tabs in this menu: Path, SD Card, FTP, and NAS.
5.4.4.2.1 Path
This tab is where the user can designate a path for recorded video and snapshots to reside in. Below is a screenshot of the Path tab:
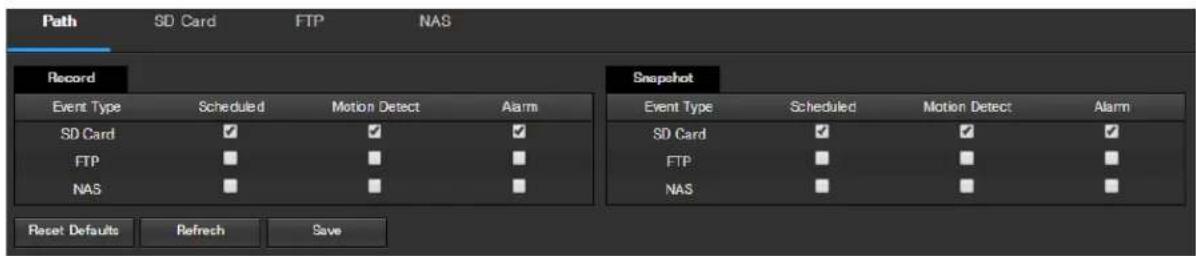
text_image
Path SD Card FTP NAS Record Event Type Scheduled Motion Detect Alarm SD Card ✓ ✓ ✓ FTP ■ ■ ■ NAS ■ ■ ■ Snapshot Event Type Scheduled Motion Detect Alarm SD Card ✓ ✓ ✓ FTP ■ ■ ■ NAS ■ ■ ■ Reset Defaults Refresh SaveBelow is an explanaon of the elds on the Path sengs tab:
- Event Type: This column designates storage opons available to the camera. The opons are SD Card, FTP, and NAS.
- Record Type: These columns designate which recording type should be recorded to which event type. Check the box at the intersecon of the record type and event type to designate where that recording should be sent to.
To reset to default sengs, click the Reset Defaults buon. To refresh the page, click the Refresh buon. To save the sengs, click the Save buon.
5.4.4.2.2 SD Card
This tab is where the user can change SD card sengs. Below is a screenshot of the SD Card tab:
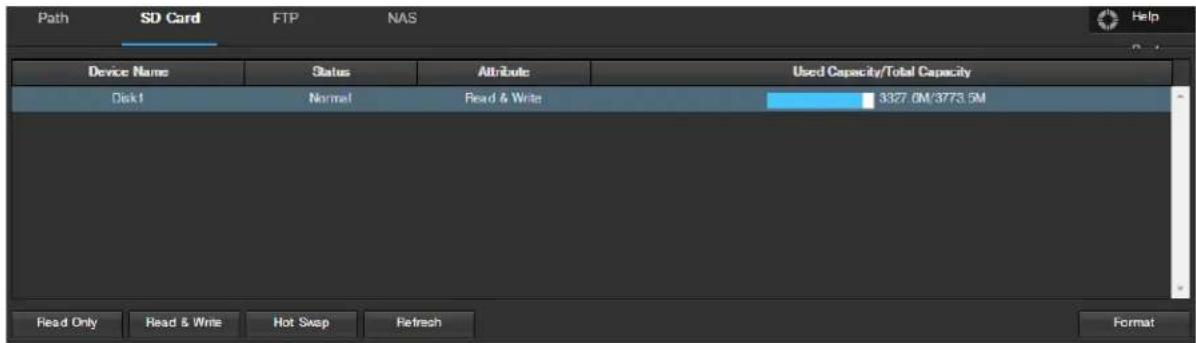
text_image
SD Card FTP NAS Device Name Status Attribute Used Capacity/Total Capacity Disk1 Normal Read & Write 3327.0M/3773.5M Read Only Read & Write Hot Swap Refresh FormatBelow is an explanaon of the elds on the SD Card sengs tab:
• Device Name: This column designates the name of the SD card that is currently in the camera.
• Status: This column designates the status of the SD card.
- Aribute: This column designates the read/write aributes for the SD card. By default this is Read & Write.
• Used Capacity/Total Capacity: This column shows the available memory on the SC card.
- Read Only: This buon allows the user to designate an SD card as read only.
• Hot Swap: This buon allows the user to physically remove the SD card and replace it with another safely.
• Refresh: This buon refreshes the SD card table.
- Format: This buon formats the SD card.
5.4.4.2.3 FTP
This tab is where the user can change FTP sengs. Below is a screenshot of the FTP tab:
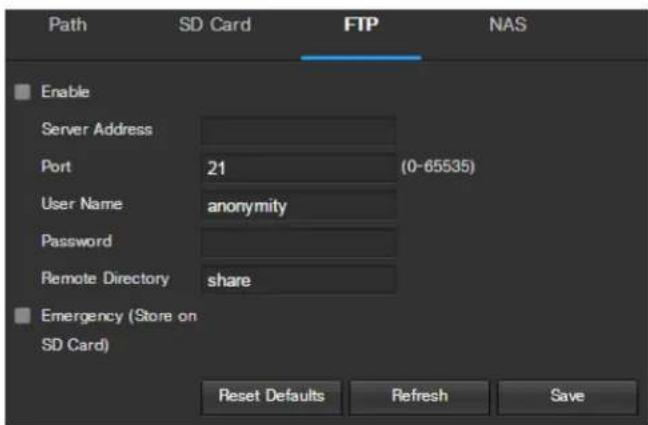
text_image
Path SD Card FTP NAS ■ Enable Server Address Port 21 (0-65535) User Name anonymity Password Remote Directory share ■ Emergency (Store on SD Card) Reset Defaults Refresh SaveBelow is an explanaon of the elds on the FTP sengs tab:
- Enable: This checkbox allows the user to enable FTP uploading for the camera's recorded media.
- FTP Address: This eld allows the user to designate a DDNS address for the FTP server.
• Port: This eld allows the user to designate the port number for the FTP server. - User Name: This eld allows the user to input the username used to login to the FTP server.
- Password: This eld allows the user to input the password used to login to the FTP server.
- Remote Directory: This eld allows the user to specify a remote directory on the FTP to send the recorded media to.
- Emergency (Store on SD Card): This checkbox allows the camera to store recorded media on the SD card in case the FTP server is unavailable.
To reset to default sengs, click the Reset Defaults buon. To refresh the page, click the Refresh buon. To save the sengs, click the Save buon.
5.4.4.2.4 NAS
This tab is where the user can change NAS sengs. Below is a screenshot of the NAS tab:
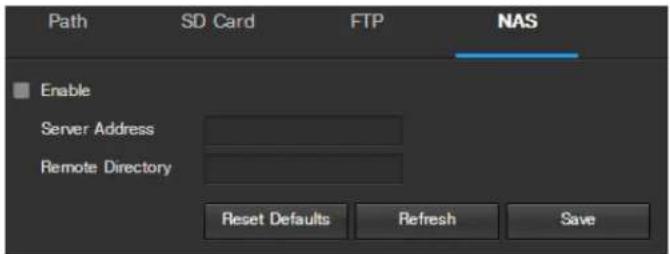
text_image
Path SD Card FTP NAS Enable Server Address Remote Directory Reset Defaults Refresh SaveBelow is an explanaon of the elds on the NAS sengs tab:
- Enable: This checkbox allows the user to enable NAS uploading for the camera's recorded media.
- DDNS Address: This eld allows the user to designate a DDNS address for the NAS server/device.
- Remote Directory: This eld allows the user to specify a remote directory on the NAS to send the recorded media to.
To reset to default sengs, click the Reset Defaults buon. To refresh the page, click the Refresh buon. To save the sengs, click the Save buon.
5.4.4.3 Record Control
This menu is where general recording sengs are congured. Below is a screenshot of the record control menu:
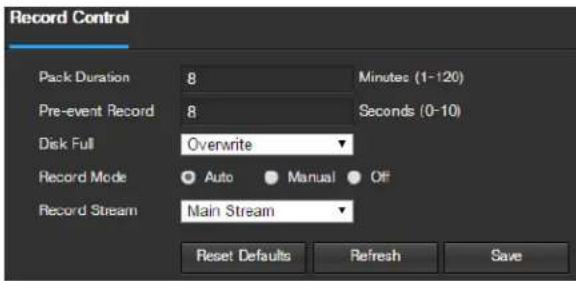
text_image
Record Control Pack Duration 8 Minutes (1-120) Pre-event Record 8 Seconds (0-10) Disk Full Overwrite Record Mode Auto Manual Off Record Stream Main Stream Reset Defaults Refresh SaveBelow is an explanaon of the elds on the Record Control sengs tab:
- Pack Duraon: This eld allows the user to set how many minutes each le is comprised of.
• Pre-event Record: This eld allows the user to specify how many seconds before an event should be recorded. - Disk Full: This dropdown box allows the user to designate what the camera should do when the disk is full. There are 2 opons: Overwrite or Stop.
- Record Mode: This set of radio buons allows the user to designate the recording mode. The opons are Auto, Manual, and O.
- Record Stream: This dropdown box allows the user to specify which stream to record. The opons are main stream and sub stream.
To reset to default sengs, click the Reset Defaults buon. To refresh the page, click the Refresh buon. To save the sengs, click the Save buon.
5.4.5 System
This menu secon allows the user to change general sengs for the camera.
5.4.5.1 General
This menu controls where general sengs are congured. There are 2 tabs in this menu: General and Date & Time.
5.4.5.1.1 General
This tab is where the user can congregate some basic camera sengs. Below is a screenshot of the General tab:
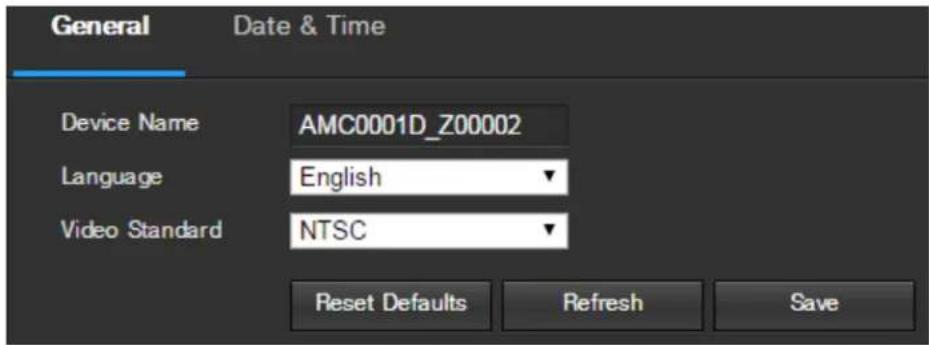
text_image
General Date & Time Device Name AMC0001D_Z00002 Language English Video Standard NTSC Reset Defaults Refresh SaveBelow is an explanaon of the elds on the General sengs tab:
• Device Name: This field allows the user to change the device's name.
• Language: This dropdown box allows the user to change the language used in the camera.
• Video Standard: This dropdown box allows the user to select either the NTSC or PAL video standard.
To reset to default sengs, click the Reset Defaults buon. To refresh the page, click the Refresh buon. To save the sengs, click the Save buon.
5.4.5.1.1 Date & Time
This tab is where the user can congregate the date and me sends for the camera. Below is a screenshot of the Date & Time tab:
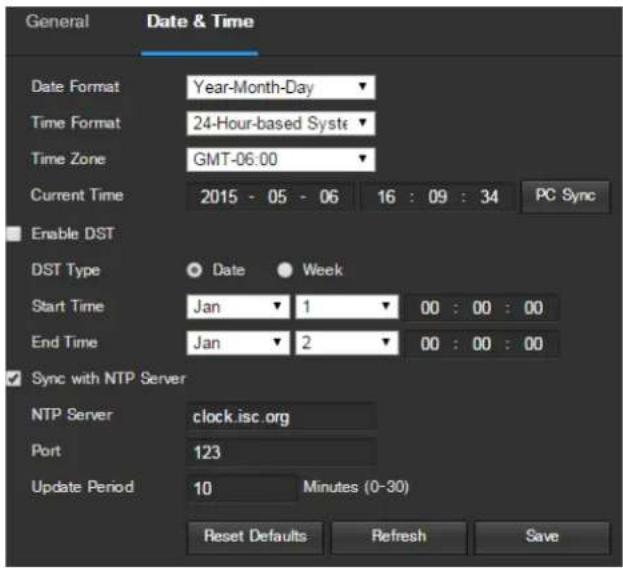
text_image
General Date & Time Date Format Year-Month-Day Time Format 24-Hour-based Syste Time Zone GMT-06:00 Current Time 2015 - 05 - 06 16 : 09 : 34 PC Sync Enable DST DST Type Date Week Start Time Jan 1 00 : 00 : 00 End Time Jan 2 00 : 00 : 00 Sync with NTP Server NTP Server clock.isc.org Port 123 Update Period 10 Minutes (0-30) Reset Defaults Refresh SaveBelow is an explanaon of the elds on the General sengs tab:
- Date Format: This dropdown box allows the user to change the date format used in the camera.
• Time Format: This dropdown box allows the user to change the me format used in the camera.
• Time Zone: This dropdown box allows the user to change the me zone used in the camera. - Current Time: This eld allows the user to enter in the date and me manually. Clicking the PC Sync buon allows the camera to sync with a Network Time Protocol (NTP) server.
- DST Enable: This checkbox allows the user to enable daylight savings me for the camera.
- DST Type: This radio buon allows the user to select whether DST is based on the week, or a specific day.
- Start Time: This dropdown box and eld allow the user to enter in the start me for DST.
• End Time: This dropdown box and eld allow the user to enter in the end me for DST. - Synchronize with NTP: This checkbox allows the user to enable the camera's synchronizaon with an NTP server.
• NTP Server: This eld allows the user to enter in an NTP server.
• Port: This eld allows the user to enter in the port number for the NTP server. - Update Period: This eld allows the user to enter in the update period me. This number designates how frequently the camera pings the NTP server to ensure it has the correct me. The range is from 0-30 minutes.
To reset to default sengs, click the Reset Defaults buon. To refresh the page, click the Refresh buon. To save the sengs, click the Save buon.
5.4.5.2 Manage Users
This menu allows the user to change the user accounts on the camera. By default, the camera only has the admin account which has all rights/authories. Additional accounts can be created on this screen. Below is a screenshot of the manage users screen:
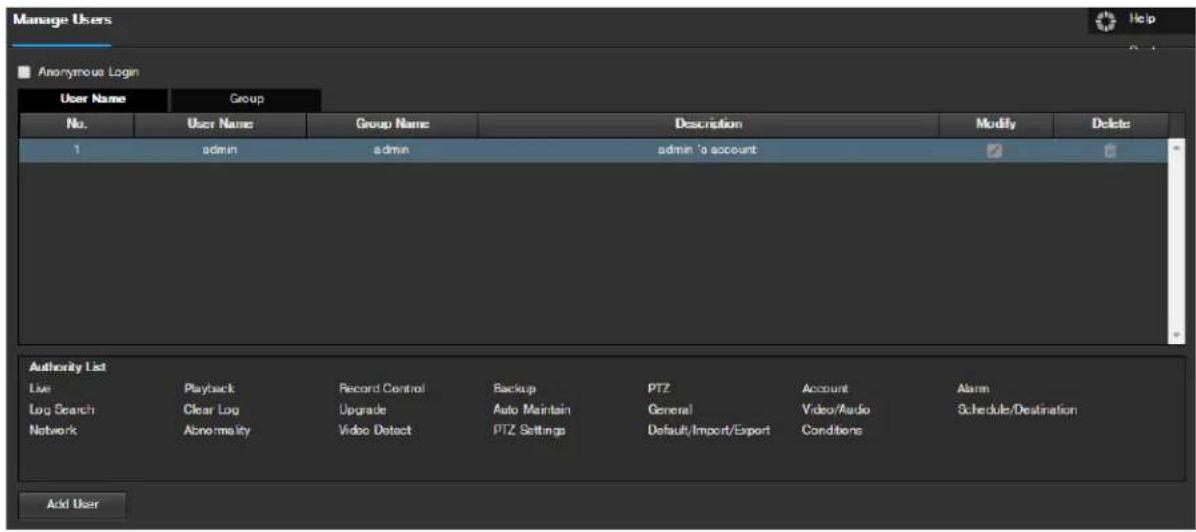
text_image
Manage Users Anonymous Login User Name Group No. User Name Group Name Description Modify Delete 1 adults admin admin's account Authority List Live Playback Record Control Backup PTZ Account Alarm Log Search Clear Log Upgrade Auto Maintain General Video/Audio Schedule/Destination Network Abnormality Video Detect PTZ Settings Default/Import/Export Conditions Add UserBelow is an explanaon of the elds on the Manage Users screen:
- Anonymous Login: This checkbox allows the user to enable the anonymous login feature. This allows all user account names to remain hidden on this screen.
- User Name: This tab shows the usernames available on the camera.
• Group: This tab shows the user groups available on the camera. - No.: This column shows the user's number on the user list.
- User Name: This column shows the usernames of the dierent accounts on the camera.
• Group Name: This column shows the group of the different accounts on the camera.
• Descripon: This column shows a descripon of the account. - Modify: This column allows the user to modify the user account.
- Delete: This column allows the user to delete a user account. Note: The admin account cannot be deleted.
• Authority List: This box shows which user rights/authories are assigned to an account. - Add User: This buon allows the user to add a new user to the camera.
5.4.5.3 Restore Factory Sengs
This screen allows the user to reset the camera and all of its sengs to the factory sengs. Below is a screenshot of the Default screen:
text_image
Restore Factory Settings Restore Factory Default SettingsNote: An alternate method to conduct a Factory Reset for the device is to press and hold the indicator light/reset buon on the back of the device for 10 seconds (unl the light changes).
5.4.5.4 Import/Export
This screen allows the user to import or export sengs from the camera. Below is a screenshot of the Import/Export screen:
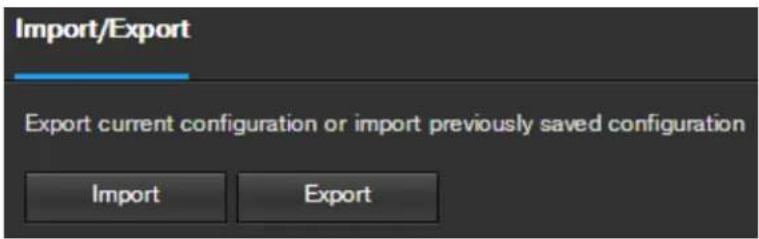
text_image
Import/Export Export current configuration or import previously saved configuration Import ExportTo import sengs, click the Import buon. To export sengs, click the Export buon.
5.4.5.5 Auto Maintain
This screen allows the user to set auto maintenance sengs for the camera. Below is a screenshot of the Auto Maintain screen:
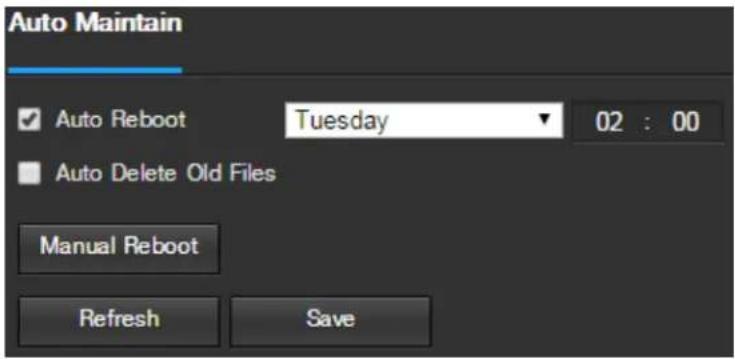
text_image
Auto Maintain ✓ Auto Reboot Tuesday 02 : 00 □ Auto Delete Old Files Manual Reboot Refresh SaveBelow is an explanaon of the elds on the Auto Maintain screen:
- Auto Reboot: This checkbox allows the user to enable the auto reboot funcon. The dropdown box and eld to the right of this checkbox allow the user to specify what date and me of the week the camera will auto reboot.
• Auto Delete Old Files: This checkbox allows the user to enable the auto deleon of old les on the camera.
- Manual Reboot: This buon allows the user to manually reboot the camera.
To refresh the page, click the Refresh buon. To save the sengs, click the Save buon.
5.4.5.6 Upgrade
This menu allows the user to upgrade the camera's rmware. Below is a screenshot of the Upgrade screen:

text_image
Upgrade Select Firmware File Browse... UpgradeTo search the PC for a rmware le, click the Browse buon. To upgrade once the rmware le is selected, click Upgrade.
Note: When upgrading the camera's rmware, do not disconnect the internet or power from the camera.
5.4.6 Informaon
This menu secon allows the user to view informaon about the camera for reference purposes.
5.4.6.1 Version
This screen allows the user to see various informaon about the camera's soware versions, as well as other informaon. Below is a screenshot of the camera's version screen:
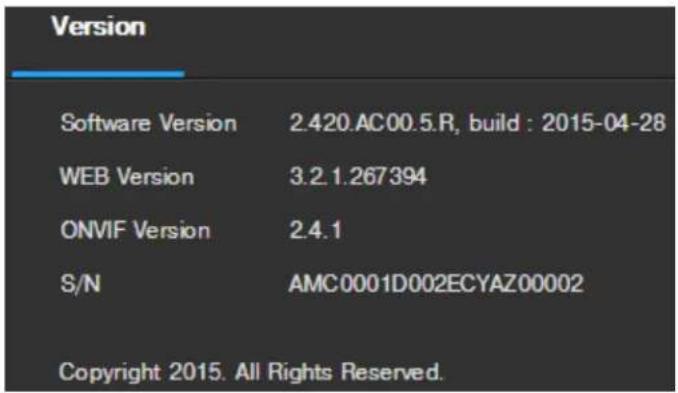
text_image
Version Software Version 2.420.AC00.5.R, build : 2015-04-28 WEB Version 3.2.1.267394 ONVIF Version 2.4.1 S/N AMC0001D002ECYAZ00002 Copyright 2015. All Rights Reserved.On this screen, soware version, web interface version, and ONVIF version are displayed. Also, the UID (Token ID) is displayed here.
5.4.6.2 Log
This screen is where the camera's acvity log is kept. Below is a screenshot of the Log screen:
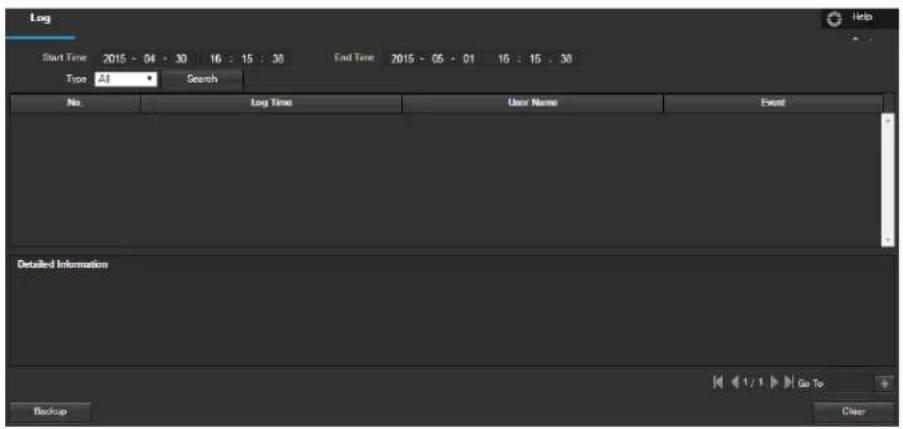
text_image
Log Start Time: 2015 - 04 - 30 16 : 15 : 38 End Time: 2015 - 05 - 01 16 : 15 : 38 Type All Search No Log Time User Name Event Detailed Information Backup ClearTo view logs for a specific me period, modify the start me and end me elds, choose the type of event (system, seng, data, event, record, manage users, clear log), and click search.
To backup the log, click the Backup buon. To clear the log, click the Clear buon.
5.4.6.3 Online Users
This screen allows the user to see which users are online. Below is a screenshot of the Online Users screen:
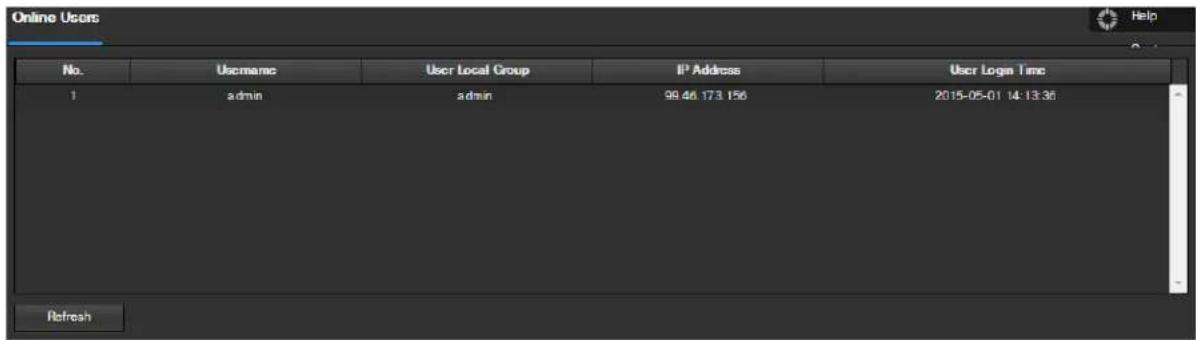
text_image
Online Users No. Username User Local Group IP Address User Loga Time 1 admin admin 99.46.173.156 2015-05-01 14:13:36 RefreshClick Refresh to refresh this table.
5.5 Alarm
This screen is where the alarm log is kept. Below is a screenshot of the alarm screen:
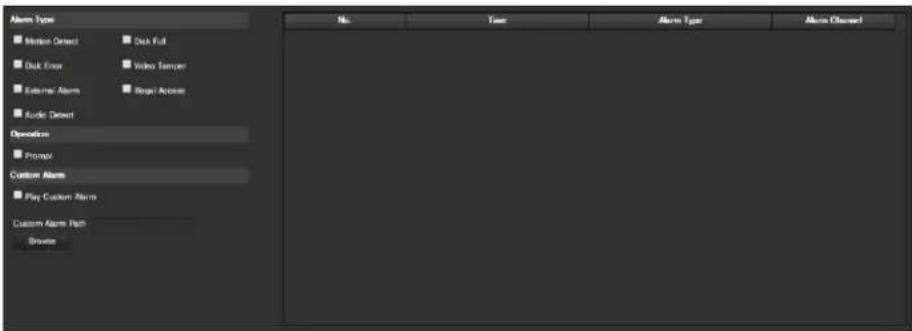
text_image
Alarm Type Motion Detect Disk Full Disk Error Video Sampler External Alarm Regular Access Audio Detect Operation Prompt Custom Alarm Play Custom Alarm Custom Alarm Path Browse No. Time Alarm Type Alarm ChannelThe table on the right shows the alarm log and all of the alarm instances that have occurred.
The checkboxes allow the user to narrow down which alarms they want to see in the alarm log. Clicking the checkbox next to Prompt will cause the system to pop up a dialog box anytime an alarm is triggered. Clicking the checkbox next to Play Custom Alarm will use a custom alarm sound for the alarm prompt. Click the Browse buon to search for a custom alarm sound to use.
5.6 Logout
Clicking the logout buon will log out the user.
6. FAQs/Troubleshoong
1. The camera does not boot up properly.
Below are a few possible reasons why this may be occurring:
- The power input is not correct voltage.
- The power cable conncon is not secured correctly.
- The rmware was upgraded incorrectly.
2. Camera oen automacally shuts down or stops running.
Below are a few possible reasons why this may be occurring:
- The input voltage is too low or is not stable.
- The insides of the camera have accumulated too much dust.
- The temperature is either too hot or too cold.
• The hardware is malfunconing.
3. The system does not detect an SD Card.
Below are a few possible reasons why this may be occurring:
• The SD card is broken.
• The SD card slot is malfunconing.
- The SD card has not been formaed properly.
4. Real-me video color is distorted.
Below are a few possible reasons why this may be occurring:
• The camera is not compatible with the monitor.
• The camera color or brightness sengs are not correctly congured.
5. Local Recordings are not searchable.
Below are a few possible reasons why this may be occurring:
• The SD card is broken.
• The SD card slot is malfunconing.
- The camera's rmware is incompatible with the recorded video.
• The recorded les have been overwrien.
- The recording funcon has been disabled.
6. Playback video is distorted.
Below are a few possible reasons why this may be occurring:
• The video quality seng is too low.
• The camera soware has a read error. Restart the camera to solve this problem.
• The SD card is broken.
• The SD card slot is malfunconing.
- The camera's hardware is malfunctioning.
8. There is no audio during real-me monitoring.
Below are a few possible reasons why this may be occurring:
- The camera's microphone is damaged.
• The speakers being used are not sufficiently powered.
• The camera hardware is malfunconing.
9. There is no audio during recorded video playback.
Below are a few possible reasons why this may be occurring:
• Audio recording may not be enabled.
- The camera's microphone is damaged.
10. The mestamp is not displaying the correct me.
Below are a few possible reasons why this may be occurring:
- The me and date sengs may not be congured correctly.
11. Moon detecon does not work.
Below are a few possible reasons why this may be occurring:
• The moon detecon me period may be incorrectly congured.
- Moon detecon zone setup is not correctly congured.
- Moon detecon sensitivity is too low.
12. Web Access isn't working.
Below are a few possible reasons why this may be occurring:
- Windows version is pre -Windows 2000 service pack 4. Use a more recent version of Windows.
• AcveX controls have been disabled.
• The PC is not using DirectX 8.1 or higher. Upgrade to a more recent version of DirectX. - The camera is having network conneccon errors.
- Web access may be setup incorrectly.
- The username or password may be incorrect.
13. Web Access live view is only displaying a static picture. Both live playback and recorded playback aren't working.
Below are a few possible reasons why this may be occurring:
• The network speed is not sufficient to transfer video data via web access.
- The client PC may have limited resources.
- Mulcast mode may be causing this issue.
- A privacy mask or screensaver may be enabled.
• The logged in user may not have sucient rights to monitor real-me playback.
- The camera's local video output quality is not sucient.
14. Network conncon is not stable.
Below are a few possible reasons why this may be occurring:
- The network is not stable.
• There may be an IP address conict.
• There may be a MAC address conict. - The PC or camera network card may be defective.
- The WiFi network the camera is picking up is too weak.
15. The alarm signal cannot been disarmed.
Below are a few possible reasons why this may be occurring:
- An alarm may be setup incorrectly.
- An alarm output may have been manually opened.
- There may be an error in the camera's rmware.
17. Alarms are not working.
Below are a few possible reasons why this may be occurring:
- The alarm is not setup correctly.
- The alarm cable is not connected correctly.
- The alarm input signal is not correctly congured.
- There are two loops connected to one alarm device.
18. The camera is not recording enough video.
Below are a few possible reasons why this may be occurring:
- The storage capacity is not enough.
- The storage device is damaged.
19. Downloaded les cannot be played back.
Below are a few possible reasons why this may be occurring:
- The media player soware on the PC may not be able to read the le format.
- The PC may not have DirectX 8.1 or higher.
- The PC may not have Windows XP or higher.
20. Forgot login informaon.
Below are a few soluons:
- Hold the reset buon on the back of the camera to execute a factory reset. This will restore the device to its factory sengs and will reset ALL of the camera's sengs.
21. When I login via HTTPS, a dialogue says the cercate has expired or is not valid yet.
Ensure the PC has the same me as the camera's system me.
Glossary of Terms
- Abnormality – Any malfuncon in terms of storage of data to the SD card.
- Alarm Delay – The gap in me between alarm acvaon and Relay alarm acvaon.
- Alternate Gateway – The node on the computer network that the network soware uses when an IP address does not match any other routes in the round table, and when the default gateway is not available.
- An-Dither – This me value controls how long the alarm signal lasts. The values in this eld can range from 5 to 600 seconds. Based on moon detecon, a buzzer can go o, a tour can begin, PTZ can be acvated, a snapshot can be taken, or the camera can begin recording.
- DDNS – This stands for Dynamic Domain Name System. DDNS is a method of automacally updang a name server in the Domain Name System (DNS), oen in real me, with the acve DNS conguraon of its congured hostnames, addresses or other informaon.
- Default Gateway – The node on the computer network that the network soware uses when an IP address does not match any other routes in the round table.
- DHCP – Dynamic Host Conguraon Protocol is a network protocol that enables a server to automacally assign an IP address to a computer from a dened range of numbers (i.e., a scope) congured for a given network.
- Fluency – Fluency described the lack of stuering or excessive delay in a video stream. Fluency usually comes at the expense of video quality when a network is constrained.
- IP Address – Internet Protocol Address is a unique numerical label assigned to each device connected to a computer network. The IP address allows communication between different devices on a network.
- Main Stream – Main Stream is the main streaming protocol for the camera. Main stream uses more bandwidth and aempts to keep quality and uency high.
- NO/NC – Normally Open and Normally Closed are opons for sensor type. These sengs allow for different exposure types when capturing video and sll images.
- NTP – Network Time Protocol is a networking protocol for clock synchronizaon between computer systems over packet-switched, variable-latency data networks.
- P2P – Peer-to-Peer is a decentralized communicaons model in which each party has the same capabilities and either party can initiate a communicaon session.
- PPPoE – Point to Point Protocol over Ethernet is a network protocol for encapsulang Point to Point Protocol data packets inside Ethernet frames.
- PTZ – Pan Tilt Zoom is a feature that allows a camera to remotely change its posion.
- QR Code – Quick Response code is a type of digital barcode that enables devices to share complex data strings quickly.
- Record Delay – Record Delay species in seconds how long the delay between alarm acvaon and recording should be.
- Relay Out – Relay Out triggers a connected alarm (connected to the alarm port on the back of the camera) when an alarm on the camera is triggered.
- S/N – S/N stands for serial number. The S/N is unique to each camera and can be used to connect to dierent Amcrest apps and services to provide dierent methods of access to the camera.
- Sensitivity – Sensitivity is the amount of change required to increase the moon detected by a percentage. The lower the sensitivity, the more movement is required to trigger an alarm.
-
SMTP – Simple Main Transfer Protocol is an Internet standard for electronic mail (e-mail) transmission.
• Stac IP – An IP address that does not change. -
Sub Stream – Sub Stream is an alternate streaming protocol for the camera. Sub stream uses less bandwidth and aempts to keep uency high at the expense of quality.
- Subnet Mask – a 32-bit number that masks an IP address, and divides the IP address into network address and host address.
- TCP/IP – TCP/IP stands for Transmission Control Protocol/Internet Protocol and it is the language/protocol that allows communicaon between internet connected devices, whether on a local network, or a on the Internet at large.
- Threshold – Threshold is the level that the moon detecon needs to reach in order to trigger an alarm.
- UPnP – UPnP stands for Universal Plug and Play, and it is a protocol used to easily connect devices to the internet.
- Video Tamper – Video Tamper refers to any major changes happening to the video feed such as it being blocked out, interfered with, or disconnected.
Appendix A: Toxic or Hazardous Materials or Elements
O: Indicates that the concentraon of the hazardous substance in all homogeneous materials in the parts is below the relevant threshold of the SJ/T11363-2006 standard.
X: Indicates that the concentraon of the hazardous substance of at least one of all homogeneous materials in the parts is above the relevant threshold of the SJ/T11363-2006 standard. During the environmental-friendly use period (EFUP) period, the toxic or hazardous substance or elements contained in products will not leak or mutate so that the use of these (substances or elements) will not result in any severe environmental polluon, any bodily injury or damage to any assets. The consumer is not authorized to process such kind of substances or elements, please return to the corresponding local authorities to process according to your local government statutes.
Note:
- For detailed operaonal instrucons, please refer to the User Manual on the CD that was included in your purchase.
• To view setup videos for many of the steps outlined in this guide, go to hp://amcrest.com/videos
• This user manual is for reference only. Slight dierences may be found in the user interface.
• All the designs and soware here are subject to change without prior wrien noce.
• All trademarks and registered trademarks menoned are the properes of their respective owners.
To contact Amcrest support, please do one of the following:
- Visit hp://amcrest.com/contacts and use the email form
- Call Amcrest Support using one of the following numbers
Toll Free: (888) 212-7538
Internaonal Callers (Outside of US): +1-713-893-8956
USA: 713-893-8956
Canada: 437-888-0177
UK: 203-769-2757
• Email Amcrest Customer Support support@amcrest.com
Copyright Amcrest ^© 2015