Strider Mini Signature - Baby scale Steelcraft - Free user manual and instructions
Find the device manual for free Strider Mini Signature Steelcraft in PDF.


User questions about Strider Mini Signature Steelcraft
0 question about this device. Answer the ones you know or ask your own.
Ask a new question about this device
Download the instructions for your Baby scale in PDF format for free! Find your manual Strider Mini Signature - Steelcraft and take your electronic device back in hand. On this page are published all the documents necessary for the use of your device. Strider Mini Signature by Steelcraft.
USER MANUAL Strider Mini Signature Steelcraft
Lightweight Travel System
Compatible with the Britax Safe-n-Sound Unity Baby Capsules and the Click & Go™ Signature Bassinet.
(All products are sold separately)
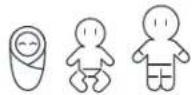
0 - 20kg
(newborn - 4 years approx.)
IMPORTANT KEEP THIS BOOKLET IN A SAFE PLACE FOR FUTURE REFERENCE
SERIES HA4956 | britax.com.au
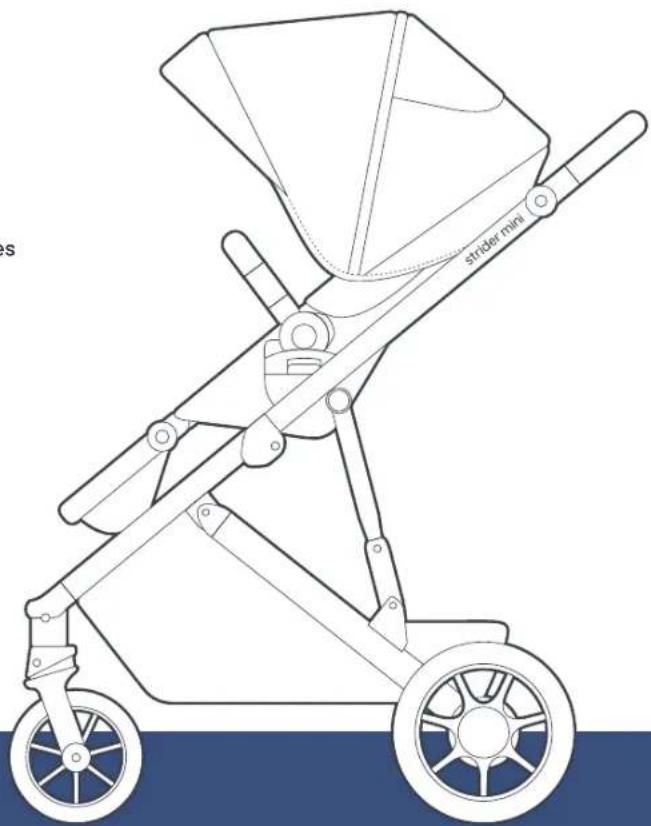
natural_image
Line drawing of a baby stroller with labeled 'strider mini' component (no other text or symbols)Steelcraft
Contents
About Your Stroller
Stroller Warnings & Important Notes 04
Lift & Carry Correctly 06
What's in the Box: Parts 07
What's in the Box: Accessories 08
Optional Accessories & Compatibility 08
Stroller Features 09
Configurations 11
Stroller Assembly
Opening the Stroller Frame 12
Attaching or Removing the Rear Wheels 13
Attaching or Removing the Front Wheels 13
Attaching the Seat 14
Attaching the Canopy 15
Attaching the Arm Bar 16
Attaching the Organiser Bag 17
Installing the Newborn Comfort Insert 18
Attaching the Shade Cover 19
Attaching the Rain Cover 20
Attaching & Removing the Cup / Bottle Holder 21
Stroller Operation
Using the Brakes 21
Using the Front Wheel Swivel Lock 22
Adjusting the Backrest 22
Adjusting the Leg Rest 23
Adjusting the Pivotal Handle 23
Securing Your Child in the Harness 24
Adjusting the Harness 25
Opening the Harness 25
Adjusting the Shoulder Harness Height 26
Using the Storage Basket 26
Using the Tether Strap 27
Removing and Reversing the Stroller Seat 28
Using the Stroller 29
Folding the Stroller 30
Lifting and Carrying the Stroller 32
Bassinet
Bassinet Warnings & Important Notes 33
Attaching the Bassinet 34
Removing the Bassinet 34
Baby Capsule
Baby Capsule Warnings & Important Notes 35
Attaching & Removing Britax Unity Baby Capsule 36
Attaching & Removing Britax B Safe 35 (for NZ market) 37
Care & Maintenance 38
Warranty 41
Always follow the manufacturer's instructions. Read all instructions carefully before assembly and use of this stroller.
The correct use and maintenance of this product is essential.

WARNINGS TO AVOID INJURY OR DEATH:
ALWAYS APPLY THE BRAKES WHENEVER THE STROLLER IS STATIONARY.
•DO NOT LEAVE CHILDREN UNATTENDED.
• SECURE THE CHILD IN THE HARNESS AT ALL TIMES.
•DO NOT CARRY EXTRA CHILDREN OR BAGS ON THIS STROLLER.
•MAKE SURE CHILDREN ARE CLEAR OF ANY MOVING PARTS IF YOU ADJUST THE STROLLER.
•DO NOT USE ANY ACCESSORIES OTHER THAN THOSE APPROVED FOR USE WITH THIS STROLLER BY BRITAX.
- IT IS UNSAFE TO USE ACCESSORIES NOT APPROVED FOR USE WITH THIS STROLLER.
•THE MAXIMUM WEIGHT OF THE CHILD IS NOT TO EXCEED:
STROLLER: 20KG
CLICK & GO™ BASSINET: 9KG
BRITAX UNITY BABY CAPSULE: 12KG
BRITAX B SAFE 35 CAR SEAT: 15.8KG
MAXI COSI MICO AP: 9KG
NUNA KLIK PLUS: 11KG
FOR IMPORTANT NOTES AND WARNINGS ON ACCESSORIES
- REFER TO THEIR INDIVIDUAL SECTIONS IN THIS BOOK OR THE INSTRUCTION MANUAL INCLUDED WITH THE INDIVIDUAL PRODUCTS. THE MAXIMUM WEIGHT VARIES FOR EACH ACCESSORY.
IMPORTANT NOTES:
- Use great care when using the stroller on travelers or other moving surfaces.
- Do not use the stroller on stairs, escalators.
- Do not lift the stroller by the arm bar (supplied) because it may disengage.
- Do not allow children to stand on the seat.
- Do not hang bags unless they are supplied or goods from the handle as this could cause the stroller to tip over.
- Do not leave the stroller and its accessories near an open fire or exposed flame.
- Do not place more than 10kg in the basket or 1kg in the seat pocket (if supplied), 1kg in the cup/bottle holder or 1.5kg in the organiser bag.

This CAUTION symbol is shown at certain steps in this instruction manual to highlight the danger of being injured by moving parts.
Lift & Carry Correctly
The SMART lifting technique: This technique can be used to pick up small light loads from low levels.
Size up the load
• Assess the load (size, shape, and weight).
• Assess whether the load needs to be moved;
- Where is it going to be placed" Check that there are no obstructions;
- Assess whether mechanical or human assistance is required.
Move the load as close to the body as possible
- A load is heavier to lift or carry if it is not close to the body.
- The whole hand should be used to ensure a firm grip.
Always bend your knees
- Maintain balance.
- Keep feet apart and in a comfortable position.
- Minimise lower back bending.
- Bend knees preferable at as large an angle as possible but not at a right angle - use a semi-squat in preference to a full squat.
Raise the load with your legs
- Achieve the lift smoothly and without jerkiness.
- Maintain the normal curvature of the spine to allow the force of the load to be distributed evenly from the spine to the pelvis.
Turn your feet in the direction that you want to move the load.
- Avoid unnecessary bending, twisting, and reaching.
- Change direction by turning your feet and not your back.
- To set the load down, squat down, keep your head up and let your legs do the work.
Remember to THINK TALL - chest lifted, shoulders relaxed, chin tucked in, and head level.
What's in the Box: Parts
1x Stroller Frame & Basket 1x Canopy
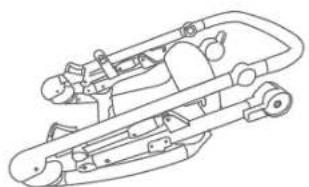
natural_image
Technical line drawing of a mechanical assembly (no text or symbols)1x Stroller Seat
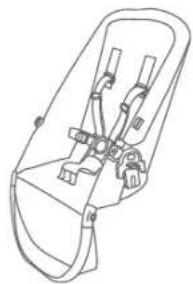
natural_image
Line drawing of a bicycle seatbelt with no text or symbols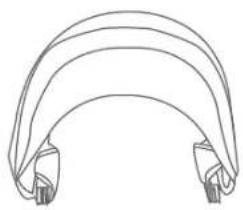
natural_image
Pure curved line diagram without any text, numbers, or symbols2 x Front Wheels1 x Arm Bar
2 x Rear Wheels
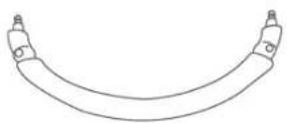
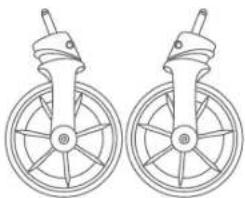
natural_image
Line drawing of two identical bicycle wheels with six spokes (no text or symbols)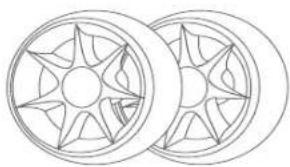
natural_image
Two identical wireframe wheel rim designs with star patterns (no text or symbols)STRIDER MINI SIGNATURE
What's in the Box: Accessories
2 x Shoulder Harness Pads
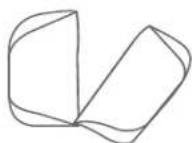
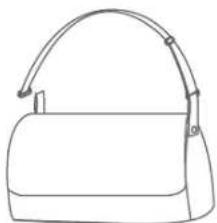
1x Stroller Organiser Bag
natural_image
Line drawing of a handbag with handle and side panel (no text or symbols)Optional Accessories
- Click & Go™ Baby Capsule Adaptors for Maxi Cosi and Nuna Klik Plus
- Steelcraft Cup Holder
- Steelcraft Rain Cover
- Steelcraft Shade Cover
• Newborn & Toddler Comfort Pack
Compatible with:
- Click & Go Signature Bassinet
• Britax Safe-n-Sound Unity Neos Baby Capsule
• Britax Safe-n-Sound Unity Baby Capsule Isofix Compatible
• Britax B Safe 35 (for NZ market) - Maxi Cosi Mico Baby Capsule (with Click & Go™ baby capsule adaptors for Maxi Cosi Mico & Nuna Klik plus)*
- Nuna Klik Plus Baby Capsule (with Click & Go™ baby capsule adaptors for Maxi Cosi Mico & Nuna Klik plus)*
* Refer to Click & Go™ baby capsule adaptors for Maxi Cosi Mico and Nuna Klik plus for attaching and removing the baby capsules.
Stroller Features
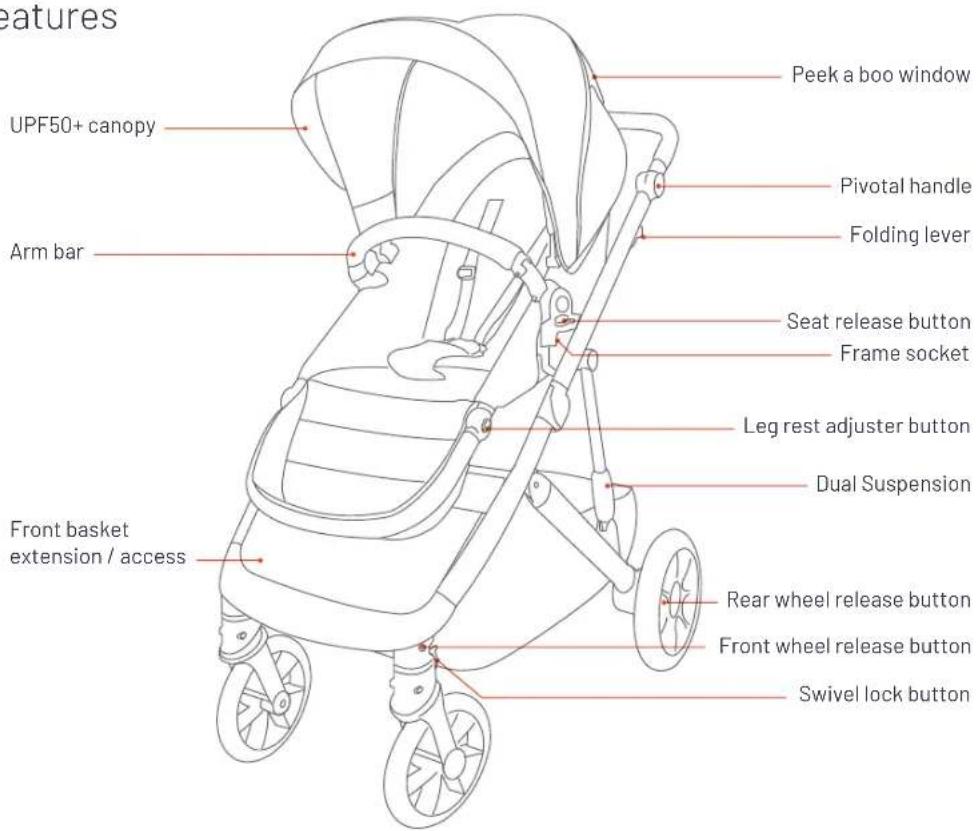
text_image
features UPF50+ canopy Arm bar Front basket extension / access Peek a boo window Pivotal handle Folding lever Seat release button Frame socket Leg rest adjuster button Dual Suspension Rear wheel release button Front wheel release button Swivel lock buttonStroller Features
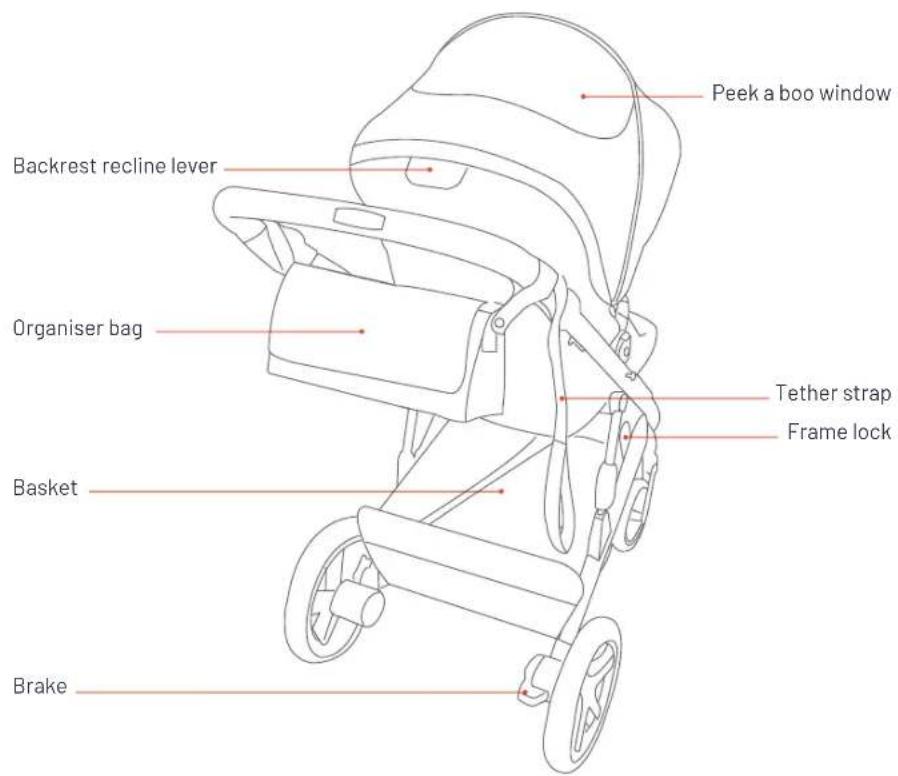
text_image
Backrest recline lever Organiser bag Basket Brake Peek a boo window Tether strap Frame lockConfigurations
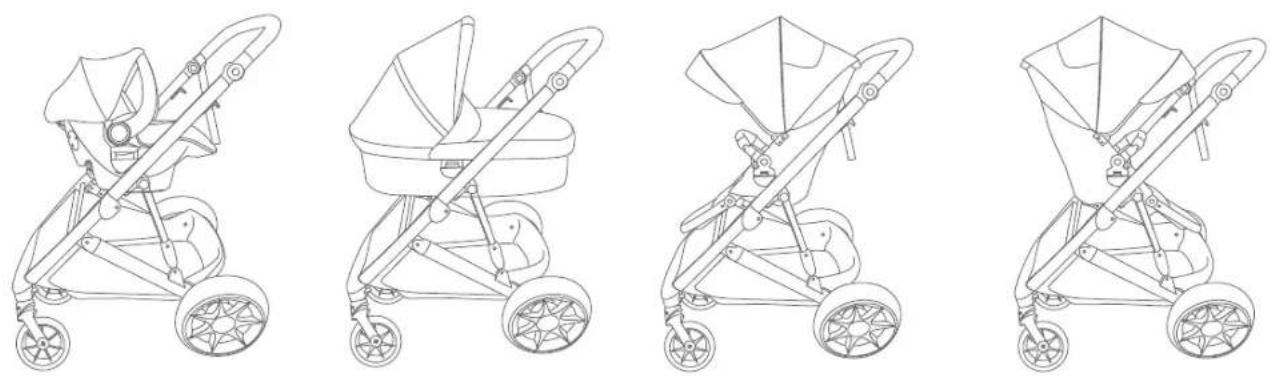
PLEASE NOTE: These configurations are reference only. Refer to our website (britax.com.au) for most up to date compatibility. Shown with optional accessories (sold separately).
DO NOT exceed maximum weight limits defined in the Baby Capsules or Accessory instruction manuals.
STRIDER MINI SIGNATURE | 11
Stroller Assembly
Opening the Stroller Frame
IMPORTANT NOTES:
PLEASE REFER TO PAGE 6 FOR SMART LIFTING TECHNIQUES.
- Release the frame lock with due care and open the frame.
- When opening the stroller, be aware of the danger of being injured by moving parts and locking devices during the process. Keep all hands and limbs clear of these parts.
- There is potential for fingers or parts of the body to injured when the stroller is being unfolded, due care should be exercised.
- Keep children clear of the stroller when unfolding the stroller.
- Open the stroller slowly and be careful where you place your hands. Keeping your hands on the handle is the best way to unfold the stroller.
text_image
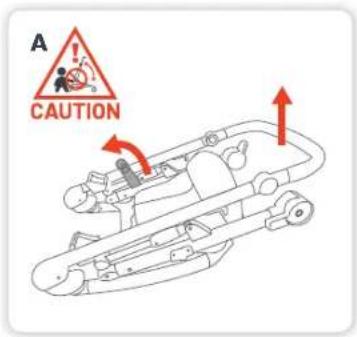
A CAUTIONA Push the release on the frame lock and open the frame.
text_image
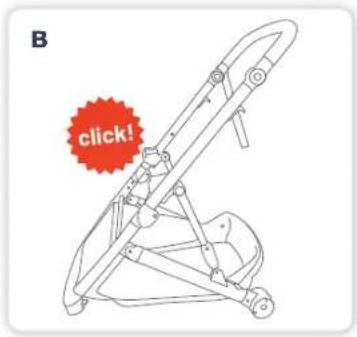
B click!B Lift handle until frame locks into upright position.
Stroller Assembly
natural_image
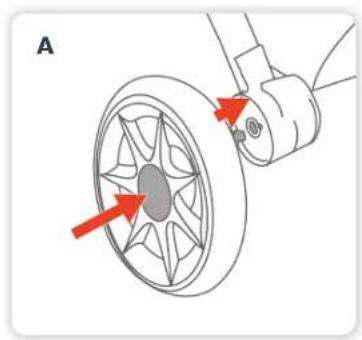
Diagram of a mechanical component with red arrows indicating direction, no text or symbols presentA Hold in the rear wheel release button in the centre of the wheel and slide the mounting pin into the housing on the rear axle. Please ensure it is locked.
natural_image
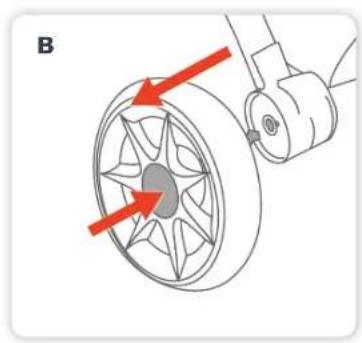
Mechanical diagram showing a wheel with red arrows indicating direction, no text or symbols presentB To remove the rear wheels, press and hold the release button in the centre of the wheel and pull away from the wheel housing.
Attaching or Removing the Front Wheels Attaching or I
text_image
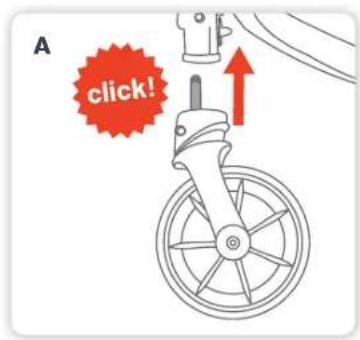
A click!A Slide the front wheel mounting pins into the housing on the frame until they lock into place. Please ensure it is locked.
natural_image
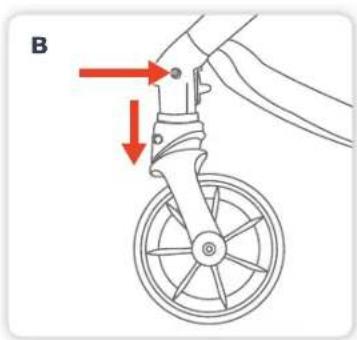
Diagram of a bicycle suspension system with red arrows indicating force directions (no text or labels)B To remove the front wheels, push front wheel release button and pull the wheel out of the housing.
Stroller Assembly
Attaching the Stroller Seat
IMPORTANT NOTE:
Always remove your child from the stroller seat before installing, removing or changing the seat direction.
☑ TIP: The seat is reversible so it can be attached to the frame in the forward facing position or the rearward facing position.
text_image
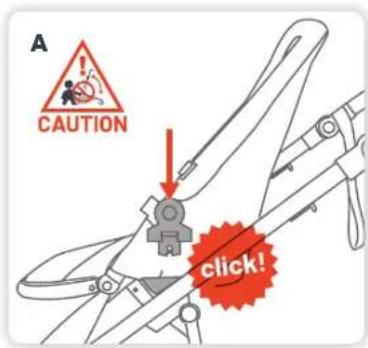
A CAUTION click!A Hold the stroller seat over the frame and align the seat connectors with frame sockets.
text_image
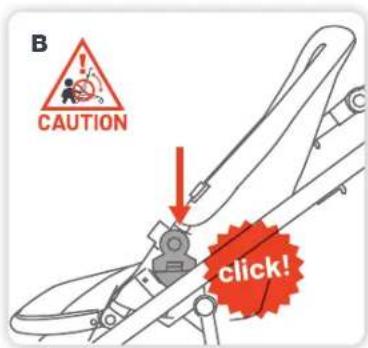
B CAUTION click!B Push down the seat until both stroller seat connectors have locked into the frame sockets. Please ensure the seat is locked.
Stroller Assembly
Attaching the Canopy
IMPORTANT NOTE: The sun is very strong. DO NOT LEAVE YOUR CHILD EXPOSED TO THE SUN. The canopy or hood on this product will not give your child total protection from the harmful rays of the sun.
text_image
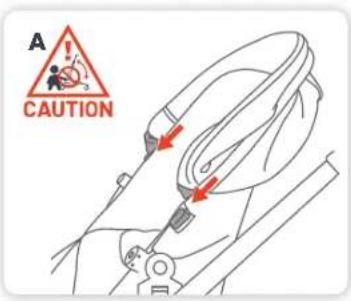
A CAUTIONA Fit the canopy around the seat with hook and loop slide the canopy frame mouldings until they interlock together.
natural_image
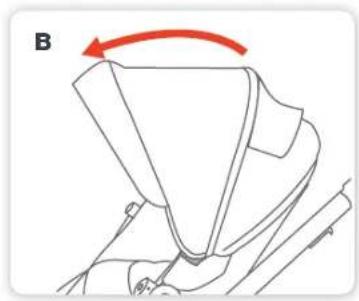
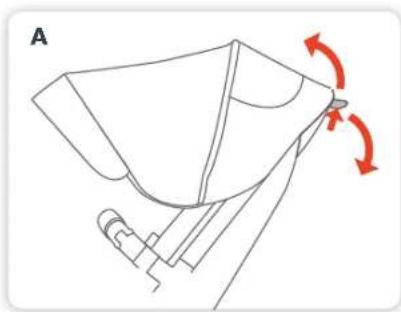
Line drawing of a mechanical component with a red arrow indicating rotation (no text or symbols)B To adjust the canopy, open by pulling forward, or close by pushing the canopy backward.
natural_image
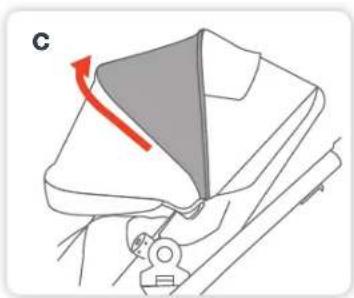
Illustration of a person's seatbelt being adjusted with a red arrow indicating rotation (no text or symbols)C To expand the canopy unzip the centre section of the canopy.
natural_image
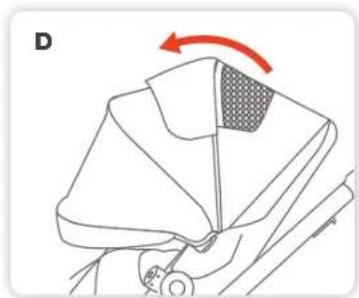
Diagram of a garment pattern piece with a red arrow indicating rotation (no text or symbols)D There is peek-a-boo window for ventilation and observation.
STRIDER MINI SIGNATURE | 15
Stroller Assembly
Attaching the Arm Bar
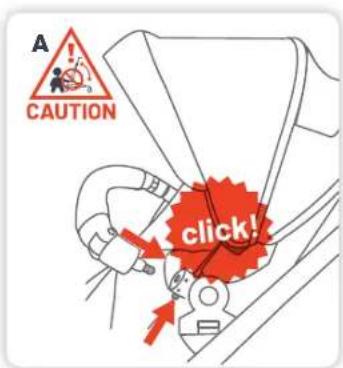
WHEN A CHILD IS IN THE STROLLER, KEEP THE ARM BAR ATTACHED AT ALL TIMES.
text_image
A! CAUTION click!A Align the pins on each side of the arm bar with the arm bar sockets on the seat. Press and hold the button underneath the arm bar sockets then slide the arm bar pins into the sockets until It is locked. Please ensure It is locked.
natural_image
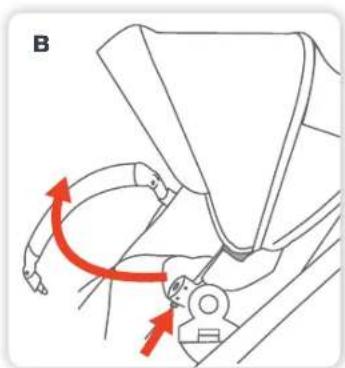
Mechanical diagram showing a lever mechanism with red arrows indicating motion direction (no text or symbols)B To remove the arm bar, press and hold the button underneath the arm bar and pull the arm bar out. Rotate the arm bar for easy access.
Stroller Assembly
Attaching the Organiser Bag
IMPORTANT NOTE:
Do not place more than 1.5kg in the organiser bag. Disconnect the shoulder strap when using on the stroller.
text_image
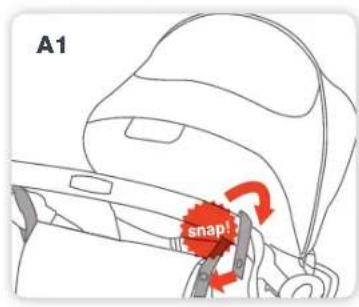
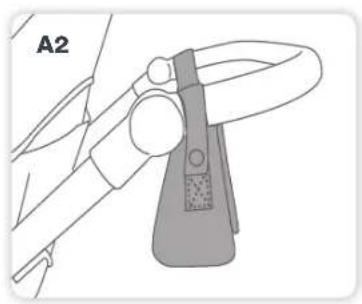
A1 snap!A1+ A2 Position your organiser bag loop just above the height adjuster and snap the press stud on both sides.
text_image
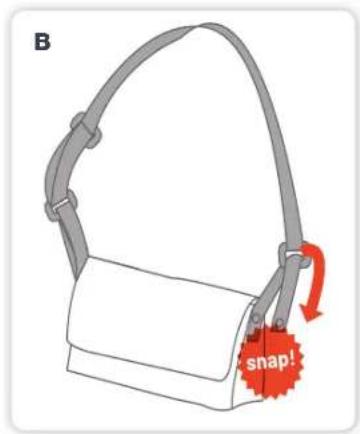
B snap!B Thread the hanging strap on both sides through the D ring on the end of the shoulder strap. Store the shoulder strap when not in use.
natural_image
Diagram of a mechanical clamp or bracket assembly with labeled section A2 (no text or symbols on the diagram itself)Stroller Assembly
Installing the Newborn Comfort Insert
Sold Separately
IMPORTANT NOTES:
- While using this product regularly check to ensure that the harness straps remain tight.
- Ensure that the shoulder straps are fitted through the appropriate harness slots to suit your child's seated shoulder height.
text_image
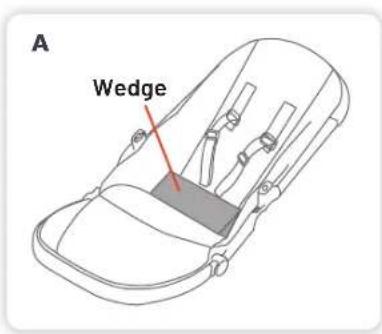
A WedgeA To use the newborn back support wedge, place the newborn back support wedge firmly in the seat.
natural_image
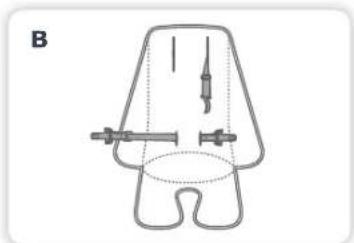
Diagram of a mechanical or anatomical component with no visible text, numbers, or symbolsB Place the insert on the stroller seat and thread the waist and shoulder harness straps through the button holes in the back of the seat insert.
natural_image
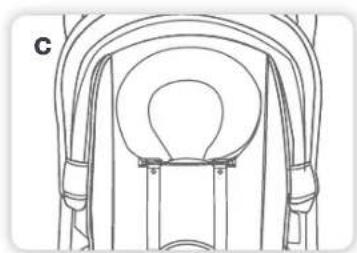
Technical line drawing of a mechanical component with curved and rectangular features (no text or symbols)C To use the head pillow, place the head pillow elastic behind the shoulder harness strap.
text_image
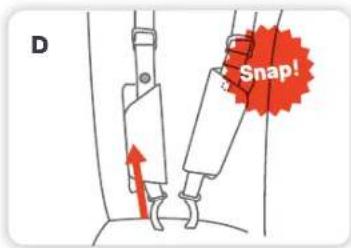
D Snap!D Slide the shoulder pads through the shoulder harness and close the stud on the shoulder harness with one in the shoulder pads to keep the shoulder pads in place.
Stroller Assembly
Installing the Shade Cover
Sold Separately
A
natural_image
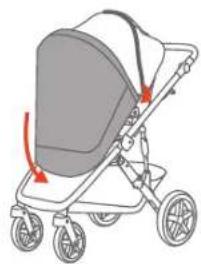
Illustration of a baby stroller with directional arrows indicating motion (no text or symbols)A Fit the shade cover over the canopy front and secure the toggle and elastic loop around the canopy frame then pull to the front and secure with the elasticised end.
B
natural_image
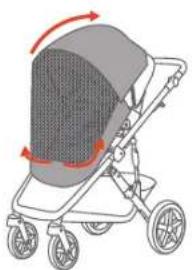
Illustration of a baby stroller with red arrows indicating rotation or movement (no text or symbols)B Lift the shade cover flap to use mesh panel for ventilation and open zipper to access the baby.
Stroller Assembly
Installing the Rain Cover
Sold Separately
IMPORTANT NOTES:
- Ensure rain cover is kept away from the child's face.
- Refit rain cover if required to ensure child is safe.
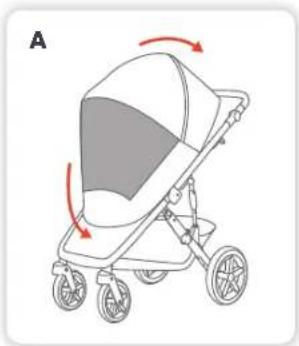
√ TIP: The rain cover can be used in both single and tandem modes. An extension panel is also provided which is easily secured to the single mode rain cover with a zip.
natural_image
Illustration of a baby stroller with rotation arrows indicating movement (no text or symbols)A Pull the front elastic section of rain cover over the leg rest. Ensure the rain cover fits snugly over the canopy and is securely fitted to stroller seat.
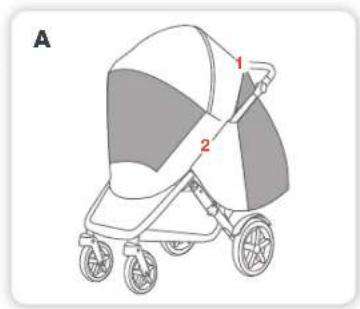
Using the Extension:
natural_image
Illustration of a two-wheeled stroller with labeled parts (1 and 2), no text or symbols present.A Attach the rain cover extension as required and secure to the rain cover with the zipper (1) and hook & loop (2) attachments.
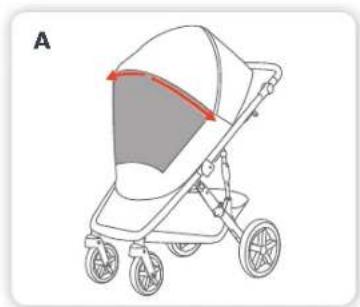
Accessing your child:
natural_image
Illustration of a baby stroller with wheels and a curved arrow indicating direction (no text or symbols)A Open zipper (dashed orange line) to access the baby.
Stroller Assembly
Attaching the Cup / Bottle Holder
Sold Separately
IMPORTANT NOTES:
- Do not place over 1kg in the cup / bottle holder.
- Do not place hot drinks in the cup / bottle holder.
- Remove contents from the cup / bottle holder before folding the stroller.
text_image
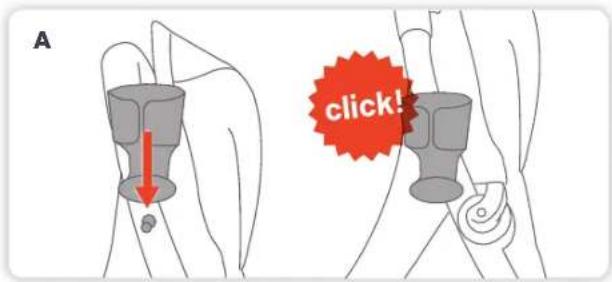
A click!A The cup / bottle holder can only fit on the right-hand side of the frame. Push the cup / bottle holder attachment to the connector on the frame.
Stroller Operation
Using the Brakes
! WARNINGS: ALWAYS APPLY
THE BRAKES WHEN THE STROLLER IS STATIONARY.
text_image
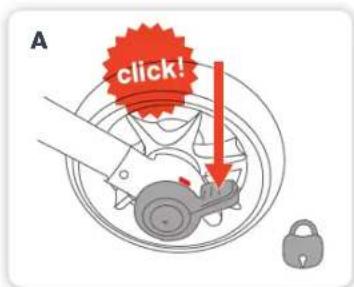
A click!A To engage the brake, step on the red brake pedal until you hear a 'click'. The indicator window will change to red.

text_image
B click!B To disengage the brake, step on the red brake pedal until you hear a 'click'. The indicator window will change to green.
STRIDER MINI SIGNATURE | 21
Stroller Operation
Using the Front Wheel Swivel Lock
PLEASE NOTE: Always lock the swivel wheels when using the stroller on rough surfaces as this will minimise wheel wobble.
The swivel wheels should only be locked when the wheels are in the trailing position (wheels under frame).
natural_image
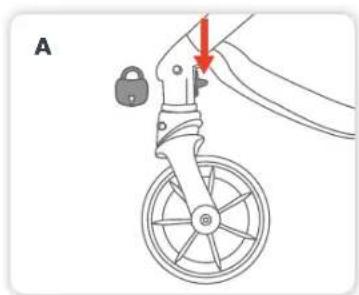
Diagram of a hand operating a bicycle steering wheel with a padlock, showing no text or symbolsA To lock the front wheels into the fixed position, press the grey swivel lock down on both wheels until they lock into position.
natural_image
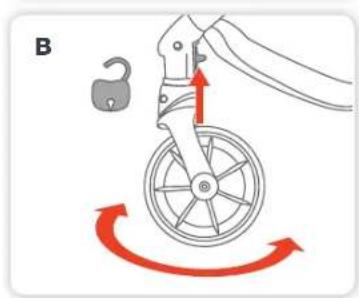
Illustration of a bicycle steering wheel with red curved arrows indicating rotational motion (no text or symbols)B To allow the wheels to swivel, push the grey swivel wheel lock up on both wheels until they lock into position.
Adjusting the Backrest
! WARNINGS:
- THE UPRIGHT POSITIONS ARE NOT SUITABLE FOR USE WITH CHILDREN LESS THAN 6 MONTHS OLD.
- THE LOWEST RECLINE POSITION SHOULD BE USED TO TRANSPORT BABIES. THE BACKREST CAN BE ADJUSTED TO A MORE UPRIGHT POSITION AS THE CHILD GROWS OLDER AND IS ABLE TO SUPPORT ITS HEAD WITHOUT ASSISTANCE.
TIP: If the child is sitting in the seat, support the backrest as it reclines. If you have difficulty adjusting the backrest you may need to remove the child from the seat to allow you to raise or lower the backrest with ease.
natural_image
Diagram of a mechanical component with red directional arrows indicating rotation (no text or symbols)A Lift the recline lever on the back of the seat and hold while raising or lowering the backrest to the desired position.
☑ TIP: There are three backrest positions.
Stroller Operation
Adjusting the Leg Rest Adjusting the Pivoting Handle
IMPORTANT NOTES:
- The leg rest feature is provided for your child's comfort.
- The leg rest is not designed to support extra weight.
- Do not allow children to stand or sit on the leg rest, it will disengage if extra weight is applied.
- If leg rest disengages simply lift up again to reset leg rest mode.
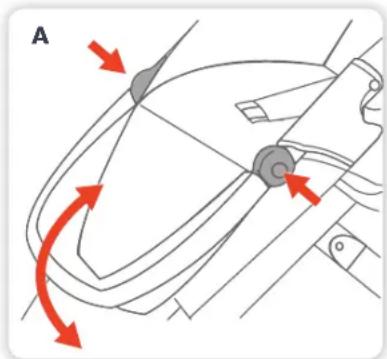
natural_image
Diagram of a car interior showing directional arrows and structural components (no text or symbols)A Press the two release buttons on both sides of the leg rest hinge and hold while raising or lowering the leg rest to the desired position.
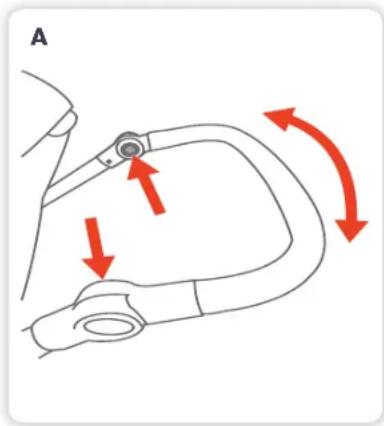
natural_image
Diagram of a curved mechanical component with red arrows indicating motion or force direction (no text or symbols)A Press the two release buttons on the inside of the handle and hold while raising or lowering the handle to the desired position.
When the desired height has been achieved let go of both release buttons.
☑ TIP: The pivotal handle has five positions.
Stroller Operation
Securing the Child Harness

WARNINGS:
• USE THE HARNESS AT ALL TIMES.
- ENSURE YOUR CHILD IS SECURED WITH A CORRECTLY ADJUSTED HARNESS.
• THE ADJUSTED HARNESS SHOULD CLOSELY FIT THE CHILD.
- NEVER LEAVE THE HARNESS BUCKLED WHEN NOT FITTED TO A CHILD IN THE STROLLER, BECAUSE THE HARNESS CAN FORM LOOPS WHICH MAY POSE A STRANGULATION HAZARD.
- WHEN HARNESS IS NOT IN USE, DISCONNECT SHOULDER STRAPS FROM THE WAIST STRAPS AND BUCKLE TO PREVENT STRANGULATION.
- A five-point harness is provided to restrain your child.
- Buckle tongues separate for added safety.
- To reconnect buckle tongues and to secure the child in the harness please follow the steps to the right carefully.
PLEASE NOTE: Each waist buckle tongue has a raised rib on one side and can only be locked into the buckle assembly with the raised rib facing up. Ensure the harness straps are not twisted as they may become uncomfortable for the child.
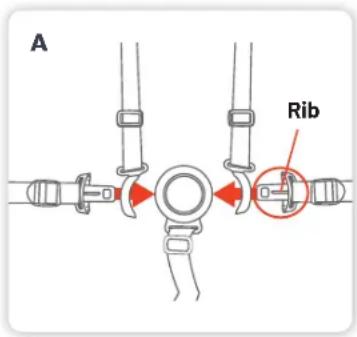
text_image
A RibA Always apply the brakes before placing child in the stroller seat. Position the shoulder strap near the child's shoulder and position crotch strap between legs. Thread the waist strap buckle tongues through the shoulder straps tongue guides.
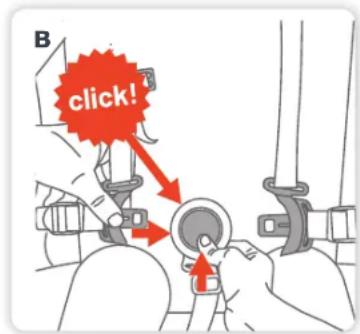
text_image
B click!B Hold the centre button in on the crotch buckle and insert the waist buckle tongues into the crotch strap buckle until you hear a 'click'. Repeat the procedure on the other side. Please ensure it is locked.
Stroller Operation
Adjusting the Harness Opening the Harness
natural_image
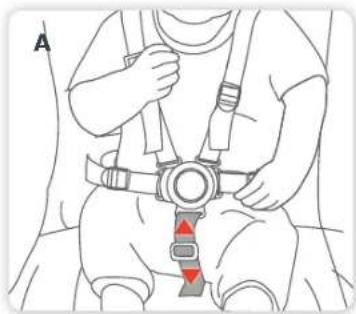
Line drawing of a person wearing a seatbelt and harness, with a red belt and arrow indicating direction (no text or symbols)A Tighten or loosen the crotch strap by sliding the 3 bar harness adjuster up or down. The crotch strap should be adjusted to a snug fit.
text_image
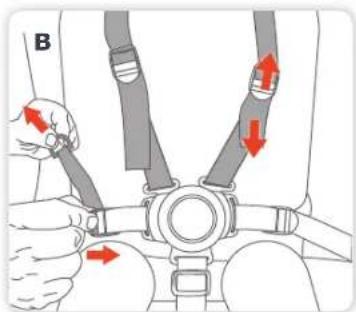
BB Tighten or loosen the waist and shoulder straps, hold and lift the 4 bar harness adjuster and pull the harness strap to adjust to the desired fit. The straps needs to fit firmly around the child.
text_image
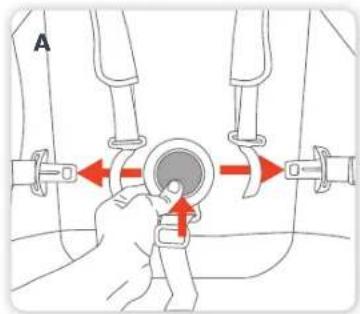
AA Release the harness by pressing the centre button in on the crotch buckle while pulling the waist tongues out of the crotch buckle.
Stroller Operation
Adjusting the Shoulder Harness Height Using the Storage Basket
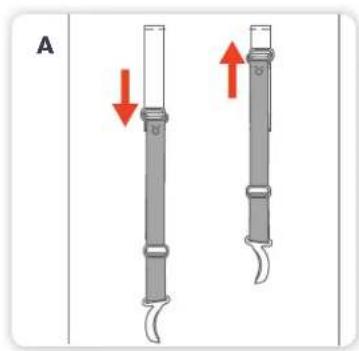
IMPORTANT NOTE: The harness can be adjusted to different heights to accommodate the child. The shoulder straps must be positioned near the child's shoulders.
text_image
A B BA To change the shoulder harness height, simply hold the shoulder harness and slide up and down to the desired position.
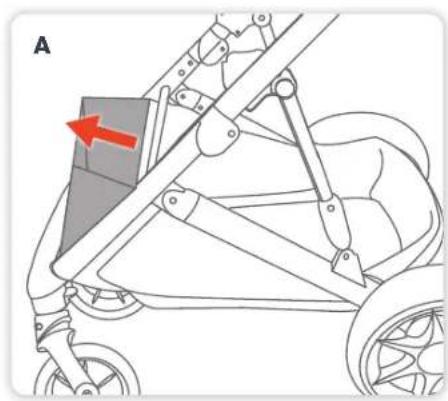
IMPORTANT NOTE: Do not place more than 10kg in the basket.
natural_image
Diagram of a stroller with wheels and a highlighted seat area, showing no text or symbolsA You can extend the front of the basket to create more storage space and easy access to basket.
Stroller Operation
Using the Tether Strap

WARNINGS: USE THE TETHER
natural_image
Illustration of a person adjusting a medical device with clamps (no text or symbols)A wrist tether strap is provided on the handle grip. Slide your hand through the tether strap loop whenever you use the stroller. Only remove your hand from the tether strap loop when the brakes have been applied to the stroller wheels.
Stroller Operation
Removing & Reversing the Stroller Seat IMPORTANT NOTE:
Always remove your child from the stroller seat before installing, removing or changing the seat direction.
☑ TIP: The seat is reversible so it can be attached to the frame in the forward facing position or the rearward facing position.

natural_image
Technical line drawing of a mechanical device with red arrows indicating force or movement (no text or symbols)A Holding the seat release buttons on both sides and lift both buttons upwards at the same time lifting the stroller seat up and away from the stroller frame.
natural_image
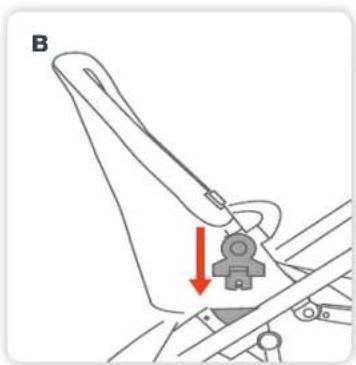
Mechanical diagram showing a lever mechanism with a red arrow indicating force direction (no text or symbols)B Turn the seat facing opposite direction and then attach the stroller seat to the frame in the rearward facing position.
Stroller Operation
Using the Stroller
PLEASE REFER TO PAGE 6 FOR SMART LIFTING TECHNIQUES.
• Always ensure you bend your knees where appropriate and take due care when lifting the frame.
- With your hand through the wrist tether strap loop, push the stroller holding the handle.
- The stroller can be steered in the desired direction - allowing the front wheels to swivel will make this easier.
- The front wheels may wobble or oscillate when walking fast, locking the front swivel wheels will stop this.
- The stroller can be taken up kerbs by either pressing down on the handles and raising the front wheels or turning the stroller around and pulling the stroller up the kerb.
- Caution is required when pushing the stroller on a steep slope as the stroller may become unstable. Always hold the handle firmly.
- Do not run with the stroller.
- Whenever you stop, always apply the brakes before you leave the stroller.
- To ensure the safety of your child only hang the supplied bag from the handle bar and use the basket to store all other bags or goods.
Stroller Operation
Folding the Stroller
PLEASE REFER TO PAGE 6 FOR SMART LIFTING TECHNIQUES.
IMPORTANT NOTES:
- Remove the child from the stroller before commencing any folding operation.
- Fold the stroller slowly and be careful where you place your hands.
- When folding the stroller, be aware of the danger of being injured by moving parts and locking devices during the process. Keep all hands and limbs clear of these parts.
- There is potential for fingers or parts of the body to be injured when the stroller is being folded, due care should be exercised.
- Keep children clear of the stroller during folding the stroller.
PLEASE NOTE: The stroller seat and wheels can be removed to reduce the total folded size.
With the stroller seat attached, folding the leg support will also help to reduce the folded size.
FOLDING TIPS:
- For easier handling. It is recommended to remove the stroller seat from the frame (Refer to Page 28) before folding. Then fold the frame and put both the seat and frame in the car.
- For smaller cars, it may be convenient to simply remove the rear wheels.
IMPORTANT NOTES:
- Remove the Bassinet or Baby Capsule if connected to the frame prior to folding.
- The rain cover must also be removed if fitted.
Stroller Operation
Folding the Stroller
PLEASE REFER TO PAGE 6 FOR SMART LIFTING TECHNIQUES.
- Remove the child from the stroller.
- Engage the brakes. (Refer to Page 21)
- Ensure the front wheels are in swivel mode so the front wheels will automatically position under the stroller during folding. (Refer to Page 22)
- Close the canopy. (Refer to Page 15)
- Adjust the leg rest to the lowest position. (Refer to Page 23)
• Make sure the handle height is set to the highest position aligned with the frame to prevent the handle coming in contact with the wheels when folded.
☑ TIP: It is recommended to remove the stroller seat from the frame (Refer to Page 28) before folding. Then fold the frame and put both the seat and frame in the car.
text_image
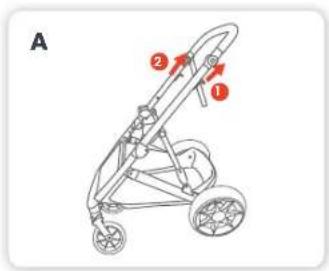
A ① ②A Engage the brake. Pull up the folding levers 1 & 2 and begin to push the handle down to fold.
natural_image
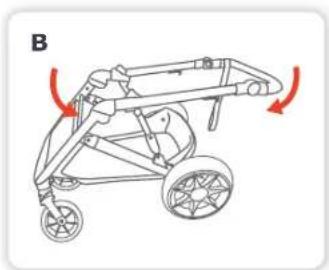
Line drawing of a stroller with wheels and a handle, showing motion arrows (no text or symbols)B Continue folding all the way down until frame is fully folded and frame lock is engaged.
natural_image
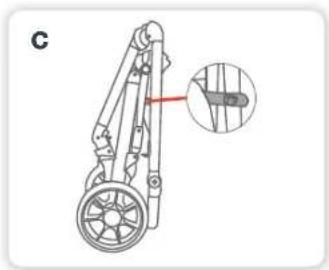
Mechanical device diagram showing a wheel and lever assembly with a magnified inset highlighting a specific component (no text or symbols present)C Ensure the frame is securely locked.
Stroller Operation
Folding the Stroller Lifting & Carrying the Stroller
CAUTION: If you have chosen not to remove the stroller seat from the frame the stroller can be folded with the stroller seat attached to the stroller frame, however, caution must be taken when lifting the stroller because of the overall weight.
☑ TIP: The stroller can fold with seat in any position however stroller seat in the forward facing position will achieve a more compact fold.
IMPORTANT NOTE: To avoid injury: bend you knees when opening, lifting, carrying, folding, unfolding or adjusting the stroller or any accessories.
Bassinet
Sold Separately
Bassinet Warnings & Important Notes

WARNINGS:
• DO NOT USE THE BASSINET ONCE THE CHILD CAN SIT UP.
- IT IS UNSAFE TO USE ACCESSORIES NOT APPROVED FOR USE WITH THIS STROLLER.
• DO NOT USE ANY ACCESSORIES OTHER THAN THOSE APPROVED FOR USE WITH THIS STROLLER BY BRITAX.
- THE MAXIMUM WEIGHT OF THE CHILD USING THE PRODUCT IS NOT TO EXCEED 9KGS.
IMPORTANT NOTES:
- For proper use of the bassinet, please follow the instruction manual provided with the bassinet.
- The Click & Go™ Signature Bassinet is only compatible bassinet designed to fit the Strider Mini Signature stroller.
- Remove the stroller seat or baby capsule from the frame before fitting the bassinet.
- Always remove your child from the bassinet before fitting or removing the bassinet from the stroller frame.
- The bassinet must always face towards the handle.
- The bassinet must be removed from the frame before folding.
- Do not lift the stroller by the bassinet.
Bassinet
Sold Separately
Attaching the Bassinet Removing the Bassinet
natural_image
Line drawing of a baby stroller with a red arrow indicating force or pressure point (no text or symbols)
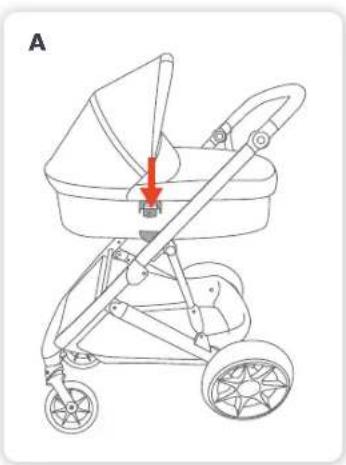
A The bassinet must face the stroller handle. Align the bassinet directly over the frame socket and push down until it locks. Pull up on the bassinet to ensure it is locked.
natural_image
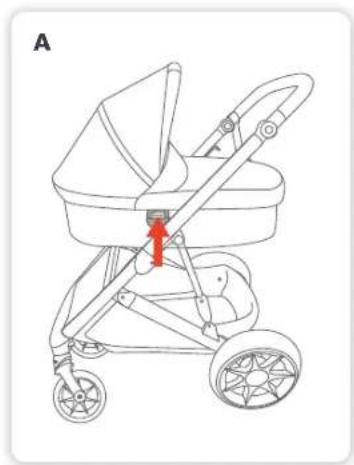
Line drawing of a baby stroller with wheels and a red arrow indicating a specific point (no text or symbols present)A Holding and lifting the bassinet release buttons on both sides and lift the bassinet up and away from the stroller.
Baby Capsule
Sold Separately

WARNINGS:
- IT IS UNSAFE TO USE ACCESSORIES NOT APPROVED FOR USE WITH THIS STROLLER
- DO NOT USE ANY ACCESSORIES OTHER THAN THOSE APPROVED FOR USE WITH THIS STROLLER BY BRITAX.
- THE MAXIMUM WEIGHT OF THE CHILD USING THE BRITAX UNITY BABY CAPSULE IS 12KG, OR THE BRITAX B SAFE 35 INFANT CAR SEAT IS 15.8KG.
IMPORTANT NOTES:
- Britax Safe-n-Sound Unity Neos Baby Capsule, Britax Safe-n-Sound Unity Baby Capsule Isofix compatible or B Safe 35 Infant Car Seat (for NZ market) are compatible baby capsules designed to fit the Strider Mini Signature stroller.
- The baby capsule must be correctly fitted and locked onto the Strider Mini Signature stroller frame.
-
The baby capsule must only be used on the stroller frame in the rearward facing position (baby facing parent), fitted facing toward the stroller handle in single mode.
-
The Unity Baby Capsule must only be used on the second seat frame in the forward facing position, fitted facing toward the front of the stroller.
- Secure the child using the baby capsule harness at all times.
- Do not leave the child in the baby capsule for extended periods.
- The baby capsule is designed to provide mobility outside of the car but it should not be used instead of an appropriate cot.
- The baby capsule must be removed from the stroller frame or the second seat frame before folding.
- The sun is very strong. DO NOT LEAVE YOUR CHILD EXPOSED TO THE SUN. The canopy or hood on this product will not give your child total protection from the harmful rays of the sun.
Baby Capsule
Sold Separately
Attaching & Removing the Britax Unity Baby Capsule
text_image
A click!
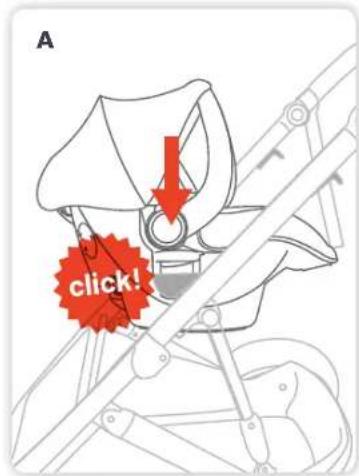
A The baby capsule must face the stroller handle. With the baby capsule handle in the upright position, align the baby capsule directly over the frame sockets.
Push down the baby capsule until connectors have locked into frame sockets.
natural_image
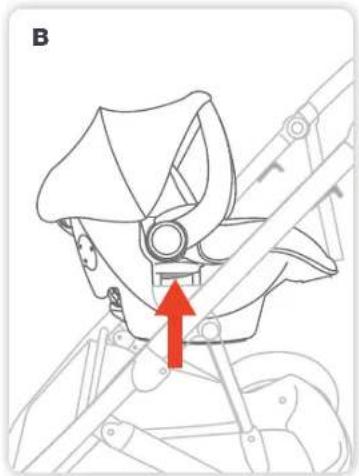
Technical line drawing of a mechanical assembly with a red arrow indicating a specific component (no text or symbols present)B Holding and lifting the baby capsule release buttons on both sides and lift the baby capsule up and away from the stroller.
PLEASE NOTE: These instructions are for installing and removing the Britax Unity baby capsule on the stroller only. For installing and proper use of the baby capsule in the car, please follow the instructions manual provided with the baby capsule.
Ensure the baby is secured in the baby capsule with the harness at all times. Refer to the baby capsule instruction manual regarding placing and securing your baby in the baby capsule.
Baby Capsule
Sold Separately
Attaching & Removing the Britax B Safe 35 (for NZ market)
natural_image
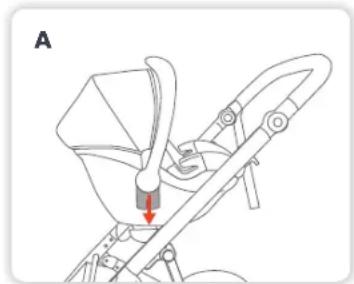
Diagram of a mechanical device with a red arrow indicating a force or movement (no text or symbols present)A Engage the brake.
Align the B Safe capsule with the frame sockets.
The baby capsule must be facing the handle.
text_image
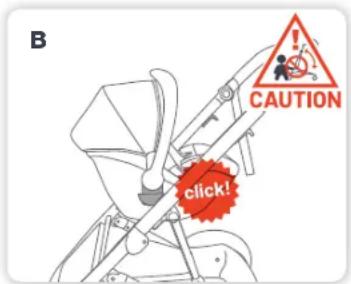
B CAUTION click!B Press firmly down on the frame sockets until you hear a 'click' which indicates the baby capsule has locked into position.
Pull up the baby capsule to ensure they are locked into the stroller frame.
natural_image
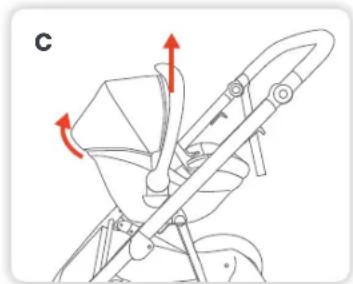
Technical line drawing of a mechanical device with red arrows indicating motion or force direction (no text or symbols)C Pull and hold the release lever on the back of the car seat and lift up to remove from the stroller.
PLEASE NOTE: These instructions are for installing and removing the baby capsule on the stroller only. For installing and proper use of the baby capsule in the car, please follow the instructions manual provided with the baby capsule.
Ensure the baby is secured in the baby capsule with the harness at all times. refer to the baby capsule instruction manual regarding placing and securing your baby in the baby capsule.
Care & Maintenance
General Maintenance & Repair
- Ensure all safety devices, locks, harness, and brakes are in working order.
- Ensure all joints and folding areas move freely as intended.
- Should any moving or locking parts become stiff or hard to operate, ensure these are free from tension, or dirt by wiping clean with a damp cloth to remove any dirt, sand, or debris. Allow to dry and lightly spray with a dry silicon lubricant. Please carefully read the lubricant instructions prior to use.
- Ensure wheels are regularly cleaned with a damp cloth by removing dirt, sand, or debris. Allow to dry and lightly spray the wheel pivot pin with a dry silicon lubricant to keep the wheels moving smoothly. Please carefully read the lubricant instructions prior to use.
- Regularly spray all moving parts with a dry silicon lubricant. Please carefully read the lubricant instructions prior to use.
- Ensure all connecting rivets and screws are secure. Tighten if required.
- If there are compression marks on the tyres, use a domestic hair dryer to gently warm (DO NOT OVERHEAT) the tyre and the compression marks should slowly disappear.
- To maintain the safety and longevity of the stroller, seek prompt repairs or replacement for bent, torn, worn, or broken parts. Do not continue to use the stroller if unsafe.
- All repairs should only be carried out by an authorised Britax/Steelcraft repairer. Only Britax/Steelcraft replacement parts should be used with the stroller. It may be unsafe to use parts supplied from another manufacturer.
General Tips
Do not store the stroller in your car for prolonged periods of time during summer as it may lead to damage to some of the plastics components.
Do not leave the stroller in direct sunlight for extended periods of time, as colours of some fabrics may fade, and tyres may deteriorate.
Do not fold or store the stroller if damp or wet, as fabric may develop mould or mildew. Always store the stroller inside in a dry, well-ventilated area.
Do not place heavy objects on top of the stroller as it may alter the shape.
Should you have any further questions on care & maintenance of the stroller, please contact our Consumer Service Team at: au-support@britax.com
Care & Maintenance
Cleaning
Fabrics
- Removable fabrics may be cleaned using lukewarm water and soap or mild detergent. Rinse thoroughly and allow to dry away from direct sunlight.
- Non-removable fabrics can be spot cleaned using a damp sponge and soap or mild detergent. Allow to dry completely before re-use or storage.
- Never use bleach, or abrasive cleaning products.
• DO NOT iron or dry clean.
NOTE: DO NOT place any of the stroller fabrics in the dryer. Allow to dry naturally, away from direct sunlight.
Frame
- Remove dirt and dust away from any moving mechanism.
- Clean frame with a soft damp cloth and soap or mild detergent and allow to dry thoroughly.
- DO NOT use abrasive cleaning products as it may cause stains, discolouration or scratches to the frame.
- DO NOT soak or submerge frame in water.
- DO NOT remove, dismantle or alter any part of the stroller mechanism or brakes.
Leatherette
- Spot clean with a damp soft cloth.
- DO NOT use a dripping wet cloth or wet the leatherette excessively.
Wheels
- Remove wheels from stroller.
- Clean with damp cloth and soap or mild detergent. Use brush to remove dirt and mud build up around the tyre. Allow to dry thoroughly before placing wheels back on the frame.
- If necessary lubricate wheel shaft with a small amount of lubricant before placing into the stroller.
- Ensure the stroller is cleaned thoroughly after using it on the beach as sand and salt can damage stroller mechanism, wheel assembly, causing premature wear and corrosion.
PLEASE NOTE:
Our product warranty does not cover any rust to the rivets or screws, if you are caught in the rain or at the beach always thoroughly dry the frame to avoid any rust damage.
Care & Maintenance
Just like servicing your car or bicycle, prams and strollers also need regular maintenance checks. These checks can improve product performance, extend the life of your stroller and help to provide you and your children a safe and smooth journey.

text_image
RECOMMENDATION Service every 6 Months Inspect MonthlyWe recommend servicing your stroller every 6 months and completing an inspection once a month. To prolong the life of your stroller, a regular maintenance should be performed.
5 STEP CHECK LIST
01 INSPECT SAFETY DEVICES tether strap, frame lock, harness, buckle and brakes, and ensure all are in working order and free from dirt, sand, and debris.
02 INSPECT all connecting rivets and screws are secure.
03 MAKE SURE FOLDING JOINTS are free of dirt, dust, and debris by cleaning with a damp cloth, allow to dry and lightly spray with a dry silicon lubricant. Please carefully read the lubricant instructions prior to use.
04 REMOVE WHEELS and wipe clean with a damp cloth to remove any dirt, sand or debris. Allow to dry and lightly spray the wheel pivot pin with a dry silicon lubricant to keep the wheels moving smoothly. Please carefully read the lubricant instructions prior to use.
05 ENSURE WHEN FOLDING AND STORING to wipe down your stroller frame and allow to dry before storing in a dry place without direct sunlight.
Warranty
Did you know?
Registering your product online simplifi es proof of purchase in the event of a warranty claim.
Head to our website to fill out the product registration form: britax.com.au

natural_image
Simple line icon of a computer monitor with a checkmark inside, enclosed in a circle (no text or symbols)Making A Warranty Claim
Your rights under a Britax company warranty are separate from and independent of your rights under the statutory consumer guarantees. What you need to do to enforce your rights under a statutory consumer guarantee is set out in the Australian Competition and Consumer Commission's Consumer Guarantees - A Guide for Consumers.
To make a claim under a Britax company warranty, please contact our customer service team on:
Australia: 1300 303 330 / New Zealand: 0508 688 822 or alternatively by email at: Australia: au-support@britax.com / New Zealand: nzoffi ce@britax.com
You will be required to :
- Return the product to the place of purchase or to a designated repair agent;
- Present your receipt as proof of purchase;
- Identify the defect in the product; and
- Present the product to Britax for inspection on request.
Britax will advise you whether the product is covered by the Britax company warranty. Britax's decision of whether a product is covered by a Britax company warranty is final. Britax will act reasonably when determining whether a product is covered by a company warranty.
Warranty
Australian Consumer Law
On all of our goods, you have the benefit of a statutory consumer guarantee. In summary, goods are guaranteed to be of "acceptable quality" (fit for purpose), goods are guaranteed to match any sample against which they are sold. These consumer guarantees are provided for by the Australian Consumer Law and, if you believe any one of these guarantees is not satisfied by a Britax product, you have rights under the Australian Consumer law to enforce that guarantee.
Your rights under the statutory consumer guarantees are set out in the Australian Competition and Consumer Commission's Consumer Guarantees - A Guide for Consumers.
In addition to the statutory consumer guarantees, Britax offers its own company warranty on all of its products. You therefore have the option of seeking redress for defective or faulty product either under the Britax company warranty or the statutory guarantees.
After the Britax company warranty expires, you still have your rights under the statutory consumer guarantees.
Depending on the product involved, the Britax company warranty on the following page applies:
Warranty
Steelcraft Warranty
Steelcraft products are covered by this company warranty against faulty materials and workmanship (normal wear and tear excluded) that affects the normal operation of your Steelcraft product. In the unlikely event that you find that your Steelcraft product does not satisfy this warranty, Britax will (at its option) repair or replace that product within a reasonable period of you making a claim in accordance with this policy.
In the event that a replacement product is no longer available, Britax reserves the right to provide what it considers to be a suitable alternative.
For this company warranty to apply, you must make an application before the expiration of the following periods from date of purchase*.

2 years on Steelcraft strollers and Steelcraft stroller accessories.*
This company warranty does not apply to second hand or after market goods or goods used for rental, hire or other commercial purposes or to any claim where the damage or fault is, in whole or part, the result of incorrect installation, mistreatment, intentional damage, any use other than use in normal conditions or any use otherwise than in accordance with the instruction manual for that product.
Please read your instruction manual carefully before using any of our products.
INTERNATIONAL WARRANTY
Britax products are available through a network of retailers in Australia and New Zealand. If you are an international customer we do not offer a warranty service outside of these regions.
THIS PRODUCT IS NOT INTENDED FOR COMMERCIAL USE

Britax Childcare Pty. Ltd.
A.B.N. 55 006 773 600
Level 4, 650 Lorimer Street, Port Melbourne, Victoria 3207, Australia
Phone: (03) 9288 7288 Fax: (03) 9311 5798
Customer Service
Australia: 1300 303 330 / New Zealand: 0508 688 822
Due to our continuing program of development, Britax reserves the right to alter the specifications, color or design without any further notice.
The Steelcraft trademark is the property of Britax Childcare Pty. Ltd - Australia.
The Britax trademark is the property of Britax Childcare Holdings Limited - UK.
Visit the Britax website at: www.britax.com.au or email us at au-support@britax.com
Due to the variations in the style and design of our products the illustrations used in this instruction booklet are generic.
This product is designed to comply with Australian and New Zealand standard AS/NZS 2088:2013 "Prams and Strollers - Safety Requirements"
Copyright © 2021 Britax Childcare Pty. Ltd. Australia