
43H6C - TV HISENSE - Free user manual and instructions
Find the device manual for free 43H6C HISENSE in PDF.


User questions about 43H6C HISENSE
0 question about this device. Answer the ones you know or ask your own.
Ask a new question about this device
Download the instructions for your TV in PDF format for free! Find your manual 43H6C - HISENSE and take your electronic device back in hand. On this page are published all the documents necessary for the use of your device. 43H6C by HISENSE.
USER MANUAL 43H6C HISENSE
Before using the TV, please read this manual thoroughly and retain it for future reference.
Copyright Statement
© 2016 Hisense Company Ltd. All Rights Reserved.
All material in this User Manual is the property of Hisense Company Ltd. and its subsidiaries, and is protected under US, CANADA, MEXICO and International copyright and/or other intellectual property laws. Reproduction or transmission of the materials, in whole or in part, in any manner, electronic, print, or otherwise, without the prior written consent of Hisense Company Ltd. is a violation of Hisense Company Ltd. rights under the aforementioned laws.
No part of this publication may be stored, reproduced, transmitted or distributed, in whole or in part, in any manner, electronic or otherwise, whether or not for a charge or other or no consideration, without the prior written permission of Hisense Company Ltd. Requests for permission to store, reproduce, transmit or distribute materials may be made to one of the following addresses:
USA: Hisense USA Corporation
PO Box 3289
Suwanee, GA 30024
CANADA: Hisense Canada Co., Ltd,
405 Britannia Rd E., Suite 11
Mississauga, Ontario,L4Z 3E6
MEXICO: Hisense Mexico S de RL de CV
Boulevard Miguel de Cervantes Saavedra No. 301, Torre Norte, Piso 2,
Hisense, and any and all other Hisense product names, logo's, slogans or marks are registered trademarks of Hisense Company Ltd. and its subsidiaries. All other trademarks are the property of their respective holders
Disclaimer Page
**Notwithstanding anything to the contrary, including in any or all descriptions, representations, statements or other communications related to this Hisense device (hereinafter “Device”) made in any form whatsoever and at any time, some or all of the pre-installed, or subsequently installed Application Services may not be available or capable of functioning as intended by the provider of the Application Services in any or all usage areas for reasons outside of Hisense’s control, including but not limited to, Internet access, local service limitations, etc. Any purchase or use of the Device, including any Application Services, is purely at the user’s risk. Application Services are provided on an as-available basis without warranties of any kind, either expressed or implied, that the Application Service will be uninterrupted or error-free, including but not limited to vagaries of weather, disruption of Service, acts of God, warranties of title, local or regional limitations, no infringement, NOR IMPLIED WARRANTIES OF MERCHANTABILITY OR FITNESS FOR A PARTICULAR PURPOSE. No advice or information given by Hisense, providers, affiliates, or contractors or their respective employees shall create such a warranty. Hisense specifically disclaims responsibility for any or all Application Services from functioning at any time, and by purchasing the Device, you accept such disclaimer without any claim on Hisense. You are solely responsible for providing an active and working connection to the Internet, along with any and all hardware and/or software necessary to use the Hisense Device as intended.
Table of Contents
Connecting Devices to your TV 3
Connecting an antenna, cable set-top box or satellite receiver 3
Connecting a Satellite Receiver, DVD player .... 3
Connecting an AV device with a component video cable 4
Connecting an AV device with an HDMI cable....4
Connecting headphones ....5
Connecting speakers (or other audio receivers) 5
Connecting a digital sound bar to use Audio Return Channel (ARC) 6
Connecting your TV to a Wired or Wireless Network 7
Connecting to a Wireless network 7
Connecting to a Wired (Ethernet) network....7
Using Your TV Remote Control....9
Shortcuts Instructions....11
Completing the First-Time Setup Menu....12
Basic and Advanced TV Settings 14
Accessing the Quick Setup Menu....14
Picture Menu....14
Sound Menu 15
Channel Menu 15
Network Menu 15
System Menu....16
About TV Menu 17
Parental Controls 18
Getting familiar with the Home screen....20
Table of Contents
Live TV 21
Viewing channel information....21
Viewing a channel list 21
Creating a Favorites list ....21
Viewing your Favorites list ....21
Apps....22
Opera TV Store 22
TV Browser 22
Installing an App ....22
Removing an App ....22
Moving App Icons around 23
Customizing the name of your TV 23
Media 23
Panels that appear on the Media screen 23
File formats that are supported....23
Viewing Videos 23
Browsing Content 23
Viewing Pictures as a Slideshow 24
Mirroring content from your device to the TV 24
Software updates for your TV 25
Quick Problem-Solving Tips....26
Connecting Devices to your TV
You have several options for connecting your TV to different devices. The method in which you connect will be based upon the type of cables you have and the available outputs on your device.
Connecting an antenna, cable set-top box or satellite receiver
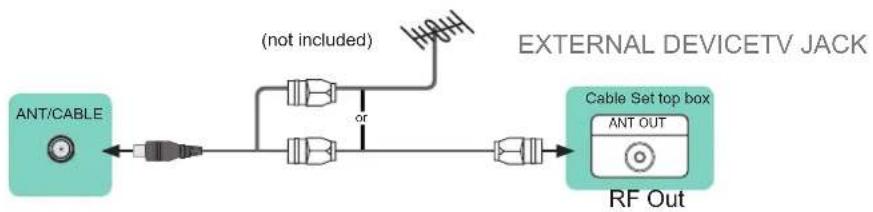
To connect an antenna, cable set-top box or satellite receiver:
- Connect one end of a coaxial cable (not included) to the [RF OUT] jack on the antenna, cable or satellite box. If you are using an antenna with twin-lead cable, you may need a 300-75 Ohm adapter (not provided) to connect it to the back of your TV. Likewise, if you are using several antennas, you may need a combiner (not provided).
- Connect the other end of the cable to the [ANT/CABLE] jack on the side of TV.
- Using your remote, press the [INPUT] button and select TV as the input source.
flowchart
graph LR
    A["ANT/CABLE"] --> B["RF Out"]
    B --> C["Cable Set top box"]
    C --> D["RF Out"]
    D --> E["External Device TV jack"]
    style A fill:#99CCFF
    style B fill:#99CCFF
    style C fill:#99CCFF
    style D fill:#99CCFF
    note1["(not included)"] --> B
    note2["or"] --> C
Figure 1. Antenna, cable set-top box or satellite receiver to the TV
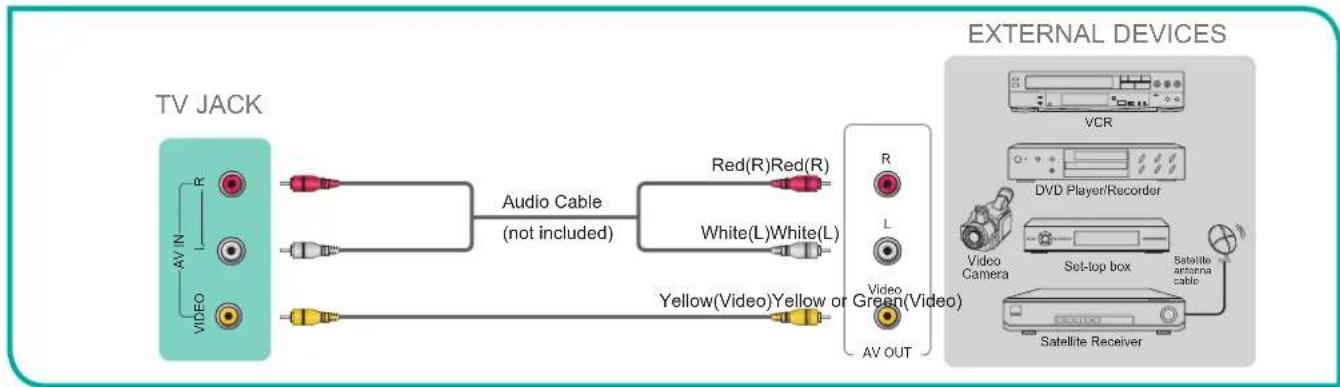
Connecting a Satellite Receiver, DVD player (or other Audio Visual (AV) device with a composite video cable (yellow/red/white)
To connect an AV device with a composite video cable (not provided):
- Use the audio and video cables to connect the composite video/audio jacks (of the external AV device) to the [AV IN] jacks of the TV. (Video = yellow, Audio Left = white, and Audio Right = red).
- Plug the connected devices into the AV connectors on the TV before switching it on.
- Using your remote, press the [INPUT] button and select AV as the input source.
flowchart
graph LR
    A["TV JACK"] -->|Audio Cable (not included)| B["White(L)White(L)"]
    A -->|Audio Cable (not included)| C["Red(R)Red(R)"]
    A -->|Audio Cable (not included)| D["Yellow(Video)Yellow or Green(Video)"]
    A -->|Audio Cable (not included)| E["AV OUT"]
    F["External Devices"] --> G["VCR"]
    F --> H["DVD Player/Recorder"]
    F --> I["Video Camera"]
    F --> J["Set-top box"]
    F --> K["Satellite antenna cable"]
    F --> L["Satellite Receiver"]
Figure 2. AV device with a composite video cable
Connecting an AV device with a component video cable (red/blue/green)
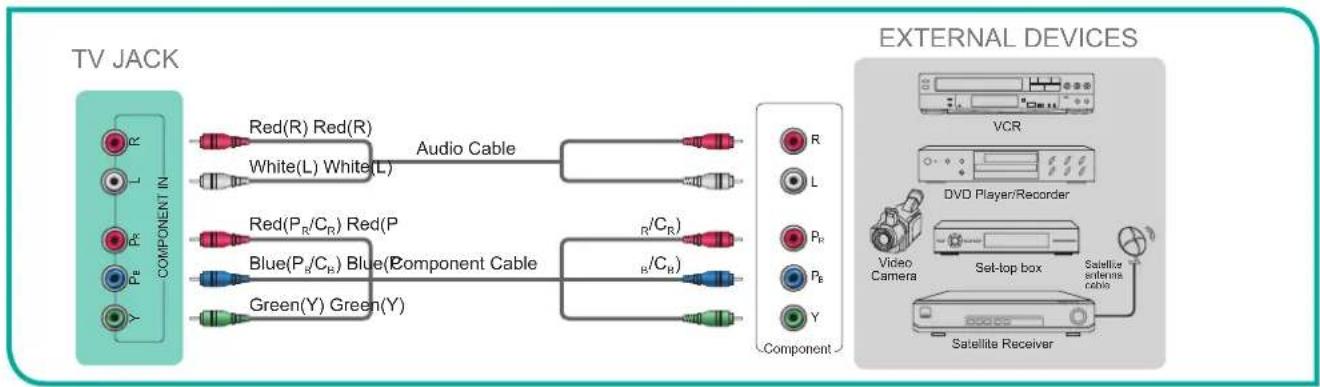
To connect an AV device with a component cable (which is red/blue/green):
- Use a component video cable (not provided) to connect the component output jacks of the external device to the YP_BP_R jacks for the TV. Use an audio cable to connect the component audio jacks of the external device to the TV AUDIO (L/R) jacks.
- Plug the connected devices into the YP B P R and L/R ports on the TV before switching it on.
- Using your remote, press the [INPUT] button and select Component as the input source.
flowchart
graph LR
    A["TV JACK"] --> B["COMPONENT IN"]
    B --> C["Red(R) Red(R)"]
    B --> D["White(L) White(L)"]
    B --> E["Red(P_R/C_R) Red(P)"]
    B --> F["Blue(P_B/C_B) Blue(Component Cable)"]
    B --> G["Green(Y) Green(Y)"]
    C --> H["Audio Cable"]
    D --> H
    E --> I["R/C_R"]
    F --> J["B/C_B"]
    G --> K["Component"]
    H --> L["R"]
    H --> M["L"]
    I --> N["P_R"]
    I --> O["P_B"]
    I --> P["Y"]
    Q["VCR"] --> R["DVD Player/Recorder"]
    R --> S["Video Camera"]
    S --> T["Set-top box"]
    T --> U["Satellite receiver"]
    U --> V["Satellite cable"]
Figure 3. AV device with a component video cable

NOTE
One AV device can be connected to the TV using a component video or composite video cable.
Connecting an AV device with an HDMI cable
This 4K TV has two different software versions of HDMI ports to connect HDMI-enabled devices. The two high-powered HDMI version 2.0(HDMI 3, HDMI 4) inputs enable you to connect 4K Ultra-HD external devices that require more bandwidth to transmit to the TV screen. For example, if you have an X-box or Blu-ray player that supports the 2.0 standard. The two HDMI version 1.4 inputs are great for any of your external devices that support a standard full high-definition resolution of 1080p.
Please refer to the User Manual that came with your device for step-by-step instructions.
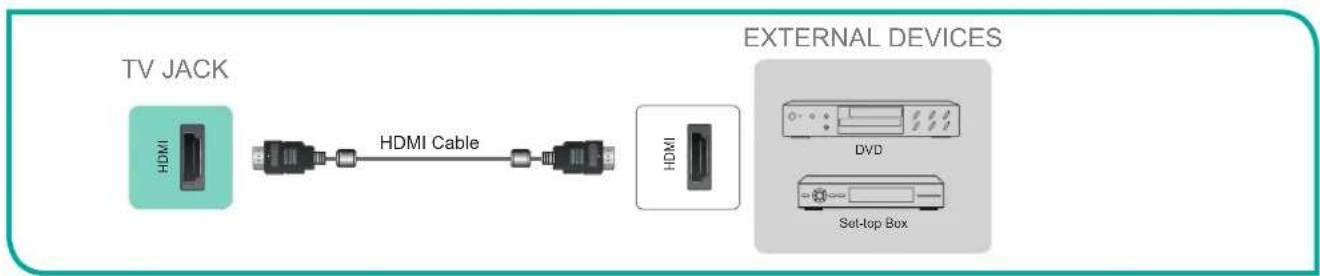
To connect an AV device with an HDMI cable:
- Use an HDMI cable to connect the [HDMI] output port of the AV device to the [HDMI] jack of the TV.
- Plug the connected devices into the power socket.
- Using your remote, press the [INPUT] button and select the corresponding HDMI input.
flowchart
graph LR
    A["TV JACK"] --> B["HDMI Cable"]
    B --> C["External Devices"]
    C --> D["DVD"]
    C --> E["Set-top Box"]
Figure 4. AV device with an HDMI cable
NOTES
• Because the HDMI connector provides video and audio signals, it is not necessary to connect an audio cable.
• The HDMI cable will not supplied with the product.
• We strongly recommend to use HDMI Cable with 2 cores as shown in the figure.
Connecting Devices to your TV
Connecting an MHL-enabled device
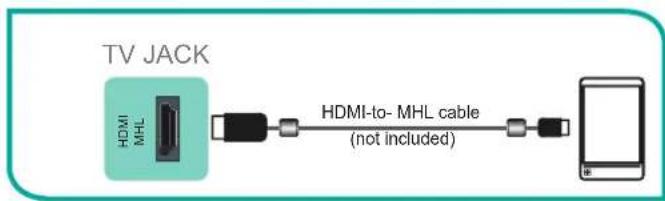
You can connect an MHL-enabled device, such as a cell phone, and view the screen of your device on the TV.
- Connect one end of an HDMI-to-MHL cable to the micro USB port on the device.
- Connect the other end of the cable to the HDMI / MHL jack.
- Select the corresponding source from the TV.
text_image
TV JACK HDMI MHL HDMI-to- MHL cable (not included)Figure 5. MHL-enabled device to the TV
NOTES
• This feature may be unavailable on some TV series.
• The MHL cable will not supplied with the product.
• We strongly recommend to use MHL Cable with 2 core as shown in the figure.
Connecting headphones
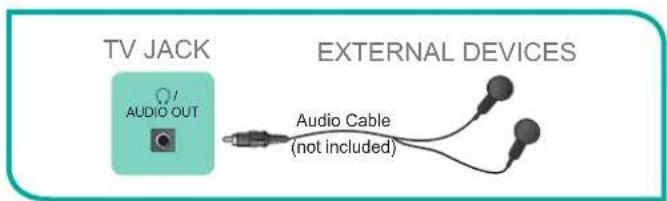
You can connect headphones to the [AUDIO OUT] port on your TV. While the headphone is connected, the sound from the built-in speakers will be disabled.
text_image
TV JACK AUDIO OUT EXTERNAL DEVICES Audio Cable (not included)Figure 6. Headphones to the TV
Connecting speakers (or other audio receivers)
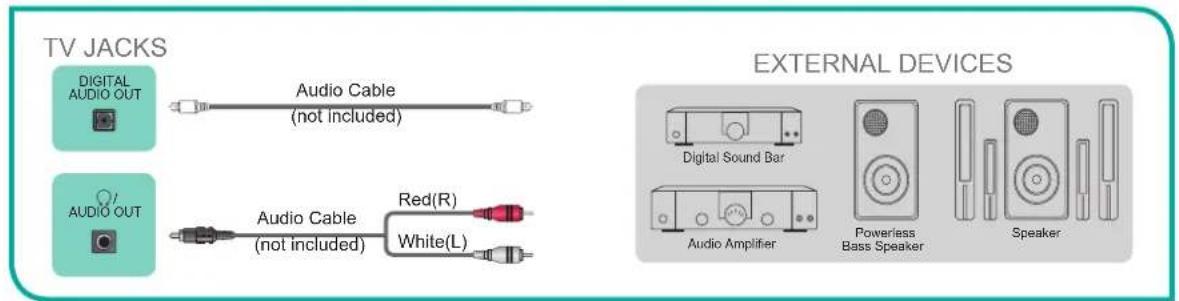
To connect speakers (or other audio receivers) with an audio cable:
- Use an audio cable (not provided) to connect the [DIGITAL AUDIO IN] jack of the audio receiver device to the [DIGITAL AUDIO OUT] jack of the TV. Another option is to use an RCA Y-cable (1/8"-stereo mini to L/R phono) to connect an analog sound system to the [AUDIO OUT] jack of the TV.
- Plug the connected devices into the main power socket before switching on the TV.
text_image
TV JACKS DIGITAL AUDIO OUT Audio Cable (not included) AUDIO OUT Audio Cable (not included) Red(R) White(L) EXTERNAL DEVICES Digital Sound Bar Audio Amplifier Powerless Bass Speaker SpeakerFigure 7. Audio receiver with audio cable

NOTE
If you prefer to use Audio Return Channel, then follow the steps on the next page under 'Connecting a digital sound bar to use Audio Return Channel'.
Connecting Devices to your TV
NOTES
- When a digital audio system is connected to the [DIGITAL AUDIO OUT] jack, decrease the TV and system volume.
• 5.1 CH (channel) audio is available when the TV is connected to an external device that supports a 5.1 channel surround sound - You can receive 5.1 channel audio in one of two ways. The first way is to connect the [DIGITAL AUDIO OUT] jack from the device to the Amplifier. The second way is to connect the [DIGITAL AUDIO OUT] jack on the back of the TV to the [Optical] port on the Amplifier. After you've completed one of the two methods then be sure to go into the Advanced Audio Settings of the TV and select RAW to receive the 5.1 channel audio. You will need to also go into the sound or audio settings of your device to ensure it is set to 5.1 Channel output. It may read 'Bitstream', 'RAW' or 'Digital'.
Connecting a digital sound bar to use Audio Return Channel (ARC)
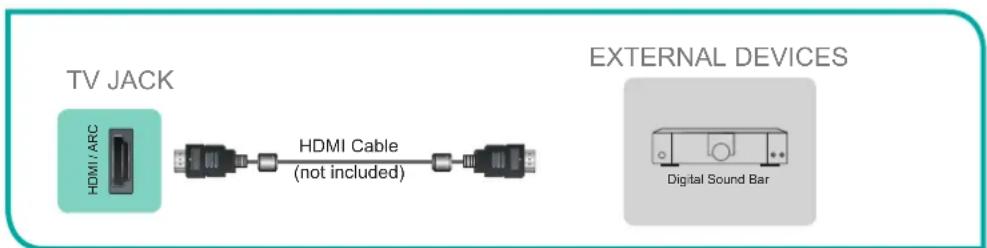
If you'd like to use the Audio Return Channel (ARC) feature to have sound sent from the TV back down an HDMI cable to a digital soundbar, then you will need to connect the cable to the [HDMI / ARC] port. By using this feature, you will also be able to control the soundbar with your TV remote instead of having to use multiple remotes for each device.
NOTE
Only digital sound bars that require a wired connection are compatible with the H7 Series Smart TV.
To connect a digital sound bar with an HDMI cable:
- Connect the cable that's attached to the soundbar to the [HDMI / ARC] port on the TV.
- Turn on the soundbar by pressing the Power button.
- Press the Quick Setup menu button on your remote and press the right arrow on the [D-pad] of your remote to show the full menu settings and go to System > HDMI Function.
- Turn on the CEC&MHL Control setting.
- Press the Quick Setup menu button on your remote and press the right arrow on the [D-pad] of your remote to show the full menu settings.
- Select Sound > Advance Audio Settings
- Go to the section of the screen that reads TV Speaker & ARC and select ARC First. NOTE: If the device has an Input Selector feature then make sure to change it to TV.
text_image
TV JACK HDMI / ARC HDMI Cable (not included) EXTERNAL DEVICES Digital Sound BarFigure 8. Digital Sound Bar to the HDMI / ARC port
Connecting Your TV to a Wired or Wireless Network
You have the option to connect your TV to a wireless or wired network to access the Internet.
Connecting to a Wireless Network
natural_image
Line drawing of a flat-screen monitor with blank screen (no text or symbols)
Wireless Adapter built-in the TV set
text_image
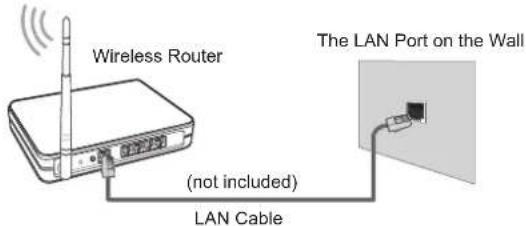
Wireless Router (not included) LAN Cable The LAN Port on the WallFigure 9. Connect the TV to a wireless network
Our built-in wireless LAN adapter supports the IEEE 802.11 ac/b/g/n communication protocols and we recommend that you use an IEEE 802.11n or IEEE 802.11ac router. When you play a video over an IEEE 802.11 b/g connection, the video may not play smoothly.
NOTES
- You must use the Hisense built-in Wireless LAN Adapter to use a wireless network because the set does not support an external USB network adapter.
- To use a wireless network, your TV must be connected to a wireless IP sharer. If the wireless IP sharer supports Dynamic Host Configuration Protocol (DHCP), your TV can use a DHCP or static IP address to connect to the wireless network.
- Select a channel for the wireless IP sharer that is not currently being used. If the channel set for the wireless IP sharer is currently being used by another device nearby, this will result in interference and communication failure.
• If you apply a security system other than the systems listed below, it will not work with the TV. - If Pure High-throughput (Greenfield) 802.11N mode is selected and the Encryption type is set to WEP, TKIP or TKIP-AES (WPS2 Mixed) for your Access Point (AP), then the Hisense TV will not support a connection in compliance with these Wi-Fi certification specifications.
- If your access point (AP) supports Wi-Fi Protected Setup (WPS), you can connect to the network via Push Button Configuration (PBC) or PIN (Personal Identification Number). WPS will automatically configure the SSID and WPA key in either mode.
Connecting to a Wired (Ethernet) Network
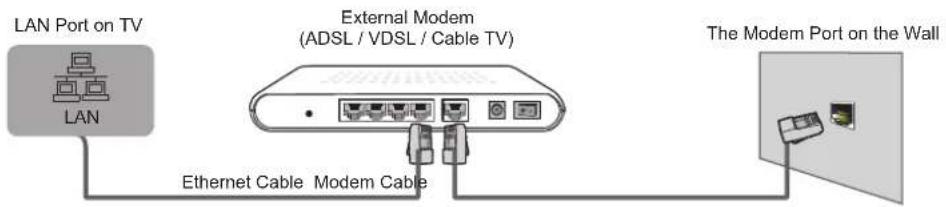
You can attach your TV to your LAN in one of the three following ways:
Option 1.
- You can attach your TV to your LAN by connecting the LAN port on the back of your TV to an external modem using a Cat 5 LAN cable. See Figure 10.
text_image
LAN Port on TV LAN External Modem (ADSL / VDSL / Cable TV) Ethernet Cable Modem Cable The Modem Port on the WallFigure 10. Connect a LAN port on the TV to an external modem
Connecting your TV to a Wired or Wireless Network
Option 2
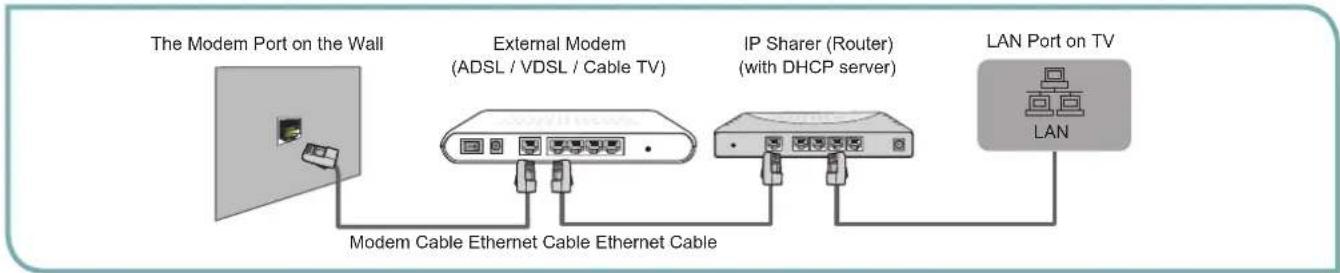
- You can attach your TV to your LAN by connecting the [LAN] port on the back of your TV to an IP Sharer which is connected to an external modem. Use an Ethernet cable for the connection. See figure 11.
flowchart
graph LR
    A["The Modem Port on the Wall"] --> B["External Modem (ADSL / VDSL / Cable TV)"]
    B --> C["IP Sharer (Router) (with DHCP server)"]
    C --> D["LAN Port on TV"]
    B --> E["Modem Cable Ethernet Cable Ethernet Cable"]
    C --> E
Figure 11. Connect a LAN port on the TV to an IP sharer
Option 3
- Depending on how your network is configured, you may be able to attach your TV to your LAN by connecting the [LAN] port on the back of your TV directly to a network wall outlet with an Ethernet cable. See the diagram below.

flowchart
graph LR
    A["The LAN Port on the Wall LAN Port on TV"] --> B["Ethernet Cable"]
    B --> C["LAN"]
Figure 12. Connect a LAN port on the TV to a network wall outlet
If you have a Dynamic Network, you should use an ADSL modem or router that supports Dynamic Host Configuration Protocol (DHCP). Modems and routers that support DHCP automatically provide the IP address, subnet mask, gateway, and DNS, so you don't have to enter them manually. Most home networks are Dynamic Networks.
Some networks require a Static IP address. If your network requires a Static IP address, you must enter the IP address, subnet mask, gateway, and DNS values manually on your TV's Cable Setup Screen when you set up the network connection. To get the IP address, subnet mask, gateway and DNS values, contact your Internet Service Provider (ISP).
NOTE
You can use ADSL modems that support DHCP if your network requires a static IP address. ADSL modems that support DHCP also let you use static IP addresses.
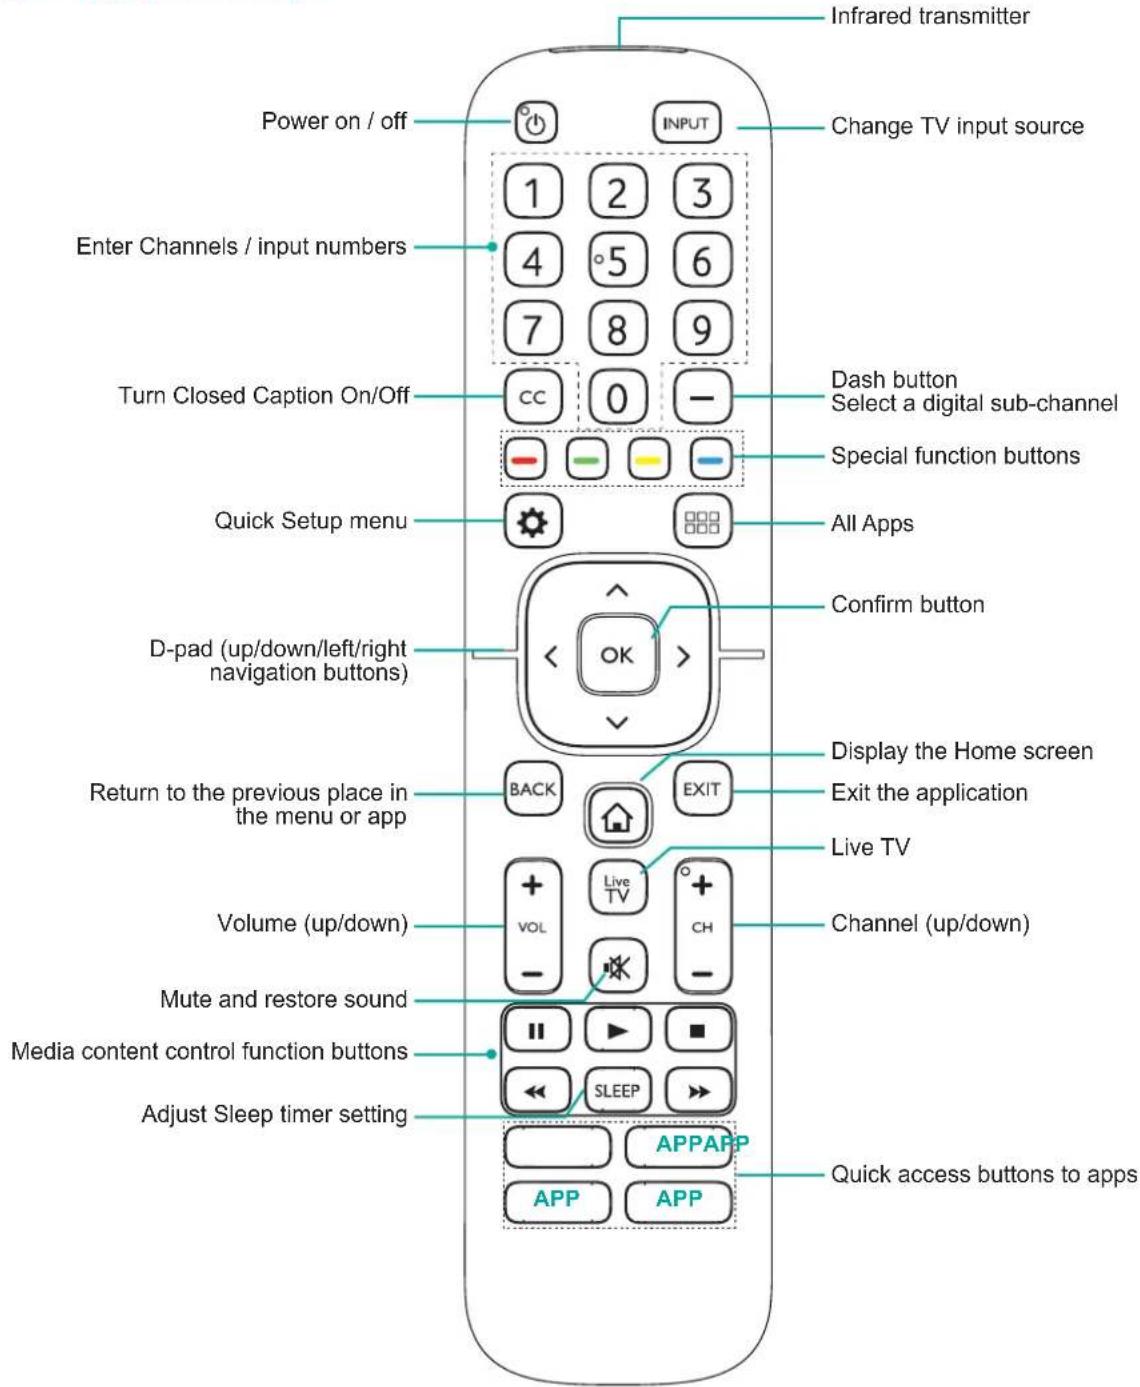
Buttons on your TV remote
text_image
Infrared transmitter Power on / off Change TV input source 1 2 3 Enter Channels / input numbers 4 5 6 7 8 9 Turn Closed Caption On/Off CC 0 - Dash button Select a digital sub-channel Special function buttons Quick Setup menu All Apps D-pad (up/down/left/right navigation buttons) Confirm button Return to the previous place in the menu or app BACK EXIT Display the Home screen Exit the application Live TV Volume (up/down) VOL Live TV CH Mute and restore sound SLEEP Channel (up/down) Media content control function buttons Adjust Sleep timer setting APP APP APP APP Quick access buttons to appsUsing Your TV Remote Control
Begin using your remote
- Slide the back cover to open the battery compartment of the remote control.

Insert the batteriesGently push and slide Gently push and slide
- Insert two AAA size batteries. Make sure to match the (+) and (-) ends of the batteries with the (+) and (-) ends indicated in the battery compartment.
- Replace the battery compartment cover.
Important Information about the remote and batteries:
- Discard batteries in a designated disposal area. Do not throw them into a fire.
- Remove old batteries immediately to prevent them from leaking into the battery compartment.
• If you do not intend to use the remote control for a long time, remove the batteries. - Battery chemicals can cause a rash. If the batteries leak, clean the battery compartment with a cloth. If chemicals touch your skin then wash it immediately.
• Do not mix old and new batteries. - Do not mix alkaline, standard (carbon-zinc) or rechargeable (NiCd, NiMH, etc.) batteries.
- Do not continue using the remote if it gets warm or hot.
Call our Support Center immediately on the Hisense support website.
Remote Control Range Information
The remote control can work at a distance of up to 26 feet in front of the TV set.
- It can work at a 30 degree horizontal or vertical angle.
Program Your Universal Cable or Satellite Remote Control to Operate Your New Hisense Television
(only for USA)
If you would like to program your other household remote controls to your new Hisense television, please refer to the User's Manual supplied by your Cable or Satellite provider. The Cable or Satellite providers' User's Manuals should include instructions on how to program their remote to your television.
A list of Hisense codes for the most common Cable and Satellite providers are listed below. Use the Hisense code that is associated with your Cable or Satellite provider (if applicable).
DIRECTV.....0178, 10178, 10019, 10748, 11314, 11660, 11710, 11780, 12049, 10171, 11204, 11326, 11517, 11564, 11641, 11963, 12002, 12183
Time Warner Cable.....386, 0178, 10178, 400, 450, 461, 456, 0748, 1463, 0463, 10463
Comcast.....0178, 10178, 10463, 11463, 10748, 11314, 11660, 10171, 11204, 11326, 11517, 11641, 11780, 11785, 11892, 11963, 12002
Cox Communications.....0178, 10178, 1326, 1463
Dish Network.....505, 627, 538, 720, 659
If the Hisense code associated with your Cable or Satellite provider is not listed, does not work or you cannot locate the instructions to program your remote, call your local Cable or Satellite provider's customer service center.
If your Cable or Satellite provider does not have a Hisense code available, please contact us.
Using Your Cable Set-top Box or Satellite Receiver Remote as a 'Universal' Remote
If you prefer to use your Cable Set-top Box or Satellite Receiver Remote as a 'Universal Remote', then visit the Support page to view a list of the codes.
Shortcuts Instructions
Shortcuts Instructions
You can use shortcuts on the remote control for fast operation. For more information about your TV remote, refer to the Quick Start Guide in accessories.
Turning your TV on or off
To turn your TV on:
- Connect the power cord to the back of the TV, then plug the power cord into an AC outlet.
- When the TV is powered on, press the [⏻] button on the remote to turn TV.
To turn your TV off, press the [⏻] button on the remote.
NOTES
- When your TV is in standby mode, it is still consuming power. To completely disconnect power, please remove the plug from the AC outlet.
• If your TV does not receive an input signal for several minutes, it automatically goes into standby mode
Selecting the Input Source
Select the Input Source depending on the video device you have connected to your TV.
To select the input source:
- Turn on your TV, then press the [INPUT] button on the remote, the list of Source appears.
- Press the [< / >] buttons to select the input source.
- Press the [OK] button to confirm your selection.
Using the Live TV
To view broadcast programs, press the [Live TV] button on your remote.
Channel search guide
When you select TV as input, if no TV channels were saved before, you will be prompted to do a channel search. Before channel tuning could start, you must specify the tune mode, Antenna or Cable. You can also go to Setting menu > Channel to change the channel settings.
Launch Live TV
After channel tuning is done for the first time, the screen will display Live TV operating tips, including: how to start the channel list, how to start channel info and so on.
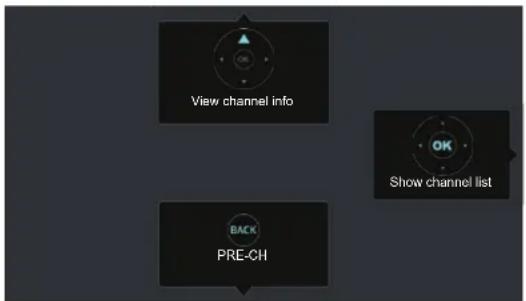
flowchart
graph TD
    A["View channel info"] --> B["Show channel list"]
    C["BACK PRE-CH"] --> D["Back"]
[OK] Show channel list
[ ∧ ] View channel info
[Back] View recent channels
Completing the First-Time Setup Menu
Now that you have attached the TV stand and connected your external devices, it's time to complete the first-time setup menu.
Completing the First-Time Setup Menu
Press the [Power] button on the remote to turn on the TV.
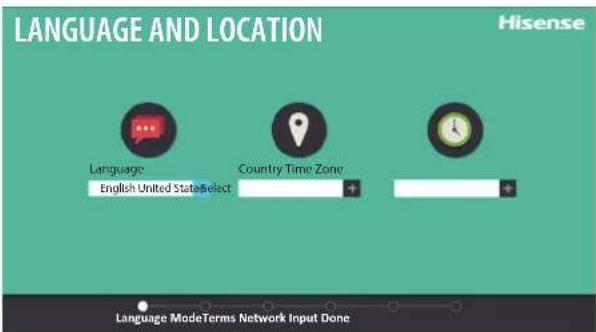
A splash screen that shows the Hisense logo appears. Next, the First-Time Setup Menu begins by prompting you to choose your Language, Country, and Time Zone. After the splash screen that displays the Hisense logo appears, begin the first-time setup menu.
Screen Task
Language and Location
text_image
LANGUAGE AND LOCATION Hisense Language English United StateSelect Country Time Zone Language ModeTerms Network Input Done- Using the D-pad arrows of your remote, choose your Language, Country and Time Zone.
- Next, navigate to the Forward arrow and press [OK].
TIP: The edge of the drop-down boxes and the back and forward arrows change to blue when you select them.
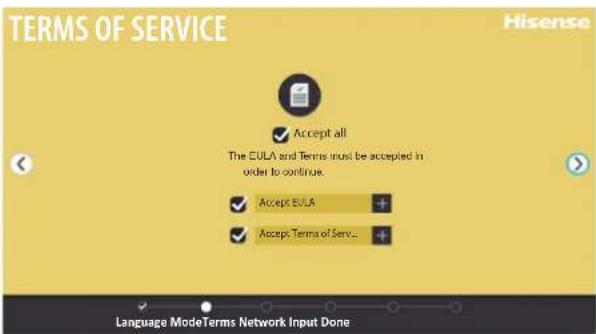
Terms of Service
text_image
TERMS OF SERVICE Hisense Accept all The EULA and Terms must be accepted in order to continue. Accept EULA Accept Terms of Serv... Language Mode Terms Network Input Done- Press [OK] on your remote to select Accept All.
- When you're done, then navigate to the Forward arrow and press [OK].
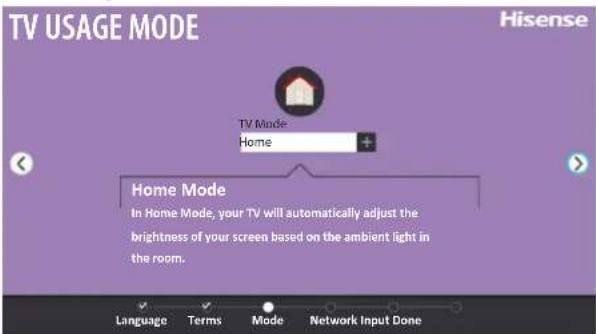
TV Usage Mode
text_image
TV USAGE MODE Hisense TV Mode Home Home Mode In Home Mode, your TV will automatically adjust the brightness of your screen based on the ambient light in the room. Language Terms Mode Network Input DoneSelect Home (which appears by default) and then navigate to the Forward arrow to press [OK].
Note: 'Store mode' should only be selected by Retailers who plan to demonstrate the TV.
Disclaimer: Images throughout this document are for illustrative purposes only and may differ from the actual product.
Completing the First-Time Setup Menu
First-time Setup Menu (continued)
Screen Task
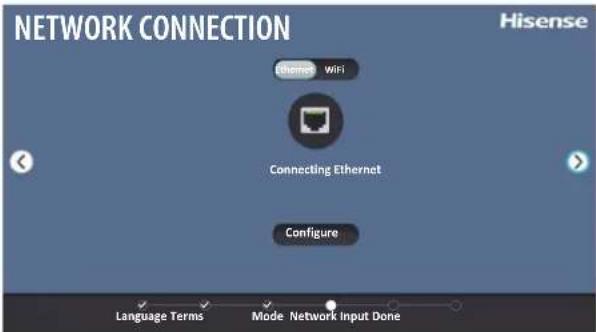
Network Connection
text_image
NETWORK CONNECTION Hisense Ethernet WiFi Connecting Ethernet Configure Language Terms Mode Network Input DoneIf your TV does not automatically detect an Ethernet connection, then select Wi-Fi. When you're done, select your network from the list that displays and move to the next screen.
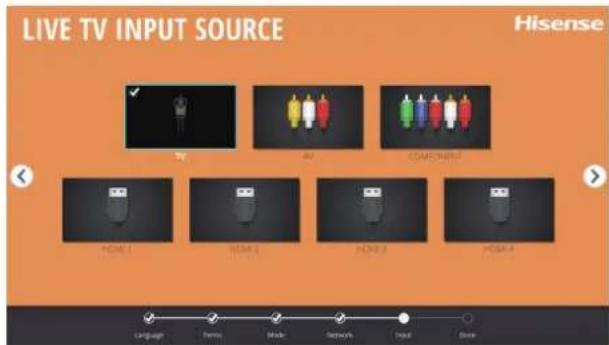
LIVE TV INPUT SOURCE
text_image
LIVE TV INPUT SOURCE Hisense HESSE TYPE MODE MODE 1 MODE 2 MODE 3 MODE 4 Language Tennis Music Network Input DoneSelect how you receive your TV channels. Choose from one of the following sources below and then move to the next screen.
• TV
• AV
- COMPONENT
• HDMI
NOTE: If you use an antenna to receive channels, then you must complete the first-time setup menu in order to run a channel scan.
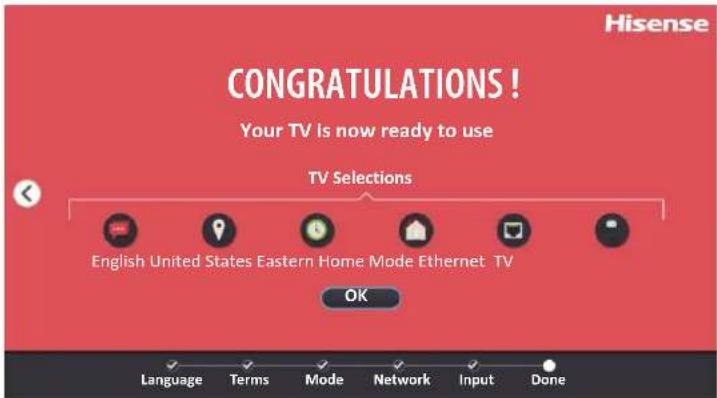
CONGRATULATIONS! Your TV is now ready to use.
Press [OK] on your remote if you are fine with the selections that appear on the screen. Otherwise, navigate to the back arrow on the screen to change your selection.
text_image
Hisense CONGRATULATIONS! Your TV is now ready to use TV Selections English United States Eastern Home Mode Ethernet: TV OK Language Terms Mode Network Input DoneBasic and Advanced TV Settings
Your Hisense TV comes with many TV setting features to allow you to customize the picture based on your viewing preference and environment. As you navigate throughout different screens to access settings, some of the indicators appear as words 'On' and 'Off' and some are open [o] and closed [l] symbols. An [o] indicator signifies a feature that is disabled.
Accessing the Quick Setup Menu
You can press the [Quick Setup] menu button [⚙️] and press the right arrow on the D-pad to view the full menu settings.
The Quick Setup menu consists of the following settings:
Picture
- Sound
- Channel
- Network
- System
- About TV
Picture Menu
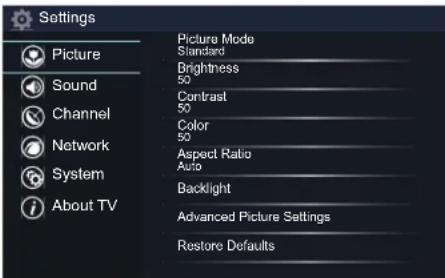
If you'd like to configure the settings for your picture, then there are six types of picture modes available: Vivid, Standard, Theater, Energy Saving, Game and Sport.
Once you choose the mode, you can adjust the picture based on the following settings:
- Brightness: Adjust the Brightness level to generate lighter or darker images.
Contrast: Adjust the Contrast level to increase or decrease how bright images appear. - Color: Adjust the color intensity of the picture for a more vibrant image.
Aspect Ratio: Adjust the Aspect Ratio to stretch or zoom in on your picture. You can choose from the following settings: Normal, Zoom, Wide, Cinema, 1:1 PIXEL MAP, Panoramic, Direct, Auto. - Backlight: This TV has a Dynamic Backlight Control setting that you can set to high or low. The Backlight setting enables you to adjust how bright you want images to appear. In addition, an Eco Sensor setting is available that will enable the TV to automatically adjust the picture settings according to the amount of ambient light in your room. This is a money-saving feature because it reduces power consumption.
-
Advanced Picture Settings: Adjust advanced picture settings based on your viewing preference.
-
Display: Adjust advanced picture settings in the component source.
- OverScan: Disable the overscan for PC inputs to fully display all menu items at the edges of the screen.
- Tint: Adjust the colors from a green to magenta tint to view the natural skin tones of people on the screen.
- Sharpness: Adjust how sharp or soft edges of images appear.
- Noise Reduction: Improve how clear the picture appears by reducing noise.
- Adaptive Contrast: Automatically darken dark areas and lighten light areas of images to see more details.
• Color Temperature: Select a preset color temperature. - White Balance: Adjust the intensity of red, green and blue lights to view the true colors of all images in the picture.
• Color Tuner: Adjust the Hue, Saturation and Brightness of color settings.
- Restore Defaults : Restore all the picture settings in the current picture mode to the factory default values.
text_image
Settings Picture Mode Standard Brightness 50 Contrast 50 Color 50 Aspect Ratio Auto Backlight Advanced Picture Settings Restore DefaultsBasic and Advanced TV Settings
Sound Menu
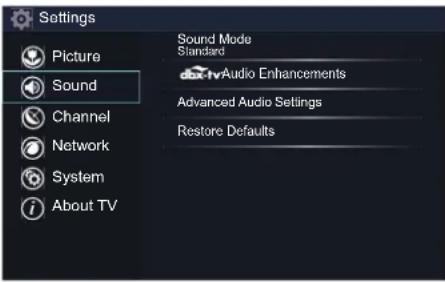
Sound Mode: Select a preset sound mode to suit the type of content you are listening to: Standard, Theater, Music, Speech and Late Night.
Set the sound effects to suit your preference:
Configure your audio settings for your sound preferences. Once you choose the mode, you can adjust the audio based on the following settings:
- dbx-tv Audio Enhancements: dbx-tv's Total Technology delivers the best possible TV sound for your TV.
- TotalSonics: Total Sonics: Optimizes overall sound quality by increasing bass, making dialog clear and natural, and widening the sound field.
- TotalSurround* Total Surround: Provides surround sound experience with psycho-acoustic processing to place sounds beside, behind, and above the viewer. For best results use with Total Sonics.
- Total Volume* Total Volume: Maintains consistent loudness levels from wide dynamic range programs, too-loud commercials, and channel or input changes.
- Advanced Audio Settings: Tune the audio settings and quality of the TV.
- Equalizer: Boost the volume at different frequencies.
- Lip Sync: Synchronize the displayed image with the audio output.
• Balance: Adjust the left and right speaker strength to optimize audio for a specific location. - Digital Audio Out: Select the digital audio output format that best suits the audio device type. For example, choose RAW (which is uncompressed audio in RAW form) if you have 5.1 Channel Surround Sound Speaker set up. Choose PCM if you have an amplifier that does not support Dolby Digital technology.
- Digital Audio Delay: Adjust the digital audio output delay time to sync sound from an external speaker with the images on the TV.
- TV Speaker & ARC: Select the TV speaker or an external speaker for sound output.
- Audio Out: Change the way audio is sent through the type of device that's connected to your TV Audio Out port.
- Restore Defaults : Restore all of the audio settings in current audio mode to the factory default values.
Channel Menu
- Tuner Mode: Select Tuner Mode if you receive TV channels over the air (antenna) or directly through a cable connection without using a set top box. The input will be used during a channel scan.
- Auto Channel Scan: Automatically scan for channels to view programming from your TV source.
- Channel Skip: Skip a channel that your TV picked up during a previous channel scan search.
- Favorites List: Quickly access your most-watched channels by creating a Favorites list.
Network Menu
- Network Configuration: Set up the network to gain full access of Smart TV features.
- Connection Type: Ethernet
Choose a wired network connection to access the Internet.
- Ethernet: Display the network connection status.
- IP Setting Mode: Configure the IP setting for your network connection.
text_image
Settings Picture Sound Channel Network System About TV Sound Mode Standard Audio Enhancements Advanced Audio Settings Restore Defaults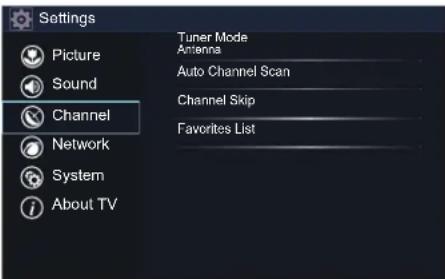
text_image
Settings Picture Sound Channel Network System About TV Tuner Mode Antenna Auto Channel Scan Channel Skip Favorites List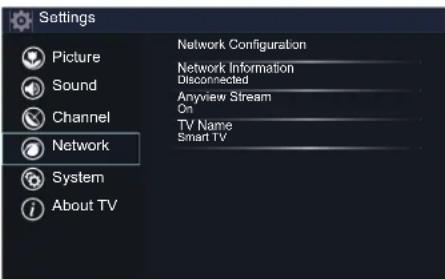
text_image
Settings Picture Sound Channel Network System About TV Network Configuration Network Information Disconnected Anyview Stream On TV Name Smart TVBasic and Advanced TV Settings
- Connection Type: Wireless
Choose a wireless network connection to access the Internet.
- Advanced Settings: Configure the advanced wireless network settings for the TV.
• Available Networks: Select an available network to connect. And you can also add wireless network or refresh wireless network.
- Connection Type: Off
Turn off the Internet connection.
- Network Information: View information about your network connection.
- Anyview Stream: Share video, music or other content from another device on to your TV screen.
- TV Name: Choose a name for your TV. The name will be shown to devices that are available for sharing data.
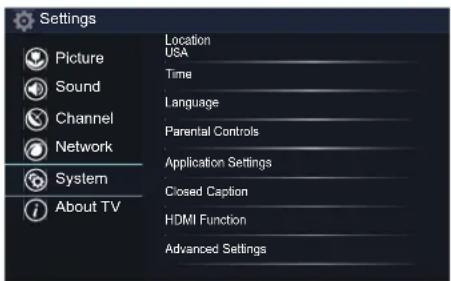
System Menu
- Location: Choose the location from where you will watch your TV.
- Time: Set the current time based on your location.
• Time Zone: Select your time zone.
• Time Format: Set the time to display in a 12 or 24-hour format.
- Daylight Savings: Select whether to apply Daylight Savings Time to the TV.
• Date/Time: Set the Date and Time.
• Power On Timer: Enable the Power On Timer to Off, Once or Daily.
• Power Off Timer: Enable the Sleep Timer to Off, Once or Daily.
- Sleep Timer: Set the sleep timer to automatically turn the TV Off within a specified time: Off, 10 Minutes, 20 Minutes, 30 Minutes, 40 Minutes, 50 Minutes, 60 Minutes, 90 Minutes and 120 Minutes.
- Language: Adjust the default language settings for the TV.
-
Parental Controls: Turn On Parental Controls to block children from being able to view certain programs. The default password is 0000.
-
Locks: Enable or disables all locks. All selected locks can be turned off for parental viewing and easily turned on again.
- Block Time: Block certain channels and programs during certain periods of time.
- Channel Block: Block programs by channels when you turn On the Parental Controls feature.
- Program Block: Blocks programs according to their TV or MPAA (movie) rating when you have turned on the Parental Controls feature and selected that rating to be blocked.
- Input Block : Block content from devices that are connected to certain TV ports.
- Change PIN: Change your PIN that you use to access Parental Controls. If you want to change your parental control password, first enter the new password then enter the same password again.
NOTE
If you forget your password, call the Hisense Consumer Electronics Care Center or reset your TV back to the factory settings.
- Restore Parental Control Defaults: Restore Parental Control back to the factory default setting.
- Application Settings: Set settings for apps on your TV.
- Netflix : Remove this TV from your Netflix account. Please contact Netflix if you want to stop being billed for you service.
• ESN : Display the Netflix Electronic Serial Number.
• VUDU : Remove this TV from your VUDU account. Please contact VUDU if you
text_image
Settings Picture Sound Channel Network System About TV Location USA Time Language Parental Controls Application Settings Closed Caption HDMI Function Advanced SettingsBasic and Advanced TV Settings
want to stop being billed for you service.
- Closed Caption: Adjust Closed Captioning settings.
- Analog Caption: Select an Analog Caption setting from Off, CC1-CC4, Text 1-TEXT4. CC1-CC4: Closed captioning appears in a small banner across the bottom of the screen. CC1 is usually the “printed” version of the audio.
CC2-CC4 display content are provided by the broadcaster.Text1-Text4: Closed captioning that covers half or all of the screen. Text1-Text4 display content are provided by the broadcaster.
Off: To turn off the Analog Caption.
• Digital Caption: Select a Digital Caption setting: Off, CS1-CS6.
- Digital CC Settings: There are two caption styles. One is the automatic function set as the broadcaster, while the other is the custom style where you can adjust the Style, Size, Font, Text Color, Text Opacity, Background Color etc.
- HDMI Function : Configure how to control CEC-enabled devices with your TV remote.
• CEC & MHL Control: Allow HDMI devices to control each other.
• Device Auto Power Off: Allow CEC-enabled devices to turn Off with the TV.
• TV Auto Power On: Allow the TV to turn On with CEC-enabled devices.
- Device Connect: Allow CEC-enabled devices to communicate with each other when connected through an HDMI cable.
• CEC Device Lists: View a list of all CEC-enabled devices.

NOTE
HDMI cables must be used to connect HDMI CEC-compatible devices to your TV. The HDMI CEC feature of the connected device must be turned on. If you connect an HDMI device that is not HDMI CEC-compatible, all the HDMI-CEC Control features do not work.
Depending on the connected HDMI device, the HDMI-CEC Control feature may not work.
- Advanced Settings: Access the Advanced Settings menu.
- Menu Timeout : Set the amount of time that you'd like for the menu to display : 10s, 20s, 30s, 60s or Off.
- Use Mode: Set the TV to use in Home, Store Mode, or Store Mode with 4K Video.
• Input Labels: Edit the input labels. - Default LiveTV Source: Select the default input selected by the remote control Live TV button.
- Setup Wizard: Use the Setup Wizard for instructions to help you set up your TV.
- Power Indicator: Set the Power Indicator light to stay On or Off when watching TV.
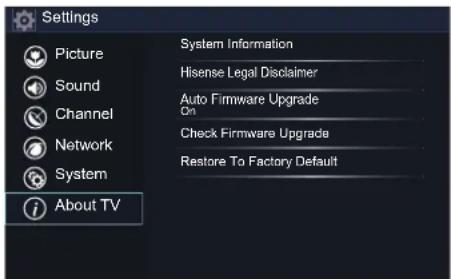
About TV Menu
About TV
• System Information: View system information.
- Hisense Legal Disclaimer: Read the Hisense Legal Disclaimer.
• Auto Firmware Upgrade: Set your TV to automatically receive the latest firmware.
- Check Firmware Upgrade: Check to ensure that your TV has received the latest firmware.
- Restore To Factory Default: Restore your TV back to the factory default.
text_image
Settings Picture Sound Channel Network System About TV System Information Hisense Legal Disclaimer Auto Firmware Upgrade On Check Firmware Upgrade Restore To Factory DefaultParental Controls
Parental Controls
The Parental Controls setting allows you to block content that is not appropriate for children to watch. You can do this by creating a 4-digit passcode. The factory-default passcode is 0000.
Turning Parental Controls 'On'
To access Parental Controls:
- Press the [Quick Setup] menu button on your remote.
- Press the right arrow button to display the full menu settings.
- Select System > Parental Controls > Locks.
- Press [OK] on your remote.
An Enter PIN window displays.
Using the numerical keypad on your remote, enter the factory-default passcode 0000 and press [OK].
Press [OK] button on the D-pad to turn the locks 'On'.
You will see the other Parental Control settings change from a greyed out state and become highlighted. When this occurs, begin adding other settings to the Block Time, Channel Block, Program Block, Input Block, Change PIN or Restore Parental Control Defaults features.

NOTE
All ratings that are higher than those you select are also blocked. For example, if you choose to block the PG-13 rating, then the higher ratings (R and NC-17) are automatically blocked too.
Block Time
Choose a time of day that you'd like to start blocking certain programs.
Channel Block
Block programs by channels when you turn on the Parental Controls feature.
Program Block
Block programs according to their TV or MPAA (movie) rating when you have turned on the Parental Controls feature and selected that rating to be blocked.
Input Block
Block content from devices that are connected to certain TV ports.
Change PIN
Change your PIN that you use to access Parental Controls.
Restore Parental Control Defaults
Restore Parental Controls back to the factory setting.
Description of U.S. TV Ratings
| Content Defined as | |
| FV | Fantasy Violence |
| D | Suggestive dialog |
| L | Course or crude language |
| S | Sexual situations |
| V | Violence |
Description of Age-based Ratings
| TV-Y All children | |
| TV-Y7 | Directed to older children |
| TV-G | General audience |
| TV-PG | Parental Guidance Suggested |
| TV-14 | Parents strongly cautioned |
| TV-MA | Mature Audiences Only |
U.S. Movie Ratings
| Rating Defined as | |
| G | General audience |
| PG | Parental Guidance suggested |
| PG-13 | Parents strongly cautioned |
| R | Restricted |
| NC-17 | No one 17 and under permitted |
| X | A rating that has now been superseded by NC-17 |
Canadian English Ratings
| Rating Defined as | |
| C | Children |
| C8+ | Children 8 years and older |
| G | General programming that is suitable for all audiences |
| PG | Parental Guidance |
| 14+ | Viewers 14 years and older |
| 18+ | Adult Programming |
Canadian French Ratings
| Rating Defined as | |
| G | General (appropriate for all ages and must contain little to no violence or sexual content) |
| 8ans+ | General but inadvisable for young children(could contain scenes disturbing to children under eight). Recommended for viewing with parent. |
| 13ans+ | Programming is appropriate for children 13 and older and may contain moderate violence, language and some sexual situations. |
| 16ans+ | Recommended for children 16 and older and may contain strong violence, language and sexual content. |
| 18ans+ | Programming intended for viewers that are 18 and older. Programming may contain extreme violence and graphic sexual content/pornography. |

NOTE
If you forget your passcode, call the Hisense Consumer Electronics Care Center or choose Restore Parental Control defaults from the Parental Controls settings menu.
Getting familiar with the Home screen
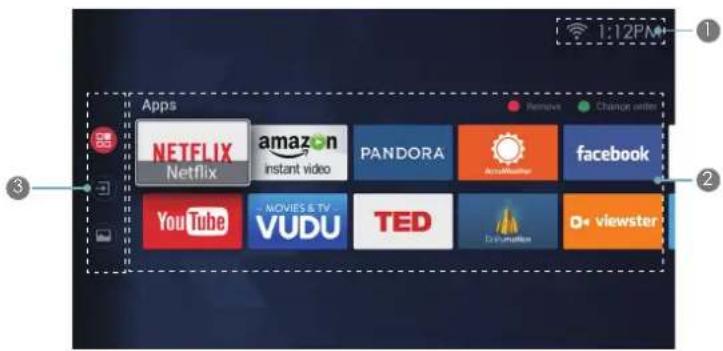
The simple design of the Home screen menu makes it easy to navigate. It accesses Apps, Media or Inputs.
To access the Home screen, press the [icon] button on your remote control and use the arrows buttons to make your selection.

NOTE
The menus are only for reference, may vary slightly from the actual screen.
text_image
1:12PM Apps NETFLIX Netflix amazon instant video PANDORA AppleWeather facebook YouTube MOVIES & TV VUDU TED D+ viewsterFigure 13. Home screen
Indicators and Icons on the top of the Home screen
You can always view the current time in the top right corner of the Home screen.
If your TV is connected to the Internet through a wireless connection or an Ethernet cable, then an icon will display in the top right corner of the screen. This location makes it very convenient for you to determine if you still have Internet connectivity as you use the TV.
In addition, if you have connected a device (such as a thumb drive) to a USB port and your TV recognizes it, then a device icon will also display in the same area.
The Apps appear on the Home screen
Each time you access the Home screen, the Apps will display on the screen. You can quickly enter these applications what you want.
The navigation bar appear on the Home screen
Press the [ʌ/ v] buttons to select icons of the navigation bar, you can enter to Apps, Media and Input.
LiveTV
To view broadcast programs, select the Live TV icon on the screen or press the [Live TV] button on your remote.
Viewing Channel information
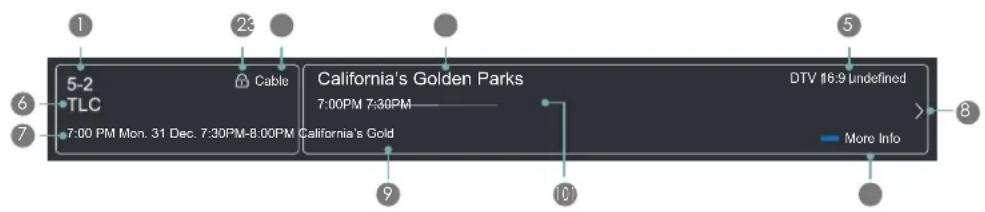
As you use the [Channel] button on your remote to scroll through channels, an information banner appears on the top of the screen.
text_image
5-2 TLC 7:00 PM Mon. 31 Dec. 7:30PM-8:00PM California's Golden Park Cable 7:00PM 7:30PM California's Gold DTV 16:9 Undefined More InfoFigure 14. Information banner
The information banner displays the following information:
1 Channel number
2 Lock status
③ Input
4 Program name
5 Show identification
6 Channel name
7 Current date and time
8 Prompt
11 More info
9 Beginning and end time of the next program
10 Start/Stop time progress bar of the current program
If you are watching a particular channel, you can also press the up arrow on the [D-pad] of your remote to view channel information.
Viewing a channel list
After you have done an automatic channel scan (if you're using an Antenna) or are receiving your channels through a cable provider, you can view your list of channels by pressing [OK] on your remote.
You will see the channel list display on the right side of the screen.
Creating a 'Favorites' list
To quickly access your most-watched channels, you can create a 'Favorites' list.
To create your 'Favorites' list:
- Press the [Quick Setup] menu button on your remote.
- Select Channel> Favorites List
- Using the up/down arrows on the [D-pad] of your remote, select a channel and press [OK].
A heart-shaped indicator will appear beside the channel as confirmation that it has been successfully added.
Viewing your 'Favorites' list
To view channels that you've added to your Favorites list simply press [OK] on your remote to call out the Channel list.
The channel list appears on the right side of the screen and heart-shaped icons are shown next to the channels that make up your Favorites list.
Apps
Apps
Numerous factory-installed apps are available for you to choose from for your entertainment preferences.
Opera TV Store
Opera TV Store contains cloud-based apps optimized for your TV. The apps range from Video, Music, Social Networking, Games and News Information.
To begin using Opera TV Store, you simply need to accept the End-User License Agreement and then select the app that you want to use.
TV Browser
The TV Browser allows you to surf the Internet on your TV and provides quick access to the Google™ search engine.
To view a website or search using the TV Browser:
- Using the Navigation buttons on your remote, navigate to TV Browser icon.
- Press [OK] on your remote.
The browser window displays. - Using the navigation buttons on your remote, navigate up to the URL bar to place your cursor there.
- Press [OK] on your remote to bring up the on-screen keyboard.
- Type the website address or search term on the text field.
- Press the [Blue] special function button towards the top of the remote (under the number pad).
The website address or search term you've typed populates in the URL bar window. - Select the forward arrow (to the right of the URL bar) and press [OK] on your remote to load the page or start the search.
Installing an App
Even though your TV has numerous factory-installed apps, there may be others that you'd like to download.
To install an app:
- From the Home screen, click on the My Apps icon.
- Navigate to Opera TV Store.
- Navigate to the Search tab at the top of the screen.
- Use the navigation buttons of your remote to select the app.
A page displays that shows a written description of the app. -
Click on Open or Add to Favorites.
-
Begin typing the name of the app. As you begin typing the first two to three letters the Opera Store suggests words to quicken your search time.
Removing an App
You can only delete apps that you've downloaded to the TV. Factory-installed apps can not be deleted.
To delete an app:
- From the My Apps screen, use the directional arrows on the navigation buttons of your remote to select the app that you want to remove.
- Press the [Red] on your remote control.
A dialog message displays that asks if you're sure you want to remove the app. - Press [OK] on your remote.
A confirmation message displays and the icon is removed from the My Apps list.
NOTE
If an app is deleted, the information related to that app is also removed.

Media
Moving App Icons around
Select the app you want to move, then press the [Green] on your remote control and press [^/ √/ < / >] to change order.

NOTE
- Apps may be updated without prior notice, please take the actual as standard.
• Some applications may not be available, depending on your TV series and the area you are.
Customizing the name of your TV
If you have several TV's in your home then you may want to customize the name of your TV. By giving your TV a name, it will make it easier for you to identify it when connecting devices to the TV to stream or mirror content.
To customize the name of your TV:
- Press the [ ⚙] button on your remote to open the Quick Setup menu.
- Go to Full menu settings > Network > TV Name.
- Select User Input and press [OK] to bring up the keyboard and begin typing the name.
- When you are finished, power off the TV and power it back on for the change to take effect.
Media
Media is a central location for you to upload and view or listen to different types of content (for example, your photos, music and movies) through the following methods:
• A USB thumb drive or hard drive
- Your mobile phone, tablet or other personal device: You can stream movies, pictures and photos that are stored on your personal device and play or view the content on your TV.
When you connect your thumb drive or other personal device to the TV, the TV automatically detects it and displays a device icon in the top right corner of the screen. Our company-developed HiMedia technology is what this Media feature is developed upon.
Panels that appear on the Media screen
The Media screen displays four panels: All, Picture, Video, Music.
File formats that may be supported
NOTE: Due to differences in programming tools and other factors, some of the file formats that are listed may or may not be supported.
| Medium File Format | |
| Videos .avi(MPEG2, Divx), .mkv(Divx), .mpeg(MPEG2), .wmv(Divx, XviD) | |
| Picture .JPG | |
| Music .avi(mp3, WMA, ac3), .mp3 | |
Viewing Videos
While viewing videos you will see a number of icons appear at the bottom of the screen. You can use the [D-pad] button of your
remote to select these icons that will control the video.
Browsing Content
To browse through content based on the type that you wish to access:
- Navigate to the appropriate menu tab on the left side of the screen and select Music, Video or Picture. The library of items displays on the right side of the screen.
Mirroring content from your device to the TV
-
Navigate to the right side of the screen and click on the name of the folder that contains your content.
-
Make your selection to play or view the content.
If you want to close out of the Media center, then press the [Exit] button on your remote.
Viewing Pictures as a Slideshow
To view pictures in a slideshow:
- Navigate to the Pictures tab.
- Click on Start the Slideshow.
The slideshow of your pictures begins to play. To stop the slideshow, press the [OK] button on your remote and press it again to restart it.
Using Anyview Cast to mirror content from your device to the TV screen
The Hisense Anyview Cast is an app that enables you to share (or cast) a video, audio or image from your Android-based device to the TV.
From your tablet or phone
To mirror content from your tablet to the TV:
- From the TV Settings, go to Network and turn on the Anyview Stream setting.
- Press the [All Apps] button on your remote and select the Anyview Cast app.
- Turn on your Android-based device and go to Settings > Display > Cast Screen.
NOTE: Some Android-based devices may not support casting. -
Find your TV in the list of devices that displays and select it.
-
Wait for the 'Creating Connection' progress bar to complete on the TV screen and the video or image will display in a moment.
Software updates for your TV
The software (also referred to as firmware) is part of what powers your TV. Hisense will provide software updates to continuously enhance your TV and correct any issues that may impact your user experience; therefore, we recommend that you keep your TV connected to the Internet to automatically receive updates when they are available.
You can choose to receive updates automatically or check for software updates and install them manually.
Checking for updates automatically
In order for your TV to receive software notification updates automatically, it must be turned 'On' and connected to the Internet. The Auto Firmware Upgrade setting (which enables your TV to receive the updates automatically) is turned to 'On' by factory default. If you turn the Auto Firmware Upgrade setting 'Off', it will disable this functionality of your TV.
Note: While your TV is on and checking for updates, the program that you are watching will not be interrupted.
Disabling the Auto Firmware Upgrade feature
If you do not want your TV to automatically check for updates and to receive notifications when they are available, then:
-
Using your remote, press the [Quick Setup] menu button.
-
Go to About TV > Auto Firmware Upgrade and turn the feature 'Off'
By doing this, you will have to manually check to see if you have the latest software update.
Checking for the latest firmware
To manually check for the latest firmware:
-
Using your remote, press the [Quick Setup] menu button.
-
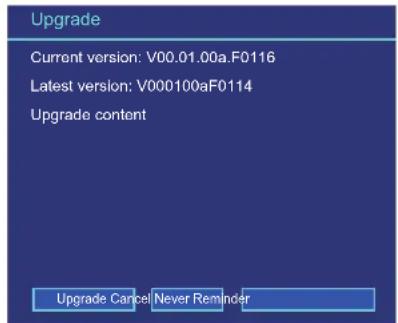
Go to About TV > Check Firmware Upgrade.
text_image
Upgrade Current version: V00.01.00a.F0116 Latest version: V000100aF0114 Upgrade content Upgrade Cancel Never ReminderFigure 15. Check Firmware screenshot
Manually installing software updates
If you have not kept your TV connected to the Internet or you turned the Auto Firmware Upgrade feature 'Off' then you'll need to manually install the software.
If the Check Firmware Upgrade screen shows that an updated package is available, then:
-
From the Check Firmware submenu, select Download upgrade pack.
-
Follow the rest of the steps that display
Quick Problem-Solving Tips
When you experience an issue with your TV, turn it off and on again. If this does not resolve the problem, then refer to the tips below. If the problem is still not resolved, then contact us.
ISSUES POSSIBLE SOLUTIONS
| There is no sound or picture from the TV | ·Check to see if the power cord is plugged into a power outlet.·A power switch on the right side bottom edge of the front panel must be turned on. Press the ⏻Power button on the remote control to activate the unit from 'Standby' mode.·Check to see if the LED light is on or not. If it is, then the TV is receiving power. |
| I have connected an external source to my TV and do not see a picture and/or hear any sound | ·Check for the correct output connection on the external source and for the correct input connection on the TV.·Make sure you have made the correct selection for the input mode for the incoming signal. |
| When I turn on my TV, there is a delay for a few seconds before the picture appears. Is this normal? | ·Yes, this is normal. The TV is initializing and searching for previous setting information. |
| The picture is normal but there is no sound | ·Check the volume settings.·Check if 'Mute' mode is set to On. |
| Sound but no picture or black and white picture | ·If the picture is black and white, unplug the TV from the AC outlet and replug it after 60 seconds.·Check that the Color is set to 50 or higher.·Try different TV channels. |
| The sound and/or picture is distorted or appears wavy | ·An electric appliance may be affecting the TV. Turn off any appliances that are nearby and move it farther away from the TV.·Insert the power plug of the TV set into another power outlet. |
| The sound and picture is blurry or cuts out | ·If using an external antenna, check the direction, position and connection of the antenna.·Adjust the direction of your antenna or reset or fine tune the channel. |
| A horizontal or vertical stripe appears on the picture and/or the picture is shaking | ·Check to see if there is an appliance or electric tool nearby that is causing interference. |
| The plastic cabinet makes a "clicking" type of sound | ·The 'click' sound can occur when the temperature of the television changes. This change causes the television cabinet to expand or contract, which makes the sound. This is normal and the TV is OK. |
| The remote control does not work | ·Confirm that TV still has power and is operational.·Change the batteries in the remote control.·Check if the batteries are correctly installed. |

NOTE
For usage in Mexico, operation of this equipment is subject to the following two conditions: 1) it is possible that this device doesn't cause any detrimental interference and 2) this device must take any kind of interference, including that which may cause its malfunctioning.
Disclaimer: Images throughout this document are for illustrative purposes only and may differ from the actual product.