Vac-Then-Steam MV2010 - Vacuum Cleaner SHARK - Free user manual and instructions
Find the device manual for free Vac-Then-Steam MV2010 SHARK in PDF.


User questions about Vac-Then-Steam MV2010 SHARK
0 question about this device. Answer the ones you know or ask your own.
Ask a new question about this device
Download the instructions for your Vacuum Cleaner in PDF format for free! Find your manual Vac-Then-Steam MV2010 - SHARK and take your electronic device back in hand. On this page are published all the documents necessary for the use of your device. Vac-Then-Steam MV2010 by SHARK.
USER MANUAL Vac-Then-Steam MV2010 SHARK
www.SharkVacThenSteam.com
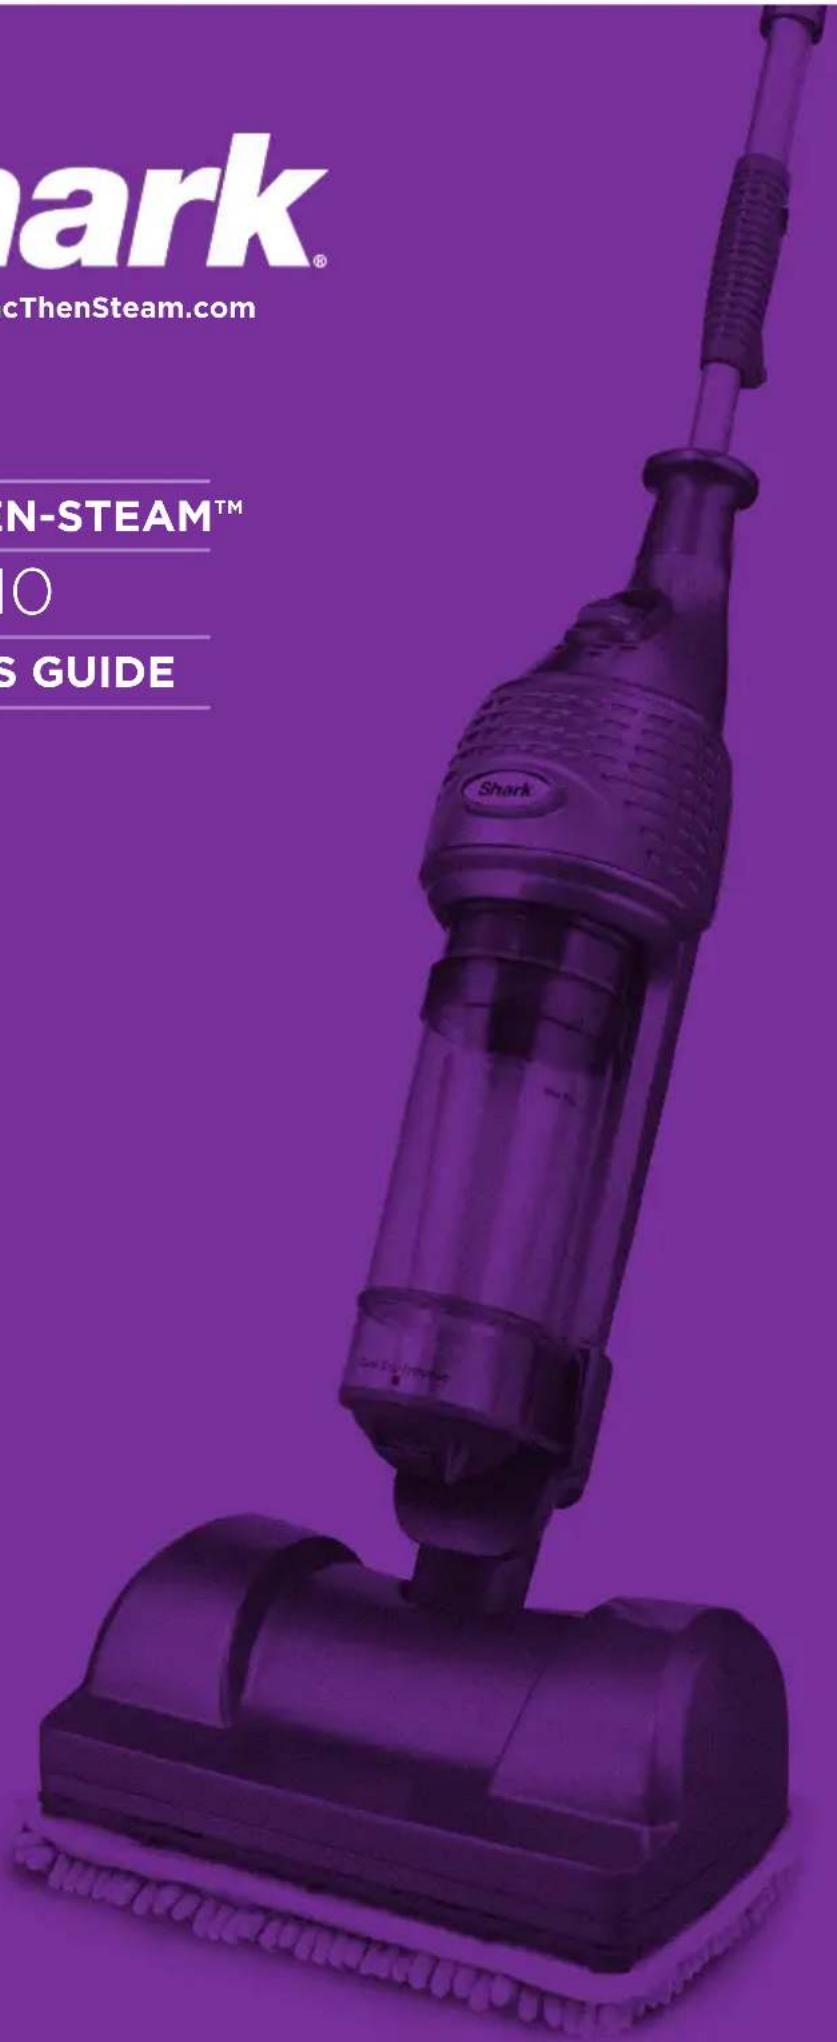
VAC-THEN-STEAM™
MV2010
OWNER'S GUIDE
text_image
mark® cThenSteam.com N-STEAM™ 10 S GUIDEIMPORTANT SAFETY INSTRUCTION!
For Household Use Only
WHEN USING YOUR SHARK® VAC-THEN-STEAM™, BASIC SAFETY PRECAUTIONS SHOULD ALWAYS BE FOLLOWED, INCLUDING THE FOLLOWING:
WARNING: TO REDUCE THE RISK OF FIRE, ELECTRIC SHOCK OR INJURY READ ALL INSTRUCTIONS BEFORE USING YOUR VAC-THEN-STEAM™.
DANGER OF SCALDING.
Please use caution when using the steam function. The steam emitted from the appliance is very hot.
- Use the system only for its intended use.
- DO NOT use outdoors. Use only on dry, indoor surfaces.
- DO NOT leave the appliance unattended when plugged in. Always unplug the power cord from the electrical outlet when not in use and before servicing.
- DO NOT allow the appliance to be used by children. Close attention is necessary when used by or near children, pets or plants.
- DO NOT operate the appliance with a damaged plug or cord, or if the unit has been dropped, damaged, left outdoors or dropped into water. To avoid the risk of electric shock, do not disassemble or attempt to repair the appliance on your own. Return the appliance to EURO-PRO Operating LLC (see warranty) for examination and repair. Incorrect re-assembly or repair can cause a risk of electrical shock or injury to persons when the appliance is used.
- Use only as described in this manual.
-
Use only manufacturer's recommended accessories and replacement pads.
-
To protect against a risk of electric shock, DO NOT immerse the appliance into water or any other liquids.
-
DO NOT handle plug or appliance with wet hands or operate appliance without shoes.
-
DO NOT pull or carry by power cord, use power cord as a handle, close a door on the power cord, or pull the power cord around sharp edges or corners. Do not run appliance over cord. Keep power cord away from heated surfaces.
-
DO NOT unplug by pulling on power cord. To unplug, grasp the plug not the power cord. Do not use extension cords or outlets with inadequate current carrying capacity.
-
DO NOT put any objects into the unit openings. Do not use the unit if any opening is blocked; keep free of dust, lint, hair and anything that may reduce airflow.
-
DO NOT put hands or feet under the Vac-Then-Steam™. Unit gets very hot and may burn.
-
Use ONLY on flat, horizontal surfaces. Do not use on walls, counters or windows.
-
DO NOT use on leather, wax polished furniture and floors, synthetic fabrics, velvet or other delicate, steam sensitive materials.
-
DO NOT add cleaning solutions, scented perfumes, oils or any other chemicals to the water used in this appliance as this may damage the unit or make it unsafe for use and void the warranty. If you live in a hard water area, we recommend using distilled water in your Vac-Then-Steam™.
-
When in use, NEVER turn the appliance over or on its side. NEVER DIRECT STEAM TOWARDS PEOPLE, ANIMALS OR PLANTS.
-
NEVER LEAVE THE CLEANING UNIT IN ONE SPOT ON ANY SURFACE FOR ANY PERIOD OF TIME WHEN MICRO-FIBER PAD IS ATTACHED.
-
Carefully remove the micro-fiber pad immediately after you have unplugged and allowed the appliance to cool.
- When cleaning the appliance, unplug the power cord from the electrical outlet and clean with a dry or damp cloth. Do not pour water or use alcohol, benzene or paint thinner on the unit.
- Extreme caution should be exercised when using this appliance to clean stairs.
- Never use Steam function without micro-fiber pad attached.
- Keep your work area well lit.
- Store appliance indoors in a cool, dry place.
- To avoid circuit overload, do not operate another appliance on the same socket (circuit) as the cleaning unit.
- If an extension cord is absolutely necessary, an extension cord rated a minimum of 15 ampere, 14 gage cord should be used. Cords rated for less amperage may overheat. Care should be taken to arrange cord so that it cannot be pulled or tripped over.
- DO NOT store unit with damp/wet micro-fiber cleaning pad attached.
- DO NOT use the vacuum cleaner without dust cup and filter in place.
- DO NOT vacuum up any liquids.
- DO NOT pick up anything that is burning or smoking such as cigarettes, matches or hot ashes.
- To reduce the risk of fire DO NOT use to pick up flammable or combustible liquids such as gasoline or use vacuum in areas where flammable or combustible fumes may be present.
- DO NOT pick up toxic solutions such as chlorine bleach, ammonia or drain cleaner with the cleaning unit.
- DO NOT use in an enclosed space where vapors are present from paint, paint thinner, mothproofing substances, flammable dust or other explosive or toxic materials.
-
DO NOT run the cleaning unit over large-sized objects.
-
DO NOT pick up hard or sharp objects such as glass, nails, screws or coins that could damage the cleaning unit.
- DO NOT place appliance on unstable surfaces such as chairs or tables.
- DO NOT allow the cleaning unit to be used as a toy.
- Close attention is necessary when used near children.
- Keep hair, loose clothing, fingers and all parts of the body away from openings and moving parts.
- Turn off all controls before plugging or unplugging your Vac-Then-Steam™.
WARNING: Your appliance is designed to clean non-carpeted, sealed hard floor surfaces that will withstand high heat. Do not use on unsealed wood or unglazed ceramic floors, on surfaces that have been treated with wax or on some no wax floors. The sheen may be removed by the heat and steam action. It is always recommended to test an isolated area of the surface to be cleaned before proceeding. We also recommend that you check the use and care instructions provided by the floor manufacturer.
POLARIZED PLUG
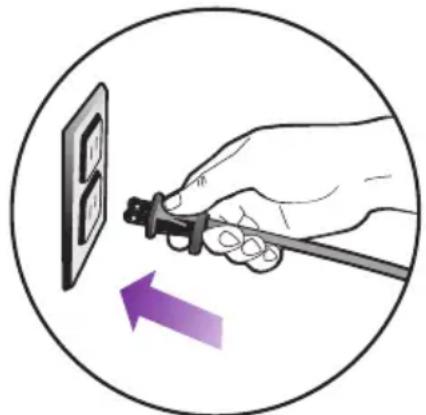
TO REDUCE THE RISK OF ELECTRIC SHOCK, this appliance has a polarized plug (one blade is wider than the other). As a safety feature, this plug will fit into a polarized outlet only one way. If the plug does not fit fully into the outlet, reverse the plug. If it still does not fit, contact a qualified electrician. DO NOT ATTEMPT TO DEFEAT THIS SAFETY FEATURE.
natural_image
Hand holding a tool near a wall-mounted panel, with a purple arrow indicating direction (no text or symbols)SAVE THESE INSTRUCTIONS
www.SharkVacThenSteam.com
Steam Technology
Thank you for purchasing the Shark® Vac-Then-Steam™, the complete bare floor cleaning system.
The unique steam technology, turns simple tap water into super-heated steam that infuse the micro-fiber pads for chemical free cleaning. Only this method creates and delivers 212°F steam that is effective enough to clean and sanitize all your hard floor surfaces. The Shark® Vac-Then-Steam™ can help you achieve a truly clean and healthy environment for you and your family.
THIS BOOK COVERS MODEL NUMBER:
MV2010 11
TECHNICAL SPECIFICATIONS
Voltage: 120V., 60Hz.
Power: 1550 Watts
Water
Capacity: 300 ml (10 oz.)
natural_image
Illustration of a purple vacuum cleaner with attached circuit board (no text or symbols)Contents
English
Getting Started: Assembly 2
Getting Started: Mode Controls ....4
Vacuum Mode 5
Steam Mode 8
Maintaining Your Vac-Then-Steam™ 12
Troubleshooting Guide ....14
Warranty and Registration 15
Visit SharkVacThenSteam.com for more helpful hints and support.
Getting Started: Assembly
When assembling your Vac-Then-Steam™ there may be a little water in or around the water tank. This is because we quality test all our Shark products before distributing them, so you get a quality Shark ® Vac-Then-Steam™.
text_image
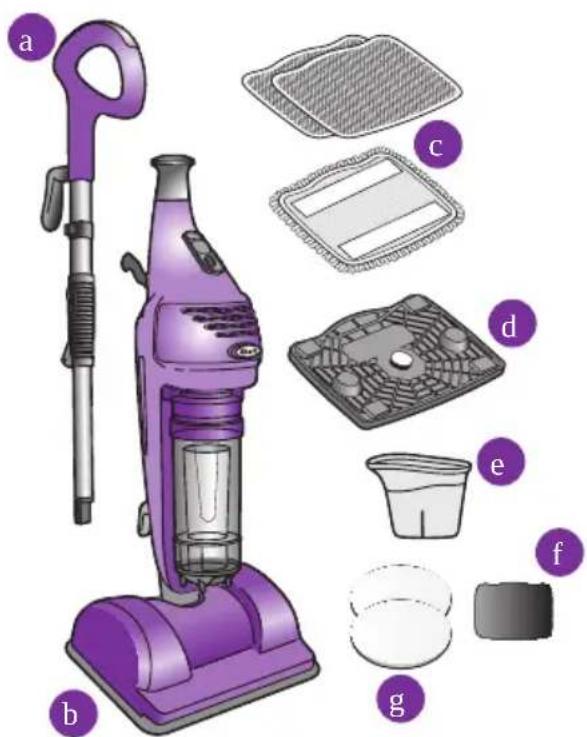
a b c d e f ga Telescopic Handle
b Cleaning Unit with Dust Cup
c 2 All-Purpose Cleaning Pads and 1 Heavy Duty Cleaning Pads
d Steam Frame
e Filling Flask
f 1 Replacement Post-Motor Filter
g 1 Replacement Dust Cup Filters Set
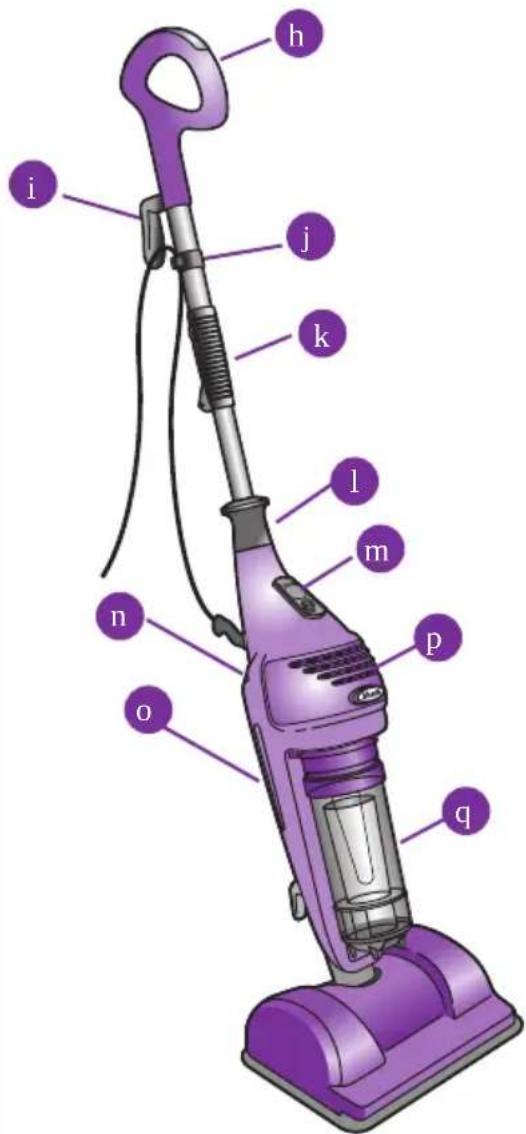
text_image
i j k l m n o p q hh Mop Handle
i Quick Release Swivel Cord Wrap
j Cord Clip
k Telescopic Handle Latch
1 Carry Grip
m Vacuum and Steam Mode Panel
n Water Tank Cap
o Water Tank Viewing Window
p Post-Motor Filter Access
q Dust Cup
text_image
Illustration showing a purple vacuum cleaner being adjusted for a tool, with step-by-step instructions in Chinese.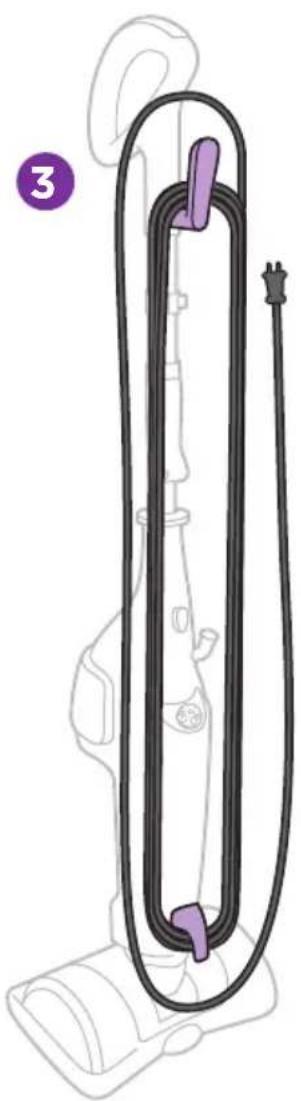
natural_image
Diagram of a vacuum cleaner with attached cable and plug, no text or symbols presentASSEMBLY
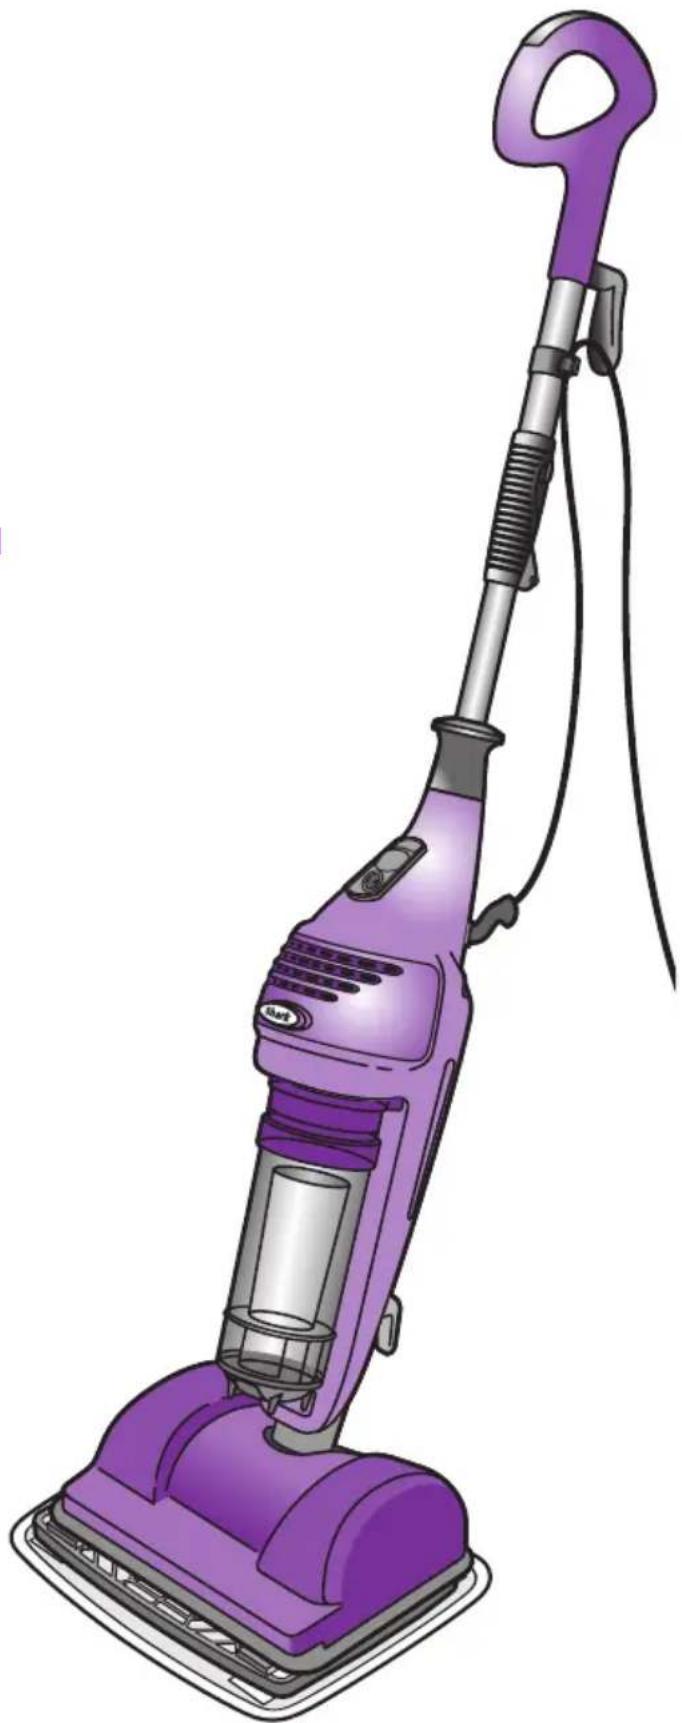
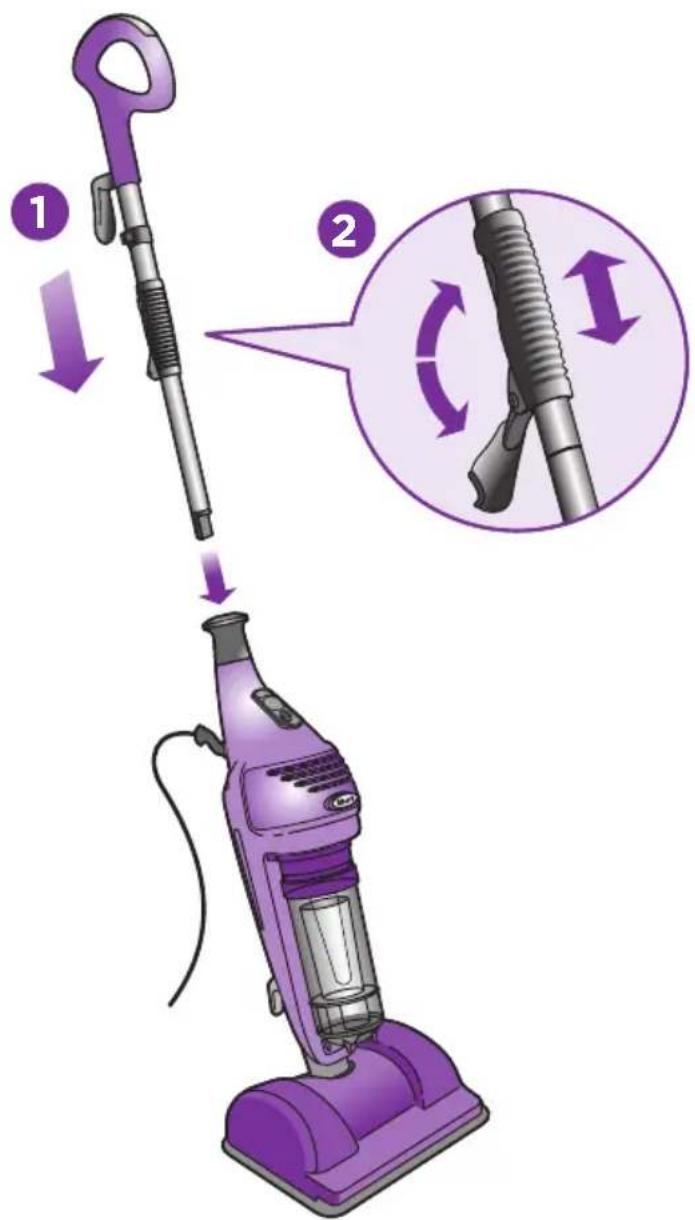
1 Slide the Telescopic Handle into the cleaning unit until it locks into place. Once in position, you never have to remove the handle.
2 For your comfort, you can adjust the height of the handle. To do so pull the latch down on the handle tube 90 degrees to the open position. Holding the handle, extend the tube to the height that is right for you and then close latch to lock into position.
3 Wrap cord around cord holders and secure plug to cord.
NOTE: The Vac-Then-Steam™, is a complete bare-floor cleaning and sanitizing system. It comes "vacuum-ready" out of the box.
QUICK TIP: For easier pushing and pulling, extend the height of the handle by using the telescopic latch on the pole.
Getting Started: Vacuum and Steam Panel
The Vac-Then-Steam™ has two operating modes:
VACUUM MODE:
natural_image
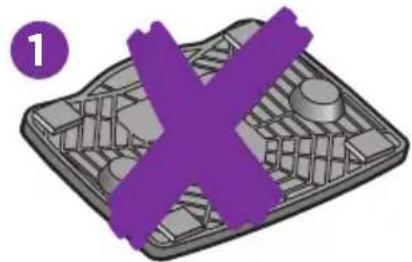
3D rendered mechanical component with purple X symbol overlay (no text or symbols)DO NOT USE STEAM PAD AND FRAME IN VACUUM MODE
text_image
2 STEAM VACUUM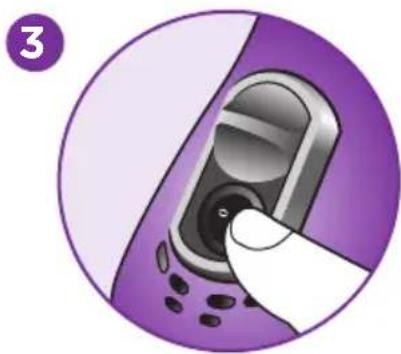
natural_image
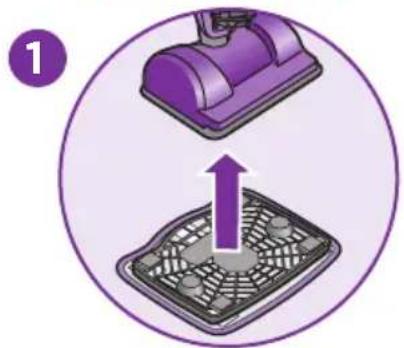
Illustration of a hand inserting a flip into a mobile phone (no text or symbols)1 Remove steam pad and frame, if attached. See page 8 for instructions. Vacuum will not activate if steam frame is attached.
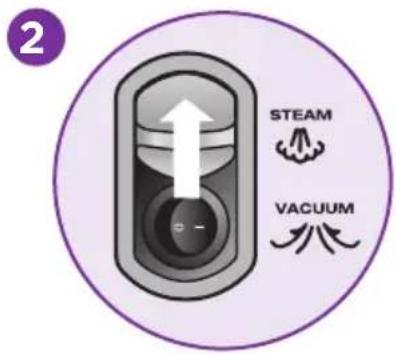
2 SLIDE THE TOGGLE SWITCH UP to expose the vacuum power button.
3 Press the VACUUM POWER BUTTON to the ON "I" position to activate the vacuum.
STEAM MODE:
text_image
1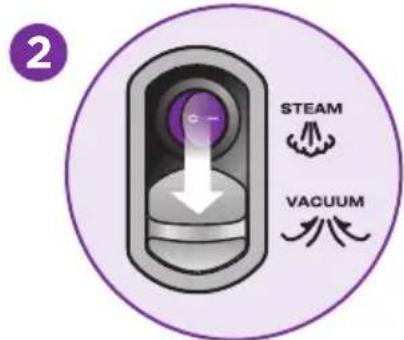
text_image
2 STEAM VACUUM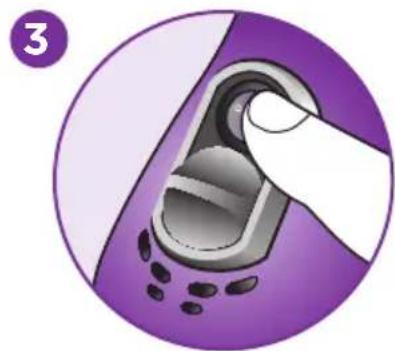
natural_image
Illustration of a hand inserting a device into a circular device with purple and pink tones (no text or symbols)1 Attach steam pad and frame.
Steam mode will not work if the pad and frame are NOT attached. See page 8 for assembly instructions.
2 Fill the water tank.
SLIDE THE TOGGLE SWITCH DOWN to expose the Steam Power button
3 Press the STEAM POWER BUTTON to the ON "I" position. The button will be illuminated red when steam mode is activated.
4 Wait 30 seconds to heat water, then TILT HANDLE BACK TO ACTIVATE STEAM PUMP.
Vacuum Mode
English
After inserting the telescopic handle, your cleaning system is vacuum-ready. Begin vacuuming your hard-surface floors by tilting the cleaning unit back and pressing the vacuum power button.
natural_image
Illustration of a hairdryer with a purple circular motion indicator (no text or symbols)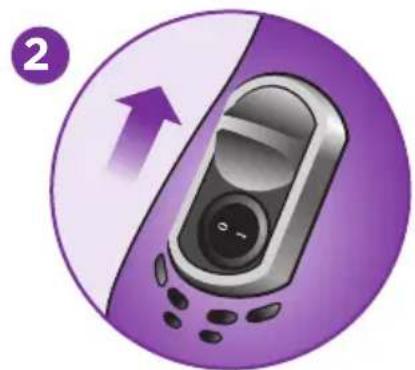
natural_image
Illustration of a mobile phone with an arrow pointing to it, set against a purple circular background (no text or symbols)USING VACUUM MODE
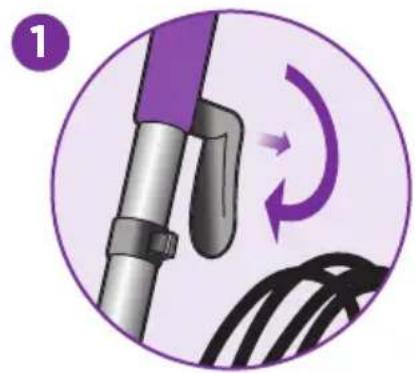
1 Pull and twist the quick release cord holder to unwrap the power cord completely. Plug in the unit.
2 To vacuum, slide the toggle switch until the vacuum power button is exposed. Press the vacuum power mode button to the ON "I" position.
IMPORTANT: You cannot use the vacuum function if the frame and pad are attached to the base of the cleaning unit.
NOTE: Only vacuum sealed and non-carpeted bare floor surfaces. Refer to floor manufacturer guidelines and warnings.
text_image
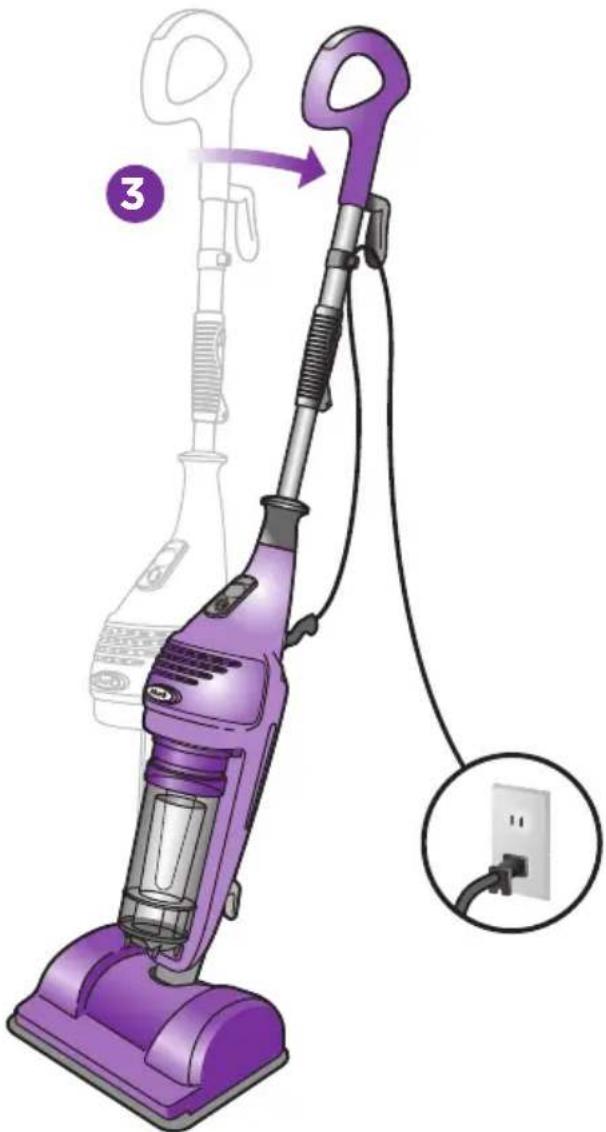
Illustration of a purple vacuum cleaner with labeled parts and an inset showing its electrical socket connection.3 Place your foot lightly on the top of the cleaning unit base. Tilt the cleaning unit back. Vacuum your floors.
IMPORTANT: Vacuum all surfaces first before steam-cleaning to avoid condensation build-up. Avoid vacuuming after steam mopping.
NOTE: If you vacuum and then steam-clean one room, before moving on to the next, wait 10 minutes for the condensation to clear before vacuuming again.
Vacuum Mode
text_image
Illustration showing a person using a purple vacuum cleaner to adjust equipment, with numbered steps and a magnified inset highlighting the component.STORAGE
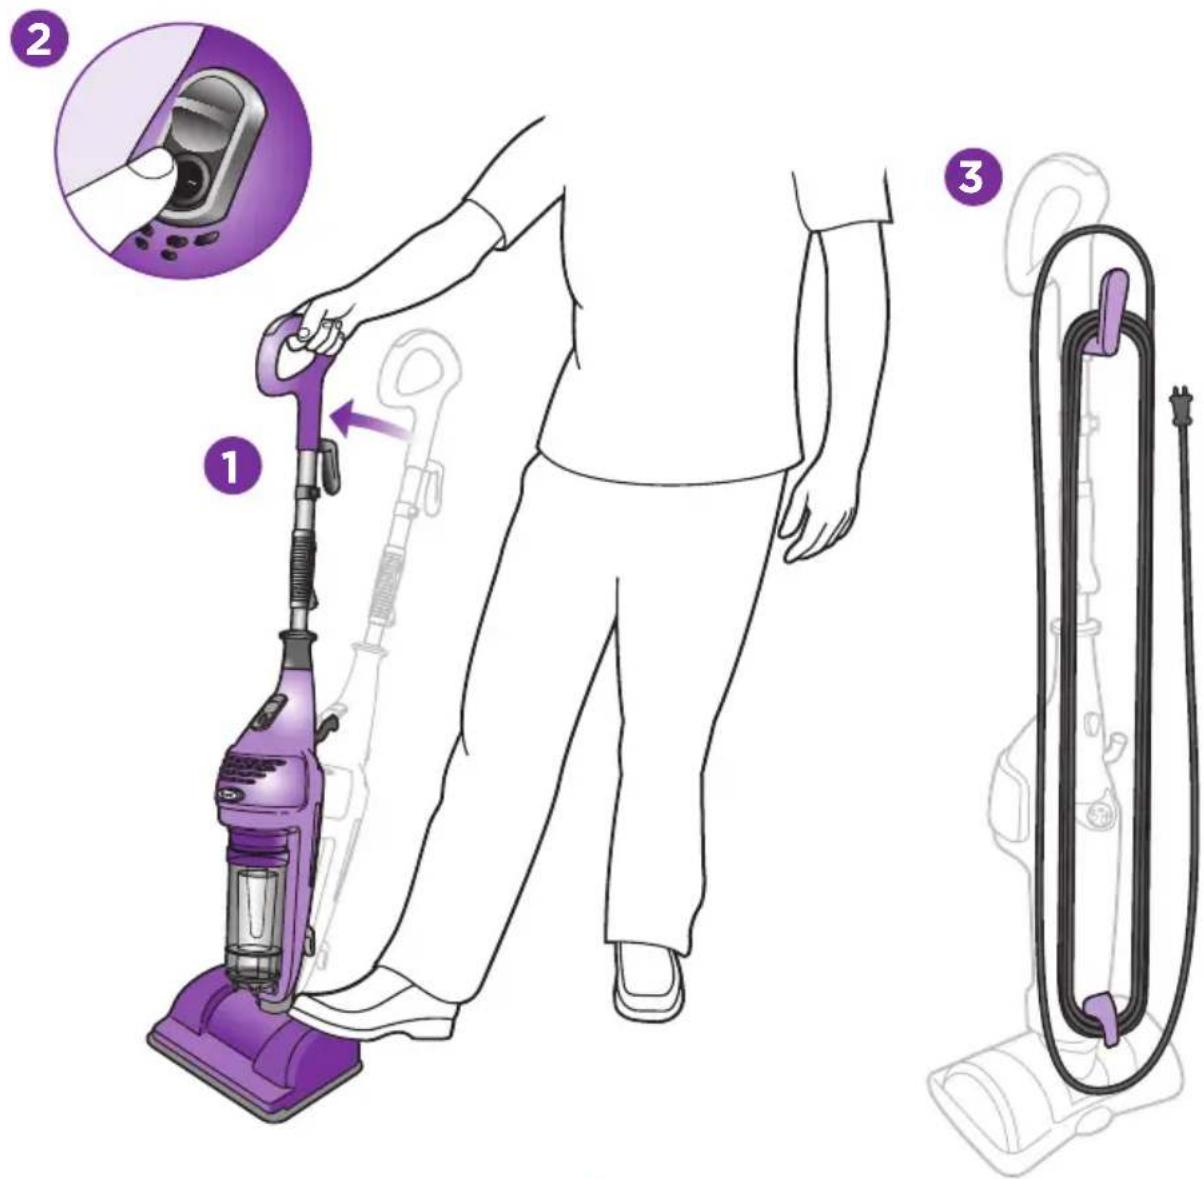
1 Place your foot lightly on the top of the base. Tilt cleaning unit into the upright position.
2 Turn OFF "O" the vacuum power button and unplug the unit.
3 Wrap cord around cord holders and secure plug. Store cleaning unit in an upright position.
natural_image
Illustration of a hand holding a pen and a small object, enclosed in a purple circle (no text or symbols)IMPORTANT:
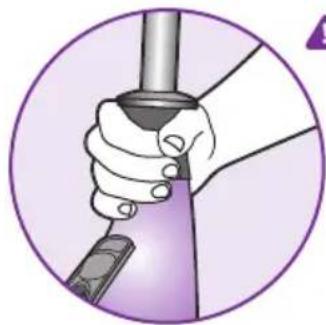
Always carry the Vac-Then-Steam™ by the cleaning unit collar; rather than by the handle.
text_image
Illustration showing three-step cleaning process of a vacuum cleaner: adding liquid, rotating component, and cleaning bowl.EMPTYING THE CONE FILTER

flowchart
graph TD
    A["1: Feed into plastic container"] --> B["2: Hand holding brush"]
    B --> C["3: Stopping in a vacuum tube"]
    C --> D["4: Discharge into a vacuum cleaner"]
1 Press the dust cup latch at the bottom of the canister upward. Pull the dust cup assembly out and down.
2 Twist dust cup cover counterclockwise to open.
3 Tap canister gently over trash receptacle to empty.
EMPTYING THE CONE FILTER
Over time the debris may gather in the cone filter of your Vac-Then-Steam™. Clean the filter often for optimal suction performance.
1 Lift the filter frame out from the top of the dust cup and remove the two filter layers from the filter frame.
2 Tap filter canister gently over trash receptacle to empty debris from the conical filter.
Reattach the filter frame.
3 To reattach the dust cup cover, align the indicators that are printed on the rear of the dust cup and cover. Turn the cover clockwise and make sure the solid arrows are aligned before reinserting the dust cup into the vacuum.
4 To replace the dust cup in to the unit, gently push the dust cup assembly up and in. The dust cup will click into place.
Steam Mode
text_image
1 MAGNETIC CONNECTIONS 2 3ASSEMBLY
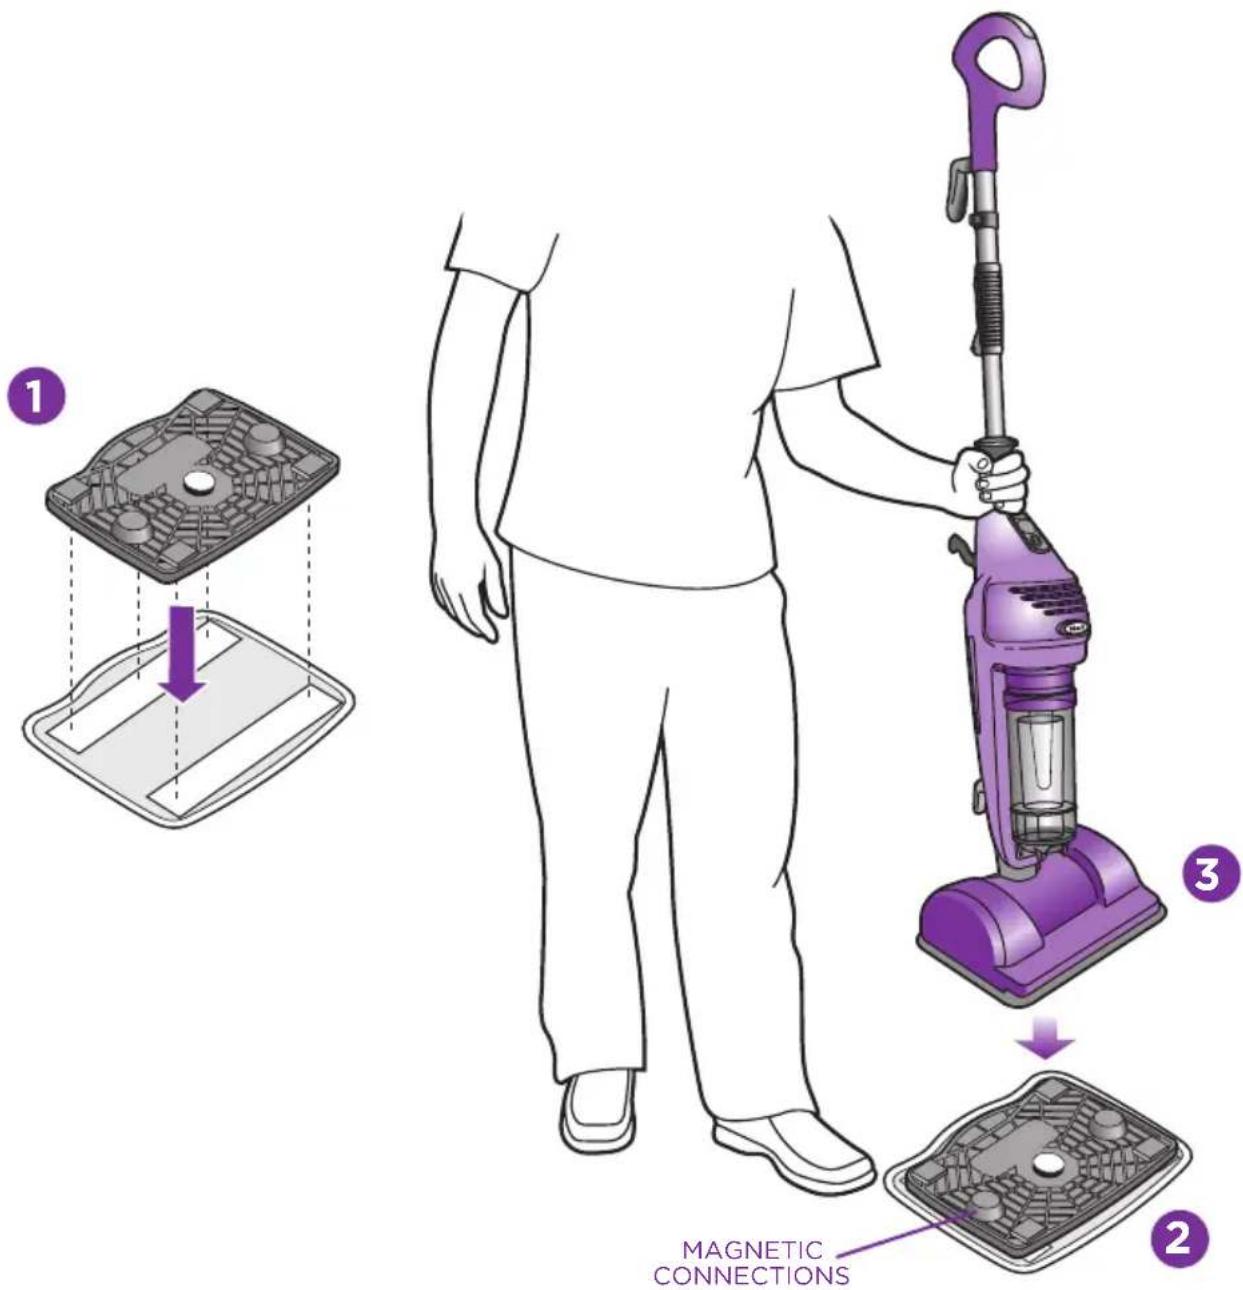
1 Attach a steam pad onto the bottom of the steam frame, matching the hook and loop fasteners.
2 Place the steam frame/pad assembly on the floor with the magnetic connections facing up.
3 Place the cleaning unit onto the Steam Frame. THE UNIT MUST BE UPRIGHT.
IMPORTANT: Steam frame and pad must be attached to the cleaning unit in order to use the steam function.
text_image
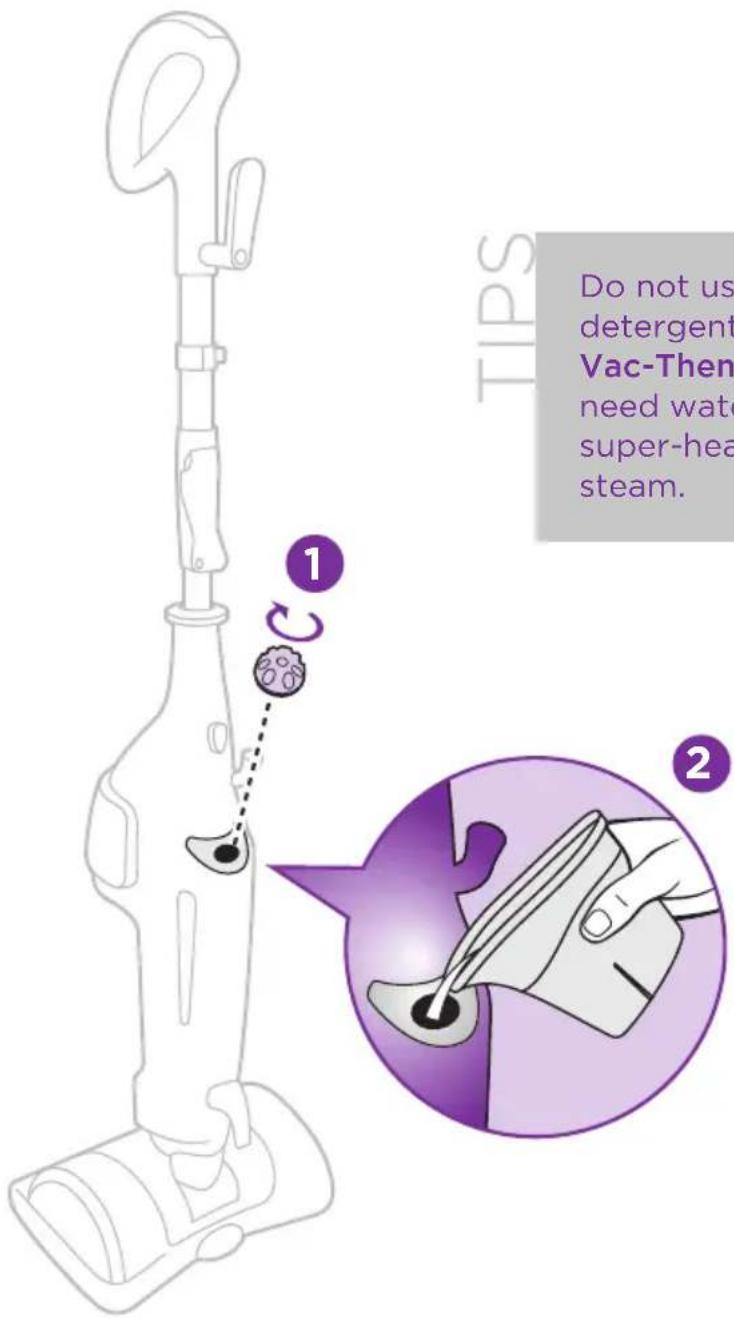
TIPS Do not use detergent Vac-Then need water super-hea steam. ① ②Do not use chemicals or detergents in your Vac-Then-Steam™. You only need water to achieve super-heated, sanitizing steam.
FILLING THE WATER TANK
1 Keep the cleaning unit in the upright position to add water. Turn the water tank cap counter-clockwise and remove from the tank.
2 Use the filling flask and pour water into the tank. Do not overfill. Replace the cap on the water tank by turning cap clockwise and tightening.
NOTE: If you live in a hard water area, we recommend using distilled water in your Vac-Then-Steam™.
Steam Mode
text_image
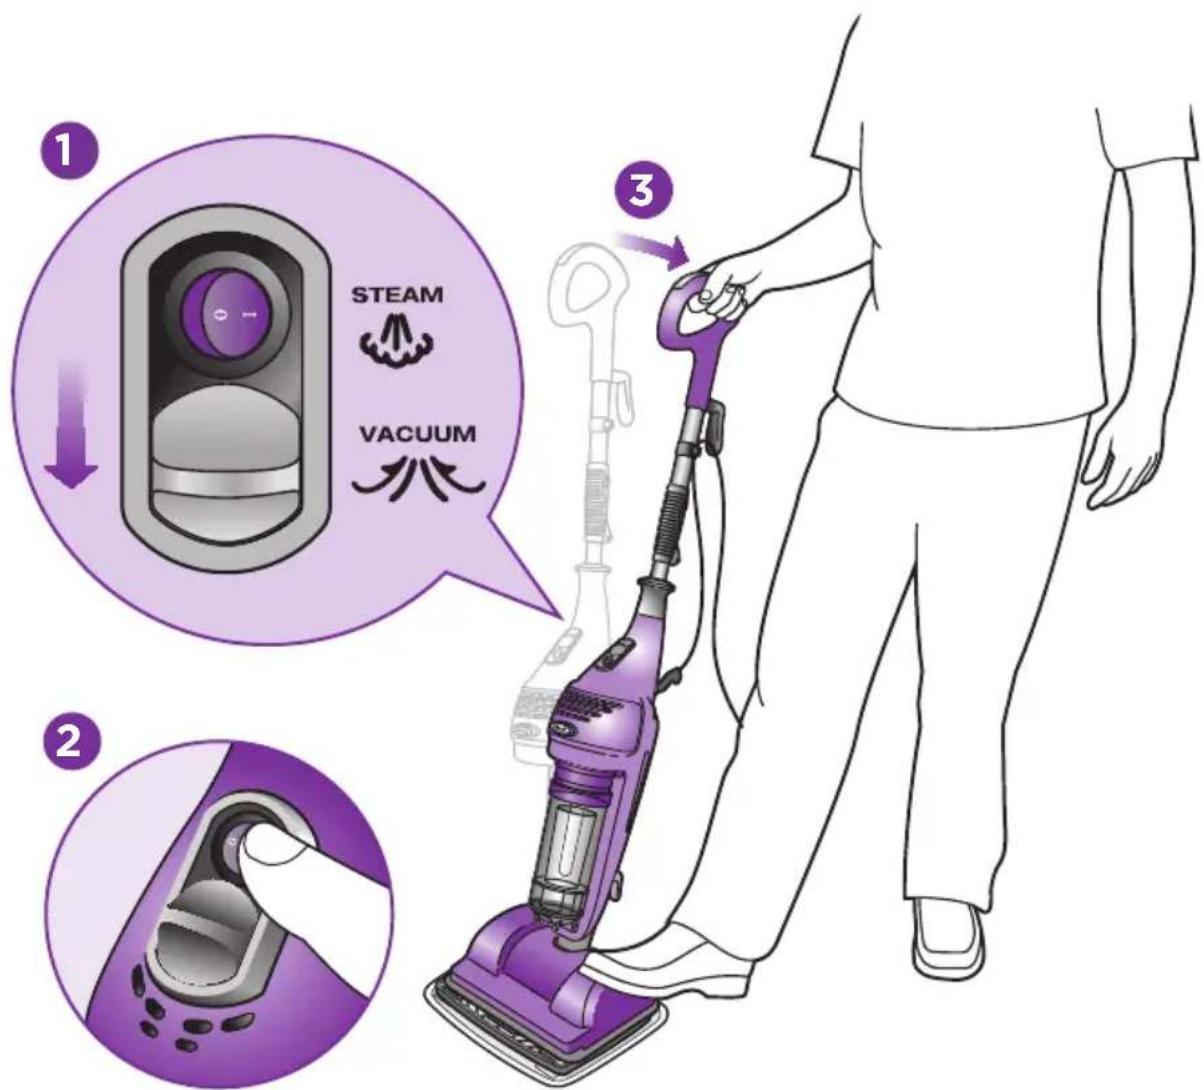
STEAM VACUUM 1 2 3STEAM CLEANING
1 Plug in the cleaning unit. Slide the toggle switch to expose the steam power button.
2 Press the steam power button to the ON "I" position. The illuminated red light indicates that the "boiler" is on. Wait 30 seconds for the water to heat up and for steam to be ready.
3 Place your foot lightly on the top of the base. TILT HANDLE BACK TO ACTIVATE STEAM PUMP.
4 Push handle upright to stop steam.
NOTE: Check water level and fill anytime throughout the cleaning process to maintain optimal steam.
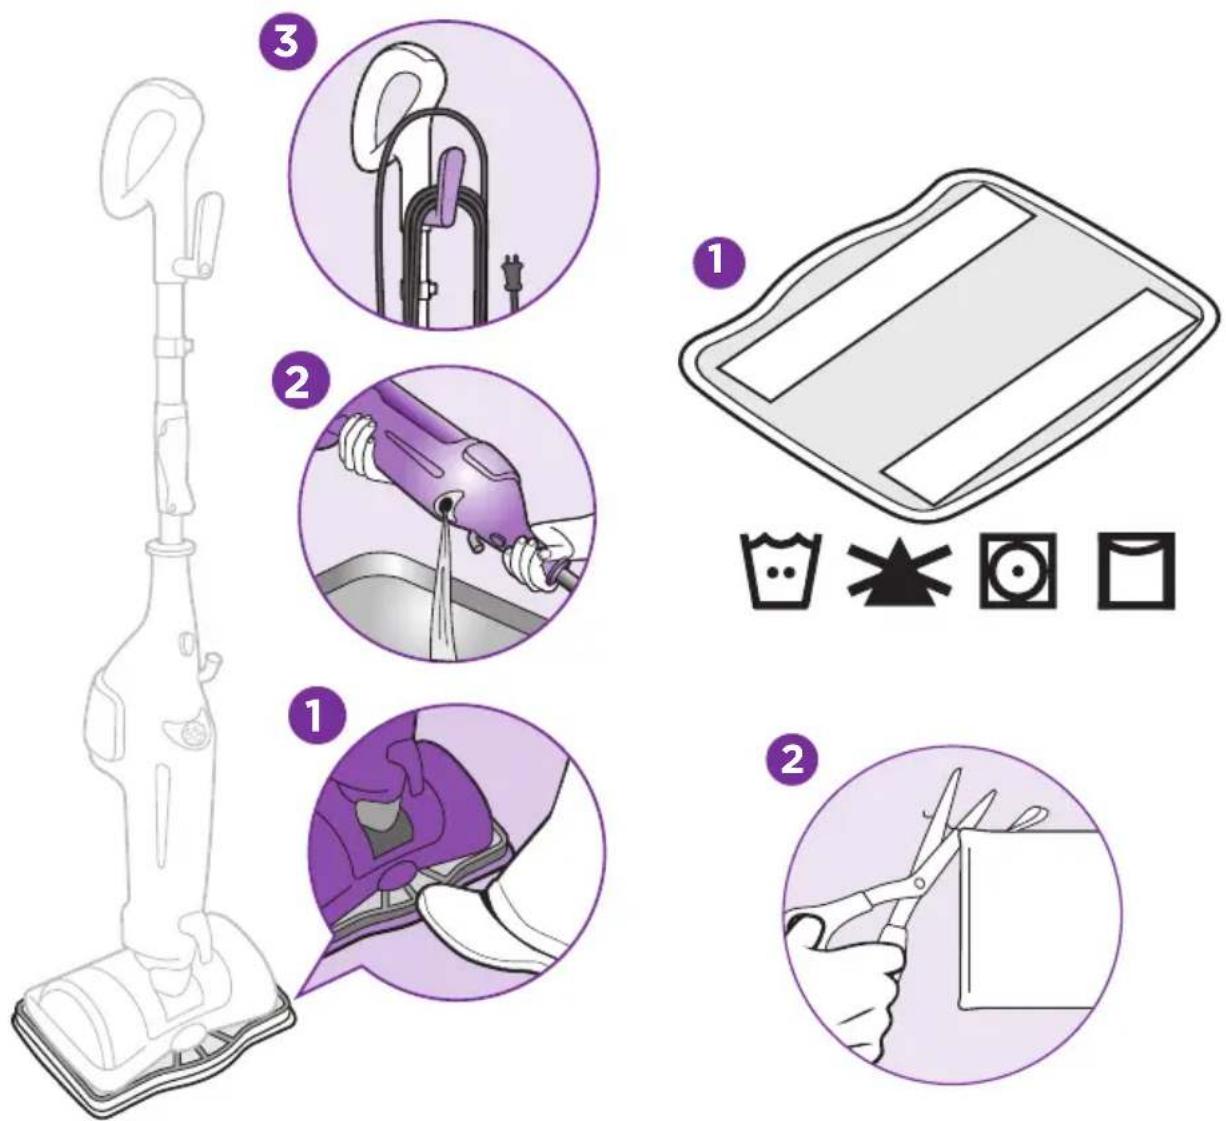
STORAGE
1 Unplug and turn the unit OFF "O". Press your foot on the steam frame. Separate steam pad from steam frame.
2 Remove the water tank cap and empty water tank.
3 Wrap cord securely around cord management hooks.
CAUTION: Use caution when handling the steam frame. Magnetic connections on the frame retain heat.
CARE OF YOUR MICRO-FIBER CLEANING PAD
1 Wash pads in warm water. Wash separately from other laundry. Only use liquid detergent (no powder detergent). Do not use fabric softeners. Line dry or dry on a low dryer setting.
2 If there are loose threads on the pad carefully cut the threads with scissors. Do not pull on them or cut at the base.
Maintaining Your Vac-Then-Steam™
flowchart
graph TD
    A["1 Thin Filter"] --> B["2 Thick Filter"]
    B --> C["3 Drying"]
    style A fill:#f9f,stroke:#333
    style B fill:#ccf,stroke:#333
    style C fill:#cfc,stroke:#333
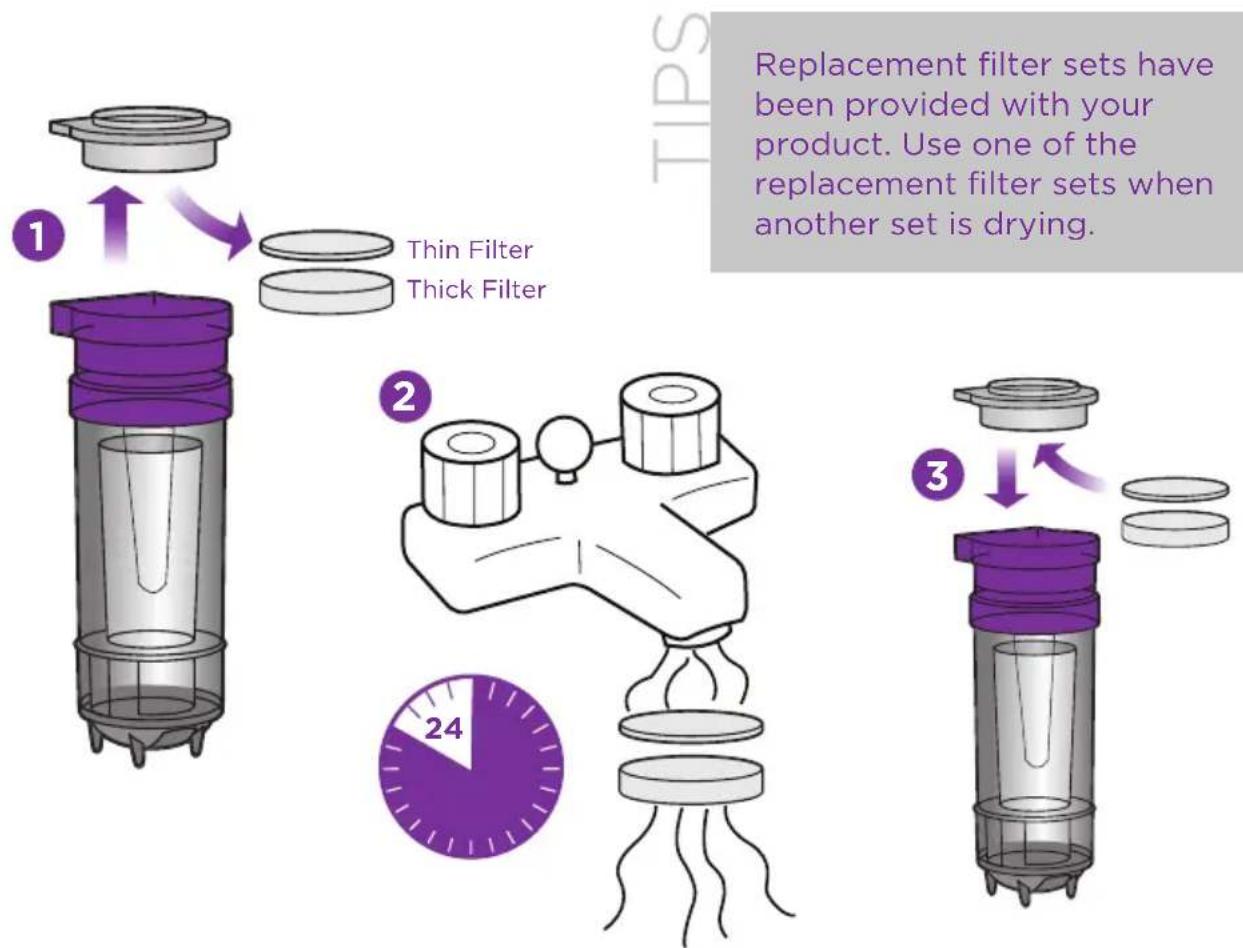
CARE OF YOUR DUST CUP FILTERS
1 Unplug and turn OFF "O" the vacuum. Pull out the dust cup. See page 7 for instructions.
Lift the filter frame out from the top of the dust cup. Remove the two filter layers from the filter frame.
2 Thoroughly rinse the two filters in lukewarm water. Squeeze out any excess water. Air dry for 24 hours before reusing.
3 Insert a dry filter set into the filter frame. The order of the filters impacts your dust cup performance. Make sure the thick filter is on the bottom and the thin filter is on top.
Put the frame with the filter set back into the top of the dust cup.
RECOMMENDED MAINTENANCE
SCHEDULE: Using only water, thoroughly rinse filters every 3 months and dry for 24 hours. Replace filter set in the Vac-Then-Steam™ once a year. More regular filter care or replacement may be required with excessive use.
text_image
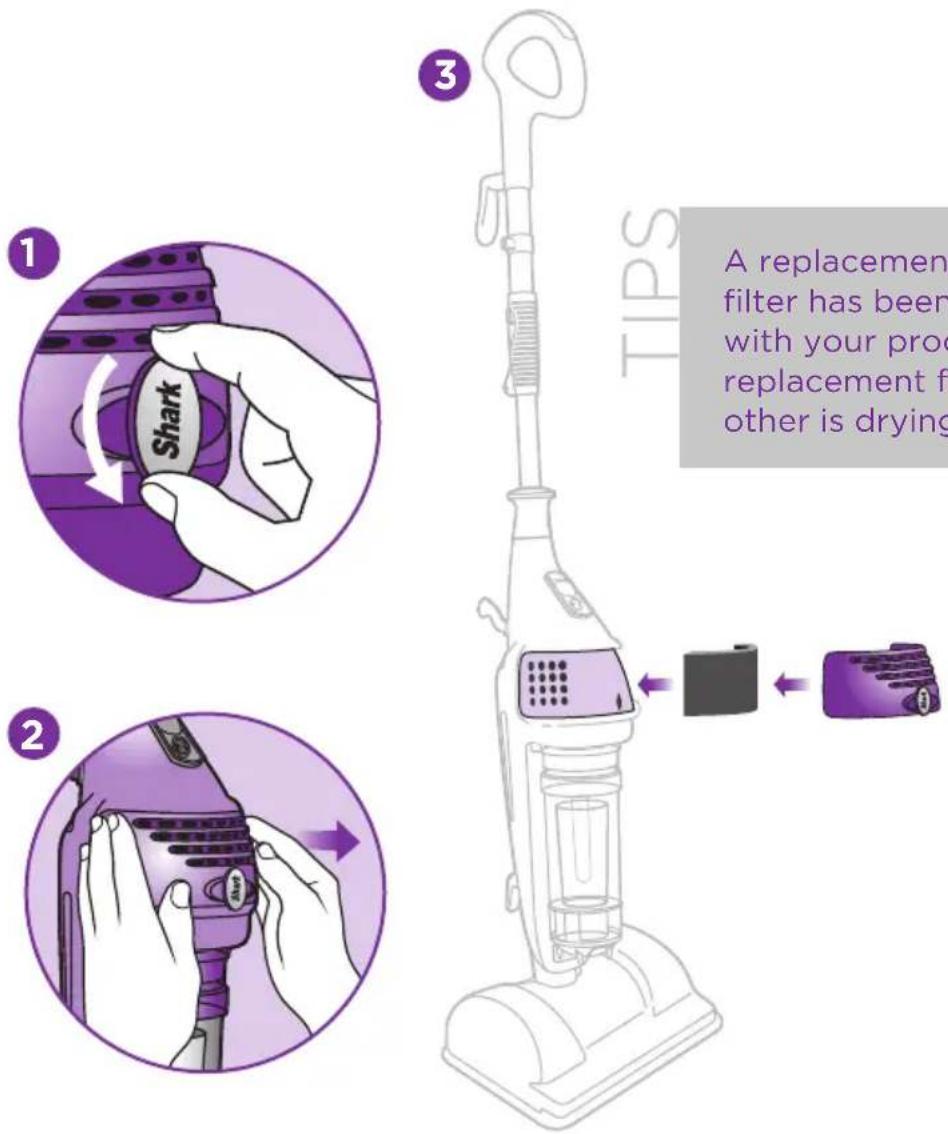
1 Shark 2 3 A replacement filter has been with your proo replacement f other is drying TIPSPOST-MOTOR FILTER
1 Twist the Shark ^® logo knob on the post-motor cover counter-clockwise to release cover.
2 Use both hands to grip cover on both sides and pull cover toward you.
Gently peel the filter off the inside of the cover. Thoroughly rinse the filter in lukewarm water. Squeeze out any excess water. Air dry for 24 hours before reusing.
3 Insert a dry filter into the inside of the cover. Snap cover onto the Vac-Then-Steam™.
Twist the Shark ^® logo knob clockwise to secure cover.
NOTE: Using only water, thoroughly rinse filter every 3 months and dry for 24 hours. Replace filter in the Vac-Then-Steam™ once a year. More regular filter care or replacement may be required with excessive use.
DO NOT use a hair dryer or any other forced hot air to dry any of the filters.
NOTE: Any other servicing should be performed by an authorized service representative
ORDERING REPLACEMENT PARTS
Go to www.SharkVacThenSteam.com to find replacement filters, accessories, and micro-fiber pads.
Troubleshooting Guide
| PROBLEM POSSIBLE REASONS & SOLUTIONS | |
| The Vac-Then-SteamTM will not turn on. | Your Vac-Then-SteamTM should be securely plugged into a 120V AC electrical outlet only.Check your fuse or breaker.Switch Steam or Vacuum Power button to the ON “I” position. |
| The Vac-Then-SteamTM will not make steam. | Make sure the water tank is filled to the indicated fill line.Attach Steam Pad and Frame to base of the unit.Switch Steam Power button to the ON “I” position.TILT MOP HANDLE BACK TO GENERATE STEAM. |
| The Vac-Then-SteamTM leaves water on the floor. | Check to see if your micro-fiber cleaning pad has absorbed too much moisture. We recommend you unplug the Vac-Then-SteamTM and replace the micro-fiber cleaning pad.Make sure the steam pad is attached correctly.Wait 30 seconds after switching Steam Power button ON “I” before mopping, allowing water to heat to a 212° sanitizing steam. If the unit is not allowed to heat properly, some water may be emitted. |
| The Vac-Then-SteamTM is hard to push. | Make sure the steam pad is attached correctly.Check to see if the cleaning pad is excessively dirty. Replace if the pad is too dirty or wet.Try increasing the height of the pole for better leverage by rasing the height of the telescopic pole. |
| The Vac-Then-SteamTM is not picking up dirt. | Check filters to see if they need cleaning. Follow instructions for rinsing and drying the filters before re-inserting back into the unit. (See “Maintenance” sections for instructions.)Dust cup may be full. Empty the dust cup.Check nozzle at the cleaning base for blockages. Clear blockages if required. |
Visit SharkVacThenSteam.com for more helpful hints and support.
ONE (1) YEAR LIMITED WARRANTY
EURO-PRO Operating LLC warrants this product to be free from defects in material and workmanship for a period of one (1) year from the date of the original purchase, when utilized for normal household use, subject to the following conditions, exclusions and exceptions.
If your appliance fails to operate properly while in use under normal household conditions within the warranty period, return the complete appliance and accessories, freight prepaid. For Customer Service support, call 1 (800) 798-7398 or visit our website SharkVacThenSteam.com.
If the appliance is found to be defective in material or workmanship, EURO-PRO Operating LLC will repair or replace it free of charge. Proof of purchase date and a check made payable to EURO-PRO Operating LLC in the amount of \$19.95 to cover the cost of return shipping and handling must be included.*
The liability of EURO-PRO Operating LLC is limited solely to the cost of the repair or replacement of the unit at our option. This warranty does not cover normal wear of parts and does not apply to any unit that has been tampered with or used for commercial purposes. This limited warranty does not cover damage caused by misuse, abuse, negligent handling or damage due to faulty packaging or mishandling in transit. This warranty does not cover damage or defects caused by or resulting from damages from shipping or repairs, service or alterations to the product or any of its parts, which have been performed by a repair person not authorized by EURO-PRO Operating LLC.
This warranty is extended to the original purchaser of the unit and excludes all other legal and/or conventional warranties. The responsibility of EURO-PRO Operating LLC warranty if any, is limited to the specific obligations expressly assumed by it under the terms of the limited warranty. In no event is EURO-PRO Operating LLC liable for incidental or consequential damages of any nature whatsoever. Some states/provinces do not permit the exclusion or limitation of incidental or consequential damages, so the above may not apply to you.
This warranty gives you specific legal rights, and you may also have other rights which vary from state to state or province to province.
*Important: Carefully pack item to avoid damage in shipping. Be sure to include proof of purchase date and to attach tag to item before packing with your name, complete address and phone number with a note giving purchase information, model number and what you believe is the problem with the item. We recommend you insure the package (as damage in shipping is not covered by your warranty). Mark the outside of your package “ATTENTION CUSTOMER SERVICE”. We are constantly striving to improve our products, therefore the specifications contained herein are subject to change without notice.
Please complete and return within ten (10) days of purchase. The registration will enable us to contact you in the event a product defect is discovered. By returning this card you acknowledge to have read and understood the instructions for use, and warnings set forth in the accompanying instructions.
RETURN TO: EURO-PRO Operating LLC, 4400 Bois Franc, St. Laurent, Quebec H4S 1A7
PURCHASER:
ADDRESS:
DATE OF PURCHASE: ...... MODEL: ...... MV2010
NAME AND ADDRESS OF STORE: ....
Euro-Pro Operating LLC
US: Newton, MA 02459
CAN: Ville St-Laurent, QC H4S 1A7
1-800-798-7398
www.SharkVacThenSteam.com
Copyright © 2011 Euro-Pro Operating LLC
Printed in China
Illustrations may differ from actual product.
MV2010.E.110103